
DR-2000 - Voice recorder OLYMPUS - Free user manual and instructions
Find the device manual for free DR-2000 OLYMPUS in PDF.

| Product type | Digital voice recorder (dictaphone) |
| Brand | Olympus |
| Model | DR-2000 (Directrec) |
| Dimensions (L × W × H) | 157 × 49 × 27 mm |
| Weight | 200 g |
| Power supply | USB port (5 V DC) |
| Maximum power | 300 mW (8 Ω speaker) |
| Connectivity | USB type A (integrated 2.5 m cable) |
| Recording format | DSS (Digital Speech Standard) |
| Recording modes | SP (standard), LP (long duration) |
| Microphone sensitivity adjustment | Dictation (low) / Conference (high) |
| Playback functions | Play, fast forward, rewind, cue, review |
| Index marks | Up to 16 per file |
| Priority | High or normal level per file |
| Programmable keys | 3 customisable keys (A, B, C) |
| USB functions | USB microphone and USB speaker |
| Included software | DSS Player Pro (Dictation Module) |
| PC compatibility | Windows 2000/XP/Vista (minimum required configuration) |
| Microphone input level | -70 dBv |
| Frequency response | 100 – 15 000 Hz |
| Maintenance and cleaning | Wipe with a dry, soft cloth. Do not use solvents. |
| Safety | Do not disconnect the USB cable while the indicator is flashing. Use a self-powered USB hub if necessary. |
| Repairability | Contact your authorized Olympus dealer for technical support. |
Frequently Asked Questions - DR-2000 OLYMPUS
User questions about DR-2000 OLYMPUS
0 question about this device. Answer the ones you know or ask your own.
Ask a new question about this device
Download the instructions for your Voice recorder in PDF format for free! Find your manual DR-2000 - OLYMPUS and take your electronic device back in hand. On this page are published all the documents necessary for the use of your device. DR-2000 by OLYMPUS.
USER MANUAL DR-2000 OLYMPUS
Thank you for purchasing an Olympus DIRECTREC.
Please read these instructions for information about using the product correctly and safely. Keep the instructions handy for future reference.
This product is equipped with the following features.
- New and improved microphone system reduces extraneous sounds such as wind or machine noise created while recording and thus enabling a higher quality of sound recording than ever before.
- New design and location of buttons enable single-handed control without ever having to visually check the placement of function buttons. Directrec fits easily into your hand providing effortless control coupled with superb dictation experience (P. 4).
The Directrec has 3 programmable (A, B, C) buttons (P. 30, 31). - All button functions are easily customized to suit a particular preference or any recording environment (P. 30 - 34).
- USB Audio Device Directrec, can be used as a USB microphone or USB speaker when connected to a PC. In addition, a powerful built-in speaker provides hi-fidelity acoustic playback.
- Directrec can be used as a remote-control for the DSS Player Pro (referred to as DSS Player from now on) not only for direct recording, but also when editing recorded files on a PC.
- Directrec can save a recording as a file on a PC in DSS (Digital Speech Standard) format.
- Two recording modes, SP (Standard Playback) mode or LP (Long Playback) mode (P. 20).
- Microphone sensitivity can be adjusted to better suit recording conditions and environment (P. 20).
● Multi-level priority setting (P. 24).
OLYMPUS IMAGING CORPORATION holds the copyrights for DSS Player Pro software and the instructions (this manual).
Microsoft and Windows are registered trademarks of Microsoft Corporation.
Intel and Pentium are registered trademarks of Intel Corporation.
Other product and brand names mentioned herein may be the trademarks or registered trademarks of their respective owners.
Introduction
Identification of Parts 4
Minimum Requirement 5
Getting Ready
Installing DSS Player Software 6
Uninstalling DSS Player Software 7
Using Online Help 8
Let's Get Started
Connection to Your PC 9
Running DSS Player.... 10
Window Names.... 11
Using the Remote Edit Window 12
Direct Recording 14
Playback (Playing a Dictation File) 17
Save Recording 19
Microphone Sensitivity 20
Recording Modes 20
Index Marks 21
Setting Priority Levels 24
System Sounds 25
Setting Job Data 26
Directrec Button Function Customization 30
Troubleshooting 35
Specifications 36
User Support
Technical Assistance And Support 36
text_image
Labeled diagram of a handheld device with numbered parts for identification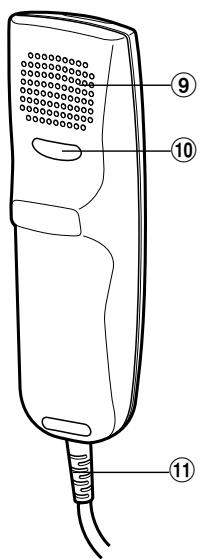
text_image
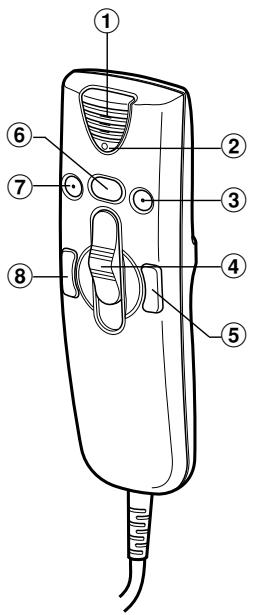
Diagram of a handheld device with numbered parts labeled 9, 10, and 11 pointing to its internal structure.①Built-in microphone
②Record/Play indicator light
③B (Programmable) button
④ Slide REC (Record)/
STOP/
PLAY/
REV (Review) switch
⑤FF (Fast Forward) button
⑥ NEW button
⑦A (Programmable) button
⑧REW (Rewind) button
⑨Built-in speaker
⑩C (Programmable) button
⑪USB Cable
Make sure that your computer meets the Minimum requirements listed below. Please check with your system administrator or your Olympus Professional Dealer.
PC: IBM PC/AT compatible PC
Operating System: Microsoft Windows 2000 Professional/XP Professional, Home Edition/Vista Ultimate, Enterprise, Business, Home Premium, Home Basic
CPU: Windows 2000/XP: Intel Pentium II class 333 MHz processor or more (Processor 500 MHz or more is recommended)
Windows Vista: 800MHz or more
RAM: Windows 2000/XP: 128 MB or more (256MB or more is recommended)
Windows Vista: 500 MB or more (1GB or more is recommended)
Hard drive space: 50 MB or more
Drive: 2x or faster CD-ROM, CD-R, CD-RW, DVD-ROM drive
Sound card: Creative Labs Sound Blaster 16 or 100% compatible sound card
Browser: Microsoft Internet Explorer 4.01 SP2 or later
Display: 800 x 600 pixels or more, 256 colors or more
USB port: One or more free ports
Installing DSS Player Software
Before you connect your Directrec to your PC, you must first install the DSS Player software.
Make sure to exit all running applications, eject the floppy disk if you are using one, and logon as administrator if you are running Windows 2000/XP (Professional only) on the network.
Insert Olympus DSS Player CD into the CD-ROM drive.
The installation program will start automatically.
If the installation program does not start automatically, browse your CD-ROM drive and execute "setup.exe".
The installation Language Selection dialog box appears.
Select the desired language.
Register user information.
Enter your name, company name, and license ID number (serial number).
The license ID number is printed on the license ID card included inside the recorder package.
Click the [Next] button. When a confirmation dialog box appears, click the [Yes] button.
4 Proceed with the installation according to the instructions on the screen.
To uninstall any of the software components of the DSS player software installed on your PC, follow the steps below.
1 Exit DSS Player program.
2 Click the [start] button on the taskbar.
3 Select [Add/Remove programs] from the [Control Panel]. A list of installed applications is displayed.
4 Select [Olympus DSS Player Pro], then click the [Change/Remove] button.
5 Proceed with the uninstallation according to the instructions on the screen.
Note
- Uninstallation does not erase the stored dictation files.
For information on the DSS Player usage and features, refer to the online Help. To start online Help:
- Click the [start] button, then select [All Programs], [Olympus DSS Player Pro], [Dictation Help].
- While DSS Player is running, select the [Help] menu, [Contents].
- While DSS Player is running, press F1 on the keyboard.

text_image
DSS Player Pro Dictation Module Help Hide Back Print Options Contents Index Search About DSS Player Pro Dictation Module This is the Voice to Do With DSS Player Pro Compatible Recorders and Devices Let's Get Started DSS Player Pro Dictation Module Guided Tour Download Function Setting Create Document Associated with Dictation Folder Setting SendReceive File Setting Backup and Archive Function About Voice Recognition Software Digital Voice Recorder DM-series Specific Items DS-40003300 Specific Items Other Features Commands Trouble Shooting Things That You Can Do With DSS Player Pro The following list shows examples of the things you can do with DSS Player Pro and the Olympus Digital Voice Recorder. While playing back a voice file that was recorded with the recorder on your PC, you can easily transcribe the recorded information using a word processor application (Playback Control Window). Record ideas that suddenly come up with the recorder and later download them to your PC. Then, organize and save the files (Remote Dictation Window). Create reports and summaries of meetings (Playback Control Window). Organize memos and ideas (Dictation Window). Automatic download and backup of recordings from the recorder to PC. Automatic distribution of recordings by email or FTP to transcriptists or other users. Automatic retrieval of typed document, via email or FTP, and linking the document to the recording. Allows you to manage and change setting on your recorder. Allows you to play and edit recordings on your PC. When used with the recorder connected to the PC, direct recording on the PC is possible.Note
- For more information on menus and operations, refer to Online Help. Online Help is available after the DSS Player is installed.
Connection to Your PC
Be sure to install the DSS Player software before connecting the Directrec to the PC. However, if you do connect the Directrec before or during the software installation, the "Add New Hardware Wizard" will appear. In this case, cancel the wizard by pressing the [Cancel] button in the wizard screen and then install or continue the installation of DSS Player software.
Connecting to Your PC Using the USB Cable

natural_image
Diagram showing a cable connector inserted into an electrical socket with a device attached (no text or symbols present)1 Connect the Directrec USB cable directly into the USB port or USB hub of your PC.
Disconnecting from Your PC
1 Disconnect the Directrec USB cable from your PC USB port or USB hub.
Notes
- Some PCs and USB hubs may not supply sufficient power and the Directrec fails to connect. Refer to your PC User's Manual regarding the USB port or USB hub on your PC.
- When using a USB hub to connect the Directrec, always use a self-powered (AC adapter) USB hub.
- Never disconnect the USB cable while the record/play indicator light is flashing. If you do, the data will be destroyed.
By default, connecting the Directrec to your PC will start the application automatically.
Disabling automatic start
1 Right-click the Device Detector icon, the lower right hand corner of the so startup application".
in the System Tray in then select “Settings
Click [DSS Player Pro].
The check mark on [DSS Player Pro] disappears.

Manual start
1 Start Windows.
Click the [start] button, then select [All Programs].
All program menus will be displayed.
Select [Olympus DSS Player Pro], then click [Dictation Module].

text_image
Administrator Internet Internet Explorer E-mail Outlook Express My Documents My Recent Documents My Pictures Windows Catalog Windows Update Accessories Games Startup Olympus DSS Player Pro Dictation Help Dictation Module RPS Direct PCConfig All Programs Log Off Shut Down start 2 3Note
- If you connect the Directrec before installing DSS Player, the “Add New Hardware Wizard” dialog box will open. If this happens, click [Cancel] to exit the wizard, then install the DSS Player software.
Main Window (Windows XP)

text_image
Dictation Module : Message TrayDR202290.DSS File Edit View Tools Download Voice Recognition Help Position Length 0:00:00 0:00:11 100% 0.00 0.05 0.10 ① ② ③ ④ ⑤ ⑥ ⑦ ⑧ ⑨ ⑩ ⑪ ⑫ ⑬ ⑭ ⑮ ⑯ ⑰ ⑱ ⑲ ⑳ ⑴ ⑵ ⑶ ⑷ ⑧ ⑨ ⑩ ⑪ ⑫ ⑬ ⑭ ⑮ ⑯ ⑰ ⑱ ⑲ ⑳ ⑪ ⑫ ⑬ ⑭ ⑮ ⑯ ⑰ ⑱ ⑲ ⑳ ⑪ ⑫ ⑬ ⑭ ⑮ ⑯ ⑰ ⑱ ⑲ ⑳ ㉑ ㉒ ㉓ ㉔ ㉕ ㉖ ㉗ ㉘ ㉙ ㉚ ㉛ ㉜ ㉝ ㉞ ㉟ ㉞ ㉟o ㉞o ㉟o o ㉟o o o o o o o o o o o o o o o o o o o o o o o o o o o o o o o o o o o o o o o o o o o o o o o o o o o o o o o o o o o o o o o o o o o o o o o o o o o o o o o o o o o o o o o o o o o o o o o o o o o o o i n a d i n e r e f t h e i n t i n t i n t i n t i n t i n t i n t i n t i n t i n t i n t i n t i n t i n t i n t i n t i n t i n t i n t i n t i n t i n t i n t i n t i n t i n t i n t i n t i n t i n t i n t i n t i n t i n t t i n t i n t i n t i n t i n t i n t i n t i n t i n t i n t i n t i n t i n t i n t i n t i n t i n t i n t i n t i n t i n t i n t i n t i n t i n t i n t i n t i n t i n t i n t i n t i n t i n sMassage Tray
* Main screen is displayed when DSS Player is started
①Playback Control Bar
Provides the control buttons to play and stop dictation files.
② Dictation Tree View
Displays the directory structure of the DSS, WAV-format files stored on your PC's hard disk.
Recordings made using Directrec will be saved as a file in the Message Tray (☐) in the Dictation Folder (☐).
③Device Tree View
Displays the directory structure of the Directrec.
④ Dictation List View
Displays the dictation files in the folder selected in ② and ③.
For enjoyable recording experience, use Directrec with the DSS Player software to record to your PC. The DSS Player can be configured to provide you with complete remote control over your recording session from the Directrec without the use of the PC mouse.
Starting the [Remote Edit] window for the DSS Player main window
Ensure Directrec is properly connected to your PC and then start the DSS Player.
DSS Player main window appears.
2 From the DSS Player main window, click the [File] menu, then select [New File...], or click the 📋 icon.
[Remote Edit] window appears.
3 Directrec button functions are completely supported when the [Remote Edit] window is open.
![OLYMPUS DR-2000 - Starting the [Remote Edit] window for the DSS Player main window - 1](/content/2019/11/84481/images/58c981389d5917f32083e70a2a151e6f3e46b215ddc769b9e94f2d8a7fd13522.jpg)
text_image
Remote Edit - Dictation\DR200019.dss File Edit Tools Help Position 0.00:05 Length 0.00:20 Priority Work Type Quality SP (mono) Sensitivity Dictation Insert recording Volume Stop DR2000Notes
- Ensure that the [Remote Edit] window is open when you use Directrec, or the remote control will not function.
- The [Remote Edit] window can also be displayed without opening the main menu when starting the DSS Player (P. 13).
Starting the [Remote Edit] window without opening the DSS Player main window
With a push of a button on the Directrec, you can set your PC to open the [Remote Edit] window directly without entering the DSS Player main window.
From the DSS Player main window, click the [Tools] menu, select [Options...], then click the [Directrec] tab.
2 Check [Start Remote Edit window automatically when Dictation Module is launched] and then click the [OK] button.
The pre-settings are now complete.
When pre-settings are checked, the computer recognizes the Directrec device connection as the DSS player starting, and opens the [Remote Edit] window without opening the main application window (P. 11).
![OLYMPUS DR-2000 - Starting the [Remote Edit] window without opening the DSS Player main window - 1](/content/2019/11/84481/images/7ba3fc56c51f21ca724ef7f7d7c0d3003a8878508dbea341e255a41f0939ecf6.jpg)
text_image
Options General Download E-mail/FTP Send Receive Backup Folders Directrec Log Start Remote Edit window automatically when Dictation Module is launched Change the slide switch REV position on the DR-2000 to REV only. OK CancelNew Recording

text_image
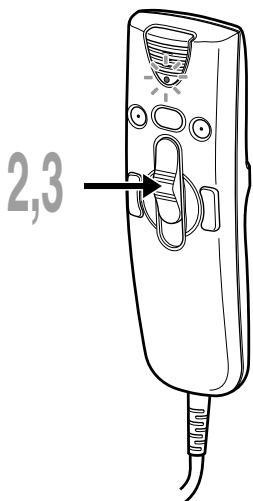
2,3From the DSS Player main window, click the [File] menu, then select [New File], or click the 🎨 icon.
[Remote Edit] window appears.
2 Move the slide switch on the Directrec to the REC position or press the (Record) button in the [Remote Edit] window to start recording.
The red record/play indicator light on Directrec will become lit. Point the microphone at the sound source.
3 Move the slide switch on the Directrec to the STOP position or press the (Stop) button to stop recording.
If you want to append additional recordings to the same file, Move the slide switch on the Directrec to the REC position or press the button again.
Current recording time
Remaining recording time

text_image
Remote Edit - Dictation\DR200019.dss File Edit Tools Help Position 0:00.05 Length 0:00.20 Priority ABCD Work Type Quality SP (mono) Sensitivity Dictation 0.00 0.05 0.10 0.15 Volume Stop DR2000 2 3Overwrite Recording
You can overwrite a previous recording from any point within the file.
Note that the overwritten recordings will be premanently erased.
text_image
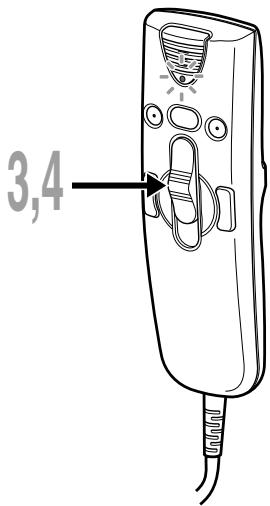
2,31 Make sure you are at the starting point of the recording to be overwritten.
2 Move the slide switch on the Directrec to the REC position or press the (Record) button in the [Remote Edit] window.
The record/play indicator light on the Directrec will light up and Overwrite Recording will start.
3 Move the slide switch on the Directrec to the STOP position or press the (Stop) button in the [Remote Edit] window to stop overwriting.

text_image
Do not check here. Remote Edit - DictationDR200019.dss File Edit Tools Help Position Length Priority Work Type Quality 0.00.05 0.00.20 ABCD SP [mono] Inset recording Sensitivity Dictation Volume 0.00 0.05 0.10 0.15 Stop DR2000 2 3Notes
- Ensure that the “Insert recording” box (P. 16) in the [Remote Edit] window is not checked or the overwrite recording will not proceed.
- You cannot select a different recording mode (SP, LP) than that of the original file before overwriting a recording.
Insert Recording
Additional recording can be inserted into a previously recorded file.
text_image
3,41 Check (√)“Insert recording” box in the [Remote Edit] window.
2 Make sure you are at the right position in the file where recording insert should take place.
3 While playing the file, move the slide switch on the Directrec to the REC position or press the (Record) button in the [Remote Edit] window to start inserting an additional recording.
The red record/play indicator light on Directrec will become lit.
4 Move the slide switch on the Directrec to the STOP position or press the (Stop) button in the [Remote Edit] window to the stop inserting the additional recording.

text_image
Remote Edit - Dictation\DR200020.dss File Edit Tools Help Position Length Priority Work Type Quality 0.00.05 0.00.20 Insert recording ABCD SP (mono) Sensitivity Dictation Volume 0.00 0.05 0.10 0.15 Stop DR2000 1 3 4Notes
- Ensure that the “Insert recording” box in the [Remote Edit] window is checked or the recording will not be inserted.
- If you place the slide switch in the STOP position for more than two seconds while moving the slide switch from the PLAY position to the REC position, the Inserted recording will be cancelled.
- You cannot select a different recording mode (SP, LP) than that of the original file before overwriting a recording.

text_image
1,31 Move the slide switch on the Directrec to the PLAY position or press the (Play) button in the [Remote Edit] window to start playback.
The green record/play indicator light on Directrec will become lit.
2 Adjust the volume slider in the [Remote Edit] window to the required level.
The recording will be played through the Directrec speaker.
3 Move the slide switch on the Directrec to the STOP position or press the (Stop) button in the [Remote
Edit] window at any point you want to stop the playback.

text_image
Current playback time Total recording time of the file being played Remote Edit - Dictation\DR200019.dss File Edit Tools Help Position Length Priority Work Type Quality 0:00.05 0:00.20 ABCD SP (mono) Insert recording Sensitivity Dictation Volume Playback slider Shows the current playback position 3 1 Time axisPlayback functions
Various functions are available with Directrec and the [Remote Edit] window to playback a recorded file.
Directrec playback functions
| Playback functions | Operation | How to Cancel |
| Fast Forward (FF) | Press the FF button once while stopped. | Move the slide switch to a position other than the STOP position. ➔ The Directrec starts the operation of the set position. |
| Rewind (REW) | Press the REW button once while stopped. | |
| Cue (CUE) | Hold the FF button while stopped or playing a file. | Release the button. |
| Review (REV) | Hold the REW button while stopped or playing a file. | Release the button. |
| Move the slide switch to the REV position. | Release the slide switch. |
Functions using the [Remote Edit] window
| Playback functions | Operation | How to Cancel |
| Fast Forward (FF) | Press the ▶ button once while stopped. | Press the ▶ button. ➔ Recorded file will play again. |
| Rewind (REW) | Press the ◀ button once while stopped. | |
| Cue (CUE) | Hold the ▶ button while stopped or playing a file. | Release the ▶ button. |
| Review (REV) | Hold the ◀ button while stopped or playing a file. | Release the ◀ button. |
- Please refer to our Online Help for further information about Directrec functions and controls (P. 8).

text_image
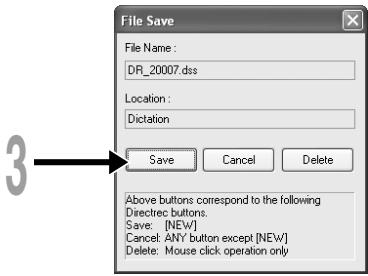
2,3 1,4To save the current recording, move the slide switch on the Directrec to the STOP position or press the (Stop) button to stop recording.
2 Either press the NEW button on Directrec or click the □ icon on the toolbar in the [Remote Edit] window. [File Save] window will appear to save the data.
3 To save the file, either press the NEW button on Directrec or click the [Save] button on the [Remote Edit] window. The recorded data will be saved.
4 The Directrec is now available for recording on a new file.
Move the slide switch on the Directrec to the REC position or press the (Record) button in the [Remote Edit] window to start recording.
text_image
File Save File Name : DR_20007.dss Location : Dictation Save Cancel Delete Above buttons correspond to the following Directrec buttons. Save: [NEW] Cancel: ANY button except [NEW] Delete: Mouse click operation onlyFile Name Format
File names are assigned in the following manner.
DR\_20001.dss
Extension File number .... A serial number automatically assigned by the DSS Player.
The ID that has been set on the Directrec. The default ID is "DR_2000". The Author ID can be modified with DSS Player (P. 26 - 28).
Microphone sensitivity is adjustable to meet recording needs.
Select from the “Sensitivity” box either “Dictation” or “Conference” in the [Remote Edit] window.
Conference : The high-sensitivity mode suitable for recording the ambient sounds. Dictation : The low-sensitivity mode suitable for recording dictation.
![OLYMPUS DR-2000 - Select from the “Sensitivity” box either “Dictation” or “Conference” in the [Remote Edit] window. - 1](/content/2019/11/84481/images/d1b04abb76fc83c074f864e8ace19a333c2eaa30140835467ceb1adc81492a47.jpg)
text_image
Remote Edit - DictationDR200019.dss File Edit Tools Help Position Length Priority Work Type Quality 0.00.05 0.00.20 ABCD SP (mono) Insert recording Sensitivity Dictation Volume Stop DR2000Note
- If you want to record clear or noise-free dictation, select Dictation mode and place the microphone 5 to 10cm (2 to 4 inches) from the source.
Recording Modes
Two recording modes are available with the Directrec. SP (standard recording) and LP (long-term recording).
Select from the "Quality" box either "SP (mono)" or "LP (mono)" in the [Remote Edit] window.
SP: Default recording mode.
LP: Can record in a smaller file size with the same recording time as the SP mode.
![OLYMPUS DR-2000 - Select from the "Quality" box either "SP (mono)" or "LP (mono)" in the [Remote Edit] window. - 1](/content/2019/11/84481/images/1d0dbeb72feae63eb299670fdf906570a9c8d113df487b59f99c2c85c368ddb0.jpg)
text_image
Remote Edit - Dictation\DR200019.dss File Edit Tools Help Position Length Priority Work Type Quality 0.00.05 0.00.20 ABCD SP (mono) Insert recording Sensitivity Dictation Volume Stop DR2000Note
- Choose SP mode for recording meetings or lectures with crisp clarity.
Index marks can be placed in a file during recording or playback to provide a quick and easy way of identifying important sections in the file.
Setting an Index Mark
text_image
1Either press the A button on Directrec, or click the √ icon on the toolbar in the [Remote Edit] window while recording or playing.
Index Mark will now be set.
A 🔒 icon will appear on the time axis bar in the [Remote Edit] window. The index mark can also be set by selecting [New Index Mark] in the [Tools] menu.

text_image
Remote Edit - DispationDR200019.dss File Edit Tools Help Position Length Priority Work Type Quality 0:00.05 0:00.20 ABCD SP (mono) Insert recording Sensitivity Volume 0.00 0.05 0.10 0.15 Playback slider Displays the current position of playback or recording.Notes
- Up to 16 index marks can be set in a file.
- Index marks cannot be set or cleared in a locked file. Please see the Online Help for further details (P. 8).
Locating an Index Mark
The ▲ icon on the time axis bar in the [Remote Edit] window indicates the position of the Index Mark. To jump to a marked position follow this procedure.

natural_image
Diagram of a device with labeled parts and directional arrows, no readable text or symbols presentEither press FF or REW button on Directrec twice, or click the button on the [Remote Edit] window. The Playback slider will automatically jump to the Index Mark(▲) position.

text_image
Position of the Index Mark File Edit Tools Help Position 0.00.05 Length 0.00.20 Priority Insert recording Work Type ABCD Quality SP (mono) Sensitivity Decimation Volume Stop DR2000 Time axisUsing the [View All Index Marks] window to jump to the Index Mark
Click the 📄 icon on the toolbar in the [Remote Edit] window. Or, select the [View All Index Marks...] in the [Tools] menu.
The [View All Index Marks] window will appear.
2 Select the marked position you want to jump to and click [Skip]. Directrec will jump to the selected Index Mark position.
![OLYMPUS DR-2000 - Using the [View All Index Marks] window to jump to the Index Mark - 1](/content/2019/11/84481/images/7384e2220a07e4528145ddf92c2e030b9b6331246053102e031b0793c7ef1ff9.jpg)
text_image
View All Index Marks 0:00:10 0:00:15 Skip Delete 2Clearing an Index Mark
1 Locate the index mark you want to clear.
2 Click the ✅ icon on the toolbar in the [Remote Edit] window. Or, select the [Delete Index Mark] in the [Tools] menu.
The index mark is erased.
Note
- Index marks cannot be set or cleared in a locked file. Please see the Online Help for further details (P. 8).
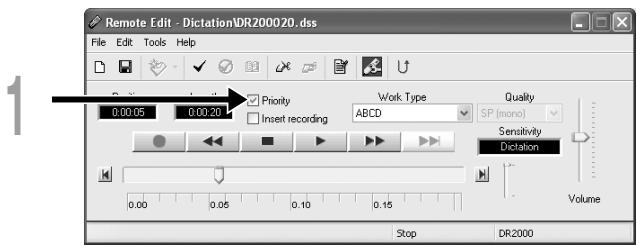
You can set a priority level on each file recorded.
natural_image
Line drawing of a door handle with lock and adjustment knob (no text or symbols)4 Press the B button on Directrec.
The "Priority" setting box in the [Remote Edit] window will be checked on and off every time this button is pressed.
√ With check : High level.
☐ Without check : Normal level.
You can also check the priority setting on /off by using the [Remote Edit] window.
text_image
Remote Edit - Dictation\DR200020.dss File Edit Tools Help Priority Work Type Quality SP (mono) Insert recording Sensitivity Dictation Volume Stop DR2000The Directrec beeps to alert you to button operations.
System sounds may be turned off.
Click the 📄 icon on the toolbar in the [Remote Edit] window. Or, select the [Directrec Configuration Tool] in the [Tools] menu.
The [Directrec Configuration Tool] dialog box will appear.
![OLYMPUS DR-2000 - Click the 📄 icon on the toolbar in the [Remote Edit] window. Or, select the [Directrec Configuration Tool] in the [Tools] menu. - 1](/content/2019/11/84481/images/90eceaff4b23391df97b84ce7c7f42d0b65b99e1c1ba2b146091ad071f14eaa2.jpg)
text_image
Remote Edit - DictationDR200020.dss Tools Help New Index Mark Delete Index Mark View All Index Marks... Edit Job Data Send Files Show Custom Button Directrec Configuration Tool REC Alt+R PLAY Alt+Ctrl+F12 STOP Alt+Ctrl+F11 EE Alt+Ctrl+F10 Work Type BCD Quality SP (mono) Sensitivity Dictation Volume Stop DR20002 Select the [Customizing] tab and check the [Enable Beep Sound] box.
√ With check: System sound is On.
☐ Without check: System sound is Off.
Click [Upload Settings].
The settings are now completed.
![OLYMPUS DR-2000 - Click [Upload Settings]. - 1](/content/2019/11/84481/images/c48bcf8471506c4e393e466e86eba2154daf6b5e9d2e2154c6ff15ee3fe2a4af.jpg)
text_image
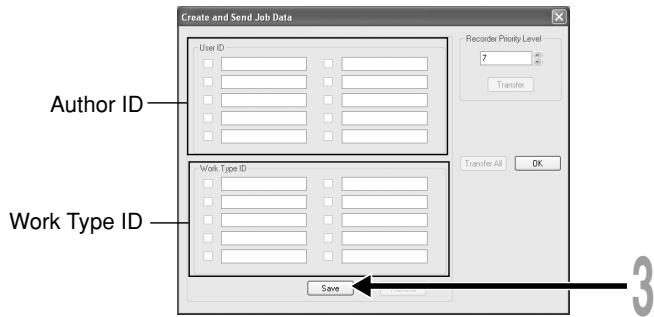
Directrec Configuration Tool Tool Help Customizing Directrec App Model Name: DR-2000 Button Function NEW NEW REW REW FF FF A Application B Application C Application User ID: DR_2000 Enable Beep Sound Enable Button Click Suppression Upload Settings 2 3The files recorded in your PC by Directrec contain Author ID and Work Type as header information. The details in header information can be easily changed by using the DSS Player.
Registering Author ID and Work Type ID in DSS Player
Up to the User ID and ten Work Type ID can be registered in the DSS Player.
1 Ensure Directrec is not connected.
2 From the DSS Player main window, click the [Download] menu, then select [Create & Send Job Data...].
The [Create & Send Job Data] window appears.
Enter your Author ID or Work Type ID in the field indicated by the arrow.
Click the [Save] button.
Author ID or Work Type ID registration is now completed.
text_image
Create and Send Job Data User ID Recorder Priority Level 2 Transfer Author ID Work Type ID Transfer All OK Save 3Directrec Default User ID to Directrec
The Directrec User ID plays an essential part in the file naming process of new recordings. The default User ID is "DR_2000". In order to change the default user ID, follow the procedure below.
Click the 📄 icon on the toolbar in the [Remote Edit] window. Or, select the [Directrec Configuration Tool] in the [Tools] menu.
The [Directrec Configuration Tool] dialog box will appear.
![OLYMPUS DR-2000 - Click the 📄 icon on the toolbar in the [Remote Edit] window. Or, select the [Directrec Configuration Tool] in the [Tools] menu. - 1](/content/2019/11/84481/images/431a84f6f42710d6659fed26f46492b5a3adf61ecda3481aff7efc20169325c8.jpg)
text_image
Remote Edit - DictationDR200020.dss Tools Help New Index Mark Delete Index Mark View All Index Marks... Edit Job Data Send Files Show Custom Button Directrec Configuration Tool REC Alt+R PLAY Alt+Ctrl+F12 STOP Alt+Ctrl+F11 FF Alt+Ctrl+F10 Work Type Quality BCD SP (mono) Sensitivity Dictation Stop DR2000 Volume2 Input your user ID into the [User ID] box and click [Upload Settings]. The input User ID will be transferred to Directrec. The ID can be any combination of "A" to "Z", Numeric and/or "_, and up to a maximum of 16 letters long.
![OLYMPUS DR-2000 - Click the 📄 icon on the toolbar in the [Remote Edit] window. Or, select the [Directrec Configuration Tool] in the [Tools] menu. - 2](/content/2019/11/84481/images/872659b0b2d83c4629568defeac078169b22fb7cedfed4d6547ea79a9a96c060.jpg)
text_image
Directres Configuration Tool Tool (100) Customizing Directres App Model Name: DR-2000 Button Function NEW/ NEW REV/ REV FF FF A Application B Application C Application Default settings User ID: DR_2000 Enable Beep Sound Enable Button Click Suppression Upload Settings 2Note
- Never disconnect the USB access if the indicator light is flashing red. If you do so, the data may be destroyed.
Setting an Author ID
Either the Directrec default Author ID or any DSS Player registered Author ID (P. 26) can be set in as header information.
Click the 📄 icon on the toolbar in the [Remote Edit] window. The [Set Job Data] window will appear.

text_image
Remote Edit - Dictation\DR200019.dss File Edit Tools Help Position Length Priority Work Type Quality 0.00.05 0.00.20 ABCD SP (mono) Insert recording Sensitivity Dictation Volume Stop DR2000Select the desired Author ID from the Author ID list box.
Click the [OK] button.
All recordings made by the author during the session will include the set ID as part of the header information.

text_image
Set Job Data Author ID DR_2000 Option Item1 Option Item2 Option Item3 Comment 1 OK Cancel 2 3Note
- Directrec's "DR_2000" is the default User ID.
Setting a Work Type
Any Work Type registered (P. 26) in the DSS Player can be set as header information.
1 Select the registered Work Type in the Work Type ID setting in the [Remote Edit] window.
All recordings made with the new Work Type ID will have the new Work Type as part of the header information.
![OLYMPUS DR-2000 - Select the registered Work Type in the Work Type ID setting in the [Remote Edit] window. - 1](/content/2019/11/84481/images/2c0e847d26d270a88b2a50865ca3454b91a8c9366d9670f4832e186ac96d9a75.jpg)
text_image
Remote Edit - DictationDR200019.dss File Edit Tools Help Position Length Priority Work Type Quality 0.00.05 0.00.20 ABCD Sensitivity Dictation Volume Stop DR2000Using [Directrec Configuration Tool], Directrec button functions can be easily customized to suit individual user needs.
Customizing Directrec Buttons
Select [Directrec Configuration Tool] in the [Tools] menu in the [Remote Edit] window. Or, click the icon on the toolbar.
The [Directrec Configuration Tool] dialog box will appear.
![OLYMPUS DR-2000 - Select [Directrec Configuration Tool] in the [Tools] menu in the [Remote Edit] window. Or, click the icon on the toolbar. - 1](/content/2019/11/84481/images/6d20d6eac08e985c60b7fd52ff64fa535731ed838cc37a5347f8e78feb3f8d0d.jpg)
text_image
Remote Edit - DictationDR200020.dss Tools Help New Index Mark Delete Index Mark View All Index Marks... Edit Job Data Send Files Show Custom Button Directrec Configuration Tool REC Alt+R PLAY Alt+Ctrl+F12 STOP Alt+Ctrl+F11 FF Alt+Ctrl+F10 Work Type BCD Quality SP (mono) Sensitivity Dictation Volume Stop DR20002 Select the function to be assigned to each button and click [Upload Settings].
The “Successfully upload setting” alert will appear and complete customization. If the “Failed to upload setting” alert appears, try the setting procedure once again.
![OLYMPUS DR-2000 - Select the function to be assigned to each button and click [Upload Settings]. - 1](/content/2019/11/84481/images/fab85cf1e4fdfea9b30766e5ee13a6f74b1b24c9d1ec684a30666950e017a7cb.jpg)
text_image
Directvec Configuration Tool Tool Help Customizing Direction App Model Name: DR-2000 Button Function NEW NEW REV RD FF FF A Application B Application C Application Default settings User ID: DR_2000 Enable Beep Sound Enable Button Click Suppression Upload SettingsList of Customizable buttons and Available Functions
| List of customizable buttons | Default settings | Functions available for settings |
| NEW | NEW | NEW, REW, FF, INDEX ^*1 ,PRIORITY ^*2 , INSERT/OVERWRITE ^*3 , DISABLE ^*4 ,Application ^*5 |
| REW | REW | |
| FF | FF | |
| A | Application(INDEX/DSS Player) | |
| B | Application (PRIORITY) | |
| C | Application (EXIT) |
To programme to start a shortcut key for the DSS Player and a selected application by using the [Directrec APP] tab. Example: (EXIT) indicates that the shortcut key for the exit command in the [Remote Edit] window is assigned. Refer to the online Help for registration.
*1: [INDEX] button function ....To insert an index mark using the [Remote Edit] window.
*2: [PRIORITY] button function....To switch the "Priority" settings in the [Remote Edit] window.
*3: [INSERT/OVERWRITE] button function....To switch the Insert and Overwrite recording modes in the [Remote Edit] window.
*4: [DISABLE] button function..... No function will be assigned.
*5: [Application...] button function.....
Displaying Programmable Buttons
The Directrec Programmable (A, B, C) buttons can be displayed in the [Remote Edit] window. They are useful as the assigned functions are also shown.
Select and check the [Show Custom Button] box in the [Tools] menu of the [Remote Edit] window.
The Programmable (A, B, C) buttons along with their programmed function will be displayed in the toolbar.
![OLYMPUS DR-2000 - Select and check the [Show Custom Button] box in the [Tools] menu of the [Remote Edit] window. - 1](/content/2019/11/84481/images/80bdbe9086c992fe34d9ee4ab64bf71515b83e0eee056c91c55e3c3dcdf71be8.jpg)
text_image
Remote Edit - Dictation/DR200021.dss Tools Help New Index Mark Delete Index Mark View All Index Marks... Edit Job Data Send Files Show Custom Button Directrec Configuration Tool REC Alt+R PLAY Alt+Ctrl+F12 STOP Alt+Ctrl+F11 FF Alt+Ctrl+F10 REV Alt+Ctrl+F0 Work Type Quality BCD SP (mono) Sensitivity Dictation Volume 0.15Note
- The Programmable buttons will not be displayed if the connected device does not include the same function buttons.
Programming Shortcut Keys (Registration)
You can customize the functions of other applications to the Directrec buttons. This enables you to use the other application software easily while dictating with Directrec. The selected application shortcut keys can be programmed to Directrec Programmable (A, B, C) buttons by using [Directrec Configuration Tool]. By doing so, the Directrec buttons can be used to start the applications and command the functions. The 📁 icon will be displayed in the task tray as a regular application in [Directrec Configuration Tool].
Programming [Remote Edit] Function (Default)
The shortcut keys in the DSS Player [Remote Edit] window are programmed as default.
Click the icon on the toolbar in the [Remote Edit] window. Or, select [Directrec Configuration Tool] in the [Tools] menu.
The [Directrec Configuration Tool] dialog box will appear.
![OLYMPUS DR-2000 - Click the icon on the toolbar in the [Remote Edit] window. Or, select [Directrec Configuration Tool] in the [Tools] menu. - 1](/content/2019/11/84481/images/a39f2c75709a0f7aebf522dc3523f5e3e46a4c89e349489e11f46cc191938dc3.jpg)
text_image
Remote Edit - DictationDR200020.dss Tools Help New Index Mark Delete Index Mark View All Index Marks... Edit Job Data Send Files Show Custom Button Directrec Configuration Tool REC Alt+R PLAY Alt+Ctrl+F12 STOP Alt+Ctrl+F11 FF Alt+Ctrl+F10 REV Alt+Ctrl+F9 Work Type Quality BCD SP (mono) Sensitivity Dictation Volume Stop DR20002 Select the [Directrec App] tab in the [Directrec Configuration Tool] dialog box.
The shortcut keys for the [Remote Edit] window programmed to each button on the Directrec as well as each start-up application are displayed.
![OLYMPUS DR-2000 - Select the [Directrec App] tab in the [Directrec Configuration Tool] dialog box. - 1](/content/2019/11/84481/images/796e68c71c3fca7430a63c2cb8816cfe989595dc5a836e6d75293e65dce0196c.jpg)
text_image
Directvec Configuration Tool File Tool Help Customizing Directvec App Button Assign NEV NEV' REV REV' FF FF A INCE10/SS Player B PRIORITY C E10' Shift + REV' Shift + RFV' Shift + FP Shift + A Shift + B Shift + C Ctrl + NEV Ctrl + RFV Ctrl + FF Ctrl + A Ctrl + B Ctrl + CThe default programmed shortcut keys are shown below.
| Button | Assigned command |
| A | Application (To insert an index mark/Running DSS Player) |
| B | Application (To assign the “Priority” settings) |
| C | Application (Exit the Remote Edit window or Main window) |
| Shift+FF | Jump to the index mark |
| Shift+A | To turn up the volume |
| Shift+B | To turn down the volume |
| Shift+NEW | Switching Insert/Overwrite Recording |
Only the programmable (A, B, C) buttons can be programmed. Programming of the NEW, REW or FF button is not possible. However, the combination with Shift key or Ctrl key of the PC will enable programming.
Programming shortcut keys to your desired application
Directrec programmable (A, B, C) buttons as well as the [Remote Edit] window can be used to control and navigate through applications when they are individually programmed as application shortcuts.
The shortcuts to applications can be saved individually as templates.
As the template can be switched automatically when the application becomes active, the various applications can be operated by remote control when required.
Click the icon on the toolbar in the [Remote Edit] window. Or, select [Directrec Configuration Tool] in the [Tools] menu.
The [Directrec Configuration Tool] dialog box will appear.
2 Click the □ icon on the toolbar in [Directrec Configuration Tool]. Or, select [New Template] in the [File] menu.
The [Open] dialog box will appear.

text_image
2 Direct Eric Configuration Tool Tool Tools New Template Ctrl+H Import Template Ctrl+I Export Template Ctrl+E Delete Template Ctrl+D Index Ctrl+H Exit Customizing Direct Eric App Button Assign NEW NEW REW REW FF FF A INDEX/SS Player B PRIORITY C EXIT Shift + NEW/ Shift + REW/ Shift + FF Shift + B Shift + C Ctrl + NEW/ Ctrl + REW/ Ctrl + FF Ctrl + A Ctrl + B Ctrl + C3 Browse and Select the application executable and click [Open]. The application shortcut is now set.
For example, if you select Microsoft Word "winword.exe" executable file, "winword" will be added to the [Directrec Configuration Tool] dialog box.
![OLYMPUS DR-2000 - Browse and Select the application executable and click [Open]. The application shortcut is now set. - 1](/content/2019/11/84481/images/51fc5d6823129b3b2c300f7ed0b60702ea3367ab50d925264e5bf852410db6f0.jpg)
text_image
Open Look in: Office10 1033 Addins Convert Forms HTML Migration Shortcut Bar Startup FINDER.EXE GRAPH.EXE INCOC.EXE NSCHINED.EXE MSTORID.EXE File name: vIMvORD.EXE Files of type: Executable Files(*.exe) Open as read-only My Recent Documents Desktop My Documents My Computer My Network 34 Select the tab added to the [Directrec Configuration Tool] dialog box and program the shortcut key to Directrec Programmable (A, B, C) buttons.
The registered contents will be automatically saved as a template. Programming to the buttons other than Programmable (A, B, C) buttons is possible with the combination with Shift key or Ctrl key of the PC.
Refer to the online Help (P. 8) for further information on programming shortcut keys.
Ⓐ: The [Button] column shows Directrec buttons. Shift+XXX and Ctrl+XXX indicates the combination of Shift key or Ctrl key on the keyboard and Directrec buttons.
⑧: The [Assign] column shows the currently programmed shortcut keys or the start-up application status.
![OLYMPUS DR-2000 - Select the tab added to the [Directrec Configuration Tool] dialog box and program the shortcut key to Directrec Programmable (A, B, C) buttons. - 1](/content/2019/11/84481/images/f216be90bb1f361726a5e01e8acaf4c849b607b256c7c5c6fa5e4b12de07e18b.jpg)
text_image
Olympus (Olympus Help: 20-000) Customizing Directec.App WiWi+CFD Button A B C Shift + NEW Shift + REW/ Shift + FF Shift + A Shift + B Shift + C Dir + NEW Dir + REW/ Dir + FF Dir + A Dir + B Dir + C Assign INSE/XISS Player PRIORITY EUT ① ②For the latest information not included in the user manual, please refer to the Online Help (P. 8).
| Symptom | Probable cause | Action |
| Unable to use Directrec controls | DSS Player (included in the package) is not installed. | Install the DSS Player (P. 6). |
| The [Remote Edit] window in the DSS Player (included in the package) is not open. | Open the [Remote Edit] window first and then use Directrec. | |
| No playback tone heard | The sound volume in the [Remote Edit] window is set to 0. | Adjust the volume level. |
| The sound volume of your computer is set to 0. | ||
| Noise heard during playback | The Directrec was shaken during recording. | ____ |
| The Directrec was placed near a cell phone or fluorescent lamp while recording or during playback. | Move the Directrec. | |
| Recording level too low | The microphone sensitivity is too low. | Set the microphone sensitivity to Conference mode and try again (P. 20). |
| Unable to set index marks | The maximum number of index marks (16) has been reached. | Erase unnecessary index marks (P. 23). |
| Cannot connect to PC | Sometimes a connection cannot be made with some PCs running Windows XP. | You need to change the PC's USB settings. See DSS Player Online Help for details (P. 8). |
| Unable to use Directrec USB microphone/speaker. | USB Audio Device is not selected in the device settings of your PC. | Go to the Windows [start] menu, →[Control Panel] and then select [Sounds and Multimedia]. Open the [Audio] tab and select USB Audio Device as the setting for “Sound Playback” and “Sound Recording”. |
Recording format: DSS (Digital Speech Standard)
Input level: -70 dBv
Overall frequency response: 100 to 15,000 Hz
Maximum working output (5 V DC): 300 mW or more (8 Ω speaker)
External dimensions: 157 x 49 x 27 mm (without protrusions)
Weight: 200 g
Cable length: 2.5 m
Plug shape: USB connector A type
Technical Assistance And Support
DR-2000 is part of the Olympus Professional Dictation System. Your dealer is trained to troubleshoot and fix many common problems that you may be having with this system. If you encounter problems using your DR-2000, we recommend that you contact your Olympus Professional Dealer that sold you the system. If your dealer cannot fix your problem, please call our technical hotline number or send an E-mail.
◆For customers in the U.S. and Canada
Phone: 1-888-553-4448
E-mail: distec@olympus.com
◆For customers in Europe
E-mail : dss.support@olympus-europa.com
DIRECTREC
DR-2000
Executive Kit
MODE D'EMPLOI
text_image
Labeled diagram of a handheld device with numbered parts for identification
text_image
Diagram of a handheld device with numbered parts labeled 9, 10, and 11 pointing to its internal structure.natural_image
Diagram showing a cable connector inserted into an audio jack, with no visible text or symbolsnatural_image
Line drawing of a device with ports and connectors, no text or symbols presentnatural_image
Line drawing of a device with a handle and label '1' pointing to it (no text or symbols on the diagram itself)text_image
Labeled diagram of a handheld device with numbered parts for identification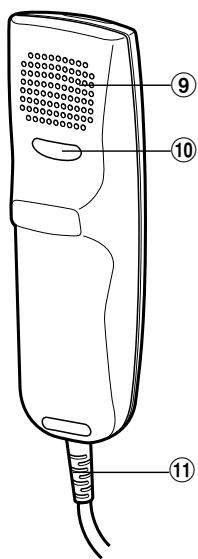
text_image
Diagram of a handheld device with numbered parts labeled 9, 10, and 11 pointing to different ports or functions.natural_image
Diagram showing cable installation and connection to a device (no text or symbols present)natural_image
Diagram of a device with labeled parts and directional arrows, no readable text or symbols presenttext_image
Directvec Configuration Tool Date: Entries Help Emulator/Indicator Directvec App WiFi/DWG Tools A B C D E F G H I J K L M N O P Q R S T U V W X Y Z A B C D E F G H I J K L M N O P Q R S T U V W X Y Z A BDeclaration of Conformity
Model Number:
DR-2000
Trade Name:
DIRECTREC
Responsible Party:
OLYMPUS IMAGING AMERICA INC.
Address:
3500 Corporate Parkway, P.O. Box 610, Center Valley, PA 18034-0610, U.S.A.
Telephone Number:
1-888-553-4448
This device Complies with Part 15 of the FCC Rules. Operation is subject to the following two conditions: (1) This device may not cause harmful interference, and (2) this device must accept any interference received, including interference that may cause undesired operation.

Tested To Comply
With FCC Standards
FOR HOME OR OFFICE USE
Canadian RFI
This digital apparatus does not exceed the Class B limits for radio noise emissions from digital apparatus as set out in the Radio Interference Regulations of the Canadian Department of Communications.
For customers in Europe

“CE” mark indicates that this product complies with the European requirements for safety, health, environment and customer protection.

This symbol [crossed-out wheeled bin WEEE Annex IV] indicates separate collection of waste electrical and electronic equipment in the EU countries.
Please do not throw the equipment into the domestic refuse.
Please use the return and collection systems available in your country for the disposal of this product.
Applicable Product : DR-2000

(Premises/Goods delivery) Wendenstrasse 14-18, 20097 Hamburg, Germany. Tel. 040-237730
(Letters) Postfach 10 49 08. 20034 Hamburg, Germany.
OLYMPUS UK LTD.
2-8 Honduras Street, London EC1Y 0TX, United Kingdom, Tel.020-7253-2772
http://www.olympus.com/