
SPT 300 - CD Player SENCOR - Free user manual and instructions
Find the device manual for free SPT 300 SENCOR in PDF.


| Product Type | Portable Radio with CD/MP3/USB Player |
| Brand | Sencor |
| Model | SPT 300 |
| Dimensions (H x W x D) | 160 mm x 385 mm x 250 mm |
| Weight | 2.60 kg |
| Power Supply | AC 230V ~50Hz or 8 x UM-1/D size batteries (not included) |
| Radio Bands | FM 87.5-108 MHz, AM 520-1620 kHz |
| CD Compatibility | CD, CD-R, CD-RW (audio/MP3), 120 mm and 80 mm discs |
| USB Support | USB flash drive up to 8 GB, MP3 files |
| Audio Output Power | 5 W RMS x 2 |
| Speakers | 8 Ω, 8 W, 3 inch x 2, 2 inch x 2, 1.5 inch x 2 |
| Playback Modes | Normal, Repeat 1, Repeat All, Repeat Folder (MP3 only), Programmed (up to 20 tracks) |
| Additional Functions | X-BASS enhancement, high-speed music search, 10+/Folder+ control |
| Connections | AUX IN (3.5 mm), PHONE JACK (3.5 mm), USB Socket |
| Antenna | Rod antenna for FM, built-in AM ferrite bar |
| Display | Positive LCD with FM ST. indicator |
| Power Indicator | Red LED when unit is ON |
| Safety Features | Automatic shutdown when CD door opened; caution for battery replacement |
| Package Contents | Main unit, AC power cord, user manual |
| Warranty | Standard manufacturer warranty (details in manual) |
Frequently Asked Questions - SPT 300 SENCOR
User questions about SPT 300 SENCOR
0 question about this device. Answer the ones you know or ask your own.
Ask a new question about this device
Download the instructions for your CD Player in PDF format for free! Find your manual SPT 300 - SENCOR and take your electronic device back in hand. On this page are published all the documents necessary for the use of your device. SPT 300 by SENCOR.
USER MANUAL SPT 300 SENCOR
natural_image
Line drawing of a SENCOR brand radio driver with control knobs and dials (no text or symbols on the device itself)USER'S MANUAL
PORTABLE RADIO WITH CD/MP3/USB PLAYER
EN
Control Location (Front Side)
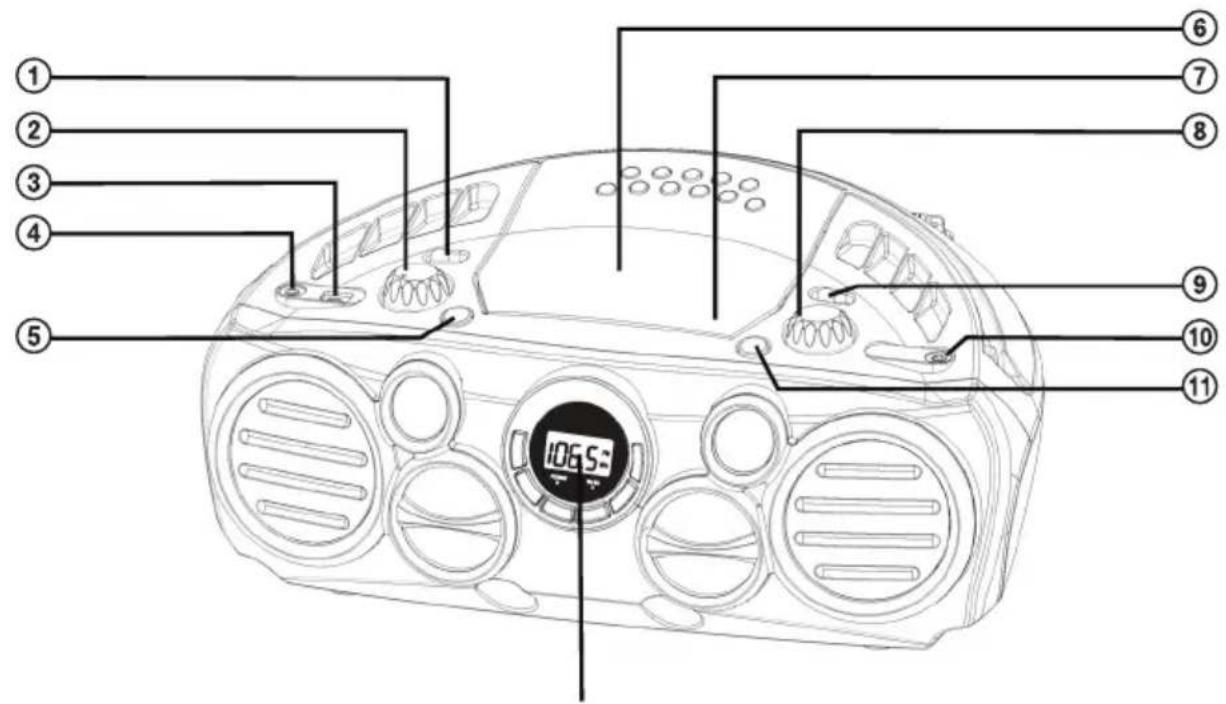
⑫
① RADIO-AUX-USB-CD/MP3 FUNCTION SWITCH
② VOLUME KNOB
③ USB SOCKET
④ PHONE JACK
⑤ XBASS BUTTON
⑥ CD DOOR
⑦ OPEN AREA
⑧ TUNING KNOB
⑨ AM-FM-FM ST. BAND SWITCH
⑩ AUX IN JACK
⑪ POWER ON/OFF BUTTON
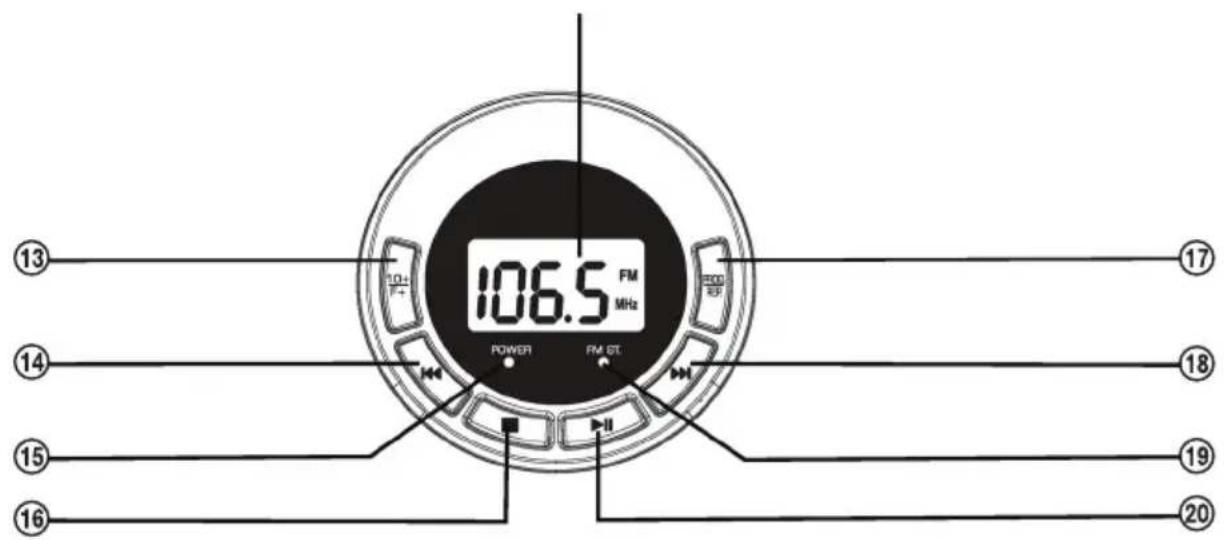
⑫ DISPLAY (POSITIVE LCD)
⑬ 10+ BUTTON
FOLDER+ BUTTON
⑭ SKIP BUTTON
⑮ POWER INDICATOR
⑯ STOP BUTTON
⑰ PROG./REPEAT BUTTON
⑱ SKIPP BUTTON
⑲ FM ST. INDICATOR
⑳ PLAY/PAUSE BUTTON
Control Location (Rear Side)
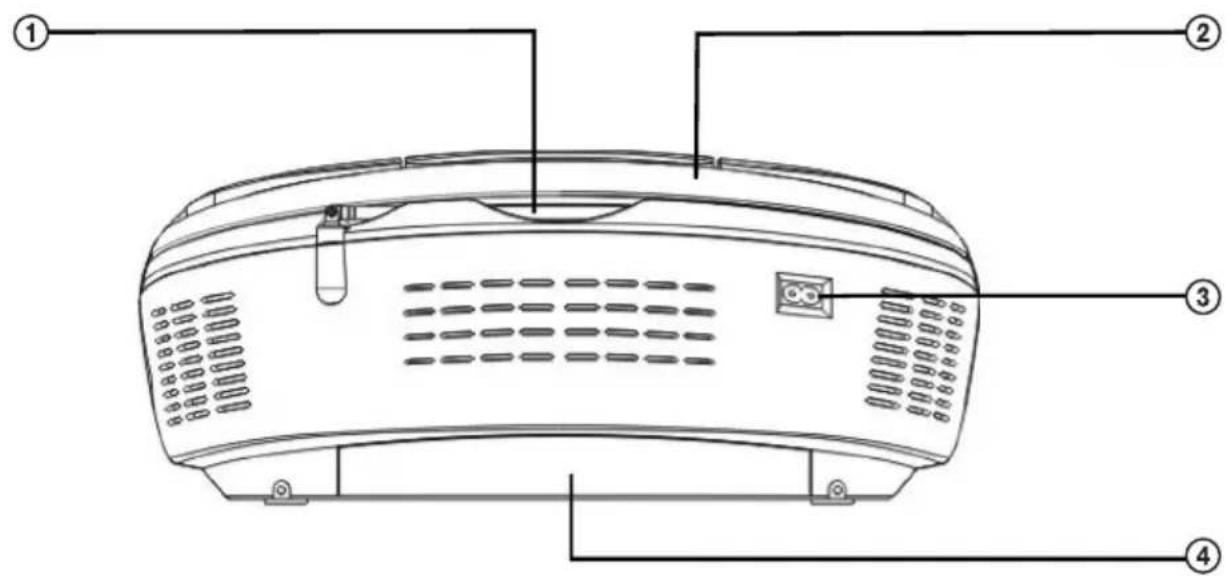
① ROD ANTENNA
② HANDLE
③ AC SOCKET
④ BATTERIES COMPARTMENT
Power Connection
Connecting AC Power
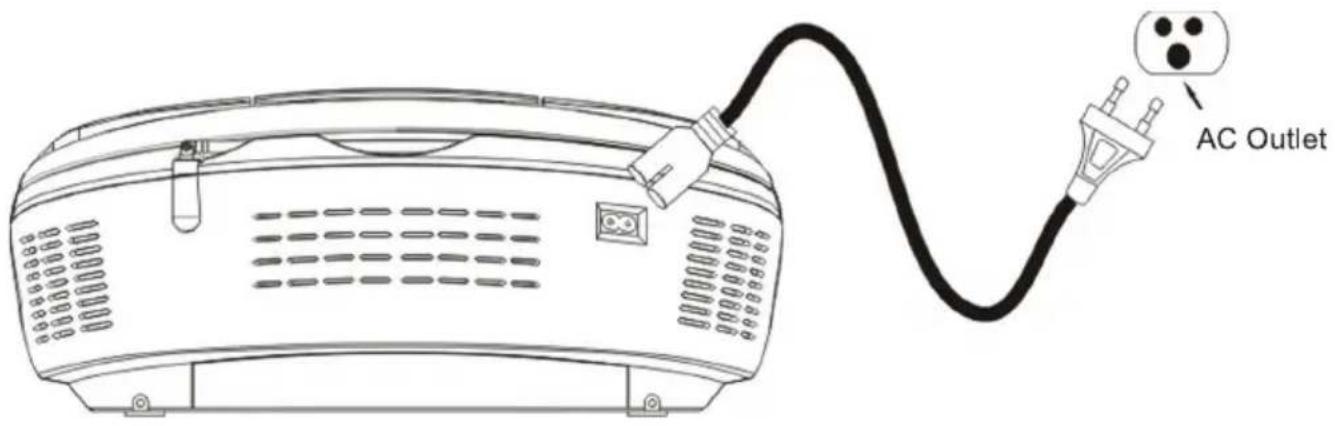
Connect the small end of AC cord to the socket at the back of the main unit and insert the plug of AC cord into standard AC wall outlet.
Caution:
The unit is designed to operate from mains supply of AC 230V\~50Hz. If the plug of AC cord does not fit properly, try to turn it over and try again. Do not force it.
When the unit is intended for being unused for a long period of the time. Please press the POWER button up to OFF position to turn off the unit and unplug the power cord from the AC wall outlet.
Battery Operation
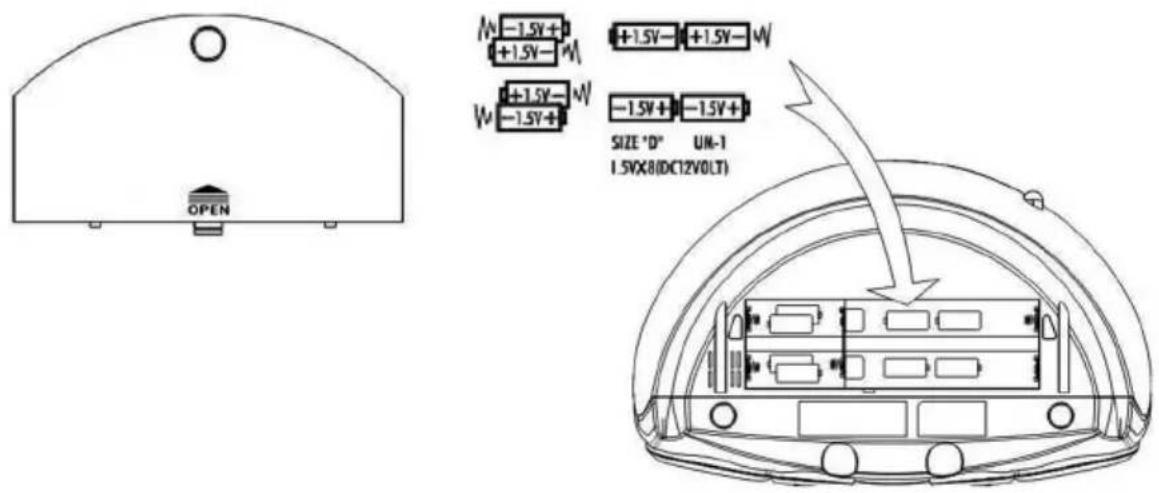
Before installing batteries (not included), ensure that the unit is disconnected from the mains supply. Remove the battery compartment cover on the bottom of the unit by lifting up the two lugs on the battery cover. The battery cover can then be lifted up.
Install 8 pieces of 1.5V (UM1) batteries (not included) by following the polarity markings and then replace the cover.
For battery operation, unplug the AC cord from the AC wall outlet first and then remove the AC cord from the socket at the back of the main unit.
Caution:
There is a danger of explosion if batteries are replaced incorrectly.
Replace batteries with the same type and same brand only.
When the unit is intended for being unused for a long period of the time. Press the POWER button up to OFF position and remove all batteries from the main unit.
Switching On for the first time
Plug into AC power or install batteries by following instructions on the previous Power Connection section. Press the POWER button to ON position to turn on the unit. The POWER indicator will be lighted up.
Switching between different sources (Radio/AUX/USB/CD)
After turning on the unit, slide the FUNCTION switch to select different sound sources
Adjusting sound volume level
After turning on the unit, turn the VOLUME knob to adjust the level of sound volume.
Adjusting the X-BASS button as desired.
Press the X-BASS button to the ON position to enhance the overall bass sound.
Press the OFF position for normal bass sound.
Adjusting the rod antenna
The aerial should be extended to ensure good reception in both FM radio modes. It may be necessary to adjust the position of the unit and/or aerial position to achieve the best signal reception.
CD Operation
The unit is designed to play normal music CD disc or MP3 disc bearing the correct identification logo. If the disc does not confirm to the standard, it may not be played back properly.
Caution:
- Playback of CD-R/CD-RW may depend on recording conditions.
- Do not attach a seal or label to either side (the recordable side or the labeled side) of a CD-R/RW disc. It may cause malfunction.
- Do not load a blank CD-R/RW disc. It will take over 1 minute to read the disc. The disc may be damaged if you try to open the CD Door while reading the disc.
• CD-ROM, CD-I, CDV, VCD, DVD or computer CDs are not possible to be read.
Loading disc
- Slide the FUNCTION switch to CD/MP3 position of the unit.
- Access the OPEN AREA on the top panel to flip the CD door open.
- Hold the CD disc by its edge with CD graphical side facing up and put it onto the CD compartment after the CD door is opened. Make sure that the disc label is facing up.
- Close the CD door and make sure no AUX-in device is plugged.
CD playback
After loading the disc, the disc will begin spinning and the total number of the tracks on the disc will be shown on the display. Press the PLAY/PAUSE button once, the first track/file on the CD will be played back. (For reading/playing back MP3 disc, the "MP3" icon will be displayed.)
Remark:
- If there is no disc in the unit, "NO" or "ERR" will be indicated on the display.
• If the CD cannot be read, "NO or ERR" will be indicated on the display.
Play/Pause Control
To pause playback temporarily by pressing the PLAY/PAUSE button. Music playback will be paused and the current elapsed track number will be shown on the display and the play icon will be blinking. Press the PLAY/PAUSE button again to resume playback.
Stop playback
To stop playback, press the STOP button on the unit. The total number of tracks of the disc will be displayed.
Skip track
During playback, press the forward or backward SKIP buttons to skip to the next or previous tracks.
High-speed music search
During playback, press and hold the forward or backward SKIP buttons to skip/search through the current track at high speed in forward or backward directions. When the SKIP buttons are released, normal playback speed will be resumed immediately.
10+/folder+ control (for MP3 disc only)
Press and hold the 10+/FOLDER+ button to advance the music search by increment of 10 tracks. Press the 10+/FOLDER+ button once to advance to the next folder on a MP3 disc.
Remark:
10+/FOLDER+ --- this function is not available for normal music CD. (Only for MP3 disc/MP3 files on USB flash-drive)
Repeat playback modes (Repeat 1/Repeat all/Repeat Folder)
Repeat the Current Track
During playback, press the PROGRAM/REPEAT button until the ① icon is displayed to select the current track/file to be repeated. The selected track/file will be repeated continuously.
Repeat Folder (for MP3 disc only)
During playback, press the PROGRAM/REPEAT button until ① icon and "FOLDER" icon are shown on the display. All tracks/files inside the desired folder will be repeated continuously.
Remark:
REPEAT FOLDER – this function is not available for normal music CD. (Only for MP3 disc/MP3 files on USB flash-drive)
Repeat All Tracks
During playback, press the PROGRAM/REPEAT button until ⏻ icon is displayed. All tracks/files on the disc will be repeated continuously.
Return to normal playback
Press the PROGRAM/REPEAT button until NO repeat indicator is displayed. The normal playback will be resumed.
Programmed CD playback
This unit can be programmed to play up to 20 tracks/files in CD mode. Load the music CD/MP3 disc onto the CD compartment (without pressing the "PLAY/PAUSE" button)
- Press PROGRAM/REPEAT button once in the stop mode. "P01" will be shown on the display and blinking.
- Press the 10+/FOLDER+ button to select the desired folder first (for MP3 disc only).
- Press the SKIP buttons to select the desired track to be programmed.
- Press PROGRAM/REPEAT button again to save the selected track/files.
- Repeat steps 2-4 to program up to 20 tracks/files.
- Press the PLAY/PAUSE button to play the programmed tracks after programming is completed. The "PROG" icon will be displayed during the programmed playback.
- To clear program and resume normal playback, press the STOP button twice during playback, or open the CD door, or change to RADIO mode to clear the programmed tracks.
Remark:
The unit can store up to 20 tracks/files in the programmable memories. During the programmed playback, user can still select the "repeat 1/repeat all" functions.
USB Operation
The unit is designed to play MP3 file on the USB flash-drive. If the files on the USB device do not confirm to the standard, they may not be played back properly.
1) Insert the USB flash-drive into the USB socket on the unit. Make sure no AUX-in device is plugged.
2) Slide the FUNCTION switch to USB position of the unit, "USB" icon will be shown on the display
3) After reading the USB flash-drive, the unit will display the total number of files on the flash-drive.
USB playback
After reading the USB flash-drive, press the PLAY/PAUSE button once, the first track/file on the USB flash-drive will be played back. The "MP3" icon will be displayed during playback.
Play/Pause Control
To pause playback temporarily by pressing the PLAY/PAUSE button. Music playback will be paused and the current elapsed track number will be shown on the display and the play icon will be blinking. Press the PLAY/PAUSE button again to resume playback.
Stop playback
To stop playback, press the STOP button on the unit. The total number of tracks/files on the USB flash-drive will be displayed.
Skip track
During playback, press the forward or backward SKIP buttons to skip to the next or previous track/file.
High-speed music search
During playback, press and hold the forward or backward SKIP buttons to skip/search through the current track/file at high speed in forward or backward directions. When the SKIP buttons are released, normal playback speed will be resumed immediately.
10+/folder+ control
Press and hold the 10+/FOLDER+ button to advance the music search by increment of 1o tracks. Press the 10+/FOLDER+ button once to advance to the next folder on the USB flash-drive.
Repeat playback modes (Repeat 1/Repeat all/Repeat Folder)
Repeat the Current Track
During playback, press the PROGRAM/REPEAT button until the ① icon is displayed to select the current track/file to be repeated. The selected track/file will be repeated continuously.
Repeat Folder
During playback, press the PROGRAM/REPEAT button until ① icon and "FOLDER" icon are shown on the display. All tracks/files inside the desired folder will be repeated continuously.
Repeat All Tracks
During playback, press the PROGRAM/REPEAT button until the ⏻ icon is displayed. All tracks/files on the USB flash-drive will be repeated continuously.
Return to normal playback
Press the PROGRAM/REPEAT button until NO repeat indicator is displayed. The normal playback will be resumed.
Programmed USB playback
This unit can be programmed to play up to 20 tracks/files in USB mode. Plugged in the flash-drive (without pressing the "PLAY/PAUSE" button)
- Press PROGRAM/REPEAT button once in the stop mode. "P01" will be shown on the display and blinking.
- Press the 10+/FOLDER+ button to select the desired folder first.
- Press the SKIP buttons to select the desired track to be programmed.
- Press PROGRAM/REPEAT button again to save the selected track/files.
- Repeat steps 2-4 to program up to 20 tracks/files.
- Press the PLAY/PAUSE button to play the programmed tracks after programming is completed. The "PROG" icon will be displayed during the programmed playback.
- To clear program and resume normal playback, press the STOP button twice during playback, or open the CD door, or change to RADIO mode to clear the programmed tracks/files.
Remark:
The unit can store up to 20 tracks/files in the programmable memories. During the programmed playback, user can still select the "repeat 1/repeat all" functions.
RADIO Operation
The unit is designed to receive FM Stereo/FM and AM radio bands.
- Slide the FUNCTION switch on the top of the unit to select RADIO mode.
- Slide the BAND switch on the side of the unit to select FM ST, FM or AM band.
- Adjust the TUNING knob on the side of unit to tune the frequency of desired radio station.
- The tuning frequency will be displayed on the LCD display.
- For the FM stereo mode, please slide the BAND switch to FM ST position. The FM ST indicator will be lighted up when the reception signal is strong.
- For the FM mono mode, please slide the BAND switch to FM position. The FM ST. indicator will be turned off.
- For the AM mode, please slide the BAND switch to AM position.
Remark:
The unit has built-in AM ferrite bar antenna, which can provide adequate reception in most areas. If the AM reception is weak, try to adjust the location of the unit or relocate the unit to improve the reception. If the FM reception is weak, try to adjust the length and the angle of the FM antenna to improve the signal reception.
AUX-IN Operation
Setting up (AUX-IN) connection
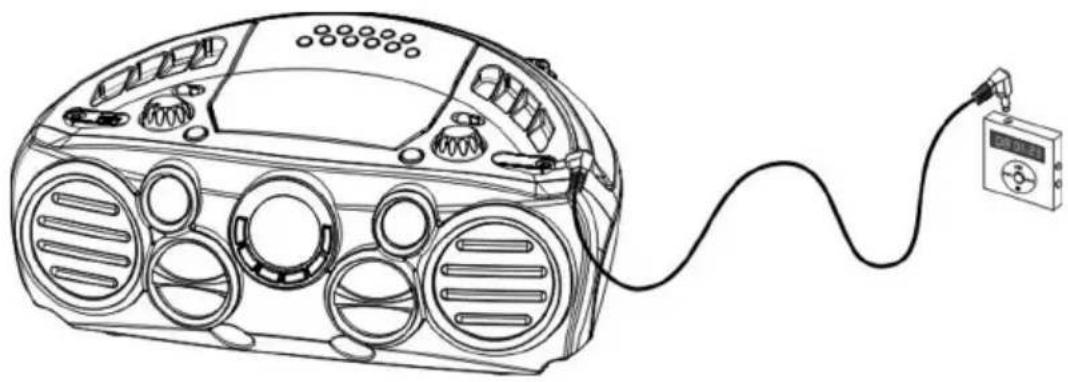
AUX-IN jack will allow you to connect external music player or external sound source to the main unit.
- Plug into a 3.5mm audio cable (not included) into your external music player and connect the other end (3.5mm jack) into the AUX-IN jack on the rear of the unit.
- Make sure your external music player is turned on.
- Slide the FUNCTION switch to CD/USB/AUX position on the unit.
- Start music playback on your external music player.
- Adjust VOLUME knob to control the sound level of music playback from the speakers on the unit.
natural_image
Line drawing of a portable electronic device with ports, cables, and a digital meter connected to it (no text or symbols)Specifications
Power Output 5 watt RMS x2
Speakers 8 Ohms 8 W 3 inch x2, 2 inch x2, 1.5 inch x2.
CD Disc- Disc Diameter 120mm/80mm
USB .... Support USB flash-drive up to 8 GB
AC Power AC230V\~50Hz
Battery Size...... UM-1 or D-Size batteries x 8 PCS
Radio Frequency FM: 87.5 - 108MHz, AM: 520-1620 KHz
Dimensions (H x W x D).... 160mm x 385mm x 250mm
Weight 2,60 kg
INSTRUCTIONS AND INFORMATION REGARDING THE DISPOSAL OF USED PACKAGING MATERIALS
Dispose of packaging material at a public waste disposal site.
DISPOSAL OF USED ELECTRICAL AND ELECTRONIC APPLIANCES
The meaning of the symbol on the product, its accessory or packaging indicates that this product shall not be treated as household waste. Please, dispose of this product at your applicable collection point for the recycling of electrical & electronic equipment waste.
Alternatively in some states of the European Union or other European states you may return your products to your local retailer when buying an equivalent new product. The correct disposal of this product will help save valuable natural resources and help in preventing the potential negative impact on the environment and human health, which could be caused as a result of improper liquidation of waste. Please ask your local authorities or the nearest waste collection centre for further details. The improper disposal of this type of waste may fall subject to national regulations for fines.
For business entities in the European Union
If you wish to dispose of an electrical or electronic device, request the necessary information from your seller or supplier.
Disposal in other countries outside the European Union
If you wish to dispose of this product, request the necessary information about the correct disposal method from local government departments or from your seller.

This product meets all the basic EU regulation requirements that relate to it.
Changes to the text, design and technical specifications may occur without prior notice and we reserve the right to make these changes.



- Control Location (Front Side)
- Control Location (Rear Side)
- Power Connection
- Connecting AC Power
- Caution:
- Battery Operation
- Switching On for the first time
- Switching between different sources (Radio/AUX/USB/CD)
- Adjusting sound volume level
- Adjusting the X-BASS button as desired.
- Adjusting the rod antenna
- CD Operation
- Loading disc
- CD playback
- Remark:
- Play/Pause Control
- Stop playback
- Skip track
- High-speed music search
- 10+/folder+ control (for MP3 disc only)
- Repeat playback modes (Repeat 1/Repeat all/Repeat Folder)
- Repeat the Current Track
- Repeat Folder (for MP3 disc only)
- Repeat All Tracks
- Return to normal playback
- Programmed CD playback
- USB Operation
- USB playback
- 10+/folder+ control
- Repeat Folder
- Programmed USB playback
- RADIO Operation
- AUX-IN Operation
- Setting up (AUX-IN) connection
- Specifications
- INSTRUCTIONS AND INFORMATION REGARDING THE DISPOSAL OF USED PACKAGING MATERIALS
- DISPOSAL OF USED ELECTRICAL AND ELECTRONIC APPLIANCES
- For business entities in the European Union
- Disposal in other countries outside the European Union
Brand : SENCOR
Model : SPT 300
Category : CD Player