
LTV 2513 CI - TV Trevi - Free user manual and instructions
Find the device manual for free LTV 2513 CI Trevi in PDF.


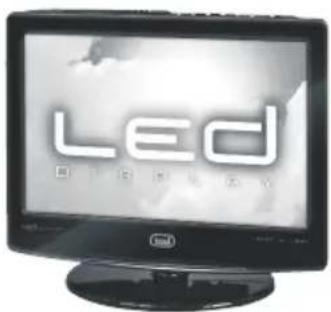
| Product Type | 13.3" TFT LCD TV with DVB-T, CI slot, and USB |
| Brand | Trevi |
| Model | LTV 2513 CI |
| Display Size | 13.3 inches (33.78 cm) diagonal, 16:10 aspect ratio |
| Max Resolution | 1280 x 800 dpi |
| Brightness | 275 cd/m² |
| Contrast Ratio | 500:1 |
| Power Supply | DC 12V via AC/DC adapter (230V AC input) or 12V car adapter |
| Power Consumption | Max 25 W, Standby < 1 W |
| TV System | PAL / SECAM (analog), DVB-T (digital) |
| Video Formats | PAL / NTSC, 576i, 576p, 720p |
| Audio Output | 2 x 3 W speakers, headphone jack |
| Inputs | HDMI, VGA, SCART, Composite AV (RCA), YPbPr (component), S-Video, PC audio, antenna, USB |
| CI Slot | Common Interface for conditional access modules |
| USB Functions | Media playback (video, audio, images, games), PVR recording |
| Teletext | Yes |
| EPG (Electronic Program Guide) | Yes (digital mode) |
| Dimensions (with stand) | 330 x 280 x 130 mm |
| Dimensions (without stand) | 330 x 255 x 70 mm |
| Weight | 1.4 kg |
| Safety Warnings | Do not expose to water, use dry cloth only, unplug during storms, keep ventilation clear, avoid heat sources |
| Maintenance | Clean with dry cloth; do not touch LCD screen directly |
| Spare Parts & Repairability | No user-serviceable parts; refer all servicing to qualified personnel |
Frequently Asked Questions - LTV 2513 CI Trevi
User questions about LTV 2513 CI Trevi
0 question about this device. Answer the ones you know or ask your own.
Ask a new question about this device
Download the instructions for your TV in PDF format for free! Find your manual LTV 2513 CI - Trevi and take your electronic device back in hand. On this page are published all the documents necessary for the use of your device. LTV 2513 CI by Trevi.
USER MANUAL LTV 2513 CI Trevi
13" TV COLOR/MONITOR TFT LCD
DVB-T - CI SLOT - USB
Manuale D'uso
1 PREFAZIONE
natural_image
Simple diagram of a plug with two connectors (no text or symbols)Auto 12V
natural_image
Simple line drawing of a plug connecting two cables (no text or symbols)natural_image
Diagram showing a cable connecting two connectors to a power outlet (no text or symbols present)UTILIZZO CON ALIMENTAZIONE DC12V DA IMPIANTO AUTO/CAMPER TRAMITE
ADATTATORE AUTO
natural_image
Pure electrical circuit lines without any symbols7.4 COLLEGAMENTO TRAMITE CAVO RCA A/V o Y/Pb/Pr
7.6 COLLEGAMENTO TRAMITE CAVO HDMI
9 TELEVISIONE DIGITALE TERRESTRE (DTV)
(Thin-Film-Transistor)
1. Safety instructions
Thank you for choosing our product. Please read this manual carefully and observe all safety and operating instructions. Store the manual in a safe place for later reference.

natural_image
Black triangular warning symbol with a lightning bolt inside, indicating electrical hazard (no text)CAUTION
RISK OF ELECTRIC SHOCK DO NOT OPEN!

natural_image
Warning symbol: black triangle with white exclamation mark (no text or numbers)
The flash symbol displayed in a triangle warns the user of dangerous electrical voltages inside the device that could lead to electrical shocks with harmful effects to health if the device is used incorrectly.
2. WARNING
The apparatus shall not be exposed to dripping or splashing and that no objects filled with liquids, such as vases, shall be placed on the apparatus.
3 NOTES.
- Read these instructions.
- Keep these instructions.
- Heed all warnings.
- Follow all instructions.
- Do not use this apparatus near water.
-
Clean only with dry cloth.
-
Do not block any ventilation openings. Maintain well ventilated conditions around the product. Do not put product on bed, sofa or anything that blocks ventilation. Install according to the manufacturers instructions.
-
Do not install near any heat sources such as radiators, heat registers, stoves, or other apparatus (including amplifiers) that produce heat.
-
Read, heed and follow all instructions to ensure correct and safe installation and interconnection of the apparatus.
-
The apparatus shall not be exposed to dripping or splashing and that no objects filled with liquids, such as vases, shall be placed on the apparatus.
-
The mains socket-outlet shall be installed near the apparatus and the mains plug shall remain readily operable.
-
Protect the power cord from being walked on or pinched particularly at plugs, convenience receptacles, and the point where they exit from the apparatus.
-
Only use attachments/accessories specified by the manufacturer.
-
Use only with the cart, stand, tripod, bracket, or table specified by the manufacturer, or sold with apparatus. When a cart is used, use caution when moving the cart/apparatus combination to avoid injury from tip-over.
- Unplug the apparatus during lightning storms or when unused for long periods of time.
- Refer all servicing to qualified service personnel. Servicing is required when the apparatus has been damaged in any way, such as power-supply cord or plug is damaged, liquid has been spilled or objects have fallen into the apparatus, the apparatus has been exposed to rain or moisture, does not operate normally, or has been dropped.
- The apparatus shall be connected to a mains socket outlet with a protective earthing connection.

Do not touch the color TFT LCD screen by hand directly.
4. Accessories
natural_image
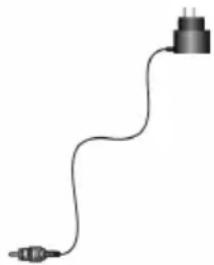
Simple line drawing of a connector with a pointed tip and terminal plug (no text or symbols)12V Car Adapter
natural_image
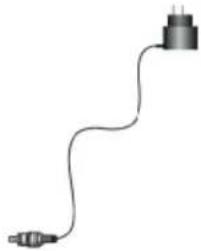
Simple line drawing of a plug and plug connector (no text or symbols)AC/DC Adapter
User Guide
5 CONTROLS AND CONNECTIONS TELEVISION
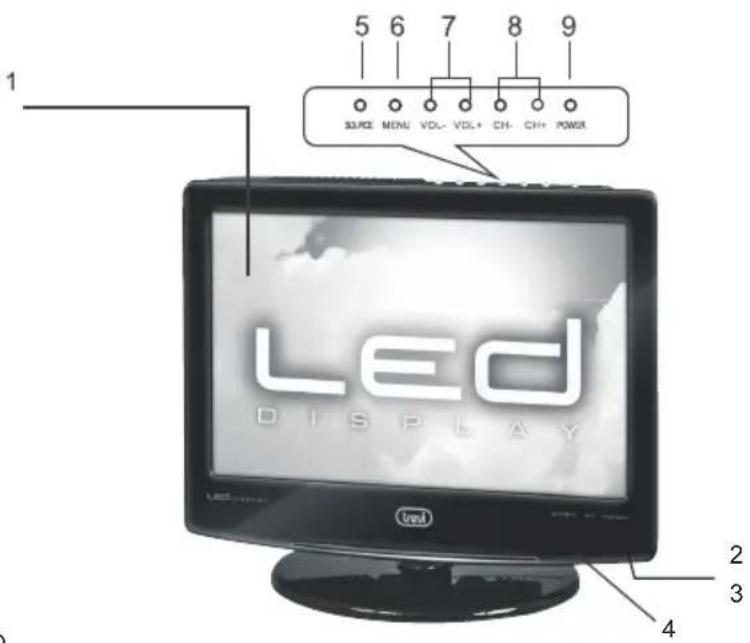
- TFT LED
- Power indicator, reständ-by, green on
- Remote sensor
- Speakers
- SOURCE button, input select
- MENU button
- VOL-/VOL + Keys, volume change
- Keys CH-/CH +, channel change
- POWER button, on / off stand-by TV
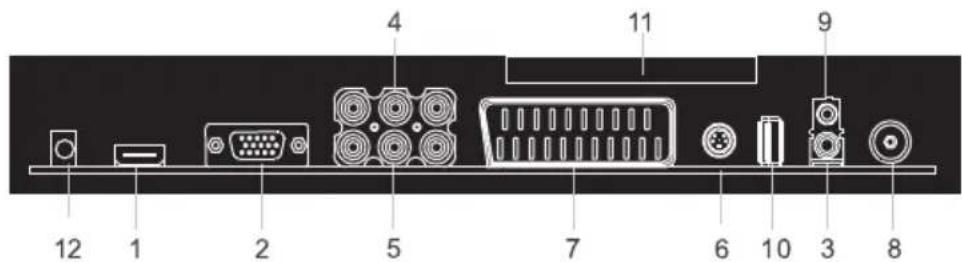
- HDMI input
- VGA input for connection to a computer
- Audio PC input, PC audio input sound card
- Input Y / Pb / Pr Component
- AV Composite Video Input
- S-VIDEO
- Scart input
- Antenna input
- Headphone jack and line audio output
- USB socket
- Slot CI (Common Interface)
- 12V DC input
6 REMOTE CONTROL
6.1 INSTALLATION
note: batteries not included
Open the battery compartment on the back of the remote control.
Insert the batteries (AAA) making sure to observe proper polarity and guide signs inside the battery compartment.
Close the battery compartment.
To prevent loss of liquid from the battery with the consequent damage to the remote control, make sure to install the batteries correctly and not to install different types of batteries (old and new, carbon-zinc and alkaline, etc. ...). Remove the batteries from the remote controls is not used for long periods.
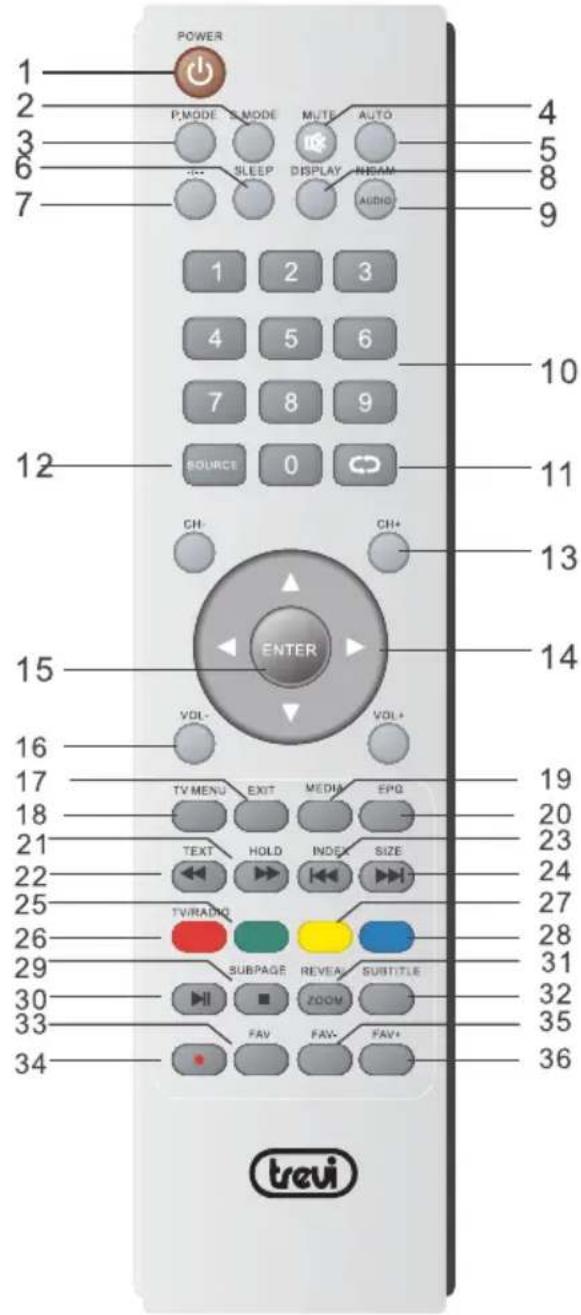
6.2 DESCRIPTION OF CONTROLS
- POWER button Press to enter or exit the standby mode.
2.S.MODE button: Press this button to change the audio mode.
3.P.MODE button: Press to select the picture mode
4.MUTE button:Press to turn on or off the audio output. -
AUTO: Press to do auto configuration directly(PC-RGB MODE)
6.SLEEP button: This feature allows you to set up sleeptime.
7.-/-- Button:Press this button to enter a program number for multiple program channel such as 2-1,etc.
8.DISPLAY button: Press this button to display information about the current mode on the screen.
9.NICAM:Press to select the NICAM modes./AUDIO: Audio Select Button
10.Number buttons (0-9):Press to select numbers. -
⬆Button:In the ATV/DTV mode, press to return to the channel last viewed.
-
SOURCE button: Press to select enter the source selecting menu
13.CH+/- button:In ATV or DTV mode, press to select channel.
14.Direction buttons:Press the direction buttons to select menu options or settings.
- ENTER/OK button: Press to confirm selection in the setup Menu.
16.VOL+/-button:Press to increase or decrease the volume.
- EXIT button: Press to exit all the OSD on the screen.
18.TV MENU button: Press to enter or exit the setup menu.
- MEDIA button: Press to enter the MEDIA playback.
20.EPG button: Press to display the Channel Guide menu in DTV mode.
21.HOLD:Hold on or off for current page display. ▶ :Playing forward fast.
- TEXT: \$witch on or off the teletext mode (TV mode) playing backward fast
23.INDEX: Request the index page (Teletext mode)/ skip backward button.
24.SIZE:Change display size in teletext mode./Skip forward button
25-26. color button/ TV/RADIO:Select the TV/RADIO mode.
-
SUBPAGE: Sub coded page access/■: Press to stop playing.
-
▶ Button:Press to pause the playback.Press Again to resume normal playback.
-
ZOOM:ZOOM can change display size. /REVEALReveal or hidden the hidden words.
-
SUBTITLE button: In DTV mode, press to select alternate subtitle languages during.
view/playback of a DTV program. In teletext mode, press to display P.100.
Note: Subtitle and teletext is only available if the service is provided by broadcaster.
33.FAV button: Displays the selected favorite programmers.
- :Record Botton.
35.FAV-:Displays the selected favorite down programmers.
36.FAV+:Displays the selected favorite up programmers.
7 INSTALLATION AND CONNECTIONS
7.1 POWER
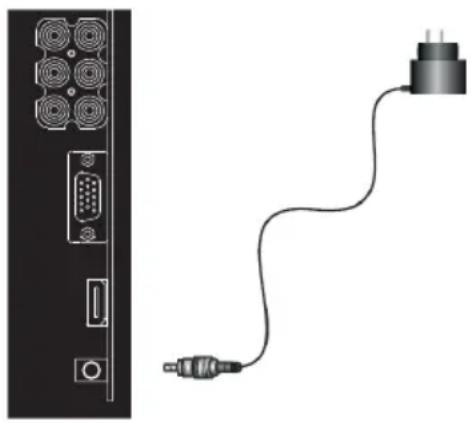
USE WITH AC 230V/50 Hz POWER SUPPLY
Plug the supplied AC 230V / DC 12V power adapter into a mains socket.
Plug the jack into the DC 12V socket on the side of the TV.
Press the POWER key on the TV or on the remote control to turn on the TV.
Press the POWER key again on the TV or on the remote control to re-activate the standby mode.
Note: If the TV receives no signal, the STANDBY mode will be activated.
To turn on the TV again, press the POWER key.
natural_image
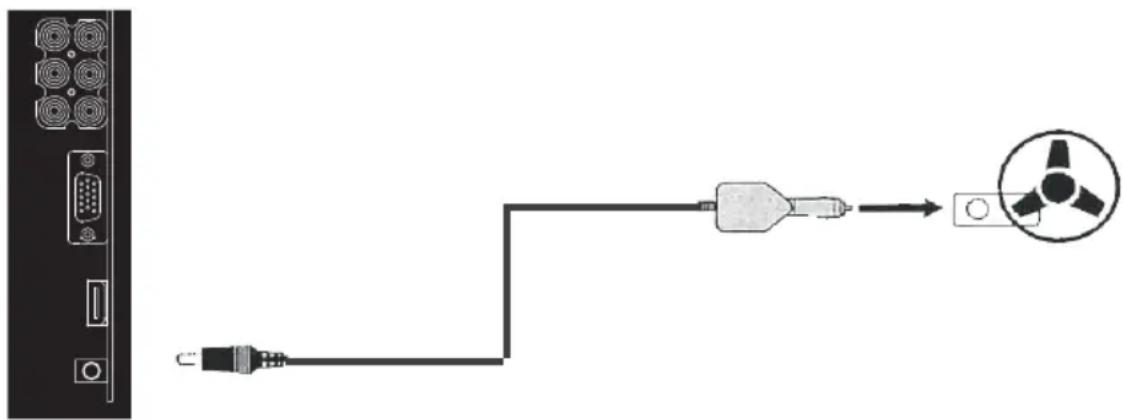
Diagram showing a cable connecting an audio jack to a physical audio device via a USB port, with no text or symbols present.USE WITH DC12V POWER SUPPLY FROM CAR/CAMPER SYSTEM BY MEANS OF CAR ADAPTER
This connection allows the use of LTV 2513CI inside the car/camper.
Plug the car adapter into a DC 12V car cigarette lighter socket and the jack at the inlet of the DC 12V adapter.
Press the POWER key on the TV or on the remote control to turn on the TV.
Press the POWER key again on the TV or on the remote control to re-activate the standby mode.
Note: Do not plug the LTV2513CI in the cigarette lighter socket of campers and trucks that supply 24V.
It is not recommended the use of the LTV2513CI for long periods of time with the car turned off, to prevent battery discharge.
natural_image
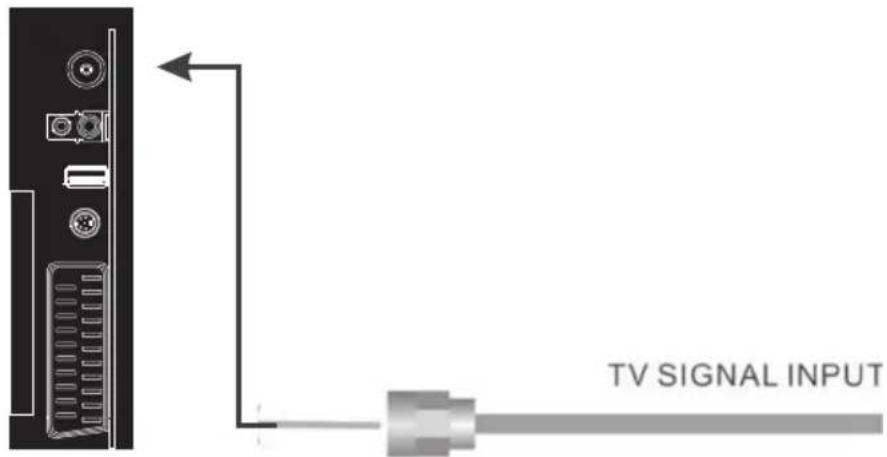
Pure electrical circuit lines without any symbols7.2 Connecting to TV-Signal Input
Connect the TV signal cable (the antenna cable, for example) to the Antenna Input Jack on the back of the unit so that you can receive television programmes.
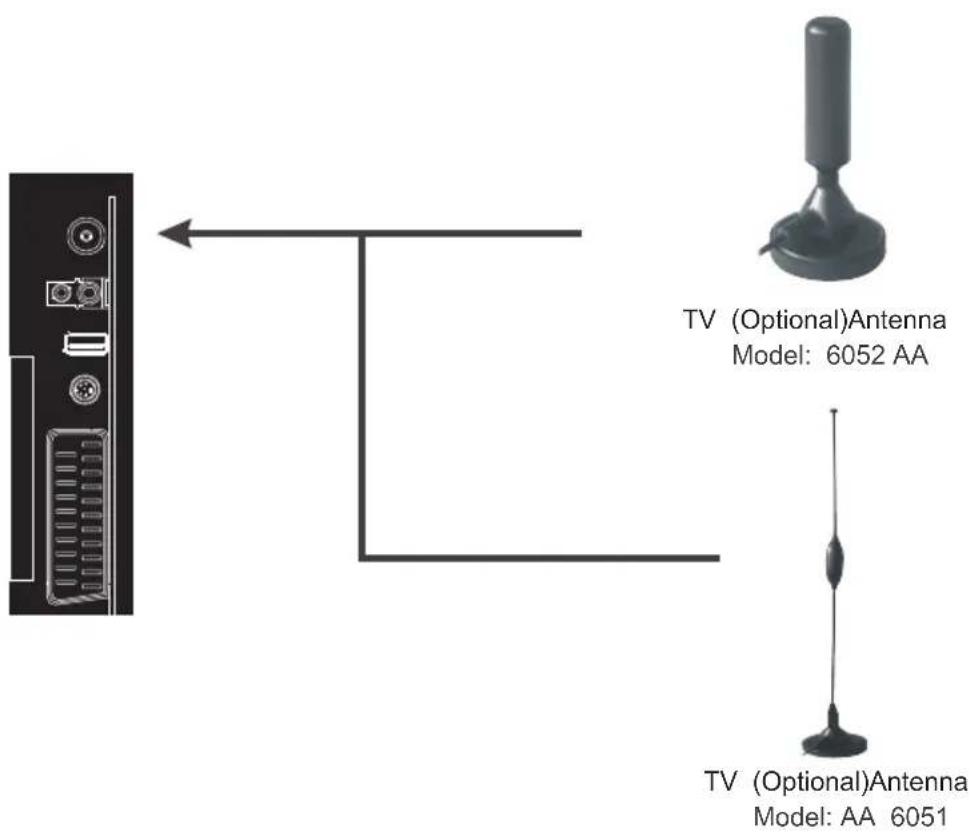
Note:
Connected the LTV 2513CI Trevi model AA 6051 or AA 6052 (optional).Antenna Input Jack to
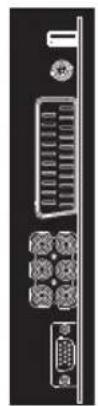
7.3 Connecting SCART
Connect the SCART output of your audio / video player with a SCART cable to the SCART input on the back of the TV.
natural_image
Back panel view of a computer tower showing internal components like CPU socket, RAM slots, and I/O ports (no text or labels visible)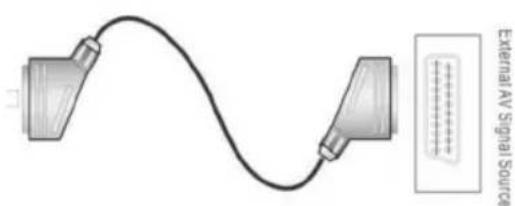
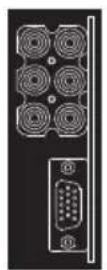
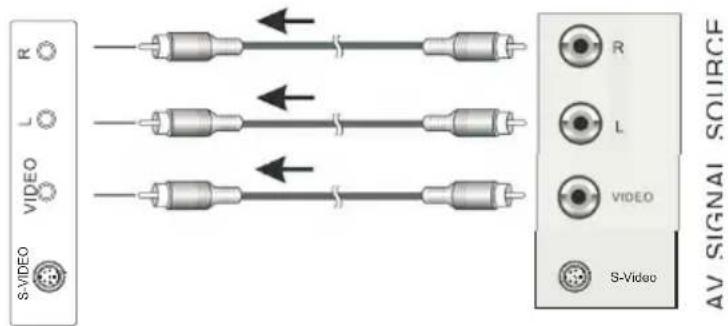
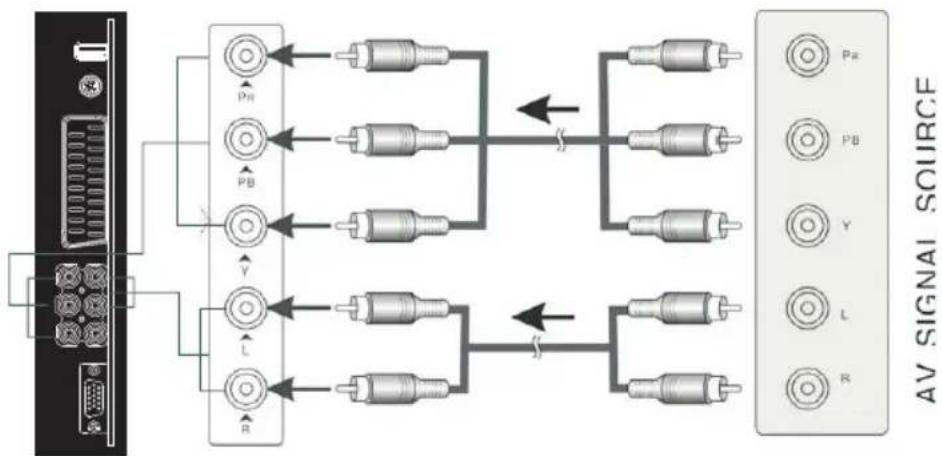
7. 4 Connecting cable RCA AV or Y/Pb/Pr
■ AV: Connect the output of AV device by RCA composite video inputs / AUDIO IN (L / R) on the back of TV. Be sure to observe the colors for the various sources: yellow for video, white for left audio channel and red for right audio channel.
■ Y / Pb / Pr: Connect the Y / Pb / Pr of the device by RCA inputs Y / Pb / Pr on the back of the TV. The various sources colors: green for Y, blue for Pb, red for Pr.
Connecting the audio output device to the AUDIO IN on the back of the TV. Be sure to observe the colors for the various sources: white for left audio channel and red for right audio channel.
RCA A/V
RCA Y/Pb/Pr
flowchart
graph TD
    A["Server"] --> B["Node 1"]
    A --> C["Node 2"]
    A --> D["Node 3"]
    A --> E["Node 4"]
    A --> F["Node 5"]
    A --> G["Node 6"]
    A --> H["Node 7"]
    A --> I["Node 8"]
    B --> J["Switch Y"]
    C --> J
    D --> J
    E --> J
    F --> J
    G --> J
    H --> J
    I --> J
    J --> K["Switch Z"]
    K --> L["Switch X"]
    L --> M["Switch Y"]
    M --> N["Switch Z"]
    N --> O["Switch X"]
    O --> P["Switch Z"]
    P --> Q["Switch Y"]
    Q --> R["Switch Z"]
    R --> S["Switch X"]
7.5 Connecting to PC
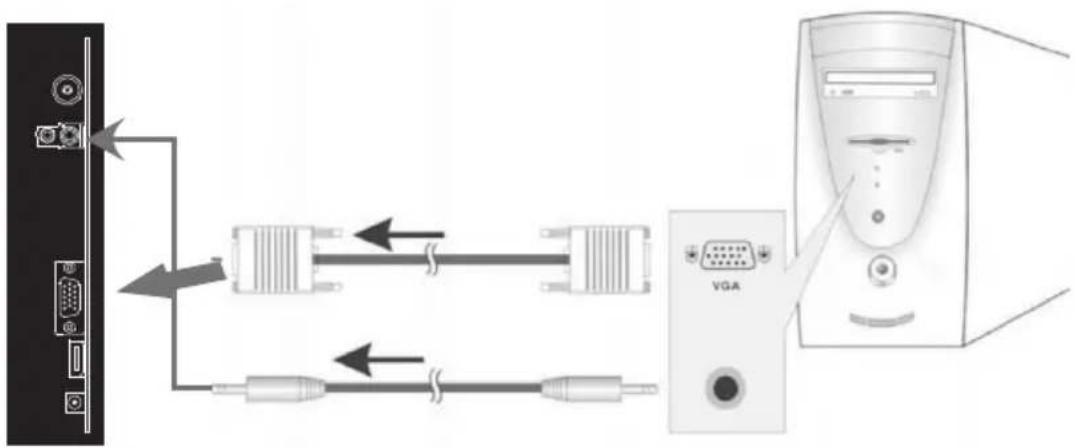
Connect one end of the VGA cable and audio cable to the input jack on the rear panel of the unit and connect the other end to the PC.
Set the PC video resolution to match that of the television.
7.6 Connecting to HDMI
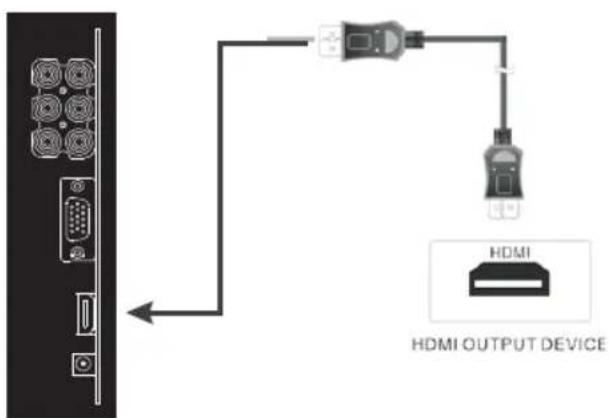
After connection, turn on the power of the unit and the external AV signal source and use the SOURCE and the direction buttons to select HDMI mode, and then press the ENTER button to confirm.
Note:
HDMI provides both audio and video signals and typically provides superior image quality to component or composite.
7.7 USB Device Connection
Connect the USB device to USB port on the back of the TV.
8.TV OPERATION
8.1ANALOGUE TV
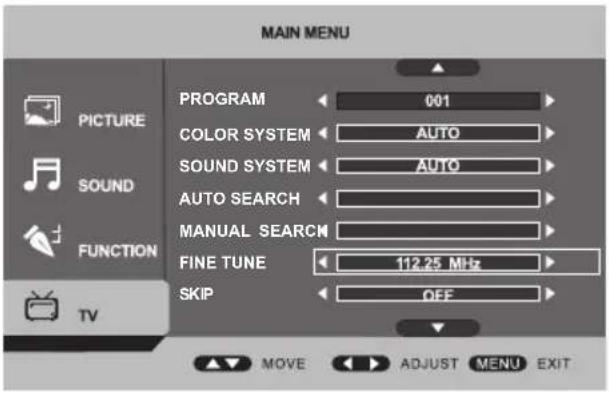
Program: select the channel.
Color System: select the local color system.
Sound System: select the local sound system.
Auto Search: search the channels automatically.
Manual Search:search the channelmanually.
Fine Tune: fine tune the program.
Skip :select skipping the current channel or not.
8.1.1 ANALOGUE TV CHANGE MENU LANGUAGE
Press the SOURCE key and select using the keys ▼ the item TV, then press ENTER.
Press the TV MENU key to access the MAIN MENU.
Press the navigation keys ▼ until selecting the item FUNCTION with the key ▶.
Select OSD LANGUAGE and press the navigation keys ▶ to select the OSD language (menu).
Press the EXIT key to exit.
8.1.2 AUTOMATIC CHANNELSEARCH
Press the TV MENU key to access the MAIN MENU.
Press the navigation keys ▼ until selecting the item TV and press ▶.
■Press the navigation keys and select the RICER.AUTOMA. function. Confirm with ▶.
The searching process starts automatically and all the available TV channels are stored in a progressive order. The process may take some minutes.
8.1.3 CHANNEL SHIFTING
Allows changing the position (number) of a previously stored channel.
Press the TV MENU key to access the MAIN MENU.
Press the navigation keys ▼ until selecting the item TV, press ▶, select EDITA CANALE and press again ▶.
Select the channel you wish to change its position and press the RED (swap) key. A small yellow asterisk will appear next to the selected channel. Navigate to the position you want to assign to the channel and press ENTER.When finished, press EXIT.
8.1.4 MANUAL CHANNEL SEARCH
Allows manually tuning the programs on the desired channel.
Press the TV MENU key to access the MAIN MENU.
Press the navigation keys ▼ until selecting the item TV and press ▶.
At the entry CANALE, select the channel number on which you manually want to tune.
Press the navigation keys ▼ until selecting the item RICER.MANUALE and press 4 or ▶.
Continue the search by pressing 4 or 4 until you find the desired program that will be automatically stored.
Note: If the "NESSUN SEGNALE" message is displayed, it means that the TV is getting no signal. Check the cable or the antenna system.
8.2 DIGITAL TERRESTRIAL TV (DTV)
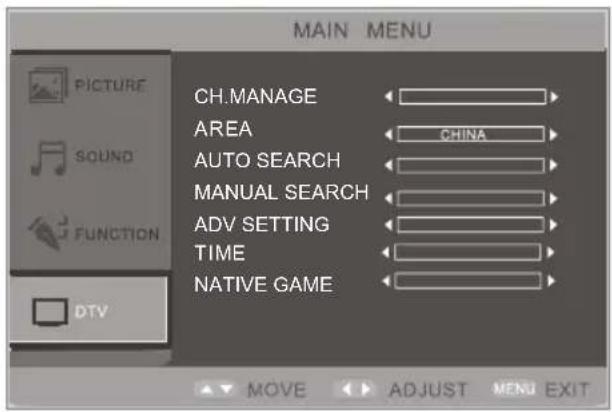
To navigate the menus you must use the navigation keys and ▼, press ENTER to confirm the selection or press the EXIT key to exit.
8.2.1 AUTOMATIC CHANNEL SEARCH
Press the TV MENU key to access the main menu.
Press the navigation keys ▼ until selecting the item DTV and press ▶.
Using the navigation keys ▼ go to the item AREA and with the navigation keys < ▶ select the country.
Using the navigation keys ▼ go to the item RICER. AUTOMA. and press ▶.
The searching process starts automatically and all available TV channels are stored in a progressive order. The process may take some minutes.
Note: If the "NESSUN SEGNALE" message is displayed, it means that the TV is getting no signal.
Check the cable or the antenna system.
8.2.2 CHANNEL SHIFTING
Allows changing the position (number) of a previously stored channel.
Press the TV MENU key to access the main menu.
Press the navigation keys ▼ until selecting the item DTV, press ▶, select CH MANAGE and then select CH.ORGN., press OK.
Select the channel you wish to change and press the YELLOW key. An arrow will appear next to the selected channel. Move to the new position you wish to assign and press the ENTER key.
When finished, press EXIT.
8.2.3 LCN Function
This TV is supplied with LCN (Logical Channel Number) function, which is a national standard for assigning the numeration of channels in the same manner all over the country where the scanning takes place. If you wish to disable this function and view the list of channels in a progressive way (1,2,3,...), press TV MENU, select DTV, press ▶, select IMPOSTA.ADV. and select LCN. Disable the LCN function using the ◀/▶ (ON/OFF) keys.
The LCN function is enabled (ON) by default.
8.2.4 MANUAL CHANNEL SEARCH
Allows manually tuning the programs on the desired channel.
Press the TV MENU key to access the main menu.
Press the navigation keys ▼ until selecting the item DTV, press ▶, select RICERCA MAN UALE and press ▶.
In the NOME CANALE window, select the channel on which you wish to perform the manual tuning and confirm with ENTER.
Wait until the TV finishesthe tuning, all TV channels found will be automatically stored and the TV will exit the menu.
Note: If the "NESSUN SEGNALE" message is displayed, it means that the TV is getting no signal.
Check the cable or the antenna system.
8.3 CHANNEL SHIFTINGSTORED CHANNEL DISPLAY
Press the CH+ key to select the next stored channel.
Press the CH- key to select the previous stored channel.
8.4 VOLUME ADJUSTMENT
Press the VOL+ and VOL- keys on the remote control to increase/decrease the TV volume.
Press the MUTE key to mute the audio temporarily. Press it again to restore the audio.
8.5 PICTURE SETTINGS
- Press the "MENU" button on the remote control to enter the OSD menu, then press "▲ / ▼" button to select the "Picture" menu.
- Press the "▶" button to enter the "Picture" menu setting, use "▲ / ▼" to move the menu bar, and then press "◀ / ▶" button to Adjust the value of selected items.
- Press "MENU" button to return to upper menu.
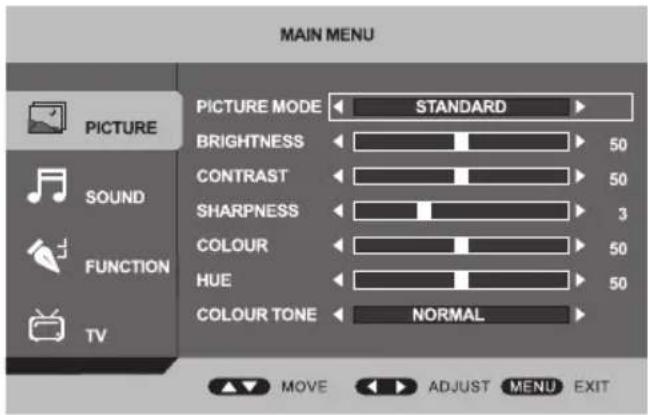
Description of settings:
Picture Mode: select the picture mode.
Brightness: adjust the brightness.
Contrast: adjust contrast ratio.
Sharpness: adjust the sharpness of the image.
Colour: adjust colour of the image.
HUE: adjust hue of the image.
Colour Tone: enter to the colour tone mode.
8.6 SOUND SETTINGS
- Press the "MENU" button on the remote control to enter the OSD menu,
then press "▲ / ▼" button to select the "Sound" menu. - Press the "▶" button to enter the "Sound" menu setting, use "▲ / ▼" to move the menu bar, and then press "◀ / ▶" button to adjust the value of selected item.
- Press "MENU" button to return to upper menu.
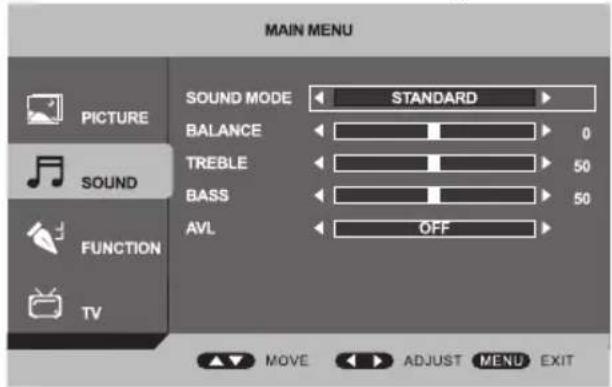
Description of settings:
Sound mode :select sound mode.
Balance:adjust balance of the sound.
Treble:adjust treble.
Bass:adjust the bass.
AVL:select the AVL function on/off.
8.7 FUNCTION SETTINGS
- Press the "MENU" button on the remote control to enter the OSD menu, then press "▲ / ▼" button to select the "Function" menu.
- Press the “▶” button to enter the “Function” menu setting, use “▲ / ▼” to move the menu bar, and then press “◀ / ▶” button to adjust the value of selected item.
- Press "MENU" button to return to upper menu.
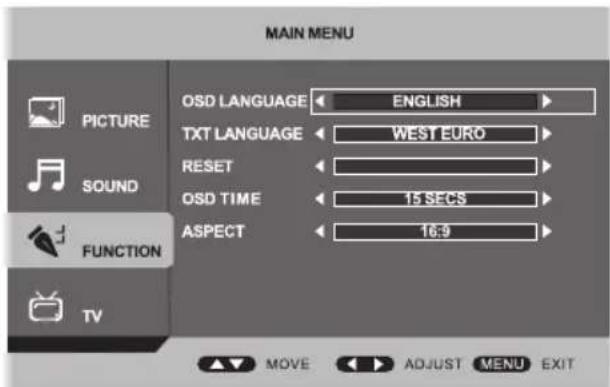
Description of settings:
OSD language :select the OSD language desired.
TXT language:select the TXT language desired.
Reset: recover factory setting..
OSD time:select the OSD time.
Aspect:select the display mode.
8.8 PC SETTINGS
Press the Source button and select PC, then use "▶" to enter into PC mode.
- Press the "PC" button on the remote control to enter the OSD menu, then press "▲ / ▼" button to select the "PC" menu.
- Press the "▶" button to enter the "PC" menu setting, use "▲ / ▼" to move the menu bar, and then press "◀ / ▶" button to adjust the value of selected item.
- Press "MENU" button to return to upper menu.
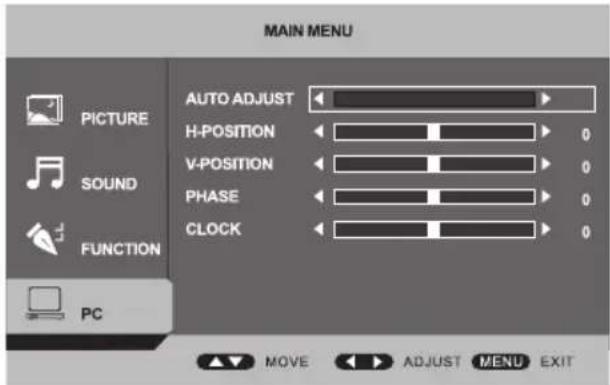
Auto adjust: Adjust VGA mode automatically.
H-Position: change the horizontal position of the image.
V-Position: change the vertical position of the image.
Phase: Adjust the display quality of the image.
Clock: conduct image stretching.
8.9 ELECTRONIC PROGRAMME GUIDE (EPG)
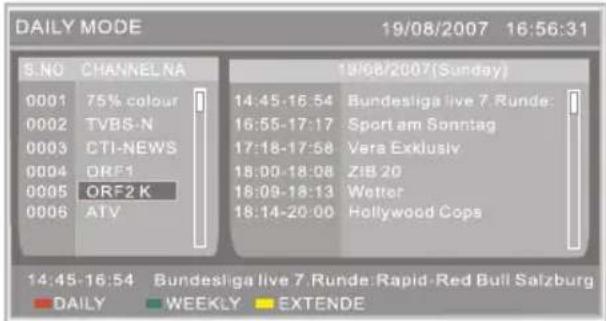
EPG can display all the information pertaining the programming of each channel.
Press the EPG key to display the information window about the programming of the channel you are watching.
Using the keys ▶ select between the Nome Canale window (to the left) or the information window of the programmes (to the right).
Using the keys ▼ selectthe channel orthe programme for which you search information. Using the RED key select the daily EPG mode and using the GREEN key the weekly mode. Once a programme is selected, using the YELLOW key, you can open a window with more information about the programme (to exit from this window, press the TV MENU key).
Once a programme is selected, using the BLUE key, you can set a scheduled recording (TIMER). A message will be displayed confirming the correct setting of the scheduled recording (Successfully updated) or a generic message of incorrect setting. An error in the setting of the scheduled recording occurs only when the programme you wish to record has already started.
Use the EXIT key to exit the EPG function.
8. 10 Teletext function
Press the ( TXT) button on the remote control to enable the Teletext function. To disable the function, press the button again.
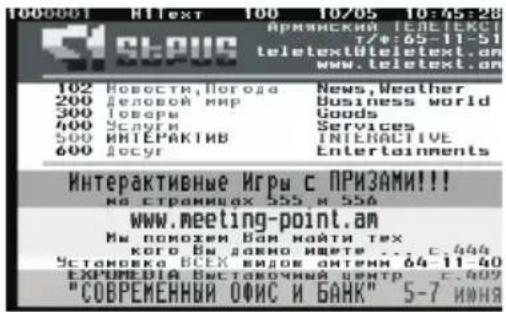
- Press (TXT) button to turn on the Teletext function press again to turn it off.
- Press the (Number) buttons to jump to different pages.
- Press the (CH+/-) buttons to go to the previous or next page.
8.11 OPERATIONS WITH USB DEVICE (MEDIA)
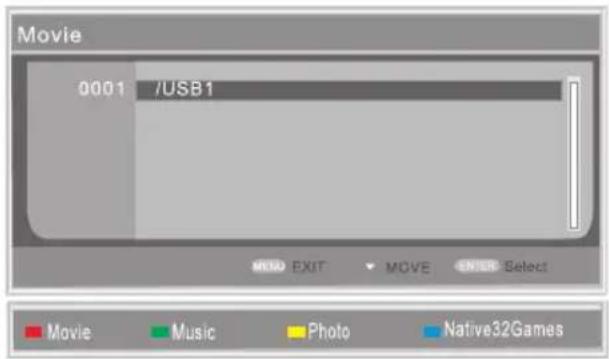
Warning: Before performing any operation, insert a USB device into the USB port on the side of the TV. Pressthe SOURCE keytoenterthe selection menu of the inputs. Usingthe ▼ keys, select the MEDIA input and confirm with OK. You can directly access the USB device by pressing the MEDIA key on the remote control. After a short pause in which the TV will check the contents of the USB device, a list of the partitions included in the USB device will be displayed. Select the device (normally USB1) and confirm with OK.
A window will be displayed showing all the folders (directories) available on the USB device. Using the coloured keys on the remote control you can select the type of file you wish to operate with (RED to display the video file, GREEN to listen to audio files, YELLOW to see image files, BLUE to play games that can be downloaded for free from the Internet). After having selected the type of file, with the selection keys 4 ▶▼ choose a folder and press OK to see the contents of the folder. Select the file you want to view/listen and confirm with OK. After having viewed or listened to afile, you can return to the previous menus by pressing the EXIT key until arriving to the MEDIA main menu.
1. PLAYBACK OF VIDEO FILES
While playing a video file, pressing the DISPLAY key will display a window with information for playback.
2.PLAYBACK OF AUDIO FILES
While playing an audio file, a window will be displayed containing all the information available on the file.
3.PLAYING IMAGE FILES
While playing an image file, pressing the DISPLAY key will display awindowwith information on the file being viewed. Using the selection keys 4 ▶▼ you can rotate, mirror or reverse the image.
4. Native32 Games Player
The user can play Games via this player. In left interface you can press to ▲ ▼ select your desired game and press Enter to play.
While the Music is playing, you can operate as below:
Press to ◀▶▲▼ play games.
Press ■ to return the upper menu.
8.12 TV RECORDING
You can record a proaram while watching it from DTV input (digital TV).
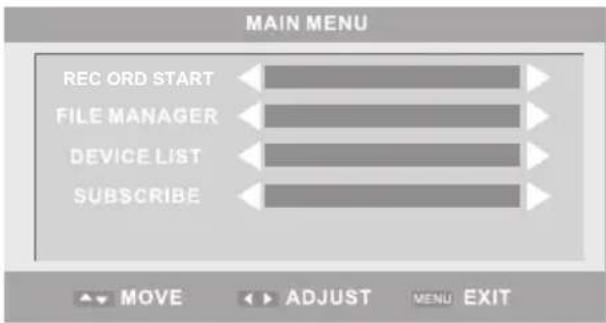
Pressing the key ●, the MENU REG. window will open with the following items:
INIZIA REGIS: press ENTER to start the immediate recording of the programme viewed. A small window will be displayed on the TV with the text message REGISTRAZIO.
FILE MANAGER: here you can manage the files present on the selected USB device; a list with the contents of the USB device will be displayed, using the selection keys
choose a file on which the following operations can be performed: RED key plays the selected file in the box on the right; the GREEN key deletes the file; the YELLOW key deletes all files present on the device; the BLUE key plays in full screen t h e selected file. If you want to delete one or more files, a confirmation of the operation will be requested. Select YES and press ENTER.
LISTA DISPOS: displays a list of the present devices.
SOTTOSCRIVI: allows the scheduled recording (TIMER) of a programme. Select a number you wish to associate to a programming (TIMER N.); select the type of programming (CHIUSA=no programming, UNA VOLTA=programming of an event,
GIORNALIERO=daily programming of an event, SETTIMANALE=weekly programming of an event); select the channel (CANALE SVEGLIA); select the date (DATA SVEGLIA); select the start time (ORA ACC); select the duration in hours and minutes (DURATA).
To stop recording, press the key ●gain. You will be asked to confirm the operation (select YES and press ENTER).
While making a recording you cannot change the channel.
If there is not enough space on the USB device, the TV will display an error message. In this case, using the functions of the FILE MANAGER, delete files to recover disk space. Warning: Deleted files cannot be restored.
The TV may signal there is slow data transfer on the USB device (Device speed not enough, RECORD anyway?). You can record by confirming (select YES and press ENTER), but there might be errors while transferring data from the TV to the USB device. Get a high-speed USB device.
You cannot record from encrypted pay channels.
8.13 HOTEL MODE
To enter Menu Hotel press the SOURCE button and enter code 4588.
It will activate a window with the following entries:
HOTEL GENERAL LOCK: You can activate or deactivate the Hotel (On / Off).
ASPECT RATIO LOCK: blocks the appearance of the image on TV
POWER ON SOURCE SET: Allows you to lock the TV on only one input.
DEFAULT VOLUME SET: You can set the volume at which you turn on your TV.
MAXIMAL VOLUME SET: Sets the maximum volume level.
CHANNEL SCAN LOCK: To prohibit access to the channel search function.
PICTURE USER LOCK: inhibits the image adjustment controls.
POWER ON STANDBY.
KEYPAD LOCK: functional lock on the keyboard TV
9. TROUBLESHOOTING
Carry out the problem-solving measures described in the following section before contacting Customer Support. Turn off the device immediately as soon as you suspect a malfunction and unplug the power plug. Do not attempt to repair the device yourself.
| SYMPTOM | CHECK ITEM |
| LED screen stays dark. | Make sure the unit is turned on and the connections are correct.Make sure the power adapter is correctly connected. |
| There is no sound. | Make sure the system connection is correct.Make sure the power of speakers is turned on. |
| There is no picture or picture move up and down unsteady. | Check if the connections with the external AV signal source are correct.Correctly set the items in the picture menu.Check if the video type input signal is not corresponding to the unit.Make sure the unit is turned on and in correct video type. |
| The remote control does not work. | Make sure there are no obstructions between the remote control and the unit.Make sure the remote control is pointing at the unit. Make sure the batteries are inserted or the polarity is correct. Make sure the batteries are not weak.Replace the weak battery. |
10 SPECIFICATIONS
Power
Consumption
Display
Display Screen Size
Max Resolution
Brightness
Contrast
Connecting
DC 12V
Max 25 W / Stand-by <1 W
13.3 "LCD
13.3"(33.78 cm) 16:10
1280X800 dpi
275 cd/m2
500:1
HDMI VGA SCART
Composite Video XPbPr / S-Video
Stereo Audio PC Audio USB input
Headphone Jack output
External antenna jack
PAL / SECAM
PAL / NTSC
2X3 W
800x600 dpi / 60 Hz
1024x768 dpi / 60Hz
1280x720 dpi/60 Hz
1280x768 dpi/60 Hz
TV System
Video Formats
VGA Output Resolution
HDMI Resolution
Dimensions with stand
Dimensions without stand Dimensions
Weight
576i, 576p 720p
330 (L) x 280 (H) x 130 (D) mm
330 (L) × 255 (H) × 70 (D) mm
1.4 Kg


- PREFAZIONE
- UTILIZZO CON ALIMENTAZIONE DC12V DA IMPIANTO AUTO/CAMPER TRAMITE
- ADATTATORE AUTO
- COLLEGAMENTO TRAMITE CAVO RCA A/V o Y/Pb/Pr
- COLLEGAMENTO TRAMITE CAVO HDMI
- TELEVISIONE DIGITALE TERRESTRE (DTV)
- Safety instructions
- CAUTION
- WARNING
- NOTES.
- Accessories
- CONTROLS AND CONNECTIONS TELEVISION
- REMOTE CONTROL
- INSTALLATION
- DESCRIPTION OF CONTROLS
- INSTALLATION AND CONNECTIONS
- POWER
- Connecting to TV-Signal Input
- Connecting SCART
- 4 Connecting cable RCA AV or Y/Pb/Pr
- Connecting to PC
- Connecting to HDMI
- USB Device Connection
- 8.TV OPERATION
- 8.1ANALOGUE TV
- ANALOGUE TV CHANGE MENU LANGUAGE
- AUTOMATIC CHANNELSEARCH
- CHANNEL SHIFTING
- MANUAL CHANNEL SEARCH
- DIGITAL TERRESTRIAL TV (DTV)
- AUTOMATIC CHANNEL SEARCH
- CHANNEL SHIFTING
- LCN Function
- MANUAL CHANNEL SEARCH
- CHANNEL SHIFTINGSTORED CHANNEL DISPLAY
- VOLUME ADJUSTMENT
- PICTURE SETTINGS
- SOUND SETTINGS
- FUNCTION SETTINGS
- PC SETTINGS
- ELECTRONIC PROGRAMME GUIDE (EPG)
- 10 Teletext function
- OPERATIONS WITH USB DEVICE (MEDIA)
- PLAYBACK OF VIDEO FILES
- 2.PLAYBACK OF AUDIO FILES
- 3.PLAYING IMAGE FILES
- Native32 Games Player
- TV RECORDING
- HOTEL MODE
- TROUBLESHOOTING
- SPECIFICATIONS
Brand : Trevi
Model : LTV 2513 CI
Category : TV