
BTM17.3SS - Microwave BAUMATIC - Free user manual and instructions
Find the device manual for free BTM17.3SS BAUMATIC in PDF.


| Product Type | Microwave Oven |
| Brand | Baumatic |
| Model | BTM17.3SS |
| Exterior Color / Material | Stainless Steel |
| Outside Dimensions (H x W x D) | 295 mm x 458 mm x 380 mm |
| Oven Cavity Dimensions (H x W x D) | 206 mm x 300 mm x 284 mm |
| Oven Capacity | 17 Liters |
| Net Weight | 13.7 kg |
| Power Supply | 230V ~ 50Hz |
| Power Consumption | 1200 W |
| Rated Microwave Power Output | 700 W |
| Operation Frequency | 2450 MHz |
| Turntable Diameter | 270 mm |
| Number of Auto Cook Menus | 8 (Milk/Coffee, Rice, Spaghetti, Potatoes, Auto Reheat, Fish, Popcorn, Pizza) |
| Auto Defrost | Yes, by weight (100-2700 g) |
| Quick Start | Yes, 30-second increments at 100% power |
| Clock Function | Yes, 12-hour display |
| Child Safety Lock | Yes |
| Control Type | Pushbutton with LED display and rotary dial |
| Door Safety Interlocks | Yes |
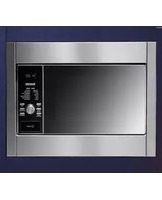
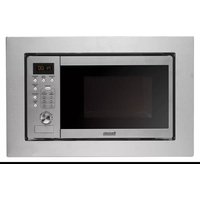
| Optional Building-In Kit | BMK1SS (Stainless Steel) |
| Cavity Material | Stainless Steel |
| Guarantee | 12 months (extendable to 24 months upon registration), 5-year parts warranty |
Frequently Asked Questions - BTM17.3SS BAUMATIC
User questions about BTM17.3SS BAUMATIC
0 question about this device. Answer the ones you know or ask your own.
Ask a new question about this device
Download the instructions for your Microwave in PDF format for free! Find your manual BTM17.3SS - BAUMATIC and take your electronic device back in hand. On this page are published all the documents necessary for the use of your device. BTM17.3SS by BAUMATIC.
USER MANUAL BTM17.3SS BAUMATIC
BTM17.3SS Microwave oven
Instruction manual
User Instruction Manual for your
BTM17.3SS MICROWAVE
natural_image
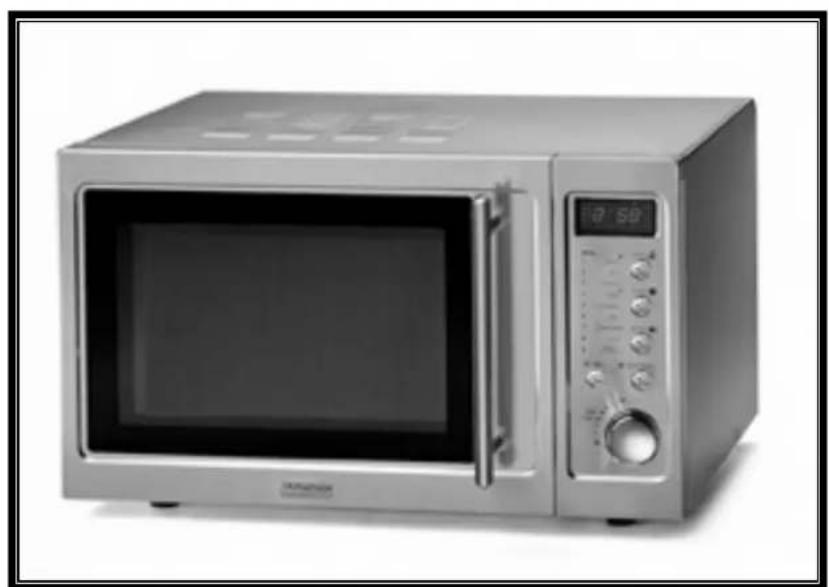
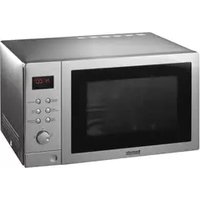
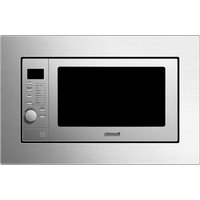
Exterior view of a modern microwave oven with open door and control panel (no visible text or symbols)NOTE: MODEL MAY BE DIFFERENT FROM ABOVE PICTURE
IMPORTANT: PLEASE READ THESE INSTRUCTIONS CAREFULLY BEFORE USING YOUR MICROWAVE OVEN. IF YOU FOLLOW THE INSTRUCTIONS, YOUR OVEN WILL GIVE YOU MANY YEARS OF GOOD, SAFE SERVICE. PLEASE KEEP THIS MANUAL SAFELY FOR FUTURE REFERENCE.

* NOTE: This manual is designed to be used either as a whole or to be used for quick set-up so you can get using your appliance as soon as possible.
For QUICKFIRE VERSION OF THIS MANUAL, you can GO DIRECTLY TO PAGE 17. Please also quickly see the IMPORTANT PAGES. They are marked in bold on the next page.
DD 18/12/07
Contents
Specifications....3
Safety Information 4-5
Environmental Note ....5
Avoiding Exposure to Microwave Energy......6
Never Use Your Microwave Oven to: ....7
Your Baumatic Microwave Oven 8
Placing your Microwave Oven 9
Installing your Microwave Oven ....10-13
Before you Start Cooking with your Microwave....14-15
Materials that you CAN use in your Microwave......16 Materials that you CAN'T use in your Microwave ......17
Setting your Microwave's Clock ....18
Notes on Microwaving Food ....19
Using your Microwave Oven 20-25
Child Lock Function......26
Cleaning 27
Troubleshooting 28-31
Conditions of Guarantee ....32
Contact Details....33
| Power Consumption: | 230V~50Hz, 1200W(Microwave) |
| Rated Microwave Power Output: | 700W |
| Operation Frequency: | 2450MHz |
| Outside Dimensions: | 295mm(H)x458mm(W)x380mm(D) |
| Oven Cavity Dimensions: | 206mm(H)x300mm(W)x284mm(D) |
| Oven Capacity: | 17Litres |
| Cooking Uniformity: | Turntable System{Φ270mm} |
| Net Weight: | Approx.13.7kg |
Your Baumatic BTM17.3SS Microwave has:
√ 8 Functions
- Milk / Coffee; 2. Rice; 3. Spaghetti; 4. Potatoes; 5. Auto Reheat; 6. Fish; 7. Popcorn; 8. Pizza;
√ LED full programmer
√ Pushbutton control operation
√ Child Safety Lock
√ Stainless Steel Exterior & Cavity
Optional Extra:
BMK1SS - Stainless Steel building-in kit.
Cooking Features:
√ General (see pages 17 & 18)
√ Quick Start (see page 19)
√ Auto Cooking (see page 20)
√ Auto Defrost (see page 21)
PLEASE READ BEFORE USING!
(To reduce the risk of fire, electric shock, injury or exposure to Mircowave energy)
ELECTRICAL SAFETY
CE This appliance complies with Directives 89/336/EEC, 73/23/EEC and following changes.
NOTE - This appliance must be grounded. In the event of a malfunction or breakdown, grounding will reduce the risk of electric shock by providing a path of least resistance of electrical current. You will be able to tell if it is because a non-grounded appliance will give off an electrical discharge. Your Microwave's plug must have a grounding pin and if you use an extension cord, this must have a 3-pin inlet/outlet as well as carry the same rating or greater than your microwave. Only connect to a properly grounded outlet.
- Manufacturer declines all responsibility for any damage due to non-grounding of appliance.
- DURING THE GUARANTEE PERIOD ONLY BAUMATIC SERVICE ENGINEERS OR AN AUTHORISED AGENT OF BAUMATIC SHOULD CARRY OUT REPAIRS ON THIS UNIT. THEREAFTER, IT SHOULD BE SERVICED ONLY BY QUALIFIED TECHNICIANS.
- DO NOT USE IF THE SUPPLY CORD IS DAMAGED OR IF IT HAS BEEN IMMERSED IN WATER.
• DO NOT USE IF THE OVEN HAS BEEN DAMAGED OR DROPPED.
- KEEP CORD AWAY FROM HEAT SOURCES.
• DON'T LET THE CORD HANG OVER THE EDGE OF TABLE.
- DO NOT USE YOUR MICROWAVE OUTDOORS OR NEAR A KITCHEN SINK, SWIMMING POOL, IN A WET BASEMENT OR ANYWHERE CLOSE TO A SOURCE OF WATER.
- NEVER TRY TO DISASSEMBLE OR REPAIR YOUR MICROWAVE – IT RETAINS A HIGH POWER VOLTAGE CHARGE EVEN WHEN UNPLUGGED!
GENERAL SAFETY
- READ AND FOLLOW THE "PRECAUTIONS TO AVOID POSSIBLE EXPOSURE TO EXCESSIVE MICROWAVE ENERGY" (Page 6).
• AS WITH MOST COOKING APPLIANCES, CLOSE SUPERVISION IS NEEDED TO REDUCE THE RISK OF FIRE IN YOUR MICROWAVE OVEN.
- SHOULD A FIRE START: 1) KEEP THE OVEN DOOR CLOSED. 2) TURN THE OVEN OFF & UNPLUG THE APPLIANCE. 3) DISCONNECT THE POWER AT THE FUSE OR CIRCUIT BREAKER PANEL.
• ONLY EVER USE YOUR MICROWAVE FOR ITS INTENDED USE (HEATING FOODS) AND NEVER FOR INDUSTRIAL OR LABORATORY PURPOSES.
• COOKING UTENSILS & DISHES WILL BE HOT WHEN YOU TAKE THEM OUT AFTER COOKING - HANDLE WITH CARE!
- NEVER USE CORROSIVE CHEMICALS OR VAPOURS IN YOUR MICROWAVE. WHEN YOU CLEAN THE DOOR AND OVEN SURFACES, USE ONLY MILD, NONABRAISIVE SOAPS OR DETERGENTS APPLIED WITH A SPONGE OR SOFT CLOTH.
• DO NOT COVER OR BLOCK ANY VENTS ON THE OVEN.
This appliance is marked according to the European directive 2002/96/EC on Waste electrical and Electronic Equipment (WEEE). By ensuring this product is disposed of correctly, you will help prevent potential negative consequences for the environment and human health, which could otherwise be caused by inappropriate waste handling of this product.
The symbol on the product, or on the documents accompanying the product, indicates that this appliance may not be treated as household waste. Instead it shall be handed over to the applicable collection point for the recycling of electrical and electronic equipment.
Disposal must be carried out in accordance with local environmental regulations for waste disposal.
For more detailed information about treatment, recovery and recycling of this product, please contact your local city office, your household waste disposal service or the shop where you purchased the product.

natural_image
Simple line drawing of a mechanical device with cross-shaped components and a rectangular base (no text or symbols)AVOIDING POSSIBLE EXPOSURE TO EXCESSIVE MICROWAVE ENERGY

IMPORTANT NOTES ABOUT MICROWAVE ENERGY – READING THESE PRECAUTIONS WILL HELP YOU TO AVOID POSSIBLE EXPOSURE TO MICROWAVE ENERGY
NEVER ATTEMPT TO USE YOUR OVEN WITH THE DOOR OPEN. THE DOOR MUST BE FULLY CLOSED EVERY TIME YOU OPERATE YOUR OVEN OTHERWISE YOU RISK EXPOSING YOURSELF AND OTHERS TO HARMFUL MICROWAVE ENERGY.
YOUR MICROWAVE IS FITTED WITH SAFETY INTERLOCKS. IT IS VERY IMPORTANT THAT THESE ARE NEVER TAMPERED WITH!
DO NOT PLACE ANY OBJECT BETWEEN THE OVEN'S DOOR AND THE DOORWAY (FRONT FACE). NEVER ALLOW DIRT, FOOD OR CLEANER RESIDUE TO ACCUMULATE ON THE SEALING SURFACES BETWEEN THE INSIDE OF THE DOOR AND THE PART OF THE DOORWAY WHERE IT MEETS.
YOUR MICROWAVE HAS SEVERAL BUILT-IN SAFETY SWITCHES TO ENSURE THE POWER REMAINS OFF WHEN THE DOOR IS OPEN. NEVER TAMPER WITH THESE SWITCHES.
NEVER TRY TO OPERATE A DAMAGED MICROWAVE OVEN. APART FROM MAKING SURE THAT THE OVEN DOOR CAN CLOSE PROPERLY, YOU NEED TO ALSO CHECK THAT THERE IS NO DAMAGE TO THE:
1) DOOR (EG. DENTED)
2) HINGES & LATCHES (BROKEN OR LOOSENED)
3) DOOR SEALS & SEALING SURFACES
REMEMBER THAT YOUR MICROWAVE OVEN SHOULD NOT BE ADJUSTED OR REPAIRED BY ANYONE BUT A QUALIFIED SERVICE TECHNICIAN.
NEVER USE THE INTERIOR OF YOUR MICROWAVE OVEN FOR STORAGE PURPOSES. NEVER STORE COMBUSTIBLE ITEMS SUCH AS BREAD, COOKIES, PAPER PRODUCTS, ETC. INSIDE THE OVEN TO FACILITATE COOKING. ACCIDENTAL OPERATION CAN CAUSE THESE ITEMS TO GO ON FIRE AND DO DAMAGE TO YOUR MICROWAVE, THEREBY PUTTING YOU AT RISK IF YOU USE IT WHILE IT IS DAMAGED.
A note on the type of energy used by your Microwave Oven
Microwaves are electromagnetic waves that transmit energy. When cooking, the microwave energy penetrates food to a depth of 4cm (1½ inches), causing its molecules to vibrate. The heat produced by this friction enables food to be heated, cooked or defrosted.
How quickly a microwave oven cooks will depend on the size, quality and shape of the food being cooked. Microwave cooking is healthy in that, without the need for large amounts of cooking liquid, it means that food retains vitamins, nutrients, aromas and flavour.
Microwave Ovens are also more energy efficient than conventional cooking because they use up to 70% less energy.
Never use your Microwave Oven to:

☒ Dry clothes or fabrics
☒ Dry or warm up pets or live animals
☒ Warm or heat any item other than food and the appropriate utensil
☒ Cook sealed containers
☒ Cook items where you have placed a liquid or mercury thermometer (eg. Inside roasts or turkeys)
☒ Heat large quantities of cooking oil (fondue or deep frying) or drinks with high alcohol contents
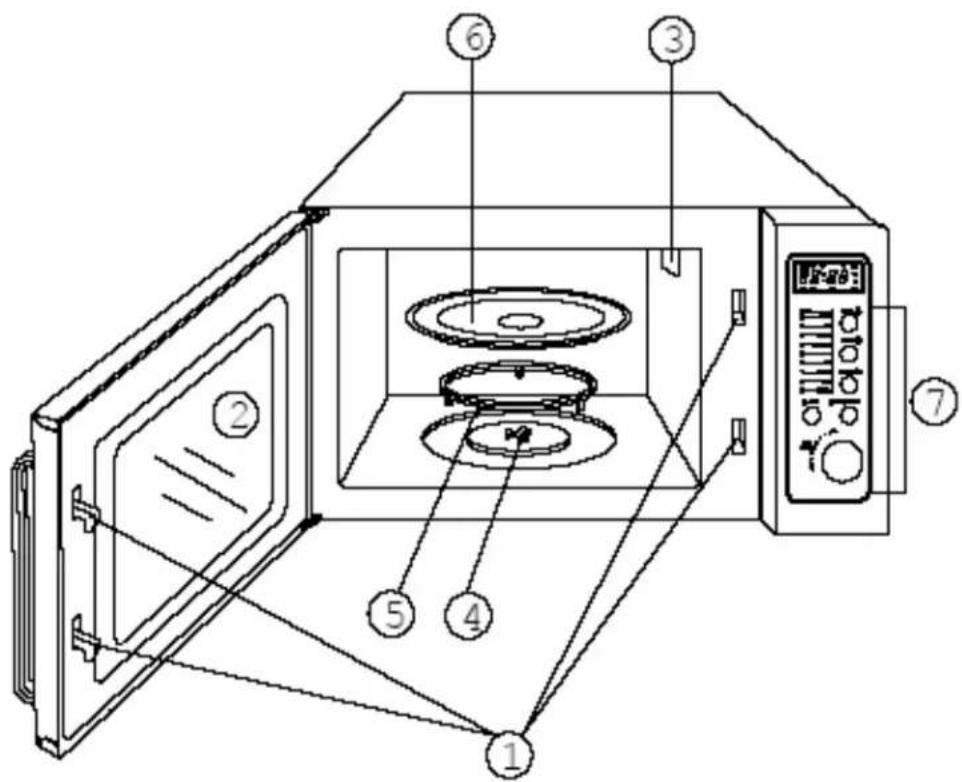
1) Safety Interlock System
2) Observation Window
3) Oven Air Vent
4) Turntable Shaft
5) Turntable Ring Assembly
6) Glass Tray
7) Control Panel
TURNTABLE INSTALLATION
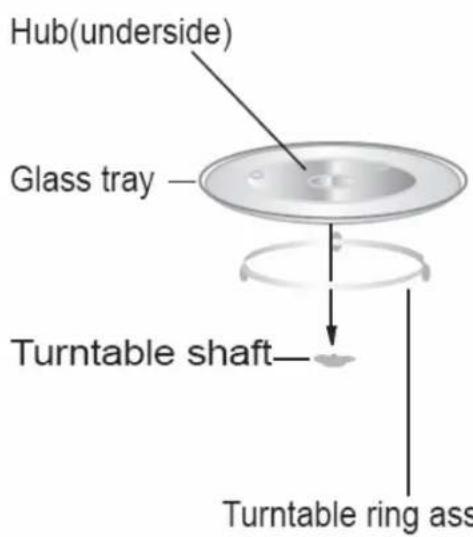
a. Never place the glass tray upside down. The glass tray should never be restricted.
b. Both glass tray and turntable ring assembly must always be used during cooking.
c. All food and containers of food should always placed on the glass tray for cooking.
d. The glass tray rotates clockwise; this is normal.
e. If glass tray or turntable ring assembly cracks or breaks, contact your nearest authorised service centre.
ONCE YOU ARE SURE THAT YOUR OVEN IS NOT DAMAGED (EG. DENTS OR A BROKEN DOOR) AND THAT THERE ARE NO PACKING MATERIALS AND ACCESSORIES INSIDE IT, YOU CAN THEN INSTALL IT ON A FLAT SURFACE SUCH AS A COUNTERTOP. BE SURE THAT THE SURFACE CAN HOLD AT LEAST YOUR MICROWAVE'S WEIGHT (13.7 kg).
BEFORE PLACING ON YOUR COUNTERTOP: REMOVE ANY PROTECTIVE FILM ON THE CABINET SURFACE.
- BUT DO NOT REMOVE THE LIGHT BROWN MICA COVER THAT IS SCREWED TO THE OVEN CAVITY TO PROTECT THE MAGNETRON.
☐ FIND A LEVEL SURFACE THAT PROVIDES ENOUGH OPEN SPACE FOR THE INTAKE AND OUTLET VENTS.
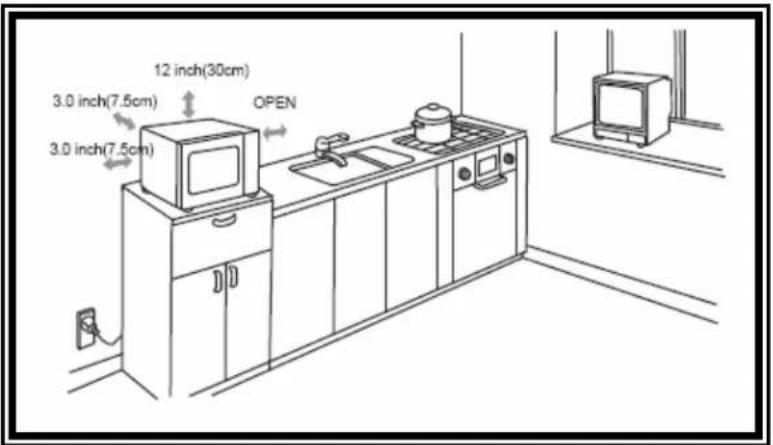
NOTE:
For in-unit installation, please see next page.

- YOU NEED TO LEAVE A MINIMUM OF 3.0 INCHES (7.5 CM) BETWEEN THE OVEN AND ANY ADJACENT WALL. ONE SIDE MUST BE LEFT OPEN FOR PROPER AIR FLOW.
- LEAVE A MINIMUM CLEARANCE OF 1 14'' INCHES (3.0CM) ABOVE THE OVEN.
- DO NOT REMOVE THE LEGS FROM THE BOTTOM OF THE OVEN.
- DON'T LET ANYTHING BLOCK EITHER THE INTAKE OR THE OUTLET OPENINGS AS THIS CAN DAMAGE THE OVEN.
○ PLACE YOUR MICROWAVE OVEN AS FAR AWAY AS POSSIBLE FROM RADIOS AND TELEVISIONS - YOUR OVEN MAY CAUSE SIGNAL INTERFERENCE.
UNLESS YOU ARE INSTALLING YOUR MICROWAVE IN ACCORDANCE WITH THE INSTALLATION INSTRUCTIONS ON PAGE 10. DO NOT PUT YOUR OVEN ON TOP OF ANY OTHER HEAT-PRODUCING APPLIANCE OR A RANGE COOKTOP. DOING SO COULD DAMAGE YOUR OVEN AND MAKE THE WARRANTY VOID.
BMK1SS
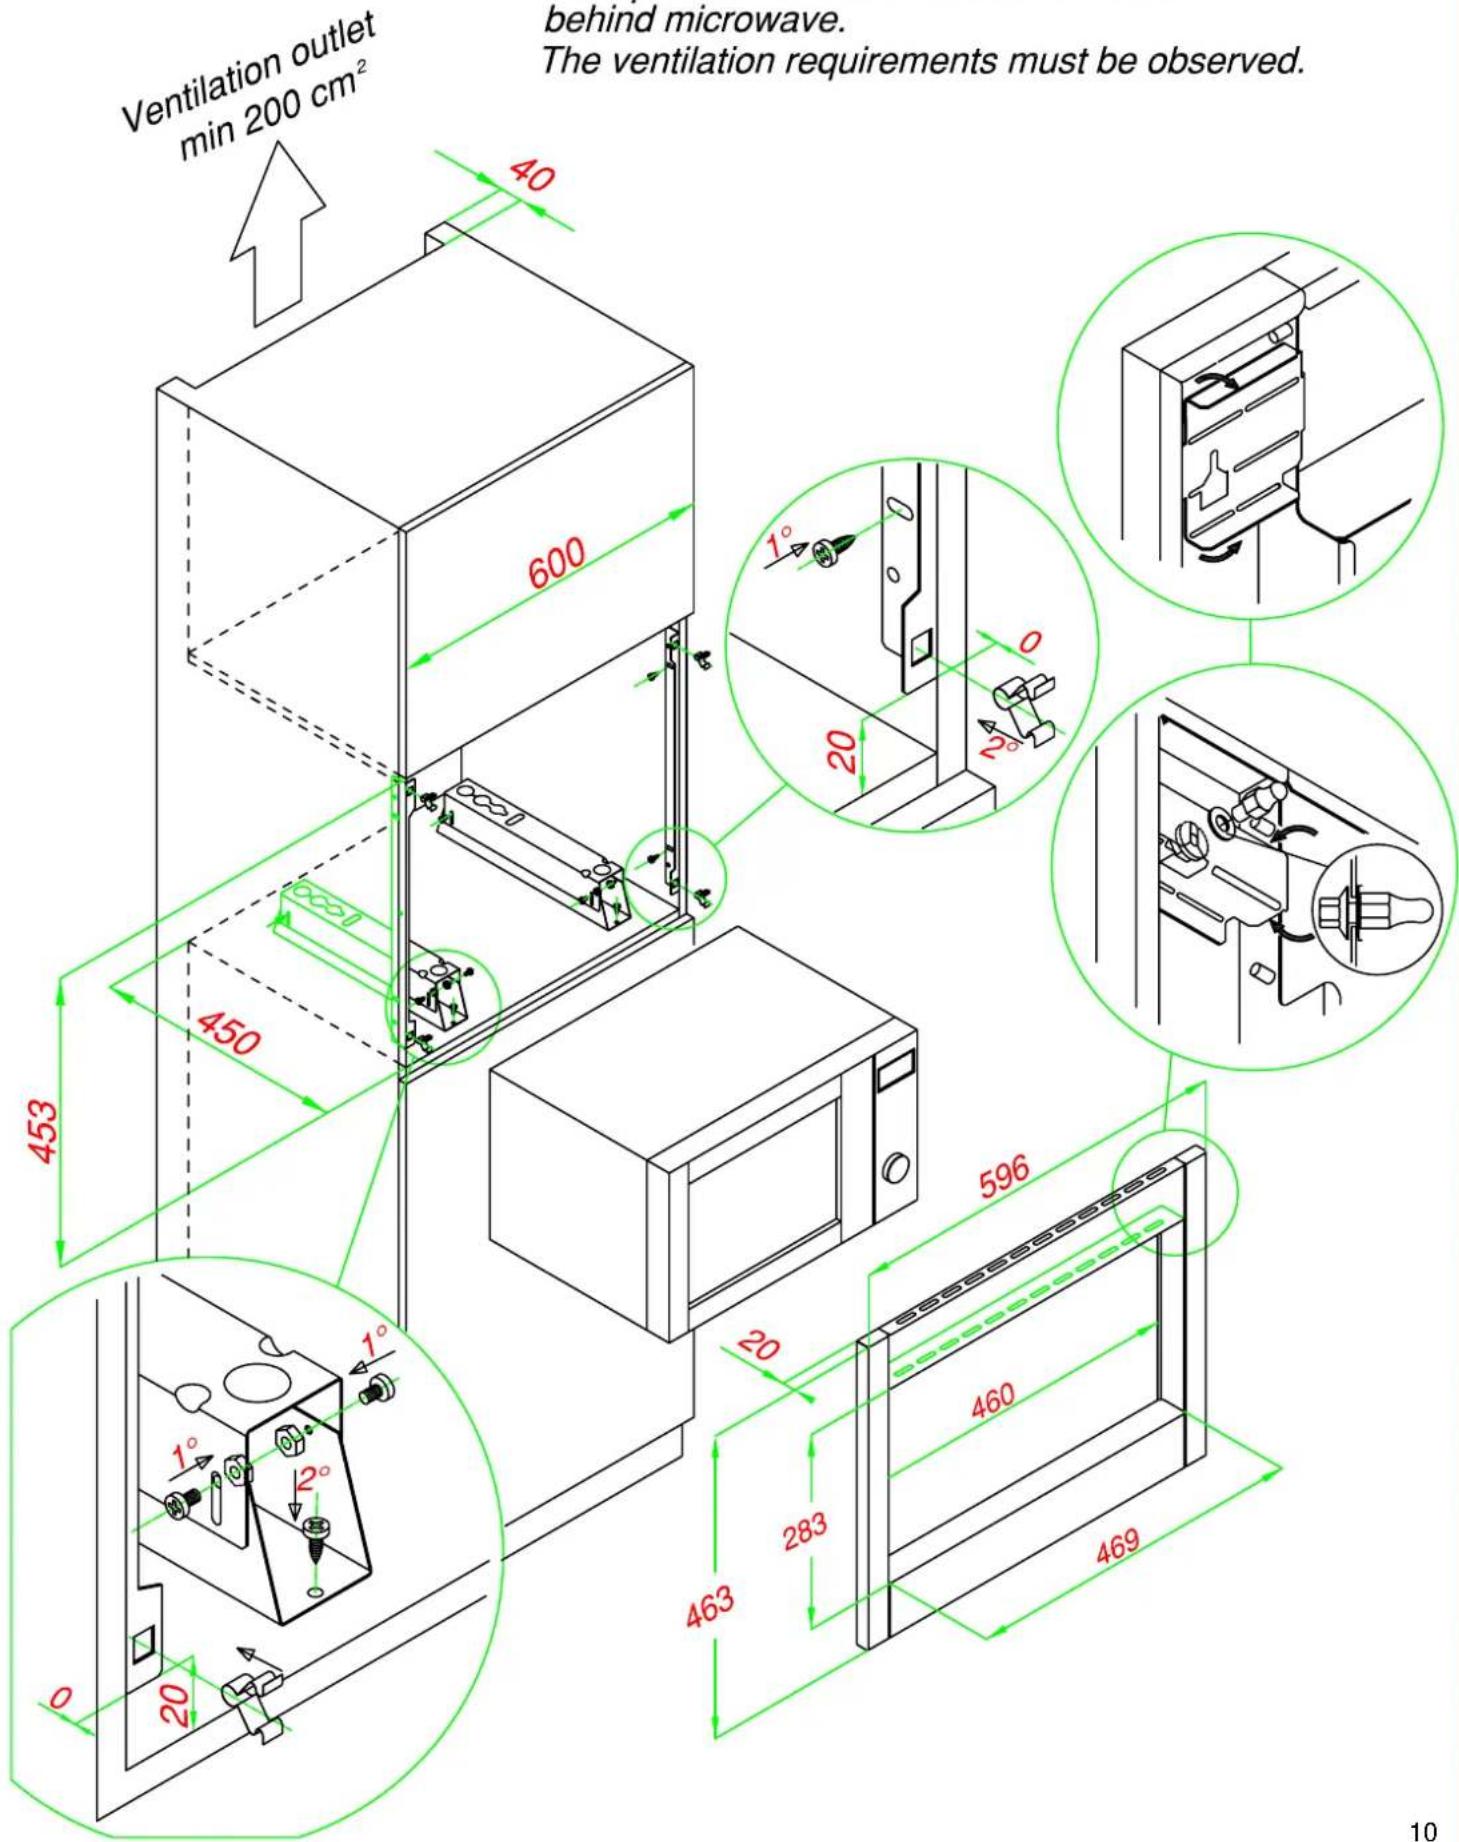
INSTALLATION REQUIREMENTS
IMPORTANT:
Rear panel of cabinet must be removed
behind microwave.
The ventilation requirements must be observed.
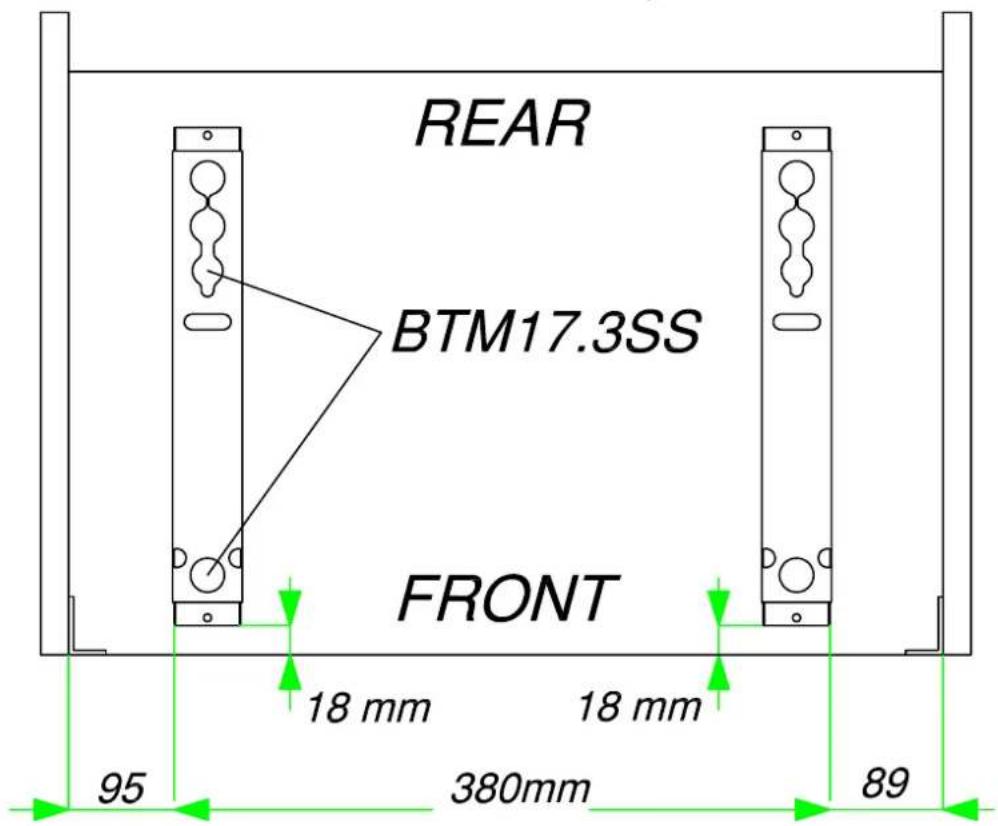
BTM17.3SS

Built under installation for your microwave.
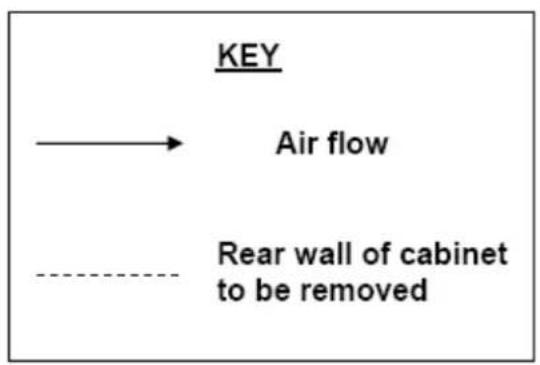
flowchart
graph TD
    A["KEY"] --> B["Air flow"]
    B --> C["Rear wall of cabinet to be removed"]
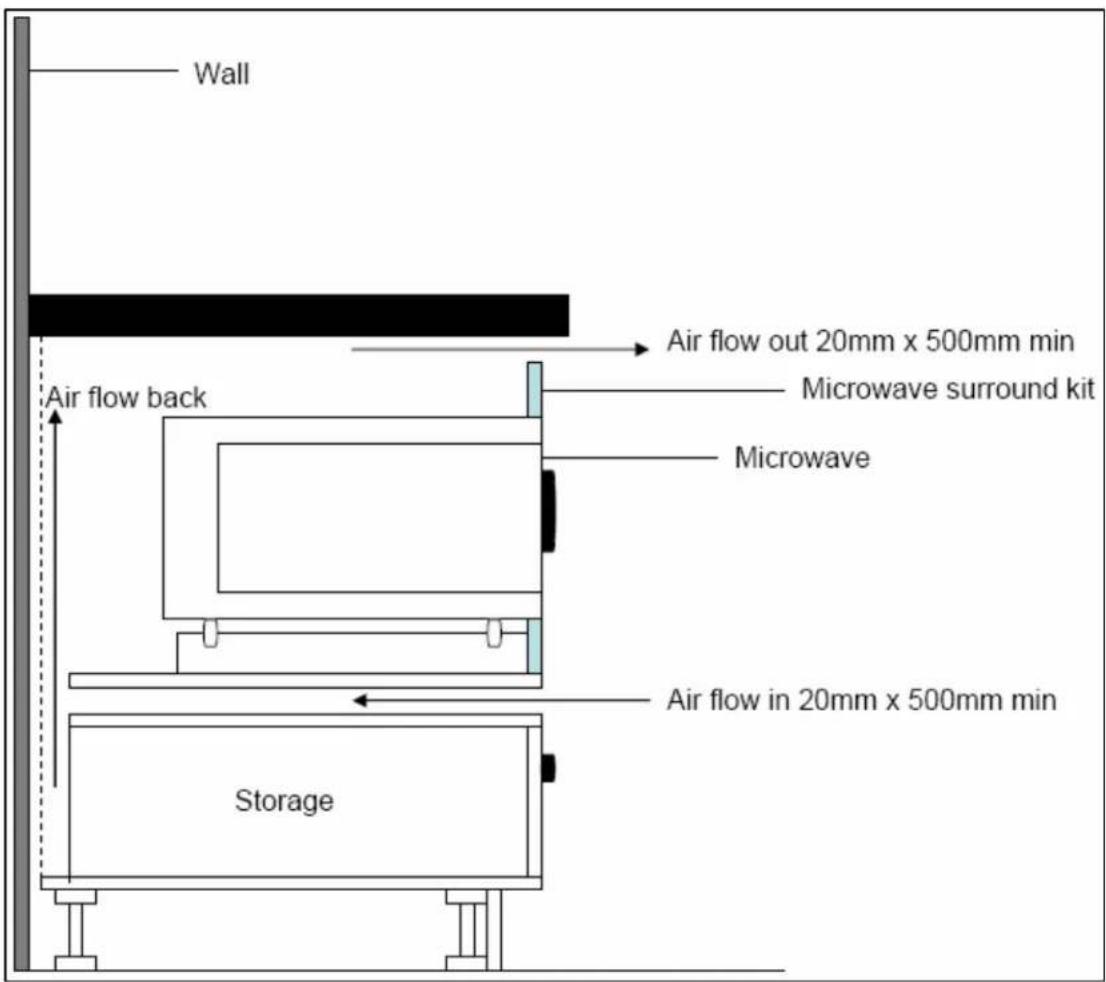
IMPORTANT: NO OTHER METHODS OF BUILDING UNDER THE MICROWAVE ARE SANCTIONED BY BAUMATIC.
Built under installation for your microwave.
It is possible to build your microwave under a worktop; however the following installation MUST be followed:-
- The rear wall of the housing unit MUST be removed to allow there to be the correct amount of ventilation.
- The ventilation gaps below the support shelf and below the worktop MUST be adhered to.
- The appropriate Baumatic Microwave Building In Kit MUST be fitted.
- An induction hob MUST NOT be fitted above the microwave.
- It is not necessary for there to be a storage drawer fitted underneath the microwave; this is shown purely as an example in the drawing on the preceding page.
- WARNING: The microwave will get hot during operation; care should be taken not to accidentally come into contact with the outer surface.
- WARNING: Children should not be allowed near to the appliance unsupervised.

PLEASE REMEMBER: NOT ALL FOODS AND UTENSILS ARE SUITABLE for use in MICROWAVE OVENS.
➢ Eggs in their shell or whole hard-boiled eggs since they may explode, even after your Microwave has stopped heating them.
home canning have reached the required boiling temperature.
Foods that need deep-frying: your Microwave cannot deep-fry and is liable to present a fire hazard if you attempt to deep fry with it.
Narrow-necked containers like syrup bottles – the neck could explode.
➢ Never use your Microwave when it is empty. This is a fire hazard.
Sealed liquids and food containers – these will almost certainly explode – NEVER PLACE THEM IN YOUR MICROWAVE!
➢ Foods that you intend to can at home. There is no way of ensuring that foods intended for
And please be careful with ...

Heating liquids and drinks: when you heat liquid using a Microwave, part of the liquid can exceed boiling point. Its surface tension is such that it will be susceptible to upward surges. To avoid the risk of being scalded, always handle bowls and cups of heated liquid steadily and carefully. PLEASE SEE NEXT PAGE FOR FURTHER ADVICE TO AVOID SCALDING!
You can reduce the chances of this happening further by
- Avoiding using straight-sided containers with narrow necks.
- Not overheating.
- Stirring the liquid before placing the container in the oven and again halfway through the heating time.
- After heating, allow to stand in the oven for a short time, stirring again before carefully removing the container, using a cloth or oven glove.
Likewise, if you are heating feeding bottles and baby food jars always stir or shake them and then check the temperature before you serve them, to avoid burns. Remember that babies can be easily scalded!
- If you are cooking bacon, do not place it directly on the turntable as excessive heating may make the turntable likely to break.
Bagged Popcorn – always read the manufacturer's guidelines before Microwaving bagged popcorn.
Always pierce foods with non-porous skins to reduce the risk of them bursting from inside steam build-up; eg: apples, potatoes, chicken livers and egg yolks.
Be sure to make checks on your food during operation to avoid burning and excessive cooking.
Always be careful when opening partially sealed containers – there is the risk of steam escaping.
TO TEST WHETHER YOUR UTENSIL IS MICROWAVE SAFE, YOU CAN CONDUCT THE FOLLOWING TEST:
- Fill a microwave-safe container with 1 cup of cold water (250ml) along with the utensil in question.
- Cook on maximum power for 1 minute (no longer than this).
- Carefully feel the utensil; if it is warm, do NOT use it for microwave cooking.


Materials that you CAN use in your microwave:
| Utensil | Remarks |
| Browning dish | Follow manufacturer's instructions. The bottom of the browning dish must be at least 3/16^ths inch (5mm) above the turntable. Incorrect usage may cause the turntable to break. |
| Dinnerware | Microwave-safe only. Follow the manufacturer's instructions. Do not use cracked or chipped dishes. |
| Glass jars | Always remove lid. Use only to warm food. Most glass jars are not heat resistant and may break. |
| Glassware | Heat-resistant oven glassware only. Make sure there is no metallic trim. Do not use cracked or chipped dishes. |
| Oven cooking bags | Follow manufacturer's instructions. Do not close with metal ties. Make slits to let steam escape. |
| Paper Towels | Use to cover food for reheating and absorbing fat. Use with supervision for short-term cooking only. |
| Paper Plates and Cups | Use for short-term cooking/warming only. Do not leave oven unattended while cooking. |
| Parchment | Use as a cover to prevent splattering or a wrap for steaming. |
| Plastic | Microwave-safe only. Follow the manufacturer's instructions. Should be labelled 'Microwave Safe'. Some plastic containers soften as the food inside gets hot. 'Boiling bags' and tightly closed plastic bags should be slit, pierced or vented as directed by the package. |
| Plastic Wrap / Cling Film | Microwave-safe only. Use to cover food during cooking to retain moisture. Do not allow plastic wrap to touch food. |
| Thermometers | Microwave-safe only (meat & candy thermometers). |
| Wax Paper | Use as a cover to prevent splattering and to retain moisture. |
Materials that you CAN'T use in your Microwave:
| Utensil | Remark |
| Aluminium trays & foil | May cause arcing. Transfer food into microwave-safe dish. |
| Food carton with metal handles | May cause arcing. Transfer food into microwave-safe dish. |
| Metal / metal-trimmed utensils | Metal shields the food from microwave energy. Metal trim may also cause arcing. |
| Metal twist ties | May cause arcing & could cause a fire in the oven. |
| Paper bags | May cause a fire in the oven. Always be careful with paper. |
| Plastic foam | Plastic foam may melt or contaminate the liquid inside when exposed to high temperatures. |
| Wood | Wood will dry out and may split or crack when used in your Microwave. |

Remember -

You can always check the packaging of utensils to confirm their microwave suitability.

"If in doubt, leave it out!"

Before you start using your Microwave, you may want to set the time on the Clock and Preset times for cooking.
√ Each time you press a button, a 'beep' will sound.
- Clock setting – For example; to set time as '8:30'
| 1) Press the ‘CLOCK’ button. |
| 2) Turn the ‘TIME / WEIGHT’ dial clockwise until the correct hour is displayed (In this case: ‘8’). |
| 3) Press the ‘CLOCK’ button. |
| 4) Turn the ‘TIME / WEIGHT’ dial clockwise until the correct minute is displayed (In this case: ‘30’). |
| 5) Press the ‘CLOCK’ button to set the time. It will now read ‘8:30’. |
- Whenever possible, always cook food covered (but not sealed!). Only pastry dishes with crust should be cooked without a cover.
There are several types of covering suitable for microwave use. Plastic film or glass lids must always be checked to ensure they can be used for microwaving.
○ Paper towels, napkins & wax paper are useful loose covers that can prevent 'spitting' and keep moisture in your food. - If you can't find cooking details for a specific quantity of food, base the cooking time needed on a similar type of food. You should adjust the cooking time accordingly.
* Double quantity = almost double time: half quantity = about half the time. - Remember that refrigerated food will need longer cooking times. Frozen food will require even more time to cook.
○ Arrange food carefully. Always place thickest areas towards the outside of the dish. - Watch the cooking time. Cook for the shortest amount of time indicated and only cook for longer if needed after checking your food. Remember that severely overcooked food can smoke or ignite.
Turn foods over once during microwaving to speed cooking of such foods as chicken and hamburgers. Turn large items like roasts at least once.
- Rearrange foods such as meatballs halfway through cooking, both from top to bottom and from the centre of the dish to the outside.
Some soft vegetables (eg. cauliflower, carrots, peas) should be cooked with a little water. However, mushrooms, tomatoes and peppers should be cooked without water. Try to cut larger vegetables into even-sized pieces. Always cook vegetables in a covered container and stir them from time to time.
○ Cook fatty pieces of meat (eg, pork, poultry) on a non metallic grid or upside-down saucer inside a suitable container. This will allow the fat to drain away. Cook leaner types of meat on a browning skillet. Be sure to turn once during the cooking time.
- Ready meals – always make sure that these are marked as being suitable for microwaving. Follow the instructions as printed on the container such as removing the foil lid or pricking the plastic film.
Remember that you will need to allow for standing time after you take your food from your Microwave Oven. Denser foods will take longer to stand to cool properly.
The Control Panel
It's a good idea to familiarise yourself with your Microwave Oven's controls before you use it to cook.
CONTROL PANEL

- MENU ACTION SCREEN
▶ Cooking time, power, action indicators, and clock time are displayed.
POWER
▶ Touch this button a number of times to set microwave cooking power level.
AUTO COOK
▶ Press for instant settings to cook popular food,
• AUTO DEFROST
▶ Touch to defrost food by weight.
CLOCK
▶ Touch this button to start setting the oven clock and ending by touching it again.
TIME/WEIGHT
▶ Turn the dial to enter the oven clock time or input cooking time.
▶ Rotate to specify food weight or number of servings
• START/QUICK START
▶ Touch to start a cooking program.
▶ Simply touch it a number of times to begin express cooking without previously setting power level and cooking time.
- STOP/CANCEL
▶ Press to cancel setting or reset the oven before setting a cooking program.
▶ Press once to temporarily stop cooking, or twice to cancel cooking altogether.
It is also used for setting child lock.
You cook with your Microwave Oven by first choosing a Power Level and then setting the time you need to cook for.
To set the Cooking Power you'd like to use, you need to press the 'Power' button one or more times. You have several different cooking powers available to you.
- Please see the table below to select the power you want:
| PRESS POWER BUTTON | DISPLAY | POWER OUTPUT |
| once | 100% | 100% |
| twice | 80% | 80% |
| 3 times | 60% | 60% |
| 4 times | 40% | 40% |
| 5 times | 20% | 20% |
FOR EXAMPLE: SUPPOSE YOU WANT TO COOK FOR 1 MINUTE AT 60 % .
- Press the 'STOP / CANCEL' button.
- Press the 'POWER' button three times.
- Rotate the 'TIMER' dial clockwise until the correct minute is displayed (1:00)
- Press the 'START' button.
QUICK START
√ The Quick Start feature of your Microwave Oven will make it operate at HIGH power (100% power output).
√ Each time you press the START button, you will set your
microwave to cook for a longer (by 30 seconds) time. See the table below:
| TIME | PRESS START BUTTON |
| 0:30 | once |
| 1:00 | twice |
| 1:30 | 3 times |
| 2:00 | 4 times |
ALWAYS MAKE SURE THE FOOD YOU USE QUICK COOK ON IS SUITABLE FOR 100% MICROWAVE POWER. IF NOT, THE FOOD COULD OVERHEAT, BOIL OR SCORCH!
* ALSO NOTE: If you want to stop cooking after you have set a cooking program, just open the door while your microwave is running and the door safety system will turn the microwave off.
SPECIAL FEATURE - AUTO REMINDER
After a cooking or defrosting program has completed, the oven will automatically continue to sound beeps every two minutes until the oven door is opened or the 'STOP/CANCEL' button has been pressed.
Setting your Microwave's Auto Cooking feature
- Your Microwave automatically works out the correct cooking mode and cooking time.
- You can choose from 8 AUTO COOKING menus.
- The codes used by the AUTO COOKING menu are listed in the chart below. ALWAYS REMEMBER TO FOLLOW THE WEIGHT ADJUSTMENTS WITH THE DIAL TO MATCH YOUR FOOD'S WEIGHT:
Auto Cook Menu
| Code | Food/cooking mode | Turn TIME/WEIGHT dial to indicate weight of food | ||||||||
| 1 | Coffee/Milk(unit) | 1 | 2 | 3 | ||||||
| 2 | Rice (g) | 100 | 200 | 400 | 600 | 800 | 1000 | |||
| 3 | Spaghetti (g)* | 100 | 200 | 300 | ||||||
| 4 | Potato (g) | 150 | 300 | 450 | 600 | |||||
| 5 | Auto reheat (g) | 100 | 200 | 300 | 400 | 500 | 600 | 700 | 800 | 1000 |
| 6 | Fish (g) | 100 | 200 | 400 | 600 | 800 | 1000 | |||
| 7 | Popcorn (g) | 100 | ||||||||
| 8 | Pizza (g) | 150 | 300 | |||||||
*Add boiling water before cooking.
The result of auto cooking depends on factors such as the shape and size of food, your personal preference as to the doneness of certain foods and even how well you happen to place food in the oven. If you find the result at any rate not quite satisfactory, please adjust the cooking time a little bit accordingly.
AUTO DEFROST
The oven allows the defrosting of meat, poultry, and seafood. The time and the defrosting power are adjusted automatically once the weight is programmed. The range weight of frozen foods varies between 100gr and 2700gr.
FOR EXAMPLE: Suppose you want to defrost 600g of shrimp.
- Place the shrimp to be defrosted into the oven.
- Press AUTO DEFROST button once.
- Turn TIME/WEIGHT dial to choose a weight 600g.
- Press START/QUICK START button.
| PRESS START/QUICK START BUTTON | TIME |
| once | 0:30 |
| twice | 1:00 |
| thrice | 1:30 |
| ... | ... |
Stop / Cancel
1) If your Microwave Oven is running, press 'Stop/Cancel' to pause it. Press 'Start' to continue operating. Press 'Stop/Cancel' twice to stop the program altogether.
2) When setting a new program, press 'Stop/Cancel' to ensure you've cancelled any previous cooking programs.
Door Open Protection
When your Microwave Oven is running, you can open the door at any time to check cooking.
When the door is opened, the oven will stop running automatically and the remaining cooking time displayed will stay the same.
Close the door and press 'Start' again. Your Microwave Oven will continue cooking as it was set in the program until the end.
Note that when the door is left open for longer than 10 minutes, the light will switch off.
Child-lock Function
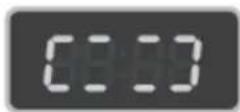
To prevent children from using your Microwave Oven, do the following:
To Lock:
Press & hold the 'STOP/CANCEL' button and hold for 3 seconds. After a 'beep', the display will show the LOCK light'[_]''. This means that your Microwave is now locked.
To Unlock:
While your Microwave is in locked mode, press and hold the 'STOP / CANCEL' button for 3 seconds.
After a long beep, the LOCK function is cancelled and the light will disappear.
Your Microwave is now unlocked and can be used again normally.
DISPLAY:
When the oven is not being run, the LED display shows the clock. `:' will flash.
While functioning, the LED displays the related setting.
In the operating and suspended state (eg., if operation is paused), the LED will display the cooking time remaining.
In the operating or suspended state or when the door is open, the flashing 'Micro' light will be lit and the restarting light will flash.
Note: never use abrasive cleaning substances or coarse cleaning materials to clean your Microwave. Your Microwave requires a minimum of maintenance. Remember that after you clean the turntable and its ring assembly, you must place them correctly otherwise your Microwave will not work properly.
Always keep the door seal surfaces clean!
- You can do this by wiping them down regularly with a damp cloth so that any grease, food debris or spatters will not build up.

- THIS IS VERY IMPORTANT AS LETTING SUCH SUBSTANCES COLLECT CAN RESULT IN LEAKAGE OF MICROWAVE ENERGY FROM YOUR OVEN.
Clean the inside of your oven after use with a slightly damp cloth.
Clean the glass turntable plate using washing-up liquid or in a dishwasher.
Clean the outside of your Microwave Oven with a soft cloth and a mild, warm detergent solution. Be careful not to let water get into any of the fan portholes or over the power cord.
Odours can be eliminated from the inside of your oven by boiling a solution of one cup of water and several tablespoons of lemon juice in the cavity.
- Very stubborn stains can be removed using a soft nail brush.
REMEMBER THAT CONDENSATION IS NORMAL. HEATING FOOD AND DRINKS WILL INEVITABLY PRODUCE STEAM WHICH, IN TURN LEADS TO CONDENSATION.
REMEMBER THAT THIS IS NORMAL!

Troubleshooting

Checking your problem against the chart below and trying solutions for each problem could keep you from having to call for service.
| PROBLEM | POSSIBLE | CAUSTRY THIS |
| Oven will not start! | Electrical cord for oven isn't plugged in | Plug into the power outlet. |
| The door is open | Close the door & try again. | |
| Wrong operation set | Check instruction. | |
| Microcomputer has scrambled | This may happen when you plug your Microwave into a wall socket for the first time. Just unplug your Microwave and plug it back in. The microcomputer will reset for proper use. | |
| Arcing or Sparking! | Unsuitable materials have been placed in your microwave oven (i.e. - metallic items.) | Use microwave-safe cookware only. |
| The oven is operated when empty | Don't operate an empty oven. | |
| Spilled food remains in the oven cavity | Clean the oven cavity with a wet towel. |

| PROBLEM | POSSIBLE CAUSE | TRY THIS |
| Unevenly cooked foods! | Unsuitable cookware is being used to prepare foods | Use microwave-safe cookware only. |
| Food is not defrosted completely | Completely defrost food. | |
| Cooking time & power level are unsuitable for your food | Use the correct cooking time and power level. | |
| Food has not been turned or stirred | Turn or stir food. | |
| Overcooked foods! | Cooking time / power level is too long / too great | Use the correct cooking time / power level. |
| Undercooked foods! | Unsuitable cookware is being used to prepare food | Use microwave-safe cookware only. |
| Food is not defrosted completely (eg. Ice present in the centre of food) | Completely defrost food. | |
| Oven ventilation ports are restricted | Check that the oven ventilation ports are not blocked. | |
| Cooking time / power level is unsuitable | Use the correct cooking time, power level. |


| PROBLEM | POSSIBLE CAUSE | TRY THIS |
| Improper defrosting! | Unsuitable cookware is being used to prepare food | Use microwave-safe cookware only. |
| Cooking time / power level is unsuitable | Use correct cooking time / power level. | |
| Food has not been turned or stirred | Turn or stir food. | |
| Noise comes from turntable during cooking! | Food debris grinding between turntable and oven floor | Frequent cleaning of these parts should eliminate or reduce the noise. |
| Noise comes from oven when using a lower power level! | When cooking on lower powers, your Microwave turns on and off to obtain lower power output | This is normal. |
| Steam coming from Exhaust vent! | Steam is produced during cooking - your Microwave is merely venting it | This is normal. |
| The oven light isn't on! | The bulb has burned out | Change the light bulb. |
| ‘Start’ has not been pressed | Press the ‘Start’ key to commence cooking and see the light come on. | |
| My food is exploding! | You have loaded sealed foods (eggs; mussels; escargots; unpierced potatoes) or sealed containers | Do not try to cook sealed items.Pierce skin/membranes of vegetables, egg yolks and meats. |
| PROBLEM | POSSIBLE | CAUSTRY THIS |
| My food is too dry! | Has been cooked for too long / too strongly | Next time, set a shorter cooking time or reduce the microwave power output. |
| My drinks, soups and liquids are spurting up from their containers! | Your food/drink has boiled over | Use a larger utensil than usual.Opening the door or pressing the 'STOP/CLEAR' key will stop boiling. |
| Turntable doesn't turn! | Something is blocking it | Make sure that your food or ovenware isn't extending beyond the turntable. |
| Turntable or support isn't correctly connected to the drive | Make sure the turntable is properly connected & that nothing has become wedged under it. |

Remember that many problems can be avoided if you just follow the guidelines for using your Baumatic Microwave Oven. Please see pages 6-7, 11-14 & 16.
Baumatic Ltd. Conditions of guarantee
Dear Customer,
Your new Baumatic appliance comes complete with a free 12 month guarantee covering both parts and labour costs resulting from defective materials or workmanship.
Baumatic also gives you the opportunity to automatically extend the guarantee period for a further 12 months at no extra cost, giving an initial guarantee period of 24 months. The extended guarantee period applies to England, Scotland, Wales and Northern Ireland only.
To qualify for your full 24 months guarantee you must register your appliance within 28 days of purchase to be covered under this guarantee. This can be done online via: www.baumatic.co.uk or through returning the guarantee card which can be found in each new Baumatic appliance.
* In addition, your appliance is covered by a 5 year parts warranty. Baumatic Ltd will provide free of charge the parts required to repair the appliance, only if they are fitted by a Baumatic engineer, for any defect that arises due to faulty materials or workmanship within a period of 5 years from the original purchase date.
* An additional 1 to 3 year insurance scheme for labour is available should you wish to extend the warranty period.
Should any person other than an authorised representative of Baumatic Ltd interfere with the appliance, the policy is negated and Baumatic Ltd will be under no further liability.
The guarantee covers the appliance for normal domestic use only, unless otherwise stated.
Any claims made under the terms of the guarantee must be supported by the original invoice/bill of sale issued at the time of purchase.
This guarantee is transferable only with the written consent of Baumatic Ltd.
If the appliance fails and is considered either not repairable or uneconomical to repair between 12 months (2 years if registered) and five years, a free of charge replacement will not be offered.
The guarantee for any replacement will only be for the remainder of the guarantee on the original product purchased.
The guarantee does not cover:
- Sinks and taps
- Failure to comply with the manufacturers instructions for use.
- The replacement of cosmetic components of accessories
- Accidental damage or wilful abuse.
- Subsequent loss or damage owing to the failure of the appliance or electrical supply
- Incorrect installation
- Losses caused by Acts of God, civil war, failure to obtain spare parts, strikes or lockouts
- Filters, fuses, light bulbs, external hoses, damage to bodywork, paintwork, plastic items, covers, baskets, trays, shelves, burner bases, burner caps, decals, corrosion, rubber seals.
In the course of the work carried out it may be necessary to remove the appliance from it operating position. Whilst all reasonable care will be taken, Baumatic Ltd cannot accept responsibility for damage sustained to any property whatsoever in this process.
This guarantee is in addition to and does not diminish your statutory or legal rights.
Contacting Baumatic Ltd
| Sales | Service | Spares | Technical/Advice | |
| TEL: 0118 933 6900 | TEL: 0118 933 6911 | TEL: 0118 933 6922 | 0118 933 6933 | |
| FAX: 0118 931 0035 | FAX: 0118 986 9124 | FAX: 0118 933 6942 | 0118 933 6942 | |
For ROI (Republic of Ireland), please contact one of the numbers below:
TEL: 01-6266798 FAX: 01-6266634
Thanks you for buying Baumatic.
* Applies to UK, Scotland, Wales & Northern Ireland only (Republic of Ireland has 1 year labour & 1 year parts warranty only)
Baumatic®
You will be mine ...
Headquarters
Baumatic Ltd.
Baumatic Buildings,
6 Bennet Road,
Reading,
Berkshire
RG2 0QX, United Kingdom
Sales Telephone
+44 118 933 6900
Sales Fax
+44 118 931 0035
Service Telephone
+44 118 933 6911
Service Fax
+44 118 986 9124
Spares Telephone
+44 118 933 6922
Technical / Advice Telephone
+44 118 933 6933
E-mail:
sales@baumatic.co.uk
technical@baumatic.co.uk
Http (Internet site):
www.baumatic.com

www.baumatic.com
- BTM17.3SS Microwave oven
- Instruction manual
- User Instruction Manual for your
- BTM17.3SS MICROWAVE
- Contents
- Cooking Features:
- PLEASE READ BEFORE USING!
- ELECTRICAL SAFETY
- GENERAL SAFETY
- AVOIDING POSSIBLE EXPOSURE TO EXCESSIVE MICROWAVE ENERGY
- A note on the type of energy used by your Microwave Oven
- Never use your Microwave Oven to:
- TURNTABLE INSTALLATION
- NOTE:
- BMK1SS
- INSTALLATION REQUIREMENTS
- Built under installation for your microwave.
- It is possible to build your microwave under a worktop; however the following installation MUST be followed:-
- And please be careful with ...
- You can reduce the chances of this happening further by
- TO TEST WHETHER YOUR UTENSIL IS MICROWAVE SAFE, YOU CAN CONDUCT THE FOLLOWING TEST:
- Remember -
- The Control Panel
- CONTROL PANEL
- - MENU ACTION SCREEN
- POWER
- AUTO COOK
- • AUTO DEFROST
- CLOCK
- TIME/WEIGHT
- • START/QUICK START
- - STOP/CANCEL
- FOR EXAMPLE: SUPPOSE YOU WANT TO COOK FOR 1 MINUTE AT 60 \% .
- QUICK START
- SPECIAL FEATURE - AUTO REMINDER
- Setting your Microwave's Auto Cooking feature
- AUTO DEFROST
- Stop / Cancel
- Door Open Protection
- Child-lock Function
- To Lock:
- To Unlock:
- DISPLAY:
- Troubleshooting
- Baumatic Ltd. Conditions of guarantee
- Contacting Baumatic Ltd
- Baumatic®
- Headquarters
- E-mail:
Brand : BAUMATIC
Model : BTM17.3SS
Category : Microwave