
VE1623TT - Fan DCG - Free user manual and instructions
Find the device manual for free VE1623TT DCG in PDF.


| Product Type | Stand Fan |
| Brand | DCG |
| Model | VE1623TT |
| Fan Diameter | 40 cm (16 inches) |
| Height | 147 cm |
| Color | Black |
| Power Supply | 220-240V~ 50/60Hz, 60W |
| Power Input (Fan) | 43.1 W |
| Standby Power | 0.47 W |
| Maximum Airflow | 48.9 m³/min |
| Maximum Air Velocity | 2.9 m/s |
| Sound Power Level | 60.0 dB(A) |
| Service Value | 1.1 (m³/min)/W |
| Number of Speeds | 3 (High, Medium, Low) |
| Oscillation | Yes |
| Timer | 0.5 to 7.5 hours |
| Remote Control | Yes (requires 2xAAA batteries) |
| Height Adjustment | Yes (telescopic pole) |
| Tilt Adjustment | Yes (manual tilt) |
| Grille | Removable front grille with clips |
| Blade Material | Plastic |
| Base | Sturdy base with cross bars and weight |
| Cleaning | Damp cloth only; do not immerse |
Frequently Asked Questions - VE1623TT DCG
User questions about VE1623TT DCG
0 question about this device. Answer the ones you know or ask your own.
Ask a new question about this device
Download the instructions for your Fan in PDF format for free! Find your manual VE1623TT - DCG and take your electronic device back in hand. On this page are published all the documents necessary for the use of your device. VE1623TT by DCG.
USER MANUAL VE1623TT DCG
natural_image
Black outdoor fan with a DCG logo and a digital display stand, standing on a beach with ocean waves in the background (no text or symbols on the fan itself)VE1623TT VENTILATORE PIANTANA DA 40 CM H 147 CM STAND FAN 16 INCHES
CLIMA dcg16.it
CARATTERISTICHE TECNICHE: 220-240V\~ 50/60Hz 60W

PRIMA DI METTERE IN FUNZIONE IL PRODOTTO, LEGGERE, CAPIRE E SEGUIRE QUESTE ISTRUZIONI.
PRIMA DEL PRIMO UTILIZZO
FEATURES OF THIS PRODUCT
BEFORE OPERATING THIS PRODUCT, READ, UNDERSTAND, AND FOLLOW THESE INSTRUCTIONS.
BEFORE FIRST USE
Read and follow all the instructions in this “Use And Care” manual even if you feel you are familiar with the products, and find a place to keep it handy for future reference.
Your attention is drawn particularly to the sections concerning "IMPORTANT SAFEGUARDS"
IMPORTANT SAFEGUARDS
PLEASE READ ALL INSTRUCTIONS CAREFULLY BEFORE USING THE PRODUCT.
When using the electrical appliance, the following basic safety precautions should always be followed.
WARNING- to reduce the risk of fire, electric shock or injury to persons or property:
- Always operate the product from a power source of the same voltage, frequency and rating as indicated on the product identification plate.
- Do not use this fan with any solid state speed control device to reduce the risk of electric shock.
- The appliance is not intended for use by persons (including children) with reduced physical, sensory, mental capabilities or lack of experience and knowledge, unless they have been given supervision or instructions concerning use of the appliance by a person responsible by their safety.
- Children should be supervised to ensure that they do not play with the appliance.
- Do not leave the fan running unattended.
- Do not operate the product if it is dropped, damaged or showing signs of product malfunction. Do not operate the product with a damaged plug or
cord. Return the complete product to the place of purchase for inspection, refund or replacement.
- If it is not working properly, contact a qualified electrician or service centre for examination and repair, never try to dismantle it by yourself.
- Do not immerse or expose the product or flexible cord to rain, moisture or any other liquid.
- This product should not be used in the immediate vicinity of water, such as bathtubs, washbowls, swimming pools etc. where the likelihood of immersion or splashing could occur.
-
Never install the unit where it could be subject to:
-
Heat sources such as radiators, heat registers, stoves or other products that produce heat
- Direct sunlight
- Mechanical vibration or shock
- Excessive dust
- Lack of ventilation, such as a cabinet or bookcase
-
Uneven surface
-
Switch off and unplug from outlet when the product is not in use, before assembling or disassembling parts and before cleaning. Fully assemble the fan before switching on.
- Avoid contact with moving parts. Do not insert any body parts (e.g. finger) or objects through the grill when the fan is operating.
- Do not cover the grille, or operate in close proximity to curtains, etc.
- This product is intended for normal domestic/household use only.
• Always disconnect the fan when moving it from one location to another. - The use of attachments or accessories not recommended or sold by the product distributor may cause personal or property hazards or injuries.
- Be sure fan is on a stable surface when operating to avoid overturning.
- Do not immerse in water.
- If the supply cord is damaged, it must be replaced by the manufacturer or its service agent, or similarly qualified person in order to avoid a hazard.
READ AND SAVE THESE INSTRUCTIONS FOR FUTURE REFERENCE.
FEATURES OF THIS PRODUCT
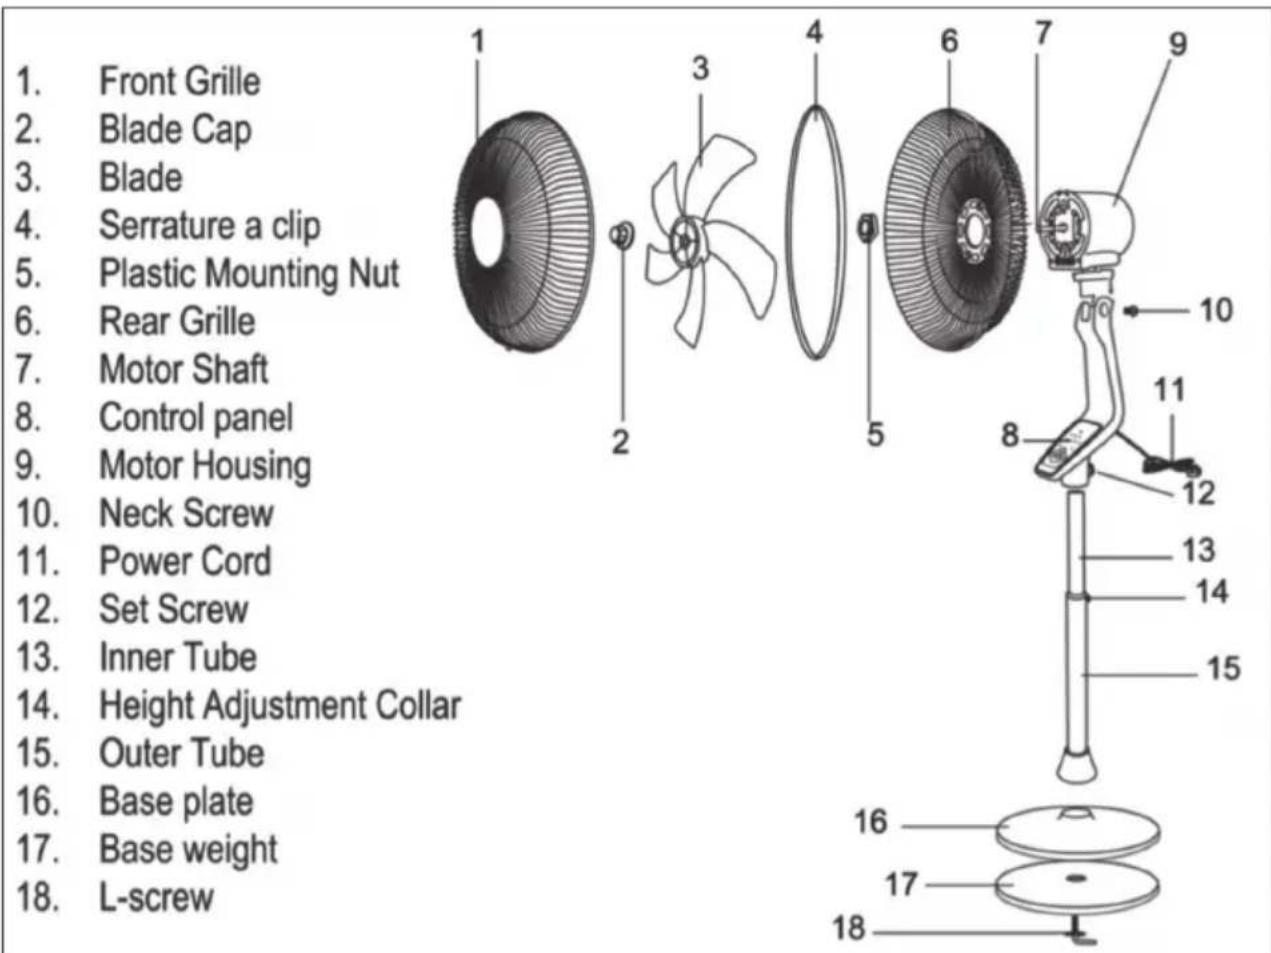
PRODUCT ASSEMBLY ASSEMBLE OF BASE
- Firstly, loosen and remove the four screws from the bars. Then cross bar A and bar B so that they interlock.
- Be sure to align the four holes in the bars with those on the flange of the Outer Tube. Secure the flange to the bars with the four screws.
- Loosen and remove the Height Adjustment Collar from the top of the Inner Tube. Slide the Base Decorative Cap down over the assembly.
- Replace the Height Adjustment Collar on top of the Inner Tube. Pull the Inner Tube out from the Outer Tube to adjust the tube to the desired height and tighten the collar.
- If necessary, slightly loosen the Set Screw by turning it anticlockwise. Slide the Switch Box down over the Inner Tube and tighten the Set Screw. Make sure the Set Screw is tightly secured.
ASSEMBLE OF BLADE AND GRILLE
- Unscrew the plastic mounting nut from the front of the motor housing by rotating it anticlockwise.
- Position the rear grille against the front of the motor housing with the handle uppermost, ensuing that the locating pegs on the motor housing are engaged correctly in the holes of the rear grille.
- Tighten the Rear Grille Mounting Nut clockwise.
DO NOT OVERTIGHTEN IT.
- Push the fan blade onto the motor shaft, locating the slot at the back of the blade on the drive pin that passes through the motor shaft.
- Tighten the blade cap by turning it anticlockwise.
- Position the front grille against the rear grille so that the holes in the rims that accept the small nut and bolt are in line. Insert the bolt through the holes and screw on the nut. Do not fully tighten at the stage.
- Push the grille retaining clips into position ensuring that they engage correctly on the rim of the grille.
- Fully tighten the small nut and bolt that passes through the rim of the grille.

natural_image
Technical line drawings of four different fan components with internal blades and mounting brackets (no text or symbols)OPERATION OF THE PRODUCT Control Panel
A. Power ON& SPEED button
B. Power OFF button
C. SWING button
D. TIMER button
E. Swing indicator
F. Power indicator
G. Speed indicators (high-mid-low)
H. Time indicators 0.5-1-2-4 hrs

- Switch on the appliance by pressing the ON button (A) on the control panel. The power indicator (F) lights up.
- To change speed, press button (A) several times. Speed will change with each button stroke. The respective indicator (G) will light up.
- For oscillation, press the SWING button (C). The swing indicator (E) light up and the fan starts oscillating. To stop oscillation, press button (C) once again.
- Your fan has a timer function. After having switched the unit on, press the TIMER button (D) and the fan will operate for as long as you choose: Press the timer button several times and the setting will change with every button stroke. The respective indicator lights (H) light up. When the set time has elapsed, the fan switches off automatically. The fan can set the timer function from 0.5-7.5 hours, as specified by the sum of the Time Indicators that are lit.
- The air flow can be adjusted by tilting the entire motor unit upward or downward. Loosen the neck screw (9) and adjust the motor until you have reached the desired vertical angle. Tighten the screw again.
- To switch the fan off, press the OFF button (B).
- Always unplug the appliance when it is not used.
- Ensure batteries are inserted in the correct direction. Do not mix battery types. When replacing, ensure both batteries are changed simultaneously. 2xAAA size batteries are required.
CLEANING
- Switch off and unplug from the power supply before assembling or disassembling and cleaning.
- Keep the air vents at the rear of the main body free from dust or fluff—use a vacuum cleaner to remove these when necessary. Do not probe any opening to remove fluff.
- Fan component parts should be cleaned using mild soap and a damp cloth or sponge. Do not allow any water or other liquid to enter the motor housing.
• Thoroughly remove soap film with clean water.
CAUTION: Do not use harsh detergents, chemical cleaners or solvents as they may damage the surface finish of the fan components.
| Information requirements | |||
| Maximum air flow | F | 48,9, | m^3 /min |
| Fan power input | P | 43,1 | W |
| Service value | SV | 1,1 | (m^3 /min)/W |
| Standby power consumption | Psb | 0,47 | W |
| Fan sound power level | Lwa | 60,0 | dB(A) |
| Maximum air velocity | C | 2,9 | m/s |
| Measuring standard of service value | IEC 60879:1986 (corr.1992) | ||

natural_image
Symbol of a trash bin crossed with a diagonal line, no text or numbers present

- VE1623TT VENTILATORE PIANTANA DA 40 CM H 147 CM STAND FAN 16 INCHES
- PRIMA DEL PRIMO UTILIZZO
- FEATURES OF THIS PRODUCT
- BEFORE FIRST USE
- IMPORTANT SAFEGUARDS
- PLEASE READ ALL INSTRUCTIONS CAREFULLY BEFORE USING THE PRODUCT.
- WARNING- to reduce the risk of fire, electric shock or injury to persons or property:
- READ AND SAVE THESE INSTRUCTIONS FOR FUTURE REFERENCE.
- PRODUCT ASSEMBLY ASSEMBLE OF BASE
- ASSEMBLE OF BLADE AND GRILLE
- DO NOT OVERTIGHTEN IT.
- OPERATION OF THE PRODUCT Control Panel
- CLEANING
- CAUTION: Do not use harsh detergents, chemical cleaners or solvents as they may damage the surface finish of the fan components.
Brand : DCG
Model : VE1623TT
Category : Fan