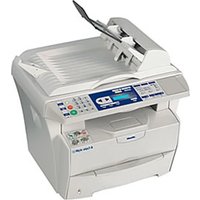
d-Copia 164MF - Printer OLIVETTI - Free user manual and instructions
Find the device manual for free d-Copia 164MF OLIVETTI in PDF.


| Product Type | Multifunction Printer (Copy, Print, Scan, Fax) |
| Brand | Olivetti |
| Model | d-Copia 164MF |
| Printing Technology | Electrophotographic laser |
| Paper Input Capacity | 250-sheet cassette + 1-sheet manual feed tray |
| Output Tray Capacity | 100 sheets (face-down) |
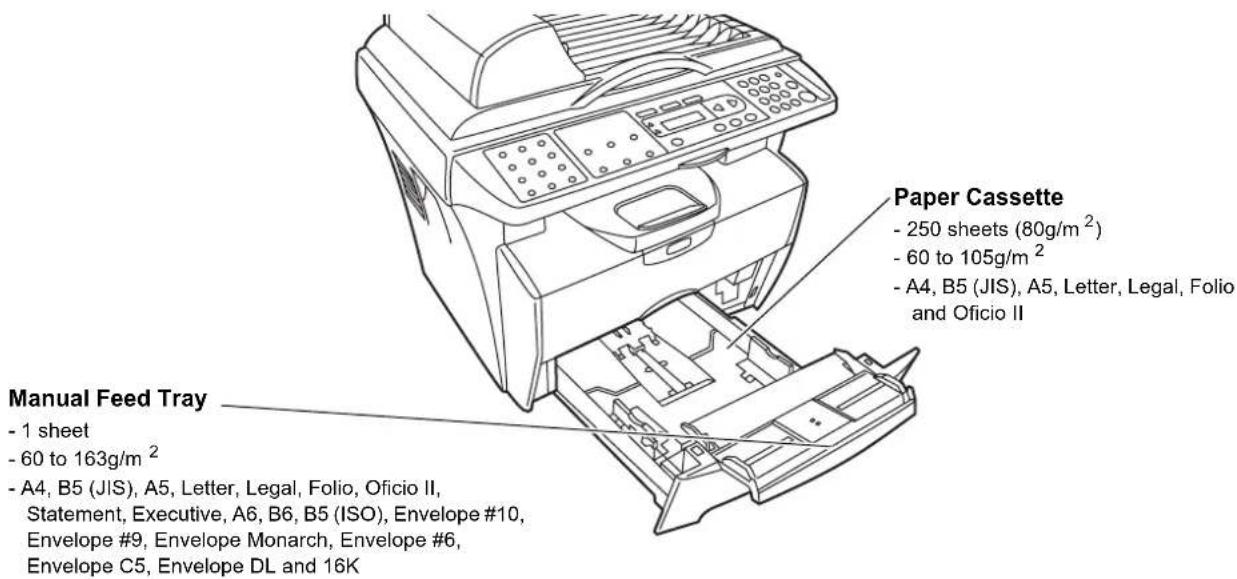
| Supported Paper Sizes (Cassette) | A4, B5 (JIS), A5, Letter, Legal, Folio, Oficio II |
| Supported Paper Sizes (Manual Feed) | A4, B5 (JIS), A5, Letter, Legal, Folio, Oficio II, Statement, Executive, A6, B6, ISO B5, Envelope #10/#9/Monarch/#6/C5/DL, 16K |
| Paper Weight | Cassette: 60–105 g/m²; Manual Feed: 60–163 g/m² |
| Copy Speed (A4, Platen) | 16 copies/min |
| First Copy Time (Platen) | 12 ± 0.5 seconds |
| Print Speed (A4/Letter) | 16 ppm (A4) / 17 ppm (Letter) |
| First Print Time | 11 seconds or less |
| Scan Speed (A4, 300 dpi) | Monochrome: 5 scans/min; Color/Grayscale: 5 scans/min (TWAIN), 4 scans/min (QLINK) |
| Print Resolution | 600 × 600 dpi |
| Scan Resolution | 600 × 300 dpi |
| Memory | 64 MB |
| Warm-up Time | 25 seconds or less |
| Power Source | 120 V AC, 60 Hz, 8.2 A or 220–240 V AC, 50/60 Hz, 3.9 A |
| Dimensions (W × D × H) | 476 × 392 × 489 mm |
| Weight | Approx. 15 kg |
| Connectivity | USB 2.0 Hi-Speed |
| Automatic Document Feeder | 50 sheets, up to Legal size |
| Special Features | EcoPrint, Collate, Combine (2-in-1, 4-in-1), Zoom (25–400%), QLINK software |
| Safety | Class 1 Laser Product, ENERGY STAR compliant |
| Supported Operating Systems | Windows 98SE/Me/2000/XP |
Frequently Asked Questions - d-Copia 164MF OLIVETTI
User questions about d-Copia 164MF OLIVETTI
0 question about this device. Answer the ones you know or ask your own.
Ask a new question about this device
Download the instructions for your Printer in PDF format for free! Find your manual d-Copia 164MF - OLIVETTI and take your electronic device back in hand. On this page are published all the documents necessary for the use of your device. d-Copia 164MF by OLIVETTI.
USER MANUAL d-Copia 164MF OLIVETTI
PUBLICATION ISSUED BY:
Olivetti S.p.A.
Copyright © 2007, Olivetti
All rights reserved
The C€ mark affixed to the product certifies that the product satisfies the basic quality requirements.

The manufacturer reserves the right to carry out modifications to the product described in this manual at any time and without any notice.

ENERGY STAR is a U.S. registered mark.
The ENERGY STAR program is an energy reduction plan introduced by the United States Environmental Protection Agency in response to environmental issues and for the purpose of advancing the development and utilization of more energy efficient office equipment.
Your attention is drawn to the following actions which could compromise the conformity attested to above, as well as the characteristics of the product:
- incorrect electrical power supply;
- incorrect installation, incorrect or improper use or use not in compliance with the warnings provided in the User's Manual supplied with the product;
- replacement of original components or accessories with others of a type not approved by the manufacturer, or performed by unauthorised personnel.
Contents
Legal and Safety
1 Machine Parts
Main Body 1-1
Document Processor 1-2
Operation Panel....1-3
Message Display....1-3
2 Loading Paper
Paper Specifications....2-1
Before Loading Paper....2-2
Loading Paper into a Cassette....2-2
Manual Feed Tray 2-3
Manual Duplex 2-5
Selecting Paper Size....2-6
Selecting Media Type 2-7
3 Preparations
Connecting the Cables 3-1
Connecting the USB Cable 3-1
Connecting the Power Cord 3-1
Turning the Machine On 3-2
Loading Software 3-2
4 Copy Functions
Basic Copying Procedure 4-1
Placing Originals in the Document Processor 4-2
Placing a Thick Original on the Platen 4-4
Zoom Copies 4-4
Standard Zoom 4-4
Variable Zoom 4-5
Collate Mode 4-5
Combine Mode 4-6
EcoPrint Mode....4-6
5 Scanning Functions
User Interface Operation 5-1
Selecting the Scan Method 5-2
Selecting Image Type 5-2
Selecting the Resolution 5-2
Enhancing Your Image 5-3
6 Printing Functions
Printing Preferences....6-1
Printing a Document....6-2
7 Using QLINK
To Start the QLINK 7-1
MFP Button Setting Section....7-2
Using the Scan To PC Button on the Operation Panel to Scan 7-2
Configuring the Scan To PC Button 7-2
Copy Function Section....7-4
Configuring the Copy Function 7-4
Scan Function Section 7-6
Send to email 7-6
Send to file 7-6
User define Buttons 7-6
8 System Settings
Message Language 8-1
Sleep Mode 8-1
Toner Install 8-2
Buzzer 8-2
Drum Reset 8-2
Drum Refresh 8-3
Drum Control 8-3
Eco Fuser 8-3
Copy Setup 8-4
Changing Function Defaults 8-4
Printing the Report Pages 8-5
9 Maintenance
Toner Container Replacement 9-1
Cleaning the Charger and Registration Roller 9-3
Cleaning the Machine....9-6
Cleaning the Document Processor....9-6
Replacing the Document Processor Pad 9-7
Shipping Lock 9-8
10 Troubleshooting
General Guidelines 10-1
Maintenance and Error Messages.... 10-3
Paper Jam 10-4
Output Tray and Rear Cover 10-4
Paper Cassette 10-5
Manual Feed Tray 10-6
Inside Machine 10-9
Document Processor 10-11
11 Specifications
Main Body 11-1
Copying Functions 11-2
Printing Functions 11-2
Scanning Functions 11-3
Document Processor 11-3
Environmental Specifications 11-3
Optional Equipment 11-4
INDEX
Making Full Use of This Machine's Advanced Functions
1 Zoom mode
Enlarging/reducing copies to a desired size between 25% and 400%
2 Copy Mode selection
Making clear reproductions of photographs
3 EcoPrint mode
Saving on toner use
25%





4 Combine modes
Making one copy from either two or four originals
5 Collate mode
Collating automatically
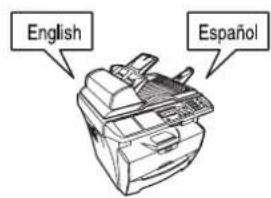
6 Language Selection
Function
Changing the language used in the message display

flowchart
graph TD
    A["Document A"] --> B["Document B"]
    B --> C["Document C"]
    C --> D["Output: Document A"]

flowchart
graph TD
    A["Document 1"] --> B["Document 2"]
    B --> C["Document 3"]
    C --> D["Output: Multiple Files"]

    subgraph Section 1
        E["Document 1"] --> F["Document 2"]
        G["Document 2"] --> H["Document 3"]
    end

    subgraph Section 2
        I["Document 1"] --> J["Document 2"]
        K["Document 3"] --> L["Document 4"]
        M["Document 1"] --> N["Document 2"]
        O["Document 3"] --> P["Document 4"]
        Q["Document 1"] --> R["Document 2"]
        S["Document 3"] --> T["Document 4"]
    end

    style Section 1 fill:#f9f,stroke:#333
    style Section 2 fill:#bbf,stroke:#333
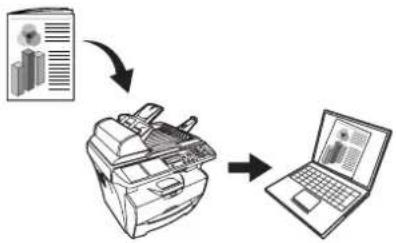
7 Making full-color scans
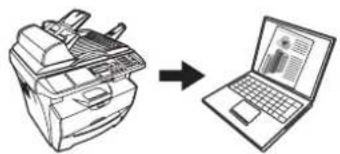
8 Loading an image from TWAIN
flowchart
graph TD
    A["Image Analysis"] --> B["Input Data"]
    B --> C["Laptop Usage"]
    C --> D["Output Data"]
Legal and Safety
CAUTION: No liability is assumed for any damage caused by improper installation.
Notice
The information in this guide is subject to change without notification. Additional pages may be inserted in future editions. The user is asked to excuse any technical inaccuracies or typographical errors in the present edition.
No responsibility is assumed if accidents occur while the user is following the instructions in this manual. No responsibility is assumed for defects in the printer's firmware (contents of its read-only memory).
This guide and any copyrightable subject matters sold or provided with or in connection with the sale of the machine are protected by copyright. All rights are reserved. Copying or other reproduction of all or part of this guide and any copyrightable subject matters without the prior written consent of Olivetti S.p.A. is prohibited. Any copies made of all or part of this guide and any copyrightable subject matters must contain the same copyright notice as the material from which the copying is done.
Regarding Tradenames
Microsoft and Windows are registered trademarks of Microsoft Corporation. ENERGY STAR is a U.S. registered mark. All other brand and product names are registered trademarks or trademarks of their respective companies.
Legal Restriction On Copying
It may be prohibited to copy copyrighted material without permission of the copyright owner.
It is prohibited under any circumstances to copy domestic or foreign currencies.
Copying other items may be prohibited.
Energy Star Program

We have determined as a participating company in the International Energy Star Program that this product is compliant with the standards laid out in the International Energy Star Program.
The International Energy Star Program has as its basic goals the promotion of efficient energy use and the reduction of the environmental pollution that accompanies energy consumption by promoting the manufacture and sale of products that fulfill program standards.
International Energy Star Program standards require that multifunction devices come equipped with a Low Power Mode where printer and fax functions remain in a waiting state but energy consumption is still reduced after a certain amount of time elapses since the device was last used, as well as a Sleep Mode where printer and fax functions remain in a waiting state but power consumption is still reduced to a minimum when there is no activity with the device within a set amount of time. This product is equipped with the following features as a result of its compliance with International Energy Star Program standards.
Low Power Mode
The device automatically enters Low Power Mode when 7.5 minutes have passed since the device was last used. The amount of time of no activity that must pass before Low Power Mode is activated may be lengthened. For further information refer to Sleep Mode on page 8-1.
Auto Sleep Mode
The device automatically enters Sleep Mode when 15 minutes have passed since the device was last used. The amount of time of no activity that must pass before Sleep Mode is activated may be lengthened. For further information refer to Sleep Mode on page 8-1.
Paper Recycling
The Energy Star Program encourages the use of environmentally friendly recycled paper. Your sales or service representative can provide information about recommended paper types.
Please read this Operation Guide before using the machine. Keep it close to the machine for easy reference.
The sections of this guide and parts of the machine marked with symbols are safety warnings meant to protect the user, other individuals and surrounding objects, and ensure correct and safe usage of the machine. The symbols and their meanings are indicated below.

DANGER: Indicates that serious injury or even death will very possibly result from insufficient attention to or incorrect compliance with the related points.
WARNING: Indicates that serious injury or even death may result from insufficient attention to or incorrect compliance with the related points.

CAUTION: Indicates that personal injury or mechanical damage may result from insufficient attention to or incorrect compliance with the related points.
Symbols
The following symbols indicate that the related section includes safety warnings. Specific points of attention are indicated inside the symbol.

..... [General warning]

..... [Warning of danger of electrical shock]

..... [Warning of high temperature]
The following symbols indicate that the related section includes information on prohibited actions. Specifics of the prohibited action are indicated inside the symbol.

.... [Warning of prohibited action]

.... [Disassembly prohibited]
The following symbols indicate that the related section includes information on actions which must be performed. Specifics of the required action are indicated inside the symbol.

.... [Alert of required action]

..... [Remove the power plug from the outlet]

.... [Always connect the machine to an outlet with a ground connection]
Please contact your service representative to order a replacement if the safety warnings in this Operation Guide are illegible or if the guide itself is missing. (fee required)

IMPORTANT - PLEASE READ FIRST.
CAUTION LABELS
Caution labels have been attached to the machine at the following locations for safety purposes.
Be sufficiently careful to avoid fire or electric shock when removing a paper jam or when replacing toner.
NOTE: Do not remove these labels.


Installation Precautions
Environment

CAUTION:
Avoid placing the machine on or in locations which are unstable or not level. Such locations may cause the machine to fall down or fall over. This type of situation presents a danger of personal injury or damage to the machine.

Avoid locations with humidity or dust and dirt. If dust or dirt become attached to the power plug, clean the plug to avoid the danger of fire or electrical shock.

Avoid locations near radiators, heaters, or other heat sources, or locations near flammable items, to avoid the danger of fire.

To keep the machine cool and facilitate changing of parts and maintenance, allow access space as shown below. Leave adequate space, especially around the vents, to allow air to be properly ventilated out of the machine.


Other Precautions
Adverse environmental conditions may affect the safe operation and performance of the machine. Install in an air-conditioned room (recommended room temperature: around 71.6°F (22°C), humidity: around 60%RH), and avoid the following locations when selecting a site for the machine.
- Avoid locations near a window or with exposure to direct sunlight.
- Avoid locations with vibrations.
- Avoid locations with drastic temperature fluctuations.
- Avoid locations with direct exposure to hot or cold air.
- Avoid poorly ventilated locations.
During copying, some ozone is released, but the amount does not cause any ill effect to one's health. If, however, the machine is used over a long period of time in a poorly ventilated room or when making an extremely large number of copies, the smell may become unpleasant. To maintain the appropriate environment for copy work, it is suggested that the room be properly ventilated.
Power Supply/Grounding the Machine

WARNING:
Do not use a power supply with a voltage other than that specified. Avoid multiple connections in the same outlet. These types of situations present a danger of fire or electrical shock.
Plug the power cord securely into the outlet. If metallic objects come in contact with the prongs on the plug, it may cause a fire or electric shock.
Always connect the machine to an outlet with a ground connection to avoid the danger of fire or electrical shock in case of an electric short. If an earth connection is not possible, contact your service representative.


Other Precautions
Connect the power plug to the closest outlet possible to the machine.
The power supply cord is used as the main disconnect device. Ensure that the socket/outlet is located/installed near the equipment and is easily accessible.
Handling of Plastic Bags

WARNING:
Keep the plastic bags that are used with the machine away from children. The plastic may cling to their nose and mouth causing suffocation.


Precautions for Use
Cautions when Using the Machine

WARNING:
Do not place metallic objects or containers with water (flower vases, flower pots, cups, etc.) on or near the machine. This situation presents a danger of fire or electrical shock should they fall inside.
Do not remove any of the covers from the machine as there is a danger of electrical shock from high voltage parts inside the machine.
Do not damage, break or attempt to repair the power cord. Do not place heavy objects on the cord, pull it, bend it unnecessarily or cause any other type of damage.
These types of situations present a danger of fire or electrical shock.
Never attempt to repair or disassemble the machine or its parts as there is a danger of fire, electrical shock or damage to the laser. If the laser beam escapes, there is a danger of it causing blindness.
If the machine becomes excessively hot, smoke appears from the machine, there is an odd smell, or any other abnormal situation occurs, there is a danger of fire or electrical shock. Turn the power switch off (O) immediately, be absolutely certain to remove the power plug from the outlet and then contact your service representative.
If anything harmful (paper clips, water, other fluids, etc.) falls into the machine, turn the power switch off (O) immediately. Next, be absolutely certain to remove the power plug from the outlet to avoid the danger of fire or electrical shock. Then contact your service representative.
Do not remove or connect the power plug with wet hands, as there is a danger of electrical shock.
Always contact your service representative for maintenance or repair of internal parts.


CAUTION
Do not pull the power cord when removing it from the outlet. If the power cord is pulled, the wires may become broken and there is a danger of fire or electrical shock. (Always grasp the power plug when removing the power cord from the outlet.)
Always remove the power plug from the outlet when moving the machine. If the power cord is damaged, there is a danger of fire or electrical shock.
If the machine will not be used for a short period of time (overnight, etc.), turn the power switch off (O). If it will not be used for an extended period of time (vacations, etc.), remove the power plug from the outlet for safety purposes during the time the machine is not in use.
Always hold the designated parts when lifting or moving the machine.
For safety purposes, always remove the power plug from the outlet when performing cleaning operations.
If dust accumulates within the machine, there is a danger of fire or other trouble. It is therefore recommended that you consult with your service representative in regard to cleaning of internal parts. This is particularly effective if accomplished prior to seasons of high humidity. Consult with your service representative in regard to the cost of cleaning the internal parts of the machine.


Other Precautions
Do not place heavy objects on the machine or cause other damage to the machine.
Do not open the upper front cover, turn off the power switch, or pull out the power plug during copying.
When lifting or moving the machine, contact your service representative.
Do not touch electrical parts, such as connectors or printed circuit boards. They could be damaged by static electricity.
Do not attempt to perform any operations not explained in this handbook.

CAUTION
Use of controls or adjustments or performance of procedures other than those specified herein may result in hazardous radiation exposure.
Do not look directly at the light from the scanning lamp as it may cause your eyes to feel tired or painful.
Cautions when Handling Consumables

CAUTION
Do not attempt to incinerate the Toner Container. Dangerous sparks may cause burns.
Keep the Toner Container out of the reach of children.
If toner happens to spill from the Toner Container, avoid inhalation and ingestion, as well as contact with your eyes and skin.
- If you do happen to inhale toner, move to a place with fresh air and gargle thoroughly with a large amount of water. If coughing develops, contact a physician.
- If you do happen to ingest toner, rinse your mouth out with water and drink 1 or 2 cups of water to dilute the contents of your stomach. If necessary, contact a physician.
- If you do happen to get toner in your eyes, flush them thoroughly with water. If there is any remaining tenderness, contact a physician.
- If toner does happen to get on your skin, wash with soap and water.
Do not attempt to force open or destroy the Toner Container.



Other Precautions
After use, always dispose of the Toner Container in accordance with Federal, State and Local rules and regulations.
Store all consumables in a cool, dark location.
If the machine will not be used for an extended period of time, remove the paper from the cassette, return it to its original package and reseal it.
Laser Safety (Europe)
Laser radiation could be hazardous to the human body. For this reason, laser radiation emitted inside this machine is hermetically sealed within the protective housing and external cover. In the normal operation of the product by user, no radiation can leak from the machine.
This machine is classified as Class 1 laser product under IEC 60825.
CAUTION: Performance of procedures other than those specified in this manual may result in hazardous radiation exposure.
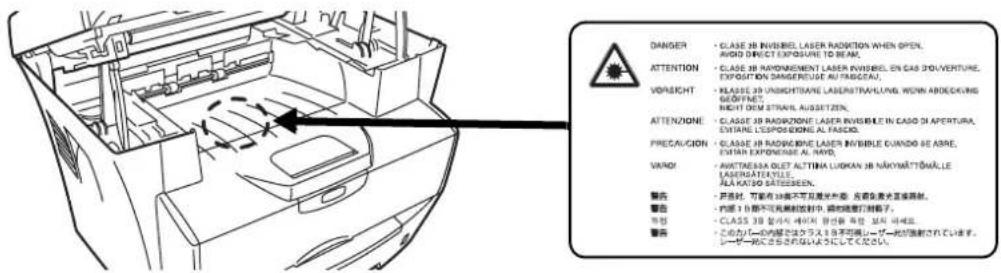
This label is attached to the laser scanner unit inside the machine and is not in a user access area.

| DANGER | CLASE 3B INVISIBEL LASER RADIATION WHEN OPEN.AVOID DIRECT EXPOSURE TO BEAM. |
| ATTENTION | CLASE 3B RAYONNEMENT LASER INVISIBEL EN CAS D'OUVERTURE.EXPOSITION DANGEREUSE AU FAISCEAU. |
| VORSICHT | KLASSE 3B UNSICHTBARE LASERSTRAHLUNG, WENN ABDECKUNG GEÖFFNET.NICHT DEM STRAHL AUSSETZEN. |
| ATTENZIONE | CLASSE 3B RADIAZIONE LASER INVISIBILE IN CASO DI APERTURA.EVITARE L'ESPOSIZIONE AL FASCIO. |
| PRECAUCION | CLASSE 3B RADIAZIONE LASER INVISIBLE CUANDO SE ABRE.EVITAR EXPONERSE AL RAYO. |
| VARO! | AVATTAESSA OLET ALTTIINA LUOKAN 3B NÄKYMÄTTÖMÄLLE LASERSÄTEILYLLE.ÄLÄ KATSO SÄTEESEEN. |
Safety Instructions Regarding the Disconnection of Power (Europe)
CAUTION: The power plug is the main isolation device! Other switches on the equipment are only functional switches and are not suitable for isolating the equipment from the power source.
DECLARATION OF CONFORMITY
TO
89/336/EEC, 73/23/EEC, 93/68/EEC and 1999/5/EC
We declare under our sole responsibility that the product to which this declaration relates is in conformity with the following specifications. Limits and methods of measurement for immunity characteristics of information technology equipment EN55024 Limits and methods of measurement for radio interference characteristics of information technology equipment EN55022 Class B equipment Limits for harmonic currents emissions for equipment input current ≤16A per phase EN61000-3-2 Limitation of voltage fluctuations and flicker in low-voltage supply systems for equipment with rated current ≤ 16A EN61000-3-3
Safety of information technology equipment, including electrical equipment EN60950-1 Radiation Safety of laser products, equipment classification, requirements and user's guide EN60825-1
Safety of Laser Beam (USA)
1. Safety of laser beam
This equipment has been certified by the manufacturer to Class 1 level under the radiation performance standards established by the U.S.DHHS (Department of Health and Human Services) in 1968. This indicates that the product is safe to use during normal operation and maintenance. The laser optical system, enclosed in a protective housing and sealed within the external covers, never permits the laser beam to escape.
2. The CDRH Act
A laser-product-related act was implemented on Aug. 2, 1976, by the Center for Devices and Radiological Health (CDRH) of the U.S. Food and Drug Administration (FDA). This act prohibits the sale of laser products in the U.S. without certification, and applies to laser products manufactured after Aug. 1, 1976. The label shown below indicates compliance with the CDRH regulations and must be attached to laser products marketed in the United States. On this copier, the label is on the rear.

3. Optical unit
When checking the optical unit, avoid direct exposure to the laser beam, which is invisible.
Shown at left is the label located on the cover of the optical unit.
4. Maintenance
For safety of the service personnel, follow the maintenance instructions in the other section of this manual.
5. Safety switch
The power to the laser unit is cut off when the upper front cover is opened.
Safety Instructions Regarding the Disconnection of Power
CAUTION: The power plug is the main isolation device! Other switches on the equipment are only functional switches and are not suitable for isolating the equipment from the power source.
This equipment has been tested and found to comply with the limits for a Class B digital device, pursuant to Part 15 of the FCC Rules. These limits are designed to provide reasonable protection against harmful interference in a residential installation. This equipment generates, uses and can radiate radio frequency energy and, if not installed and used in accordance with the instructions, may cause harmful interference to radio communications. However, there is no guarantee that interference will not occur in a particular installation. If this equipment does cause harmful interference to radio or television reception, which can be determined by turning the equipment off and on, the user is encouraged to try to correct the interference by one or more of the following measures:
- Reorient or relocate the receiving antenna.
- Increase the separation between the equipment and receiver.
- Connect the equipment into an outlet on a circuit different from that to which the receiver is connected.
- Consult the dealer or an experienced radio/TV technician for help.
CAUTION: The changes or modifications not expressly approved by the party responsible for compliance could void the user's authority to operate the equipment.
The above warning is valid only in the United States of America.
Mercury Warning

The lamp(s) inside this product contain mercury and must be recycled or disposed of according to local, state or federal laws.
Introduction
Included Manuals
Included manuals are different depending on models.
| Model Included | Manual |
| d-Copia 163MF | Operation Guide (this document) |
| d-Copia 164MF | Operation Guide (this document)Facsimile Operation Guide |
Operation Guide (this document)
Describes how to load paper or how to operate copying, printing, or scanning and explains how to handle problems.
Facsimile Operation Guide
Describes how to use fax function and explains how to handle problems.
Overview of Operation Guide
This Operation Guide has following chapters:
1 Machine Parts - identifies the names and functions of the machine and operation panel.
2 Loading Paper - contains explanations on loading paper and attaching the manual feed tray.
3 Preparations - contains information on setting the machine up ready for use.
4 Copy Functions - explains how to make copies.
5 Scanning Functions - explains how to scan originals.
6 Printing Functions - explains how to make prints.
7 Using QLINK - explains how to use QLINK software.
8 System Settings - explains the procedures to make the various settings.
9 Maintenance - describes the maintenance and toner replenishment procedures.
10 Troubleshooting - explains how to handle problems such as error indications or paper jams.
11 Specifications - contains machine specifications.
Conventions
This manual uses the following conventions.
| Convention Description Example | ||
| Italic Typeface Used | to emphasize a key word, phrase or references to additional information. | Open the Front Cover.For details on Auto Sleep, refer to Sleep Mode on page 8-1. |
| Courier Typeface Used | to denote messages or names displayed on the operation panel. | Access 13. Sleep Mode. |
| Bracket Bold Text Typeface | Used to denote operation panel keys. | Press [Copy Mode] to select the desired mode. |
| Bold Typeface Used | to emphasize buttons or items to be selected in dialog boxes, and titles displayed in dialog boxes. | Click Next. |
| Notes Used to provide additional or useful information about a function or feature. Can also contain references to other publications. | NOTE: For information about storing the pin, refer to step 10. | |
| Important Used to provide important information. | IMPORTANT: Ensure paper is not folded, curled, or damaged. | |
| Caution Cautions are statements that suggest mechanical damage as a result of an action. | CAUTION: Do not pull the cassette out when holding the front of the machine. | |
| Warning Used to alert users to the possibility of personal injury. | WARNING: High voltage is present in the charger section. | |
Accessing Menu Items
When you configure the machine, you do so by accessing a menu item and making your setting from there. Each configuration instruction in this guide tells you to access the menu item and provides a route map to direct you to that item. An example of a route map and its significance is shown below.
 |
ents the operation panel button to be pressed.
Press the left or right button until 1. Common Setup is displayed.
Press the left or right button until 12. Paper Size is displayed.
1 Machine Parts
Main Body

1 Scan Unit
2 Front Cover 6 Developer Unit
3 Cassette 7 Drum Unit
4 Manual Feed Tray
5 Toner Container

8 Shipping Lock 12 Platen
9 Original Size Indicator Plate
10 Operation Panel
11 Original Cover
13 Output Tray
14 Paper Stopper
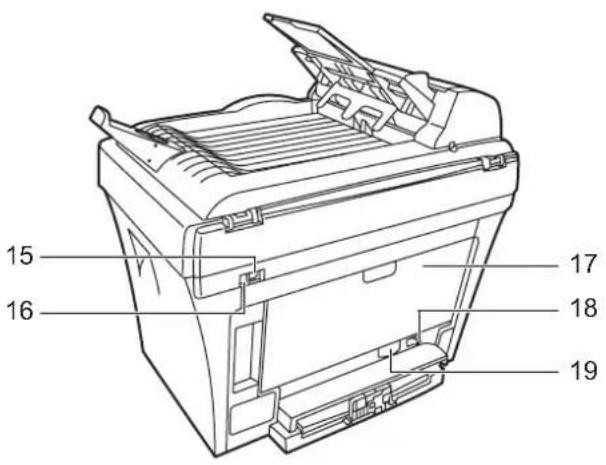
15 USB Interface Connector
16 5V DC Output (for Print Server IB-110)
17 Rear Cover
18 Power Switch
19 Power Cord Receptacle
Document Processor
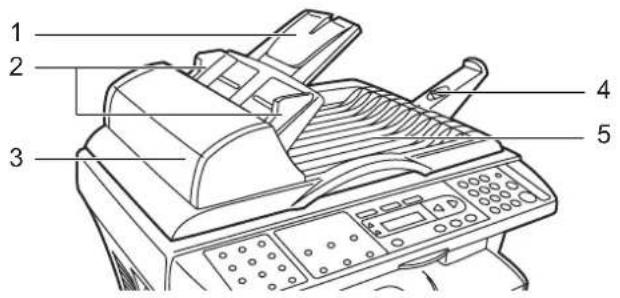
1 Original Table
2 Original Insert Guides 5 Original Eject Table
3 Left Cover
4 Ejection Extension
Operation Panel
d-Copia 164MF

d-Copia 163MF

1 Copy Mode Key and Indicator
2 Collate Key and Indicator
3 Combine Key and Indicator
4 SCAN Key and Indicator
5 COPY Key and Indicator
6 Key
7 ▶ Key
8 Numeric Keys
9 EcoPrint Key and Indicator
10 Stop/Clear Key
11 Exposure Adjustment Key
12 Zoom Key
13 Paper Jam Indicator
14 Toner Indicator
15 Scan To PC Key
16 Message Display
17 Menu Key
18 Cancel Key
19 OK Key
20 Start Key
NOTE: When copying in EcoPrint mode, press [EcoPrint] on the operation panel, refer to EcoPrint Mode on page 4-6. Set by the Printer Driver when you print in EcoPrint mode from the personal computer, refer to Printing Functions on page 6-1.
Message Display
The message display on the operation panel shows:
- Status information, the messages listed below which are displayed during normal operation.
- Error codes, when the printer requires the operator's attention. For further information refer to Maintenance and Error Messages on page 10-3.
Status Information
| Message Meaning | |
| Warming Up The machine is warming up and is not ready.When the machine is switched on for the first time, this message will take several minutes. | |
| 100% A4······· 01 | The machine is ready to use. This is the ready screen in the copy mode. |
| Sleeping The machine is in Auto Sleep. The machine wakes from Auto Sleep whenever a key on the operation panel or a print job is received. The machine then warms up and goes on-line. For details on Auto Sleep, refer to Sleep Mode on page 8-1. | |
| Low Power The machine is in Low Power Mode. | |
| Canceling... The machine is skipping the data. | |
| Copying The machine is making the copy. | |
| Printing The machine is printing the received data from your computer. | |
| Scanning The machine is scanning the original. | |
Error Codes
Refer to Troubleshooting section.
2 Loading Paper
Paper Specifications
The following table summarizes the basic paper specifications:
| Item Specification | |
| Weight Cassette: 60 to 105g/m | 2 Manual Feed Tray: 60 to 163g/m2 |
| Thickness 0.086 to 0.110mm | |
| Dimensional Accuracy ±0.7mm | |
| Squareness of Corners 90° ±0.2° | |
| Moisture Content 4 to 6% | |
| Direction of Grain Long grain | |
| Pulp Content 80% or more |
NOTE: For further information about the sizes and types of media that can be used, refer to Specifications, on page 11-1.
Before Loading Paper
Set the paper in the cassette with the side which faced the top of its packaging facing up.
NOTE: Please set paper according to the instruction when paper side is directed.

flowchart
graph TD
    A["Printing Paper"] --> B["Stacked Paper"]
    B --> C["Add Paper"]
    C --> D["Packaging Paper"]
    D --> E["Final Packaging"]
When you open a new package of paper, fan through the sheets to separate them slightly prior to loading. If the paper is curled or folded, straighten it before loading. Paper that is curled or folded may cause paper jams.

natural_image
Line drawing of two hands holding a stack of papers (no text or symbols present)IMPORTANT: When using paper that has been run through a copier before, check it to make sure that all staples and paper clips have been removed. Attempting to copy paper that has fasteners attached may result in poor images or malfunctions.
Straighten out any creases or curls in the paper before loading it into the cassette. Failure to straighten out creases and curls may lead to paper misfeeds.
Loading Paper into a Cassette
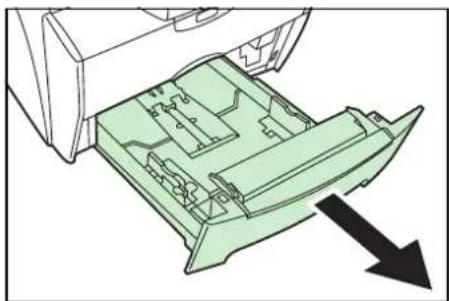
1 Pull the cassette completely out of the printer.
IMPORTANT: When pulling the cassette out of the printer, ensure it is supported and does not fall out.
natural_image
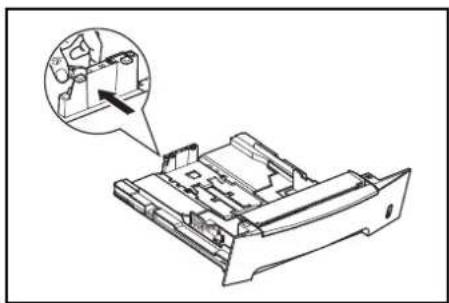
Diagram of a printer's internal structure showing a green cover with internal compartments and an arrow indicating direction (no text or symbols)2 Press the release button and adjust the paper length guide to the paper size required.
natural_image
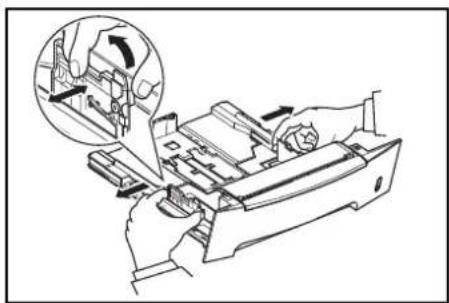
Technical line drawing of a mechanical device with an inset showing internal components (no text or symbols)3 Adjust the position of the width guides located on the left and right sides of the paper cassette. Press the release button on the left guide and slide the guides to the paper size required.
NOTE: The paper sizes are marked on the cassette.
If using Folio or Oficio II paper, remove the green stopper ① from the paper length guide and fix into position on the paper length guide ②. Pull the paper length guide towards the rear until it stops.
natural_image
Technical line drawing of a mechanical assembly with hand operating a component, showing internal components and motion arrows (no text or symbols)
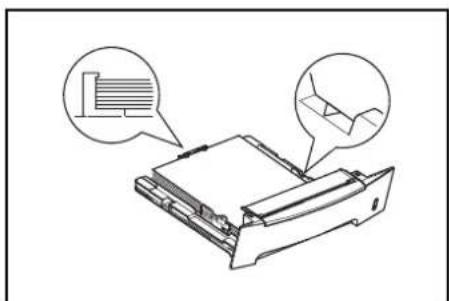
4 Load the paper in the cassette.
IMPORTANT: Always adjust the paper length and width guides before loading paper to avoid skewed paper feed and/or a paper jam.
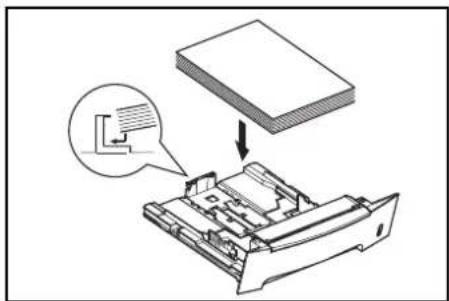
Do not load paper above the triangle mark located on the width guide.
Ensure the side to be printed is facing down and the paper is not folded, curled, or damaged.
natural_image
Diagram of a printer or printer with two circular annotations showing internal structure and hand gesture (no text or symbols present)5 Push the cassette back into the printer until it stops.
There is a paper gauge on the right side of the front of the cassette to indicate the remaining paper supply.

natural_image
Line drawing of a printer front panel with an inset showing a green cylindrical object inside (no text or symbols)Manual Feed Tray
Paper placed on the Manual Feed Tray is automatically fed and overrides the paper cassette.
1 Pull out the cassette to access the Manual Feed Tray.

natural_image
Diagram of a printer's internal structure showing a green plastic cover emerging from a paper holder, with an arrow indicating direction (no text or symbols present)2 Pull the Manual Feed Tray up and out.

natural_image
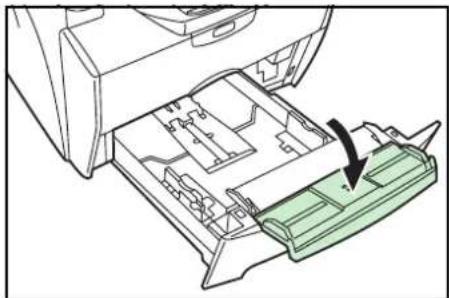
Diagram of a printer drawer with an arrow indicating the green cover area (no text or symbols present)3 Pull out the front of the Manual Feed Tray.
natural_image
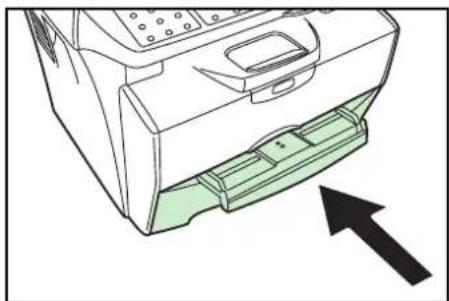
Diagram of a printer's internal structure showing internal compartments and a green cover with an arrow indicating insertion (no text or symbols present)4 Push the cassette back into the printer.
natural_image
Diagram of a printer's internal structure with an arrow indicating orientation (no text or symbols present)5 Adjust the paper width guides and slide the paper into the tray as far as it will go. The side to be printed should be face up.

Ensure the paper width guides are flush against the edge of the paper.
Envelopes should be fed in the face-up position, right edge first.
NOTE: Prior to purchasing envelopes, print a sample to check quality.

natural_image
Line drawing of a printer with a green paper being inserted, showing no text or symbols.IMPORTANT: Slide the paper firmly into the tray until it stop.
Load one sheet or envelope at a time.
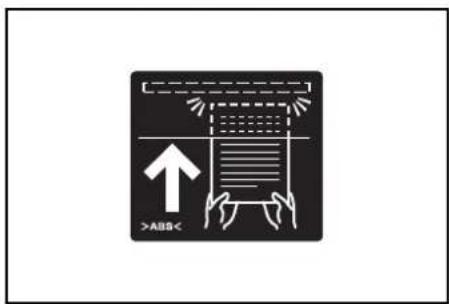
Start printing after loading the Manual Feed Tray.
6 After use, move the width guides fully outwards and close the Manual Feed Tray.
NOTE: For further information about the sizes and types of media that can be used, refer to Specifications on page 11-1.
7 Pull out the paper stopper.

natural_image
Line drawing of a printer's front panel and internal drawer with a green component, showing no text or symbols.Manual Duplex
Use Manual Duplex if you require printing on both sides of the paper. For Manual Duplex, load one sheet on the Manual Feed Tray at a time.
1 Load one sheet on the Manual Feed Tray in the face-up position and print the front side first.

natural_image
Line drawing of a printer with paper and paper attachment (no text or symbols)2 Load the printed sheet in the printed face-down position on the Manual Feed Tray again, and print the rear side.
Long edge binding or Short edge binding can be selected depending on the orientation of the sheet.
| Binding Orientation How to Load | |
Long Edge Binding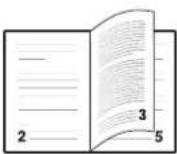 | 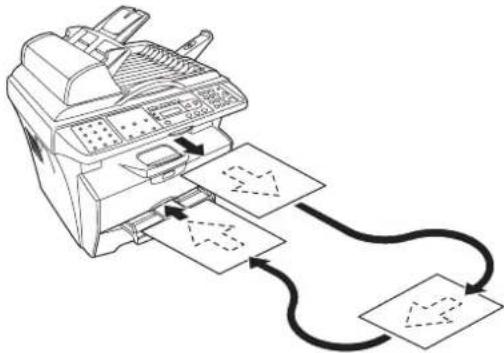 |
Short Edge Binding | 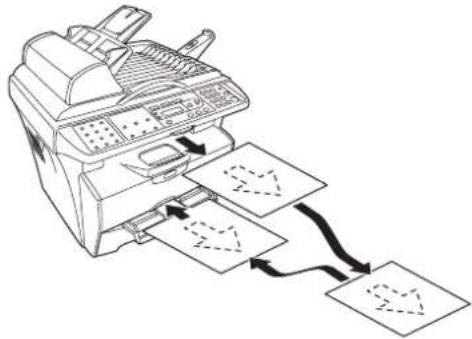 |
Selecting Paper Size
After loading paper, you need register the paper size.
The paper size that can be used are: A4, Letter, Legal, A5, B5, Officio II, Executive, Statement, Folio, B6, A6, ISO B5, Envelope C5, Envelope #10, Envelope DL, Envelope #9, Monarch, Envelope #6, 16K
| [Menu] |
| ◀ or ▶ |
| 1. Common Setup [OK] |
| ◀ or ▶ |
| 12. Paper Size [OK] |
1 Access 12. Paper Size.
If you are unsure how to use this route map refer to Accessing Menu Items on page xx.
2 Press ◀ or ▶ to select the paper size and press [OK]. The display returns to the ready screen.
Selecting Media Type
You can select the media type.
The media type that can be used are: PLAIN, TRANSP., PREPRINT, BOND, RECYCLED, VELLUM, ROUGH, LETTERHD, COLOR, PREPUNCH, ENVELOPE, CARDSTOCK, COATED, THICK, HIGH QLT, CUSTOM
| [Menu] |
| ◀or▶ |
| 1. Common Setup [OK] |
| ◀or▶ |
| 15.Media Type [OK] |
1 Access 15.Media Type.
If you are unsure how to use this route map refer to Accessing Menu Items on page xx.
2 Press ◀ or ▶ to select the media type and press [OK]. The display returns to the ready screen.
3 Preparations
Connecting the Cables
The machine can be connected to a computer.
Connecting the USB Cable
To connect the machine directly to your computer, use the USB cable.
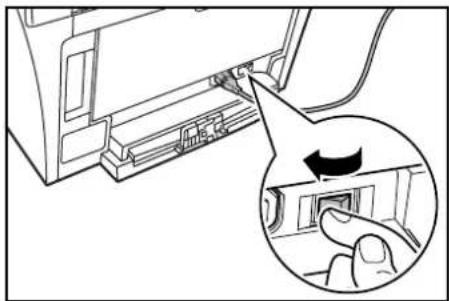
1 Turn the machine off, remove the power cord from the outlet and turn the computer off.
natural_image
Diagram showing a computer monitor with an open port and a hand inserting a button (no text or symbols present)2 Connect the USB cable to the USB interface connector located at the rear side of the machine.
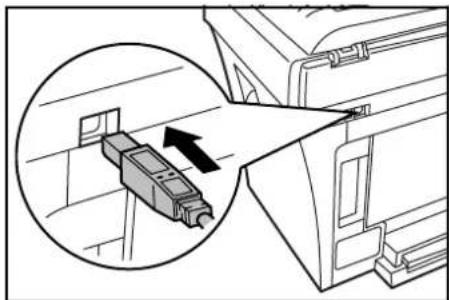
natural_image
Diagram showing a device connector with an arrow pointing to a component, enclosed in a circular inset (no text or symbols)3 Connect the other end of the USB cable to the USB interface connector on your computer.
Connecting the Power Cord
Connect the power cord to the rear of the machine. Connect the other end to a suitable power outlet.

natural_image
Diagram showing a computer monitor with an attached cable and a magnified inset of the cable connector (no text or symbols present)Turning the Machine On
Turn the power switch on. The machine will begin to warm up after which the ready screen is displayed.
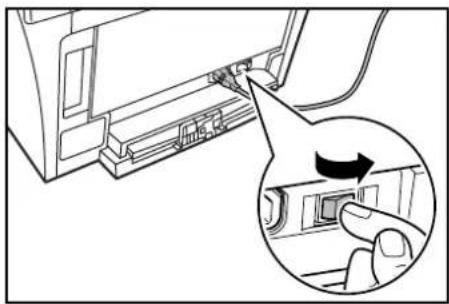
natural_image
Diagram showing a computer monitor with an open port and a hand inserting a button, highlighting the process (no text or symbols present)Loading Software
Installing the Printer Driver and Scanner Driver.
Ensure the machine is plugged in and connected to the computer's USB port before installing software from the CD-ROM.
Required operating systems (OS) for using the Software: Microsoft Windows 98SE/Me/2000/XP
Examples of the operations given in this guide are for the Windows XP. Essentially the same operations are used for Windows 98SE/Me/2000 environments.
1 Switch on the PC and activate Windows.
NOTE: If the Welcome to the Found New Hardware Wizard dialog box displays, select Cancel.

2 Insert the CD-ROM (Product Library) into the CD-ROM drive. Once the installation program launches, the License Agreement Notice is displayed.
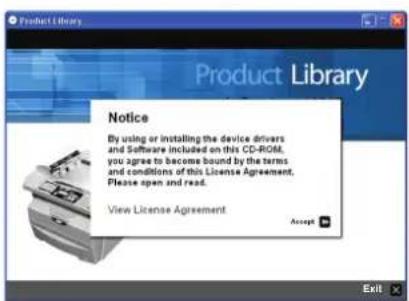
NOTE: If the installation program fails to launch, use Windows Explorer to access the CD-ROM and double-click Setup.exe.
3 Click View License Agreement to display and read it.
4 Click Accept to proceed.

5 Click Select Language.
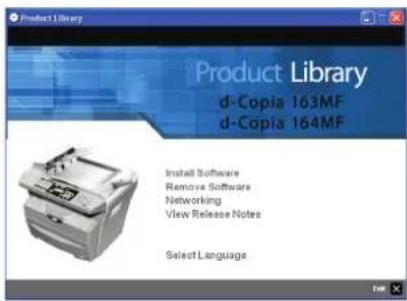
6 Click the language to be used.
7 Click Install Software. The Installation Wizard starts.

8 Click Next.
9 For the simple, default installation, select Express Mode and click Next.

NOTE: If you selected Custom Mode, select Universal serial bus (USB) to select the connection method, and follow the on-screen instructions. For details, refer to Custom Installation on page 3-4.
10 Click Install. The installation program installs the software.

NOTE: When installing software for Windows XP, if a software installation warning for an unsigned device driver is displayed, click Continue Anyway to bypass the warning and install the driver. All device drivers have been fully tested.

11 When the installation is complete, the Installation Completed window is displayed. Click Finish to leave the install program and return to the disc main menu.
Custom Installation
The Custom Mode is the user selection mode and can be customized the install options.
1 Follow steps 1 to 8 of Loading Software on page 3-2.
2 Select Custom Mode and click Next.
3 Select Universal serial bus (USB) and click NEXT.
4 Select the software packages you wish to install, and clear the ones you do not want installed.
5 Click Next.
6 Click Install. The installation program installs the software.
7 When the installation is complete, the Installation Completed window is displayed. Click Finish to leave the install program and return to the disc main menu.
Remove Software
When you fail in the installation of Software, please uninstall it once.
1 Follow steps 1 to 6 of Loading Software on page 3-2.
2 Click Remove Software.
3 Select the software packages you wish to uninstall, and click Uninstall.
4 Click Next.
5 Click Finish to leave the install program and return to the disc main menu.
4 Copy Functions
Basic Copying Procedure
To change the default settings for the machine, refer to System Settings.
1 Turn the machine on. At the end of warm-up, the ready screen will be displayed.
2 Select from the copier's various functions.

3 Press [Copy Mode] to select the desired mode.

| Mode Description | ||
 | (text and photo mode) | Select for originals containing a mixture of both text and photographs. |
 | (photo mode) Select | for originals containing mostly photographs. |
 | (text mode) Select | for originals containing mostly text. |
4 Adjusting Copy Exposure.
The Copy Exposure (density) is adjusted manually. To make the copy darker, press [Darker]. To make the copy lighter, press [Lighter].

5 Enter the number of copies required. Up to 99 can be entered.

6 Open the original cover and place the original face down onto the platen against the left rear corner of the platen. Close the original cover.

natural_image
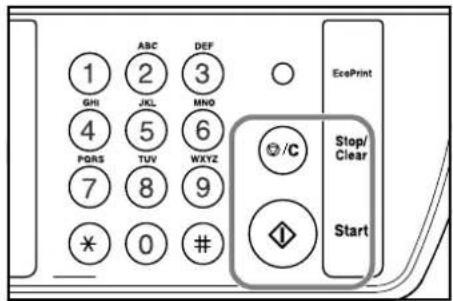
Line drawing of a hand using a handheld device to press or print a printer (no text or symbols visible)7 Press [Start]. Copying begins immediately. To cancel copying, press [Stop/Clear].
Completed copies are delivered to the output tray.

natural_image
Line drawing of a printer with paper filter and green cover (no text or symbols)Placing Originals in the Document Processor
The document processor automatically feeds and scans multiple sheet originals one by one.
IMPORTANT: Be sure that the document processor is closed whenever transporting the machine.
Acceptable Originals
- Use sheet originals only
• Paper weight: 60 to 105g/m²
• Paper sizes: Legal (Maximum), Statement and A5R (Minimum)
• Maximum number which can be set at one time: 50 sheets
Originals to Avoid
Be sure not to use the following originals in the document processor.
• Originals with punched holes or perforations.
- Transparencies.
- Soft originals such as carbon or vinyl paper, or other originals that are curled, wrinkled or creased.
- Irregularly shaped originals, wet originals, or originals that have adhesive tape or glue on them.
- Originals with clips or staples. Remove the clips or staples, and straighten any curls, wrinkles or creases, before placing them in the document processor. Failure to do so may result in the originals being jammed.
- Originals with cut-out sections or that have a slippery surface on either side.
• Originals on which any correction fluid is still wet.
- Folded originals - smooth out the folds before setting them in the document processor. Failure to do so may result in the originals being jammed.
1 Check that there are no other originals remaining in the document processor.
2 Be sure to fan through the originals a few times to separate the sheets before placing them in the document processor.
3 Adjust the original insert guides to fit the width of original to be copied.

natural_image
Line drawing of a person using a handheld device on an automotive control panel (no text or symbols visible)4 Pull the ejection extension when using A4.

natural_image
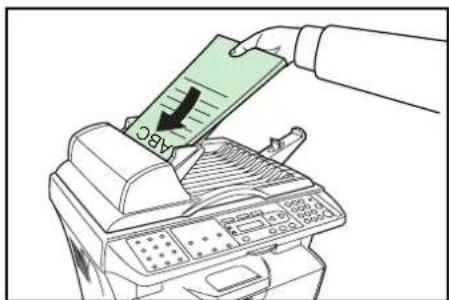
Line drawing of a printer with a green arrow pointing to the tray (no text or symbols present)5 Arrange the originals in order and place them face up on the original table. Slide the leading edge of the originals securely into the document processor as far as they will go.
Placing a Thick Original on the Platen
When copying from an original which cannot be placed in the document processor (books, magazines, etc.), open the document processor and place the original directly on the platen.
Close the document processor after use.

natural_image
Line drawing of a printer with green cover and control panel (no text or symbols)Zoom Copies
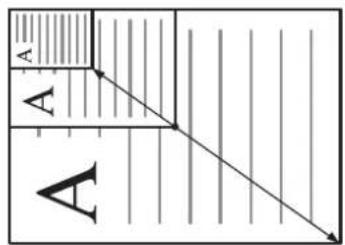
It is possible to change the zoom ratio in order to make copies of an enlarged or reduced size. The following modes are available for selecting the desired zoom ratio.
25%
400%
| Mode Description | |
| Standard Zoom Copies | can be made at one of the fixed zoom ratios.The following ratios are registered in the machine:Original 100%Fit To PaperLetter - Statement 64%A4 - A5 70%Statement - Letter 129%A5 - A4 141% |
| Variable Zoom The zoom ratio can be set to any 1% increment between 25% and 400%, as desired and shown below.Custom | |
NOTE: Fit To Paper is used when original that there are characters and illustrations in a full form is copied. The blank part of the print is calculated, and original is reduced and copied. It is not a function to enlarge or reduce by the automatic operation according to the paper size.
Standard Zoom
1 Press [Zoom].
2 Press ◀ or ▶ to select the desired zoom ratio.
3 Press [OK]. The message display returns to the ready screen. The new zoom ratio is registered.
To start copying, place the original on the platen and press [Start].
Variable Zoom
Perform the following procedure to make settings for the Variable Zoom mode.
1 Press [Zoom].
2 Press ◀ or ▶ to select Custom and press [OK].
3 Enter the desired ratio using numeric keys.

4 Press [OK]. The message display returns to the ready screen. The new zoom ratio is registered.
To start copying, place the original on the platen and press [Start].
Collate Mode
Multiple originals can be collated.

flowchart
graph TD
    A["Document 1"] --> B["Document 2"]
    B --> C["Document 3"]
    D["Document 1"] --> E["Document 2"]
    E --> F["Document 3"]
    G["Document 1"] --> H["Document 2"]
    H --> I["Document 3"]
    J["Document 1"] --> K["Document 2"]
    K --> L["Document 3"]
    M["Document 1"] --> N["Document 2"]
    N --> O["Document 3"]
Originals Copies
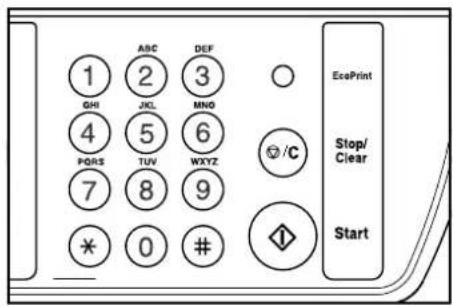
1 Press [Collate] to select pr.

2 Enter the desired number of copies.
3 Place the original on the platen and press [Start]. Scanning of the first original will start.
Replace the first original with the next one and press [Start]. Scanning will start.
4 Once all of the originals have been scanned, press Ⓞ Copying starts. Scanned pages are printed.
Combine Mode
The images from either 2 or 4 originals can be reduced and combined onto a single copy.
| Mode Description | |
| Copies four originals onto one sheet. | |
| Copies two originals onto one sheet. | |
| Copies one original onto one sheet. |
NOTE: Combine Mode does not support the Collate Mode or Zoom Mode. When an original set in the Document Processor, the Combine mode automatically starts scanning all the page.
1 Press [Combine] to select the desired mode.

2 Enter the desired number of copies.
3 Place the original on the platen and press [Start]. Scanning will start.
4 Replace the first original with the next one and press [Start]. Scanning will start. Scanned pages are printed every two or four page.
EcoPrint Mode
EcoPrint enables the machine to consume less toner for a page to save your printing costs. This will cause images to be printed lighter than normal without affecting print speed. Press [EcoPrint], the printing image becomes lighter, but readable.
5 Scanning Functions
This product allows you to operate the scanner from within a TWAIN or plug-in software application. As the scanner driver is not a stand-alone software, it has to be started from within a TWAIN-compliant software application and then the scanner driver is able to scan and load the image to your computer. The command to start the scanner driver may vary due to different software applications. To check the correct command, please refer to the user manual of your software application.
User Interface Operation
1 Open your TWAIN scanning application.
2 Pull down the File menu and choose Select Source.
If the Select Source command is not available on the File menu, see your application's user's guide to determine how the TWAIN link is used.
A dialog box with a list of scanning sources appears.
3 Select or import your scanner.
You need to select the source only once, unless you want to choose another scanner.
4 A dialog box containing scanning features appears as below:

5 Select the scanning method you want to use on the Scan Method drop-down menu.
6 Select the mode you want to use for your scans on the Image Type drop-down menu.
7 Select a scanning resolution on the Resolution drop-down menu.
8 Select the settings for the scanning features (e.g., Sharpen, Descreen, etc.) that you want to use.
9 Click Preview or Scan to preview or scan your document(s).

Selecting the Scan Method
Select how you want to scan on the Scan Method drop-down menu.
| Mode Description | |
| Simplex/Multi-page Use this setting if you are using the Document Processor to scan documents at a time. | |
| Flatbed Use this setting if you are using the platen to scan one page at a time. | |

Selecting Image Type
Select Image Type through the mode from the scanner user interface for your own purpose.
| Mode Description | |
| Black and White The original | will be scanned in monochrome. The resulting file size for the scan data will be smaller in comparison with the other color modes. |
| 8-Bit Gray The shading of the original will be reproduced. | |
| 24-Bit Color The original will be scanned in full color. | |

Selecting the Resolution
The higher the resolution value is, the finer the image will be. A higher resolution results in a larger file size and longer scanning time.
Preview
Click Preview to scan a document so you can review the scanned image. This allows you to specify an area to be scanned and any scanning feature settings to be used for future scans. When a scanning feature is changed and applied, the Preview image is updated for a real-time view of the change. You can define the area to be scanned by dragging the cursor lines with the mouse.
Zoom
Click Zoom to preview a selected area.
Scan
Click Scan to scan the area with the specified parameters. You can define the area to be scanned by dragging the cursor lines with the mouse.
Exit
Click Exit to cancel the current job.
Enhancing Your Image

Brightness
Adjusts the lightness or darkness of an image. The higher the value, the brighter the image.

Contrast
Adjusts the range between the darkest and the lightest shades in the image. The higher the contrast, the bigger the different gray scales.

Invert
The invert command reverses the brightness and the color in the image. For color images, each pixel will be changed into its complementary color at the command of Invert.

Mirror
The Mirror command reverses the image (create a mirror image).

Preview Auto-Area
Clicking the Preview Auto-Area button automatically crops the preview scan area to the previewed document. This will then be the cropping area for all of the scanned documents.

Original Size
Select a size on the Original Size list of frequently used scan sizes, including business card, 5 x 3 in., 6 x 4 in., Letter, B5, A5, A4 or your current scan area to perform an immediate selection of your scan size.

Units
The Units button indicates the measuring system that is in use (Inch, Cm, or Pixel).

Descreen
Click the Descreen button to access a drop-down menu that allows you to specify the type of document you are scanning in order to eliminate the moiré pattern commonly found in printed matter. You can specify Newspaper, Magazine, or Catalog. Moiré pattern is an undesirable pattern resulting from the incorrect screen angle of the overprinting halftone.

Sharpen
Click the Sharpen button to access a drop-down menu that allows you to specify a level to sharpen the scanned image. You can specify a Sharpen setting of Light, More, Heavy, or Extra Heavy.

Color Adjustment
Click the Color Adjustment button to enable the button for the Hue, Saturation, and Lightness feature.
NOTE: The Advanced Settings button must be enabled in order to use the Hue Saturation, and Lightness feature.

Auto Level
Click the Auto Level button to add shadow to reveal more details in an image.

Advanced Settings
Click the Advanced Settings button to view the advanced settings buttons for Highlight/Shadow Levels, Curves, Color Balance, Hue/Saturation/Lightness, Color Drop-out, and Custom Settings (six buttons on the right side of the TWAIN dialog box).

Highlight/Shadow
This feature is available when 8-Bit Gray, 8-Bit Color, or 24-Bit Color is selected on the Image Type drop-down menu. Highlight refers the lightest point in a scanned image; shadow refers the darkest point.
Click the Highlight/Shadow button to access Highlight/Shadow Levels dialog box. You can type values in the text boxes or you can place the mouse cursor over the line, click the right mouse button, and drag the line to specify the values you want.
Use the Highlight and Shadow settings together to extend the range of color and reveal more details in a color image.

Curves
When you select the Curves button, a dialog box appears that allows you to adjust the midtone of the image without losing details in the lightest and darkest areas.
Select Curve or Line, depending on if you want a curved or an angled setting. Place the mouse cursor over the line, click the right mouse button, and drag the line to set the curve you want.

Color Balance
When you select the Color Balance button, a dialog box appears that allows you to adjust the color of the image so that it comes close to that of the original.
The default parameters are used to adjust the image. You can type values in Color Levels text boxes or you can drag the sliding arrow under the color.

Hue/Saturation/Lightness
Click this button to adjust the hue, saturation, and lightness of an image. This button is enabled when the Color Adjustment button is selected. You can type values in the text boxes or you can drag the sliding arrow under the each item.
Hue - specify a value in Hue box to adjust the hue up to 360^ by clicking on the desired color on the color wheel or selecting a setting on the drop-down menu. The level of intensity for a color simultaneously changes when the hue adjustment is made.
Saturation - specify a value in Saturation box to adjust the saturation level of the color. The level of saturation indicates whether the color is pale or rich.
Lightness - specify a value in Lightness box to adjust the color strength.
NOTE: These options are available only when the Color Adjustment button is enabled.

Color Drop-out
This feature is available when Black and White or 8-Bit Gray is selected on the Image Type drop-down menu. Click the Color Drop-out button to access a dialog box that allows you to choose to remove the R (Red), G (Green), or B (Blue) color channel while scanning. Increasing the brightness after removing one of the color channels will make the image clearer.

Custom Settings
Click the Custom Settings button to access a dialog box where you can save your scan settings and configuration settings. There are two tabs: Scan Settings and Configuration Settings.
Scan Settings
Scan Settings tab allows you to save your scanning feature settings in a file, load an existing file, or delete an existing file.

| Saving a scan settings file | Type a name for your settings in File Name text box and click Save. Your settings will be saved and the file name will appear in the list box. |
| Using a scan settings file | You can use an existing settings file. Right-click the file name for the settings you want to use and click Load. The settings in the file will automatically be specified in the scanning features dialog box. |
| Deleting a scan settings file | Right-click a file name and press [Delete] on the computer keyboard to delete the file. You cannot delete the default scan settings file default.av2. |
| Using a scan settings file | You can use an existing settings file. Right-click the file name for the settings you want to use and click Load. The settings in the file will automatically be specified in the scanning features dialog box. |
| Deleting a scan settings file | Right-click a file name and press [Delete] on the computer keyboard to delete the file. You cannot delete the default scan settings file default.av2. |
| Using a scan settings file | You can use an existing settings file. Right-click the file name for the settings you want to use and click Load. The settings in the file will automatically be specified in the scanning features dialog box. |
| Deleting a scan settings file | Right-click a file name and press [Delete] on the computer keyboard to delete the file. You cannot delete the default scan settings file default.av2. |
Configuration Settings
Configuration Settings tab allows you to customize some special settings.
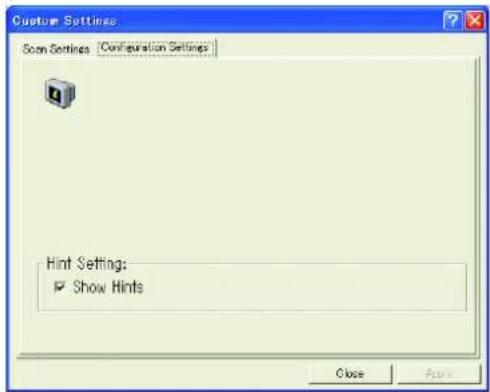
| Hint Setting | Check Show Hints box if you want to have flags that show the name of an item appear when you place the mouse cursor on an item in the dialog box. Click Apply to save the changes. |





Lock Scaling
Lock Scaling
Lock Scaling
Lock Scaling
Lock Scaling
6 Printing Functions
This section explains how to customize the installed printer driver settings and how to make prints.
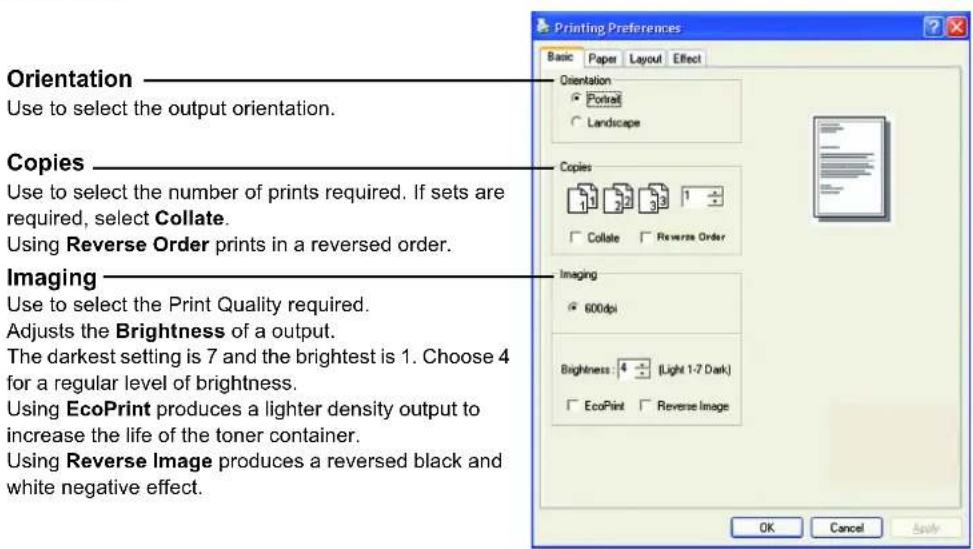
Printing Preferences
Basic Tab
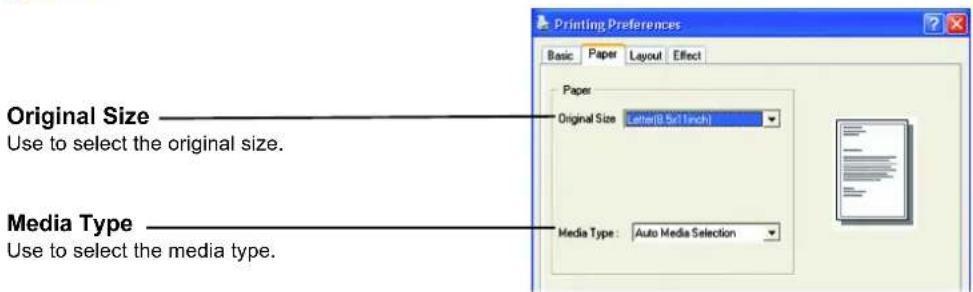
Paper Tab
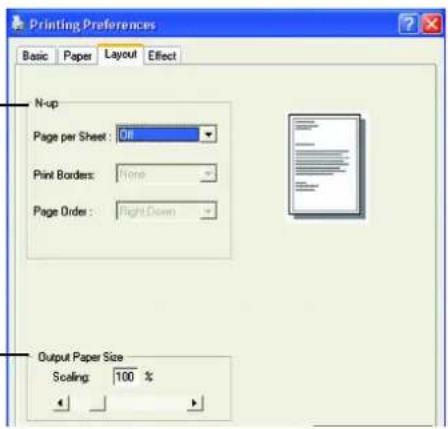
Layout Tab
N-up
Use to select N-Up to print up to 9 images on one sheet. Enabling the Print Borders displays the page borders of each page.
Output Paper Size
Use to enlarge or reduce the image between 25% and 400%.
Effect Tab
Watermark
Use to select and edit watermarks. New/Add allows you to add a new watermark. Edit allows you to change the watermark. Delete allows you to delete any watermark in the list.
![Printing Preferences Basic Paper Layout Effect First Page Only Watermark [none] New/Add Edit Remove String](/content/2026/05/841421/images/933dcb0aa1a053a7d13abeffe9bceefde8db057bba887d8f8b163407f7697f3b.jpg)
Printing a Document
1 Ensure the paper required is loaded in the machine.
2 From the application File menu, select Print. The Print dialog box displays.
3 Select the drop down list of printer names. All the printers installed are listed. Select your printer.
4 Select the options required, enter the number of copies required and if printing more than one set, select Collate.
Select OK to start printing.
NOTE: If a paper jam occurs or the paper runs out, the Status Monitor is displayed. This enables you to monitor and manage printer activity. You can exit the Status Monitor by clicking Delete, dealing with the paper jam or paper empty.

7 Using QLINK
The QLINK is a software utility that allows you to quite easily, with very few mouse clicks, access the most frequently used scanning applications. Using the QLINK eliminates the need to manually launch the specific applications and allows you to scan a document directly to a folder on your computer. The QLINK provides three categories of operations, as shown below:
1 MFP Button Setting Section - Configure [Scan To PC] on the operation panel.
2 Copy Function Section- Enhanced copy functions, such as Four/Two or One-on-One Copying.
3 Scan Function Section - Scan directly to a file, or email. User-defined buttons allow you to configure a button to meet your own application requirements.
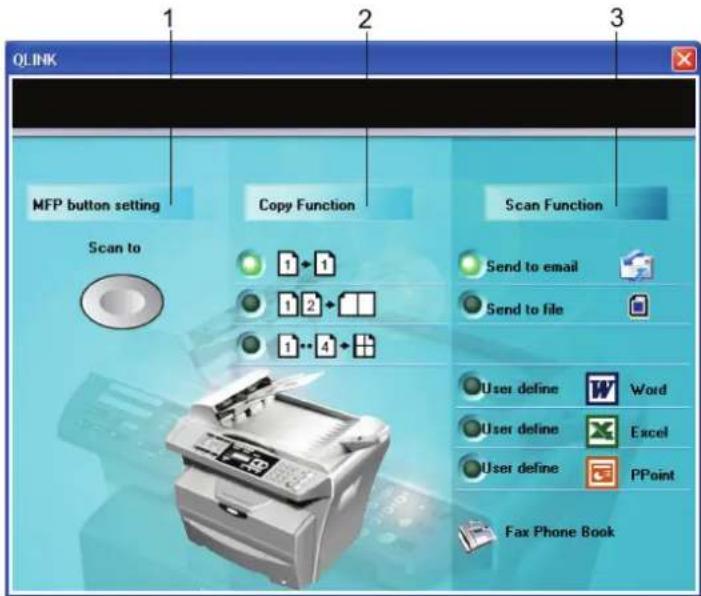
Two of the three sections in the above QLINK figure have a number of different buttons which are predefined for the most frequently used applications. The Scan Function section contains one button for Send to file, one button for Send to email, and three user-defined buttons with which you can assign your desired application. The Copy Function section contains three buttons for 4 to 1 copying. The MFP button setting section contains a big button, called Scan to, which allows you to configure [Scan To PC] on the operation panel.
To Start the QLINK
Double-click 📄 and then click the small QLINK icon located in the status area and the QLINK appears.
MFP Button Setting Section
Using the Scan To PC Button on the Operation Panel to Scan
Using [Scan to PC] eliminates the need to manually launch the specific applications and allows you to scan a document directly to a folder on your computer.
1 Place the original face up in the Document Processor, or face down on the platen.
2 Press [Scan to PC] on the operation panel.
3 Press ◀ or ▶ to select an application item in the message display.
4 Press [OK] to confirm your selected application item.
5 Press [Start] to start the scanning process.
Configuring the Scan To PC Button
When the QLINK is displayed, click the Scan to on the QLINK, and Edit Application list appears, as shown below:

New Application
New Application allows you to add your extra desired application item.
Edit
Edit allows you to change your application item or its properties in the list.
Click one of the applications in the list and then Edit to launch Preferences dialog box, as shown below:

| Program path Select | the path where your application's executable file is located in your computer by clicking Browse. |
| Program name Your application's original name is shown here. | |
| Program name on MFP LCD | Set a name for your application, which will appear on the message display. |
| Scan Adjust all other preferred scanner settings, including Original Image Type, Original Size, Resolution, Brightness, and Contrast. | |
| File Format | By selecting from File Format pull down list, you can save your original as PDF, BMP, JPEG and TIFF. |
| File Path You can select another folder/directory where the scanned file will be sent by clicking Browse. | |
Delete
Delete allows you to delete any application item in the list.
OK
This button is to save your updated settings.
Copy Function Section
The three copy buttons in the QLINK can be customized to allow you to take advantage of the features built into this machine's printer driver to do the Combine function if you load originals in the Document Processor.
By following the figure directions below, click one of the three copy buttons in the QLINK to copy.

flowchart
graph TD
    A["1"] --> B["1"]
    C["1"] --> D["2"] --> E[" "]
    F["1"] --> G["4"] --> H[" "]
Prints 1 original image reduced to fit onto one sheet of paper.
Prints 2 original images reduced to fit onto one sheet of paper.
Prints 4 original images reduced to fit onto one sheet of paper.
Configuring the Copy Function
To configure any of the three copy buttons in the QLINK, right-click it and click Configuration. Copy dialog box for this button appears, as shown below:

Scanner Setting
By clicking the arrow sign beside the drop-down list, you can choose from the following original image types:

If the content in the original is occupied by photo images only or by photo images with a little text on it, select Photo to get a photo-concentrated image copy. On the contrary, Text option helps you get a text-concentrated copy. However, if the proportion of the photo image is almost the same as that of text in the original to be copied, it is recommended to select Mixed in order to get the most optimal printout with photo and text mixed.
Advanced Setting
This button is to show the Scan preference dialog box, as shown below:
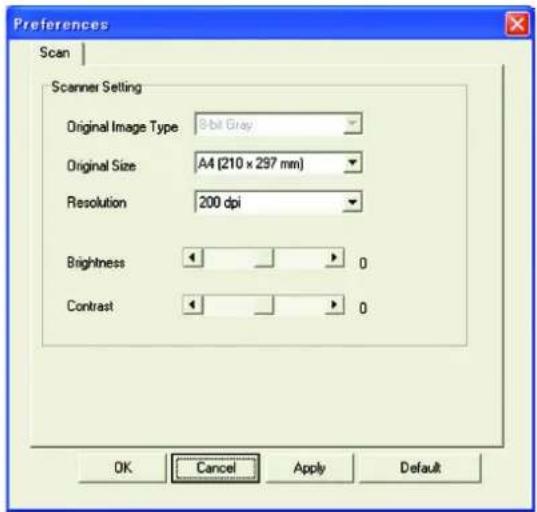
You can make good use of this Scan preference dialog box to adjust all other preferred scan settings, including Original Size, Resolution, Brightness, and Contrast.
Copy Setting
| Copies Selects the number of copies. | |
| Scale(%) Increase or decrease copy scaling. | |
| Printer | To update the default printer properties, click Properties, and an example of printer driver property window is displayed as shown below: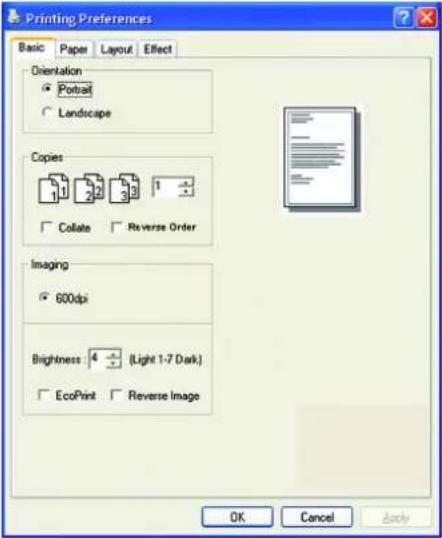 |
| Collate Enables the collate function. | |
OK
This button is to save your updated settings.
Scan Function Section
Send to email
Send to email enables you to scan a page or document directly into the E-mail application, Outlook Express, as a standard attachment.
To scan your originals to the E-mail application in the QLINK, click Send to email.
NOTE: If your Outlook Express application does not work, try to launch it before clicking Send to email.
Send to file
Send to file enables you to scan an image and save it to any directory on your hard disk. This allows you to easily archive your paper documents.
To scan your originals to a file in the QLINK, click Send to file.
User define Buttons
There are up to three user-defined buttons on the QLINK. You can set your own preferences and configuration to fit your required application.
To configure a User define Button, right click one of the three User define buttons and then click Configuration. An Application dialog box as an example appears, depending on the previously selected or default application item.
| Select Scan To Send The drop-down list allows you to select one of your preferred applications.The list contains the 8 default application items, which are frequently used scanning applications. | |
| OK This button is to save your updated settings. |
To scan your originals to the application for which a User define Button is defined in the QLINK, click a User define Button.
8 System Settings
This chapter explains the procedures to make the various settings that are required in relation to the overall operation of this machine.
Message Language
You can select the language of the message display from English, Français, Deutsch, Italiano, Nederlands, Español, Dansk, Svenska, Norsk, Polski, Čeština, Magyar, Suomi, РУССКИЙ, Lithuanian, ЕЛЛЯНУКА, Йнгилizce, 中文, Português, Português (SA).
| [Menu] |
| ◀ or ▶ |
| 1. Common Setup[OK] |
| ◀ or ▶ |
| 11. Language[OK] |
1 Access 11. Language.
If you are unsure how to use this route map refer to Accessing Menu Items on page xx.
2 Press ◀ or ▶ to select the language to be used in the display and press [OK].
The display changes to the selected language and returns to the ready screen.
Sleep Mode
The machine has an Auto Sleep Timer that is used to conserve power when it is not operating. You can adjust this time to between 5 minutes and 2 hours before the machine enters sleep mode. The factory default time is 15 minutes.
When you change this time, the transition time of Low Power Mode changes.
| Sleep Mode Transition Time Low Power Mode Transition Time | |
| Off Off | |
| 5 min 2.5 min | |
| 15 min 7.5 min | |
| 30 min 15 min | |
| 1 hr 0.5 hr | |
| 2 hr 1 hr | |
| [Menu] |
| ◀ or ▶ |
| 1. Common Setup[OK] |
| ◀ or ▶ |
| 13. Sleep Mode[OK] |
1 Access 13. Sleep Mode.
If you are unsure how to use this route map refer to Accessing Menu Items on page xx.
2 Press ◀ or ▶ to select the time for the Sleep Mode to engage and press [OK]. The display returns to the ready screen.
Toner Install
If you replace the toner container, you must reset the toner counter as explained below.
| [Menu] |
| ◀ or ▶ |
| 1. Common Setup[OK] |
| ◀ or ▶ |
| 14. Toner Install[OK] |
1 Access 14. Toner Install.
If you are unsure how to use this route map refer to Accessing Menu Items on page xx.
2 Press ◀ or ▶ to select On and press [OK]. The display returns to the ready screen.
Buzzer
The Buzzer can be set to sound when a key on the operation panel is pressed or in cases when errors occur, etc.
| [Menu] |
| ◀ or ▶ |
| 1. Common Setup[OK] |
| ◀ or ▶ |
| 16. Buzzer[OK] |
1 Access 16. Buzzer.
If you are unsure how to use this route map refer to Accessing Menu Items on page xx.
2 Press ◀ or ▶ to select On or Off. Press [OK]. The display returns to the ready screen.
Drum Reset
Perform the drum reset procedure when the drum unit has been replaced.
CAUTION: If this procedure has not been performed, the machine cannot set the proper main charger current control and a print quality problem may occur.
| [Menu] |
| ◀ or ▶ |
| 1. Common Setup[OK] |
| ◀ or ▶ |
| 17. Drum Reset[OK] |
1 Access 17. Drum Reset.
If you are unsure how to use this route map refer to Accessing Menu Items on page xx.
2 Press ◀ or ▶ to select On and press [OK]. The display returns to the ready screen.
Drum Refresh
The drum refresh is cleaning the drum surface. If potential printing quality problems has occurred, perform the drum refresh. Refer to General Guidelines on page 10-1.
| [Menu] |
| ◀ or ▶ |
| 1. Common Setup[OK] |
| ◀ or ▶ |
| 18. DrumRefresh[OK] |
1 Access 18. DrumRefresh.
If you are unsure how to use this route map refer to Accessing Menu Items on page xx.
2 Press ◀ or ▶ to select On or Off. Press [OK]. The display returns to the ready screen.
Drum Control
The drum control is cleaning the drum surface automatically when the machine is turned on. You can adjust the cleaning time from 0, 90, 155 seconds.
| [Menu] |
| ◀ or ▶ |
| 1. Common Setup[OK] |
| ◀ or ▶ |
| 19. DrumControl[OK] |
1 Access 19. DrumControl.
If you are unsure how to use this route map refer to Accessing Menu Items on page xx.
2 Press ◀ or ▶ to select the cleaning time. Press [OK]. The display returns to the ready screen.
Eco Fuser
When this mode is selected On, the fuser heater is switched off during sleep mode to save power consumption. However, warm-up time becomes longer than Off.
| [Menu] |
| ◀ or ▶ |
| 1. Common Setup[OK] |
| ◀ or ▶ |
| 110. Eco Fuser[OK] |
1 Access 110. Eco Fuser.
If you are unsure how to use this route map refer to Accessing Menu Items on page xx.
2 Press ◀ or ▶ to select On or Off. Press [OK]. The display returns to the ready screen.
Copy Setup
Changing Function Defaults
For functions that you use often, changing the default value to the setting will minimize the time required to make that setting each time the corresponding function is used. The following table shows the functions for which the default values can be changed and their available settings. The factory default settings are shown with an asterisk (*).
| Function Available Settings | Reference | ||
| 21. Def Copy Mode * Text | PhotoText + Photo | page 4-1 | |
| 22. Def Exposure 1 to 7 | (Default setting is 4) | page 4-1 | |
| 23. Def Zoom * Original | (100%)Custom(25%-400%)Fit To PaperLTR To STMA4 To A5STM To LTRA5 To A4 | page 4-4 | |
| 24. Def Collate | * | OnOff | page 4-5 |
| 25. Def EcoPrint | * | OnOff | page 4-6 |
| [Menu] |
| ◀ or ▶ |
| 2. Copy Setup[OK] |
1 Access 2. Copy Setup.
If you are unsure how to use this route map refer to Accessing Menu Items on page xx.
2 Press ◀ or ▶ to select the default setting that you want to change and press [OK]. The screen for the selected default setting is displayed.
3 Press ◀ or ▶ to select the new default setting and press [OK]. The display returns to the ready screen.
Printing the Report Pages
The following table shows the reports that are available for printing.
| Item Description | |
| 31. Configuration Lists information on the settings and environments of use for this machine. | |
| 32. Menu map List of the menu selection system. | |
| 33. Usage report No. of Copies, Prints, Scans. | |
| [Menu] |
| ◀ or ▶ |
| 3. Report[OK] |
1 Access 3. Report.
If you are unsure how to use this route map refer to Accessing Menu Items on page xx.
2 Press ◀ or ▶ to select 31. Configuration, 32. Menu map or 33.
Usage report and press [OK]. Printing of the report will begin. The display returns to the ready screen.
9 Maintenance
Toner Container Replacement
The toner container requires replacing when empty. A starter toner container provides approximately 3000 prints. A full toner container is offered in two yield types, 2000 or 6000 pages (at 5% coverage).
The machine displays messages at two stages of toner usage.
- When the machine becomes low on toner, the machine displays the message Toner Low as the first caution. Note the replacement is not always necessary at this stage.
- If you ignore the above message and continue printing, the machine displays the message Please Replace Toner just before the toner is used up. The toner container must be replaced immediately.
To replace the Toner Container use the instructions below.

CAUTION: Do not attempt to incinerate the Toner Container. Dangerous sparks may cause burns. Do not attempt to force open or destroy the Toner Container.
1 Open the Scan Unit.
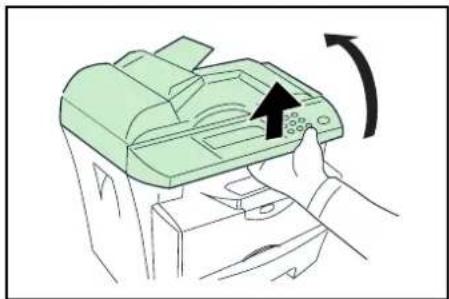
natural_image
Illustration of a hand using a printer to press or install a device, with an arrow indicating the process (no text or symbols present)2 Open the Front Cover.

natural_image
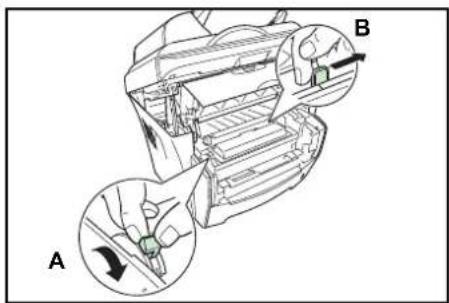
Illustration of a hand inserting a green plastic component into a machine (no text or symbols visible)3 Turn Lock Lever A to the unlock position, push Lock Lever B to the right and pull out the Toner Container.
Place the used Toner Container in the plastic bag provided for disposal.
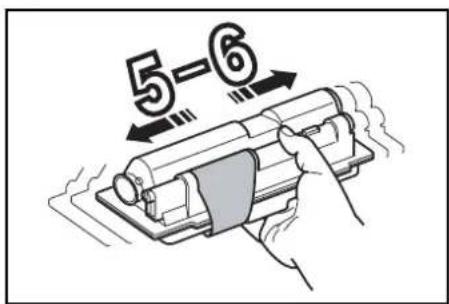
4 Remove the packaging from the new Toner Container.
Shake the container horizontally to distribute the toner evenly.
5 Remove the label from the Toner Container.

natural_image
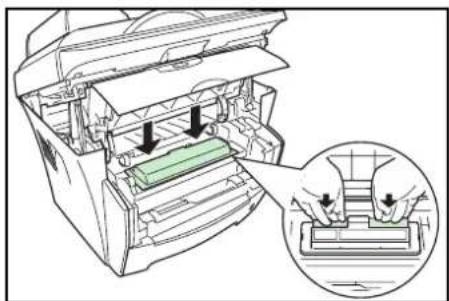
Diagram showing a hand holding a tool interacting with a device, with an inset magnified view of the tool's rotation (no text or symbols present)6 Install the new Toner Container in the printer. Push firmly on the top of the container at the positions marked PUSH HERE, until you hear a click.
7 Turn Lock Lever A to the lock position.

natural_image
Technical illustration of a mechanical assembly with a hand inserting a green component, showing internal components and a labeled section A (no text or symbols present)8 Close the Front Cover.

natural_image
Diagram of a mechanical device with internal components and a green component, showing a rotational arrow (no text or symbols)9 Close the Scan Unit pushing the Lever.

IMPORTANT: Take care not to place your fingers between the scan unit and the main body when the scan unit is closed.

Cleaning the Charger and Registration Roller
To avoid print quality problems, the interior of the machine must be cleaned with every Toner Container replacement.
1 Open the Scan Unit.
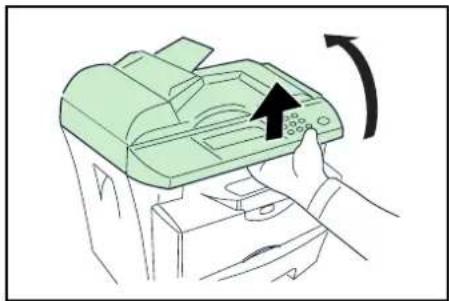
natural_image
Illustration of a hand pressing a green printer into a container with an arrow indicating rotation (no text or symbols)2 Open the Front Cover.

natural_image
Illustration of a hand inserting a green plastic component into a machine (no text or symbols visible)3 Lift the Developer Unit together with the Toner Container out of the printer.

natural_image
Illustration of hands installing or adjusting a green component inside a mechanical device (no text or symbols visible)4 Using the green handles lift the Drum Unit out of the machine.
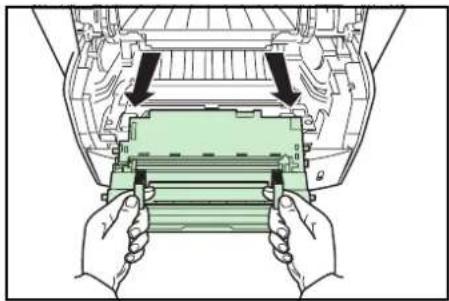
natural_image
Illustration of hands installing or adjusting a green component inside a mechanical housing (no text or symbols visible)NOTE: The Drum Unit is sensitive to light. Never expose the Drum Unit to light for more than five minutes.
5 Place the Drum Unit flat on a clean, level surface.

natural_image
Technical line drawing of a printer with a prohibition symbol (no text or labels present)IMPORTANT: Do not place the Drum Unit on end.
6 Use a clean, lint free cloth to clean dust and dirt away from the metal Registration Roller (metal) ①.

IMPORTANT: Take care not to touch the Transfer Roller (black) ② during cleaning.
7 Slide the Charger Cleaner (green) back and forth 2 or 3 times to clean the charger wire, then return it to its original position.

8 When cleaning is complete, return the Drum Unit to its position, aligning the guides at both ends with the slots in the machine.
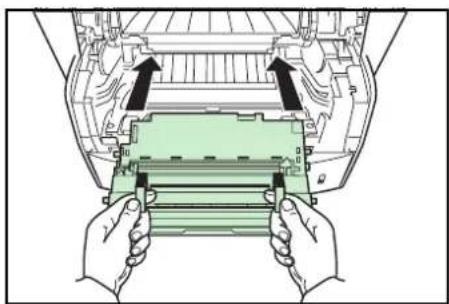
natural_image
Illustration of hands installing or adjusting a green plastic component inside a mechanical housing (no text or symbols visible)9 Insert the Developer Unit together with the Toner Container, back into the machine.

natural_image
Line drawing of hands installing or adjusting a green plastic component into an open mechanical device (no text or symbols visible)10 Close the Front Cover.
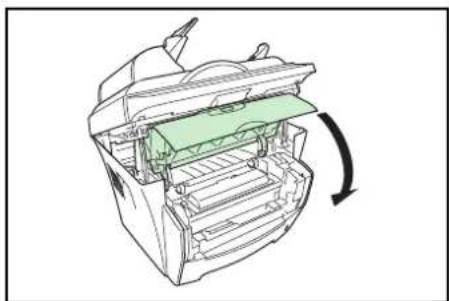
natural_image
Technical line drawing of a mechanical device with internal components and a green component, showing a rotational arrow (no text or symbols)11 Close the Scan Unit pushing the Lever.

IMPORTANT: Take care not to place your fingers between the scan unit and the main body when the scan unit is closed.
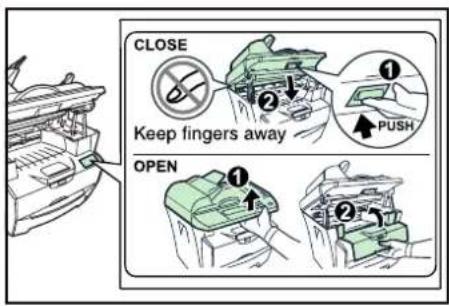
Cleaning the Machine
CAUTION: For safety purposes, always remove the power cord from the outlet when performing cleaning.
Always use a soft cloth dampened with alcohol or mild detergent to clean the machine.
Open the Document Processor and wipe the gray portion, as shown in the illustration.
If copies appear soiled while using the document processor the slit glass is dirty.
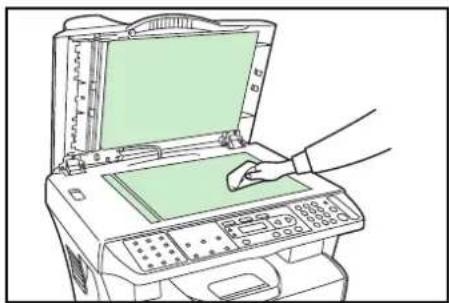
natural_image
Line drawing of a hand inserting a green card into an open printer (no text or symbols visible)Cleaning the Document Processor
From time to time the document processor pad and feeding rollers may become contaminated with ink, toner particles, or paper dust. In this case, documents may not feed smoothly. If this occurs, follow the cleaning procedure describe below.
1 Open the Left Cover.
2 Wipe the Feeding Roller by moving the swab from side to side. Rotate the roller forward with your finger and repeat the above cleaning procedure until the rollers are clean. Be careful not to snag or damage the Pick Spring.
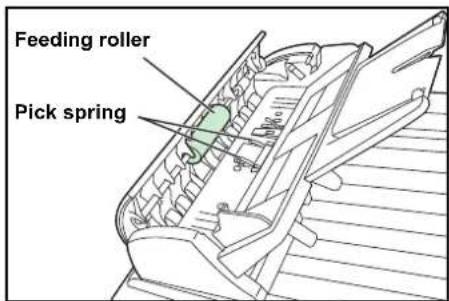
3 Wipe the Pad from top to bottom. Be careful not to snag the Pick Spring.
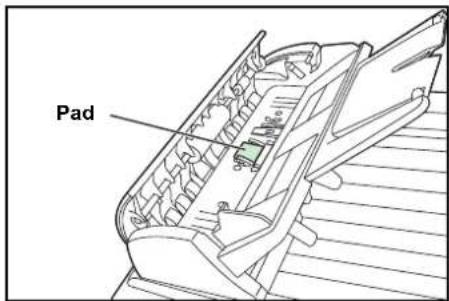
Replacing the Document Processor Pad
After scanning approximately 50,000 pages through the Document Processor, the pressure pad may be worn out and you may experience problems with document feeding. In this case, it is highly recommended that you replace the pad with a new one. Consult your nearest service representative or authorized service center to order a document processor pad, and follow the procedure below to replace it.
1 Open the Left Cover.
2 Press both arms of the document processor pad inwardly with your fingers and then pull out the document processor pad.
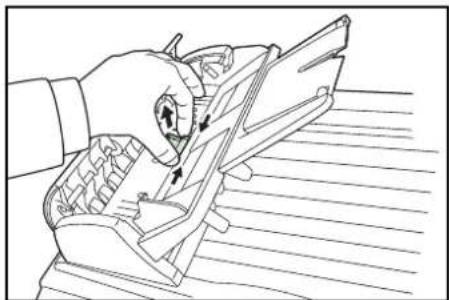
natural_image
Line drawing of a hand using a tool to cut or adjust a mechanical component (no text or symbols present)3 Remove the document processor pad from the box.
4 Press both arms of the document processor pad inwardly with your finger.
5 Place the pad into the holes until it snaps into place.

natural_image
Technical line drawing of a mechanical assembly with no visible text or symbolsShipping Lock
Always slide shipping lock to Lock position before moving this machine from one location to another. And slide to Unlock position before using it.

10 Troubleshooting
General Guidelines
The table below provides basic solutions for problems you may encounter with the machine. We suggest you consult this table to troubleshoot the problems before calling for service.
| Symptom Check Item Corrective Action Reference | |||
| Nothing lights on the operation panel when the power switch is turned on. | Is the power plug connected to an AC outlet? | Connect the plug to an AC outlet. — | |
| No copies delivered after [Start] is pressed. | Is there some indication of the trouble on the operation panel? | Check the appropriate response to that indication and perform the corresponding procedure. | page 10-3 |
| Blank copies. Were | the originals placed correctly? | When placing originals on the platen, place them face-down. | page 4-1 |
| When setting originals in the document processor, place them face-up. | — | ||
| Light copies. Is the | copier in either the Photo, Text+Photo, or Text mode? | Adjust the exposure to the correct level. page 4-1 | |
| Is the copier in the Toner Save mode? | Select an image quality mode other than the Toner Save mode. | — | |
| Is the Add Toner indicator lit? Replace the toner container. page 9-1 | |||
| Is the copy paper damp? Replace the copy paper with new paper. | page 2-1 | ||
| Dark copies. | Is the copier in either the Photo, Text +Photo, or Text mode? | Adjust the exposure to the correct level. page 4-1 | |
| Dirty copies. | Is the platen or the document processor dirty? | Clean the platen and/or the document processor. | page 9-6 |
| Clean the charger. | page 9-3 | ||
| All black pages. | — | Contact your Service Technician. | — |
| Dropouts, horizontal streaks or stay dots | Is the charger wire dirty? | Clean the charger wire. | page 9-3 |
| Is the drum surface dirty? | Clean the drum surface. | page 8-3 | |
| Symptom Check Item | Corrective Action | Reference | |
| Black or white bands on copies. | Is the charger wire dirty? Clean the charger wire. page 9-3 | ||
| Is the charger cleaner in the CLEANER HOME POSITION? | Remove the process unit and return the charger cleaner to its home position. | page 9-3 | |
| If you are using the document processor, is the slit glass dirty? | Clean the slit glass.It is also possible to use the Scan Noise Reduction function to make black lines on the copies less apparent. | page 9-6 | |
| Skewed copies. Were the originals placed correctly? | When placing originals on the platen, align them against the upper left corner. | page 4-1 | |
| When placing originals in the document processor, align the width guides securely before inserting the originals. | — | ||
| Frequent paper jams. | Is the paper loaded properly in the cassette? | Load the paper properly. page 2-1 | |
| Is the paper curled, folded or wrinkled? | Replace the paper with new paper. — | ||
| Is there any jammed paper or loose scraps of paper remaining inside the machine? | Carry out the appropriate procedure to remove the paper. | page 10-4 | |
| Does the registered paper size match the size you are actually using? | Be sure the registered paper size matches the size you are actually using. | — | |
| Is the paper loaded properly on the manual feed tray? | Place 1 sheet properly. page 2-3 | ||
| The Toner indicator doesn't go out after replacing the toner container. | Did you shake the new toner container enough? | Shake the toner container horizontally 5 or 6 times. | page 9-1 |
| The scanner function doesn't work normally. | Did you install Software from installation program of CD-ROM? | Install Software from CD-ROM. page 3-2 | |
| Did you install Software from Found New Hardware Wizard? | Install Software from Found New Hardware Wizard. | page 3-4 | |
| Software cannot be uninstalled. | Did you uninstall Software from Uninstall of the Start menu? | Uninstall Software from CD-ROM. page 3-4 | |
| Print Server (IB-110) is connected, this machine cannot be operated from your PC. | Is the setting of the printer driver correct? | Select the Enable bidirectional support of the Ports tab. | page 11-4 |
| The version of the Print Server (IB-110) doesn't correspond. | Contact your Service Technician. — | ||
Maintenance and Error Messages
When any of the following messages appears on the message display, perform the procedure provided below.
| Message Procedure | Reference | |
| Close Scan Unit The scan | unit is open. Close the scan unit. — | |
| Front Cover OpenClose cover | The front cover is open. Close the covers securely. — | |
| Memory LowOnly 1 Copy Made | The machine's memory is full. Insert fewer originals and try to copy again. | — |
| Open ADF coverRemove the paper | This appears when the paper has jammed while being fed from the document processor because of the way it was placed.Remove all the document pages inside the document processor, and set them again correctly. | page 10-11 |
| Open front coverRemove the paper | A paper jam has occurred. Remove the jammed paper. page 10-4 | |
| Paper EmptyAdd paper | The paper has run out. Add paper to the paper source.The cassette is not properly closed. Be sure the cassette is closed securely. | page 2-1 |
| Paper Mismatch | There is no paper. Load the correct size paper. | page 2-1 |
| Please ReplaceToner | Toner has run out so further copying or printing is impossible.Replace the toner container using a new toner kit. | page 9-1 |
| [PRINTER ERROR]Out of Memory | The data transferred to the machine was too complex to print on a page. | — |
| [PRINTER ERROR]Engine Panic | Turn the power switch off and then back on again. If this message still remains, turn the power switch off, and contact your service representative or authorized service center. | — |
| [PRINTER ERROR]Service Call | ||
| [SCANNER ERROR]Lamp Error | Turn the power switch off and then back on again. If this message still remains, turn the power switch off, and contact your service representative or authorized service center. | — |
| [SCANNER ERROR]AFE R/W Error | ||
| [SCANNER ERROR]Home Sensor | ||
| [SCANNER ERROR]NVRAM R/W Fail | ||
| Toner Low Toner is running | low. Replace the toner container using a new toner kit as soon as possible. | page 9-1 |
| Unlock scannerPower Off and On | Turn the power switch off and slide shipping lock to unlock position. | page 9-8 |
Paper Jam
If a paper jam occurs, copying or printing will stop.
Leave the power switch on and to remove the jammed paper.
WARNING: High voltage is present in the charger section. Take sufficient care when working in this area, as there is a danger of electrical shock.
CAUTION: The fuser unit is extremely hot. Take care when working in this area.
Output Tray and Rear Cover
1 If paper is not completely ejected into the Output Tray, open the Rear Cover and remove the jammed paper by pulling it out.

natural_image
Line drawing of a printer with a green paper being inserted, showing the printer's internal structure and base (no text or symbols)2 Open the Scan Unit.
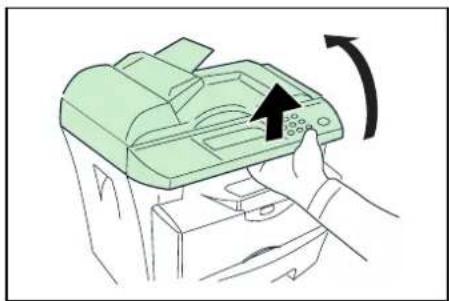
natural_image
Illustration of a hand pressing a printer into a device with an arrow indicating rotation (no text or symbols present)3 Open the Front Cover.
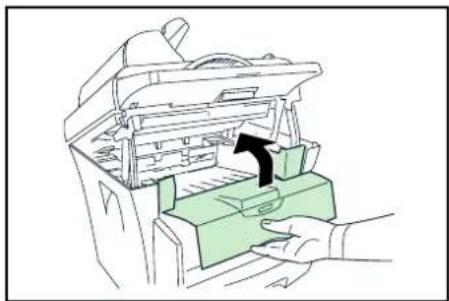
natural_image
Illustration of a hand inserting a green plastic component into a machine (no text or symbols visible)4 Close the Front Cover.
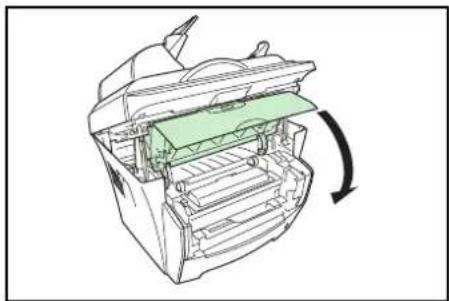
natural_image
Diagram of a mechanical device with internal components and a green component, showing a rotational arrow (no text or symbols)5 Close the Scan Unit pushing the Lever. The error is cleared.

IMPORTANT: Take care not to place your fingers between the scan unit and the main body when the scan unit is closed.

Paper Cassette
1 Pull out the cassette.
2 Remove any partially fed paper.
Check to see if paper is loaded correctly. If not, reload the paper.
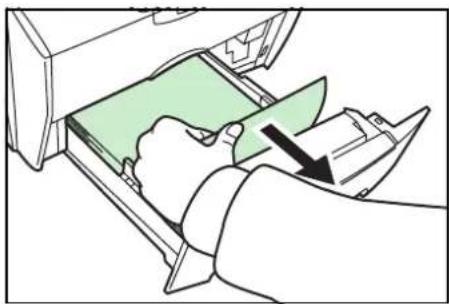
natural_image
Illustration of a hand inserting a device into a machine (no text or symbols visible)3 Push the cassette back in firmly.
4 Open the Scan Unit.
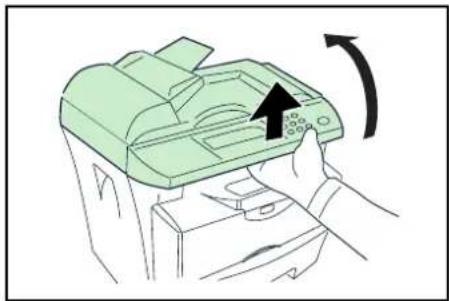
natural_image
Illustration of a hand using a green printer to press or install a device, with an arrow indicating rotation (no text or symbols present)5 Open the Front Cover.

natural_image
Illustration of a hand inserting a green plastic component into a machine (no text or symbols visible)6 Close the Front Cover.

natural_image
Diagram of a mechanical device with internal components and a green component, showing a rotational arrow (no text or symbols)7 Close the Scan Unit pushing the Lever. The error is cleared.

IMPORTANT: Take care not to place your fingers between the scan unit and the main body when the scan unit is closed.
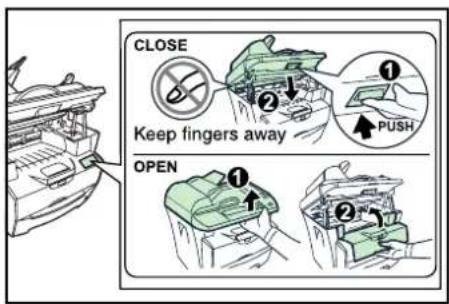
Manual Feed Tray
1 Remove the paper from the Manual Feed Tray.
IMPORTANT: Do not try to remove paper that has already been partially fed, proceed to step 2.
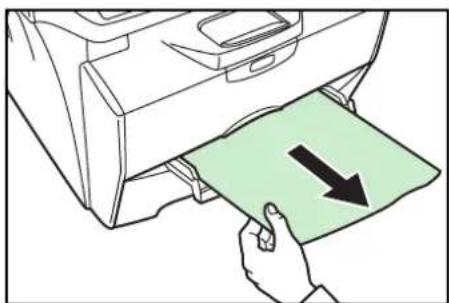
natural_image
Illustration of a hand pressing down on a green paper with a black arrow indicating downward motion (no text or symbols)2 Open the Scan Unit.

natural_image
Illustration of a hand holding a green printer with an arrow indicating rotation (no text or symbols present)3 Open the Front Cover.

natural_image
Illustration of a hand inserting a green plastic component into a machine (no text or symbols visible)4 Lift the Developer Unit together with the Toner Container out of the printer.

natural_image
Illustration of hands installing or adjusting a mechanical device into a device casing (no text or symbols visible)5 Using the green handles lift the Drum Unit out of the machine.
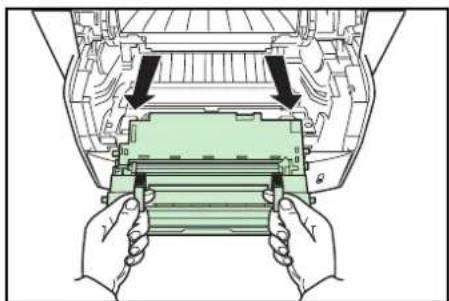
natural_image
Illustration of hands installing or adjusting a green component inside a mechanical device (no text or symbols visible)NOTE: The Drum Unit is sensitive to light. Never expose the Drum Unit to light for more than five minutes.
6 If the jammed paper appears to be pinched by rollers, pull it along the normal running direction of the paper.
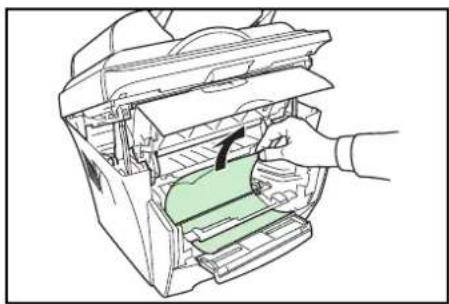
natural_image
Illustration of a hand inserting a green component into an open device (no text or symbols visible)If it has not be fed as far as the metal registration roller, remove the paper from the Manual Feed Tray side.
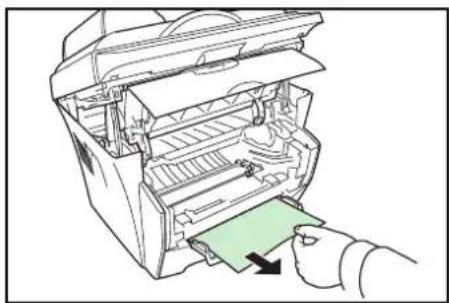
natural_image
Illustration of a hand inserting a green card into a device (no text or symbols visible)7 Return the Drum Unit to its position, aligning the guides at both ends with the slots in the printer.

natural_image
Illustration of hands installing or adjusting a green mechanical component inside a device (no text or symbols visible)8 Insert the Developer Unit together with the Toner Container, back into the machine.
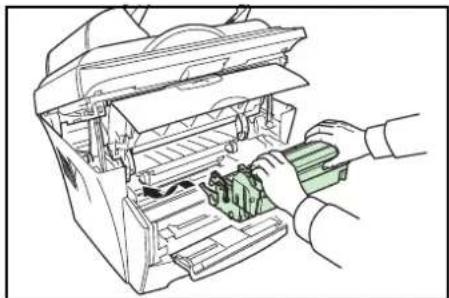
natural_image
Line drawing of hands installing or removing a mechanical device into a storage unit (no text or symbols visible)9 Close the Front Cover.
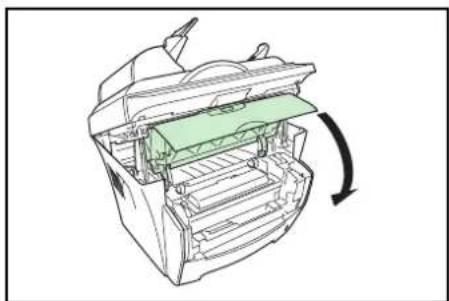
natural_image
Technical line drawing of a mechanical device with internal components and a green component, showing a rotational arrow (no text or symbols)10 Close the Scan Unit pushing the Lever.

IMPORTANT: Take care not to place your fingers between the scan unit and the main body when the scan unit is closed.
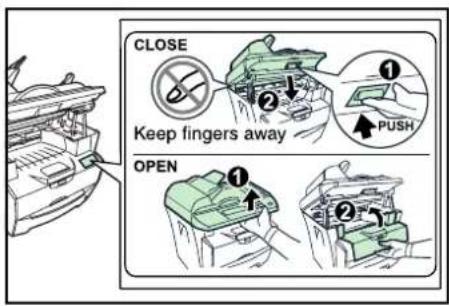
11 Reload the Manual Feed Tray.
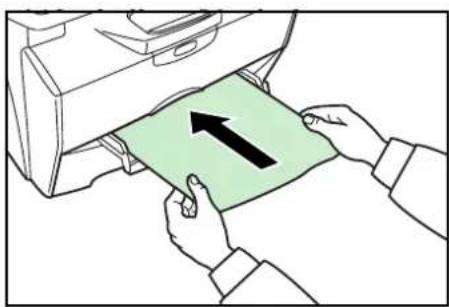
natural_image
Illustration of hands inserting a green card into a printer (no text or symbols visible)Inside Machine
1 Open the Scan Unit.
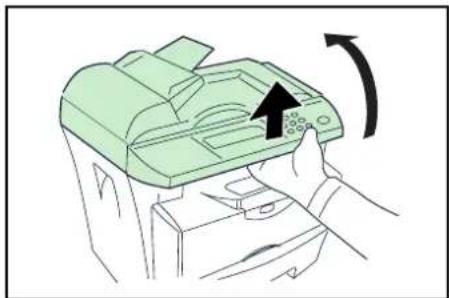
natural_image
Illustration of a hand operating a printer with an arrow indicating rotation (no text or symbols present)2 Open the Front Cover.
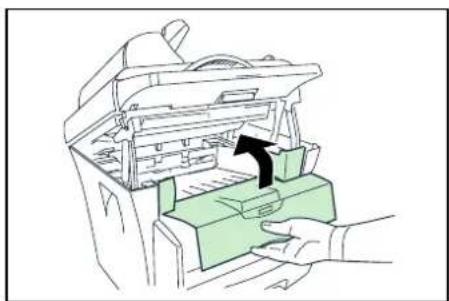
natural_image
Illustration of a hand inserting a device into a machine (no text or symbols visible)3 Lift the Developer Unit together with the Toner Container out of the printer.
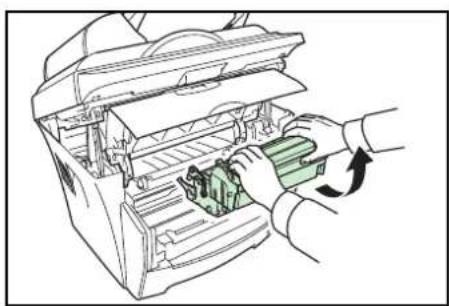
natural_image
Illustration of hands installing or adjusting a mechanical device into a device casing (no text or symbols visible)4 Using the green handles lift the Drum Unit out of the machine.
NOTE: The Drum Unit is sensitive to light. Never expose the Drum Unit to light for more than five minutes.
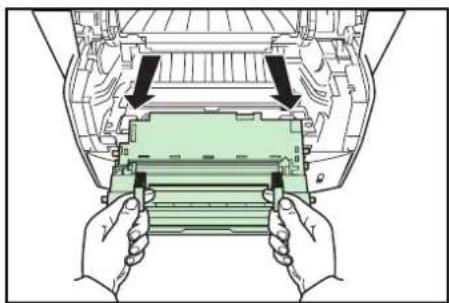
natural_image
Illustration of hands installing or adjusting a green plastic component inside a vehicle chassis (no text or symbols visible)5 Remove the paper from the machine.
NOTE: If the jammed paper appears to be pinched by rollers, pull it along the normal running direction of the paper.

natural_image
Diagram of a printer's internal structure showing the lid and base panel, with a hand inserting a green component (no text or symbols present)6 Return the Drum Unit to its position, aligning the guides at both ends with the slots in the machine.
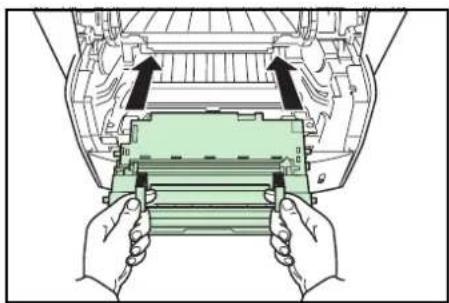
natural_image
Illustration of hands installing or adjusting a green plastic component inside a vehicle chassis (no text or symbols visible)7 Insert the Developer Unit together with the Toner Container, back into the machine.

natural_image
Line drawing of hands installing or adjusting a green component into an open mechanical device (no text or symbols visible)8 Close the Front Cover.
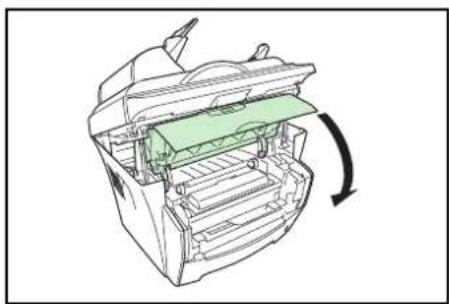
natural_image
Diagram of a mechanical device with internal components and a green component, showing a curved arrow indicating rotation (no text or symbols present)9 Close the Scan Unit pushing the Lever.
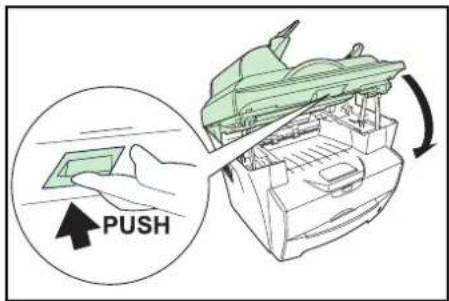
IMPORTANT: Take care not to place your fingers between the scan unit and the main body when the scan unit is closed.

Document Processor
1 Remove all of the originals from the Original Table.

natural_image
Illustration of a hand inserting a green card into a machine (no text or symbols visible)2 Open the Left Cover of the document processor.

natural_image
Illustration of a hand inserting a green component into a printer device (no text or symbols visible)3 Remove the jammed original. If the original is caught in the rollers or difficult to remove, proceed to the next step.

natural_image
Illustration of a hand inserting a green card into a machine (no text or symbols visible)4 Remove the jammed original.
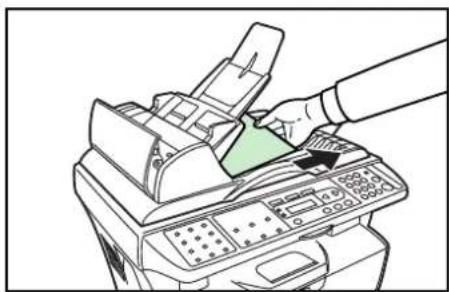
natural_image
Line drawing of a hand inserting a green component into a printer (no text or symbols)5 Close the Left Cover.
6 Place the originals.
11 Specifications
NOTE: Specifications are subject to change without notice.
Main Body
| Item Specification | |
| Printing system Electro-photographic | |
| Originals Sheets of paper, books and 3-dimensional objects | |
| Copy sizesCassette A4, B5 (JIS), A5, Folio, Legal, Letter, Oficio IIManual Feed Tray A4, B5 (JIS), A5, Folio, Legal, Letter, Oficio II,Statement, Executive, A6, B6, B5 (ISO), Envelope#10, Envelope #9, Envelope Monarch, Envelope #6,Envelope C5, Envelope DL, 16K | |
| Paper TypesCassetteManual Feed Tray | Plain paper, recycled paper, thick paper 60 to 105g/m^2 Plain paper, recycled paper, thick paper 60 to 163g/m^2 Transparency, envelopes and post cards supported |
| Paper feed source capacityCassette 250 sheetsManual Feed Tray 1 sheet | |
| Output Tray Capacity 100 sheets (face-down) | |
| Warm-up time 25 seconds or less | |
| Memory | d-Copia 163MF: 32MBd-Copia 164MF: 64MB |
| Ambient conditionsTemperature 10 to 32.5°CHumidityAltitudeIllumination | 20 to 80%RHMaximum 2,000m1,500lux or less |
| Power source | 120V AC, 60Hz, 8.2A220 to 240V AC, 50/60Hz, 3.9A |
| Dimensions (W) × (D) × (H) | 476 × 392 × 489mm |
| Weight Approx. 15kg | |
| Required space (W) × (D) 479 × 437mm | |
Copying Functions
| Item Specification | |
| Copying speedPlaten (1:1) A4: 16copies/min.Document Processor (1:1) | A5: 10copies/min.B5: 14copies/min.Letter: 17copies/min.A4: 12copies/min.A5: 10copies/min.B5: 14copies/min.Letter: 13copies/min.Legal: 11copies/min. |
| First copy (1:1, Letter/A4)PlatenDocument Processor | 12 ±0.5 seconds14 ±0.5 seconds |
| ResolutionScanning and Printing 600 × 600dpi | |
| Continuous copying 1 to 99sheets | between 25 and 400% |
| Zoom ratios Any 1% increment |
Printing Functions
| Item Specification | |
| Printing speed A4 16 pages per minute / Letter 17 pages per minute | |
| First print 11 seconds or less | |
| Resolution 600 × 600dpi | |
| Host Interface USB: 1 port (Hi-speed USB) | |
Scanning Functions
| Item Specification | |
| Scanning Speed(1:1, A4, 300dpi) | Monochrome: 5scan/min.Full Color or Grayscale: 5scan/min. (TWAIN), 4scan/ min. (QLINK) |
| Resolution 600 × 300dpi | |
| Color mode Full Color: 24bit/dot (each color)Grayscale: 8bit/dotMonochrome: 1bit/dot | |
| File format PDF, TIFF, JPEG (8-Bit Gray mode, 24-Bit Color mode), BMP | |
| Host Interface USB (TWAIN): 1 port (Hi-speed USB) |
Document Processor
| Item Specification | |
| Original feed system Automatic feeding | |
| Originals Sheets of paper | |
| Original sizes Maximum: Legal | Minimum: Statement and A5R |
| Original paper weight 60 to 105g/m2 | |
| Maximum number of originals | 50 |
Environmental Specifications
| Item Specification | |
| Duplex copying Manual | |
| Paper feed Recycled paper made from 100% recycled pulp maybe used with this product. | |
Optional Equipment
Print Server (IB-110)
The print server (IB-110) provides an optimal printing network for Olivetti printers and copiers so that all users on the network can take advantage of them. The included utility, Virtual Link enables you to utilize the MFP's scanning function.
The print server's USB interface offers easy external connections. Our original utility simplifies configuring your Ethernet network to offer printing to users.
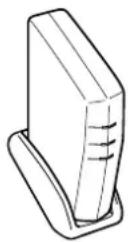
INDEX
Numerics
2 in 1 4-6
4 in 1 4-6
A
Accessing Menu Items xx
B
Buzzer 8-2
C
Cassette 2-2
CAUTION LABELS viii
Changing Function Defaults 8-4
Cleaning
Charger 9-3
Document Processor 9-6
Machine 9-6
Registration Roller 9-3
Collate Mode 4-5
Combine Mode 4-6
Connecting the Cables 3-1
Conventions xix
Copy Functions 4-1
Copy Setup 8-4
Copying 4-1
D
Document Processor 4-2
Document Processor Pad Replacement 9-7
Drum Control 8-3
Drum Refresh 8-3
Drum Reset 8-2
E
Eco Fuser 8-3
EcoPrint 4-6
Error Messages 10-3
G
General Guidelines 10-1
I
Installation Precautions ix
L
Language 8-1
Loading paper
Cassette 2-2
Manual Feed tray 2-3
Loading Software 3-2
LoadingPaper 2-1
M
Machine Parts 1-1
Document Processor 1-2
Main Body 1-1
Message display 1-3
Operation Panel 1-3
Maintenance 9-1
Maintenance Messages 10-3
Manual Feed tray 2-3
0
Optional Equipment 11-4
P
Paper
Cassette 2-2
Manual Feed tray 2-3
Media Type 2-7
Paper Size 2-6
Paper Specifications 2-1
Preparation 2-2
Paper Jam 10-4
Document Processor 10-11
Inside Machine 10-9
Manual Feed Tray 10-6
Output Tray 10-4
Paper Cassette 10-5
Rear Cover 10-4
Paper length adjusting tab 2-2
Paper width adjusting tab 2-3
Photo mode 4-1
Power Cord 3-1
Power switch 3-2
Precautions for Use xi
Preparations 3-1
Print Server (IB-110) 11-4
Printing Functions 6-1
Basic tab 6-1
Effect tab 6-2
Layout tab 6-2
Paper tab 6-1
Q
QLINK 7-1
Copy Function Section 7-4
MFP Button Setting Section 7-2
Scan Function Section 7-6
Start the QLINK 7-1
R
Report Pages 8-5
S
Scanning Functions 5-1
Image Type 5-2
Resolution 5-2
Scan Method 5-2
Shipping Lock 9-8
Sleep Mode 8-1
Specifications 11-1
Copying Functions 11-2
Document Processor 11-3
Environmental Specifications 11-3
Main Body 11-1
Printing Functions 11-2
Scanning Functions 11-3
Standard Zoom 4-4
System Settings 8-1
T
Text and Photo mode 4-1
Text mode 4-1
Toner Container Replacement 9-1
Toner Install 8-2
Troubleshooting 10-1
U
USB Cable 3-1
V
Variable Zoom 4-4, 4-5
Z
Zoom Copy 4-4
For best results and machine performance, we recommend that you use only our original supplies for your products.

DIRECTIVE 2002/96/CE ON THE TREATMENT, COLLECTION, RECYCLING AND DISPOSAL OF ELECTRIC AND ELECTRONIC DEVICES AND THEIR COMPONENTS
INFORMATION
1. FOR COUNTRIES IN THE EUROPEAN UNION (EU)
The disposal of electric and electronic devices as solid urban waste is strictly prohibited: it must be collected separately.
The dumping of these devices at unequipped and unauthorized places may have hazardous effects on health and the environment.
Offenders will be subjected to the penalties and measures laid down by the law.
To dispose of our devices correctly:
a) Contact the Local Authorities, who will give you the practical information you need and the instructions for handling the waste correctly, for example: location and times of the waste collection centres, etc.
b) When you purchase a new device of ours, give a used device similar to the one purchased to our dealer for disposal.

The crossed dustbin symbol on the device means that:
- when it to be disposed of, the device is to be taken to the equipped waste collection centres and is to be handled separately from urban waste;
- The producer guarantees the activation of the treatment, collection, recycling and disposal procedures in accordance with Directive 2002/96/CE (and subsequent amendments).
2. FOR OTHER COUNTRIES (NOT IN THE EU)
The treatment, collection, recycling and disposal of electric and electronic devices will be carried out in accordance with the laws in force in the country in question.
N°06-144
MANUFACTURER'S CE DECLARATION of CONFORMITY according to EN 45014
Declares under its sole responsibility that the product:
Categoria generale:
Equipment category:
Information Technology Equipment
is in compliance with directive 99/5/EC dated 9^th march 1999
and fulfills the essential requirements of Electromagnetic Compatibility and of Electrical Safety as prescribed by the Directives:
89/336/EEC dated 3rd May 1989 with subsequent amendments (Directive 92/31/EEC dated 28th April 1992 and Directive 93/68/EEC dated 22nd July 1993);
73/23/EEC dated 19th February 1973 with subsequent amendments (Directive 93/68/EEC dated 22nd July 1993),
since designed and manufactured in compliance with the following European Harmonized Standards:
EN 55022:1998 + A1:2000 + A2:2003 (Limits and methods of measurements of radio interference characteristics of Information Technology Equipment) / Class B;
EN 61000-3-2:2000 (Electromagnetic Compatibility (EMC) - Part 2 : Limits - Section 2 : Limits for harmonic current emissions (equipment input current ≤ 16 A per phase) / Class A
EN 61000-3-3:1995 + A1:2001 (Electromagnetic Compatibility (EMC) - Part 3 : Limits - Section 3 : Limitation of voltage fluctuations and flicker in low voltage supply systems for equipment with rated current up to and including 16A);
EN 55024:1998 + A1:2001 + A2:2003 (Electromagnetic Compatibility – Information technology equipment – Immunity characteristics – Limits and methods of measurement);
EN 60950-1:2001 + A11:2004 (Safety of Information Technology Equipment, including electrical business equipment).
EN 60825-1:1994 +A1:2002+A2:2001 (Radiation Safety of laser products, equipment classification, requirements ad user's guide).
ETSI TBR 21/1998 - Requirements for pan-European approval for connection to the analogue Public Switched Telephone Networks (PSTN) of TE (excluding TE supporting the voice telephony service) in which network addressing, if provided, is by means of Dual Tone Multi Frequency (DTMF) signaling.
Compliance with the above mentioned essential requirements is shown by affixing the CE marking on the product.
Ivrea, 25 Settembre 2006
Ivrea, 25 ^th September 2006
Giovanni Ferrario
Chief Executive Officer Amministrazione Delegato
Olivert S.p.A.
Notes: 1) CE Marking has been affixed in 2006
2) The Quality System is in compliance with the UNI EN ISO 9000 series of Standards
MANUFACTURER'S CE DECLARATION of CONFORMITY according to EN 45014
Declares under its sole responsibility that the product:
Categoria generale:
Equipment category:
Information Technology Equipment
89/336/EEC dated 3rd May 1989 with subsequent amendments (Directive 92/31/EEC dated 28th April 1992 and Directive 93/68/EEC dated 22nd July 1993);
73/23/EEC dated 19th February 1973 with subsequent amendments (Directive 93/68/EEC dated 22nd July 1993).
since designed and manufactured in compliance with the following European Harmonized Standards:
EN 55022:1998 + A1:2000 + A2:2003 (Limits and methods of measurements of radio interference characteristics of Information Technology Equipment) / Class B;
EN 61000-3-2:2000 (Electromagnetic Compatibility (EMC) - Part 2 : Limits - Section 2 : Limits for harmonic current emissions (equipment input current ≤ 16 A per phase) / Class A
EN 61000-3-3:1995 + A1:2001 (Electromagnetic Compatibility (EMC) - Part 3 : Limits - Section 3 : Limitation of voltage fluctuations and flicker in low voltage supply systems for equipment with rated current up to and including 16A);
EN 55024:1998 + A1:2001 + A2:2003 (Electromagnetic Compatibility – Information technology equipment – Immunity characteristics – Limits and methods of measurement);
EN 60950-1:2001 + A11:2004 (Safety of Information Technology Equipment, including electrical business equipment).
EN 60825-1:1994 +A1:2002+A2:2001 (Radiation Safety of laser products, equipment classification, requirements ad user's guide).
Compliance with the above mentioned essential requirements is shown by affixing the CE marking on the product.
Ivrea, 25 ^th September 2006
Giovanni Ferrario
Chief Executive Officer
Notes: 1) CE Marking has been affixed in 2006
2) The Quality System is in compliance with the UNI EN ISO 9000 series of Standards
- PUBLICATION ISSUED BY:
- Contents
- Legal and Safety
- Machine Parts
- Loading Paper
- Preparations
- Copy Functions
- Scanning Functions
- Printing Functions
- Using QLINK
- System Settings
- Maintenance
- Troubleshooting
- Specifications
- INDEX
- Making Full Use of This Machine's Advanced Functions
- Zoom mode
- Copy Mode selection
- EcoPrint mode
- Combine modes
- Collate mode
- Language Selection
- Making full-color scans
- Loading an image from TWAIN
- Notice
- Regarding Tradenames
- Legal Restriction On Copying
- Energy Star Program
- Low Power Mode
- Auto Sleep Mode
- Paper Recycling
- Please read this Operation Guide before using the machine. Keep it close to the machine for easy reference.
- Symbols
- IMPORTANT - PLEASE READ FIRST.
- CAUTION LABELS
- Installation Precautions
- Environment
- CAUTION:
- Other Precautions
- Power Supply/Grounding the Machine
- WARNING:
- Handling of Plastic Bags
- Precautions for Use
- Cautions when Using the Machine
- CAUTION
- Cautions when Handling Consumables
- Laser Safety (Europe)
- Safety Instructions Regarding the Disconnection of Power (Europe)
- DECLARATION OF CONFORMITY
- TO
- Safety of Laser Beam (USA)
- Safety of laser beam
- The CDRH Act
- Optical unit
- Maintenance
- Safety switch
- Safety Instructions Regarding the Disconnection of Power
- Mercury Warning
- Introduction
- Included Manuals
- Operation Guide (this document)
- Facsimile Operation Guide
- Overview of Operation Guide
- Conventions
- Accessing Menu Items
- Main Body
- Document Processor
- Operation Panel
- Message Display
- Error Codes
- Paper Specifications
- Before Loading Paper
- Loading Paper into a Cassette
- Manual Feed Tray
- Manual Duplex
- Selecting Paper Size
- Selecting Media Type
- Connecting the Cables
- Connecting the USB Cable
- Connecting the Power Cord
- Turning the Machine On
- Loading Software
- Custom Installation
- Remove Software
- Basic Copying Procedure
- Placing Originals in the Document Processor
- Acceptable Originals
- Originals to Avoid
- Placing a Thick Original on the Platen
- Zoom Copies
- Standard Zoom
- Variable Zoom
- Collate Mode
- Combine Mode
- EcoPrint Mode
- User Interface Operation
- Selecting the Scan Method
- Selecting Image Type
- Selecting the Resolution
- Preview
- Zoom
- Scan
- Exit
- Enhancing Your Image
- Brightness
- Contrast
- Invert
- Mirror
- Preview Auto-Area
- Original Size
- Units
- Descreen
- Sharpen
- Color Adjustment
- Auto Level
- Advanced Settings
- Highlight/Shadow
- Curves
- Color Balance
- Hue/Saturation/Lightness
- Color Drop-out
- Custom Settings
- Scan Settings
- Configuration Settings
- Printing Preferences
- Basic Tab
- Paper Tab
- Layout Tab
- N-up
- Output Paper Size
- Effect Tab
- Watermark
- Printing a Document
- To Start the QLINK
- MFP Button Setting Section
- Using the Scan To PC Button on the Operation Panel to Scan
- Configuring the Scan To PC Button
- New Application
- Delete
- OK
- Copy Function Section
- Configuring the Copy Function
- Scanner Setting
- Advanced Setting
- Scan Function Section
- Send to email
- Send to file
- User define Buttons
- Message Language
- Sleep Mode
- Toner Install
- Buzzer
- Drum Reset
- Drum Refresh
- Drum Control
- Eco Fuser
- Copy Setup
- Changing Function Defaults
- Printing the Report Pages
- Toner Container Replacement
- Cleaning the Charger and Registration Roller
- Cleaning the Machine
- Cleaning the Document Processor
- Replacing the Document Processor Pad
- Shipping Lock
- General Guidelines
- Maintenance and Error Messages
- Paper Jam
- Output Tray and Rear Cover
- Paper Cassette
- Inside Machine
- Optional Equipment
- Print Server (IB-110)
- Numerics
- A
- B
- C
- D
- E
- G
- I
- L
- M
- 0
- P
- Q
- R
- S
- T
- U
- V
- Z
- DIRECTIVE 2002/96/CE ON THE TREATMENT, COLLECTION, RECYCLING AND DISPOSAL OF ELECTRIC AND ELECTRONIC DEVICES AND THEIR COMPONENTS
- INFORMATION
- FOR COUNTRIES IN THE EUROPEAN UNION (EU)
- To dispose of our devices correctly:
- FOR OTHER COUNTRIES (NOT IN THE EU)
Brand : OLIVETTI
Model : d-Copia 164MF
Category : Printer