PSW604MUT - Wall mount Mitsai - Free user manual and instructions
Find the device manual for free PSW604MUT Mitsai in PDF.


| Product Type | Wall Mount |
| Brand | Mitsai |
| Model | PSW604MUT |
| Compatible Screen Size | 32" - 65" |
| VESA Pattern | 100x100mm to 400x400mm |
| Maximum Weight Capacity | 45 kg (100 lbs) |
| Material | Steel |
| Color | Black |
| Installation Type | Fixed (0° tilt) |
| Distance from Wall | 20 mm |
| Included Accessories | Screws, anchors, spacers, wall plate, brackets |
| Tools Required | Screwdriver, level, stud finder |
| Safety Features | Locking brackets, safety bolts |
| Warranty | 1 year |
| Manual Available | Yes, in PDF format |
Frequently Asked Questions - PSW604MUT Mitsai
User questions about PSW604MUT Mitsai
0 question about this device. Answer the ones you know or ask your own.
Ask a new question about this device
Download the instructions for your Wall mount in PDF format for free! Find your manual PSW604MUT - Mitsai and take your electronic device back in hand. On this page are published all the documents necessary for the use of your device. PSW604MUT by Mitsai.
USER MANUAL PSW604MUT Mitsai
INTERACTIVE TV WALL MOUNT
SOPORTE TV INTERACTIVO
natural_image
Illustration of a car steering wheel with curved arms and a flat roof, set against a pixelated grid background (no text or symbols)INSTRUCTIONS MANUAL
MANUAL DE INSTRUÇÕES
IWM1380BK5
EN
INTERACTIVE TV WALL MOUNT
INSTRUCTION MANUAL
Dear client,
Thank you for purchasing this product.
The quality of this appliance has been certified by several laboratory tests. This instruction manual is provided to simplify the use of the appliance. The instructions guarantee quick and safe use.
Please read the instructions and safety measures described in this manual carefully.
We wish our clients great satisfaction in using their new appliance.
INDEX
| 1. | Safety | Instructions | ||
| 1.1. | Power | Supply | ||
| 1.2. | Power Cord and Other Cables | 4 | ||
| 1.3. | Humidity | and | Water | |
| 1.4. | Cleaning | |||
| 1.5. | General | Precautions | ||
| 2. | Use | and | Operation | |
| 2.1. | Product | Description | ||
| 2.2. | Operating | Instructions | ||
| 2.2.1. | Wall | Plate | Assembly | |
| 2.2.2. | Wood | Stud | Wall | Assembly |
| 2.2.3. | Concrete | Wall | Mounting | |
| 2.2.4. | Attaching Plastic Covers to the Wall Plate | 8 | ||
| 2.2.5. | Attaching Brackets to a Flat Back Screen | 8 | ||
| 2.2.6. | Attaching the TV Plate to a Screen with a Recessed Back | 9 | ||
| 2.2.7. | Mounting the Flat Panel Screen | 10 | ||
| 2.2.8. | Adjusting | the | Display | |
| 2.2.9. | Using | Cord | Management | |
| 3. | Technical | Specifications | ||
| 4. | Customer | Service | ||
| 5. | Protection | of | the | Environment |
1. SAFETY INSTRUCTIONS

ATTENTION RISK OF ELECTRIC SHOCK DO NOT OPEN

ATTENTION: TO AVOID THE RISK OF ELECTRIC SHOCK, DO NOT REMOVE THE COVER. THE INTERIOR DOES NOT CONTAIN ANY PARTS THAT MAY BE REPAIRED BY THE USER. ASK FOR ASSISTANCE TO QUALIFIED PERSONNEL.
Important Warnings
Before using your appliance, read carefully this instruction manual and keep it in a safe place, as you may need it for future consultations.
Before you start your appliance, and to ensure a correct use, do not use it if:
- It has fallen on the ground;
- You notice any evidence of damage;
- Any anomaly occurs during its operation;
To avoid hazards and deterioration of your appliance by an incorrect use, it is advisable to read the instructions carefully and attentively.
Your appliance must not be used to other ends than the ones foreseen in the instructions manual. Your safety is only guaranteed in a household use and not for commercial use. The incorrect use will not be covered and automatically cancels the right to warranty.
Assistance
Be sure that, in case of malfunction, you take your appliance to a qualified technician for assistance.
THIS APPLIANCE CAN BE USED BY CHILDREN FROM 8 YEARS OLD AND ABOVE AND PERSONS WITH REDUCED PHYSICAL, SENSORY OR MENTAL CAPABILITIES OR LACK OF EXPERIENCE AND KNOWLEDGE IF THEY HAVE BEEN GIVEN INSTRUCTION CONCERNING USE OF THE APPLIANCE IN A SAFE WAY AND UNDERSTAND THE HAZARDS INVOLVED. CHILDREN
EN
INTERACTIVE TV WALL MOUNT
SHALL NOT PLAY WITH THE APPLIANCE. CLEANING AND MAINTENANCE SHALL NOT BE MADE BY CHILDREN WITHOUT SUPERVISION.
These instructions are also available on www.suporteworten.pt
1.1. Power Supply
Make sure the mains voltage is compatible with the appliance voltage. If this is not the case consult the vendor or Customer Support Service.
1.2. Power Cord and Other Cables
Do not roll up or pull the cord to disconnect the appliance, and do not use it to twine the appliance. Keep the cord away from warm surfaces.
Never use the appliance if it has a damaged cable or socket, or if it is not working properly.
If the power cord is damaged, do not use your appliance. Take it to technical assistance for replacement.
1.3. Humidity and Water
Do not use your appliance in humid places. Do not allow the appliance to become wet under any circumstances as this may be dangerous. TO AVOID FIRE HAZARD OR ELECTRIC SHOCK DO NOT EXPOSE YOUR APPLIANCE TO HUMIDITY OR WATER.
Do not place your appliance under water (for example to wash it).
1.4. Cleaning
Use only a soft and dry cloth to clean to enclosure of the product.
1.5. General Precautions
- Please follow the instructions in the user manual which help to properly install and operate this product and enjoy its advanced features. Please keep the instructions for future reference.
- Read all instructions before using the product.
- Maintenance and service operations are only to be carried out by authorized dealers.
- Any damage caused by manual modifications to the product is not covered by the warranty.
- If this product is used for other purposes than originally designed, or if it is not correctly connected, the product may suffer damage and the warranty will be voided.
- This product was designed to be installed on wood stud walls and solid concrete walls.
INTERACTIVE TV WALL MOUNT
EN
- Before installing make sure the supporting surface will support the combined load of the equipment and hardware.
- Never exceed the maximum load capacity.
- This product is intended for indoor use only. Use of this product outdoors could lead to product failure or personal injury.
- This product contains small items that could be a choking hazard if swallowed. Keep these items away from young children.
- Make sure these instructions are read and completely understood before attempting installation. If you are unsure of any part of this installation, contact a professional installer for assistance.
- The wall or mounting surface must be capable of supporting the combined weight of the mount and the display; otherwise the structure must be reinforced.
- Safety gear and proper tools must be used. A minimum of two people are required for this installation. Failure to use safety gear can result in property damage, serious injury or death.
- This product contains high pressure gas spring parts, please do not burn it, expose it to high temperatures, or disassemble it as this may cause accidental injury. Obsolete products can be returned to the manufacturer or deposited with specialized contractors.
2. USE AND OPERATION
2.1. Product Description
Hardware kit:

EN
INTERACTIVE TV WALL MOUNT
| ID | Qty | Description | ID | Qty | Description |
| 1 1 | Wall plate B3 | 4 Long bolt washer | |||
| 2 2 | Plastic cover C | 4 M6x25mm bolt | |||
| 3 1 | TV plate D | 4 M8x25mm bolt | |||
| 4 2 | Bracket E | 4 Spacer | |||
| 5 4 | Screw F | 4 Washer | |||
| 6 I | 4x4 Allen key | G | 1 | 5x5 Allen key | |
| A 4 | M5x25mm bolt | H | 1 | Wrench | |
| B1 4 | Long bolt | I | 1 | Spirit level | |
| B2 4 | Wall anchor J | 2 Nut |
2.2. Operating Instructions
2.2.1. Wall Plate Assembly

2.2.2. Wood Stud Wall Assembly
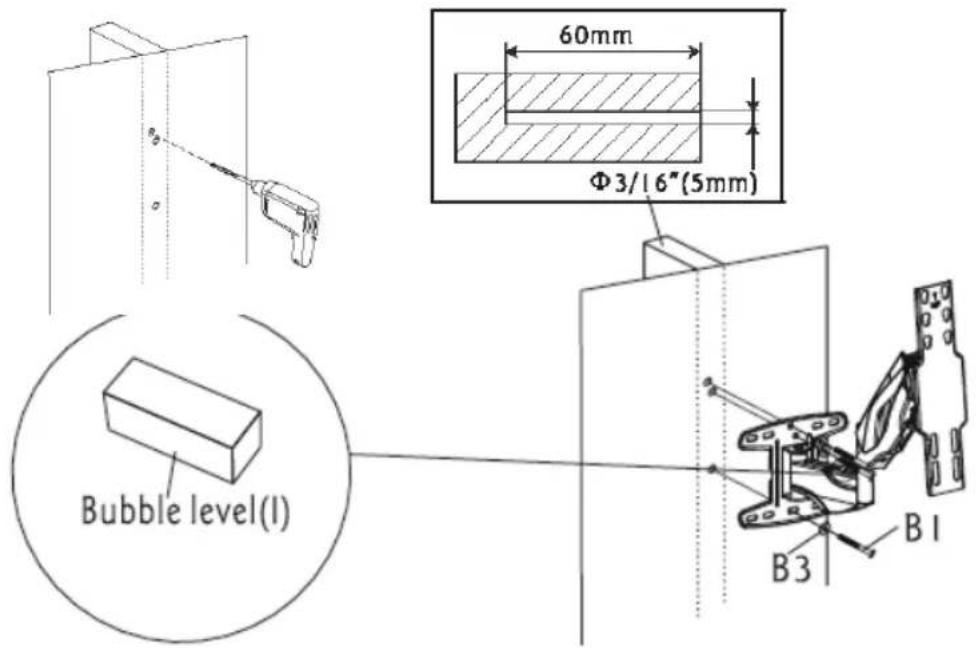
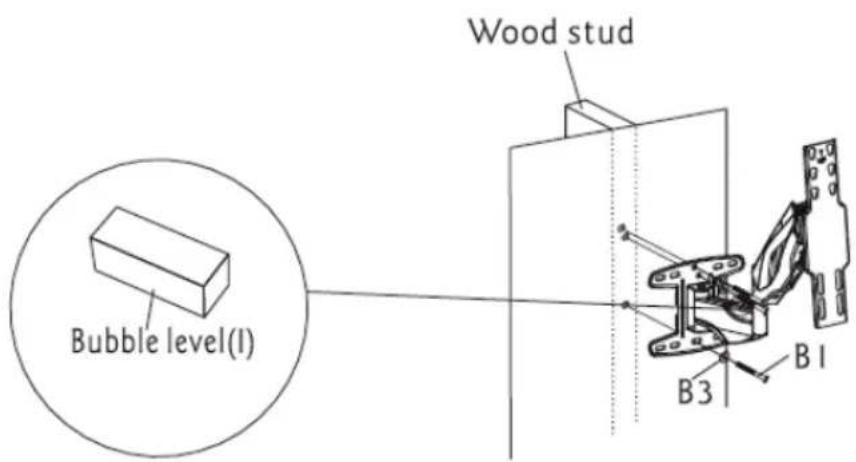
Use the wall plate (I) as a template, make sure it is level. Mark four mounting holes along the wood stud center lines. Drill four 3/16" (5 mm) dia. holes 60 mm deep. Level the wall plate and fasten to the wall using four long bolts (BI) and four washers (B3). Tighten the bolts firmly. Do not overtighten.
2.2.3. Concrete Wall Mounting
Level the wall plate and use it as a template to mark four holes on the wall. Drill four 3/8"(10 mm) dia. holes 60 mm deep. Insert four anchors (B2) into the holes and fix the wall plate using four long bolts (BI) and four washers (B3). Tighten the screws firmly. Do not overtighten.

EN
INTERACTIVE TV WALL MOUNT
2.2.4. Attaching Plastic Covers to the Wall Plate
Fix the plastic covers (2) over the wall plate by pushing them toward each other until they lock into position.

natural_image
Technical line drawing of a mechanical assembly with labeled parts (no text or symbols present)2.2.5. Attaching Brackets to a Flat Back Screen
Center the TV plate vertically on the back of the screen. Select the screws (D). Fix the TV plate to the screen using the four selected screws and four spacers (E) at the top and bottom. Tighten the screws firmly. Do not overtighten.
Option 1

Option 2

Tighten the screws into the top bracket holes
2.2.6. Attaching the TV Plate to a Screen with a Recessed Back
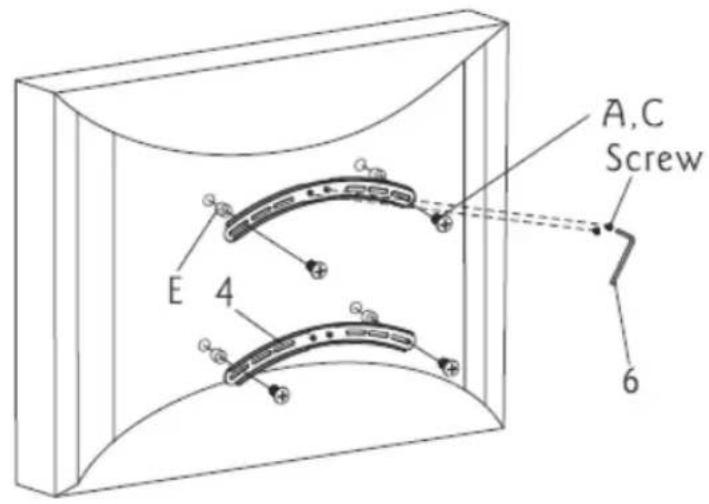
Center the TV plate vertically on the back of the screen. Select screws (A, B, C). Attach the TV plate to the screen using the four selected screws, four washers (F) and four spacers (E) at the top and bottom. Tighten the screws firmly. Do not overtighten.
Option 1

Tighten the screws into the top bracket holes
Option 2
EN
INTERACTIVE TV WALL MOUNT
2.2.7. Mounting the Flat Panel Screen
Hook the top of the brackets (4) onto the top flange of the TV plate (3). Then swing the screen down.
NOTE: Always use an assistant or mechanical lifting equipment to safely lift and position heavy equipment.


Tighten the screws into the bottom bracket holes
2.2.8. Adjusting the Display
The articulated arms can be adjusted to position the screen as required. Use the Allen key (G) to tighten and loosen the tension screw. Do not overtighten and do not loosen to the point that the screws come out.
Adjust the monitor's height alter installing. If the monitor does stop at any height, please
use the supplied 5x5 Allen key to adjust the screw on the arm. To balance the mount and monitor weight so that it can stop at any height, please adjust the screw in the “-” direction for up and “+” direction for down.

Adjust the monitor using the supplied 5x5 Allen key (G).
2.2.9. Using Cord Management
Route the cords along the articulated arms using the cable management.

EN
INTERACTIVE TV WALL MOUNT
2.3. Maintenance
To ensure the seal performance of the gas spring, we recommend to fully adjust the upper arm (with the spring) one or more times per month.
3. TECHNICAL SPECIFICATIONS
- TV Size: 42"-55"
• Weight capacity: 21Kg
• VESA: 200x200; 300x300; 400x200; 400x300; 400x400
• Distance to the Wall: 60-557mm
• ± 90° Swivel angle - 5^ 10^ Tilt angle
- ± 5^ Rotation
• ± 50° Interactive movement - Tilt level for correct application included
- Screws included
4. CUSTOMER SERVICE
Mitsai has designed this appliance in order to guarantee maximum reliability. However, if a problem occurs you may be able to determine its cause by following the procedures suggested in this section.
Do not attempt to open the appliance – there is a risk of electrical shock.
If you are not able to solve the problem please contact your seller or manufacturer.
All users must be familiar with this section. Knowing what could go wrong can help to prevent problems occurring.
WARNING: any attempt to repair the appliance without contacting the manufacturer will void the warranty.
If the problem persists take your appliance to the customer service of any Worten, Modelo or Continente store in order to solve the problem.
Worten Equipamentos para o Lar provides a 2 year warranty for manufacturing defects from the date of purchase of the appliance. The warranty is applicable for correct use and maintenance of the appliance, namely according to the instructions in this manual. Malfunctions caused by any other situations are not covered by the warranty.
The repair of electric appliances must only be made by qualified technicians in order to prevent future problems.
To avoid unnecessary risks, any malfunctions concerning wires or other components must be repaired in a specialized technical support workshop because suitable tools are required.
5. PROTECTION OF THE ENVIRONMENT

In order to protect the environment we strive to reduce the volume of packaging used, limiting it to three easily sorted materials: cardboard, paper and plastic.
The appliance is manufactured using recyclable materials once disassembled by a specialized company. Comply with local regulations concerning recycling of all materials.


ES
SOPORTE TV INTERACTIVO
ES
SOPORTE TV INTERACTIVO
natural_image
Technical line drawing of a mechanical assembly with a tool and pivot (no text or symbols)

natural_image
Technical line drawing of a mechanical assembly with no visible text or symbols
2.3. Mantenimiento
MANUAL DE INSTRUÇÕES
Caro(a) cliente,

natural_image
Isometric line drawing of a rectangular block with a small mechanical component inside (no text or symbols)

natural_image
Technical line drawing of a mechanical assembly with labeled parts (no text or symbols present)Ajuste a TV utilizando a chave sextavada 5x5 (G) fornecida.
natural_image
Diagram of a wall-mounted mechanical arm with a close-up inset showing internal components (no text or symbols)©

natural_image
Line drawing of a wall-mounted device with two vertical connectors and a connecting rod (no text or symbols)2.3. Manutenção
- EN
- INTERACTIVE TV WALL MOUNT
- INSTRUCTION MANUAL
- SAFETY INSTRUCTIONS
- ATTENTION RISK OF ELECTRIC SHOCK DO NOT OPEN
- Important Warnings
- Assistance
- SHALL NOT PLAY WITH THE APPLIANCE. CLEANING AND MAINTENANCE SHALL NOT BE MADE BY CHILDREN WITHOUT SUPERVISION.
- Power Supply
- Power Cord and Other Cables
- Humidity and Water
- Cleaning
- General Precautions
- USE AND OPERATION
- Product Description
- Operating Instructions
- Wall Plate Assembly
- Wood Stud Wall Assembly
- Concrete Wall Mounting
- Attaching Plastic Covers to the Wall Plate
- Attaching Brackets to a Flat Back Screen
- Attaching the TV Plate to a Screen with a Recessed Back
- Mounting the Flat Panel Screen
- Adjusting the Display
- Using Cord Management
- Maintenance
- TECHNICAL SPECIFICATIONS
- CUSTOMER SERVICE
- PROTECTION OF THE ENVIRONMENT
- ES
- SOPORTE TV INTERACTIVO
- Mantenimiento
- MANUAL DE INSTRUÇÕES
- Manutenção
Brand : Mitsai
Model : PSW604MUT
Category : Wall mount