
Privia PX-765 - Musical instrument CASIO - Free user manual and instructions
Find the device manual for free Privia PX-765 CASIO in PDF.


| Product Type | Digital Piano |
| Model | Privia PX-765BK |
| Keyboard | 88-key piano keyboard with Touch Response, 3 levels + Off |
| Maximum Polyphony | 128 notes |
| Number of Tones | 19 built-in tones |
| Effects | Brilliance (-3 to +3), Reverb (4 types), Chorus (4 types), DSP |
| Metronome | Beats: 0-9, Tempo: 20-255 |
| Built-in Songs | Concert Play: 10 songs, Music Library: 60 songs + 10 download slots |
| Recorder | MIDI Recorder: 1 song, 2 tracks, approx. 5000 notes |
| Pedals | Damper (half-pedal support), Sostenuto, Soft |
| Connectivity | USB Type B, PHONES/OUTPUT jacks (2x stereo standard), Pedal connector, DC 12V power terminal |
| Speakers | 12 cm x 2, 8W + 8W output |
| Power Supply | AC adaptor AD-A12150LWA, 12V --- 18W |
| Auto Power Off | Approx. 4 hours, can be disabled |
| Dimensions (Piano + Stand) | 139.1 (W) x 29.9 (D) x 79.8 (H) cm |
| Weight (Piano + Stand) | Approx. 31.5 kg |
| Accessories Included | AC adaptor, music stand, pedal unit, screws, screw caps |
| User Memory Save | Auto Resume function (settings saved on power off, optional) |
| Compatible Apps | CASIO dedicated app (download from support site) |
| Maintenance | Clean with a soft, dry cloth; do not use solvents |
| Safety | Use only specified accessories; keep cover fully open while playing; unplug during storms |
| Repairability | Refer to qualified service personnel; no user-serviceable parts inside |
| Environmental | Operating temperature: 0-40°C, storage: -20-60°C |
Frequently Asked Questions - Privia PX-765 CASIO
User questions about Privia PX-765 CASIO
0 question about this device. Answer the ones you know or ask your own.
Ask a new question about this device
Download the instructions for your Musical instrument in PDF format for free! Find your manual Privia PX-765 - CASIO and take your electronic device back in hand. On this page are published all the documents necessary for the use of your device. Privia PX-765 by CASIO.
USER MANUAL Privia PX-765 CASIO
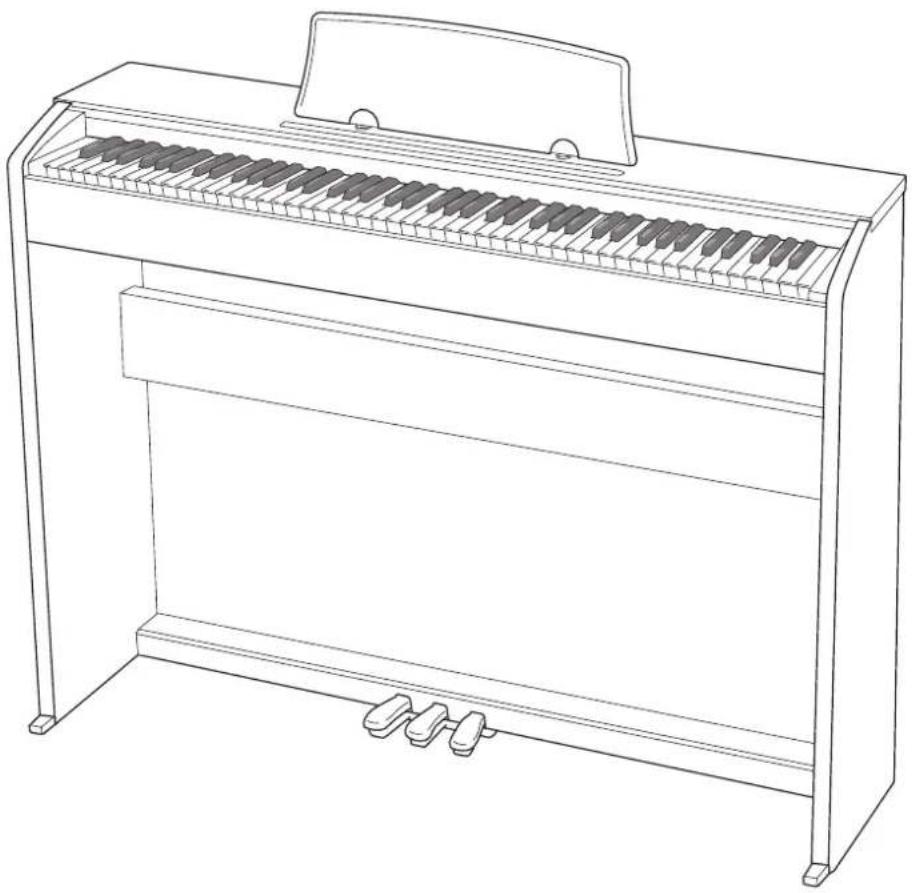
Before using this Digital Piano for the first time, be sure to read the separate USER'S GUIDE to familiarize yourself with basic operations.
natural_image
Line drawing of a piano with standard keys and a stand (no text or symbols)Getting Ready......EN-31
Assembling the Stand...... EN-31
To connect the cable.... EN-34
To install the music stand...... EN-34
Removing the Protective Tape from the Keyboard..... EN-35
Connecting Headphones......EN-35
Connecting Audio Equipment or an Amplifier......EN-36
Bundled and Optional Accessories......EN-36
General Guide ......EN-2
FUNCTION Button...... EN-3
Auto Resume and Operation Lock ...... EN-3
About Music Score data...... EN-3
Power Outlet......EN-4
Turning Power On or Off ...... EN-4
Returning the Digital Piano to Its Factory Default Settings.... EN-4
Playing with Different Tones ......EN-5
Selecting and Playing a Tone...... EN-5
Layering Two Tones...... EN-6
Using Effects ...... EN-7
Using the Digital Piano's Pedals...... EN-8
Using the Metronome ...... EN-9
Splitting the Keyboard for Duet Play.... EN-10
Using Built-in Songs (Concert Play, Music Library, Demo Tunes)......EN-12
Performing Demo Play ...... EN-12
Concert Play...... EN-12
Practicing with a Concert Play Song ...... EN-13
Music Library ...... EN-14
Playing Back a Specific Music Library Song ...... EN-15
Practicing with a Music Library Song...... EN-15
Recording and Playback ......EN-16
Recording to Built-in MIDI Recorder...... EN-16
Using the MIDI REC Button...... EN-16
Configuring Settings with the Keyboard......EN-19
To configure settings with the keyboard...... EN-19
Keyboard Keys Used for Configuring Settings ...... EN-20
Parameter List...... EN-22
Reverb ...... EN-22
Tone selection...... EN-22
Chorus ...... EN-22
Brilliance ...... EN-22
Layer balance ...... EN-22
Lower Pedal...... EN-22
Damper noise...... EN-22
Select layer tone ...... EN-22
Duet mode ...... EN-22
Music Library song select (MUSIC LIBRARY SELECT)...... EN-23
Tempo (TEMPO)...... EN-23
Beat (BEAT)...... EN-23
METRONOME TEMPO ...... EN-23
METRONOME BEAT...... EN-23
CONCERT PLAY ▶/■...... EN-23
LISTEN...... EN-23
LESSON......EN-23
PLAY......EN-23
CONCERT PLAY SELECT (Song) (SELECT +/-) ... EN-23
CONCERT PLAY VOLUME (VOLUME +/-) ......EN-23
Music Library volume ...... EN-23
Metronome volume ...... EN-23
Temperament...... EN-24
Temperament Base note...... EN-24
Temperament select ...... EN-24
Touch response ...... EN-24
Transpose ...... EN-24
A-tuning......EN-24
Octave shift ...... EN-24
Keyboard volume ...... EN-24
USB flash drive mode ...... EN-25
Local control......EN-25
Send channel......EN-25
Operation tone EN-25
Panel lock......EN-25
Auto Resume ...... EN-25
Linking with an Application (APP Function)...... EN-26
Connecting to a Computer......EN-27
Minimum Computer System Requirements......EN-27
Connecting the Digital Piano to Your Computer...... EN-27
Using MIDI....EN-28
Transferring Song Data with a Computer ...... EN-28
Reference......EN-37
Troubleshooting......EN-37
Product Specifications ...... EN-38
Appendix...... A-1
Tone List....A-1
Concert Play List....A-1
Music Library List....A-1
MIDI Implementation Chart
Company and product names used in this manual may be registered trademarks of others.
General Guide
⚠️ CAUTION
- Make sure that the cover is fully open whenever you are playing on the keyboard. A partially open cover can suddenly close unexpectedly and pinch your fingers.
NOTE
- The names shown here are always indicated in bold when they appear within the text of this manual.
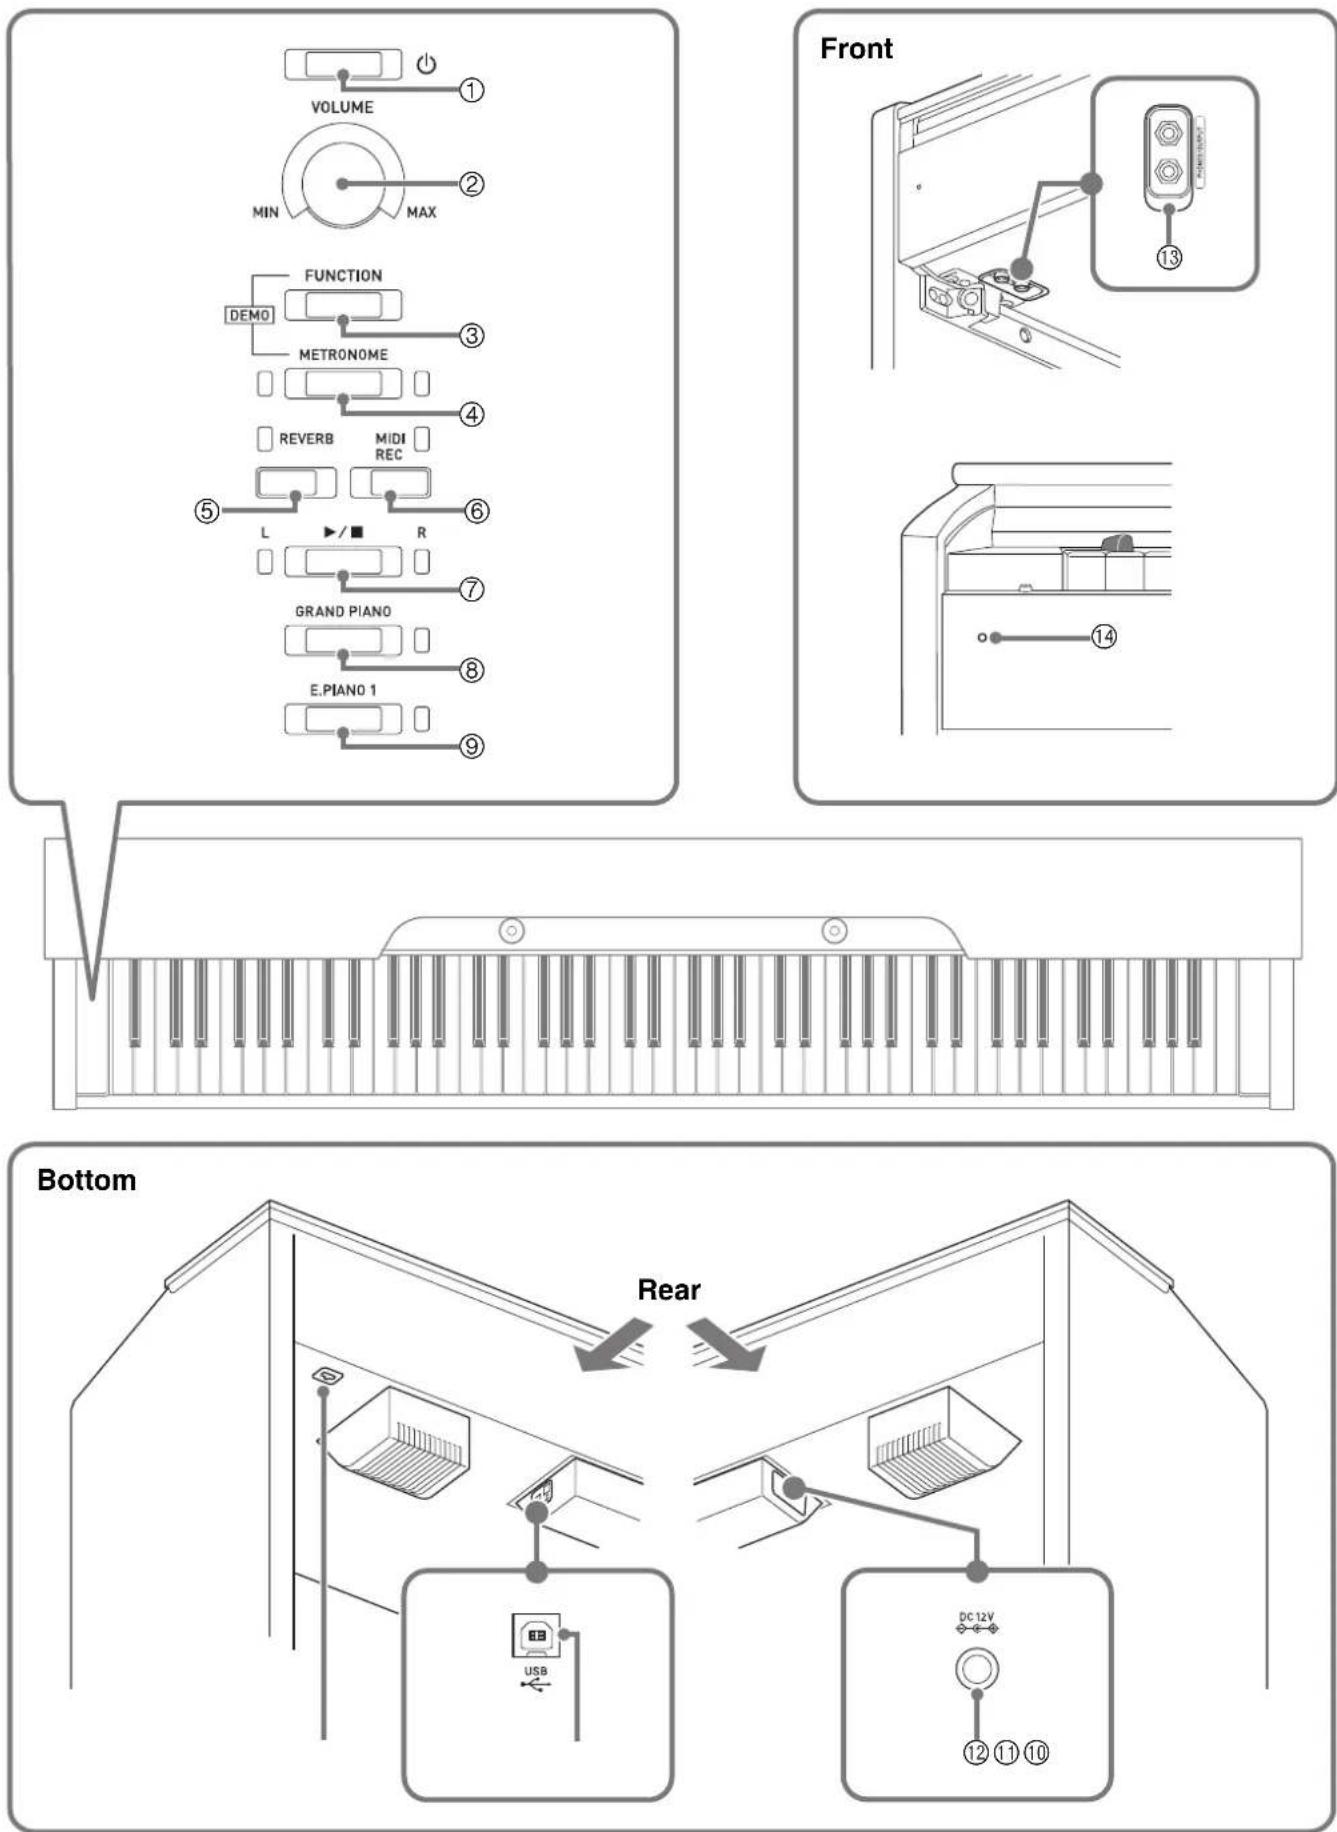
① ⏻ (POWER) button
⑧ GRAND PIANO button
② VOLUME controller
⑨ E.PIANO 1 button
③ FUNCTION button
⑩ Pedal connector
④ METRONOME button
⑪ USB port
⑤ REVERB button
⑫ Power terminal (DC 12V)
⑥ MIDI REC button
⑬ PHONES/OUTPUT jacks
⑦ ▶/■ button
⑭ Power lamp
FUNCTION Button
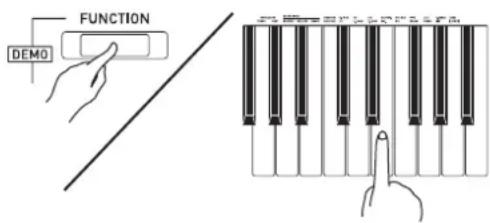
The FUNCTION button is used in combination with other buttons and keys.
To change a setting, hold down the FUNCTION button as you press the button or key that is assigned the setting you want to configure.
- When you press a key, the Digital Piano beeps to indicate the current setting.
● A long beep indicates that a setting is turned off.
NOTE
- For details about operations and settings, see "Configuring Settings with the Keyboard" on page EN-19.
Auto Resume and Operation Lock
Your Digital Piano can be configured to save its current settings when power is turned off and restore them when turned back on again (Auto Resume). You can also lock its buttons to protect against operation errors (Operation Lock). For details, see "Parameter List" on pages EN-22 - EN-25.
About Music Score data
You can use a computer to download music score data from the CASIO Website. For more information, visit the URL below.
https://support.casio.com/global/en/emi/manual/PX-765/
After you finish assembling the stand, turn on the Digital Piano. For details, see "Getting Ready" on page EN-31.
Turning Power On or Off
- Press the ⏻ (POWER) button to turn on Digital Piano power.
- The power lamp lights and the Digital Piano powers up. The power up operation takes about 5 seconds.
- To turn off the Digital Piano, hold down the ⏻ (POWER) button until the power lamp goes out.
NOTE
- Pressing the ⏻ (POWER) button to turn off power actually puts the Digital Piano into a standby state. Minute amounts of current continue to flow within the Digital Piano in the standby state. If you do not plan to use the Digital Piano for a long time or if there is a lightning storm in your area, be sure to unplug the AC adaptor from the power outlet.
Auto Power Off
This Digital Piano is designed to turn off automatically to avoid wasting power after no operation is performed for a preset amount of time. The Auto Power Off trigger time is about four hours.
- You also can use the procedure below to temporarily suspend Auto Power Off.
■To disable Auto Power Off
-
While the Digital Piano is turned on, press the ⏻ (POWER) button to turn it off.
-
While holding down the FUNCTION button, press the ⏻ (POWER) button to turn on the Digital Piano.
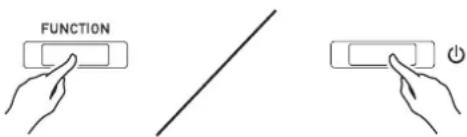
• Auto Power Off will be disabled at this time.
NOTE
- Turning off the Digital Piano after performing the above steps will re-enable Auto Power Off.
Returning the Digital Piano to Its Factory Default Settings
Perform the following procedure when you want to return the Digital Piano's stored data and settings to their initial factory defaults.
- Turn off the Digital Piano.
- Holding down the FUNCTION, MIDI REC and E.PIANO 1 buttons, press the ⏻ (POWER) button.
-
Hold down the FUNCTION, MIDI REC and E.PIANO 1 buttons until the E.PIANO 1 lamp, and then the GRAND PIANO lamp, and then the R lamp start to flash.
• After some time, the flashing will stop. -
Release the FUNCTION, MIDI REC and E.PIANO 1 buttons.
- The Digital Piano will initialize its internal system. You will be able to use the Digital Piano in a short while.
NOTE
- See "Turning Power On or Off" (page EN-4) for information about turning power on and off.
Playing with Different Tones
Selecting and Playing a Tone
The Digital Piano comes with 19 built-in tones. *1

*1: The names of the tones are marked above the keyboard keys to which they are assigned.
*2: In this manual, these six tones are collectively referred to as "piano tones". The CONCERT, MELLOW, and BRIGHT tones are collectively referred to as "GRAND PIANO tones".
To select a tone
- Select the tone you want.
● To select GRAND PIANO CONCERT or E.PIANO 1
- Press the GRAND PIANO button or E.PIANO 1 button.
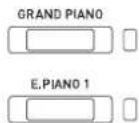
- The button lamp of the selected tone will light.
● To select one of the other tones
- While holding down the FUNCTION button, press the keyboard key that corresponds to the tone you want to select.
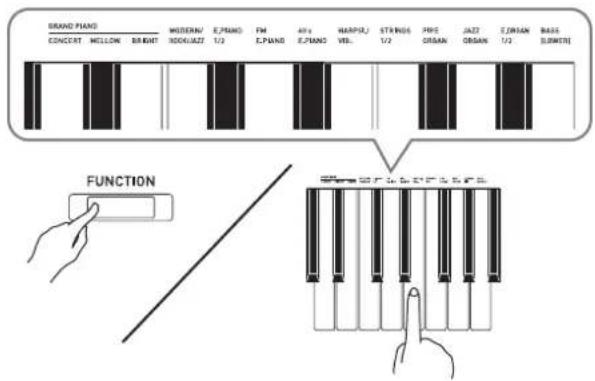
- Use the VOLUME controller to adjust the volume.
NOTE
- Some keys may have more than one tone assigned. In this case, each press of the key cycles to the next assigned tone. Which tone is selected by the key press is indicated by beeps.
Example: Cycling through MODERN, ROCK, and
JAZZ settings
MODERN: (1 beep)
ROCK: (2 beeps)
JAZZ: (3 beeps)
- Of the Digital Piano's 19 built-in tones, the first three are grand piano tone. Each tone has its own distinctive merits, so you should select the tone that suits the song you are playing along with or your own personal preferences.
| Tone Name Characteristics | |
| CONCERT This | is a full concert grand piano tone for dynamic and natural tone changes. This tone is designed to reproduce damper, resonance, and other piano nuances, which makes it ideal for virtually any type of piano performance. |
| MELLOW A warm, subdued grand piano tone. | |
| BRIGHT A bright and clear grand piano tone. | |
Bass Tone (BASS)
Selecting the BASS (LOWER) tone in step 1 of the above procedure will assign the bass tone to the low range (left side) of the keyboard. The high range (right side) will be assigned the tone that was selected when you pressed the BASS key.
- BASS tone lets you effectively split the keyboard between two different tones.
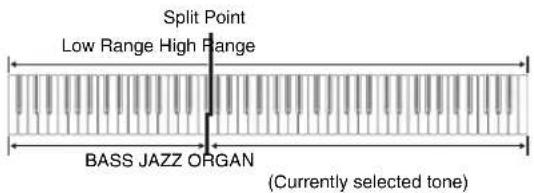
NOTE
• To return the keyboard to a single tone, select any tone other than BASS.
- You cannot select BASS when recording to Track 2.
- You can configure settings to sustain reverberation of the BASS (LOWER) tone while the damper pedal or sostenuto pedal is pressed. For more information, see "Lower Pedal" (page EN-22).
Layering Two Tones
Use the following procedure to layer two tones, so they sound at the same time.
When specifying two tones for layering, first tone you select will be the main tone, while the second tone will be the layered tone.
-
Hold down the FUNCTION button and press the Select Layer Tone key.
-
For details about using the keyboard keys for settings, see "Keyboard Keys Used for Configuring Settings" (page EN-20).
• Each press of the keyboard key toggles between on and off. -
Hold down the FUNCTION button and press key of the tone to be layered.
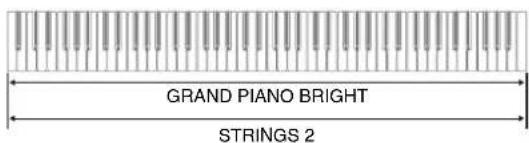
- To return to the original tone, hold down the FUNCTION button and press the Select Layer Tone key (which exits the Layer Mode).
NOTE
- You cannot layer the BASS tone with another tone.
- You cannot perform the layer operation when recording to Track 2.
To adjust the volume balance between two layered tones
- While holding down the FUNCTION button, use the keyboard keys shown below to adjust the volume of the layered tones.
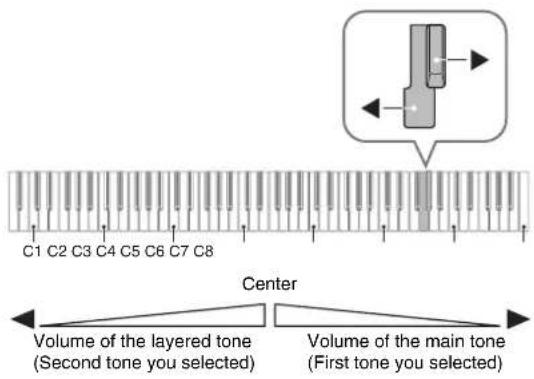
- To return the volume setting to its initial default, hold down the FUNCTION button and press both of the keys at the same time.
Using Effects
Reverb : Makes your notes resonate.
Chorus: Adds more breadth to your notes.
- For details about using the keyboard keys for settings, see "Keyboard Keys Used for Configuring Settings" (page EN-20).
To apply Reverb
- Each press of the REVERB button toggles reverb between on and off.
- Reverb is applied when it is turned on.
■To select the reverb type
- While holding down the FUNCTION button, press the keyboard key of the reverb type to be applied.
1: Room
2: Small hall
3: Large hall
4: Stadium
To apply chorus to a tone
- While holding down the FUNCTION button, use the Chorus keyboard key to cycle through the available settings.
• Each press of the Chorus keyboard key causes the Digital Piano to beep according to which setting is selected, as shown in the table below.
- Chorus
| Number of Beeps Setting | |
| 1 (long) | Off (OFF) |
| 1 (short) | Light Chorus |
| 2 | Medium Chorus |
| 3 | Deep Chorus |
| 4 | Flanger (whooshing effect) |
About DSP
DSP makes it possible to digitally produce complex acoustic effects. The DSP is assigned to each tone whenever you turn on Digital Piano power.
Using the Digital Piano's Pedals
Your Digital Piano comes equipped with three pedals: damper, soft, and sostenuto
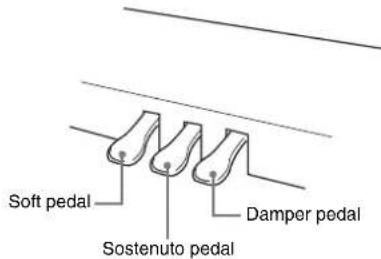
Pedal Functions
- Damper Pedal
Pressing the damper pedal while playing will cause the notes you play to reverberate for a long time. Half-pedal operation (pressing the pedal part way) is also supported.
- When one of the GRAND PIANO tones or the MODERN piano tone is selected, using the damper pedal adds damper resonance that is similar to that produced on an acoustic grand piano.
- Sostenuto Pedal
Only the notes of the keys that are depressed when this pedal is pressed are sustained until the pedal is released.
- Soft Pedal
Pressing this pedal while playing suppresses notes played on the keyboard after the pedal was pressed, and makes them sound softer.
NOTE
- If pressing the pedal does not produce the desired effect, it could mean that the pedal cord is not connected properly. Refer to step 1 under "To connect the cable" (page EN-34).
Disabling Damper Noise Output
Damper noise is a slight metallic ringing sound that is generated as the damper of an acoustic piano separates from the wires pedal when the damper pedal is pressed. The damper resonance of your Digital Piano normally includes damper noise, but you can perform the procedure below to disable its output. Damper noise can be applied to the four piano tones (three GRAND PIANO tones and MODERN).
1. While holding down the FUNCTION button, press the Damper Noise keyboard key.
- For details about using the keyboard keys for settings, see "Keyboard Keys Used for Configuring Settings" (page EN-20).
• Each press of the key toggles the setting and causes the Digital Piano to beep as described below.
- Long beep: Damper noise output disabled
- Short beep: Damper noise output enabled
Using the Metronome
1. Press the METRONOME button.
• This starts the metronome.
• The lamp flashes with each beat.
2. While holding down the FUNCTION button, press the METRONOME BEAT keyboard key.
- Keep the FUNCTION button depressed as you advance to step 3.
3. Hold down the FUNCTION button and press the BEAT keyboard key (0 to 9) that corresponds to the beat you want to specify.
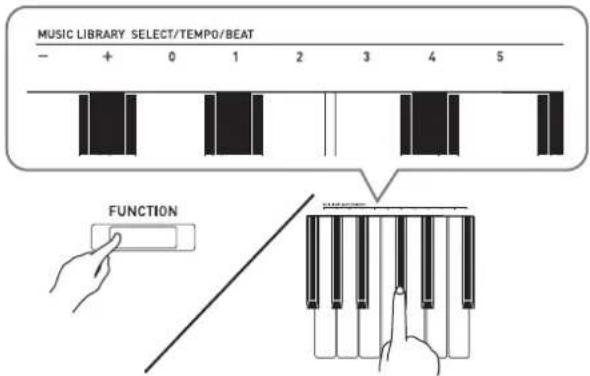
- You can specify a beat value in the range of 0 to 9 (beats per measure). A chime will sound on the first beat of each measure, and clicks will sound for the remaining beats. Specifying 0 plays a straight click, without any chime. This setting lets you practice with a steady beat.
4. Release the FUNCTION button and then hold it down again as you press the METRONOME TEMPO keyboard key.
- Keep the FUNCTION button depressed as you advance to step 5.
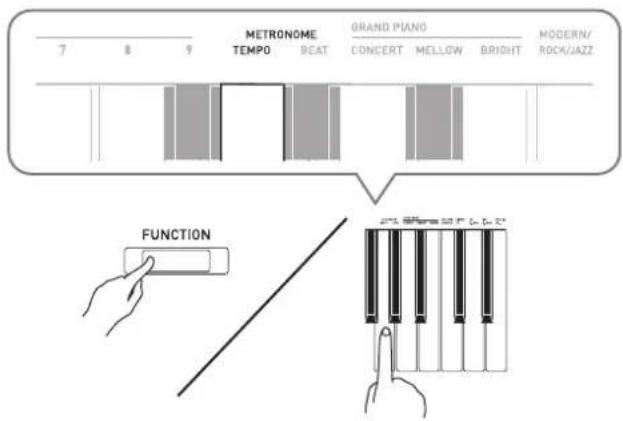
5. While holding down the FUNCTION button, use the TEMPO keys to specify a tempo value in the range of 20 to 255 beats per minute.
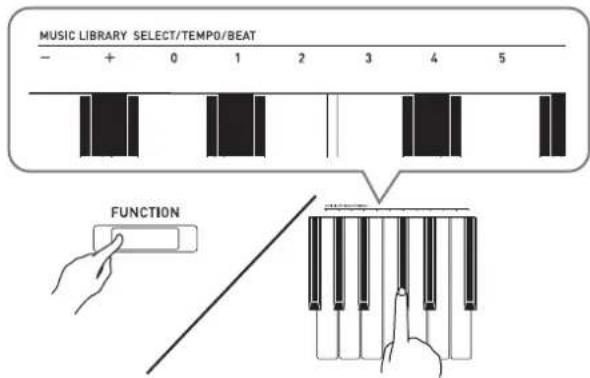
• Each press of the + or - key raises or lowers the tempo value by 1.
- You can also use the tempo value input keys (0 to 9) to enter a specific tempo value.
- Input three digits as the tempo value.
Example: To set a tempo of 20, press keys 0, 2, and then 0.
6. Press the METRONOME button to turn off the metronome.
NOTE
- If you used the numeric input (0 to 9) keyboard keys to input beat and/or tempo values and the values are within the allowable setting ranges, the Digital Piano will emit a high pitch beep when you release the FUNCTION button. If a value is outside the allowable range, a low-pitch sound will be emitted.
- In step 5 of the above procedure, pressing the + and – keys at the same time will set the tempo of the Concert Play lesson song or Music Library song (in the case of a recorded song, the tempo when the song was recorded) that was last selected on the Digital Piano.
To adjust the metronome volume
You can perform the following procedure at any time, regardless of whether or not the metronome is sounding.
-
While holding down the FUNCTION button, use the Metronome Volume keys to specify a volume value in the range of 0 to 42.
-
For details about using the keyboard keys for settings, see "Keyboard Keys Used for Configuring Settings" on page EN-20.
• Each press of the + and - key raises or lowers the metronome volume value by 1.

- To return to the initial default setting, press + and - at the same time.
Splitting the Keyboard for Duet Play
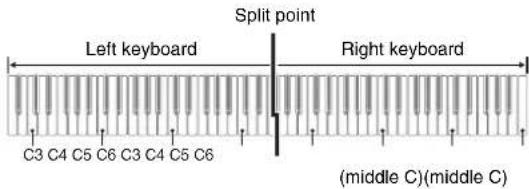
You can split the keyboard in the center so the left and right sides have the same range. The left outer pedal is the left side damper pedal, while the right outer pedal is the right side damper pedal.
Keyboard
Pedals
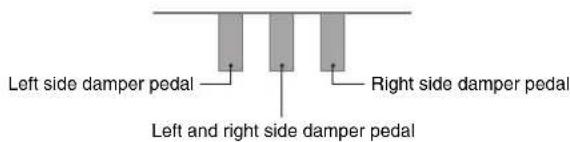

- Only the damper pedal for the right side keyboard supports half-pedal operations.
- Select the piano tone you want to use for the duet.
Example: GRAND PIANO (BRIGHT)
- To cycle between the Duet Mode settings below, hold down the FUNCTION button and press the Duet Mode key.
Off
On
Pan: Outputs left side keyboard tone from the left speaker and right side keyboard tone from the right speaker.
IMPORTANT!
- The Octave Shift and Transpose settings cannot be changed while On or Pan is selected for the Duet Mode setting.
- While Pan is selected for the Duet Mode settings, the Hall Simulator, Reverb, and Chorus settings cannot be changed.
Changing the Octaves of the duet keyboards
You can change the ranges of the left and right keyboards in octave units from their initial default settings. This comes in handy, for example, if the initial default range is not enough when one person is playing the left hand part and another person is playing the right hand part.
- While holding down the FUNCTION and GRAND PIANO buttons, press the keyboard C key that you want located at C4 (middle C) of the left keyboard. Keep FUNCTION and GRAND PIANO buttons depressed as you advance to step 2, below.
- This will sound the note assigned to C4 and change the octave of the left keyboard.
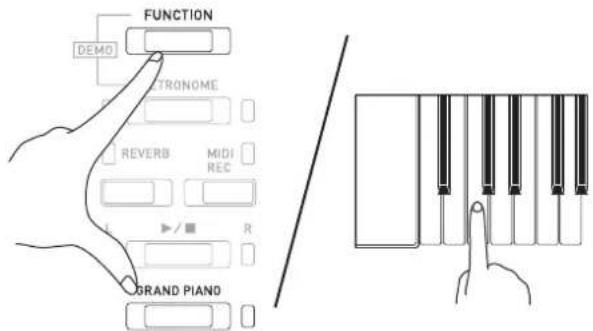
Example: Press the keyboard key of the leftmost C will assign the range shown below.
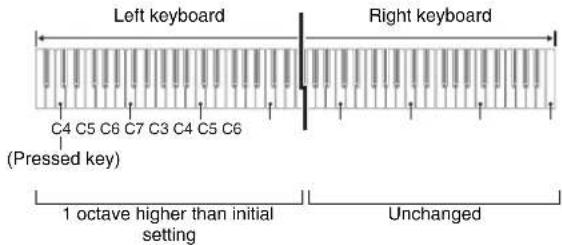
- While still holding down the FUNCTION and GRAND PIANO buttons, press the keyboard C key that you want located at C4 (middle C) of the right keyboard.
- This will sound the note assigned to C4 and change the octave of the right keyboard.
NOTE
- Exiting the Duet Mode and then selecting On or Pan for the Duet Mode setting again will return the keyboards to their initial default ranges.
Using Built-in Songs (Concert Play, Music Library, Demo Tunes)
Your Digital Piano comes with 10 built-in piano and orchestra tunes (Concert Play 1 through 10), and 60 piano solos (Music Library 1 to 60).
Concert Play lets you enjoy playing along with orchestral accompaniment. You can use Music Library to practice famous piano pieces.
IMPORTANT!
- Whenever you change to another song, this Digital Piano loads the song data. Note that button operations are disabled while song loading is in progress. If you are playing something on the keyboard, changing the song may cause note output to stop.
Performing Demo Play
-
While holding down the FUNCTION button, press the METRONOME button.
-
This starts sequentially looped playback of all Concert Play (Listen) songs and Music Library songs.
-
You can play along with a song on the keyboard as it is playing. The tone assigned to the keyboard is the one that is preset for the song that is playing.
-
To change the demo song, hold down the FUNCTION button and press the MIDI REC button or REVERB button.
-
To advance to the next demo song, hold down the FUNCTION button and press the MIDI REC button.
- To return to the previous demo song, hold down the FUNCTION button and press the REVERB button.
-
For a list of songs, see page A-1.
-
Press the ▶/■ button to stop built-in song play.
NOTE
- Pressing the METRONOME button while holding down the FUNCTION button during Concert Play jumps to the first Music Library song. Performing the same operation during Music Library play jumps to the first Concert Play song.
- The tune selection and playback stop operations described above are the only operations that are possible during demo tune play.
Concert Play
Concert Play has recordings of a live orchestra, which you can use to play along with authentic accompaniment.
You can also use Concert Play for 3-step practice.
Step 1: LISTEN
Listen to playback of the piano and orchestra to familiarize yourself with the music.
Step 2: LESSON
Practice the Concert Play piano part.
- You can turn off the left hand part or right hand part of a built-in song and play along on the piano.
Step 3: PLAY
Play along with the orchestra accompaniment.
- The Concert Play contains actual recordings of an orchestra. Because of this, the instrument sounds are different from the tones that can be selected with this piano (page EN-5). This also means that Concert Play playback includes breath sounds and performance noises.
Practicing with a Concert Play Song
To listen to a Concert Play song (LISTEN)
- While holding down the FUNCTION button, use the CONCERT PLAY SELECT + and - keyboard keys to scroll song numbers in sequences (from 1 to 10).
- For information about Concert Play songs, see the "Concert Play List" on page A-1.
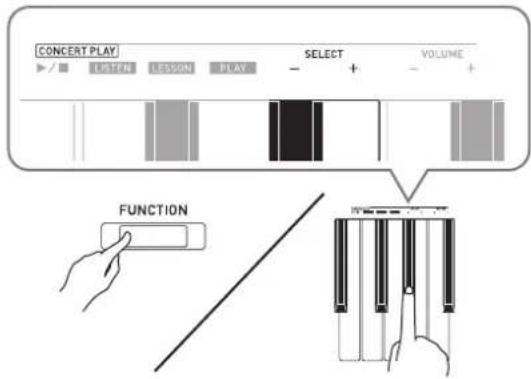
-
While holding down the FUNCTION button, press the LISTEN keyboard key.
-
This enters the Listen Mode for listening to the piano and orchestra performance.
- Playback tempo is fixed and cannot be changed during Listen Mode playback.
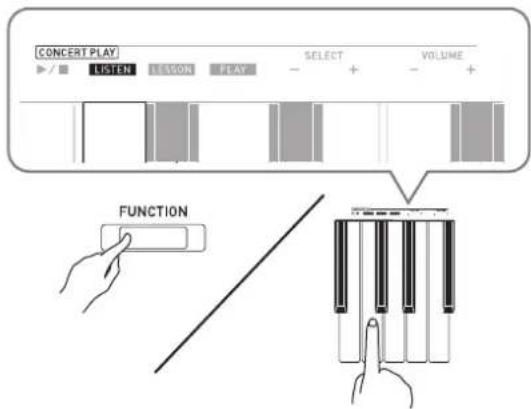
- While holding down the FUNCTION button, press the CONCERT PLAY ▶/■ keyboard key to start playback.
- Playback will stop automatically when the end of the song is reached.
- To stop playback, hold down the FUNCTION button as you press the CONCERT PLAY ▶/■ keyboard key again.
NOTE
- You can use adjust the volume level of the playback, if you want. See "Configuring Settings with the Keyboard" (page EN-19) for more information.
To practice the piano part (LESSON)
PREPARATION
- You can change tempo of the playback, if you want. See "Configuring Settings with the Keyboard" (page EN-19) for more information.

- Some Concert Play tunes incorporate tempo changes in their arrangements. Because of this, the playback tempo may at times be faster or slower than the tempo setting.
- While holding down the FUNCTION button, press the LESSON keyboard key.
- This enters the Lesson Mode, which allows simple play along with the piano part.
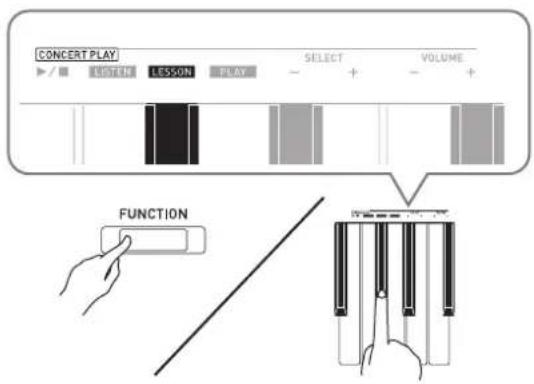
- While holding down the FUNCTION button, press the ▶/■ button to select the part you want to turn off.
- Pressing a button toggles its part on (button lamp on) and off (button lamp off).
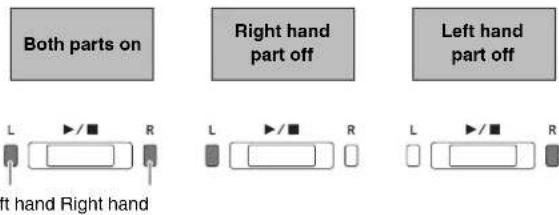
- While holding down the FUNCTION button, press the CONCERT PLAY ▶/■ keyboard key.
- This starts playback, without the part you turned off in step 2.
-
Play the missing part on the keyboard.
-
To stop playback, hold down the FUNCTION button as you press the CONCERT PLAY ▶/■ keyboard key again.
To play along with the orchestra accompaniment (PLAY)
- While holding down the FUNCTION button, press the PLAY keyboard key.
- This will enter the Play Mode, which plays the orchestra part without the piano part.
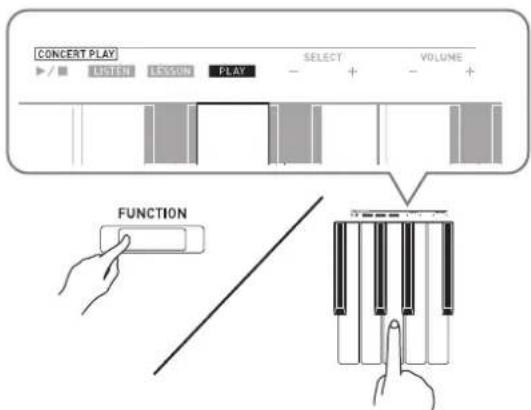
- While holding down the FUNCTION button, press the CONCERT PLAY ▶/■ keyboard key to start playback.
- Playback tempo is fixed and cannot be changed during Play Mode playback.
-
Play the piano part on the keyboard.
-
To stop playback, hold down the FUNCTION button as you press the CONCERT PLAY ▶/■ keyboard key again.
Music Library
You can use the Music Library for your listening enjoyment or to practice piano songs.
• The Music Library includes 60 songs, numbered 1 through 60.
- You can also import up to 10 songs* from a computer to Digital Piano memory, and assign them Music Library song numbers 61 through 70.
*You can download music data from the Internet and then transfer it from your computer to Digital Piano memory. See "Transferring Song Data with a Computer" on page EN-28 for more information.
Playing Back a Specific Music Library Song
-
Find the song number of the song you want to play in the "Music Library List" on page A-1.
-
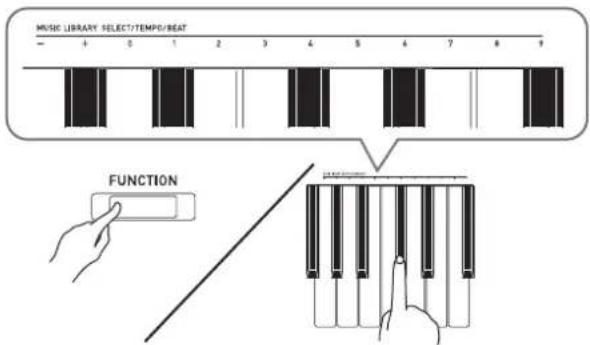
To change to another song, hold down the FUNCTION button as you use the MUSIC LIBRARY SELECT (+, -, 0 to 9) keys to specify a song number.
• Each press of the + or - key raises or lowers the song number by 1.
- You can also input a value from 0 to 9 to specify a Music Library song number.
- Input two digits as the song number.
Example: To specify song number 5, press keys 0 and then 5.
- Press the ▶/■ button.
• This starts the playback of the song.
- To stop playback, press the ▶/■ button again.
- Playback will stop automatically when the end of the song is reached.
NOTE
- Pressing the + and - keys at the same time in step 2 of the above procedure will select song number 1.
- You also can adjust the playback tempo and volume of the song. See "Configuring Settings with the Keyboard" on page EN-19 for more information.
Practicing with a Music Library Song
You can turn off the left hand part or right hand part of a song and play along on the Digital Piano.
NOTE
- The Music Library includes a number of duets. While a duet is selected, you can turn off the first piano (Primo) or second piano (Secondo) tone and play along with the song.
- Some music library tunes incorporate tempo changes in their arrangements. Because of this, the playback tempo may at times be faster or slower than the tempo setting.
PREPARATION
- Select the song you want to practice and adjust the tempo. See step 3 under "Using the Metronome" (page EN-9).
- While holding down the FUNCTION button, press the ▶/■ button to select the part you want to turn off.
- Pressing a button toggles its part on (button lamp on) and off (button lamp off).
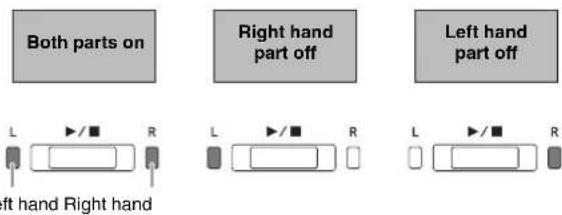
- Press the ▶/■ button.
- This starts playback, without the part you turned off in step 1.
- Play the missing part on the keyboard.
- To stop playback, press the ▶/■ button again.
Recording and Playback
You can record notes you play with the Digital Piano's MIDI recorder for later playback. When a commercially available USB flash drive is inserted in the Digital Piano's USB flash drive port, audio data is recorded to and played back from the USB flash drive (Audio Recorder).
Recording to Built-in MIDI Recorder
Tracks
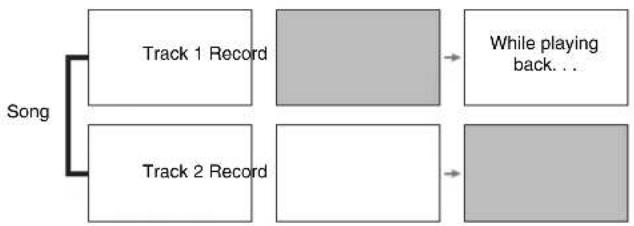
A track is a container of recorded data, and a song consists of two tracks: Track 1 and Track 2. You can record each track separately and then combine them so they play back together as a single song.
flowchart
graph TD
    A["Song"] --> B["Track 1 Record"]
    A --> C["Track 2 Record"]
    B --> D["While playing back..."]
    C --> E[" "]
Memory Capacity
- You can record approximately 5,000 notes in Digital Piano memory.
- The MIDI REC button lamp will flash at high speed when memory runs low.
- Recording stops automatically if the number of notes in memory exceeds the maximum.
Recorded Data
- Keyboard play
• Tone used for keyboard play - Beat (Track 1 only)
- Tempo setting (Track 1 only)
- Layer setting (Track 1 only)
- Duet (Track 1 only)
• Temperament (Track 1 only)
• Keyboard volume (Track 1 only) - Chorus (Track 1 only)
• Brilliance (Track 1 only)
• Reverb setting (Track 1 only)
• Damper Noise On/Off (Track 1 only)
Recording Data Storage
- Starting a new recording deletes any data that was previously recorded in memory.
- Should power fail during recording, all of the data in the track you are recording will be deleted.
IMPORTANT!
- CASIO COMPUTER CO., LTD. takes no responsibility for any damages, lost profits, or claims by third parties arising from the deletion of recorded data due to malfunction, repair, or for any other reason.
Using the MIDI REC Button
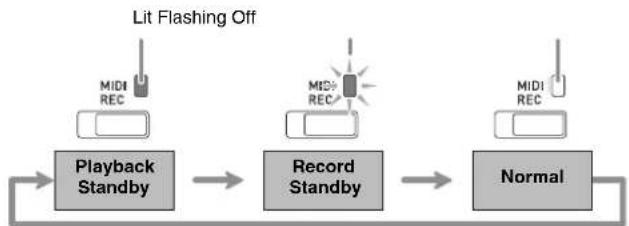
Each press of the MIDI REC button cycles through the recording options in the sequence shown below.
flowchart
graph LR
    A["Playback Standby"] --> B["Record Standby"]
    B --> C["Normal"]
    D["MIDI REC"] --> A
    E["MIDI REC"] --> B
    F["MIDI REC"] --> C
    G["Lit Flashing Off"] --> D
    G --> E
    G --> F
Recording to a Specific Song Track
After recording to either of the tracks of a song, you can record to the other track while listening to playback what you recorded in the first track.
- Press the MIDI REC button once or twice so the MIDI REC lamp is flashing.
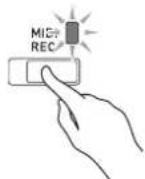
- At this time the L lamp will flash to indicate that the Digital Piano is standing by for recording to Track 1.
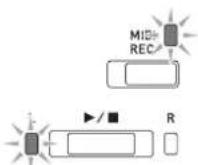
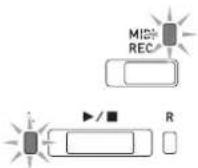
- While holding down the FUNCTION button, press the ▶/■ button to select the track you want to record.
• Make sure that the indicator lamp for the record track is flashing.
Track 1: L lamp
Track 2: R lamp
Example:Track 1 selected
-
Select the tone and effects (Track 1 only) you want to use in your recording.
-
Tone (page EN-5)
• Effects (page EN-7)
NOTE
- If you want the metronome to sound while you are recording, configure the beat and tempo settings, and then press the METRONOME button. See "Using the Metronome" on page EN-9 for more information.
- Press the ▶/■ button or start playing.
• Recording will start automatically.
-
To stop recording, press the ▶/■ button.
-
This will cause the MIDI REC button lamp and the lamp of the track you recorded to change from flashing to lit.
-
To play back the track you just recorded, press the ▶/■ button.
-
After you are finished recording or playing back, press the MIDI REC button so its lamp goes out.
Recording to One Track while Listening to Playback of the Other Track
- Press the MIDI REC button so its lamp is lit.
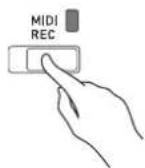
-
While holding down the FUNCTION button, press the ▶/■ button to select the track you want to play back while recording.
-
Press the MIDI REC button so its lamp is flashing.
• This will cause the L lamp to flash.
- While holding down the FUNCTION button, press the ▶/■ button to select the track you want to record.
• Make sure that the indicator lamp for the record track is flashing.
Example: To listen to playback of Track 1 as you record to Track 2
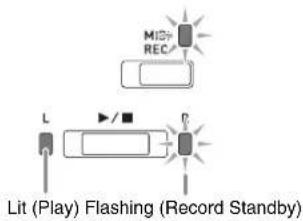
-
Select the tone and effects (Track 1 only) you want to use for your recording.
-
Press the ▶/■ button or start playing.
-
This will start both playback of the recorded track and recording to the other track.
-
If, while recording is in progress, you want to rerecord from the beginning, hold down the MIDI REC button until the Digital Piano beeps. This discards the current recording data and enters recording standby.
-
To stop recording, press the ▶/■ button.
Playing Back from Digital Piano Memory
- Press the MIDI REC button so its lamp is lit.
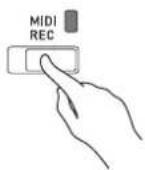
NOTE
- When a song has something recorded in both tracks, you can turn off one track and play back just the other track, if you want.
- Press the ▶/■ button.
- This starts playback of the song and/or track you selected.
NOTE
- You can change the tempo setting as a track is playing.
- Press the ▶/■ button again to stop playback.
Deleting Recorded Data
The following procedure deletes a specific track of a song.
IMPORTANT!
- The procedure below deletes all of the data of the selected track. Note that the delete operation cannot be undone. Check to make sure you really do not need the data in Digital Piano memory before you perform the following steps.
- Press the MIDI REC button once or twice so the MIDI REC lamp is flashing.
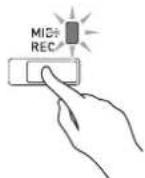
- While holding down the FUNCTION button, press the ▶/■ button to select the track you want to delete.
- Press the MIDI REC button until its lamp is lit.
- This will cause the lamp of the track you selected in step 2 of this procedure to flash.
Example: If you selected Track 2 for deletion
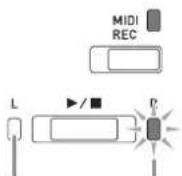
Off Flashing: Delete standby
-
Once again, hold down the FUNCTION button as you press the ▶/■ button.
-
This deletes the selected track and enters record standby.
- To cancel the delete operation at any time, press the MIDI REC button so its lamp becomes unlit.
NOTE
- Only the Digital Piano's ▶/■ button are operational from step 3 until you actually perform the delete operation in step 4. No other button operation can be performed.
Configuring Settings with the Keyboard
In addition to selecting tones and songs (Concert Play or Music Library), you also can use the FUNCTION button in combination with the keyboard keys to configure effect, keyboard touch, and other settings.
To configure settings with the keyboard
- Use the "Parameter List" on pages EN-22 - EN-25 to find the setting you want to configure, and note its details.
- Use "Keyboard Keys Used for Configuring Settings" on page EN-20 to find the location on the keyboard for configuring the setting you want.
- While holding down the FUNCTION button, press the keyboard key for the setting you want to configure.
- The Digital Piano will sound an operation tone after it configures the setting.
Example: To lower the Concert Play volume, press the CONCERT PLAY VOLUME minus (−) key.
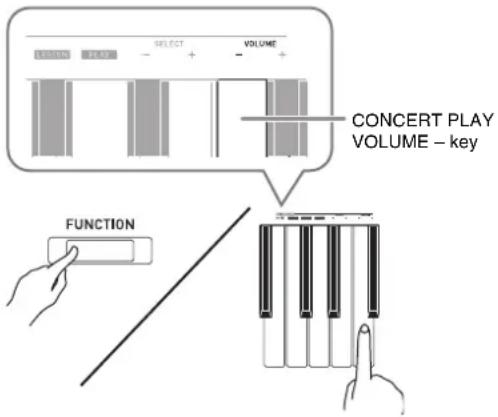
- Release the FUNCTION button to complete the setting procedure.
NOTE
- You can configure the Digital Piano so no operation tone sounds in step 3. For details, see “ ^50 Operation tone” under “Parameter List” on pages EN-22 - EN-25.
Keyboard Setting Operation Types
There are four types of operations that you can perform while configuring settings with the keyboard keys: Type A, Type B, Type C, and Type D.
Type A : Direct input
Example: Pressing the JAZZ ORGAN keyboard key to select the JAZZ ORGAN tone
Type B: Raising or lowering a setting using the + and - keyboard keys
- Holding down a key raises or lowers the setting at high speed.
- To return to the initial default setting, press both keys at the same time.
Type C: Inputting a value using the number (0 through 9) keyboard keys.
- To input a two-digit value, press 0 and then 2. To input a three-digit value, press 0, 2, and then 0.
Type D: Toggling or cycling through settings by pressing a keyboard key
- When you press a key, the Digital Piano will beep to let you know which setting is selected.
- A long beep indicates that the applicable setting is turned off.
Example: While chorus is turned off, pressing the Chorus keyboard key twice will cause the Digital Piano to beep twice, which indicates that the Medium Chorus setting is selected.
NOTE
- You can find out what operation type applies to each setting by checking the "Operation Type" in the "Parameter List" on pages EN-22 - EN-25.
Keyboard Keys Used for Configuring Settings
- The numbers ① through ③ correspond to the same numbers in the "Parameter List" on pages EN-22 - EN-25.
[Left keyboard]
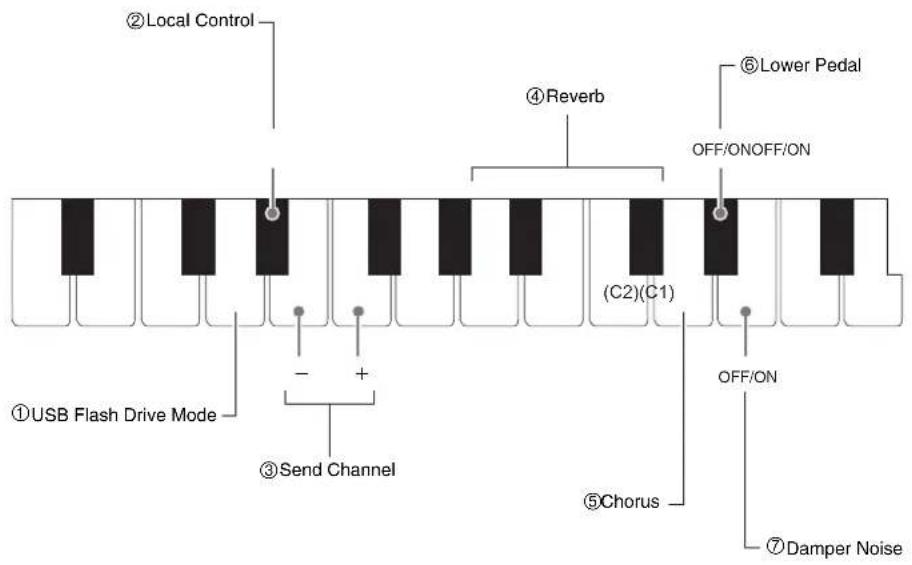
![[Overall]](/content/2026/05/839988/images/637fa3edfbb1d716f00baef9acfb9eb4b0f01ad024dda5eef49d62a6ce406e0a.jpg)
[Middle Left Keyboard]
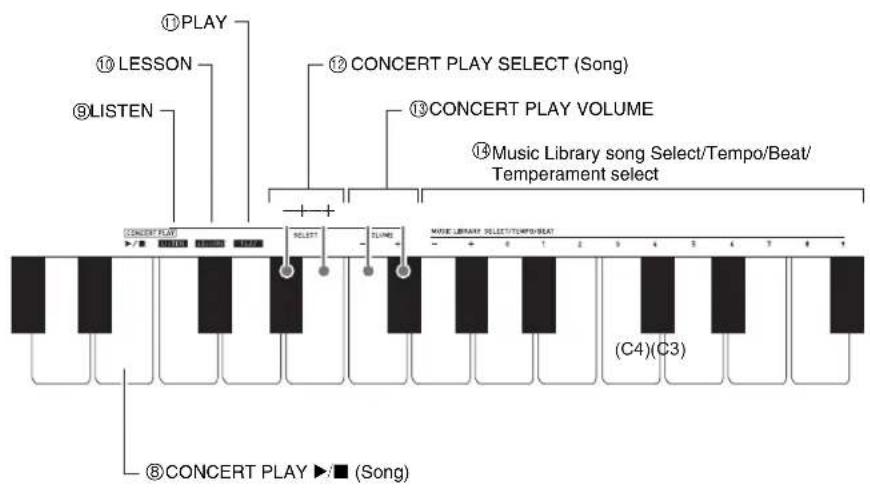
flowchart
graph TD
    A["CONCERT PLAY"] --> B["SOCKET"]
    B --> C["LISTEN"]
    C --> D["LESSON"]
    D --> E["PLAY"]
    F["CONCERT PLAY SELECT (Song)"] --> G["SOCKET"]
    H["CONCERT PLAY VOLUME"] --> I["SOCKET"]
    J["Music Library song Select/Tempo/Beat/Temperament select"] --> K["SOCKET"]
    L["CONCERT PLAY ▶ (Song)"] --> M["SOCKET"]
    N["(C4)(C3)"] --> O["SOCKET"]
[Middle Right Keyboard]
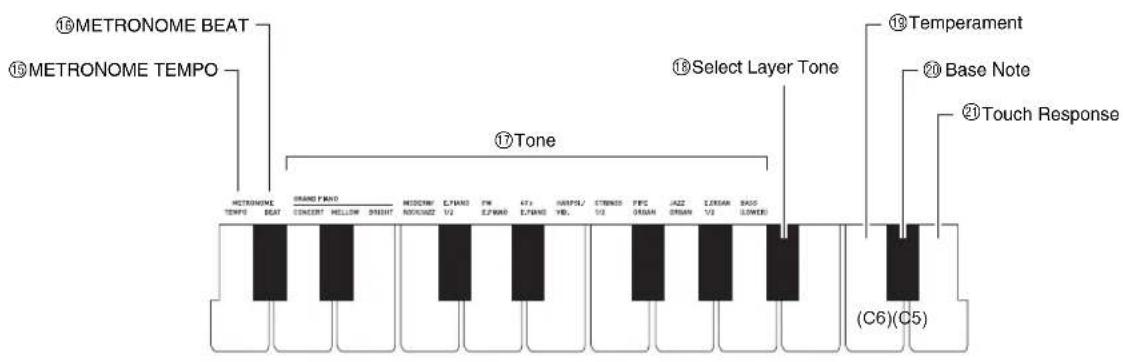
[Overall]

[Right keyboard]
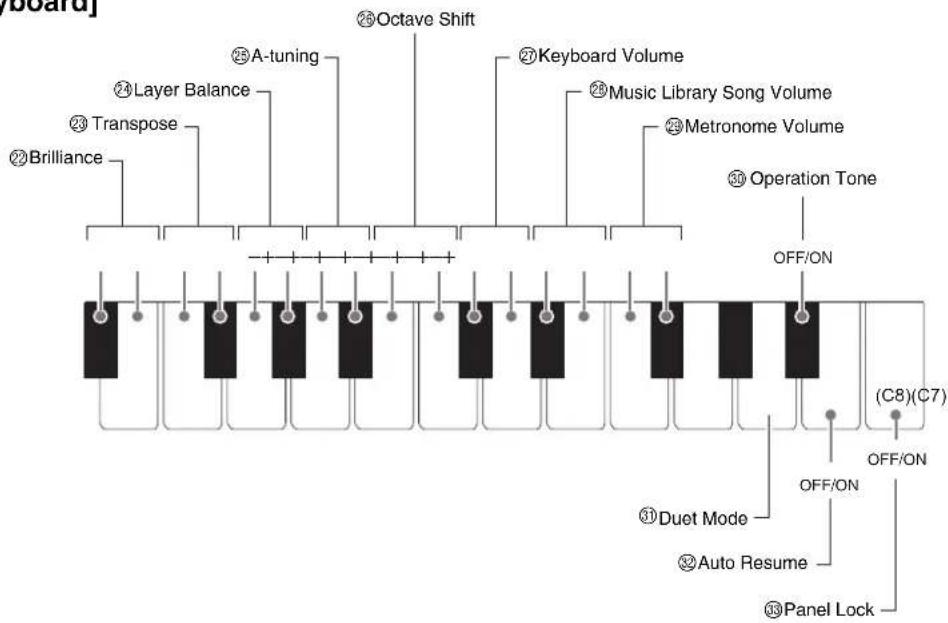
flowchart
graph TD
    A["Brilliance"] --> B["Layer Balance"]
    B --> C["A-tuning"]
    C --> D["Octave Shift"]
    D --> E["Keyboard Volume"]
    E --> F["Music Library Song Volume"]
    F --> G["Metronome Volume"]
    G --> H["Operation Tone"]
    H --> I["OFF/ON"]
    I --> J["(C8)(C7)"]
    J --> K["OFF/ON"]
    K --> L["Duet Mode"]
    L --> M["Auto Resume"]
    M --> N["Panel Lock"]
Parameter List
Tones
| Parameter Settings | Operation Type(page EN-19) | Description Remarks | ||
| 4Reverb | Off, 1 to 4Default: 2 | A Specifies | the reverb of notes.(page EN-7) | |
| 17Tone selection | See page EN-5.Default: GRAND PIANO(CONCERT) | A Assigns | a tone to the keyboard.(page EN-5) | |
| 5Chorus | Off, 1 to 4Default: Off | D Controls | the breadth of notes.(page EN-7) | |
| 22Brilliance | -3 to 0 to 3Default: 0 | B Specifies | the brilliance of notes.Pressing [+] makes notes brighter and harder. Pressing [-] makes notes mellower and softer. | • To return the setting to its initial default (0), press [+] and [-] at the same time. |
| 24Layer balance | -24 to 0 to 24Default: -10 | B Specifies | the volume balance between the main tone and the layered tone. (page EN-6) | • To return the setting to its initial default (-10), press [+] and [-] at the same time. |
| 6Lower Pedal Off, | OnDefault: Off | D When turned on and the BASS(LOWER) tone is selected, pressing the damper pedal or sostenuto pedal will apply sustained reverberation to the BASS(LOWER) tone. (page EN-6) | ||
| 7Damper noise | Off, OnDefault: On | D Enables/disables damper noise output. (page EN-8) | ||
| 18Select layer tone | Off, OnDefault: Off | D Enables or disables layering.(page EN-6) | • BASS (LOWER) cannot be layered with another tone.• Configuring of layering settings is not supported for recording function Track 2 recording. | |
| 11Duet mode | Off, On, PanDefault: Off | D Enables or disables the Duet Mode.(page EN-10) | • When Pan is specified, Reverb and Chorus effects cannot be applied. | |
■Song/Metronome
| Parameter Settings | Operation Type(page EN-19) | Description Remarks | ||
| 14 Music Library song select (MUSIC LIBRARY SELECT) | 1 to 70Default: 1 | B C | Selects a Music Library tune.(page EN-15) | This setting cannot be changed while recording. |
| 14 Tempo (TEMPO) | 20 to 255Default: 120 | B C | Specifies the tempo of Concert Play Lesson Mode songs, Music Library songs, the metronome, recording and playback, etc. (page EN-9) | During recording, pressing + and - at the same time sets a value of 120.The tempo cannot be changed while in the Concert Play LISTEN Mode or PLAY Mode. |
| 14 Beat (BEAT) | 0 to 9Default: 4 | C Specifies | the metronome beat.(page EN-9) | |
| 15 METRONOME TEMPO | -- Enters a setting mode for | specifying the metronome tempo with keyboard keys. Use the 16 TEMPO keyboard keys to input a tempo value. (page EN-9) | The tempo cannot be changed while in the Concert Play LISTEN Mode or PLAY Mode. | |
| 16 METRONOME BEAT | -- Enters a setting mode for | specifying the metronome beat with keyboard keys. Use the 16 BEAT keyboard keys to input a beat value. (page EN-9) | ||
| 8 CONCERT PLAY ▶/■ | Play, Stop D Toggles a Concert | Play song between play and stop. (page EN-13) | This setting cannot be changed while recording. | |
| 9 LISTEN | -A Enters the Concert Play Listen | Mode. (page EN-13) | This setting cannot be changed while recording. | |
| 10 LESSON | -A Enters the Concert Play Lesson | Mode. (page EN-14) | This setting cannot be changed while recording. | |
| 11 PLAY | -A Enters the Concert Play Play Mode.(page EN-14) | Page EN-14) | This setting cannot be changed while recording. | |
| 12 CONCERT PLAY SELECT (Song)(SELECT +/-) | 1 to 10Default: 1 | B Specifies | a Concert Play song number. (page EN-12) | This setting cannot be changed while recording. |
| 13 CONCERT PLAY VOLUME(VOLUME +/-) | 0 to 42Default: 32 | B Sets the volume level of Concert Play playback. | This setting cannot be changed while recording. | |
| 28 Music Library volume | 0 to 42Default: 42 | B Sets the volume level of Music Library playback. | This setting cannot be changed while recording. | |
| 29 Metronome volume | 0 to 42Default: 36 | B Specifies the metronome volume.(page EN-10) | ||
■Keyboard
| Parameter Settings | Operation Type(page EN-19) | Description Remarks | ||
| 19 Temperament20 TemperamentBase note14 Temperament select | Temperament:0 to 16Base note:C to BDefaults:Temperament: 0(Equal Temperament)Base note: C | You can change the scale (tuning system) of the keyboard from standard equal temperament to another tuning that is more suitable for playing Indian music, Arabic music, classical pieces, etc.·When you any temperament other than “Equal”, you must also configure a base note (base note of the temperament of the song being performed) setting.·For details about temperament, refer to a book that covers music theory. | ||
| 0: Equal /1: Pure Major /2: Pure Minor /3: Pythagorean /4: Kirnberger 3 /5: Werckmeister /6: Mean-Tone /7: Rast /8: Bayati /9: Hijaz /10: Saba /d11: Dashti /12: Chahargah /13: Segah /14: Gurjari Todi /15: Chandrakauns /16: Charukeshi | ||||
| While holding down the FUNCTION button, press the applicable keyboard keys as described below.1. Press the20 Base Note keyboard key.2. Press the keyboard key of the note you want to specify as the base note. You can specify any note in any register. | ||||
| 21 Touch response | Off, 1 to 3Default: 2 | D Specifies the | relative touch of the keyboard keys.Setting a smaller value causes lighter touch to produce more powerful sound. | ·Each press of the keyboard key causes it to beep the number of times shown below to indicate the current setting.Once (long): OffOnce (short): 1Twice: 2Three times: 3 |
| 23 Transpose | -12 to 0 to 12Default: 0 | B Raises or lowers the | tuning of the Digital Piano in semitone steps. | ·The transpose setting cannot be changed while in the Duet Mode.·Raising the key of the Digital Piano can cause notes the highest part of the range to become distorted. |
| 25 A-tuning | 415.5Hz to 440.0Hz to 465.9HzDefault: 440.0Hz | B Raises or lowers the | overall pitch of the Digital Piano in 0.1Hz steps from the standard pitch of A4 = 440.0Hz. | ·To toggle between the two settings below, hold down the FUNCTION button and press the A-tuning keyboard keys (+ and - ) at the same time.440.0 Hz (1 beep)442.0 Hz (2 beeps) |
| 25 Octave shift | -2 to 0 to 2Default: 0 | B Change the range of | the keyboard in octave units. | |
| 27 Keyboard volume | 0 to 42Default: 42 | B Adjusts the volume | levels of all parts that are controlled by the keyboard. | |
■MIDI and Other Settings
| Parameter Settings | Operation Type(page EN-19) | Description Remarks | ||
| 1 USB flash drive mode | MIDI, Storage Default: MIDI | D | T h e D mode automatically when it is connected to a computer by a USB cable. Select storage when saving Recorder memory song data to a computer or when loading computer song data to Digital Piano memory. (page EN-28) | After this setting is changed to Storage, the GRAND PIANO, E.PIANO 1, and R lamps will flash, and all other lamps will be unlit.All Digital Piano operations are disabled at this time.Each press of the USB device mode keyboard key toggles between the MIDI and storage modes. |
| 2 Local control | Off, OnDefault: On | D Selecting | "Off" for Local control cuts off the Digital Piano's sound source, so no sound is produced by the Digital Piano when keys are pressed. | |
| 3 Send channel | 1 to 16Default: 1 | B Specifies | one of the MIDI channels (1 through 16) as the Send channel, which is used for sending MIDI messages to an external device. | |
| 4 Operation tone | Off, OnDefault: On | D Selecting | "Off" disables sounding of the operation tone whenever a keyboard key is pressed while the FUNCTION is depressed. | This setting is retained even when the Digital Piano is turned off. |
| 5 Panel lock | Off, OnDefault: Off | D Selecting | "On" for this setting locks the Digital Piano's buttons (except for the ⏻ (Power) button and the buttons required for unlock), so no operation can be performed.Turn on operation lock when you want to protect against unintentional button operations. | |
| 6 Auto Resume | Off, OnDefault: Off | D When On | is selected for this setting, the Digital Piano will remember its settings whenever it is turned off, and restore them when power is turned on again.When Off is selected, settings are reset to their initial defaults whenever the Digital Piano is turned on. | The settings below are not remembered, even if Auto Resume is enabled.Duet ModeLayeredTune LR (part) settingLocal Control |
Linking with an Application (APP Function)
Your Digital Piano can connect with a smartphone, tablet, or other smart device. A special app is available to display music scores and a piano roll display to support your practice.
Downloading the Special App
Go to the website below to download the app and install it on your smart device.
https://support.casio.com/global/en/emi/manual/PX-765/
Connecting to a Computer
You can connect the Digital Piano to a computer and exchange MIDI data between them. You can send play data from the Digital Piano to commercially available music software running on your computer, or you can send MIDI data from your computer to the Digital Piano for playback.
Minimum Computer System Requirements
The following shows the minimum computer system requirements for sending and receiving MIDI data.
Check to make sure that your computer complies with these requirements before connecting the Digital Piano to it.
- Operating System
Windows 8.1 *1
Windows 10 *2
Windows 11
macOS (OS X/Mac OS X) 10.13, 10.14, 10.15, 11.0, 12.0
*1: Windows 8.1 (32-bit, 64-bit)
*2: Windows 10 (32-bit, 64-bit)
- USB port
NOTE
- For the latest OS support information, please see the "Operating System Compatibility (Windows/macOS)" section on our website below. https://support.casio.com/global/en/emi/manual/PX-765/
Connecting the Digital Piano to Your Computer
IMPORTANT!
- Make sure you follow the steps of the procedure below exactly. Connecting incorrectly can make data send and receive impossible.
1. Turn off the Digital Piano and then start up your computer.
- Do not start up the music software on your computer yet!
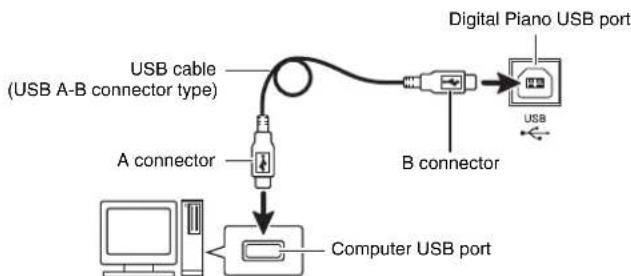
2. After starting up your computer, use a commercially available USB cable to connect it to the Digital Piano.
- Use a USB A-B connector type USB cable.
flowchart
graph TD
    A["Computer USB port"] --> B["A connector"]
    B --> C["USB cable (USB A-B connector type)"]
    C --> D["Digital Piano USB port"]
    D --> E["B connector"]
    E --> F["USB"]
3. Turn on the Digital Piano.
- If this is the first time you are connecting the Digital Piano to your computer, the driver software required to send and receive data will be installed on your computer automatically.
4. Start up commercially available music software on your computer.
5. Configure the music software settings to select "CASIO USB-MIDI" as the MIDI device.
- For information about how to select the MIDI device, see the user documentation that comes with the music software you are using.
IMPORTANT!
- Be sure to turn on the Digital Piano first before starting up your computer's music software.
NOTE
- Once you are able to connect successfully, there is no problem with leaving the USB cable connected when you turn off your computer and/or Digital Piano.
- For detailed specifications and connections that apply to MIDI data send and receive by this Digital Piano, see the latest support information provided by the website at the following URL. https://support.casio.com/global/en/emi/manual/PX-765
Using MIDI
What is MIDI?
The letters MIDI stand for Musical Instrument Digital Interface, which is the name of a worldwide standard for digital signals and connectors that makes it possible to exchange musical data between musical instruments and computers (machines) produced by different manufacturers.

- For detailed information about MIDI Implementation, visit the CASIO website at: https://support.casio.com/global/en/emi/manual/PX-765/
See "Send channel" and "Local control" on page EN-25.
Transferring Song Data with a Computer
Use the procedures in this section to transfer Recorder memory data to a computer for storage, and to load songs to user song memory (Music Library 61 to 70).

- Turning off the Digital Piano while data is being saved or loaded can cause all data currently stored in Digital Piano memory (recorded songs, etc.) to be deleted. Take care so power is not turned off accidentally during data save and load operations. If data is deleted, it will take longer than normal for the Digital Piano to power up the next time you turn it on (page EN-4).
-
Perform steps 1 through 3 of the procedure under "Connecting the Digital Piano to Your Computer" on page EN-27.
-
Change the Digital Piano's USB device mode to storage.
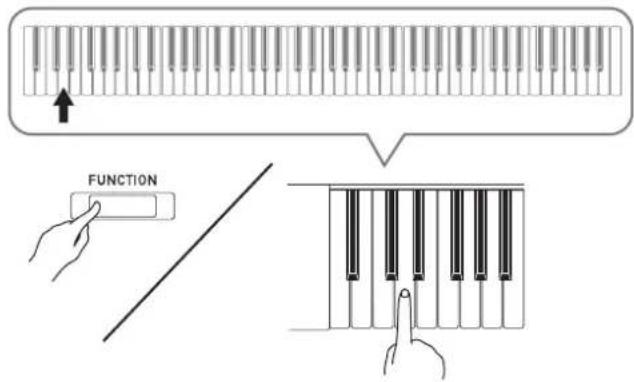
- While holding down the FUNCTION button, press the keyboard key that corresponds to the USB device mode.
• After this setting is changed, the GRAND PIANO, E.PIANO 1, R lamps flash, and all other lamps are unlit. -
See "USB flash drive mode" on page EN-25 for more information.
-
On your computer, perform the required operation to display your computer's storage devices.
| If your computer is running this operating system: | Do this: |
| Windows 8.1, Windows 10, Windows 11 | Open any folder. On the navigation window, click “PC”. |
| macOS Skip step 3 and double-click “PIANO” on your Mac desktop. | |
- The memory of this Digital Piano will appear as "PIANO" under "Devices with Removable Storage".
4. Double-click "PIANO".
- "PIANO" contains folders named "MUSICLIB" and "RECORDER".
Digital Piano memory
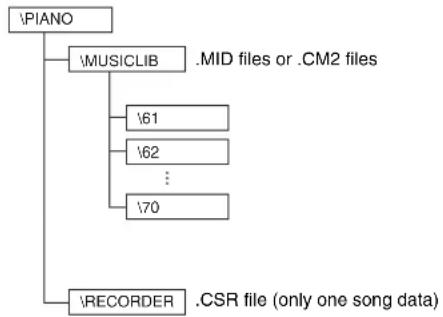
flowchart
graph TD
    A["\PIANO"] --> B["\MUSICLIB"]
    A --> C["\RECORDER"]
    B --> D["\61"]
    B --> E["\62"]
    B --> F["\70"]
    D --> G["MID files or .CM2 files"]
    E --> H["..."]
    F --> I[".CSR file (only one song data)"]
- To transfer a user song to the Digital Piano from your computer, open the "MUSICLIB" folder and put the song into one of the numbered subfolders (61 through 70). Each subfolder corresponds to a Music Library number: Subfolder 61 to Music Library 61, and so on.
- For example, storing song data in sub-folder 61 will cause it to be treated as Music Library song 61 data by the Digital Piano.
- To store Recorder song (.CSR) data on a computer, copy the .CSR file in the RECORDER folder to the computer. To return saved song (.CSR) data to Digital Piano memory, copy it to the RECORDER folder.
| Data Type | Folder Name | File Name and Extension* |
| User songs MUSI | CLIB .MID: SM | MF format data (format 0/1) .CM2: CASIO original format data |
| Recorder memory data | RECORDER | BIDREC01.CSR: CASIO original format data |
* Before starting a store or load operation, first check the file name extension to ensure it matches the ones shown in this column.
In the case of a song recorded with the Digital Piano's recorder function, change its file name to one of the names and extensions shown in this column.
IMPORTANT!
- The initial default configuration for Windows 8.1, Windows 10, and Windows 11 is to hide file name extensions. Perform one of the following operations on your computer to show file name extensions.
-
To show file name extensions under Windows 8.1, Windows 10, or Windows 11
-
Open any folder.
- Click the [View] menu and then select the [File name extensions] check box in the [Show/hide] group.
■To load a song into user song memory (Music Library 61 to 70)
- Open the MUSICLIB folder.
- Copy the song file (.MID or .CM2) to the number-named subfolder (61 to 70) whose name matches the number of the Music Library location to which you want to load the song.
- If there are two files with the filename extensions .MID and .CM2 in the MUSICLIB folder, only the .MID data will be loaded into user song memory.
■To transfer Recorder memory data between the Digital Piano and your computer
To transfer the Digital Piano's current Recorder memory data to your computer, copy the contents of the RECORDER folder to your computer.
To return Recorder data you previously saved to your computer back to Recorder memory, copy it back to the RECORDER folder (and replace the current RECORDER folder contents).
5. After the file copy operation is complete, return the USB device mode to MIDI.
- If you are using a Macintosh, perform the eject operation (drag them to the trash can).
- While holding down the FUNCTION button, press the applicable keyboard key. See "USB flash drive mode" on page EN-25 for more information.
- Returning the USB device mode to MIDI will load the contents of MUSICLIB into user song memory and the contents of RECORDER into Recorder memory.
IMPORTANT!
- A data conversion error is indicated when the GRAND PIANO, E.PIANO 1, L/R lamps are all lit, and all other lamps are unlit.
Copyrights
The rights of creators and copyright holders of music, images, computer programs, databases, and other data are protected by copyright laws. You are allowed to reproduce such works for personal or non-commercial use only. For any other purpose, all reproduction (including data format conversion), modification, transfer of reproductions, distribution over a network, or any other use without permission of the copyright holder exposes you to claims for damages and criminal prosecution for copyright infringement and violation of the author's personal rights. Be sure to reproduce and otherwise use copyrighted works only in accordance with applicable copyright laws.
Getting Ready
Assembling the Stand
PREPARATION
- Before starting assembly, check to make sure that you have all the parts shown below.
- This stand does not include any of the tools required for assembly. It is up to you to prepare a large Philips head (+) screwdriver for assembly.
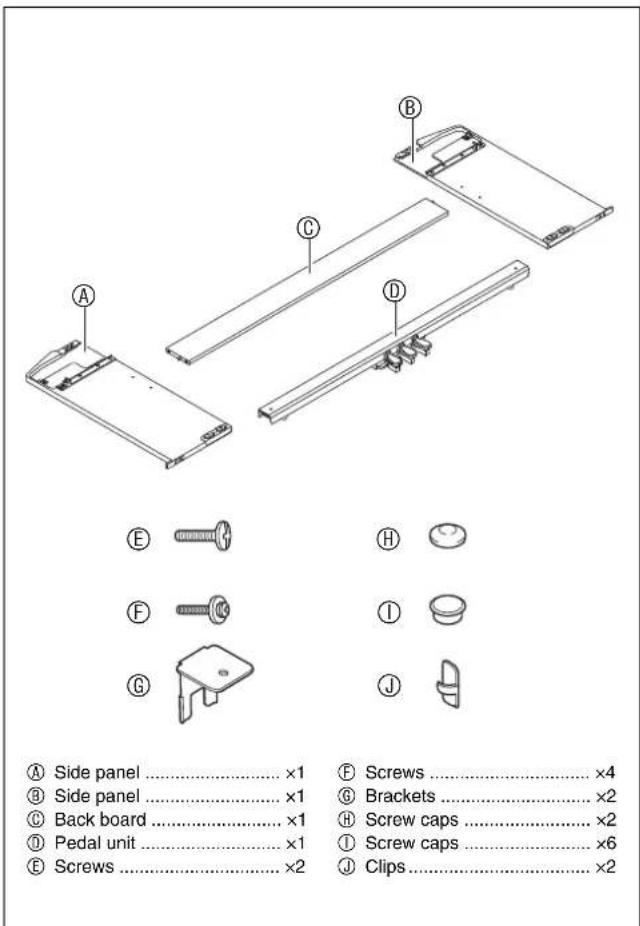
IMPORTANT!
- Do not remove the tape securing the keyboard cover in place until assembly is complete. Removing the tape can cause the keyboard cover to open and close during assembly, creating the risk of personal injury to your hands and fingers.
- Do not use any screws other than those that come with the stand. Doing so risks damage to the stand and/or Digital Piano.
- You can find the screws in a plastic bag inside of the packing material.
- If anything is missing or damaged, contact your local CASIO service provider.
⚠️ CAUTION
• To assemble the stand, at least two persons should work together on a flat surface.
• Take care that you do not pinch your fingers between parts when assembling them.
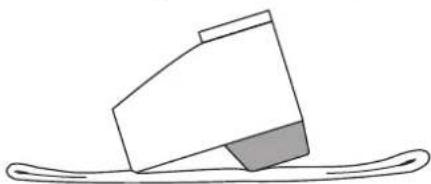
- Spread felt or some other type of cloth under the bench to avoid direct contact between the rubber at the tips of the legs and the floor surface. Direct contact between the rubber and flooring can cause discoloration, marring, or other damage to the flooring.
- When placing the Digital Piano on the floor, be sure to place it on something soft (a blanket, cushion, etc.) Do not place the Digital Piano directly onto the floor.
natural_image
Simple line drawing of a block on an inclined plane with a shaded base (no text or symbols)NOTE
- Be sure to follow the proper procedure when assembling the stand.
PREPARATION
- Pull the pedal unit cable out from the pedal unit ①.
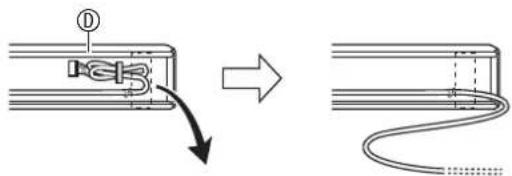
- Remove the four screws (two on each end) from back board ©.
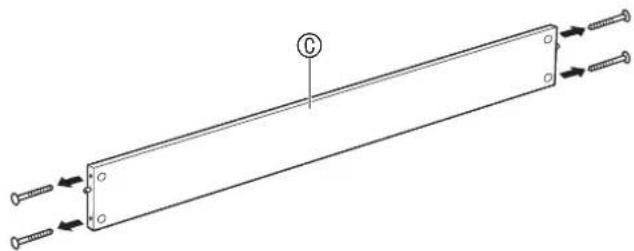
natural_image
Technical line drawing of a mechanical component with two screws and a labeled section (no text or symbols)-
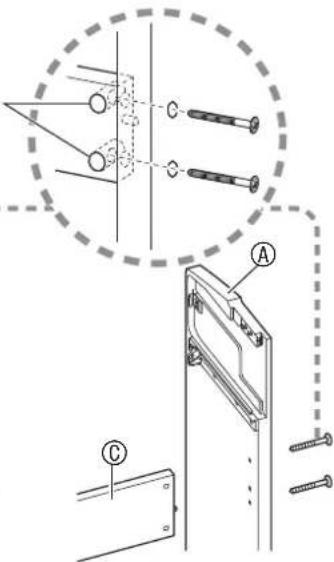
Attach side panels Ⓐ and Ⓑ to back board Ⓓ. Secure side panels Ⓔ and Ⓙ to the back board Ⓑ using the screws you removed in step 1.
-
Attach the side panels so the side of the back board ① where the joint connectors are inserted is facing towards the back of the stand.
- If you have trouble inserting a screw into a joint connector screw hole, use a screwdriver to adjust the joint connector by rotating it.

IMPORTANT!
Joint connectors
- When inserting a screw into a joint connector, keep your finger on the joint connector hole on the back of back board ⑥ to make sure the joint connector does not come out of the hole.
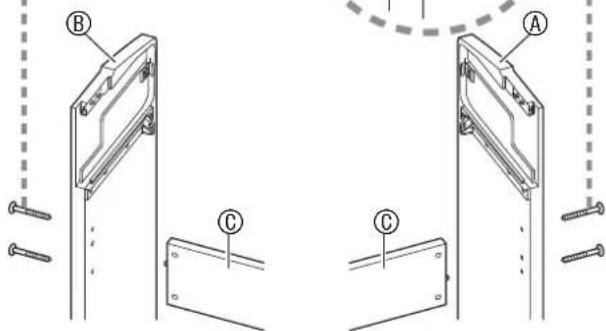
3-1. If you plan to locate the piano and stand where it is not against a wall, you need to extend the anti-tip brackets at the base of side panels Ⓐ and Ⓑ. Remove the two screws (one on the outside of each side panel) that hold the brackets, and then slide the brackets as shown in the illustration. After extending the anti-tip brackets, reinstall the screws that secure them in place, but do not tighten the screws fully at this time.
[Inside of side panels]
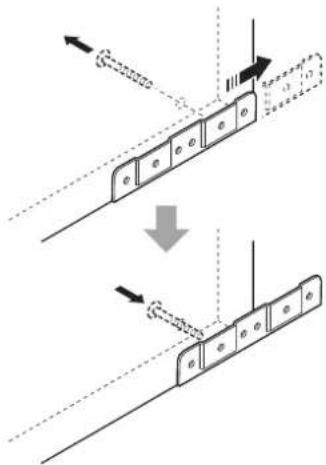
3-2. If you plan to locate the piano and stand against a wall, loosen the two screws (one on the outside of each side panel) that secure the brackets. You do not need to remove the screws in this case.
- In this case, you do not need to remove the screws. Just loosen them.
natural_image
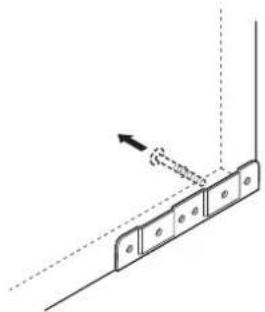
Pure mechanical diagram showing a bracket with mounting holes and a dashed line, no text or symbols present- Insert angle brackets ⑥ into the gap between the anti-tipping bracket and the side panel.
natural_image
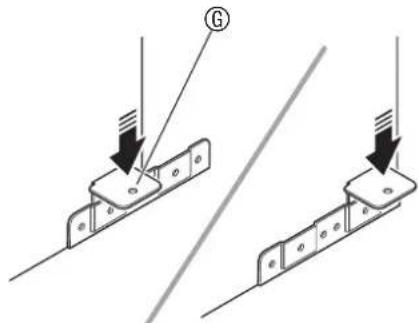
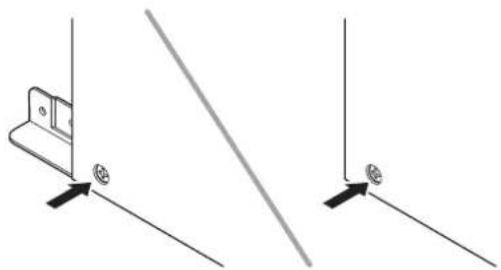
Technical diagram showing two mechanical components with arrows indicating assembly or force direction (no text or symbols present)- From the outside of side panels Ⓐ and Ⓑ, temporarily tighten the screws you loosened in step 3, above.
natural_image
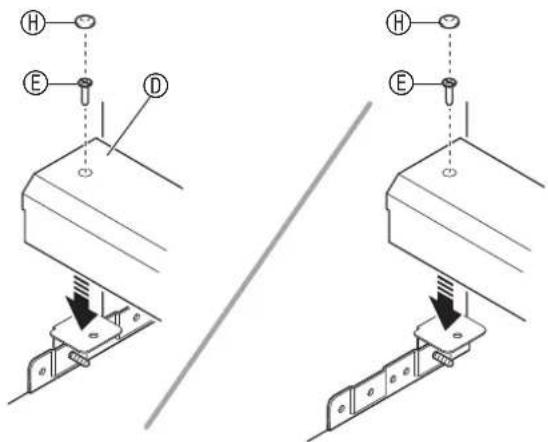
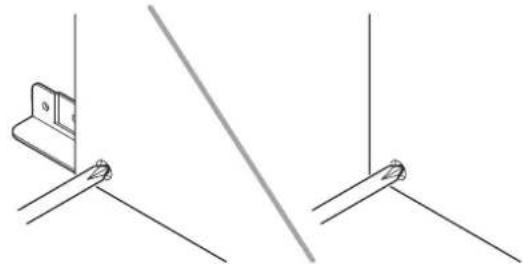
Pure technical diagram showing two angled mechanical components with arrows indicating direction (no text or symbols)- Place the two ends of the pedal unit Ⓓ onto the Ⓖ brackets and secure them with Ⓔ screws. Finish with Ⓙ screw caps.
- While pressing the pedal unit down towards the floor, securely tighten the screws you partially tightened in step 5.
natural_image
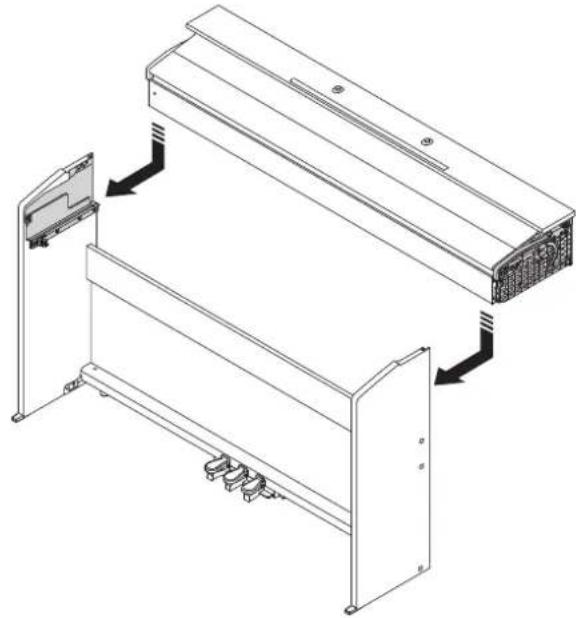
Pure technical line drawing of two mechanical mounting brackets with diagonal lines (no text or symbols)- From the back of the assembled stand, slide the piano into the grooves of side panel Ⓐ and side panel Ⓑ.
- Note that there is nothing anchoring the piano to the stand at this time. Take care to ensure that the piano does not fall off the stand.
natural_image
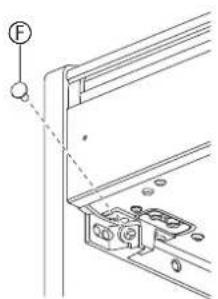
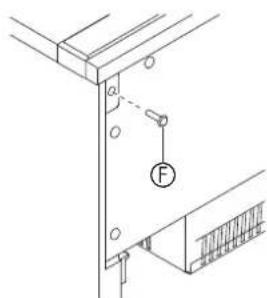
Technical line drawing of a server rack with mounting brackets and internal components (no text or symbols)- Use Ⓔ screws to secure the piano to the stand from both the front and the back.
[Front]
[Rear]
natural_image
Technical line drawing of a mechanical bracket with mounting holes and a force symbol (no text or labels)- After checking to make sure the six screws that secure side panels Ⓐ and Ⓑ are fully tightened, cover the heads of the screws with screw caps Ⓙ.
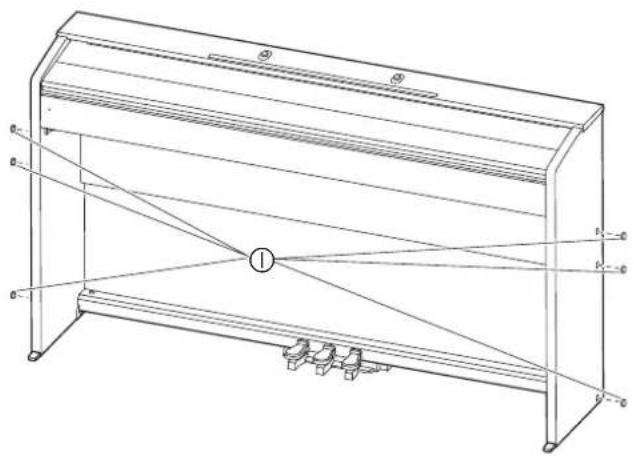
natural_image
Technical line drawing of a multi-tiered rectangular structure with internal components and labeled points (no text or symbols beyond basic geometry)To connect the cable
- Making sure that the pedal unit cable plug is oriented as shown in the illustration below, plug it into the pedal connector on the bottom of the piano.
a. Press the plug fully into the connector as far as it will go.
b. Use the clips Ⓙ to secure the pedal cable to two locations on side panel Ⓔ.
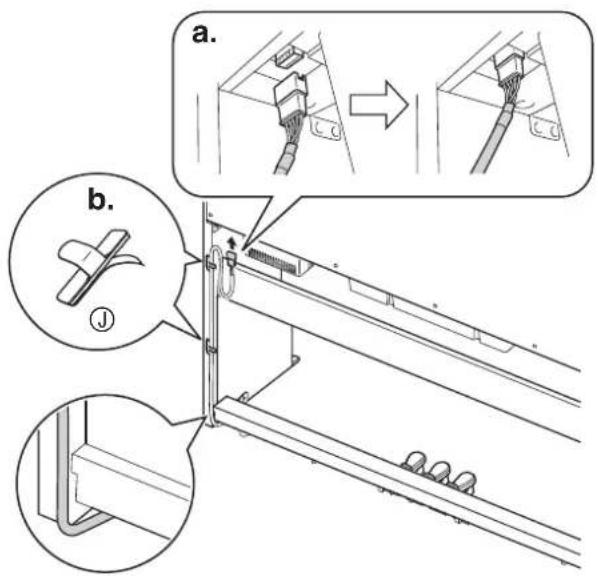
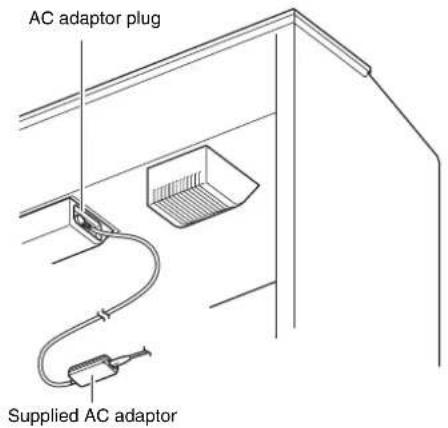
- Insert the plug of the AC adaptor that comes with the Digital Piano into its power terminal (12VDC).
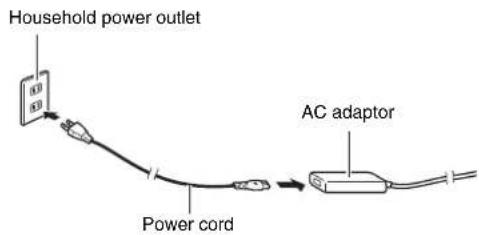
- Plug the power cord of the AC adaptor that comes with the Digital Piano into a household power outlet as shown in the illustration below.
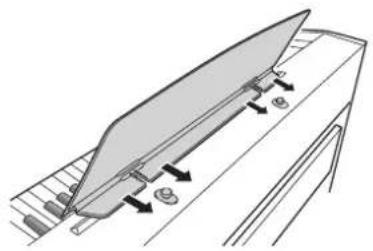
To install the music stand
- Slide the music stand under the two bolts on the top of the piano and then tighten the bolts.
natural_image
Technical diagram of a mechanical assembly with directional arrows indicating motion or force (no text or symbols present)Removing the Protective Tape from the Keyboard
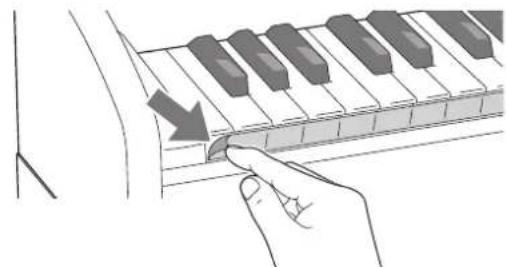
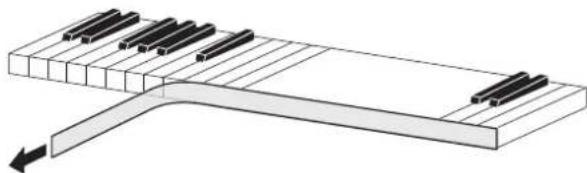
Protective tape is affixed to the front edges of the keyboard keys to protect them during shipment. Remove the protective tape before using the Digital Piano.
natural_image
Illustration of a hand pressing down on a piano keyboard with keys (no text or symbols)- Peel off the tape by pulling carefully towards you as shown in the illustration.
natural_image
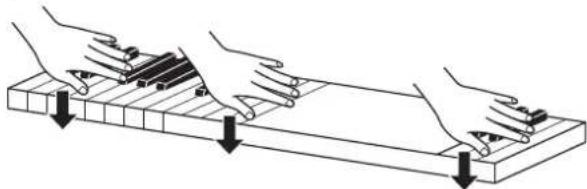
Pure diagram of a piano keyboard layout without any text, numbers, or symbols- If some keys seem to be raised up after you remove the tape, press down to return them to their normal positions.
natural_image
Illustration of two hands pressing down on a wooden beam with arrows indicating force or movement (no text or symbols)Connecting Headphones
Front
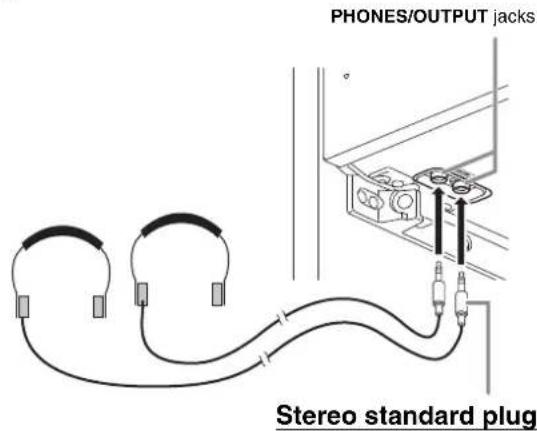
Connect commercially available headphones to the PHONES/OUTPUT jacks. Connecting headphones to either of the PHONES/OUTPUT jack cuts off output to the speakers, which means you can practice even late at night without bothering others. To protect your hearing, make sure that you do not set the volume level too high when using headphones.
NOTE
- Be sure to push the headphones plug into the PHONES/OUTPUT jacks as far as it will go. If you don't, you may hear sound from only one side of the headphones.
- If the plug of the headphones you are using does not match the PHONES/OUTPUT jacks, use the applicable commercially available adaptor plug.
- If you are using headphones that require an adaptor plug, make sure you do not leave the adaptor plugged in when you unplug the headphones. If you do, nothing will sound from the speakers when you play.
Connecting Audio Equipment or an Amplifier
You can connect audio equipment or a music amplifier to the Digital Piano and then play through external speakers for more powerful volume and better sound quality.

IMPORTANT!
- Whenever connecting a device to the Digital Piano, first use the VOLUME controller to set the volume to a low level. After connecting, you can adjust the volume to the level you want.
- Whenever you connect any device to the Digital Piano, be sure to read the user documentation that comes with the device.
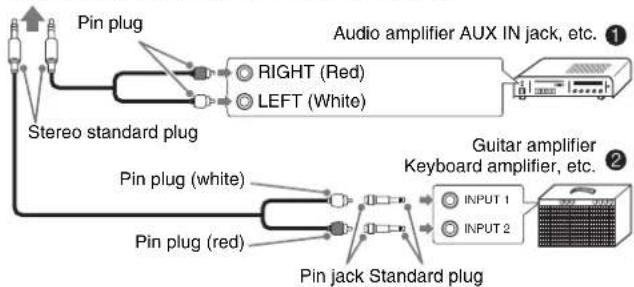
To either of the Digital Piano's PHONES/OUTPUT jack
flowchart
graph LR
    A["Pin plug"] --> B["Audio amplifier AUX IN jack, etc."]
    B --> C["RIGHT (Red)"]
    B --> D["LEFT (White)"]
    E["Stereo standard plug"] --> F["Pin plug (white)"]
    F --> G["Guitar amplifier Keyboard amplifier, etc."]
    G --> H["INPUT 1"]
    G --> I["INPUT 2"]
    J["Pin plug (red)"] --> K["Pin jack Standard plug"]
Connecting Audio Equipment (Figure 1)
Use commercially available connecting cords (Standard Plug × 1, Pin Plugs × 2) to connect as shown in Figure ①. Make sure that the end of the cord that you connect to the Digital Piano is a stereo standard plug. A monaural standard plug will result in output of only one of the two stereo channels. Normally, you should set the input selector of the audio equipment to the terminal where the Digital Piano is connected (AUX IN, etc.) Adjust volume using the Digital Piano's VOLUME controller.
Connecting a Music Amplifier (Figure ②)
Connect the connecting cord* to one of the types of amplifiers shown in Figure ②.
Adjust volume using the Digital Piano's VOLUME controller.
*Digital Piano: Stereo standard plug
Amplifier : Inputs signals for the left and right channels. Not connecting either plug will result in output of only one of the two stereo channels.
Bundled and Optional Accessories
Use only accessories that are specified for use with this Digital Piano.
Use of unauthorized accessories creates the risk of fire, electric shock, and personal injury.

NOTE
- You can get information about accessories that are sold separately for this product from the CASIO catalog available from your retailer, and from the CASIO website at the following URL.
https://support.casio.com/global/en/emi/manual/PX-765/
Troubleshooting
| Problem Action | See Page | |
| No sound is produced when I press a keyboard key. | 1. Rotate the VOLUME controller more towards “MAX”.2. Disconnect whatever is connected to the PHONES/OUTPUT jacks.3. Turn on the Local control setting. | EN-5EN-35EN-25 |
| The pitch of the Digital Piano is off. | 1. Change the transpose setting to “0”. Or turn power off and then back on.2. Change the tuning setting to 440.0 Hz. Or turn power off and then back on.3. Change the octave shift setting to 0.4. Change the temperament setting to “0: Equal”, which is the standard modern tuning. | EN-24EN-24EN-24EN-24 |
| Nothing happens when I press a pedal. | Check the orientation of the pedal unit plug and makes sure it is inserted as far as it goes. | EN-34 |
| Tones and/or effects sound strange. Turning power off and then back on again does not eliminate the problem.Example: Note intensity does not change even though I alter key pressure. | Turn off Auto Resume, and then turn power off and then back on again. | EN-25 |
| I cannot transfer data after connecting the Digital Piano to a computer. | 1. Check to make sure that the USB cable is connected to the Digital Piano and computer, and that the correct device is selected with your computer's music software.2. Turn off the Digital Piano and then exit the music software on your computer. Next, turn the Digital Piano back on and then restart the music software on your computer. | EN-27 |
| It takes a long time before I can use the Digital Piano after I turn it on. | It takes about 20 seconds after you turn on power to perform the memory format operation. Wait until the format operation is complete. Note that you should take care to avoid turning off the Digital Piano while a data transfer operation with a computer is in progress. | EN-28 |
| A tone's quality and volume sounds slightly different depending where it is played on the keyboard. | This is an unavoidable result of the digital sampling process,* and does not indicate malfunction.* Multiple digital samples are taken for the low range, middle range, and high range of the original musical instrument. Because of this, there may be very slight differences in tonal quality and volume between sample ranges. | |
| When I press a button, the note that is sounding cuts out momentarily or there is a slight change in how effects are applied. | This happens when the sounds of multiple parts are sounding at the same time while using layer, using the Duet Mode, playing back a built-in tune, recording, etc. Pressing a button when one of these conditions exists will cause the effect setting that is built into the tone to change automatically, which causes notes to cut out momentarily or causes a slight change in how effects are being applied. | |
| I need to reset all Digital Piano data and settings to their initial defaults. | Hold down the FUNCTION, MIDI REC and E.PIANO 1 buttons, and press the power button to turn on power. | |
| I need to reset a specific setting to its initial default. | Hold down the FUNCTION button and press the + and - keyboard keys of the setting at the same time. | |
Product Specifications
| Model PX-765BK | |
| Keyboard | 88-key piano keyboard, with Touch Response |
| Maximum Polyphony 128 notes | |
| Tone 19 types | Layer (excluding bass tones) |
| Acoustic Simulator | Damper Resonance (Damper Noise on/off), Hammer Response |
| Effects | Brilliance (-3 to 0 to 3), Reverb (4 types), Chorus (4 types), DSP |
| Metronome • Beats: 0 to 9Tempo range: 20 to 255 | |
| Duet Mode | Adjustable tone range (-2 to 2 octaves) |
| Concert Play • Songs: 10Song volume: AdjustablePart On/Off: L, R (Lesson Mode only)3 Modes: LISTEN, LESSON, PLAY | |
| Music Library | Songs: 60; 10 download songs (Up to approximately 90 KB per song, up to approximately 900 KB/10 songs total)**Based on 1 KB = 1024 bytesSong volume: AdjustablePart On/Off: L, R |
| Recorder MIDI Recorder | Modes: Real-time recording, playbackSongs: 1Tracks: 2Capacity: Approximately 5,000 notes totalRecording storage: Built-in flash memory |
| Pedals | Damper (half-pedal supported), sostenuto, soft |
| Other Functions | Touch Response: 3 levels, OffTranspose: 2 octaves (-12 to 0 to +12)T uning: 415.5 Hz to 440.0 Hz to 465.9 Hz (0.1 Hz steps)Temperament: Eq ual + 16 other typesOctave Shift: 4 octaves (-2 to 0 to +2)Panel Lock |
| MIDI | 16-channel multi-timbre receive |
| USB Memory - | |
| Input/Output Terminals | PHO NES/OUTPUT jacks: Stereo standard jacks × 2AC Adaptor Terminal: 12 VDCUSB port: Type BPedal connector |
| Speakers | 12 cm × 2 (Output: 8W + 8W) |
| Power Requirements | AC adaptor: AD-A12150LWAuto Power Off: Approximately 4 hours; Can be disabled. |
| Power Consumption | 12V --- 18W |
| Dimensions | Piano and Stand: 139.1(W) × 29.9(D) × 79.8(H) cm (54 13/16 × 11 3/4 × 31 7/16 inches) |
| Weight | Piano and Stand: Approximately 31.5 kg (69.4 lbs) |
- Specifications and designs are subject to change without notice.
Tone List
| Tone Name Program Change Bank Select MSB | ||
| GRAND PIANO CONCERT 0 0 | ||
| GRAND PIANO MELLOW 1 0 | ||
| GRAND PIANO BRIGHT 2 0 | ||
| MODERN PIANO 3 0 | ||
| ROCK PIANO 4 0 | ||
| JAZZ PIANO 5 0 | ||
| ELEC.PIANO 1 6 0 | ||
| ELEC.PIANO 2 7 0 | ||
| FM E.PIANO 8 0 | ||
| 60'S E.PIANO 9 0 | ||
| HARPSICHORD 10 0 | ||
| VIBRAPHONE | 11 0 | |
| STRINGS 1 | 12 0 | |
| STRINGS 2 | 13 0 | |
| PIPE ORGAN | 14 0 | |
| JAZZ ORGAN | 15 0 | |
| ELEC.ORGAN 1 | 16 0 | |
| ELEC.ORGAN 2 | 17 0 | |
| BASS (LOWER) | 18 0 | |
Concert Play List
| Song No. | Song Name |
| 1 | Je Te Veux |
| 2 | Vltava (Má vlast) |
| 3 | Canon |
| 4 | Tableaux d’Une Exposition “Promenade” |
| 5 | Piano Concerto No.20 K.466 2nd Mov. |
| 6 | Polovetzian Dance (Prince Igor) |
| 7 | Sonate K.331 1st Mov. |
| 8 | Violin Concerto 1st Mov. |
| 9 | Jesus, Bleibet Meine Freude |
| 10 | Melody In F |
Music Library List
| Song No. | Song Name |
| 01 | Nocturne Op.9-2 |
| 02 | Fantaisie-Impromptu Op.66 |
| 03 | Étude Op.10-3 “Chanson de l’adicu” |
| 04 | Étude Op.10-5 “Black Keys” |
| 05 | Étude Op.10-12 “Revolutionary” |
| 06 | Étude Op.25-9 “Butterflies” |
| 07 | Prélude Op.28-7 |
| 08 | Valse Op.64-1 “Petit Chien” |
| 09 | Valse Op.64-2 |
| 10 | Moments Musicaux 3 |
| 11 | Impromptu Op.90-2 |
| 12 | Marche Militaire 1 (Duet) |
| 13 | Frühlingslied [Lieder Ohne Worte Heft 5] |
| 14 | Fröhlicher Landmann [Album für die Jugend] |
| 15 | Von fremden Ländern und Menschen [Kinderszenen] |
| 16 | Träumerei [Kinderszenen] |
| 17 | Tambourin |
| 18 | Menuet BWV Anh.114[Clavierbüchlein der Anna Magdalena Bach] |
| 19 | Inventio 1 BWV 772 |
| 20 | Inventio 8 BWV 779 |
| 21 | Inventio 13 BWV 784 |
| Song No. | Song Name |
| 22 | Praeludium 1 BWV 846 [Das Wohltemperierte Klavier 1] |
| 23 | Le Coucou |
| 24 | Gavotte |
| 25 | Sonatina Op.36-1 1st Mov. |
| 26 | Sonatine Op.20-1 1st Mov. |
| 27 | Sonate K.545 1st Mov. |
| 28 | Sonate K.331 3rd Mov. “Turkish March” |
| 29 | Rondo K.485 |
| 30 | Für Elise |
| 31 | Marcia alla Turca |
| 32 | Sonate Op.13 “Pathétique” 1st Mov. |
| 33 | Sonate Op.13 “Pathétique” 2nd Mov. |
| 34 | Sonate Op.13 “Pathétique” 3rd Mov. |
| 35 | Sonate Op.27-2 “Moonlight” 1st Mov. |
| 36 | Rhapsodie 2 |
| 37 | Waltz Op.39-15 (Duet) |
| 38 | Liebesträume 3 |
| 39 | Blumenlied |
| 40 | La Prière d’une Vierge |
| 41 | Csikos Post |
| 42 | Humoresque Op.101-7 |
| 43 | Melodie [Lyrische Stücke Heft 2] |
| 44 | Sicilienne Op.78 |
| 45 | Berceuse [Dolly] (Duet) |
| 46 | Arabesque 1 |
| 47 | La Fille aux Cheveux de Lin [Préludes] |
| 48 | Passepied [Suite bergamasque] |
| 49 | Gymnopédie 1 |
| 50 | Je Te Veux |
| 51 | Salut d’Amour |
| 52 | The Entertainer |
| 53 | Maple Leaf Rag |
| 54 | L’arabesque [25 Etüden Op.100] |
| 55 | La Styrienne [25 Etüden Op.100] |
| 56 | Ave Maria [25 Etüden Op.100] |
| 57 | Le retour [25 Etüden Op.100] |
| 58 | La chevaleresque [25 Etüden Op.100] |
| 59 | No.13 [Études de Mécanisme Op.849] |
| 60 | No.26 [Études de Mécanisme Op.849] |
Model PX-765 Version : 1.0
MIDI Implementation Chart
| Function Transmitted | Recognized Remarks | |||
| Basic Channel | Default Changed | 1 - 161 - 16 | 1 - 161 - 16 | |
| Mode | Default Messages Altered | Mode 3X***** | Mode 3X***** | |
| Note Number | 0 - 127 0 - 127***** | 0 - 127*1True voice | *1 : Depends on tone | |
| Velocity | Note ON Note OFF | O 9nH v = 1 - 127X 8nH v = 64 | O 9nH v = 1 - 127X 9nH v = 0, 8nH v = 0 - 127 | |
| After Touch | Key's Ch's | X X | X O | |
| Pitch Bender | X | O | ||
| Control Change | 0, 32156, 387101116171819646566677677788081828384889193100, 101120121 | OXXXXXXXXXXQXXOOXXXXXXXXXXOXXOOXX | OOOOOOOOOOOOOOOOOOOOOOOOOOOOOOOOOOOOOOOOOOOOOOOOOOOOOOOOOOOOOOOOOOOOOOOOOOOOOOOOOOOOOOOOOOOOOOOOOOOOOOOOOOOOOOOOOOOOOOOOOOOOOOOOOOOOOOOOOOOOOOOOOOOOOOOOOOOOOOOOOOOOOOOOOOOOOOOOOOOOOOOOOOOOOOOOOOOOOOOOOOOOOOOOOOO | Bank selectModulationPortamento TimeData entry LSB, MSB*2VolumePanExpressionDSP Parameter0*2DSP Parameter1*2DSP Parameter2*2DSP Parameter3*2DamperPortamento SwitchSostenutoSoft pedalVibrato rateVibrato depthVibrato delayDSP Parameter ^1,2 DSP Parameter _5^*,2 DSP Parameter _6^*,2 DSP Parameter ^7,2 Portamento ControlHigh resolution velocity prefix ^*3 Reverb send ^4 Chorus sendRPN LSB, MSB ^*2 All sound offReset all controller |
| Program Change | O***** | O0 - 127:True # | ||
| System Exclusive | O | O | *2 | |
| System : Song PosCommon : Song Sel : Tune | XXXX | XXX | ||
| System : ClockReal Time : Commands | XO | XX | ||
| Aux Messages : Local ON/OFF : All notes OFF : Active Sense : Reset | XOXX | XOOX | ||
| Remarks | *2 :For details, see MIDI Implementation athttps://support.casio.com/global/en/emi/manual/PX-765/*3 : Note on only*4 :This Instrument treats a hall simulator as a reverb. | |||
Mode 1 : OMNI ON, POLY Mode 2 : OMNI ON, MONO O : Yes Mode 3 : OMNI OFF, POLY Mode 4 : OMNI OFF, MONO X : No
CASIO®
- Getting Ready......EN-31
- General Guide ......EN-2
- Power Outlet......EN-4
- Playing with Different Tones ......EN-5
- Using Built-in Songs (Concert Play, Music Library, Demo Tunes)......EN-12
- Recording and Playback ......EN-16
- Configuring Settings with the Keyboard......EN-19
- Connecting to a Computer......EN-27
- Reference......EN-37
- Appendix...... A-1
- MIDI Implementation Chart
- General Guide
- ⚠️ CAUTION
- NOTE
- FUNCTION Button
- Auto Resume and Operation Lock
- About Music Score data
- Turning Power On or Off
- Auto Power Off
- ■To disable Auto Power Off
- Returning the Digital Piano to Its Factory Default Settings
- Playing with Different Tones
- Selecting and Playing a Tone
- To select a tone
- Bass Tone (BASS)
- Layering Two Tones
- To adjust the volume balance between two layered tones
- Using Effects
- To apply Reverb
- ■To select the reverb type
- To apply chorus to a tone
- About DSP
- Using the Digital Piano's Pedals
- Pedal Functions
- - Damper Pedal
- - Sostenuto Pedal
- - Soft Pedal
- Disabling Damper Noise Output
- While holding down the FUNCTION button, press the Damper Noise keyboard key.
- Using the Metronome
- Press the METRONOME button.
- While holding down the FUNCTION button, press the METRONOME BEAT keyboard key.
- Hold down the FUNCTION button and press the BEAT keyboard key (0 to 9) that corresponds to the beat you want to specify.
- Release the FUNCTION button and then hold it down again as you press the METRONOME TEMPO keyboard key.
- While holding down the FUNCTION button, use the TEMPO keys to specify a tempo value in the range of 20 to 255 beats per minute.
- Press the METRONOME button to turn off the metronome.
- To adjust the metronome volume
- Splitting the Keyboard for Duet Play
- IMPORTANT!
- Changing the Octaves of the duet keyboards
- Using Built-in Songs (Concert Play, Music Library, Demo Tunes)
- Performing Demo Play
- Concert Play
- Practicing with a Concert Play Song
- To listen to a Concert Play song (LISTEN)
- To practice the piano part (LESSON)
- PREPARATION
- To play along with the orchestra accompaniment (PLAY)
- Music Library
- Playing Back a Specific Music Library Song
- Practicing with a Music Library Song
- Recording and Playback
- Recording to Built-in MIDI Recorder
- Tracks
- Memory Capacity
- Recorded Data
- Recording Data Storage
- Using the MIDI REC Button
- Recording to a Specific Song Track
- Recording to One Track while Listening to Playback of the Other Track
- Playing Back from Digital Piano Memory
- Deleting Recorded Data
- Configuring Settings with the Keyboard
- To configure settings with the keyboard
- Keyboard Setting Operation Types
- Type A : Direct input
- Type B: Raising or lowering a setting using the + and - keyboard keys
- Type C: Inputting a value using the number (0 through 9) keyboard keys.
- Type D: Toggling or cycling through settings by pressing a keyboard key
- Keyboard Keys Used for Configuring Settings
- Parameter List
- Linking with an Application (APP Function)
- Downloading the Special App
- Connecting to a Computer
- Minimum Computer System Requirements
- - Operating System
- - USB port
- Connecting the Digital Piano to Your Computer
- Turn off the Digital Piano and then start up your computer.
- After starting up your computer, use a commercially available USB cable to connect it to the Digital Piano.
- Turn on the Digital Piano.
- Start up commercially available music software on your computer.
- Configure the music software settings to select "CASIO USB-MIDI" as the MIDI device.
- Using MIDI
- What is MIDI?
- Transferring Song Data with a Computer
- Double-click "PIANO".
- ■To load a song into user song memory (Music Library 61 to 70)
- ■To transfer Recorder memory data between the Digital Piano and your computer
- After the file copy operation is complete, return the USB device mode to MIDI.
- Copyrights
- Getting Ready
- Assembling the Stand
- Joint connectors
- To connect the cable
- To install the music stand
- Removing the Protective Tape from the Keyboard
- Connecting Headphones
- Connecting Audio Equipment or an Amplifier
- Connecting Audio Equipment (Figure 1)
- Connecting a Music Amplifier (Figure ②)
- Bundled and Optional Accessories
- CASIO®
Brand : CASIO
Model : Privia PX-765
Category : Musical instrument