
Privia PX-7WE - Musical instrument CASIO - Free user manual and instructions
Find the device manual for free Privia PX-7WE CASIO in PDF.


| Product Type | Digital Piano |
| Number of Keys | 88 |
| Key Action | Weighted Hammer Action |
| Touch Sensitivity | 3 levels + fixed |
| Sound Source | AHL (Acoustic & Hansonic) |
| Maximum Polyphony | 128 notes |
| Built-in Tones | 18 (including piano, electric piano, organ, strings) |
| Built-in Rhythms | 60 |
| Effects | Chorus, Brightness, DSP |
| Metronome | Yes, adjustable tempo and beat |
| Recording | 2-track, 1 song |
| Connections | USB-MIDI, headphone jack, sustain pedal input, audio out (stereo mini) |
| Pedals | 1 included (SP-3), optional 3-pedal unit |
| Speaker System | 8W + 8W, 2 speakers |
| Power Supply | AC adapter (12V DC, 2A) or 6 AA batteries |
| Power Consumption | 8W (with AC adapter) |
| Dimensions (W x D x H) | 1322 x 286 x 134 mm |
| Weight | 11.8 kg (without batteries) |
| Auto Power Off | Yes, adjustable (30 min, 60 min, 120 min, off) |
| Cleaning | Wipe with soft, dry cloth; avoid solvents |
| Safety | Use specified AC adapter; keep away from liquids; unplug during storms |
| Repairability | Accessible service centers; replaceable parts (power supply, pedals) |
Frequently Asked Questions - Privia PX-7WE CASIO
User questions about Privia PX-7WE CASIO
0 question about this device. Answer the ones you know or ask your own.
Ask a new question about this device
Download the instructions for your Musical instrument in PDF format for free! Find your manual Privia PX-7WE - CASIO and take your electronic device back in hand. On this page are published all the documents necessary for the use of your device. Privia PX-7WE by CASIO.
USER MANUAL Privia PX-7WE CASIO
Please keep all information for future reference.
natural_image
Line drawing of a piano with visible keys and strings (no text or symbols)Safety Precautions
Before trying to use the piano, be sure to read the separate "Safety Precautions".
IMPORTANT SAFETY INSTRUCTIONS
-
Read these instructions.
-
Keep these instructions.
-
Heed all warnings.
-
Follow all instructions.
-
Do not use this apparatus near water.
-
Clean only with dry cloth.
-
Do not block any ventilation openings. Install in accordance with the manufacturer's instructions.
-
Do not install near any heat sources such as radiators, heat registers, stoves, or other apparatus (including amplifiers) that produce heat.
-
Do not defeat the safety purpose of the polarized or grounding-type plug. A polarized plug has two blades with one wider than the other. A grounding type plug has two blades and a third grounding prong. The wide blade or the third prong are provided for your safety. If the provided plug does not fit into your outlet, consult an electrician for replacement of the obsolete outlet.
-
Protect the power cord from being walked on or pinched particularly at plugs, convenience receptacles, and the point where they exit from the apparatus.
-
Only use attachments/accessories specified by the manufacturer.
-
Use only with the cart, stand, tripod, bracket, or table specified by the manufacturer, or sold with the apparatus. When a cart is used, use caution when moving the cart/apparatus combination to avoid injury from tip-over.

natural_image
Symbolic icon of a person pushing a large object, enclosed in a circle (no text or symbols)-
Unplug this apparatus during lightning storms or when unused for long periods of time.
-
Refer all servicing to qualified service personnel. Servicing is required when the apparatus has been damaged in any way, such as power-supply cord or plug is damaged, liquid has been spilled or objects have fallen into the apparatus, the apparatus has been exposed to rain or moisture, does not operate normally, or has been dropped.
The apparatus shall not be exposed to dripping or splashing and that no objects filled with liquids, such as vases, shall be placed on the apparatus.
The power indicator being unlit does not mean the apparatus is completely disconnected from the MAINS.
When you need to have the apparatus completely disconnected from the MAINS, you must unplug the power cord. For that purpose, locate the apparatus in a way that secures easy access to the power cord.
NOTICE
This equipment has been tested and found to comply with the limits for a Class B digital device, pursuant to Part 15 of the FCC Rules. These limits are designed to provide reasonable protection against harmful interference in a residential installation. This equipment generates, uses and can radiate radio frequency energy and, if not installed and used in accordance with the instructions, may cause harmful interference to radio communications. However, there is no guarantee that interference will not occur in a particular installation. If this equipment does cause harmful interference to radio or television reception, which can be determined by turning the equipment off and on, the user is encouraged to try to correct the interference by one or more of the following measures:
- Reorient or relocate the receiving antenna.
- Increase the separation between the equipment and receiver.
- Connect the equipment into an outlet on a circuit different from that to which the receiver is connected.
- Consult the dealer or an experienced radio/TV technician for help.
FCC WARNING
Changes or modifications not expressly approved by the party responsible for compliance could void the user's authority to operate the equipment.
Declaration of Conformity
Model Number: PX-730 / PX-7
Trade Name: CASIO COMPUTER CO., LTD.
Responsible party: CASIO AMERICA, INC
Address: 570 MT. PLEASANT AVENUE, DOVER, NEW JERSEY 07801
Telephone number: 973-361-5400
This device complies with Part 15 of the FCC Rules, Operation is subject to the following two conditions:
(1) This device may not cause harmful interference, and (2) this device must accept any interference received, including interference that may cause undesired operation.
Important!
Please note the following important information before using this product.
- Before using the AD-A12150LW Adaptor to power the unit, be sure to check the AC Adaptor for any damage first. Carefully check the power cord for breakage, cuts, exposed wire and other serious damage. Never let children use an AC adaptor that is seriously damaged.
• The product is not intended for children under 3 years. - Use only CASIO AD-A12150LW adaptor.
• The AC adaptor is not a toy. - Be sure to disconnect the AC adaptor before cleaning the product.

This mark applies in EU countries only.

Manufacturer:
CASIO COMPUTER CO.,LTD.
6-2, Hon-machi 1-chome, Shibuya-ku, Tokyo 151-8543, Japan
Responsible within the European Union:
CASIO EUROPE GmbH
Assembling the Stand....E-27
Unpacking..... E-27
Assembling the Stand.... E-27
To connect the cable.... E-32
To install the music stand....E-32
General Guide ...... E-2
FUNCTION Button.... E-3
Saving Settings and Using Operation Lock .... E-3
Power Outlet..... E-4
Using an AC Adaptor E-4
Connections...... E-5
Connecting Headphones E-5
Connecting Audio Equipment or an Amplifier ...... E-5
Bundled and Optional Accessories.... E-5
Playing with Different Tones ...... E-6
Selecting and Playing a Tone ...... E-6
To adjust the brilliance of a tone....E-7
Layering Two Tones E-8
Using Effects.... E-9
Using the Digital Piano's Pedals.... E-9
Using the Metronome ...... E-10
Playing a Piano Duet....E-11
Playing Back Built-in Songs ...... E-12
Playing Back All of the Built-in Songs.... E-12
Playing Back a Specific Music Library Song..... E-12
Practicing with a Music Library Song.... E-13
Recording and Play Back..... E-14
Tracks E-14
To record to a specific track of a song..... E-15
To record to one track of a song while listening to
the playback of the other track.... E-16
Playing Back from Digital Piano Memory.... E-16
Deleting Recorded Data E-17
Configuring Settings with the Keyboard E-18
To configure settings with the keyboard....E-18
Keyboard Keys Used for Configuring Settings..... E-19
Parameter List.....E-20
Reverb E-20
Chorus E-20
Tone selection E-20
Brilliance (BRILLIANCE)......E-20
Layer balance E-20
Tempo (TEMPO) E-20
Song select (SONG SELECT) E-20
Song volume (SONG VOLUME)...... E-20
Metronome volume (METRONOME VOLUME)..... E-20
Metronome beat (METRONOME BEAT) ...... E-20
Keyboard key (Transpose) E-21
Keyboard tuning (Tuning) E-21
Octave shift..... E-21
Temperament (TEMPERAMENT) E-21
Temperament select
(TEMPERAMENT SELECT).....E-21
Temperament Base note (BASE NOTE) ...... E-21
Touch response (TOUCH RESPONSE)...... E-21
USB device mode (USB DEVICE MODE)...... E-22
Send channel.....E-22
Local control E-22
Operation tone.... E-22
Back up.... E-22
Operation lock.... E-22
Connecting to a Computer...... E-23
Minimum Computer System Requirements ...... E-23
Connecting the Digital Piano to Your Computer ..... E-23
Using MIDI E-24
Transferring Song Data with a Computer..... E-24
Reference..... E-33
Troubleshooting E-33
Product Specifications....E-34
Operating Precautions E-35
Appendix...... A-1
Tone List A-1
Song List A-1
MIDI Implementation Chart
Company and product names used in this manual may be registered trademarks of others.
General Guide

CAUTION
- Make sure that the cover is fully open whenever you are playing on the keyboard. A partially open cover can suddenly close unexpectedly and pinch your fingers.
NOTE
- The names shown here are always indicated in bold when they appear within the text of this manual.
① Pedal connector
The FUNCTION button is used when configuring a variety of different digital piano settings. The following are FUNCTION button basics.
- To change a setting, hold down the FUNCTION button as you press the keyboard key that is assigned the setting you want to select.
An operation confirmation tone will sound whenever you press a keyboard key to configure a setting.
Example:"To select a tone" on page E-6

natural_image
Illustration of a child playing piano with hand gestures, showing keyboard and keyboard layout (no text or symbols)NOTE
- For details about operations and settings, see "Configuring Settings with the Keyboard" on page E-18.
● The following table shows how pressing the FUNCTION button changes the operation of certain buttons.
| This button: Does this while FUNCTION button is depressed: | |
| SONG ▶/■Starts and stops demo tune play. | |
| RECORDER Selects the left-hand part. | |
| METRONOME Selects the right-hand part. | |
| MODERN Toggles Reverb on (button lamp lit) and off (lamp unlit). | |
| CLASSIC | Toggles Chorus on (button lamp lit) and off (lamp unlit). |
| ELEC PIANO Toggles Duet on (button lamp lit) and off (lamp unlit). | |
Saving Settings and Using Operation Lock
Your digital piano lets you save its current settings and lock its buttons to protect against operation errors. For details, see "Parameter List" on pages E-20 - E-22.
Power Outlet
Your digital piano runs on standard household power. Be sure to turn off power whenever you are not using the digital piano.
Using an AC Adaptor
Use only the AC adaptor (JEITA Standard, with unified polarity plug) that comes with this digital piano. Use of a different type of AC adaptor can cause malfunction of the digital piano.
Specified AC Adaptor: AD-A12150LW
- Use the supplied power cord to connect the AC adaptor as shown in the illustration below.

Note the following important precautions to avoid damage to the power cord.
During Use
- Never pull on the cord with excessive force.
- Never repeatedly pull on the cord.
- Never twist the cord at the base of the plug or connector.
- The power cord should not be stretched tight while it is in use.
During Movement
- Before moving the digital piano, be sure to unplug the AC adaptor from the power outlet.
During Storage
- Loop and bundle the power cord, but never wind it around the AC adaptor.
IMPORTANT!
- Never connect the AC adaptor (JEITA Standard, with unified polarity plug) that comes with this digital piano to any other device besides this piano. Doing so creates the risk of malfunction.
- Make sure the digital piano is turned off before plugging in or unplugging the AC adaptor.
- The AC adaptor will become warm to the touch after very long use. This is normal and does not indicate malfunction.
Connections
IMPORTANT!
- Whenever connecting something to the digital piano, first use the VOLUME controller to set the volume to a low level. After connecting, you can adjust the volume to the level you want.
Connecting Headphones
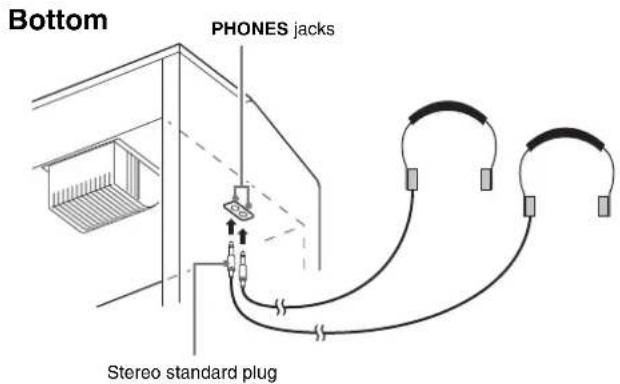
Connecting headphones to either of the PHONES jack cuts off output to the speakers, which means you can practice even late at night without bothering others. To protect your hearing, make sure that you do not set the volume level too high when using headphones.
NOTE
- Be sure to push the headphones plug into the PHONES jacks as far as it will go. If you don't, you may hear sound from only one side of the headphones.
- If the plug of the headphones you are using does not match the PHONES jacks, use the applicable commercially available adaptor plug.
- If you are using headphones that require an adaptor plug, make sure you do not leave the adaptor plugged in when you unplug the headphones. If you do, nothing will sound from the speakers when you play.
Connecting Audio Equipment or an Amplifier
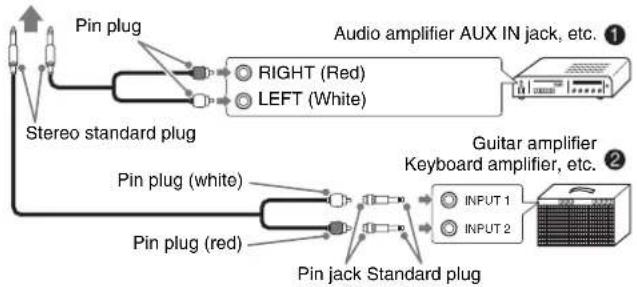
You can connect audio equipment or a music amplifier to the digital piano and then play through external speakers for more powerful volume and better sound quality.
To either of the digital piano's PHONES jack
flowchart
graph TD
    A["Pin plug"] --> B["Audio amplifier AUX IN jack, etc."]
    B --> C["Ground"]
    D["Stereo standard plug"] --> E["Pin plug (white)"]
    E --> F["Guitar amplifier Keyboard amplifier, etc."]
    F --> G["Pin jack Standard plug"]
    H["Pin plug (red)"] --> F
    I["RIGHT (Red)"] --> B
    J["LEFT (White)"] --> B
    K["INPUT 1"] --> F
    L["INPUT 2"] --> F
Connecting Audio Equipment (Figure 1)
Use commercially available connecting cords (Standard Plug × 1, Pin Plugs × 2) to connect as shown in Figure ①. Make sure that the end of the cord that you connect to the digital piano is a stereo standard plug. A monaural standard plug will result in output of only one of the two stereo channels. Normally, you should set the input selector of the audio equipment to the terminal where the digital piano is connected (AUX IN, etc.) Adjust volume using the digital piano's VOLUME controller.
Connecting a Music Amplifier (Figure ②)
Connect the connecting cord* to one of the types of amplifiers shown in Figure ②.
Adjust volume using the digital piano's VOLUME controller.
*Digital Piano: Stereo standard plug Amplifier : Inputs signals for the left and right channels. Not connecting either plug will result in output of only one of the two stereo channels.
Bundled and Optional Accessories
Use only accessories that are specified for use with this digital piano.
Use of unauthorized accessories creates the risk of fire, electric shock, and personal injury.
NOTE
- You can get information about accessories that are sold separately for this product from the CASIO catalog available from your retailer, and from the CASIO website at the following URL. http://world.casio.com/
Playing with Different Tones
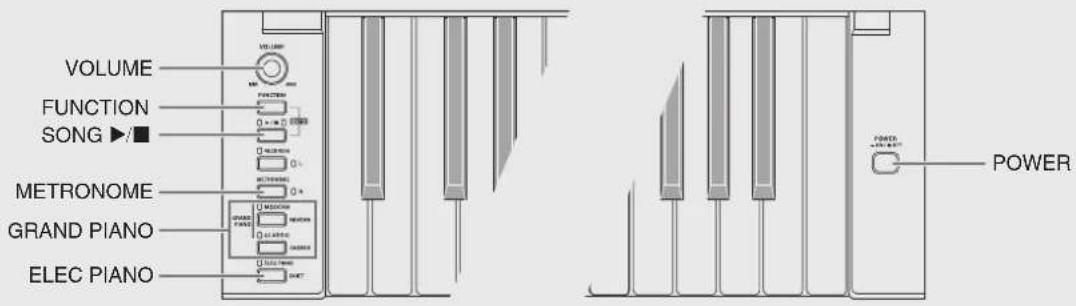
Selecting and Playing a Tone
The piano comes with 16 built-in tones.

* The names of the tones are marked above the keyboard keys to which they are assigned.
To select a tone
1. Press the POWER button.
IMPORTANT!
- When you turn on the digital piano, it performs a power up operation in order to initialize its system. During system initialization the tone button lamps cycle on and off in the sequence for about seven seconds to let you know that system initialization is in progress.
2. Select the tone you want.
● To select GRAND PIANO (MODERN or CLASSIC) or ELEC PIANO
- Press one of the GRAND PIANO buttons (MODERN or CLASSIC) or the ELEC PIANO button to select the one you want.

- The button lamp of the selected tone will light.
● To select one of the other tones
- While holding down the FUNCTION button, press the keyboard key that corresponds to the tone you want to select.

natural_image
Illustration of hands typing on an MIDI keyboard (no text or symbols present)3. Use the VOLUME controller to adjust the volume.
NOTE
- GRAND PIANO tones (MODERN, CLASSIC) Your digital piano has a total of 16 built-in tones. The MODERN and CLASSIC tones are stereo sampled tones that can be selected using the GRAND PIANO buttons. Try using the GRAND PIANO tones to familiarize yourself with their distinctive sounds and characteristics.
| Tone Name Characteristics | |
| MODERN This | tone provides a bright grand piano sound. The volume and timbre of this tone is quick to respond to different keyboard pressures, and it has relatively strong reverb. This tone is a good choice for dynamic and lively performances. |
| CLASSIC This is | a natural piano tone that closely resembles the sound of an acoustic grand piano. Reverb and other effects are kept to a minimum in order to enhance the impact of piano pedals operations (acoustic resonance), for musically delicate expressions. This tone is a good choice for lesson and practice sessions. |
- The GRAND PIANO tone (VARIATION) is best for playing along with an accompaniment.
Bass Tones (BASS 1, BASS 2)
Selecting either of the two BASS (LOWER) tones (1 or 2) in step 2 of the above procedure will assign the selected bass tone to the low range (left side) of the keyboard. The high range (right side) will be assigned the tone that was selected when you pressed the BASS 1 or BASS 2 key.
- BASS 1 and BASS 2 let you effectively split the keyboard between two different tones.
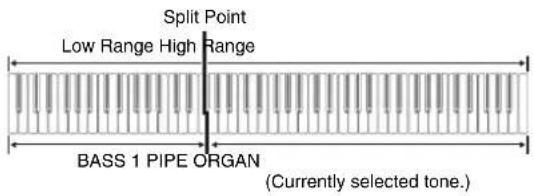
NOTE
- To return the keyboard to a single tone, select any tone other than BASS 1 or BASS 2.
- You cannot select BASS 1 or BASS 2 when recording to Track 2.
To adjust the brilliance of a tone
- While holding down the FUNCTION button, use the BRILLIANCE keys to specify a brilliance value in the range of -3 to 0 to 3.

| For this type of sound: | Press this keyboard key: |
| Mellower and softer | ▼ |
| Brighter and harder | ▲ |
NOTE
- To return a tone to its initial default setting "0", press ▼ and ▲ at the same time.
Layering Two Tones
Use the following procedure to layer two tones, so they sound at the same time.
When specifying two tones for layering, first tone you select will be the main tone, while the second tone will be the layered tone.
- While holding down the FUNCTION button, hold down the keyboard key for the main tone as you press the keyboard key for the layered tone.
Example: To layer HARPSICHORD and STRINGS 1

- To unlayer the keyboard, select another tone by pressing the GRAND PIANO button or by using the procedure under "Selecting and Playing a Tone" (page E-6).
NOTE
- You also can layer piano tones by holding down one of the GRAND PIANO buttons (MODERN or CLASSIC) as you press the ELEC PIANO button.
- You cannot layer the BASS 1 or BASS 2 tone with another tone.
- You cannot perform the layer operation when recording to Track 2.
To adjust the volume balance between two layered tones
- While holding down the FUNCTION button, use the keyboard keys shown below to adjust the volume of the layered tones.

- To return the volume setting to its initial default, hold down the FUNCTION button and press both of the keys at the same time.
Using Effects
Reverb : Makes your notes resonate.
Chorus: Adds more breadth to your notes.
To turn reverb on and off
- While holding down the FUNCTION button, press the MODERN button to toggle reverb on (lamp lit) and off (lamp unlit).
To turn chorus on and off
- While holding down the FUNCTION button, press the CLASSIC button to toggle chorus on (lamp lit) and off (lamp unlit).
To configure reverb and chorus effect settings
- While holding down the FUNCTION button, press one of the Reverb or Chorus keyboard keys.
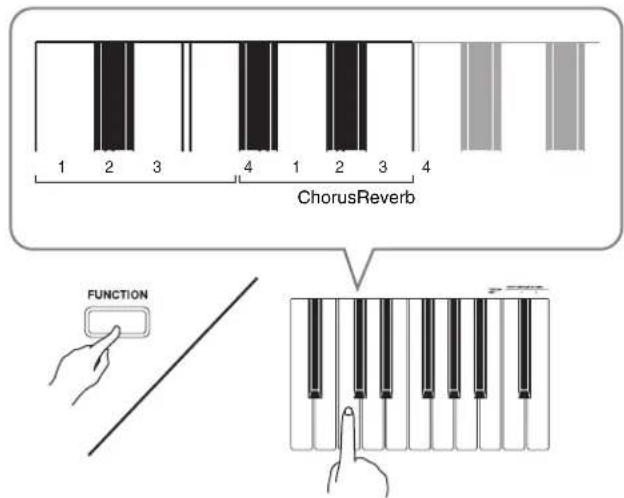
Example:Selecting Reverb 4
- Reverb Value
| To do this: Select this setting: | |
| Turn on reverb 1: Room | |
- Chorus Value
| To do this: Select this setting: | |
| Turn on chorus 1: | Light Chorus2: Medium Chorus3: Deep Chorus4: Flanger (Whooshing effect) |
■About DSP
DSP makes it possible to digitally produce complex acoustic effects. The DSP is assigned to each tone whenever you turn on digital piano power.
Using the Digital Piano's Pedals
Your digital piano comes equipped with three pedals: damper, soft, and sostenuto
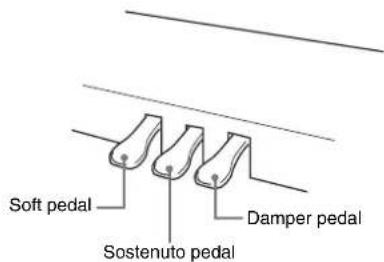
Pedal Functions
- Damper Pedal
Pressing the damper pedal while playing will cause the notes you play to reverberate for a very long time.
- When a GRAND PIANO tone (MODERN, CLASSIC, VARIATION) is selected as the tone, pressing this pedal will cause notes to reverberate (with acoustic resonance) just like the damper pedal on an acoustic grand piano. Half-pedal operation (pressing the pedal part way) is also supported.
- Soft Pedal
Pressing this pedal while playing suppresses notes played on the keyboard after the pedal was pressed, and makes them sound softer.
- Sostenuto Pedal
Only the notes of the keys that are depressed when this pedal is pressed are sustained until the pedal is released.
Using the Metronome
1. Press the METRONOME button.
• This starts the metronome.
- The lamp above the SONG ▶/■ button flash in time with the metronome beat.
2. To change the beat, hold down the FUNCTION button as you press one of the METRONOME BEAT keys to select a beat setting.

- You can specify beats per measure value of 0, 2, 3, 4, 5, or 6. Specifying 0 as the setting plays a straight click, without any chime. This setting lets you practice with a steady beat.
3. While holding down the FUNCTION button, use the TEMPO keys to specify a tempo value in the range of 20 to 255 beats per minute.

• Each press of the + or - key raises or lowers the tempo value by 1.
- You can use the value input keys (0 to 9) to enter a specific three-digit. Be sure to input all three digits.
Example: To enter "96", press keys 0, 9, 6.
4. Press the METRONOME button or SONG ▶/■ button to turn off the metronome.
NOTE
- To return the tempo setting to the default tempo of the currently selected Music Library tune, press the + and - keys at the same time in step 3. Pressing + and - while recording will return the tempo value to 120.
To adjust the metronome volume
NOTE
- You can perform the following procedure at any time, regardless of whether or not the metronome is sounding.
1. While holding down the FUNCTION button, use the METRONOME VOLUME keys to specify a volume value in the range of 0 to 42.
- For details about using the keyboard keys for settings, see "Keyboard Keys Used for Configuring Settings" on page E-19.
• Each press of the ▼ or▲ key raises or lowers the metronome volume value by 1.
NOTE
- To return to the initial default setting, press ▼ and ▲ at the same time.
Playing a Piano Duet
You can use the Duet Mode to split the piano's keyboard in the center so two people can play a duet.
Keyboard
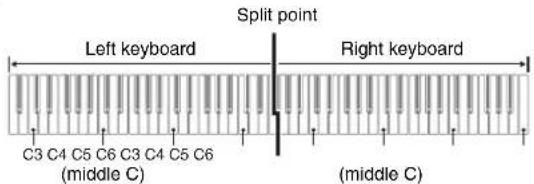
The left and right side keyboards have virtually the same range. The left pedal operates as the left side damper pedal, while the right pedal is the right side damper pedal.
Pedals
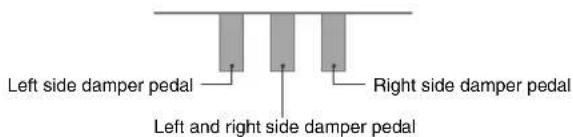
The Duet Mode is the perfect way to conduct lessons, with the teacher playing on the left side as the student playing the same song on the right side.
NOTE
- Only the damper pedal for the right side keyboard supports half-pedal operations.
- Select the piano tone you want to use for the duet.
Example: GRAND PIANO (MODERN)
- While holding down the FUNCTION button, press the ELEC PIANO button to toggle duet on (lamp lit) and off (lamp unlit).
IMPORTANT!
- You cannot use the Duet Mode while recording (page E-14).
Changing the Octaves of the duet keyboards
You can change the ranges of the left and right keyboards in octave units from their initial default settings. This comes in handy, for example, if the initial default range is not enough when one person is playing the left hand part and another person is playing the right hand part.
- While holding down the FUNCTION and ELEC PIANO buttons, press the keyboard C key that you want located at C4 (middle C) of the left keyboard.
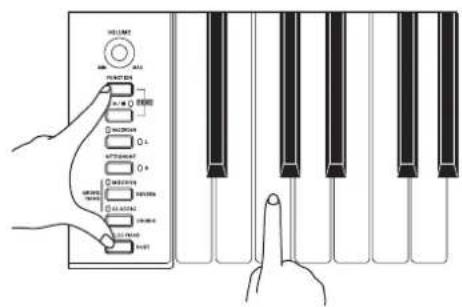
Example: Press the keyboard key of the leftmost C (C4) will assign the range shown below.

- While holding down the FUNCTION and ELEC PIANO buttons, press the keyboard C key that you want located at C4 (middle C) of the right keyboard.
NOTE
- You can return the keyboards to their initial default ranges by exiting and then re-entering the Duet Mode.
Playing Back Built-in Songs
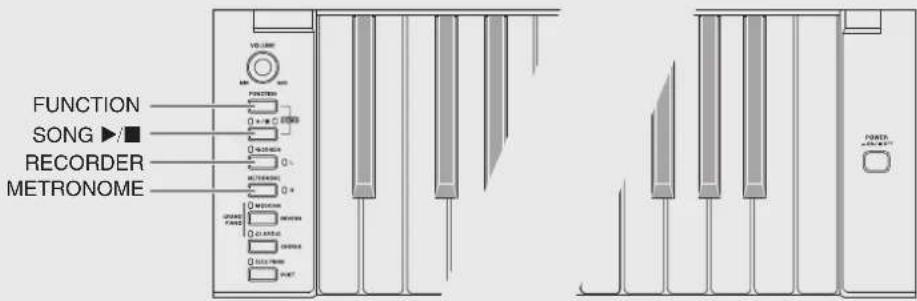
Your digital piano comes with a Music Library of 60 built-in tunes. You can play all 60 tunes in sequence, from beginning to end.
IMPORTANT!
• After you select a built-in song, it can take a number of seconds for the song data to be loaded. While the data is being loaded, the keyboard keys and button operations will be disabled. If you are playing something on the keyboard, the following operation will cause output to stop.
Playing Back All of the Built-in Songs
-
While holding down the FUNCTION button, press the SONG ▶/■ button.
-
This will start repeat demo playback of the built-in songs in sequence, from 01 through 60.
- You can play along with a song on the keyboard as it is playing. The tone assigned to the keyboard is the one that is preset for the song that is playing.
-
You can select a specific song during demo playback. For details, see step 2 under "Playing Back a Specific Music Library Song".
-
Press the SONG ▶/■ button again to stop built-in song play.
NOTE
- The tune selection and playback stop operations described above are the only operations that are possible during demo tune play.
Playing Back a Specific Music Library Song
The Music Library includes both built-in songs (01 to 60), plus one song (61) that have been saved to digital piano memory from a computer*. You can use the procedure below to select one of these songs and play it back.
*You can download music data from the Internet and then transfer it from your computer to digital piano memory. See "Transferring Song Data with a Computer" on page E-24 for more information.
- Find the song number of the song you want to play in the song list on page A-1.
- To change to another song, hold down the FUNCTION button as you use the SONG SELECT keys to specify a song number.

• Each press of the + or - key raises or lowers the song number by 1.
- You can use the value input keys (0 to 9) to enter a specific two-digit song number. Be sure to input both digits.
Example: To select song 08, enter 0 and then 8.
- Press the SONG ▶/■ button.
• This starts the playback of the song.
4. To stop playback, press the SONG ▶/■ button again.
- Playback will stop automatically when the end of the song is reached.
NOTE
- Pressing the + and - keys at the same time will select song number 01.
- You also can adjust the playback tempo and volume of the song. See "Configuring Settings with the Keyboard" on page E-18 for more information.
Practicing with a Music Library Song
You can turn off the left hand part or right hand part of a song and play along on the piano.
NOTE
- The Music Library includes a number of duets. While a duet is selected, you can turn off the first piano
PREPARATION
- Select the song you want to practice and adjust the tempo. See "Configuring Settings with the Keyboard" on page E-18.
- A number of tunes have tempo changes part way through in order to produce specific musical effects.
1. While holding down the FUNCTION button, press the RECORDER (L) button or METRONOME (R) button to select the part you want to turn off.
- Pressing a button toggles its part on (button lamp on) and off (button lamp off).
Left hand Right hand

2. Press the SONG ▶/■ button.
- This starts playback, without the part you turned off in step 1.
3. Play the missing part on the keyboard.
4. To stop playback, press the SONG ▶/■ button again.
Recording and Play Back
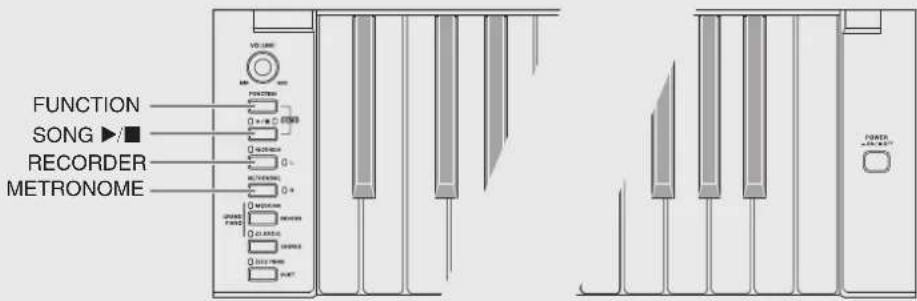
You can store the notes you play in digital piano memory for later playback.
Tracks
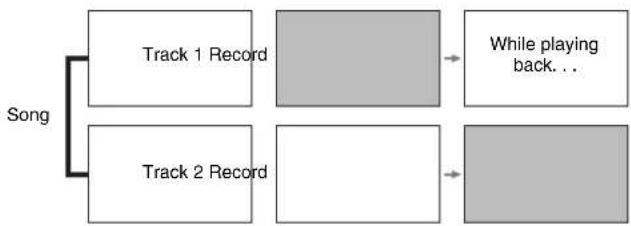
A track is a container of recorded data, and a song consists of two tracks: Track 1 and Track 2. You can record each track separately and then combine them so they play back together as a single song.
flowchart
graph TD
    A["Song"] --> B["Track 1 Record"]
    A --> C["Track 2 Record"]
    B --> D["While playing back..."]
    C --> E["Output"]
Memory Capacity
- You can record approximately 5,000 notes in digital piano memory.
- The RECORDER button lamp will flash at high speed when memory runs low.
- Recording stops automatically if the number of notes in memory exceeds the maximum.
Recorded Data
- Keyboard play
- Tone used
- Pedal operations
- Reverb and chorus settings (Track 1 only)
- Tempo setting (Track 1 only)
- Layer setting (Track 1 only)
- Split setting (Track 1 only)
- Temperament and base note settings (Track 1 only)
- Octave shift setting (Track 1 only)
Recording Data Storage
- Starting a new recording deletes any data that was previously recorded in memory.
- Should power fail during recording, all of the data in the track you are recording will be deleted.
IMPORTANT!
- CASIO COMPUTER CO., LTD. takes no responsibility for any damages, lost profits, or claims by third parties arising from the deletion of recorded data due to malfunction, repair, or for any other reason.
Using the RECORDER Button
Each press of the RECORDER button cycles through the recording options in the sequence shown below.

flowchart
graph LR
    A["Reorder"] --> B["Playback Standby"]
    C["Lit Flashing Off"] --> D["Reorder"]
    D --> E["Record Standby"]
    F["Reorder"] --> G["Normal"]
    B --> E
    E --> G
To record to a specific track of a song
After recording to either of the tracks of a song, you can record to the other track while listening to playback what you recorded in the first track.
- Press the RECORDER button twice so its lamp is flashing.

- At this time the L lamp will flash to indicate that the digital piano is standing by for recording to Track 1.

- While holding down the FUNCTION button, press the RECORDER (L) button or METRONOME (R) button to select the track you want to record.
- Make sure that the indicator lamp for the record track is flashing.
Track 1: L lamp
Track 2: R lamp
Example:Track 1 selected

-
Select the tone and effects (Track 1 only) you want to use in your recording.
-
Tone (page E-6)
- Effects (page E-9)
NOTE
- If you want the metronome to sound while you are recording, configure the beat and tempo settings, and then press the METRONOME button. See "Using the Metronome" on page E-10 for more information.
- Start playing something on the keyboard.
• Recording will start automatically.
-
To stop recording, press the SONG ▶/■ button.
-
This will cause the RECORDER button lamp and the lamp of the track you recorded to change from flashing to lit.
-
To play back the track you just recorded, press the SONG ▶/■ button.
-
After you are finished recording or playing back, press the RECORDER button so its lamp goes out.
To record to one track of a song while listening to the playback of the other track
- Press the RECORDER button so its lamp is lit.

-
While holding down the FUNCTION button, press the RECORDER (L) button or METRONOME (R) button to select the track you want to play back while recording.
-
Press the RECORDER button so its lamp is flashing.
• This will cause the L lamp to flash.
- While holding down the FUNCTION button, press the RECORDER (L) button or METRONOME (R) button to select the track you want to record.
• Make sure that the indicator lamp for the record track is flashing.
Example: To listen to playback of Track 1 as you record to Track 2

-
Select the tone and effects (Track 1 only) you want to use for your recording.
-
Press the SONG ▶/■ button or play something on the keyboard.
- This will start both playback of the recorded track and recording to the other track.
- To stop recording, press the SONG ▶/■ button.
Playing Back from Digital Piano Memory
- Press the RECORDER button so its lamp is lit.

NOTE
- When a song has something recorded in both tracks, you can turn off one track and play back just the other track, if you want.
- Press the SONG ▶/■ button.
- This starts playback of the song and/or track you selected.
NOTE
- You can change the tempo setting as a track is playing.
- Press the SONG ▶/■ button again to stop playback.
Deleting Recorded Data
The following procedure deletes a specific track of a song.
IMPORTANT!
- The procedure below deletes all of the data of the selected track. Note that the delete operation cannot be undone. Check to make sure you really do not need the data in digital piano memory before you perform the following steps.
- Press the RECORDER button twice so its lamp is flashing.

-
While holding down the FUNCTION button, press the RECORDER (L) button or METRONOME (R) button to select the track you want to delete.
-
Press the RECORDER button until its lamp is lit.
- This will cause the lamp of the track you selected in step 2 of this procedure to flash. Example: If you selected Track 2 for deletion
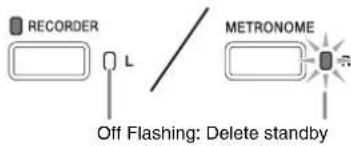
-
Once again, hold down the FUNCTION button and press the button that corresponds to the track you want to delete (RECORDER (L) or METRONOME (R)).
-
This deletes the selected track and enters playback standby.
- To cancel the delete operation at any time, press the RECORDER button twice so its lamp is unlit.
NOTE
- Only the digital piano's METRONOME button and RECORDER button are operational from step 3 until you actually perform the delete operation in step 4. No other button operation can be performed.
Configuring Settings with the Keyboard

In addition to selecting tones and Music Library tunes, you also can use the FUNCTION button in combination with the keyboard keys to configure effect, keyboard touch, and other settings.
To configure settings with the keyboard
- Use the "Parameter List" on pages E-20 - E-22 to find the setting you want to configure, and note its details.
- Use "Keyboard Keys Used for Configuring Settings" on page E-19 to find the location on the keyboard for configuring the setting you want.
- While holding down the FUNCTION button, press the keyboard key for the setting you want to configure.
- The digital piano will sound an operation tone after it configures the setting.
Example: To lower the transpose setting by one semitone
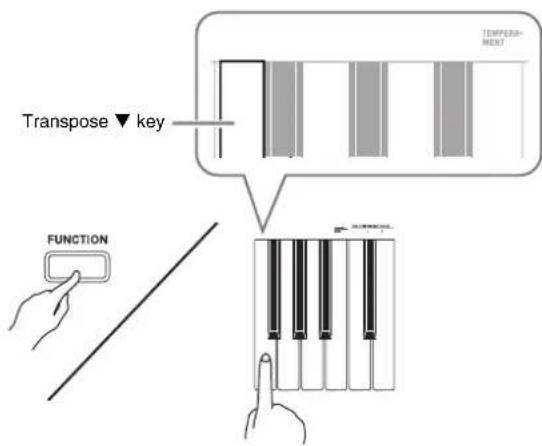
- Release the FUNCTION button to complete the setting procedure.
NOTE
- You can configure the digital piano so no operation tone sounds in step 3. For details, see “⑲ Operation tone” under “Parameter List” on pages E-20 - E-22.
Keyboard Setting Operation Types
There are three types of operations that you can perform while configuring settings with the keyboard keys: Type A, Type B, and Type C.
Type A: Direct input
Example: Pressing the STRINGS keyboard key to select the STRINGS 1 tone
Type B: Raising or lowering a setting using the + and - or ▼ and ▲ keyboard keys
- Holding down a key raises or lowers the setting at high speed.
- To return to the initial default setting, press both keys at the same time.
Type C: Value input using the numeric keys (0 to 9) Example: To enter "120", press keys 1, 2, 0.
NOTE
- You can find out what operation type applies to each setting by checking the "Operation Type" in the "Parameter List" on pages E-20 - E-22.
Keyboard Keys Used for Configuring Settings
- The numbers ① through ② correspond to the same numbers in the "Parameter List" on pages E-20 - E-22.
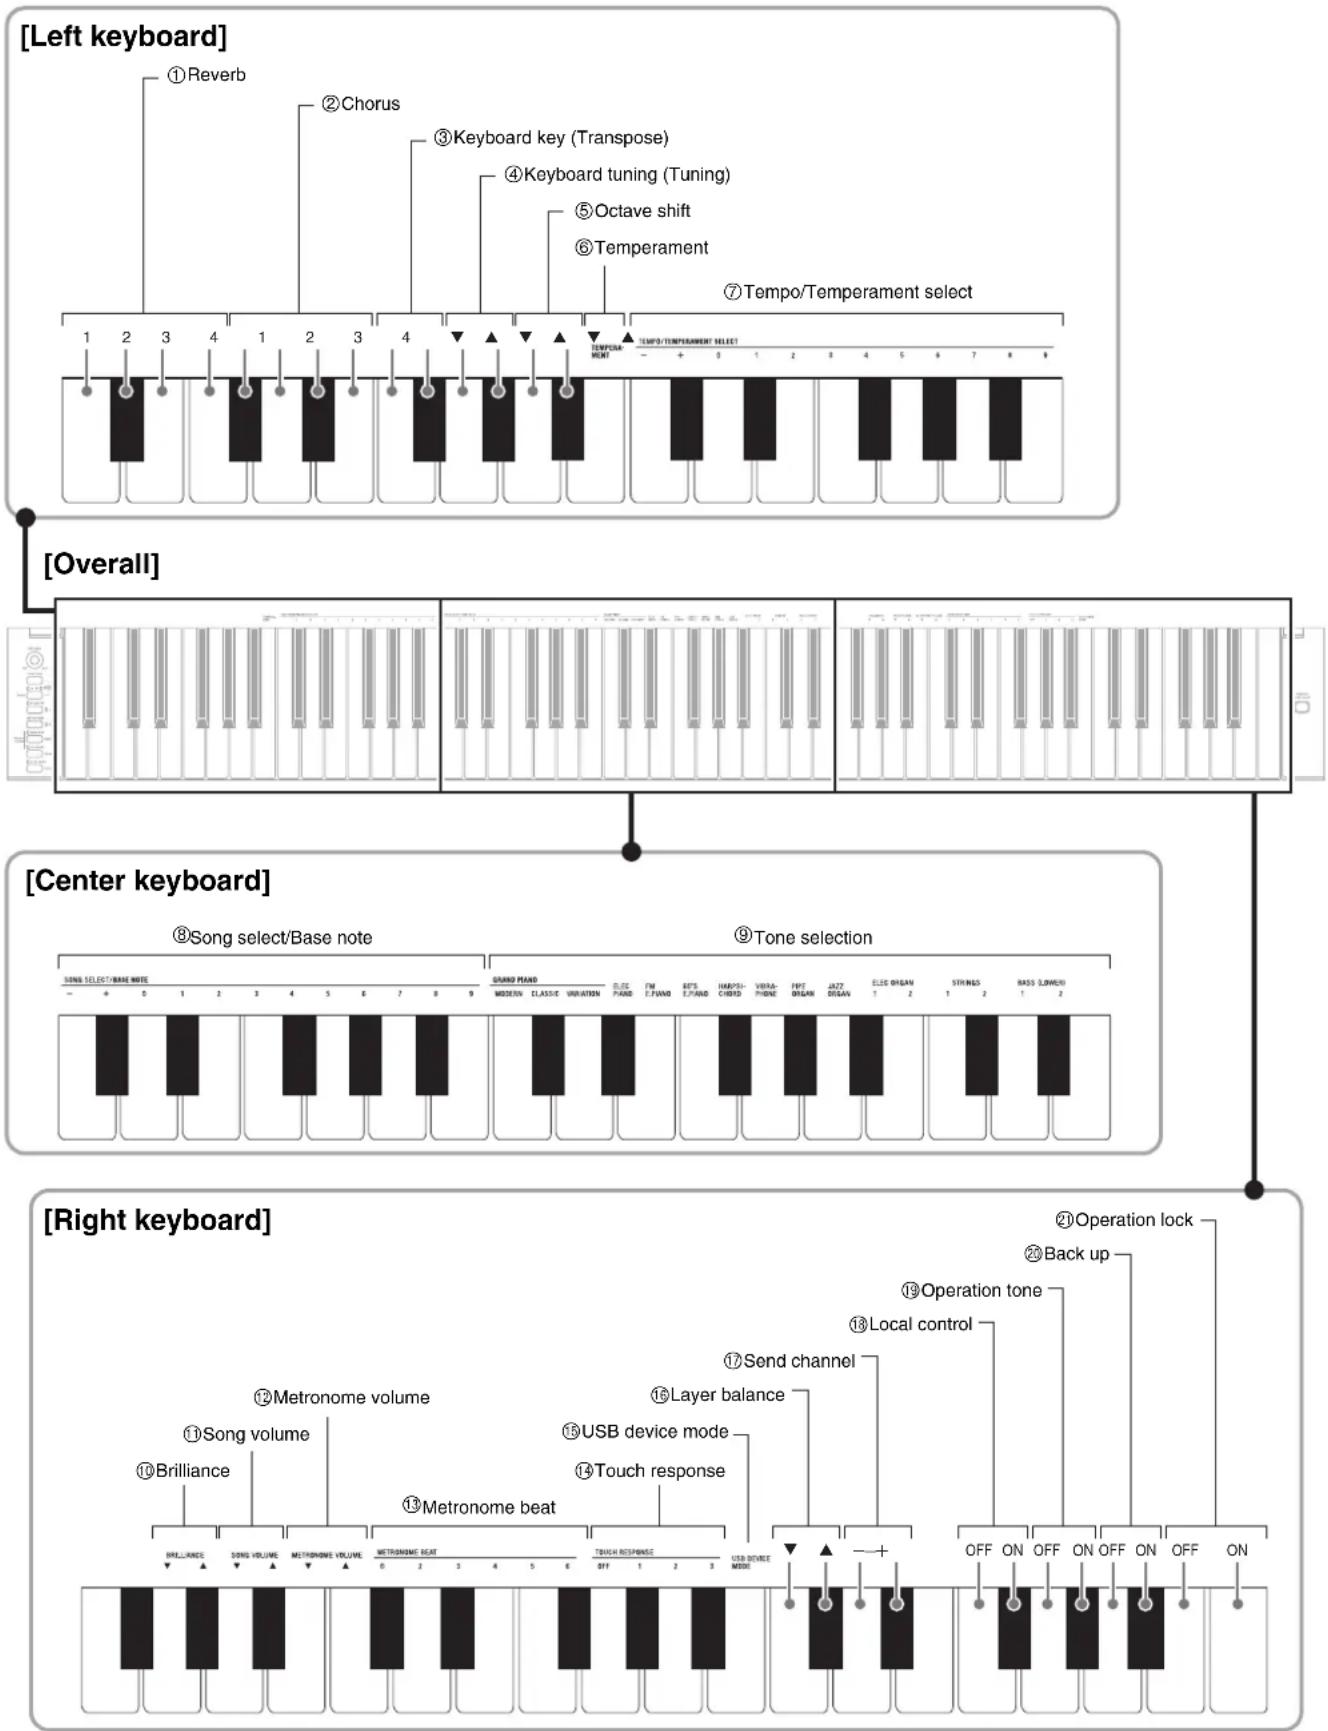
flowchart
graph TD
    A["Left keyboard"] --> B["1 Reverb"]
    A --> C["2 Chorus"]
    A --> D["3 Keyboard key (Transpose)"]
    A --> E["4 Keyboard tuning (Tuning)"]
    A --> F["5 Octave shift"]
    A --> G["6 Temperament"]
    A --> H["7 Tempo/Temperament select"]

    I["Overall"] --> J["1 2 3 4 1 2 3 4"]
    K["Center keyboard"] --> L["8 Song select/Base note"]
    K --> M["9 Tone selection"]
    N["Right keyboard"] --> O["10 Brilliance"]
    N --> P["11 Song volume"]
    N --> Q["12 Metronome volume"]
    N --> R["13 Metronome beat"]

    S["Operation lock"] --> T["20 Back up"]

    U["Off ON OFF ON OFF ON"] --> V["USB device mode"]
    W["Send channel"] --> X["Layer balance"]
    Y["Touch response"] --> Z["Metronome beat"]
Parameter List
Tones
| Parameter Settings | Operation Type(page E-18) | Description Remarks | ||
| 1Reverb 1 to 4 | Default: 2 | A Specifies | the reverb of notes.(page E-9) | |
| 2Chorus 1 to 4 | Default: 2 | A Controls | the breadth of notes.(page E-9) | |
| 9Tone selection See | page E-6.Default: GRAND PIANO(MODERN) | A Assigns | a tone to the keyboard.(page E-6) | |
| 10Brilliance(BRILLIANCE) | -3 to 0 to 3Default: 0 | B Specifies | the brilliance of notes.(page E-7) | |
| 16Layer balance -24 | to 0 to 24Default: 0 | B Specifies | the volume balancebetween the main tone and the layered tone. (page E-8) | |
■Song/Metronome
| Parameter Settings | Operation Type(page E-18) | Description Remarks | ||
| 7 Tempo (TEMPO) | 20 to 255Default: 120 | B (+/-)C (0 to 9) | Specifies the tempo of Music Library songs, the metronome, recording and playback, etc.(page E-10) | · Always enter three digits when using the number keys (0 to 9) to input a value.Example:To input 90, enter 0, 9, 0 (leading zero required).· During recording, pressing + and - at the same time sets a value of 120. |
| 8 Song select(SONG SELECT) | 01 to 60Default: 01 | B (+/-)C (0 to 9) | Selects a Music Library tune.(page E-12) | · Always enter two-digits when using the number keys (0 to 9) to input a value.Example:To input 8, enter 0, 8 (leading zero required).· This setting cannot be changed while recording. |
| 11 Song volume(SONG VOLUME) | 00 to 42Default: 42 | B Sets the volume level of Music Library playback. | · This setting cannot be changed while recording. | |
| 12 Metronome volume(METRONOME VOLUME) | 00 to 42Default: 36 | B Specifies the metronome volume.(page E-10) | ||
| 13 Metronome beat(METRONOME BEAT) | 0, 2, 3, 4, 5, 6Default: 4 | A Specifies the metronome beat.(page E-10) | · The metronome beat setting cannot be changed while playback of a Music Library tune is in progress. | |
■Keyboard
| Parameter Settings | Operation Type(page E-18) | Description Remarks | ||
| 3 Keyboard key(Transpose) | -12 to 0 to 12Default: 0 | B Raises or lowers the tuning ofthe digital piano in semitone steps. | The transpose setting cannot be configured while Music Library playback is in progress or while in the Duet Mode.Raising the key of the digital piano can cause notes the highest part of the range to become distorted. | |
| 4 Keyboard tuning(Tuning) | -99 to 0 to 99Default: 0 | B Raises or lowers the overall pitch of the digital piano in 1-cent steps (100 cents = 1 semitone) from the standard pitch of A4 = 440 Hz. | The pitch setting cannot be changed while playback of a Music Library tune is in progress. | |
| 5 Octave shift -2 to | 0 to 2Default: 0 | B Change the range of the keyboard in octave units. | You can configure octave shift settings for the main tone part and layered tone part.You cannot configure octave shift settings for split tone parts. | |
| 6 Temperament(TEMPERAMENT)7 Temperament select(TEMPERAMENT SELECT)8 Temperament Base note(BASE NOTE) | Temperament:00 to 16Base note:-, +, 0 to 9 (C to B)Defaults:Temperament: 00(Equal Temperament)Base note: C | Hold downFUNCTION as you press each of the following keyboard keys.1. TEMPERAMENT(6)2. TEMPERAMENT SELECT (7)3. BASE NOTE (8) | You can change the scale (tuning system) of the keyboard from standard equal temperament to another tuning that is more suitable for playing Indian music, Arabic music, classical pieces, etc. | |
| -: C / +: C#/ 0: D / 1: E/ 2: E / 3: F / 4: F#/ 5: G / 6: A'/ 7: A / 8: B'/ 9: B | ||||
| 14 Touch response(TOUCH RESPONSE) | Off (OFF), 1 to 3Default: 2 | A Specifies the relative touch of the keyboard keys.Setting a smaller value causes lighter touch to produce more powerful sound. | ||
■MIDI and Other Settings
| Parameter Settings | Operation Type(page E-18) | Description Remarks | ||
| 15 USB device mode (USB DEVICE MODE) | MIDI, Storage Default: MIDI | — | The digital piano enters MIDI mode automatically when it is connected to a computer by a USB cable. Select storage when saving Recorder memory song data to a computer or when loading computer song data to digital piano memory. (page E-24) | While Storage is selected for this setting, the GRAND PIANO (MODERN, CLASSIC) and ELEC PIANO button lamps flash, and all other lamps are unlit.All digital piano operations are disabled at this time.Each press of the USB device mode keyboard key toggles between the MIDI and storage modes. |
| 17 Send channel 01 to 16Default: 01 | B Specifies | one of the MIDI channels (1 through 16) as the Send channel, which is used for sending MIDI messages to an external device. | ||
| 18 Local control Off, | OnDefault: On | A Selecting | “Off” for Local control cuts off the digital piano’s sound source, so no sound is produced by the digital piano when keys are pressed. | The Local control setting cannot be changed while playback of a Music Library tune is in progress. |
| 19 Operation tone Off, OnDefault: On | A Selecting | “Off” disables sounding of the operation tone whenever a keyboard key is pressed while the FUNCTION is depressed. | This setting is retained even when the digital piano is turned off.The operation tone setting cannot be changed while Music Library playback is in progress, while the metronome is sounding, and during recording. | |
| 20 Back up Off, On | Default: Off | A When “On” is selected for this setting, the digital piano will remember its current settings*,1, and restore them when it is turned on again.When “Off” is selected, settings*2 are reset to their initial defaults whenever the digital piano is turned on. | The back up setting cannot be changed while Music Library playback is in progress, while the metronome is sounding, in the Duet Mode, and during recording.*1The following settings are not remembered.D u c t M o d eT u n e L R (p a r t)Local control*2Except for the operation tone on/off setting. | |
| 21 Operation lock Off, OnDefault: Off | A Selecting | “On” for this setting locks the digital piano’s buttons (except for the power button and the buttons required for unlock), so no operation can be performed.Turn on operation lock when you want to protect against unintentional button operations. | The operation lock setting cannot be changed while Music Library playback is in progress, while the metronome is sounding, and during recording. | |
Connecting to a Computer
You can connect the Digital Piano to a computer and exchange MIDI data between them. You can send play data from the Digital Piano to music software running on your computer, or you can send MIDI data from your computer to the Digital Piano for playback.
Minimum Computer System Requirements
The following shows the minimum computer system requirements for sending and receiving MIDI data.
Check to make sure that your computer complies with these requirements before connecting the Digital Piano to it.
- Operating System
Windows® XP (SP2 or later)*1
Windows Vista® *2
Windows® 7 *3
Mac OS ^® X (10.3.9, 10.4.11 or later, 10.5.6 or later, 10.6.2 or later)
*1: Windows XP Home Edition Windows XP Professional (32-bit)
*2: Windows Vista (32-bit)
*3: Windows 7 (32-bit, 64-bit)
- USB port
IMPORTANT!
- Never connect to a computer that does not conform to the above requirements. Doing so can cause problems with your computer.
Connecting the Digital Piano to Your Computer
IMPORTANT!
- Make sure you follow the steps of the procedure below exactly. Connecting incorrectly can make data send and receive impossible.
- Turn off the Digital Piano and then start up your computer.
- Do not start up the music software on your computer yet!
- After starting up your computer, use a commercially available USB cable to connect it to the Digital Piano.

flowchart
graph TD
    A["USB cable (A-B type)"] --> B["A connector"]
    B --> C["Computer USB port"]
    D["Digital Piano USB port"] --> E["B connector"]
    E --> F["USB"]
- Turn on the Digital Piano.
- If this is the first time you are connecting the Digital Piano to your computer, the driver software required to send and receive data will be installed on your computer automatically.
-
Start up your computer's music software.
-
Configure the music software settings to select one of the following as the MIDI device.
CASIO USB-MIDI : (For Windows Vista, Windows 7, Mac OS X)
USB Audio Device: (For Windows XP)
- For information about how to select the MIDI device, see the user documentation that comes with the music software you are using.
IMPORTANT!
- Be sure to turn on the Digital Piano first before starting up your computer's music software.
NOTE
- Once you are able to connect successfully, there is no problem with leaving the USB cable connected when you turn off your computer and/or Digital Piano.
- For detailed specifications and connections that apply to MIDI data send and receive by this Digital Piano, see the latest support information provided by the website at the following URL. http://world.casio.com/
Using MIDI
What is MIDI?
The letters MIDI stand for Musical Instrument Digital Interface, which is the name of a worldwide standard for digital signals and connectors that makes it possible to exchange musical data between musical instruments and computers (machines) produced by different manufacturers.

- For detailed information about MIDI Implementation, visit the CASIO website at: http://world.casio.com/.
See "Send channel" and "Local control" on page E-22.
Transferring Song Data with a Computer
Use the procedures in this section to transfer Recorder memory data to a computer for storage, and to load songs to user song memory (Music Library 61).
IMPORTANT!
- Turning off the Digital Piano while it is exchanging data with a computer can cause data in Digital Piano memory to become corrupted. If this happens, a memory format operation will start the next time you turn on the Digital Piano. Note that it takes about 20 seconds for the format operation to finish, and you will not be able to perform any operation during that time.
-
Perform steps 1 through 3 of the procedure under "Connecting the Digital Piano to Your Computer" on page E-23.
-
Change the digital piano's USB device mode to storage.
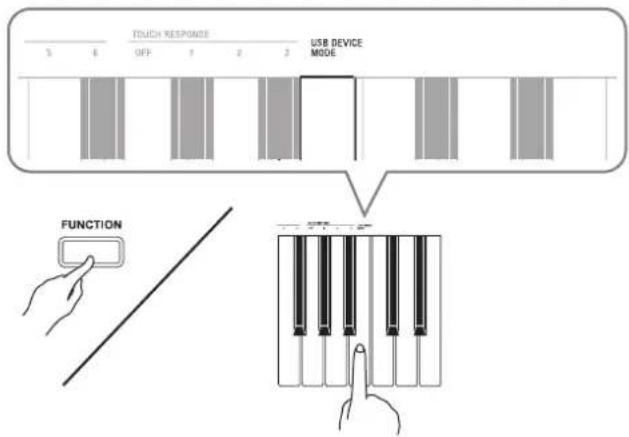
- While holding down the FUNCTION button, press the keyboard key that corresponds to the USB device mode.
• After this setting is changed, the GRAND PIANO (MODERN, CLASSIC) and ELEC PIANO button lamps flash, and all other lamps are unlit. -
See "USB device mode (USB DEVICE MODE)" on page E-22 for more information.
-
On your computer, perform the required operation to display your computer's storage devices.
| If your computer is running this operating system: | Do this: |
| Windows XP Double-click “My Computer”. | |
| Windows Vista, Windows 7 | Double-click “Computer”. |
| Mac OS Skip step 3 and double-click “PIANO” on your Mac desktop. | |
- The memory of this digital piano will appear as "PIANO" under "Devices with Removable Storage".
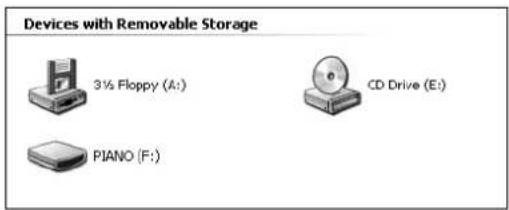
4. Double-click "PIANO".
- "PIANO" contains folders named MUSICLIB and RECORDER. Use MUSICLIB to load a song into the piano's user song memory (Music Library 61), and RECORDER to transfer Recorder memory data to and from your computer.

| Data Type | Folder Name | File Name and Extension* |
| User songs MUSIC | CLIB BIDSNG | 01.MID: SMF format data (format 0/1)BIDSNG01.CM2: CASIO original format data |
| Recorder memory data | RECORDER | BIDREC01.CSR: CASIO original format data |
*Before starting a store or load operation, first check the file name and extension to ensure it matches the ones shown in this column.
The initial default configuration for Windows XP, Windows Vista, and Windows 7 is to hide file name extensions. Perform one of the following operations on your computer to show file name extensions.
■To show file name extensions under Windows XP
- Open the folder you want.
- On the [Tools] menu, click [Folder Options].
- Click the [View] tab. In the [Advanced settings] list, clear the check box next to [Hide extensions for known file types].
- Click [OK].
■To show file name extensions under Windows Vista or Windows 7
- Open Folder Options by clicking the [Start] button, clicking [Control Panel], clicking [Appearance and Personalization], and then clicking [Folder Options].
- Click the [View] tab. Under [Advanced settings] clear the [Hide extensions for known file types] check box.
- Click [OK].
■To load a song into user song memory (Music Library 61)
- Copy the file (.MID or .CM2) you want to load into user song memory to the MUSICLIB folder.
- Change the name of the file to BIDSNG01, with a file name extension of .MID or .CM2.
- If there are two files with the names BIDSNG01.MID and BIDSNG01.CM2 in the MUSICLIB folder, only the BIDSNG01.MID data will be loaded into user song memory. If you want the BIDSNG01.CM2 file to be loaded in this case, change the name of the BIDSNG01.MID to something else.
NOTE
- The message “Cannot rename MIDIDATA” will appear on your computer screen if you try to change the name of the copied file to BIDSNG01.MID while there is already a file in the MUSICLIB folder named BIDSNG01.MID. Change the name of the current BIDSNG01.MID to something else and then rename the copied file to BIDSNG01.MID.
■To transfer Recorder memory data between the digital piano and your computer
To transfer the digital piano's current Recorder memory data to your computer, copy the contents of the RECORDER folder to your computer.
To return Recorder data you previously saved to your computer back to Recorder memory, copy it back to the RECORDER folder (and replace the current RECORDER folder contents).
5. After the file copy operation is complete, return the USB device mode to MIDI.
- While holding down the FUNCTION button, press the applicable keyboard key. See "USB device mode (USB DEVICE MODE)" on page E-22 for more information.
- Returning the USB device mode to MIDI will load the contents of MUSICLIB into user song memory and the contents of RECORDER into Recorder memory.
IMPORTANT!
- A data conversion error is indicated when both of the SONG ▶/■ button lamps, and the GRAND PIANO (MODERN) button, GRAND PIANO (CLASSIC) button, and ELEC PIANO button lamps are all lit, and all other lamps are unlit.
Copyrights
The rights of creators and copyright holders of music, images, computer programs, databases, and other data are protected by copyright laws. You are allowed to reproduce such works for personal or non-commercial use only. For any other purpose, all reproduction (including data format conversion), modification, transfer of reproductions, distribution over a network, or any other use without permission of the copyright holder exposes you to claims for damages and criminal prosecution for copyright infringement and violation of the author's personal rights. Be sure to reproduce and otherwise use copyrighted works only in accordance with applicable copyright laws.
Assembling the Stand
Unpacking
PREPARATION
- Before starting assembly, check to make sure that you have all the parts shown below. You can find the screws in a plastic bag inside of the polystyrene foam packing material.
- This stand does not include any of the tools required for assembly. It is up to you to prepare a large Philips head (+) screwdriver for assembly.

① Side panel ....... ×1
② Side panel ....... ×1
© Back panel ....... ×1
① Screws ....x8
⑤ Screw caps....×8
⑤ Pedal unit ....x1
⑥ Screws ....x2
① Clips ×2
①-(a) Bracket ....x1
①-(b) Bracket ×1
① Screw caps ....x2
⑨ Joint connectors.... ×4
① Polystyrene foam packing material (Required for stand assembly.)....x1
Assembling the Stand
CAUTION
• The stand should be assembled by two people working together.
- The stand should be assembled on a flat surface.
- Do not remove the tape securing the keyboard cover in place until assembly is complete. Removing the tape can cause the keyboard cover to open and close during assembly, creating the risk of personal injury to your hands and fingers.
• Take care that you do not pinch your fingers between parts when assembling them.
- When placing the digital piano on the floor, be sure to place it on something soft (a blanket, cushion, etc.). Do not place the digital piano directly onto the floor.

natural_image
Simple line drawing of a block on a surface with a gray block, no text or symbols presentNOTE
- When attaching the digital piano and the back panel Ⓐ to side panels Ⓐ and Ⓑ, lay the entire assembly on its side.
- Be sure to follow the proper procedure when assembling the stand.
PREPARATION
- Before starting assembly of the stand, divide the polystyrene foam packing material ① into the sections as shown in the illustration below. After dividing up the material, you should end up with a total of six pieces named ①-(a), ①-(b), and ①-(c), which you will use while assembling the stand.
- If you do not have any packing material available for some reason, use a magazine or some other thick item.
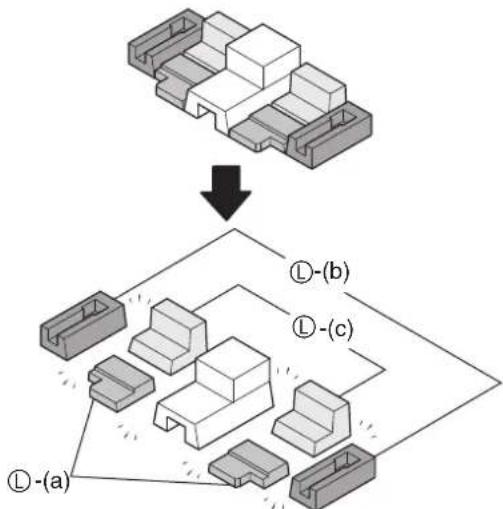
flowchart
graph TD
    A["3D mechanical assembly"] --> B["↓"]
    B --> C["① - (a)"]
    B --> D["② - (b)"]
    B --> E["③ - (c)"]
- Pull the pedal unit cable out from the pedal unit Ⓔ.

- Place the digital piano onto the two Ⓐ-(a) foam pieces.

*Make sure that the edges of the brackets on either side of the digital piano are positioned at the top of the foam pieces.
- Perform the following steps to attach side panel Ⓐ to the digital piano.

IMPORTANT!
- When inserting the corner of the side panel into the bracket on the side of the digital piano in step (2-3) below, take care to avoid damaging the side panel corner (★). Never try to insert the side panel into the bracket without first tilting the side panel at an angle as instructed in step (2-2). Doing so creates the risk of damage of the side panel corner.
(2-1) On side panel Ⓐ, locate the corner that has a metal piece attached to it, and then insert that corner into foam piece Ⓞ-(b).
(2-2) Tilt side panel Ⓐ slightly as indicated by the arrow in the illustration.
(2-3) Keeping side panel® tilted at an angle, carefully insert the opposite corner (★) into the bracket on the side of the digital piano.

- Keeping side panel Ⓐ tilted at an angle, align the side panel with side of the digital piano.
(3-1) Push side panel Ⓐ in the direction indicated by the black arrow in the illustration to align the side panel so there is as little space as possible between its top edge Ⓐ and the bottom of the top panel of the digital piano (★).
(3-2) After alignment is complete, stand side panel ⑧ straight up so it is firmly against the side of the digital piano.

IMPORTANT!
- When performing step (3-1) above, make sure that you position side panel Ⓐ so its top edge reaches the bottom of the digital piano top panel. If it does not, you will not be able to stand side panel Ⓐ straight up in step (3-2).
- Perform the following steps to secure the side panel to the digital piano.
(4-1) Press downwards on side panel Ⓐ to ensure that it is inserted as far as it will go into the bracket on the side of the digital piano.
(4-2) Use the Ⓐ screws to secure side panel Ⓐ to the digital piano.

- Insert foam piece Ⓐ-(c) under side panel Ⓐ as shown in the illustration.

IMPORTANT!
- The foam piece should be located directly under the two screw holes (★) in the side panel.
-
Repeat steps 2 through 5 to attach side panel Ⓑ to the other side of the digital piano.
-
Attach back panel Ⓓ to side panels Ⓐ and Ⓑ. Use the four screws Ⓓ and four joint connectors Ⓒ.
- Insert the four joint connectors at the four locations on back panel ©. The holes in the joint connectors should be aligned with the holes in the back panel.
- Lift up back@psa itsdrew holes align with the screw holes in the side panels, and then tighten the screws Ⓓ.
- If you have trouble inserting the screws ① into the joint connector ② holes, use a screwdriver to rotate the joint connector (★ in Figure).
⚠️ CAUTION
- Never try to force the screws! Forcing the screws ① to turn while the joint connector ⑧ holes are not aligned correctly can strip the screw threads.
- Partially tighten the screws on one side of the Back panel © and then fully tighten the screws on the other side.
- Next, fully tighten the screws that you partially tightened.
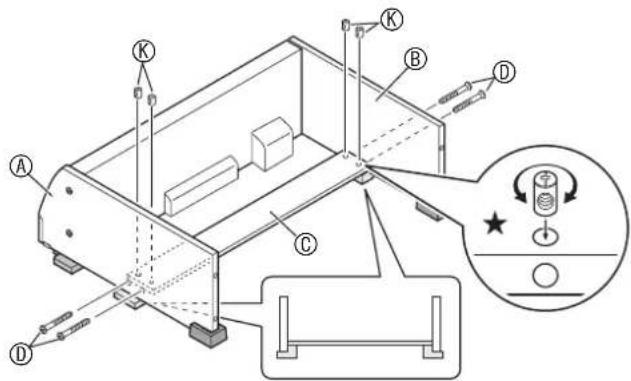
- After ensuring that all of the screws are fully tightened, remove the packing material and stand up the stand.
- After standing up the stand, cover each of the eight screws you have installed up to this point with screw caps Ⓔ.
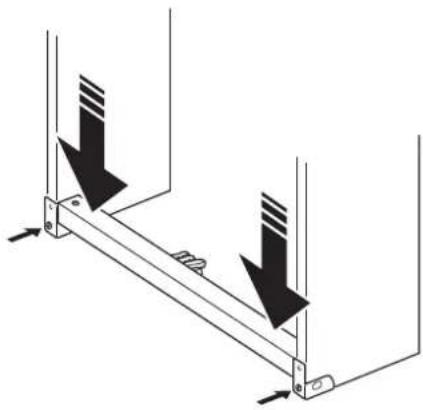
- Attach the brackets ① to the pedal unit ⑤, and temporarily secure them with screws ⑥.
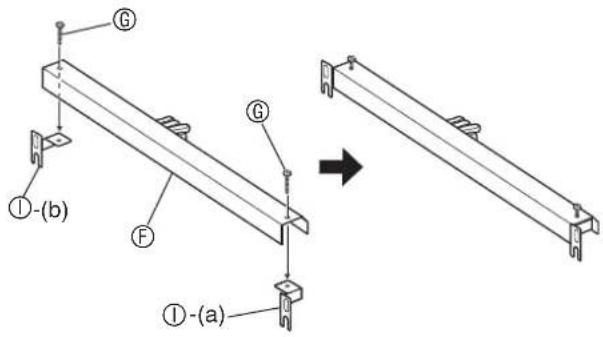
If you plan to locate the digital piano against a wall, proceed to step 10 on page E-31.
- Remove the screws that hold the corner brackets in place on the back corners (the corners away from the pianist) of the side panels.
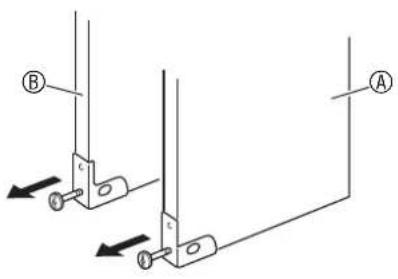
- As shown in the illustration, reverse the corner brackets you removed in step 10, and insert pedal unit brackets ①-(a) and ①-(b) between the each of the corner brackets and the side panels A and B.

⚠ WARNING
- The corner brackets help to prevent the stand from tipping over. Whenever the stand is in a location that is not up against a wall, reorient the corner brackets as shown in the illustration. Leaving the corner brackets in their original orientations can make it easy for the stand to tip over towards the back, creating the risk of personal injury.
- Securely tighten the screws Ⓖ that you temporarily tightened in step 9.
- Cover the screw heads with the caps Ⓙ.
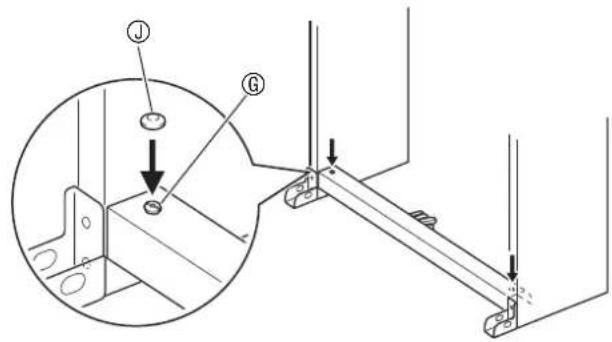
- Secure the corner brackets to the stand using the screws you removed in step 10.
IMPORTANT!
- Press down on the edges of the pedal unit as you tighten the corner bracket screws.
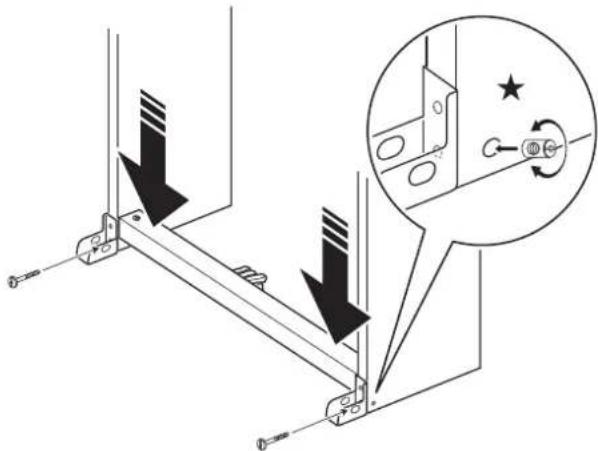
- The side panels have joint connectors inside that engage with the corner bracket screws. If you have trouble inserting the screws into the joint connector screw holes, use a screwdriver to rotate the joint connector and adjust the position of the screw hole for easier access. See the detail drawing (marked with a star) in the above illustration.
To tighten the joint connector and screw
(1) Rotate the screw counterclockwise about three turns to ensure that the screw is in the center of the joint connector.
(2) Slowly rotate the screw clockwise and confirm that it tightens without resistance. If you feel any resistance, it means that the screw is not engaging properly with the joint connector. Rotate the screw counterclockwise again and try to get it to engage properly.
(3) If you experience problems getting the screw to engage properly, use a screwdriver to rotate the joint connector 180 degrees. Next perform steps (1) and (2) again to engage the screw from the screw hole on the other side.
- Forcibly tightening a screw while it is not engaged properly can strip the threads of the screw and joint connector, making it impossible to tighten the screw.
- Connect the pedal unit cable.
- For details about connections, see "To connect the cable" (page E-32).
Locating the Stand against a Wall
- Perform steps 1 through 9 starting on page E-28.
- Loosen the bracket screws at the bottom of the stand's side panels Ⓐ and Ⓑ to create a gap between the side panels and corner brackets as shown in the illustration.

- As shown in the illustration, insert the pedal unit brackets into to the gaps you created in step 10.

natural_image
Technical line drawing of a metal frame assembly with mounting brackets and wiring (no text or symbols)- Securely tighten the screws ⑥ that you temporarily tightened in step 9.
• Cover the screw heads with the caps ①.
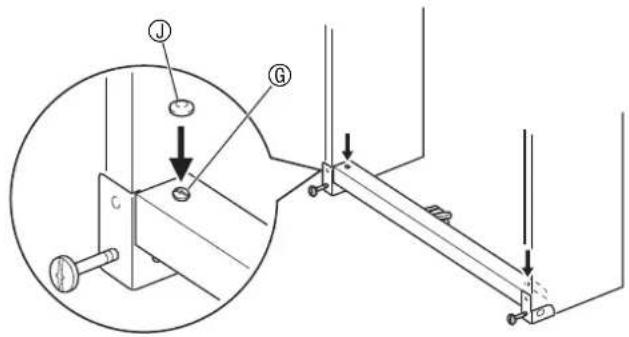
- Tighten the screws you loosened in step 10 to secure the corner brackets to the side panels.
IMPORTANT!
- Press down on the edges of the pedal unit as you tighten the corner bracket screws.
natural_image
Diagram of a mechanical or electrical component with two downward arrows indicating force or direction (no text or symbols present)To connect the cable
- Making sure that the pedal unit cable plug is oriented as shown in the illustration below, plug it into the pedal connector on the bottom of the digital piano.
- Press the plug fully into the connector as far as it will go. - Use the clips ⑩ to secure the pedal cable to two locations on side panel ⑨.

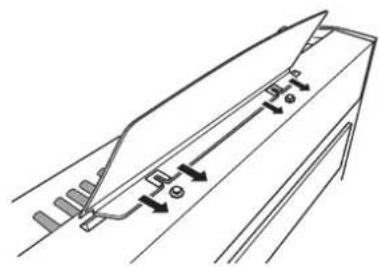
To install the music stand
- Slide the music stand under the two bolts on the top of the digital piano as shown in the illustration and then tighten the bolts.
natural_image
Technical line drawing of a mechanical component with arrows indicating motion or force direction (no text or symbols)Troubleshooting
| Problem Cause Action | See Page | ||
| No sound is produced when I press a keyboard key. | 1. The VOLUME controller is set to “MIN”.2. Headphones or an adaptor plug is plugged into one of the PHONES jacks.3. MIDI Local control is turned off. | 1. Rotate the VOLUME controller more towards “MAX”.2. Disconnect whatever is connected to the PHONES jacks.3. Turn on the Local control setting. | E-7E-5E-22 |
| The pitch of the digital piano is off. | 1. The digital piano’s key setting is something other than “0”.2. Digital piano tuning is incorrect. 2. Adjust digital piano tuning, or turn the digital piano off and then back on again.3. Octave shift is enabled. | 1. Change the key setting to “0”, or turn digital piano power off and then back on again.2. Digital piano tuning, or turn the digital piano off and then back on again.3. Change the octave shift setting to 0. | E-21E-21E-21 |
| Nothing happens when I press a pedal. | The pedal unit cable is not connected. | Connect the cable correctly. | E-32 |
| Tones and/or effects sound strange. Turning power off and then back on again does not eliminate the problem.Example: Note intensity does not change even though I alter key pressure. | The “Back up” feature is turned on. Turn off “Back up”. Next, turn power off and then back on again. | E-22 | |
| I cannot transfer data after connecting the digital piano to a computer. | - 1. Check to make sure that the USB cable is connected to the digital piano and computer, and that the correct device is selected with your computer’s music software.2. Turn off the digital piano and then exit the music software on your computer. Next, turn the digital piano back on and then restart the music software on your computer. | E-23 | |
| It takes a long time before I can use the Digital Piano after I turn it on. | Digital Piano memory data was corrupted because a data transfer operation with a computer was in progress the last time you turned off the piano. When this happens, the Digital Piano performs a memory format operation the next time you turn it on. You cannot perform any other operation while a format operation is in progress. | It takes about 20 seconds after you turn on power to perform the memory format operation. Wait until the format operation is complete. Note that you should take care to avoid turning off the Digital Piano while a data transfer operation with a computer is in progress. | E-24 |
| A tone’s quality and volume sounds slightly different depending where it is played on the keyboard. | This is an unavoidable result of the digital sampling process,* and does not indicate malfunction.* Multiple digital samples are taken for the low range, middle range, and high range of the original musical instrument. Because of this, there may be very slight differences in tonal quality and volume between sample ranges. | ||
| When I press a button, the note that is sounding cuts out momentarily or there is a slight change in how effects are applied. | This happens when the sounds of multiple parts are sounding at the same time while using layer, using the Duet Mode, playing back a built-in tune, recording, etc. Pressing a button when one of these conditions exists will cause the effect setting that is built into the tone to change automatically, which causes notes to cut out momentarily or causes a slight change in how effects are being applied. | ||
Product Specifications
| Model PX-730BK / PX-730CY / PX-7WE | |
| Keyboard 88-key piano keyboard, with Touch Response | |
| Maximum Polyphony 128 notes | |
| Tones 16 | • Layer (excluding bass tones)• Split (Low-range bass tones only) |
| Effects | Brilliance (-3 to 0 to 3), Reverb (4 types), Chorus (4 types), DSP, Acoustic Resonance |
| Metronome • Beats: 0, 2, 3, 4, 5, 6 | • Tempo Range: 20 to 255 |
| Duet Adjustable tone range (-1 to 2 octaves) | |
| Music Library | • Number of Songs: 60, User Songs: 1 (memory capacity; up to 65KB )**Based on 1 KB = 1024 bytes, 1 MB = 1024 ^2 bytes• Song volume: Adjustable• Part On/Off: L, R |
| Recorder • Functions: Real-time recording, playback• Number of Song: 1• Number of Tracks: 2• Capacity: Approximately 5,000 notes total• Recorded Data Protection: Built-in flash memory | |
| Pedals Damper (with half-pedal operation), soft, sostenuto | |
| Other Functions • Touch Select: 3 types, Off• Transpose: 2 octaves (-12 to 0 to 12)• Tuning: A4 = 440.0 Hz ±99 cents (variable)• Temperament• Octave shift• Operation Lock | |
| MIDI 16-channel multi-timbre receive | |
| Inputs/Outputs | • PHONES jacks: Stereo standard jacks × 2Output impedance: 3ΩOutput Voltage: 1.5V (RMS) MAX• Power: 12V DC• USB port: TYPE B• Pedal connector |
| Speakers | 12cm × 2 (Output 8W + 8W) |
| Power Requirements | AC Adaptor: AD-A12150LW |
| Power Consumption | 12V --- 18W |
| Dimensions | Digital Piano and Stand: 137.4 (W) × 29.8 (D) × 79.2 (H) cm (54 ^1/_8 × 11 ^3/_4 × 31 ^3/_16 inch) |
| Weight | Digital Piano and Stand: approximately 30.6kg (67.4 lbs) |
- Specifications and designs are subject to change without notice.
Operating Precautions
Be sure to read and observe the following operating precautions.
■Location
Avoid the following locations for this product.
- Areas exposed to direct sunlight and high humidity
- Areas subjected to temperature extremes
- Near a radio, TV, video deck, or tuner The above devices will not cause malfunction of the product, but the product can cause interference in the audio or video of a nearby device.
■User Maintenance
- Never use benzine, alcohol, thinner, or other chemical agents to clean the product.
- To clean the product or its keyboard, wipe with a soft cloth moistened in a weak solution of water and a mild neutral detergent. Wring all excess moisture from the cloth before wiping.
■Included and Optional Accessories
Use only accessories that are specified for use with this product. Use of unauthorized accessories creates the risk of fire, electric shock, and personal injury.
■Weld Lines
Lines may be visible on the exterior of the product. These are "weld lines" that result from the plastic molding process. They are not cracks or scratches.
■Musical Instrument Etiquette
Always be aware of others around you whenever using this product. Be especially careful when playing late at night to keep the volume at levels that do not disturb others. Other steps you can take when playing late at night are closing the window and using headphones.
- Any reproduction of the contents of this manual, either in part or its entirety, is prohibited. Except for your own, personal use, any other use of the contents of this manual without the consent of CASIO is prohibited under copyright laws.
- IN NO EVENT SHALL CASIO BE LIABLE FOR ANY DAMAGES WHATSOEVER (INCLUDING, WITHOUT LIMITATION, DAMAGES FOR LOSS OF PROFITS, BUSINESS INTERRUPTION, LOSS OF INFORMATION) ARISING OUT OF THE USE OF OR INABILITY TO USE THIS MANUAL OR PRODUCT, EVEN IF CASIO HAS BEEN ADVISED OF THE POSSIBILITY OF SUCH DAMAGES.
- The contents of this manual are subject to change without notice.
■AC Adaptor Handling Precautions
- Use a power outlet that is easily accessible so you can unplug the AC adaptor when a malfunction occurs or whenever else you need to do so.
- The AC adaptor is intended for indoor use only. Do not use it where it might be exposed to splashing or moisture. Do not place any container, such as a flower vase, that contains liquid on the AC adaptor.
- Store the AC adaptor in a dry place.
- Use the AC adaptor in an open, well-ventilated area.
- Never cover the AC adaptor with newspaper, a table cloth, a curtain, or any other similar item.
- Unplug the AC adaptor from the power outlet if you do not plan to use the Digital Piano for a long time.
- Never try to repair the AC adaptor or modify it in any way.
- AC adaptor operating environment Temperature: 0 to 40°C Humidity: 10% to 90% RH
- Output polarity: ◇—●—⊕
AC Adaptor Handling Precautions
Model: AD-A12150LW
- Read these instructions.
- Keep these instructions on hand.
- Heed all warnings.
- Follow all instructions.
- Do not use this product near water.
- Clean only with a dry cloth.
- Do not install near radiators, heat registers, stoves, or any other source of heat (including amplifiers).
- Use only attachments and accessories specified by the manufacturer.
- Refer all servicing to qualified service personnel. Servicing is required after any of the following occurs: when the product is damaged, when the power supply cord or plug is damaged, when liquid is spilled into the product, when a foreign object falls into the product, when the product is exposed to rain or moisture, when the product does not operate normally, when the product is dropped.
- Do not allow the product to be exposed to dripping or splashing liquid. Do not place any object containing liquid on the product.
- Do not allow the electrical load output to exceed the label rating.
- Make sure the surrounding area is dry before plugging into a power source.
- Make sure the product is oriented correctly.
- Unplug the product during lightning storms or when you do not plan to use it for a long time.
- Do not allow product ventilation openings to become blocked. Install the product in accordance with the manufacturer's instructions.
- Take care the power cord is located where it will not be stepped upon or bent severely, particularly in locations close to plugs and convenience receptacles, and in locations where it exits from the product.
- The AC adaptor should be plugged into a power outlet as close to the product as possible to allow immediate disconnection of the plug in case of emergency.
The symbol below is an alert indicating un-insulated hazardous voltage inside the product's enclosure, which may be sufficient to constitute the risk of electric shock to users.

The symbol below is an alert indicating the presence of important operating and maintenance (servicing) instructions in the documentation that accompanies the product.

Tone List/Lista de tonos
| Tone Name/Nombre de tonos | Program Change/Cambio de programa | Bank Select MSB/MSB de selección debanco |
| GRAND PIANO MODERN 0 0 | ||
| GRAND PIANO CLASSIC 0 1 | ||
| GRAND PIANO VARIATION 0 2 | ||
| ELEC PIANO 4 0 | ||
| FM E.PIANO 5 0 | ||
| 60'S E.PIANO 4 1 | ||
| HARPSICHORD 6 0 | ||
| VIBRAPHONE 11 0 | ||
| PIPE ORGAN 19 0 | ||
| JAZZ ORGAN 17 0 | ||
| ELEC ORGAN 1 16 0 | ||
| ELEC ORGAN 2 16 1 | ||
| STRINGS 1 49 0 | ||
| STRINGS 2 48 0 | ||
| BASS (LOWER) 1 | 32 0 | |
| BASS (LOWER) 2 | 32 1 |
| Function Transmitted | Recognized Remarks | |||
| Basic Channel | Default Changed | 1 - 161 - 16 | 1 - 161 - 16 | |
| Mode | Default Messages Altered | Mode 3X***** | Mode 3X***** | |
| Note Number | 0 - 127 0 - 127***** | 0 - 127*1True voice | *1: Depends on tone*1: Depende del tono | |
| Velocity | Note ON Note OFF | O 9nH v = 1 - 127X 8nH v = 64 | O 9nH v = 1 - 127X 9nH v = 0, 8nH v =** | **: no relation**: sin relación |
| After Touch | Key's Ch's | X X | X O | |
| Pitch Bender | X | O | ||
| Control Change | 0,32156,3871011161718196465666776777880818283849193100,101120121 | OXXXXXXXXXXXXXXXXXXXXXXXXXXXXXXXXXXXXXXXXXXXXXXXXXXXXXXXXXXXXXXXXXXXXXXXXXXXXXXXXXXXXXXXXXXXXXXXXXXXXXXXXXXXXXXXXXXXXXXXXXXXXXXXXXXXXXXXXXXXXXXXXXXXXXXXXXXXXXXXXXXXXXXXXXXXXXXXXXXXXXXXXXXXXXXXXXXXXXXXX | OOOOOOOOOOOOOOOOOOOOOOOOOOOOOOOOOOOOOOOOOOOOOOOOOOOOOOOOOOOOOOOOOOOOOOOOOOOOOOOOOOOOOOOOOOOOOOOOOOOOOOOOOOOOOOOOOOOOOOOOOOOOOOOOOOOOOOOOOOOOOOOOOOOOOOOOOOOOOOOOOOOOOOOOOOOOOOOOOOOOOOOOOOOOOOOOOOOOOOOOO | Bank selectModulationPortamento TimeData entry LSB, MSB ^2 VolumePanExpressionDSP Parameter ^0.2 DSP Parameter ^1.2 DSP Parameter ^2.2 DSP Parameter ^3.2 DamperPortamento SwitchSostenutoSoft pedalVibrato rateVibrato depthVibrato delayDSP Parameter ^4.2 DSP Parameter ^5.2 DSP Parameter ^6.2 DSP Parameter ^7.2 Portamento ControlReverb sendChorus sendRPN LSB, MSB ^2 All sound offReset all controller |
| Program Change | O***** | O0 - 127:True # | ||
| System Exclusive | O | O | *2 | |
| System Common | : Song Pos : Song Sel : Tune | XXXX | XXX | |
| System Real Time | : Clock : Commands | O O | XX | |
| Aux Messages | : Local ON/OFF : All notes OFF : Active Sense : Reset | XOXX | XOO | |
| Remarks | *2: For details, see MIDI implementation at http://world.casio.com/. *2: Si desea más información, vea Implementación MIDI en http://world.casio.com/ | |||
Mode 1 : OMNI ON, POLY
Mode 3 : OMNI OFF, POLY
Mode 2 : OMNI ON, MONO
Mode 4 : OMNI OFF, MONO
O:Yes
X: No

This recycle mark indicates that the packaging conforms to the environmental protection legislation in Germany.
- Safety Precautions
- IMPORTANT SAFETY INSTRUCTIONS
- NOTICE
- FCC WARNING
- Declaration of Conformity
- Important!
- Assembling the Stand....E-27
- General Guide ...... E-2
- Power Outlet..... E-4
- Connections...... E-5
- Playing with Different Tones ...... E-6
- Playing Back Built-in Songs ...... E-12
- Recording and Play Back..... E-14
- Configuring Settings with the Keyboard E-18
- Connecting to a Computer...... E-23
- Reference..... E-33
- Appendix...... A-1
- MIDI Implementation Chart
- General Guide
- CAUTION
- NOTE
- Saving Settings and Using Operation Lock
- Power Outlet
- Using an AC Adaptor
- Specified AC Adaptor: AD-A12150LW
- During Use
- During Movement
- During Storage
- Connections
- Connecting Headphones
- Connecting Audio Equipment or an Amplifier
- Connecting Audio Equipment (Figure 1)
- Connecting a Music Amplifier (Figure ②)
- Bundled and Optional Accessories
- Playing with Different Tones
- Selecting and Playing a Tone
- To select a tone
- Press the POWER button.
- Select the tone you want.
- Use the VOLUME controller to adjust the volume.
- Bass Tones (BASS 1, BASS 2)
- To adjust the brilliance of a tone
- Layering Two Tones
- To adjust the volume balance between two layered tones
- Using Effects
- To turn reverb on and off
- To turn chorus on and off
- To configure reverb and chorus effect settings
- ■About DSP
- Using the Digital Piano's Pedals
- Pedal Functions
- Using the Metronome
- Press the METRONOME button.
- To change the beat, hold down the FUNCTION button as you press one of the METRONOME BEAT keys to select a beat setting.
- While holding down the FUNCTION button, use the TEMPO keys to specify a tempo value in the range of 20 to 255 beats per minute.
- Press the METRONOME button or SONG ▶/■ button to turn off the metronome.
- To adjust the metronome volume
- While holding down the FUNCTION button, use the METRONOME VOLUME keys to specify a volume value in the range of 0 to 42.
- Playing a Piano Duet
- Changing the Octaves of the duet keyboards
- Playing Back Built-in Songs
- Playing Back All of the Built-in Songs
- Playing Back a Specific Music Library Song
- To stop playback, press the SONG ▶/■ button again.
- Practicing with a Music Library Song
- PREPARATION
- While holding down the FUNCTION button, press the RECORDER (L) button or METRONOME (R) button to select the part you want to turn off.
- Press the SONG ▶/■ button.
- Play the missing part on the keyboard.
- Recording and Play Back
- Tracks
- Memory Capacity
- Recorded Data
- Recording Data Storage
- Using the RECORDER Button
- To record to a specific track of a song
- To record to one track of a song while listening to the playback of the other track
- Playing Back from Digital Piano Memory
- Deleting Recorded Data
- Configuring Settings with the Keyboard
- To configure settings with the keyboard
- Keyboard Setting Operation Types
- Type A: Direct input
- Type B: Raising or lowering a setting using the + and - or ▼ and ▲ keyboard keys
- Keyboard Keys Used for Configuring Settings
- Parameter List
- Connecting to a Computer
- Minimum Computer System Requirements
- - Operating System
- Connecting the Digital Piano to Your Computer
- Using MIDI
- What is MIDI?
- Transferring Song Data with a Computer
- Double-click "PIANO".
- ■To show file name extensions under Windows XP
- ■To show file name extensions under Windows Vista or Windows 7
- ■To load a song into user song memory (Music Library 61)
- ■To transfer Recorder memory data between the digital piano and your computer
- After the file copy operation is complete, return the USB device mode to MIDI.
- Copyrights
- Assembling the Stand
- Unpacking
- ⚠️ CAUTION
- ⚠ WARNING
- To tighten the joint connector and screw
- Locating the Stand against a Wall
- To connect the cable
- To install the music stand
- Operating Precautions
- ■Location
- ■User Maintenance
- ■Included and Optional Accessories
- ■Weld Lines
- ■Musical Instrument Etiquette
- ■AC Adaptor Handling Precautions
- AC Adaptor Handling Precautions
- Model: AD-A12150LW
Brand : CASIO
Model : Privia PX-7WE
Category : Musical instrument