
DVD366 - DVD player Reflexion - Free user manual and instructions
Find the device manual for free DVD366 Reflexion in PDF.


| Product Type | DVD Player |
| Model | DVD366 |
| Brand | Reflexion |
| Dimensions (W x D x H) | 224 x 190 x 45 mm |
| Weight | 0.66 kg |
| Power Input | AC 100-240V ~ 50/60Hz |
| Power Consumption (On) | 10 W |
| Power Consumption (Standby) | < 1.0 W |
| Video Output | HDMI, Composite (CVBS) |
| Audio Output | 2.1 Stereo, Mono L/R, Coaxial (digital) |
| HDMI Resolution | 720p, 1080i, 1080p |
| Disc Playback Formats | DVD, DVD±R/RW, VCD, CD, CD-R/RW, HDCD, SVCD, Picture CD, MP3, AVI, DAT, JPEG, DVD-9 |
| USB Playback Formats | AVI (MPEG-1/2/4), MP3, JPG, JPEG |
| USB Specification | USB 2.0, supports up to 32 GB USB sticks |
| USB File System | FAT, FAT32 |
| Remote Control Battery | 2 x AAA (not included) |
| OSD Languages | English, German, French, Spanish, Portuguese, etc. |
| TV System | NTSC / PAL / AUTO |
| Copy Function | CD to USB ripping, MP3 disc to USB copying |
| Safety | Class 1 Laser product, double insulation (Class II) |
Frequently Asked Questions - DVD366 Reflexion
User questions about DVD366 Reflexion
0 question about this device. Answer the ones you know or ask your own.
Ask a new question about this device
Download the instructions for your DVD player in PDF format for free! Find your manual DVD366 - Reflexion and take your electronic device back in hand. On this page are published all the documents necessary for the use of your device. DVD366 by Reflexion.
USER MANUAL DVD366 Reflexion
BEDIENFELD AM GERÄT 5
ANSCHLUSSCHEMA 6
FERNBEDIENUNG 7
On-screen Display (OSD)
SPRACH-EINSTELLUNG
OSD-SPRACHE
Read the entire manual of the device carefully before using the unit. Keep the instructions in a safe place for future reference.
SAFETY INFORMATION
IMPORTANT SAFETY INSTRUCTIONS - PLEASE READ CAREFULLY BEFORE USE.
Observe the safety instructions on the back of the device.
 | Danger! Attention, Caution! This symbol warns you of dangerous voltage inside. To avoid electric shock, do not open the housing. |
 | Important! This warning sign alerts you to important instructions accompanying the product. |
 | This symbol for CLASS II (double insulation) indicates that the device is provided with double insulation. |
 CLASS 1 LASER PRODUCT CLASS 1 LASER PRODUCT | This product uses a Class 1 laser to read discs. This DVD player is equipped with safety switches to prevent exposure when the disc tray is open and the safety interlocks are overridden. Invisible laser radiation is present when the DVD player lid is open and the system interlock has failed or been bypassed. It is very important that you avoid direct contact with the laser beam at all times. Please do not attempt to bypass the safety switches. |
Follow the instructions below:
• Do not use this device near water.
• Use a slightly damp cloth for cleaning.
• Do not cover any ventilation openings.
- Set up the device according to these operating instructions.
- Please note that the power supply cable must not be crushed or kinked and avoid routing the power cable over sharp edges.
- Disconnect the device from the power supply during thunderstorms or when it is not in use for a long period of time.

Keep the device away from splashing and dripping water. Do not place any objects filled with liquids on the device.
IMPORTANT SAFETY INSTRUCTIONS
This appliance complies with all current safety regulations. The following safety tips are intended to protect the user from careless use and the dangers that may develop as a result.
- This appliance has been manufactured with the utmost care and has undergone a rigorous final inspection. However, as with any other electrical appliance, there is a possibility that problems may arise. Immediately disconnect the appliance from the mains in the event of smoke, intense heat or any other unnatural phenomenon.
- The mains plug or appliance plug is used to disconnect the appliance from the mains and should be easily accessible at all times.
- Only connect the appliance to power sources that comply with the specifications of the appliance. These can be found on the back of the unit and in the operating instructions.
• The mains socket should be located near the unit and must be easy to reach.
- Pull the mains cable out of the socket by the plug. Never pull on the mains cable itself, it could be damaged and cause a short circuit.
- When using a multiple socket, do not connect too many appliances to the multiple socket to avoid overloading.
- Keep rodents away from the appliance to avoid damage to the cable.
- To prevent injury, make sure that the power cable cannot be reached or pulled out of the socket by small children.
- Do not place the appliance near sources of heat. The housing and the power cable could be damaged by the influence of heat.
- When setting up the unit, make sure it is on a firm and level surface.
• In the event of a thunderstorm, disconnect the unit from the mains.
- Disconnect the appliance from the mains if you are not going to use it for a long time or leave it unattended.
- When setting up the unit, make sure that there is sufficient ventilation. Never place the unit near heat sources and do not cover any of the ventilation openings.
- Avoid direct sunlight on the unit. Keep a clearance of 5 cm (2") from the surroundings when placing on a shelf.
- Keep water or moisture away from the unit. Do not use the unit in wet or humid environments such as the bathroom, a steam kitchen or near a swimming pool.
- Do not use the appliance if moisture condensation may occur.
• Any repairs must only be carried out by qualified personnel.
- Never open the appliance. Repairs that are not carried out by qualified personnel can be a possible cause of fire.
- Liquids spilled into the unit may be a cause of serious damage. Switch the unit OFF and disconnect it from the mains. Contact your dealer or customer service.
- Never remove the safety covers. There are no usable or serviceable components inside the unit. You would lose your warranty claim. The appliance may only be repaired by the manufacturer's service department.
- All illustrations in these operating instructions are for illustrative purposes only and do not necessarily correspond to the actual appliance.
WHAT IN THE BOX?
-
DVD PLAYER
-
REMOTE CONTROL
-
AV CABLE
-
USER MANUAL
NOTE:
• Batteries for the remote control (2x AAA) are not included.
CONTROL PANEL ON THE DEVICE
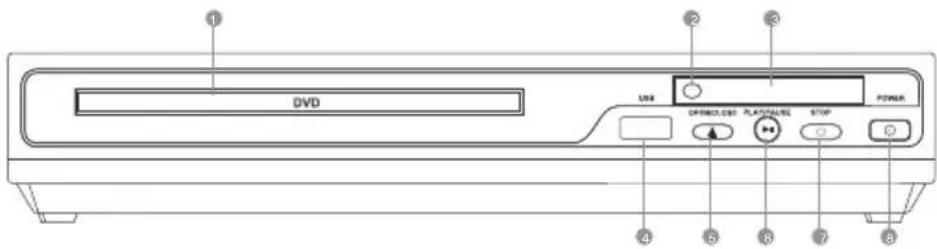
-
DVD drive
-
Open / Close button
-
Remote control sensor
-
Play / Pause button
-
Display
-
Stop-button
-
USB socket
-
Power-button (On / Off, Standby)
Note:
- Please keep the Remote control sensor on the device free. Blocking the remote control sensor can lead to connection problems with the remote control.
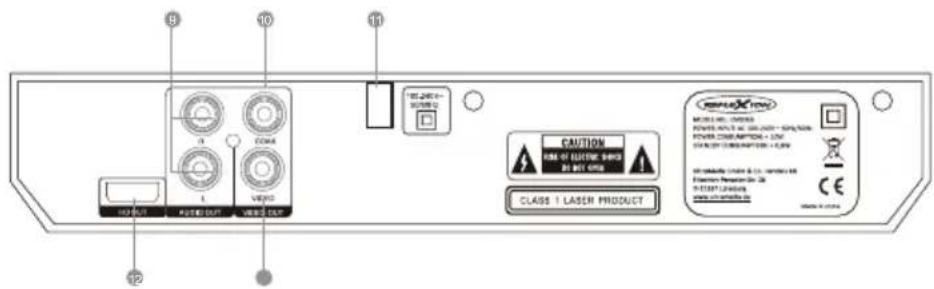
-
Audio connection (cinch output)
-
HDMI connection
-
COAX connection (digital audio output)
-
Video connection (cinch output)
-
AC power cable
CONNECTION DIAGRAM
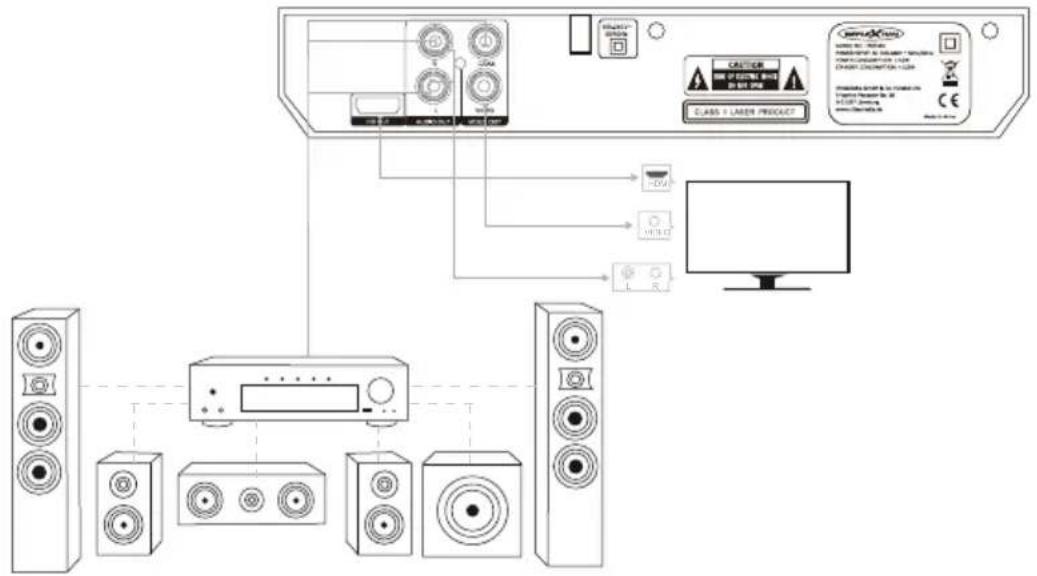
flowchart
graph TD
    A["Speaker"] --> B["Audio Device"]
    B --> C["Class + Laser Product"]
    C --> D["Computer Monitor"]
    D --> E["Speaker"]
    E --> F["Laser Product"]
    F --> G["Class + Laser Product"]
    G --> H["Speaker"]
    H --> I["Laser Product"]
    I --> J["Class + Laser Product"]
    J --> K["Speaker"]
    K --> L["Laser Product"]
    L --> M["Class + Laser Product"]
    M --> N["Speaker"]
    N --> O["Laser Product"]
    O --> P["Class + Laser Product"]
    P --> Q["Speaker"]
    Q --> R["Laser Product"]
    R --> S["Class + Laser Product"]
Connect and switch on:
- Connect the DVD player to your TV and/or amplifier as shown above.
• Turn on the TV and select the appropriate input connector: HDMI or AV. - Connect the DVD player to an appropriate power source (AC100-240V\~50/60Hz).
- Press (POWER) on the front panel or remote control. The TV will display "Read" or "No Disc", with or without a disc inserted.
- Press (OPEN / CLOSE) on the front panel or remote control, the disc tray will open or close automatically.
- When a disc is inserted, the disc type is displayed in the upper left corner of the screen.
- Press (POWER) on the front panel or remote control to switch the unit to standby mode.
REMOTE CONTROL
The remote control uses infrared waves (IR). Hold the remote control in the direction of the DVD player. If the remote control is out of range or angle, the remote control may not work properly.
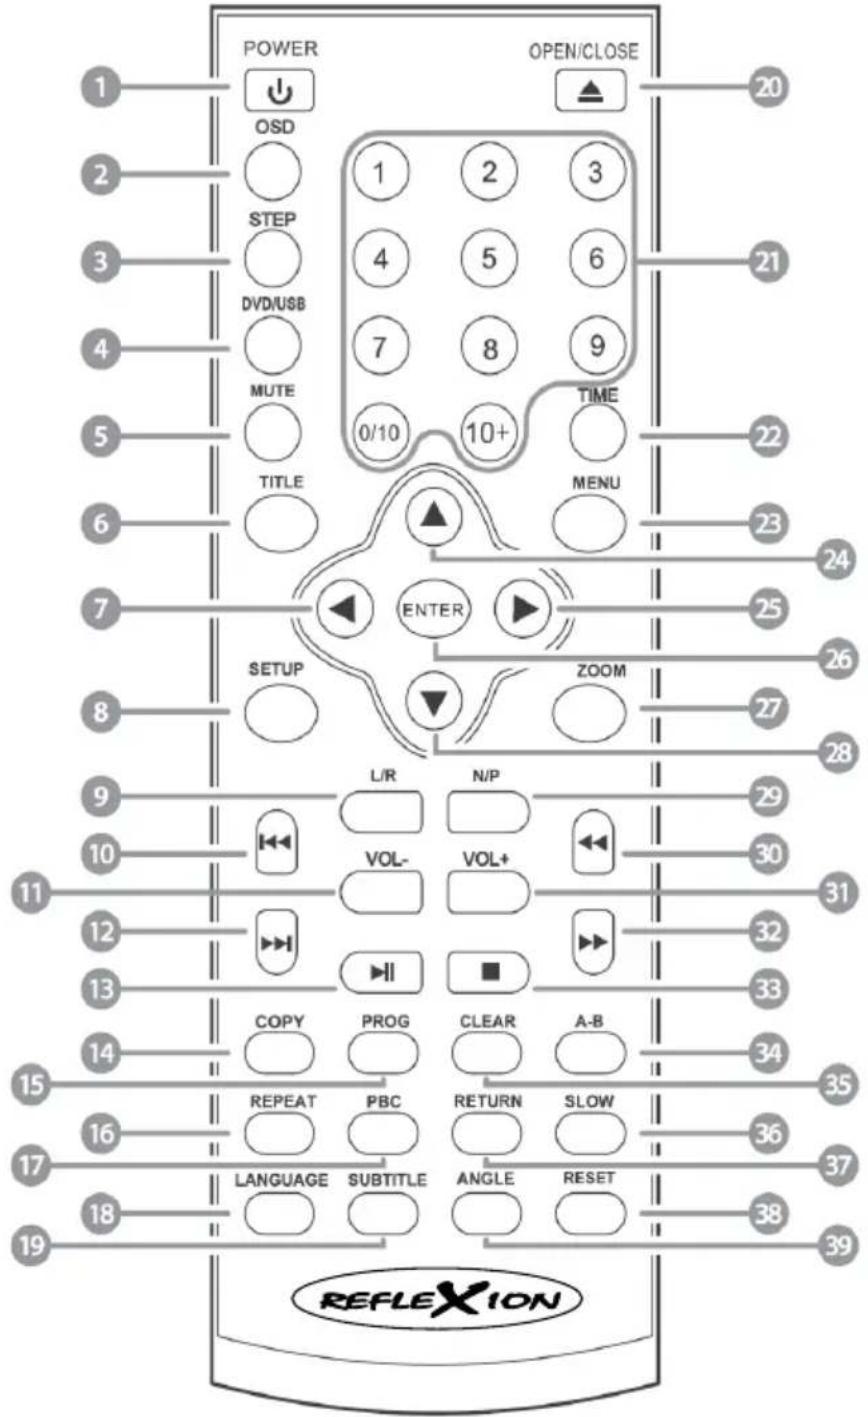
| 1 POWER | Switch the device on/off (standby). | ||
2 OSD  | Displays the DVD OSD menu. | ||
3 STEP  | Frame by frame playback. | ||
4 DVD/  Switches between DVD/USB mode. Switches between DVD/USB mode. | |||
5 MUTE  | Mute sound (On/Off). | ||
6 TITLE  | Displays the title information. | ||
7 LEFT  gate to the left in the menu. gate to the left in the menu. | |||
8 SETUP  | Open/close the setup menu. | ||
9 L/R  e the sound setting. e the sound setting. | |||
10 PREV  | Previous chapter/title. | ||
11 VOL-  | Reduce volume. | ||
12 NEXT  | Next chapter/title. | ||
13 PLAY  ISE ISE | Play/Pause | ||
14  | COPY | Start CD Copy function. For more information see Copy function on page 45. | |
15  | PROG | Programme playback. | |
| 16 |     | REPEAT | Change playback mode.DVD:- CHAPTER: Repeat chapter- TITLE: Repeat Title- REP ALL: Repeat all- OFF: Normal playbackCD:- REP 1: Repeat one track- REP ALL: Repeat all tracks- OFF: Normal playback |
17 PBC  | Returns to the main menu for VCD playback. | ||
| 18 [82XS] Language | LANGUAGE | Selects the available disc playback language. | |
19  SUBTITLE SUBTITLE | SUBTITLE | Selects the available disc subtitle language. | |
20  | OPEN/CLOSE | Open/Close. | |
| 21 | NUMBER KEYS | Number keys for e.g. title/chapter selection. | |
| 22 | TIME | Select the title, chapter or a time passage. | |
| 23 | MENU | Opens the DVD root menu. | |
| 24 | UP | Navigate upwards in the menu. | |
| 25 | RIGHT | Navigate to the right in the menu. | |
| 26 | ENTER | Confirm menu entry. | |
| 27 | ZOOM | Zoom into the image. There are several zoom modes available. | |
| 28 | DOWN | Navigate down in the menu. | |
| 29 | N/P | N/P | Press N/P to toggle between NTSC, PAL and AUTO. |
| 30 | REV | Fast rewind. | |
| 31 | VOL+ | Increase volume. | |
| 32 | FWD | Fast forward. | |
| 33 | STOP | Stop playback. | |
| 34 | A-B | Set playback/end point for A-B playback. | |
| 35 | CLEAR | Delete number entry for the time function. | |
| 36 | SLOW | Slow playback. There are various options to choose from. | |
| 37 | RETURN | Menu item back. | |
| 38 | RESET | Reset the unit settings to the default values. | |
| 39 | ANGLE | Selects the playback angle. Only if available on the disc. | |
TECHNICAL FEATURES
Playing a disc
Once a disc is loaded, the player will start playing automatically.
• If the disc is a DVD, the player will show the DVD menu or title menu.
• If the disc is a VCD 2.0, the player will activate PBC playback control status.
• If the disc is a CD, the play will start playing the CD in sequence.
Note: for composite only
- If the screen is black / White or scrolling up and down, press N/P on remote to toggle between NTSC and PAL.
Basic playback controls
- Press the (PLAY/PAUSE) button to play or pause the disc.
• Press the (PREV) button to skip backward to the previous title/chapter. - Press the (NEXT) button to skip forward to the next title/Chapter.
- Press the (PREV) button to fast reverse the disc 2x, 4x, 8x, 20x or back to normal playback speed.
- Press the (FWD) button to fast forward the disc 2x, 4x, 8x, 20x or back to normal playback speed.
- Press the (STOP) button once to stop the disc playing; press the (PLAY/PAUSE) button to resume playback from the last played location.
- Press the (STOP) button twice to stop playback completely.
Notes:
- Unless otherwise indicated, use remote control to operate the features discribed throughout this manual.
On-screen display (OSD)
- DVD playback: Press (OSD) on the remote control to display single elapsed time, single remaining time, total elapsed time, total remaining time and other information about the disc.
• VCD playback: Press (OSD) on the remote control to display single elapsed time, single remaining time, display off and other information about the disc.
Play mode (N/P): for composite only
Press N/P to toggle between NTSC, PAL and Auto.
Subtitles
Press the (SUBTITLE) button repeatedly to activate and select subtitles. Only if available on the disc.
Angle
Press the (ANGLE) button repeatedly to select the different camera angles on the disc. Only if available on the disc.
Language
Press the (LANGUAGE) button repeatedly to select the different languages on the disc. Only if available on the disc.
TITLE
Press the (TITLE) button to display the title menu when watching films/recordings on disc with multi-title encoding. (This works for discs encoded with multiple titles).
Menu/PBC
(PBC) to return to the main VCD playback menu. (This works for discs with multiple chapters).
• If you are playing a VCD 2.0, press (RETURN) to return to the PBC playback menu.
- When playing an SVCD, press (MENU/PBC) to display the menu on the screen. After inserting the disc, the unit automatically switches to PBC ON.
- When playing VCD1.1m CD-DA and MP3, press (MENU/PBC) and PBC off is displayed on the TV screen. In this mode, the menu is not displayed on the screen; press the number key to select the track.
Numerical Keys
Press (NUMERICAL KEYS) to select pictures or tracks.
Direction keys
On playing discs, us (UP/DOWN/LEFT/RIGHT) arrow to select options in the title, menu or setup.
Time
Press (TIME) and follow corresponding numerical keys to navigate to specific title, chapter or time.
REPEAT
DVD
When playing DVD discs, press the (REPEAT) button and select one of the following options:
• CHAPTER: Repeat Chapter
• TITLE: Repeat Title
• REP ALL: Repeat all
• OFF: Normal playback
CD
When playing audio CDs, select one of the following options:
• REP 1: Repeat One Track
• REP ALL: Repeat all tracks.
• OFF: Normal playback
Repeat from A-B
Press (A-B) ONCE to set the initial starting point (A); press it again to set the end point (B). The unit will now repeat playback from your set points (A) to (B). Pressing A-B a third time, it will cancel the repeat setting.
Zoom
Press the (ZOOM) button repeatedly and select the zoom level from the following options: 2x, 3x, 4x, 1/2, 1/3, 1/4, Off.
Channel (L/R)
When playing discs in SVCD, VCD or CD format, press the (L/R) button to select one of the following options: Stereo, Mono L, Mono R, Mix Mono.
Volume and mute
When playing discs in SVCD, VCD or CD format, press L/R to select one oft he following options: Stereo, Mono L, Mono R, Mix Mono.
Volume and mute
- Press the (Vol+) button to increase the volume.
• Press the (Vol-) button to decrease the volume.
• Press the (MUTE) button to turn the sound on/off.
Program (Prog)
During playback: Press the (PROG) button to access the programme status, then enter the desired track numbers, e.g. 2, 4, 6 and 8. (If you have entered an incorrect number, you can press the (CLEAR) button to delete the numbers). To finish the process, simply press the (PROG) button again.
UK
Slow
Press the (SLOW) button repeatedly to select a slow motion level from the following options: 1/2, 1/3, 1/4, 1/5, 1/6, 1/7 or normal.
Clear
If you are using the programming or GoTo function, press the (CLEAR) button to delete the number entered.
Step
If you press the (STEP) button during DVD playback, the film is played frame by frame without sound. Press the (PLAY/PAUSE) button to return to normal playback.
SETUP OPTIONS
The setup options for system, language, audio, video, speakers and digital can be accessed via the setup menu.
- Press the (SETUP) button on the remote control to enter the main menu.
• Use the (UP/DOWN) buttons to navigate up or down in the menu.
• Use the (LEFT/RIGHT) buttons to navigate left or right. - Press the (ENTER) button to confirm the selection and move to the submenu.
• To exit the setting, press the (SETUP) button again.
SETUP OPTIONS
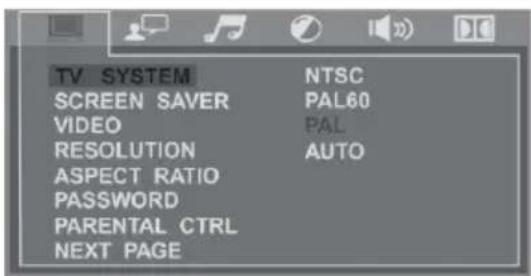
TV SYSTEM: for composite only
Based on TV hardware, select proper options: NTSC, PAL or Auto. Default is PAL.
SCREEN SAVER
Use this option to turn the screen saver ON or OFF.
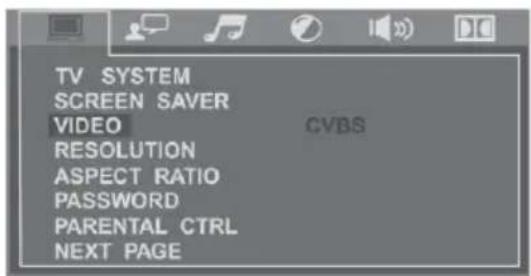
VIDEO
Your video settings must correspond with the type of connection to your TV or other equipment.
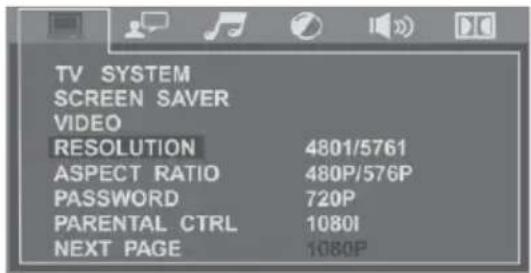
RESOLUTION
On HDMI, select one of the following video output resolution: OFF, 720P, 1080I, 1080P
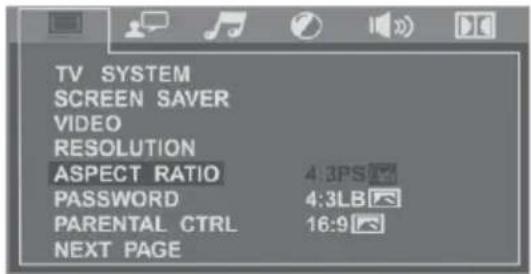
TV TYPE
Use this submenu to select the aspect ratio.
Note:
• For DVDs, the screen format is convertible.
- If your screen displays in 4:3, when a DVD with 16:9 display format is played back, the picture will be flattened.
| TV Screen/Film Format | 4/3 | 16:9 | ||
| Normal | Full View | Mailbox | Wide Screen | |
 |  |  |  |  |
 |  |  |  |  |
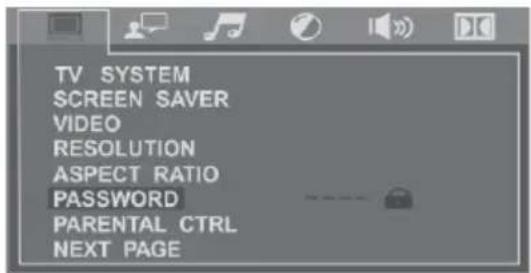
PASSWORD
Use the numerical keys to set your personal 4-digit password. The default and master password is „0000“.
UK
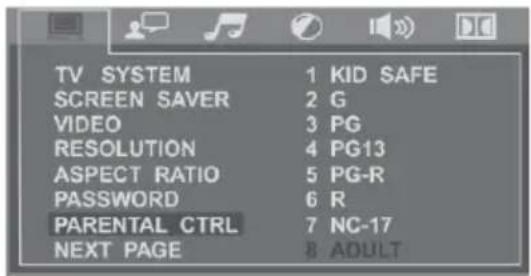
RATING
Use this option to set an appropriate rating to test strict viewing for children. The options available correspond to the film rating on the disc.
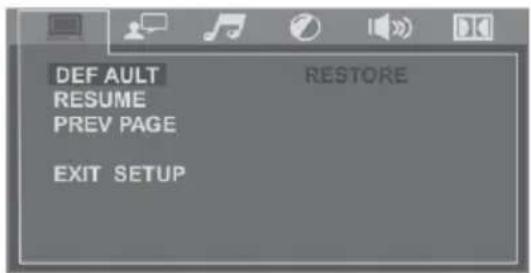
Default
Use this option to restore the default factory settings.
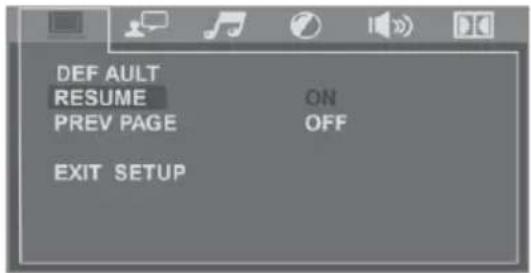
POWER RESUME
If this option is set to „ON“ and the power is turned off, the player will remember where it stopped and when the power is resumed, it will continue to play from that point.
LANGUAGE SETUP
Select options for your on-screen and menu language and subtitles.
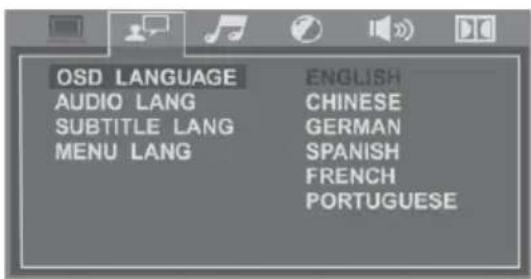
OSD LANGUAGE
Select a language to be used on on-screen display and setup menu.
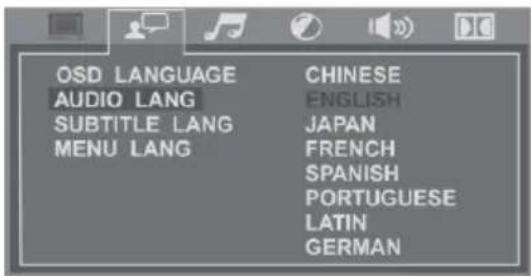
AUDIO LANGUAGE
Use this option to set the audio (dubbing) language.
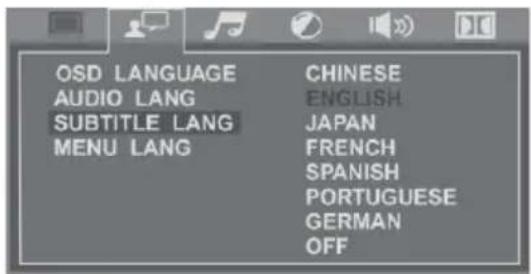
SUBTITLE LANGUAGE
Use this option to set the subtitle language, or choose „off“ to hide the subtitles.
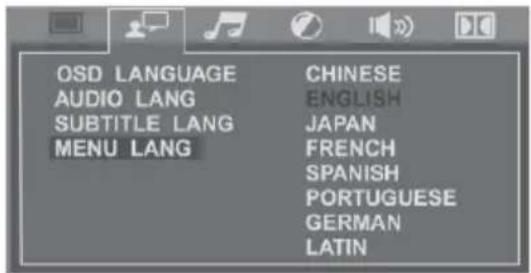
MENU LANGUAGE
Use this option to set the films menu language.
AUDIO SETUP
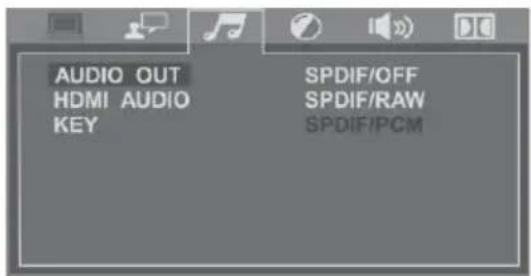
AUDIO OUT
Use this menu to select your audio output.
UK
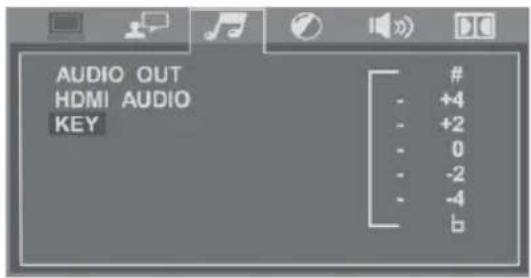
KEY
Use (UP/DOWN) arrows to adjust the key.
VIDEO SETUP
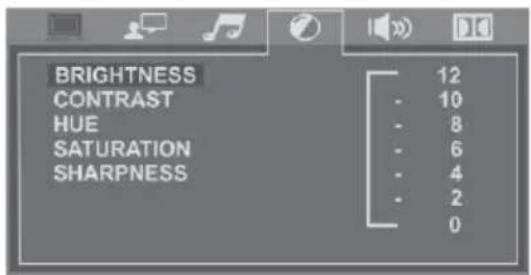
Under this menu you can select options for your image output.
Brightness
Use (UP/DOWN) arrows to adjust the brightness.
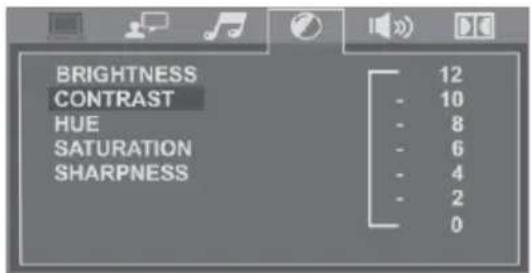
Contrast
Use (UP/DOWN) arrows to adjust the contrast.
Hue
Use (UP/DOWN) arrows to adjust the hue.
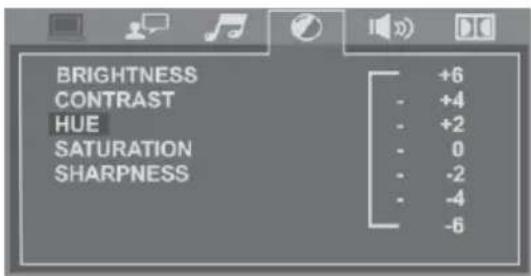
Saturation
Use (UP/DOWN) arrows to adjust the saturation.
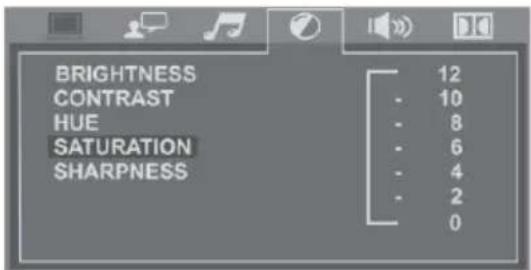
Sharpness
Use (UP/DOWN) arrows to adjust the sharpness.
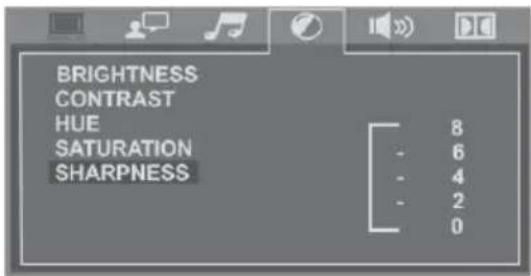
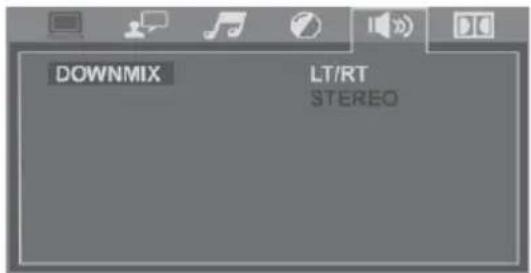
SPEAKER SETUP
Downmix
This setting is for Home Theater. If two channels is required, select the Stereo option.
DIGITAL SETUP
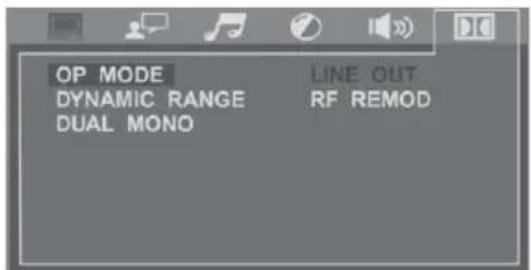
Use this menu to select digital setup options including OP, dynamic range and dual/mono.
OP MODE
• Select LINE OUT to decrease the volume.
• Select RF REMOD to set the volume higher.
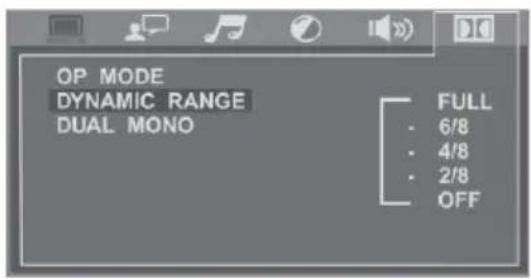
DYNAMIC RANGE
When LINE OUT is selected, use this setting to adjust the line out ratio for a different effect. The audio signal peak value will be at the minimum when set to Full; peak value will be at the maximum when set to Off.
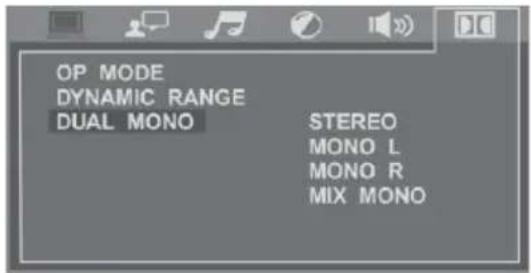
DUAL MONO
Choose this option to set up the lef (L) and right (R) mono output; there are four modes in this option.
RIPPING AND COPY
Note:
- The CD, MP3 disc must be in good condition with no scratches or marks in order to be played smoothly.
-
The destination USB device must be compatible with the DVD player and have enough space.
-
In CD playback mode, press the (COPY) button on the remote control to display the CD ripping interface.
- Use the arrow buttons (UP, DOWN, LEFT, RIGHT) to move around on the screen and select the options.
- Then press the (ENTER) button to enter the option/submenu or confirm your choice.
• (Fig.1) In the OPTIONS menu you can select a different speed or bitrate, or create or cancel a playlist.
- (Fig.2) In the TRACKS menu you can view the length oft he tracks. Press the (ARROW BUTTONS) to select a track, then press (ENTER) to confirm your selection. To select (or unselect) all tracks, move the highlight of the box on top oft he track box (see Fig.2) and press the (ENTER) button.
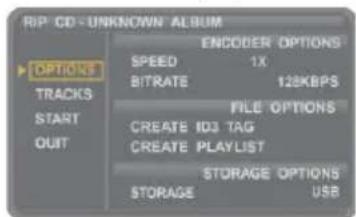
Fig.1
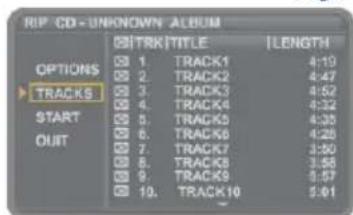
Fig.2
UK
• (Fig.3) In the START menu you can follow the progress of CD-ripping. Press the (ENTER) button to start the progress.
• (Fig.4) The screen will display the progress. To cancel or change the speed, press the (ENTER) button.
• (Fig.5) At the end oft he process, the screen will display RIPPING COMPLETE. Use the (DOWN) arrow button to select QUIT, then press (ENTER) to exit.
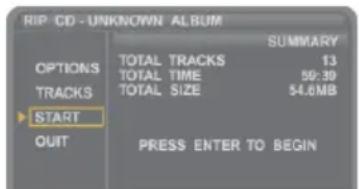
Fig.3
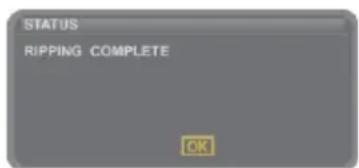
Fig.5
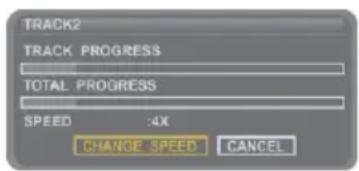
Fig.4
Copying from an Mp3 disc to a USB device
• Play the MP3 disc on the unit.
• Plug your USB device into the port at the front oft he unit.
• Use the DOWN/UO/LEFT/RIGHT arrow buttons to move the cursor on the screen.
- Press the COPY button to copy the highlighted playback file.
- During the copying process, you can follow the copying progress on the screen. It will display COPY FILE 1%-100%.
- At the end of the copying process, the screen will display CLOSE FILE. At this point, you can repeat the above operations to continue copying files.
MP3 disc playback
Follow the basic operating instructions for disc playback. Once an MP3 disc has been inserted, the player will automatically start searching for the information on the disc. When loading MP3 discs in succession, a navigation menu will appear; press the (RETURN) or (STOP) button to display the disc menu on the screen.
MP3 disc playback menu
![[001]001.MP3 01.001 02.002 03.003 04.004 05.005 06.006 07.007 08.008 09.009 001.001 002.002 003.003 004.004 005.005 006.006 007.007 008.008 009.009](/content/2026/05/838749/images/a417d12408ccd80cdd547c0475929e0ee2a47f7778fe7e6f5fccb63adb468632.jpg)
When in the menu, use the (UP/DOWN) arrow buttons together with the cursor to select the file, then press (ENTER) to confirm.
- When in the file, use the (UP/DOWN) arrow buttons and the cursor to select the file, then press (ENTER) to play the file.
- Use the (LEFT) arrow button and the cursor to return tot he previous menu. Press the (PREV/NEXT) button to go to the PREVIOUS/NEXT page.
JPEG (Picture CD) playback
The device can play picture CD discs in JPEG format.
- Insert the disc, the DVD player will automatically start searching the disc information and the main menu will appear on the TV screen.
- Press the (NUMBER) or the (ARROW BUTTONS) to select the picture for display, then press the (PLAY/PAUSE) button to display the picture.
- When playing a picture CD, the machine allows pause, repeat and browsing. Use the (NEXT) or (PREV) button to browse.
- Press the (ZOOM) button to enlarge a picture. While in zoom mode, press the fast forward (FFW) and backward (PREV) button to control the zoom scale. To move the view area oft he enlarged picture, use the (ARROW BUTTONS).
- In view mode, pictures can be rotated with the arrow buttons. The type of slide show transition can be selected from the navigation menu or simply by pressing (PROG).
USB playback
This DVD Player supports the following USB playback multimedia formats: MP3, AVI, DAT, JPEG.
- Insert your USB device firmly into the USB port at the front panel.
a) If there is no disc in the disc tray, the player will automatically play the multimedia files from the USB device.
b) If the player is in disc playing mode, press the (DVD/USB) button to switch to USB mode. A message will appear on the screen and prompt you to select Disc or USB mode. Use (UP/DOWN) arrow buttons to make your selection, then press ENTER to confirm.
- When the player enters USB multimedia file playback mode, the play menu interface will be displayed on the screen. Press the (ARROW BUTTONS) to mive the highlight to your selection, then press (ENTER) to confirm.
Music playback menu
![[061]001.MP3 01 001 02 002 03 003 04 004 05 005 06 006 07 007 08 008 09 009 001_001 002_002 003_003 004_004 005_005 006_006 007_007 008_008 009_009](/content/2026/05/838749/images/c541f4cd7f9dac50f24278de4c5443d253774ba104263c8cb79d4946d1ff2195.jpg)
Picture playback menu
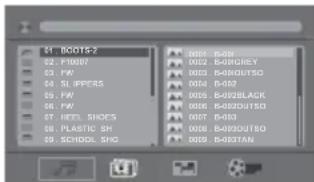
Video playback menu
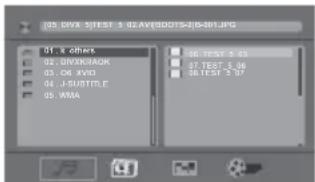
NOTE:
- If the USB device contains MP3 as well as other multimedia files, the DVD Player will give priority to MP3 files.
- When reading large files, the DVD Player may pause temporarily.
- Using a USB device that is unsupported by this DVD Player may cause problems with normal playback. In such a case, switch, off the power, take out the USB device and then reconnect the device and restart it.
- This unit supports USB 2.0, other USB devices may not work. Always check the format oft he USB devices.
SIMPLE TROUBLESHOOTING
If the DVD player fails, or the performance decreases sharply, check the device considering the following instructions: Also, check connected devices to find the source of the error. If the DVD player still does not work as expected, contact customer support.
No function
• Check whether the power cable is plugged in.
• Check whether the power cable is damaged.
No picture or sound
• Check the picture and sound settings.
- Check if the HDMI/AV cable is connected to the DVD player and your TV.
Poor image quality
• Check if the inserted disc is damaged.
• Check the picture settings of the connected TV.
No color
• Check the color setting on the connected TV set.
• Make sure that the connected cables are plugged in correctly.
The DVD player does not respond to the remote control
• Make sure there are no obstacles between the remote control and the DVD player.
• Make sure the remote control is within reach.
Make sure that the batteries in the remote control are full and inserted correctly.
DATA SHEET
| DATA SHEET DVD366 | ||
| Device type DVD366 | ||
| Manufacturer Reflexion | ||
| Power consumption "On" 10W | ||
| Power consumption standby <1,0W | ||
| HDMI output 720P, 1080i, 1080P | ||
| Power input AC: 100-240V~50/60Hz | ||
| Signal system/play mode NTSC / PAL / AUTO | ||
| Video output HDMI, Video | ||
| Sound output 2.1, Stereo, Mono L/R, Mix Mono | ||
| Connections | AC Power Input (230V) 1 | |
| HDMI 1 | ||
| AV (Cinch) 1 | ||
| Coax (digital audio out) | 1 | |
| DVD playback formats | DVD, DVD+R/-R, DVD+RW/-RW, VCD, CD, CD-R, CD-RW, VCD, HDCD, SVCD, Picture CD, MP3, AVI, DAT, JPEG, DVD-9 | |
| USB playback formats | AVI (MPEG-1, MPEG-2, MPEG-4), MP3, JPG, JPEG | |
| USB Specification | USB 2.0 / max. 32GB USB sticks | |
| USB File System Format | FAT, FAT32 | |
| OSD language | English / German / France etc.. | |
| Weight device | 0,66 Kg | |
| Dimensions device: (W / D / H) mm | 224 x 190 x 45mm | |
Design and specifications are subject to change without notice
SIMPLIFIED EU DECLARATION OF CONFORMITY
Hereby, UltraMedia GmbH & Co. Handels KG declares that the radio equipment type DVD366 is in compliance with Directive 2014/53 / EU.
The full text of the EU Declaration of Conformity can be requested at the following email address.
We hope you enjoy using the device.
Your UltraMedia team

DISPOSAL INSTRUCTIONS
This symbol on the product or in the instructions means that the device as well as electrical and electronic devices and batteries must be disposed of separately from your household waste at the end of its service life. There are separate collection systems for recycling in the EU. For more information, please contact your local authority or your dealer.
BATTERIES AND RECHARGEABLE BATTERIES MUST NOT BE DISPOSED OF WITH HOUSE HOLD WASTE! NON-PROFESSIONAL DISPOSAL OF BATTERIES AND RECHARGEABLE BATTERIES CAUSES ENVIRONMENTAL POLLUTION / DAMAGE.
EVERY CONSUMER IS REQUIRED BY LAW TO RETURN BATTERIES AND ACCUMULATORS AT THE END OF THEIR WORKING LIFE CYCLE TO APPROPRIATE COLLECTION POINTS, SUCH AS THEIR MUNICIPALITY/BOROUGH OR RETAIL OUTLET.
DROP-OFF AT COLLECTION POINTS IS FREE OF CHARGE. BY HANDING THEM IN AT COLLECTION POINTS, BATTERIES AND ACCUMULATORS ARE RECYCLED AND THUS DISPOSED OF IN AN ENVIRONMENTALLY FRIENDLY WAY.
DISPOSING OF BATTERIES AND RECHARGEABLE BATTERIES IN HOUSEHOLD WASTE DOES NOT ENSURE ENVIRONMENTALLY FRIENDLY DISPOSAL AND MAY CAUSE DAMAGE TO THE ENVIRONMENT.
BATTERIES AND ACCUMULATORS MUST BE REMOVED FROM THE DEVICE BEFORE DISPOSAL. PLEASE RETURN ONLY IN DISCHARGED CONDITION!
*) MARKED WITH:
CD = CADMIUM,
HG = MERCURY,
PB = LEAD
WARRANTY
Dear Customer,
Thank you for choosing one of our products. Our products undergo precise quality control in the course of production. If one of our devices gives you cause for complaint, or you have questions about one of our devices, please call our customer support.
We give a 36 month warranty on TV and SAT devices, and a 24 month warranty on portable DVD and audio devices from the date of purchase. Outside of the warranty, we offer you a paid repair based on a cost estimate. Please contact our customer support before submitting.
The warranty relates to material and production defects. Your device will be repaired or replaced during the warranty period. Unfortunately, UltraMedia cannot reimburse the purchase price. Damage caused by improper use, the use of third-party accessories, falls, dust, water damage and signs of wear (e.g. scratches, optical wear and tear) caused by the customer or external influences are excluded from the guarantee.
In order to assert the warranty claims, send the device with all accessories, a copy of the invoice and the description of the fault to the address given below. Devices that do not have a proof of purchase cannot be guaranteed. Please do not forget to include your full address and a telephone number / email address for any queries.
Shipping to us takes place at your own expense. Unpaid parcels cannot be accepted and are returned to the sender.
Please pack the device securely for transport. UltraMedia assumes no liability for damage in transit that occurs on the way to us. After receiving your submission, we will process your device as soon as possible and send it back to you.
Before sending your device in, please contact our customer support or your specialist dealer, as many problems can also be solved over the phone.

- On-screen Display (OSD)
- SPRACH-EINSTELLUNG
- OSD-SPRACHE
- SAFETY INFORMATION
- Follow the instructions below:
- IMPORTANT SAFETY INSTRUCTIONS
- WHAT IN THE BOX?
- CONTROL PANEL ON THE DEVICE
- CONNECTION DIAGRAM
- Connect and switch on:
- REMOTE CONTROL
- TECHNICAL FEATURES
- Playing a disc
- Note: for composite only
- Basic playback controls
- Notes:
- Play mode (N/P): for composite only
- Subtitles
- Angle
- Language
- TITLE
- Menu/PBC
- Numerical Keys
- Direction keys
- Time
- REPEAT
- DVD
- CD
- Repeat from A-B
- Zoom
- Channel (L/R)
- Volume and mute
- Program (Prog)
- UK
- Slow
- Clear
- Step
- SETUP OPTIONS
- TV SYSTEM: for composite only
- SCREEN SAVER
- VIDEO
- RESOLUTION
- TV TYPE
- Note:
- PASSWORD
- RATING
- Default
- POWER RESUME
- LANGUAGE SETUP
- OSD LANGUAGE
- AUDIO LANGUAGE
- SUBTITLE LANGUAGE
- MENU LANGUAGE
- AUDIO SETUP
- AUDIO OUT
- KEY
- VIDEO SETUP
- Brightness
- Contrast
- Hue
- Saturation
- Sharpness
- SPEAKER SETUP
- Downmix
- DIGITAL SETUP
- OP MODE
- DYNAMIC RANGE
- DUAL MONO
- RIPPING AND COPY
- Copying from an Mp3 disc to a USB device
- MP3 disc playback
- JPEG (Picture CD) playback
- USB playback
- SIMPLE TROUBLESHOOTING
- No function
- No picture or sound
- Poor image quality
- No color
- The DVD player does not respond to the remote control
- SIMPLIFIED EU DECLARATION OF CONFORMITY
- DISPOSAL INSTRUCTIONS
- WARRANTY
Brand : Reflexion
Model : DVD366
Category : DVD player