
DVD7052 - DVD player Reflexion - Free user manual and instructions
Find the device manual for free DVD7052 Reflexion in PDF.


| Product Type | Portable Dual DVD Player |
| Brand | Reflexion |
| Model | DVD7052 |
| Power Supply (Main Unit) | AC 100-240V 50/60Hz (Adapter Input) |
| Adapter Output | DC 9V 1.5A |
| Battery Type | Integrated rechargeable battery |
| Battery Runtime | Approx. 1.5 hours |
| Charging Time | Up to 2 hours |
| Display Resolution | 800 x 480 pixels |
| Supported Disc Formats | DVD, DVD±R/RW, CD, CD-R/RW, VCD, SVCD, MP3, WMA, JPEG |
| USB Playback Formats | MPEG, MP4, VOB, DAT, MP3, JPEG |
| USB Version | USB 2.0 (max 32 GB) |
| Audio Output | 1.0 Vrms (1KHz, 0dB), 2x 1W speakers, headphone jack |
| Video Output | 1 Vp-p (75 Ohm), AV out |
| Dimensions (Approx.) | 25 x 18 x 4 cm (main unit) |
| Weight (Approx.) | 1.0 kg (including battery) |
| Safety Class | Class II (double insulated) |
| Accessories Included | Main monitor, second monitor, connecting cable, power supply, remote control (CR2025 battery), car adapter, 2x mounting straps, user manual |
| Warranty | 24 months (portable DVD) |
| Special Features | Dual screens, built-in rechargeable battery, headrest mounting, parental lock, password protection |
Frequently Asked Questions - DVD7052 Reflexion
User questions about DVD7052 Reflexion
0 question about this device. Answer the ones you know or ask your own.
Ask a new question about this device
Download the instructions for your DVD player in PDF format for free! Find your manual DVD7052 - Reflexion and take your electronic device back in hand. On this page are published all the documents necessary for the use of your device. DVD7052 by Reflexion.
USER MANUAL DVD7052 Reflexion
Dual-DVD-Player
Model-Nr.: DVD7052
natural_image
Line drawing of two connected monitors with cables, no text or symbols presentALLGEMEİNE SETUP SEİTE
USER MANUAL (ENGLISH)
Dual-DVD-Player
Model-No.: DVD7052
natural_image
Line drawing of two connected monitors with cables, no text or symbols presentRead the entire manual of the appliance carefully before using the appliance. Keep the instructions in a safe place for future reference.

IMPORTANT SAFETY INSTRUCTIONS
- Warning: To reduce the risk of electric shock, do not open the unit. There are no serviceable parts inside the unit. Always contact the manufacturer's service department.
- Warning: To prevent fire or electric shock, do not expose this appliance to rain or moisture.
- The appliance must not be exposed to dripping or splashing water. Do not place objects filled with liquids, such as vases, on the unit.
- Do not expose the player to direct sunlight or heat sources such as radiators or stoves.
- Do not cover any ventilation openings. Slots and openings are for ventilation. Do not place the unit on blankets, pillows or sofas as this may cover the openings.
- Place the unit only on flat and stable surfaces, otherwise the unit may fall and cause damage or injury.
- Never place heavy or pointed objects on the LCD screen or on the cabinet.
- Use only the mains adapter supplied. Use of any other mains adapter will invalidate any warranty.
- The mains plug of the adapter is used to interrupt the power supply and must be accessible.
- Unplug the mains plug when not in use.
- Pay attention to environmental aspects when disposing of the battery.
- Caution: An incorrectly inserted battery can explode. Replace only with the same or similar type of battery.
- Warning: The battery shall not be exposed to high temperatures such as direct sunlight, fire, etc.
- Warning: Excessive volume may cause hearing loss.
- Warning: Only use attachments and accessories recommended by the manufacturer.

To prevent hearing damage, avoid prolonged listening at a higher volume. Read the operating instructions completely. Make sure that the unit is switched off when left unattended.

This appliance is a Class II or double insulated electrical appliance. It does not require a safety connection to electrical earth.
- Warning: This digital video disc player uses a laser system. Control or adjustments other than those specified in this manual may result in hazardous radiation exposure.
- Warning: To avoid direct exposure to the laser beam, do not open the cabinet. Visible laser radiation when the housing is open.
- Warning: Never look into the laser beam.
- Caution: Do not place this unit in an enclosed space, such as a bookshelf.
- Warning: If the unit is used by a child, parents must make sure that the child understands the operating instructions and how to handle the battery so that the unit is always used correctly.
-
Warning: If the battery overheats, swells or there is a release of odour, please stop using the battery. Please replace the battery.
-
Warning: Do not charge the Integrated Battery in places with insufficient ventilation or on cushions, sofas, mattresses, etc.
- Warning: We accept no responsibility for any damage resulting from misuse or failure to observe the warning label on the unit casing.
- Warning: Do not use a USB extension cable longer than 250mm on the USB socket.
- Warning: Do not swallow the battery supplied with the remote control. There is a risk of chemical burns. If the coin cell battery is swallowed, severe internal burns can occur in as little as 2 hours, resulting in death. Keep new and used batteries away from children. If the battery compartment does not close properly, stop using the remote control and keep it away from customers. If batteries are swallowed, seek medical attention immediately.
Headphone warning notice:
Set the volume of the unit to minimum before using headphones. If the volume is set too high, it can impair / damage your hearing over a long period of time. Therefore, to protect your hearing, use a comfortable room volume.
Note on copyright
It is prohibited by law to copy, broadcast, display, cablecast, publicly perform or rent copyrighted material without permission. This product uses the copy protection function developed by Macrovision. Copy protection signals have been recorded on some discs.
Picture noise occurs during recording and playback of this disc. This product incorporates copy protection technology that is protected by U.S. patents and other patents and other intellectual property owned by Macrovision Corporation and others. Use of this protection technology must be intended for home and other limited viewing uses unless otherwise authorized by Macrovision Corporation. Reverse engineering and disassembly are not permitted.
Serial number
You will find the serial number on the back of the unit. This number applies exclusively to this unit and is not used for other units. You should note the data here and keep these instructions together with the proof of purchase.
Model-No.:
Serial-No.:
Purchase date:

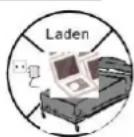

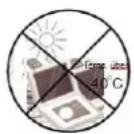
BATTERY CHARGING PROCESS
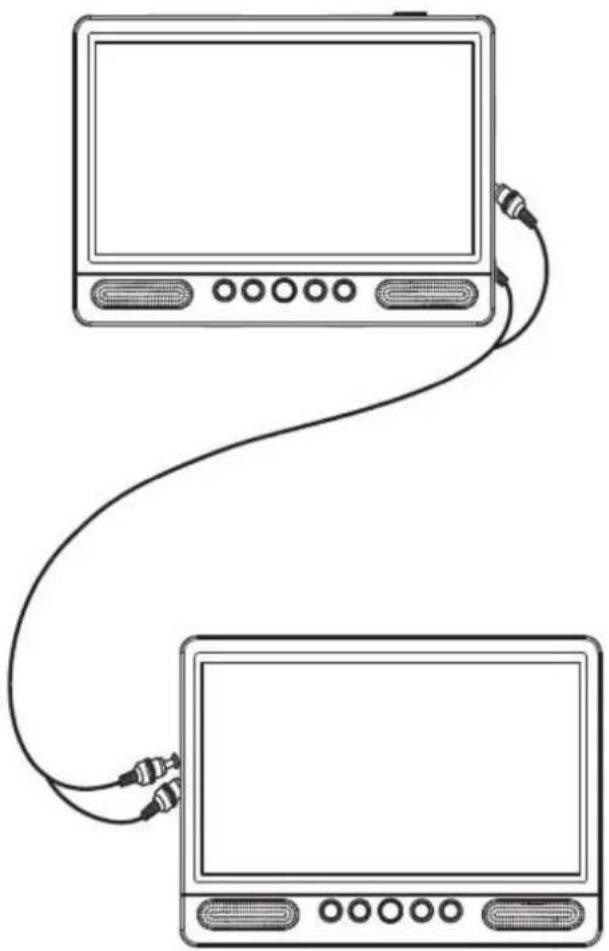
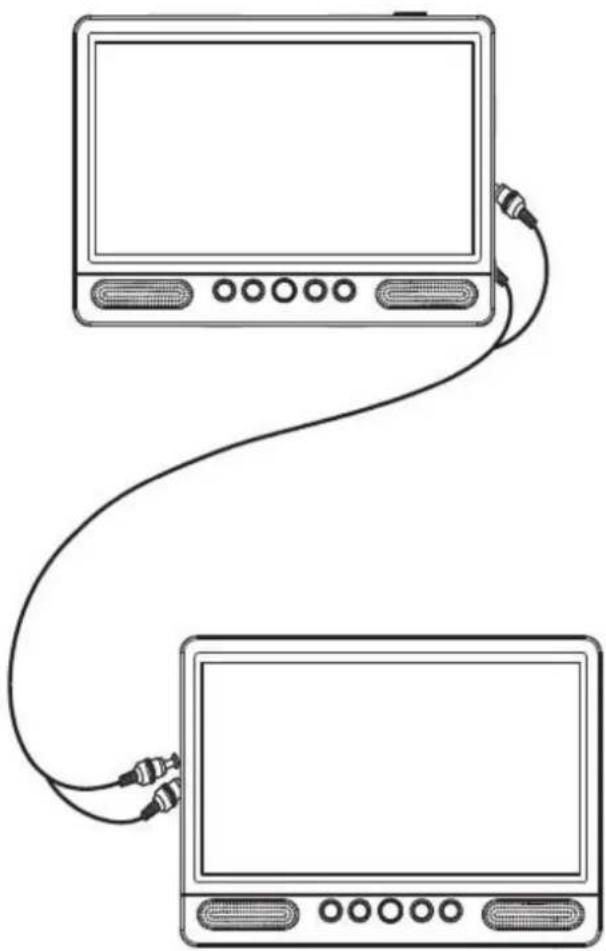
Fully charge the battery of the main unit and the second monitor before using the unit for the first time. To do this, connect the main unit and the second monitor with the connection cable included in the scope of delivery. Then plug the power supply unit into the DC IN socket and the power outlet.
Note:
- Please note that the unit may only be connected to a compatible voltage source (DC 9V 1.5A) as specified on the unit type plate and in the operating instructions. Use of a voltage other than that specified may result in malfunction or defect and will invalidate the warranty.
-
Only use original accessories.
-
During operation, a red LED lights up in the left loudspeaker of the main unit.
- When charging the unit, a green LED flashes.
- When charging is complete, the LED is constantly green.
Note:
- Charging may take up to 2 hours.
- Once the charging process is complete, disconnect the mains cable from the device.
- To ensure that the battery contained in the device can always show its full performance and is not damaged, we recommend fully charging the integrated battery once a month even when not in use.
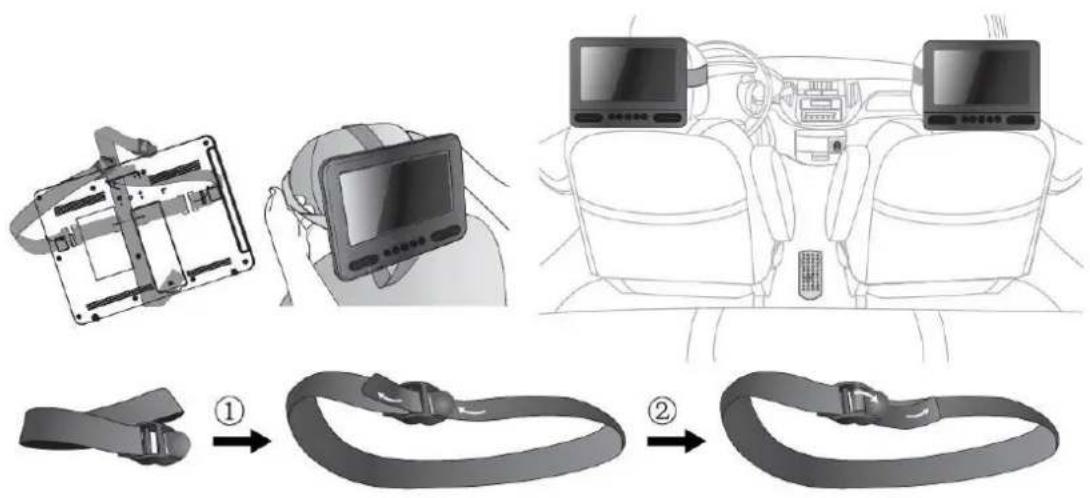
MOUNTING IN THE VEHICLE
Use the supplied car fastening straps to attach the main unit and the and monitor to the back of the front seat head restraints.
head restraints. Tighten the mounting straps around the head restraints. tighten the mounting straps around the head restraints.
Dear Customer,
Thank you for purchasing this portable DVD player. When you open the box for the first time, please make sure that all the accessories are present. Before connecting any parts and power supply, please read the instruction manual and keep the manual near your portable DVD player at all times.
Note:
- If the package contents are incomplete, please contact your dealer as soon as possible.
WHAT'S IN THE BOX?
| 1x Main monitor | 1x Connecting cable |
| 1x Second monitor | 1x Power supply |
| 1x Remote control (incl. CR2025 battery) | 1x User manual |
| 1x Car adapter | 2x pair of fastening straps |
Hinweis:
- SETUP
- ▲ / |<< (Up / Previous title)
- ▼ / >>| (Down / Next title)
- ENTER
- ◀ / VOL- (Left / Volumg down)
- ▶ / VOL+ (Right / Volume up)
- SOURCE
- ON / OFF
- USB jack
- Headphone jack
- AV OUT
- DC OUT
- DC IN 9-12V
Zweiter-Monitor
- MUTE
- ▲ (Up)
- ▼ (Down)
- MODE
- ◀ (Left)
- ▶ (Right)
- BACK LIGHT (Display On / Off)
- DC IN 9-12V
- AV IN
- Headphone jack
- ON / OFF
REMOTE CONTROL: REPLACING THE BATTERY
When using the unit for the first time, pull out the transparent plastic battery transport lock at the bottom of the remote control.
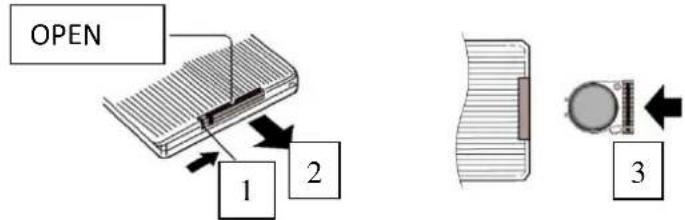
- Slide the lower left corner (1) to the right.
- Then pull out the battery holder (2) and remove the old battery from the battery tray and insert the new battery. Make sure that the polarity is correct when inserting the battery. The + side of the battery points upwards.
- Now push the battery slide back into the remote control (3).
Note:
- Remove the battery from the remote control during storage or prolonged non-use of the DVD player.
BUTTONS ON THE REMOTE CONTROL
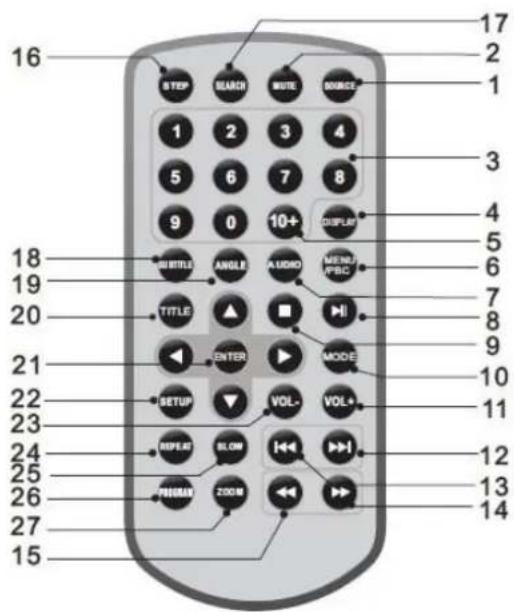
- SOURCE: DVD / CARD / USB
- MUTE: Mute Sound
- 0-9 ZIFFERN TASTEN: Select the TV channels
- DISPLAY: Displays the playing time and status information
- 10+ Taste: To select a track that is ranked 10 or higher, as an example: you want to select track 12, then press the 10+ button and then the 2, you quickly select track 12.
- MENU / PBC: Open the DVD main menu (DVD). Switch PBC on/off (VCD).
- AUDIO: DVD: Press the audio key to select a different language or audio track, if available. MP3 / CD / VCD: Press the audio key to listen to different channels. (Left, Right, Mix, Stereo).
- PLAY/PAUSE (▶ II): Press the PLAY/PAUSE button once to pause playback and a second time to restart it.
- STOP (■): If you press the STOP button once, playback is interrupted. You can continue playback at that point by pressing the Play button. Press the STOP button twice in succession to delete the playback point.
- MODE Adjusts the screen setting (brightness, contrast and saturation).
- VOL+ Turns up the volume.
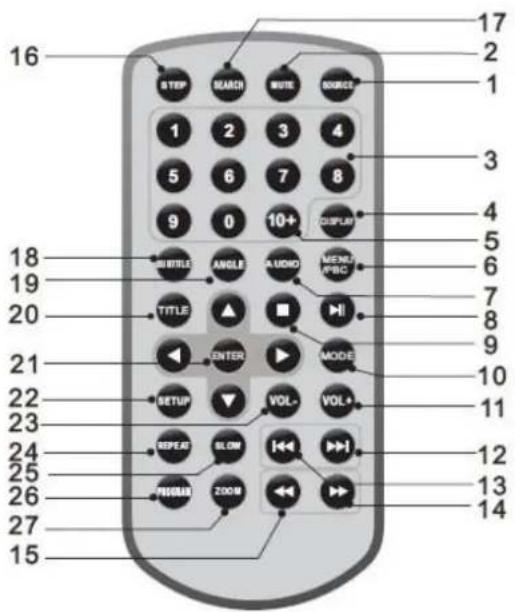
- Selects the next title or chapter.
-
Selects the previous title or chapter.
-
This allows you to fast-forward the playback. (2x > 4x > 8x > 16 > 32 > Play). When you press the Play button, playback starts at normal speed.
-
◀: This allows you to rewind the playback. (2x > 4x > 8x > 16 > 32 > Play). When you press the Play button, the playback starts at normal speed.
-
STEP: Single frame playback in DVD mode.
-
SEARCH: Direct search for playback point, title or chapter in DVD mode.
-
SUBTITEL (Untertitel): DVD: Select between the available subtitle languages by pressing the key several times.
-
ANGLE: Use the button to change the viewing angle on DVDs that support this function.
-
TITLE: Back to the DVD title menu.
-
ENTER: Confirmation of the menu selection.
-
SETUP: Open or close the settings menu.
-
VOL:- Lower the volume.
-
REPEAT: Press the REPEAT button to select the type of repeat.
DVD modes: Chapter, Title, Off.
VCD Modes: Single, All, Off.
CD/MP3 Modes: Single, Folder, Off..
-
SLOW: Slow motion (1/2, 1/4, 1/8, 1/16 and normal).
-
PROGRAM: DVD/VCD: Here you can save your favourites. Press the programme key to open the Favourites menu. Now you can directly save the number of your favourite and the playback option with the number fields. To return to normal playback mode, press the PROGRAM key again to exit the menu.
-
ZOOM: Each time you press ZOOM, the TV display changes as follows: 2x size, 3x size, 4x size, 1/2, 1/3, 1/4.
JPEG: Press ZOOM, then ▶to enlarge or

reduce the picture. Use the buttons ▲▼◀▶
to move around the picture.
SETTING SETUP MENU
Press the "SETUP" key to open the main menu. Use the direction keys to select the desired menu item. After completing the setting, press the "SETUP" key to close the menu.
GENERAL SETUP PAGE
General setup page
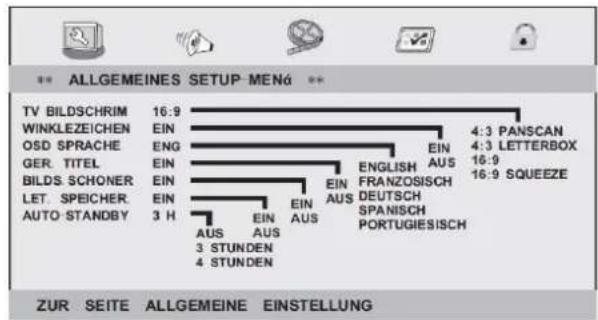
Selects the aspect ratio of the image playback. Adjust the aspect ratio of the desired setting.
The following settings are available:
4: 3 PANSCAN / 4: 3 LETTER BOX / 16: 9 / PILLOWBOX
ANGLE MARK:
Displays the current angle setting information in the right corner of the TFT screen, if available on the disc.
SCREEN LANGUAGE:
Sets the language of menus and displays on the screen.
SUBTITLE FOR HARD HEARING
If present on the DVD, the output of invisible subtitles output in the image sets. Your TV needs a subtitle decoder. Usually only available on US DVDs.
SCREEN SAVER:
Set the screen saver On or Off.
AUTO STANDBY:
Sets the time after which the unit should automatically go into standby mode.
• Off: Auto Standby is disabled and the device stays.
- On 3 hours / 4 hours: The device switches to standby mode after 3 or 4 hours if the device is not operated within this time.
AUDIO SETUP PAGE
Audio setup page
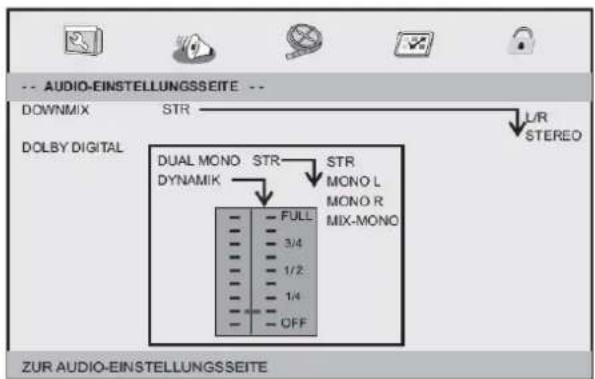
DOWNMIX
Sets the analog stereo output of your DVD player.
• L/R: Select this option if the DVD player is connected to a Dolby Pro-Logic decoder.
- Stereo: Select this option when playing through two front speakers.
DOLBY DIGITAL
- The DOLBY DIGITAL setting options are DUAL, MONO, and DYNAMIC.
DUAL MONO
STEREO:
- The left mono sound is played on the left and the right mono sound is played on the right speaker or output.
MONO L:
- The left mono sound is played back on the left and right speakers or output.
MONO R:
- The right mono sound is played back on the left and right speakers or output.
MIX MONO:
- The mixed left and right mono sound is played back on both speakers and outputs.
Dynamik:
Sets the dynamic compression from full (FULL) to off (OFF).
VIDEO SETUP PAGE
Video setup page
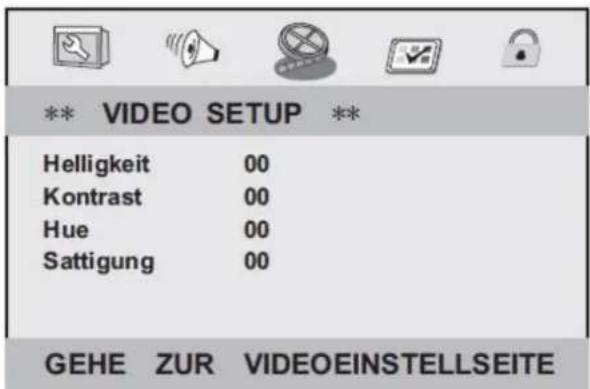
VIDEO SETUP
You can change the video settings: BRIGHTNESS, CONTRAST, COLOR, COLOR INTENSITY.
PREFERRED SETTINGS
Preferred settings
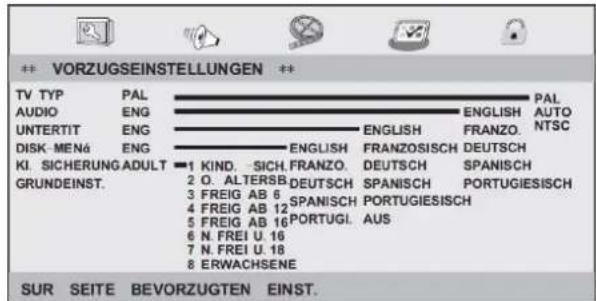
TV SYSTEM:
- Select the color system on the AV output that matches your TV. This DVD player is compatible with PAL and NTSC.
- PAL: Select this option if the connected TV uses the PAL system. It changes the video signal of an NTSC disc and the output is in PAL format.
- NTSC: Select this option if the connected TV uses the NTSC system. It changes the video signal of a PAL disc and the output is in NTSC format.
AUTO:
Changes the output video signal according to the disc.
AUDIO
Selects the audio language if present on the disc.
SUBTITLE
Selects the language for the subtitle, if present on the disc.
DISK MENU
Selects the language of the menus of the disc, if present on the disc.
PARENTAL LOCK
Some DVDs may have a control level for some scenes or the whole DVD. This function lets you adjust the playback level. There are 8 levels and these are country dependent. This allows you to lock the playback of some discs or scenes that are not suitable for your children.
Note:
• Mostly not available on European discs. Step information for the USA.
DEFAULT SETTING
Restore the factory settings of the setup menu.
PASSWORD SETTING PAGE
Password setting page
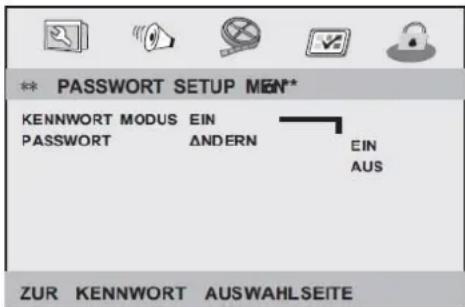
PASSWORD MODE
Asks for the password in the parent control and other settings.
PASSWORD
Here you can assign a new password.
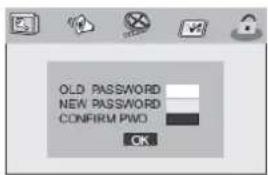
The default password is: 1369
1. OLD PASSWORD:
Enter the old password.
2. NEW PASSWORD:
Enter the new 4-digit password using the number keys on the remote control.
3. CONFIRM PASSWORD:
Enter the new password again. If the entries match, the entry jumps to OK.
4. OK:
Now press the ENTER button on the remote control to confirm.
Note:
- If you change the password, the password mode is also changed. The preset password 1369 always works, even if the password has been changed.
SETTING MENU- SECOND MONITOR
Picture settings
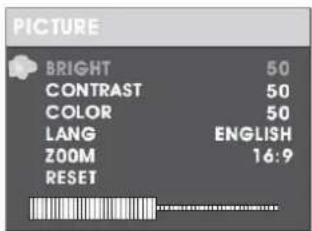
Brightness:
Adjust the screen brightness.
Contrast:
Adjust the screen contrast.
Colour:
Adjust the screen colour setting.
Language:
Selecting the display language.
Aspect Ratio:
Setting the screen to 16:9 or 4:3.
Screen:
Set screen aspect ratio to 16:9 or 4:3.
TECHNICAL DATA
| Power supply | Input | AC 100 – 240V 50/60Hz |
| Output | DC 9V 1,5A | |
| Operating air humidity | 5% - 90% | |
| Output | Video output | 1 Vp-p (75Ohm) |
| Audio output | 1.0 Vrms (1KHz, 0dB) | |
| Audio | Loudspeaker: 2x 1W, headphone output coaxial | |
| Battery run time | Approx. 1.5 hours | |
| Resolution | 800 x 480 | |
| USB | Version 2.0 / max. 32Gb | |
| Playback formats | Disk: DVD, DVD-R/-RW, DVD+R/+RW, CD, MP3, CD-R/-RW, WMA, VCD, SVCD, JPEGUSB: MPEG, MP4, VOB, DAT, MP3, JPEG | |
| System | ||
| Laser | Semiconductor laser, wavelength 650nm | |
| Colour system | NTSC, PAL | |
| Frequency range | 20Hz – 20KHz (1dB) | |
| Signal-to-noise ratio | >80dB (nur Analog OUT) | |
| Dynamic range | >80dB (DVD/CD) | |
Note: Specifications and design are subject to change without notice.
SIMPLIFIED EU DECLARATION OF CONFORMITY
Hereby, UltraMedia GmbH & Co. Handels KG declares that the radio equipment type DVD7052 is in compliance with Directive 2014/53 / EU.
The full text of the EU Declaration of Conformity can be requested at the following email address.
We hope you enjoy using the device.
Your UltraMedia team
CE
DISPOSAL INSTRUCTIONS

This symbol on the product or in the instructions means that the device as well as electrical and electronic devices and batteries must be disposed of separately from your household waste at the end of its service life. There are separate collection systems for recycling in the EU. For more information, please contact your local authority or your dealer.
BATTERIES AND RECHARGEABLE BATTERIES MUST NOT BE DISPOSED OF WITH HOUSEHOLD WASTE! NON-PROFESSIONAL DISPOSAL OF BATTERIES AND RECHARGEABLE BATTERIES CAUSES ENVIRONMENTAL POLLUTION / DAMAGE.
EVERY CONSUMER IS REQUIRED BY LAW TO RETURN BATTERIES AND ACCUMULATORS AT THE END OF THEIR WORKING LIFE CYCLE TO APPROPRIATE COLLECTION POINTS, SUCH AS THEIR MUNICIPALITY/BOROUGH OR RETAIL OUTLET.
DROP-OFF AT COLLECTION POINTS IS FREE OF CHARGE. BY HANDING THEM IN AT COLLECTION POINTS, BATTERIES AND ACCUMULATORS ARE RECYCLED AND THUS DISPOSED OF IN AN ENVIRONMENTALLY FRIENDLY WAY.
DISPOSING OF BATTERIES AND RECHARGEABLE BATTERIES IN HOUSEHOLD WASTE DOES NOT ENSURE ENVIRONMENTALLY FRIENDLY DISPOSAL AND MAY CAUSE DAMAGE TO THE ENVIRONMENT.
BATTERIES AND ACCUMULATORS MUST BE REMOVED FROM THE DEVICE BEFORE DISPOSAL. PLEASE RETURN ONLY IN DISCHARGED CONDITION!
*) MARKED WITH:
CD = CADMIUM,
HG = MERCURY,
PB = LEAD
WARRANTY
Dear Customer,
Thank you for choosing one of our products. Our products undergo precise quality control in the course of production. If one of our devices gives you cause for complaint, or you have questions about one of our devices, please call our customer support.
We give a 36 month warranty on TV and SAT devices, and a 24 month warranty on portable DVD and audio devices from the date of purchase. Outside of the warranty, we offer you a paid repair based on a cost estimate. Please contact our customer support before submitting.
The warranty relates to material and production defects. Your device will be repaired or replaced during the warranty period. Unfortunately, UltraMedia cannot reimburse the purchase price. Damage caused by improper use, the use of third-party accessories, falls, dust, water damage and signs of wear (e.g. scratches, optical wear and tear) caused by the customer or external influences are excluded from the guarantee.
In order to assert the warranty claims, send the device with all accessories, a copy of the invoice and the description of the fault to the address given below. Devices that do not have a proof of purchase cannot be guaranteed. Please do not forget to include your full address and a telephone number / email address for any queries.
Shipping to us takes place at your own expense. Unpaid parcels cannot be accepted and are returned to the sender.
Please pack the device securely for transport. UltraMedia assumes no liability for damage in transit that occurs on the way to us. After receiving your submission, we will process your device as soon as possible and send it back to you.
Before sending your device in, please contact our customer support or your specialist dealer, as many problems can also be solved over the phone.

- Dual-DVD-Player
- Model-Nr.: DVD7052
- ALLGEMEİNE SETUP SEİTE
- USER MANUAL (ENGLISH)
- Model-No.: DVD7052
- IMPORTANT SAFETY INSTRUCTIONS
- Headphone warning notice:
- Note on copyright
- Serial number
- BATTERY CHARGING PROCESS
- Note:
- MOUNTING IN THE VEHICLE
- Hinweis:
- Zweiter-Monitor
- REMOTE CONTROL: REPLACING THE BATTERY
- BUTTONS ON THE REMOTE CONTROL
- SETTING SETUP MENU
- GENERAL SETUP PAGE
- ANGLE MARK:
- SCREEN LANGUAGE:
- SUBTITLE FOR HARD HEARING
- SCREEN SAVER:
- AUTO STANDBY:
- AUDIO SETUP PAGE
- DOWNMIX
- DOLBY DIGITAL
- DUAL MONO
- STEREO:
- MONO L:
- MONO R:
- MIX MONO:
- Dynamik:
- VIDEO SETUP PAGE
- VIDEO SETUP
- PREFERRED SETTINGS
- TV SYSTEM:
- AUTO:
- AUDIO
- SUBTITLE
- DISK MENU
- PARENTAL LOCK
- DEFAULT SETTING
- PASSWORD SETTING PAGE
- PASSWORD MODE
- PASSWORD
- OLD PASSWORD:
- NEW PASSWORD:
- CONFIRM PASSWORD:
- OK:
- SETTING MENU- SECOND MONITOR
- Picture settings
- Brightness:
- Contrast:
- Colour:
- Language:
- Aspect Ratio:
- Screen:
- SIMPLIFIED EU DECLARATION OF CONFORMITY
- DISPOSAL INSTRUCTIONS
- WARRANTY
Brand : Reflexion
Model : DVD7052
Category : DVD player