
Wezzer Plus LP30 - Weather Station Levenhuk - Free user manual and instructions
Find the device manual for free Wezzer Plus LP30 Levenhuk in PDF.


| Product Type | Weather Station |
| Brand | Levenhuk |
| Model | Wezzer Plus LP30 |
| Base Station Dimensions | 208 x 43 x 210 mm (8.1 x 1.6 x 8.2 in) |
| Base Station Power Supply | 3 AAA batteries (not included) |
| Remote Sensor Dimensions | 40 x 21 x 120 mm (1.5 x 0.8 x 4.7 in) |
| Remote Sensor Power Supply | 2 AAA batteries (not included) |
| Remote Sensor Radio Frequency | 433.92 MHz |
| Wireless Range | 100 m (328 ft) in open area |
| Indoor Temperature Range | 0 to +50 °C (+32 to +122 °F) |
| Outdoor Temperature Range | -30 to +60 °C (-22 to +140 °F) |
| Outdoor Humidity Range | 20 to 95% |
| Temperature Units | °C / °F |
| Time Format | 12 h / 24 h |
| Weekday Language | English |
| Display Type | Monochrome LCD |
| Weather Forecast Icons | Sunny, Partly Cloudy, Cloudy, Rainy, Snowy |
| Memory Function | MAX/MIN temperature records |
| Number of Channels | Up to 3 (1 sensor included) |
| Warranty | International Lifetime Warranty (product), 6 months (accessories) |
Frequently Asked Questions - Wezzer Plus LP30 Levenhuk
User questions about Wezzer Plus LP30 Levenhuk
0 question about this device. Answer the ones you know or ask your own.
Ask a new question about this device
Download the instructions for your Weather Station in PDF format for free! Find your manual Wezzer Plus LP30 - Levenhuk and take your electronic device back in hand. On this page are published all the documents necessary for the use of your device. Wezzer Plus LP30 by Levenhuk.
USER MANUAL Wezzer Plus LP30 Levenhuk
Levenhuk Wezzer PLUS LP30 Thermometer
EN User Manual
The kit includes: base station, sensor, user manual, and warranty.
Also required (not included):
2 AAA batteries for the sensor
3 AAA batteries for the base station
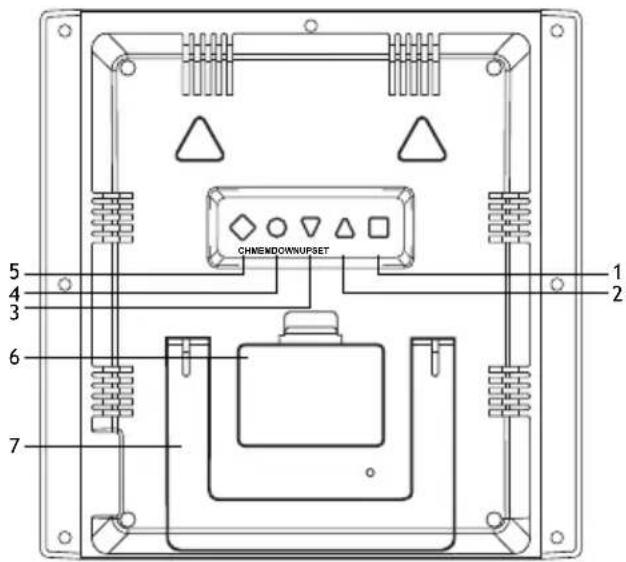
Parts overview
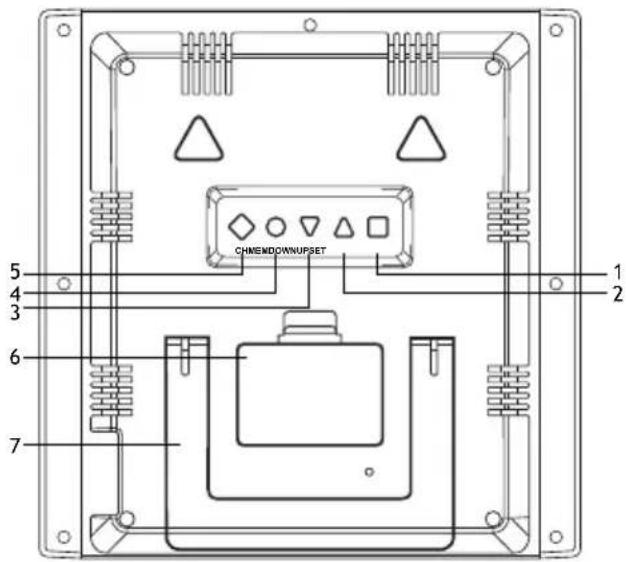
Base station
- SET button
- UP button
- DOWN button
- MEM button
- CH button
- Battery compartment cover
- Table stand (fold-out)
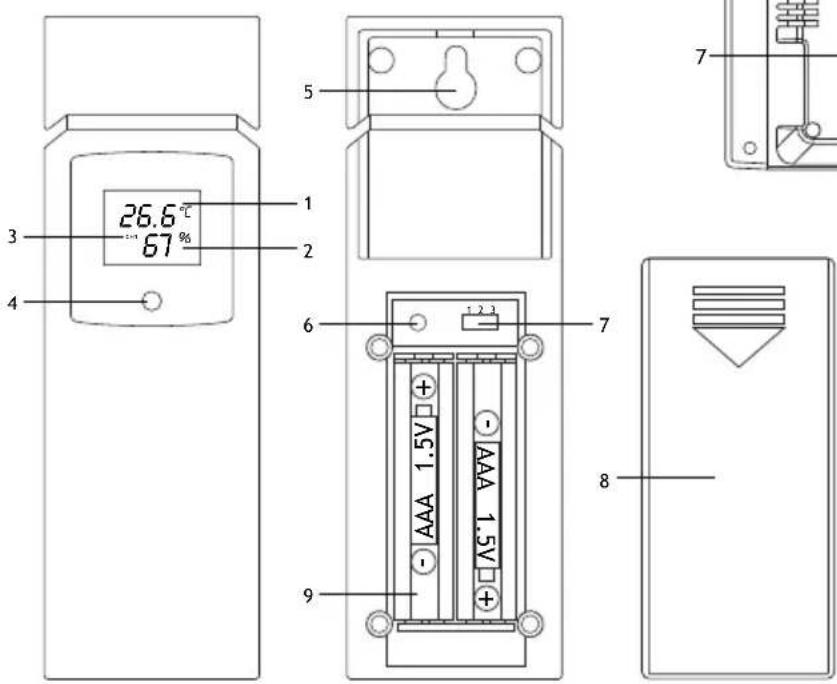
Sensor
- Temperature
- Humidity
- Current channel
- LED indicator
- Wall mount hole
- RESET button
- Channel switch (1–3)
- Battery compartment cover
- Battery compartment
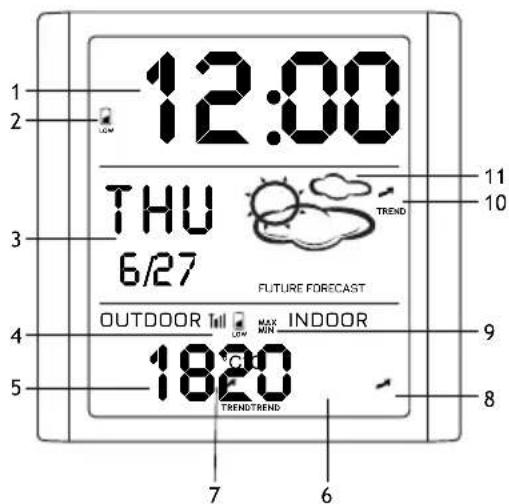
Interface icons
- Time display
- Low battery indicator
- Calendar and week display
- Sensor connection status
- Outdoor temperature
- Indoor temperature
- Outdoor temperature trend
- Indoor temperature trend
- MAX./MIN. temperature record
- Atmospheric pressure trend
- Weather forecast
Getting started
Base station
- Open the battery compartment cover (6) and insert 3 batteries according to the correct polarity. Close the cover.
- Wait until the indoor temperature is displayed on the base station.
Sensor
- Open the battery compartment cover (8). The sensor should be operated on channel 1.
- Insert 2 batteries according to the correct polarity. Close the cover.
• To re-establish the sensor connection manually, press RESET using a pin.
Sensor connection
- Place the base station and the remote sensor within the effective transmission range. Ensure that the channels are assigned after you set up the power supply for the base station and all the sensors.
- If the reception is successful, the display will show the temperature of the respective outdoor sensor. If the values are not received from a channel, “—” appears on the display. Check the batteries and try it again. Check if there is any source of interference.
- When changing batteries, replace the batteries first in the base unit, and then in all the sensors, to re-establish the connection. If an adapter supplies power to any of the devices, briefly disconnect the power to that device when replacing the batteries. If you change the batteries only in one of the devices (for example, in the sensor), the signal may not be received correctly.
- If you have problems in receiving the readings, make sure that channel 1 is selected on the sensor, and then press and hold CH on the base station for 5 seconds.
- The effective range may differ depending on the unit's position. Due to interference (various remote control devices, etc.), the maximum distance between the base unit and the sensor may be significantly reduced. In such cases, we suggest moving the base unit and sensor a little. Sometimes it is enough to move one of these units a few inches!

NOTE! Although the sensor is weather resistant, never place it in direct sunlight or in the rain or snow.
Time setting
Press the SET button and hold it for 3 seconds. The digits that are to be set are flashing. Press UP or DOWN to change the value, and then press SET to continue.
The setting order: Hours > Minutes > Year > Month > Date > Temperature unit.
Finally, press the SET button to save the settings and exit.
The language and the selected abbreviations for each day of the week are shown in the following table.
| Language Monday Tuesday Wednesday Thursday Friday Saturday Sun day | |||||||
| English, EN M | ON TUE WED | THU FRI SAT SUN | |||||
Weather
Temperature
Press the UP button to switch between °C and °F.
Weather forecast
- Sunny
- Partly cloudy
- Cloudy
- Rainy
- Snowy
①

②

③

④

⑤

History record
- Press the MEM button to display the MAX./MIN. temperature.
- To clear MIN./MAX. temperature records, press and hold the MEM button for 3 seconds.
Specifications
| Base station | |
| Temperature, units of measurement °F, °C | |
| Operating temperature range (indoors) 0... +50°C (+32... +122°F) | |
| Time format 24 hours, 12 hours | |
| Weekday display language English | |
| Screen monochrome | |
| Power supply 3 AAA batteries (not included) | |
| Dimensions 208x43x210mm (8.1x1.6x8.2in.) | |
| Wireless sensor 1 pc. (included) | |
| Sensor | |
| Radio signal frequency 433.92MHz | |
| Radio signal radius 100m (328ft.) (in an open area) | |
| Operating temperature range (outdoors) -30... +60°C (-22... +140°F) | |
| Power supply 2 AAA batteries (not included) | |
| Operating humidity range (outdoors) | 20... 95% |
| Dimensions 40x21x120mm (1.5x0.8x4.7in.) | |
The manufacturer reserves the right to make changes to the product range and specifications without prior notice.
Care and maintenance
- Take the necessary precautions when using the device with children or others who have not read or who do not fully understand these instructions.
- Do not try to disassemble the device on your own for any reason. For repairs and cleaning of any kind, please contact your local specialized service center.
- Protect the device from sudden impact and excessive mechanical force.
- Store the device in a dry, cool place away from hazardous acids and other chemicals, away from heaters, open fire, and other sources of high temperatures.
- Operate the device only in a completely dry environment and do not touch the device with wet or damp body parts.
- Only use accessories and spare parts for this device that comply with the technical specifications.
- Check this device and its cables and connections for any possible damage before use.
- Never attempt to operate a damaged device or a device with damaged electrical parts! Damaged parts must be replaced immediately by an authorized service agent.
- If a part of the device or battery is swallowed, seek medical attention immediately.
- Children should use the device under adult supervision only.
Battery safety instructions
Always purchase the correct size and grade of battery most suitable for the intended use. Always replace the whole set of batteries at one time; taking care not to mix old and new ones, or batteries of different types. Clean the battery contacts and also those of the device prior to battery installation. Make sure the batteries are installed correctly with regard to polarity (+ and -). Remove batteries from equipment that is not to be used for an extended period of time. Remove used batteries promptly. Never short-circuit batteries as this may lead to high temperatures, leakage, or explosion. Never heat batteries in order to revive them. Do not disassemble batteries. Remember to switch off devices after use. Keep batteries out of the reach of children, to avoid risk of ingestion, suffocation, or poisoning. Utilize used batteries as prescribed by your country's laws.
Levenhuk International Lifetime Warranty
All Levenhuk telescopes, microscopes, binoculars, and other optical products, except for their accessories, carry a lifetime warranty against defects in materials and workmanship. A lifetime warranty is a guarantee on the lifetime of the product on the market. All Levenhuk accessories are warranted to be free of defects in materials and workmanship for six months from the purchase date. The warranty entitles you to the free repair or replacement of the Levenhuk product in any country where a Levenhuk office is located if all the warranty conditions are met.
For further details, please visit: www.levenhuk.com/warranty
If warranty problems arise, or if you need assistance in using your product, contact the local Levenhuk branch.
BG
Sensor
Sensore
The original Levenhuk cleaning accessories




Levenhuk Cleaning Pen LP10

natural_image
Black levenhuk handheld hairdryer tool with handle and spout (no visible text or symbols)- Removes dust with a brush
- The soft tip is treated with a special cleaning fluid that removes greasy stains
- Does not damage optical coatings of the lenses
• Leaves no smudges or stains
Levenhuk Inc. (USA): 928 E 124th Ave. Ste D, Tampa, FL 33612, USA,
+1-813-468-3001, contact_us@levenhuk.com
Levenhuk Optics s.r.o. (Europe): V Chotejně 700/7, 102 00 Prague
102, Czech Republic, +420 737-004-919, sales-info@levenhuk.cz
Levenhuk® is a registered trademark of Levenhuk, Inc.
© 2006–2022 Levenhuk, Inc. All rights reserved.
www.levenhuk.com
20220421
- Levenhuk Wezzer PLUS LP30 Thermometer
- Parts overview
- Base station
- Sensor
- Interface icons
- Getting started
- Sensor connection
- Time setting
- Weather
- Temperature
- Weather forecast
- History record
- Care and maintenance
- Battery safety instructions
- Levenhuk International Lifetime Warranty
- BG
- Sensore
- Levenhuk Cleaning Pen LP10
Brand : Levenhuk
Model : Wezzer Plus LP30
Category : Weather Station