
YT-82801 - Tour Yato - Free user manual and instructions
Find the device manual for free YT-82801 Yato in PDF.


| Product Type | Lathe |
| Brand | Yato |
| Model | YT-82801 |
| Power Source | Electric, 220-240V, 50Hz |
| Motor Power | 750W (1 HP) |
| Speed Range | 100 - 2500 RPM (variable) |
| Swing Over Bed | 250 mm (10 in) |
| Distance Between Centers | 500 mm (20 in) |
| Chuck Size | 100 mm (4 in) 3-jaw self-centering |
| Spindle Bore | 20 mm |
| Weight | 45 kg (99 lb) |
| Dimensions (L x W x H) | 1000 x 400 x 300 mm (39 x 16 x 12 in) |
| Main Functions | Turning, facing, drilling, threading, knurling |
| Construction Material | Cast iron bed and headstock |
| Safety Features | Emergency stop switch, chuck guard, overload protection |
| Maintenance | Regular lubrication of slideways and leadscrew; clean chips after use |
| Cleaning | Wipe with dry cloth; avoid solvents on painted surfaces |
| Spare Parts Availability | Available through Yato authorized dealers and service centers |
| Repairability | Repairs must be performed by qualified technician; contact Yato support |
| Included Accessories | 3-jaw chuck, faceplate, tool post, center set, tool kit |
| Manufacturer | Yato Tools |
| User Manual | Provided in PDF format (68 pages) |
Frequently Asked Questions - YT-82801 Yato
User questions about YT-82801 Yato
0 question about this device. Answer the ones you know or ask your own.
Ask a new question about this device
Download the instructions for your Tour in PDF format for free! Find your manual YT-82801 - Yato and take your electronic device back in hand. On this page are published all the documents necessary for the use of your device. YT-82801 by Yato.
USER MANUAL YT-82801 Yato
natural_image
Black YATO 3D-printed electric drill putter with attached base (no visible text or symbols)CE
PL GB D RUS UA LT LV CZ SK H RO E
natural_image
Three-panel black-and-white photo showing hands installing or adjusting a device with a battery pack, no visible text or symbols.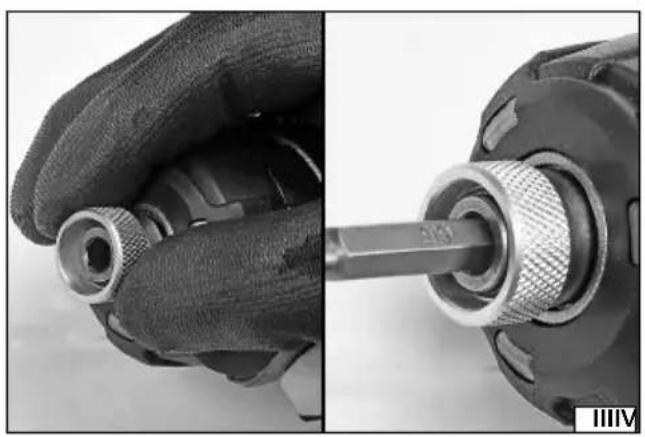
natural_image
Close-up of hands using a screwdriver to adjust a mechanical component (no text or symbols visible)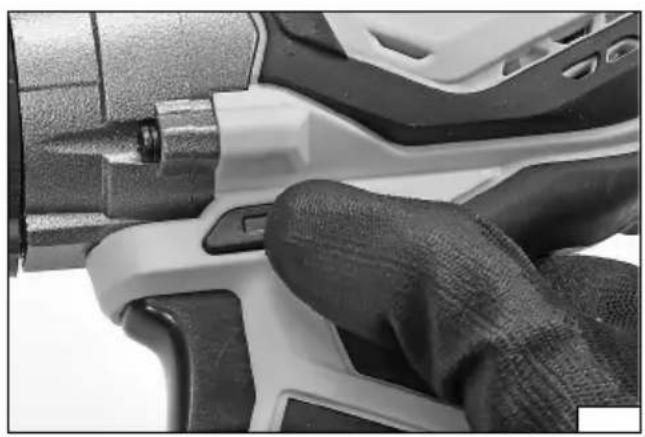
natural_image
Close-up of a hand holding a power tool, showing mechanical components and grip (no visible text or symbols)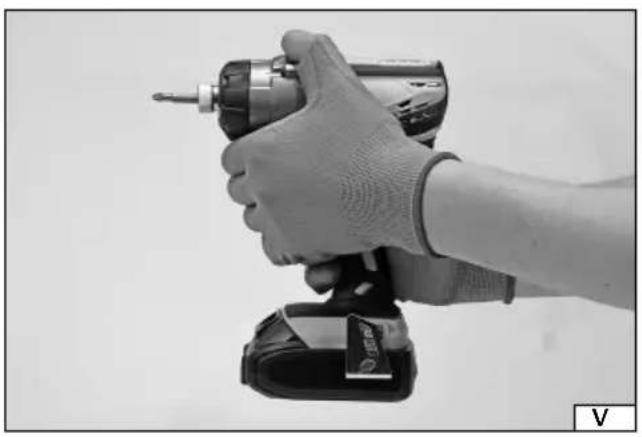
natural_image
Close-up of a hand using a power drill press, no visible text or symbols2017
Rok produkcji:
Production year:
Produktionsjahr:
Год выпуска:
Рік випуску:
Pagaminimo metai:
Ražošanas gads:
Rok výroby:
Rok výroby:
Gyártási év:
Read the operating instruction
Wear protective goggles
Wear hearing protectors
Rotation direction switch
Correct disposal of this product: This marking shown on the product and its literature indicates this kind of product mustn't be disposed with household wastes at the end of its working life in order to prevent possible harm to the environment or human health. Therefore the customers is invited to supply to the correct disposal, differentiating this product from other types of refusals and recycle it in responsible way, in order to re - use this components. The customer therefore is invited to contact the local supplier office for the relative information to the differentiated collection and the recycling of this type of product.
UMWELTSCHUTZ
CHARAKTERYSTYKA WYROBU
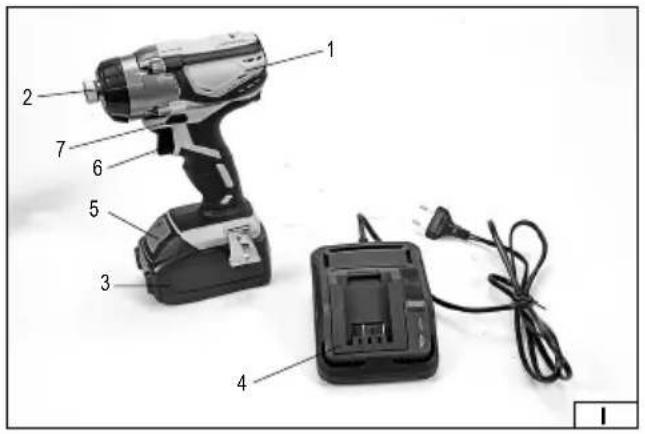
The impact wrench is a versatile tool, that does not require an external power source, it is portable, designed for the DIY users. It should be used only for is crewing in and out bolts and nuts with left-hand and right-handed thread, by using a variety of screwdriver bits. Through the impact mechanism the impact wrench offers much higher torque than a typical cordless screwdriver drill. Its special advantages would be appreciated by the DIYs who make a variety of assembly and finishing works. A correct, reliable and safe functioning of the electric tool depends on its proper use, so:
Before you proceed to operate the device, read the manual thoroughly and keep it.
The supplier will not be held responsible for any damage resulting from the safety regulations and the recommendations indicated hereby not being observed.
EQUIPMENT
The product is supplied in a complete state and requires no assembly. Together with the product there are provided: the rechargeable battery and charging station (charger).
Attention! The product of the catalog number: YT-82801 has not been equipped with a rechargeable battery and charging station.
TECHNICAL PARAMETERS
| Parameter Unit of measurement Value | ||
| Catalogue number YT-82800, YT-82801 | ||
| Operating voltage [V] 18 DC | ||
| Rotation (idle) [min] | -] 0 - 3000 | |
| Impact frequency 0 - 3000 | ||
| Maximum torque [Nm] 160 | ||
| Noise level | ||
| - acoustic pressure [dB] 82,0 ± 3,0 | ||
| - LWA power [dB] 93,0 ± 3,0 | ||
| Protection grade | IP20 | |
| Insulation class | III | |
| Level of vibration (drilling / screwdriveting) | [m/s2] | 8,15 ± 1,5 |
| Mass | [kg] | 1,1 |
| Tool handle | [mm] | ○6,3 |
| Battery | Li-Ion | |
| Capacity of the battery* | [Ah] | 2 |
| Charger* | ||
| Input voltage | [V~] | 220 - 240 |
| Mains frequency | [Hz] | 50 / 60 |
| Rated power | [W] | 60 |
| Output voltage | [V] 21 DC | |
| Input current | [A] | 2.4 |
| Time of charging** [h] | 1 |
* only for models equipped with battery and charger
** charging time applies only to the battery with a capacity listed in table
GENERAL SAFETY CONDITIONS
NOTE! Get acquainted with all the instructions below. Failure to observe them may lead to an electric shock, fire or injuries. The notion of electric tool used in the instructions applies to all the tools which are powered with electric current, both wire tools and wireless ones.
OBSERVE THE FOLLOWING INSTRUCTIONS
Place of work
The place of work must be properly illuminated and clean. Disorder and poor illumination may be a cause of accidents. Do not work with electric tools in explosive environments, or those which contain inflammable liquids, gases or vapours. Electric tools generate sparks, which may cause a fire in case of contact with inflammable gases or vapours. Do not allow children and outsiders to the place of work. A lack of concentration may result in a loss of control over the tool.
Electric safety
The plug of the power supply cable must fit the mains socket. Do not modify the plug. Do not use any adapters whatsoever in order to adapt the plug to the socket. Unmodified plug which fits the socket reduces the risk of an electric shock. Avoid contact with grounded surfaces, such as pipes, heaters and refrigerators. Grounding of the body increases the risk of an electric shock. Do not expose electric tools to precipitation or humidity. Water and humidity which gets into the electric tool increases the risk of an electric shock. Do not overload the power supply cable. Do not use the power supply cable in order to carry the tool or to connect and disconnect the plug from the mains socket. Avoid contact of the power supply cable with heat, oils, sharp tools and moving elements. Damage to the power supply cable increases the risk of an electric shock. In case work is realised outside closed areas, it is necessary to use extension cords designed for applications outside closed areas. Using a correct extension cord permits to reduce the risk of an electric shock.
Personal safety
Commence work in good physical and psychological conditions. Pay attention to what you do. Do not work if you are tired or under effects of medicines or alcohol. Even a moment's inattention during work may lead to serious injuries. Always use individual means of protection. Always wear goggles. Using individual means of protection, such as dust-masks, protective shoes, helmets and hearing protections permits to reduce the risk of serious injuries. Avoid accidental activation of the tool. Make sure the switch is in the OFF position, before you connect the tool to the mains. Holding the tool with a finger on the switch or connecting an electric tool when the switch is in the ON position may lead to serious injuries. Before you turn an electric tool on remove all the spanners and other tools, which have been used for adjustments. A spanner left on rotating elements of the tool may lead to serious injuries. Keep your balance. Maintain an appropriate position. It will permit to control the electric tool in case of unpredicted situations during its operation. Use protective clothes. Do not wear loose clothes or jewellery. Keep your hair, clothes and gloves away from moving elements of the electric tool. Loose clothes, jewellery or long hair may get caught on moving elements of the tool. Use dust extractors or dust containers, if the tool is equipped with any. Make sure they are properly connected. Using of dust extractors permits to reduce the risk of serious injuries.
Safety precautions while using the electric tool
Before the battery is installed, make sure the switch is off. Installation of the battery when the switch is on may lead to accidents. Use solely the charger recommended by the manufacturer. Using a charger designed for another type of battery may be a cause of fire.
The electric tool must be operated exclusively with the battery indicated by the manufacturer. Using another battery may be a cause of fire or injuries.
When the battery is not used, it must be stored away from such metal objects as paper clips, coins, nails, screws or other small metal elements, which might short-circuit the terminals. Short-circuited terminals of the battery may cause burns or fire.
Under adverse circumstances liquid may leak from the battery; avoid any contact. In case of accidental contact with the liquid, rinse it with water. In case of eye contact, seek medical. The liquid leaking from the battery may cause irritation or burns.
During work when the tool may touch a hidden live conductor, the electric tool must be held by insulated handles. The installed bit in case of contact with a live conductor may conduct electricity to the metal elements of the tool, which may cause electric shock to the operator.
Repairs
Have the tool repaired solely by authorised workshops, where original spare parts are used. This will ensure the adequate safety of operation of the electric tool.
PREPARATION FOR WORK
ATTENTION! All the operations mentioned in this point must be realised with the power supply off.
- the battery must be disconnected from the tool!
Safety recommendations for battery loading
Attention! Before loading may start make sure the body of the charger, the cable and the plug are not broken or damaged. It is prohibited to use a damaged loading dock and charger! For the purpose of loading batteries only the charging dock and the charger provided may be used. Using another charger may be a cause of fire or damage the tool. Batteries may be charged only in a dry room, protected from unauthorised persons, particularly children. Do not use the charging dock and the charger without permanent supervision of an adult! If it is necessary to leave the room where loading is taking place, it is required to disconnect the charger from the mains, removing the charger from the mains socket. In case when smoke comes out of the charger, or a strange smell is emitted, etc., it is required to immediately remove the plug of the charger from the mains socket!
The drill and automatic return screwdriver is provided with an unloaded battery, so before work may commence, it is required to charge it following the procedure below, using the charger and charging dock provided. Li-ION batteries do not show the so called “memory effect”, so it is allowed to charge them at any moment. However, it is recommended to discharge them during normal work, and then load them to their full capacity. If due to the nature of the task it is not possible to do so each time, then it is required to do it at least from time to time. Under no circumstances is it allowed to discharge the batteries short-circuiting the
GB
electrodes, since this would cause irreversible damage! It is also prohibited to check the load of the batteries, short-circuiting the electrodes for sparking.
Storage of the battery
In order to prolong the life of the battery, it is required to provide adequate storage conditions. The batteries can go through approximately 500 „loading - discharging" cycles. The battery must be stored between 0 and 30^ , at the relative humidity of 50% . In order to store the battery for a prolonged period, it is required to charge it to approximately 70% of its capacity. In case of prolonged storage, it is required to recharge the battery once a year. Do not permit excessive discharging of the battery, since this would reduce its life and may cause irreversible damage.
During storage, the battery will be gradually unloading due to leakage conductance. The process of automatic unloading depends on the temperature of storage, since the higher the temperature, the fastest the process. In case of incorrect storage of batteries, there is a danger of electrolyte leakage. In case of leakage, it is required to protect the leakage with neutralizing agent. In case of contact of electrolyte with the eyes, it is required to rinse the eyes abundantly, and then immediately seek medical assistance. It is prohibited to use a tool with a damaged battery.
In case the battery is completely worn out, it is required to deposit it at a special point dedicated to disposal of such waste.
Transport of the batteries
Lithium-ion batteries are in accordance with legal regulations treated as dangerous waste. The user of the tool may transport the tool with the battery or only batteries by land. Then no additional conditions must be complied with. In transport is realised by third parties (for example dispatch through courier service), then it is required to proceed in accordance with regulations for transport of dangerous materials. Before shipment, contact an authorised person.
It is prohibited to transport damaged batteries. During transport the battery must be removed from the tool, and the exposed contacts protected, e.g. with insulating tape. Protect the batteries so that they do not move inside the package during transport. It is also required comply with the national regulations for transport of dangerous materials.
Charging the battery
Attention! Before charging you should disconnect the charger from the mains by unplugging the power supply plug from the mains. In addition, you should clean the battery and its terminals of dirt and dust with a soft, dry cloth.
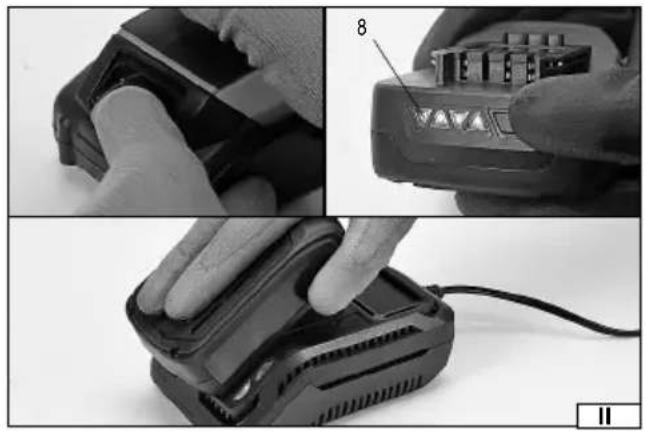
The battery has a built-in charge indicator. When you press the button, LEDs will light up (II), the more LEDs will light up, the more fully the battery pack is charged. If the button is pressed and the LEDs are off it means that the battery is discharged.
Disconnect the battery from the tool.
Push the battery in the charger socket (II).
Plug the charger into a mains socket.
When the red LED lights up, it means the loading process.
When charging is complete, the red LED goes off, and green LED lights up, indicating a full charge of the battery.
Unplug the charger from the mains outlet.
Remove the battery from the charging station, by pressing the battery latch button.
Attention! If, when the charger is connected to the power supply, the green LED is on, this indicates a fully charged battery. In this case, the charger does not start charging.
Fixing the screwdriver tips in drill holder (III)
Attention! Due to the presence of impact mechanism you should use only the tips, which are designed for operation with impact tools of greater or equal than torque than the torque of tool.
Attention! Due to the presence of impact mechanism It is forbidden to mount the drill bits and work with them. If the drill bit is locked in hole its impact mechanism may result in rupture of the drill bit, what could be the cause of injuries.
Attention! Fixing must be carried out when the battery disconnected, this will prevent accidental activation of the tool.
The handle of the wrench is designed to be used with the hexagonal. "long" bits and adapters with a length of at least 50 mm and fitted with a groove. to ensure the blocking of the tip in its holder. It is forbidden to use bits shorter than 50 mm and such that do not feature the groove.
Pull forward the ring to ool holder, and then enter the tip into holder and release the ring, which should return to its starting position. Check whether the tip is properly locked in its holder, If you cannot pull it out, this means the proper mounting.
The tip removal should be carried out in reverse order.
Setting the direction of rotation (IV)
Set the switch to the desired position. The direction of screws movement is marked on the switch by arrows with the most popular right-hand thread. In the case of screws with left-hand thread the movement of the screw will be opposite to the direction indicated by the arrow.
GB
Preparatory steps to work
Before starting the work:
Clamp the workpiece in a vise or with carpentry clamps.
Use the tools which are appropriate for the work to be done. Choose the right type of tip to the screw socket.
Wear work clothing and protection for sight and hearing.
Grasp the tool with both hands (V).
Adopt a stable stand.
Turn on the tool by finger pressing the switch.
Attention! If you notice any suspicious noise during operation, cracks, stench, etc. you should immediately turn off the tool and remove battery pack from it.
The depth of switch push determines the revs speed and torque. The tool does not have option to set the preset speed and torque.
You should enter the tip in socket screw or impose on the nut, and then swithc on the device. This will prevent damage to the fasteners or to the tip. It will also reduce the risk of injuries.
In the case of screwing bolts in the surface, it is recommended that you perform a pilot hole with a diameter of core screws. This will prevent the destruction of the material during screwing. It is also possible to screw without a pilot hole. During both types of screwing in you should begin with a small revs speed and possibly increase it in the course of work.
In the case of screw connections, for example, when screwing in the coated screws in threaded holes or when you screw on the nuts on the threaded pins you should perfor the first few turns by hand, key or a screwdriver. Only after ensuring the correct screwing in of one element in the second, you may ready to work a screw impact wrench. In the case of screwing the threaded elements it is not recommended to exert too much pressure on the impact wrench. This can lead to the destruction of the thread.
After tightening the elements, it will start the hammer mechanism, what will be indicated by “bumps” the revving mechanism, in this case, you should release your pressure on the switch and cease further tightening the components. Continuing to tighten can lead to the destruction of connecting elements.
Using attachments
The tool must not be used to power working attachments.
Additional information
During work do not exert excessive pressure on the processed material and do not make violent moves, so as to avoid any damage to the working tool and the drill.
Make regular breaks during work.
Do not overstress the tool. The temperature of the external surfaces must not exceed 60°C.
Once the work has been concluded, turn the drill off, remove the battery and carry out maintenance tasks and inspection.
MAINTENANCE AND OVERHAUL
ATTENTION! Before any adjustment, technical service or maintenance operations unplug the tool. Once the operations have been finished, the technical conditions of the tool must be assessed by means of external evaluation and inspection of the following elements: body and handle, conductor with a plug and deflection, functioning of the electric switch, patency of ventilation slots, sparking of brushes, noise level of functioning of bearings and gears, start-up and smoothness of operation. During the guarantee period, the user cannot dismantle the electric tools or change any sub-assemblies or elements, since it will cancel any guarantee rights. All irregularities detected at overhaul or during functioning of the tools are a signal to have the tool repaired at a service shop. Once the functioning has been concluded, the casing, ventilation slots, switches, additional handle and protections must be cleansed with a stream of air (at a pressure not exceeding 0.3 MPa), with a brush or a cloth without any chemical substances or cleaning liquids. Tools and handles must be cleansed with a clean cloth.
CHARAKTERISTIK DES ERZEUGNISSES
DECLARATION OF CONFORMITY
0517/YT-82800/EC/2017
We declare and guarantee with full responsibility that the following products:
Cordless impact screwdriver 18 V d.c., 6,3 mm, 0 - 3000 min ^-1 ; item no. YT-82800, YT-82801
meet requirements of the following European Standards / Technical Specifications:
EN 60745-1:2009 + A11:2010
EN 60745-2-2:2010
EN 55014-1:2006 + A1:2009 + A2:2011
EN 55014-2:1997 + A1:2001 + A2:2008
and fulfill requirements of the following European Directives:
2006/42/EC Machinery and safety elements
2014/30/EU Electromagnetic compatibility (EMC) Directive
2011/65/EU Restriction of the Use of Certain Hazardous Substances
Serial number: concern all serials numbers of item(s) mentioned in this declaration
The last two digits of the year in which the CE marking was affixed: 17
Year of production: 2017
The person authorized to compile the technical file:
Tomasz Zych
(Place and date of issue)

DYREKTORDS. ZAKUROW
DARIUSZHAYEK
(Name and signature of authorized person)
TOYA S.A.
- UMWELTSCHUTZ
- CHARAKTERYSTYKA WYROBU
- Before you proceed to operate the device, read the manual thoroughly and keep it.
- EQUIPMENT
- TECHNICAL PARAMETERS
- GENERAL SAFETY CONDITIONS
- OBSERVE THE FOLLOWING INSTRUCTIONS
- Place of work
- Electric safety
- Personal safety
- Safety precautions while using the electric tool
- Repairs
- PREPARATION FOR WORK
- Safety recommendations for battery loading
- GB
- Storage of the battery
- Transport of the batteries
- Charging the battery
- Fixing the screwdriver tips in drill holder (III)
- Setting the direction of rotation (IV)
- MAINTENANCE AND OVERHAUL
- CHARAKTERISTIK DES ERZEUGNISSES
- DECLARATION OF CONFORMITY
Brand : Yato
Model : YT-82801
Category : Tour