
BWD4348 - Washing machine Becken - Free user manual and instructions
Find the device manual for free BWD4348 Becken in PDF.


| Product Type | Washer Dryer |
| Brand / Model | Becken BWD4348 |
| Washing Capacity | 8 kg |
| Drying Capacity | 6 kg |
| Dimensions (W x D x H) | 595 x 475 x 850 mm |
| Weight | 65 kg |
| Power Supply | 220-240 V~, 50 Hz, 10 A |
| Rated Power (Wash) | 1900 W |
| Drying Power | 1300 W |
| Max Spin Speed | 1400 rpm |
| Energy Efficiency Class | A |
| Water Pressure (Min/Max) | 0.05 MPa / 1 MPa |
| Noise Level (Wash / Spin / Dry) | 58 dB / 78 dB / 62 dB |
| Programs | Cotton, Cotton Eco, Synthetic, Baby Care, Jeans, Mix, Colours, Sport Wear, Quick, Delicate, Wool, Spin Only, Rinse&Spin, Dry Only, 1 Hour W/D |
| Key Functions | Delay Start (0-24 h), Child Lock, My Cycle, Temperature Selection (Cold, 20-90 °C), Spin Speed Adjustment, Dry Level (Gentle/Normal/Extra) |
| Detergent Dispenser | 3 compartments (Pre-wash, Main wash, Softener) |
| Safety Features | Child lock, door lock, overflow protection, anti-scald drain |
| Maintenance | Clean inlet filter, detergent drawer, drain pump filter |
| Included Accessories | Cold water supply hose, transport hole plugs, user manual |
| Installation Requirements | Rigid, dry, level surface; room temp above 0 °C; avoid direct sunlight and heat sources |
Frequently Asked Questions - BWD4348 Becken
User questions about BWD4348 Becken
0 question about this device. Answer the ones you know or ask your own.
Ask a new question about this device
Download the instructions for your Washing machine in PDF format for free! Find your manual BWD4348 - Becken and take your electronic device back in hand. On this page are published all the documents necessary for the use of your device. BWD4348 by Becken.
USER MANUAL BWD4348 Becken
MANUAL DE INSTRUÇÕES

natural_image
Front view of a white Boeken washing machine with digital display and control panel (no visible text or symbols on the device itself)Modelo: BWD4348
Dear client,
Thank you for purchasing this product.
The quality of this appliance has been certified by several laboratory tests. This instructions manual is provided to simplify the use of the appliance as well as to guarantee a safe use.
Please read carefully the instructions and safety measures described in this manual.
We sincerely hope you will be satisfied when using your new appliance.
Index
- Safety Instructions .... 4
1.1. Power Supply 5
1.2. Power Cord and Other Cables ...... 6
1.3. Humidity and Water....6
1.4. Cleaning 6
1.5. General Precautions....6
- Operating Instructions.... 10
2.1. Product Description.... 10
2.2. Product usage 11
2.3. Maintenance.... 28
2.4. Troubleshooting 31
-
Technical Specifications .... 33
-
Post-Sale Service 36
-
Environmental Protection.... 36
BECKEN
1. Safety Instructions
 | WARNING |  |
| Risk of Electric ShockDo Not Open | ||
| Warning: to avoid the risk of electric shock, do not remove the cover. The interior does not contain any parts that can be repaired by the user. Ask for assistance from the Customer Support Service. | ||
Important Warnings
Before using your appliance read these instructions manual carefully and keep it in a safe place as you may need to consult it in the future.
Before turning on your appliance, and to ensure a safe and correct operation, do not use if:
- It has fallen to the ground;
- You notice any evidence of damage;
- Any anomaly occurs during its operation.
To avoid hazards or deterioration of your appliance through incorrect use it is advisable to read these instructions thoroughly.
Your appliance should not be used for other purposes than the ones intended and solely for household use. Any damage resulting from using the appliance outside this scope, any incorrect use, as well as any manual modifications to the product will not be covered and automatically voids the warranty.

CAUTION: HOT SURFACE!

CAUTION: RISK OF FIRE!
Explanation of symbols:

Warning!
This combination of symbol and signal word indicates a potentially dangerous situation which may result in death or serious injuries unless it is avoided.

Caution!
This combination of symbol and signal word indicates a potentially dangerous situation which may result in slight or minor injuries or damage to property and the environment.

Note!
This combination of symbol and signal word indicates a potentially dangerous situation which may result in slight or minor injuries.
Assistance
In case of malfunction, take your appliance to the Customer Support Service for assistance.
This appliance can be used by children from the age of 8 and by people with reduced physical, sensorial or mental capabilities and/or lack of experience and knowledge if they have been given instructions on using the appliance safely and if they understand the hazards involved. Children may not play with the appliance. Cleaning and maintenance must not be carried out by children without supervision.
These instructions are also available at www.suporteworten.pt
1.1. Power Supply
Make sure the main voltage is compatible with the appliance's. If this is not the case, please consult the Customer Support Service.
1.2. Power Cord and Other Cables
Do not tangle the cord or pull it to disconnect the appliance. Also, keep the cord away from warm surfaces.
Never use the appliance if it has a damaged cable or socket.
Take it to the Customer Support Service for replacement.
1.3. Humidity and Water
Do not use your appliance in humid places. Do not allow the appliance to become wet under any circumstances as this may be dangerous. To avoid fire hazard or electric shock do not expose your appliance to humidity or water. Furthermore, do not place your appliance under water (e.g. for cleaning).
1.4. Cleaning
Before cleaning, be sure to switch off the appliance and remove the plug from the main power supply. Always allow the unit to cool down before cleaning.
To clean the exterior of the product, use a dry soft cloth only.
1.5. General Precautions
- Please follow the instructions in the user manual which will help you to properly install and operate this product and enjoy its advanced features. Please keep the instructions for future reference.
- Read all instructions before using the product.
- Maintenance and service operations are only to be carried out by authorized professionals.
- Any damage caused by manual modifications to the product is not covered by the warranty.
- If this product is used for other purposes than the ones originally intended, or if it is not correctly connected, the product may become damaged and the warranty will be voided.

Warning!
Risk of electric shock
- The new hose-sets supplied with the appliance are to be used and old hose-sets should not be reused.
- Before performing any maintenance to the device, unplug the appliance from the mains.
- Always unplug the machine and turn off the water supply after use. The max. inlet water pressure is in pascals, as well as the min. inlet water pressure.
- To ensure your safety, the power plug must be inserted into an earthed three-pole socket. Check this carefully and make sure that your socket is properly and reliably earthed.
- Please make sure that the water and electrical devices are connected by a qualified technician in accordance with the manufacturer's instructions and local safety regulations.
- Pull out the appliance's plug from the power socket before cleaning or performing any maintenance.
- Do not use any socket with rated current less than that of appliance. Never pull out the power plug with your hands wet.
- Please remember to switch off the water and power supply immediately after your clothes are washed.
- Animals and children may climb into the machine, so please check it before each operation.
- Kids should be supervised that they do not play with the appliance.
- The glass door may be very hot during the operation. Keep children and pets far away from the machine during the operation. Also, please do not place the appliance in rooms with high humidity levels as well as in the rooms with explosive or caustic gas.
- Remove all packages and transport bolts before using the appliance. Otherwise, there is a risk of serious damage.
BECKEN
Risk of explosion
- Do not wash or dry articles that have been cleaned in, washed in, soaked in, or dabbed with combustible or explosive substances (such as wax, oil, paint, gasoline, degreasers, dry-cleaning solvents, kerosene, etc., as this may result in fire or explosion.
- The washer dryer is not to be used if industrial chemicals have been used for cleaning.
- The exhaust air must not be discharged into a flue which is for exhausting fumes from appliances burning gas or other fuels.
■ Beforehand thoroughly rinse items that were washed by hand.

Caution!
Installing the product
- This household appliance is for indoor use only. It is not intended for built-in use.
- Please do not obstruct the openings with a carpet.
- The appliance should not be installed in bathrooms or very wet rooms, as well as in the rooms with explosive or caustic gases.
- Appliances with a single inlet valve can only be connected to the cold water supply. Appliances with double inlet valves should be correctly connected to the hot water and cold water supply.
- The plug must be accessible after installation.
- The appliance must not be installed: behind a lockable door, a sliding door or a door with a hinge on the opposite side to that of the washer dryer, at a humid place.
- Remove all packages and transport bolts before using the appliance. Otherwise, there is a risk of serious damage.
Risk of damaging the appliance
- The product is for home use only and is only designed for textiles suitable for machine washing and drying.
- Do not climb up and sit on top of the cover of the machine.
- Do not lean against the machine door.
-
Cautions when Handling the Machine:
-
Transport bolts shall be reinstalled to the machine by a specialized person.
- The accumulated water shall be drained out of the machine.
- Handle the machine carefully. Never hold each protruded part on the machine while lifting. The machine door cannot be used as a handle during conveyance.
- This appliance is heavy, so please transport with care.
- Hands must not be inserted into the running water extracting tub.
- Please do not close the door with excessive force. If you are having trouble closing the door, please check if clothes are well put in or distributed.
- It is forbidden to wash carpets.
BECKEN
2. Operating Instructions
2.1. Product Description


Note!
The product line chart is for reference only. Please refer to your real product as standard.
Accessories
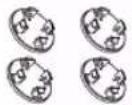 | 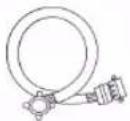 |  |  |  |
| Transport hole plug | Cold water supply hose | Hot water supply hose (optional) | Drain hose support (optional) | User manual |
2.2. Product usage
■ Before washing clothes for the first time, the product should be operated in one complete round without clothes inside.
- Flammable and explosive or toxic solvents are forbidden. Gasoline and alcohol etc. should not be used as detergents. Please only select detergents suitable for machine washing, especially for drum.
- Make sure that all pockets are emptied. Sharp and rigid items such as coins, brooches, nails, screws or stones etc. may cause serious damages to this machine.
- Please check whether the water inside the drum has been drained before opening its door. Please do not open the door if there is any water visible.
- Be careful not to get burned when the product drains hot washing water.
- After the programme is completed, please wait for two minutes to open the door (some models).
- Never refill the water by hand during washing.
- If you cannot avoid fabrics to get soiled with vegetable or cooking oil or if they have been contaminated by hair care products, before you place them in a tumble dryer, they should first be washed in hot water with extra detergent, as this will reduce, but not eliminate, the hazard.
- Adequate ventilation has to be provided to avoid the back flow of gases into the room from appliances burning other fuels, including open fires.
- Do not dry unwashed items in the appliance.
- Items that have been soiled with substances such as cooking oil, acetone, alcohol, petrol, kerosene, spot removers, turpentine, waxes and wax removers should be washed in hot water with an extra amount of detergent before being dried in the appliance.
- Items such as foam rubber (latex foam), shower caps, water proof textiles, rubber backed articles and clothes or pillows fitted with foam rubber pads should not be dried in the machine.
- Fabric softeners, or similar products, should be used as specified by the fabric softener instructions.
- The machine lid can be opened during water extraction, but it takes 15 seconds or more for the water extracting chamber tub completely stop.
BECKEN
- The final part of a washer dryer cycle occurs without heat (cool down cycle) to ensure that the items are left at a temperature that will not damage them.
- Please remove all objects from pockets such as lighters and matches before using the appliance.
- WARNING: Never stop a washer dryer before the end of the drying cycle unless all items are quickly removed and spread out so that the heat is dissipated.
Installation
Installation area

Warning!
- Stability is important to prevent the product from wandering off.
- Please make sure that the product does not stand on the power cord.


natural_image
Simple line drawing of a rectangular box with a central cross mark and concentric circles (no text or symbols)Before installing the machine, a location with the following requirements should be selected:
- Rigid, dry, and levelled surface
- Avoiding direct sunlight
- Sufficient ventilation
-
Room temperature above 0 °C
-
Far away from heat resources such as coal or gas.
Unpacking the washing machine

Warning!
- Packaging material (e.g. Films, Styrofoam) can be dangerous for children.
- There is a risk of suffocation. Please keep all packaging far away from children.
natural_image
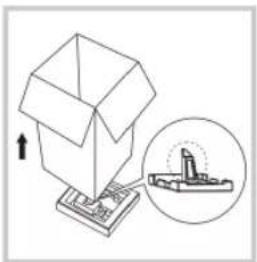
Illustration of a box with an arrow pointing upward, and a magnified inset showing a mechanical component (no text or symbols)- Remove the cardboard box and styrofoam packing.
- Lift the washer dryer and remove the base packing. Make sure the small triangle foam is removed with the bottom one together. If not, lay the unit down on one side, then remove the small foam from the unit bottom manually.
- Remove the tape securing the power supply cord and drain hose.
- Remove the inlet hose from the drum.
- Remove transport bolts

Warning!
- You must remove the transport bolts from the back before using the product.
- You will need the transport bolts again if you move the product, so make sure you keep them in a safe place.

natural_image
Diagram of a hand using a tool to adjust or install a mechanical component into a housing (no text or symbols visible)Please take the following steps to remove the bolts:
- Loosen 4 bolts with a spanner and then remove them.
- Stop the holes with transport hole plugs.
- Keep the transport bolts properly stored for future use.
Levelling the washer dryer

Warning!
- The lock nuts on all four feet must be tightly screwed against the housing.
- Check if the legs are closely attached to the cabinet. If not, please turn them to their original positions and tighten the nuts.
- Loosen the lock nut and turn the feet until they closely contact with the floor.
- Adjust the legs and lock them with a spanner, making sure the machine is steady.
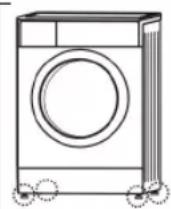

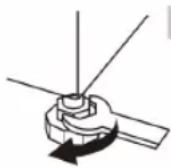
Raise

Lower


Connecting the Water Supply Hose

Warning!
- To prevent leakage or water damage, please follow the instructions in this chapter.
- Do not kink, crush, modify or sever the water inlet hose.
- For models equipped with a hot valve, connect it to hot water tap with the supplied hot water supply hose. Energy consumption will decrease automatically when some programmes are used.
There are two ways to connect the inlet pipe, as follows:
- Connection between an ordinary tap and the inlet hose.
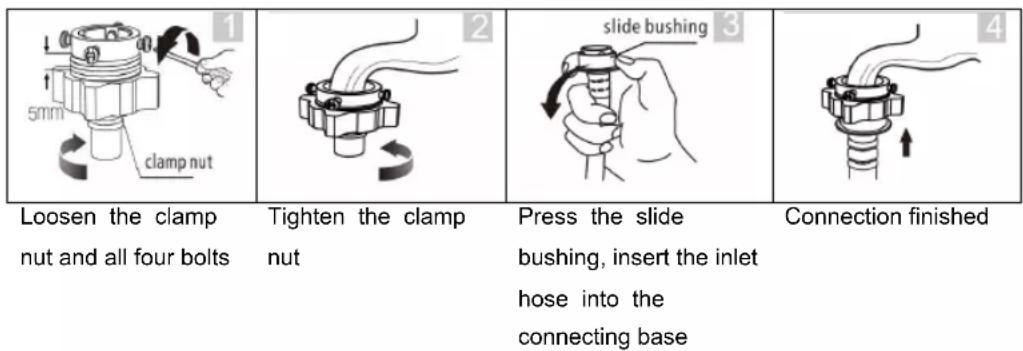
- Connection between a screw tap and the inlet hose.

Connect the other end of the inlet pipe to the inlet valve at the back of the machine and tightly fasten the pipe clockwise.

Drain Hose

Warning!
- Do not kink or protract the drain hose.
- Position drain hose properly, otherwise damage might result of water leakage.
BECKEN
There are two ways to place the end of the drain hose:
-
Put it into the water trough
-
Connect it to the branch drain pipe of the trough


Note!
- If the machine has a drain hose support, please install it as follows.

natural_image
Line drawing of a kitchen sink with faucet and chain (no text or symbols)

Warning!
- When installing the drain hose, fix it properly with a rope.
- If the drain hose is too long, do not force it into the washing machine as it will cause abnormal noises.
Quick Start

Caution!
■ Before washing, please make sure the machine is properly installed.
■ Before washing for the first time, the washing machine should be operated in one complete round without any clothes inside as follows.
1. Before Washing

Plug in
Open the tap
Load
Close the door
Add detergent

Note!
- Detergent needs to be added in "case I "after selecting pre-washing for machines with this function.
2. Washing

BECKEN

Note!
- If default is selected, step 3 can be skipped.
- The function button line chart is for reference only. Please refer to your real product as standard.
3. After Washing
The buzzer beeps or "End" shows on the display.
Before Each Wash
- The working condition of the washer should be 0-40 °C. If used under 0 °C, the inlet valve and draining system may be damaged. If the machine is placed under condition of 0 °C or less, then it should be transferred to normal room temperature to ensure the water supply hose and drain hose are not frozen before use.
- Please check the labels and the explanation of how to use the detergent before washing. Use non-foaming or less-foaming detergent suitable for a proper machine washing.

natural_image
Line drawing of a sweater with a tag and a bag (no text or symbols)Check the label

Take the items out of the pockets
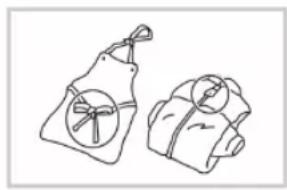
natural_image
Line drawing of two fabric pouches with circular patterns (no text or symbols)Knot the ling strips, zip or button

natural_image
Simple line drawing of a bag with an animal inside, no text or symbols presentPut small clothes into the pillow slip

natural_image
Line drawing of a traditional-style jacket with two arms and patterned front panels (no text or symbols)Turn easy-pilling and long-pile fabric inside out

natural_image
Diagram showing a mechanical or process step with arrows indicating direction (no text or symbols)Separate clothes with different textures

Warning!
- When washing single clothes, the machine may easily cause great eccentricity and give alarm due to great unbalance. Therefore, it is suggested to add one or two more clothes to be washed together so that draining can be done smoothly.
- Do not wash clothes soiled with kerosene, gasoline, alcohol and other flammable materials.
Detergent Dispenser
| Pre wash detergent
II Main wash detergent
Softener

Liquid detergent
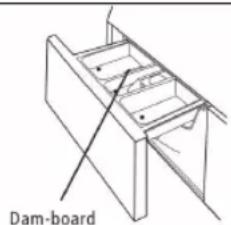
Powder detergent

natural_image
Pure technical line drawing of a mechanical assembly without any text, numbers, or symbolsPull out the dispenser

Caution!
- Detergent only needs to be added in "case I "after selecting pre-washing for machines with this function.
BECKEN
| Programme | Programme | ||||||
| Cotton | ● | ○ | Dry Only | ||||
| Cotton Eco | ● | ○ | Spin Only | ||||
| 1 Hour W/D | ● | ○ | Delicate | ● | ○ | ||
| Jeans | ● | ○ | Quick | ● | ○ | ||
| Colours | ● | ○ | Sport Wear | ● | ○ | ||
| Mix | ● | ○ | Baby Care | ● | ○ | ||
| Wool | ● | ○ | Synthetic | ● | ○ | ||
| Rinse&Spin | ○ |
● Means must ○ Means optional

Note!
- As for the agglomerated or ropy detergent or additive, before they are poured into the detergent box, it is suggested to use some water for dilution to prevent the inlet of the detergent box from being blocked and overflowing while filling water.
- Please choose a suitable type of detergent for the various washing temperature to get the best washing performance with less water and energy consumption.
Control Panel
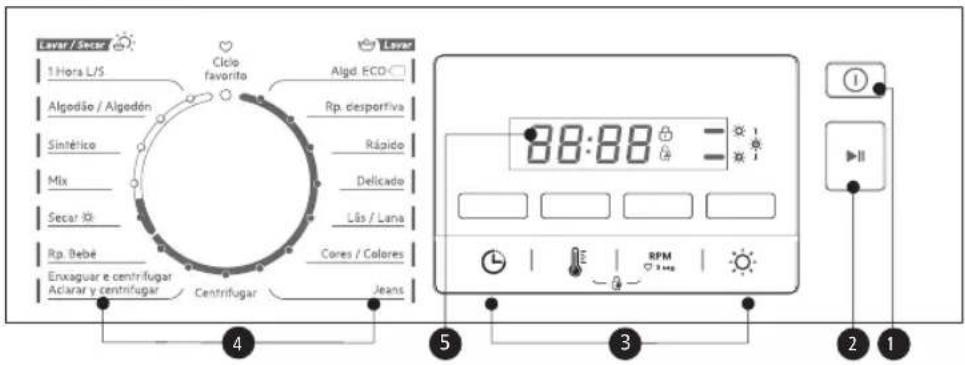

Note!
- The chart is for reference only. Please refer to your real product as standard.
| 1 On/Off | 2 Start/Pause |
| Product is switched on or off. | Press the button to start or pause the washing cycle |
| 3 Option | 4 Programmes |
| This allows you to select an additional function and will light when selected. | Available according to the laundry type. |
| 5 Display | |
| The display shows the settings, estimated time remaining, options and status messages for your washer. The display will remain on throughout the cycle. | |
| A Wash Time | Delay Time | Speed | Error | End | |
| 125 | 2h | 1200 | E20 | End | |
| B Door Lock | |||||
| C Dry level (Gentle – Normal – Extra) | |||||
| D Child Lock | |||||
To set the Delay function:
- Select a programme
- Press the Delay button to choose the time (the delaying time is 0-24 H.)
- Press [Start/Pause] to start the delay operation

On/Off

Choose the

Programme

Set the time


Start
To cancel the Delay function:
Press the [Delay] button until the display shows 0H. It should be pressed before starting the programme. If the programme has already started, you should press the [On/Off] button to reset the programme.

Caution!
- If there is any break in the power supply while the machine is operating, a special memory stores the selected programme and when the power is restarted, press the [On/Off] button so the programme resumes.
Other Functions

My Cycle
Saves the frequently used programmes
Press [ ♥] for 3 sec. to save the running programme. The default is cotton.

Child Lock
To avoid misoperation by children

flowchart
graph LR
    A["①"] --> B["▶||"]
    B --> C["Temp."]
    C --> D["Speed"]
    D --> E["Lock Icon"]
On/Off
Start/Pause
Press [Temp.] and [Speed] for 3 sec. until the buzzer beeps

Caution!
- Press both buttons for 3 sec. also to release the function.
- The "Child Lock" will lock all buttons except [On/Off].
- When there is a power supply cut off, the child lock protection will be released.
- The child lock will remain effective when the power is resumed for some models.
Speed
Speed
Press the button to change the spin speed.
Temp.
Temp.
Press the button to regulate the temperature (Cold, 20 °C, 30 °C, 40 °C, 60 °C, 90 °C)

To mute the buzzer

On/Off
Start/Pause
Press [Temp.] button for 3 sec. until the buzzer is mute.
To activate the buzzer, press the button again for 3 seconds. The setting will be kept until the next reset.
BECKEN

Caution!
■ After Muting the buzzer, all sounds will be off.

Dry Level
Press the Dry Level button continuously to choose the dry level: Extra Dry/Normal Dry/Gentle Dry.
Extra Dry: If you need to wear clothes immediately, you can choose this function
Normal Dry: The normal dry procedure
Gentle Dry: Only to dry clothes slightly.

Note!
■ Drying hints
- Clothes could be dried after spinning.
- To ensure a quality dry of your textiles, please classify them according to their kinds and the drying temperature.
- Synthetic should be set the proper drying time.
- If you want to iron the clothes after drying, please put them in for a while.
■ Clothes not suitable for drying
- Particularly delicate items such as synthetic curtains, woollen and silk, clothes with metal inserts, nylon stockings, bulky clothes, such as anoraks, bedcovers, quilts, sleeping bags and duvets must not be dried.
- Clothes padded with foam-rubber or materials similar to foam-rubber must not be machine dried.
- Fabrics containing residues of setting lotions or hair sprays, nail solvents or similar solutions must not be machine dried in order to avoid the formation of harmful vapours.
Programmes
Programmes are available according to the laundry type.
| Programmes | |
| Cotton | Hard-wearing textiles, heat-resistant textiles made of cotton or linen. |
| Cotton Eco | To increase the washing effects, the washing time is increased. |
| Synthetic | Wash synthetic articles, for example: shirts, coats, blending. While washing knitting textiles, the amount of detergent must be reduced due to its loose string construction and easily bubble formation. |
| Baby Care | To wash baby clothes. This programme can make the baby's wear cleaner and do a better rinse performance to protect the baby's skin. |
| Jeans | Specially for jeans. |
| Mix | Mixed load consisting of textiles made of cotton and synthetics. |
| Colours | To wash brightly coloured clothes. This programme can protect colours better. |
| Sport Wear | To wash activewear. |
| Quick | Extra short programme approx., suitable for lightly soiled washing as a small amount of laundry. |
| Delicate | For delicate, washable textiles, e.g. made of silk, satin, synthetic fibres or blended fabrics. |
| Wool | Hand or machine-washable wool or richwool textiles. Especially gentle wash programme to prevent shrinkage, longer programme pauses (textiles rest in wash liquor). |
| Spin Only | Extra spin with selectable spin speed. |
| Rinse&Spin | Extra rinse with spin. |
| Dry Only | Select it to dry clothes, the temperature is different. The drying time is according to the load. |
| 1 Hour W/D | For small synthetic clothes or shirts. The load limitation is 1 kg (about 4 shirts). When you have an urgent appointment but no cleaner shirt left in your cupboard, this programme will help you. Time duration is only 1 hour including wash and dry. Remark: Big towels or jeans are not suitable for this programme, as they will enlarge the time duration and affect the moisture content. |

Note!
- Please refer to your product to select the programmes.
Washing Programme Table
| Programme Wash | ng Drying Loa d (kg) | Temp. (°C) | Default Time (H) |
| 8.0 Default | 8.0 | ||
| 1400 | |||
| Cotton ECO 8.0 30 1:07 | |||
| Spot Wear 4.0 40 | 1:19 | ||
| Quick 2.0 Cold 0:15 | |||
| Delicate 2.5 30 1:00 | |||
| Wool 2.0 40 1:07 | |||
| Colours 8.0 Cold | 1:00 | ||
| Jeans 8.0 40 1:48 | |||
| Spin Only 8.0 - 0:12 | |||
| Rinse&Spin 8.0 - 0:31 | |||
| Baby Care | 7.0 | 60 | 1:45 |
| Dry Only | -/6.0 - | 4:28 | |
| Mix | 8.0/4.0 | 40 | 1:13 |
| Synthetic | 4.0/4.0 | 40 | 2:20 |
| Cotton | 8.0/6.0 | 40 2:40 | |
| 1 Hour W/D | 1.0/1.0 | Cold 1:00 | |
- The energy class is A Energy test programme: Cotton Eco 60 °C
Speed: the highest speed; Other as default.
Half load for 8.0Kg machine: 4.0Kg.
- “Cotton Eco 60 °C” is the standard washing programme and “Dry only” is the standard drying programmes to which the information in the label and the data sheet relates. They are suitable to clean normally soiled cotton laundry and that they are the most efficient programmes in terms of combined energy and water consumptions for washing that type of cotton laundry. The actual water temperature may differ from the declared cycle temperature.
BECKEN

Note!
- The parameters in this table are only for user's reference. The actual parameters may be different from the parameters in the abovementioned table.
- The programme with can be chosen for dry function.
2.3. Maintenance
Cleaning the inlet filter
Note!
- The INLET filter must be cleaned if there is less water.
Washing the filter in the tap
- Close the tap.
- Remove the water supply hose from the tap.
- Clean the filter.
- Reconnect the water supply hose.
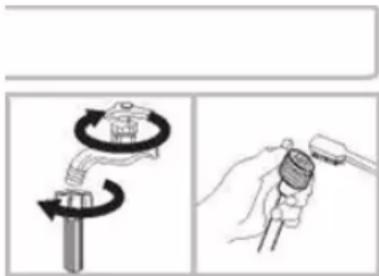
natural_image
Illustration showing two hand tools: one with a rotating knob and the other holding a tool (no text or symbols present)Washing the filter in washing machine:
- Unscrew the inlet pipe from the backside of the machine.
- Remove the filter with long nose pliers and reinstall it back after being washed.
- Use the brush to clean the filter.
- Reconnect the inlet pipe.

natural_image
Two-step diagram showing a hand using a tool to adjust or install a mechanical component, with no visible text or symbols.Note!
• If the brush is not clean, you can remove the filter and wash it separately;
- Reconnect the appliance and then turn on the tap.
Cleaning the detergent dispenser
- Press down the arrow location on the softener cover inside the dispenser drawer.
- Lift the clip and take out the softener cover and wash all grooves with water.
- Restore the softener cover and push the drawer into position.
1.
2.
3.
4.

natural_image
Diagram of a refrigerator interior with labeled parts (no text or symbols present)Pull out the dispenser drawer pressing A

natural_image
Line drawing of a mechanical device with a lever and internal components (no text or symbols)Clean the dispenser drawer under water
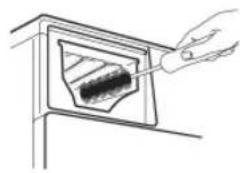
natural_image
Line drawing of a hand holding a tool interacting with a dark object inside a rectangular frame (no text or symbols)Clean inside the recess with an old toothbrush

natural_image
Line drawing of a refrigerator interior showing compartments and handle (no text or symbols)Insert the dispenser drawer
Note!
• Do not use alcohol, solvents or chemical products to clean the machine.
Cleaning the drain pump filter
⚠ Warning!
- Be careful of the hot water!
- Allow detergent solution to cool down.
- Unplug the machine to avoid electrical shock before washing.
- Drain pump filter can filter the yarns and small foreign matters from the washing.
- Clean the filter periodically to ensure the normal operation of washing machine.
-

Open the Service filter -
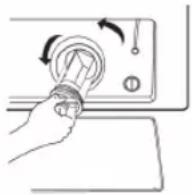
Open the filter by turning it counterclockwise -

natural_image
Diagram showing a door switch with a circular dial and a separate button (no text or symbols)Remove extraneous matter

natural_image
Diagram of a mechanical component with rotating arms and a flat plate (no text or symbols)Close the lower cover cap
Caution!
• Make sure the valve cap and emergency drain hose are reinstalled properly; the cap plates should be inserted aligned with the hole plates, otherwise water may leak;
- Some machines don't have an emergency drain hose, so steps 2 and 3 can be skipped. Rotate the lower cover cap directly to make the water run into the basin.
- When the appliance is operating and depending on the programme selected, the pump can be filled with hot water. Never remove the pump cover during a washing cycle; always wait until the appliance has finished the cycle, and is empty. When replacing the cover, ensure it is securely re-tightened.
2.4. Troubleshooting
If you press start and the appliance does not work or stops during operation, first try to find a solution to the problem, if not, contact the Customer Support Service.
| Description | Reason | Solution |
| Washer dryer cannot start up | The door is not closed properly | Restart after the door is closedCheck if clothes are stuck |
| The door cannot be opened | The washer's safety protection design is active | Unplug from the mains, restart the product |
| Water leakage | The connection between the inlet pipe or outlet hose is not tight | Check and fasten the water pipesClean up the outlet hose |
| Detergent residues in the box | Detergent is dampened or agglomerated | Clean and wipe the detergent box |
| Indicator or display does not light up | Unplug from the mainsThe PC board or harness has a connection problem | Check if the power is shut down and the power plug is correctly plugged in |
| Abnormal noise | Check if the fixing (bolts) have been removedCheck if the machine is installed on a solid and levelled floor | |
| Description | Reason | Solution |
| E30 | The door is not properly closed | Restart after the door is closedCheck if clothes are stuck |
BECKEN
| E10 | Water injecting problem while washing | Check if the water pressure is too lowStraighten the water pipeCheck if the inlet valve filter is blocked |
| E21 | Overtime water draining | Check if the drain hose is blocked |
| E12 | Water overflow | Restart the washer |
| EXX | Others | Please try again first, call up the customer support line if there are still troubles |

Note!
- After checking, restart the appliance. If the problem persists or the display shows other alarm codes again, contact the customer support service.
3. Technical Specifications
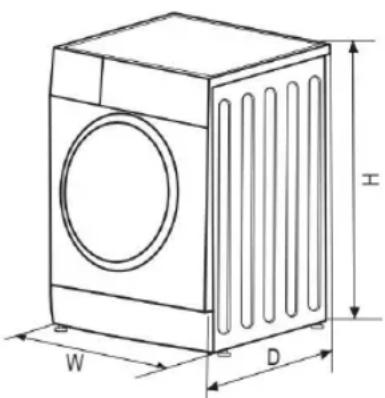
| Max. Current 10 A | |
| Standard Water Pressure 0.05 MPa~1 MPa |
| Model BWD4348 | |
| Power Supply 220-240 V~, 50 Hz | |
| Washing Capacity 8.0 kg | |
| Drying Capacity 6.0 kg | |
| Dimensions (WxDxH) 595 x 475 x 850 | |
| Weight 65 kg | |
| Rated Power 1900 W | |
| Drying Power 1300 W | |
BECKEN
Product Data Sheets
| Washing Capacity 8 kg | |
| Drying Capacity 6 kg | |
| Spin Speed 1400 rpm | |
| Energy efficiency class 1 A | |
| Energy consumption per cycle (to wash and dry a full capacity wash load at 60 °C) | 5.44 kwh/Cycle |
| Water consumption per cycle (Total) 152 L/cycle | |
| Annual energy consumption (Using the dryer) 2 1088 kWh/annual | |
| Annual water consumption (Using the dryer) 3 30400 L/annual | |
| Annual energy consumption (Never Using the dryer) 3 192 kWh/annual | |
| Annual water consumption (Never Using the dryer) 3 12800 L/annual | |
| Washing performance class 4 A | |
| Spin-drying efficiency class 5 A | |
| Standard washing cycle 6 Cotton ECO | |
| Energy consumption of the Cotton ECO 60 °C at full load (Washing) | 0.88 kwh/cycle |
| Water consumption of the Cotton ECO 60 °C at full load (Washing) | 64 L/cycle |
| Remaining moisture content of the Cotton ECO 60 °C at full load (Washing) | 44% |
| Programme duration of Cotton ECO 60 °C at full load (Washing) | 305 min |
| Energy consumption of the Dry at full load (Drying) | 4.56 kwh/cycle |
| Water consumption of the Dry at full load (Drying) | 88 L/cycle |
| Remaining moisture content of the Dry at full load (Drying) | 0% |
| Programme duration of Dry at full load (Drying) | 340 min |
| Power consumption of off-mode | 0.5 W |
| Power consumption of Left on-mode 1.0 W | |
| Noise level of washing | 58 dB (A) |
| Noise level of spinning | 78 dB (A) |
| Noise level of drying | 62 dB (A) |

Note!
■ Programme setting for testing in accordance with applicable standard EN 50229:2015+Commission Directive 96/60/EC.
- When using the test programmes, wash the specified load using the maximum spin speed.
- The actual parameters will depend on how the appliance is used, and may be different from the parameters in the abovementioned table.
- When testing with Standard Programme (drying), the load is composed of two parts to test alone, the energy consumption, water consumption and programme duration are the total of the two parts.
- The household washer dryer machine is equipped with a power manager system. The duration of the left-on mode is less than 1 minute.
Remarks
The energy efficiency class is from A (highest efficiency) to D (lowest efficiency).
② Estimated annual energy and water consumption for a four-person household, always using the dryer (based on 200 cycles) per year.
③ Estimated annual energy and water consumption for a four-person household, never using the dryer (based on 200 cycles) per year; Water consumption per year based on 220 standard washing cycles for standard programme at 60 °C and 40 °C at full and partial load Actual water consumption will depend on how the appliance is used.
④ Washing performance class.
⑤ Spin-drying efficiency class from G (least efficient) to A (most efficient).
⑥ The standard programme is standard washing programme. The programme is suitable to clean normally soiled cotton laundry and they are the most efficient programmes in terms of combined energy and water consumptions for washing that type of cotton laundry. The actual water temperature may differ from the declared cycle temperature.
Please choose the suitable type of detergent for the various washing
BECKEN
temperatures to get the best washing performance with less water and energy consumption.
4. Post-Sale Service
BECKEN has designed this appliance in order to guarantee maximum reliability. However, if a problem occurs do not attempt to open the appliance - there is a risk of electrical shock. If you are not able to solve the problem, please contact the Customer Support Service of any Worten, Modelo or Continente store in order to be assisted. Worten Equipamentos para o Lar provides a 2-year warranty for manufacturing defects from the date of purchase of the appliance.
WARNING: any attempt to repair the appliance without contacting the manufacturer or seller will void the warranty.
All users must be familiar with these instructions. Knowing what could go wrong can help prevent problems from occurring.
5. Environmental Protection
In order to protect the environment, we strive to reduce the volume of packaging used, limiting it to three easily sorted materials: cardboard, paper and plastic. The appliance is manufactured using recyclable materials after disassembled by a specialized company. Please comply with local regulations concerning the recycling of all materials.

natural_image
Symbol of a trash bin with crossed lines indicating no waste or restriction, and a solid black rectangle below (no text or labels)natural_image
Illustration of a box with an arrow pointing upward and a magnified inset showing a mechanical component (no text or symbols)natural_image
Diagram of a hand using a tool to adjust or install a mechanical component, no text or symbols present
¡Atención!
natural_image
Line drawing of a kitchen sink with faucet and faucet (no text or symbols)

¡Advertencia!
natural_image
Simple line drawing of a sweater with a tag and patterned jacket (no text or symbols)Verifique la etiqueta

Vacíe los bolsillos

natural_image
Two handbags with circular designs, one open and one closed, shown in line drawing style (no text or symbols)natural_image
Simple line drawing of a bag with a small animal inside, no text or symbols presentnatural_image
Line drawing of a traditional-style jacket with shoulder-length sleeves and front connectors (no text or symbols)natural_image
Diagram showing a mechanical or process step with two components moving in a container (no text or symbols)Retire el dispensador

¡Precaución!
natural_image
Two-step diagram showing a hand holding a tool with a rotating knob and a handle, no text or symbols present.natural_image
Two-step diagram showing a hand using a tool to adjust a circular component on a table, with no visible text or symbols.
Nota:
natural_image
Diagram of a mechanical component with labeled section A (no text or symbols beyond label)natural_image
Line drawing of a mechanical lever mechanism inside a container (no text or symbols)natural_image
Simple line drawing of a hand inserting a plug into a socket (no text or symbols)natural_image
Line drawing of a mechanical or electrical component with internal compartments and a handle (no text or symbols)natural_image
Diagram showing a door with a knob and a separate tool, no text or symbols presentnatural_image
Diagram of a mechanical component with rotational arrows indicating motion (no text or symbols)natural_image
Symbol of a trash bin crossed with two crossed lines, no text or labels presentCaro(a) cliente,
natural_image
Diagram of a box being inserted into a device with an inset showing a mechanical component (no text or symbols present)natural_image
Diagram of a hand using a tool to adjust or install a mechanical component, no text or symbols presentnatural_image
Line drawing of a front-loading washing machine with wheels and a circular vent (no text or symbols)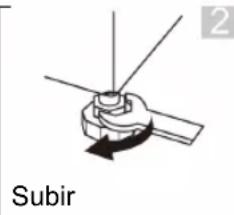


natural_image
Diagram of a mechanical assembly with a rotating component and a handle (no text or symbols)natural_image
Diagram of a mechanical assembly with a lever and directional arrow (no text or symbols)Ligação terminada
natural_image
Diagram showing a faucet being inserted into a socket, with an arrow indicating the process (no text or symbols present)Torneira especial para máquina de lavar e secar roupa
BECKEN

Nota!
natural_image
Line drawing of a kitchen sink with faucet and faucet (no text or symbols)

Atenção!
flowchart
graph TD
    A["1: Hand opening on wall"] --> B["2: Valve insertion"]
    B --> C["3: Ring closure"]
    C --> D["4: Ring closure with arrow"]
    D --> E["5: Setup pre-lavagem with Lavagem principal and Armacador"]
Ligar a ficha Abra a torneira Carga Feche a porta Adicionar o
detergente

Nota!
natural_image
Simple line drawing of a sweater with a decorative tag (no text or symbols)Verifique a etiqueta

natural_image
Two handbags with circular designs, one open and one closed, shown in line drawing style (no text or symbols)natural_image
Simple line drawing of a bag with a bag inside, containing a small object inside (no text or symbols)natural_image
Line drawing of a traditional-style sweater with patterned collar and side handles (no text or symbols)natural_image
Diagram showing a mechanical or structural assembly with arrows indicating motion (no text or symbols)natural_image
Technical line drawing of a mechanical device with no visible text or symbolsRetire a gaveta
! Atenção!
natural_image
Line drawing of a washing machine with a hand holding the top part (no text or symbols)natural_image
Two-step diagram showing a hand holding a tool with a circular arrow indicating rotation (no text or symbols)Lavar o filtro na má quina de lavar roupa:
natural_image
Illustration showing two steps of a hand using a tool to adjust or install a component, with no visible text or symbols.4 Nota!
natural_image
Line drawing of a mechanical device with a lever and handle (no text or symbols)natural_image
Line drawing of a hand inserting a plug into a socket (no text or symbols)natural_image
Line drawing of a mechanical or electrical component with internal compartments and a handle (no text or symbols)natural_image
Diagram of a mechanical component with rotational arrows indicating motion (no text or symbols)natural_image
Symbol of a trash bin with crossed lines indicating no waste or restriction, accompanied by a black rectangular block below (no text or symbols present)
BECKEN
Imported, produced and distributed by:
Worten Equipamentos p/o Lar S.A.
- Index
- BECKEN
- Safety Instructions
- Important Warnings
- Explanation of symbols:
- Warning!
- Caution!
- Note!
- Assistance
- Power Supply
- Power Cord and Other Cables
- Humidity and Water
- Cleaning
- General Precautions
- Risk of electric shock
- Risk of explosion
- Installing the product
- Risk of damaging the appliance
- Operating Instructions
- Product Description
- Product usage
- Installation
- Unpacking the washing machine
- Levelling the washer dryer
- Connecting the Water Supply Hose
- Drain Hose
- Quick Start
- Before Washing
- Washing
- After Washing
- Before Each Wash
- Other Functions
- Dry Level
- Programmes
- Maintenance
- Cleaning the inlet filter
- Washing the filter in the tap
- Washing the filter in washing machine:
- Cleaning the detergent dispenser
- Cleaning the drain pump filter
- ⚠ Warning!
- Troubleshooting
- Technical Specifications
- Remarks
- Post-Sale Service
- Environmental Protection
- ¡Atención!
- ¡Advertencia!
- ¡Precaución!
- Nota!
- Atenção!
- ! Atenção!
- Lavar o filtro na má quina de lavar roupa:
- Nota!
Brand : Becken
Model : BWD4348
Category : Washing machine