
DMX9720XS - Media player KENWOOD - Free user manual and instructions
Find the device manual for free DMX9720XS KENWOOD in PDF.


| Product Type | Monitor with Receiver |
| Display Size | 10.1 inches diagonal |
| Display Resolution | 1280 x 720 pixels (RGB) |
| Installation Dimensions (W x H x D) | 178 x 100 x 155 mm |
| Weight | 3.25 kg |
| Operating Voltage | 12 V DC car battery |
| Maximum Power Output | 50 W x 4 (Front & Rear) |
| Preout Voltage | 5 V / 10 kΩ |
| Bluetooth Version | 5.0 |
| Bluetooth Profiles | HFP, A2DP, AVRCP, PBAP, SPP |
| USB Standard | USB 2.0 High Speed |
| USB File Systems | FAT16, FAT32, exFAT, NTFS |
| Audio Playback Formats | MP3, WMA, AAC, WAV, FLAC, DSD, Vorbis |
| Video Playback Formats | MPEG-1, MPEG-2, MPEG-4, WMV, H.264, MKV |
| FM Tuner Frequency Range | 87.5 – 108.0 MHz (50 kHz step) |
| AM Tuner Frequency Range | 531 – 1611 kHz (9 kHz step) |
| Digital Radio (DMX9720XDS only) | DAB+ (BAND III: 174.928 – 239.200 MHz) |
| Apple CarPlay | Wired (USB) and wireless |
| Android Auto | Wired (USB) and wireless |
| Wi-Fi Standard | 802.11 a/b/g/n/ac (dual band) |
| HDMI Input | Type-A (supports HDCP 2.2) |
| Touch Screen | Capacitive, multi-touch |
| Hi-Res Audio Support | Yes (PCM up to 192 kHz/24-bit, DSD up to 11.2 MHz) |
| Security Code | Yes (4-8 digit PIN) |
| Camera Input | Multiple cameras supported (rear, front, etc.) |
Frequently Asked Questions - DMX9720XS KENWOOD
User questions about DMX9720XS KENWOOD
0 question about this device. Answer the ones you know or ask your own.
Ask a new question about this device
Download the instructions for your Media player in PDF format for free! Find your manual DMX9720XS - KENWOOD and take your electronic device back in hand. On this page are published all the documents necessary for the use of your device. DMX9720XS by KENWOOD.
USER MANUAL DMX9720XS KENWOOD
DMX9720XS DMX9720XDS
MONITOR WITH RECEIVER INSTRUCTION MANUAL
JVCKENWOOD Corporation
- Updated information (the latest Instruction Manual, system updates, new functions, etc.) is available from https://www.kenwood.com/cs/ce/.
- The Instruction manual is subject to change for modification of specifications and so forth. Be sure to download the latest edition of the Instruction manual for reference. https://manual.kenwood.com/edition/im406/
Made for

iPhone | iPod

Works with
Apple CarPlay
android auto

HIGH-DEFINITION MULTIMEDIA INTERFACE


Hi-Res Audio logo and Hi-Res Audio Wireless logo are used under license from Japan Audio Society.


Bluetooth®

Important Notice on Software

Software License on This duct
The software embedded in this product comprises a number of independent software components, each of which is copyrighted by JVCKENWOOD Corporation or by a third party.
This product uses software components that are based on an End-User License Agreement (hereinafter called "EULA") stipulated by JVCKENWOOD Corporation and by third parties.
The EULA dictates the availability of the source codes of free-software components as a prerequisite to distributing them in executable form under the terms of the GNU General Public License or the Lesser
General Public License (hereinafter called "GPL/LGPL"). To get information about the software components that are subject to the terms of the GPL/LGPL, please visit the following Website:
Website URL https://www2.jvckenwood.com/gpl/
Queries concerning the contents of the source code or the like will not be accepted.
Please note that software components based on a EULA that is not subject to the terms of the GPL/LGPL or those that have been developed or created by JVCKENWOOD Corporation will be excluded from the scope of source code disclosure.
Because licenses to use software components distributed under the GPL/LGPL are offered to the customers for free of charge, no warranty is granted to the customers, whether explicitly or implicitly, to the extent of the applicable laws.
Unless otherwise stipulated by the applicable laws or agreed upon in writing, the copyright holders or those who are entitled to modify and redistribute the software components are not held responsible for any and all damages resulting from their use or from inability to use them. For more information about the terms of use of the software components, required items of compliance and so on, please refer to the GPL/LGPL.
Customers wishing themselves to use a software component that is subject to the GPL/LGPL embedded in this product are encouraged to read the terms of the corresponding license before use. Because each individual license is prescribed by a third party other than JVCKENWOOD Corporation, the original (English) of the license is presented.
EULA

Software License Agreement
JVCKENWOOD Corporation (hereinafter called
"Licensor") holds either the copyright to the embedded software or the right to sublicense it. This agreement establishes the conditions under which the customer uses this "Licensed Software."
The customer shall agree to the terms of this license agreement before proceeding to use Licensed Software.
This agreement is deemed to have taken effect when the customer (hereinafter called "User") has used a product implementation of Licensed Software.
The Licensed Software may contain software Licensor has been licensed to use by third parties directly or indirectly. Some third parties may have terms of use prescribed for their customers, apart from this Software License Agreement. This agreement does not apply to such software. Be sure to consult "Important Notice on Software" as presented separately.
Article 1 (General)
Licensor grants to User a non-exclusive, non-assignable right of use Licensed Software within the country where the User purchases the Product (hereinafter the "Country") (except for the exception provided for in Paragraph 1, Article 3).
Article 2 (Right of Use)
- The rise of use granted under this agreement is the right to use Licensed Software in this product.
- User may not duplicate, copy, modify, add to, translate or otherwise alter, or loan licensed Software and the associated literature in whole or in part.
- Use of Licensed Software is limited to a private extent, and Licensed Software may not be distributed, licensed or sublicensed for any purposes whatsoever, including commercial use.
- User shall use Licensed Software as per the instruction manual or instructions given in the help file and may not use or duplicate data in violations of the regulations of the Copyright Law or other governing laws by using Licensed Software in whole or in part.
Article 3 (Terms of License)
- In assigning this product, User may not retain the original copy of the embedded Licensed Software (including associated literature, updates and upgrades) and any duplicates and associated literature with regard to the license to use Licensed Software. User may transfer Licensed Software only to the condition of binding the assignee to abide by the terms of this Software License Agreement.
- User may not reverse-engineer, disassemble, decompile or otherwise analyze the source code of Licensed Software.
Article 4 (Rights to Licensed Software)
All rights to Licensed Software and the associated literature, including copyrights, shall reside with Licensor or
the original right holder who has granted the Right of Use and right to sublicense to Licensor (hereinafter referred to as "Original Right Holder"), and User does not have any rights other than Right of Use granted hereunder with regard to Licensed Software and the associated literature.
Article 5 (Exemption Granted to Licensor)
- Licensor and Original Right Holder do not assume any responsibility for damages caused to User or third parties resulting from the exercise by User of the license granted hereunder, unless otherwise provided by any law to the contrary.
- Licensor does not warrant Licensed Software to be merchantable, compatible and fit for specific purposes.
Article 6 (Responsibility for Third Parties)
If disputes over the infringement of third parties' intellectual property rights, such as copyrights and patent rights, arise out of the use of Licensed Software by User, User shall resolve these disputes at User's own expenses while keep Licensor and Original Right Holder harmless.
Article 7 (Secrecy Obligation)
User shall keep confidential Licensed Software provided hereunder, information contained in the associated literature or the like and those provisions of this agreement not yet in public knowledge and may not disclose or leak these to third parties without prior written consent from Licensor.
Article 8 (Cancellation of the Agreement)
Licensor reserves the right to cancel this agreement forthwith and claim compensation from User for the damages caused by such cancellation when User:
(1) Breaches any of the provisions of this agreement, or
(2) Has received a petition for seizure, provisional seizure, provisional disposition or any other kind of compulsory execution.
Article 9 (Destruction of Licensed Software)
If this agreement is terminated under the provision of the foregoing paragraph, User shall destroy Licensed Software, along with all associated literature and its duplicates, within two (2) weeks from the date of termination.
Article 10 (Copyright Protection)
- Copyrights and all other intellectual property rights relating to Licensed Software shall reside with Licensor and Original Right Holder and in no circumstances with User.
- User shall abide by the laws relating to copyrights and intellectual property rights in using Licensed Software.
Article 11 (Export Control)
- Licensed Software and the associated literature or the like may not be exported to places outside the Country (including transmission outside the Country over the Internet or the like).
- User agrees that Licensed Software is subject to export controls imposed by the Country and the United States of America.
- User agrees to comply with all the international and domestic laws that apply to this software (U.S. Export Administration Regulations and regulations established by the U.S., the Country and their governmental agencies regarding usage by end users and export destinations).
Article 12 (Miscellaneous)
- Even if this agreement is invalidated in part by law, all other provisions shall remain in effect.
- Licensor and User shall consult each other in good faith to resolve any matters not provided for in this agreement or questions arising from the interpretation of this agreement.
- Licensor and User agree that this agreement is governed by the law of Japan and that all disputes involving claims and obligations that may arise out of this agreement will be settled by arbitration at the Tokyo District Court as the court of first instance.
Contents
Before Use 6
Precautions....6
How to read this manual 6
Basic Operations 7
Functions of the Buttons on the Front Panel ... 7
Turning on the Unit 8
Initial Settings......8
Adjusting the volume....11
Touch screen operations 11
HOME screen descriptions....11
Popup menu 12
Source selection screen description......12
Source control screen descriptions 14
List screen 15
Widget 16
Widget....16
Drive Widget Panel 16
Importing Image Files......17
APPS 18
Wireless Mirroring Operation....18
Apple CarPlay Operation....18
Android Auto Operation....20
USB 23
Connecting a USB device 23
USB Basic Operation....23
Search Operation....25
iPod/iPhone 26
Preparation....26
iPod/iPhone Basic Operation 27
Search Operation....28
Radio 29
Radio Basic Operation ....29
Memory Operation....30
Selecting Operation ....30
Traffic Information (FM only)......31
Radio Setup....31
Digital Radio 32
Digital Radio Basic Operation ....32
Storing Service in Preset Memory....33
Selecting Operation ....33
Traffic Information 34
Digital Radio SETUP....35
Bluetooth Control 36
Information for using Bluetooth® devices......36
Register the Bluetooth device ....37
Bluetooth Setup....39
Playing the Bluetooth Audio Device ....40
Using the Hands-Free Unit....42
Hands-Free Setup....47
Other External Components 48
View Camera 48
Use Dashboard Camera....51
External audio/video players (AV-IN)....52
HDMI source....52
OEM Features Operation ....52
Setup 53
Monitor Screen Setup....53
Connections & AV Setup....53
Display & Button Setup 55
User Interface Setup....56
System Setup....58
Controlling Audio 60
3-way speaker system setup 60
Speaker / X'over setup....61
Equalizer Control....62
Listening Position / DTA....63
Fader / Balance / Zone Control......65
Volume Offset....67
Sound Effect....67
Parametric Equalizer....68
Audio Setup memory ....71
Remote control 72
Battery Installation....72
Functions of the Remote control Buttons .....72
Connection/Installation 75
Before Installation....75
Installing the unit....78
Troubleshooting 91
Problems and Solutions....91
Error Messages....92
Appendix 93
playable Media and Files....93
Specifications....95
About this Unit....98
Before Use
Precautions
⚠️ WARNINGS
To prevent injury or fire, take the following precautions:
• To prevent a short circuit, never put or leave any metallic objects (such as coins or metallic tools) inside the unit.
- Do not watch or fix your eyes on the unit's display when you are driving for any extended period.
- If you experience problems during installation, consult your KENWOOD dealer.
Precautions on using this unit
- When you purchase optional accessories, check with your KENWOOD dealer to make sure that they work with your model and in your area.
- You can select a language to display menus, audio file tags, etc. See System Setup (P.58).
- The Radio Data System feature won't work in areas where the service is not supported by any broadcasting station.
Protecting the monitor
- To protect the monitor from damage, do not operate the monitor using a ball point pen or similar tool with a sharp tip.
Cleaning the unit
- If the faceplate of this unit is stained, wipe it with a dry soft cloth such as a silicon cloth. If the faceplate is stained badly, wipe it with a cloth moistened with neutral cleaner, then wipe it again with a clean soft dry cloth.
NOTE
- Applying spray cleaner directly to the unit may damage its mechanical parts. Wiping the faceplate with a hard cloth or using a volatile liquid such as thinner or alcohol may scratch the surface or erase the screened print.
Acquiring GPS signal
The first time you turn on this unit, you must wait while the system acquires satellite signals for the first time. This process could take up to several minutes. Make sure your vehicle is outdoors in an open area away from tall buildings and trees for fastest acquisition.
After the system acquires satellites for the first time, it will acquire satellites quickly each time thereafter.
About GLONASS
This unit uses Global Navigation Satellite System (GLONASS) in addition to GPS.
Combining GPS and GLONASS can refine positioning accuracy than using GPS only.
Caution for Smartphone Users
Simultaneously running multiple applications on your smartphone while screen sharing places heavy demand on the microprocessor of the phone, potentially affecting communication and performance.
For best results while pairing with your KENWOOD receiver, please be sure to close any unused applications.
How to read this manual
- The screens and panels shown in this manual are examples used to provide a clear explanation of operations.
For this reason, they may be different from the actual screens or panels, or some display patterns may be different from the actual ones. - Display language: English is used for the purpose of explanation. You can select a display language from the [SETUP] menu. See System Setup (P.58).
Basic Operations
Functions of the Buttons on the Front Panel

| Number | Name Motion | |
| 1 | Remote Sensor | • Receives the remote control signal. |
| 2 | HOME/ | • Displays the HOME screen (P.11).• Pressing for 1 second turns the power off.• When the power is off, turns the power on. |
| 3 | CAMERA • Switches view camera display on/off. (P.48)The camera whose view is displayed first changes according to the Camera Assignment Settings (P.49) and the shift lever position in the shift gate. The camera whose view was displayed last is kept and the same camera view will be displayed the next time. If its assignment setting is changed, the rear camera view is displayed. | |
| 4 | MENU/ATT • | Displays the popup menu screen.• Pressing for 1 second switches attenuation of the volume on/off. |
| 5 | Volume knob | • Adjusts the volume. (P.11) |
| 6 | • Displays the APP (Apple CarPlay/Android Auto/Wireless Mirroring) screen.• While the APP screen is displayed, switches to the control screen of current source. | |
| 7 | VOICE | • Switches the voice recognition function on/off. (P.20, P.22, P.44)• When neither Apple CarPlay, Android Auto, nor a Bluetooth Hands-Free phone is connected, pressing and holding displays Bluetooth pairing waiting dialog. (P.37) |
Turning on the Unit
1 Press the [HOME]∅ button.

The unit is turned on.
●To turn off the unit:
1 Press the [HOME]∅] button for 1 second.
NOTE
- If it is your first time to turn the unit on after installation, it will be necessary to perform Initial SETUP (P.8).
Initial Settings
Initial SETUP
Perform this setup when you use this unit first time.
1 Set each item as follows.

[Language]
Select the language used for the control screen and setting items. Default is "British English(en)".
① Touch [Language].
② Touch [Language select].
③ Select the desired language.
④ Touch[1].
For details, see System Setup (P.58).
[Clock]
Sets the synchronization of the clock and adjusts it.
For details, see Calendar/clock settings (P.10).
■[Display & Button]
Set the button illumination color.
① Touch [Display & Button].
② Touch [Button Illumination Colour].
③ Select the desired color.
④ Touch [7].
For details, see Display & Button Setup (P.55).
[Camera]
Set the parameters for the camera.
① Touch [Camera].
② Set each item and touch [7].
For details, see Camera Setup (P.48).
[DEMO]
Set the demonstration mode. Default is "ON".
■ [3way X'over]
Displays the message screen.
For details, see 3-way speaker system setup (P.60).
2 Touch [Finish].

NOTE
• These settings can be made from the SETUP menu. See Setup (P.53).
Security Code Setup
You can set up a security code to protect your receiver system against theft.
When the Security Code function is activated, the code cannot be changed and the function cannot be deactivated. Note that the Security Code can be set with a 4 to 8 digit number of your choice.
Preparation
- Set [DEMO] to OFF in the System setting menu screen (P.58).
1 Press the [HOME]∅ button.
2 Touch [.]
3 Touch [SETUP].
▶ SETUP Menu screen appears.
4 Touch [System].
▶ System setting menu appears.
5 Touch [Security Code Set] in the system setting menu.
▶ Security Code Set screen appears.
6 Enter a security code with 4 to 8 digit number and touch [Enter].

7 Enter the same code again and touch [Enter].
Now, your security code is registered.
NOTE
- Touch [BS] to delete the last entry.
- If you enter a different security code, the procedure returns to step 5 (for first code entry).
- If you have disconnected the Receiver from the battery, enter the correct security code as that you have entered in step 5 and touch [Enter]. You can use your receiver.
To change the security code:
1 Touch [Security Code Change] on the Security screen.
▶ Security Code Set screen appears.
2 Enter the current registered security code and touch [Enter].
3 Enter a new security code with 4 to 8 digit number and touch [Enter].
4 Enter the same code again and touch [Enter].
The new security code is registered.
To clear the security code:
1 Touch [Security Code Cancellation] on the Security screen.
▶ Security Code Set screen appears.
2 Enter the current registered security code and touch [Enter].
The security code is cleared.
Calendar/clock settings
1 Press the [HOME]∅ button.
2 Touch
3 Touch [SETUP].
▶ SETUP Menu screen appears.
4 Touch [System].
▶ System setting menu appears.
5 Set each item as follows.
Scroll the page to show hidden items.
![Language Select British English(en) Time Format 12-Hour Clock GPS-SYNC Time Zone Bangkok [GMT +7:00]](/content/2026/05/837760/images/ebca985b8da843d4879248073ee166a848fc03417b6ed1e1f89c0baea7731854.jpg)
[Time Format]
Select the time display format.
[12-Hour] (Default)/[24-Hour]
[Clock]
[GPS-SYNC] (Default): Synchronizes the clock time with the GPS.
[Manual]: Set the clock manually.
[Time Zone]
Select the time zone.
[Clock Adjust]
If you select [Manual] for Clock, adjust the date and time manually. (P.10)
NOTE
- Please set the date and time. If they are not set, some functions may not work.
Adjust the date and time manually
1 Touch [Clock] in the System setting menu.
2 Select [Manual].
3 Touch [Time Zone] in the System setting menu.
4 Select the time zone.
5 Touch [Clock Adjust] in the System setting menu.
6 Adjust the date, then adjust the time.
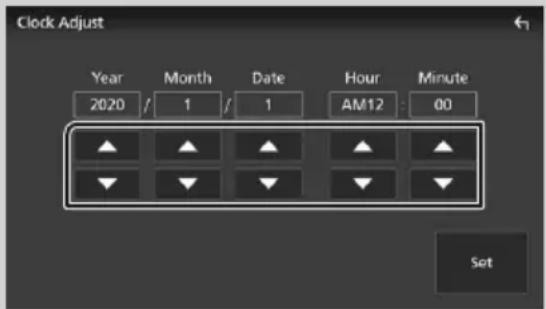
7 Touch [Set].
Adjusting the volume
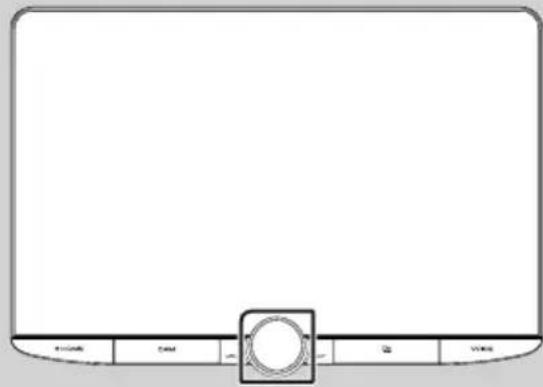
You can adjust the volume (0 to 40). Turn the knob clockwise to increase, and counter-clockwise to decrease.
Touch screen operations
To perform operations on the screen, you need to touch, touch and hold, flick or swipe to select an item, display a setting menu screen or change pages.
●Touch
Touch the screen gently to select an item on the screen.
natural_image
Simple line drawing of a hand cursor clicking a button (no text or symbols)●Touch and hold
Touch the screen and keep your finger in place until the display changes or a message is displayed.

natural_image
Hand cursor icon pressing a circular button (no text or symbols)●Flick
Slide your finger quickly to the left or right on the screen to change the page. You can scroll a list screen by flicking up/down on the screen.

●Swipe
Slide your finger up or down on the screen to scroll the screen.

HOME screen descriptions
Most functions can be performed from the HOME screen.

| 1 | ·Widget (P.16) |
| 2 | ·Displays the source selection screen. (P.13) |
| 3 | ·Displays the SETUP Menu screen. (P.53) |
| 4 | ·Short-cut playback source icons (P.14) |
Display the HOME screen
1 Press the [HOME]∅] button.

HOME screen appears.
Popup menu
1 Press the[MENU]/[ATT]button.
▶ Popup menu appears.
2 Touch to display the popup menu.

The contents of the menu are as follows.
 | • Displays the Screen Adjustment screen.(P.53) |
 | • Turns the display off.(P.12) |
 | • Displays the view camera screen.(P.48) |
 | • Displays the SETUP Menu screen.(P.53) |
 | • Displays the Audio screen.(P.60) |
 | • Displays the control screen of current source. Icon feature differs depending on the source. This icon is for USB source. |
 | • Close the popup menu. |
 | • Short-cut source icons: The source changes to the one you have set with a short-cut. For the short-cut setting, refer to Customize Short-cut source icons(P.14). |
 | • Displays the Device List screen.(P.37) |
Turn off the screen
1 Select [Display OFF] on the popup menu.

NOTE
- Touch the display to turn on the screen.
- To display the clock while the screen is off, it is necessary to set "OSD Clock" to "ON". (P.55)
Source selection screen description
You can display icons of all playback sources and options on the source selection screen.

| 1 | • Changes playback sources. For playback sources, seeSelect the playback source (P.13). |
| 2 | • Changes pages. (Touch 📁/_) You can also change pages by flicking left or right on the screen. |
| 3 | • Returns to the previous screen. |
| 4 | • Displays the SETUP Menu screen. (P.53) |
Select the playback source
1 Press the [HOME]∅ button.
HOME screen appears.
2 Touch
From the screen, you can select the following sources and functions.
 | • Switches to the Digital Radio broadcast.* (P.32) |
 | • Switches to the Apple CarPlay screen from the connected iPhone. (P.18) |
 | • Switches to the Android Auto screen from the connected Android smartphone. (P.20) |
 | • Displays the Hands-Free screen. (P.42) When neither Apple CarPlay, Android Auto, nor a Bluetooth Hands-Free phone is connected, displays Bluetooth pairing waiting dialog.*2 (P.37) |
 | • Switches to the Wireless Mirroring screen from the connected Android smartphone. (P.18) |
 | • Switches to the Radio broadcast. (P.29) |
 | • Plays a Bluetooth audio player. (P.40) |
 | • Plays an iPod/iPhone. (P.26) |
 | • Plays files on a USB device. (P.23) |
 | • Plays a device connected to the HDMI input terminal. (P.52) |
 | • Switches to an external component connected to the AV Audio input and the Video input terminal.*3 *4 (P.52) |
 | • Puts the unit in standby. (P.13) |
- For sources and information displayed when an iDatalink is connected, see OEM Features Operation (P.52). *1
*1 DMX9720XDS only
*2 When connecting as Apple CarPlay or Android Auto, it works as a phone provided in Apple CarPlay or Android Auto. If Apple CarPlay or Android Auto are connected during talking by the Bluetooth device or iDatalink phone, the current call will be continued.
*3 You can use the [AV-IN] source when a cable from a visual source except a camera is connected to the Video input terminal, and a cable is connected to the AV Audio input terminal. (P.87)
*4 Set "VIDEO IN" to "None" in Camera Assignment Settings. (P.49)
Put the unit in standby
1 Press the [HOME]∅] button. ▶ HOME screen appears.
2 Touch
3 Touch [STANDBY].

Customize Short-cut source icons
You can arrange the positions of the source icons as you like.
The 4 items placed in bottom line will appear on the bottom bar in various screens, as the short-cut playback source icons.
1 Press the [HOME]∅ button.
HOME screen appears.
2 Touch
3 Touch and hold the icon which you want to move in the customizing mode.
4 Drag the icon to the desired position.

Changes the page


Source control screen descriptions
There are some functions which can be performed from most screens.

Displays the source selection screen. (P.12)
2
Displays the SETUP Menu screen. (P.53)
3 Short-cut source icons
The source changes to the one you have set with a short-cut. For the short-cut setting, refer to Customize Short-cut source icons (P.14).
4 Content list *
Displays the track/file/station/channel list.
5 TEL Y.1
Connected Bluetooth device information.
6 Indicator items
Indicators: Displays the current source condition and so on.
• [ATT]: The attenuator is active.
• [DUAL]: The dual zone function is active.
• [MUTE]: The mute function is active.
• [LOUD]: The loudness control function is active.
7 Function panel *
Touch the left side of the screen to display the function panel. Touch again to close the panel.
8 Operation keys
You can operate the current source with these operation keys. The available functions are different depending on the source type.
* For left hand drive vehicles, the left and right drawers are swapped. For how to set up the driving position, see User Interface Setup (P.56).
List screen
There are some common function keys in the list screens of most sources.
See (P.25, 28, 41).
Display the list screen
For USB/iPod:
1 Touch [Q] or the item listed on the information area in the source control screen.
The list screen appears.
For Bluetooth audio:
1 Touch [Q].
The list screen appears.
You can use following operation keys from this screen.
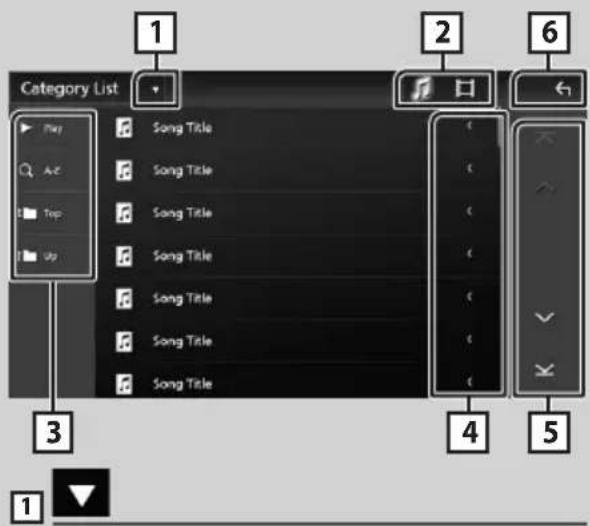
Displays the list type selection window.
Displays a music/movie file list.

Keys with various functions are displayed here.
- Play: Plays all tracks in the folder containing the current track.
• Q A-Z: Jumps to the letter you entered (alphabetical search). - Top Up gives to the upper hierarchy level.

Scrolls the displayed text.

You can change pages to display more items by touching [^]/[√].
• [×]/[×]: Displays the top or bottom page.

Returns to the previous screen.
NOTE
- Depending on the current source or mode, some function key may not appear.
Widget
Widget
1 Press the [HOME]∅ button.
2 You can change the widget or customize the widget area.

1 Full screen widget panel
You can change the full screen panel widget by flicking left or right on the widget panel. The widget is switched in the following sequence: Album Art, Visualizer, Photo Frame.
2 Flexible source widget panel
- Displays the current source information and operation keys.
- While playing an audio source, you can switch the widget panel size between 2-line and 4-line by touching the right top corner of the widget panel.
- [X] (USB/HDMI/AV-IN/Wireless Mirroring source only): Displays the source control screen.
• [HDMI/AV-IN/Wireless Mirroring source only):
Switches the widget panel orientation between horizontal and vertical.
3 Drive widget panel
You can change the drive panel widget by touching the right top corner of the widget panel. (P.16)
Photo Frame Widget
You can display a slideshow of the image files stored in your iPhone or Android smartphone.
Preparation
• See Importing Image Files (P.17).
Drive Widget Panel
You can change the widget.
1 Press the [HOME]∅ button.
2 Touch the right top corner of the drive widget panel.
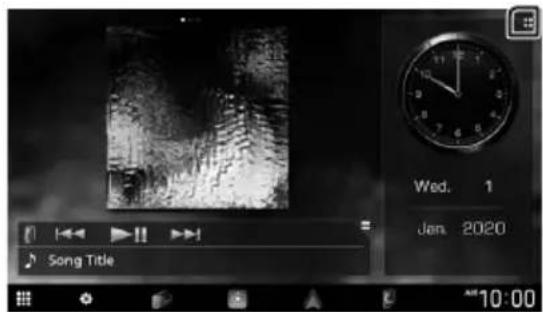
The drive widget list appears.
3 Touch the desired widget.
You can select from the following widgets.
- Clock Widget
- Compass Widget
- EQ Setting Widget
- Camera Widget
• Climate/TPMS/Radar Widget *1 *2 - ADAS Widget *1*2
*1 DMX9720XDS only
*2 Displayable widgets vary depending on the type of the connected iDatalink (commercially available) and the model of the vehicle.
● To change the widget position
You can change the widget panel position to right or left. If the drive widget panel position is changed, the full screen widget panel position and flexible source widget panel position are also changed.
1 Touch and hold the drive widget panel.
▶ Widget customize mode is activated.

2 Drag the drive widget to right or left.
Importing Image Files
You can display image files stored in your iPhone or Android smartphone by connecting your iPhone or Android smartphone in which the "KENWOOD Portal APP" application is installed to this unit.
The image files are displayed on the photo frame widget. Also, you can set an image as the wallpaper.
See Photo Frame Widget (P.16) and To register an original image (P.56).
Preparation
- Install the latest version of the "KENWOOD Portal APP" application on your iPhone or Android smartphone.
– iPhone: Search for "KENWOOD Portal APP" in the Apple App Store to find and install the most current version. - Android smartphone: Search for "KENWOOD Portal APP" in Google play to find and install the most current version.
- For details, see "KENWOOD Portal APP" application.
1 Connect the device.
- To connect a device via Bluetooth, register it as the Bluetooth device and do the App (SPP) profile setting of the connection beforehand. See Register the Bluetooth device (P.37) and Switch the connected device (P.38).
- Connect an iPhone using KCA-iP103 via the USB terminal. (P.89)
2 Unlock your device.
APPS
Wireless Mirroring Operation
You can display the same screen of the Android smartphone on the monitor of the unit using the Wireless Mirroring function of the Android smartphone.
Preparation
- You can use the Wireless Mirroring function with Android smartphones compatible with this function.
- This function may be called Wireless Display, Screen Mirroring, AllShare Cast, etc., depending on the manufacturer.
- The settings on the Android smartphone differ depending on the device type. For details, refer to the instruction manual supplied with your Android smartphone.
- If your Android smartphone is locked, Mirroring screen may not appear.
- If the Android smartphone is not ready for UIBC, you cannot perform touch operation.
1 Press the [HOME]∅] button.
2 Touch
3 Touch [Wireless Mirroring]. (P.13)
The App screen is displayed.
4 Operate your Android smartphone to activate the Wireless Mirroring function, then connect to this unit.
5 Select ("DMX****") as the network to use.
When the connection is established, then the same screen displayed on the Android smartphone is displayed.
NOTE
- Apps is discontinued when the power is turned ON/OFF or you leave the vehicle. To restart Apps, operate the Android smartphone.
- When the Apps source is displayed, you cannot register or reconnect a Bluetooth device. Switch the Apps source to another source, and then operate the Bluetooth device.
Apple CarPlay Operation
Apple CarPlay is a smarter, safer way to use your iPhone in the car. Apple CarPlay takes the things you want to do with iPhone while driving and displays them on the screen of the product. You can get directions, make calls, send and receive messages, and listen to the music from iPhone while driving. You can also use Siri voice control to make it easier to operate iPhone.
For details about Apple CarPlay, visit https://www.apple.com/ios/carplay/.
Compatible iPhone devices
You can use Apple CarPlay with the following iPhone models.
- iPhone XS Max
- iPhone 7 Plus
- iPhone XS
- iPhone 7
- iPhone XR
- iPhone SE
- iPhone X
- iPhone 6s Plus
- iPhone 8 Plus
- iPhone 6s
- iPhone 8
Connecting an iPhone
Wired connection
1 Connect your iPhone using KCA-iP103 via the USB terminal. (P.89)
When an iPhone compatible with Apple CarPlay is connected to the USB terminal, the Bluetooth Hands-Free phone currently connected is disconnected. If another Bluetooth Hands-Free phone is being used, disconnection will occur after ending the call.
2 Unlock your iPhone.
Wireless connection
You can select the iPhone registered in [Device List] and use it as the Apple CarPlay device.
See Register the Bluetooth device (P.37).
NOTE
- Turn on the Bluetooth function and Wi-Fi function of an iPhone.
- If two or more iPhone have been registered, select the iPhone to be used as the [Apple CarPlay] source. (P.19)
- It is necessary to connect the GPS antenna in order to use a wireless Apple CarPlay.
- When the Wi-Fi connection becomes unavailable, the HOME screen is displayed.
- You cannot use Apple CarPlay if the function is turned off by operating the iPhone at functional setup.
To switch the Current Screen to the Apple CarPlay Screen When Connecting Your iPhone
- Touch [Apple CarPlay] icon on the source selection screen. (P.13)
- Touch the following connection message if the message appears.

NOTE
• The connection message appears when;
– The iPhone you used previously is connected again.
– The screen other than HOME and the source selection screen is displayed.
- The connection message is displayed for about 5 seconds.

Select an Apple CarPlay device
If two or more iPhone compatible with Apple CarPlay have been registered, select the iPhone to be used as the Apple CarPlay source.
See Switch the connected device (P.38).
Operation keys and available Apps on the home screen of Apple CarPlay
You can use the Apps of the connected iPhone. The items displayed and the language used on the screen differ among the connected devices.
To enter the Apple CarPlay mode, touch [Apple CarPlay] icon on the source selection screen. (P.13)

• Displays the home screen of Apple CarPlay.
- Touch and hold to activate Siri.
2 Application keys
Starts the application.
3 [HOME]
Exits the Apple CarPlay screen and displays the Home screen.
* The icon design may change depending on the iOS version.
To exit the Apple CarPlay screen
1 Press the [HOME]∅] button.

Use Siri
You can activate Siri.
1 Press the [VOICE] button.

2 Talk to Siri.
To deactivate
1 Press the [VOICE] button.
Switch to the Apple CarPlay screen while listening to another source
1 Press the [button.

NOTE
- When listening to another source with the Apple CarPlay screen displayed, playing music in the Apple CarPlay mode will switch the current source to the Apple CarPlay source.
Android Auto™ Operation
Android Auto enables you to use the functions of your Android smartphone convenient for driving. You can easily access route guidance, make calls, listen to music, and access convenient functions on the Android smartphone while driving.
For details about Android Auto, visit https://www.android.com/auto/ and https://support.google.com/androidauto.
Compatible Android smartphones
You can use Android Auto with Android smartphones of Android version 5.0 or later.
For Wi-Fi connection, Android 8.0 or later.
NOTE
- Android Auto may not be available on all devices and may not be available in all countries or regions.
●About the placement of smartphone
Install the smartphone connected as Android Auto device in the place where it can receive the GPS signals.
When using Google Assistant, install the smartphone in the place where the smartphone easily catch a voice by the microphone.
NOTE
- Do not put the smartphone in a spot exposed to direct sunlight or near an air blowing out port of an air conditioner. The placement of the smartphone in such places can lead to malfunction or damage of your smartphone.
- Do not leave the smartphone in the vehicle.

Connect Android smartphone
Wired connection
1 Connect an Android smartphone via the USB terminal. (P.89)
To use the Hands-Free function, connect the Android smartphone via Bluetooth. When an Android smartphone compatible with Android Auto is connected to the USB terminal, the device is connected via Bluetooth automatically, and the Bluetooth Hands-Free phone currently connected is disconnected.
2 Unlock your Android smartphone.
3 Press the [HOME]∅] button.
4 Touch
5 Touch [Android Auto]. (P.13)
Wireless connection
You can select the Android smartphone registered in [Device List] and use it as the Android Auto device. See Register the Bluetooth device (P.37).
1 Press the [HOME]/∅] button.
2 Touch
3 Touch [Android Auto]. (P.13)
NOTE
- Turn on the Bluetooth function and Wi-Fi function of Android smartphone.
- If two or more Android smartphones have been registered, select the Android smartphone to be used as the Android Auto source. (P.21)
- To change the password for wireless connection manually, refer to [Reset Android Auto Wireless Connection] (P.54).
- When the Wi-Fi connection becomes unavailable, the HOME screen is displayed.

Select an Android smartphone
If two or more Android smartphones have been registered, select the Android smartphone to be used as the Android Auto source. See Switch the connected device (P.38).
Operation keys and available Apps on the Android Auto screen
You can perform the operations of the Apps of the connected Android smartphone.
The items displayed on the screen differ among the connected Android smartphones.
To enter the Android Auto mode, touch the [Android Auto] icon on the source selection screen. (P.13)


Navigation bar
Starts the application or displays information.
To exit the Android Auto screen
1 Press the [HOME]∅] button.
Using voice control
1 Press the [VOICE] button.

2 Start speaking.
NOTE
- When you press and hold the [VOICE] button while inputting voice, you can start over from the beginning.
To cancel
1 Press the [VOICE] button.
Switch to the Android Auto screen while listening to another source
1 Press the [button.

NOTE
- When listening to another source with the Android Auto screen displayed, playing music in the Android Auto mode will switch the current source to the Android Auto source.
USB
Connecting a USB device
1 Connect the USB device with the USB cable. (P.88)

natural_image
Line drawing of a USB connector with a cable, showing a port and connector (no text or symbols)2 Press the [HOME]∅] button.
3 Touch
4 Touch [USB]. (P.13)
Disconnect the USB device
1 Press the [HOME]∅] button.
2 Touch a source other than [USB].
3 Detach the USB device.
Usable USB device
You can use a mass-storage-class USB device with this unit.
The word "USB device" appearing in this manual indicates a flash memory device.
●About the file system
The file system should be the one of the following.
• FAT16 • FAT32 • exFAT • NTFS
NOTE
• Install the USB device in the place where it will not affect safe driving.
- You cannot connect a USB device via a USB hub and Multi Card Reader.
• Take backups of the audio files used with this unit. The files can be erased depending on the operating conditions of the USB device. We shall have no compensation for any damage arising from any erased data.
USB Basic Operation
Most functions can be controlled from the source control screen and playback screen.
NOTE
- Set the remote controller mode switch to AUD mode before starting operation, see Switch the operation mode (P.72).
Control screen

Open the drawer


1 [CODEC]
- When a high-resolution source is played, its format information is displayed.
2 Operation keys
• [Q]: Searches track/file. For details on search operation, see Search Operation (P.25).
- [I◄◄] [►►I]: Searches the previous/next track/file.
Touch and hold to fast forward or fast backward. (It will be cancelled automatically after about 50 seconds.)
USB
• [▶III] : Plays or pauses.
• [×]: Touch to mute or not to mute.
- [ ] : Repeats the current track/folder. Each time you touch the key, repeat modes are switched in the following sequence: Folder repeat ( folder repeat ( ), Repeat all ( )
- [×] : Randomly plays all tracks in the current folder. Each time you touch the key, random modes are switched in the following sequence: Folder random (×random off()
3 Function panel
Touch the left side of the screen to display the function panel. Touch again to close the panel.
- [−] [+] : Searches for the previous/next folder.
4 Track information
- Displays the information on the current file. Only a file name and a folder name are displayed if there is no tag information.
5 Play mode indicator/Playing time
- ▶, ▶▶, etc.: Current play mode indicator Meanings of individual icons are as follows: ▶ (play), ▶▶ (fast forward), ◀◀ (fast backward), ■■ (pause).
- For confirmation of current playing position. You can drag the circle left or right to change the playing position.

6 Content list
- Touch the right side of the screen to display the Content list. Touch again to close the list.
- Displays the playing list. When you touch a track/file name on the list, playback will start.
7 Artwork
• The jacket of the currently playing file is displayed.

8 File search area (Video file only)
Touch to search for the next/previous file.
9 Key display area (Video file only)
Touch to display the control screen.
Search Operation
You can search music or video files by the following operations.
1 Touch [Q].
2 Touch [▼].

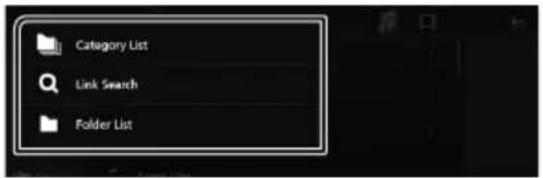
3 Select a list type.
NOTE
- For operations on the list screen, see List screen (P.15).

Category search
You can search for a file by selecting a category.
1 Touch [Category List].
2 Select whether you search audio files or video files.
3 Touch the desired category.

The list corresponding to your selection appears.
4 Touch to select the desired item in the list. Repeat this step until you find the desired file.

Link search (Audio file only)
You can search for a file of the same artist/album/genre as that in the current track.
1 Touch [Link Search].
2 Touch the desired tag type. You can select from artists, albums and genres.

The list corresponding to your selection appears.
3 Touch the desired item in the content list.

Folder search
You can search for a file according to hierarchy.
1 Touch [Folder List].
2 Touch the desired folder.

When you touch a folder its contents are displayed.
3 Touch to select your desired item in the list. Repeat this step until you find the desired file.
iPod/iPhone
Preparation

Connectable iPod/iPhone
The following models can be connected to this unit.
Made for
- iPhone XS Max
- iPhone XS
- iPhone XR
- iPhone X
- iPhone 8 Plus
-
iPhone 8
-
iPhone 7 Plus
- iPhone 7
- iPhone SE
- iPhone 6s Plus
- iPhone 6s
- iPod touch (6th generation)
NOTE
- Latest compatible list of iPod/iPhone. For details, see www.kenwood.com/cs/ce/ipod/.
- By connecting your iPod/iPhone to this unit with the iPod connection cable KCA-iP103 (optional accessory), you can supply power to your iPod/ iPhone as well as charge it while playing music. Note that the power of this unit must be held on.
- If you restart playback after connecting the iPod, the music that has been played by the iPod is played first.

Connect iPod/iPhone
Wired connection
Preparation
- Connect an iPod/iPhone with the KCA-iP103 (optional accessory) while Apple CarPlay is not connected.
- With an iPhone compatible with Apple CarPlay, turn off Apple CarPlay by operating the iPhone at functional setup before connecting iPhone. For details of the setup method, contact the manufacturer of the terminal.
- Plug the iPod/iPhone into the USB terminal with the KCA-iP103 (optional accessory).
- Only one iPod/iPhone can be connected.
1 Connect the iPod/iPhone using the KCA-iP103. (P.89)
2 Press the [HOME]∅] button.
3 Touch
4 Touch [iPod]. (P.13)
●To disconnect the iPod/iPhone connected with the cable:
1 Detach the iPod/iPhone.
Bluetooth connection
Pair the iPhone through Bluetooth.
Preparation
- To connect an iPhone via Bluetooth, register it as a Bluetooth device and do the profile setting for the connection beforehand. See Register the Bluetooth device (P.37) and Switch the connected device (P.38).
- Connect an iPhone via Bluetooth while Apple CarPlay and an iPod/iPhone are not connected via USB.
- With an iPhone compatible with Apple CarPlay, turn off Apple CarPlay by operating the iPhone at functional setup before connecting iPhone. For details of the setup method, contact the manufacturer of the terminal.
- Select the method of making connections for outputting sound from the iPod source
1 Press the [HOME] button.
2 Touch
3 Touch [SETUP].
▶ SETUP Menu screen appears.
4 Touch [Connections & AV].
▶ Connections & AV setting menu appears.
5 Touch [iPod Bluetooth Connection].
[Bluetooth] (Default): Output sound using a Bluetooth device.
[Bluetooth+HDMI]: Output sound using an HDMI device and perform music selection, etc. using a Bluetooth device.
iPod/iPhone Basic Operation
NOTE
- Set the remote controller mode switch to AUD mode before starting operation, see Switch the operation mode (P.72).
Control screen

Open the drawer

1 Operation keys
- [Q] : Searches for a track/file. For details on search operation, see Search Operation (P.28).
- [I◄◄] [►►I]: Searches for the previous/next track/file.
Touch and hold to fast forward or fast backward. (It will be cancelled automatically after about 50 seconds.)
• [▶III]: Plays or pauses.
• [×]: Touch to mute or not to mute.
- [ ] : Repeats the current track/album. Each time you touch the key, repeat modes are switched in the following sequence:
Song repeat ( 🔍 all songs repeat ( ), 🔍 All Repeat off ( 🔍 )
- [✗] : Randomly plays all tracks in the current album. Each time you touch the key, random modes are switched in the following sequence: Song random (✗), Random off (✗)
2 Track information
• Displays the information on the current file.
- Touch to display the category list screen. See Category search (P.28).
3 Play mode indicator/Playing time
- ▶, ▶▶, etc.: Current play mode indicator Meanings of individual icons are as follows: ▶ (play), ▶▶ (fast forward), ◀◀ (fast backward), ■ (pause).
- For confirmation of current playing position. You can drag the circle left or right to change the playing position.

4 Content list
- Touch the right side of the screen to display the Content list. Touch again to close the list.
- Displays the playing list. When you touch a track/file name on the list, playback will start.
NOTE
- The Content list is not displayed unless you select a file from the category list and play it. To use the category list, see Search Operation (P.28).
5 Artwork
- The jacket of the currently being played file is displayed.
Search Operation
You can search music files by the following operations.
1 Touch [Q].
2 Touch [▼].

3 Select a list type.

NOTE
- For operations on the list screen, see List screen (P.15).

Category search
You can search for a file by selecting a category.
1 Touch [Category List].
2 Touch the desired category.

The list corresponding to your selection appears.
3 Touch to select the desired item in the list. Repeat this step until you find the desired file.

Link search
You can search for a file of the same artist/album/genre/composer as that in the current track.
1 Touch [Link Search].
2 Touch the desired tag type. You can select from artists, albums, genres and composers.

The list corresponding to your selection appears.
3 Touch the desired item in the content list.
Radio
Radio Basic Operation
Most functions can be controlled from the source control screen.
To listen to the Radio source, touch [Radio] icon on the source selection screen. (P.13)
NOTE
- Set the remote control mode switch to AUD mode before starting operation, see Switch the operation mode (P.72).

1 Information display
Displays the information of the current station: Frequency, PS name
P#: Preset number
2 Operation keys
- [I◄◄] [►►I]:Tunes in a station. The method of frequency switching can be changed (see 2 in table).
- [AME] : Presets stations automatically. For details, see Auto memory (P.30).
• [icon] : Displays the Radio Setup screen. For details, see Radio Setup (P.31).
• [×]: Touch to mute or not to mute.
• [TI] (FM only) : Sets the traffic information mode on. For details, see Traffic Information (P.31). - [PTY] (FM only) : Searches a program by setting program type. For details, see Search by program type (P.30).
• [MONO] (FM only) : Select the Monaural reception.
3 Band key
Switches the band (FM1/FM2/FM3, AM).
4 Preset key
Recalls the memorized station.
When touched for 2 seconds, stores the current receiving station in memory.
5 Indicator Items
• [RDS]: Indicates the state of the Radio Data System station when the AF function is on. White: Radio Data System is being received. Orange: Radio Data System is not being received.
• [EON]: The Radio Data System station is sending EON.
- [NEWS]: News bulletin interruption is in progress.
• [TI]: Indicates the reception state of traffic information.
White: TP is being received.
Orange: TP is not being received.
• [ST]: A stereo broadcast is being received.
6 Seek mode
Switches the seek mode in the following sequence; [AUTO1], [AUTO2], [MANUAL].
• [AUTO1]: Tunes in a station with good reception automatically.
- [AUTO2]: Tunes in stations in memory one after another.
- [MANUAL]: Switches to the next frequency manually.
Memory Operation

Auto memory
You can store stations with good reception in memory automatically.
1 Touch desired band key.

2 Touch [AME].
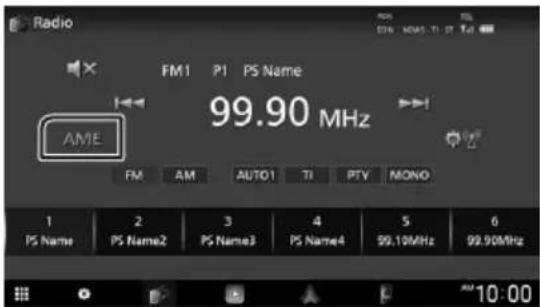
3 Touch [Yes].

Auto memory starts.

Manual memory
You can store the current receiving station in memory.
1 Touch desired band key.
2 Select a station you wish to store in memory.
3 Touch and hold [#] (#:1-6) in which you want to store the station until a beep sounds.
Selecting Operation

Preset select
You can list and select memorized station.
1 Select a station from the list.


Search by program type only)
You can tune to a station with a specific program type when listening to FM.
1 Touch [PTY].

▶ PTY Search screen appears.
2 Select a program type from the list.
3 Touch [Search].

You can search a station of the selected program type.
Traffic Information (FM only)
You can listen and watch the traffic information automatically when a traffic bulletin starts. However, this feature requires a Radio Data System that includes the TI information.
1 Touch [TI].

▶ Traffic information mode is set.
When the traffic bulletin starts
The Traffic Information screen appears automatically.

NOTE
- It is necessary to have Traffic Information function set to on in order to have the Traffic Information screen appear automatically.
- The volume setting during reception of traffic information is automatically stored. The next time the traffic information is received, this unit recalls the volume setting automatically.
• To cancel Traffic Information: Touch [Cancel].
Radio Setup
You can set tuner related parameters.
1 Touch


Radio SETUP screen appears.
2 Set each item as follows.
■ [NEWS] (FM only)
Sets a news bulletin interrupt time. Default is "OFF".
■ [AF] (FM only)
When station reception is poor, automatically switches to the station that is broadcasting the same program over the same Radio Data System network. Default is "OFF".
■ [Regional] (FM only)
Sets whether to switch to the station only in the specific region using the "AF" control. Default is "OFF".
■ [LO.S] (FM only)
Turns the Local Seek function on or off.
■ [Auto TP Seek] (FM only)
When traffic information station reception is poor, automatically searches for a station that can be received better. Default is "ON".
■ [Language select] (FM only)
Selects a display language for the PTY function.
[Aerial Control]
Allows you to turn off the Radio Data System function to prevent the motor-driven antenna from extending. Default is "ON".
Digital Radio (DMX9720XDS)
Digital Radio Basic Operation
Most functions can be controlled from the source control screen.
To enter Digital Radio source, touch [Digital
Radio] icon in the source selection screen. (P.13)
NOTE
- Set the remote control mode switch to AUD mode before starting operation, see Switch the operation mode (P.72).
Control screen

Open the drawer


1 Indicator display
Displays the received signal strength.
2 Operation keys
• [Q] : Displays the Service List screen. For details on search operation, see Service search (P.34).
- [I◀◀] [▶▶I]:Tunes in a ensemble, service, and component. The seek mode switching can be changed. (see 5 Seek mode).
• [×]: Touch to mute or not to mute.
3 Function panel
Touch the left side of the screen to display the function panel. Touch again to close the panel.
- [TI]: Selects the traffic information mode. For details, see Traffic Information (P.34).
- [SETUP]: Displays the Digital Radio SETUP screen. For details, see Digital Radio SETUP (P.35).
- [PTY]: Searches for a program by program type. For details, see Search by program type (P.33).
- [DLS]: Display the Dynamic Label Segment screen.
4 Indicator display
P#: Preset number
CH#: Channel display
5 Seek mode
Touch to switch seek modes in the following sequence: [AUTO1], [AUTO2], [MANUAL].
- [AUTO1]: Tunes in a ensemble with good reception automatically.
- [AUTO2]:Tunes in the memorized ensemble one after another.
- [MANUAL]: Switches to the next ensemble manually.
6 Preset list
- Touching [<<] allows you to change the display size.
• Recalls the memorized service. - When touched for 2 seconds, stores the currently being received service in the memory.
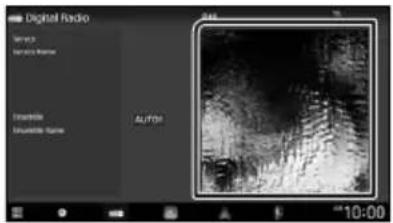
7 Artwork area
The picture data is displayed if available from current content.
8 Information display
Displays the information on the current station: Service Name
Touching 📋] allows you to switch between Content A, Content B and Content C.
Content A: DLS, PTY Genre
Content B: Song Title, Artist Name, Ensemble name
Content C: Now Playing, Next Program, Audio Quality
Touch to switch between the Control and Information screen.
9 Indicator Items
• [RDS]: Radio Data System is being received.
- [NEWS]: News bulletin interruption is in progress.
• [TI]: Indicates the reception state of traffic information.
White: TP is being received.
Orange: TP is not being received.
Storing Service in Preset Memory
You can store the current receiving service in the memory.
1 Select a service you wish to store in memory.
2 Touch 📁 on the right side of the screen.

3 Touch and hold [P#] (#:1-15) in which you want to store the station until a beep sounds.
Selecting Operation
Search by program type
You can tune in the station broadcasting the specified type of program when listening to Digital Radio.
1 Touch [✗] on the left side of the screen. Touch [PTY].
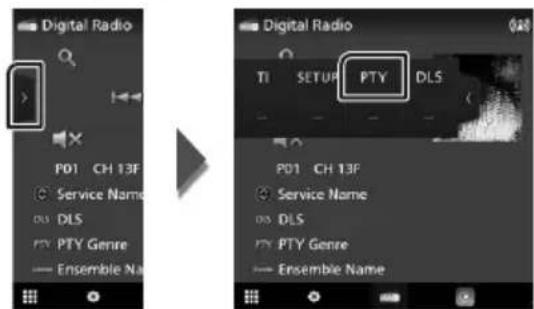
▶ PTY Search screen appears.
2 Select a program type from the list.
3 Touch [Search].

You can search for the station broadcasting the selected type of program.
![KENWOOD DMX9720XS - Touch [Search]. - 2](/content/2026/05/837760/images/8a33c9af256ab2812484292f6aca5c132703189cb9e9a2e53bbcea0f02931ccf.jpg)
Service search
You can select a service from a list of all services received.
1 Touch [Q].

2 Select the desired content from the list.


Touch and hold to find the latest service list.
[QA-Z]
Displays the keyboard screen.
Jump to the letter you entered (alphabet search).
Traffic Information
You can listen to and watch traffic information automatically when a traffic bulletin starts. However, this feature requires a Digital Radio that includes TI information.
1 Touch [▶] on the left side of the screen. Touch [TI].

▶ Traffic information mode is set.
![KENWOOD DMX9720XS - Touch [▶] on the left side of the screen. Touch [TI]. - 2](/content/2026/05/837760/images/85c25cdf032a34ef3896be43777e1364ff9b2eeaf0f3d95685f87d6bb6bb6fa1.jpg)
When the traffic bulletin starts
The Traffic Information screen appears automatically.

NOTE
- It is necessary to turn on the Traffic Information function in order to allow the Traffic Information screen to appear automatically.
• The volume setting made during reception of traffic information is automatically memorized. When the traffic information is received next time, this unit recalls the volume setting automatically.
• To cancel Traffic Information: Touch [Cancel].
Digital Radio SETUP
You can set Digital Radio related parameters.
1 Touch [✗] on the left side of the screen. Touch [SETUP].

▶ Digital Radio SETUP screen appears.
2 Set each function as follows.
[Priority]
If the same service is provided by Digital Radio during Radio Data System reception, automatically switches to Digital Radio. If the same service is provided by Radio Data System when reception of the service being provided by Digital Radio becomes poor, automatically switches to Radio Data System.
[PTY Watch]
If the service of the set program type begins with the ensemble being received, switches from any source to Digital Radio for service reception.
■[Announcement Select]
Switches to the set Announcement service. For details, see Announcement setup (P.35).
■ [Antenna Power]
Sets power supply to the Digital Radio antenna. Set to "ON" when the Digital Radio antenna in use is equipped with a booster. Default is "ON".
■[Related Service]
When you select ON, the unit switches to a related service (if exists) when a Digital Radio service network is not available. Default is "OFF".
■[Language select]
Selects a display language for the PTY function.
Announcement setup
When the service for which ON is selected starts, switches from any source to Announcement to receive it.
1 Touch [Announcement Select] on the Digital Radio SETUP screen.
The Announcement Select screen appears.
2 Touch each Announcement list and set on or off.
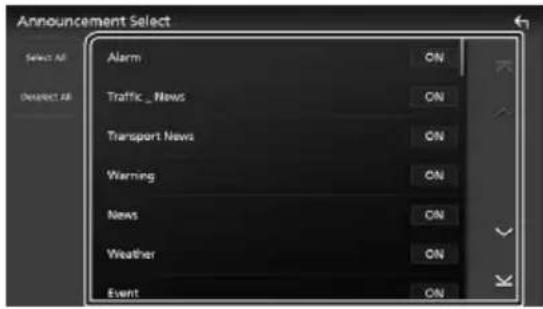
[Select All]
Turn on all announcements.
[Deselect All]
Turn off all announcements.
NOTE
- The volume setting during reception of Announcement service is automatically stored. The next time the Announcement service is received, this unit recalls the volume setting automatically.
Bluetooth Control
Using the Bluetooth function allows you to use various functions such as listening to the audio file and making/receiving a call.
Information for using Bluetooth® devices

Bluetooth®
Bluetooth is a short-range wireless radio communication technology for mobile devices such as smartphones/cell-phones, portable PCs, and other devices.
Bluetooth devices can be connected without cables and communication with each other.
NOTE
- While driving, do not perform complicated operations such as dialing numbers, using the phonebook, etc. When you perform these operations, stop your car in a safe place.
- Some Bluetooth devices may not be connected to this unit depending on the Bluetooth version of the device.
- This unit may not work for some Bluetooth devices.
- Connecting conditions may vary depending on your environment.
- Some Bluetooth devices are disconnected when this unit is turned off.
- The Bluetooth devices cannot be used while using Apple CarPlay.
- The Bluetooth currently connected with other device is disconnected when an iPhone compatible with Apple CarPlay is connected.
About the smartphone/cell-phone and Bluetooth audio player
This unit conforms to the following Bluetooth specifications:
Version
Bluetooth Ver. 5.0
Profiles
Smartphone/cell-phone:
HFP (V1.7) (Hands Free Profile)
SPP (Serial Port Profile)
PBAP (Phonebook Access Profile)
Audio player:
A2DP (Advanced Audio Distribution Profile)
AVRCP (V1.6) (Audio/Video Remote Control Profile)
Sound codec
LDAC, SBC, AAC
NOTE
- The units supporting the Bluetooth function have been certified for conformity with the Bluetooth Standard according to the procedure prescribed by Bluetooth SIG.
• However, it may be impossible for such units to communicate with your smartphone/cell-phone depending on its type.
Register the Bluetooth device
It is necessary to register the Bluetooth audio player or smartphone/cell-phone in this unit before using the Bluetooth function.
You can register up to 10 Bluetooth devices.
NOTE
- Up to 10 Bluetooth devices can be registered. If an attempt is made to register the 11th Bluetooth device, the Bluetooth device connected on the earliest date will be deleted to register the 11th one.
- This unit is compatible with the Apple Easy Pairing function. When an iPod touch or iPhone connected via USB terminal previously is connected again, an authentication dialog appears. Performing operation for authentication on this unit, or iPod touch or iPhone registers the smartphone as a Bluetooth device.
1 Press the [HOME] button.
2 Touch
3 Touch [SETUP].
▶ SETUP Menu screen appears.
4 Touch [Connections & AV].

5 Touch [Device List].
6 Select a device type.
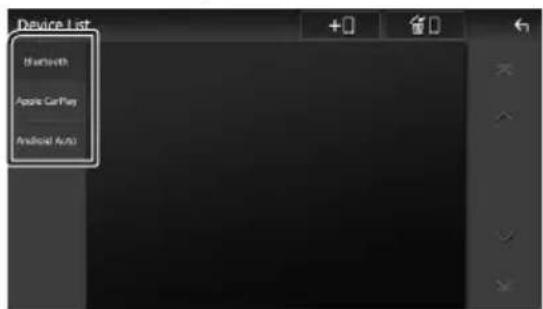
[Bluetooth]
To connect as Bluetooth Hands-Free and Bluetooth audio source.
■ [Apple CarPlay]
To connect as Apple CarPlay source.
■ [Android Auto]
To connect as Android Auto source.
7 Touch

- Bluetooth pairing waiting dialog appears.

NOTE
- If an Apple CarPlay device is currently connected, the Apple CarPlay device will be disconnected.
- When neither Apple CarPlay, Android Auto, nor a Bluetooth Hands-Free phone is connected, pressing and holding the [VOICE] button displays Bluetooth pairing waiting dialog.
8 Search for the unit ("DMX*****") from your smartphone/cell-phone.
Complete steps 8 to 10 within 30 seconds.
9 Operate your smartphone/cell-phone according to the displayed messages.
- Confirm the request both on the smartphone/cell-phone.
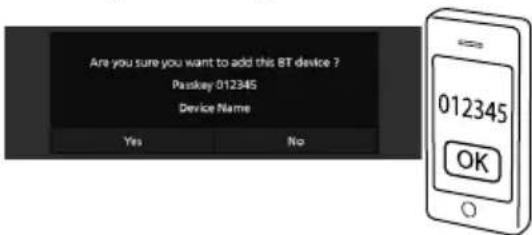
●Input the PIN Code in your smartphone/cell-phone.
PIN Code is set to "0000" as the default.

Bluetooth Control
10 Touch [Yes].
When data transmission and connection have completed, the Bluetooth connection icon appears on the screen.
NOTE
- When registering the iPhone that is available for Apple CarPlay wirelessly, a confirmation message appears.
- [Yes]: Displays the Apple CarPlay screen for wireless connection.
– [No]: Apple CarPlay is not connected. When using Apple CarPlay, see Select an Apple CarPlay device (P.19).

Switch the connected device
If two or more Bluetooth devices have been registered, select the device to be used.
1 Touch [Device List] in the Connections & AV setting menu.
2 Select the device type.
[Bluetooth]
To connect as Bluetooth Hands-Free and Bluetooth audio source.
■[Apple CarPlay]
To connect as Apple CarPlay source.
■[Android Auto]
To connect as Android Auto source.
3 Touch the name of the device you want to connect.

NOTE
- If the icon is lighted, it means that the unit will use that device.
- If you touch the device name with the icon on the list of Apple CarPlay devices, it will be disconnected.
- You can quickly display the Device List screen by touching [icon] in the popup menu. (P.12)
To switch the connected device to a Bluetooth device
1 Touch [Bluetooth] on the Device List screen.
▶ Bluetooth device list appears.
2 Touch the name of the Bluetooth device you want to connect.
3 Set each profile as follows.

■ [TEL (HFP) 1], [TEL (HFP) 2]
Select when the device is connected with the unit as Hands-Free phone 1 or 2.
■[Audio (A2DP)/App (SPP)]
Select to use as an audio player or to interwork with an application installed in a smartphone.
4 Touch [Close].
To delete the registered device
You can delete the device that is registered as Bluetooth source or Apple CarPlay source. When you delete a Bluetooth device which supports Android Auto, the device is also deleted from the Android Auto device list.
1 Touch the Device List screen.

2 Touch the device name to check.

[√ All]
Selects all Bluetooth devices.
■ [□ All]
Clears all check marks.
NOTE
- You cannot select a device currently connected.
- When you select Android Auto tab, [10] is not displayed.
3 Touch [Delete].
▶ Confirmation message appears.
4 Touch [Yes].
▶ All the selected device(s) is deleted.
Bluetooth Setup
NOTE
- The Bluetooth Setup is disabled while using Apple CarPlay.
1 Press the [HOME] button.
2 Touch
3 Touch [SETUP].
▶ SETUP Menu screen appears.
4 Touch [Connections & AV].

▶ Connections & AV setting menu appears.
5 Touch [Bluetooth] and set to [ON]. See the following section for each setting.
- Change the PIN Code (P.39)
- Change the device name (P.39)
- Change the settings for Hands-Free function, see Hands-Free Setup (P.47).
NOTE
- For the other setting items on this screen, see Connections & AV Setup (P.53).
Change the device name
1 Touch [Device Name] in the Connections & AV setting menu.
▶ Change Device Name screen appears.
2 Touch and hold
3 Input the device name.
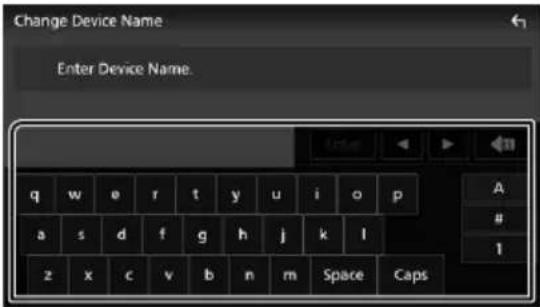
4 Touch [Enter].
Change the PIN Code
1 Touch [PIN Code] in the Connections & AV setting menu.
▶ Change PIN Code screen appears.
2 Touch and hold
3 Input the PIN Code.

4 Touch [SET].
Playing the Bluetooth Audio Device
Most function can be controlled from the source control screen.
To select Bluetooth source, touch [Bluetooth] icon on the source selection screen. (P.13)
NOTE
- The Bluetooth audio source is disabled while using Apple CarPlay.
- The Bluetooth audio source is disabled when the device set as Audio(A2DP)/App(SPP) is using Android Auto.

Bluetooth basic operation
Control screen


Operation keys \*
- [Q]: Searches for a file. See File search (P41).
- [I◄◄] [►►I]: Searches for the previous/next content.
Touch and hold to fast forward or fast backward. (It will be cancelled automatically after about 50 seconds.)
• [▶]: Plays.
• [Ⅲ]: Pauses.
- [×]: Touch to mute or not to mute.
- [ ] : Repeats the current track/folder. Each time you touch the key, repeat modes are switched in the following sequence:
File repeat (older repeat (), songs repeat (repeat off ()
- [×] : Randomly plays all tracks in the current folder. Each time you touch the key, random modes are switched in the following sequence:
Folder random (×) all random ( ), × Random off (×)

Information display \*
• Displays the name of track information.
- Connected device name.

Play mode indicator/Playing time
▶, II: Current play mode indicator Meanings of individual icons are as follows:
▶ (play), ▶▶ (fast forward), ◀◀ (fast backward), ■ (pause), ■ (stop).

CODEC
When an LDAC-compatible device is connected, "LDAC" is displayed.


- Displays the Connections & AV setting menu. (P39)

KENWOOD Music Mix
Bluetooth audio devices can be switched easily to play music. See KENWOOD Music Mix (P.41).
* These items appear only when the audio player which supports AVRCP profile is connected.
NOTE
- The operation keys, indications and information displayed on the screen differ depending on the connected device.
- If the operation keys do not appear, operate from the player.
- Depending on your smartphone/cell-phone or audio player, sound may be heard and controlled but text information may not appear.
- If the volume is too low, raise it on your smartphone/cell-phone or audio player.
- It is recommended that you change the playback quality from "priority on sound quality" to "priority on stable connection" in the settings of your LDAC-compatible device so that the intermittent sound problem is less likely to occur.

KENWOOD Music Mix
Up to 5 Bluetooth audio device can be connected and switched easily to play music.
1 Touch

▶ A list of registered devices is displayed.
2 Touch [ ] of device name you want to connect.
- Touching [F] displays the Device List screen. (P.38)
- Touching [11] on the left of the connected device (☐) connects this device.

• Device used normally.
• : Device used for KENWOOD Music Mix
3 Touch ▶ White/dark blue background) on the left of the name of the device to be played.
The background changes from dark to light blue and starts playback.
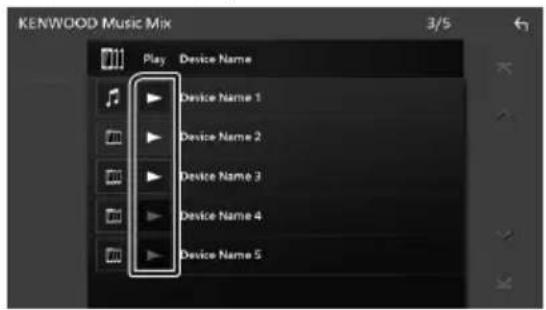
- (ray): Not connected.
- ▶ (White/dark blue background) : Connected.
- ▶ (White/light blue background) : During playback.
4 Touch

NOTE
- If a connected Bluetooth audio device is operated to play music, connections are switched.
- When a Bluetooth source is switched to another one, its settings are deleted and the connection is restored to the connection before source switching.
- You cannot select an Android smartphone connected as an Android Auto device.

File search
1 Touch [Q].
2 Touch the desired file or folder.
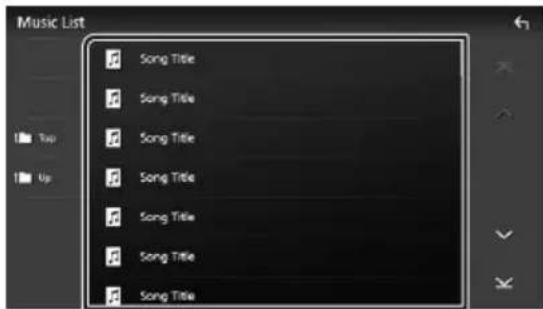
When you touch a folder its contents are displayed.
3 Touch the desired item in the content list.
▶ Playback starts.
NOTE
- For operations in the list screen, see List screen (P.15).
Using the Hands-Free Unit
You can use the telephone function by connecting the Bluetooth telephone to this unit.
NOTE
- While Apple CarPlay or Android Auto is connected, the Bluetooth Hands-Free function and two Bluetooth devices connections cannot be used. Only the Apple CarPlay or Android Auto Hands-Free function can be used.

Make a call
1 Press the [HOME] button.
2 Touch

3 Touch [TEL].

▶ Hands-Free screen appears.
NOTE
- If your smartphone/cell-phone supports PBAP, you can display the phonebook and call lists onto the touch panel screen when the smartphone/cell-phone is connected.
- Phonebook: up to 1000 entries - Up to 50 entries including dialed calls, received calls, and missed calls
4 Select a dialing method.

• Call using call records
• [回]: Call using the phonebook
• [★]: Call using the preset number
• [☐]: Call by entering a phone number
- Select the smartphone/cell-phone to use When you connect two smartphones/cell- phones
1) Touch [Device name1 | Device name2] to select the phone you want to use.
●Bluetooth Setup
1) Touch [icon]. Connections & AV setting menu appears. (P.39)
●Voice Recognition
1) Touch [icon]. (P.44)
NOTE
- Status icons such as battery and antenna icons may differ from those displayed on the smartphone/cell-phone.
- Setting the smartphone/cell-phone in the private mode can disable the Hands-Free function.
Call using call records
1 Touch

2 Select the phone number from the list.
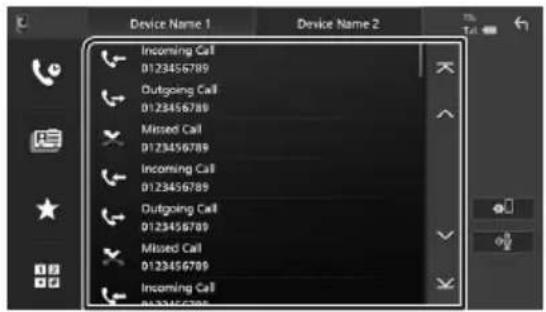
Call using the phonebook
1 Touch

2 Touch

3 Select the initial.

- Characters with no corresponding name will not appear.
- A first character with an accent character such as "ü" can be searched for with a non-accent character "u". A character with an accent character in a sentence cannot be searched for.
4 Select the person you want to call from the list.
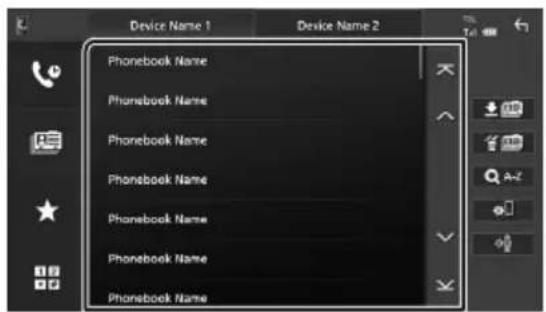
5 Select the phone number from the list.

NOTE
- You can sort the phone numbers in the list by last name or first name. For details, see Hands-Free Setup (P.47).
- When Russian is selected in "Language Select" (P.58), you can switch between English keyboard and Russian keyboard.
- When Hebrew is selected in "Language Select" (P.58), you can switch between English keyboard and Hebrew keyboard.
- You can search with 3 initial letters on the English keyboard and 1 initial letter on the Russian / Hebrew keyboard.
Call using the preset number
1 Touch

2 Touch the name or phone number.

Call by entering a phone number
1 Touch

2 Enter a phone number with number keys.

3 Touch


Voice Recognition
You can access the voice recognition function of the smartphone/cell-phone connected to this unit. You can search the smartphone/cell-phone phonebook by voice. (The functionality depends on the smartphone/cell-phone.)
1 Press the [VOICE] button.
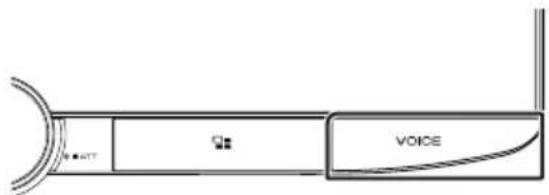
▶ Voice Recognition screen appears.
2 Start speaking.
NOTE
- You can use the voice recognition function by touching 📄 on the Hands Free screen.
- You can use the voice recognition function for the connected smartphone/cell-phone if you selected [TEL (HFP) 1] or [TEL (HFP) 2] for HFP when registered.

Receive a call
1 Touch to answer a phone call or

to reject an incoming call.

NOTE
- When shifting the gear to the reverse (R) position and monitoring the picture from the rear view camera, this screen does not appear even if a call comes in.
- The portrait registered in the phonebook is displayed while making/receiving calls and during a call.
- If you edit the phonebook on the connected device side after downloading the phonebook, the portrait may not be displayed depending on the edited content. It is recommended that you download the phonebook whenever you edit it.
- The image quality of a displayed portrait may depends on a connected device.
To end call
1 While talking, touch


Operations during a call

●Adjust the volume of your voice
1) Touch [Speech Quality].
2) Touch [◀] or [▶] for [Microphone Level].

●Adjust the receiver volume
Turn the knob clockwise to increase, and counter-clockwise to decrease.

natural_image
Front view of a rectangular electronic device with control buttons at the bottom (no text or symbols on the device itself)●Mute your voice
Touch [icon] to mute or not to mute your voice.
●Output the dial tone
Touch [DTMF] to display the tone input screen. You can send tones by touching desired keys on the screen.
●Switching between speaking voice output destinations
Touching [ ]/ [ ] such time switches speaking voice output destinations between the smartphone/cell-phone and the speaker.
●Call-waiting
When you receive a new call while talking on the phone, you can answer the newly received call by touching 📞. The current call is put on hold.
Each time you touch 📞], the caller will change to the other one.
When you touch [icon], the current call will end to be switched to the call waiting on hold.
Bluetooth Control

Phone number preset
You can register frequently used phone numbers in this unit.
1 Touch

2 Touch [Edit].
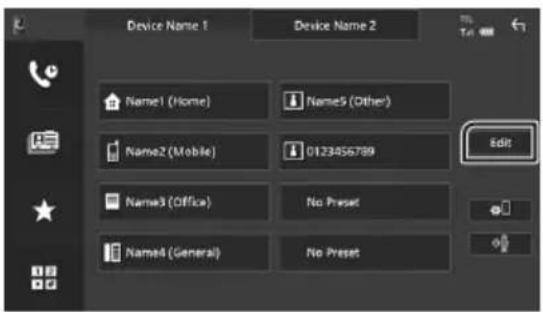
3 Select where to preset.

■[Delete all]
To delete all preset numbers, touch [Delete all] and then touch [Yes] on the confirmation screen.
4 Select how to preset.

■[Add number from phonebook]
Select the number to preset from the phonebook.
■[Add number direct]
Enter the telephone number directly and touch [SET].
[Delete]
To delete a preset number, touch [Delete] and then touch [OK] on the confirmation screen.
![KENWOOD DMX9720XS - [Delete] - 1](/content/2026/05/837760/images/b0a97e8c0f1e824fea66aac319663365c5dbeccb0b774daeb0bc8e47b6aaa647.jpg)
Phonebook transfer
You can transfer phonebook data from your Bluetooth smartphone using PBAP.
1 Touch

2 Touch


▶ Phonebook data transfer starts.
NOTE
- If the Phonebook contains more than 1000 entries, only 1000 entries are transferred. The 1001st and later entries are not transferred.
- If no Phonebook has been downloaded, touching [Download Phonebook Now] will start downloading the Phonebook.
- The portrait registered in the phonebook is displayed while making/receiving calls and during a call.
If you edit the phonebook on the connected device side after downloading the phonebook, the portrait may not be displayed depending on the edited content. It is recommended that you download the phonebook whenever you edit it.
Phonebook deletion
1 Touch

2 Touch the name to check.

[√ All]
Checks all boxes.
■ [□ All]
Clears all check marks.
3 Touch [Delete].
▶ Confirmation message appears.
4 Touch [Yes].
Hands-Free Setup
You can make various settings for the Hands-Free function.
1 Press the [HOME]∅ button.
2 Touch
3 Touch [SETUP].
▶ SETUP Menu screen appears.
4 Touch [Connections & AV].
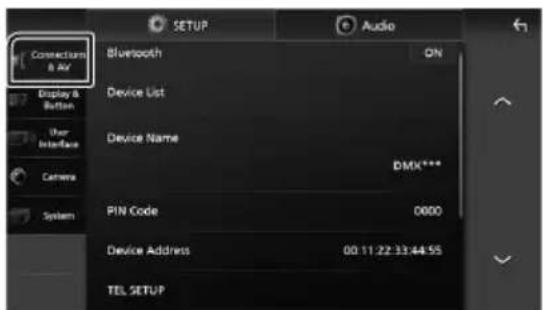
▶ Connections & AV setting menu appears.
5 Touch [TEL SETUP].
▶ TEL SETUP screen appears.
6 Set each function as follows.

■[Bluetooth HF/Audio]
Select the speakers to output the sound from the smartphone/cell-phone (such as phone call voice and ringing tone) and Bluetooth audio player.
[Front]: Outputs sound from the front speakers.
[All] (Default): Outputs sound from all speakers.
■ [Auto Response]\*
Set the automatic response time to pick-up an incoming call.
OFF (Default): Turns off the Automatic response function.
[1/5/10/15/20/25/30]: Sets the ringing time (second).
[Auto Pairing]
When set to "ON", the Apple Auto Pairing function is turned on to automatically register the iPod touch or iPhone connected to this unit.
[ON] (Default): Turns on the Apple Auto Pairing function.
OFF: Turns off the Apple Auto Pairing function.
[Sort Order]
Set how to sort the data in the smartphone/cell-phone phonebook.
[First]: Sorts data by the first name.
[Last]: Sorts data by the last name.
-DMX9720XDS:[First] (Default)
-DMX9720XS:[Last] (Default)
* Either the auto response time set on this unit or the time set on the smartphone/cell-phone, whichever is shorter takes effect.
7 Touch [OK].

Other External Components
View Camera
NOTE
• To connect a camera, see Connecting the camera (P.90).
- To use a rear view camera, a REVERSE lead connection is required. (P.86)
- If [Rear Camera Interruption] is active the camera screen is displayed when you shift the gear to the reverse (R) position.
- The camera whose view was displayed last is kept and the same camera view will be displayed the next time. If its assignment setting is changed, the rear camera view is displayed.
- Rear/front camera interruption screen is not kept as the camera screen which will be displayed the next time.

Display the camera screen
1 Press the [MENU]/[ATT] button.
▶ Popup menu appears.
2 Touch [Camera].

▶ View camera screen appears.
3 Adjust each item as follows.


Camera Switching Keys \*1
Touch to switch the view camera. It is necessary to set "Camera Assignment Settings" beforehand except "Rear". See To set up the camera assignment settings (P.49).
2 Camera off
Touch to exit the camera screen.
3 Switching the Guideline \*2
Touching each time turns on or off the guideline.
4 Switching the Angle \*2
Touching each time changes camera angles.
*1 When two or more cameras of rear, front, dashboard, left, and right are connected with this unit.
*2 Only when the rear camera screen is displayed and CMOS-3xx series is connected with this unit as the rear camera.

Camera Setup
1 Press the [HOME]∅ button.
2 Touch
3 Touch [SETUP].
▶ SETUP Menu screen appears.
4 Touch [Camera].
▶ Camera setting menu appears.
5 Set each item as follows.

■ Camera Assignment Settings
Set up the camera assignment. See To set up the camera assignment settings (P.49).
■ [Rear Camera Interruption]
[ON] (Default): Displays the picture from the rear view camera when you shift the gear to the reverse (R) position.
OFF: Select this when no camera is connected.
■ [Rear Camera Message] \*
[Always display] (Default): Always displays the caution message on the rear camera interruption screen.
[Clear after 5 seconds]: Displays the caution message for about 5 seconds on the rear camera interruption screen.
■ [Rear Camera Settings] \*
Adjusts the CMOS-3xx series with ID 1 ("Rear Camera") set. For details, see the instruction manual of your camera.
■[Parking Guidelines]
You can display parking guidelines to enable easier parking when you shift the gear to the reverse (R) position.
Default is "ON".
■[Guidelines SETUP]
If you select [ON] for [Parking Guidelines], you can adjust the parking guidelines. See To adjust the parking guidelines (P.50).
■ [Front Camera Settings \*3]
Adjusts the CMOS-3xx series with ID 2 ("Front Camera") set. For details, see the instruction manual of your camera.
■ [Front Camera Interruption] \*
[10 sec]/[15 sec] (Default)/[20 sec]: The front camera screen is displayed when return the gear from the reverse (R) position.
*1 To use the function, it is necessary to set [Rear Camera Interruption] to [ON].
*2 When CMOS-3xx series is connected with this unit.
*3 To use the function, it is necessary to connect CMOS-3xx series and to set [Camera Assignment Settings] to [Front]. (P.49)
*4 To use the function, it is necessary to set [Rear Camera Interruption] to [ON] and to set [Camera Assignment Settings] to [Front]. (P.49)
To set up the camera assignment settings
1 Touch [Camera Assignment Settings] in the Camera setting menu. (P.48)
2 Select the item to set up.
■[REAR VIEW CAMERA]
Set the camera assignment from view camera connected to Rear view camera input terminal.
■ [FRONT VIEW CAMERA / DASH CAM]
Set the camera assignment from view camera connected to Front view camera/Dashboard camera input terminal.
Set the camera assignment from view camera connected to HD camera input terminal.
■[3rd VIEW CAMERA]
Set the camera assignment from view camera connected to 3rd view camera input terminal.
[VIDEO IN]
Set the camera assignment from view camera connected to Video input terminal.
3 Select the view camera to set up.
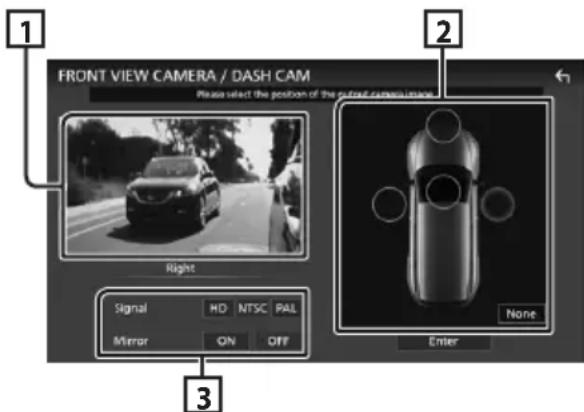
1 Picture from view camera
Displays the picture from the view camera connected to the input terminal to be set. (P.90)
2 Camera Position
Assign each position to the view camera connected to the selected input terminal.
Front *1/Left *1/Right *1/Dashboard
Camera 1/Rear 2/[None]

Picture quality settings
Switch the picture quality setting.
Signal *3:"HD"/"NTSC" (Default)/"PAL"
Mirror *4: "ON"/"OFF" (Default)
*1 Except the [REAR VIEW CAMERA] setting screen.
*2The[REAR VIEW CAMERA] setting screen only.
*3 The [REAR VIEW CAMERA] and [FRONT VIEW CAMERA / DASH CAM] setting screens only.
*4The[FRONT VIEW CAMERA / DASH CAM] and [3rd VIEW CAMERA] setting screens only.
4 Touch [Enter].
NOTE
- The screen shot above is for the [FRONT VIEW CAMERA / DASH CAM] setting screen. It may be different from the ones for [REAR VIEW CAMERA], [3rd VIEW CAMERA] and [VIDEO IN].
- The Dashboard Camera can be selected when it is connected. (P.90)

To adjust the parking lelines
NOTE
• Install the rear view camera in the appropriate position according to the instruction manual supplied with the rear view camera.
- When adjusting the parking guidelines, make sure to apply the parking brake to prevent the car from moving.
1 Touch [Parking Guidelines] in the Camera screen and set to [ON]. (P.48)
2 Touch [Guidelines SETUP] on the Camera screen.
3 Adjust the parking guidelines by selecting the ✕ mark.

4 Adjusting the position of the selected mark.
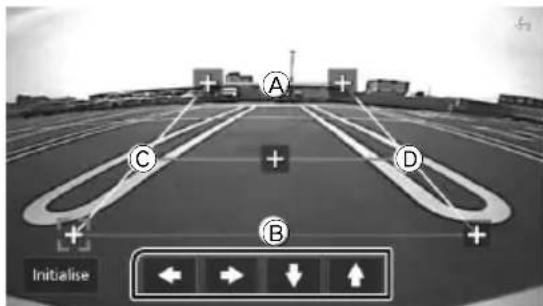
Make sure that lines Ⓐ and Ⓑ are horizontally parallel, and that lines Ⓒ and Ⓓ are of the same length.
NOTE
- Touch [Initialise] and then touch [Yes] to set all the + marks to their initial default position.
Use Dashboard Camera
A Dashboard Camera, DRV-N520 (optional accessory), connected to this unit lets you play video-recorded data and so on.
For details, see the instruction manual of the Dashboard Camera DRV-N520 (optional accessory).
NOTE
• To connect a dashboard camera, see Connecting the camera (P.90).
- To use the dashboard camera function, it is necessary to set "Camera Assignment Settings" to "Dashboard Camera". (P.49)
■ Display the dashboard camera screen
1 Press the [MENU]/[ATT] button.
▶ Popup menu appears.
2 Touch [Camera].

1 Camera Switching Keys
Touch to switch the view camera. It is necessary to set "Camera Assignment Settings" beforehand except "Rear". See To set up the camera assignment settings (P.49).
2 Camera off
Touch to exit the camera screen.
3 Key display
Touch to display the dashboard camera control keys.
External audio/video players (AV-IN)
1 Connect an external component to the AV Audio input and the Video input terminal. (P.87)
2 Select [AV-IN] as the source. (P.13)
3 Turn on the connected component and start playing the source.
NOTE
- To select the AV-IN source, it is necessary to set "VIDEO IN" to "None" in [Camera Assignment Settings]. (P.49)
HDMI source
1 Connect your smartphone to the HDMI input terminal. (P.87)
Use HDMI cable KCA-HD100 (optional accessory).
2 Select [HDMI] as the source. (P.13)
3 Start an application or playback on your smartphone.
OEM Features Operation (DMX9720XDS only)
This unit can display vehicle information when connected to the bus system of the vehicle using an iDatalink (commercially available).
1 Press the [HOME]∅ button.
HOME screen appears.
2 Touch 📄 on the HOME screen.
3 Touch icon.


Displays the control screen of the Bluetooth Hands-Free function provided for the vehicle.
Displays information about the tire pressures of the vehicle. *
Displays the control screen of the media player source provided for the vehicle.
Displays the control screen of the Bluetooth streaming source provided for the vehicle.
Displays information about the instruments such as a speedometer.
Displays information about the air conditioner of the vehicle. *
Displays information about the Parking Distance Sensor of the vehicle.
Displays the control screen of the accessories in the vehicle.
* These iDatalink features are displayed as the widget on the Home screen. (P.11) You can display the relevant screens by touching the widget.
NOTE
- Displayable screens, key names, and screen names vary depending on the type of the connected iDatalink and the model of the vehicle. For more details, access the following URL: www.idatalink.com/
Setup
1 Press the [HOME]∅ button.
2 Touch
3 Touch [SETUP].

See the following section for each setting.
- Set up connections and AV (P.53)
- Set up display and button (P.55)
- Set up the user interface (P.56)
- Set up camera (P48)
- Set up systems (P.58)
Monitor Screen Setup
You can adjust the image quality of video, menu screen, etc.
1 Press the [MENU]/[ATT] button.
▶ Popup menu appears.
2 Touch [Screen Adjustment].

▶ Screen Adjustment screen appears.
3 Adjust each setting as follows.

■ [Backlight]/[Contrast]/[Black]/[Brightness]/[Colour]/[Tint]
Adjust each setting.
[Aspect]
Select a screen mode.
[Full]: Changes the aspect ratio of video and displays video fully on the screen.
[Normal]: Displays video at the ratio of 4:3.
[Auto]:
USB device: Displays video fully (vertically or horizontally) with no ratio change.
NOTE
- Settings to adjust vary depending on the current source.
Connections & AV Setup
You can set connections and AV parameters.
1 Press the [HOME]∅ button.
2 Touch
3 Touch [SETUP].
▶ SETUP Menu screen appears.
4 Touch [Connections & AV].
▶ Connections & AV setting menu appears.
5 Set each parameter as follows.
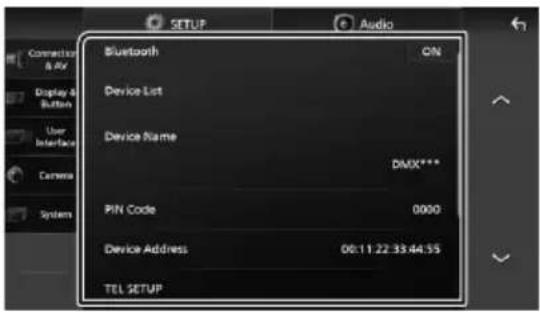
[Bluetooth]
Turns the Bluetooth function on or off.
■[Device List]
Select the connected device to be used. (P.38)
Setup
■[Device Name]
If you select [ON] for [Bluetooth], you can change the Bluetooth device name.
See Change the device name (P.39).
[PIN Code]
If you select [ON] for [Bluetooth], you can change the PIN code.
See Change the PIN Code (P.39).
[Device address]
Display the Bluetooth device address.
[TEL SETUP]
You can make various settings for the Hands-Free function.
See Hands-Free Setup (P.47).
■[Wi-Fi SETUP]
You can change the device name and display the device address, password. See Change the device name (P.54).
■[Speech Quality Adjust]
Adjust the speech quality.
[Microphone Level] : Adjust the level of microphone gain. Default is "0".
[Echo Cancel Level]: Adjust the level of echo cancellation. Default is "0".
[Noise Reduction Level] : Reduce the noise generated in the surrounding environment without changing the microphone volume. Use this function when the voice of caller is not clear. Default is "0".
[iPod Bluetooth Connection]
See Select the method of making connections for outputting sound from the iPod source (P.26).
[AV-OUT]
You can select an AV source to be output from the AV OUTPUT port.
OFF, iPod, USB, or AV-IN
- You cannot select AV-IN if the Video input terminal is used for camera.
- You cannot select iPod if it is connected via Bluetooth or Apple CarPlay is connected.
- If you select iPod as the main source, you cannot select USB as the AV output source.
-
If you select USB as the main source, you cannot select iPod as the AV output source.
-
If you select HDMI as the main source, files with sampling rates higher than 96 kHz in USB selected as the AV output source are skipped.
- If you select Bluetooth audio, Radio, Digital Radio, Wireless Mirroring, Apple CarPlay or Android Auto as the main source, you cannot select USB or iPod as the AV output source.
■[Reset Android Auto Wireless Connection]
You can change the password for wireless Android Auto.
The system of the unit is rebooted after selecting [YES].
Change the device name
1 Touch [Device Name] in the Connections & AV setting menu. or Touch [Wi-Fi SETUP] and then touch [Device Name].
▶ Change Device Name screen appears.
2 Touch and hold
3 Input the device name.

4 Touch [Enter].
Display & Button Setup
1 Press the [HOME]∅] button.
2 Touch
3 Touch [SETUP].
▶ SETUP Menu screen appears.
4 Touch [Display & Button].
▶ Display & Button setting menu appears.
5 Set each parameter as follows.
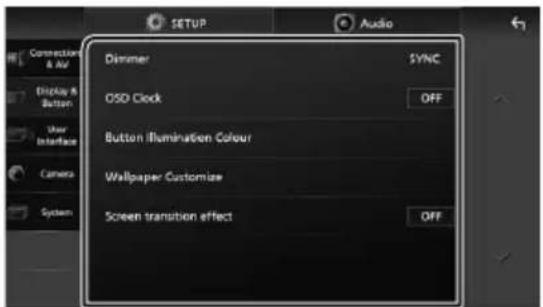
Dimmer
Select the dimmer mode.
OFF: Does not dim the display and buttons.
[ON]: Dims the display and buttons.
SYNC: Turns the dimmer function on or off when the vehicle light control switch is turned on or off.
[OSD Clock]
Select if you want to display the clock while the screen is off, or while watching video files on USB, etc.
"ON" (Default)/"OFF"
■ [Button Illumination Colour]
You can set the button illumination color. (P.55)
■ [Wallpaper Customize]
You can change the wallpaper image or color. (P.56)
■ [Screen transition effect]
Select whether to use the screen transition effect when the source control screen is switched to the Home screen.
"ON" (Default)/"OFF"
Customizing the button color
You can set the button illumination color.
1 Touch [Button Illumination Colour] in the Display & Button setting menu.
2 Touch the desired color.
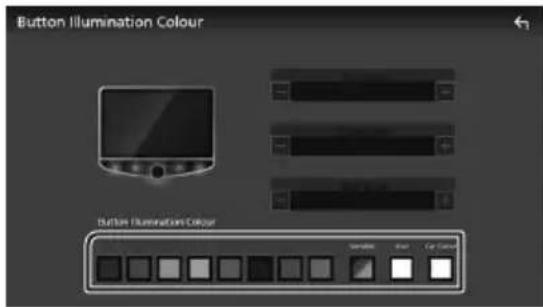
[Variable]
You can set the button color to continuously scan through the color spectrum.
[User]
You can set the color created with the RGB color mixer.
■ [Car Colour] (DMX9720XDS only)
This can be selected when the iDatalink (commercially available) is connected.
3 Touch

To register an original color
You can register your original color.
1 Touch [User] on the Button Illumination Colour screen.
2 Use [-] and [+] to adjust each color value.

3 Touch

NOTE
- You can create a color based on a preset color. Touch the preset color instead of [User], and adjust the color value.
Setup
Change the wallpaper image or color
1 Touch [Wallpaper Customize] in the Display & Button setting menu.
2 Select an image.

*1 The album art currently being displayed is used as a wallpaper.
*2Select a wallpaper color in advance.
*3 Select an original image in advance.
To select wallpaper color
1 Touch [Wallpaper Colour] on the Wallpaper Customize screen.
2 Select a wallpaper color.

[User]
You can set the color created with the RGB color mixer. For how to create an original color, see To register an original color (P.55).
■ [Car Colour] (DMX9720XDS only)
This can be selected when the iDatalink (commercially available) is connected.
■ [Button Illumination Synch] * The color you have selected at [Button Illumination Colour] can be set. If you adjust the color value with the following RGB color mixer, the adjusted color will be applied to the wallpaper and the button illumination.
The color you have selected at [Button Illumination Colour] can be set. If you adjust the color value with the following RGB color mixer, the adjusted color will be applied to the wallpaper and the button illumination.
■ [Button Illumination Synch] \*
For how to set the button illumination color and create an original color, see Customizing the button color (P.55). "ON"/"OFF" (default)
*1 When [Button Illumination Colour] is "Variable", this option is fixed to OFF.
3 Touch [ ]
To register an original image
With "KENWOOD Portal APP" application installed on your iPhone or Android smartphone, you can upload image files to this unit and set an image as the wallpaper image. See Importing Image Files (P.17).
User Interface Setup
You can setup user interface parameters.
1 Press the [HOME]∅ button.
2 Touch
3 Touch [SETUP].
▶ SETUP Menu screen appears.
4 Touch [User Interface].
▶ User Interface setting menu appears.
5 Set each parameter as follows.

■ [Source Setup - Remote Control]
Select the sources to be switched with the remote controller. For how to operate the remote controller, see Basic Operation (P.73).
■ [Steering Remote Controller]
Sets the desired function in the steering remote controller. (Contact your KENWOOD dealer for details.)
[Beep]
Turn the key touch tone on or off. Default is "ON".
■[Parking Assist Display]
When the iDatalink (commercially available) is connected, you can display information about obstacles around the car.
[ON]: Always displays information.
[Dyn.] (Default): Displays information when the sensor detects obstacles.
OFF: Cancels this function.
This can be set when the iDatalink (commercially available) is connected.
■ [Parking Assist Position]
Select where to display information about obstacles on the screen (left or right).
"Left" (Default)/"Right"
This can be set when the iDatalink (commercially available) is connected.
[Driving Position]
Select the driving position (left or right). "Left"/"Right" (Default)
Learning function of steering remote
This function is available only when your vehicle is equipped with the electrical steering remote controller.
If your steering remote controller is not compliant, learning may not be completed and error message may appear.
1 Touch [Steering Remote Controller] in the User Interface setting menu.
▶ Steering Remote Controller Setting screen appears.
2 Press and hold the steering remote controller button.
NOTE
- You can have the unit learned all buttons at a time. In that case, press all buttons one at a time and after pressing all of them, touch [Learning completed] in Steering Remote Controller Setting screen. However, new functions cannot be learned after this operation.
3 Touch the function you want to set.
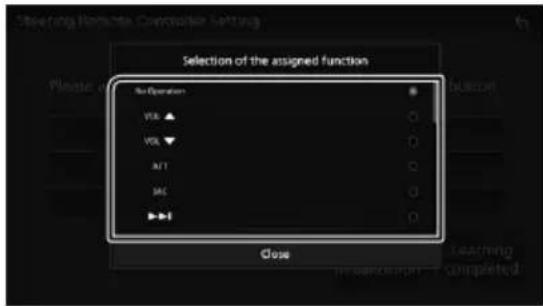
4 Repeat steps 2 and 3 as necessary.

5 Touch [Learning completed].
NOTE
- When changing the function already learned, press and hold the button you want to change in step 2 and then touch to select the changed function from the function list.
- Confirm the contents of the settable function on the function list. You cannot edit the function list.
- To initialize the contents, touch [Learning initialisation] of [Steering Remote Controller] in User Interface setting menu. After you touch [Initialise], a confirmation message appears. Follow the message and complete the operation.
System Setup
You can setup system parameters.
1 Press the [HOME]∅ button.
2 Touch
3 Touch [SETUP].
▶ SETUP Menu screen appears.
4 Touch [System].
▶ System setting menu appears.
5 Set each parameter as follows.

[DEMO]
Select the demonstration mode. Default is "ON".
■[Software Information]
Confirm the software version of this unit. (P.59)
■[Open Source Licenses]
Display the open source licenses.
[Initialise]
Touch [Initialise] and then touch [Yes] to set all the settings to the initial default settings.
• Audio SETUP Memory is not initialized.
[OEM SETUP]
Confirm the information about or change the settings for using the iDatalink (commercially available).
■[Language select]
Select a language.
[Time Format]
[Clock]
[Time Zone]
[Clock Adjust]
You can set the date and time. See Calendar/clock settings (P.10).
■[Security Code Set]
■ [Security Code Cancellation]
■[Security Code Change]
You can set up a security code. See Security Code Setup (P.9).
Software Information
You can confirm the software version of this unit.
1 Touch [Software Information] in the System setting menu.
2 Confirm the software version.

NOTE
- For how to update the software, see the relevant update procedure manual which comes with the software.
Controlling Audio
You can adjust various settings such as audio balance or subwoofer level.
1 Press the [HOME]∅] button.
2 Touch
3 Touch [Audio].

See the following section for each setting.
- Set up Speaker / X'over (P.61)
• Controlling EQ / SW Level (P.62) - Set Position / DTA (P.63)
• Controlling FAD / BAL / Zone (P.65) - Set Volume Offset (P.67)
- Set Sound Effect (P.67)
• Use Audio Memory (P.71)
NOTE
- When the iDatalink (commercially available) is connected, the best audio settings are set automatically.
Each parameter as follows are set. (DMX9720XDS only) - Speaker / X'over
- EQ / SW Level
- Position / DTA
- FAD / BAL / Zone
- Sound Effect
• To recall the settings automatically adjusted by the iDatalink connection when the settings are changed manually, touch [Audio SETUP]
Clear] in the Audio Memory setting menu. (DMX9720XDS only) (P.71)
3-way speaker system setup
Select the appropriate crossover network mode for the speaker system used (2-way or 3-way speaker system).
CAUTION
- Connecting 3-way speakers with the 2-way mode selected can break the speakers.
1 Press the [HOME]∅ button.
HOME screen appears.
2 Touch
Source selection screen appears.
3 Touch [STANDBY].
4 Press ☐ button ① followed by the [HOME] ☐ ] button ② for 1 second at the same time.

▶ Speaker system select screen appears.
5 Select the crossover network mode.
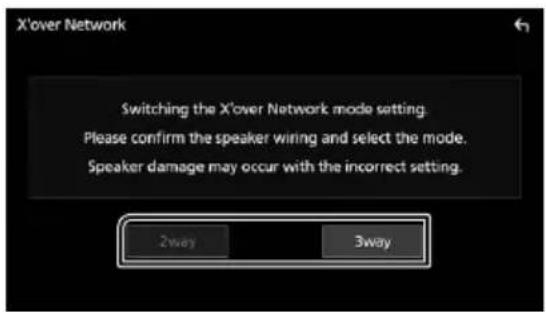
▶ A confirmation screen appears.
6 Touch [Yes].
NOTE
- When the 3-way speaker system is selected, the following functions are disabled.
- Front focus of Listening Position / DTA
– Fader for Controlling General Audio - Zone Control
– Selection of the speakers to output sound from the smartphone/cell-phone of Bluetooth HF/Audio - Beep for User Interface Setup
- While talking on the paired phone or using the voice recognition function, the speaker system cannot be switched.
- When the dual zone is selected and audio source other than "OFF" is selected as Rear Source, the speaker system cannot be switched to the 3-way mode.
Speaker / X'over setup
1 Press the [HOME] button.
2 Touch
3 Touch [Audio].
▶ Audio screen appears.
4 Touch [Speaker / X'over].
5 Select a car type.
You can select the car type and speaker network, etc.
When you select your car type, the Delay Time Alignment is activated automatically (for timing adjustment of sound output for each channel) to have the highest surround effects.

6 Touch the speaker (①) you wish to adjust and set each parameter (②) as follows.
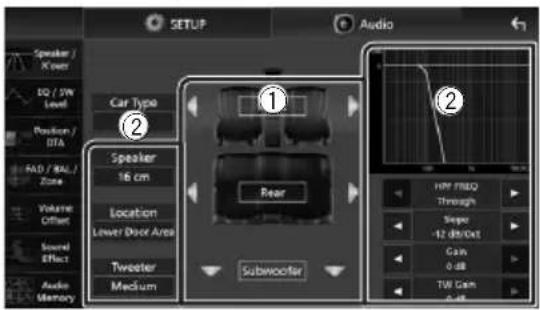
[Speaker]
You can select a speaker type and its size to get the best sound effects.
When the speaker type and size are selected, the speaker crossover network is set automatically.
■ [Location] (Only for Front, Rear)
Select the speaker position you have installed.
■ [Tweeter] (Only for Front)
You can set up the tweeter when you are selecting front speakers.
None, Small, Medium, Large
■ [HPF FREQ] (Only for Front, Rear)
High Pass Filter adjustment.
■ [LPF FREQ] (Only for Subwoofer)
Low Pass Filter adjustment.
[Slope]
Set a crossover slope.
[Gain]
Adjust the gain of the front speaker, rear speaker, or subwoofer.
■ [TW Gain] (Only for Front)
Adjust the tweeter level.
■ [Phase Inversion] (Only for Subwoofer)
Set the phase of subwoofer output.
Check [Phase Inversion] to shift the phase 180 degrees.
When Speaker network is set to 3-way:

[Speaker]
You can select a speaker type and its size to get the best sound effects. If you have no speakers, select "None".
When the speaker type and size are selected, the speaker crossover network is set automatically.
■ [FREQ] (High Pass)
High Pass Filter adjustment. (Only for High Pass)
■ [FREQ] (Low Pass)
Low Pass Filter adjustment. (Only for Low Pass)
■ [HPF FREQ], [LPF FREQ] (Only for Band Pass)
Band Pass Filter adjustment.
[Slope] 102
Set a crossover slope.
[Gain]
Set the gain of each speaker.
■ [Phase Inversion]
Set the phase of tweeter, mid range, and woofer output.
Check [Phase Inversion] to shift the phase 180 degrees.
*1 Only when "LPF FREQ"/"HPF FREQ" (Band Pass) is set to a mode other than "Through".
*2 Only when "FREQ" (Low Pass) is set to a mode other than "Through".
NOTE
- For how to switch to the 3-way speaker system, see 3-way speaker system setup (P.60).
Equalizer Control
You can adjust equalizer by selecting the optimized setting for each category.
1 Press the [HOME]∅ button.
2 Touch
3 Touch [Audio].
▶ Audio screen appears.
4 Touch [EQ / SW Level].
5 Touch the screen and set the Graphic Equalizer as desired.

■Gain level (area in dotted frame)
Adjust the gain level by touching each frequency bar.
You can select a frequency bar and adjust its level by [▲], [▼].
[ALL SRC]
Apply the adjusted equalizer curve to all sources. Touch [ALL SRC] and then touch [OK] on the confirmation screen.
■[Memory]
Saves the adjusted equalizer curve as "User1" to "User4". (P.63)
[Initialise]
Initialize (flatten) the current EQ curve.
■ [Bass EXT] (Bass Extend Settings)
When turned on, the frequencies lower than 62.5 Hz is set to the same gain level (62.5 Hz).
[SW Level]
Adjust the subwoofer volume. This setting is not available when Subwoofer is set to "None". See Speaker / X'over setup (P.61).
■ [Pop]/[Easy]/[Top40]/[Jazz]/[Powerful]/[Rock]/[Flat]/[Bass Boost]/[User1]/[User2]/[User3]/[User4]
Recall the preset EQ curve.
![KENWOOD DMX9720XS - ■ [Pop]/[Easy]/[Top40]/[Jazz]/[Powerful]/[Rock]/[Flat]/[Bass Boost]/[User1]/[User2]/[User3]/[User4] - 1](/content/2026/05/837760/images/44d78d5c6bfbbfee05774cb51c6c78a0f728694f3cf537c9718e7e2ae9fbc48a.jpg)
Save the EQ curve
1 Adjust the EQ curve.
2 Touch [Memory].
3 Select where to save.

Listening Position / DTA
Listening Position / DTA allows you to improve the sound field depending on the position of the seat you sit.
Listening Position / DTA allows you to set "Listening Position" and "Front Focus". You cannot set both at the same time.
1 Press the [HOME]∅ button.
2 Touch
3 Touch [Audio].
▶ Audio screen appears.
4 Touch [Position / DTA].

- Set up Listening Position (P.63)
- Set up Front Focus (P.64)

Listening Position
Adjust the sound delay time so that the sounds from different speakers arrive at the listener sitting on the selected seat at the same time.
1 Touch [Listening Position] on the Position / DTA screen.
2 Select a listening position from [Front R] (Right front), [Front L] (Left front), [Front All] (All front), and [All].

Controlling Audio
Position DTA control
You can fine-adjust your listening position.
1 Touch [Adjust].
2 Touch [Delay].
3 Touch [◀] or [▶] to adjust the delay time of the selected speaker.

4 Touch [Level].
5 Touch [◀] or [▶] to adjust the sound level of the selected speaker.

NOTE
- To initialize the Delay and Level settings, touch [Initialise] and [YES] on the confirmation screen.

Front Focus
You can focus the imaginary sound image on the front of the selected seat.
1 Touch [Front Focus] in the Position / DTA screen.
2 Select a front focus position.
For [Front All] and [All], select Priority L or R depending on which side you want to put the imaginary sound image.

NOTE
- When the 3-way speaker system is selected, "Fader" adjustment is disabled.
Front Focus fine adjustment
1 Touch [Adjust].
2 Touch [Delay].
3 Set each parameter as follows.


[Sound Image LR (Front)]
Focus the sound image on the front of front seats.
![KENWOOD DMX9720XS - [Sound Image LR (Front)] - 1](/content/2026/05/837760/images/1ab735a699e49ae373a646834115cc99c3722bae430a3357d8c7fe76312a1357.jpg)
[Sound Image LR (Rear)]
Focus the sound image on the front of rear seats.
■ [Size of the Virtual Sound Field]
Adjust the size of sound image to meet your taste. If the sound image is shifted from the front, move it back by [Sound Image LR (Front)] or [Sound Image LR (Rear)].
■ [Subwoofer Delay]
Adjust the delay time of subwoofer sound.
4 Touch [Level].
5 Touch [◀] or [▶] to adjust the sound level of the selected speaker.
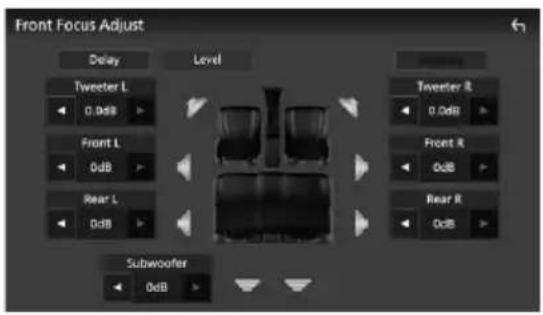
NOTE
- To initialize the Delay and Level settings, touch [Initialise] and [YES] on the confirmation screen.
Fader / Balance / Zone Control
1 Press the [HOME]∅ button.
2 Touch
3 Touch [Audio].
▶ Audio screen appears.
4 Touch [FAD / BAL / Zone].

• Fader / Balance Control (P.65)
- Set up Zone Control (P.66)
![KENWOOD DMX9720XS - Touch [FAD / BAL / Zone]. - 2](/content/2026/05/837760/images/6128907146a6d35e149a6074622b63eea521cd2a31bfd99f6d5af1b7f5f79453.jpg)
Fader / Balance Control
You can adjust the volume balance among the speakers.
1 Touch [◀], [▶], [▲], and [▼] to adjust the volume balance.

[◀] and [▶] adjust the left and right volume balance. [▲] and [▼] adjust the front and rear volume balance.
[Center]
Clear the adjustment.
NOTE
- When the 3-way speaker system is selected, "Fader" adjustment is disabled.

Zone Control
You can select different sources for front and rear positions in the vehicle.
1 Touch [Dual Zone] on the FAD / BAL / Zone screen.

[Source]
You can switch the current source.
2 Set each source as follows.

■[Zone Select]
Touch [Single Zone] to turn off the dual zone function.
■ [Front Source], [Rear Source]
Select an audio source for each.
Rear Source;
"AV-IN"/"iPod"/"USB"/"OFF"
[Rear VOL.]
Adjust the rear source volume.
NOTE
- When the rear source is switched, the audio source that is output at the AV OUTPUT terminal is also switched to the same source.
- When the dual zone function is set to on, the following functions are not available.
- Output from the subwoofer
- Subwoofer Level/Bass Boost (P.67)
- Equalizer Control/Sound Effect/Listening Position (P.62, 67, 63)
-
Speaker Setup (P.61)
– Fader for Controlling General Audio
– High-resolution Sound Source File Playback -
When the dual zone is selected and audio source other than "OFF" is selected as Rear Source, the speaker system cannot be switched.
- You cannot select AV-IN if the Video input terminal is used for camera.
Rear Source
- You cannot select iPod if it is connected via Bluetooth or Apple CarPlay is connected.
- If you select iPod as the Front Source, you cannot select USB as the Rear Source.
- If you select USB as the Front Source, you cannot select iPod as the Rear Source.
- If you select HDMI as the Front Source, files with sampling rates higher than 96 kHz in USB selected as the Rear Source are skipped.
- If you select Bluetooth audio, Radio, Digital Radio, Wireless Mirroring, Apple CarPlay or Android Auto as the Front Source, you cannot select USB or iPod as the Rear Source.
Volume Offset
Finely adjust the volume of the current source to minimize the difference in volume between different sources.
1 Press the [HOME]∅] button.
2 Touch
3 Touch [Audio].
▶ Audio screen appears.
4 Touch [Volume Offset].
5 Touch [+] or [-] to adjust the level.

[Initialise]
Returns to the initial settings.
Touch [Initialise] and then touch [YES] on the confirmation screen.
NOTE
- If you have increased the volume first, then reduce the volume using "Volume Offset". Switching the current source to another source suddenly may output extremely loud sound.
Sound Effect
You can set sound effects.
1 Press the [HOME]∅ button.
2 Touch
3 Touch [Audio].
▶ Audio screen appears.
4 Touch [Sound Effect].
5 Set each parameter as follows.

[Bass Boost]
Set the amount of bass boost "OFF"/"1"/"2"/"3".
[Loudness]
Set the amount of boost of low and high tones.
"OFF", "Low", "High"
■[Drive Equalizer]
Reduces the driving noise by raising the bandwidth.
"OFF", "ON"
■[Space Enhancer]
Select the feeling of sound space enhancement.
"OFF"/"Small"/"Medium"/"Large".
This setting is not available for the Digital Radio (DMX9720XDS) and Radio source.
[Supreme]
Turn ON/OFF the Supreme function.
Technology to extrapolate and supplement with proprietary algorithm, the high-frequency range that is cut off when encoding.
[Realizer]
Virtually make the sound more realistic using the Digital Signal Processor (DSP) system.
Select the level from "OFF"/"1"/"2"/"3".
[Stage EQ]
You can adjust the height of speakers virtually to suit your listening position.
"OFF"/"Low"/"Middle"/"High".
[Parametric EQ]
When set to "ON", you can use the parametric equalizer. For details, see Parametric
Equalizer (P.68).
Parametric Equalizer
In addition to the conventional Graphic Equalizer, this unit has a parametric equalizer, which allows you more precise adjustments. By using each equalizer properly, you can calibrate the unit more thoroughly.
Adjustment using this function requires expertise.
When to Use Each Function
●Parametric Equalizer
Use this to finely correct or improve the frequency characteristics of the acoustics of the car in order to establish a basis for adjustments.
Practiced ears or a measuring equipment may be required to apprehend the problems of the sound field inside the car.
●Graphic Equalizer
Use this to actively create an attractive sound as conventionally.
Everybody can easily get the result through trial and error of intuitive operations.
Even more effective adjustments are possible when the basis is established by using the Parametric Equalizer.

About the Parametric Equalizer
This system allows you to freely control the filter, frequency, Q factor (acuteness) and slope gain at 14 points consisting of 9 points common for front/rear/subwoofer, 2 points for front only, 2 points for rear only, and one point for subwoofer only.
NOTE
- Configure the Parametric Equalizer to establish the basis for adjustments before making adjustments using the Graphic Equalizer.
- The changes made using the Parametric Equalizer are not shown on the Graphic Equalizer screen.
- You can check the effects using the Parametric Equalizer ON/OFF key.
About Adjustments
If there are unpleasant peaks, you can slide the peaking filter to the left or right and search the frequencies by ear. Studio engineers use this method to make adjustments quickly and efficiently.
However, in order to identify peaks and dips of a car audio system, you have to capture the pink noise outputted from the speaker using a microphone and analyze it using a real time analyzer (RTA). From the analysis result, identify the peaks and/or dips that need to be corrected and configure the filters to cancel them.
About the Filters of Parametric Equalizer
Filters allow you to remove or extract specific sound through signal processing.

NOTE
- Cutoff frequency is the boundary between the passband and the stopband. The definition of cutoff frequency is a frequency for which the output is -3 dB of the nominal passband value.
●High-Pass Filter
Passes signals with frequencies higher than a certain frequency (fc: cutoff frequency) and attenuates signals with frequencies lower than the cutoff frequency. Use this to pass only high-frequency signals. Use this in the following cases for example:
- For extracting the frequency band for separate tweeters. By extracting the specific frequency band, level adjustment can be made to the frequency band individually.
- The sound may be muddy when you play back low frequency sound. This occurs when frequencies below the speaker capacity is inputted. To cancel this, use the high-pass filter to cut off the frequencies below the speaker capacity.
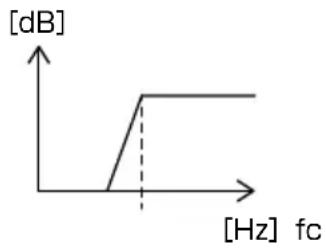
line
| Frequency [Hz] | Amplitude [dB] | | -------------- | -------------- | | 0 | 0 | | 1 | 1 | | 2 | 1 | | 3 | 1 | | 4 | 1 | | 5 | 1 | | 6 | 1 | | 7 | 1 | | 8 | 1 | | 9 | 1 | | 10 | 1 | | 11 | 1 | | 12 | 1 | | 13 | 1 | | 14 | 1 | | 15 | 1 | | 16 | 1 | | 17 | 1 | | 18 | 1 | | 19 | 1 | | 20 | 1 | | 21 | 1 | | 22 | 1 | | 23 | 1 | | 24 | 1 | | 25 | 1 | | 26 | 1 | | 27 | 1 | | 28 | 1 | | 29 | 1 | | 30 | 1 | | 31 | 1 | | 32 | 1 | | 33 | 1 | | 34 | 1 | | 35 | 1 | | 36 | 1 | | 37 | 1 | | 38 | 1 | | 39 | 1 | | 40 | 1 | | 41 | 1 | | 42 | 1 | | 43 | 1 | | 44 | 1 | | 45 | 1 | | 46 | 1 | | 47 | 1 | | 48 | 1 | | 49 | 1 | | 50 | 1 | | Note: The frequency values are not explicitly provided in the code, so they are represented as 'bc' in the chart.●High-Shelving Filter/Low-Shelving Filter
These filters reduce or increase signals above or below a certain frequency (fc: cutoff frequency), which create shelves in the frequency spectrums. A high-shelving filter reduces or increases the frequencies above the target frequency and a low-shelving filter reduces or increases the frequencies below the target frequency. The low shelf controls the lower frequencies and the high shelf controls the high frequencies. Use these in the following cases for example:
- When you want to change the volume of the tweeters, for example when they are close to your ears and are sounding too loud.
- When you want to change the subwoofer volume at hand.

line
| Frequency (Hz) | Value (dB) | | -------------- | ---------- | | 0 | 0 | | 0.5 | 0 | | 1 | 0 | | 1.5 | 0 | | 2 | 0 | | 2.5 | 0 | | 3 | 0 | | 3.5 | 0 | | 4 | 0 | | 4.5 | 0 | | 5 | 0 | | 5.5 | 0 | | 6 | 0 | | 6.5 | 0 | | 7 | 0 | | 7.5 | 0 | | 8 | 0 | | 8.5 | 0 | | 9 | 0 | | 9.5 | 0 | | 10 | 0 | | 10.5 | 0 | | 11 | 0 | | 11.5 | 0 | | 12 | 0 | | 12.5 | 0 | | 13 | 0 | | 13.5 | 0 | | 14 | 0 | | 14.5 | 0 | | 15 | 0 | | 15.5 | 0 | | 16 | 0 | | 16.5 | 0 | | 17 | 0 | | 17.5 | 0 | | 18 | 0 | | 18.5 | 0 | | 19 | 0 | | 19.5 | 0 | | 20 | 0 | | 20.5 | 0 | | 21 | 0 | | 21.5 | 0 | | 22 | 0 | | 22.5 | 0 | | 23 | 0 | | 23.5 | 0 | | 24 | 0 | | 24.5 | 0 | | 25 | 0 | | 25.5 | 0 | | 26 | 0 | | 26.5 | 0 | | 27 | 0 | | 27.5 | 0 | | 28 | 0 | | 28.5 | 0 | | 29 | 0 | | 29.5 | 0 | | 30 | 0 | | 30.5 | 0 | | 31 | 0 | | 31.5 | 0 | | 32 | 0 | | 32.5 | 0 | | 33 | 0 | | 33.5 | 0 | | 34 | 0 | | 34.5 | 0 | | 35 | 0 | | 35.5 | 0 | | 36 | 0 | | 36.5 | 0 | | 37 | 0 | | 37.5 | 0 | | 38 | 0 | | 38.5 | 0 | | 39 | 0 | | 39.5 | 0 | | 40 | 0 | | Note: The frequency values are not explicitly provided in the code, so they are calculated based on the given code format [Hz] and [dB] values.●Peaking Filter
The frequencies in the vicinity of a certain frequency (f0: center frequency) are boosted or attenuated. Use this in the following cases for example:
- When you want to control a narrow range of frequencies to correct the frequency abnormality in the car.
- To diminish a chattering noise from the speaker by attenuating the frequency range of the noise.
- To adjust of the sound balance of the whole range between the low end and the high end.

line
| Frequency (Hz) | Amplitude (dB) | | -------------- | -------------- | | 0 | 0 | | 1 | Peak | | 2 | 0 | | 3 | 0 | | 4 | 0 | | 5 | 0 | | 6 | 0 | | 7 | 0 | | 8 | 0 | | 9 | 0 | | 10 | 0 | | 11 | 0 | | 12 | 0 | | 13 | 0 | | 14 | 0 | | 15 | 0 | | 16 | 0 | | 17 | 0 | | 18 | 0 | | 19 | 0 | | 20 | 0 | | 21 | 0 | | 22 | 0 | | 23 | 0 | | 24 | 0 | | 25 | 0 | | 26 | 0 | | 27 | 0 | | 28 | 0 | | 29 | 0 | | 30 | 0 | | 31 | 0 | | 32 | 0 | | 33 | 0 | | 34 | 0 | | 35 | 0 | | 36 | 0 | | 37 | 0 | | 38 | 0 | | 39 | 0 | | 40 | 0 | | 41 | 0 | | 42 | 0 | | 43 | 0 | | 44 | 0 | | 45 | 0 | | 46 | 0 | | 47 | 0 | | 48 | 0 | | 49 | 0 | | 50 | 0 | | Note: The frequency values are not explicitly provided in the code, so they are represented as 'fO' in the plot.●Low-Pass Filter
Passes signals with frequencies lower than a certain frequency (fc: cutoff frequency) and attenuates signals with frequencies higher than the cutoff frequency. Use this to pass only low-frequency signals. Use this in the following cases for example:
- For extracting the low frequencies band for a subwoofer.
- For extracting middle/low frequencies when you are using speakers with separate tweeters and you want to output the high frequencies to the tweeters and output the middle/low frequencies to the woofers.
- To cut the high frequencies when they are too loud.

line
| Frequency [Hz] | Amplitude [dB] | | :--- | :--- | | 0 | 1 | | 1 | 1 | | 2 | 0.5 | | 3 | 0.25 | | 4 | 0.125 | | 5 | 0.0625 | | 6 | 0.025 | | 7 | 0.0125 | | 8 | 0.00625 | | 9 | 0.003125 | | 10 | 0.0015625 | | 11 | 0.00078125 | | 12 | 0.000390625 | | 13 | 0.0001953125 | | 14 | 0.00009765625 | | 15 | 0.000048828125 | | 16 | 0.0000244140625 | | 17 | 0.00001220703125 | | 18 | 0.000006103515625 | | 19 | 0.0000030517578125 | | 20 | 0.00000157587890625 | | 21 | 0.000000787939453125 | | 22 | 0.0000003989697265625 | | 23 | 0.00000019998986328125 | | 24 | 0.000000099999984144625 | | 25 | 0.00000004999999787778125 | | 26 | 0.00000002999999934336325 | | 27 | 0.00000001999999962164625 | | 28 | 0.000000009999999313333125 | | 29 | 0.00000000499999916164625 | | 30 | 0.000000002999999133333125 | | 31 | 0.0000000019999991144625 | | 32 | 0.000000001999999133333125 | | 33 | 0.0000000019999991144625 | | 34 | 0.0000000019999991144625 | | 35 | 0.0000000019999991144625 | | 36 | 0.0000000019999991144625 | | 37 | 0.0000000019999991144625 | | 38 | 0.0000000019999991144625 | | 39 | 0.0000000019999991144625 | | 40 | 0.87787777777778778 |
Adjust the Parametric Equalizer
Preparation
- Correct the value in "Listening Position" and "Front Focus" before adjusting the parametric equalizer. See Listening Position / DTA (P.63).
1 Press the [HOME] button.
2 Touch [ ]
3 Touch [Audio].
4 Touch [Sound Effect].
5 Set the Parametric EQ to [ON] and touch [Yes].
6 Touch [SETUP].
▶ Parametric EQ screen appears.
7 While auditioning music, move the peaking filter to the left and right to search for unpleasant peaks and suppress them.
8 Use pink noise and an analyzer to identify dips, as dips are difficult to find.
Correct steep (10 dB or greater) peaks and dips as these are generally regarded as obstructions to sound quality.
9 Set each parameter as follows.
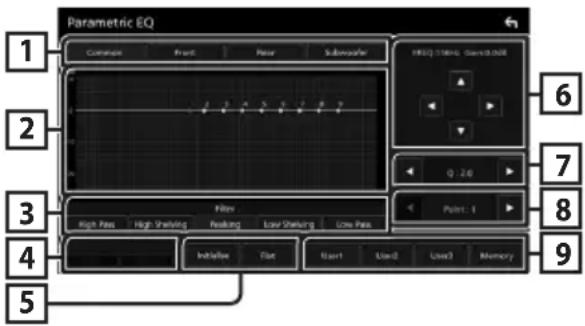
1 Speaker
Select the speaker.
When Speaker network is set to 2-way:
"Common" / "Front" / "Rear" / "Subwoofer"
When Speaker network is set to 3-way:
"Common"/"Tweeter"/"Middle"/"Woofer"
2 EQ points/curve
Displays the EQ point and the curve. Adjust the EQ points by touching.
EQ point (red): The EQ point currently being adjusted.
EQ point (blue/yellow): EQ points that are not currently being adjusted.
Curve (orange): EQ curve of the speaker currently being adjusted.
Curve (blue): Overall EQ curve.
3 Filter
Select the filter.
"High Pass" / "High Shelving" / "Peaking" / "Low Shelving" / "Low Pass"
4 Affects All Speakers *1
• [ON]: Outputs sound from all speakers.
- OFF: Outputs sound from the currently selected speaker only.
5 [Initialise] / [Flat]
- [Initialise]: Initialize (flatten) the adjustment of all the speakers.
- [Flat]: Initialize (flatten) the adjustment of the current speaker.
6 Frequency / Gain
Set the frequency and gain.
[◀] and [▶] adjust the frequency.
[▲] and [▼] adjust the gain.
NOTE
- Touch the EQ point to roughly determine the frequency and gain, then use this key to make fine adjustments.
7 Q / Slope *2
Set the Q factor and slope.
8 Point
Select the EQ point to adjust.
9 Preset
- [User1] / [User2] / [User3]: Recalls the preset EQ.
- [Memory]: Stores the current EQ settings.
*1 Only when the speaker other than "Common" is selected.
*2 When "Peaking" filter is selected, you can adjust the Q factor. When "High Pass" or "Low Pass" filter is selected, you can adjust the slope.
NOTE
- You can adjust the EQ points and curve based on a preset EQ. Recall the preset EQ and touch the preset key again to unselect it before adjustment.
10 When you have finished adjustments, save the results as a preset, and check the effects by switching presets or turning the Parametric EQ [ON] and OFF.
11 Use the Graphic Equalizer to make final adjustments. (P.62)
Audio Setup memory
Audio Control settings can be memorized. The memorized settings can be recalled at any time.
1 Press the [HOME]∅ button.
2 Touch
3 Touch [Audio].
▶ Audio screen appears.
4 Touch [Audio Memory].

[SETUP Memory]
Lock or unlock the Audio SETUP Memory/Recall/Clear.
■[Audio SETUP Memory]
Memorize the current audio settings.
- FAD / BAL / Zone, Speaker / X'over, Equalizer (User Preset, SW Level), Position / DTA, Sound Effect (P.60)
■[Audio SETUP Recall]
Recall the memorized audio setting.
■[Audio SETUP Clear]
Clear the Audio SETUP Memory and the currently memorized audio settings.
- If the iDatalink (commercially available) is connected, the audio settings revert to the values set by the iDatalink. (DMX9720XDS only)
Remote control
This unit can be operated using the remote control.
CAUTION
- Risk of fire or explosion if the battery is replaced by an incorrect type. Ensure to replace only with the same type.
- Risk of fire, explosion or the leakage of flammable liquid or gas if the battery is left in an extremely high temperature surrounding environment and/or subjected extremely low air pressure. The battery pack or batteries shall not be exposed to excessive heat such as sunshine, fire or the like.
- Risk of fire, explosion or the leakage of flammable liquid or gas if the battery is disposed into fire or a hot oven, recharged, shorted, mechanically crushed or cut of the battery.
- If spilled fluid comes in contact with your eyes or on clothing, immediately rinse with water and consult a physician.
Battery Installation
If the remote control operates only over shorter distances or does not operate at all, it is possible that the batteries are depleted. In such instances, replace the both batteries with new ones.
1 Insert two "AAA"/"R03"-size batteries with the and poles aligned properly, following the illustration inside the case.

natural_image
Diagram of a battery pack and internal circuit components (no text or symbols)Functions of the Remote control Buttons
Switch the operation mode
The functions operated from the remote control differ depending on the position of the mode switch.

AUD mode
Switch to this mode when controlling a selected source or tuner source, etc.
■DVD mode/TV mode
Not used.
NOTE
- When controlling a player that is not integrated in the unit, select "AUD" mode.

Direct search mode
Using the remote control, you can jump directly to the desired file, track, chapter, etc. by entering the number corresponding to the content.
NOTE
- This operation cannot be performed for the USB device and iPod.
1 Press the [DIRECT] button several times until the desired content appears.
The available contents are different depending on the source type.
Radio
Frequency value
2 Enter the number of the content you want to play using the numeric keypad.
3 Press the [◀◀] or [▶▶] button.
The content corresponding to the number you entered is played.
![KENWOOD DMX9720XS - Press the [◀◀] or [▶▶] button. - 1](/content/2026/05/837760/images/24afbf5bc11b1d8180a08ee5ae40abd2f74705b2b3904c2543a5a7758ade629b.jpg)
Basic Operation
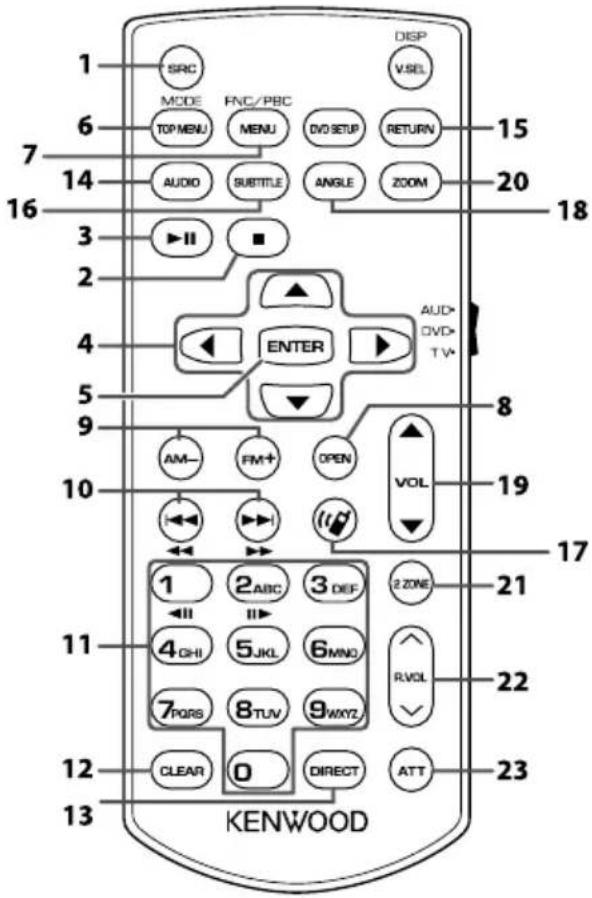
| Key Name | Mode switch | Function | |
| 1 | SRC – Switches to the source to be played. (P.56)In Hands-Free mode, hangs up the phone. | ||
| 2 | ■ | – Not used. | |
| 3 | ▶II | – Pauses the track or file, and resumes playing by pressing twice.For the Radio and Digital Radio (DMX9720XDS) sources in AUD mode, switches the seek mode. | |
| 4 | ▲/▼/◀/▶ | – Not used. | |
| 5 | ENTER – Not used. | ||
| 6 | TOP MENU AUD Screen mode changes each time you press this key during video playback. | ||
| 7 | MENU AUD Displays the control screen of current source. (USB) | ||
| 8 | OPEN | – Not used. | |
| 9 | AM-/FM+ | AUD | Selects the folder to be played. For the Radio and Digital Radio (DMX9720XDS) sources in AUD mode, selects FM/AM band to be received. |
| 10 | |◀◀/▶▶| | – Selects the track or file to be played. For the Radio, Digital Radio (DMX9720XDS) sources in AUD mode, switches to broadcast stations received by the unit. | |
| 11 | Numeric Keypad | AUD Allows you to enter the number to search in the direct search mode.For details on the direct search mode, seeDirect search mode(P.73).For the Radio and Digital Radio (DMX9720XDS) sources, allows you to enter the preset number.If the preset number is one digit, press the number.If the preset numbers is two digits, press continuously the numbers within 3 seconds.Pressing [◀][▶] within 3 seconds allows you to determine the preset number of one digit. | |
| 12 | CLEAR – Not used. | ||
| 13 | DIRECT – Switches to the direct search mode. (P.73). | ||
| 14 | AUDIO – Not used. | ||
| 15 | RETURN – Not used. | ||
| 16 | SUBTITLE – Not used. | ||
| 17 | – When a call comes in, answers the call. | ||
| 18 | ANGLE – Not used. | ||
| 19 | VOL ▲▼ | – Adjusts the volume. | |
| 20 | ZOOM – Not used. | ||
| 21 | 2 ZONE – Switches the Dual Zone function on and off. | ||
| 22 | R.VOL ▲Adjusts volume at rear when the Dual Zone function is on. | ||
| 23 | ATT – Lowers the volume by pressing the key once.Restores the previous volume by pressing the key twice. | ||
Connection/Installation
This section is for the professional installer.
For safety's sake, leave wiring and mounting to professionals. Consult the car audio dealer.
Before Installation
Before installation of this unit, please note the following precautions.
⚠️ WARNINGS
- If you connect the ignition wire (red) and the battery wire (yellow) to the car chassis (ground), you may cause a short circuit, that in turn may start a fire. Always connect those wires to the power source running through the fuse box.
- Do not cut out the fuse from the ignition wire (red) and the battery wire (yellow). The power supply must be connected to the wires via the fuse.
CAUTION
• Install this unit in the console of your vehicle. Do not touch the metal part of this unit during and shortly after the use of the unit. Metal part such as the heat sink and enclosure become hot.
NOTE
- Mounting and wiring this product requires skills and experience. For best safety, leave the mounting and wiring work to professionals.
- Do not install the unit if it becomes an obstacle to driver performance.
- Adjust the panel position not to become an obstacle to driver performance.
- Make sure to ground the unit to a negative 12V DC power supply.
- Do not install the unit in a spot exposed to direct sunlight or excessive heat or humidity. Also avoid places with too much dust or the possibility of water splashing.
-
Do not use your own screws. Use only the screws provided. If you use the wrong screws, you could damage the unit.
-
If the power is not turned ON ("There is an error in the speaker wiring. Please check the connections." is displayed), the speaker wire may have a short-circuit or touched the chassis of the vehicle and the protection function may have been activated. Therefore, the speaker wire should be checked.
- If your car's ignition does not have an ACC position, connect the ignition wires to a power source that can be turned on and off with the ignition key. If you connect the ignition wire to a power source with a constant voltage supply, such as with battery wires, the battery may be drained.
- If the console has a lid, the lid will not be closed even when the unit is installed correctly.
- If the fuse blows, first make sure the wires are not touching to cause a short circuit, then replace the old fuse with one with the same rating.
• Insulate unconnected wires with vinyl tape or other similar material. To prevent a short circuit, do not remove the caps on the ends of the unconnected wires or the terminals. - Connect the speaker wires correctly to the terminals to which they correspond. The unit may be damaged or fail to work if you share the wires or ground them to any metal part in the car.
- When only two speakers are being connected to the system, connect the connectors either to both the front output terminals or to both the rear output terminals (do not mix front and rear). For example, if you connect the connector of the left speaker to a front output terminal, do not connect the connector to a rear output terminal.
• After the unit is installed, check whether the brake lamps, blinkers, wipers, etc. on the car are working properly. - Mount the unit so that the mounting angle is 30irc or less.
- This unit has the cooling fan to decrease the internal temperature. Do not mount the unit in a place where the cooling fan of the unit is blocked. Blocking these openings will inhibit the cooling of the internal temperature and result in malfunction.

- Do not press hard on the panel surface when installing the unit to the vehicle. Otherwise scars, damage, or failure may result.
- Reception may drop if there are metal objects near the Bluetooth/Wi-Fi antenna.

flowchart
graph TD
    A[" "] --> C[" "]
    B[" "] --> C[" "]
    C --> D[" "]
    style C fill:#f9f,stroke:#333,stroke-width:2px
Bluetooth/Wi-Fi antenna unit
●Forward and Lateral Fields of Vision
- To determine driver's forward and lateral fields of vision under normal conditions, place a pole (directly visible from the front or visible through the car rear-view mirror) as shown.

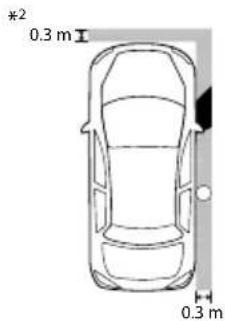
[■]: Field of vision from steering position
■]: Exempted area (pole size is subject to regulation)
- For right hand drive vehicles, standards are reversed.
*1 The pole must be visible from the driver's position as direct forward field of vision.
*2 The pole must be directly visible or indirectly visible through the mirror, etc. from the driver's position.
Supplied accessories for installation
| 1 |  | x1 |
| 2 |  | x1 |
| 3 |  | x1 |
| 4 |  5 × 8 mm 5 × 8 mm | x6 |
| 5 |  5 × 8 mm 5 × 8 mm | x6 |
| 6 |  .5 m .5 m | x1 |
| 7 |  | x1 |
| 8 |  | x1 |
| 9 |  | x2 |
| 10 |  -Left/Right -Left/Right | x1 |
| 11 |  5 × 8 mm 5 × 8 mm | x6 |
![⑫ x1 ⑬ (Ø3 x 6 mm) (Black) x2 ⑭ x1 ⑮ [1] x3 ⑯ [1] x1 ⑰ [1] x1 ⑱ [1] x1](/content/2026/05/837760/images/6d8429177b189af9aa2ab67866bf6f30d09526abd28f946c0d975d97d9af319b.jpg)
[1]DMX9720XDS only
Installation procedure
1) To prevent a short circuit, remove the key from the ignition and disconnect the terminal of the battery.
2) Remove the vehicle parts for installing the unit and connecting wires to terminal.
3) Make the proper input and output wire connections for each unit.
4) Connect the speaker wires of the wiring harness.
5) Connect the wiring harness wires in the following order; ground, battery, ignition.
6) Determine the height of the display unit and position of the slider. See Distance between the display unit and the main unit (P.78).
7) Connect the wiring harness connector to the unit.
8) Install the main unit to the vehicle.
9) Reinstall the vehicle parts.
10) Install the display unit.
11) Reconnect the terminal of the battery.
12) Perform the Initial Setup.
See Initial SETUP (P.8).
Installing the unit

Confirm the installing position of the display unit
●Vehicles cannot be installed
It may be possible to install if it can avoid the following by adjustment for slider position and display height.
| Lever operations are interfered such as shift lever, wiper lever, winker lever when install the unit. | A hazard switch is hidden from a driver seat. | The display unit hits a panel on the vehicle. |
 |  |  |
●Distance between the display unit and the main unit
Adjust slider position and display height so that it does not interfere with display movement.
| Slider position | Display angle Display height | ||||||||
| -10° 0° 45° 1 | 234 | ||||||||
| Back position |  | 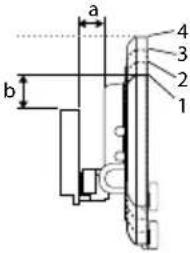 |  | -10° | a | 10 | |||
| b 38.1 50.9 | 63.8 | 76.5 | |||||||
| 0° | a 26.7 | ||||||||
| b 34.7 47.7 | 60.7 | 73.7 | |||||||
| 45° | c 5.7 14.4 | 24.1 3 | 3.4 | ||||||
| d 55.4 46.3 | 37.1 | 27.8 | |||||||
| Forward position | 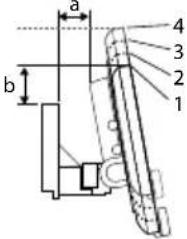 |  |  | -10° | a 30.1 | ||||
| b 38.1 50.9 | 63.8 | 76.5 | |||||||
| 0° | a 46.7 | ||||||||
| b 34.7 47.7 | 60.7 | 73.7 | |||||||
| 45° | c | 25.7 | 34.9 44.1 | 53.3 | |||||
| d 55.4 46.3 | 37.1 | 27.8 | |||||||
Unit: mm
Examples
Cluster panel on the vehicle
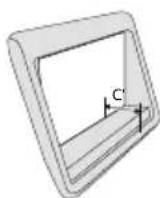
Slider in back position
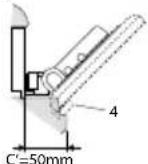
Slider in forward position


- C'=50mm; Slider position: Forward position Display height: Set only "4"
- C' = 30mm ; Slider position: Back position Display height: Set only "4"
Slider position: Forward position Display height: Set "2"\~"4"
Positioning the slider in forward
1 Remove the four screws from the bottom of the main unit.
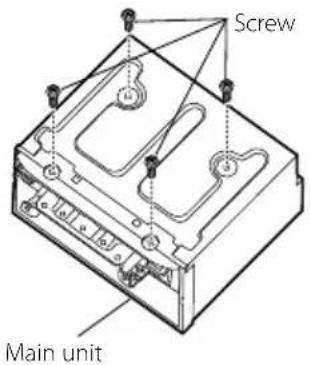
2 Remove the two cover for back position, and then remove the two hexagon head screws from the bracket for back position.
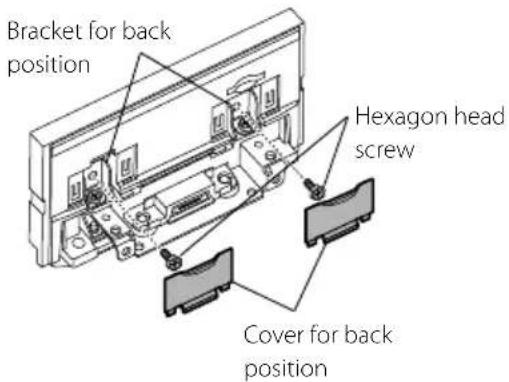
3 Pull the slider block forward and remove the two hexagon head screws to remove the bracket for back position.

4 Install the bracket for forward position (accessory ⑩) each side so that its projections are aligned with the slots on the main unit.

5 Fix the bracket for forward position to the slider block with the two hexagon head screws. Push the slider block until it stops and then fix the bracket for forward position to the main unit with the two hexagon head screws.

6 Reinstall the four screws to the bottom of the main unit.

7 Install the cover for forward position (accessory ⑨) to two locations, as shown.

natural_image
Technical line drawing of a mechanical assembly with no visible text or symbolsAdjusting the display height
1 Remove the four flat head screws from both sides.

2 Adjust the display height according to the screw hole position.
Default is "1".

3 Reinstall the four flat head screws on both sides and fix the display.
NOTE
- Fix with flat head screws correctly. After installing the display unit (accessory ⑧) to the main unit, tilt the display forward until it stops and confirm that the display unit (accessory ⑧) does not hit vehicle parts. If the display unit hits vehicle parts, adjust the display height again.
GPS antenna
GPS antenna is installed inside of the car. It should be installed as horizontally as possible to allow easy reception of the GPS satellite signals.
To mount the GPS antenna inside your vehicle:
1) Clean your dashboard or other surface.
2) Remove the separator of the metal plate (accessory ⑦).
3) Press the metal plate (accessory ⑦) down firmly on your dashboard or other mounting surface. You can bend the metal plate (accessory ⑦) to conform to a curved surface, if necessary.
4) Remove the separator of the GPS antenna (accessory ⑥), and stick the antenna to the metal plate (accessory ⑦).
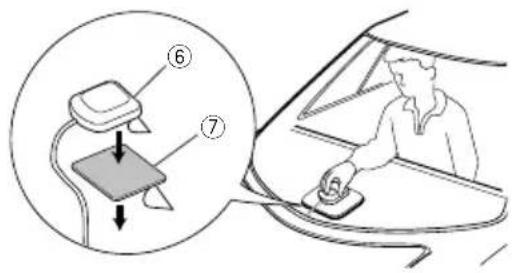
NOTE
- Use the supplied GPS antenna. Using the GPS antenna other than the supplied one may cause a drop in positioning accuracy.
- Depending on the type of car, reception of the GPS satellite signals might not be possible with an inside installation.
- Please install this GPS antenna in an area away from any antennas that are used with CB radios or satellite televisions.
- The GPS antenna should be installed at a position that is spaced at least 12 inch (30 cm) from smartphone/cell-phone or other transmitting antennas. Signals from the GPS satellite may be interfered with by these types of communication.
- Painting the GPS antenna with (metallic) paint may cause a drop in performance.
Microphone unit
1) Check the installation position of the microphone (accessory ③).
2) Clean the installation surface.
3) Remove the separator of the microphone (accessory ③), and stick the microphone to the place shown below.
4) Wire the microphone cable up to the unit with it secured at several positions using tape or other desired method.
5) Adjust the direction of the microphone (accessory ③) to the driver.

Fix a cable with a commercial item of tape.
Installation the Digital Radio antenna (DMX9720XDS)
CAUTION
- This film antenna is exclusively for use inside the vehicle.
-
Do not install at the following locations:
-
Where it may block driver's view
- Where it may obstruct operation of safety devices such as air bags
- On movable glass surface such as rear hatch
- On the side of the vehicle (e.g. doors, front-side windows)
- On rear windows
• Signal strength will decrease at the following locations:
- On IR reflecting glass or where covered with mirror type glass film
- Where it overlaps with genuine radio antenna (pattern)
- Where it overlaps with window heating wires
- When glass that blocks radio signals (e.g. IR reflecting glass, thermal insulation glass) is used
• Poor reception may occur:
- Due to noise when the windshield wipers, air conditioner, or motor is turned on
– Depending on the location of the broadcast station in relation to the vehicle (antenna)
- Thoroughly wipe oil and dirt from the pasting surface with the included cleaner (accessory ⑯).
- Do not bend or damage the film antenna (accessory ⑰).
- It may not be possible to install on some type of vehicle.
- Check the cable routing of the film antenna (accessory ⑰) and amplifier (accessory ⑱) before pasting.
●Installation overview
The antenna should be installed on the passenger side for safety.
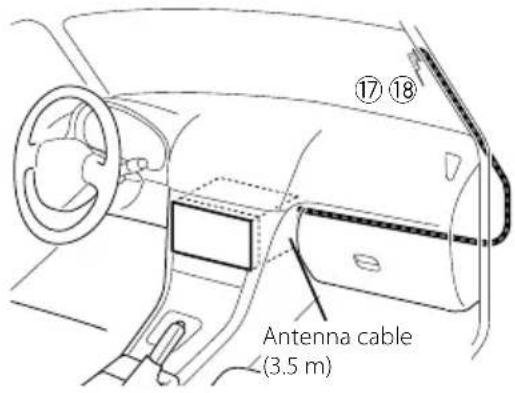
●Determining the antenna installation location
- The direction of the film antenna (accessory ⑰) changes depending on whether the film antenna is installed on the right side or left side.
- Be sure to check the installation location of the film antenna (accessory ⑰) before installing. The film antenna cannot be reattached.
• Install the antenna at least 100 mm away from other antennas. - Do not attach the amplifier unit (accessory ⑱) to the ceramic line (black part) around the windscreen, as it will not stick sufficiently.
Connection/Installation
When installing the antenna on the right side

When installing the antenna on the left side

NOTE
- *Where the earth sheet of Amplifier (accessory ⑱) can be pasted on the metal part of the front pillar.
CAUTION
When installing the antenna cable inside a front pillar that contains an air bag
- The front pillar cover is secured with a special clip which may need to be replaced when the front pillar cover is removed.
Contact your vehicle dealer for details on replacing the front pillar cover and availability of replacement parts.

• Install the amplifier unit (accessory ⑱ ) above the air bag so that the antenna and the air bag.

●Determining the antenna installation location
1) Remove the front pillar cover of your car.

2) Clean the windscreen with the supplied cleaner (accessory ⑯).

- Wait until the glass surface is completely dry before pasting.
- If the glass surface is cold, such as during winter, warm it with defroster or dryer.
3) Remove the first sheet (tag 1) of film antenna (accessory ⑰) horizontally and paste the antenna on the front glass.
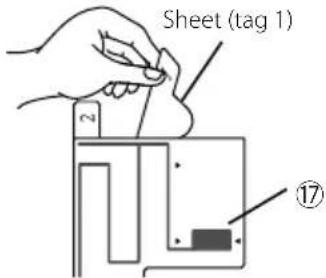
- Do not touch the pasting surface (adhesive side) of the film antenna (accessory ⑰).
4) Rub the film antenna (accessory ⑰) gently in the direction of the arrow shown below to firmly stick it to the windscreen.
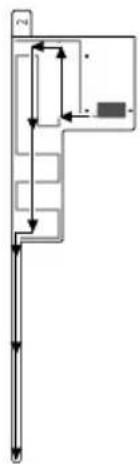
flowchart
graph TD
    A["Step 2"] --> B["Step 1"]
    B --> C["Step 3"]
    C --> D["Step 4"]
    D --> E["Step 5"]
    E --> F["Step 6"]
    F --> G["Step 7"]
    G --> H["Step 8"]
    H --> I["Step 9"]
    I --> J["Step 10"]
    J --> K["Step 11"]
    K --> L["Step 12"]
    L --> M["Step 13"]
    M --> N["Step 14"]
    N --> O["Step 15"]
    O --> P["Step 16"]
    P --> Q["Step 17"]
    Q --> R["Step 18"]
    R --> S["Step 19"]
    S --> T["Step 20"]
5) Remove the second sheet (tag 2) on the film antenna (accessory ⑰) vertically.

6) Match the protrusions of the amplifier unit (accessory ⑱) with the ◀ markings on the film antenna (accessory ⑰) and attach the amplifier.
Do not touch the lead terminal or the adhesive side of the amplifier unit (-).
When installing the antenna on the right side

When installing the antenna on the left side
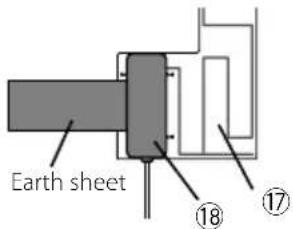
7) Remove the film covering the earth sheet and attach the earth sheet to the metal part of the vehicle.
Provide sufficient space for the earth sheet so that it does not obstruct the interior parts (front pillar cover). Also take care that the interior parts do not obstruct the amplifier unit (accessory 18).

8) Wire the antenna cables.
Use cord clamper (accessory ⑮ ) to secure the antenna cable to the pillar in several places.
9) Reattach the front pillar cover.
10) Be sure not to damage the earth sheet and amplifier unit (accessory ⑱) when reattaching.
11) Connect the amplifier unit (accessory ⑱) to the DAB input terminal on the rear of the unit.
12) Set [Antenna Power] to [ON]. (P.35)
Installing the main unit
NOTE
- Determine the slider position before installing the main unit. (P.79) The slider position cannot be changed after installing to the vehicle.
- Make sure that the unit is installed securely in place. If the unit is unstable, it may malfunction (eg, the sound may skip).
1 Remove parts that interfere with installing such as a panel on the vehicle.
2 Install the car bracket to the main unit.

3 Connect the wiring harness wires and peripheral equipment.
4 Install the main unit to the vehicle.
5 Reinstall the removed parts such as a panel on the vehicle.

6 Install the display unit (accessory ⑧) to the main unit.

NOTE
- If the display unit hits a panel on the vehicle, adjust the display height by referring to Adjusting the display height (P.80).
7 Fix the display unit with six hexagon head screws (accessory ⑪).

natural_image
Technical line drawing of a mechanical assembly with mounting brackets and a base plate (no text or symbols)8 Attach the protective cover (accessory ⑫) to coupling part, and then fix it with two binding head screws (accessory ⑬).
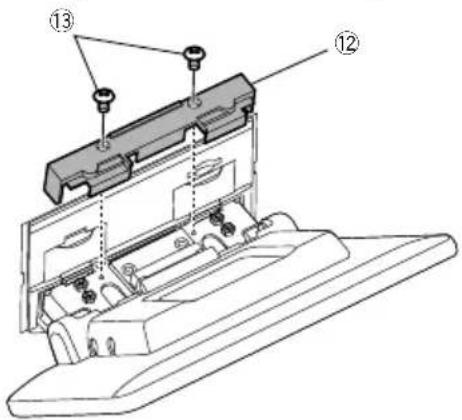
NOTE
- If the protective cover (accessory ⑫) is not attached, this unit will not turn on. Even if the unit is turned on, the power may be turned off halfway. Be sure to attach the protective cover (accessory ⑫).
9 Raise the display manually.

Connecting wires to terminals

flowchart
graph TD
    A["Residential Powertrain"] --> B["Connect to the vehicle's parking brake detection switch harness."]
    B --> C["PRK SW"]
    C --> D["Light Green (Parking sensor wire) (2 m)"]
    D --> E["For best safety, be sure to connect the parking sensor."]
    E --> F["Accessory ①"]
    F --> G["Blue/White (Power control wire)"]
    F --> H["P. CONT"]
    H --> I["When using the optional power amplifier, connect to its power control terminal. (Max. 200mA, 12V)"]
    F --> J["Light Blue/Yellow (Steering remote control wire)"]
    J --> K["Remote CONT STEERING WHEEL REMOTE INPUT"]
    K --> L["To steering remote To use the steering wheel remote control feature, you need an exclusive remote adapter (not supplied) matched to your car."]
    F --> M["Red (Ignition wire)"]
    M --> N["Ignition key switch"]
    N --> O["Car fuse box"]
    O --> P["Battery"]
    P --> Q["Black (Ground wire) ⊖ (To car chassis)"]
    Q --> R["Green/White"]
    R --> S["Green/Red"]
    S --> T["CAM-"]
    T --> U["CAM+"]
    U --> V["To CMOS-3xx series (optional accessory) camera control terminal"]
    V --> W["Pink (Speed Pulse Input) (2m)"]
    W --> X["S SENS"]
    X --> Y["Connect to the vehicle's speed pulse harness. Do not cut the "S SENS" tag or failure may result."]
    Y --> Z["Purple/White (Reverse sensor wire) (2 m)"]
    Z --> AA["REVERSE"]
    AA --> AB["Depending on what antenna you are using, connect either to the control terminal of the motor antenna, or to the power terminal for the booster amplifier of the film-type antenna. (Max. 300mA, 12V)"]
    style A fill:#f9f,stroke:#333
    style F fill:#ccf,stroke:#333
Connect to vehicle's reverse lamp harness when using the optional rear view camera.
3-way speaker system setup

NOTE
- For speaker system setup, see 3-way speaker system setup (P.60).
- For speaker setup and crossover setup, see Speaker / X'over setup (P.61).
- For how to connect speaker wires to terminals other than speaker terminals and Preout terminals, see Connecting the system and external components (P.87) and Connecting wires to terminals (P.86).
Connecting the system and external components

| 1 | Accessory 14: Steering remote harnessConnect to vehicle's steering remote harness.Contact your KENWOOD dealer for details. |
| 2 | Accessory 3: Bluetooth Microphone |
| 3 | FM/AM antenna input |
| 4 | AV Audio output (ø3.5 mini jack) |
| 5 | When connecting to an external amplifier,connect its ground wire to the car's chassis toavoid damaging the unit. Rear Audio Preout(Left; White, Right; Red) Front Audio Preout(Left; White, Right; Red) Subwoofer Preout(Left; White, Right; Red) |
Connection/Installation
| 6 | HDMI inputUse HDMI cable KCA-HD100 (optionalaccessory).When you connect the cable to HDMI terminal,remove the fixture. After connecting the cable,put the fixture again.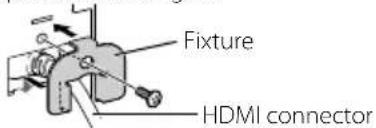 |
| 7 | Accessory 18: DAB antenna(DMX9720XDS only) |
| 8 | iDatalink connector (DMX9720XDS only) |
| 9 | Dashboard camera interfaceConnect a Dashboard Camera DRV-N520(optional accessory). (P.90) |
| 10 | AV Audio input (ø3.5 mini jack) |
| 11 | Accessory 6: GPS AntennaUse the supplied GPS antenna. Using the GPSantenna other than the supplied one maycause a drop in positioning accuracy. |
| 12 | 3rd view camera input (Yellow). SeeTo set upthe camera assignment settings (P.49). |
| 13 | Rear view camera input (Yellow) *1 |
| 14 | Front view camera/ Dashboard camera input(Yellow). *2 |
| 15 | Video output (Yellow) |
| 16 | Video input (Yellow) |
*1 Connect an HD camera to Rear view camera input terminal to use HD video.
*2 Connect an HD camera to Front view camera/ Dashboard camera input terminal to use HD video.
![Connecting a USB device Accessory ② (1 m) [3] USB device [2] USB terminal [1]](/content/2026/05/837760/images/34b94befd62466e622905cedbccfab555bdfbee64bc54b3127ec7d652ecb4ecb.jpg)
[1] USB maximum power supply current: DC 5 V = 1.5 A
[2] Sold separately
[3] See Securing the USB extension cable (P.89).
Securing the USB extension cable
Secure the USB extension cable with insulating tape or the like so that its connectors are not disconnected.

natural_image
Technical illustration of a mechanical connector with a cylindrical shaft and housing (no text or symbols)Connecting an iPod/iPhone

flowchart
graph TD
    A["iPod/iPhone"] --> B["Lightning Digital AV Adapter"]
    B --> C["KCA-iP103 (0.8 m)"]
    B --> D["KCA-HD100 (1.8 m)"]
    B --> E["KCA-iP103 (0.8 m)"]
    C --> F["USB terminal 111"]
    D --> F
    E --> F
    G["iPhone (with Apple CarPlay)"] --> H["KCA-iP103 (0.8 m)"]
    G --> I["Accessory ② (1 m)"]
[1] USB maximum power supply current: DC 5 V = 1.5 A
[2] Sold separately
[3] Optional accessory
[4] See Securing the USB extension cable (P.89).
Connecting an Android smartphone
Android smartphone (with Android Auto) [2]
![USB cable 2 Accessory ② (1 m) USB terminal [1]](/content/2026/05/837760/images/7b74c32313c05ebdb2e6d6e1778181a4a548d9498f45cfb0aba43e4cdf40a317.jpg)
[1] USB maximum power supply current: DC 5 V = 1.5 A
[2] Sold separately
[3] See Securing the USB extension cable (P.89).

Connecting the camera

flowchart
graph TD
    A["Left side view camera and Right side view camera [2"]] --> B["Front view camera [4"] [6]]
    B --> C["Video input (Yellow)"]
    C --> D["3rd view camera input (Yellow)"]
    D --> E["3rd view camera"]
    E --> F["Front view camera/ Dashboard camera input (Yellow)"]
    F --> G["DASH CAM"]
    G --> H["Rear view camera [4"] [5]]
    H --> I["Rear view camera"]
    I --> J["Rear view camera"]
    J --> K["Dashboard camera interface"]
    K --> L["DRV-N520 [1"]]
    style A fill:#f9f,stroke:#333
    style B fill:#f9f,stroke:#333
    style C fill:#ccf,stroke:#333
    style D fill:#ccf,stroke:#333
    style E fill:#ccf,stroke:#333
    style F fill:#ccf,stroke:#333
    style G fill:#ccf,stroke:#333
    style H fill:#ccf,stroke:#333
    style I fill:#ccf,stroke:#333
    style J fill:#ccf,stroke:#333
    style K fill:#ccf,stroke:#333
    style L fill:#ccf,stroke:#333
[1] Optional accessory
[7] Sold separately
[3] Up to 3 cameras of Dashboard camera, Front view camera, Left side view camera and Right side view camera can be connected. For more information, see To set up the camera assignment settings (P.49).
[4] CMOS-3xx series (optional accessory) or commercially available camera.
[5] For HD video, an HD camera is also used as Rear view camera.
[6] For HD video, an HD camera is also used as Front view camera.
Troubleshooting
Problems and Solutions
If any trouble occurs, first check the following table for possible problems.
NOTE
- Some functions of this unit may be disabled by some settings made on this unit.
- What might seem to be a malfunction in your unit may just be the result of slight misoperation or miswiring.

About settings
- Cannot set up the subwoofer.
- Cannot set up subwoofer phase.
- No output from the subwoofer.
- Cannot set up the low pass filter.
- Cannot set up the high pass filter.
Subwoofer is not set to on.
Set the subwoofer to on. See Speaker / X'over setup (P.61).
The dual zone function is enabled.
▶ Set the dual zone function to off. See Zone Control (P.66).
- Cannot select the output destination of the subsource in the dual zone.
- Cannot adjust the volume of the rear speakers.
The dual zone function is disabled.
▶ Set the dual zone function to on. See Zone Control (P.66).
- Cannot set up the equalizer.
- Cannot set up the crossover network.
The dual zone function is enabled.
▶ Set the dual zone function to off. See Zone Control (P.66).

About audio operations
Radio reception is poor.
The car antenna is not extended.
▶ Pull out the antenna all the way.
The antenna control wire is not connected.
Connect the wire correctly. See Connecting the system and external components (P.87).
Cannot select a folder.
The random play function is enabled.
▶ Turn off the random function.

Others
The Touch Sensor Tone doesn't sound.
The preout jack is being used.
The Touch Sensor Tone cannot be output from the preout jack.
Error Messages
When you fail to operate the unit correctly, the cause of the failure appears as the message on the screen.
There is an error in the speaker wiring. Please check the connections.
Protective circuit has been activated because a speaker cord has shorted or it has come in contact with the car chassis.
▶ Wire or insulate the speaker cord as appropriate and turn the power off and on again.
Hot Error
When the internal temperature of this unit rises to 60irc C or more, the protection circuit is activated and you may not be able to operate the unit.
▶ Use the unit again after reducing the temperature of the unit.
Error 07-67
The unit is not operating correctly due to some reason or other.
▶ Turn the power off and on again. If the "Error 07–67" message does not disappear, contact your nearest KENWOOD dealer.
No Device (USB device)
The USB device is selected as a source although no USB device is connected.
Change the source to any source other than USB/iPod. Connect a USB device, and change the source to USB again.
Disconnected (iPod, Bluetooth audio player)
The iPod/Bluetooth audio player is selected as a source although no iPod/Bluetooth audio player is connected.
Change the source to any source other than iPod/Bluetooth. Connect an iPod/Bluetooth audio player, and change the source to iPod/Bluetooth again.
No Media file
The connected USB device contains no playable audio file. Media was played that does not have data recorded that the unit can play.
▶ See Playable Media and Files (P.93) and try another USB device.
USB device over current status detected.
The connected USB device is rated a current capacity higher than the allowable limit.
▶ Check the USB device. Some trouble may have occurred to the connected USB device.
Change the source to any source other than USB. Remove the USB device.
The speed sense wire is not connected. Please check the connection.
The speed pulse disconnection is detected. By default, it is treated as connected.
To improve precision of a vehicle position recognition, check the connection of the speed pulse.
Starting tuner failed.
The tuner unit is not operating correctly due to some reason or other.
▶ Turn the power off and on again. If the "Starting tuner failed." message does not disappear, contact your nearest KENWOOD dealer.

Apple CarPlay
The GPS antenna must be connected to use Apple CarPlay wirelessly. Please verify the proper connections or plug in by USB to use Apple CarPlay.
The GPS antenna is not connected when the Apple CarPlay is started by connecting wirelessly or when the iPhone compatible with wireless Apple CarPlay is registered in [Device List].
▶ Check the connection of the GPS antenna or plug in over USB to use Apple CarPlay.
Appendix
playable Media and Files
You can play various kinds of media and files on this unit.

About files
The following audio and video files are supported.
■Playable Audio files
| Format Bit rate | Sampling frequency | Bit count | ||
| AAC-LC (.m4a) | MPEG-2/MPEG-4 AAC LC HE-AAC(V1,V2) | 8 – 320kbps, VBR 16 – 48 | kHz 16 bit | |
| MP3 (.mp3) | MPEG-1/MPEG-2 Audio Layer 3 | 8 – 320kbps, VBR 16 – 48 | kHz 16 bit | |
| WMA (.wma) | Windows Media Audio Standard L3 profile (Version 7,8,9) | 8 – 320kbps 16 – 48 kHz | 16 bit | |
| Linear PCM (WAVE) (.wav) | RIFF waveform Audio Format | – | 16 – 192 kHz | 16 bit/24 bit |
| FLAC (.flac) | flac | – | 16 – 192 kHz | 16 bit/24 bit |
| Vorbis (.ogg) | vorbis | – | 16 – 48 kHz | 16 bit |
| DSD (.dsf, .dff) | DSF, DSDIFF | – | 2.8 MHz, 5.6 MHz, 11.2 MHz | 1 bit |
• WMA and AAC files with DRM cannot be played.
• DSD sound is converted to PCM sound before playback.
• The EmChinks tag of DSDIFF is not supported.
- Although the audio files complies with the standards listed above, they may not be played depending on the types or conditions of media or device.
• This unit supports playback of High-Resolution Audio files.
It is recommended that a car audio system should be configured with all High-Resolution Audio compatible products from player to speaker to enjoy its high quality sound.
■Acceptable Video files
| Profile | Max. Picture size | Max. bit rate | Audio format | |
| MPEG-1 (.mpg, .mpeg) | - | 352 × 240, 352 × 288 | 1.5 Mbps | MPEG Audio Layer 2 |
| MPEG-2 (.mpg, .mpeg) | MP@ML | 720 × 480, 720 × 576 | 8 Mbps | MPEG Audio Layer 2 |
| H.264/MPEG-4 AVC (.mp4, .m4v, .avi, .flv, .f4v) | Baseline Profile, Main Profile | 1920 × 1080 (30 fps) | 8 Mbps | MP3, AAC |
| MPEG-4 (.mp4, .avi) | Advanced Simple Profile | 1920 × 1080 (30 fps) | 8 Mbps | MP3, AAC |
| WMV (.wmv) | Main Profile | 1920 × 1080 (30 fps) | 8 Mbps | WMA |
| MKV (.mkv) | Video format follows H.264/MPEG-4 AVC, MPEG-4, WMV | MP3, AAC, WMA, Vorbis, FLAC | ||
• This unit can only play back files which are smaller than 4 GB.
Appendix
■Limitation on structure of file and folder
| USB device | |
| Maximum number of folder layers 8 | |
| Maximum number of files (per folder) 999 | |
| Maximum number of folders (per folder) 9999 | |
| Maximum number of folders (per device) Unlimited |
- You can enter a folder name and file name with 255 or fewer single-byte characters.
- Files in the folder whose folder name begins with a dot (.) cannot be played.
Specifications
■Monitor section
Picture Size
: 10.1 inches (diagonal) wide
: TFT active matrix system
Number of Pixels
: 2,764,800 (1280H × 720V × RGB)
Effective Pixels
: 99.99 %
Pixel Arrangement
: RGB striped arrangement
Back Lighting
:LED
■USB interface section
USB Standard
: USB 2.0 High Speed
File System
: FAT16, FAT32, exFAT, NTFS
Maximum Power Supply Current
: DC 5 V = 1.5 A × 1
D/A Converter
: 24 bit/32 bit
Audio Decoder
: MP3 / WMA / AAC / WAV / FLAC / DSD / Vorbis
Video Decoder
: MPEG-1 / MPEG-2 / MPEG-4 / WMV / H.264 / MKV
Frequency Response
• 192 kHz: 20 - 88,000 Hz
• 96 kHz:20-44,000 Hz
• 48 kHz: 20 - 22,000 Hz
• 44.1 kHz:20-20,000 Hz
Total Harmonic Distortion
: 0.010 % (1 kHz)
S/N Ratio (dB)
: 98.5 dB
Dynamic Range
: 89 dB
■Wireless Mirroring Section
Mode
: Sink
Copyright protection
: HDCP2.2
Touch Control
: UIBC
■Wi-Fi section
IEEE Standard
:802.11 a/b/g/n/ac
Frequency Range
: Dual Band (2.4GHz/5GHz)
Channels
: Auto (1-11ch)/Auto (149,153,157,161ch)
Transfer rates (MAX)
Outside Indonesia area
: 11a: 54 Mbps / 11b: 11 Mbps / 11g: 54 Mbps /
11n: 300 Mbps / 11ac: 867 Mbps
For Indonesia sales area
: 11a: 54 Mbps / 11b: 11 Mbps / 11g: 54 Mbps /
11n: 144 Mbps / 11ac: 173 Mbps
Output Power
2.4 GHz/SISO
Outside Indonesia area
: 11b: 13 dBm ± 2 dB / 11g: 11 dBm ± 2 dB /
11n (20 MHz): 10 dBm ± 2 dB
For Indonesia sales area
: 11b: 12 dBm ± 2 dB / 11g: 4 dBm ± 2 dB /
11n (20 MHz): 2 dBm ± 2 dB
5 GHz/SISO
: 11a: 6 dBm ± 2 dB /
11n (20 MHz)/11ac (20 MHz): 6 dBm ± 2 dB /
11n (40 MHz)/11ac (40 MHz): 5 dBm ± 2 dB /
11ac (80 MHz): 5 dBm ± 2 dB
5 GHz/MIMO
: 11n (20 MHz)/11ac (20 MHz): 9 dBm ± 2 dB /
11n (40 MHz)/11ac (40 MHz): 8 dBm ± 2 dB /
11ac (80 MHz): 8 dBm ± 2 dB
Bluetooth section
Technology
: Bluetooth Ver.5.0
Frequency
: 2.402 - 2.480 GHz
RF Output Power (E.I.R.P.)
: +4 dBm (MAX), Power Class 2
Maximum Communication range
: Line of sight approx. 10m (32.8 ft)
Audio Codec
:LDAC/SBC/AAC
Profile (Multi Profile support)
• HFP (V1.7) (Hands Free Profile)
• SPP (Serial Port Profile)
• A2DP (Advanced Audio Distribution Profile)
• AVRCP (V1.6) (Audio/Video Remote Control Profile)
• PBAP (Phonebook Access Profile)
Appendix
■HDMI section
HDMI
:Type-A
Input Resolution
• VGA (640x480p @59.94Hz/60Hz)
• 480p (720x480p @59.94Hz/60Hz)
• 720p (1280x720p @59.94Hz/60Hz)
Input Audio Type
: 32K/44.1K/48K/88.2K/96K/176.2K/192K Hz 16 bit/20 bit/24 bit Linear PCM
■DSP section
Graphics equalizer
Band: 13 Band
Frequency (BAND1 - 13)
:62.5/100/160/250/400/630/1k/1.6k/2.5k/4k/6.3k/10k/16kHz
Gain
:-9/-8/-7/-6/-5/-4/-3/-2/-1/0/1/2/3/4/5/6/7/8/9 dB
2-way X'Over
High pass filter
Frequency: Through, 30/40/50/60/70/80/90/100/120/150/180/220/250 Hz
Slope: -6/-12/-18/-24 dB/Oct.
Low pass filter
Frequency:30/40/50/60/70/80/90/100/120/150/180/220/250 Hz, Through
Slope: -6/-12/-18/-24 dB/Oct.
3-way X'Over
High pass filter
Frequency:250/300/1k/1.6k/2.5k/4k/5k/6.3k/8k/10k/12.5kHz
Slope: -12/-18/-24 dB/Oct.
Band pass filter
Frequency: Through, 50/60/70/80/90/100/120/150/180/220/250/300 Hz
250/300/1k/1.6k/2.5k/4k/5k/6.3k/8k Hz, Through
Slope: -12/-18/-24 dB/Oct.
Low pass filter
Frequency: 30/40/50/60/70/80/90/100/120/150 Hz, Through
Slope: -12/-18/-24 dB/Oct.
Position
Front / Rear / Subwoofer Delay
: 0 - 6.1 m (0.01 m Step)
Gain
:-8 - 0 dB
Subwoofer level
:-50-+10dB
■Digital Radio section (DMX9720XDS)
Frequency Range
BAND III: 174.928 - 239.200 (MHz)
Sensitivity
:-100 dBm
S/N Ratio (dB)
: 90 dB
■Digital Antenna Connector section (DMX9720XDS)
Connector type
:SMB
Output Voltage (11 - 16V)
: 9.5 V DC
Maximum Current
:< 100 mA
■FM tuner section
Frequency Range (step)
: 87.5 MHz - 108.0 MHz (50 kHz)
Usable Sensitivity (S/N : 30 dB)
: 7.3 dBf (0.7 μV/75 Ω)
Frequency Response
: 30 Hz - 15 kHz
S/N Ratio (dB)
: 70 dB (MONO)
Selectivity (± 400 kHz)
: 80 dB
Stereo Separation
: 45 dB (1 kHz)
■AM tuner section
Frequency Range (step)
DMX9720XS
: 531 kHz - 1611 kHz (9 kHz)
DMX9720XDS
: 531 kHz - 1701 kHz (9 kHz)
Usable Sensitivity
: 30 dBμ (31 μV)
■Video section
Color System of External Video Input
: NTSC/PAL
External Audio Max Input Level (mini jack)
: 2 V/25 kΩ
Video Input Level (RCA jacks)
: 1 Vp-p/75 Ω
Video Output Level (RCA jacks)
: 1 Vp-p/75 Ω
Audio Output Level (mini jack)
: 0.9 V/10 kΩ
■Audio section
Maximum Power (Front & Rear)
:50 W×4
Typical Power Output (Front & Rear)
Full Bandwidth Power (at less than 1% THD)
:22 W×4
Output frequency band
: 20 - 88,000 Hz
Preout Level (V)
: 5 V/10 kΩ
Preout Impedance
: ≤ 300 Ω
Speaker Impedance
:4-8Ω
General
Operating Voltage
: 12 V DC car battery
Installation Dimensions (W × H × D)
: 178 × 100 × 155 mm
Weight
: 3.25 kg
NOTE
- Although the effective pixels for the liquid crystal panel is given as 99.99% or more, 0.01% of pixels may not light or may light incorrectly.
Specifications are subject to change without prior notice.
About this Unit
■Copyrights
- The Bluetooth® word mark and logos are registered trademarks owned by Bluetooth SIG, Inc. and any use of such marks by JVCKENWOOD Corporation is under license. Other trademarks and trade names are those of their respective owners.
• DSD, LDAC and LDAC logo are trademarks of Sony Corporation.
• Hi-Res Audio logo and Hi-Res Audio Wireless logo are used under license from Japan Audio Society.


- Reverse engineering and disassembly are prohibited.
- Windows Media is a registered trademark or trademark of Microsoft Corporation in the United States and/or other countries. This product is protected by certain intellectual property rights of Microsoft. Use or distribution of such technology outside of this product is prohibited without a license from Microsoft.
- This software is based in part on the work of the independent JPEG Group.
- Use of the Made for Apple badge means that an accessory has been designed to connect specifically to the Apple product(s) identified in the badge, and has been certified by the developer to meet Apple performance standards. Apple is not responsible for the operation of this device or its compliance with safety and regulatory standards. Please note that the use of this accessory with an Apple product may affect wireless performance.
• Apple, iPhone, iPod, iPod touch, and Lightning are trademarks of Apple Inc., registered in the U.S. and other countries.
• Apple, Siri, Apple CarPlay, Apple Music and Apple CarPlay logo are trademarks of Apple Inc., registered in the U.S. and other countries. - App Store is a service mark of Apple Inc., registered in the U.S. and other countries.
- IOS is a trademark or registered trademark of Cisco in the U.S. and other countries and is used under license.
- Google, Android, Google Play and Android Auto are trademarks of Google LLC.
To use Android Auto on your car display, you'll need an Android Auto compatible vehicle or aftermarket stereo, an Android phone running Android 5.0 or higher, and the Android Auto app.
- Wi-Fi ircledR is a registered trademark of Wi-Fi Alliance ircledR .
- The Wi-Fi CERTIFIED™ Logo is a certification mark of Wi-Fi Alliance®.
• Copyright© 2018 Techpoint, Inc. All rights reserved.
HD-TVI™
• The terms HDMI and HDMI High-Definition Multimedia Interface, and the HDMI Logo are trademarks or registered trademarks of HDMI Licensing Administrator, Inc. in the United States and other countries.
- This product includes FontAvenue® fonts licenced by NEC Corporation.FontAvenue is a registered trademark of NEC Corporation.
FontAvenue
- This product includes "Ubiquitous QuickBoot TM" technology developed by Ubiquitous Corp. Ubiquitous QuickBoot TM is a trademark of Ubiquitous Corp. Copyright© 2017 Ubiquitous Corp. All rights reserved.

- THIS PRODUCT IS LICENSED UNDER THE AVC PATENT PORTFOLIO LICENSE FOR THE PERSONAL USE OF A CONSUMER OR OTHER USES IN WHICH IT DOES NOT RECEIVE REMUNERATION TO (j)ENCODE VIDEO IN COMPLIANCE WITH THE AVC STANDARD ("AVC VIDEO") AND/OR (jj)DECODE AVC VIDEO THAT WAS ENCODED BY A CONSUMER ENGAGED IN A PERSONAL ACTIVITY AND/OR WAS OBTAINED FROM A VIDEO PROVIDER LICENSED TO PROVIDE AVC VIDEO. NO LICENSE IS GRANTED OR SHALL BE IMPLIED FOR ANY OTHER USE. ADDITIONAL INFORMATION MAY BE OBTAINED FROM MPEG LA, L.L.C. SEE HTTPS://WWW.MPEGLA.COM
- THIS PRODUCT IS LICENSED UNDER THE MPEG-4 VISUAL PATENT PORTFOLIO LICENSE FOR THE PERSONAL AND NON-COMMERCIAL USE OF A CONSUMER FOR (i) ENCODING VIDEO IN COMPLIANCE WITH THE MPEG-4 VISUAL STANDARD ("MPEG-4 VIDEO") AND/OR (ji) DECODING MPEG-4 VIDEO THAT WAS ENCODED BY A CONSUMER ENGAGED IN A PERSONAL AND NON-COMMERCIAL ACTIVITY AND/OR WAS OBTAINED FROM A VIDEO PROVIDER LICENSED BY MPEG LA TO PROVIDE MPEG-4 VIDEO. NO LICENSE IS GRANTED OR SHALL BE IMPLIED FOR ANY OTHER USE. ADDITIONAL INFORMATION INCLUDING THAT RELATING TO PROMOTIONAL, INTERNAL AND COMMERCIAL USES AND LICENSING MAY BE OBTAINED FROM MPEG LA, LLC. SEE HTTPS://WWW.MPEGLA.COM.
- THIS PRODUCT IS LICENSED UNDER THE VC-1 PATENT PORTFOLIO LICENSE FOR THE PERSONAL AND NON-COMMERCIAL USE OF A CONSUMER TO (i) ENCODE VIDEO IN COMPLIANCE WITH THE VC-1 STANDARD ("VC-1 VIDEO") AND/OR (ii) DECODE VC-1 VIDEO THAT WAS ENCODED BY A CONSUMER ENGAGED IN A PERSONAL AND NON-COMMERCIAL ACTIVITY AND/OR WAS OBTAINED FROM A VIDEO PROVIDER LICENSED TO PROVIDE VC-1 VIDEO. NO LICENSE IS GRANTED OR SHALL BE IMPLIED FOR ANY OTHER USE. ADDITIONAL INFORMATION MAY BE OBTAINED FROM MPEG LA, L.L.C. SEE HTTPS://WWW.MPEGLA.COM
- libFLAC
Copyright (C) 2000-2009 Josh Coalson Copyright (C) 2011-2013 Xiph.Org Foundation Redistribution and use in source and binary forms, with or without modification, are permitted provided that the following conditions are met:
– Redistributions of source code must retain the above copyright notice, this list of conditions and the following disclaimer.
– Redistributions in binary form must reproduce the above copyright notice, this list of conditions and the following disclaimer in the documentation and/or other materials provided with the distribution.
- Neither the name of the Xiph.org Foundation nor the names of its contributors may be used to endorse or promote products derived from this software without specific prior written permission.
THIS SOFTWARE IS PROVIDED BY THE COPYRIGHT HOLDERS AND CONTRIBUTORS ``AS IS'' AND ANY EXPRESS OR IMPLIED WARRANTIES, INCLUDING, BUT NOT LIMITED TO, THE IMPLIED WARRANTIES OF MERCHANTABILITY AND FITNESS FOR A PARTICULAR PURPOSE ARE DISCLAIMED. IN NO EVENT SHALL THE FOUNDATION OR CONTRIBUTORS BE LIABLE FOR ANY DIRECT, INDIRECT, INCIDENTAL, SPECIAL, EXEMPLARY, OR CONSEQUENTIAL DAMAGES (INCLUDING, BUT NOT LIMITED TO, PROCUREMENT OF SUBSTITUTE GOODS OR SERVICES; LOSS OF USE, DATA, OR PROFITS; OR BUSINESS INTERRUPTION) HOWEVER CAUSED AND ON ANY THEORY OF LIABILITY, WHETHER IN CONTRACT, STRICT LIABILITY, OR TORT (INCLUDING NEGLIGENCE OR OTHERWISE) ARISING IN ANY WAY OUT OF THE USE OF THIS SOFTWARE, EVEN IF ADVISED OF THE POSSIBILITY OF SUCH DAMAGE.
- libvorbis
Copyright (c) 2002-2008 Xiph.org Foundation Redistribution and use in source and binary forms, with or without modification, are permitted provided that the following conditions are met:
– Redistributions of source code must retain the above copyright notice, this list of conditions and the following disclaimer.
– Redistributions in binary form must reproduce the above copyright notice, this list of conditions and the following disclaimer in the documentation and/or other materials provided with the distribution.
- Neither the name of the Xiph.org Foundation nor the names of its contributors may be used to endorse or promote products derived from this software without specific prior written permission.
THIS SOFTWARE IS PROVIDED BY THE COPYRIGHT HOLDERS AND CONTRIBUTORS ``AS IS'' AND ANY EXPRESS OR IMPLIED WARRANTIES, INCLUDING, BUT NOT LIMITED TO, THE IMPLIED WARRANTIES OF MERCHANTABILITY AND FITNESS FOR A PARTICULAR PURPOSE ARE DISCLAIMED. IN NO EVENT SHALL THE FOUNDATION OR CONTRIBUTORS BE LIABLE FOR ANY
DIRECT, INDIRECT, INCIDENTAL, SPECIAL, EXEMPLARY, OR CONSEQUENTIAL DAMAGES (INCLUDING, BUT NOT LIMITED TO, PROCUREMENT OF SUBSTITUTE GOODS OR SERVICES; LOSS OF USE, DATA, OR PROFITS; OR BUSINESS INTERRUPTION) HOWEVER CAUSED AND ON ANY THEORY OF LIABILITY, WHETHER IN CONTRACT, STRICT LIABILITY, OR TORT (INCLUDING NEGLIGENCE OR OTHERWISE) ARISING IN ANY WAY OUT OF THE USE OF THIS SOFTWARE, EVEN IF ADVISED OF THE POSSIBILITY OF SUCH DAMAGE.
- libogg
Copyright (c) 2002, Xiph.org Foundation Redistribution and use in source and binary forms, with or without modification, are permitted provided that the following conditions are met:
– Redistributions of source code must retain the above copyright notice, this list of conditions and the following disclaimer.
– Redistributions in binary form must reproduce the above copyright notice, this list of conditions and the following disclaimer in the documentation and/or other materials provided with the distribution.
- Neither the name of the Xiph.org Foundation nor the names of its contributors may be used to endorse or promote products derived from this software without specific prior written permission.
THIS SOFTWARE IS PROVIDED BY THE COPYRIGHT HOLDERS AND CONTRIBUTORS ``AS IS'' AND ANY EXPRESS OR IMPLIED WARRANTIES, INCLUDING, BUT NOT LIMITED TO, THE IMPLIED WARRANTIES OF MERCHANTABILITY AND FITNESS FOR A PARTICULAR PURPOSE ARE DISCLAIMED. IN NO EVENT SHALL THE FOUNDATION OR CONTRIBUTORS BE LIABLE FOR ANY DIRECT, INDIRECT, INCIDENTAL, SPECIAL, EXEMPLARY, OR CONSEQUENTIAL DAMAGES (INCLUDING, BUT NOT LIMITED TO, PROCUREMENT OF SUBSTITUTE GOODS OR SERVICES; LOSS OF USE, DATA, OR PROFITS; OR BUSINESS INTERRUPTION) HOWEVER CAUSED AND ON ANY THEORY OF LIABILITY, WHETHER IN CONTRACT, STRICT LIABILITY, OR TORT (INCLUDING NEGLIGENCE OR OTHERWISE) ARISING IN ANY WAY OUT OF THE USE OF THIS SOFTWARE, EVEN IF ADVISED OF THE POSSIBILITY OF SUCH DAMAGE.
KENWOOD
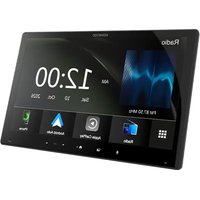
- DMX9720XS DMX9720XDS
- Important Notice on Software
- Software License on This duct
- EULA
- Software License Agreement
- Article 1 (General)
- Article 2 (Right of Use)
- Article 3 (Terms of License)
- Article 4 (Rights to Licensed Software)
- Article 5 (Exemption Granted to Licensor)
- Article 6 (Responsibility for Third Parties)
- Article 7 (Secrecy Obligation)
- Article 8 (Cancellation of the Agreement)
- Article 9 (Destruction of Licensed Software)
- Article 10 (Copyright Protection)
- Article 11 (Export Control)
- Article 12 (Miscellaneous)
- Contents
- Before Use 6
- Basic Operations 7
- Widget 16
- APPS 18
- USB 23
- iPod/iPhone 26
- Radio 29
- Digital Radio 32
- Bluetooth Control 36
- Other External Components 48
- Setup 53
- Controlling Audio 60
- Remote control 72
- Connection/Installation 75
- Troubleshooting 91
- Appendix 93
- Before Use
- Precautions
- ⚠️ WARNINGS
- To prevent injury or fire, take the following precautions:
- Precautions on using this unit
- Protecting the monitor
- Cleaning the unit
- NOTE
- Acquiring GPS signal
- About GLONASS
- Caution for Smartphone Users
- How to read this manual
- Basic Operations
- Turning on the Unit
- ●To turn off the unit:
- Initial Settings
- Initial SETUP
- [Language]
- [Clock]
- ■[Display & Button]
- [Camera]
- [DEMO]
- ■ [3way X'over]
- Touch [Finish].
- Security Code Setup
- Preparation
- Press the [HOME]∅ button.
- Touch [.]
- Touch [SETUP].
- Touch [System].
- Touch [Security Code Set] in the system setting menu.
- Enter a security code with 4 to 8 digit number and touch [Enter].
- Enter the same code again and touch [Enter].
- To change the security code:
- Touch [Security Code Change] on the Security screen.
- Enter the current registered security code and touch [Enter].
- Enter a new security code with 4 to 8 digit number and touch [Enter].
- Enter the same code again and touch [Enter].
- To clear the security code:
- Touch [Security Code Cancellation] on the Security screen.
- Calendar/clock settings
- Adjust the date and time manually
- Adjusting the volume
- Touch screen operations
- ●Touch
- ●Touch and hold
- ●Flick
- ●Swipe
- HOME screen descriptions
- Display the HOME screen
- Popup menu
- Press the[MENU]/[ATT]button.
- Touch to display the popup menu.
- Turn off the screen
- Select [Display OFF] on the popup menu.
- Source selection screen description
- Select the playback source
- Touch
- Put the unit in standby
- Customize Short-cut source icons
- Source control screen descriptions
- List screen
- Display the list screen
- For USB/iPod:
- For Bluetooth audio:
- Widget
- Photo Frame Widget
- Drive Widget Panel
- ● To change the widget position
- Touch and hold the drive widget panel.
- Drag the drive widget to right or left.
- Importing Image Files
- Connect the device.
- Unlock your device.
- APPS
- Wireless Mirroring Operation
- Apple CarPlay Operation
- Compatible iPhone devices
- Connecting an iPhone
- Wired connection
- Wireless connection
- To switch the Current Screen to the Apple CarPlay Screen When Connecting Your iPhone
- Select an Apple CarPlay device
- Operation keys and available Apps on the home screen of Apple CarPlay
- Application keys
- [HOME]
- To exit the Apple CarPlay screen
- Use Siri
- To deactivate
- Switch to the Apple CarPlay screen while listening to another source
- Android Auto™ Operation
- Compatible Android smartphones
- ●About the placement of smartphone
- Connect Android smartphone
- Select an Android smartphone
- Operation keys and available Apps on the Android Auto screen
- Navigation bar
- To exit the Android Auto screen
- Using voice control
- Press the [VOICE] button.
- Start speaking.
- To cancel
- Switch to the Android Auto screen while listening to another source
- Press the [button.
- USB
- Connecting a USB device
- ●About the file system
- USB Basic Operation
- [CODEC]
- Operation keys
- Function panel
- Track information
- Play mode indicator/Playing time
- Content list
- Artwork
- File search area (Video file only)
- Key display area (Video file only)
- Search Operation
- Category search
- Link search (Audio file only)
- Folder search
- iPod/iPhone
- Connectable iPod/iPhone
- Connect iPod/iPhone
- Bluetooth connection
- iPod/iPhone Basic Operation
- Operation keys
- Track information
- Play mode indicator/Playing time
- Content list
- Artwork
- Link search
- Radio
- Radio Basic Operation
- Information display
- Band key
- Preset key
- Indicator Items
- Seek mode
- Memory Operation
- Auto memory
- Manual memory
- Selecting Operation
- Preset select
- Search by program type only)
- Traffic Information (FM only)
- Touch [TI].
- When the traffic bulletin starts
- Radio Setup
- Touch
- Set each item as follows.
- ■ [NEWS] (FM only)
- ■ [AF] (FM only)
- ■ [Regional] (FM only)
- ■ [LO.S] (FM only)
- ■ [Auto TP Seek] (FM only)
- ■ [Language select] (FM only)
- [Aerial Control]
- Digital Radio (DMX9720XDS)
- Digital Radio Basic Operation
- Indicator display
- Indicator display
- Seek mode
- Preset list
- Artwork area
- Information display
- Indicator Items
- Storing Service in Preset Memory
- Search by program type
- Touch [Search].
- Service search
- Touch [Q].
- Select the desired content from the list.
- [QA-Z]
- Traffic Information
- Touch [▶] on the left side of the screen. Touch [TI].
- Digital Radio SETUP
- [Priority]
- [PTY Watch]
- ■[Announcement Select]
- ■ [Antenna Power]
- ■[Related Service]
- ■[Language select]
- Announcement setup
- [Select All]
- [Deselect All]
- Bluetooth Control
- Information for using Bluetooth® devices
- Bluetooth®
- About the smartphone/cell-phone and Bluetooth audio player
- Version
- Profiles
- Audio player:
- Sound codec
- Register the Bluetooth device
- [Bluetooth]
- ■ [Android Auto]
- Touch
- Touch [Yes].
- Switch the connected device
- ■[Apple CarPlay]
- ■[Android Auto]
- To switch the connected device to a Bluetooth device
- ■ [TEL (HFP) 1], [TEL (HFP) 2]
- ■[Audio (A2DP)/App (SPP)]
- To delete the registered device
- Touch the device name to check.
- Touch [Delete].
- Touch [Yes].
- Bluetooth Setup
- Press the [HOME] button.
- Touch [Connections & AV].
- Touch [Bluetooth] and set to [ON]. See the following section for each setting.
- Change the device name
- Touch [Device Name] in the Connections & AV setting menu.
- Touch and hold
- Input the device name.
- Touch [Enter].
- Change the PIN Code
- Touch [PIN Code] in the Connections & AV setting menu.
- Input the PIN Code.
- Touch [SET].
- Playing the Bluetooth Audio Device
- Bluetooth basic operation
- Operation keys \*
- Information display \*
- Play mode indicator/Playing time
- CODEC
- KENWOOD Music Mix
- Touch [ ] of device name you want to connect.
- Touch ▶ White/dark blue background) on the left of the name of the device to be played.
- Touch
- File search
- Touch the desired file or folder.
- Touch the desired item in the content list.
- Using the Hands-Free Unit
- Make a call
- Call using call records
- Select the phone number from the list.
- Call using the phonebook
- Select the initial.
- Select the person you want to call from the list.
- Select the phone number from the list.
- Call using the preset number
- Touch the name or phone number.
- Call by entering a phone number
- Enter a phone number with number keys.
- Touch
- Voice Recognition
- Receive a call
- Touch to answer a phone call or
- To end call
- While talking, touch
- Operations during a call
- ●Adjust the volume of your voice
- ●Adjust the receiver volume
- ●Mute your voice
- ●Output the dial tone
- ●Switching between speaking voice output destinations
- ●Call-waiting
- Phone number preset
- Touch [Edit].
- Select where to preset.
- ■[Delete all]
- Select how to preset.
- ■[Add number from phonebook]
- ■[Add number direct]
- [Delete]
- Phonebook transfer
- Phonebook deletion
- Touch the name to check.
- [√ All]
- ■ [□ All]
- Hands-Free Setup
- ■[Bluetooth HF/Audio]
- ■ [Auto Response]\*
- [Auto Pairing]
- [Sort Order]
- Other External Components
- View Camera
- Display the camera screen
- Press the [MENU]/[ATT] button.
- Touch [Camera].
- Adjust each item as follows.
- Camera Switching Keys \*1
- Camera off
- Switching the Guideline \*2
- Switching the Angle \*2
- Camera Setup
- Touch [Camera].
- Set each item as follows.
- ■ Camera Assignment Settings
- ■ [Rear Camera Interruption]
- ■ [Rear Camera Message] \*
- ■ [Rear Camera Settings] \*
- ■[Parking Guidelines]
- ■[Guidelines SETUP]
- ■ [Front Camera Settings \*3]
- ■ [Front Camera Interruption] \*
- To set up the camera assignment settings
- ■[REAR VIEW CAMERA]
- ■ [FRONT VIEW CAMERA / DASH CAM]
- ■[3rd VIEW CAMERA]
- [VIDEO IN]
- Select the view camera to set up.
- Picture from view camera
- Camera Position
- Picture quality settings
- To adjust the parking lelines
- Use Dashboard Camera
- ■ Display the dashboard camera screen
- External audio/video players (AV-IN)
- HDMI source
- OEM Features Operation (DMX9720XDS only)
- Touch icon.
- Setup
- Monitor Screen Setup
- Connections & AV Setup
- ■[Device Name]
- [PIN Code]
- [Device address]
- [TEL SETUP]
- ■[Wi-Fi SETUP]
- ■[Speech Quality Adjust]
- [iPod Bluetooth Connection]
- [AV-OUT]
- ■[Reset Android Auto Wireless Connection]
- Display & Button Setup
- Dimmer
- [OSD Clock]
- ■ [Button Illumination Colour]
- ■ [Wallpaper Customize]
- ■ [Screen transition effect]
- Customizing the button color
- [Variable]
- [User]
- ■ [Car Colour] (DMX9720XDS only)
- To register an original color
- Change the wallpaper image or color
- To select wallpaper color
- ■ [Button Illumination Synch] \*
- Touch [ ]
- To register an original image
- User Interface Setup
- ■ [Source Setup - Remote Control]
- ■ [Steering Remote Controller]
- [Beep]
- ■[Parking Assist Display]
- ■ [Parking Assist Position]
- [Driving Position]
- Learning function of steering remote
- Touch [Steering Remote Controller] in the User Interface setting menu.
- Press and hold the steering remote controller button.
- Touch the function you want to set.
- Repeat steps 2 and 3 as necessary.
- Touch [Learning completed].
- System Setup
- ■[Software Information]
- ■[Open Source Licenses]
- [Initialise]
- [OEM SETUP]
- Software Information
- Controlling Audio
- 3-way speaker system setup
- CAUTION
- Speaker / X'over setup
- [Speaker]
- [Slope]
- [Gain]
- ■ [FREQ] (High Pass)
- ■ [FREQ] (Low Pass)
- ■ [HPF FREQ], [LPF FREQ] (Only for Band Pass)
- [Slope] 102
- ■ [Phase Inversion]
- Equalizer Control
- ■Gain level (area in dotted frame)
- [ALL SRC]
- ■[Memory]
- ■ [Bass EXT] (Bass Extend Settings)
- [SW Level]
- ■ [Pop]/[Easy]/[Top40]/[Jazz]/[Powerful]/[Rock]/[Flat]/[Bass Boost]/[User1]/[User2]/[User3]/[User4]
- Save the EQ curve
- Listening Position / DTA
- Listening Position
- Position DTA control
- Front Focus
- Front Focus fine adjustment
- [Sound Image LR (Front)]
- [Sound Image LR (Rear)]
- ■ [Size of the Virtual Sound Field]
- ■ [Subwoofer Delay]
- Touch [Level].
- Touch [◀] or [▶] to adjust the sound level of the selected speaker.
- Fader / Balance / Zone Control
- Touch [FAD / BAL / Zone].
- Fader / Balance Control
- Touch [◀], [▶], [▲], and [▼] to adjust the volume balance.
- [Center]
- Zone Control
- Touch [Dual Zone] on the FAD / BAL / Zone screen.
- [Source]
- Set each source as follows.
- ■[Zone Select]
- ■ [Front Source], [Rear Source]
- [Rear VOL.]
- Rear Source
- Volume Offset
- Sound Effect
- [Bass Boost]
- [Loudness]
- ■[Drive Equalizer]
- ■[Space Enhancer]
- [Supreme]
- [Realizer]
- [Stage EQ]
- [Parametric EQ]
- Equalizer (P.68).
- Parametric Equalizer
- When to Use Each Function
- ●Parametric Equalizer
- ●Graphic Equalizer
- About the Parametric Equalizer
- About Adjustments
- About the Filters of Parametric Equalizer
- ●High-Pass Filter
- ●High-Shelving Filter/Low-Shelving Filter
- ●Peaking Filter
- ●Low-Pass Filter
- Adjust the Parametric Equalizer
- Audio Setup memory
- [SETUP Memory]
- ■[Audio SETUP Memory]
- ■[Audio SETUP Recall]
- ■[Audio SETUP Clear]
- Remote control
- Battery Installation
- Functions of the Remote control Buttons
- Switch the operation mode
- AUD mode
- ■DVD mode/TV mode
- Direct search mode
- Press the [DIRECT] button several times until the desired content appears.
- Enter the number of the content you want to play using the numeric keypad.
- Press the [◀◀] or [▶▶] button.
- Connection/Installation
- Before Installation
- ●Forward and Lateral Fields of Vision
- Supplied accessories for installation
- Installation procedure
- Installing the unit
- Confirm the installing position of the display unit
- ●Vehicles cannot be installed
- ●Distance between the display unit and the main unit
- Examples
- Positioning the slider in forward
- Adjusting the display height
- Remove the four flat head screws from both sides.
- Adjust the display height according to the screw hole position.
- Reinstall the four flat head screws on both sides and fix the display.
- GPS antenna
- To mount the GPS antenna inside your vehicle:
- Microphone unit
- Installation the Digital Radio antenna (DMX9720XDS)
- ●Installation overview
- ●Determining the antenna installation location
- When installing the antenna cable inside a front pillar that contains an air bag
- Installing the main unit
- Raise the display manually.
- Securing the USB extension cable
- Connecting an Android smartphone
- Connecting the camera
- Troubleshooting
- Problems and Solutions
- About settings
- About audio operations
- Radio reception is poor.
- Cannot select a folder.
- Others
- The Touch Sensor Tone doesn't sound.
- Error Messages
- There is an error in the speaker wiring. Please check the connections.
- Hot Error
- Error 07-67
- No Device (USB device)
- Disconnected (iPod, Bluetooth audio player)
- No Media file
- USB device over current status detected.
- The speed sense wire is not connected. Please check the connection.
- Starting tuner failed.
- Apple CarPlay
- The GPS antenna must be connected to use Apple CarPlay wirelessly. Please verify the proper connections or plug in by USB to use Apple CarPlay.
- Appendix
- playable Media and Files
- About files
- Specifications
- ■Monitor section
- Picture Size
- Number of Pixels
- Effective Pixels
- Pixel Arrangement
- Back Lighting
- ■USB interface section
- USB Standard
- File System
- Maximum Power Supply Current
- D/A Converter
- Audio Decoder
- Video Decoder
- Frequency Response
- Total Harmonic Distortion
- S/N Ratio (dB)
- Dynamic Range
- ■Wireless Mirroring Section
- Mode
- Copyright protection
- Touch Control
- ■Wi-Fi section
- IEEE Standard
- Frequency Range
- Channels
- Transfer rates (MAX)
- Outside Indonesia area
- For Indonesia sales area
- Output Power
- GHz/SISO
- GHz/SISO
- GHz/MIMO
- Bluetooth section
- Technology
- Frequency
- RF Output Power (E.I.R.P.)
- Maximum Communication range
- Audio Codec
- Profile (Multi Profile support)
- ■HDMI section
- HDMI
- Input Resolution
- Input Audio Type
- ■DSP section
- Graphics equalizer
- Gain
- 2-way X'Over
- 3-way X'Over
- Position
- Subwoofer level
- ■Digital Radio section (DMX9720XDS)
- Sensitivity
- ■Digital Antenna Connector section (DMX9720XDS)
- Connector type
- Output Voltage (11 - 16V)
- Maximum Current
- ■FM tuner section
- Frequency Range (step)
- Usable Sensitivity (S/N : 30 dB)
- Selectivity (± 400 kHz)
- Stereo Separation
- ■AM tuner section
- Usable Sensitivity
- ■Video section
- ■Audio section
- General
- About this Unit
- ■Copyrights
- FontAvenue
- KENWOOD
Brand : KENWOOD
Model : DMX9720XS
Category : Media player