KBDD8358 - Refrigerator Kubo - Free user manual and instructions
Find the device manual for free KBDD8358 Kubo in PDF.


| Product Type | Refrigerator |
| Brand | Kubo |
| Model | KBDD8358 |
| Energy Class | A+ |
| Total Net Capacity | 250 L |
| Fridge Capacity | 200 L |
| Freezer Capacity | 50 L |
| Dimensions (H x W x D) | 1800 x 600 x 700 mm |
| Weight | 60 kg |
| Noise Level | 40 dB |
| Climate Class | N-ST |
| Cooling System | Static |
| Defrost Type | Automatic (fridge), Manual (freezer) |
| Temperature Control | Electronic |
| Number of Shelves | 4 Glass Shelves |
| Number of Door Bins | 3 |
| Vegetable Drawer | 1 |
| Freezer Drawers | 3 |
| Ice Cube Tray | Included |
| Reversible Door | Yes |
| Interior Light | LED |
| Energy Consumption | 150 kWh/year |
| Power Supply | 220-240 V, 50 Hz |
| Refrigerant | R600a |
Frequently Asked Questions - KBDD8358 Kubo
User questions about KBDD8358 Kubo
0 question about this device. Answer the ones you know or ask your own.
Ask a new question about this device
Download the instructions for your Refrigerator in PDF format for free! Find your manual KBDD8358 - Kubo and take your electronic device back in hand. On this page are published all the documents necessary for the use of your device. KBDD8358 by Kubo.
USER MANUAL KBDD8358 Kubo
Thank you for purchasing this product.
The quality of this appliance has been certified by several laboratory tests. This instructions manual is provided to simplify the use of the appliance as well as to guarantee a safe use.
Please read carefully the instructions and safety measures described in this manual.
We sincerely hope you will be satisfied when using your new appliance.
INDEX
1. SAFETY INSTRUCTIONS 4
1.1. Power Supply 5
1.2. Power Cord and Other Cables 5
1.3. Humidity and Water 6
1.4. Cleaning 6
1.5. General Precautions 6
2. OPERATING INSTRUCTIONS 12
2.1. Product Description 12
2.2. Product usage 12
2.3. Maintenance 25
2.4. Troubleshooting 27
3. POST-SALE SERVICE 29
4. ENVIRONMENTAL PROTECTION 29
1. SAFETY INSTRUCTIONS
 | WARNING |  |
| RISK OF ELECTRIC SHOCKDO NOT OPEN | ||
| Warning: to avoid the risk of electric shock, do not remove the cover. The interior does not contain any parts that can be repaired by the user. Ask for assistance from the Customer Support Service. | ||
Important Warnings
Before using your appliance read these instructions manual carefully and keep it in a safe place as you may need to consult it in the future.
Before turning on your appliance, and to ensure a safe and correct operation, do not use if:
- It has fallen to the ground;
- You notice any evidence of damage;
- Any anomaly occurs during its operation.
Your appliance should not be used for other purposes than the ones intended and solely for household use. Any damage resulting from using the appliance outside this scope, any incorrect use, as well as any manual modifications to the product will not be covered and automatically voids the warranty.
Assistance
In case of malfunction, take your appliance to the Customer Support Service for assistance.
This appliance can be used by children aged from 8 years and above and persons with reduced physical, sensory or mental capabilities or lack of experience and knowledge if they have been given supervision or instruction concerning use of the appliance in a safe way and understand the hazards involved. Children shall not play with the appliance. Cleaning and user maintenance shall not be made by children without supervision
These instructions are also available at www.suporteworten.pt
1.1. Power Supply
Make sure the main voltage is compatible with the appliance's. If this is not the case, please consult the Customer Support Service.
1.2. Power Cord and Other Cables
Do not tangle the cord or pull it to disconnect the appliance. Also, keep the cord away from warm surfaces.
Never use the appliance if it has a damaged cable or socket.
Take it to the Customer Support Service for replacement.
1.3. Humidity and Water
Do not use your appliance in humid places. Do not allow the appliance to become wet under any circumstances as this may be dangerous. To avoid fire hazard or electric shock do not expose your appliance to humidity or water. Furthermore, do not place your appliance under water (e.g. for cleaning).
1.4. Cleaning
Before cleaning, be sure to switch off the appliance and remove the plug from the main power supply. Always allow the unit to cool down before cleaning.
To clean the exterior of the product, use a dry soft cloth only.
1.5. General Precautions
- Maintenance and service operations are only to be carried out by authorized professionals.
- n the interest of your safety and to ensure the correct use, before installing and first using the appliance, read this user manual carefully, including its hints and warnings. To avoid unnecessary mistakes and accidents, it is important to ensure that all people using the appliance are thoroughly familiar with its operation and safety features. Save these instructions and make sure that they remain with the appliance if it is moved or sold, so that everyone using it through its life will be properly informed on appliance use and safety.
- Keep all packaging well away from children. There is risk of suffocation.
- If you are discarding the appliance, pull the plug out of the socket, cut the connection cable (as close to the appliance as you can) and remove the door to prevent playing children from suffering an electric shock or trapping themselves in it.
- If this appliance featuring magnetic door seals is to replace an older appliance with a spring lock (latch) on the door or lid, be sure to make that spring lack unusable before you discard the old appliance. This will prevent it from becoming a death trap for a child.
General safety
WARNING: Keep ventilation openings in the appliance enclosure or in the built-in structure clear of obstruction.
WARNING: Do not use mechanical devices or other means to accelerate the defrosting process, other than those recommended by the manufacturer.
⚠ WARNING: Do not damage the refrigerant circuit.
WARNING: Do not use other electrical appliances (such as ice cream makers) inside refrigerating appliances unless they are approved
for this purpose by the manufacture.
WARNING: Do not touch the light bulb if it has been on for a long period of time because it could be very hot. This applies to appliances with a light in the compartment.
WARNING: When positioning the appliance, ensure the supply cord is not trapped or damaged.
WARNING: Do not locate multiple portable socket-outlets or portable power suppliers at the rear of the appliance.
WARNING: Risk of fire / flammable materials
- Do not store explosive substances such as aerosol cans with a flammable propellant in this appliance.
- The refrigerant isobutane (R-600a) is contained within the refrigerant circuit of the appliance, a natural gas with a high level of environmental compatibility which is, nevertheless, flammable.
- During transportation and installation of the appliance, make sure that none of the components of the refrigerant circuit become damaged.
- avoid open flames and sources of ignition
- thoroughly ventilate the room in which the appliance is situated
- It is dangerous to alter the specifications or modify this product in any way. Any damage to the cord may cause a short circuit, fire and/or electric shock.
- This appliance is intended to be used in household and similar applications such as - staff kitchen areas in shops, offices and other working environments; -farmhouses and by clients in hotels, motels and other residential type environments; -bed and breakfast type environments; -catering and similar non-retail applications.
Electrical safety
- The power cord must not be lengthened.
- Make sure the power plug is not squashed or damaged by the back of the appliance. A squashed or damaged power plug may overheat and cause a fire.
- Make sure that you can come to the mains plug of the appliance.
- Do not pull the main cable.
- If the power plug socket is loose, do not insert the power plug. There is a risk of electric shock or fire.
- You must not operate the appliance without the lamp.
- This appliance is heavy. Care should be taken when moving it.
- Do not remove nor touch items from the freezer compartment if your hands are damp/wet, as this could cause skin abrasions or frost/freezer burns.
- Avoid prolonged exposure of the appliance to direct sunlight.
Daily use
- Do not put hot on the plastic parts in the appliance.
- Do not place food products directly against the rear wall.
- Frozen food must not be re-frozen once it has been thawed out. This applies to appliances with a freezer compartment.
- Store pre-packed frozen food in accordance with the frozen food manufacturer's instructions. This applies to appliances with a freezer compartment.
- Appliance's manufactures storage recommendations should be strictly adhered to. Refer to relevant instructions.
- Do not place carbonated or fizzy drinks in the freezer compartment as it creates pressure on the container, which may cause it to explode, resulting in damage to the appliance. This applies to appliances with a freezer compartment.
- Ice lollies can cause frost burns if consumed straight from the appliance. This applies to appliances with a freezer compartment.
- To avoid contamination of food, please respect the following instructions
-
Opening the door for long periods can cause a significant increase of the temperature in the compartments of the appliance.
-
Clean regularly surfaces that can come in contact with food and accessible drainage systems.
- Store raw meat and fish in suitable containers in the refrigerator, so that it is not in contact with or drip onto other food.
- If the appliance is left empty for long periods, switch off, defrost, clean, dry and leave the door open to prevent mount developing within the appliance.
Care and cleaning
- Before maintenance, switch off the appliance and disconnect the mains plug from the mains socket.
- Do not clean the appliance with metal objects.
- Do not use sharp objects to remove frost from the appliance. Use a plastic scraper. This applies to appliances with a freezer compartment.
- Regularly examine the drain in the refrigerator for defrosted water. If necessary, clean the drain. If the drain is blocked, water will collect in the bottom of the appliance. This applies to appliances with a freezer compartment. This applies if there is a fresh food storage compartment.
2. OPERATING INSTRUCTIONS
2.1. Product Description

This picture if for illustration purposes only; for further details, please refer to your actual appliance.
2.2. Product usage
Installation
Important! For electrical connection carefully follow the instructions given in specific paragraphs.
- Unpack the appliance and check for damages. Do not connect the appliance if it is damaged. Report possible damages immediately to the place you bought it. In that case, retain packing.
- It is advisable to wait at least four hours before connecting the appliance to allow the oil to flow
back in the compressor.
- Adequate air circulation should be around the appliance, lacking this leads to overheating.
To achieve sufficient ventilation, follow the instructions relevant to installation. - Wherever possible the product spacers should be against a wall to avoid touching or catching warm parts (compressor, condenser) to prevent possible burns.
- The appliance must not be located close to radiators or cookers.
- Make sure the mains plug is accessible after installation of the appliance.
Service
- Any electrical work required to do the servicing of the appliance should be carried out by a qualified electrician or competent person.
- This product must be serviced by the Customer Support Service, and only genuine spare parts must be used.
Energy saving
- Don't put hot food in the appliance;
- Don't pack food close together as this prevents air from circulating;
- Make sure food doesn't touch the back of the compartment(s);
- If electricity goes out, don't open the door(s);
-
Don't open the door(s) frequently;
-
Don't keep the door(s) open for too long;
- Don't set the thermostat to exceeding cold temperatures;
- All accessories, such as drawers, shelves balconies, should be kept there for lower energy consumption.
Reversing the door
Tools required: Philips screwdriver, flat head screwdriver, hexagonal spanner.
- Ensure the unit is unplugged and empty.
- Tilt the unit backwards. You should rest the unit on something solid so that it will not slip during the door reversal process.
- All parts removed must be saved for the reinstallation of the door.
- Do not lay the unit flat as this may damage the coolant system.
-
It's better that 2 people handle the unit during assembly.
-
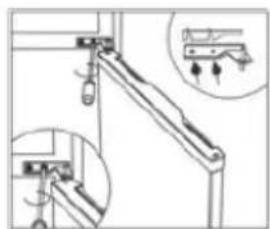
Carefully remove the top hinge cover with a flat screwdriver
-
Unscrew the top hinge with a Philips screwdriver.
-
Remove the hole cover with a flat screwdriver.


-
Move the core cover from left side to right side. And then lift the upper door and place it on a padded surface to prevent it from scratching.
-
Unscrew the middle hinge and then lift the bottom door and put it on a soft pad to avoid scratch.
-
Move two middle hole covers from left to right.
-
Lie down the rear of cabinet on a soft pad. And unscrew the bottom hinge and levelling foot.
-
Unscrew and remove the bottom hinge pin, turn the bracket over and replace it.
-
Install the hinge at left side and foot base at right side. Then screw two levelling feet with their original parts.



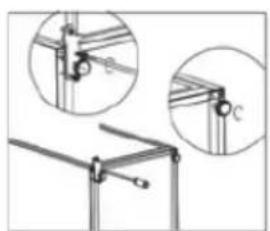
- Move two middle hole covers from left to right.

- Stand up the unit and put the door on the bottom hinge. Make sure the bottom hinge core is inserted in the door hole. Then move the hinge hole cover of bottom door from left side to right side.

- Install the middle hinge.

- Install the upper door with the upper hinge.

- Clap in the hinge cover and hole cover on the top of unit.
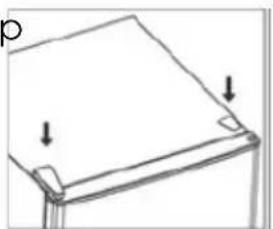
- Detach the Fridge and the Freezer door gaskets and then attach them after rotating the door.

Installing the door's external handle (if present)
![graph LR A["Left refrigerator"] --> B["Right refrigerator"] B --> C["Right refrigerator"]](/content/2026/05/835811/images/224be62b7f5f00ec136b6066af96295e720d2ae02b08c64342d0002bab5a77aa.jpg)
Space Requirement
- Keep enough space to open the door.
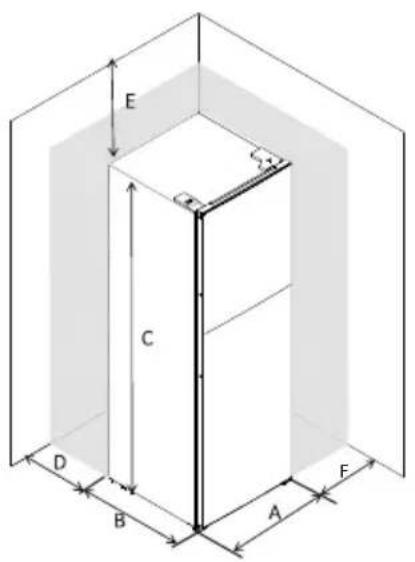
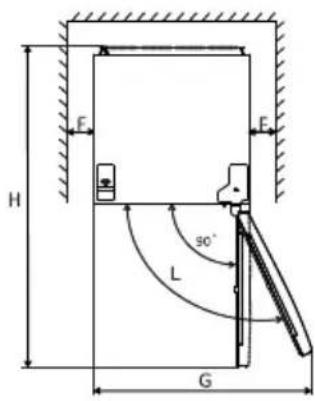
| A 545 | |
| B 555 | |
| C 1430 | |
| D min=50 | |
| E min=50 | |
| F min=50 | |
| G 1090 | |
| H 1110 | |
| I 135° |
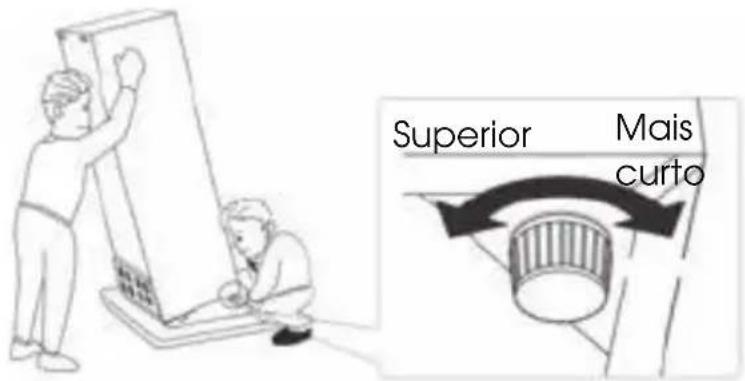
Levelling the unit
To do this, adjust the two levelling feet at front of the unit.
If the unit is not levelled, the doors and magnetic seal alignments will not be covered properly.


Positioning
Install this appliance where the room temperature corresponds to the climate class indicated on the rating plate of the appliance:
For refrigerating appliances with climate class:
- extended temperate: this refrigerating appliance is intended to be used at room temperatures ranging from 10 °C to 32 °C; (SN)
- temperate: this refrigerating appliance is intended to be used at room temperatures ranging from 16 °C to 32 °C; (N)
- subtropical: this refrigerating appliance is intended to be used at room temperatures ranging from 16 °C to 38 °C; (ST)
- tropical: this refrigerating appliance is intended to be used at room temperatures ranging from 16 °C to 43 °C; (T)
Location
The appliance should be installed well away from sources of heat such as radiators, boilers, direct sunlight etc. Ensure that air can circulate freely around the back of the cabinet. To ensure best performance, if the appliance is positioned below an overhanging wall unit, the minimum distance between the top of the cabinet and the wall unit must be at least 50 mm. Ideally, however, the appliance should not be positioned below overhanging wall units. Accurate levelling is ensured by one or more adjustable feet at the base of the cabinet.
This refrigerating appliance is not intended to be used as a built-in appliance;

WARNING: It must be possible to disconnect the appliance from the mains power supply; the plug must therefore be easily accessible after installation.
Electrical connection
Before plugging it in, ensure that the voltage and frequency shown on the rating plate correspond to your domestic power supply. The appliance must be earthed. The power supply cable plug is provided with a contact for this purpose. If the domestic power supply socket is not earthed, connect the appliance to a separate earthed socket in compliance with current regulations, consulting a qualified electrician.
The manufacturer declines all responsibility if the above safety precautions are not observed.
This appliance complies with the E.E.C. Directives.
First use
Cleaning the interior
Before using the appliance for the first time, wash the interior and all internal accessories with lukewarm water and some neutral soap so as to remove the typical smell of a brand new product, then dry thoroughly.
Important! Do not use detergents or abrasive powders, as these will damage the finish.
Temperature Setting
- Plug in your appliance. The internal temperature is controlled by a thermostat. There are 8 settings: 1 is warmest setting and 7 is coldest; when set to 0, the appliance will switch off. When set to max, the compressor will not stop working.
- The appliance may not operate at the correct temperature if it is in a particularly hot or if you open the door often.

Daily use
Place different food in different compartments according to be below table
| Refrigerator compartments | Type of food |
| Door or balconies of fridge compartment | ·Foods with natural preservatives, such as jams, juices, drinks or condiments.·Do not store perishable foods. |
| Crisper drawer | ·Fruits, herbs and vegetables should be placed separately in the crisper bin.·Do not store bananas, onions, potatoes or garlic in the refrigerator. |
| Fridge shelf – middle | ·Dairy products or eggs |
| Fridge shelf – top | ·Foods that do not need cooking, such as ready-to-eat foods, deli meats or leftovers. |
| Freezer drawer(s)/shelf | ·Foods for long-term storage.·Bottom drawer/shelf for raw meat, poultry or fish.·Middle drawer/shelf for frozen vegetables, chips.·Top drawer/shelf for ice cream, frozen fruit, frozen baked goods. |
| Temperature Setting Recommendation | ||
| Room temperature | Freezer compartment | Fridge compartment |
| Summer(Above 38 °C) | / | 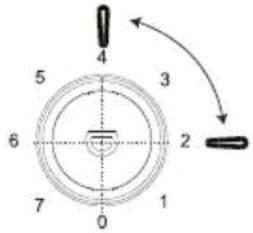 Set on 2~4 Set on 2~4 |
| Normal | / | 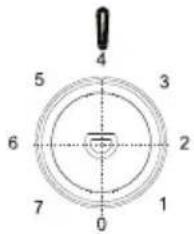 Set on 4 Set on 4 |
| Winter(Below 16°C) | / | 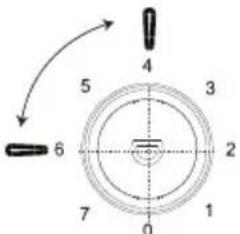 Set on 4~6 Set on 4~6 |
- The Information above gives users recommendations on temperature setting.
Impact on Food Storage
- Under the recommended setting, the best storage time in the refrigerator is no more than 3 days.
- Under the recommended setting, the best storage time in the freezer is no more than 1 month.
- The best storage time may reduce under other settings.
Freezing fresh food
- The freezer compartment is suitable for freezing fresh food and storing frozen and deep-frozen food for a long time.
- Place the fresh food to be frozen in the freezer compartment.
- The maximum amount of food that can be frozen in 24 hours is specified on the rating plate.
- The freezing process lasts 24 hours: during this period do not add other food to be frozen.
Storing frozen food
When first starting-up or after a period of non-use, before putting the product in the compartment, let the appliance run at least 2 hours on the highest setting.
Important! In the event of accidental defrosting, because, for example, the power has been off for a long time, the defrosted food must be consumed quickly or cooked immediately and then re-frozen (after cooked).
Thawing
Deep-frozen or frozen food, prior to be used, can be thawed in the fridge compartment or at room temperature, depending on the time available for this operation.
Small pieces may even be cooked frozen, directly from the freezer. In this case, cooking will take longer.
Ice cubes
This appliance is equipped with an ice cube machine.
Accessories
Movable shelves
The refrigerator walls have a series of runners so that shelves can be positioned as desired.

Positioning the door balconies
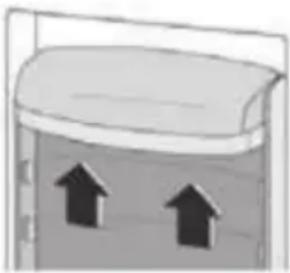
To store food packages of various sizes, the door balconies can be placed at different heights. To make these adjustments proceed as follows: gradually pull the balcony in the direction of the arrows until it comes free, then reposition as required.
Helpful hints and tips
To help you make the most of the freezing process, here are some important hints:
- The maximum amount of food which can be frozen in 24 hrs. is shown on the rating plate;
- The freezing process takes 24 hours. No additional food to be frozen should be added during this period;
- Only freeze top quality, fresh and thoroughly cleaned foods items;
- Prepare food in small portions to enable it to be rapidly and completely frozen and to make it possible to subsequently thaw only the amount required;
- Wrap up the food in aluminium foil or polythene and make sure that the packages are airtight;
- Do not allow fresh, unfrozen food to touch food, which is already frozen, thus avoiding a rise in temperature of the latter;
- Lean foods store better and longer than fatty ones; salt reduces the storage life of food;
- Ice cubes, if consumed immediately after removal from the freezer compartment, can possibly cause the skin to be freeze burnt;
- It is advisable to white the freezing date on each individual pack. Removing them from the freezer compartment can cause freeze burns;
- It is advisable to show the freezing date on each individual pack to make sure you monitor the storage time.
Hints for storage of frozen food
To obtain the best performance from this appliance, you should:
- Make sure that commercially frozen food items were adequately stored by the retailer;
- Make sure that frozen food items are transferred from the food store to the freezer in the shortest possible time;
- Not open the door frequently or leave it open longer than absolutely necessary.
- Once defrosted, food deteriorates rapidly and cannot be re-frozen;
- Do not exceed the storage period indicated by the food manufacturer
Hints for fresh food refrigeration
To obtain the best performance:
- Do not store warm food or evaporating liquids in the refrigerator
- Cover or wrap the food, particularly if it has a strong flavour
- Dough (all types): wrap in polythene bags and place on the glass shelves above the vegetable drawer.
- For safety, store accordingly only for one or two days at the most.
- Cooked foods, cold dishes, etc... should be covered and may be placed on any shelf.
- Fruit and vegetables: these should be thoroughly cleaned and placed in the special drawer(s) provided.
- Butter and cheese: these should be placed in special airtight
containers or wrapped in aluminium foil or polythene bags to exclude as much air as possible.
- Milk bottles: these should have a cap and should be stored in the balconies on the door.
- Bananas, potatoes, onions and garlic, if not packed, must not be kept in the fridge.
2.3. Maintenance
Environment Protection
This appliance does not contain gasses which could damage the ozone layer, in either its refrigerant circuit or insulation materials. The appliance shall not be discarded together with the urban refuse and rubbish. The insulation foam contains flammable gases: the appliance must be disposed according to the appliance regulations to obtain from your local authorities. Avoid damaging the cooling unit, especially the heat exchanger.
The materials used on this appliance marked by the symbol 📋 are recyclable.
Cleaning
For hygienic reasons, the appliance interior, including interior accessories, should be cleaned regularly.
Caution! The appliance may not be connected to the mains during cleaning. Danger of electrical shock! Before cleaning, switch the appliance off and remove the plug from the mains, or switch off the circuit breaker or fuse. Never clean the appliance with a steam cleaner. Moisture could accumulate in electrical components and you will be in danger of electrical shock! Hot vapours can damage plastic parts. The appliance must be dry before it is placed back into service.
Important! Ethereal oils and organic solvents can attack plastic parts, e.g. lemon juice or the juice from orange peel, butyric acid or
cleansers that contain acetic acid.
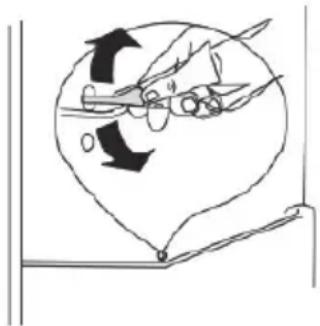
Cleaning the drain hole
To avoid defrost water from overflowing into the fridge, periodically clean the drain hole at the back of the fridge compartment. Use a cleaner to clean the hole as showed on the right.
- Do not allow such substances to come into contact the appliance parts.
- Do not use abrasive cleaners.
- Remove the food from the freezer. Store them in a cool place, well covered.
- Switch the appliance off and remove the plug from the mains or switch off the circuit breaker of fuse.
- Clean the appliance and the interior accessories with a cloth and lukewarm water. After cleaning it, wipe with fresh water and rub dry.
• After everything is dry, place the appliance back into service.
Defrosting the freezer
The freezer compartment will become progressively covered with frost.
This should be removed. Never use sharp metal tools to scrape off frost from the evaporator as you could damage it.
However, when the ice becomes very thick on the inner liner, complete defrosting should be carried out as follows:
- Pull out the plug from the socket;
- Remove all stored food, wrap it in several layers of newspaper and put it in a cool place;
-
Keep the door open and place a basin underneath the appliance to collect the defrost water;
-
When defrosting is completed, dry the interior thoroughly;
- Reconnect the plug in the power socket to run the appliance again
Replacing the lamp
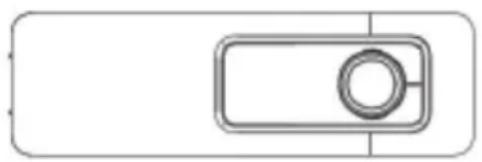
The internal light is a LED type.
- Warning! The LED light must not be replaced by the user! If the LED light is damaged, contact the customer helpline for assistance
2.4. Troubleshooting
Troubleshooting

Caution! Before troubleshooting, disconnect the power supply.
Only a qualified electrician or Customer Support Service must perform any troubleshooting action not included in this manual.
Important! The refrigerator freezer emits some sounds during normal use (compressor, refrigerant circulation).
| Problem Possible cause Solution | ||
| Appliance does not work | Temperature regulation knob is set to “0”. | Change the temperature setting using the knob to switch on the appliance. |
| Mains plug is not plugged in or is loose | Insert mains plug. | |
| Fuse has blown or is defective | Check fuse, replace if necessary. | |
| Socket is defective | Mains malfunctions are to be corrected by an electrician. | |
| The food is too warm. | Temperature is not properly adjusted. | Please look in the initial Temperature Setting section. |
| Door was open for an extended period. | Open the door only as long as necessary. | |
| A large quantity of warm food was place in the appliance within the last 24 hours. | Turn the temperature regulation to a colder setting temporarily. | |
| The appliance is near a heat source. | Please look in the installation location section. | |
| Appliance cools too much | Temperature is set too cold. | Turn the temperature regulation knob to a warmer setting temporarily. |
| Unusual noises | Appliance is not levelled. | Re-adjust the feet. |
| The appliance is touching the wall or other objects. | Move the appliance slightly. | |
| A component, e.g. a pipe, on the rear of the appliance is touching another part of the appliance or the wall. | If necessary, carefully bend the component out of the way. | |
| Water on the floor | Water drain hole is blocked. | Refer to the “Maintenance” section. |
| Side panel is hot | Condenser is inside the panel. | It's normal. |
If the malfunctions persist, contact the Customer Support Service.
3. POST-SALE SERVICE
Kubo has designed this appliance in order to guarantee maximum reliability. However, if a problem occurs do not attempt to open the appliance - there is a risk of electrical shock. If you are not able to solve the problem, please contact the Customer Support Service of any Worten, Modelo or Continente store in order to be assisted. Worten Equipamentos para o Lar provides for a period of 3 years, or another period defined in the applicable legislation, from the date of purchase of the device.
Availability of repair parts
Depending on the repair part, they are available for a minimum of seven years for professional repairers or a minimum of ten years for professional repairers and end users after the last unit of the model has been placed on the market.
4. ENVIRONMENTAL PROTECTION
In order to protect the environment, we strive to reduce the volume of packaging used, limiting it to three easily sorted materials: cardboard, paper and plastic. The appliance is manufactured using recyclable materials after disassembled by a specialized company. Please comply with local regulations concerning the recycling of all materials.

| Brand | KUBO |
| Model | KBDD8358 |
| Appliance Category Freestanding | |
| Overall Dimensions (WXDXH) | 1430x545x555 |
| Net Fresh Food Storage Volume 169L | |
| Net Frozen Food Storage Volume 37L | |
| Defrosting Type Manual | |
| Climatic Class ST,N | |
| Recommended Storagy Temperature Fridge Compartment | ~4°C |
| Recommended Storagy Temperature Frezzer Compartment | ~-18°C |
| Energy Consumption | 172 kWh/year |
| Ariborne Acoustical Noise 40dB | |
| Energy Class E | |
| Temperature Rise Time 13,5h | |
| Freezing Capacity 2.4Kg/24h | |
| Rated Voltage 220-240V |
DELEGATED REGULATION (EU) 2019/2016 OF THE COMMISSION on the energy label of household appliances.
Parts Model information
To access the EPREL registration of the model:
- Go to https://eprel.ec.europa.eu
- Get the model identifier from the energy label of the product and type it in the search box
- The model's energy labeling information is displayed
Estimado cliente,
- Instale la bisagra del medio.

| A 545 | |
| B 555 | |
| C 1430 | |
| D mín=50 | |
| E mín=50 | |
| F mín=50 | |
| G 1090 | |
| H 1110 | |
| Creo 135° |

Place different food in different compartments according to be below table
Consejos útiles
- Instale a porta superior com a dobradiça superior.


Instalar a pega externa da porta (se presente)
![graph LR A["Left refrigerator"] --> B["Right refrigerator"] B --> C["Right refrigerator"]](/content/2026/05/835811/images/87f0be312831174f72b771f8a86fb788b3f575a2c77ecb197dad4736c2840906.jpg)
| A 545 | |
| B 555 | |
| C 1430 | |
| D min=50 | |
| E min=50 | |
| F min=50 | |
| G 1090 | |
| H 1110 | |
| Pensei 135° | |
Nivelar a unidade
Posicionamento
Instale este aparelho onde a temperatura ambiente corresponda à classe climática indicada na placa de características do aparelho:
- INDEX
- SAFETY INSTRUCTIONS 4
- OPERATING INSTRUCTIONS 12
- POST-SALE SERVICE 29
- ENVIRONMENTAL PROTECTION 29
- SAFETY INSTRUCTIONS
- IMPORTANT WARNINGS
- ASSISTANCE
- POWER SUPPLY
- POWER CORD AND OTHER CABLES
- HUMIDITY AND WATER
- CLEANING
- GENERAL PRECAUTIONS
- GENERAL SAFETY
- WARNING: RISK OF FIRE / FLAMMABLE MATERIALS
- ELECTRICAL SAFETY
- DAILY USE
- CARE AND CLEANING
- OPERATING INSTRUCTIONS
- PRODUCT DESCRIPTION
- PRODUCT USAGE
- INSTALLATION
- SERVICE
- ENERGY SAVING
- REVERSING THE DOOR
- INSTALLING THE DOOR'S EXTERNAL HANDLE (IF PRESENT)
- SPACE REQUIREMENT
- LEVELLING THE UNIT
- POSITIONING
- LOCATION
- ELECTRICAL CONNECTION
- FIRST USE
- CLEANING THE INTERIOR
- TEMPERATURE SETTING
- IMPACT ON FOOD STORAGE
- FREEZING FRESH FOOD
- STORING FROZEN FOOD
- THAWING
- ICE CUBES
- ACCESSORIES
- MOVABLE SHELVES
- POSITIONING THE DOOR BALCONIES
- HELPFUL HINTS AND TIPS
- HINTS FOR STORAGE OF FROZEN FOOD
- HINTS FOR FRESH FOOD REFRIGERATION
- MAINTENANCE
- ENVIRONMENT PROTECTION
- CLEANING THE DRAIN HOLE
- DEFROSTING THE FREEZER
- REPLACING THE LAMP
- TROUBLESHOOTING
- POST-SALE SERVICE
- AVAILABILITY OF REPAIR PARTS
- ENVIRONMENTAL PROTECTION
- PARTS MODEL INFORMATION
- CONSEJOS ÚTILES
- NIVELAR A UNIDADE
- POSICIONAMENTO
Brand : Kubo
Model : KBDD8358
Category : Refrigerator