
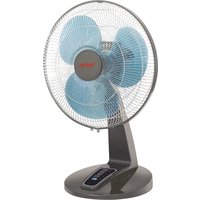
Eole Crystal VU6525 - Fan TEFAL - Free user manual and instructions
Find the device manual for free Eole Crystal VU6525 TEFAL in PDF.

| Product Type | Pedestal Fan |
| Brand | Tefal |
| Model | Eole Crystal VU6525 |
| Color | White with translucent crystal blades |
| Height | 135 cm |
| Diameter | 40 cm (blade span) |
| Base Diameter | 35 cm |
| Weight | 5.5 kg |
| Power Supply | 220-240 V, 50 Hz |
| Power Consumption | 50 W |
| Number of Speed Settings | 3 |
| Oscillation | Yes, 90° horizontal |
| Remote Control | Yes, included |
| Timer | Yes, up to 7 hours |
| Blade Material | Transparent polycarbonate |
| Grille Material | Steel with anti-rust coating |
| Pole Material | Aluminum |
| Adjustable Height | Yes, 3 positions |
| Noise Level | Approx. 55 dB (max speed) |
| Energy Class | Class A |
| Cleaning | Wipe grille and blades with damp cloth; do not immerse |
| Safety Features | Overheating protection, stable base |
| Spare Parts Availability | Replacement parts available from Tefal service centers |
| Reparability Index | 8/10 (user-replaceable fuse, motor accessible) |
| Warranty | 2 years |
Frequently Asked Questions - Eole Crystal VU6525 TEFAL
User questions about Eole Crystal VU6525 TEFAL
0 question about this device. Answer the ones you know or ask your own.
Ask a new question about this device
Download the instructions for your Fan in PDF format for free! Find your manual Eole Crystal VU6525 - TEFAL and take your electronic device back in hand. On this page are published all the documents necessary for the use of your device. Eole Crystal VU6525 by TEFAL.
USER MANUAL Eole Crystal VU6525 TEFAL
natural_image
Line drawing of a tall industrial tower with a mesh ventilation grille (no text or symbols)natural_image
Line drawing of a tall industrial tower with a grid-patterned side panel (no text or symbols)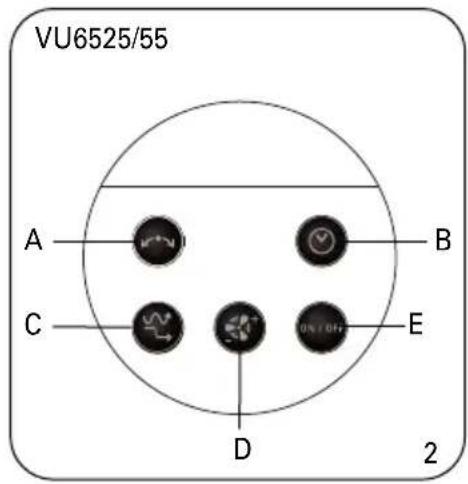
natural_image
Technical diagram showing mechanical assembly with two views of a circular component, no text or symbols present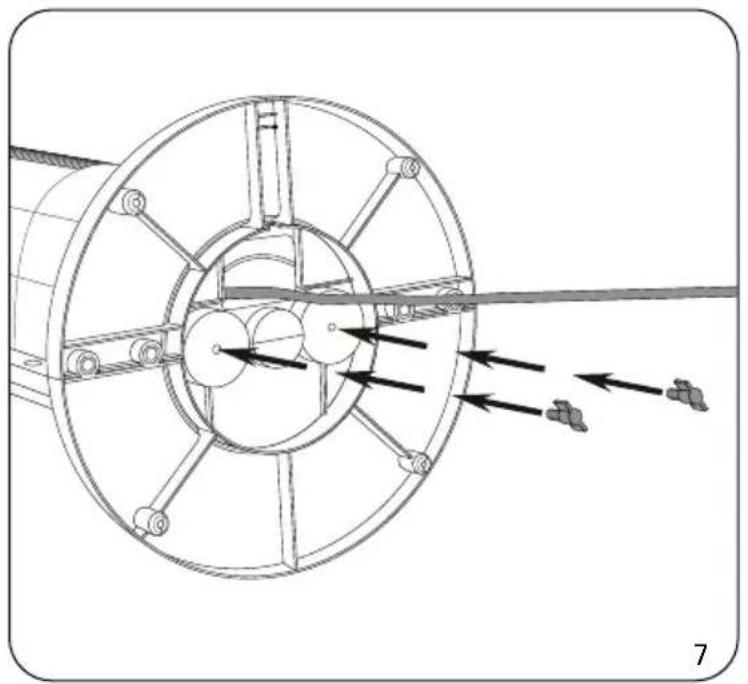
natural_image
Technical diagram of a mechanical assembly with directional arrows indicating motion or force (no text or symbols present)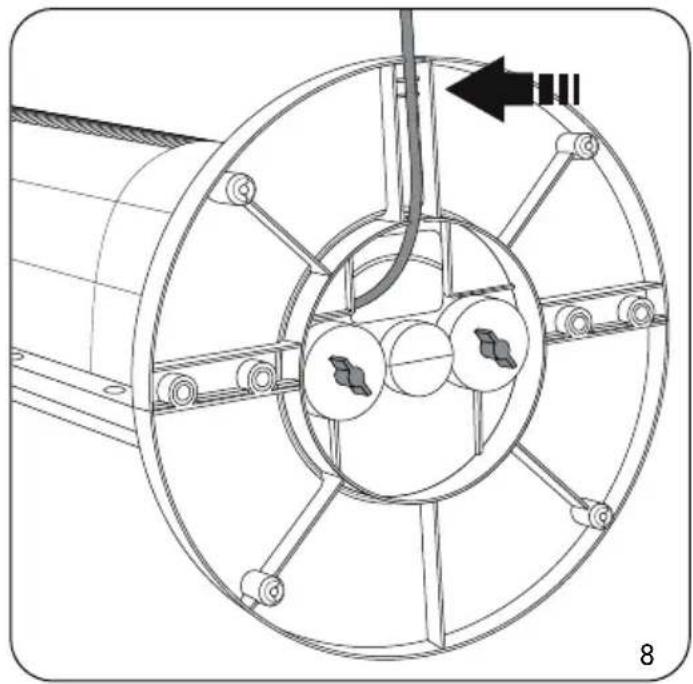
natural_image
Technical diagram of a mechanical assembly with circular components and a directional arrow (no text or symbols)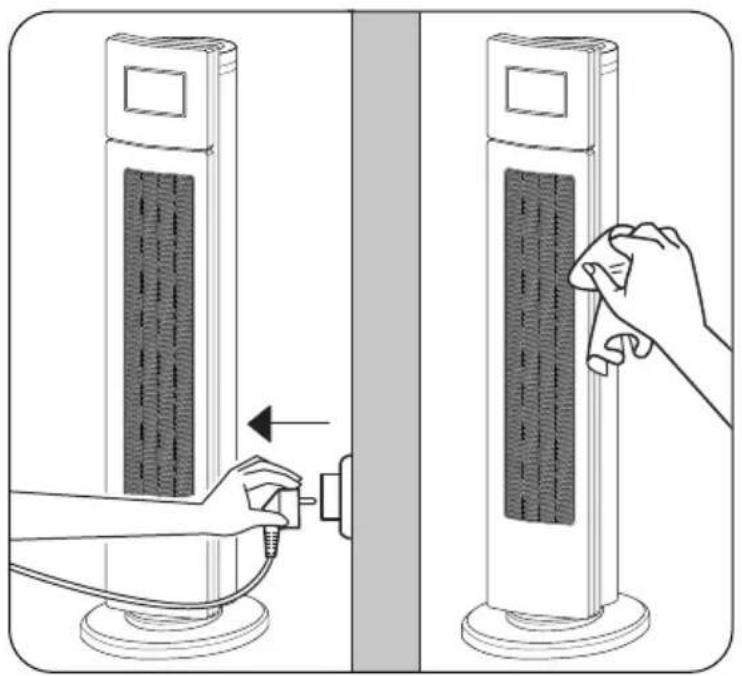
natural_image
Illustration of a hand inserting a cable into a tower-mounted device, showing the process (no text or symbols present)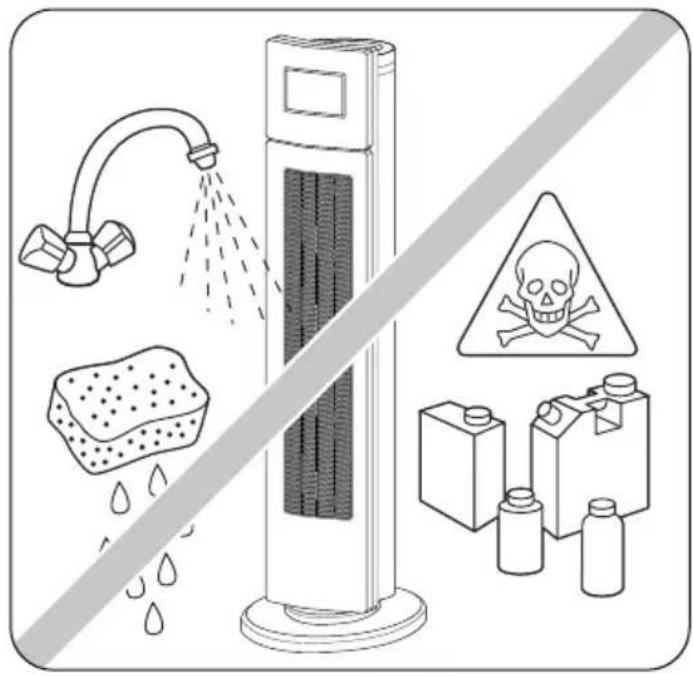
Please read carefully and keep in a safe place.
WARNINGS
It is essential that you read these instructions carefully and comply with the following recommendations.
- For your safety, this appliance complies with the applicable standards and regulations (Low Voltage Directive, Electromagnetic Compatibility, Environmental...).
- Before using, always check the condition of the appliance, the power socket and the power lead.
- Do not pull on the power cable or the appliance, even to unplug it from the wall socket.
- Never insert objects into the appliance (e.g. needles...).
- This appliance is not intended for use by persons (including children) with reduced physical, sensory or mental capabilities, or lack of experience and knowledge, unless they have been given supervision or instruction concerning use of the appliance by a person responsible for their safety. Children should be supervised to ensure that they do not play with the appliance.
- This appliance can be used by children aged from 8 and above and persons with reduced physical, sensory or mental capabilities or lack of experience and knowledge if they have been given supervision or instruction concerning the use of the appliance in a safe way and understand the hazards involved. Children shall not play with the appliance. Cleaning and user maintenance shall not be made by children without supervision.
- This product has been designed for domestic use only. Any commercial use, inappropriate use or failure to comply with the instructions, the manufacturer accepts no responsibility and the guarantee will not apply.
- Do not use your appliance in a dusty room or a room where there is a risk of fire.
- This appliance is intended for domestic use only. It must therefore not be used in industrial applications.
- If the power cable is damaged, it must be replaced by the manufacturer, its after-sales service or a person with similar qualifications to avoid any danger.
- Elimination of the product at the end of its life span: To care for the environment, dispose of your appliance at your local waste disposal centre.
VERY IMPORTANT
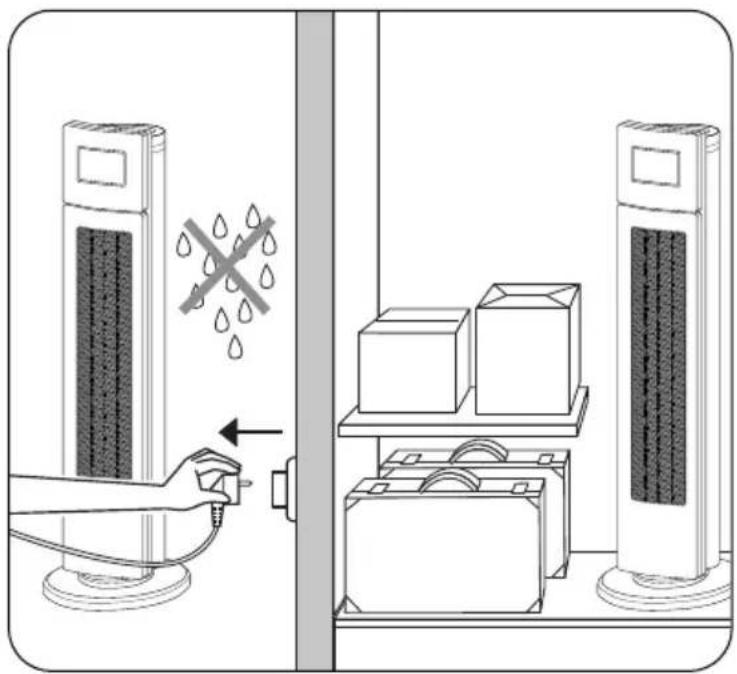
- Keep the appliance 50 cm away from any objects (curtains, walls, aerosols, etc.)
- NEVER ALLOW WATER TO PENETRATE THE APPLIANCE.
- Do not touch the appliance with wet hands.
- Before operating, please ensure that :
- The appliance is assembled according to the manufacturers instructions.
- The appliance is placed on a stable and firm surface
- The appliance is in a normal operating position (in an upright position on its feet).
VOLTAGE
- Before using the appliance for the first time, ensure that your mains voltage corresponds to the voltage indicated on the appliance.
- Your appliance can be used with a power plug without an earth connection. It is a class II appliance (double insulation ).
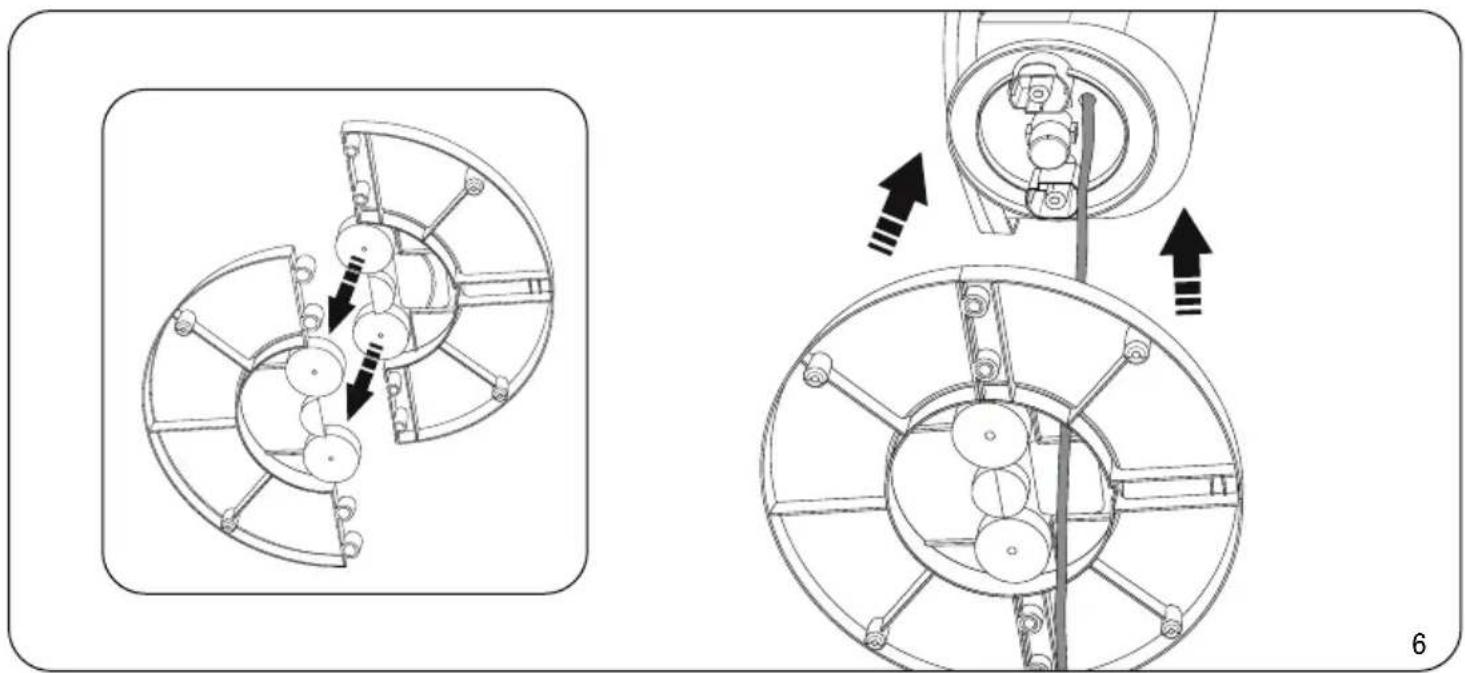
ASSEMBLING
- Your appliance is supplied unassembled. For your safety, it is essential to assemble it correctly. Fig. 6, 7, 8.
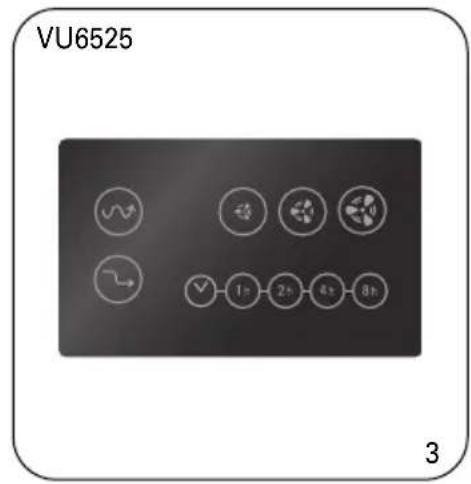
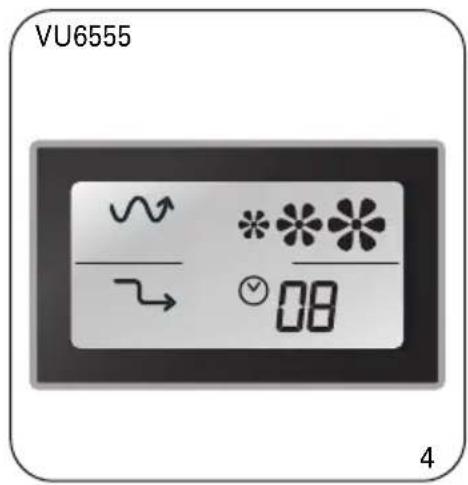
OPERATION MOD. VU6525/55
Press the buttons as follows :
- Position ON/OFF : start and stop the unit
- Position ◆: low-level ventilation
- Position : medium ventilation
- Position : high-level ventilation.
- Oscillation : press the button if you want the fan to swivel.
The "A" "B" and "C" buttons described below are only operational once the appliance has been turned on and can be used simultaneously (see page 2).
- "A" button, oscillation control:
- Press the "A" button once, the fan oscillates horizontally.
- To stop the oscillation function, press the "A" button again.
- "B" button, set automatic appliance shutdown:
You have 4 choices, 1-, 2-, 4- or 8-hour operating time.
- Press the "B" button once; the 1-hour timer is activated and the 1h indicator comes on.
- Press the "B" button a second time; the 2-hour timer is activated and the 2h indicator comes on.
- Press the "B" button a third time; the 4-hour timer is activated and the 4h indicator comes on.
- Press the "B" button a fourth time; the 8-hour timer is activated and the 8h indicator comes on.
- To stop the "TIMER" function, press the "B" button again.

flowchart
graph LR
    A["1 hour"] --> B["2 hours"]
    B --> C["4 hours"]
    C --> D["8 hours"]
    D --> E["STOP"]
- "C" button, set VARIATION or REDUCTION mode
| VARIATIONREDUCTIONRandomspeedcycles(90-secondcycles)+Randomspeedcycles(90-secondcycles)+Speedstepsdownevery30minutes | |
Pre-selectspeed ◀/*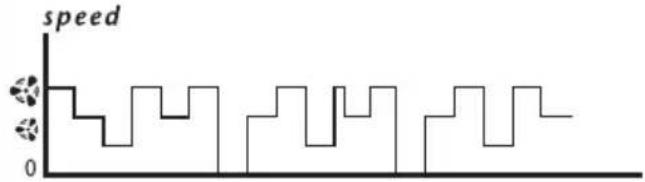 Pre-selectspeed ◀/* Pre-selectspeed ◀/*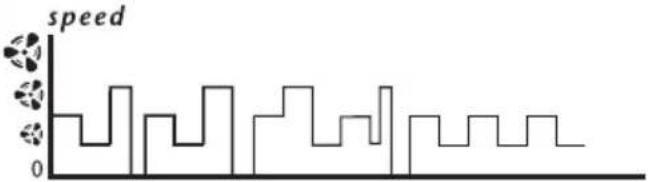 Pre-selectspeed ◀/* Pre-selectspeed ◀/*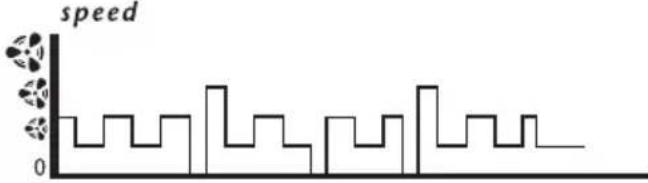 | Pre-selectspeed ◀/*[VARIATION speed ◀0Pre-selectspeed ◀/*[variation speed variation speed0 30min.Pre-selectspeed ◀/*[variation speed variation speed variation speed0 3 0 min.60min. |
Pre-select the start-up speed according to your needs (see table above), then select REDUCTION mode or VARIATION mode (using method described below):
- Press the "C" button once; "VARIATION" mode is activated and the "VARIATION" indicator comes on.
- Press the "C" button again; "REDUCTION" mode is activated and the "REDUCTION" indicator comes on.
- Press the "C" button again to stop this function.

flowchart
graph LR
    A["Variation"] --> B["Reduction"]
    B --> C["STOP"]
- "D" button:
- Press the "D" button once; the appliance starts up at speed 1 and indicator /*comes on.
- Press the "D" button a second time; the appliance changes to speed 2 and indicator/* comes on.
- Press the "D" button a third time, the appliance changes to speed 3 and indicator ✦/※ comes on.
- If you press the "D" button again, the appliance changes back to speed 1 and indicator comes on
- "E" button, immediate appliance shutdown:
- Press the "E" button to completely shut down the appliance.
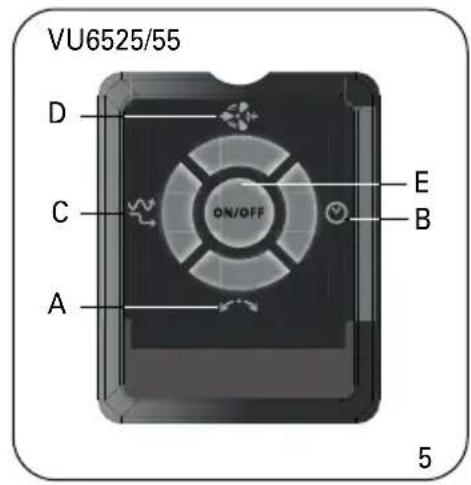
REMOTE CONTROL MOD. VU6525/55
The remote control buttons are the same as those on the appliance control panel.
The information is sent to the appliance by means of an infrared transmission LED located on the front of the remote control. The infrared receiver is located on the fan control panel.
Do not scratch or cover the transmission LED, or the infrared receiver on the fan.
To use the remote control, point the transmission LED towards the infrared receiver on the fan and press the required button.
Ensure that there are no obstacles between the transmission LED and the receiver.
The maximum range is approximately 6 metres opposite the fan.
Remote control power:
The remote control is powered by two AAA or LR03 type alkaline batteries, which are not supplied. Insert the batteries into the battery housing, respecting the battery polarity as indicated in the housing.
Whenever a command is issued to the control panel, the fan beeps.
CLEANING
- Your appliance must be unplugged before proceeding with any cleaning work.
- You can clean it with a slightly damp cloth.
- IMPORTANT: Never use abrasive products which might damage the appearance of your appliance.
STORAGE
- When you are not using your appliance, store it in a dry place.
- When storing the appliance over a period of time, remove the batteries from the remote control (mod. VU6525/VU6555).
IMPORTANT:
It is recommended that you unplug your appliance whenever it is not in use.
IN THE EVENT OF PROBLEMS

- Never dismantle your appliance yourself, this will negate any guarantee. A poorly repaired appliance may be dangerous for the user.
- If the appliance ceases to operate or is damaged in any way, contact one of our authorised service centres.
ENVIRONMENT PROTECTION FIRST!
① Your appliance contains valuable materials which can be recovered or recycled.
Leave it a local civic waste collection point.
To protect the environment, do not throw away dead batteries, instead, take them to a battery collection point. Do not dispose of with household waste.
คำเตือน
flowchart
graph LR
    A["Variation"] --> B["Reduction"]
    B --> C["STOP"]

ÜM D
natural_image
Three horizontal arrows pointing right, one with a left-pointing arrow below, no text or symbols present/
/

/ *
Brand : TEFAL
Model : Eole Crystal VU6525
Category : Fan