PSKIW25 - Sports Watch Pyle - Free user manual and instructions
Find the device manual for free PSKIW25 Pyle in PDF.


| Product Type | Sports Watch |
| Brand | Pyle |
| Model | PSKIW25 |
| Display Type | Digital LCD |
| Dimensions (approx.) | 48 mm x 42 mm x 14 mm |
| Weight (approx.) | 50 g |
| Battery Type | CR2032 (replaceable) |
| Battery Life (typical) | 12 months |
| Water Resistance | 50 meters (5 ATM) |
| Main Functions | Time, date, stopwatch, countdown timer, alarm, backlight, dual time, hourly chime |
| Backlight | LED (electroluminescent) |
| Case Material | Plastic / Resin |
| Band Material | Silicone / Rubber |
| Closure | Buckle |
| Care and Cleaning | Wipe with a soft dry cloth; avoid solvents |
| Safety | Keep away from magnets and heat sources |
| Spare Parts / Repairability | Battery and strap are replaceable; other parts not available |
| General Information | User manual available in multiple languages |
Frequently Asked Questions - PSKIW25 Pyle
User questions about PSKIW25 Pyle
0 question about this device. Answer the ones you know or ask your own.
Ask a new question about this device
Download the instructions for your Sports Watch in PDF format for free! Find your manual PSKIW25 - Pyle and take your electronic device back in hand. On this page are published all the documents necessary for the use of your device. PSKIW25 by Pyle.
USER MANUAL PSKIW25 Pyle
"Recreational Gear For The Great Outdoors"
IMPORTANT: Pack carefully in original package if possible. We are not responsible for damage located in returning items for repair. A letter stating your exact street address, daytime phone number, and the problem you are experienced should be included. You must also check a copy of the original receipt a written date of purchase

natural_image
Two individuals wearing sunglasses and headgear, smiling (no visible text or symbols)Bromlyn, NY 11904
1800-44-3671
Monday Through Thursday, 9AM10 5PM
Friday 9AM in 1PM Eastern.
www.pyleaudio.com

"Recreational Gear For The Great Outdoors"

www.pyleaudio.com
1.0 Introduction
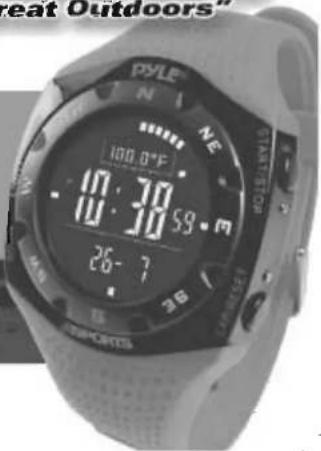
Thank you for purchasing this Watch. Your Watch features electronic sensors, which measures and shows the outdoor conditions: weather forecast, temperature, pressure, altitude and compass directions.
Your Watch provides the essential information when you understand, and it can be further logged into a logbook for later review. Your Watch also includes current time, daily alarm, chronograph, timer and dual time function.
To get the most of your purchase, it is advisable to use this watch in conformity with the below notes:
- Be sure to carefully read this manual and keep it on hand for later reference when necessary.
- Avoid exposing your Watch to extreme conditions for an unreasonable time.
- Avoid rough usages or severe impacts on your Watch.
- Do not open the Watch's case unless by a certified service agency because your Watch contains delicate electronic sensors and components.
- Clean your Watch with a soft cloth occasionally for a longer useful life of your watch.
- Keep your Watch away from magnets or any appliances which contain magnetic objects such as mobile phones, speakers and motors.
- Store your Watch in a dry place when it is not in use.
2.0 Buttons and Its Functions - Part B
![Key Lock ON [SR] [EL] [M] [SiS] [L-R] Auto-aught ON](/content/2026/05/834973/images/a06ba3618683c81b2601d2a1f52b40aa8775b8eab1065b93c8842f65ca791879.jpg)
EL Button [EL]
- To turn on the EL back light for about 3 seconds. - Auto-backlight function
- Hold down the [EL] button to turn ON or OFF this function.
- When this function is ON, the auto-backlight indicator ' * will appear, pressing any key will turn ON the EL back light.
Key Lock Function
- Hold down the [M] button and then hold down the [S/S] button (keep holding the [M] button at the same time) to turn ON or OFF this function.
- When this function is ON, the key lock indicator 'no' will appear, pressing any key will NOT activate any functions until the key lock is tuned OFF.
2.0 Buttons and Its Functions - Part A
![[SR] [FL] [M] 3:05 10-8 [SVS] [LR]](/content/2026/05/834973/images/4404a7c3dd74b9aeaa3bca5a980db7498400e7ef434064e6af82acf41dc69b75.jpg)
Mode Button [M]
• To select among Current Time, Daily Alarm, Chronograph, Timer and Dual Time Modes.
• To select among Ski, Ski Recall, Allimeter, Barometer and Compass Modes.
- To select among the setting items in setting display. Sensor Button [SR]
• To select between Sensor and Timekeeping Modes. Start/Stop Button [SiS]
- To select between functional displays under the same mode.
• To activate the 'start' or 'stop' chronograph function in chronograph mode.
• To toggle Yes/No.
• To increase the digits in setting display.
LapReset Button [UR]
• To activate the 'lap' or 'reset' chronograph function in chronograph and timer modes.
• To move the cursor to left by one during History recaling display.
• To decrease the digits under setting display.
• To toggle Yes!No.
3.0 Major Function Modes - Timekeeping Mode and Sensor Mode

flowchart
graph TD
    A["Sensor Mode"] --> B["1:05 05 23-2"]
    B --> C["3:05"]
    C --> D["L-HUI 3:05"]
    D --> E["1:05 05 10-8"]
    E --> F["RL1 0 FF"]
    F --> G["L-HP 0 00 00"]
    G --> H["Current Time Mode Parameter Mode"]
    H --> I["Solar Alarm Mode"]
    I --> J["Analog Period Mode"]
    J --> K["Dual Time Mode"]
    K --> L["Timer Mode"]
    L --> M["Timing Period Mode"]
    M --> N["Current Time Mode"]
    style A fill:#f9f,stroke:#333
    style N fill:#f9f,stroke:#333
Remark 1: The Ski Recall Mode will be skipped if NO Ski Data is recorded.
4.0 Current Time Mode - Functional Display

flowchart
graph TD
    A["Day of week"] --> B["3:05 05"]
    B --> C["10-8"]
    C --> D["weather forecast"]
    D --> E["3:05 05"]
    E --> F["10-8"]
    F --> G["temperature"]
    G --> H["3:05 05"]
    H --> I["10-8"]
    I --> J["Day of Week Display"]
    J --> K["10-8"]
    K --> L["Current time data"]
    L --> M["Temperature Display"]
    M --> N["3:05 05"]
    N --> O["10-8"]
    O --> P["atitude tendency"]
    P --> Q["3:05 05"]
    Q --> R["10-8"]
    R --> S["Sea Level Pressure Tendency"]
    S --> T["10-8"]
    T --> U["Current Time Mode"]
    U --> V["Sea Level Pressure Tendency"]
    V --> W["10-8"]
    W --> X["Atitude Tendency"]
    X --> Y["3:05 05"]
    Y --> Z["10-8"]
Functional Display
• The Current Time Mode includes four kinds of functional displays:
• Day of Week Display.
• Temperature Display
• Altitude Tendency Display and
• Sea Level Pressure Tendency Display
• To select among different functional displays.
deagram
IMPORTANT: If the user intends to get an
accurate reading of air temperature, the user
30 minutes before getting the actual
measurement. This allows no body temperature effect on the Watch.
Automatic Display Switching
- When the [S/S] button is pressed and held,
Total monthly displays will appear due by data in sequence
4.2 Current Time Mode - Setting the Current Time

flowchart
graph TD
    A["Current Time Display"] --> B["Current Time Setting Display"]
    B --> C["second"]
    C --> D["Key Loop"]
    D --> E["LCD Control"]
    E --> F["12/24 hour interval"]
    F --> G["Month/Day"]
    G --> H["day"]
    H --> I["Month"]
    I --> J["year"]
    J --> K["minutes"]
    K --> L["week"]
    L --> M["week"]
    M --> N["week"]
    N --> O["week"]
    O --> P["week"]
    P --> Q["week"]
    Q --> R["week"]
    R --> S["week"]
    S --> T["week"]
    T --> U["week"]
    U --> V["week"]
    V --> W["week"]
    W --> X["week"]
    X --> Y["week"]
    Y --> Z["week"]
    Z --> AA["week"]
    AA --> AB["week"]
    AB --> AC["week"]
    AC --> AD["week"]
    AD --> AE["week"]
    AE --> AF["week"]
    AF --> AG["week"]
    AG --> AH["week"]
    AH --> AI["week"]
    AI --> AJ["week"]
    AJ --> AK["week"]
    AK --> AL["week"]
    AL --> AM["week"]
    AM --> AN["week"]
    AN --> AO["week"]
    AO --> AP["week"]
    AP --> AQ["week"]
    AQ --> AR["week"]
    AR --> AS["week"]
    AS --> AT["week"]
    AT --> AU["week"]
    AU --> AV["week"]
    AV --> AW["week"]
    AW --> AX["week"]
    AX --> AY["week"]
    AY --> AZ["week"]
    AZ --> BA["week"]
    BA --> BB["week"]
    BB --> BC["week"]
    BC --> BD["week"]
    BD --> BE["week"]
    BE --> BF["week"]
    BF --> BG["week"]
    BG --> BH["week"]
    BH --> BI["week"]
    BI --> BJ["week"]
    BJ --> BK["week"]
    BK --> BL["week"]
    BL --> BM["week"]
    BM --> BN["week"]
    BN --> BO["week"]
    BO --> BP["week"]
    BP --> BQ["week"]
    BQ --> BR["week"]
    BR --> BS["week"]
    BS --> BT["week"]
    BT --> BU["week"]
    BU --> BV["week"]
    BV --> BW["week"]
    BW --> BX["week"]
    BX --> BY["week"]
    BY --> BZ["week"]
    BZ --> CA["week"]
    CA --> CB["week"]
    CB --> CC["week"]
    CC --> CD["week"]
    CD --> CE["week"]
    CE --> CF["week"]
    CF --> CG["week"]
    CG --> CH["week"]
    CH --> CI["week"]
    CI --> CJ["week"]
    CJ --> CK["week"]
    CK --> CR["week"]
    CR --> CS["week"]
    CS --> CT["week"]
    CT --> CU["week"]
    CU --> CV["week"]
    CV --> CW["week"]
    CW --> CX["week"]
    CX --> CY["week"]
    CY --> CZ["week"]
How to Set Current Time
- To select the setting display, hold down the [M] button for about 2 seconds in the Current Time Mode. In the setting display, the flashing "SET" icon will appear.
- In the setting display, press the [M] button to change the selection following the adjacent Current Time Setting Sequence.
- When the second digits are flashing (selected), press the [S/S] or [L/R] button to reset the digits to "00".
- When the digits are flashing (selected), press the [S/S] or [L/R] button to increase / decrease the number. (Hold down the button to change the number at a higher speed).
- When month-day order setting is selected, press the [S/S] or [L/R] button to select between month-day and day-month formats. When 12/24 hour format setting is selected, press the [S/S] button to select between 12 and 24 hour formats.
- When the LCD contrast is selected, press the [S/S] or [L/R] button to increase / decrease the contrast level (1 to 10). When the key beep setting is selected, press the [S/S] or [L/R] button to select between ON and OFF the beep.
- When the settings are completed, hold down the [M] button to exit the setting display. The Watch will also exit the setting display if NO button is pressed for 1 minute.
4.1 Current Time Mode - Weather Forecast Feature

Weather Forecast Feature
• A special feature of the Watch is the weather
predicting function. It works by analyzing the changes of the past air pressure.
How to Indicate the Coming Weather
• The Watch provides four different symbols to
indicate the forecast weather, which are
- Sunny
- Partly Cloudy
- Cloudy
- Rain
- The weather forecast feature can only be shown in the Current Time and Dual Time Modes.
IMPORTANT: Since the Watch predicts the coming weather by using the data of the changes in the air pressure, a higher accuracy predication may result when the user stays at the same altitude for at least 6 hours.
IMPORTANT: The Watch predicts the weather by adopting general weather prediction principles, it is NOT capable to reflect a dramatic change of weather within a very short period of time.
5.0 Daily Alarm Mode - Daily Alarm 1, Daily Alarm 2 and Chime Display
flowchart
graph TD
    A["9:05 FL1"] --> B["FF"]
    B --> C["Daily Alarm 1 Display"]
    C --> D["0"]
    D --> E["FL2"]
    E --> F["0"]
    F --> G["Hourly Chime Display"]
    G --> H["0"]
    H --> I["0"]
    I --> J["0"]
    J --> K["0"]
    K --> L["0"]
    L --> M["0"]
    M --> N["0"]
    N --> O["0"]
    O --> P["0"]
    P --> Q["0"]
    Q --> R["0"]
    R --> S["0"]
    S --> T["0"]
    T --> U["0"]
    U --> V["0"]
    V --> W["0"]
    W --> X["0"]
    X --> Y["0"]
    Y --> Z["0"]
    Z --> AA["0"]
    AA --> AB["0"]
    AB --> AC["0"]
    AC --> AD["0"]
    AD --> AE["0"]
    AE --> AF["0"]
    AF --> AG["0"]
    AG --> AH["0"]
    AH --> AI["0"]
    AI --> AJ["0"]
    AJ --> AK["0"]
    AK --> AL["0"]
    AL --> AM["0"]
    AM --> AN["0"]
    AN --> AO["0"]
    AO --> AP["0"]
    AP --> AQ["0"]
    AQ --> AR["0"]
    AR --> AS["0"]
    AS --> AT["0"]
    AT --> AU["0"]
    AU --> AV["0"]
    AV --> AW["0"]
    AW --> AX["0"]
    AX --> AY["0"]
    AY --> AZ["0"]
    AZ --> BA["0"]
    BA --> BB["0"]
    BB --> BC["0"]
    BC --> BD["0"]
    BD --> BE["0"]
    BE --> BF["0"]
    BF --> BG["0"]
    BG --> BH["0"]
    BH --> BI["0"]
    BI --> BJ["0"]
    BJ --> BK["0"]
    BK --> BL["0"]
    BL --> BM["0"]
    BM --> BN["0"]
    BN --> BO["0"]
    BO --> BP["0"]
    BP --> BQ["0"]
    BQ --> BR["0"]
    BR --> BS["0"]
    BS --> BT["0"]
    BT --> BU["0"]
    BU --> BV["0"]
    BV --> BW["0"]
    BW --> BX["0"]
    BX --> BY["0"]
    BY --> BZ["0"]
    BZ --> CA["0"]
    CA --> CB["0"]
    CB --> CC["0"]
    CC --> CD["0"]
    CD --> CE["0"]
    CE --> CF["0"]
    CF --> CG["0"]
    CG --> CH["0"]
    CH --> CI["0"]
    CI --> CJ["0"]
    CJ --> CK["0"]
    CK --> CR["0"]
    CR --> CS["0"]
    CS --> CT["0"]
    CT --> CU["0"]
    CU --> CV["0"]
    CV --> CW["0"]
    CW --> CX["0"]
    CX --> CY["0"]
    CY --> CZ["0"]
    CZ --> DA["0"]
    DA --> DB["0"]
    DB --> DC["0"]
    DC --> DD["0"]
    DD --> DE["0"]
    DE --> DF["0"]
    DF --> DG["0"]
    DG --> DH["0"]
    DH --> DI["0"]
    DI --> DJ["0"]
    DJ --> DK["0"]
Daily Alarm 1 and Daily Alarm 2
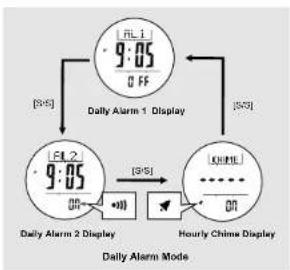
- The Watch has two daily alarms: Daily Alarm 1 and Daily Alarm 2. The Daily Alarm 1 and Daily Alarm 2 are working independently.
- Press the [S/S] button to switch among the Daily Alarm 1, Daily Alarm 2 and Chime Deploy following the adjacent diagram.
How to Turn ON/OFF the Daily Alarm
• To turn ON or OFF the Daily Alarm 1 (2), press
the [LR] button in Daily Alarm 1 (2) Display.
- When the Daily Alarm 1 (2) is ON, the alarm
- If the alarm indicator appears, the Watch will sound at the preset alarm time every day. When the alarm sounds, press any button to stop it
How to Turn ON/OFF the Hourly Chime
• To turn ON/OFF the Hourly Chime, press the [LR] button in the Chime Display.
- When the chime is ON, the chime indicator will appear. If the Chime Indicator appears, the Watch will beep/strike on the hour. i.e. 1:00, 2:00, 3:00 otc.
5.1 Daily Alarm Mode - Setting the Alarm
flowchart
graph TD
    A["9:05 on*"] --> B["Daily Alarm 1 Display"]
    B --> C["Hold [M"]]
    C --> D["Time"]
    D --> E["Hour"]
    E --> F["Increase/Decrease the number"]
    F --> G["Increase/Decrease the number at 3 Higorspeed"]
    G --> H["Hold [RSI"]/LSR]
    H --> I["9:05 on*"]
    I --> J["digits have been selected flashing!"]
How to Set the Alarm 1 and Alarm 2
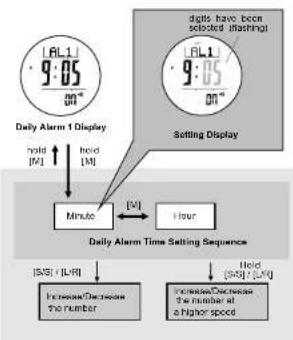
- To select the setting display, hold down the [M] button for about 2 seconds in Alarm 1 (2) Display, then the flashing "SET" icon will appear.
- In setting display, press the [M] button to change the selection between minute and hour.
- When the digits are flashing (selected), press the [S/S] or [L/R] button to increase / decrease the number. (Hold down the button to change the number at a higher speed).
- When the settings are completed, hold down the [M] button to exit the setting display. The Watch will also exit the setting display if NO button is pressed for 1 minute.
6.1 Chronograph Mode - Recording and Recalling Lap Time

Lap Time
• The chronograph can measure elapsed time without slopping the counting - lap time.
- The Chronograph allows recording the lap time up to 10 laps.
How to Record Lap Time
- When the chronograph is counting, press the [L/R] button once to record a lap time (this key operation will not affect the counting).
- The lap number and lap time will appear on the display for 10 seconds, and it returns to the coupling display automatically.
- Repeat the steps mentioned above to get another lap time.
How to Recall Lap Times
• To recall lap times, hold down the [M] button in the Chronograph Display.
- When the Total Time Display appears, press the [S/S] or [L/R] button to check the next / previous lap time.
- Hold down the [M] button to go back to the Chronograph Display.
How to Reset Lap Time
- To record a new set of lap time, hold down the [L/R] button for 2 seconds to reset the chronograph to 'All Zeros' display when the chronograph is slipped.
6.0 Chronograph Mode - Start/Stop the Chronograph
flowchart
graph TD
    A["1/100 sec"] --> B["Chronograph All Zero Display"]
    B --> C["1/10s Infection minutes"]
    C --> D["Total Time"]
    D --> E["Chromograph Counting Display"]
    E --> F["Digit running"]
    F --> G["The digits step counting"]
    G --> H["Chromograph Stop Display"]
    H --> I["Elapsed Time"]
    I --> J[" hold [L/R"]]]
    J --> K["Chromograph Checkers"]
    K --> L["Total Time"]
Chronograph Mode
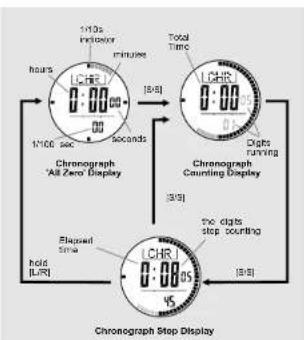
- The Watch includes a function. Chronograph Mode, to measure elapsed, accumulative elapsed and lap times.
- The display shows 'All Zero' display when the chronograph is selected at the first time or the chronograph is reset.
How to Start/Stop the Chronograph
- When the chronograph is stopped (not counting), press the [S/S] button once to start the chronograph (counting); press the [S/S] button once again to stop the chronograph (not counting). Repeating these steps will get an accumulative elapsed time.
How to Reset the Chronograph
- To record a new set of elapsed time, hold down the [L/R] button for 2 seconds to reset the chronograph to 'All Zero' display when the chronograph is stopped.
NOTE: When the chronograph is reset, the recorded lap time will be also deleted.
7.0 Timer Mode - Countdown Timer and the Quick-Set-Values

flowchart
graph TD
    A["User Request Value (JPY)"] --> B["3 min 5 m"]
    B --> C["LAY"]
    C --> D["10 min"]
    D --> E["LAY"]
    E --> F["15 min"]
    F --> G["45 min"]
    G --> H["Quick-Sat-Value (OSVit)"]
    H --> I["User Request Value (JPY)"]
    style A fill:#f9f,stroke:#333
    style D fill:#ccf,stroke:#333
    style F fill:#cfc,stroke:#333
Countdown Timer
- The Watch includes a countdown timer feature: the Timer Mode.
- The Timer starts counting-down from the target time (hour, minute and second) to zero and stops at zero.
- The target time can be set by the Quick-Set Value and User-Preset Value.
The Quick-Set Values
• The Quick-Set-Values are a set of values which CANNOT be changed by the user. - Five Quick-Set Values (3,5,10,15 and 45 minutes) has been installed in the Watch for selling the target time more easily.
The User-Preset Value
- The User-Preset Value is a target time value which is set by the user.
- The setting range is up to 99 hours 59 minutes 99 seconds.
- Once a User-Preset Value has been set, such as 30 minutes, that value will be stored into the Watch for setting the target time.
- To set the User-Preset Value, check the coming section "How to Set the User-Preset Value" for more details.
7.1 Timer Mode - Setting the User Preset Value

flowchart
graph TD
    A["Timer Display"] -->|hold["M"]| B["hour"]
    B --> C["minute"]
    C --> D["Second"]
    D --> E["hold [S/S"], hold["L/R"]]
    E --> F["Increase/decrease the number"]
    E --> G["Increase/decrease the number at a higher speed"]
    H["Setting Display"] --> I["bits have been selected (flushing)"]
    I --> J["Timer"]
How to Set the User Preset Value
• To select setting display, hold the [M] button for 2 seconds, and the flashing 'SET' icon will appear.
- In the setting display, press the [M] button to change the selection among hour, minute and second.
- When the digits are flashing (selected), press the [S/S] or [L/R] button to increase / decrease the number. (Hold down the button to change the number at a higher speed)
- When the setting is completed, hold down the [M] button to exit the setting display. The Watch will also exit the setting display if NO button is pressed for 1 minute.
8.0 Dual Time Mode - Dual Time and Setting the Dual Time
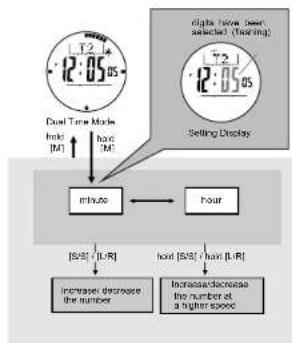
flowchart
graph TD
    A["Dual Time Mode"] --> B["time"]
    C["12:05:05"] --> D["minute"]
    E["12:05:05"] --> F["minute"]
    G["12:05:05"] --> H["minute"]
    I["12:05:05"] --> J["minute"]
    K["12:05:05"] --> L["minute"]
    M["12:05:05"] --> N["minute"]
    O["12:05:05"] --> P["minute"]
    Q["12:05:05"] --> R["minute"]
    S["12:05:05"] --> T["minute"]
    U["12:05:05"] --> V["minute"]
    W["12:05:05"] --> X["minute"]
    Y["12:05:05"] --> Z["minute"]
    AA["12:05:05"] --> AB["minute"]
    AC["12:05:05"] --> AD["minute"]
    AE["12:05:05"] --> AF["minute"]
    AG["12:05:05"] --> AH["minute"]
    AI["12:05:05"] --> AJ["minute"]
    AK["12:05:05"] --> AL["minute"]
    AM["12:05:05"] --> AN["minute"]
    AO["12:05:05"] --> AP["minute"]
    AQ["12:05:05"] --> AR["minute"]
    AS["12:05:05"] --> AT["minute"]
    AU["12:05:05"] --> AV["minute"]
    AW["12:05:05"] --> AX["minute"]
    AY["12:05:05"] --> AZ["minute"]
    BA["12:05:05"] --> BB["minute"]
    BC["12:05:05"] --> BD["minute"]
    BE["12:05:05"] --> BF["minute"]
    BG["12:05:05"] --> BH["minute"]
    BI["12:05:05"] --> BJ["minute"]
    BK["12:05:05"] --> BL["minute"]
    BM["12:05:05"] --> BN["minute"]
    BO["12:05:05"] --> BP["minute"]
    BZ["12:05:05"] --> CA["minute"]
    CB["12:05:05"] --> CD["minute"]
    CE["12:05:05"] --> CF["minute"]
    CG["12:05:05"] --> DH["minute"]
    DI["12:05:05"] --> DJ["minute"]
    DK["12:05:05"] --> DL["minute"]
    DV["12:05:05"] --> DV
    DW["12:05:05"] --> DX["minute"]
    DX --> DX
    DB["12:05:05"] --> DB
    DC["12:05:05"] --> DC
    DD["12:05:05"] --> DD
    DB --> DD
    DC --> DD
Dual Time Mode
- The Watch has a function, Dual Time Mode, which shows the current time for a second time zone.
- The second digits of the dual time will be synchronized with that of the Current Time Mode.
How to Set the Dual Time
- To select the setting display, hold down the [M] button for 2 seconds in the Dual Time Mode, then the minute digits will be flashing. Press the [S/S] / [L/R] button to increase / decrease the number. (Hold down the button change the number at a higher speed).
- In the setting display, press the [M] button to change the selection between hour and minute.
- When the setting is completed, hold down the [M] button to exit the setting display. The Watch will also exit the setting display if NO button is pressed for 1 minute.
7.2 Timer Mode - Using the Timer

flowchart
graph TD
    A["Timer Display (Timer is set at 10 minutes)"] -->|L/R| B["Counting Display"]
    B --> C["Stop Counting Display"]
    C --> D["Counting Display"]
    D --> E["Reel Time Clock"]
    E --> F["digits start counting angle"]
    F --> G["digits start counting angle"]
    G --> H[" digital start counting angle"]
    H --> I["digits stop counting"]
    I --> J[" digital stop counting"]
    J --> K[" digital stop counting"]
    K --> L[" digital stop counting"]
    L --> M[" digital stop counting"]
    M --> N[" digital stop counting"]
    N --> O[" digital stop counting"]
    O --> P[" digital stop counting"]
    P --> Q[" digital stop counting"]
    Q --> R[" digital stop counting"]
    R --> S[" digital stop counting"]
    S --> T[" digital stop counting"]
    T --> U[" digital stop counting"]
    U --> V[" digital stop counting"]
    V --> W[" digital stop counting"]
    W --> X[" digital stop counting"]
    X --> Y[" digital stop counting"]
    Y --> Z[" digital stop counting"]
    Z --> AA[" digital stop counting"]
    AA --> AB[" digital stop counting"]
    AB --> AC[" digital stop counting"]
    AC --> AD[" digital stop counting"]
    AD --> AE[" digital stop counting"]
    AE --> AF[" digital stop counting"]
    AF --> AG[" digital stop counting"]
    AG --> AH[" digital stop counting"]
    AH --> AI[" digital stop counting"]
    AI --> AJ[" digital stop counting"]
    AJ --> AK[" digital stop counting"]
    AK --> AL[" digital stop counting"]
    AL --> AM[" digital stop counting"]
    AM --> AN[" digital stop counting"]
    AN --> AO[" digital stop counting"]
    AO --> AP[" digital stop counting"]
    AP --> AQ[" digital stop counting"]
    AQ --> AR[" digital stop counting"]
    AR --> AS[" digital stop counting"]
    AS --> AT[" digital stop counting"]
    AT --> AU[" digital stop counting"]
    AU --> AV[" digital stop counting"]
    AV --> AW[" digital stop counting"]
    AW --> AX[" digital stop counting"]
    AX --> AY[" digital stop counting"]
How to Use the Timer
- When the Timer is set, press the [S/S] button to start the timer. Press the [S/S] button once again to stop the timer.
Timer Alarm Sound
• In the last 10 minutes, the Watch will beep for every minute.
- In the last minute, the Watch will beep for every 10 seconds. In the last 5 seconds, the Watch will beep for every second
- When it reaches 0, a beep sound will last for 30 seconds. Pressing any button can stop the beep sound.
How to Reload the Timer
- The last target time will be reloaded automatically at the end of the 30-second hoop sound.
- Press the [L/R] button when the timer is stopped.
- To start a new counting by using a new target time, set the timer again either by QSV or UPV.
9.0 Ski Mode - Ski Function Overview

flowchart
graph TD
    A["Current Temperature"] --> B["Accumulation Ascend"]
    C["Current Altitude"] --> D["Accumulation Ascend"]
    E["Torque Time Period"] --> F["Current SSI Speed"]
    G["Seli Log Function"] --> H["Seli Mode Function"]
    I["Timing"] --> J["3:5s"]
    K["Record 1"] --> L["Lap 1"]
    M["Ski Lap"] --> N["Sdi Roccere"]
    O["Sdi Logbook"] --> P["Sdi Logbook"]
Ski Mode
- Once the Ski Function is turned ON, the 'Skir icon' flashes. The Watch will:
- Exhibit the current ski data on the display, and - Log (the Ski Log Function) the ski data into the Ski Logbook automatically or manually.
NOTE: The Watch will log the ski data continuously once the Ski Function is turned ON even if the Watch is switched to other function modes subsequently.
Ski Logbook
- The Logbook organizes the ski data as follows: - Ski Lap - The ski data are recorded when the skier starts/stops a ski run. - Ski Record - The ski record stores a series of Ski Laps, and hence it provides a summary of all Ski Laps.
Ski Recall Mode
- The logged ski information can be reviewed from the Ski Logbook in the Ski Recall Mode. Check the coming chapter 10.0 for more details.
9.1 Ski Mode - How to Turn ON/OFF the Ski Function

flowchart
graph TD
    A["Start: 3-05 ON"] --> B{Hold["M"]]
    B --> C["OK"]
    C --> D["Ski Function ON"]
    D --> E{Hold["SbS"]]
    E --> F["OK"]
    F --> G["Ski Function ON"]
    G --> H{Hold["M"]}
    H --> I["OK"]
    I --> J["Ski Function ON"]
    J --> K{Hold["SbS"]}
    K --> L["OK"]
    L --> M["Ski Function ON"]
How to Turn ON the Ski Function
- Hold down the [M] button in Ski Mode until the 'ON Indicator flashes.
- When the 'ON' indicator is flashing, hold down the [S/S] button until the 'DONE' indicator appears.
- Then the SiC Function is turned ON, and the silicon will be flashing on the display.
NOTE: The Ski Function will be turned OFF automatically after it has been turned ON for 12 hours. How to Turn OFF the Ski Function
- Hold down the [M] button in Ski Mode until the 'OFF indicator flashes.
- Hold down the [S/S] button until the 'DONE' indicator appears.
- Then the Sid Function is turned OFF, and the sk icon stops flashing on the display.
9.2 Ski Mode - Ski Mode Display
![Not Fasting Fasting 26.0°C 3.05 Ski Mode Change the Top Row Display 26.0°C [1/2] power temperature power temperature Ski Mode Fasting Ski Mode Ski Mode ON 26.0°C 3.05 Ski Mode Ski Mode Change the Middle Row Display [SIP] power decrease speed [SIP] increase speed [SIP] increase speed [Multiples Max 30/97] [SIP] increase speed [SIP] increase speed Ski Mode Ski Mode Change the Bottom Row Display Ski Mode Ski Mode 3.05 power [L/R] power [L/R] power up to 30](/content/2026/05/834973/images/847bdc98d4271e6c7845a8528db43aef6902feb1daffd244b8c34fc9dc69cd6f.jpg)
Ski Mode Display
- Once the Ski Mode is selected, performing below key operations can select the Ski Mode sub-functional displays.
Change the Top Row Display
- Press the [S/S] button to change the top row display between Current Altitude and Current Temperature.
IMPORTANT: If the user intends to get an accurate reading of air temperature, the user must take off the watch from the wrist for 20 to 30 minutes before getting the actual measurement. It allows no body temperature effect on the Watch.
Change the Middle Row Display
- Press the [L/R] button to change the middle row display among Ski Run's Current Descent Speed, Total Elspeed Time. Accumulative Descent and Accumulative Ascent. NOTE: This setting can only be changed when the Ski Function is turned ON.
Change the Bottom Row Display
- Hold down the [L/R] button to change the bottom row display between Current Time and Current Lap.
NOTE: This setting can only be changed when the Ski Function is turned ON.
9.3 Ski Mode - Change the Measurement Unit
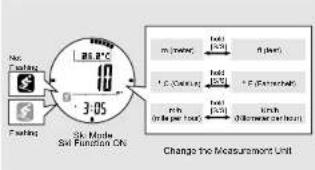
Change the Measurement Unit
- Hold down the [S/S] button to change the measurement unit following the adjacent diagram: - Distance measurement unit interchange between m (meter) and R (feet).
- Temperature measure unit interchange between ^3 C (Celsius) and ^4 IF (Fahrenheit).
- Speed measurement unit interchange between m/h (mile per hour) and Km/h (kilometer per hour).
9.4 Ski Mode - Ski Log Function
Ski Record 1
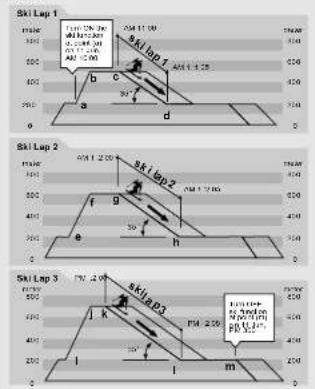
An Example to illustrate the Sidi Log Function
- Assume a user enjoys three ski runs within a day as it is outlined by the adjacent diagram. To enjoy the Ski Leg function, the user has to turn ON the Ski Function before the ski runs.
- The Watch will log below ski data into the Ski Logbook automatically, and these information can be reviewed in Ski Logcall Moda lgor.
Ski Record (the info and summary of all ski laps)
• The record date = 11 June
• The record start time = AM10.00 00.
- The total travel time = 50000.
- The total number of 80 laps recorded = 380 laps - The total descent time = 165.00
- The total decrease in the - 6.15 do - The asymptotic decrease = 1200
- The accumulated asset = 1200m - The accumulated asset = 1700m
• The maximum descent speed = 15 Km/h*
• The highest altitude reached = 700 m
• The lowest attitude reached = 200 m.
- The slope of the six course = 35°
Ski Lan (ski data)
• The lap start time - AM 11:00 00 (Lap 1), AM 12:00
00 (Lap 2). PM 2:00 00 (Lap 3).
• The total descent time = 1:05:00 (Lap 1), 3:05:00
- The maximum descent speed = 8 Km/h* (Lap. 1), 11
Kmh' (Lap 2), 15 Kmh' (Lap 3).
• The average descent speed = 5 Km/h (Lap 1), 6
Kmh (Lap 2), 10 Kmh (Lap 3).
The highest altitude reached = 500 m (Lap 1), 600 m
- The latest altitude matched = 200 m (1.23 L) 200 m
(Lap 21, 200 m (Lap 3).
• The altitude change = 300 m (Lap 1), 400 m (Lap 2).
500 m [Lap 3].
• The desert sevice charge graph for every lap.
NOTE. These maximum speeds are not real figures, the maximum speed can be logged in a meal situation.
9.6 Ski Mode - What are Slope and Sensitivity Settings

Slope Setting
- The slope setting is the setting that needs the user to input the slope angle of the ski field into the Watch.
- Most of the ski fields post that figures to skiers at the ski fields.
Sensitivity Setting - The Watch will automatically activate the ski lap function (start the descent timer and create a ski lap) when a ski run starts (a significant altitude change is detected).
-
Sensitivity setting is the setting that adjusts the accuracy for the above auto-activation.
• Type of Sensitivity -
Ascending sensitivity setting: Adjust the sensitivity for altitude ascending auto-activation.
- Descending sensitivity setting: Adjust the sensitivity for altitude descending auto-activation.
• Level of Sensitivity - Fast Sensitivity: When false auto-activation is observed occasionally, select this setting to improve the performance.
• Normal Sensitivity: if the auto-activation functions normally, please keep this setting. - Slow Sensitivity: If the auto-activation cannot function, select this setting to improve the performance.
9.5 Ski Mode - How a Ski Lap Is Logged
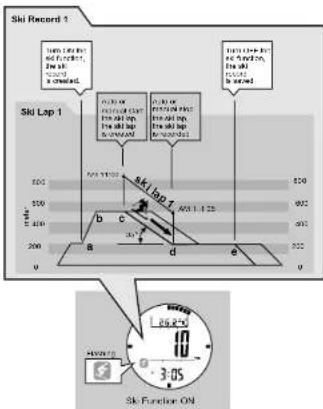
How to Log a Ski Lap
- When the Ski Function is turned ON:
• The Watch will create a Ski Record to log the
starting time and date into the Ski Logbook.
- When a ski run is started subsequently, the
- When a Ski turn is started subsequently, the watch will create a Ski Lan automatically or
Watch will create a ski lap automatically of manually to log the ski data into the Ski
Monthly to lag end, all goods into the UK Logbook.
How to Activate a Ski Lap Automatically
- When a ski run slacks and a significant altitude
change is detected, the decent time timer will
start counting, automatically, and a new ski lap is
start costing, automatically, and a now off created.
- When a ski run stops and the altitude change is
- When a die ran stops and the duplicate charge is not significant, the decent time timer will stop.
counting automatically, and the current ski lap is
scouting automatically, and the contents are up to recorded.
How to Activate a Ski Lap Manually
- Press the [M] button once in the Ski Mode to
select 'MANUAL' Display, then the Watch is ready
for starting/stoping a ski lap manually
- To start a Ski Run: Press the (S/S) button once to
- To start a ski run. Press the (50) button once to start the ski run, then the dereri-time timer will
start counting from 0, and a new ski lan is created.
start coaching from 0, and a now develop is created.
• To stop a Ski Run: Press the [S/S] button once
again when the ski run is stopped, and the decent
time timer will stop counting, and the current ski
lap is record
9.7 Ski Mode - Slope and Sensitivity Settings

flowchart
graph TD
    A["Sti Mode ON"] --> B["Ski Function ON"]
    B --> C{Control}
    C -->|N1| D["Ssi Function On"]
    C -->|N2| E["Ssi Mode Selection"]
    D --> F["Setting Sequence"]
    E --> G["Setting Sequence"]
    F --> H["Stable Setting"]
    G --> I["Stable Setting"]
    H --> J["Stable Signal"]
    I --> K["Stable Signal"]
    J --> L["Stable Signal"]
    K --> M["Stable Signal"]
    L --> N["Stable Signal"]
    M --> O["Stable Signal"]
    N --> P["Stable Signal"]
    O --> Q["Stable Signal"]
    P --> R["Stable Signal"]
    Q --> S["Stable Signal"]
    R --> T["Stable Signal"]
    S --> U["Stable Signal"]
    T --> V["Stable Signal"]
    U --> W["Stable Signal"]
    V --> X["Stable Signal"]
    W --> Y["Stable Signal"]
    X --> Z["Stable Signal"]
    Y --> AA["Stable Signal"]
    Z --> AB["Stable Signal"]
How to Set the Slop and Sensitivity
- To select the setting display, hold the [M] button for about 2 seconds in the SKI Mode, the flashing 'SET' icon will appear.
- In the setting display, press the [M] button to change the selection following the adjacent diagram.
- When the 'ON' or 'OFF' is flashing, hold down the [S/S] button for about 2 seconds to turn ON ('ON' is flashing) or OFF ('OFF' is flashing) the Ski Function.
- When Slope angle is flashing, press the [S/S] or [L/R] button to increase / decrease the angle. (Hold down the button to change the angle at a higher speed).
- When the 'rATE AS' (Ascending sensitive role) appears, press the [S/S] or [L/R] button to change the setting among 'FAST' (Fast), 'SLOW' (Slow) and 'NORM' (Normal).
- When the 'RATE DS' (Descending sensitive rate) appears, press the [S/S] or [L/R] button to change the setting among 'FAST' (Fast), 'SLOW' (Slow) and 'NORM' (Normal).
- When the setting is completed, hold down the [M] button to exit the setting display. The Watch will also exit the setting display if NO button is pressed for 1 minute.
10.0 Ski Recall Mode - Ski Logbook

flowchart
graph TD
    A["Record X"] --> B["Record 1"]
    B --> C["the record date"]
    B --> D["the record start time"]
    B --> E["the total travel period"]
    B --> F["the total no of site laps recorded"]
    B --> G["the total descent time"]
    B --> H["the the accumulative descent"]
    B --> I["the the accumulative descent"]
    B --> J["the highest attitude reached"]
    B --> K["the lowest attitude reached"]
    B --> L["the show of the sk course"]

    M["Ski Records (the data summary of all stored sid laps)"] --> N["Gap X"]
    N --> O["Gap 1"]
    O --> P["The lag at least time"]
    O --> Q["The total descent time"]
    O --> R["The maximum descent speed"]
    O --> S["The average descent speed"]
    O --> T["The highest attitude reached"]
    O --> U["The lowest attitude reached"]
    O --> V["the attitude change"]
    O --> W["the descent attitude change graph"]

    X["Ski Lap (the data summary of a particular sid lap)"]
Ski Record
• The Ski Record logs a series of Ski Laps, and it provides a summary of these ski laps:
• The record date.
• The record start time.
• The total travel period.
• The total number of ski lanes recorded
• The total decrease time
• The accumulative descent
- The accumulative ascent
- The maximum demand is
- The maximum desert spots, - The biggest altitude reached.
• The highest altitude reached, and
- The lowest altitude reaches and
Ski Lap
• The Ski Lap logs the data of a particular ski lap, and it includes:
• The lap start time
• The total descent time
• The maximum descent speed,
• The average descent speed.
• The highest altitude reached
• The lowest altitude reached
• The altitude change, and
10.2 Ski Recall Mode - Ski Lap Recall

flowchart
graph TD
    A["Local Control"] --> B["Start Time"]
    B --> C{Lap Selection Sequence}
    C -->|Yes| D["Local Select"]
    C -->|No| E["Local Select"]
    D --> F["Lap Start Time Display"]
    E --> F
    F --> G["Local Select"]
    G --> H["Local Select"]
    H --> I["Local Select"]
    I --> J["Local Select"]
    J --> K["Local Select"]
    K --> L["Local Select"]
    L --> M["Local Select"]
    M --> N["Local Select"]
    N --> O["Local Select"]
    O --> P["Local Select"]
    P --> Q["Local Select"]
    Q --> R["Local Select"]
    R --> S["Local Select"]
    S --> T["Local Select"]
    T --> U["Local Select"]
    U --> V["Local Select"]
    V --> W["Local Select"]
    W --> X["Local Select"]
    X --> Y["Local Select"]
    Y --> Z["Local Select"]
    Z --> AA["Local Select"]
    AA --> AB["Local Select"]
    AB --> AC["Local Select"]
    AC --> AD["Local Select"]
    AD --> AE["Local Select"]
    AE --> AF["Local Select"]
    AF --> AG["Local Select"]
    AG --> AH["Local Select"]
    AH --> AI["Local Select"]
    AI --> AJ["Local Select"]
    AJ --> AK["Local Select"]
    AK --> AL["Local Select"]
    AL --> AM["Local Select"]
    AM --> AN["Local Select"]
    AN --> AO["Local Select"]
    AO --> AP["Local Select"]
    AP --> AQ["Local Select"]
    AQ --> AR["Local Select"]
    AR --> AS["Local Select"]
    AS --> AT["Local Select"]
    AT --> AU["Local Select"]
    AU --> AV["Local Select"]
    AV --> AW["Local Select"]
    AW --> AX["Local Select"]
    AX --> AY["Local Select"]
    AY --> AZ["Local Select"]
    AZ --> BA["Local Select"]
    BA --> BB["Local Select"]
    BB --> BC["Local Select"]
    BC --> BD["Local Select"]
    BD --> BE["Local Select"]
    BE --> BF["Local Select"]
    BF --> BG["Local Select"]
    BG --> BH["Local Select"]
    BH --> BI["Local Select"]
    BI --> BJ["Local Select"]
    BJ --> BK["Local Select"]
    BK --> BL["Local Select"]
    BL --> BM["Local Select"]
    BM --> BN["Local Select"]
    BN --> BO["Local Select"]
    BO --> BP["Local Select"]
    BP --> BQ["Local Select"]
    BQ --> BR["Local Select"]
    BR --> BS["Local Select"]
    BS --> BT["Local Select"]
    BT --> BU["Local Select"]
    BU --> BV["Local Select"]
    BV --> BW["Local Select"]
    BW --> BX["Local Select"]
    BX --> BY["Local Select"]
    BY --> BZ["Local Select"]
    BZ --> CA["Local Select"]
    CA --> CB["Local Select"]
    CB --> CC["Local Select"]
    CC --> CD["Local Select"]
    CD --> CE["Local Select"]
    CE --> CF["Local Select"]
    CF --> CG["Local Select"]
    CG --> CH["Local Select"]
    CH --> CI["Local Select"]
    CI --> CJ["Local Select"]
    CJ --> CK["Local Select"]
    CK --> CR["Local Select"]
    CR --> CS["Local Select"]
    CS --> CT["Local Select"]
    CT --> CU["Local Select"]
    CU --> CV["Local Select"]
    CV --> CW["Local Select"]
    CW --> CX["Local Select"]
    CX --> CY["Local Select"]
    CY --> CZ["Local Select"]
How to Select the Ski Lap
- When one of the target record data (except Slope Review Display) is displayed, hold down the [M] button to enter the lap selection sequence to select a target lap among the logged laps.
- To exit the lap selection sequence and back to Ski Recall Mode by pressing the [M] button once.
How to Select among Different Ski Lap s
- During the Lap Start Time Display, press the [L/R] button to select a target lap among the logged laps following the adjacent diagram.
How to Review the Lap Data
- When a target lap is displayed, press the [S/S] button to re view different lap data displays following the adjacent diagram.
- Press the [M] button once to exit the lap selection sequence and go back to the Ski Start Time Display.
10.1 Ski Recall Mode - Ski Record Recall

flowchart
graph TD
    A["Start Time - Record 4 Sid Recall Mode"] --> B["Current records (fishing)"]
    A --> C["Total no. of record"]
    A --> D["the record code"]
    A --> E["I/O: 05"]
    A --> F["CLAP"]
    A --> G["MAC-SSS"]
    A --> H["MAC-SSS"]
    A --> I["Total Selection Sequence (Prior Records were Exposed)"]
    A --> J["Current Selection Sequence (Prior Records were Exposed)"]
    B --> K["I/O: 01"]
    C --> L["CLAP: 02"]
    D --> M["I/O: 03"]
    E --> N["CLAP: 04"]
    F --> O["CLAP: 05"]
    G --> P["CLAP: 06"]
    H --> Q["CLAP: 07"]
    I --> R["CLAP: 08"]
    J --> S["CLAP: 09"]
    K --> T["I/O: 01"]
    L --> U["I/O: 02"]
    M --> V["I/O: 03"]
    N --> W["I/O: 04"]
    O --> X["I/O: 05"]
    P --> Y["I/O: 06"]
    Q --> Z["I/O: 07"]
    R --> AA["I/O: 08"]
    S --> AB["I/O: 09"]
    T --> AC["I/O: 10"]
    U --> AD["I/O: 11"]
    V --> AE["I/O: 12"]
    W --> AF["I/O: 13"]
    X --> AG["I/O: 14"]
    Y --> AH["I/O: 15"]
    Z --> AI["I/O: 16"]
    AA --> AJ["I/O: 17"]
    AB --> AK["I/O: 18"]
    AC --> AL["I/O: 19"]
    AD --> AM["I/O: 20"]
    AE --> AN["I/O: 21"]
    AF --> AO["I/O: 22"]
    AG --> AP["I/O: 23"]
    AH --> AQ["I/O: 24"]
    AI --> AR["I/O: 25"]
    AJ --> AS["I/O: 26"]
    AK --> AT["I/O: 27"]
    AL --> AU["I/O: 28"]
    AM --> AV["I/O: 29"]
    AN --> AW["I/O: 30"]
    AO --> AX["I/O: 31"]
    AP --> AY["I/O: 32"]
    AS --> AZ["I/O: 33"]
    AT --> BA["I/O: 34"]
    AU --> BB["I/O: 35"]
    AV --> BC["I/O: 36"]
    AW --> BD["I/O: 37"]
    AX --> BE["I/O: 38"]
    AY --> BF["I/O: 39"]
    AZ --> BG["I/O: 40"]
Ski Recall Mode Display
- When the Ski Recall Mode is selected:
• The total number of logged records will
appear on the top row of the display.
• The starting time and date of the selected
record will appear in the middle and bottom
How to Select among Different Ski Records
- Press the [L/R] button to select a target record from the logged records following the adjacent diagram.
How to Review the Record Data
- When a target record is selected, press the [S/S] button to review the different record data. During the review, press the [M] button once to return to previous display.
How to Select the Ski Lap
- Check the coming chapter 102 for more details on how to select a target lap among the logged laps.
NOTE: The slope angle can be changed (even after the ski record has been stored) as following:
- Hold down the [M] button in the Slope Review Display to select setting display, then press [S/S] and [L/R] button to change the angle. When the setting is completed, hold down the [M] button to oct the setting display.
- All speed related data will be updated automatically after the changing.
10.3 Ski Recall Mode - Delete the Ski Record
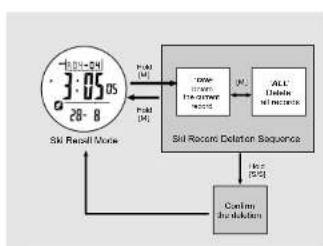
flowchart
graph TD
    A["Sist Recall Mode"] -->|Fold["M"]| B["SI-Record Deletion Sequence"]
    B -->|Fold["M"]| C["ALC Delete Operation"]
    C -->|Fold["M"]| D["SLC Delete Operation"]
    D --> E["SLC Delete Operation"]
    E --> F["SLC Delete Operation"]
    F --> G["SLC Delete Operation"]
    G --> H["SLC Delete Operation"]
    H --> I["SLC Delete Operation"]
    I --> J["SLC Delete Operation"]
    J --> K["SLC Delete Operation"]
    K --> L["SLC Delete Operation"]
    L --> M["SLC Delete Operation"]
    M --> N["SLC Delete Operation"]
    N --> O["SLC Delete Operation"]
    O --> P["SLC Delete Operation"]
    P --> Q["SLC Delete Operation"]
    Q --> R["SLC Delete Operation"]
    R --> S["SLC Delete Operation"]
    S --> T["SLC Delete Operation"]
    T --> U["SLC Delete Operation"]
    U --> V["SLC Delete Operation"]
    V --> W["SLC Delete Operation"]
    W --> X["SLC Delete Operation"]
    X --> Y["SLC Delete Operation"]
    Y --> Z["SLC Delete Operation"]
    Z --> AA["SLC Delete Operation"]
    AA --> AB["SLC Delete Operation"]
    AB --> AC["SLC Delete Operation"]
    AC --> AD["SLC Delete Operation"]
    AD --> AE["SLC Delete Operation"]
    AE --> AF["SLC Delete Operation"]
    AF --> AG["SLC Delete Operation"]
    AG --> AH["SLC Delete Operation"]
    AH --> AI["SLC Delete Operation"]
    AI --> AJ["SLC Delete Operation"]
    AJ --> AK["SLC Delete Operation"]
    AK --> AL["SLC Delete Operation"]
    AL --> AM["SLC Delete Operation"]
    AM --> AN["SLC Delete Operation"]
    AN --> AO["SLC Delete Operation"]
    AO --> AP["SLC Delete Operation"]
    AP --> AQ["SLC Delete Operation"]
    AQ --> AR["SLC Delete Operation"]
    AR --> AS["SLC Delete Operation"]
    AS --> AT["SLC Delete Operation"]
    AT --> AU["SLC Delete Operation"]
    AU --> AV["SLC Delete Operation"]
    AV --> AW["SLC Delete Operation"]
    AW --> AX["SLC Delete Operation"]
    AX --> AY["SLC Delete Operation"]
    AY --> AZ["SLC Delete Operation"]
    AZ --> BA["SLC Delete Operation"]
    BA --> BB["SLC Delete Operation"]
    BB --> BC["SLC Delete Operation"]
    BC --> BD["SLC Delete Operation"]
    BD --> BE["SLC Delete Operation"]
    BE --> BF["SLC Delete Operation"]
    BF --> BG["SLC Delete Operation"]
    BG --> BH["SLC Delete Operation"]
    BH --> BI["SLC Delete Operation"]
    BI --> BJ["SLC Delete Operation"]
    BJ --> BK["SLC Delete Operation"]
    BK --> BL["SLC Delete Operation"]
    BL --> BM["SLC Delete Operation"]
    BM --> BN["SLC Delete Operation"]
    BN --> BO["SLC Delete Operation"]
    BO --> BP["SLC Delete Operation"]
    BP --> BQ["SLC Delete Operation"]
How to Delete the Ski Record
- Hold down the [M] button in the Ski Recall Mode to select the Record Deletion Display.
- In the Record Deletion Display, press the [M] button to change the selection between 'ONE' (delete the current record) and 'ALL' (delete all records) following the adjacent Diagram.
- When the 'ONE' or 'ALL' is flashing (selected), hold down the [S/S] button to confirm the deletion or hold down the [M] button to abort the deletion and exit the setting display.
NOTE: When the Ski Function is lumed ON, the current ski record cannot be deleted.
11.0 Altimeter Mode - Temperature and History Display

flowchart
graph TD
    A["329-3-05"] --> B["Current Time"]
    B --> C["Current Temperature"]
    C --> D["Current altitude"]
    D --> E["Current time"]
    F["329-3-05"] --> G["Current Time"]
    G --> H["Current Temperature"]
    H --> I["Current altitude"]
    I --> J["Current time"]
    K["321-3-05"] --> L["Current Time"]
    L --> M["Current Temperature"]
    M --> N["Current altitude"]
    N --> O["Current time"]
    P["329-3-05"] --> Q["Current Time"]
    Q --> R["Current Temperature"]
    R --> S["Current altitude"]
    S --> T["Current time"]
    U["329-3-05"] --> V["Current Time"]
    V --> W["Current Temperature"]
    W --> X["Current altitude"]
    X --> Y["Current time"]
    Z["329-3-05"] --> AA["Current Time"]
    AA --> AB["Current Temperature"]
    AB --> AC["Current altitude"]
    AC --> AD["Current time"]
    AE["329-3-05"] --> AF["Current Time"]
    AF --> AG["Current Temperature"]
    AG --> AH["Current altitude"]
    AH --> AI["Current time"]
    AJ["329-3-05"] --> AK["Current Time"]
    AK --> AL["Current Temperature"]
    AL --> AM["Current altitude"]
    AM --> AN["Current time"]
    AO["329-3-05"] --> AP["Current Time"]
    AP --> AQ["Current Temperature"]
    AQ --> AR["Current altitude"]
    AR --> AS["Current time"]
    AT["329-3-05"] --> AU["Current Time"]
    AU --> AV["Current Temperature"]
    AV --> AW["Current altitude"]
    AW --> AX["Current time"]
    AY["329-3-05"] --> AZ["Current Time"]
    AZ --> BA["Current Temperature"]
    BA --> BB["Current altitude"]
    BB --> BC["Current time"]
    BD["329-3-05"] --> BE["Current Time"]
    BE --> BF["Current Temperature"]
    BF --> BG["Current altitude"]
    BG --> BH["Current time"]
    BI["329-3-05"] --> BJ["Current Time"]
    BJ --> BK["Current Temperature"]
    BK --> BL["Current altitude"]
    BL --> BM["Current time"]
Functional Display
- The Watch includes two Altimeter functional displays: Temperature and History Display. One of the two functional displays will appear in the top row of the display.
- Press the [S/S] to select between Temperature and History Display.
Fast sampling
- In the Altitude Mode, hold down the [L/R] button will activate fast sampling (sample per second) for five minutes.
Temperature Display
- In Temperature Display, the top display shows the current temperature in degree Celsius (C) or degree Fahrenheit (F).
IMPORTANT: To get an accurate reading of air temperature, you must take off the watch from the wrist for 20 to 30 minutes which allows no body temperature effect on your watch.
History Display
- The Watch records the altitude readings automatically on the hour, i.e 1:00, 2:00, 3:00 and etc. These
records are plotted into an altitude record graph.
- In the History Display, the altitude recent graph
shows in the top row of the display
- To review the altitude records for the last 23 hours, press the [L/R] button to move the cursor to the left cyclically, the corresponding altitude reading end its time recorded (flashing) appear on the display accordingly
11.2 Altimeter Mode - Absolute and Relative Altitude

area
| Absolute Altitude | Absolute Level (cm) | | :--- | :--- | | 80m | 180 | | 90m | 80 | | 180m | 180 |
Absolute and Relative Altitude
- Absolute altitude is the vertical distance between your current altitude and Sea Level (0 m).
- Relative altitude is the vertical distance between your current altitude and the altitude of a specific level at which you set the altimeter to zero.
• An example of using relative altitude.
- The altitude difference between the starting point and the finishing point of a trak can be measured by Relative Altitude.
- Set the altitude to 'Zero' at the starting point, the Watch will show the altitude difference at the finishing point of the trek.
How to Switch between Absolute and Relative Altitudes
- Check the coming chapter 'Zero Altitude Adjustment' for more details on how to set the
current attitude to zero attitude
- An 'r' indicator will be shown along with the altitude reading as long as the Altitude has been adjusted by the 'Zero' adjustment.
- To switch the Watch back to absolute altitude measurement, employ one of the following altitude adjustments: Factory Default Adjustment, Sea Level Pressure Adjustment and Absolute Altitude Adjustment. Check the respective chapters for more details on how to make the adjustment.
11.1 Altimeter Mode -Measurement Unit Selection

flowchart
graph TD
    A["hold [S/S"]] --> B["F (Sub-struct) n (low)"]
    B --> C["hold [S/S"]]
    C --> D["C (Octus) n (high)"]
    D --> E["hold [S/S"]]
    E --> F["C (Center) n (low)"]
    F --> G["hold [S/S"]]
    G --> H["hold [S/S"]]
    H --> I["T (Fastest) n (low)"]
    I --> J["hold [S/S"]]
    J --> K["T (Fastest) n (high)"]
    K --> L["hold [S/S"]]
    L --> M["hold [S/S"]]
    M --> N["Hold"]
    style A fill:#f9f,stroke:#333
    style N fill:#f9f,stroke:#333
How to Switch between Measurement Units
- The Watch displays altitude either in meter (m) or feet (ft).
- The Watch displays temperature either in degree Celsius (°C) or degree Fahrenheit (°F).
- To switch among different units, hold down the [S/S] button to change the units following the adjacent diagram.
- Altimeter Mode -3 Altimeter Adjustment Overview
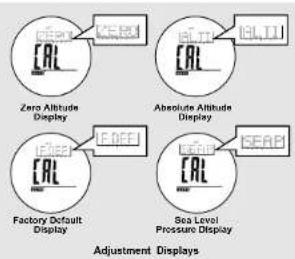
Why the Affordants be Adjusted
- As the absolute altitude is calculated from air pressure, the change of air pressure would affect the altitude reading.
• To achieve a more accurate result, the Watch needs to be calibrated from time to time as pressure may change gradually even within hours. Attimeter Adjustment
- There are 4 kinds of adjustment methods: Zero Altitude, Absolute Altitude, Sea Level Pressure and Factory Default Adjustment.
- Zero Altitude: Adjust the altitude mandatorily to zero for relative altitude measurement. If the altitude is adjusted by Zero Adjustment, an *r* indicator will appear on the display.
- Absolute Altitude: Set the altitude to a known value and it can be recalled for a next setting.
- Sea Level Pressure: Input is a specific sea level pressure which got from an official site.
- Factory Default: Restore the Watch to the default factory setting where the Sea Level Pressure is assumed at 1013.2 mb
NOTE: When the Ski Function is turned ON, Altimeter Adjustment function is prohibited.
NOTE: Altitude is calibrated independently on each mode. For example, if the absolute altitude is selected, the effect of the previous sea level pressure setting will be ignored.
NOTE: The Watch includes an automatic Sea Level Pressure comparison device, this smart device allows NO fluctuation of altitude readings to be recorded when staying at the same altitude.
11.4 Altimeter Mode - Zero Altitude Adjustment
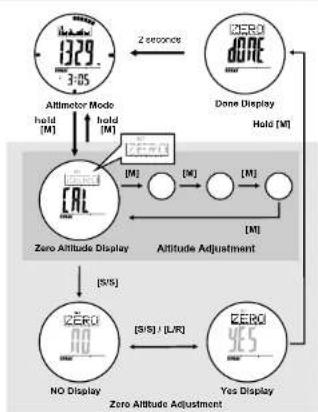
flowchart
graph TD
    A["329"] --> B["3-DS"]
    B --> C["Attimator Mode"]
    C --> D["Hold [M"]]
    D --> E["Zero Altitude Display"]
    E --> F["NO Display"]
    F --> G["Zero Altitude Adjustment"]
    G --> H["S/S"]
    H --> I["YES Display"]
    I --> J["S/S"] / L/R
    J --> K["Zero Altitude Adjustment"]
    K --> L["Done Display"]
    L --> M["Hold [M"]]
    M --> N["Zero Altitude Display"]
    N --> O["S/S"]
    O --> P["NO Display"]
    P --> Q["Zero Altitude Adjustment"]
    Q --> R["Done Display"]
    R --> S["Hold [M"]]
    S --> T["Done Display"]
    T --> U["Zero Altitude Display"]
    U --> V["S/S"]
    V --> W["NO Display"]
    W --> X["Zero Altitude Adjustment"]
    X --> Y["Done Display"]
    Y --> Z["Done Display"]
    Z --> AA["Done Display"]
Adjust the Alt meter Using Zero Altitude Adjustment
- To select the Adjustment Display, hold the [M] button in Altimeter Mode. Then press the [M] button to select among the Zero Altitude, Absolute Altitude, Sea Level Pressure and Factory Default Adjustment.
- To adjust the Watch by using Zero Altitude Adjustment press the [S/S] button in Zero Altitude Display, and the indicator 'NO' will appear.
- When the indicator 'NO' appears, press the [S/S] or [LR] button to select between "YES" (reset the Watch to zero) or "NO" (abort the resetting). When "YES" or "NO" is selected, hold the [M] button to confirm the setting.
- To exit the Adjustment Display, hold the [M] button for 2 seconds, the Watch will go back to the Alarmator Made. If the "YES" Display is selected when exiting the Adjustment Display, the "DONE" Display will appear for 2 seconds prior to the normal operation.
- To restore the Watch to factory default, please refer to the coming section "Albimater Mode - Factory Default Adjustment" for more details.
11.6 Altimeter Mode - Sea Level Pressure Adjustment

flowchart
graph TD
    A["329 3:05"] --> B["Attimeter Mode"]
    B --> C["Hold [M"]]
    C --> D["Attitude Adjustment"]
    D --> E["Seal Level Pressure Display"]
    E --> F["Absolute Attitude Display"]
    F --> G["Seal Level Pressure Display"]
    G --> H["Increase / Decrease the number"]
    G --> I["Increase / Decrease the number at a higher speed"]
    H --> J[" hold [SUS"]/LR]
    I --> K[" hold [SUS"]/LR]
Why Need to adjust the Sea Level Pressure
- As altitude is calculated from the mean sea level. Air pressure changes contribute to the changes of the mean sea level.
• Using the Watch in a place that has a different sea level pressure will affect the altitude readings. - To achieve a more accurate reading, the sea level pressure needs to be updated from place to place and from time to time.
How to Adjust the Altimeter Using Sea Level Pressure Adjustment -
You can adjust the current altitude reading by sea level pressure adjustment by the following:
-
To select the Adjustment Display, hold the [M] button in the Altimator Moda. Than press the [M] button to select among the Zero Altitude, Absolute Altitude, Sea Level Pressure and Factory Default Adjustment.
• To adjust the Watch using Sea Level Pressure Adjustment Squeezeville [5/8] button in Pressure Display, and the sea level pressure reading will appear. - When the sea level pressure reading appears, press the [S/S] or [L/R] button to increase or decrease the number to the target number (Hold down the button to change the number at a higher speed).
- If the adjustment is completed, hold the [M] button to confirm the adjustment and exit the adjustment display.
11.5 Altimeter Mode - Absolute Altitude Adjustment

flowchart
graph TD
    A["Altimotor Mode"] --> B["Absolute Altitude Display"]
    B --> C["Altitude Adjustment"]
    C --> D["Absolute Altitude Display"]
    D --> E["Altitude Adjustment"]
    E --> F["Increase / Decrease the number"]
    E --> G["Increase / Decrease the number at a higher speed"]
    B --> H[" hold [M"] ]
    B --> I[" hold [M"]]
    B --> J[" hold [M"]]
    B --> K[" hold [M"]]
    B --> L[" hold [M"]]
    B --> M[" hold [M"]]
    B --> N[" hold [M"]]
    B --> O[" hold [M"]]
    B --> P[" hold [M"]]
    B --> Q[" hold [M"]]
    B --> R[" hold [M"]]
    B --> S[" hold [M"]]
    B --> T[" hold [M"]]
    B --> U[" hold [M"]]
    B --> V[" hold [M"]]
    B --> W[" hold [M"]]
    B --> X[" hold [M"]]
    B --> Y[" hold [M"]]
    B --> Z[" hold [M"]]
    B --> AA[" hold [M"]]
    B --> AB[" hold [M"]]
    B --> AC[" hold [M"]]
    B --> AD[" hold [M"]]
    B --> AE[" hold [M"]]
    B --> AF[" hold [M"]]
    B --> AG[" hold [M"]]
    B --> AH[" hold [M"]]
    B --> AI[" hold [M"]]
    B --> AJ[" hold [M"]]
    B --> AK[" hold [M"]]
    B --> AL[" hold [M"]]
    B --> AM[" hold [M"]]
    B --> AN[" hold [M"]]
    B --> AO[" hold [M"]]
    B --> AP[" hold [M"]]
    B --> AQ[" hold [M"]]
    B --> AR[" hold [M"]]
    B --> AS[" hold [M"]]
    B --> AT[" hold [M"]]
    B --> AU[" hold [M"]]
    B --> AV[" hold [M"]]
    B --> AW[" hold [M"]]
    B --> AX[" hold [M"]]
    B --> AY[" hold [M"]]
    B --> AZ[" hold [M"]]
    B --> BA[" hold [M"]]
    B --> BB[" hold [M"]]
    B --> BC[" hold [M"]]
    B --> BD[" hold [M"]]
    B --> BE[" hold [M"]]
    B --> BF[" hold [M"]]
    B --> BG[" hold [M"]]
    B --> BH[" hold [M"]]
    B --> BI[" hold [M"]]
    B --> BJ[" hold [M"]]
    B --> BK[" hold [M"]]
    B --> BL[" hold [M"]]
    B --> BM[" hold [M"]]
    B --> BN[" hold [M"]]
    B --> BO[" hold [M"]]
    B --> BP[" hold [M"]]
    B --> BQ[" hold [M"]]
    B --> BR[" hold [M"]]
    B --> BS[" hold [M"]]
    B --> BT[" hold [M"]]
    B --> BU[" hold [M"]]
    B --> BV[" hold [M"]]
    B --> BW[" hold [M"]]
    B --> BX[" hold [M"]]
    B --> BY[" hold [M"]]
    B --> BZ[" hold [M"]]
    B --> CA[" hold [M"]]
    B --> CB[" hold [M"]]
    B --> CC[" hold [M"]]
    B --> CD[" hold [M"]]
    B --> CE[" hold [M"]]
    B --> CF[" hold [M"]]
    B --> CG[" hold [M"]]
    B --> CH[" hold [M"]]
    B --> CI[" hold [M"]]
    B --> CJ[" hold [M"]]
    B --> CK[" hold [M"]]
    B --> CR[" hold [M"]]
    B --> CS[" hold [M"]]
    B --> CT[" hold [M"]]
    B --> CU[" hold [M"]]
    B --> CV[" hold [M"]]
    B --> CW[" hold [M"]]
    B --> CX[" hold [M"]]
    B --> CY[" hold [M"]]
    B --> CZ[" hold [M"]]
    B --> DA[" hold [M"]]
    B --> DB[" hold [M"]]
    B --> DC[" hold [M"]]
    B --> DD[" hold [M"]]
    B --> DE[" hold [M"]]
    B --> DF[" hold [M"]]
    B --> DG[" hold [M"]]
    B --> DH[" hold [M"]]
Before Adjusting the Altitude
- Adjusting the altimeter at a place where the altitude is known, such as sea level (Cm) or besides an altitude sign pole (e.g., 89 m).
• The altitude is input into the Watch during the adjustment.
IMPORTANT: Inputting an incorrect altitude during the adjustment results a misleading attitude in the future.
To Adjust the Altimeter Using Absolute Altitude Adjustment -
You can adjust the current altitude reading to an absolute altitude value by the following:
-
To select the Adjustment Display, hold the [M] button in Allimeter Mode. Then press the [M] button once again to select among the Zero Altitude, Absolute Altitude, See Level Pressure and Factory Default Adjustment.
- To adjust the Watch by using Absolute Altitude Adjustment, press the [S/S] button in the Absolute Altitude Display and the altitude reading will appear.
- When the altitude reading (the last setting) appears, press the [S/S] or [L/R] button to increase or decrease the number to the target altitude. (Hold down the button to change the number at a higher speed).
- If the setting is completed, hold the [M] button to confirm the setting and exit the adjustment display.
NOTE: Once you have adjusted the altitude using absolute altitude adjustment at a place (e.g. your office where the altitude is 100m), the Watch will store the figure (100m) for you to adjust the altitude the next time at the same place.
11.7 Altimeter Mode - Factory Default Adjustment
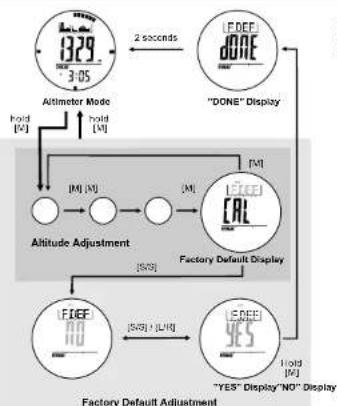
flowchart
graph TD
    A["Altimeter Mode 1329-3-05"] -->|hold["M"]| B["Altitude Adjustment"]
    B --> C["Factory Default Display"]
    C --> D["“DONE” Display"]
    D --> E["2 seconds"]
    E --> F["DONE"]
    F --> G["Factory Default Display"]
    G --> H[""YES” Display" NO" Display"]
    H --> I["Factory Default Adjustment"]
    I --> J["Altitude Adjustment"]
    J --> K["Factory Default Display"]
    K --> L["DONE"]
    L --> M["Factory Default Adjustment"]
    M --> N["Altitude Adjustment"]
    N --> O["Factory Default Display"]
    O --> P[""YES" Display" NO" Display"]
    P --> Q["Factory Default Adjustment"]
    Q --> R["Altitude Adjustment"]
    R --> S["Factory Default Display"]
    S --> T["DONE"]
    T --> U["Factory Default Adjustment"]
    U --> V["Altitude Adjustment"]
    V --> W["Factory Default Display"]
    W --> X[""YES" Display" NO" Display"]
    X --> Y["Factory Default Adjustment"]
How to Adjust the Altimeter Using Factory Default Adjustment
- You can also adjust the altitude reading calculation using the factory default value by the following.
- To select the adjustment display, hold the [M] button in the Altimeter Mode and press the [M] button to select among the Zero Altitude, Absolute Altitude, Sea Level Pressure and Factory Default Adjustment.
- To adjust the Watch using the factory default adjustment (restore it to the factory default by assuming the sea level pressure at 1013.2 mb), press the [S/S] button in Factory Default Display, and the indicator "NO" will appear.
- When the indicator "NO" appears, press the [S/S] or [LR] button to select between "YES" (reset the Watch to factory default) and "NO" (about the resetting).
- To exit the Adjustment Display, hold the [M] button for 2 seconds, the Watch will go back to the Atmater Mode. It is the "YES" Display is selected when exiting the Adjustment Display, the "DONE" Display will appear for 2 seconds prior to the normal operation.
12.0 Barometer Mode - Temperature and History Display

flowchart
graph TD
    A["Current temperature"] --> B["Sea Level Pressure"]
    C["Current ambient pressure"] --> D["Sea Level Pressure"]
    E["Current time"] --> F["Sea Level Pressure"]
    G["Temperature Display"] --> H["Sea Level Pressure Display"]
    I["History Display (2 to 23 hour)"] --> J["History Graph Display (Current Time)"]
    K["Current ambient pressure"] --> L["Sea Level Pressure"]
    M["Current time"] --> N["Sea Level Pressure"]
    O["Historical Survey History Review"] --> P["History Graph Display (1st Record at the hour)"]
    Q["Barometer Mode"] --> R["+23 current moving hour direction"]
    S["Barometer Mode"] --> T["+23 current time"]
    U["Barometer Mode"] --> V["Barometer Mode"]
Functional Display
- The Watch includes three Darometer functional displays: Temperature, See Level Pressure and History Graph Display. One of the three functional displays will appear in the top row of the display. Fast sampling
- During the Altitude Mode, hold down the [UR] button will activate fast sampling (sample per second) for five minutes.
Temperature Display
- In Temperature Display, the current temperature in degree Celsius (C) or degree Fahrenheit (F) shows in the top row of the display.
IMPORTANT: If you want to have an accurate reading of air temperature, you must take off the Watch from the wrist (for 20 to 30 minutes) that allows no body temperature effect on your watch. Sea Level Pressure Display
• In Sea Level Pressure Display, the sea level
pressure shows in the top row of the display. History Graph Display
- The Watch records the pressure readings automatically on the hour, ie 1:00, 2:00, 3:00 and etc. These records will be plotted into a pressure record graph.
- In the History Display, the pressure record graph shows in the top row of the display.
- To review the pressure records of the last 23 hours, press the [LR] button to move the cursor to the left of the graph cyclically, the corresponding pressure record and its time recorded (flashing) will appear
12.2 Barometer Mode - Absolute Pressure Adjustment
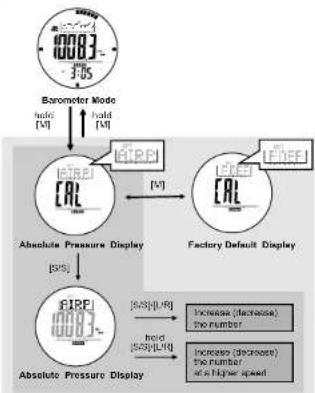
flowchart
graph TD
    A["Parameter Mode"] --> B["Absolute Pressure Display"]
    B --> C["Factory Default Display"]
    C --> D["Absolute Pressure Display"]
    D --> E["Increase (decrease) the number"]
    D --> F["Increase (decrease) the number at a higher speed"]
    B --> G["S/50"]
    C --> H["S/50"]
    D --> I["S/50"]
    style A fill:#f9f,stroke:#333
    style B fill:#ccf,stroke:#333
    style C fill:#cfc,stroke:#333
    style D fill:#fcc,stroke:#333
    style E fill:#ffc,stroke:#333
    style F fill:#fcc,stroke:#333
Before Calibrating the Barometer
- Before calibrating the Barometer, you must have the absolute pressure of your current position because the pressure value will be input into the Watch during the adjustment.
- Consult the nearest observatory to get the ambient harmonic price of your current position.
IMPORTANT: Inputting an incorrect pressure value during the calibration procedure results a misleading pressure reading in the future.
How to Adjust the Barometer Using Absolute Pressure Adjustment
- You can adjust the current pressure needing to en absolute pressure value.
- To select the Adjustment Display, hold the [M] button in the Baramotor Modic, then press the [M] button to select between the Absolute Pressure and Factory Default/Adjustments.
- To adjust the Watch using Absolute Pressure Adjustment press the [S/S] button in the Absolute Pressure Display and the pressure reading will appear.
- When the pressure reading appears, press the [S/S] or [L/R] button to increase / decrease the number. (Hold down the button to change the number at a higher speed)
- If the setting is completed, hold the [M] button to confirm the setting and ext the adjustment display.
12.1 Barometer Mode - Measurement Unit Selection and Barometer Adjustment
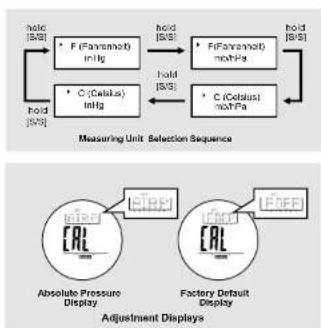
flowchart
graph TD
    A["Hold (S/S)"] --> B["F (Farensolt) int/g"]
    A --> C["C (Celius) int/g"]
    B --> D["Hold (S/S)"]
    C --> E["Hold (S/S)"]
    D --> F["F (Farensolt) mob/Fe"]
    E --> G["C (Celius) mob/Fe"]
    F --> H["Hold (S/S)"]
    G --> I["Hold (S/S)"]
    H --> J["Measuring Unit Selection Sequence"]
    I --> J
    K["Absolute Pressure Display"] --> L["Factory Default Display"]
    M["Adjustment Displays"] --> L
How to Switch between Measurement Units
- The Watch can display pressure in mb/hPa or InHg; the Watch can display temperature in degree Celsius (€) or degree Fahrenheit (F).*
- To switch among different units, hold down the [S/S] button to charge the units following the adjacent unit selection sequence.
Why the Barometer Needs to be Adjusted
- The Watch was calibrated for you in the factory. For normal use, you do not need to calibrate the Barometer.
- But for the serious users, the Watch includes 2 adjustment procedures.
Barometer Adjustment
- There are 2 kinds of Barometer adjustment methods: Absolute Pressure and Factory Default Adjustments
• Absolute Pressure adjustment: Input the known atmospheric pressure into the Watch directly.
- Factory Default adjustment: Restore the Watch to the factory default setting
- For in-depth information for each of the adjustment methods, please read the coming sections.
NOTE: When the Ski Function is turned ON, Barometer Adjustment function is prohibited.
12.3 Barometer Mode - Factory Default Adjustment
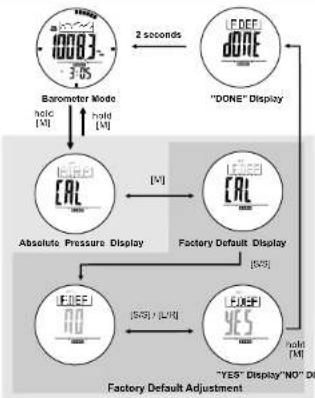
flowchart
graph TD
    A["Barometer Mode"] -->|hold["M"]| B["Absolute Pressure Display"]
    B --> C[""DONE" Display"]
    C --> D["Factory Default Display"]
    D --> E["YES" Display "NO" Dis"]
    E --> F["Factory Default Adjustment"]
    F --> G["YES" Display "NO" Dis"]
    G --> H["Factory Default Adjustment"]
    H --> I["ABS" Display "NO" Dis"]
    I --> J["Factory Default Adjustment"]
    J --> K["ABS" Display "NO" Dis"]
    K --> L["Factory Default Adjustment"]
    L --> M["ABS" Display "NO" Dis"]
    M --> N["Factory Default Adjustment"]
    N --> O["ABS" Display "NO" Dis"]
    O --> P["Factory Default Adjustment"]
    P --> Q["ABS" Display "NO" Dis"]
    Q --> R["Factory Default Adjustment"]
    R --> S["ABS" Display "NO" Dis"]
    S --> T["Factory Default Adjustment"]
    T --> U["ABS" Display "NO" Dis"]
    U --> V["Factory Default Adjustment"]
    V --> W["ABS" Display "NO" Dis"]
    W --> X["Factory Default Adjustment"]
    X --> Y["ABS" Display "NO" Dis"]
    Y --> Z["Factory Default Adjustment"]
    Z --> AA["ABS" Display "NO" Dis"]
    AA --> AB["Factory Default Adjustment"]
    AB --> AC["ABS" Display "NO" Dis"]
    AC --> AD["Factory Default Adjustment"]
    AD --> AE["ABS" Display "NO" Dis"]
    AE --> AF["Factory Default Adjustment"]
    AF --> AG["ABS" Display "NO" Dis"]
    AG --> AH["Factory Default Adjustment"]
    AH --> AI["ABS" Display "NO" Dis"]
    AI --> AJ["Factory Default Adjustment"]
    AJ --> AK["ABS" Display "NO" Dis"]
    AK --> AL["Factory Default Adjustment"]
    AL --> AM["ABS" Display "NO" Dis"]
    AM --> AN["Factory Default Adjustment"]
    AN --> AO["ABS" Display "NO" Dis"]
    AO --> AP["Factory Default Adjustment"]
    AP --> AQ["ABS" Display "NO" Dis"]
    AQ --> AR["Factory Default Adjustment"]
    AR --> AS["ABS" Display "NO" Dis"]
    AS --> AT["Factory Default Adjustment"]
    AT --> AU["ABS" Display "NO" Dis"]
    AU --> AV["Factory Default Adjustment"]
    AV --> AW["ABS" Display "NO" Dis"]
    AW --> AX["Factory Default Adjustment"]
    AX --> AY["ABS" Display "NO" Dis"]
    AY --> AZ["Factory Default Adjustment"]
    AZ --> BA["ABS" Display "NO" Dis"]
    BA --> BB["Factory Default Adjustment"]
    BB --> BC["ABS" Display "NO" Dis"]
    BC --> BD["Factory Default Adjustment"]
    BD --> BE["ABS" Display "NO" Dis"]
    BE --> BF["Factory Default Adjustment"]
How to Adjust the Barometer Using the Factory Default Adjustment
- You can also adjust the pressure reading calculation using the factory default value.
- To select the Adjustment Display, hold the [M] button in the Barometer Mode, then press the [M] button to select between Absolute Pressure and Factory Default Adjustments.
- To adjust the Watch using the factory default adjustment, press the [S/S] button in the Factory Default Display, and the indicator "NO" will appear.
- When the indicator "NO" appears, press the [S/S] or [LR] button to select between "YES" (reset the "Watch to factory default") or "NO" (abort the resetting).
- To exit the Adjustment Display, hold the [M] button for 2 seconds, and then the Watch will go back to the Barometer Mode. It is the "YES" Display is selected when exiting the Adjustment Display, the "DONE" Display will appear for 2 seconds prior to the normal operation.
13.0 Compass Mode - Precautions
The Precautions when Using the Compass
- Keep your Watch away from magnets or any appliances which may contain magnetic objects such as mobile phones, speakers, motors and etc.
- The Watch, like most magnetic compass points to the magnetic north which is slightly different from the true north. Check the 'What is Magnetic Declination' section for more details.
- Perform the compass calibration from time to time, because the calibration maintains the precision of the compass.
• To achieve an accurate result, you should avoid measuring direction on the following conditions:
1) The watch is placed close to a magnetic object
2) The watch is placed close to a metal object
3) The watch is placed close to an electrical appliance
4) The watch is placed inside a moving object or a ferroconcrete building.
13.2 Compass Mode - Compass Mode

Compass Mode
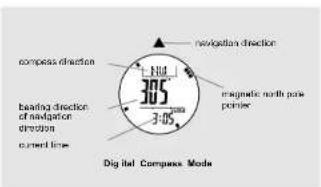
• In the Compass Mode, the top of the display shows the compass direction.
- The middle display shows the bearing direction.
- The bottom display shows the current time in hour and minute.
- The pointer encircled the display shows the direction of magnetic North anisogically.
IDLE Mode
- If no button is pressed for about 1 minute, the Watch will go to the IDLE Mode automatically. To activate the compass again, press any button.
Distortion
- If distortion is detected, the indicator 'OFF CAL' with flashing direction digits will appear
- Please refer to the coming section "Calibrating the Compass" to restore the compass to normal operation when distortion occurs.
13.1 Compass Mode - Compass Directions and Bearing Directions
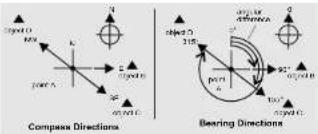
| Marks | Compass Directions Bearing Directions | |
| N | North | 349° - 11° |
| NE | North Northeast | 12° - 33° |
| NE | North east | 34° - 56° |
| ENE | East Northeast | 57° - 78° |
| E | East | 79° - 101° |
| LSE | East Southwest | 102° - 123° |
| SE | Southeast | 124° - 146° |
| BSE | South Southwest | 147° - 168° |
| S | South | 169° - 191° |
| SSW | South Southwest | 192° - 213° |
| SW | Southwest | 214° - 236° |
| WSW | West Southwest | 237° - 258° |
| W | West | 259° - 281° |
| WNW | West Northwest | 282° - 303° |
| NW | Northwest | 304° - 326° |
| NNW | North Northeast | 327° - 348° |
The Direction of an Object
- The direction of an object from a point can be specified in either compass directions or bearing directions.
• The Watch includes both compass directions and bearing directions.
The Compass Directions
- The compass directions are shown in the adjacent table.
- For example, in the figure on the left, the compass direction of object B from point A is due. East. The compass direction of object C from point A is Southeast. The compass direction of object D from point A is Northwest.
The Bearing Directions
- The Bearing direction of an object is defined as the angular difference between North and the object. (A sum a 0 for due North, and the measuring range is from 0 to 359)
- For example, in the figure on the left, the bearing direction of object B from point A is 30. The bearing direction of object C from point A is 135°. The bearing direction of object D from point A is 315°.
13.3 Compass Mode - Backward Bearing Direction and Compass Lock
![normal bearing direction 305 3.05 backward bearing direction [SB] 125 3.05 backward bearing indicator Normal Bearing g Direction n Backward Bearing g Direction n](/content/2026/05/834973/images/8c58215b8c04a0decd696fffed351aaf2f7d8af225576ff78adca678864089ae.jpg)
Backward Bearing Direction
• The Watch Includes a backward bearing function.
- The backward bearing direction is the bearing direction in the opposite direction from the normal bearing direction.
- When the 'Backward Bearing' indicator " appears, the Watch is showing the backward bearing direction of the navigation direction.
- In the Compass Mode, press the [S/S] button to select between normal and backward bearing directions.
Compass Lock
- The Watch includes a compass lock function that locks useful direction reading.
- In the Compass Mode, press the [L/R] button to lock/unlock the direction reading.
- When the "Lock" indicator "mo" appears, the compass direction, bearing direction and the magnetic north pole counter are locked.
- Compass Lock will be released automatically when the Watch enters IDLE Mode.
![HJ 305 3-05 ← [L-R] compass lock indicator NO Direct cicle n Unlocked 305 3-05 Direct cicle n Locked](/content/2026/05/834973/images/dcb556312e16fe1fd8446945715118938378e2caeec6e093257e50d13a82646b.jpg)
13.4 Compass Mode - Applications of the Compass


flowchart
graph TD
    A["point A (starting point)"] --> B["point B"]
    B --> C["point C"]
    C --> D["point D"]
    D --> E["point E (finish point)"]
    style A fill:#f9f,stroke:#333
    style B fill:#ccf,stroke:#333
    style C fill:#cfc,stroke:#333
    style D fill:#fcc,stroke:#333
    style E fill:#ffc,stroke:#333
Check your position by Backward Bearing Directions
- Spot two distant identifiable landmarks like mountains, light-house, fort or building from your current position, for example the mountains A and B.
- Check out the backward bearing directions of mountains A and B from your current position, for example 135° from mountain A and 270° from mountain B.
- Use a ruler to draw a line 135° from the north at the mountain A to your current position on the map. Draw another line 270° from the north at the mountain B to your current position on the map.
- Your current position on the map will be the intersection (point A) of the lines 135 from the mountain A and 270° from the mountain B
• Check the Trek Course Correctly
- During a trekking, the Watch can keep your course in a correct way. For example, the correct trail starts from point A and finishes at point E as drawn on the adjacent map.
- Mark the points (identifiable landmarks) where the trail turns its direction or the trail branches its way, such as the points A, B, C, D and E on the adjacent map.
- Find out the bearing directions of point B from point A (315°), point C from point B (0°), point D from point C (225°), and then point E from point D (315°).
- During the trekking, make sure that the heading direction is 315° from point A to point B. Performing the similar checking in other sections of the trail helps you keep your course correctly.
IMPORTANT: If you are in doubt of the directions and positions of the trail, consult the park administration office before starting the trekking.
13.6 Compass Mode - Magnetic Declination Compensation

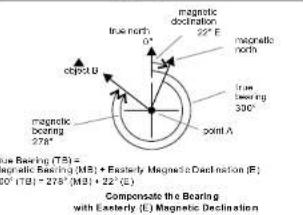
Magnetic Declination Compensation
- To compensate for an object's bearing, either subtract westerly (W) magnetic declination or add separately(E) magnetic declination with the magnetic bearing.
• Example 1: Westerly magnetic declination 23° and the compass needle points 323°.
- TB = MB - W. When MB = 323°, W = 23°
- TH = 323' - 23'
18 = 300
• The true bearing is 300°
• Example 2: Easterly magnetic declination 22° and the compass needle points 278°.
- TD = MD + E. When MB = 278°; E = 22°
TB = 278° + 22°
TB = 300
• The true hearing is 300°
- The Watch allows you to compensate the compass bearing at a place where the magnetic declination is either Westerly declination or Easterly declination.
- Check the coming section "Calibrating the Compass" for more details of the setting.
13.5 Compass Mode - Magnetic Declination

What is Magnetic Declination
• The Magnetic North Pole is slightly different from the True North Pole.
- The WeatherMaster, like most magnetic compass, points to the Magnetic North Pole. On the contrary, everything measured on a map is related to the True North Pole.
- The angular difference between Magnetic North Pole and True North Pole is called magnetic declination. Its magnitude (degrees and minutes) and direction (easterly and westerly) depend on where you are in the world.
- For a serious compass user who intends to perform an accurate navigation, the compass must be adjusted for magnetic declination.
- The Watch also includes a compensation setting for Magnetic Declination. Check the coming section "Calibrating the compass - Magnetic Declination Mode" for more details.
Magnetic Declination Information
- Most topographic maps include a small arrow which shows the magnetic north pole and magnetic declination information.
- For the benefit of the user, this manual includes the magnetic declinations for some major cities. Check the coming section 'Magnetic Declination at Major Cities' for more details.
- For those cities, their names are not included on the list, please check the online magnetic declination information at:
1.http://www.geola.nrcsn.gc.ca/geomagie_cgrf.html
- Http://www.ngdc.noss.gov/cgi-
binisogigmagnidsnth1.pl
13.7 Compass Mode - Magnetic Declination at Major Cities
| No. | Country/Place | Major City | Declination | No. | Country/Place | Major City | Declination |
| 1 | Alpherson City - 20 | 33 | Achenarle | Amsterdam | +26 | ||
| 2 | Asadarko Centro +12E | 54 | New Zealand | Wilmington | +22E | ||
| 3 | Asalis Vikma +3E | 55 | Nunya | Ours -2E | |||
| 4 | Buchan Karama +2E | 56 | Polskhararnsford | +2E | |||
| 6 | Bangkokot Dhaka +6E | 57 | Philippines | Manga -19 | |||
| 8 | Bangkok-Mumbai -3E | 58 | Paraguay-London -3W | ||||
| 10 | Ghana Grenada -21E | 59 | Peruera | Vancouver | +10E | ||
| 6 | Guranga Odawa -46Y | 60 | Singapore | Singapore | +6E | ||
| 9 | China | Santiago | +3E | 61 | South Africa Cape Town -24W | ||
| 10 | China Buling -6W | 62 | Spain/Malaysia -2W | ||||
| 11 | China Hong Kong -2W | 63 | Sweden Stockholm | +2E | |||
| 12 | Cairo Plaza | San Juan | -1W | 64 | Switzerland-Burm +1E | ||
| 13 | Cairo | Tswana -46Y | 65 | Taiwan Taipu -4W | |||
| 14 | Cairo Republic | Prague | +3E | 66 | Thailand Bangkat -1W | ||
| 15 | Domtaris | Copenhagen | +3E | 67 | UAE | Abu Dhabi | +2E |
| 16 | Egypt City | -4E | 68 | United Kingdom London -2W | |||
| 17 | Fijiand Swazha | +5E | 69 | United States | Washington, DC | -1W | |
| 18 | Frankfurt -4E | -1W | 70 | United States | Jersey | +22E | |
| 19 | Germany | Berlin | +3E | 71 | United States | Iberia | +17E |
| 20 | Geneva-Alfreda -4E | 72 | United States | Little Lakes | +16E | ||
| 21 | Hungary Bucukasi +6E | 73 | United States | Santiago & Co. | +14E | ||
| 22 | India | West Delhi | +1E | 74 | United States | Dhaka -1W | |
| 23 | Istanbul-Jahara -1H | 75 | United States | Algeria -4W | |||
| 24 | Iraqi Janakulam | +4E | 76 | United States | Honolulu | +10E | |
| 25 | Italy | Turku +2E | 77 | United States | Bolear -15W | ||
| 26 | Japan | Europe | -7W | United States | Stemple -1W | +1E | |
| 27 | Jordan Amman -4E | 78 | United States | Jackson | +0E | ||
| 28 | Kenya | Kosmeli -1E | 79 | United States | Santa Ana | +3E | |
| 29 | Kenya | Swartz -5W | 80 | United States | Oklahoma City | +8E | |
| 30 | Khatsya | Kuala Lumpur | +3E | United States | Salem -1E | ||
| 31 | Kazakhstan-Kosma City | +6E | 81 | United States | Hanoi-Lung | -15W | |
| 32 | Napal Bahmatana | +0E | 82 | United States | Salt Lake City | +12E |
NOTE: Since magnetic dedication will be changed as going with time, recommend to check the update data from following site:
http://www.magnate-ektrmation.com/ & http://www.rngite.com/projarmagmodetac#schwden.poi
13.8 Calibrating Mode - Calibration the Compass

flowchart
graph TD
    A["305 3:05"] --> B["Compass Mode"]
    B --> C["Hold [M"]]
    C --> D["CRL"]
    D --> E["Rotation Calibration Display"]
    E --> F["Magnetic Declination Display"]
    F --> G["Magnetization"]
    style A fill:#f9f,stroke:#333
    style B fill:#ccf,stroke:#333
    style C fill:#cfc,stroke:#333
    style D fill:#fcc,stroke:#333
    style E fill:#cff,stroke:#333
    style F fill:#ffc,stroke:#333
    style G fill:#fcc,stroke:#333
When to Calibrating the Compass
• The Watch has to employ a compass calibration
in one of the following conditions:
- The watch is using for the first time.
-
The button has been replaced.
-
The battery has been replaced,
the "OFF CAL" indicator appear.
4) The compass use in a location that is apart
from the place in which the compass has been attributed.
- The user signals to regulate the restriction of
the digital compass.
How to Calibrate the Compass
• The compass calibration includes two different
Magnetic Destination Setting.
- It is advisable to carry out them both from time
to time, that achieves a more accurate reading.
IMPORTANT: If the Watch has not been calibrated.
the difficult route by the which may be a inaccurate direction.
13.10 Calibrating the compass - Magnetic Declination Mode
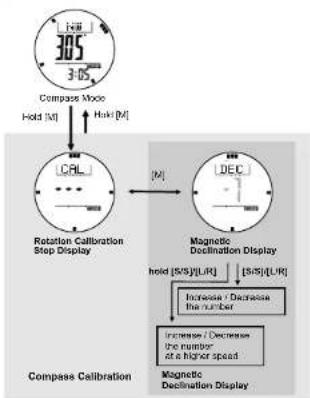
flowchart
graph TD
    A["305 3-05"] --> B["Compare Mode"]
    B --> C["Hold [M"]]
    C --> D["RCAL"]
    D --> E["Rotation Calibration Stop Display"]
    E --> F["Magnetic Declination Display"]
    F --> G["hold [S/S"]/LIR]
    G --> H["Increase / Decrease the number"]
    H --> I["Increase / Decrease the number of a higher speed"]
    I --> J["Magnetic Declination Display"]
Magnetic Declination Mode
- Check the previous section "Magnetic Declaration at Major Cities" to get the magnetic declination of the city which is close to your current position. That value will be input into the Watch during the calibration.
• To select Magnetic Declination Display, press the [M] button in Rotation Calibration Display.
- When the current magnetic declination appears, press the [S/S] or [L/R] button to increase / decrease the number. (Hold down the button to change the number at a higher speed).
- If the setting is completed, hold the [M] button to confirm the setting and exit the adjustment display.
13.9 Calibrating the Compass - Compass Rotation Calibration Mode

flowchart
graph TD
    A["Compass Mode"] --> B["Hold [M"]]
    B --> C["Rotation Calibration Step Display"]
    C --> D["Magnetic Declination Display"]
    D --> E["Rotate Calibration Turning Display"]
    E --> F["Compass Calibration"]
    style A fill:#f9f,stroke:#333
    style F fill:#f9f,stroke:#333
Rotation Calibration Display
• To select the Rotation Calibration Display, hold the [M] button in Compass Mode.
- To start rotation calibration, press [SNS] button once. The pointers will start rotating, turning the watch (keep parallel to the horizon) in the same direction of the rotating pointers for more than 2 turns.
- Press [S/S] or [L/R] button to stop the calibration when the 2-tum rotation calibration is completed.
- When the pointer stop rotating, hold the [M] button to go back to the Compass Mode or press the [M] button once to set the magnetic declination.
14.0 Battery - Battery Low Indication and Battery Replacement
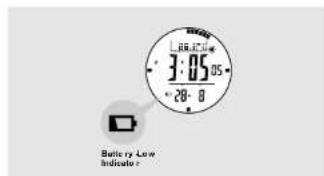
Battery Low Detection
- When the battery-low indicator appears on the display, it means that the capacity of the battery is low. It is recommended to replace the battery with a new CR2032 battery.
- However, if the appearance of the battery-low indicator is caused by using the Watch under very cold condition, the indicator will disappear when normal temperature returns.
NOTE: It is recommended to complete the battery replacement by a certified service agency because this Watch contains delicate electronic sensors and components.
IMPORTANT: If the battery is replaced, all memory will be cleared. Follow the previous chapter "Calibrating the Compass" to calibrate the compass before using the Compass.
15.0 Specifications - Part A
Current Time Mode
- Hour, minute, second, am, pm, month, date, and day of week or barometer pressure history display, altitude, history and temperature
Time System
• 12-hour or 24-hour format
Calendar System
• Auto-Calendar pre-programmed from the year
2004 to 2096
Weather Forecast
• 4 symbols to indicate the weather forecast
Daily Alarm Mode
• 2 daily alarms
- Hourly china
Alarm Sounds
• Sounds for 30 seconds at preset time of the real
time clock
Chronograph Mode
Resolution
• 17108 second
Measuring Range
• 99 hours 59 minutes 59.99 seconds
Measuring Mode
- 100 lap membranes
• Recall top memories and total time
Timer Mode
Resolution
• 1 second resolution
Measuring range
• 99 hours 59 minutes 59 seconds
Operation Mode
• Counlevoan
Quick Set
- 5 quick set Values (3, 5, 10, 15 and 45 minutes)
Timer Sounds
• Sounds for 30 seconds when counting to zero
Dual Time Mode
• Hour, minute, second, am, pm
15.0 Specifications - Part B
Ski Mode
• Ski Lap trigger: Automatic or Manual
• Ski Slope setting: 5 'to 90'
• Sensitivity type, Ascending and Descending
• Sensitivity Level: Fast, Normal and Slow
• Altitude range: -736m to 9154m (-2316ft to
3006601
• Travel Time: Maximum 93 m in units, 59.89
SARAFIS
■ 10kT 10p T 10m10y. 41 AKI 30pA
Aitimeter Mode
Resolution
• 7th (110)
Measuring Range
-706m to 9164m (-2316ft to 30086ft)
History Recall
- Last 24 hours
Barometer Mode
Resolution
0.1 hPa/mbar (0.01 inHg)
Measuring Range
• 300 hPaimbar to 1100 hPaimbar (8.65 inHg to
32.48 InHgI
History Recall
- Last 24 hours
Compass Mode
Resolution
• 1° display (digital): 1 of 60 pointers (practical)
Measuring range
- 0° to 269° (digital); 1 to 80 pointer (graphical)
Others
• Digital bearing reading Lock
• Digital backward bearing
Thermometer
Resolution
- 0.1 ℃ (0.1°F)
Measuring range
-10.0 °C to 60.0 °C (14.0 °F to 140.0 °F)
Backlight
• Electro-Lumineacent (EL) backlight
Battery
• Single 3V lithium battery (CR20G2)
Battery Low Detection
• Battery voltage low indicator
- "Recreational Gear For The Great Outdoors"
- Introduction
- Buttons and Its Functions - Part B
- EL Button [EL]
- Key Lock Function
- Buttons and Its Functions - Part A
- Mode Button [M]
- LapReset Button [UR]
- Major Function Modes - Timekeeping Mode and Sensor Mode
- Current Time Mode - Functional Display
- Current Time Mode - Setting the Current Time
- Current Time Mode - Weather Forecast Feature
- Daily Alarm Mode - Daily Alarm 1, Daily Alarm 2 and Chime Display
- How to Set the User Preset Value
- Dual Time Mode
- How to Set the Dual Time
- How to Use the Timer
- Timer Alarm Sound
- How to Reload the Timer
- Ski Mode
- Ski Logbook
- Ski Recall Mode
- How to Turn ON the Ski Function
- Ski Mode Display
- Change the Measurement Unit
- Ski Mode - Ski Log Function
- Ski Mode - What are Slope and Sensitivity Settings
- Ski Mode - How a Ski Lap Is Logged
- Ski Mode - Slope and Sensitivity Settings
- Ski Record
- Ski Lap
- How to Select the Ski Lap
- How to Select among Different Ski Lap s
- How to Review the Lap Data
- Ski Recall Mode Display
- How to Review the Record Data
- How to Delete the Ski Record
- Functional Display
- Fast sampling
- Temperature Display
- History Display
- Absolute and Relative Altitude
- How to Switch between Measurement Units
- Why the Affordants be Adjusted
- pressure shows in the top row of the display. History Graph Display
- Before Calibrating the Barometer
- How to Adjust the Barometer Using Absolute Pressure Adjustment
- Why the Barometer Needs to be Adjusted
- Barometer Adjustment
- How to Adjust the Barometer Using the Factory Default Adjustment
- Compass Mode - Precautions
- The Precautions when Using the Compass
- Compass Mode - Compass Mode
- Compass Mode
- IDLE Mode
- Distortion
- Compass Mode - Compass Directions and Bearing Directions
- The Direction of an Object
- The Compass Directions
- The Bearing Directions
- Compass Mode - Backward Bearing Direction and Compass Lock
- Backward Bearing Direction
- Compass Lock
- Compass Mode - Applications of the Compass
- Compass Mode - Magnetic Declination Compensation
- Compass Mode - Magnetic Declination
- Compass Mode - Magnetic Declination at Major Cities
- Calibrating Mode - Calibration the Compass
- Calibrating the compass - Magnetic Declination Mode
- Calibrating the Compass - Compass Rotation Calibration Mode
- Battery - Battery Low Indication and Battery Replacement
- Specifications - Part A
- Current Time Mode
- Time System
- Calendar System
- to 2096
- Weather Forecast
- Daily Alarm Mode
- Chronograph Mode
- Resolution
- Timer Mode
- Specifications - Part B
- Aitimeter Mode
- • 7th (110)
- Barometer Mode
Brand : Pyle
Model : PSKIW25
Category : Sports Watch