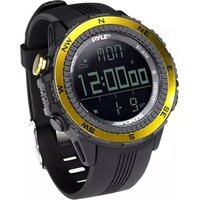
PSWWM82 - Sports Watch Pyle - Free user manual and instructions
Find the device manual for free PSWWM82 Pyle in PDF.


| Product Type | Sports Watch |
| Brand | Pyle |
| Model | PSWWM82 |
| Display Type | Digital LCD |
| Case Diameter | 45 mm |
| Case Thickness | 12 mm |
| Weight | 50 g |
| Water Resistance | 50 meters (5 ATM) |
| Power Source | CR2032 battery |
| Battery Life | Approximately 2 years |
| Main Functions | Time, date, stopwatch, alarm, pedometer |
| Strap Material | Silicone |
| Strap Width | 22 mm |
| Backlight | Yes, EL backlight |
| Compatibility | Unisex |
| Cleaning Instructions | Wipe with a soft, dry cloth |
| Safety Warnings | Keep away from extreme temperatures; avoid pressing buttons underwater |
| Spare Parts / Repairability | Battery and strap replaceable; contact Pyle for service |
| General Information | Manual available for download in PDF format from Pyle website |
Frequently Asked Questions - PSWWM82 Pyle
User questions about PSWWM82 Pyle
0 question about this device. Answer the ones you know or ask your own.
Ask a new question about this device
Download the instructions for your Sports Watch in PDF format for free! Find your manual PSWWM82 - Pyle and take your electronic device back in hand. On this page are published all the documents necessary for the use of your device. PSWWM82 by Pyle.
USER MANUAL PSWWM82 Pyle
Back Cover

Front Cover
OUTSIDE
1.0 Introduction
- Thank you for purchasing this Watch. Your Watch features electronic sensors, which measures and shows the outdoor conditions: weather forecast, temperature, pressure, altitude and compass directions.
- Your Watch provides the essential information you need when you go hiking, wild camping and other outdoor activities especially for a prolonged period.
- Your Watch also includes current time, daily alarm, chronograph, timer and dual time functions.
- Your Watch is carefully designed and produced for outdoor activities. In order to utilize the features, it is advisable to read the following instructions before using the Watch.
- Avoid exposing your Watch to extreme conditions for an unreasonable time.
- Avoid rough usage or severe impact on your Watch.
- Do not open the Watch's case unless by a certified service agency because your watch contains delicate electronic sensors and components.
- Clean your Watch with a soft cloth occasionally for a longer useful life.
- Keep your Watch away from magnets or any appliances which contain magnetic objects such as mobile phones, speakers and motors.
- Store your Watch in a dry place when it is not in use.
2.0 Buttons and Its Functions - Model A and Model B
![Sensor / Light [SR] / EL 12:00:00 1 - 9 Start/Stop [S/S] Sensor [SR] Mode [M] Lap/Reset [L/R] Mode [M] 12:00:00 1 - 9 Start/Stop [S/S] Light [EL] Lap/Reset [L/R]](/content/2026/06/1260867/images/519687637732af699feea1d912724348f856a2c67bbf28dcb692d1665edf8567.jpg)
Model A Model B
2.0 Buttons and Its Functions - Model A and Model B
Mode Button [M]
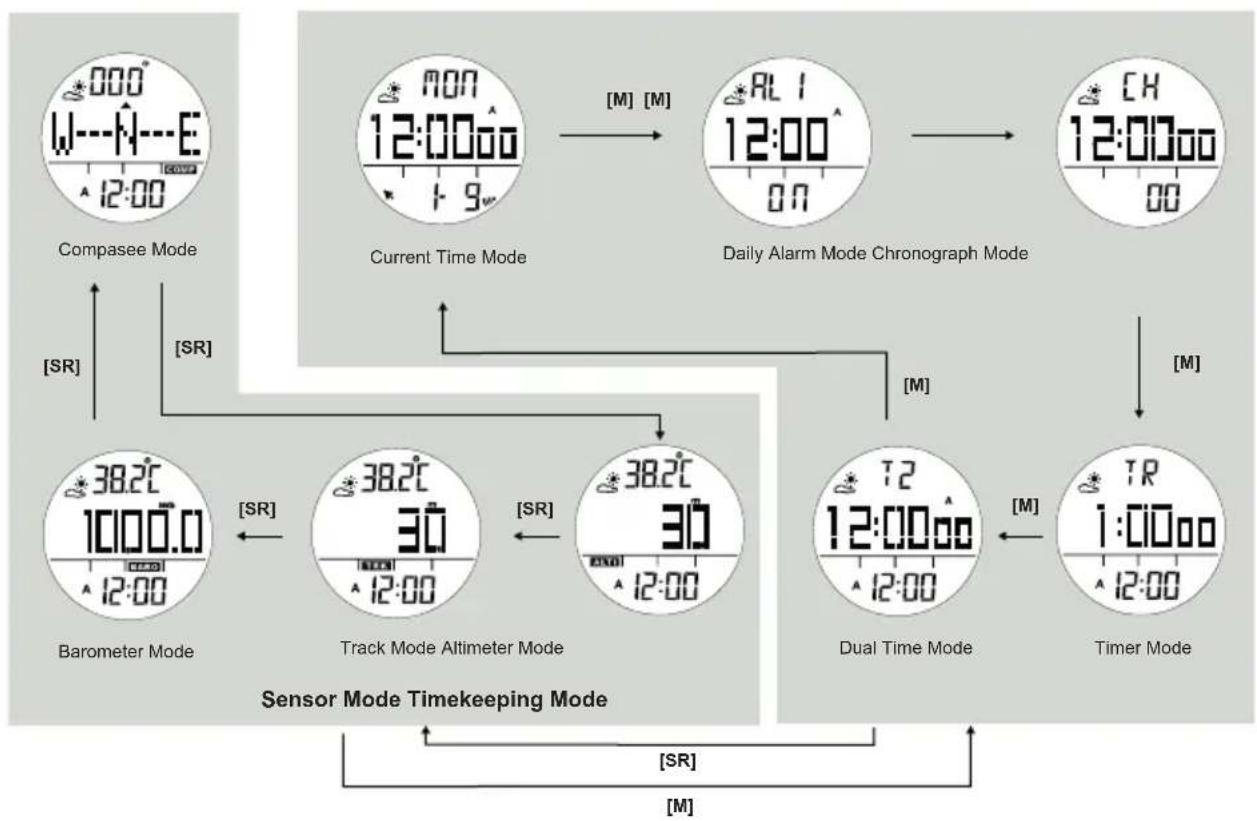
• To select among the Current Time, Daily Alarm, Chronograph, Timer and Dual Time modes.
• To select among the setting items in setting display.
Sensor Button [SR] (Model B), Sensor Button [SR] / EL Button[EL] (Model A)
To select among the Altimeter, Barometer, Track and Compass modes.
- Hold 1 second to turn on the EL Back Light for about 3 seconds. (Model A only)
Start/Stop Button [S/S]
• To select between functional displays under the same mode.
• To activate the 'start' or 'stop' chronograph function in the chronograph mode.
• To toggle Yes/No.
• To increase the digits in setting display.
Lap/Reset Button [L/R]
• To activate the 'lap' or 'reset' chronograph function in the chronograph mode.
• To move the cursor to the left by one in the History recalling display.
• To decrease the digits in setting display.
• To toggle Yes/No.
EL Button [EL] (Model B)
• To turn on the EL back light for about 3 seconds.
Note
Press any button to activate the watch under Power Saving Mode. (For more information, please refer to Chapter 14.0)
3.0 Major Function Modes - Timekeeping Mode and Sensor Mode
flowchart
graph TD
    A["Compasee Mode"] --> B["Current Time Mode"]
    B --> C["Daily Alarm Mode Chronograph Mode"]
    C --> D["Sensor Mode Timekeeping Mode"]
    D --> E["Barometer Mode"]
    D --> F["Track Mode Altimeter Mode"]
    D --> G["Dual Time Mode"]
    D --> H["Timer Mode"]
    style A fill:#f9f,stroke:#333
    style B fill:#ccf,stroke:#333
    style C fill:#cfc,stroke:#333
    style D fill:#fcc,stroke:#333
    style E fill:#ffc,stroke:#333
    style F fill:#cfc,stroke:#333
    style G fill:#cfc,stroke:#333
    style H fill:#cfc,stroke:#333
4.0 Current Time Mode - Functional Display
![weather forecast day of week 12:00:00 current time date - 9 Day of Week Display [S/S] 38.2°C temperature 12:00:00 - 9 Temperature Display Current Time Mode](/content/2026/06/1260867/images/4291f70d3cfd72780c120a850d96656251382ae00bd375d40cd3138890c035f9.jpg)
Functional Display
- The Current Time Mode includes 4 kinds of functional displays:
• Day of Week display
- Current Time display
- Date
- Weather Forcast
- To select between day of week and temperature displays by pressing [S/S].
4.1 Current Time Mode - Weather Forecast Feature

Weather Forecast Feature
- A special feature of the Watch is the coming weather predicting function. It works by analyzing the changes of the past air pressure.
How to Indicate the Coming Weather
- The Watch provides 4 different symbols to indicate the forecast weather, which are:
- Sunny
- Cloudy with Sun
- Cloudy
- Raining
IMPORTANT: Since the Watch predicts the coming weather by using the data of the changes in the air pressure, a higher accuracy may result when the user stays at the same altitude for at least 24 hours.
IMPORTANT: The Watch predicts the weather by adopting general weather prediction principles, it is NOT capable to reflect the dramatic changes of weather within a very short period of time.
4.2 Current Time Mode - Setting the Current Time
flowchart
graph TD
    A["Current Time Display"] --> B["12:00:00"]
    B --> C["12/24 Hour Format"]
    C --> D["Chime ON/OFF"]
    D --> E["Key Tone ON/OFF"]
    E --> F["Unit Celsius/Fahrenheit"]
    F --> G["Unit Meter/feet"]
    G --> H["Unit mb/hpa/inHg"]
    H --> I["Increase/Decrease the number"]
    H --> J["Increase/Decrease the number at a higher speed"]
    K["digits have been selected (flashing)"] --> L["12:00:00"]
    L --> M["12:00:00"]
    M --> N["Current Time Setting Sequence"]
    style A fill:#f9f,stroke:#333
    style L fill:#f9f,stroke:#333
How to Set the Current Time
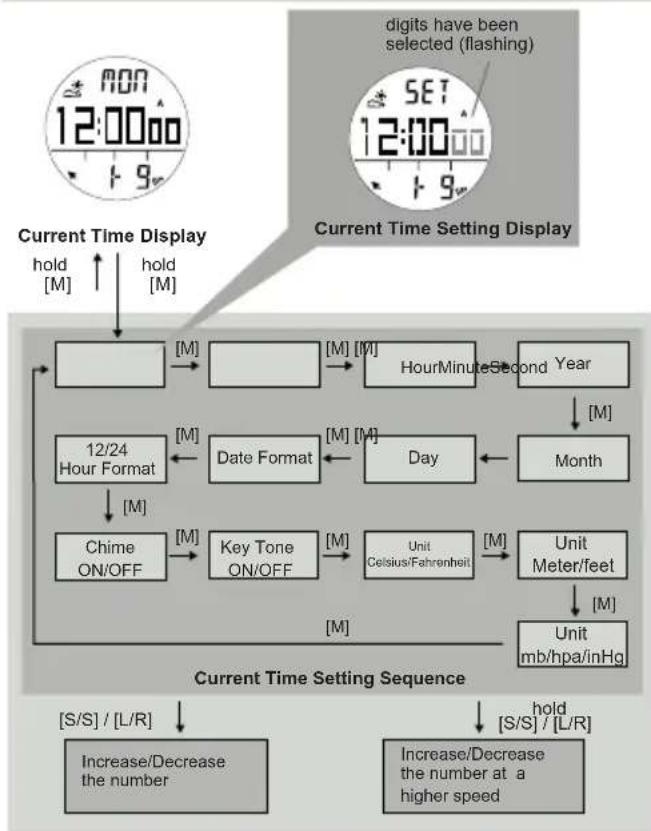
- To select the setting display, press and hold the [M] button for about 2 seconds in the Current Time Mode. In setting display, the word "SET" will appear.
- In the setting display, press the [M] button to change the selection following the adjacent Current Time Setting Sequence.
- When the second digits are flashing (selected), press the [S/S] or [L/R] button to reset the digits to "00".
- When the digits are flashing (selected), press the [S/S] or [L/R] button to increase / decrease the number. (Hold down the button to change the number at a higher speed).
- When month-day order setting is selected, press the [S/S] or [L/R] button to select either month-day or day-month format. When 12/24 hour format setting is selected, press the [S/S] button to select either 12 or 24 hour format.
- When the setting is completed, press and hold the [M] button to exit the setting display.
5.0 Daily Alarm Mode - Daily Alarm 1, Daily Alarm 2
![RL 1 12:00 ON [S/S] Daily Alarm 1 Display RL 2 12:00 ON [S/S] Daily Alarm 2 Display Daily Alarm Mode](/content/2026/06/1260867/images/d43c9961b3ce000bb3dac8b89942b1ab775ed3f197e515a199f6e2dff5e629ce.jpg)
Daily Alarm 1 and Daily Alarm 2
- The Watch includes two daily alarms: Daily Alarm 1 and Daily Alarm 2. The Daily Alarm 1 and Daily Alarm 2 are working independently.
- Press the [S/S] button to switch among the Daily Alarm 1 and Daily Alarm 2 following the adjacent diagram.
How to Turn ON/OFF the Daily Alarm
- To turn ON/OFF the Daily Alarm 1 (2), press the [L/R] button in Daily Alarm 1 (2) Display.
- When the Daily Alarm 1 (2) is ON, the alarm indicator '•') will appear.
- If the alarm indicator appears, the Watch will sound at the preset alarm time every day. When the alarm sounds, press any button to stop the beep.
5.1 Daily Alarm Mode - Setting the Alarm

flowchart
graph TD
    A["Daily Alarm 1 Display"] --> B["Hour"]
    C["Setting Display"] --> D["Hour"]
    B --> E["Minute"]
    D --> E
    E --> F["[S/S"] / [L/R]]
    E --> G["[S/S"] / [L/R]]
    F --> H["Increase/Decrease the number"]
    G --> I["Increase/Decrease the number at a higher speed"]
    style A fill:#f9f,stroke:#333
    style C fill:#f9f,stroke:#333
    style B fill:#ccf,stroke:#333
    style D fill:#ccf,stroke:#333
    style E fill:#cfc,stroke:#333
    style F fill:#ffc,stroke:#333
    style G fill:#ffc,stroke:#333
How to Set the Alarm 1 and Alarm 2
- To select the setting display, hold the [M] button for about 2 seconds in the Alarm 1 (2) Display, then the digitshave been selected will flashing.
- In the setting display, press the [M] button to change the selection between minute and hour.
- When the digits are flashing (selected), press the [S/S] or [L/R] button to increase / decrease the number. (Hold down the button to change the number at a higher speed).
- When the setting is completed, press and hold the [M] button to exit the setting display.
6.0 Chronograph Mode - Start/Stop the Chronograph
flowchart
graph TD
    A["Chronograph 'All Zero' Display"] -->|1/100 sec| B["Chronograph Counting Display"]
    A -->|seconds| C["Chronograph Stop Display"]
    B -->|Digits running| D["Total Time"]
    B -->|the digits stop counting| E["Elapsed time"]
    C -->| hold["L/R"]| F["Chronograph 'All Zero' Display"]
    C -->|[S/S]| G["Chronograph Counting Display"]
    style A fill:#f9f,stroke:#333
    style B fill:#ccf,stroke:#333
    style C fill:#cfc,stroke:#333
Chronograph Mode
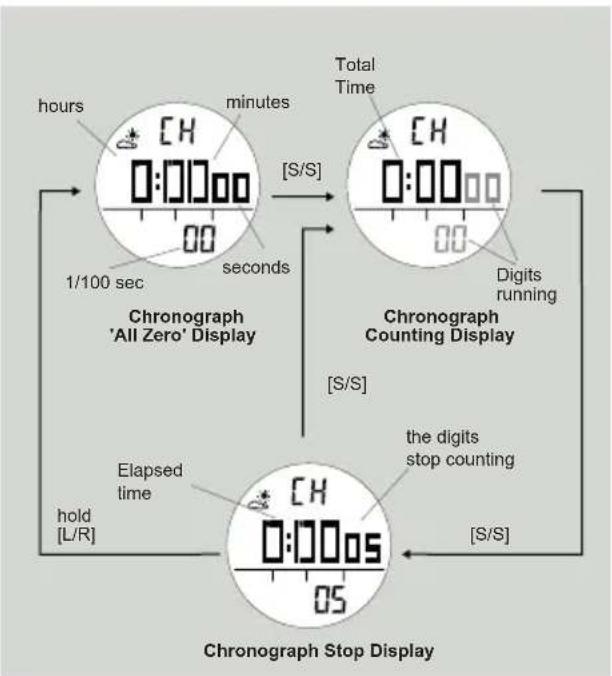
- The Watch includes a function to measure elapsed time, accumulative elapsed time and lap times - Chronograph Mode.
- The display shows an 'All Zeros' display when the chronograph is selected the first time or it is reset.
How to Start/Stop the Chronograph
- When the chronograph is stopped (not counting), press the [S/S] button once to start the chronograph (counting); press the [S/S] button once again to stop the chronograph (not counting). Repeating these steps will get an accumulative elapsed time.
How to Reset the Chronograph
- To record a new set of elapsed time, hold the [L/R] button for 2 seconds to reset the chronograph to the 'All Zeros' display when the chronograph is stopped.
- In the 'All Zeros' display, the chronograph is ready for a new counting.
6.1 Chronograph Mode - Recording and Recalling Lap Time
![the digits is running the lap number the lap time will freeze for 10 seconds [L/R] 10 seconds Chronograph Running Display Chronograph Lap Display To Record Lap Time](/content/2026/06/1260867/images/9bc16851f28d1e2a3317880356440fd9627a9d0da99ac5b3b391366fc7fd451f.jpg)

flowchart
graph LR
    A["Lap 1 Time Display"] -->|[S/S]| B["the next lap memories"]
    B -->|[S/S]| C["Total Time Display"]
    B -->|[L/R]| B
How to Record Lap Time
- The chronograph can measure elapsed time without stopping the counting - lap time.
- The Chronograph Mode allows recording lap time up to 10 laps.
- When the chronograph is counting, press the [L/R] button once to record a lap time (this key operation will not affect the counting).
- The lap number and lap time will appear on the display for 10 seconds, and it returns to counting display automatically.
- Repeat the steps mentioned above to get another lap time.
How to Recall Lap Times
- To recall lap time, hold down the [M] button in the Chronograph Display.
- When the Lap 1 Time Display appears, press the [S/S] or [L/R] button to check the next or previous lap time respectively.
- Hold down the [M] button to go back to the Chronograph Display.
How to Reset Lap times
- To record a new set of lap time, hold the [L/R] button for 2 seconds when it is stopped.
7.0 Timer Mode - Countdown Timer and the Quick-Set-value

Countdown Timer
- The Watch includes a countdown timer feature: the Timer Mode.
- The Timer starts counting from the preset value to zero and stops at zero.
• The count down time is able to set by the user. - The setting limit is up to 99 hours 59 minutes 59 seconds.
- Once the user preset time is set, like 30 minutes, the value is stored into the Watch for the user to recall it in the future.
- To set the count down time, check the coming section for more details.
7.1 Timer Mode - Setting the Count Down Timer

flowchart
graph TD
    A["Timer Display"] -->|hold["M"]| B["Hour"]
    B --> C["Minute Second"]
    C --> D["[M"]]
    D --> E["[S/S"] / [L/R]]
    E --> F["Increase/Decrease the number"]
    E --> G["Increase/Decrease the number at a higher speed"]
    H["digits have been selected (flashing)"] --> I["Setting Display"]
    I --> J["User Preset Value Setting Sequence"]
How to Set the Count Down Timer
- To select the setting display, hold the [M] button for 2 seconds, and the digits have been selected will flashing.
- In the setting display, press the [M] button to change the selection among hour, minute and second.
- When the digits are flashing (selected), press the [S/S] or [L/R] button to increase / decrease the number. (Hold down the button to change the number at a higher speed).
- When the setting is completed, hold the [M] button to exit the setting display.
7.2 Timer Mode - Using the Timer

flowchart
graph TD
    A["Timer Display (Timer is set at 10 minutes)"] -->|[S/S]| B["Counting Display"]
    B -->|[S/S]| C["Stop Counting Display"]
    C -->|[S/S]| D["Counting Display"]
    style A fill:#f9f,stroke:#333
    style B fill:#f9f,stroke:#333
    style C fill:#f9f,stroke:#333
    style D fill:#f9f,stroke:#333
How to Use the Timer
- When the Timer is set, press the [S/S] button to start the timer. Press the [S/S] button once again to stop the timer.
Timer Alarm Sound
• In the last 10 minutes, the Watch will beep for every minute.
- In the last minute, the Watch will beep for every 10 seconds. In the last 5 seconds, the Watch will beep for every second.
- When it reaches 0, a beep sound will last for 30 seconds. Pressing any button can stop the beep sound.
How to Reload the Timer
- The last target time will be reloaded automatically at the end of the 30-second beep sound.
- Press the [L/R] button when the timer is stopped.
8.0 Dual Time Mode - Dual Time and Setting the Dual Time

flowchart
graph TD
    A["Digital Clock"] --> B["Dual Time Mode"]
    B --> C["hold [M"]]
    B --> D["hold [M"]]
    E["digits have been selected (flashing)"] --> F["Setting Display"]
    G["Minute Hour"] --> H["[M"]]
    H --> I["[S/S"] / [L/R]]
    I --> J["Increase/Decrease the number"]
    I --> K["Increase/Decrease the number at a higher speed"]
    L["Dual Time Setting Sequence"]
Dual Time Mode
- The Watch includes a function to show the time of a second time zone - Dual Time Mode.
- The second digit of the dual time synchronizes with the Current Time.
To Set the Dual Time
- To select the setting display, hold the [M] button for 2 seconds in the Dual Time Mode and the digits have been selected will flashing.
- In the setting display, press the [M] button to change the selection between hour and minute.
- When the digits are flashing (selected), press the [S/S] / [L/R] button to increase / decrease the number. (Hold down the button to change the number at a higher speed).
- When the setting is completed, press and hold the [M] button to exit the setting display.
9.0 Altimeter Mode - Temperature and History Display

flowchart
graph TD
    A["Current Temperature: 37.0°C"] --> B["Current Attitude: 100"]
    B --> C["Current Time: 12:10"]
    C --> D["Altitude Value Altitude Tendency"]
    D --> E["[L/R"] hold["L/R"]]
    E --> F["200°C: 300"]
    F --> G["[S/S"]]
    G --> H["200°C: 12:00"]
    H --> I["History Display"]
    I --> J["[L/R"]]
    J --> K["History Display (-2 to -34 hour)"]
    K --> L["History Display"]
    style A fill:#f9f,stroke:#333
    style B fill:#f9f,stroke:#333
    style C fill:#f9f,stroke:#333
    style D fill:#ccf,stroke:#333
    style E fill:#ccf,stroke:#333
    style F fill:#ccf,stroke:#333
    style H fill:#ccf,stroke:#333
    style I fill:#ccf,stroke:#333
    style J fill:#ccf,stroke:#333
    style K fill:#ccf,stroke:#333
    style L fill:#ccf,stroke:#333
Functional Display
- Altimeter mode includes two functional displays: altitude value or altitude tendency, which are shown in the middle of display.
- The top line shows the temperature and bottom line shows the time.
History Display
- The watch can stores up to 34 past hourly data including altitude and temperature.
- Press [L/R] to recall the latest hourly data, corresponding history data (altitude and temperature) with flashing time-stamp will be shown.
- Press [L/R] to recall next hourly data as adjacent diagram.
- Hold [L/R] for 2 seconds can return to current time display instantly.
IMPORTANT: If you want to have an accurate reading of air temperature, you must take off the watch from the wrist that prevents body temperature effect on your watch.
IMPORTANT: Altimeter updated rate is 1 second for the first 5 minutes, then 10 seconds for next 24 hours and 1 minute afterward.
9.1 Altimeter Mode - Setting the Altimeter

flowchart
graph TD
    A["Altimeter Display"] -->|2_seconds_hold["M"] hold["M"]| B["SET 30"]
    C["Done display"] -->|2_seconds_hold["M"]| D["SET Default YES"]
    B --> E["Recall last setting value display"]
    D --> F[""YES" displayDone"]
    E --> G["Sea level pressure display"]
    F --> H[""No" display"]
    G --> I["[S/S"] / [L/R]]
    H --> J["[S/S"] / [L/R]]
    I --> K["Increase/Decrease the number"]
    J --> L["Increase/Decrease the number at a higher speed"]
    K --> M["Altimeter Setting Sequence"]
    L --> M
How to Set the Altitude and Sea level pressure
- To select the setting display, hold the [M] button for 2 seconds, the word "SET" and the flashing value of altitude will appear.
- In the setting display, press the [M] button to change the selection between altitude, sea level pressure and default setting.
- When the digits are flashing (selected), press the [S/S] or [L/R] button to increase / decrease the number. (Hold down the button to change the number at a higher speed).
Reset to Default
• In order to adjust the altitude to default value, select "YES" in Set Default Display as adjacent diagram, press [M] to confirm and "Done!" message will be shown.
- To exit the Adjustment Display, hold the [M] button for 2 seconds, and the Watch will go back to the Altimeter Mode.
10.0 Track Mode

flowchart
graph TD
    A["Current Temperature 38.2°C"] --> B["Track Altitude Display"]
    B --> C["Max Altitude Display"]
    C --> D["Accumulated Descent Altitude Display"]
    D --> E["Accumulated Ascent Altitude Display"]
    E --> F["Reset Display"]
    F --> G["Hold [L/R"]]

    subgraph Process Steps
        H["track altitude"] --> I["Max Altitude Display"]
        J["Min Altitude Display"] --> K["Accumulated Ascent Altitude Display"]
    end

    style A fill:#f9f,stroke:#333
    style B fill:#ccf,stroke:#333
    style C fill:#cfc,stroke:#333
    style D fill:#fcc,stroke:#333
    style E fill:#cff,stroke:#333
    style F fill:#ffc,stroke:#333
    style G fill:#cfc,stroke:#333
How to Measure the Relative Altitude
- The Watch can measure relative altitude. For example, it can measure the ascending or descending altitude between the starting point and the finish point of a trail.
- When the Track mode is selected, the icon "TRK" will appear on the screen.
- To start measure the ascending or descending altitude of a trail, hold [L/R] to reset the reading to zero and press [S/S] to start tracking at the starting point of a trail. The flashing “▲” indicator will be shown on the display.
- You can check the reading at any point you like and it shows the altitude relative to the starting point.
- When you finish the Tracking, press [S/S] to stop the function.
Track Mode
- Press [L/R] to recall the maximum height/temperature, minimum height/temperature, accumulated ascent altitude, accumulated descent altitude as adjacent diagram.
Update Rate
• The watch will updated the reading automatically.
- For the first 5 minutes, when the Track mode is selected, it will updated every second.
• Will update every 10 seconds in the next 24 hours.
• Afterwards, it will update every minute.
11.0 Barometer Mode - Temperature and History Display

flowchart
graph TD
    A["Current Temperature: 38.2°C"] --> B["Pressure Value: 1000.0"]
    C["Current Pressure: 12:10"] --> B
    D["Current Time: [S/S"]] --> E["Sea Level Pressure Tendency: 38.2°C"]
    F["L/R"] hold["L/R"] --> G["Pressure Value: 20.0°C"]
    H["20.0°C"] --> I["Time Stamp: 12:00"]
    J["20.0°C"] --> K["Time Stamp: 12:00"]
    L["20.0°C"] --> M["Time Stamp: 12:00"]
    N["20.0°C"] --> O["Time Stamp: 12:00"]
    P["20.0°C"] --> Q["Time Stamp: 12:00"]
    R["20.0°C"] --> S["Time Stamp: 12:00"]
    T["20.0°C"] --> U["Time Stamp: 12:00"]
    V["20.0°C"] --> W["Time Stamp: 12:00"]
    X["20.0°C"] --> Y["Time Stamp: 12:00"]
    Z["20.0°C"] --> AA["Time Stamp: 12:00"]
    AB["20.0°C"] --> AC["Time Stamp: 12:00"]
    AD["20.0°C"] --> AE["Time Stamp: 12:00"]
    AF["20.0°C"] --> AG["Time Stamp: 12:00"]
    AH["20.0°C"] --> AI["Time Stamp: 12:00"]
    AJ["20.0°C"] --> AK["Time Stamp: 12:00"]
    AL["20.0°C"] --> AM["Time Stamp: 12:00"]
    AN["20.0°C"] --> AO["Time Stamp: 12:00"]
    AP["20.0°C"] --> AQ["Time Stamp: 12:00"]
    AR["20.0°C"] --> AS["Time Stamp: 12:00"]
    AT["L/R"] --> AU["History Display (-2 to -34 hour)"]
    AU --> AV["History Display"]
    AW["L/R"] --> AX["History Display"]
    AY["Pressure Value"] --> AZ["L/R"] hold
    BA["Sea Level Pressure Tendency"] --> BB["L/R"] hold
    BC["Cursor moving direction"] --> BD["-23 hour"]
    BE["Current time"] --> BF["-23 hour"]
    BG["flashing cursor (1st record at the hour)"] --> BH
Functional Display
- Barometer mode includes two functional displays: pressure value or sea level pressure tendency, which are shown in the middle of display.
- The top line shows the temperature and bottom line shows the time.
History Display
- The watch can stores up to 34 past hourly data including sea level pressure and temperature.
- Press [L/R] to recall the latest hourly data, corresponding history data (sea level pressure and temperature) with flashing time-stamp will be shown.
- Press [L/R] to recall next hourly data as adjacent diagram.
- Hold [L/R] for 2 seconds can return to current time display instantly.
IMPORTANT: If you want to have an accurate reading of air temperature, you must take off the watch from the wrist that prevents body temperature effect on your watch.
IMPORTANT: Barometer updated rate is 1 second for the first 5 minutes, then 10 seconds for next 24 hours and 1 minute afterward.
11.1 Barometer Mode - Setting the Pressure
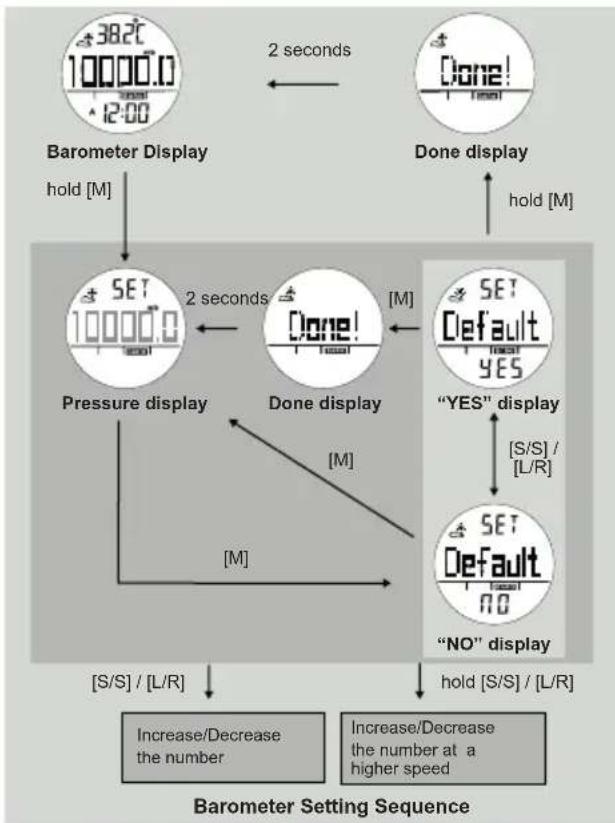
flowchart
graph TD
    A["Barometer Display"] -->|hold["M"]| B["Pressure display"]
    C["Done display"] -->|hold["M"]| D["Done!"]
    B -->|2 seconds| E["SET 10000.0"]
    D -->|2 seconds| F["SET Default YES"]
    E --> G["“NO” display"]
    F --> H["“S/S” / [L/R"]]
    G --> I["Increase/Decrease the number"]
    G --> J["Increase/Decrease the number at a higher speed"]
    style A fill:#f9f,stroke:#333
    style C fill:#f9f,stroke:#333
    style B fill:#ccf,stroke:#333
    style D fill:#ccf,stroke:#333
    style E fill:#cfc,stroke:#333
    style F fill:#cfc,stroke:#333
    style G fill:#fcc,stroke:#333
    style H fill:#fcc,stroke:#333
    style I fill:#cff,stroke:#333
    style J fill:#cff,stroke:#333
How to Set the Barometer
- To select the setting display, hold the [M] button for 2 seconds, the word "SET" and the flashing value of pressure will appear.
- In the setting display, press the [M] button to adjust the pressure.
- When the digits are flashing (selected), press the [S/S] or [L/R] button to increase / decrease the number. (Hold down the button to change the number at a higher speed).
Reset to Default
- In order adjust the pressure to default value, select "YES" in Set Default Display as adjacent diagram, press [M] to confirm and "Done!" message will shown.
- To exit the Adjustment Display, hold the [M] button for 2 seconds, and the Watch will go back to the Barometer Mode.
12.0 Compass Mode - Precautions

Precautions for using the Compass
- Keep your Watch away from magnets or any appliances which may contain magnetic objects such as mobile phones, speakers, motors and etc.
- The Watch, like most magnetic compass, points to the magnetic north which is slightly different from the true north. Check the 'What is Magnetic Declination' section for more details.
- Perform the compass calibration from time to time, because the calibration can ensure the precision of the compass.
• To achieve an accurate result, you should avoid measuring direction on the following conditions:
1) The watch is placed close to the magnetic objects.
2) The watch is placed close to the metal objects.
3) The watch is placed close to the electrical appliances.
4) The watch is placed inside a moving object or a ferroconcrete building.
12.1 Compass Mode - Compass Directions and Bearing Directions

| Marks | Compass Directions Bearing Directions | |
| N | North | 349° - 11° |
| NNE | North Northeast | 12° - 33° |
| NE | Northeast | 34° - 56° |
| ENE | East Northeast | 57° - 78° |
| E | East | 79° - 101° |
| ESE | East Southeast | 102° - 123° |
| SE | Southeast | 124° - 146° |
| SSE | South Southeast | 147° - 168° |
| S | South | 169° - 191° |
| SSW | South Southwest | 192° - 213° |
| SW | Southwest | 214° - 236° |
| WSW | West Southwest | 237° - 258° |
| W | West | 259° - 281° |
| WNW | West Northwest | 282° - 303° |
| NW | Northwest | 304° - 326° |
| NNW | North Northwest | 327° - 348° |

The Direction of an Object
- The direction of an object from a point can be specified in either compass directions or bearing directions.
• The Watch includes both compass directions and bearing directions.
The Compass Directions
- The compass directions are shown in the adjacent table.
- For example, in the figure on the left, the compass direction of object B from point A is due East. The compass direction of object C from point A is Southeast. The compass direction of object D from point A is Northwest.
The Bearing Directions
- The Bearing direction of an object is defined as the angular difference between North and the object. (Assume 0^ for due North, and the measuring range is from 0^ to 359^ ).
- For example, in the figure on the left, the bearing direction of object B from point A is 90^ . The bearing direction of object C from point A is 135^ . The bearing direction of object D from point A is 315^ .
12.2 Compass Mode - Compass Mode

Compass Mode
- In the Compass Mode, the top row of the display shows the bearing direction.
- The middle row of the display shows the compass direction.
- The bottom row of the display shows the current time in hour and minute.
- The pointer encircled the display shows the direction of magnetic North analogically.
IDLE Mode
- If no key is pressed for about 1 minute, the watch will go to the IDLE Mode automatically. To activate the compass again, press any button.
Distortion
• If distortion is detected, the bearing direction will flash.
- Please refer to the coming section "Calibrating the Compass" to restore the compass to normal operation when distortion is detected.
12.3 Compass Mode - Applications of the Compass


Check your position by Backward Bearing Directions
- Spot two distant identifiable landmarks like mountains, light-house, fort or building from your current position, for example the mountains A and B.
- Check out the backward bearing directions of mountains A and B from your current position, for example 135° from mountain A and 270° from mountain B.
- Use a ruler to draw a line 135° from the north at the mountain A to your current position on the map. Draw another line 270° from the north at the mountain B to your current position on the map.
- Your current position on the map will be the intersection (point A) of the lines 135° from the mountain A and 270° from the mountain B.
The Compass Directions
- During a trekking, the Watch can keep your course in a correct way. For example, the correct trail starts from point A and finishes at point E as drawn on the adjacent map.
- Mark the points (identifiable landmarks) where the trail turns its direction or the trail branches its way, such as the points A, B, C, D and E on the adjacent map.
- Find out the bearing directions of point B from point A (315°), point C from point B (0°), point D from point C (225°), and then point E from point D (315°).
- During the trekking, make sure that the heading direction is 315° from point A to point B. Performing the similar checking in other sections of the trail helps you keep your course correctly.
IMPORTANT: If you are in doubt of the directions and positions of the trail, consult the park administration office before starting the trekking.
12.4 Compass Mode - Magentic Declination
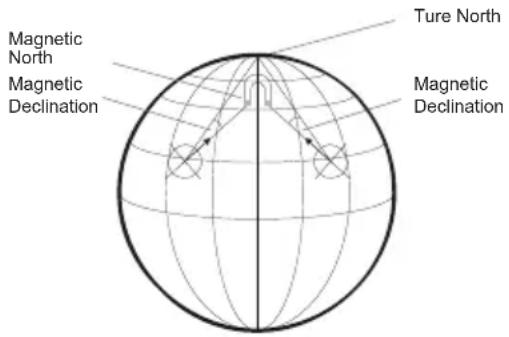
What is Magnetic Dection
- The Magnetic North Pole is slightly different from the True North Pole.
- The WeatherMaster, like most magnetic compass, points to the Magnetic North Pole. On the contrary, everything measured on a map is related to the True North Pole.
- The angular difference between Magnetic North Pole and True North Pole is called magnetic declination. Its magnitude (degrees and minutes) and direction (easterly and westerly) depend on where you are in the world.
- For a serious compass user who intends to perform an accurate navigation, the compass must be adjusted for magnetic declination.
- The Watch also includes a compensation setting for Magnetic Declination. Check the coming section "Calibrating the compass - Magnetic Declination Mode" for more details.
Magnetic Declination Information
- Most topographic maps include a small arrow which shows the magnetic north pole and magnetic declination information.
- For the benefit of the user, this manual includes the magnetic declinations for some major cities. Check the coming section 'Magnetic Declination at Major Cities' for more details.
- For those cities, their names are not included on the list, please check the online magnetic declination information at: 1.http://www.geolab.nrcan.gc.ca/geomag/e_cgrf.html 2.http://www.ngdc.noaa.gov/cgi-bin/seg/gmag/fldsnth1.pl
12.5 Compass Mode - Magnetic Declination Compensation
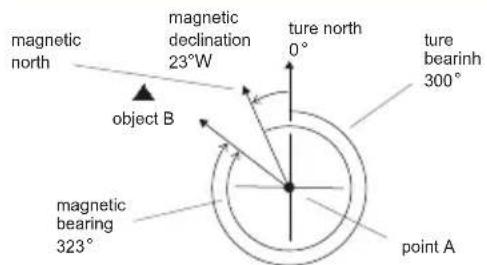
True Bearing (TB) =
Magnetic Bearing (MB) + Westerly Magnetic Declination (W)
300^ (TB) = 323^ (MB) + 23^ (E)
Compensate the Bearing with Westerly (W) Magnetic Declination

True Bearing (TB) =
Magnetic Bearing (MB) + Easterly Magnetic Declination (E)
300^ (TB) = 278^ (MB) + 22^ (E)
Compensate the Bearing
with Easterly (E) Magnetic Declination
Magnetic Declination Compensation
-
To compensate for an object's bearing, either subtract westerly (W) magnetic declination or add easterly(E) magnetic declination with the magnetic bearing.
• Example 1: Westerly magnetic declination 23^ and the compass needle points 323^ . -
TB = MB - W. When MB = 323°; W = 23°
- TB = 323° - 23°
- TB = 300°
- The true bearing is 300°
• Example 2: Easterly magnetic declination 22^ and the compass needle points 278^ .
- TB = MB + E. When MB = 278°; E = 22°
- TB = 278° + 22°
- TB = 300°
- The true bearing is 300°
- The Watch allows you to compensate the compass bearing at a place where the magnetic declination is either Westerly declination or Easterly declination.
- Check the coming section "Calibrating the Compass" for more details of the setting.
12.6 Compass Mode - Magnetic Declination at Major Cities
| No. | Country/Place | Major City | Declination | No. | Country/Place | Major City | Declination |
| 1 | Afghanistan | Kabul | +3E | 33 | Netherlands | Amsterdam | +0E |
| 2 | Australia | Canberra | +12E | 34 | New Zealand | Wellington | +22E |
| 3 | Austria | Vienna | +3E | 35 | Norway | Oslo | +2E |
| 4 | Bahrain | Manama | +2E | 36 | Pakistan | Islamabad | +2E |
| 5 | Bangladesh | Dhaka | +0E | 37 | Philippines | Manila | -1W |
| 6 | Belgium | Brussels | +0E | 38 | Portugal | Lisbon | -3W |
| 7 | Brazil | Brasilia | -21W | 39 | Russia | Moscow | +10E |
| 8 | Canada | Ottawa | -14W | 40 | Singapore | Singapore | +0E |
| 9 | Chile | Santiago | +3E | 41 | SouthAfrica | Cape Town | -24W |
| 10 | China | Beijing | -6W | 42 | Spain | Madrid | -2W |
| 11 | China | Hong Kong | -2W | 43 | Sweden | Stockholm | +5E |
| 12 | Costa Rica | San Jose | -1W | 44 | Switzerland | Bern | +1E |
| 13 | Cuba | Havana | -4W | 45 | Taiwan | Tai-pei | -4W |
| 14 | Czech Republic | Prague | +3E | 46 | Thailand | Bangkok | -1W |
| 15 | Denmark | Copenhagen | +3E | 47 | UAE | Abu Dhabi | +2E |
| 16 | Egypt | Cairo | +4E | 48 | United Kingdom | London | -2W |
| 17 | Finland | Helsinki | +8E | 49 | United States | Washington, DC | -11W |
| 18 | France | Paris | -1W | 50 | United States | Juneau | +22E |
| 19 | Germany | Berlin | +3E | 51 | United States | Phoenix | +11E |
| 20 | Greece | Athens | +4E | 52 | United States | Little Rock | +1E |
| 21 | Hungary | Budapest | +4E | 53 | United States | Sacramento | +14E |
| 22 | India | New Delhi | +1E | 54 | United States | Denver | +9E |
| 23 | Indonesia | Jakarta | +1E | 55 | United States | Atlanta | -4W |
| 24 | Israel | Jerusalem | +4E | 56 | United States | Honolulu | +10E |
| 25 | Italy | Rome | +2E | 57 | United States | Boston | -15W |
| 26 | Japan | Tokyo | -7W | 58 | United States | Saint Paul | +1E |
| 27 | Jordan | Amman | +4E | 59 | United States | Jackson | +0E |
| 28 | Kenya | Nairobi | +0E | 60 | United States | Santa Fe | +9E |
| 29 | Korea | Seoul | -8W | 61 | United States | Oklahoma City | +5E |
| 30 | Malaysia | Kuala Lumpur | +0E | 62 | United States | Salem | +16E |
| 31 | Mexico | Mexico City | +6E | 63 | United States | Harrisburg | -11W |
| 32 | Nepal | Kathmandu | +0E | 64 | United States | Salt Lake City | +12E |
NOTE: Since magnetic declinations will be changed with time, it is recommended to check the updated data from following sites: http://www.magnetic-declination.com/ & http://www.ngdc.noaa.gov/geomagmodels/Declination.jsp
12.7 Calibrating Mode - Calibration the Compass

flowchart
graph TD
    A["Compass Mode"] -->|hold["M"] hold["M"]| B["Rotation Calibration Display"]
    B --> C["Magnetic Declination Display"]
    D["000°"] --> E["W---N---E"]
    E --> F["12:00"]
    G["90°"] --> H["Declination"]
    H --> I["[M"]]
    I --> B
When to Calibrate the Compass
• The Watch has to employ a compass calibration in one of the following conditions:
1) The Watch is being used for the first time,
2) The battery is replaced,
3) The bearing direction digits are flashing,
4) The compass is used in a location that is apart from the place in which the compass has been calibrated,
5) The user intends to maintain the precision of the digital compass.
How to Calibrate the Compass
- The compass calibration includes two different processes: Rotation Calibration Mode and Magnetic Declination Setting.
- It is advisable to conduct both calibrations from time to time to achieve a more accurate reading.
IMPORTANT: If the compass has not been calibrated, the direction made by the compass may be inaccurate.
12.8 Calibrating the compass - Compass Rotation Calibration Mode

flowchart
graph TD
    A["Compass Mode hold [M"] hold["M"]] --> B["CALI"]
    B --> C["Rotation Calibration Start Display"]
    C --> D["S/S"]
    D --> E["CALI"]
    E --> F["Rotate the watch"]
    F --> G["Done!"]
    G --> H["Done Display"]
    H --> I["CALI"]
    I --> J["Rotation Calibration Complete"]
    J --> K["CALI"]
    K --> L["Rotation Calibration Turning Display"]
    L --> M["Magnetic Declination Display"]
    M --> N["90° Declinat"]
    N --> O["Compass Calibration"]
Rotation Calibration Display
- To select the Rotation Calibration Display, hold the [M] button in the Compass Mode.
• To start rotation calibration, press [S/S] button once. - Start turning the watch (keep your watch horizontally) in the same direction.
- Rotote the watch until the rectangular pattern is filled.
• The word "Done!" will be shown when finishes.
12.9 Calibrating the compass - Magnetic Declination Mode

flowchart
graph TD
    A["000°"] --> B["12:00"]
    B --> C["Compass Mode"]
    C --> D["hold [M"] hold["M"]]
    D --> E["CALI"]
    E --> F["Rotation Calibration Stop Display"]
    F --> G["90° Declination"]
    G --> H["Declination Display"]
    H --> I["hold [S/S"]/[L/R]]
    I --> J["Increase/Decrease the number"]
    J --> K["Increase/Decrease the number at a higher speed"]
    K --> L["Magnetic Declination Display"]
Magnetic Declination Mode
- Check the coming section "Magnetic Declination at Major Cities" to choose the magnetic declination of the city which is close to your current position. The angle will be input into the Watch during the calibration.
- To select Magnetic Declination Display, press the [M] button in Rotation Calibration Display.
- When the current magnetic declination appears, press the [S/S] or [L/R] button to increase/ decrease the number. (Hold down the button to change the number at a higher speed).
- When the setting is completed, hold the [M] button to confirm the setting and exit the adjustment display.
13.0 Low Battery Indication & Battery Replacement

Low Battery Indication
Low Battery Detection
- When the battery-low indicator appears on the display, it means that the capacity of the battery is low. It is recommended to replace the battery with a new CR2032 battery.
- However, if the appearance of battery-low indicator is caused by using the Watch under very cold condition, the indicator will disappear when normal temperature returns.
NOTE: It is recommended to complete the battery replacement by a certified service agency because this Watch contains delicate electronic sensors and components.
NOTE: The memory will be cleared when the battery is replaced. Follow the previous section "Calibrating the Compass" to calibrate the compass before using the Compass.
14.0 Power Saving Mode
![MON 12:00:00 1-9" Current Time Mode hold [L/R] 5 seconds Any button Power Saving Mode (LCD display turned off)](/content/2026/06/1260867/images/b05ef3d72cfd6504af94d72ee813a09f697593c763b19db97373cfd81cfb1710.jpg)
Power Saving Mode
- This Watch has a Power Saving Function which can turn off the LCD display so that the battery can last longer.
- In the Power Saving Mode, the watch function is still working normally. (i.e. The timekeeping function is still running in Power Saving Mode.)
How to enter/exit the Power Saving Mode
- To enter the Power Saving Mode, hold down the [L/R] button in Current Time Mode for about 5 seconds and the LCD display will be turned off.
- Press any key in Power Saving Mode to exit this mode and the LCD display will be resumed.
15.0 Specifications
Current Time Mode
- Normal Time with month, day, day of week, hour, minute and second display
Time System
• 12-hour or 24-hour format
Calendar System
• MM/DD or DD/MM format
• Auto-Calendar pre-programmed from the year 2000 to 2099
Dual Time function
Weather Forecast
• 4 symbols to indicate the predicated weather
Daily Alarm Mode
2 daily alarms
Alarm Sound
• Sounds for 30 seconds at preset time of real time clock
Chronograph Mode
• Resolution: 1/100 second
Measuring Range
• 99 hours 59 minutes 59.99 seconds
Measuring Mode
- 10 laps memory
- Recall Lap memory and total time
Count Down Timer
• Resolution: 1 second
Measuring Range
• 99 hours 59 minutes 59 seconds
Time Sound
• Last 10 minutes beeps once per minute
• Last 1 minutes beeps once per 10 seconds
• Last 5 seconds beeps once per second
• Sounds for 30 seconds when counting to zero
Temperature
Resolution
- 0.1°C
• 0.1°F when below 100°F, 1°F when above >100°F.
Range:
- -10 \~ +60 °C / 14 \~ +140°F
Unit
• °C /°F
Altimeter Mode
Measuring range
• -706 to +9164 meter / -2316 to 30065 feet
Unit
• 1m (1 ft)
History Recall
• 34 hourly history data (altitude and temperature)
15.0 Specifications
Display
• Graphical display for altitude tendency
Track Mode
Display
- Track altitude difference
- User selectable on/off
• Show max/min altitude, max/min temperature, accumulated altitude ascent/descent along the track.
Barometer Mode
Resolution
• 0.1mb / 0.1 hPa / 0.01 inHg
Measuring range
• 300 to 1100 mb (hPa) / 8.86 to 32.48 inHg
Unit
- mb/hPa/inHg
History Recall
• 34 hourly history data (sea level pressure & temperature)
Display
• Graphical display for sea level pressure tendency
Other
• Pressure offset adjustable
Compass Mode
Resolution
• 1°
Display
• Cardinal direction in scrolling matrix
Backlight
• Electro - Luminescent (EL) backlight
Other
- Hourly chime
• Key tome ON/OFF
• Power saving mode - Low battery detection
1.0 Introduction
flowchart
graph TD
    A["Current Time Display"] --> B["12:00:00"]
    B --> C["12/24 Hour Format"]
    C --> D["Chime ON/OFF"]
    D --> E["Key Tone ON/OFF"]
    E --> F["Unit Celsius/Fahrenheit"]
    F --> G["Unit Meter/feet"]
    G --> H["Unit mb/hpa/inHg"]
    H --> I["Increase/Decrease the number"]
    H --> J["Increase/Decrease the number at a higher speed"]
    K["digits have been selected (flashing)"] --> L["12:00:00"]
    L --> M["Current Time Setting Display"]
    M --> N["12/24 Hour Format"]
    N --> O["Day"]
    O --> P["Month"]
    P --> Q["Unit Meter/feet"]
    Q --> R["Unit mb/hpa/inHg"]
    S["Current Time Setting Sequence"] --> T["[S/S"] / [L/R]]
    T --> U["[S/S"] / [L/R]]
    U --> V["[S/S"] / [L/R]]

flowchart
graph LR
    A["Lap 1 Time Display 0:20:00"] -->|[S/S]| B["the next lap memories"]
    B -->|[S/S]| C["Total Time Display 0:20:00"]
    B -->|[L/R]| D["->"]
    C -->|[L/R]| E["->"]
Compte à Rebours
flowchart
graph TD
    A["Timer Display"] -->|hold["M"]| B["Hour"]
    C["Setting Display"] -->|hold["M"]| B
    B --> D["Minute Second"]
    D --> E["[M"]]
    E --> F["Increase/Decrease the number"]
    E --> G["Increase/Decrease the number at a higher speed"]
    H["digits have been selected (flashing)"] --> I["1:0000 12:00"]
    I --> J["Hour"]
    J --> K["[M"]]
    K --> L["Minute Second"]
    L --> M["[M"]]
    M --> N["Increase/Decrease the number"]
    M --> O["Increase/Decrease the number at a higher speed"]
flowchart
graph TD
    A["Dual Time Mode"] -->|hold["M"]| B[" "]
    B --> C["MinuteHour"]
    C --> D["[S/S"] / [L/R]]
    D --> E["Increase/Decrease the number"]
    C --> F["Increase/Decrease the number at a higher speed"]
    G["digits have been selected (flashing)"] --> H["Setting Display"]
    I["Dual Time Setting Sequence"] --> J["12:00:00"]
    K["Dual Time Setting Sequence"] --> L["12:00:00"]

IMPORTANT: If you are in doubt of the directions and positions of the trail, consult the park administration office before starting the trekking.
True Bearing (TB) =
Magnetic Bearing (MB) + Westerly Magnetic Declination (W)
300^ (TB) = 323^ (MB) +23^ (E)
Compensate the Bearing
with Westerly (W) Magnetic Declination

True Bearing (TB) =
Magnetic Bearing (MB) + Easterly Magnetic Declination (E)
300^ (TB) = 278^ (MB) + 22^ (E)
Compensate the Bearing
with Easterly (E) Magnetic Declination
| No. | Country/Place | Major City | Declination | No. | Country/Place | Major City | Declination |
| 1 | Afghanistan | Kabul | +3E | 33 | Netherlands | Amsterdam | +0E |
| 2 | Australia | Canberra | +12E | 34 | New Zealand | Wellington | +22E |
| 3 | Austria | Vienna | +3E | 35 | Norway | Oslo | +2E |
| 4 | Bahrain | Manama | +2E | 36 | Pakistan | Islamabad | +2E |
| 5 | Bangladesh | Dhaka | +0E | 37 | Philippines | Manila | -1W |
| 6 | Belgium | Brussels | +0E | 38 | Portugal | Lisbon | -3W |
| 7 | Brazil | Brasilia | -21W | 39 | Russia | Moscow | +10E |
| 8 | Canada | Ottawa | -14W | 40 | Singapore | Singapore | +0E |
| 9 | Chile | Santiago | +3E | 41 | SouthAfrica | Cape Town | -24W |
| 10 | China | Beijing | -6W | 42 | Spain | Madrid | -2W |
| 11 | China | Hong Kong | -2W | 43 | Sweden | Stockholm | +5E |
| 12 | Costa Rica | San Jose | -1W | 44 | Switzerland | Bern | +1E |
| 13 | Cuba | Havana | -4W | 45 | Taiwan | Tai-pei | -4W |
| 14 | Czech Republic | Prague | +3E | 46 | Thailand | Bangkok | -1W |
| 15 | Denmark | Copenhagen | +3E | 47 | UAE | Abu Dhabi | +2E |
| 16 | Egypt | Cairo | +4E | 48 | United Kingdom | London | -2W |
| 17 | Finland | Helsinki | +8E | 49 | United States | Washington, DC-11W | |
| 18 | France | Paris | -1W | 50 | United States | Juneau | +22E |
| 19 | Germany | Berlin | +3E | 51 | United States | Phoenix | +11E |
| 20 | Greece | Athens | +4E | 52 | United States | Little Rock | +1E |
| 21 | Hungary | Budapest | +4E | 53 | United States | Sacramento | +14E |
| 22 | India | New Delhi | +1E | 54 | United States | Denver | +9E |
| 23 | Indonesia | Jakarta | +1E | 55 | United States | Atlanta | -4W |
| 24 | Israel | Jerusalem | +4E | 56 | United States | Honolulu | +10E |
| 25 | Italy | Rome | +2E | 57 | United States | Boston | -15W |
| 26 | Japan | Tokyo | -7W | 58 | United States | Saint Paul | +1E |
| 27 | Jordan | Amman | +4E | 59 | United States | Jackson | +0E |
| 28 | Kenya | Nairobi | +0E | 60 | United States | Santa Fe | +9E |
| 29 | Korea | Seoul | -8W | 61 | United States | Oklahoma City | +5E |
| 30 | Malaysia | Kuala Lumpur | +0E | 62 | United States | Salem | +16E |
| 31 | Mexico | Mexico City | +6E | 63 | United States | Harrisburg | -11W |
| 32 | Nepal | Kathmandu | +0E | 64 | United States | Salt Lake City | +12E |
NOTE: Since magnetic declinations will be changed with time, it is recommended to check the updated data from following sites: http://www.magnetic-declination.com/ & http://www.ngdc.noaa.gov/geomagmodels/Declination.jsp
12.7 Mode de Calibrage – Calibrer la Boussole

flowchart
graph TD
    A["Compass Mode"] -->|hold["M"] hold["M"]| B["Rotation Calibration Display"]
    B --> C["Magnetic Declination Display"]
    D["000° W---N---E 12:00"] --> A
    E["90° Declination"] --> F["[M"]]
    G["CalI"] --> B
Quand Calibrer la Boussole
flowchart
graph TD
    A["Compass Mode"] --> B["Hold [M"] hold["M"]]
    B --> C["CALI"]
    C --> D["Rotation Calibration Start Display"]
    D --> E["S/S"]
    E --> F["CALI"]
    F --> G["Rotation Calibration"]
    G --> H["Rotate the watch"]
    H --> I["Magnetic Declination Display"]
    I --> J["90° Declinat"]
    J --> K["Rotate Calibration Turning Display"]
    K --> L["Done!"]
    L --> M["Done Display"]
    M --> N["CALI"]
    N --> O["Rotation Calibration Complete"]
    O --> P["Magnetic Declination Display"]
    P --> Q["90° Declinat"]
    Q --> R["Compass Calibration"]
flowchart
graph TD
    A["000°"] --> B["12:00"]
    B --> C["Compass Mode"]
    C --> D["hold [M"] hold["M"]]
    D --> E["CALI"]
    E --> F["Rotation Calibration Stop Display"]
    F --> G["90° Declineat"]
    G --> H["Declination Display"]
    H --> I["hold [S/S"]/[L/R] --> [S/S]/[L/R]]
    I --> J["Increase/Decrease the number"]
    J --> K["Increase/Decrease the number at a higher speed"]
    K --> L["Magnetic Declination Display"]
Low Battery Indication
- Introduction
- Buttons and Its Functions - Model A and Model B
- Mode Button [M]
- Sensor Button [SR] (Model B), Sensor Button [SR] / EL Button[EL] (Model A)
- Start/Stop Button [S/S]
- Lap/Reset Button [L/R]
- EL Button [EL] (Model B)
- Note
- Current Time Mode - Functional Display
- Functional Display
- Current Time Mode - Weather Forecast Feature
- Weather Forecast Feature
- How to Indicate the Coming Weather
- Current Time Mode - Setting the Current Time
- How to Set the Current Time
- Daily Alarm Mode - Daily Alarm 1, Daily Alarm 2
- Daily Alarm 1 and Daily Alarm 2
- How to Turn ON/OFF the Daily Alarm
- Daily Alarm Mode - Setting the Alarm
- How to Set the Alarm 1 and Alarm 2
- Chronograph Mode - Start/Stop the Chronograph
- Chronograph Mode
- How to Start/Stop the Chronograph
- How to Reset the Chronograph
- Chronograph Mode - Recording and Recalling Lap Time
- How to Record Lap Time
- How to Recall Lap Times
- How to Reset Lap times
- Timer Mode - Countdown Timer and the Quick-Set-value
- Countdown Timer
- Timer Mode - Setting the Count Down Timer
- How to Set the Count Down Timer
- Timer Mode - Using the Timer
- How to Use the Timer
- Timer Alarm Sound
- How to Reload the Timer
- Dual Time Mode - Dual Time and Setting the Dual Time
- Dual Time Mode
- To Set the Dual Time
- Altimeter Mode - Temperature and History Display
- History Display
- Altimeter Mode - Setting the Altimeter
- How to Set the Altitude and Sea level pressure
- Reset to Default
- Track Mode
- How to Measure the Relative Altitude
- Track Mode
- Update Rate
- Barometer Mode - Temperature and History Display
- Barometer Mode - Setting the Pressure
- How to Set the Barometer
- Compass Mode - Precautions
- Precautions for using the Compass
- Compass Mode - Compass Directions and Bearing Directions
- The Direction of an Object
- The Compass Directions
- The Bearing Directions
- Compass Mode - Compass Mode
- Compass Mode
- IDLE Mode
- Distortion
- Compass Mode - Applications of the Compass
- Check your position by Backward Bearing Directions
- Compass Mode - Magentic Declination
- What is Magnetic Dection
- Magnetic Declination Information
- Compass Mode - Magnetic Declination Compensation
- Magnetic Declination Compensation
- Calibrating Mode - Calibration the Compass
- When to Calibrate the Compass
- How to Calibrate the Compass
- Calibrating the compass - Compass Rotation Calibration Mode
- Rotation Calibration Display
- Calibrating the compass - Magnetic Declination Mode
- Magnetic Declination Mode
- Low Battery Indication & Battery Replacement
- Low Battery Detection
- Power Saving Mode
- Power Saving Mode
- How to enter/exit the Power Saving Mode
- Specifications
- Current Time Mode
- Time System
- Calendar System
- Dual Time function
- Weather Forecast
- Daily Alarm Mode
- Alarm Sound
- Measuring Range
- Measuring Mode
- Count Down Timer
- Time Sound
- Temperature
- Resolution
- Range:
- Unit
- Altimeter Mode
- History Recall
- Display
- Barometer Mode
- Other
- Backlight
- Compte à Rebours
- Mode de Calibrage – Calibrer la Boussole
- Quand Calibrer la Boussole
Brand : Pyle
Model : PSWWM82
Category : Sports Watch