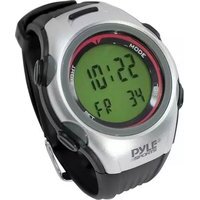
Speed Master PPDM5 - Sports Watch Pyle - Free user manual and instructions
Find the device manual for free Speed Master PPDM5 Pyle in PDF.


| Product Type | Sports Watch |
| Model | Speed Master PPDM5 |
| Brand | Pyle |
| Display Type | Digital LCD |
| Case Material | Plastic |
| Band Material | Resin |
| Case Diameter | 45 mm |
| Case Thickness | 12 mm |
| Weight | 50 g |
| Water Resistance | 50 meters (5 ATM) |
| Power Source | CR2032 battery (included) |
| Battery Life | Approximately 2 years |
| Functions | Time, Date, Chronograph, Stopwatch, Alarm, Daily Alarm |
| Accuracy | ±30 seconds per month |
| Maintenance | Clean with soft cloth, avoid solvents |
| Safety | Not suitable for diving; avoid extreme temperatures |
| Spare Parts | Battery, straps available from Pyle |
| Repair & Service | Contact Pyle customer service for repairs |
| General Information | User manual available in PDF format for free download |
Frequently Asked Questions - Speed Master PPDM5 Pyle
User questions about Speed Master PPDM5 Pyle
0 question about this device. Answer the ones you know or ask your own.
Ask a new question about this device
Download the instructions for your Sports Watch in PDF format for free! Find your manual Speed Master PPDM5 - Pyle and take your electronic device back in hand. On this page are published all the documents necessary for the use of your device. Speed Master PPDM5 by Pyle.
USER MANUAL Speed Master PPDM5 Pyle


Art No.: PYLE_SPORTS-PPDM5
FEATURES
- Daily Step
- Daily Exercise Timer
• Daily Distance
• Daily Calorie
• Dally Fat Bum - Current Speed
• Average Speed
• Maximum Speed
• Target Training (Step / Time / Distance / Speed)
• 7 Days Memory - Week Total Memory
- Odometer
- Dual Time
- Stopwatch
• Km / Mile unit
• 12/24 hour format - Pedometer calibration
- Odometer save
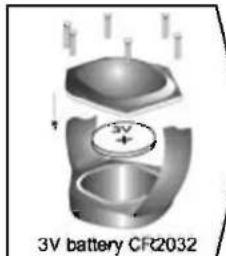
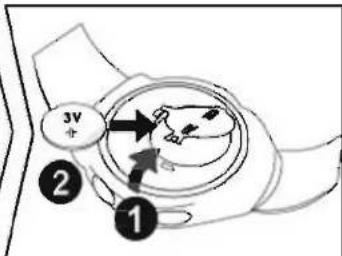
BATTERY INSTALLATION
For the best service of the watch, please go to an experienced watch dealer to change the battery.
Remove the battery cover from the bottom of the watch with a screw driver. Install the 3.0V-battery with the positive facing up and replace the cover. Remove the battery and reinsert it if the LCD displays irregular figures. This will clear and restart the watch's microprocessor.
KEY ASSIGNMENT

-2-
INITIAL SETTING
Pedometer watch
Press the SET, SEL or MODE button (sound signal) until all display segments appear for a short time. You automatically enter First-Use-Setting Mode, press SEL to select and press SET to confirm setting.

flowchart
graph TD
    A["ENG"] -->|SET| B["UNIT"]
    B -->|SET| C["1980 1-1"]
    C -->|SET| D["Input Birthday (1901-2099)"]
    E["Time 24hr"] -->|SET| F["00:00 02"]
    F -->|SET| G["2010 1-1"]
    G -->|SET| H["Input date Year, Date, Month"]
    I["Input Weight 50kg"] -->|SET| J["150cm"]
    J -->|SET| K["CALI YES"]
    K -->|SET| L["Pedometer Calibration"]

Note : If KM is selected, the scale of the unit will be in KM, KG and Meter. If Mile is selected, the scale of the unit will be in Mile, LB and Inch
Note: It is strongly recommended that the user calibrate the pedometer to their personal movement pattern. Otherwise this unit will use only statistical data based on the height input by the user. The performance of the unit will not be in its full capacity.
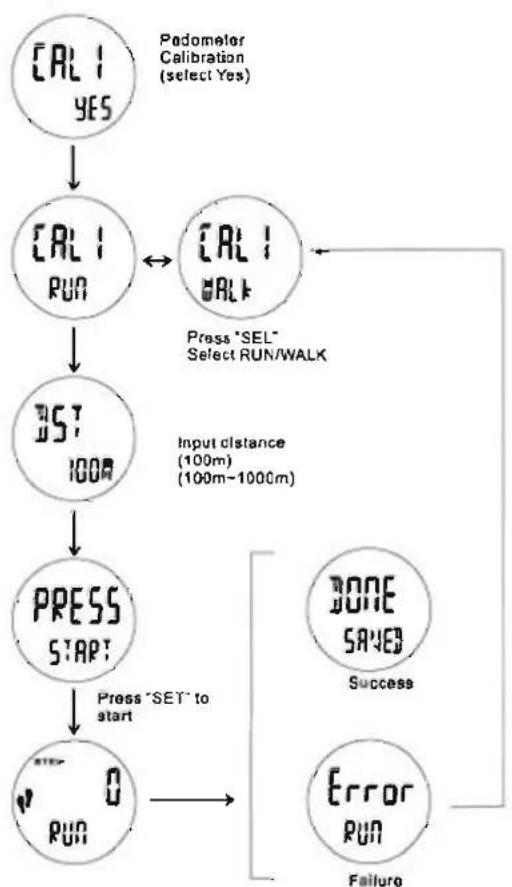
Pedometer Calibration
You can choose between YES and NO with the SEL button. Choose YES and confirm with the SET button.
- The unit enters into Calibrate RUN mode, Press SET to confirm and advance to SET RUN Distance.
- Press SEL to set the run distance, increment by 100 meter. Press SET to confirm the Distance. Now the unit is ready for Calibrate Running Stripe Length. Press SET and start running.
- At the time distance covered, press SET to stop. Display DONE and SAVED appears; the calibration was correct and was saved.
Note: It is important that you also perform the calibration for walking, as described in the following section:
- Press SET again to confirm the calibration for running and enter calibration for walking. Repeat above process for Walking.
Calibration not Successful
In case the calibration was not successful, the display ERROR appears. After a few seconds the display CALI FOR RUNNING or WALKING appears again and you can start a new calibration.
Note: After Calibration, if the height is changed, all calibrated data will be lost. And the stride length will be reset according to the new entry of height.
flowchart
graph TD
    A["CAL1 YES"] --> B["CAL1 RUN"]
    B --> C["35T 100m"]
    C --> D["PRESS START"]
    D --> E["Press SET to start"]
    E --> F["Failure"]

    G["CAL1 OK"] --> H["Press 'SEL' Select RUN/WALK"]
    H --> I["BONE SAVED Success"]
    I --> J["Error RUN"]
After the initial setting, you are ready to go.
TURN ON/OFF Pedometer Function
In Pedometer mode, press SET button until the 2 foot print icon appear to turn on Pedometer function. To turn off, press SET button again.
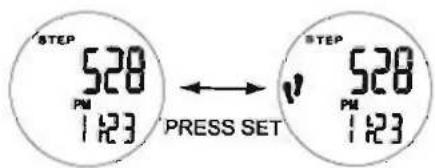
Note: Pedometer function can only be turned ON/OFF in PEDO mode.
Operation Modes
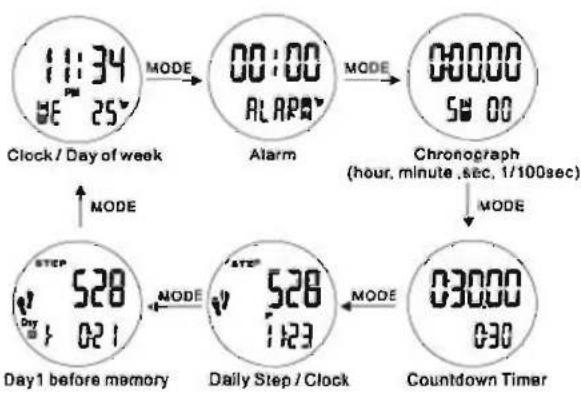
The unit has 6 operation modes: Clock, Alarm, Stopwatch, Timer, Pedometer and Memory
flowchart
graph TD
    A["11:34 DE 25°"] -->|MODE| B["00:00 ALAPB"]
    B -->|MODE| C["00:00 5W 00"]
    C -->|MODE| D["Chronograph (hour, minute, sec, 1/100sec)"]
    D -->|MODE| E["03:00 030"]
    E -->|MODE| F["Daily Step / Clock"]
    F -->|MODE| G["Day1 before memory"]
    G -->|MODE| H["Step 528 Day 1 021"]
Scroll Through the operation mode by pressing the MODE button.
Time Mode
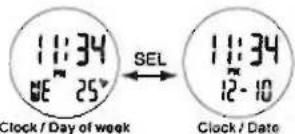
Press MODE button until you reach the time mode, shown by "TIME-1".
Press the SEL button to toggle between Clock / day of week and Clock / Date.
Second Time
The user can set 2 different times with this watch. In Clock mode, HOLD SEL BUTTON to toggle between Time-1 and Time-2. To set clock, HOLD SET BUTTON and repeat time setting procedure.

flowchart
graph LR
    A["T1AE-1"] <--> B["T1AE-2"]
    style A fill:#fff,stroke:#000
    style B fill:#fff,stroke:#000
Daily Alarm Mode
Press MODE button until you reach the alarm mode, shown by "ALARM".
Hold SET button to enter Alarm Setting Mode Press SEL to set desirable Hours, Press SET to confirm and advance to set Minutes. Press SEL to advance to desirable minutes, Press SET to confirm.

Activate/Deactivate Alarm
Press the SEL button when the alarm time is displayed Alarm symbol ▼ is displayed = alarm on Alarm symbol not displayed = alarm off
Switch off Alarm
When the alarm rings, you can switch it off by pressing the MODE, SEL or SET button.
Snooze
If you don't switch off the alarm when it's ringing, the alarm will automatic ring again after 5 minutes.
Stopwatch Mode
Press MODE button until you reach the stopwatch mode, shown by "CHRONO".
In stopwatch mode you can choose between the sub functions
• CHRONO (stopwatch) and
• LAP RECORD (best lap)

Note: Switching between "stopwatch" and "lap record" only works if at least 1 lap has been recorded.
- Press SEL button to start / stop the stopwatch.
- Press SET button to record the lap memory when the stopwatch is counting.
- 99 lap times can be saved. If the lap memory is full, the display FULL appears.
• To reset the stopwatch, press and hold SEL button to zero.

For your reference, you can refer to following methods to take different measurement:.

flowchart
graph TD
    A["Start: Press*SEL*"] --> B["0:00'02"36"]
    B --> C["1:01'36"]
    C --> D["Press*SEL* stop"]
    D --> E["0:36.18"]
    E --> F["1:01'23"]
    F --> G["Hold*SEL* reset"]
    G --> H["0:00.00 54:00"]
    I["No. of Lap"] --> J["Press*SET* split lap (after 1 sec)"]
    J --> K["0:00'03"36"]
    K --> L["0:01'36"]
    L --> M["0:00'07"]
    M --> N["1:02'36"]
    N --> O["No. of Lap"]
    P["No. of Lap"] --> Q["0:00'03"]
    Q --> R["1:01'36"]
    R --> S["FLASH (after 4 sec)"]
    S --> T["0:00'07"]
    U["Press*SEL* to stop stopwatch"] --> V["0:00'05"36"]
    V --> W["1:02'36"]
    W --> X["0:00'12"]
    X --> Y["1:03'36"]
To recall the stopwatch memory
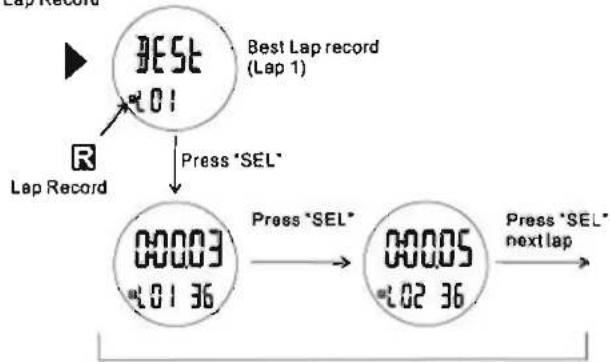
- Press SEL button to stop the stopwatch, then press SET button to enter lap record mode.
- Display show the record of BEST LAP, the icon "BEST" will be displayed.
- Press SEL button to read different lap memories.
- Press SET button to exit the lap record mode.
Press "SET" enter
Lap Record
flowchart
graph TD
    A["Best Lap Record (Lap 1)"] --> B["Lap Record"]
    B --> C["Press 'SEL'"]
    C --> D["00003 L01 36"]
    D --> E["Press 'SEL'"]
    E --> F["00005 L02 36"]
    F --> G["Press 'SEL' nextlap"]
Lap Record
Countdown Timer Mode
Press MODE button until you reach the Countdown timer mode, shown by "TIMER". The pedometer watch possesses a countdown timer of max 9 hours 59 minutes.
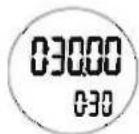
Basic setting 00:30:00 (30 minutes)
Keep the SET button pressed to set the countdown timer, "SETTING" appears.
Press SEL to advance to desire hours, Press SET to confirm Press SEL to advance to desire minutes, Press SET to confirm
For timer applies:
- Press SEL button - Timer starts
- Press SEL button again – Timer stops
- Press SEL button again – Timer continuous
- Keep SEL pressed for about 3 seconds when the time is stopped – timer resets to the originally set time.
- When the countdown timer reaches zero, an alarm sounds, which ends after about 15 seconds, or can be ended by pressing the MODE, SEL or SET button.
Pedometer Mode
Press MODE button until you reach the Pedometer mode, shown by "PEDO".
By pressing the SEL button in the pedometer mode, you can choose between the sub functions

- Clock
- Calories/ Fat Burned
• Training Timer • Daily Average Speed
• Distance • Daily Maximum Speed
• Current Speed • Target Zone

flowchart
graph TD
    A["Step/Clock"] -->|SEL| B["Step/Training Timer"]
    B -->|SEL| C["Step/Distance"]
    C -->|SEL| D["Step/Daily average Speed"]
    D -->|SEL| E["Calories / Fat burned"]
    E -->|SEL| F["Step/Current Speed"]
    F -->|SEL| G["Step/Daily max Speed"]
    G -->|SEL| H["Target Zone"]
    H -->|SEL| I["back to Step/Clock"]
Features Reset - including Daily Step, Training Timer, Distance, Calorie, Fat Burnt, Average speed, Maximum speed Under PEDO mode, in any mode except clock function screen, Hold SET button. All daily data will be reset to 0.
Target Zone
User can select one of the following targets for his own daily workout target Distance, Speed, Step and Timer
The unit defaults as Target Step. If user desire other workout data, please HOLD SET button In Target Zone Mode until SET appear on the upper row as in figure.
Press SEL to toggle between four target types, Press SET to confirm Press SEL to advance to desire target values, Press SET to confirm

flowchart
graph TD
    A["Step/Target Step"] --> B["Hold *SET to select target type"]
    B --> C["Hold ID SET"]
    D["Set Target"] --> E["Select Target type"]
    E --> F["SET 05.00"]
    E --> G["SET 000"]
    E --> H["SET 10000"]
    E --> I["SET 0.00"]
    J["SE T"] --> K["SET 15T"]
    L["SE T"] --> M["SET SPEED"]
    N["SE T"] --> O["SET STEP"]
    P["SE T"] --> Q["SET TIME"]
    R["SE T"] --> S["SET TIME"]
    T["SE T"] --> U["SE"]
    V["SE T"] --> W["SEL"]
    X["SE T"] --> X
    Y["SE T"] --> Y
    Z["SE T"] --> Z
    style A fill:#f9f,stroke:#333
    style D fill:#f9f,stroke:#333
    style E fill:#ccf,stroke:#333
    style F fill:#cfc,stroke:#333
    style G fill:#cfc,stroke:#333
    style H fill:#cfc,stroke:#333
    style I fill:#cfc,stroke:#333
    style J fill:#cfc,stroke:#333
    style K fill:#cfc,stroke:#333
    style L fill:#cfc,stroke:#333
    style M fill:#cfc,stroke:#333
    style N fill:#cfc,stroke:#333
    style O fill:#cfc,stroke:#333
    style P fill:#cfc,stroke:#333
    style Q fill:#cfc,stroke:#333
    style R fill:#cfc,stroke:#333
    style S fill:#cfc,stroke:#333
Target Alert
For Step, Timer and Distance, there will be an alert when target meet.
For Speed, there will be an alert when below target.
The unit defaults the following workout data:
Target Step: 10000 steps
Target Timer: 1 hour
Target Distance: 5 KM/Mile
Target Speed: 0 Km/hr or Mile/hr.
Once selected, the pedometer mode will display the selected information
Activate/Deactivate Target Alert
Hold SEL button to Activate/Deactivate Target Alert
Alert symbol ↗ is displayed = alert on
Alert symbol not displayed = alert off
Memory Mode
Press MODE button until you reach the Memory mode, shown by "MEMORY".
By pressing the SEL button in the memory mode, you can choose between the sub functions
- 7 dally memories (step & timer, distance, calorie & fat burned)
- Week total memories (step & distance, calorie & fat burned)
• Odometer (Total distance)
• BMI
7 daily memories
Daily memories will be stored for past Seven days. Press SEL button to toggle between daily memories from Day1 to Day7. Press SET button to toggle between data of step & timer, distance and calorie & fat burned.

Note: Calorie, Fat Burnt, Average Speed and Maximum Speed automatically record daily. These data will reset every night at 0:00
Week total memories
It measure 7 days accumulated data: total steps & total distances, total calories & fat burned. Press SEL button until you reach WEEK TOTAL appear on the upper row as in figure.

Note: It is necessary to enter the correct weight to receive a meaningful value of calorie consumption and fat burning.
Odometer Save function
Before changing battery or perform total reset. Please write down the accumulated distance travels and use this function to input distance back to the pedometer.
To set, go to odometer mode, HOLD SET until ODOMETER SAVE screen appear and first digit in the lower low start to blink, press SEL to choose desire number and SET to confirm. Repeat the procedure until desirable distance is entered.

Note:
- ODO can only be reset to zero during TOTAL RESET or battery changing
- To avoid ODO Info lost during battery changing, user can re-enter the value in "Set Odometer" session above
BMI (Body Mass Index)
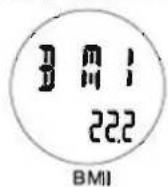
| Age (years) | BMI normal value (kg/m2) |
| 19-24 | 19 - 24 |
| 25-34 | 20 - 25 |
| 35-44 | 21 - 26 |
| 45-54 | 22 - 27 |
| 55-64 | 23 - 28 |
| >64 | 24 - 29 |
| approximate values of the BMI | |
The BMI (Body Mass Index) is a measured value for the evaluation of the body weight of humans. The BMI only gives a rough guidance level.
The BMI is calculated by dividing the body weight in kg by the body size in meters squared. The pedometer watch automatically calculates the BMI from the entered data.
After the INITIAL SETTING of the unit, there are 4 resetting procedures for user to reset the data.
- Complete Reset - INITIAL SETTING Change battery or Hold SET and SEL buttons, repeat INITIAL SETTING procedure.
- Reset Clock without resetting workout data In Clock mode, Hold SET button to enter setting mode. Repeat process in the SETTING SECTION described above.
- Reset Weight/Height/Calibration In Pedometer mode at clock function, Hold SET button to enter Calibration mode. Repeat process in the PEDOMETER CALIBRATION described above.
- Features Reset - including Daily Step, Training Timer, Distance, Calorie, Fat Burnt, Average speed, Maximum speed Under PEDO mode, in any mode except clock function screen, Hold SET button. All daily data will be reset to 0.
DISPLAY LIGHT
The display is illuminated for about 2 seconds by pressing the LIGHT button, so you can read the display of the pedometer watch in darkness. A permanent illumination of the display is not possible. Please note that the illumination consumes more power, which reduces the lifespan of the battery.
TROUBLESHOOTING
Why is the displayed covered distance Incorrect? Have you performed a calibration? For optimum results the calibration has to be performed for "walking" as well as "running". A shuffling gait, bad shoes and varying surface can lead to inaccurate measurements. A lower distance is measured when climbing steps, because the watch is designed for even surfaces. Choose the used during calibration speed when walking or running. Please note that the measurements of untrained persons can be inaccurate/irregular.
Why does the display light not work? Perhaps the battery is empty? Please check the battery and replace it if it is empty (3 V / CR2032). Note the +/- pole.
SPECIFICATIONS
| Clock | 12/24 format with hour/ minute |
| Step measurement range | 0 - 99,999 steps |
| Distance measurement range | 0 - 99.99 km or mile |
| Exercise timer range | 23 hrs 59 mins |
| Stopwatch measurement capacity | 99 hrs 59 mins 59 sec/ 99 Laps |
| Calorie measurement range | 0 - 99,999 Kcal |
| Fat measurement range | 0 - 15,000 g |
| Target distance range | 0 - 99.99 km or mile |
| Target timer range | 23 hrs 59 mins |
| Target speed range | 0 - 39.9 km/h or mile/hr |
| Body weight range | 50kg - 219kg or 68lbs - 479lbs |
| Body height range | 150cm - 249cm or 40° - 99° |
| Odoemter | 9999km or mile |
| Power | 1x CR2032 3V battery |
| Countdown Timer | 99 hrs 59 mins 59 sec |
- FEATURES
- BATTERY INSTALLATION
- INITIAL SETTING
- Pedometer watch
- Pedometer Calibration
- Calibration not Successful
- TURN ON/OFF Pedometer Function
- Operation Modes
- Time Mode
- Second Time
- Daily Alarm Mode
- Activate/Deactivate Alarm
- Switch off Alarm
- Snooze
- Stopwatch Mode
- To recall the stopwatch memory
- Countdown Timer Mode
- Pedometer Mode
- Target Zone
- Target Alert
- Activate/Deactivate Target Alert
- Memory Mode
- daily memories
- Week total memories
- Odometer Save function
- DISPLAY LIGHT
- TROUBLESHOOTING
Brand : Pyle
Model : Speed Master PPDM5
Category : Sports Watch