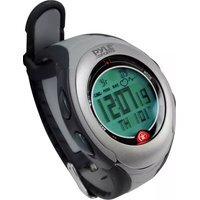
PPDM2 - Sports Watch Pyle - Free user manual and instructions
Find the device manual for free PPDM2 Pyle in PDF.


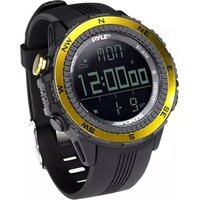
| Product Type | Sports Watch |
| Model | PPDM2 |
| Brand | Pyle |
| Display Type | Digital LCD |
| Case Material | Resin/Plastic |
| Strap Material | Silicone |
| Case Diameter | 45 mm |
| Weight | 50 g |
| Water Resistance | 50 meters (5 ATM) |
| Power Source | Rechargeable Lithium-ion battery (USB charging) |
| Battery Life | Up to 7 days typical use |
| Charging Time | Approximately 2 hours |
| Main Functions | Stopwatch, Timer, Alarm, Date/Time, Backlight, Step Counter, Heart Rate Monitor (optional) |
| Connectivity | Bluetooth (for smartphone sync) |
| Compatible OS | iOS 10+ / Android 5+ |
| Languages Supported | English, French, Spanish, German, etc. |
| Care Instructions | Clean with soft damp cloth; avoid harsh chemicals; rinse after saltwater exposure |
| Safety Warnings | Not for diving; remove if skin irritation occurs; keep away from children under 3 |
| Spare Parts Availability | Battery, strap, charging cable available from Pyle support |
| Repairability | User-replaceable battery (with proper tools), professional repair recommended for other issues |
Frequently Asked Questions - PPDM2 Pyle
User questions about PPDM2 Pyle
0 question about this device. Answer the ones you know or ask your own.
Ask a new question about this device
Download the instructions for your Sports Watch in PDF format for free! Find your manual PPDM2 - Pyle and take your electronic device back in hand. On this page are published all the documents necessary for the use of your device. PPDM2 by Pyle.
USER MANUAL PPDM2 Pyle
Activation - Before starting
Bike Watch
Please remove the protective foil from the display when you use the speed master watch for the first time and press the A, C or D button (sound signal), until all display segments appear for a short time. You automatically reach setting the units of measurement.
- Choose between the metric and imperial with the C button. Confirm your selection with the A button, the 24h blink. Setting the time in the time mode (also see TIME MODE)
- Choose between the 12h and 24h display with the C button. Confirm your selection with the A button, the seconds blink.
Note: By pressing and holding the C button you can use the fast forward function in the settings.
- Press the C button to reset the seconds to zero. Confirm with the A button, the minutes blink.
- Set the minutes with the C button. Confirm with the A button, the hours blink.
- Set the hours, year, month, day, birthday, weight, height and wheel size (also see WHEEL SIZE INPUT). Now press the D button and all settings are saved.
The Bike watch can be worn like a wristwatch.
Accessories
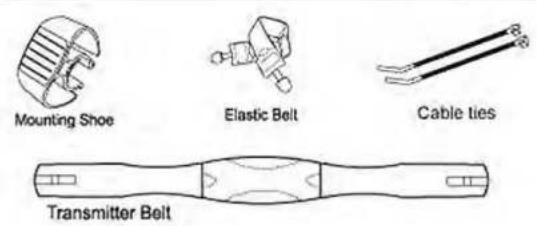

Transmitter

battery
(3V/CR2032)X3

Magnet
INTRODUCTION
WARNING: Always consult your physician before starting a fitness programme. A pulse computer is not a medical device. It is a training tool designed to measure and display your heart rate.
USE A PRECISE TRAINING METHOD
All the experts agree: the heart is the most important muscle in the body and, like all muscles, should be exercised regularly to remain strong and efficient. But how can determine whether you are exercising your heart both safely and effectively?
Fortunately, the heart itself provides you with key information that will help you to examine the effectiveness and the degree of safety of your training method. Your heart rate, which is expressed in a single number (Beats Per Minute), gives a constant account of your body's state of health. Your heart rate will tell you how fast you are using energy or weather you are exercising too hard or too lax.
Obviously, your body does not benefit from a training method if your heart rate is too low. If it is too high, you run the risk of injury and you will suffer from fatigue.
It does not matter whether your goal is to win athletics meetings, lose weight or simply to improve your overall health. What is important is that you can refine your training method by keeping your heart rate within a certain target zone. In order to accomplish this, you would obviously need to know your precise heart rate at any given moment throughout your training session. modern technology has now enabled us to present you with wireless electronic pulse computers, monitoring your heart rate with one of these computers is easy and fun to do.
KNOW YOUR LIMITS AND DETERMINE YOUR PERSONAL EXERCISE ZONE
Exercise zones are established by setting Upper and Lower Heart Rate Limits. These limits constitute a certain percentage of your
Maximum Heart Rate (MHR). You may already know your MHR if you are an avid athlete or if you have already taken a Max. Heart Rate test. If not, the following formular will help you to make an educated guess:
| MHR=220-(Your age) |
| e.g. Age: 20 |
| MHR: 220-20=200 |
| For instance, the current heart rate is 150, then 75% will be shown. |
EXERCISE ZONE (BPM)

Zone 1 - Health (50% - 65% of the MHR)
This exercise zone is meant for long training sessions of low intensity. Exercising in this zone will improve both your mental and physical healthy.
Zone 2 - Fitness (65% - 80% of the MHR)
This exercise zone is used by athletes who wish to increase their strength and improve their endurance while burning a greater number of calories.
Zone 3 - Performance (80% - 95% of the MHR)
This exercise zone is ideal for short and very intensive training sessions. Competitive athletes use this zone in order to build greater speed and explosive power. Exercising in this zone will create an "oxygen debt" and increase the degree of lactic acid in the muscular tissue.
FEATURES
If necessary, you can consult the table on the gift box.
SPEED MASTER
• Digital motion sensor for speed detection
- Current speed
• Exercise timer
• Distance
- Step count
• Average speed, Maximum speed
- Odometer
• Odometer Save Function
- Calibration for personalized step length of running & jogging
HEART RATE MONITOR
• Maximum pulse alert
• Pulse zone training programs
(health, fitness, performance and user-define)
- Zone timers (in zone, belowzone, above zone and total)
- Pulse out zone alert
- Highest pulse, lowest pulse, average pulse
CALORIE FUNCTIONS
• Calories loss and fat burn during exercise
• Calculation of BMI
- Fitness level
CHRONOGRAPH
- Count-down timer
- 1/100 second 99 laps multi-split stopwatch
WATCH
• Auto Calendar
- Clock alarm
• Hourly chime signal
OTHER SPECIFICATIONS
• EL backlight
• Water resistant housing
BIKE
- Current / maximum / average speed
• Speed comparator
• Trip distance 0 – 999 km
• Total distance 0 - 9999 km - Trip timer
- Odometer Save Function
• Auto Scan
BATTERY INSTALLATION
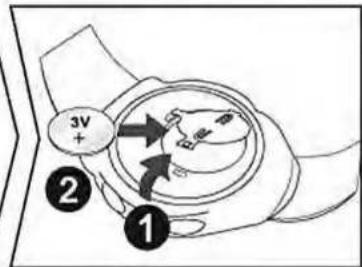
Computer Watch
Remove the back cover of the watch with a screwdriver, install the 3.0V-battery with the positive(+) pole facing up and replace the cover. Remove the battery and reinsert it if the LCD displays irregular figures. This will clear and restart the watch's microprocessor.

Transmitter Belt
Remove the battery cover from the bottom of the belt using a small coin. Install the 3V battery with the positive (+) pole facing the battery cover and replace the cover.
Do not disposed off batteries with the household waste

Transmitter
Remove the battery cover from the bottom of the transmitter by pushing. Install 3V battery with the position (+) pole facing the battery cover and replace the cover.
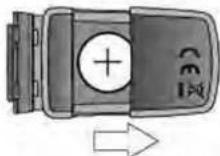
3V-Battery CR2032
WEARING THE TRANSMITTER BELT
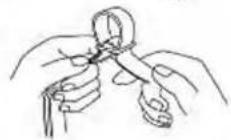
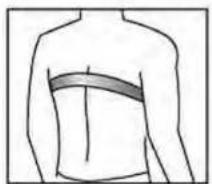
Adjust the elastic belt so that it fits tightly around your chest just below the pectoral muscles. Moisten the transmitter's conductive pads with saliva or ECG-gel (available at your local chemist's) in order to ensure a good contact with the skin at all times.
Positioning the Transmitter Belt upward as per diagram.

natural_image
Simple line drawing of a human torso with a bandage on the chest (no text or symbols)


natural_image
Diagram of a biological cell with internal structures and two droplets above (no text or labels)conductive pads
conductive pads
HOW TO USE THE COMPUTER WATCH
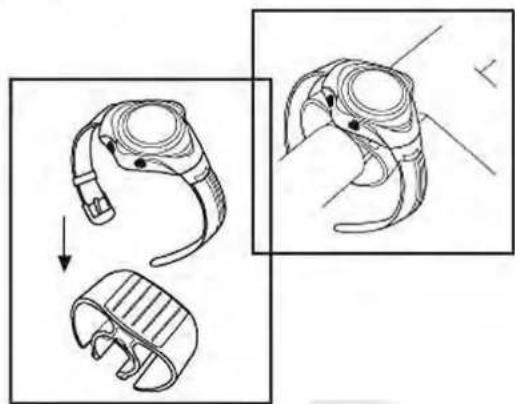
The computer can be worn like a watch on your wrist or it can be fixed on the handlebar of your bike with the optional mounting system. Keep the computer and the transmitter within a max operating distance of 60cm.
natural_image
Technical illustration of a smartwatch with two views showing the handle and grip (no text or symbols)
natural_image
Black-and-white photo of a person lying down with a heart-shaped outline (no text or symbols)TRANSMITTER INSTALLATION
Clamp the magnet on the spoke of front wheel with the screw provided and attach the transmitter to the left fork by using the cable ties as shown in Fig 1. Make sure the arc of magnet intersects the alignment mark on the transmitter with 2 mm clearance.
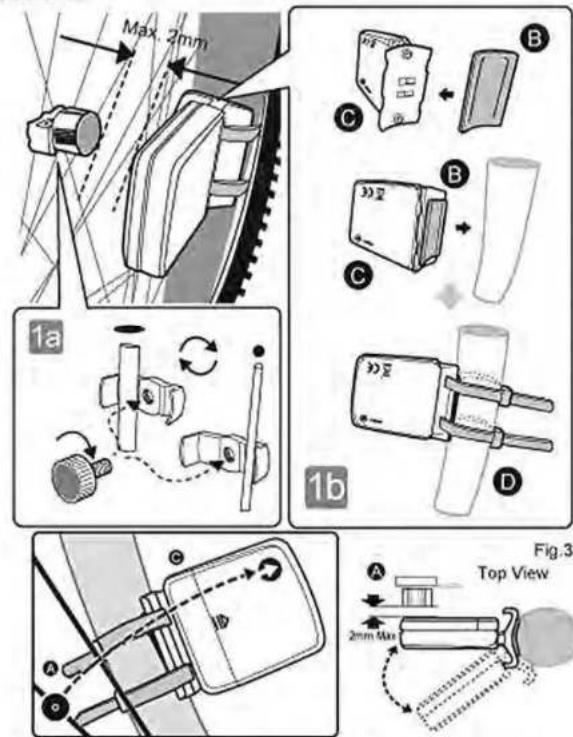
Adjust the distance between transmitter and magnet with max. 2mm as shown in Fig.3.
WHEEL SIZE INPUT
Keep the A button pressed for about 3 seconds in TIME MODE, "SETTING" appears on the display. Switch to wheel size input mode and 2124 blinks. Multiply wheel diameter (d) in millimeters by 3.1416 to determine wheel factor (c), refer to Fig. 4. Press the "C" button to adjust digit to be input and the "A" button to confirm the digit o the desired number.
Fig. 4

distance in millimeter per one turn
For convenience you can refer to the chart of wheel diameter size factor inputs.
| Wheel Diameter d | Wheel Factor c | |
| 20' | 1596 | |
| 22' | 1759 | |
| 24' | 1916 | |
| 26" (650A) | 2073 | |
| 26.5" (Tubular) | 2117 | |
| 26.6" (700x25C) | 2124 | |
| 26.8" (700x28C) | 2136 | |
| 27" (700x32C) | 2155 | |
| 28" (700B) | 2237 | |
| (w/tire) | ||
| ATB 24"x1.75 | 1888 | |
| ATB 26"x1.4 | 1995 | |
| ATB 26"x1.5 | 2030 | |
| ATB 26"x1.75 | 2045 | |
| ATB 26"x2 (650B) | 2099 | |
| 27"x1 | 2136 | |
| 27"x1 1/4 | 2155 | |
Function Button/Modes/Settings
Function Buttons of the Speed Master Watch

Main Function Mode
The Speed Master watch has five main function modes, which are described further in the next chapters:
- Time Mode
-Stopwatch Mode - Heart Rate Mode
- Bike Mode
- Pedometer Mode
The first mode displayed is the time mode. Press the D button to switch between the different modes. The different modes are described in sections TIME MODE, STOPWATCH MODE, HEART RATE MODE, BIKE MODE and PEDOMETER MODE.
TIME MODE
Press the D button until you reach the time mode, shown by "TIME".
By pressing the C button in the time mode, you can choose between the sub-functions
- Time (TIME)
• Alarm (ALARM) and - Countdown Timer (TIMER).
Time
Press the C button in the time mode until TIME is displayed.
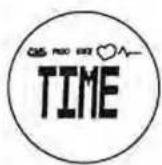

In the time mode, the year is displayed in the upper segment of the display and the weekday and date in the lower segment.
Setting the Time
Keep the A button pressed for about 3 seconds, "SETTING" appears on the display and 24H blinks. Choose between the 12h and 24h display with the C button. Confirm your selection with the A button, the seconds blink.
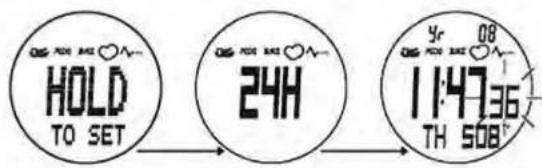
- Press the C button to reset the seconds to zero. Confirm your selection with the A button, the minutes blink.
Note: You can use the fast forward function in the settings by pressing and holding the C button. - Set the minutes with the C button, Confirm with the A button. Set the hours, year, month, day, birthday, weight, height and wheel size (also see WHEEL SIZE INPUT). Now press the D button and all settings are saved.

flowchart
graph LR
    A["2008 TU 101"] --> B["BIRTHDAY 1984-01-01"]
    B --> C["WEIGHT 50KG"]
    D["HEIGHT 150CM"] --> E["WHEEL 2124"]
Note: Start the setting procedure again to correct any wrong settings.
Alarm
Press the C button in the time mode until ALARM is displayed.
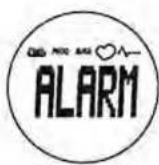
Setting the Alarm
- Keep the A button pressed for about 3 seconds, "SETTING" appears on the display and minutes blink. Set the minutes with the C button. Confirm your selection with the A button, the hours blink.
- Set the hours with the C button.
Confirm with the A button, the month blinks. - Set the month with the C button. Settings of 1, 2, 3,... 11, 12 and - are possible. If you choose -, the alarm sounds every month (on the set day - see the next section, "setting the day"). Confirm with the A button, the day blinks.
- Set the day with the C button. Settings of 1, 2, 3, 30, 31 and - are possible. If you choose --, the alarm sounds every day. Confirm with the A button, the button CHIME (hourly alarm) blinks.
- You can now set the hourly alarm to ON or OFF with the C button.

Bell symbol 🙏 displayed = hourly alarm on Bell symbol not displayed = hourly alarm off
Now press the D button, all settings are saved and the set alarm is activated automatically.

Activate/Deactivate Alarm
Press the A button when the alarm time is displayed Alarm symbol "” is displayed = alarm on Alarm symbol not displayed = alarm off
Switch off Alarm
When the alarm rings, you can switch it off by pressing the A, C or D button.
Countdown Timer
Press the C button in time mode until TIMER is displayed.
The heart rate monitor watch possesses a countdown timer and a count up timer.

Basic setting 00:01:00 (1 minute)
Keep the A button pressed to set the countdown timer, "SETTING" appears. Set the minutes with the C button, confirm with the A button, select the hours with the C button, confirm with the A button.
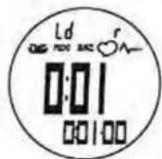


r: The timer starts to count down the previously set time again after zero is reached.
U: The timer starts to count up from zero after zero is reached.
S: The timer stops after zero is reached.
Confirm the entry with the D button
For all three types of timers applies:
- Press A button - Timer starts
- Press A button again - Timer stops
- Press A button again - Timer continuous
- Keep A pressed for about 3 seconds when the time is stopped - timer resets to the originally set time.
- When the countdown timer reaches zero, an alarm sounds, which ends after about 15 seconds, or can be ended by pressing the A, C or D button.
STOPWATCH MODE
Press the D button until you reach the stopwatch mode, shown by
"CHRONO"
In stopwatch mode you can choose between the sub functions
• CHRONO (stopwatch) and
• DATA RECALL (view data)
Stopwatch
Press the C button in the stopwatch mode until CHRONO is displayed.


Note: Switching between "stopwatch" and "data recall" only works if at least 1 lap has been recorded.
99 lap times can be saved. If the lap memory is full, the display MEMORY FULL appears.

- Press A button to start / stop the stopwatch.
- Press C button to record the lap memory when the stopwatch is counting.
- If the stopwatch saves over 99 laps, it will display FULL.
- To reset the stopwatch, press and hold A button to zero.
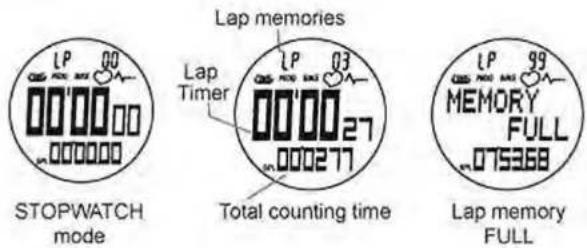
To recall the stopwatch memory
- Press A button to stop the stopwatch, then press
C button to enter data recall mode. - Display show the record of BEST LAP, the icon "BEST-LAP" will be displayed.
- Press A button to read different lap memories.
- Press C button to exit the memory recall mode.
For your reference, you can following methods to take different measurement:
STANDARD MEASUREMENT : A-A-A

flowchart
graph TD
    A["START Press A"] --> B["LP 01"]
    B --> C["STOP Press A"]
    C --> D["LP 01 3568"]
    D --> E["RESET Hold A"]
    E --> F["LP 01 00"]
    F --> G["00'00'00"]
LAP TIME MEASUREMENT : A-C-C-A-A

flowchart
graph TD
    A["Start"] --> B["Lap 1: LP 013568, 013568"]
    B --> C["Lap 2: LP 010030, 023598"]
    C --> D["Lap 3: LP 010300, 033898"]
    D --> E["Reset"]
    E --> F["Hold A"]
    F --> G["STOP"]
    G --> H["Press A"]
RECALL LAP MEMORY : C-A-A-.....A-C-A

flowchart
graph TD
    A["STOPWATCH MODE\n01'03 00\n033898"] -->|Press C| B["RECALL BEST LAP\n01'00.30\n023598"]
    B -->|Press A| C["RECALL FIRST LAP\n01'35 68\n013568"]
    C -->|Press A| D["RETURN TO STOPWATCH MODE\n01'03 00\n033898"]
    D -->|Hold A| E["RESET"]
    E --> F["RECALL LAST LAP\n01'03 00\n033898"]
HEART RATE MODE
Press the D button until you are in the heart rate mode, displayed by "HRM".

By pressing the C button in the heart rate mode, you can choose between the sub functions
- Training time (TIMER)
• Memory (MEMORY)
• Training zone (ZONE)
• Calories, fat and BMI (CALORIE)
• Bike speed (BIKE)
• Pedometer speed (PEDO) and
• Fitness level (FITNESS LEVEL)
Note: If the buttons are not pressed for about 5 minutes in the heart rate mode, the clock automatically changes to the time mode.

When the chest belt is worn, the current heart rate is shown in the middle segment of the display. Otherwise "0" is displayed. The heart symbol blinks when the heart rate is received from the chest belt. If no signal is received, the heart symbol stops blinking and the last heart rate remains displayed.
On the right of the current heart rate the % of the maximum heart rate is displayed. The maximum heart rate is calculated automatically by entering personal data such as age, weight, etc
Attention: All the sub functions described below only work when the chest belt is worn.
Training Time
Press the C button in the heart rate mode until TIMER is displayed.
The training time is shown in the lower segment of the display, in the middle the heart rate.

The display of the training time is activated automatically when a heart rate signal is received. The training time shows the total time you have worn the chest belt and the heart rate was received by the heart rate monitor watch, even if you switch to another mode from the heart rate mode.
If you press the A button shortly, you can choose between the following displays:
TIMER= The total training time
( )=The time while you were within the chosen training zone
(▲)=The time while you were outside of the chosen training zone
(▼)=The time while you were below the chosen training zone
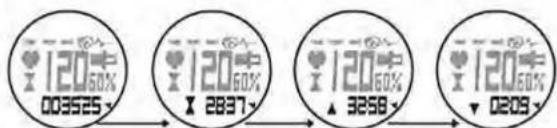
Press and hold the A button (shown by RESET), to reset the training time to zero.
Memory
Press the C button in the heart rate mode until MEMORY is displayed.
The saved heart rate data is shown in the lower segment of the display, the current heart rate in the middle, as long as the chest belt is worn.
You can look at the following data by pressing the A button:
HI = highest heart rate
LO = lowest heart rate
AV = average heart rate

Press and hold the A button (shown by RESET), to reset the training time to zero.
Training Zones
Press the C button in the heart rate mode until ZONE is displayed.
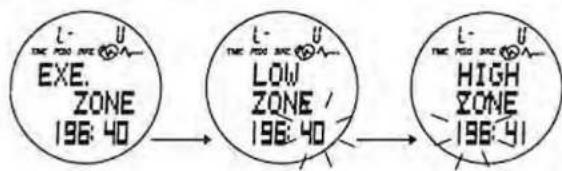
The lower and upper limits of your training zone are shown in the lower segment of the display, the heart rate in the middle and the chosen zone (1, 2, 3 or U) at the top.

Setting:
Keep the A button pressed, "SETTING" appears, select zone 1, 2, 3 or U with button C. Confirm the selection of 1, 2 or 3 with the D button. The setting is completed. The upper and lower limits are calculated automatically.

flowchart
graph LR
    A["HOLD TO SET"] --> B["L: EXE, ZONE 127:98"]
    B --> C["L: EXE, ZONE 156:127"]
    C --> D["L: EXE, ZONE 186:156"]
Press the A button when choosing the user defined training zone U, the lower limit blinks, set with the C button, confirm with the A button, upper limit blinks, set with the C button and confirm with the D button, the setting is completed.
flowchart
graph LR
    A["EXE.<br>ZONE<br>196: 40"] --> B["L-<br>THE ZONE / LOW ZONE / 196: 40"]
    B --> C["HIGH<br>ZONE<br>196: 41"]
Display:
Heart rate is within the training zone
▲ Heart rate is above the training zone
▼ Heart rate is below the training zone.
Training Zone Alarm
Keep the C button pressed with the display of the upper and lower limits.
Alarm symbol 🌈 appears = Training zone alarm activated Alarm symbol disappears = Training zone alarm deactivated If the heart rate drops below the lower limit or it rises above the upper limit, the alarm sounds (if activated!).
Alarm when exceeding the maximum heart rate.
On the right of the current heart rate the % of the maximum heart rate is displayed.
If your heart rate is at 99% of the calculated maximum heart rate or even exceeds it, a permanent audio warning sounds to call your attention. You can minimize the risk of overexertion. The alarm for the maximum heart rate is independent of whether the training zone alarm is activated or not.
The audio warning automatically ends as soon as your heart rate drops below 99% of your maximum heart rate.
Calories, Fat and BMI
Press the C button in the heart rate mode until CALORIE is displayed. In the lower segment of the display calories, fat and BMI are displayed (switch with the A button), in the middle the heart rate.
Calories (CALORIES appears)
The metabolic rate in calories is measured automatically when the heart rate is received in the heart rate mode. The measured value is shown in the bottom line of the display (C...). Press and hold the A button (shown by RESET) to reset the value to zero.
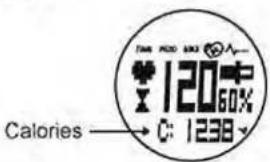
Fat (FAT appears)
As soon as the heart rate signal is received in the heart rate mode, the estimated value of the burned fat in grams is shown in the lower line of the display (F:). Press and hold the A button (shown by RESET) to reset the value to zero.
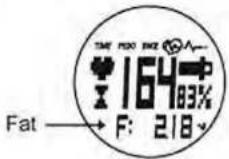
Note: It is necessary to enter the correct date of birth, weight and height to receive a meaningful value of calorie consumption and fat burning.
Note: The body fat function is only active, if the training intensity is more than 120bpm.
BMI (Body Mass Index)

| Age (years) | BMI normal value (kg/m2) |
| 19-24 | 19 - 24 |
| 25-34 | 20 - 25 |
| 35-44 | 21 - 26 |
| 45-54 | 22 - 27 |
| 55-64 | 23 - 28 |
| >64 | 24 - 29 |
| approximate values of the BMI | |
The BMI (Body Mass Index) is a measured value for the evaluation of the body weight of humans. The BMI only gives a rough guidance level.
The BMI is calculated by dividing the body weight in kg by the body size in metres squared. The heart rate monitor watch automatically calculates the BMI from the entered data.
Bike Speed
Press the C button in the heart rate mode until BIKE is displayed.
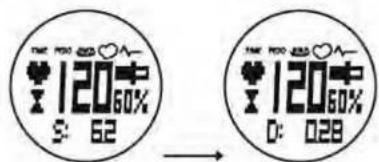
The speed (S) in km/h or the covered distance (D) in km is shown in the lower segment of the display (switch with the A button). The heart rate is shown in the middle segment of the display.
Pedometer Speed
Attention: You first have to calibrate in the pedometer mode, see section speed calibration and speed alarm, so that the heart rate monitor watch displays correct speed values.
Press the C button in the heart rate mode until PEDO is displayed.
The display START appears. Press the A button to start.
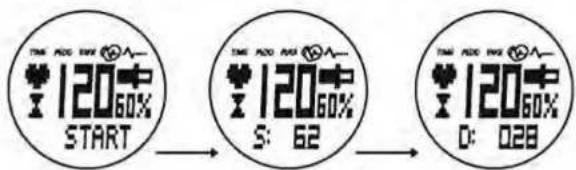
The speed (S) in km/h or the covered distance (D) in km is shown in the lower segment of the display (switch with the A button). The heart rate is shown in the middle segment of the display.
Fitness Level
Press the C button in the heart rate mode until FITNESS LEVEL is displayed.
Press the A button immediately after the training (with applied chest belt) to start a 5 minute countdown. After the countdown (recovery phase) the heart rate and the fitness level are displayed.
| Level of Fitness | Heart rate after 5 min |
| Level 6 | >130 |
| Level 5 | 130-120 |
| Level 4 | 120-110 |
| Level 3 | 110-105 |
| Level 2 | 105-100 |
| Level 1 | <100 |
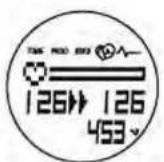
During the countdown you can see the following indicators on the display.
• Heart symbol, which moves from left to right (progress bar)
- Number on the left of the display: Heart rate at the time when the countdown was started.
• Number on the right of the display: Current heart rate. - Lower segment of the display: The minutes are counted down.

BIKE MODE
Press the D button until you reach the bike mode, shown by "BIKE".

By pressing the C button in the bike mode, you can choose between the sub functions.
- Timer (TIMER)
• Daily distance (DISTANCE)
• Average speed (AVG SPEED)
• Maximum speed (MAX SPEED)
• Total distance (ODOMETER)
• Calories, fat and BMI (CALORIE)
• Heart rate (HRM) - Scan function (SCAN)
Note: If in the bike mode the buttons are not operated for about 5 minutes, or if the heart rate monitor watch does not register any activity, the watch automatically changes into the time mode.
The current speed is shown in the middle segment of the display.
Timer
Press the C button in the bike mode until TIMER is displayed. The timer is shown in the lower segment of the display, in the middle the current speed.

The display of the time is activated automatically when a bike signal is received. Keep the A button pressed until the display RESET appears - timer, daily distance and average speed are reset to zero.
Daily Distance
Press the C button in the bike mode until DISTANCE is displayed.
The covered distance is shown in the lower segment of the display (with 2 decimal places), in the middle the current speed.

Keep the A button pressed until the display RESET appears - timer, daily distance and average speed are reset to zero.
Average Speed
Press the C button in the bike mode until AVE SPEED is displayed.
The average speed is shown in the lower segment of the display, in the middle the current speed.
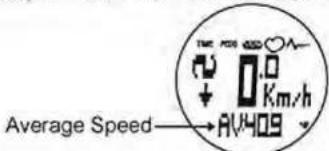
Keep the A button pressed until the display RESET appears - timer, daily distance and average speed are reset to zero.
Maximum Speed
Press the C button in the bike mode until MAX SPEED is displayed.
The maximum speed is shown in the lower segment of the display, in the middle the current speed.

Keep the A button pressed - the display RESET appears - reset the maximum speed to zero.
Total Distance
Press the C button in the bike mode until ODOMETER is displayed.
The total distance is shown in the lower segment of the display, in the middle the current speed.

Keep the A button pressed - the display RESET appears - enter to Odometer Save function.
Press the C button to adjust number, press the A button to confirm. Now press the D button, ODO is saved.
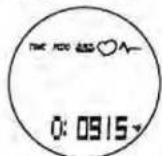
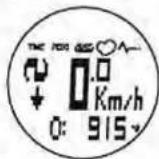
Odometer Save function
The SAVE function allows you to keep the important data of total distance (ODO) even after replacement of battery. Repeat above sequence to reach the desired odometer value. Press the D button to return to normal ODO mode.
Calories, Fat and BMI
Press the C button in the bike mode until CALORIES is displayed.
In the lower segment of the display calories, fat and BMI are displayed (switch with the A button), in the middle the heart rate.
Calories (CALORIES appears)
The metabolic rate in calories is measured automatically when the bike signal is received in bike mode. The measured value is shown in the bottom line of the display (C...). Press and hold the A button (shown by RESET) to reset the value to zero.
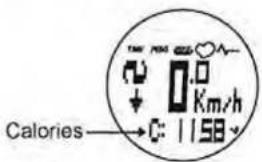
Fat (FAT appears)
As soon as the bike signal is received in bike mode, the estimated value of the burned fat in grams is shown in the lower line of the display (F:).
Press and hold the A button (shown by RESET) to reset the value to zero.

Note: It is necessary to enter the correct date of birth and weight to receive a meaningful value of calorie consumption and fat burning.
Note: The body fat function is only active, if the training intensity is more than 120bpm.
BMI (Body Mass Index)

| Age (years) | BMI normal value (kg/m2) |
| 19-24 | 19 - 24 |
| 25-34 | 20 - 25 |
| 35-44 | 21 - 26 |
| 45-54 | 22 - 27 |
| 55-64 | 23 - 28 |
| >64 | 24 - 29 |
| approximate values of the BMI | |
The BMI (Body Mass Index) is a measured value for the evaluation of the body weight of humans. The BMI only gives a rough guidance level
The BMI is calculated by dividing the body weight in kg by the body size in metres squared. The heart rate monitor watch automatically calculates the BMI from the entered data.
Heart Rate (HRM)
Press the C button in the pedometer mode until HRM is displayed.
The heart rate is shown in the lower segment of the display, in the middle the current speed.

Scan function (SCAN)
Press the C button in the bike mode until SCAN is displayed. The trip time, trip distance, average speed, maximum speed, total distance, calories and heart rate will be automatically shown every 2 seconds in the lower segment of the display, in the middle the current speed.

flowchart
graph TD
    A["SCAN"] --> B["000024"]
    B --> C["027"]
    C --> D["RV409"]
    E["NX619"] --> F["510"]
    F --> G["1158"]
    G --> H["127"]
PEDOMETER MODE
Press the D button until you reach the pedometer mode, shown by "PEDO".

By pressing the C button in the pedometer mode, you can choose between the sub functions
• Total distance and Speed calibration (ODOMETER)
• Number of steps (STEP)
• Calories, fat and BMI (CALORIES)
• Heart rate (HRM)
- Timer (TIMER)
• Daily distance (DISTANCE)
• Average speed (AVG SPEED)
• Maximum speed (MAX SPEED).
Note: If in the pedometer mode the buttons are not operated for about 5 minutes, or if the heart rate monitor watch does not register any activity, the watch automatically changes into the time mode.
The current speed is shown in the middle segment of the display.
Total distance and Speed calibration
Press the C button in the pedometer mode until ODOMETER is displayed. The total distance is shown in the lower segment of the display, in the middle the current speed.

Setting of the total distance as well as calibration of the speed for walking and running.
Note:
It does not matter if you want to only walk or run, under all circumstances perform a calibration for walking AND running to receive a meaningful result. If you really only want to walk, calibrate for walking (walking) AND running (fast walking).
In case you do not calibrate your watch, the displayed values have only limited significance. In that case the watch falls back on a standard calibration, which does not correspond to your personal movement profile.
During the calibration the watch records your personal movement profile. The steadier you walk or run, the more exact the results will be. It is also true: the longer the distance for calibration is, the more exact the results will be.
The heart rate monitor watch automatically perceives, based on the calibration, whether you are walking or running during your training, and correspondingly displays the speed, steps, etc..
Choose the same speed and rhythm as during calibration when you are running and walking, to get a meaningful result. If you wore the heart rate monitor watch on the left (right) hand during calibration, wear it also on your left (right) hand during training.
- Keep the A pressed - the display SETTING appears.
- The display ODOMETER SAVE function appears, set with the C button, confirm with the A button.
The SAVE function allows you to keep the important data of total distance (ODO) even after replacement of battery.
- Display CALI. FOR RUNNING (calibration for running) appears, you can choose between YES or NO with the C button. Choose YES and confirm with the A button.
- Display SET CALI DISTANCE appears, choose with the C button (0.1 to 1.0 km possible), confirm with the A button.
- Display PRESS SET TO START appears, start with A button. Now run the chosen distance (the display PRESS TO END appears) and press the A button afterwards.

flowchart
graph LR
    A["THE OLD SMO ♥ ∧ HOLD TO SET"] --> B["THE OLD RING ♥ ∧ SET ODOMETER 0: 0406"]
    B --> C["THE OLD ARE ♥ ∧ CALI FOR RUNNING? YES"]

flowchart
graph LR
    A["SET CALI DISTANCE QIKM"] --> B["PRESS SET TO START"]
    B --> C["CALI OK! SAVED"]
- Display CALI OK! and SAVED appears. The calibration was correct and was saved.
• The watch now changes to the display CALI FOR WALKING (calibration for walking).
It is important that you also perform the calibration for walking, as described in the following section:
- You can choose between YES and NO with the C button. Choose YES and confirm with the A button.
- Display SET CALI DISTANCE appears, choose with the C button (0.1 to 1.0 km possible), confirm with the A button.
- Display PRESS SET TO START appears, start with A button. Now walk the chosen distance (the display PRESS TO END appears) and press the A button afterwards.
- Display CALI OK! and SAVED appears. The calibration was correct and was saved.
- Finally press the D button, the watch changes to the initial position (display of current speed and lower and upper limits for the speed).
Calibration not Successful.
In case the calibration was not successful, the display CALI FAILED appears. After a few seconds the display CALI FOR RUNNING or WALKING appears again and you can start a new calibration.
Stop Calibration
Press the D button during calibration in case you want to stop the calibration. The display CALI CANCEL appears. The watch automatically changes to the initial position (display of current speed and lower and upper limits for the speed). You can now start a new calibration.
Number of Steps
Press the C button in the pedometer mode until STEP is displayed.
The number of steps is shown in the lower segment of the display, in the middle the current speed.

Keep the A button pressed - the display RESET appears - reset the number of steps to zero.
Calories, Fat and BMI
Press the C button in the heart rate mode until CALORIE is displayed.
In the lower segment of the display calories, fat and BMI are displayed (switch with the A button), in the middle the heart rate.
Calories (CALORIES appears)
The metabolic rate in calories is measured automatically when the heart rate is received in the heart rate mode. The measured value is shown in the bottom line of the display (C:...). Press and hold the A button (shown by RESET) to reset the value to zero.

Fat (FAT appears)
As soon as the heart rate signal is received in the heart rate mode, the estimated value of the burned fat in grams is shown in the lower line of the display (F:).
Press and hold the A button (shown by RESET) to reset the value to zero.

Note: It is necessary to enter the correct date of birth, weight and height to receive a meaningful value of calorie consumption and fat burning.
Note: The body fat function is only active, if the training intensity is more than 120bpm.
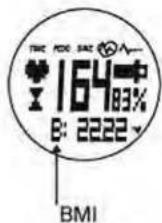
BMI (Body Mass Index)
| Age (years) | BMI normal value (kg/m2) |
| 19-24 | 19 - 24 |
| 25-34 | 20 - 25 |
| 35-44 | 21 - 26 |
| 45-54 | 22 - 27 |
| 55-64 | 23 - 28 |
| >64 | 24 - 29 |
| approximate values of the BMI | |
The BMI (Body Mass Index) is a measured value for the evaluation of the body weight of humans. The BMI only gives a rough guidance level.
The BMI is calculated by dividing the body weight in kg by the body size in metres squared. The heart rate monitor watch automatically calculates the BMI from the entered data.
Heart Rate
Press the C button in the pedometer mode until HRM is displayed.
The heart rate is shown in the lower segment of the display, in the middle the current speed.

Timer
Press the C button in the pedometer mode until TIMER is displayed.
The timer is shown in the lower segment of the display, in the middle the current speed.
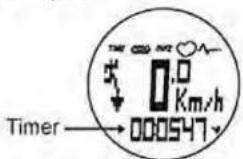
The timer starts as soon as you activate the step count. Keep the A button pressed until the display RESET appears - timer, daily distance and average speed are reset to zero.
Daily Distance
Press the C button in the pedometer mode until DISTANCE is displayed.
The covered distance is shown in the lower segment of the display (with 2 decimal places), in the middle the current speed.

Keep the A button pressed until the display RESET appears - timer, daily distance and average speed are reset to zero.
Average Speed
Press the C button in the pedometer mode until AVE SPEED is displayed.
The average speed is shown in the lower segment of the display, in the middle the current speed.

Keep the A button pressed until the display RESET appears - timer, daily distance and average speed are reset to zero.
Maximum Speed
Press the C button in the pedometer mode until MAX SPEED is displayed.
The maximum speed is shown in the lower segment of the display, in the middle the current speed.

Keep the A button pressed - the display RESET appears - reset the maximum speed to zero.
DISPLAY LIGHT
The display is illuminated for about 2 seconds by pressing the B button, so you can read the display of the heart rate monitor watch in darkness. A permanent illumination of the display is not possible. Please note that the illumination consumes more power, which reduces the lifespan of the battery.
TROUBLESHOOTING
Why is the displayed covered distance incorrect?
Have you performed a calibration? For optimum results the calibration has to be performed for "walking" as well as "running". A shuffling gait, bad shoes and varying surface can lead to inaccurate measurements. A lower distance is measured when climbing steps, because the watch is designed for even surfaces. Choose the used during calibration speed when walking or running. Please note that the measurements of untrained persons can be inaccurate/irregular.
Why does the heart rate monitor watch not display the heart rate?
Please check the chest belt. Possible causes of error are:
• The chest belt is not positioned correctly.
• The skin is too cold or dry.
• The sensor contacts are not moistened or are dirty.
• Atmospheric or wireless interferences appear due to for example high voltage lines (above or below ground), overhead electrical lines, electric motors, car engines, mobile phones, airplanes etc.
- Weak battery in the chest belt - please change.
• Distance to the chest belt is too large (max. 60 cm)
• Signals from other chest belts in the surrounding of less than 2 metres can be the cause of incorrect values.
The display of the heart rate is incorrect, why?
• Perhaps the sensor contacts of the chest belt are not moistened.
- Check if the chest belt fits tightly to the chest.
• Also check the battery
• We advise against the simultaneous use of the heart rate monitor watch and a wireless bicycle computer, because the signals from the transmitter of the bicycle computer can interfere with the heart rate monitor watch.
• Signals from other chest belts in the surrounding of less than 2 metres can be the cause of incorrect values.
The display is weak, hardly readable, what can I do?
Replace the battery as soon as the display weakens or when it fades totally. Always pay attention to the polarity when inserting a new battery. When the battery has been removed and reinserted, the personal data has to be entered again.
Why does the display light not work?
Perhaps the battery is empty? Please check the battery and replace it if it is empty (3 V / CR2032). Note the +/- pole.


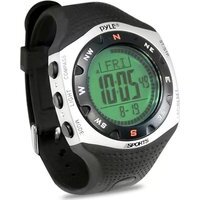
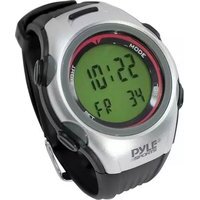
Art No.: PYLE_SPORTS-PPDM2
- Activation - Before starting
- Bike Watch
- INTRODUCTION
- USE A PRECISE TRAINING METHOD
- KNOW YOUR LIMITS AND DETERMINE YOUR PERSONAL EXERCISE ZONE
- Zone 1 - Health (50% - 65% of the MHR)
- Zone 2 - Fitness (65% - 80% of the MHR)
- Zone 3 - Performance (80% - 95% of the MHR)
- FEATURES
- SPEED MASTER
- HEART RATE MONITOR
- CALORIE FUNCTIONS
- CHRONOGRAPH
- WATCH
- OTHER SPECIFICATIONS
- BIKE
- BATTERY INSTALLATION
- Computer Watch
- Transmitter Belt
- Do not disposed off batteries with the household waste
- Transmitter
- WEARING THE TRANSMITTER BELT
- HOW TO USE THE COMPUTER WATCH
- TRANSMITTER INSTALLATION
- WHEEL SIZE INPUT
- Function Button/Modes/Settings
- Main Function Mode
- TIME MODE
- Time
- Setting the Time
- Alarm
- Setting the Alarm
- Activate/Deactivate Alarm
- Switch off Alarm
- Countdown Timer
- STOPWATCH MODE
- Stopwatch
- To recall the stopwatch memory
- HEART RATE MODE
- Training Time
- Memory
- Training Zones
- Setting:
- Display:
- Training Zone Alarm
- Alarm when exceeding the maximum heart rate.
- Calories, Fat and BMI
- Calories (CALORIES appears)
- Fat (FAT appears)
- Bike Speed
- Pedometer Speed
- Fitness Level
- BIKE MODE
- Timer
- Daily Distance
- Average Speed
- Maximum Speed
- Total Distance
- Odometer Save function
- Heart Rate (HRM)
- Scan function (SCAN)
- PEDOMETER MODE
- Total distance and Speed calibration
- Note:
- Calibration not Successful.
- Stop Calibration
- Number of Steps
- Heart Rate
- DISPLAY LIGHT
- TROUBLESHOOTING
- Why is the displayed covered distance incorrect?
- Why does the heart rate monitor watch not display the heart rate?
- The display of the heart rate is incorrect, why?
- The display is weak, hardly readable, what can I do?
- Why does the display light not work?
Brand : Pyle
Model : PPDM2
Category : Sports Watch