KM0550B - Media player Krüger&Matz - Free user manual and instructions
Find the device manual for free KM0550B Krüger&Matz in PDF.


| Product Type | Media Player (DVB-T2/T receiver) |
| Dimensions | 150 x 86 x 32 mm |
| Weight | 226 g |
| Power Supply | AC 110-240 V, 50/60 Hz, max 6 W, standby < 1 W |
| Display | LED front panel |
| Video Output | HDMI (576i/p, 720i/p, 1080i/p), SCART |
| Audio Output | Coaxial (SPDIF) |
| USB Port | USB 2.0 for media playback and PVR recording |
| Supported File Systems | FAT32, NTFS |
| Media Playback Formats | H.264, HEVC, MP3, MP4, MKV, JPEG, AVI |
| Audio Decoding | MPEG-1/2, AAC, AAC+, HE-AAC, AC3, Dolby Plus |
| TV Tuner | DVB-T/T2, VHF 170-230 MHz, UHF 470-862 MHz |
| Channel Scan | Automatic and manual, with LCN sorting |
| EPG | 7-day Electronic Program Guide |
| Timeshift & Recording | Timeshift pause/rewind and PVR recording to USB |
| Parental Control | Channel lock and menu lock with password (default 000000) |
| Remote Control | Programmable TV control buttons, 2x AAA batteries (not included) |
| Safety Features | Overvoltage protection, indoor use only, keep away from moisture and heat |
| Box Contents | Remote control, user manual |
| Warranty and Repairability | Manufacturer warranty, do not attempt self-repair; contact authorized service |
Frequently Asked Questions - KM0550B Krüger&Matz
User questions about KM0550B Krüger&Matz
0 question about this device. Answer the ones you know or ask your own.
Ask a new question about this device
Download the instructions for your Media player in PDF format for free! Find your manual KM0550B - Krüger&Matz and take your electronic device back in hand. On this page are published all the documents necessary for the use of your device. KM0550B by Krüger&Matz.
USER MANUAL KM0550B Krüger&Matz
natural_image
Completely blank white image with no visible content, text, or symbols.
natural_image
Completely blank white image with no visible content, text, or symbols.natural_image
Line drawing of a battery pack with an open lid and internal components (no text or symbols)Read the instruction manual carefully before first use and keep it for future reference. Producer is not responsible for damages caused by inappropriate handling and use of the device.



The lightning flash with arrowhead symbol, within an equilateral triangle is indicated to alert the user the presence of uninsulated, dangerous voltage, within the product enclosure that may be of sufficient magnitude to constitute risk of electric shock to persons.

The exclamation point within an equilateral triangle is intended to alert the user the presence of important operation and maintenance (servicing) instructions in the literature accompanying the appliance.
- Before connecting the device to power supply socket, make sure the voltage indicated on the appliance corresponds to the voltage in the power supply socket.
- Make sure to place this device on flat, dry and stable surface.
- Protect this device from moisture, humidity, water and any other liquid. Avoid using/ storing it in extreme temperatures. Do not expose it to direct sunlight and sources of heat.
• Product suitable for indoor use only. - Disconnect the device from the power supply if it is not going to be used for a long time.
- Protect power cord from harp edges and other factors which could lead to its damage.
- When you disconnect the power cord of the device, grasp and pull the plug, not the cord/cable.
- Place the device in a properly ventilated place.
- Do not block or cover slots, holes or openings on the product by placing on soft furnishings such as carpets, rugs or beds as these are provided for functionality and/or ventilation to ensure safe operation of the product.
- Do not place heavy objects on the device.
- Do not use this device if it has been damaged or its operation is abnormal.
- Do not attempt to repair this device yourself. In case of damage, contact with an
authorized service point for check-up/repair.
- This appliance may be used by children who are above 8 years old and by persons with reduced physical, sensory or mental capabilities, or lack of experience and knowledge, if they are supervised and guided by a person who is responsible for their safety in a cautious manner, and all the safety precautions are understood and followed. Children should not play with this device. Children should not perform cleaning and servicing of the device unsupervised.
- Fixed power cable may only be replaced in an authorized service point.
• ALWAYS disconnect this device from power supply mains before cleaning. - Clean this device with soft, slightly damp cloth. Do not use any abrasives or chemical agents to clean this product.
PRODUCT DESCRIPTION
Front panel
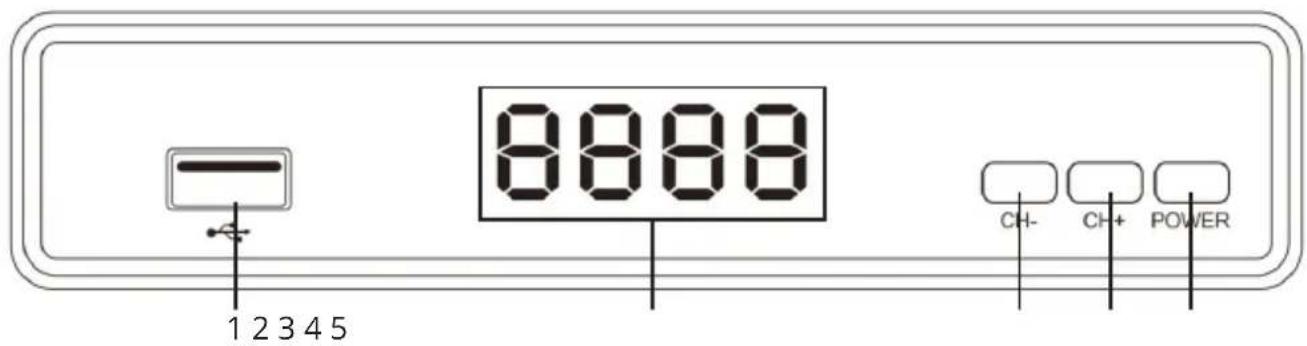
- USB port
- Display
-
Previous channel
-
Next channel
- Power button
Back panel

- Antenna input
- Coaxial output
-
HDMI output
-
SCART output
- Power cord
REMOTE CONTROL
-
Power button
-
Previous file/track
-
Fast rewind
-
Next file/track
-
Fast forward
-
Play
-
Pause
-
Record
-
Stop
-
Red button (USB): Media Player
-
Green button (SUBTITLE): enable subtitles
-
Blue button (AUDIO): language settings
-
Yellow button (TTX)
-
EPG (Electronic Program Guide)
-
Program Info
-
OK button
-
Volume increase/decrease button
-
Next/previous channel
-
Menu button
-
Exit/back button
-
FAV button
-
Volume increase/decrease button
-
Next/previous channel
-
Mute button
-
Number keys
-
TV/RADIO button
-
RECALL button (previous channel)
Programmable buttons
A. TV On/Off
B. AV/TV button
C. TV volume decrease button
D. TV volume increase button
E. SET button

PROGRAMMING TV CONTROL BUTTONS
- Place the tuner remote and the TV remote towards each other, at around 4 cm.
- Press and hold the SET button, until red LED glows stronger.
- On the tuner remote, press one of the programmable buttons (placed in TV CONTROL frame)
- Press the corresponding button on the TV remote a couple of times.
- After successful paring the red LED will flash twice.
- Press the SET button to exit pairing mode.
- The function is assigned to the button. If the button doesn't work, try repeating steps above.
CONNECTING TO THE TV
» To get standard resolution, connect the device to the TV with SCART cable.
» To get high resolution, connect the device to the TV with HDMI cable.

flowchart
graph TD
    A["Antenna"] --> B["HDMI cable"]
    B --> C["TV"]
    C --> D["Power supply"]
    D --> E["SCART cable"]
    E --> F["Power outlet"]
    style A fill:#f9f,stroke:#333
    style B fill:#ccf,stroke:#333
    style C fill:#cfc,stroke:#333
    style D fill:#fcc,stroke:#333
    style E fill:#cff,stroke:#333
    style F fill:#ffc,stroke:#333
INSTALLATION OF BATTERIES
- Open the battery compartment.
- Insert 2x AAA batteries with correct polarization (+/-).
- Close the battery compartment.
Notes:
- Do not mix the batteries.
- Remove the batteries if the remote control is not going to be used for an extended period of time.
- Do not place the remote control under the direct sunlight or near sources of excessive heat.
- Point the remote control to the unit no more than 8 meters from the remote control sensor and within 30irc horizontally and 30irc vertically of the front of the unit.

natural_image
Line drawing of a battery pack with three batteries and an open lid, showing internal components (no text or symbols)OPERATION
- Press the MENU button to enter main menu screen.
- Use navigation buttons to navigate the menu and adjust the settings.
- Press the MENU button to return to the previous menu or press the EXIT button to quit the menu screen.
QUICK INSTALLATION
If the receiver is being powered on for the first time or factory settings were restored, the welcome screen will appear on the TV screen.
»Region: Select a country.
»Language: Select language.
»Display Mode: Select a screen resolution.
»Aspect Mode: Select aspect ratio of the screen.
»OK: Press OK to start automatic channel scan.
INSTALLATION
» Auto Channels Scan: Automatic searching and saving available TV channels.
» Manual Channels Scan: Manual searching for TV channels. You can search the channel by number or frequency. When you choose the desired options, press Search to start searching.
» LCN (Logical Channel Number): Choose this option, if you want to sort the channels according to their logical channel number.
MAIN MENU
PROGRAM
Channel Edit: This menu allows for blocking, deleting, skipping and changing order of the channels, and adding channels to favorites. To preview selected channel, press the OK button. Press one of the buttons, to go to the channel edit mode:
- Press the 1 button to enable channel deleting mode. Select channels that you want to delete with the OK button, then press the EXIT button to delete these channels.
- Press the 2 button to enable moving channels mode. Select a channel that you want to move with the OK button, then using the up and down button, move the channel to new position. Press the EXIT button to save. Note: in the moving channels mode, the LCN function should be off.
- Press the 3 button to enable skip channel mode. Select channels that you want to skip with the OK button. Press the EXIT button to save.
- Press the 4 button to enable channel lock mode and input password (default: 000000). Select channels that you want to block with the OK button. Press the EXIT button to save.
- Press the 5 button to enable favorites mode. Select a channel with the OK button, and select the list. Press the EXIT button twice to save.
Program guide: function also available from the remote. Allows for browsing through TV programs.
Sort: select channel sorting method.
LCN: Logical Channel Number; sorts the channels by their numbers.
Volume scope: set the volume for all the channels.
PICTURE
Aspect ratio, Resolution, TV format: display settings. Note: default resolution for HDMI is 1080i, for SCART 576i.
OSD settings: settings for info view for selected channel.
Panel settings: LED display settings.
SEARCH
This menu allows for searching and saving channels. Select mode, country, antenna power, and FTA option (searching for free channels only).
TIME
This menu allows for setting the date and time, sleep timer and automatic turn on/off. Timer:
- Press the green button to add new entry to the timer. Set the mode (notification or recording), type, date and time and channel. Press the EXIT button to save.
- Press the red button to delete highlighted timer entry.
- Press the yellow button to edit highlighted timer entry.
- Press the blue button to delete all timer entries.
OPTIONS
Settings for language, subtitles and sound.
SYSTEM
Parental Control:
- To turn it on, go to the Parental Control menu (default password is 000000), and set the age from 4 to 18.
- To change the options, go to the Lock control menu (default password is 000000) and switch the menu lock (edit channel menu will be protected by the password) and channel lock (locked channels will require inputting the password). To change the password, select the Change password option.
Factory reset: reset all the data and set it to factory settings.
System information: view information about the system.
Software upgrade: install new software. Caution: do not unplug the device while the upgrade is in progress.
Power on control: select the action that the device will take after plugging it to the power.
TIMESHIFT
Timeshift function allows to stop and rewind TV programs if the USB drive is connected to the USB port of the device.
- Make sure the USB drive is connected to the device.
- Enter PVR Settings and turn ON Timeshift function
- Press PAUSE button on the remote control to stop the program.
- Control playback with the buttons on the remote control:
»Press PAUSE to pause playback.
»Press REV and FWD to rewind or fast-forward playback.
»Press STOP to stop timeshift and continue to watch the program.
» Press left and right arrows to choose a starting point of playback, then confirm by pressing the OK button.
Notes:
» It is recommended to use USB drive in 2.0 standard. USB drives with low parameters may not be compatible with the device.
»Large capacity USB drives may require external power supply.
RECORDING
- Make sure the USB drive is connected to the device.
- While watching a program, press the REC button on the remote control to start recording (press the REC button twice to change the default recording time).
- To stop the recording, press the STOP button on the remote control. Confirmation window will appear. Select [OK] to stop recording or [NO] to continue recording.
- Recordings will be saved on the USB drive and are available in the Media Player.
Note: Use the Timer function or EPG to schedule a recording.
EPG (ELECTRONIC PROGRAM GUIDE)
- Press the EPG button on the remote control to enter Electronic Program Guide.
- Use direction buttons on the remote control to navigate the menu.
- Press the Timer button to enter the PVR schedule menu.
TROUBLESHOOTING
| Problem Possible reason | Possible solution | |
| LED indicator is not on Power | er adapter is disconnected | Check the connection of power adapter |
| No signal Antenna is disconnected | nected Check antenna connection | |
| Antenna is damaged/improperly set | ||
| No signal is transmitted | ||
| No image or sound Improper mode has been selected on the TV | Choose proper mode on the TV | |
| Information that the channel is coded / unavailable | Coded / unavailable channel | Choose another channel |
| Remote control does not work | The device is turned off Turn | on the device |
| The remote control is not pointed at the device | Point the remote control at the device no more than 8 meters from the remote control sensor and within 30 irc horizontally and 30 irc vertically of the front of the unit | |
| There are obstacles between the remote control and the device | Make sure there are no obstacles between the remote control and the device | |
| The batteries are discharged | Replace the batteries with the new ones | |
| Forgotten channel password | - | Delete locked channel and scan channels again |
| When the device is moved to another room, there is no signal | Antenna connection in new place may be different (lower signal strength resulting in weaker channel reception or no signal) | Check antenna connection or connect amplifier to the antenna |
SPECIFICATION
MAIN FEATURES
LED display
Fully compliant with DVB-T2/DVB-T
Automatic/manual scan
Software update, media playback and PVR by USB 2.0 port
7 days EPG
Timeshift
Multilanguage menu
PVR schedule recording
Signal strength and quality display
LCN (Logical Channel Number)
TV channels preview
Parental control
Timer
Teletext
Favorite channel list
Weather
SYSTEM
CPU: GX6702S5
Internal memory: 32 Mb
RAM: 512 MB DDR3
Input impedance: 75 Ohm
Video resolution: 1920x1080 px
Video format: Auto, 16:9, 4:3 LB, 4:3 PS
Video decoding: MPEG-2, MPEG-4, H.264, H.265
Supported formats: H.264, HEVC, MP3, MP4, MKV, JPEG, AVI
Audio decoding: MPEG-1 Layer I/II, MPEG-2 layer I/II, AAC, AAC+/HE-AAC/AC3,Dolby plus
File system: FAT32, NTFS
TV TUNER
Input frequency range: (VHF) 170\~230 MHz; (UHF) 470\~862 MHz
Demodulation: QPSK, 16QAM, 64QAM, 256QAM
Band: 7 MHz, 8 MHz
INPUT/OUTPUT
SCART
COAXIAL
HDMI (576I/P, 720I/P, 1080I/P)
USB 2.0
1x IEC connector (ANT IN)
POWER SUPPLY
Input voltage: 110-240 V; 50/60 Hz
Remote control: 2x AAA battery
Power consumption: Max. 6 W
Power consumption in standby mode: Max. 1 W
PHYSICAL PARAMETERS
Dimensions: 150 x 86 x 32 mm
Power cord length: 1,1 m
Weight: 226 g
IN SET
Remote control, user' manual

English
Correct Disposal of This Product
(Waste Electrical & Electronic Equipment)



(Applicable in the European Union and other European countries with separate collection systems) This marking shown on the product or Its literature, indicates that It should not be disposed with other household wastes at the end of its working life. To prevent possible harm to the environment or human health from uncontrolled waste disposal, please separate this from other types of wastes and recycle it responsibly to promote the sustainable reuse of material resources. Household users should contact either the retailer where they purchased this product, or their local government office, for details of where and how they can take this item for environmentally safe recycling. Business users should contact their supplier and check the terms and conditions of the purchase contract This product should not be mixed with other commercial wastes for disposal.
Made in China for LECHPOL ELECTRONICS Sp. z o.o. Sp.k., ul. Garwolińska 1, 08-400 Miętne.
KWESTIE BEZPIECZEŃSTWA
natural_image
Line drawing of a battery pack with an open lid and internal components (no text or symbols)OBSŁUGA
C. Buton reducere volum TV
D. Buton creştere volum TV
E. Buton SET

PROGRAMAREABUTOANELORDECONTROLALETELEVIZORULUI
natural_image
Line drawing of a battery pack with an open lid and three batteries inside (no text or symbols)EXPLOATARE
Formate acceptate: H.264, HEVC, MP3, MP4, MKV, JPEG, AVI
Decodare audio: MPEG-1 Layer I/II, MPEG-2 layer I/II, AAC, AAC+/HE-AAC/AC3,Dolby plus
Fisier sistem: FAT32, NTFS
TUNER TV
Frecventa de intrare: (VHF) 170\~230 MHz; (UHF) 470\~862 MHz
Demodulare: QPSK, 16QAM, 64QAM, 256QAM
natural_image
Completely blank white image with no visible content, text, or symbols.
natural_image
Completely blank white image with no visible content, text, or symbols.
natural_image
Completely dark image with no visible content, text, or symbols.
natural_image
Abstract wavy line pattern with gradient shading, no text or symbols present
www.krugermatz.com
Krüger&Matz is a registered trademark
- PRODUCT DESCRIPTION
- REMOTE CONTROL
- PROGRAMMING TV CONTROL BUTTONS
- CONNECTING TO THE TV
- INSTALLATION OF BATTERIES
- Notes:
- OPERATION
- QUICK INSTALLATION
- INSTALLATION
- MAIN MENU
- PROGRAM
- PICTURE
- SEARCH
- TIME
- OPTIONS
- SYSTEM
- Parental Control:
- TIMESHIFT
- RECORDING
- EPG (ELECTRONIC PROGRAM GUIDE)
- SPECIFICATION
- MAIN FEATURES
- TV TUNER
- INPUT/OUTPUT
- POWER SUPPLY
- PHYSICAL PARAMETERS
- IN SET
- English
- KWESTIE BEZPIECZEŃSTWA
- OBSŁUGA
- PROGRAMAREABUTOANELORDECONTROLALETELEVIZORULUI
- EXPLOATARE
- TUNER TV
Brand : Krüger&Matz
Model : KM0550B
Category : Media player