
V-Charge 400 Duo - Charger VOLTCRAFT - Free user manual and instructions
Find the device manual for free V-Charge 400 Duo VOLTCRAFT in PDF.


| Product Type | Charger for model batteries |
| Brand | Voltcraft |
| Model | V-Charge 400 Duo |
| Dimensions (L x W x H) | 100 x 99 x 64 mm |
| Weight | 448 g |
| Input Voltage | 100-240 V/AC, 50/60 Hz, 3.5 A or 9-32 V/DC |
| Output Voltage | 0.1 - 30 V |
| Charging Power (AC) | 160 W total (supports power distribution) |
| Charging Power (DC) | 2 x 200 W |
| Charging Current (per channel) | 0.1 - 10 A |
| Balancer Current | Max. 1000 mA/cell |
| Capacity Limit | 100 - 50000 mAh |
| Discharge Power (internal) | 6 W |
| Discharge Power (external) | 200 W with optional discharge device (e.g., UP-D200) |
| Inductive Charging | Max. 10 W, Qi-compatible |
| Compatible Battery Types | LiPo, LiHV, Li-ion, LiFe (1-6S); NiCd/NiMH (1-16S); Lead-acid (1-12S) |
| Temperature Sensor Support | Yes (not included, optional item no. 2258298) |
| Display | LCD with backlight (adjustable brightness) |
| Safety Features | Short-circuit protection, overheat protection, reverse polarity protection |
| Care | Disconnect from power, clean with dry lint-free cloth; no aggressive detergents |
| Operating Conditions | 0 to +40 °C, 0-90% RH (non-condensing) |
| Storage Conditions | -20 to +60 °C, 0-90% RH (non-condensing) |
| Warranty | Manufacturer warranty; see enclosed documents |
Frequently Asked Questions - V-Charge 400 Duo VOLTCRAFT
User questions about V-Charge 400 Duo VOLTCRAFT
0 question about this device. Answer the ones you know or ask your own.
Ask a new question about this device
Download the instructions for your Charger in PDF format for free! Find your manual V-Charge 400 Duo - VOLTCRAFT and take your electronic device back in hand. On this page are published all the documents necessary for the use of your device. V-Charge 400 Duo by VOLTCRAFT.
USER MANUAL V-Charge 400 Duo VOLTCRAFT
natural_image
Exterior view of a black electronic device connected to a cable (no visible text or symbols)Copyright 2020 by Conrad Electronic SE.
*2267182_v2_1120_02_DS_m_2L_1
GB Operating instructions
V-Charge 400 Duo charger for model batteries
Item no. 2267182
Intended use
This product is designed to charge up to two battery packs on two charging terminals. The balancer connection can be used to ensure even charging of the individual cells in the battery pack. The charging current can be adjusted from 0.1 to 10 A, and Li-HV battery charging is also supported. 1-6S LiPo/LiHV/Li-ion/LiFe batteries, 1-16S NiCd/NiMH batteries and 1-12S lead-acid batteries can be charged directly via the designated connections. The charger can charge batteries with a capacity of up to 50,000 mAh.
It is also possible to connect an external temperature sensor to monitor the battery. Battery discharging is performed using a discharge power of up to 6 W. When an external discharge device is used, a discharging power of 200 W can be provided for rapid discharge.
The product is also suitable for inductive (wireless) charging of batteries in compatible smartphones with Qi technology and other mobile devices. Setting, monitoring and controlling the functions is made easier by a clear LCD display. The product also features a number of basic safety features such as short-circuit protection at the output and overheat protection.
An AC or DC voltage can be used for the voltage/power supply of the charger (see "Technical data"). The factory-provided power cable is designed for use with a mains AC voltage. The charger can also be powered by a rechargeable battery during outdoor activities in dry environments (see information in "Initial operation, b) Connecting to the power supply"). The requisite cable is not included with this product.
This product is intended for indoor use only. Do not use it outdoors. Contact with moisture (e.g. in a bathroom) must be avoided under all circumstances.
For safety and approval purposes, do not rebuild and/or modify this product. Using the product for purposes other than those described above may damage the product. In addition, improper use can cause hazards such as a short circuit, fire or electric shock. Read the operating instructions carefully and store them in a safe place. Only make this product available to third parties together with its operating instructions.
This product complies with statutory, national and European regulations. All company and product names contained herein are trademarks of their respective owners. All rights reserved.
Delivery content
- Charger
• CD with operating instructions - Mains cable
- Safety information
Up-to-date operating instructions
The complete operating instructions for this product can be found on our website.
Download the latest operating instructions at www.conrad.com/downloads or scan the QR code shown. Follow the instructions on the website.

Description of symbols

The symbol with the lightning in a triangle indicates that there is a risk to your health, e.g. due to an electric shock.

The symbol with an exclamation mark in a triangle points to important information in these operating instructions which must be observed.

The arrow symbol indicates special information and tips on how to use the product.

This product must only be used in dry, enclosed indoor areas. It must not become damp or wet, as this may cause a fatal electric shock!

This symbol reminds you to read the operating instructions included with the product.

Safety information
Read the operating instructions carefully and especially observe the safety information. If you do not follow the safety information and information on proper handling in these operating instructions, we will assume no liability for any resulting personal injury or damage to property. Such cases will invalidate the warranty/guarantee.
a) General information
• The device is not a toy. Keep it out of the reach of children and pets.
- Do not leave packaging material lying around carelessly. It may become a dangerous plaything for children.
- Protect the product from extreme temperatures, direct sunlight, strong vibrations, high humidity, moisture, combustible gases, vapours and solvents.
- Do not place the product under any mechanical stress.
- If it is no longer possible to operate the product safely, stop using it and prevent unauthorised use. Safe operation can no longer be guaranteed if the product:
- is visibly damaged,
- is no longer working properly,
- has been stored for extended periods in adverse ambient conditions or
-
has been subjected to any serious transport-related stress.
-
Handle the product with care. Jolts, impacts or a fall even from a low height may damage the product.
- Consult a technician if you are not sure how to use or connect the product, or if you have concerns about safety.
- Maintenance, modifications and repairs may only be carried out by a technician or a specialist repair centre.
- If you have questions which remain unanswered by these operating instructions, contact our technical support service or other technical personnel.
b) Connected devices
- Always observe the safety information and operating instructions of any other devices which are connected to the product.
c) Persons and product
- This appliance may be used by children over 8 years of age and people with reduced physical, sensory or mental capabilities if they have been given supervision or instruction concerning the safe use of the appliance and understand the hazards involved. Children must not clean or service the appliance without appropriate supervision. Children should be supervised to ensure that they do not play with the device.
d) Installation location
- The product may only be used in dry, enclosed spaces. It must not become damp or wet, otherwise the mains power supply may cause a fatal electric shock!
- Place the charger on a clean, level surface of a sufficient size.
- Do not place the charger on flammable materials (e.g. a carpet, car seat or tablecloth). Always use a suitable non-flammable, heatproof surface. Keep the charger away from flammable or combustible materials (e.g. curtains).
- Keep the ventilation openings on the bottom of the charger unobstructed and in good condition.
- Ensure that the cable is not pinched or damaged by sharp edges. Route the connecting cable so that nobody can trip over it.
- Do not place any containers filled with liquid (e.g. vases or plants) on or next to the charger. Liquids that come into contact with the interior components may destroy the charger and cause a fire or explosion. Disconnect the product from the operating voltage immediately in this case. Discontinue use and take the charger to a specialist repair centre.
- If any liquids get into the charger, switch off the mains socket to which the charger is connected. To do this, switch the corresponding circuit breakers off or unscrew the fuse. In addition, turn off the residual current device in order to disconnect all poles of the socket from the mains voltage. You can then unplug the charger from the mains socket. Discontinue use immediately and take the charger to a specialist repair shop, or dispose of it in an environmentally friendly manner.
• Always use suitable protection when placing the charger on valuable furniture, otherwise the charger may cause scratches, pressure points or discolouration.
e) Operation
• Always turn off the power to the charger before connecting or disconnecting rechargeable batteries.
- Never place devices with unsupported batteries or non-rechargeable batteries on the charger. This may cause a fire or explosion!
- Always set the correct charging voltage. Failure to do so may cause a fire or explosion.
- Ensure that there is sufficient ventilation during use; never cover the charger. Leave sufficient distance (at least 20 cm) between the charger and other objects. The charger may cause a fire if it overheats!
- The charger may be operated via a mains voltage or DC voltage. The device can be operated at 100 - 240 V/AC and 9 - 32 V/DC. Ensure the correct setting of the mains voltage and set the correct input voltage on the charger. Always ensure the correct polarity.
- Never leave the product unattended during use. Although there is a wide range of comprehensive safety mechanisms on the device, it is impossible to exclude the possibility of malfunctions or problems occurring while charging.
- When connecting the battery packs, ensure that the input and output are connected with the correct polarity.
- Never wear metal or conductive objects (e.g. jewellery such as necklaces, bracelets or rings) when handling the charger. This may result in a short circuit, which can cause a fire or explosion.
- Only use the product in temperate climates. It is not suitable for use in tropical climates.
- Do not use the product in the immediate vicinity of strong magnetic or electromagnetic fields, transmitter aerials or HF generators. These may affect the electronic control system.
- Do not place the product directly next to devices with strong electrical or magnetic fields (e.g. transformers, motors, cordless telephones and wireless devices), as these can prevent the product from working properly.
- Never use the product immediately after it has been brought from a cold room into a warm one. This may generate condensation, which can cause the product to malfunction or damage the interior components. This may cause a fatal electric shock! Allow the product to reach room temperature before using it. This may take several hours.
• Always observe the safety information and operating instructions of any other devices which are connected to the product. - If the product is not going to be used for a prolonged period of time (e.g. storage), disconnect it from the power supply by removing the power cable from the mains socket.
- Trained personnel must supervise the use of electrical appliances in schools, training facilities and DIY workshops.
- For installations in industrial facilities, follow the accident prevention regulations for electrical systems and equipment issued by the government safety organisation or the corresponding authority for your country.
f) Electrical safety
- Before connecting the product to the mains, check that your local AC mains voltage matches the specifications on the nameplate.
- Only use an earthed mains socket (230 V/AC, 50 Hz) connected to the public grid to power the product.
- The mains socket must be located near to the device and be easily accessible.
- For safety reasons, unplug the mains plug from the mains socket during thunderstorms.
- Never plug in or unplug the mains plug when your hands are wet.
Information about charging parameters
Rechargeable batteries consist of two electrodes that are placed into an electrolyte. Batteries are therefore classed as a chemical element. Chemical reactions take place inside this element. These reactions are reversible, which makes it possible to recharge the battery.
A charging voltage is required to recharge batteries. This voltage must be higher than the cell voltage. Moreover, the energy (mAh) supplied during the charging process must be higher than that which can be drawn afterwards. This ratio of the energy supplied to the energy drawn is called efficiency.
The capacity that can be drawn mainly depends on the discharging current and has a decisive impact on the condition of the battery. The supplied charge cannot be used as a measure, because some of it will be lost during charging (e.g. converted into heat).
The capacity data given by the manufacturer is the maximum theoretical quantity of current which can be delivered by the battery. This means that a 2000 mAh battery can, for example, theoretically deliver a current of 1000 mA (= 1 A) for two hours. This value depends heavily on numerous factors (e.g. condition of the battery, discharging current and temperature).
a) Selecting the charging parameters

All parameters must be set correctly before each charge. Using incorrect settings can cause a fire and injury as well as damage to property.
b) Selecting the charging current
Excessive charging currents greatly reduce the battery lifespan and, in extreme cases, can cause a fire or explosions. Selecting the appropriate charging current for a battery type is therefore very important. The charging and discharging current are determined by the C-coefficient of a battery pack. Most conventional battery packs have the C-coefficient indicated on the type plate.
The requisite charging current for a battery is calculated according to the following formula:
Capacity in mA x C-coefficient = charging current
Example:
$$ 1 0 0 0 \times 5 = 5 0 0 0 \mathrm{mA} $$
A 1000 mAh battery with a coefficient of 5C requires a charging current of approx. 5 A.
If you can't determine the C-coefficient of a battery pack, always use a coefficient of 1C and calculate the charging current accordingly. This is always a safe charging current. However, bear in mind that the charging times can vary according to the actual (but not verified) battery specifications.
c) Characteristics of suitable battery types
| NiCd / NiMH | Pb LiFe Lilon LiPo LiHV | |||||
| Rated voltage 1.2 V 2 V 3.2 V 3.6 V 3.7 V 3.8 V | ||||||
| Final charging voltage | 1.4 V 2.4 V 3.6 V 4.1 V 4.2 V 4.35 V | |||||
| Storage voltage | Not supported | Not supported | 3.3 V 3.7 V 3.8 V 3.9 V | |||
| Discharging voltage | 0.5 - 1.1 V 1.8 - 2 V | 2.6 - 2.9 V | 2.9 - 3.2 V | 3 - 3.3 V | 3.1 - 3.4 V | |
| Before charging voltage | / | 2 V 2.9 V 3.1 V 3.2 V 3.2 V | ||||
| Balancer charging | Not supported | Not supported | Supported | Supported | Supported | Supported |
| Charging without balancer | Supported | Supported | Supported | Supported | Supported | Supported |
| Number of cells | 1-16S 1-12S 1-6S | 1-6S | 1-6S | 1-6S | ||
| Charging current (max.) | 10 A | 10 A | 10 A | 10 A | 10 A | 10 A |
Product overview
a) Charger
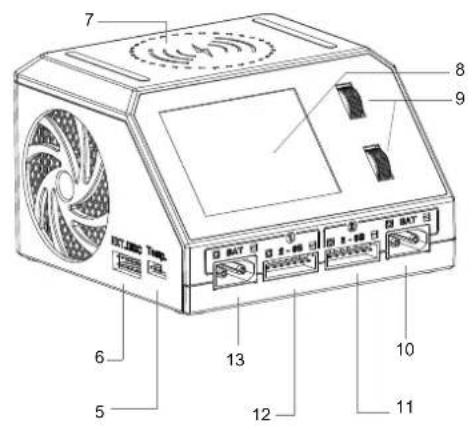
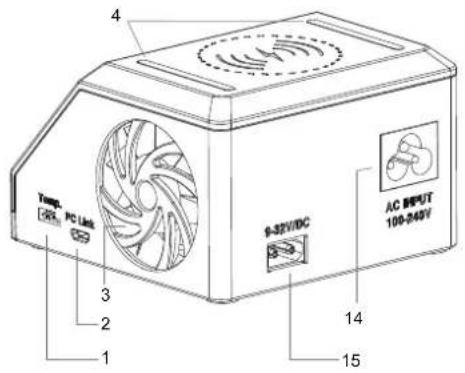
1 Temperature sensor connection 2 (for external)
2 PC link connection
3 Fan (controlled by temperature sensor) 4
Anti-slip strip
5 Temperature sensor connection 1 (for external)
6 EXT.DISC discharge connection
7 Charging pad (inductive) 8 LCD display
9 Rotary switch 1 & 2 10 Battery connection 2
11 Balancer connection 2 12 Balancer connection 1
13 Battery connection 1 14 AC INPUT 100 - 240 V AC voltage
15 9 - 32 V DC DC voltage connection
connection
b) LCD display
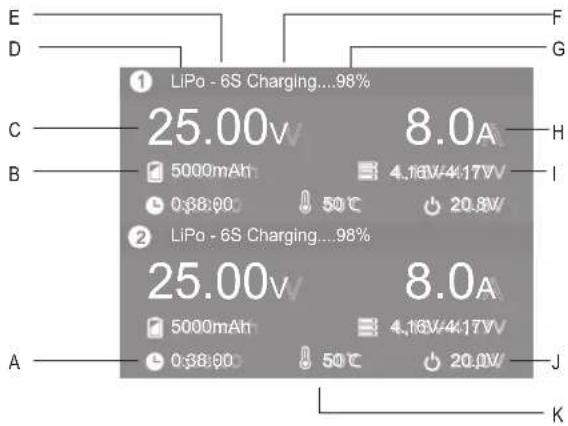
A Duration (charging/discharging) B Battery capacity
C Battery voltage D Battery type
E Number of cells in the battery F Operating mode (current)
G Charge status in %
H Charging/discharging current
I Cell voltage
J Input voltage
K Temperature
Initial operation
a) Placement
- Place the charger with the plastic feet on a non-combustible, heat-resistant surface close to a standard mains socket, if you wish to use it with a mains voltage. To use the charger with a DC voltage, the DC source must be located nearby or moved next to the charger.
- Ensure that the ventilation holes on the bottom of the charger are unobstructed and that the fan is operating.
- Keep the charger away from flammable or easily inflammable materials (e.g. curtains). Never operate the charger on car seats, carpet or other combustible materials.
b) Connecting to the power supply
- Connect the mains cable to the AC INPUT 100 - 240 V AC voltage connection (14) and plug the mains plug into a standard mains socket.

Never operate the charger with an alternating voltage that is outside the range specified in the technical data.
- If you wish to operate the charger with a DC voltage, use a suitable cable with an XT60 connector (not included) to connect the 9-32 V/DC DC voltage connection (15) to a DC voltage source, e.g. a laboratory power supply that complies with the specifications in the "Technical data" section. You can use a power adapter or, in dry conditions, a car battery. Pay attention to the charge status of your car battery when on the move.

A DC power source (laboratory power supply or battery) of at least 20 V and 25 A is recommended for a DC power supply.

Never connect both power supply connections simultaneously. Do not attempt to use the charger to charge a battery with an AC voltage and a DC voltage at the same time.
c) Connections on the charger
- The battery packs are connected to the two battery connections 1 & 2 (10 & 13) for charging. - The two balancer connections (11 & 12) are used for connecting the balancer cables. Always insert the balancer cables into the sockets with the connector aligned to the right.

When a balancer cable is connected, the charger automatically detects the number of cells.
- Connect an external temperature sensor for battery temperature monitoring (not included) to the temperature sensor connections 1 & 2 (5) & (1). The temperature sensors can be purchased separately from Conrad via item no. 2258298. - A discharge device can be connected to the EXT.DISC discharge connection (6) for rapid discharging. This enables a discharge power of up to 200W .

The PC link connection (2) does not have a regular function in the normal operating mode. It is used to update the charger firmware when the manufacturer releases firmware updates.
d) System menu settings
Press and hold the rotary switch (9) for charging channel 1 to open the system menu with the settings. You can set the following system parameters:
System parameter
| Language | Select one of the available menu languages. The following languages are available: English, German. |
| Max. power If you are operating the charger with a DC power supply and its power (P=Uxl) is less than the maximum power required by the charger, set the maximum input power between 50 and <450 W. For example, if you are using a 20 V/10 A DC power source, set the maximum input power value to 200 W. It is recommended to use a DC power supply with a power of 500 W/20 V/DC or higher. | |
| Min. Input voltage | If you are operating the charger with a DC power supply, set the minimum input voltage between 9 and 24 V/DC . This setting prevents the power supply battery from overdischarging. If the voltage falls below the set voltage, the charger stops the current process and displays the "DC in too low" warning message.For example, if you are using a 6S LiPo battery as a power source, you can set this value to 21.0 V to protect the battery from discharging below this voltage. |
| Power distribution | You can distribute the power differently over the two charging channels. Power is typically distributed evenly over the two charging channels. At 160 W, this means a power of 80 W per channel. This value can be distributed differently as required, e.g. 100 + 60 W. |
| Max. capacity | The charger terminates the charging process if the maximum capacity value is reached. The capacity value can be adjusted. |
| Max. charging time | The charger terminates the charging process if the set maximum charging time is reached. |
| Cut-off temperature | The charger terminates the charging process if the battery temperature reaches the maximum cut-off value. An external temperature sensor is required for this feature to work. |
Backlight The brightness of the LCD display backlight can be adjusted
in three stages. The following options are available: Off > Low
Medium > High.
Volume The volume of the charger can be adjusted. The following op-
tions are available: Off > Low > Medium > High. If 'Off' is se-
lected, warning tones are not muted and continue to sound.
About This menu item allows you to view the firmware version and
other system information.
Factory Reset Restore factory default settings.
Back Return to the last program or menu.
e) Adjusting the operating mode and parameters in the program menu
- After the power supply has been connected, the LCD display (8) will switch to the home/standby display. The charger will emit a beep sound.
- Connect the battery that you want to charge/discharge to a battery connection.
- Turn the rotary switch (9) for a charging channel to select a menu item and to scroll up or down. The values are displayed on the LCD display.
- Confirm the setting by briefly pressing the rotary switch.
The cell voltage and cell resistance can only be displayed when balancer charging is used.
- Press the rotary switch for a charging channel. The program menu for the parameter setting will appear on the LCD display.
The following menu items are available for selection:
Battery Select a battery type.
Cells Set the number of cells in the connected battery pack.
Mode Set the operating mode. The following modes are available: "Charge" / "Discharge" / "Storage" / "Ext. DISC" are available.
Current Select the required charging current (0.1 to 10.0 A), discharging current (0.1 to 2.0 A), and external discharging current (0.1 to 15.0 A).
TVC Setting the charging voltage at the connections.
Start Start an operation in the selected operating mode (charging, discharging, storage, etc.).
Back Return to the previous display or function.
f) Charge or discharge battery pack
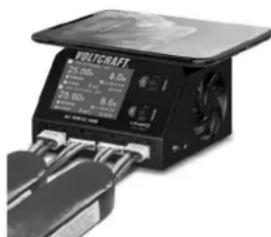
- Connect a battery to each of the battery connections 1 & 2 (10) & (13). You can connect one or two different batteries. Connect the balancer connections (11) & (12). Always connect these such that they are aligned to the right.
The default setting of the charger is charging in series. Always use the connection cables to connect the charger to the battery pack. - The fan (3) must always run while the charger is operating in order to ensure sufficient cooling.
When charging lithium batteries, it is always advisable to connect the balancer connections and charge in balancer mode. The charger will still charge even if the balancer cable is not used. There will, however, be an audible warning that the balancer cable has not been inserted.
natural_image
Electrical power supply unit labeled 'WOLTCRAFT' with digital display and cooling fins (no readable text beyond branding)- You can connect one or two different batteries. Connect the balancer connections (11 & 12).
- Turn the rotary switch (9) for a charging channel in order to select the desired menu item.
- Set the battery type and briefly press the rotary switch to confirm.
- Set the number of cells and briefly press the rotary switch to confirm.
- Set the desired operating mode ("Charge", "Discharge", "Storage", "Ext. DISC") and briefly press the rotary switch to confirm.
→ You must connect a discharge device when using the "Ext. DISC" function. For more information, see "Ext. DISC" operating mode (with discharge device)".
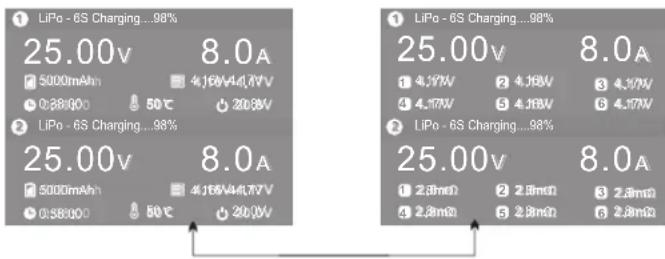
If you turn the rotary switch up or down during charging, the display values at the bottom of the LCD display will switch between the cell voltage, cell internal resistance and working parameters. Internal cell resistances can only be displayed during a charging process.
- Set the requisite charging current and briefly press the rotary switch to confirm.
- You can also change the charging current setting during the charging process. Other parameters cannot be changed in this way.
- Set the requisite charging voltage and briefly press the rotary switch to confirm.
- Select the 'START' menu item to start the charging process.
- Select the 'BACK' menu item to return to the main menu.
- You can cancel a charging process. To do this, briefly press the rotary switch 1 or 2 for the corresponding channel, select the 'STOP' menu item and briefly press the rotary switch to confirm the cancellation.
→ At the end of the charging process, always press the rotary switch to safely end charging and return to the main display.
The charger status is also indicated by the colour of the backlight.
- Blue: Charge and store
- Orange: Discharge
- Green: Fully charged
- Grey Standby
- Red Fully discharged
'Charge' operating mode
When the 'Charge' operating mode is set, the charger charges batteries at up to 80W per channel, unless an alternative power distribution has been set.
'Discharge' operating mode (without discharge device)
When the 'Discharge' operating mode is set, the charger discharges batteries with a discharging power of up to 8 W.
'Storage' operating mode
When the 'Storage' operating mode is set, the charger determines the most appropriate battery pack voltage for storage. If the battery voltage is lower than this value, the charger starts charging automatically. If the voltage is higher, the discharging process is initiated until the ideal storage voltage is reached.
Ext. DISC operating mode (with discharge device)
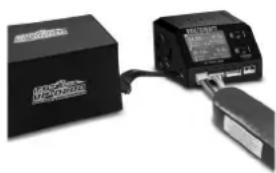
To use the 'Ext. DISC' operating mode, connect a discharge device to the EXT.DISC discharge connection (6) and set the operating mode to 'Ext. DISC'.
natural_image
Exterior view of a black electronic device connected to a power supply unit (no visible text or symbols)- Use an external discharge device such as the UP-D200 Smart Discharger 200 W with the EXT.DISC connection. This enables you to discharge at higher speeds with a discharging power of up to 200 W.
- This product discharges in balancer mode to avoid overdischarging individual cells of the battery pack.
→ You must connect a discharge device when using the 'Ext. DISC' operating mode.
Balancer mode – measure internal cell resistance
In balancer mode, the charger monitors the internal cell resistance of each cell in the battery pack. The internal cell resistance can be used to determine the functionality and condition of a battery pack. The more even the cell resistance of individual cells, the more functional/healthy the battery pack. The resulting charging process is dynamic, whereby the charging/discharge current or cell resistances adjust/fluctuate according to changing circumstances.
The charging process for charging a lithium battery is dynamic, so you will notice fluctuations in both the charging current and the internal cell resistance while the battery is charging. Due to the measurement method, it is not possible to achieve the same measurement accuracy normally achieved by resistance measuring instruments. For this reason, the internal resistance value is only designed to serve as a reference value for comparison, e.g. to evaluate battery performance or compare the performance of different batteries. The charging current also affects the accuracy of the internal resistance measurement. A battery with a large capacity and a low internal resistance requires a large charging current in order to be able to accurately measure the internal resistance.
Recovering deeply discharged lithium batteries
The charger detects cell voltages in order to start the charging process if the voltages are too low. It starts recovery of the battery pack by charging with a very low charging current of 0.5 A. As soon as a voltage is reached that allows rapid charging, charging is continued with a higher charging current.
g) Inductive charging (wireless)
Lay your mobile device on the charging pad (7) with its rear side facing down. Position it on the centre of the anti-slip strip (4) to charge it. Charging starts when the charger is connected to the power supply.
You can charge smartphones such as the iPhone X, iPhone XS, iPhone 11, iPhone 11 Pro, Samsung Galaxy S10, Galaxy Note10+, Huawei Mate 30, Huawei Mate 30 Pro, Xiaomi 9, Xiaomi 9 Pro and other devices that support induction charging.
→ You can use this charging function while using another charger function.
Errors and error messages
| Error message Possible cause Recommended solution | ||
| CONNECTION BREAK Battery and charger are disconnected. | Ensure that the contacts are free of dirt and grease and not oxidised. Connect the batteries correctly.Check the connections. | |
| BALANCE CONNECTION ERROR | Balancer cables are not connected correctly. | Check the balancer connections.Insert the balancer cables so that they are aligned to the right. |
| CONNECTION ERROR - CHECK MAIN PORT | The battery voltage is higher than the standard battery voltage. | Disconnect the battery from the charger. |
| CELL VOLTAGE HIGH The battery cell voltage is higher than the normal maximum voltage. | Disconnect the battery from the charger. | |
| REVERSE POLARITY A | battery was connected with the reverse polarity. | Connect the battery with the correct polarity. |
| OVER CHARGE CAPACITY LIMIT | The maximum charging capacity was exceeded (0 - 50000 mAh). | Disconnect the battery from the charger. |
| DC IN TOO LOW The DC input voltage is lower than 9.0 V or lower than the set voltage. | Connect a suitable DC voltage. | |
| DC IN TOO HIGH The DC input voltage is greater than 32.0 V. | Connect a suitable DC voltage. | |
| OVER TIME LIMIT The set charging time was exceeded. | Select a charging time between 0 and 720 minutes.(Factory setting: 180 minutes) | |
| INT.TEMP TOO HIGH The charger temperature is higher than 95 °C. | Disconnect the charger from the power supply and let it cool down. | |
| EXT.TEMP TOO HIGH The battery temperature is higher than the set temperature (20 to 80 °C, default setting = 50 °C). | Disconnect the charger from the power supply and let the charged batteries cool down. | |
| BATTERY WAS FULL A fully charged battery was connected. | Remove the battery from the charger. | |
| NO NEED TO CHARGE A | rechargeable battery was connected for the storage setting, but already has the correct storage voltage, e.g. a LiPo battery with a voltage of 3.8 V. | Remove the battery from the charger. |
| POWER DISTRIBUTION NEEDS TO BE ADJUSTED | The set power distribution between the charging channels is incorrect. 100% of the power is set to channel 1, but a battery is connected to channel 2 for charging. | Remove the battery from channel 2 and connect it to channel 1, or adjust the power distribution. |
Care and cleaning

Never use aggressive detergents, rubbing alcohol or other chemical solutions, as these may damage the housing or stop the product from functioning properly.
- Disconnect the product from the power supply before cleaning. Pull the mains plug from the mains socket or disconnect the DC power supply.
- Use a dry, lint-free cloth to clean the product.
- To prevent scratch marks, do not press too hard on the surface of the enclosure or LCD display when cleaning.
Disposal

Electronic devices are recyclable waste and must not be placed in household waste. At the end of its service life, dispose of the product in accordance with the applicable regulatory guidelines.
You thus fulfil your statutory obligations and contribute to environmental protection.
Technical data
Input voltage/current.... 100 - 240 V/AC, 50/60Hz, 3.5 A or 9 - 32 V/DC
Output voltage 0.1 - 30 V
Charging power 160 W/AC (channel 1 + channel 2, supports power distribution) or 2 x 200 W/DC
Charging current.... 2 x 0.1 - 10 A
Balancer current.... max. 1000 mA/cell
Capacity limit 100 - 50000 mAh, cut-off
Charging cut-off.... 1 to 720 minutes
Temperature cut-off 20 -80 °C
Charging power ...... Max. 10 W (inductive)
DC power supply 20 V/DC, 25 A, 500 W or higher (not included)
Discharging power....6 W, (200 W with external discharge device)
Suitable for 1-6S LiPo/LiHV/Lilon/LiFe rechargeable battery
1-16S NiCd/NiMH rechargeable battery
1-12S Lead rechargeable battery
Temperature sensor cable...... Not included,
can be ordered with Conrad item no. 2258298
Operating conditions.... 0 to +40 °C, 0–90 % relative humidity (non-condensing)
Storage conditions....-20 to +60 °C, 0–90 % relative humidity (non-condensing)
Dimensions (L x W x H).... 100 x 99 x 64 mm
Weight 448 g
This is a publication by Conrad Electronic SE, Klaus-Conrad-Str. 1, D-92240 Hirschau (www.conrad.com).
All rights including translation reserved. Reproduction by any method, e.g. photocopy, microfilming or capture in electronic data processing systems, requires the prior written approval of the publisher. Reprinting, also in part, is prohibited. This publication reflects the technical status at the time of printing.
Copyright 2020 by Conrad Electronic SE.

- GB Operating instructions
- V-Charge 400 Duo charger for model batteries
- Intended use
- Delivery content
- Up-to-date operating instructions
- Description of symbols
- Safety information
- a) General information
- b) Connected devices
- c) Persons and product
- d) Installation location
- e) Operation
- f) Electrical safety
- Information about charging parameters
- a) Selecting the charging parameters
- b) Selecting the charging current
- Capacity in mA x C-coefficient = charging current
- Product overview
- a) Charger
- b) LCD display
- Initial operation
- a) Placement
- b) Connecting to the power supply
- c) Connections on the charger
- d) System menu settings
- e) Adjusting the operating mode and parameters in the program menu
- f) Charge or discharge battery pack
- 'Charge' operating mode
- 'Discharge' operating mode (without discharge device)
- 'Storage' operating mode
- Ext. DISC operating mode (with discharge device)
- Balancer mode – measure internal cell resistance
- Recovering deeply discharged lithium batteries
- g) Inductive charging (wireless)
- Care and cleaning
- Disposal
- Technical data
Brand : VOLTCRAFT
Model : V-Charge 400 Duo
Category : Charger