
W Studio - Soundbar DEFINITIVE TECHNOLOGY - Free user manual and instructions
Find the device manual for free W Studio DEFINITIVE TECHNOLOGY in PDF.


| Product Type | Soundbar |
| Brand | Definitive Technology |
| Model | W Studio |
| Dimensions (W x H x D) | 42.0 x 3.5 x 4.5 in (106.7 x 8.9 x 11.4 cm) |
| Weight | 12.0 lb (5.4 kg) |
| Power Output | 200W total |
| Audio Channels | 2.1 |
| Driver Configuration | 6 x 3.0 in full-range drivers, 2 x 1.0 in tweeters |
| Frequency Response | 50 Hz – 20 kHz |
| Inputs | HDMI ARC, Optical, Bluetooth, 3.5mm Aux |
| Outputs | HDMI ARC, Wireless Subwoofer output |
| Wireless Connectivity | Bluetooth 4.2 |
| Remote Control | Included (IR) |
| Wall Mountable | Yes (bracket included) |
| Power Supply | AC 100-240V, 50/60Hz |
| Special Features | Voice Adjust technology, Digital Signal Processing |
| Included Accessories | Soundbar, Remote control, Wall mount kit, Optical cable, Power cord |
| Warranty | 2 years limited |
Frequently Asked Questions - W Studio DEFINITIVE TECHNOLOGY
User questions about W Studio DEFINITIVE TECHNOLOGY
0 question about this device. Answer the ones you know or ask your own.
Ask a new question about this device
Download the instructions for your Soundbar in PDF format for free! Find your manual W Studio - DEFINITIVE TECHNOLOGY and take your electronic device back in hand. On this page are published all the documents necessary for the use of your device. W Studio by DEFINITIVE TECHNOLOGY.
USER MANUAL W Studio DEFINITIVE TECHNOLOGY
natural_image
Modern black and white electronic device with a rectangular panel and speaker block (no visible text or symbols)
Studio
Sound Bar System with
Wireless Streaming
Owner's Manual
D.
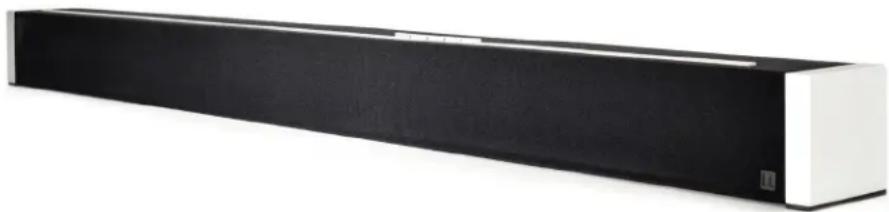
natural_image
Exterior view of a modern black and white rectangular electronic device (no text or symbols visible)Contents
What's in the Box 3
Hooking Up Your W Studio to Your TV 4
Sound Bar Buttons & Remote 5
Getting Started with Wireless Streaming 6
Apps 7
Playing Music 7
Adding Multiple Devices 8
Placement Options 9
Frequently Asked Questions 10
Specifications 14
Technical Assistance & Contact 14

Studio
Sound Bar System with Wireless Streaming
The W Studio sound bar system is Definitive Technology's flagship wireless soundbar that perfectly blends high-performance theater sound with hi-resolution musical reproduction. The W Studio's purposefully slim design (only 3.5" deep) is only overshadowed by its fit and finish, featuring solid aluminum end caps. The W Studio uses Definitive Technology's proprietary Spatial Array technology that aids in creating a high-definition, room-filling 5.1 channel surround sound experience.
The compact wireless subwoofer creates waves of big bass via its downward firing 8-inch woofer, bass port and robust 200 Watt amplifier. HDMI switching for both audio and video maximizes this home theater's high performance potential.
The Definitive Technology Wireless Collection
The W Studio is part of Definitive Technology's Wireless Collection which is an all-encompassing solution for distributing audiophile-grade music anywhere or everywhere in your home. The W Studio can be used as a stand-alone wireless speaker or as part of a family. Stream your favorite music services, internet radio and your personal digital music library all from your smartphone, tablet or computer. What's more, the streamlined setup process allows you to be up and running in a matter of minutes. And because you can Mix-and-match speakers with the open DTS PlayFi® technology standard, future-proofing your technology has never been easier.
D.
Unpacking your W Studio
Please unpack the components carefully, removing the subwoofer first as indicated on the carton and then the sound bar. We recommend saving all cartons and packing materials in case you move, or should you need to ship your W Studio.
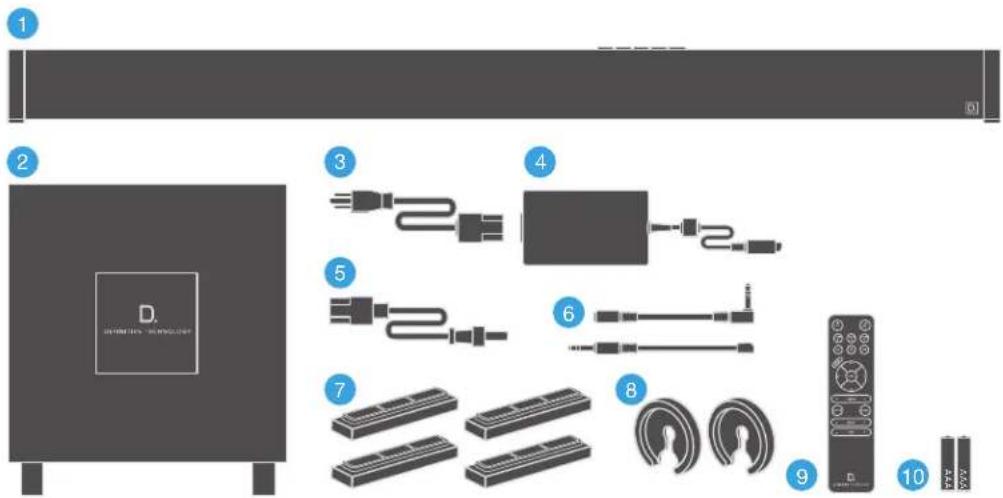
What's in the Box
Included in your W Studio carton:
- sound bar
- subwoofer
- power cord
- power supply
- subwoofer power cord
- IR adapters (input and output)
- four risers (magnetic)
- two spacers for wall mounting
- remote control
- batteries
- wall mount template
• online registration card
D.
Hooking Up Your W Studio to Your TV
Connection Method #1
All sources into your SoloCinema Studio via HDMI (recommended)
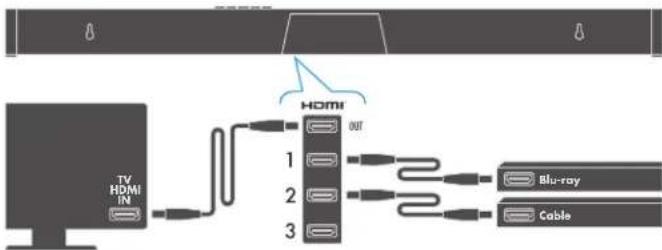
The HDMI cable runs from the HDMI output of the SoloCinema Studio to an HDMI input on the TV set.
You will use the SoloCinema Studio remote for switching between the sources you have connected to the system (Blu-Ray player, cable box etc.). We recommend this method; it ensures the highest resolution audio and video signals for the best possible audio performance.
NOTE: For greater convenience, you can program the SoloCinema Studio to respond to the power, volume, mute, and source select commands of your TV or cable box remote. See the "IR Learn" section of the OSD Set-up Menu Functions for instructions.
Connection Method #2
All sources into your TV, with TOSLINK optical audio output from the TV set to the sound bar.
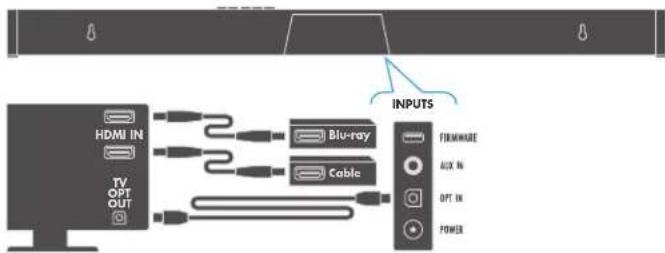
The TV does all the switching between sources, and the sound bar is always set to INPUT #5.
NOTE: Most TV's cannot pass a Dolby Digital or DTS 5.1 channel audio signal through an optical audio output connection. They can only pass 2 channel stereo through Toslink. The SoloCinema Studio will simulate a surround experience, but it will not be as effective as when processing a true 5.1 digital surround signal. This hookup method offers convenience: most functions (including source switching) can be done through one remote control, such as your cable box or TV remote. But you won't get the best system sound quality, or be able to use all of the features of the SoloCinema Studio, including your OSD (on-screen displays).
Connection Method #3
All sources into your TV with 3.5mm analog mini-jack to the sound bar.
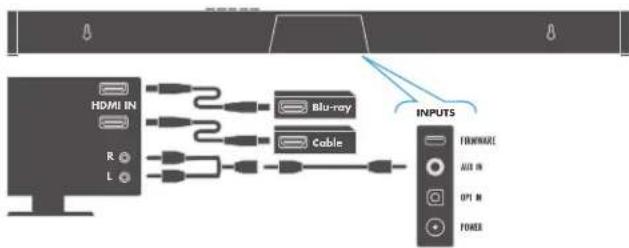
NOTE: Some older TV's have only an analog output connection. In this scenario, the TV does all the switching between sources and the SoloCinema Studio is always set to INPUT #4. A Dolby Digital or DTS digital audio signal cannot be passed through a TV's analog output connection. The best audio signal quality that can be reproduced using this method is two-channel stereo audio. This method is the least-preferred connection method of the three described here.
Pairing the Subwoofer
The sound bar and the subwoofer come paired from the factory. All you do is plug in the subwoofer's power cord and turn on the ON/OFF POWER switch. When you turn on the sound bar, both the bar and subwoofer will establish a communication link.
D.
Sound Bar Button Controls
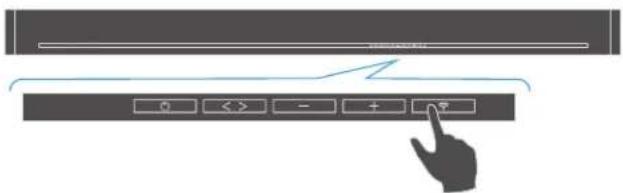
-
POWER: Press ⬇ to turn on the system (sound bar and wireless subwoofer).
-
SOURCE (Symbol <>): Six LED lights correspond to each of the six source inputs. Example: You want to play a Blu-ray disc and are currently playing another source on input #1. Your Blu-ray player is connected to source input #2. Simply touch this switch once to select the input.
NOTE: When advancing more than one source, please allow for a few seconds of delay.
- Volume DOWN: Press – to decrease the system volume. A row of LED's displays the volume level. It takes 4-5 presses to change the LED, but you will hear, and see on the OSD pop-up screen, that the volume is decreasing.
- Volume UP: Pressing + to increase the system volume, with a corresponding change in the LED display/OSD.
- Wi-Fi Source/Setup: Press once to select WiFi Input. For WiFi setup instructions, see page 6.
NOTE: you can also press and hold the Wi-Fi button on the remote to connect.
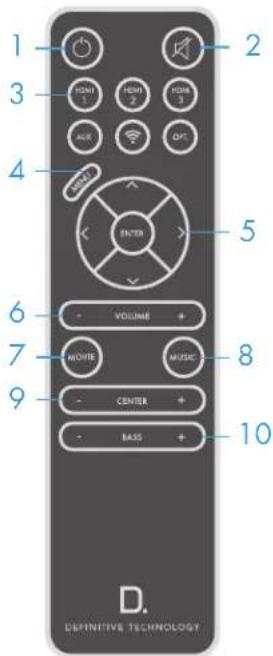
Remote Control Functionality
- Power: Press Power to toggle the unit on/off. A front panel light recognizes the command. The subwoofer also turns on when it sees a signal from the sound bar. Please allow approximately 10 seconds for the system to turn on.
- Mute: Turns sound off while the system remains on. Press MUTE again to return the sound to the previous volume level. The On-Screen Display (OSD) popup menu confirms your selection
- Sources: HDMI 1, HDMI 2, HDMI 3, AUX, WiFi, Optical. These enable you to select sources, such as a Blu-ray player or tuner that you've connected to the rear panel source inputs. The OSD pop-up confirms your selection.
- Menu: Press MENU to call up the On-Screen Display (OSD). This shows a series functions that can be accessed to make system changes. Press MENU again to exit from the OSD once you've completed making your selections. See the section titled "On-Screen Display set-up menu functions" for more detail.
- Cursor control/Enter button: Press the four arrow keys, with the ENTER button in the middle, to select and adjust menu items such as surround immersion level. The OSD pop-up menu confirms your selection.
- Master Volume up/down (+ -): Press (+) to increase the system volume. Press (-) to decrease the volume. Volume is displayed on the front panel LEDs and on the OSD popup menu.
- Movie: Press MOVIE to optimize the bass output, surround processing and other sound parameters, so movies sound their best. The OSD pop-up menu confirms your selection.
- Music: Press MUSIC to optimize the sound characteristics for maximum music enjoyment. The OSD popup menu confirms your selection.
- Center + or -: Use to increase or decrease the center channel volume, independently of changing the overall volume level. For example, if family members are sleeping, you may want to improve the movie dialog audibility without significantly increasing the overall volume level.
- Bass output up/down (+ -): Press (+) to increase the bass output of the subwoofer relative to the system volume. Press (-) to decrease the bass output. The OSD pop-up menu confirms your selection.
D.
Getting Started
Home Network Basics
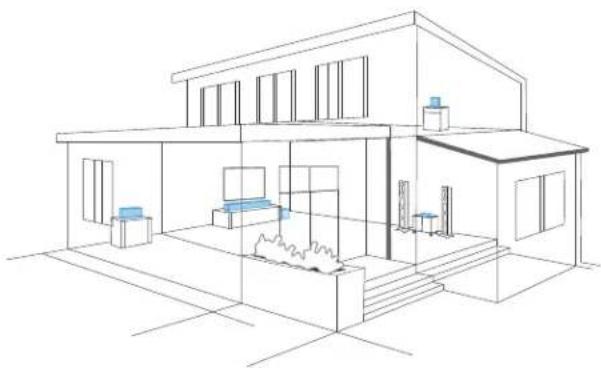
In general, Wi-Fi is the wireless streaming of data over a network. Here, Wi-Fi audio is the streaming of music throughout a home by connecting multiple speakers and/or devices to a wireless network. The controller for the Definitive Technology Wireless Collection is the Definitive Technology App, which sends music information to each DTS PlayFi enabled speaker or device.
natural_image
Architectural line drawing of a modern two-story house with windows and a patio (no text or symbols)Network and System Requirements
It all begins by building a wireless home network, preferably one with a high-speed Internet connection. Here's what you'll need to connect your W Studio to your network:
- A Wireless Network connected to the internet with an 802.11g router or better.*
- An Android device with version 2.2 operating system or newer OR an iOS device with version 6.0 operating system or newer.
- The password for your wireless network (if required).
*Router type is usually listed on the router, itself. Please call the dedicated Definitive Technology Aficionado hotline for further questions related to router type.
For The Best Music Streaming Experience
To ensure your system is operating under the best environment possible, here are a few additional tips:
- For the fastest streaming performance, especially when connecting to multiple speakers simultaneously, an 802.11n router or better is recommended.
- Ensure the DTS Play-Fi device is within wireless reach of your router, or that the signal is not blocked by concrete, brick, or other walls. The quality of your connection can be observed in the Definitive App by the Wireless Strength icon.
Connecting Your W Studio
Wi-Fi Setup
- To ensure easy setup, place your W Studio near your internet-connected wireless router. When setup is complete, you can move your device anywhere you want to.
- Connect the included power cable to the W Studio and a power outlet. The device will power on automatically.
- The white light on the back will blink quickly for about 20 seconds, after which it will begin to pulse slowly.
- The slowly pulsing light means your device is ready to connect to your Wi-Fi network.
NOTE: If the Wi-Fi LED is not pulsing slowly, Press and hold the Wi-Fi setup button (for 8 seconds), until you hear the second set of tones.
- Download the Definitive Technology App from the Apple App Store or Google Play Store.
- Launch the app and follow the instructions.

Definitive Technology App
for iPhone, iPad and Android devices.

Utility App for iPhone, iPad and Android devices.
NOTE: To enable Wi-Fi Protected Setup (WPS) mode with a WPS compatible router, press and hold the Wi-Fi button on the W Studio for 4 seconds or until the first beep. Now push the WPS button on your wireless router. The W Studio will automatically connect to your network without the need to enter your password.
D.
Apps
iOS Device Instructions
- Launch the Definitive Technology app.
- The app will suggest that a new device is ready to be setup. Click on the device and hit next within the app to take you to setup instruction screens.
- Exit the Definitive Technology app and go to your Settings on your iOS device.
- Select WiFi. Ensure that WiFi is enabled. Once enabled, choose from the list the device listed with "Play-Fi" in the name.
- Once selected, exit the settings menu and return to the Definitive Technology App to select your wireless network. (if password protected, enter your password)
- When your device is connected to the network, the Wi-Fi light will change from blinking to a solid white.
- You're connected! From here, feel free to rename your device with one of the preset names, create your own custom name, or skip right to enjoying music.
Android Device Instructions
- Launch the Definitive Technology app.
- The app will automatically find your device and prompt you to set it up. Tap the "Set Up" button.
- If your Wi-Fi network is protected, enter the password. The app will connect the device to the network.
- When your device is connected to the network, the WiFi light will change from blinking to a solid white.
- You're connected! From here, feel free to rename your device with one of the preset names, create your own custom name, or skip right to enjoying music.
Definitive Utility App
For access to extended functionality, including Product Firmware Updates, Source Selection, and EQ Settings (Definitive W Amp and Definitive W Adapt only when paired with Definitive Technology speakers), download the free Definitive Utility App, available from the App Store or Google Play Store.
NOTE: This app is not required for daily music streaming use.

Downloading the DTS Play-Fi PC App
- Visit https://play-fi.com/windows/deftech
- Click on "Download Free Version"
- Once downloaded to PC, DTS PlayFi logo will show up in your Task Manager.
- Click on DTS Play-Fi driver
- Click on any zone to begin controlling.
Call the Aficionado hotline at 1-800-223-5246 to find out how to upgrade to the Premium Play-PC driver for multi-zone control capabilities.
Working with NAS Drives, PCs, and OSX Devices
The Definitive App is capable of recognizing any Media Server or NAS Drive that is broadcasting over your home network and that's configured for open access using the DINA protocol.
Using the DTS Play-Fi Windows app, the Definitive Wireless Collection products will play any file capable of being played by the Windows operating system, including all music services. See "Downloading the DTS Play-Fi App" above to learn more.
Because OSX devices don't support DLNA, a third party software (ex. Twonky, Plex or Servio) must be downloaded for them to be visible to the network. Once downloaded, all locally stored content on OSX-based devices will show up within the Definitive Technology app under "Media Server."
Playing Music
Now that you're connected, open the Definitive Technology app to begin playing music. Start by selecting the preferred music source. The next step is to select the device(s) from which you want to hear the music. When done, click "Next." You can now select the music you want to play.
Music Choices to Select from Include:

Your Personal Music Library—hear all the music on your phone, tablet or computer for the first time in high quality audio and through your Definitive speakers. It never sounded better.

Internet Radio—Enjoy radio stations from around the world, in virtually any genre, and all of it free. Internet Radio has 37,000 stations with popular brands like Disney, BBC, NPR, Fox News Radio, Wall Street Journal Radio and more.
Online Services—Stream the most popular online music services including Pandora and Songza. For the most updated list of music services, visit www.definitivatech.com. Services like KKBox, QQMusic and Deezer are available in select countries outside of North America.
D.
Adding or Controlling Multiple DTS Play-Fi Enabled Devices to your System
The Wireless Collection makes creating a whole house wireless music system as simple as pushing a button or two. Add more speakers, a sound bar, an amp or adapter to an existing audio system. The Definitive App and your home network do the rest.
- From the Definitive App home page, choose "Settings."
- From the "Settings" screen, choose "Add DTS Play-Fi Device."
- Follow the app's instructions to add the device to your list.
Maximum number of rooms/zone supported:
Eight separate wireless source devices (smartphones, tablets, etc.), each with its own source, are supported simultaneously and any wireless source device can stream to 8 playback devices. Due to bandwidth limitations of most wireless networks, we do not recommend more than 16 wireless DTS Play-Fi products on the Wi-Fi network at a given time. With hard-wired Ethernet connections (customary for audio/video racks or in custom installation configurations), up to 256 devices can be theoretically supported. Call the Aficionado hotline for more information.
Primary vs. Secondary Speakers
Once inside the Definitive Technology app, you will notice that when sending music to your devices, they are grouped into primary and secondary zones. The DTS Play-Fi software requires that a primary speaker be selected to create a new listening session or zone. This is designed to maximize synchronization down to 1 millisecond, thereby eliminating any sound echo that can be found from other ecosystems.
Our recommendation for your listening environment is to always select as your primary device the DTS Play-Fi enabled product with the strongest signal strength. Note, however, that secondary speakers are connected to your primary speaker. As such, if you disable your primary speaker, your secondary speakers will likewise be temporarily disabled until a primary speaker is once again selected.
D.
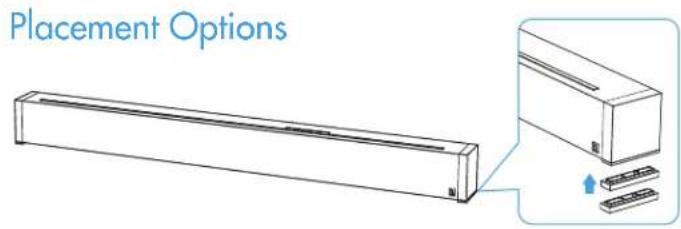
Tabletop Mounting
SoloCinema Studio comes with extra riser feet (two per side) that magnetically attach to the bar to raise it as much as 15.2 mm [5/8"] off the tabletop so the bar will clear the TV's protruding table stand.
Attach magnetic feet: Peel off the protective cover and expose the magnets. Attach the feet to the bottom edge of the sound bar.
What if the bar blocks your TV's remote IR receiver?
NOTE: The SoloCinema Studio could block your TV's remote "eye," making it impossible to control the TV via remote control, so we supply an IR flasher. Plug the flasher into the bar's IR output and position it in front of the TV's eye.
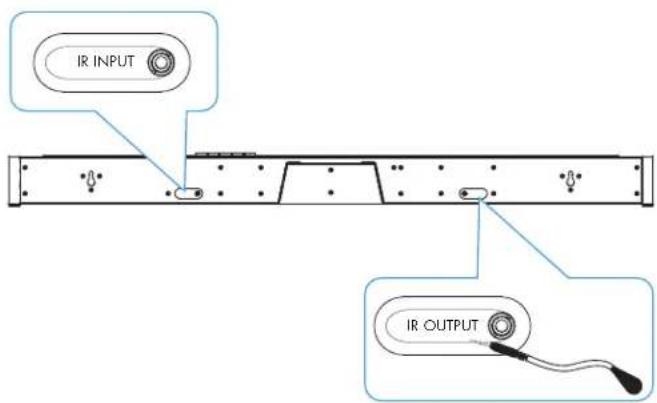
For custom installations: the IR input is more likely to be used with a home automation system, like Crestron or Control 4. This is often just an electrical connection to a piece of equipment.
Mounting the Sound Bar on the Wall
The SoloCinema Studio sound bar has built-in keyhole slots so you can wall-mount it beneath your wall-mounted television. Spacers are included to help secure and install your sound bar on the wall.
NOTE: DO NOT mount the sound bar directly to the wall. You must use the supplied wall-mount spacers to ensure proper operation and reliability.
NOTE: DO MAKE SURE you are using a wall anchor of suitable load-bearing capacity (13.65 lb).
![812.8 mm [32°]](/content/2026/05/832340/images/4a14eae44abf641b2c7473f82cccee904ee72dfce0d7956cef9fc95164568be7.jpg)
Tips For Wall Mounting the Sound Bar
Leveling the sound bar: Use a bubble level to make sure the bar is level. Mark holes with pencil, taking the keyhole slot measurement from the bar.
Drill Screw Holes in Wall: Pre-drill the pilot-hole locations for mounting screws (not included). Use screws rated to hold securely in the wall material and have screw heads at least 0.33" (8.5 mm) in diameter.
NOTE: Measure Twice Make sure the sound bar clears the ceiling, adjacent walls, corners, beams, lighting fixtures and door/window frames. Leave at least 1-2" (25-50 mm) above the sound bar location to allow the sound bar to slide onto the screws. Make sure the center of the bar is centered with the TV screen's center point.
Hang Sound bar on Posts: Line up the bar so that the screw heads slide into the keyhole slots. Slide the bar down so the screw heads hold the bar firmly in place.
D.
Frequently Asked Questions (FAQ)
- Q: I just purchased this product, and a part is missing. What should I do?
Answer: You have several options. You can contact the dealer who sold you the product, or you can e-mail or call us. Please provide us with the serial number of your product; a description of what part is missing; and the name of the dealer you purchased the product from. Customers outside the US and Canada should contact the Definitive Importer in your country. Our list of international distributors can be found here: http://www.definitivetech.com/Dealers/International.aspx
- Q: How do I get in touch with Definitive tech support?
Answer: You can e-mail: info@definitivetech.com or call (800) 228-7148 (US and Canada), +1 (410) 363-7148 (all other countries). Tech support is offered only in English.
- Q: What is Definitive's web site address?
Answer: www.definitivetech.com
- Q: I believe something is wrong, and the product needs service. What do I do?
Answer: You have several options. You can contact the dealer who sold you the product, or you can e-mail or call us. Please provide us with the serial number of your product; a description of what part is missing; and the name of the dealer you purchased the product from. Customers outside the U.S. and Canada should contact the Definitive Technology importer in your country: http://www.definitivetech.com/Dealers/International.aspx
- Q: I want to order a replacement remote control. How do I do that?
Answer: You have several options. You can contact the dealer who sold you the product, or you can e-mail or call us. Please provide us with the serial number of your product, and the name of the dealer you purchased the product from. Customers outside the U.S. and Canada should contact the Definitive Technology importer in your country: http://www.definitivetech.com/Dealers/International.aspx
- Q: Does the SoloCinema support 3D video?
Answer: Yes, via the HDMI 1.4a inputs and output to the TV.
- Q: How do I set the crossover and channel balance settings?
Answer: You don't need to make any crossover settings or adjustments. SoloCinema Studio is a complete system, with subwoofer and main system crossover points already preset.
- Q: Where should I put the subwoofer?
Answer: We encourage subwoofer experimentation! Your subwoofer and room interact to create the bass that you hear and feel. In general, placing the subwoofer along the wall, or in a corner, will reinforce the bass response and create a better listening experience. The subwoofer is wireless, so try different places in the room until you are satisfied with the bass that you experience.
- Q: Should I mount the bar below, or above, my TV set?
Answer: The bar can be placed either above, or below, the TV set, but close to ear level will sound best.
- Q: Can the sound bar be mounted to TV brackets that feature pivoting arms?
Answer: Yes, but make sure that you leave enough clearance below the TV to mount the sound bar! The combined weight of the TV, the bracket, and the SoloCinema Studio sound bar MUST be less than the rated weight capacity of the TV mount being used. You may or may not need to use the SoloCinema wall bracket, depending upon the pivoting mount being used.
- Q: I can hear sound coming out of the bar, but don't see anything on the television.
Answer: Getting multiple components to talk to each other can sometimes be problematic. Some owners occasionally experience issues such as:
- "I can see picture on the TV, but I can't hear anything out of the bar."
- "I plugged in a source with HDMI and it just doesn't work."
- "A component in my system is frozen and won't let me control it."
HDMI is an elegant, high performance way to connect audio/video components. In rare circumstances, such issues as the ones listed above can occur. When you encounter problems like this, please try the following troubleshooting steps:
-
Confirm that the Television and SoloCinema Studio are set to the correct inputs and that the Volume is set to a reasonable level
-
Toggle inputs on the bar (select a different input and then switch back)
-
Confirm that all cables are plugged in completely
-
Unplug the HDMI cable from the source and plug it back in
-
Power cycle all components in the system
-
Unplug the power cable from each component in the entire system (TV, SoloCinema Studio, and all sources). Wait 3 minutes before restoring power.
NOTE: If the trouble shooting tips above do not help you resolve your issue, please ensure that all devices in your system have up-to-date firmware. With many of todays 'Smain' (internet connected) TV's, Blu-ray players, and game systems, this can be as easy as going into a menu and instructing the device to check for updates. We recommend installing any and all updates when they become available for all your devices.
D.
On-Screen Display (OSD) Set-Up Menu Functions
(only available when using HDMI hook-up method)
With your TV ON, press the MENU button on the remote. The OSD screen appears on your TV. To exit the menu at any time, just press the MENU button. The functions:
| SOLOCINEMA STUDIO MENU |
| WIFI |
| NIGHT MODE |
| IR LEARN |
| SUB CONNECTION |
| SSA IMMERSION |
| HDMI AUDIO |
| SYSTEM |
1. Wi-fi:
See Wi-Fi setup on page 6.
2. Night Mode:
This is a useful feature to use late at night if other family members are asleep. When Night Mode (Dynamic Range Compression) is turned onpeaks in the audio signal are compressed. This makes it easier to hear at low volume levels. At the same time more intense sounds (like explosions) are reduced.
| NIGHT MODE ON | |
| OFF |
3. IR Learn:
IR Learn is used to program SoloCinema Studio to respond to other remote controls like your cable box or TV's remote IR commands.
IMPORTANT NOTE: In some rare instances, a television may create enough IR pollution to block the sound bar's learning capability. Should you experience this with your television, turn your TV on but leave the source off. This should eliminate any IR pollution. The TV screen will be black, but you will be able to work with IR LEARN OSD to program commands.
Your bar can learn to respond to the following IR commands from other remote controls:
-
POWER
-
VOLUME Up and Down
-
MUTE
-
INPUT SOURCE commands (up to six inputs).
The OSD is used to teach the remote commands to SoloCinema Studio (see example below):
NOTE: IR learn function should be completed within 3' of the sound bar. The accuracy decreases as you get further away.
To learn your TV remote's Volume UP command:
With the SoloCinema Studio powered on,
-
Press the SoloCinema Studio remote control MENU button to open the OSD
-
Scroll down to the third menu box: IR Learn
-
Click right arrow on the Studio remote directional control, and VOLUME UP Illuminates
-
Press the Studio remote ENTER key. NOTE: You will see the words "PRESS & HOLD KEY" displayed on the OSD.
-
Pick up the remote you wish to have the SoloCinema Studio learn—for example, the TV remote. Press and hold the Volume Up key
-
The words "PRESS & HOLD KEY" now change to say "RELEASE." Release the TV remote's volume up key and the OSD again prompts you to "PRESS & HOLD KEY."
-
The OSD will prompt you to PRESS & HOLD KEY three times. The word "DONE" then appears on the lower right hand corner of the OSD.
-
The OSD automatically navigates to STORE once the 3 press-and-release prompts have been completed.
-
Press the ENTER key while STORE is illuminated. The menu now reverts back to highlighting the IR LEARN function.
| IR LEARN | |
| Power Store | |
| Volume Up Cancel | |
| Volume Down Clear All | |
| Mute | |
| HDMI 1 | |
| HDMI 2 | |
| HDMI 3 | |
| AUX 4 | |
| OPT 5 | |
| BT 6 | |
D.
4. Sub Connection:
The SoloCinema Studio subwoofer and sound bar are paired at the factory to communicate automatically. In rare instances, such as if the original sub or bar are replaced, you must pair the subwoofer with the bar:
- Turn off the subwoofer and wait approximately 15 seconds
- Select SUB CONNECTION and choose START PAIRING
- Turn the subwoofer power ON
- Wait until the green light appears on the subwoofer amp panel
SUB CONNECTION START PAIRING
5. Solo Surround Array (SSA) Immersion:
The MOVIE and MUSIC surround parameters are user-definable, allowing you to customize the surround immersion intensity. Your room configuration, main listening position, and personal taste can all affect how much of the immersive sound experience you want. The MOVIE AND MUSIC settings have a 21 position scale running from minus -10 to plus +10. They have been pre-set at the factory (MOVIE, +10 and MUSIC, +5), and may need no adjustment. There is no "right" setting; experiment if you wish, adjust to taste and choose the setting that sounds best to you.
NOTE: Each time you want to use the MUSIC setting, you must choose it by pushing the MUSIC button on the remote. The system defaults to the MOVIE setting each time you select a new source. Input #6 [Bluetooth®] defaults to music.
SSA IMMERSION MOVIE MODE
MUSIC MODE
6. HDMI Audio:
This menu option controls whether or not audio is sent to the TV via HDMI. The factory preset is NORMAL. The DEMO feature routes audio to the TV set via the HDMI output. In normal operation, audio is not sent to the TV. You would rarely, if ever, use this feature. It's intended to allow comparisons between the audio that is reproduced by the bar and the same audio through the TV speakers.
| HDMI AUDIO DEMO | |
| NORMAL |
7. System:
Selecting the RESTORE DEFAULTS option restores all system settings to their original factory default settings. It may be useful in trouble shooting system issues.
NOTE: When "restore defaults" is selected, the bar will enter standby and you will have to turn the bar on.
FIRMWARE: Your SoloCinema Studio uses FIRMWARE 1.000. If you have an issue with your system, please have this firmware version number handy prior to contacting our customer service department. They will need this information to help you.
NOTE: Please register your SoloCinema Studio at www.DefinitiveTech.com/Register/ so that we can alert you in the event of firmware upgrades.
SYSTEM RESTORE DEFAULTS
IR Remote Control Function and Data List
W Studio's remote control codes are discrete IR (Infrared) codes. Custom installers may want to have access to the standard codes that enable the SoloCinema Studio's remote functions to be programmed into a universal controller.
Below are the remote control function and data lists for these functions:
IR Remote Control Function and Data list for the W Studio Sound Bar
| Standard Codes | |||||||
| NEC Transmission Format using Definitive Technology Custom Code (A): 0x0A56 | Custom Code Data Code | ||||||
| BUTTON Screen Print FUNCTION: SoloCinema Studio DECIMAL Ccode Ccode' Dcode Dcode' | |||||||
| Power power symbol Power toggle: On / Off (standby) 136 0x0A 0x56 0x88 | 0x77 | ||||||
| Mute | mute symbol | Power toggle: On/Off (standby) | 138 | 0x0A | 0x56 | 0x8A | 0x75 |
| SRC1 | HDMI 1 | Select: Source 'Input 1' | 150 | 0x0A | 0x56 | 0x96 | 0x69 |
| SRC2 | HDMI 2 | Select: Source 'Input 2' | 151 | 0x0A | 0x56 | 0x97 | 0x68 |
| SRC3 | HDMI 3 | Select: Source 'Input 3' | 152 | 0x0A | 0x56 | 0x98 | 0x67 |
| SRC4 | AUX | Select: Source 'Input Analog' | 153 | 0x0A | 0x56 | 0x99 | 0x66 |
| SRC5 | OPT. | Select: Source 'Input Digital' | 154 | 0x0A | 0x56 | 0x9A | 0x65 |
| SRC6 | Bluetooth® | Select: Source 'Input Bluetooth' | 155 0x0A 0x56 0x9B | 0x64 | |||
| CENTER + | CENTER + | Center Level: adjust Up (+) | 192 | 0x0A | 0x56 | 0xC0 | 0x64 |
| CENTER - | - CENTER | Center Level: adjust Down (-) | 193 | 0x0A | 0x56 | 0xC1 | 0x3F |
| MENU | MENU | Menu toggle: On / Off | 17 | 0x0A | 0x56 | 0x11 | 0x3E |
| ^ | ^ | OSD Navigation: Up | 10 | 0x0A | 0x56 | 0x0A | 0xF5 |
| v | v | OSD Navigation: Down | 11 | 0x0A | 0x56 | 0x0B | 0xF4 |
| ENTER | ENTER | OSD Navigation: Enter/Select | 14 | 0x0A | 0x56 | 0x0E | 0xF1 |
| < | < | OSD Navigation: Left | 12 | 0x0A | 0x56 | 0x0C | 0xF3 |
| > | > | OSD Navigation: Right | 13 | 0x0A | 0x56 | 0x0D | 0xF2 |
| VOLUME + | VOLUME + | Master Volume: adjust Up (+) | 212 | 0x0A | 0x56 | 0xD4 | 0x2B |
| VOLUME - | - VOLUME | Master Volume: adjust Down (-) | 208 | 0x0A | 0x56 | 0xD0 | 0x2F |
| BASS + | BASS + | Subwoofer Level: adjust Up (+) | 214 | 0x0A | 0x56 | 0xD6 | 0x29 |
| BASS - | - BASS | Subwoofer Level: adjust Down (-) | 210 | 0x0A | 0x56 | 0xD2 | 0x2D |
| MOVIE | MOVIE | Select: 'Movie' audio DSP processing mode | 140 0x0A 0x56 0x8C | 0x73 | |||
| MUSIC | MUSIC | Select: 'Music' audio DSP processing mode | 141 0x0A 0x56 0x8D | 0x72 | |||
IR Remote Control Function and Data list for the W Studio Sound Bar
| Discrete Codes | ||||||
| NEC Transmission Format using Definitive Technology Custom Code (B): 0x0A58 | Custom Code | Data Code | ||||
| NAME | FUNCTION: SoloCinema | DECIMAL | Ccode | Ccode' | Dcode | Dcode' |
| Power ON | DISCRETE_POWER_ON | 87 | 0x0A | 0x58 | 0x57 | 0xA8 |
| Power OFF | DISCRETE_POWER_OFF | 88 | 0x0A | 0x58 | 0x58 | 0xA7 |
| Mute | DISCRETE_MUTE | 92 | 0x0A | 0x58 | 0x5C | 0x6D |
| Unmute | DISCRETE_UNMUTE | 93 | 0x0A | 0x58 | 0c5D | 0xA2 |
| Menu ON | DISCRETE_MENU_ON | 202 | 0x0A | 0x58 | 0xCA | 0x35 |
| Menu OFF | DISCRETE_MENU_OFF | 203 | 0x0A | 0x58 | 0xCB | 0x34 |
| 0x0A | 0x58 0x00 | |||||
| 0x0A | 0x58 0x00 | |||||
| 0x0A | 0x58 0x00 | |||||
| 0x0A | 0x58 0x00 | |||||
| 0x0A | 0x58 0xC3 | 0x32 | ||||
| RF Update | Discrete RF Module Update Mode | 195 | 0x0A | 0x58 | 0x9D | 0x62 |
W Studio Specifications
| Driver Complement - Bar 6 x 3.0" mid woofer drivers, 3 x 1" aluminum dome tweeters | |
| Number of channels 5.1 | |
| Dimensions: Bar 43.02" W x 3.30" H x 3.30" D109.28 W x 8.39 H x 8.39 D (cm)Depth including wall mount spacers 3.8" (9.5 cm)Wall keyhole slots 32" apart ( 81.28 cm) | |
| Inputs/Outputs HDMI 1.4a in (3), HDMI 1.4a out (1), Toslink Optical input (1), Analog 3.5 mm mini-jack AUX (1), factory update (1) (firmware updates ONLY; not a source input) | |
| Wireless Input DTS Play-Fi/Definitive App | |
| Wireless Connectivity 2.4GHz and 5.8GHz | |
| Power Output: Bar 120 Watts | |
| Supported Surround Formats | Dolby Digital®, DTS® |
| Driver Complement: Subwoofer | (1) 8" long throw woofer in sealed enclosure |
| Dimensions: Subwoofer | 12.54" W x 14.03" H x 12.77" D;31.84cm W x 35.63cm H x 32.44cm D |
| Power Output: Subwoofer | 200 Watts |
Dual-Band Capabilities
Definitive Technology Wireless Collection products all have "dual-band" capabilities. The most commonly used wireless band - 2.4 GHz - can often times be congested and slow, especially in environments where you have many routers sending wireless signals (ex. mixed-use developments like apartment buildings). In these instances, the Wireless Collection can also jump onto the 5 GHz band.
DTS Play-Fi Accepted File Formats:
- mp3 (MPEG Layer III)
• m4a and aac (Advanced Audio Coding) - flac (Free Lossless Audio Codec)
• wav (Waveform Audio File)
File Quality:
- lossless file reproduction up to 16-bit/48kHz (CD Quality) and proper file handling for full compatibility with all high-resolution music up to 24bit/192k.
- Plays all format bitrates [kbps]. DTS PlayFi transmits hi-resolution files, but it does down-sample them so that they can be distributed throughout a home.
Software Updates
In the spirit of improving the performance and functionality of your system, software updates will be required from time to time. To download those updates, we highly encourage you to register your Definitive product during the setup process. On the home page of the app, scroll down to "Aficionado Services" and follow the instructions.
Basic Troubleshooting
Under "Settings" on the Definitive App home page, you will find a category called Troubleshooting.
This link will take you to the DTS Play-Fi Knowledge Base https://play-fi.com/faq?support. Note that quite often an issue can be traced back to router or network performance. As always, for help answering any of your questions, please call the Aficionado hotline at 1-800-223-5246.
IMPORTANT NOTE: Router speeds and ranges that a manufacturer lists are determined under ideal operating conditions. A router's signal can be affected by walls and their construction materials.
Service
Service and warranty work on your Definitive product will normally be performed by the Definitive Technology retailer or importer. If, however, you wish to return the product to us, please contact us first, describing the problem and requesting proper authorization. Please note: Definitive phone and email technical support is offered only in English.
Product Servicing
The address given in this booklet is the address of our offices. Under no circumstances should loudspeakers be shipped to our offices or returned without contacting us first and obtaining return authorization. e-mail: info@DefinitiveTech.com
Technical Assistance
Contact Us Directly
Please contact the Definitive Technology Wireless Collection Customer Service and Technical Support Group at 1-800-223-5246. To best assist you we are available 7 days a week, Monday – Friday from 9am to 9pm and on Saturdays and Sundays from 10am to 6pm email: info@DefinitiveTech.com
D.
Definitive Technology
11433 Cronridge Dr.
Owings Mills, MD 21117
(410) 363-7148
(800) 228-7148
www.definitivetech.com
email: info@DefinitiveTech.com
twitter: @DefinitiveTech
Safety and warranty information is in separate booklet.
TECHNOLOGY ACKNOWLEDGEMENTS
Manufactured under license from Dolby Laboratories. Dolby and the double-D symbol are trademarks of Dolby Laboratories. Manufactured under license under U.S. Patent Nos: 5,956,674; 5,974,380; 6,487,535 & other U.S. and worldwide patents issued & pending. DTS, the Symbol, & DTS and the Symbol together are registered trademarks & DTS Digital Surround and the DTS logos are trademarks of DTS, Inc. © DTS, Inc. All Rights Reserved.
The terms HDMI and HDMI High-Definition Multimedia Interface, and the HDMI logo are trademarks or registered trademarks of HDMI licensing LLC in the United States and other countries.
Google Play is a trademark of Google Inc.
Apple and the Apple logo are trademarks of Apple Inc., registered in the U.S. and other countries. Apo Store is a service mark of Apple Inc.
All other trademarks are the property of their respective owners.


- D.
- Contents
- Studio
- Sound Bar System with Wireless Streaming
- The Definitive Technology Wireless Collection
- Unpacking your W Studio
- What's in the Box
- Hooking Up Your W Studio to Your TV
- Connection Method #2
- Pairing the Subwoofer
- Sound Bar Button Controls
- Remote Control Functionality
- Getting Started
- Home Network Basics
- Network and System Requirements
- For The Best Music Streaming Experience
- Connecting Your W Studio
- Wi-Fi Setup
- Definitive Technology App
- Apps
- iOS Device Instructions
- Android Device Instructions
- Definitive Utility App
- Downloading the DTS Play-Fi PC App
- Working with NAS Drives, PCs, and OSX Devices
- Playing Music
- Music Choices to Select from Include:
- Adding or Controlling Multiple DTS Play-Fi Enabled Devices to your System
- Maximum number of rooms/zone supported:
- Primary vs. Secondary Speakers
- Tabletop Mounting
- Mounting the Sound Bar on the Wall
- Tips For Wall Mounting the Sound Bar
- Frequently Asked Questions (FAQ)
- On-Screen Display (OSD) Set-Up Menu Functions
- Wi-fi:
- Night Mode:
- IR Learn:
- Sub Connection:
- Solo Surround Array (SSA) Immersion:
- HDMI Audio:
- System:
- IR Remote Control Function and Data List
- Dual-Band Capabilities
- DTS Play-Fi Accepted File Formats:
- File Quality:
- Software Updates
- Basic Troubleshooting
- Service
- Product Servicing
- Technical Assistance
- Contact Us Directly
Brand : DEFINITIVE TECHNOLOGY
Model : W Studio
Category : Soundbar