
CUBA-15A - Loudspeaker Citronic - Free user manual and instructions
Find the device manual for free CUBA-15A Citronic in PDF.


| Product Type | Active PA Loudspeaker |
| Brand | Citronic |
| Model | CUBA-15A |
| Woofer Size | 15 inches |
| Tweeter Size | 1 inch |
| Amplifier Power (RMS) | 500 W |
| Peak Power | 1000 W |
| Frequency Response | 45 Hz - 20 kHz |
| Maximum SPL | 125 dB |
| Impedance | 8 ohms |
| Inputs | XLR, 1/4" TRS, RCA |
| Outputs | XLR Link |
| Bluetooth | Yes, version 5.0 |
| Enclosure Material | Plywood with carpet finish |
| Dimensions (H x W x D) | 680 x 430 x 380 mm |
| Weight | 22 kg |
| Power Supply | AC 110-240 V, 50/60 Hz |
| Power Consumption | 600 W |
| Cleaning Instructions | Wipe with a dry cloth; do not use solvents. |
| Safety Features | Overload protection, thermal protection |
| Spare Parts Available | Yes, contact authorized service centre |
| Warranty | 2 years (depending on region) |
Frequently Asked Questions - CUBA-15A Citronic
User questions about CUBA-15A Citronic
0 question about this device. Answer the ones you know or ask your own.
Ask a new question about this device
Download the instructions for your Loudspeaker in PDF format for free! Find your manual CUBA-15A - Citronic and take your electronic device back in hand. On this page are published all the documents necessary for the use of your device. CUBA-15A by Citronic.
USER MANUAL CUBA-15A Citronic
Active Wooden Speaker Cabinets with Bluetooth®
Item ref: CUBA-8A 178.708UK
CUBA-10A 178.710UK
CUBA-12A 178.712UK
CUBA-15A 178.715UK
User Manual
natural_image
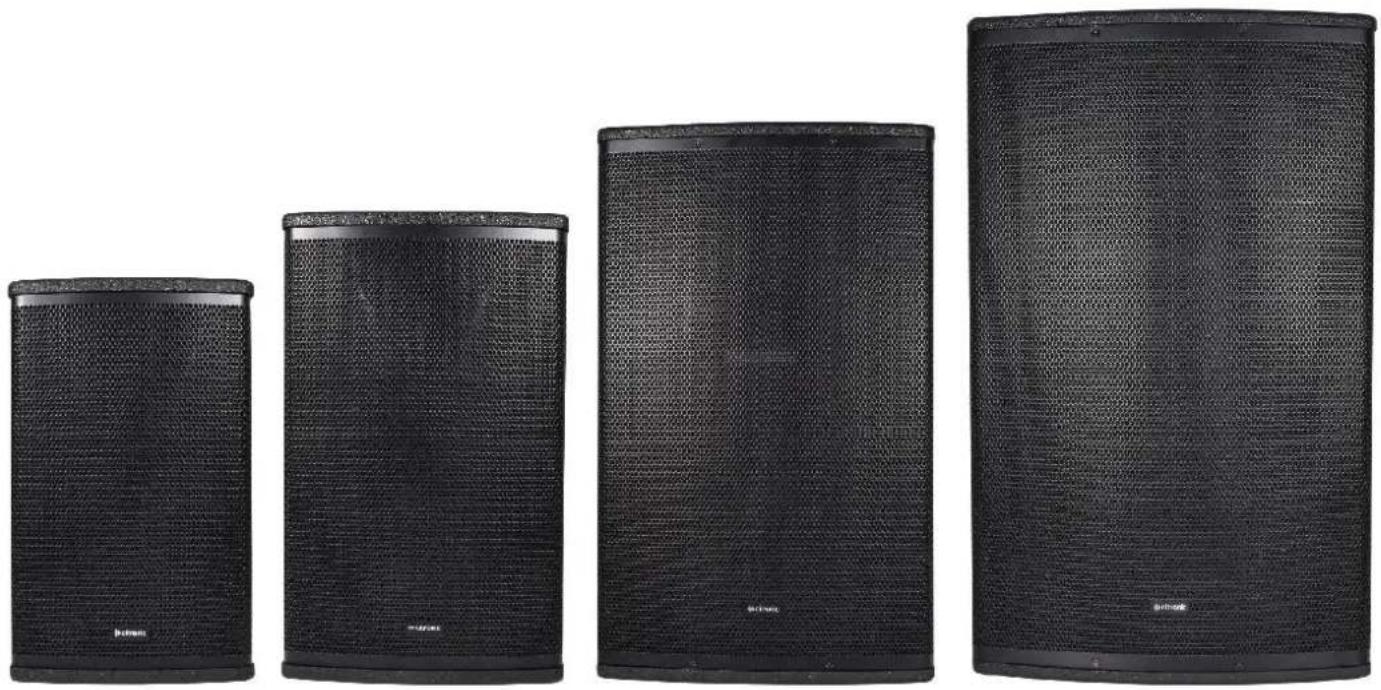
Four black audio/video speakers with mesh backouts, arranged in ascending size from left to right (no visible text or symbols)Version 1.0

Caution: Please read this manual carefully before operating
Damage caused by misuse is not covered by the warranty
Introduction
Thank you for choosing a CUBA active speaker cabinet as part of your sound system.
This product is designed to provide flexible, powerful and efficient output for a wide range of sound reinforcement applications. Please read this manual to achieve optimum performance from your speaker cabinet and avoid damage through misuse.
Package Contents
• CUBA-series active speaker cabinet
- Mains lead(s)
This product contains no user-serviceable parts, so make no attempt to try to fix or modify this item yourself as this will invalidate the warranty. We recommend you keep the original package and proof of purchase for any possible replacement or return issues.
Warning
To prevent the risk of fire or electric shock, do not expose any of the components to rain or moisture.
Avoid impact to any of the components.
No user serviceable parts inside - refer servicing to qualified service personnel.
Safety
- Please observe the following warning conventions

CAUTION: RISK OF ELECTRIC SHOCK DO NOT OPEN


This symbol indicates that dangerous voltage constituting a risk of electric shock is present within this unit

This symbol indicates that there are important operating and maintenance instructions in the literature accompanying this unit.
- Ensure that the correct mains lead is used with adequate current rating and mains voltage is as stated on the unit
- Avoid ingress of water or particles into any part of the housing. If liquids are spilled on the cabinet, stop using immediately, allow the unit to dry out and have checked by qualified personnel before further use

Warning: this unit must be earthed
Placement
- Keep the electronic parts out of direct sunlight and away from heat sources.
- Position the cabinet on a stable surface or stand that is adequate to support the weight of the product.
- Allow adequate space for cooling and access to controls and connections at the rear of the cabinet.
- Keep the cabinet away from damp or dusty environments.
Cleaning
• Use a soft dry or slightly damp cloth to clean surfaces of the cabinet
- A soft brush can be used to clear debris from controls and connections without damaging them
• To avoid damage, do not use solvents to clean any parts of the cabinet.
Rear panel layout
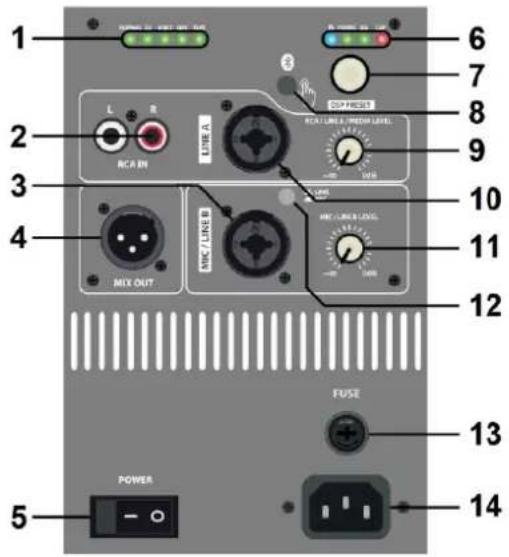
- DSP tone profile setting indicators
- LINE A input L+R RCA sockets
- MIC/LINE B input XLR/jack socket
- MIX OUT line output XLR
- POWER on/off switch
- Bluetooth & amp status indicators
- DSP tone profile rotary selector
- Bluetooth on/off & pairing button
- LINE A input & Bluetooth level control
- LINE A input XLR/jack socket
- MIC/LINE B input level control
- Input 2 MIC or LINE level switch
- Fuse holder (on IEC for CUBA 8A/10A)
- Mains inlet IEC
Setting up
Position your CUBA active speaker cabinet(s) on a stable surface capable of supporting the load and vibrations from the cabinet or ideally on a strong 35mm∅ pole mount or speaker stand with an adequate safe working load to support the cabinet. Also, each CUBA cabinet has M8 flying points for suspending from a ceiling or truss if required. It is recommended to use 3 or more fixing points for suspension.
Aim the cabinet towards the audience or listeners and not in direct line of sight with any microphones that are connected to the sound system to avoid feedback (howling or squealing caused by the mic "hearing" itself)
Each CUBA active speaker has an inbuilt Bluetooth receiver, which can be paired with a smart phone by holding the Bluetooth on/off & pairing button (8) for 3 seconds. The blue status LED (6) will flash to indicate pairing mode. Search for "CUBA-8A", "CUBA-10A", "CUBA-12A", or "CUBA-15A" in the Bluetooth menu of the smart phone and select to pair. Once paired, the LED will be lit constantly and the audio output from the smart phone will be streamed wirelessly to the CUBA speaker. This input is governed by the LINE A input & Bluetooth level control (9). Pressing the Bluetooth on/off pairing button briefly will switch the Bluetooth receiver on or off. If a previously paired device is within range, the Bluetooth receiver will auto connect.
If a mixing console is being used to control input sources, connect the output of the mixer to the CUBA cabinet LINE input (10) or MIC/LINE (3) with "LINE" selected on the MIC/LINE switch (12) using XLR or 6.3mm jack connectors. If the system is in stereo, then usually one CUBA cabinet will serve the right-side output and another for the left-side output. Normally, the volume of the CUBA cabinet LINE input is turned up high and the output will be controlled at the mixer.
A microphone may also be connected directly to input A if the MIC/LINE switch (12) is in the "MIC" position.
If a playback device (e.g. mp3 or CD player) is to be connected directly to the CUBA cabinet, this is usually connected to the LINE A input L+R RCA connectors (2)
If the inputs to the CUBA speaker cabinet are to be linked onto a further active cabinet or amplifier, the mix of all MIC/LINE/Bluetooth inputs can be fed from the MIX OUT line output XLR to further equipment (4)
When all necessary connections are made, finally connect the supplied IEC power cable (or equivalent) from the mains power supply to the IEC power inlet on the CASA speaker cabinet, ensuring that the supply voltage is as indicated on the CASA speaker unit (14)
Operation
With both volume controls turned fully down, switch on the power (5) to the CASA speaker cabinet. The red power LED (6) will light to confirm powering up.
If a smart phone is paired with the CUBA cabinet, make sure that the Bluetooth receiver is switched on (8) and play a track from the smart phone to test the speaker, turning up the level control (9) gradually.
If a mixer is connected to the CUBA speaker unit, ensure a signal is present, turn up the mixer output part way and gradually increase the volume of the input that the mixer is connected to for checking the output from the CASA speaker. If the sound is present and OK, turn down the mixer and turn up the CASA speaker to the maximum required output and control the volume from the mixer.
The status LEDs (6) include "SIG" and "CLIP" indicators. The "SIG" LED will light to show when a signal is present, and the "CLIP" LED should only light briefly on the loudest beats or transients. If this LED lights more continuously, it will be necessary to turn the volume control(s) down to avoid overload.
If a microphone is connected directly to MIC/LINE A input (3), speak into the microphone whilst gradually increasing the volume of the MIC/LINE A input (11) until the required sound level is reached.
For playback devices connected to the LINE B input (2), play an audio track with the playback device volume turned up part way and gradually increase the volume of the LINE B input (9) so that the output can be checked and increase to the required output level.
The CUBA active cabinets have an inbuilt DSP which has 5 optimal settings for different types of input or audio program material: Normal / DJ / Voice / Live / Flat. Although quite self-explanatory, it is worth experimenting with each profile to find the ideal EQ and tone response for each application. Simply turn the DSP rotary selector (7) and the DSP setting indicator LEDs (1) show which setting is active.
Before powering down the CASA speaker unit, turn down all volume controls to avoid loud noises. If not being used for long periods, disconnect from the mains power supply.
Specifications
| Model | CUBA-8A | CUBA-10A | CUBA-12A | CUBA-15A |
| Power supply | 230Vac, 50Hz (IEC) | |||
| Main driver | 200mm∅ (8") | 250mm∅ (10") | 300mm∅ (12") | 380mm∅ (12") |
| Voice coil | 50mm∅ (2") | 50mm∅ (2") | 64mm∅ (2.5") | 64mm∅ (2.5") |
| HF driver | 35mm (1.35") Ti CD | 35mm (1.35") Ti CD | 35mm (1.35") Ti CD | 44mm (1.75") Ti CD |
| Power: rms | 250W | 270W | 400W | 450W |
| Power: max. | 500W | 540W | 800W | 900W |
| Power: peak | 800W | 880W | 1120W | 1400W |
| Sensitivity | 94dB | 95dB | 98dB | 99dB |
| Max. SPL | 121.0dB | 122.5dB | 123.0dB | 124.0dB |
| Inputs | XLR/jack mic/line, XLR/jack/RCA line | |||
| Audio source | Bluetooth receiver | |||
| Line output | XLR | |||
| DSP settings | Normal, DJ. Voice, Live, Flat | |||
| Dimensions | 435 x 278 x 245mm | 500 x 310 x 260mm | 610 x 375 x 340mm | 705 x 430 x 375mm |
| Weight | 8.71kg | 10.27kg | 15.98kg | 22.00kg |
Disposal: The "Crossed Wheelie Bin" symbol on the product means that the product is classed as Electrical or Electronic equipment and should not be disposed with other household or commercial waste at the end of its useful life. The goods must be disposed of according to your local council guidelines.
Hereby, AVSL Group Ltd. declares that the radio equipment type 178.708UK, 178.710UK, 178.712UK and 178.715UK is in compliance with Directive 2014/53/EU
The full text of the EU declaration of conformity for 178.708UK is available at the following internet address: http://www.avsl.com/assets/exportdoc/1/7/178708UK%20CE.pdf
The full text of the EU declaration of conformity for 178.710UK is available at the following internet address: http://www.avsl.com/assets/exportdoc/1/7/178710UK%20CE.pdf
The full text of the EU declaration of conformity for 178.712UK is available at the following internet address: http://www.avsl.com/assets/exportdoc/1/7/178712UK%20CE.pdf
The full text of the EU declaration of conformity for 178.715UK is available at the following internet address: http://www.avsl.com/assets/exportdoc/1/7/178715UK%20CE.pdf
Brand : Citronic
Model : CUBA-15A
Category : Loudspeaker