
OP861RK - Monitor OPTOMA - Free user manual and instructions
Find the device manual for free OP861RK OPTOMA in PDF.


| Product Type | Monitor |
| Brand | Optoma |
| Model | OP861RK |
| Screen Size | 27 inches |
| Resolution | 1920 x 1080 (Full HD) |
| Aspect Ratio | 16:9 |
| Refresh Rate | 60 Hz |
| Connectivity | HDMI, VGA, USB |
| Power Consumption | 35 W (typical) |
| Weight (with stand) | 5.5 kg |
| Dimensions (WxHxD) | 620 x 450 x 200 mm |
| Special Features | Flicker-free, Blue light filter |
| Cleaning Instructions | Use a soft, dry cloth |
| Safety Precautions | Use only the supplied power adapter; avoid liquid contact |
| Spare Parts | Power adapter, monitor stand, HDMI cable |
Frequently Asked Questions - OP861RK OPTOMA
User questions about OP861RK OPTOMA
0 question about this device. Answer the ones you know or ask your own.
Ask a new question about this device
Download the instructions for your Monitor in PDF format for free! Find your manual OP861RK - OPTOMA and take your electronic device back in hand. On this page are published all the documents necessary for the use of your device. OP861RK by OPTOMA.
USER MANUAL OP861RK OPTOMA
Interactive Flat Panel
natural_image
Blank gray canvas with a thin border and no visible text, symbols, or graphics.TABLE OF CONTENTS
SAFETY 4
Safety Instructions....4
Copyright 5
Disclaimer....5
Trademark Recognition 5
FCC 5
Declaration of Conformity for EU Countries 6
WEEE 6
INTRODUCTION 7
Package Contents 7
Standard Accessories....7
Optional Accessories....7
Product Overview 8
Front View 8
Rear View....9
Remote Control 10
SETUP AND INSTALLATION....12
Wall Mounting Installation....12
Wall Mount Specifications 12
Installing an External Mini Computer.... 15
Stand Mounting Installation (Optional) 16
Using the Remote Control 19
Installing/Replacing the Remote Control Batteries.... 19
Remote Control Operating Range 20
Making Connection....21
Connecting to Power 21
Connecting External Devices 21
USING THE DEVICE.... 25
Turning the Power On/Off 25
Setup Wizard 26
BASIC OPERATIONS....28
Home Screen Overview....28
General Settings....29
Selecting an Input Source 30
Activating the Low Blue Light Function 30
Adjusting the Volume Level 31
Adjusting the Backlight Level 31
Configuring the Audio Settings 32
Configuring the Screen Settings.... 32
Configuring the Display Settings 33
Configure the Adjust Settings (for VGA input only).... 33
Side Toolbar 34
Viewing the Recent Tasks 34
Annotations Tool 35
Screen Freezing 36
Other Utilities....37
Cloud Drive....42
Advanced Settings....43
Configuring the Network Settings....44
USING THE APPS 46
Note 47
Advanced Options 51
Screenshare 52
ShareSender App Compatibility Table....52
Mobile Device....52
Computer....54
Finder 56
Managing the Files 56
Playing Multimedia Files....57
Screen Lock 62
Browser 64
Keeper 64
System Update 65
ADDITIONAL INFORMATION 69
Specifications 69
Dimensions....71
65-inch....71
75-inch....72
86-inch....73
Supported Timing List....74
RS232 Protocol Function List....75
RS232 Pin Assignments....75
RS232 RJ45 Control Connection 75
SET Command....76
GET Command 78
LED Indicator 80
Troubleshooting....80
Maintenance 81
Cleaning the Screen 81
Clean the Front Frame 81
Optoma Global Offices 82
SAFETY
Please follow all warnings, precautions and maintenance as recommended in this user manual.
Safety Instructions
- Only use attachments/accessories specified by the manufacturer.
- Do not block any ventilation openings. To ensure reliable operation of the device and to protect from over heating, it is recommended to install the device in a location that does not block ventilation. Do not put the device in an enclosure such as a book case or a cabinet that restricts air flow.
- Do not use the device near water or moisture. To reduce the risk of fire and/or electric shock, do not expose the device to rain or moisture.
- Do not install near heat sources such as radiators, heaters, stoves or any other apparatus such as amplifiers that emits heat.
- Do not let objects or liquids enter the device. They may touch dangerous voltage ports or short out parts that could result in fire or electric shock.
- Do not place the device on an unstable surface. The device may fall over resulting in injury or the device may become damaged.
• Do not setup the device in places where it might be subjected to vibration or shock.
- Do not use any hard or sharp object to operate the touch screen.
- Do not use the device if it has been physically damaged or abused. Physical damage/abuse would be (but not limited to):
– The device has been dropped.
– Power supply cord or plug has been damaged.
– Liquid has been spilled on to the device.
– The device has been exposed to rain or moisture.
- Something has fallen in the device or something is loose inside.
- Do not attempt to service the device yourself. Opening or removing covers may expose you to dangerous voltages or other hazards. Please call Optoma before you send the device for repair.
• Disconnect the power plug from AC outlet if the device is not being used for a long period of time. - Remove the batteries from the remote control before storage. If the batteries are left in the remote for long periods, they may leak.
• Turn off and unplug the power plug from the AC outlet before cleaning the device.
• Use a soft dry cloth with mild detergent to clean the display housing. Do not use abrasive cleaners, waxes or solvents to clean the device.
- See the device enclosure for safety related markings.
• The device should only be repaired by appropriate service personnel.
Copyright
This publication, including all photographs, illustrations and software, is protected under international copyright laws, with all rights reserved. Neither this manual, nor any of the material contained herein, may be reproduced without written consent of the author.
© Copyright 2018
Disclaimer
The information in this document is subject to change without notice. The manufacturer makes no representations or warranties with respect to the contents hereof and specifically disclaims any implied warranties of merchantability or fitness for any particular purpose. The manufacturer reserves the right to revise this publication and to make changes from time to time in the content hereof without obligation of the manufacturer to notify any person of such revision or changes.
Trademark Recognition
Kensington is a U.S. registered trademark of ACCO Brand Corporation with issued registrations and pending applications in other countries throughout the world.
HDMI, the HDMI Logo, and High-Definition Multimedia Interface are trademarks or registered trademarks of HDMI Licensing LLC in the deviceed States and other countries.
Google, the Google logo, and Google Drive are trademarks or registered trademarks of Google LLC.
OneDrive is a trademark and brand of Microsoft Corporation.
All other product names used in this manual are the properties of their respective owners and are Acknowledged.
FCC
This device has been tested and found to comply with the limits for a Class B digital device pursuant to Part 15 of the FCC rules. These limits are designed to provide reasonable protection against harmful interference in a residential installation. This device generates, uses and can radiate radio frequency energy and, if not installed and used in accordance with the instructions, may cause harmful interference to radio communications.
However, there is no guarantee that interference will not occur in a particular installation. If this device does cause harmful interference to radio or television reception, which can be determined by turning the device off and on is encouraged to try to correct the interference by one or more of the following measures:
- Reorient or relocate the receiving antenna.
- Increase the separation between the device and receiver.
- Connect the device into an outlet on a circuit different from that to which the receiver is connected.
- Consult the dealer or an experienced radio/television technician for help.
Notice: Shielded cables
All connections to other computing devices must be made using shielded cables to maintain compliance with FCC regulations.
Caution
Changes or modifications not expressly approved by the manufacturer could void the user's authority, which is granted by the Federal Communications Commission, to operate this projector.
Operation Conditions
This device complies with Part 15 of the FCC Rules. Operation is subject to the following two conditions:
- This device may not cause harmful interference and
- This device must accept any interference received, including interference that may cause undesired operation.
Notice: Canadian users
This Class B digital apparatus complies with Canadian ICES-003.
Declaration of Conformity for EU Countries
• EMC Directive 2014/30/EC (including amendments)
• Low Voltage Directive 2014/35/EC
• R & TTE Directive 1999/5/EC (if product has RF function)
WEEE
Disposal instructions
Do not throw this electronic device into the trash when discarding. To minimize pollution and ensure utmost protection of the global environment, please recycle it.
INTRODUCTION
Package Contents
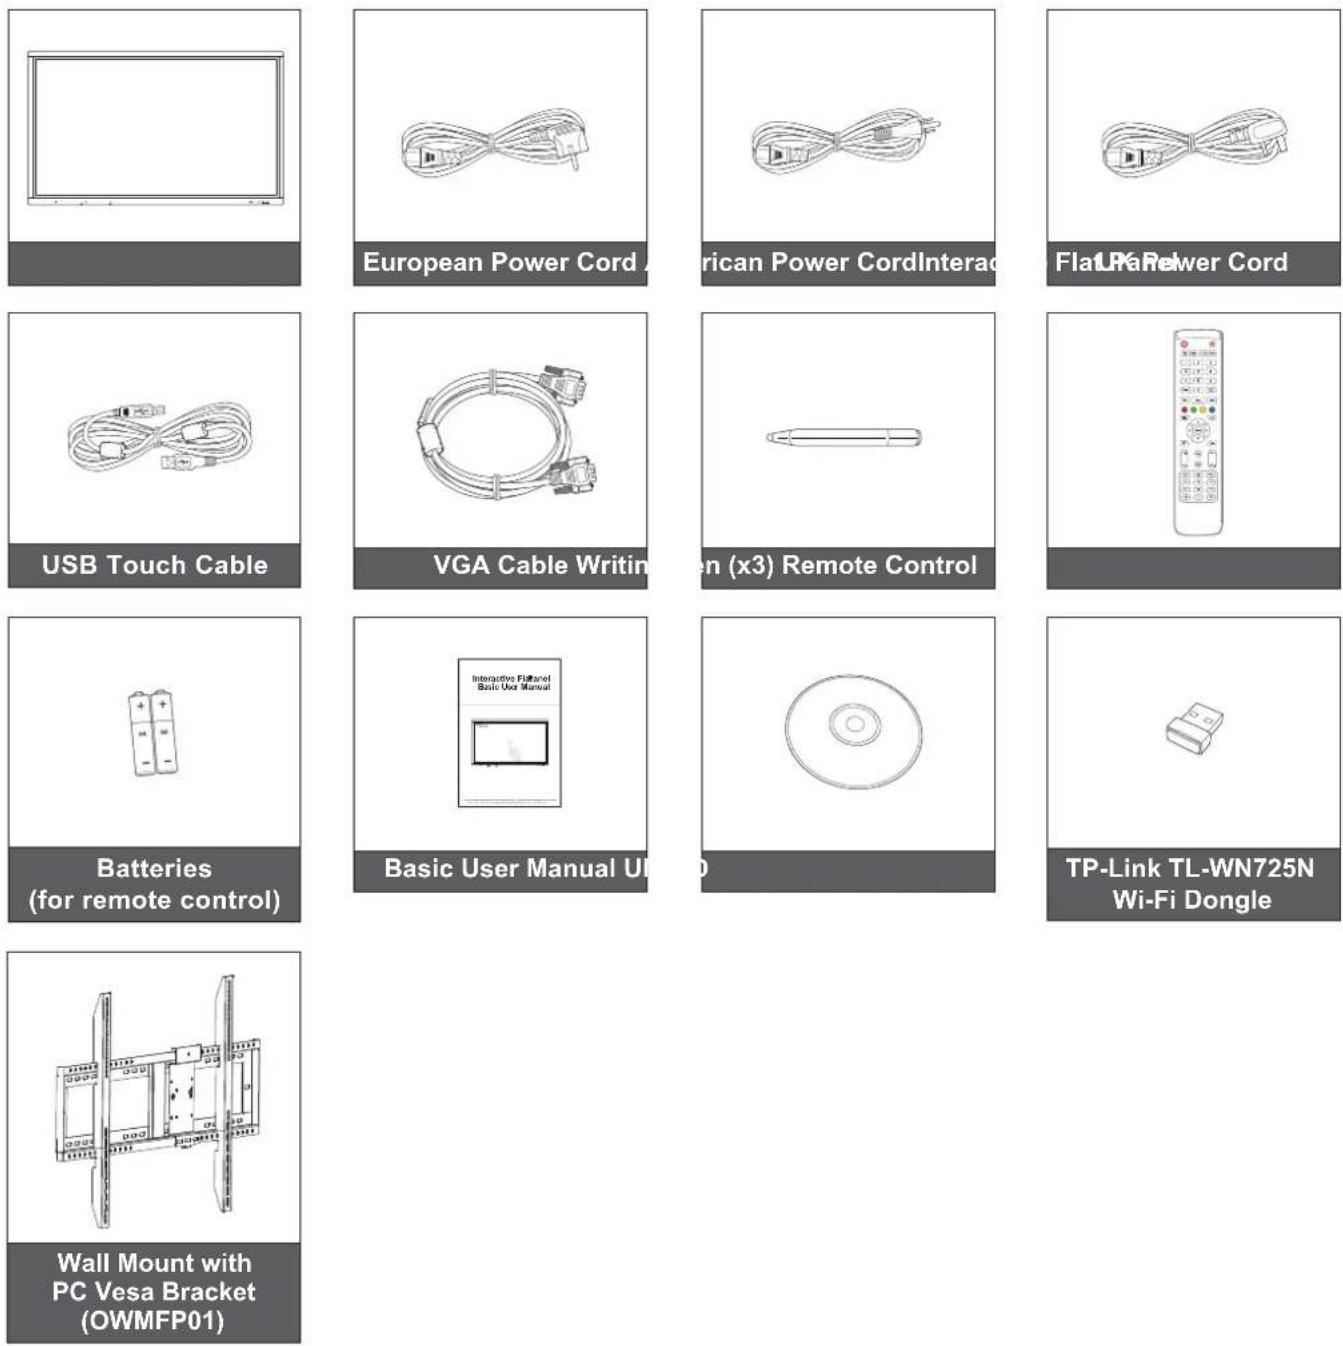
Carefully unpack and verify that you have the items listed below under standard accessories. Some of the items under optional accessories may not be available depending on the model, specification and your region of purchase. Please check with your place of purchase. Some accessories may vary from region to region.
The warranty card is only supplied in some specific regions. Please consult your dealer for detailed information.
Standard Accessories
Optional Accessories
• ST01 (Stand)
- OMPC-i5 (solt in PC, intel i5 CPU, 8G RAM, 128G SSD)
- OMPC-i7 (slot in PC, intel i7 CPU, 8G RAM, 256G SSD)
Note: For European warranty Information, please visit www.optoma.com.
INTRODUCTION
Product Overview
Front View
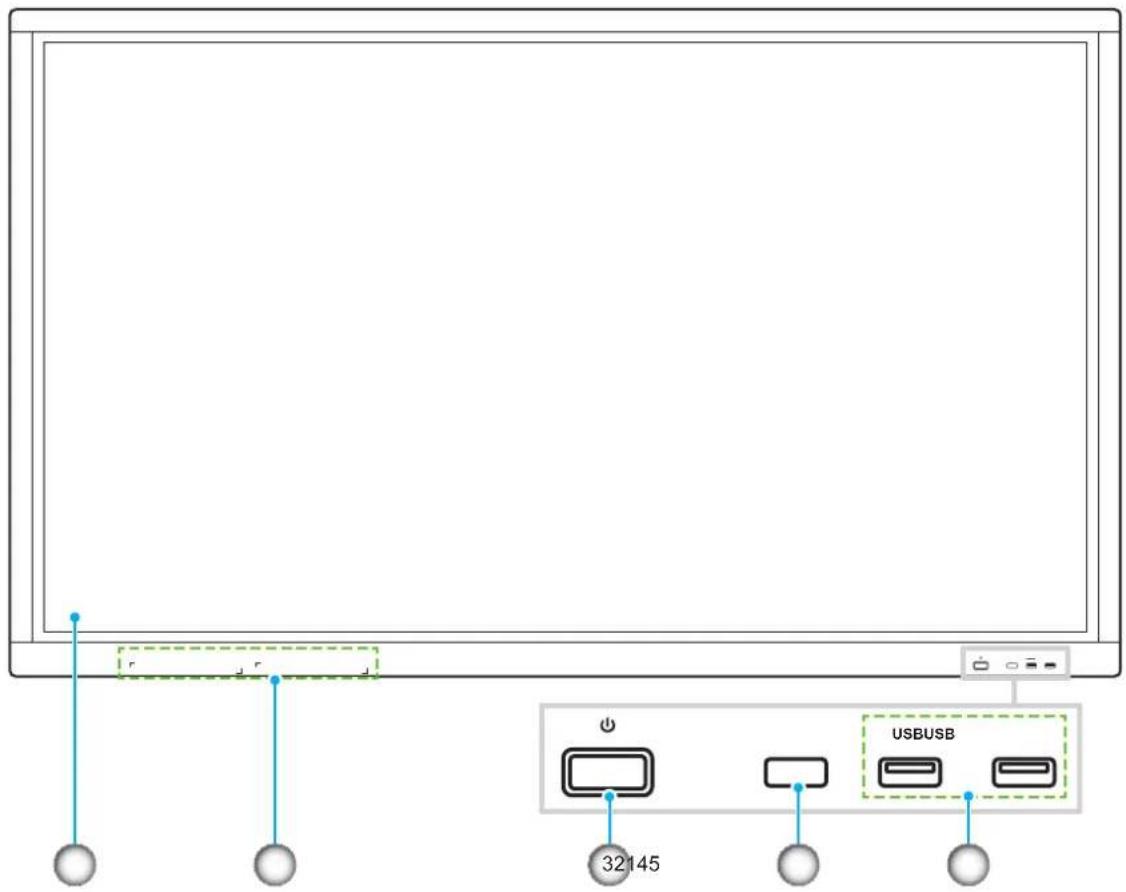
| No. Item No. Item | ||
| 1. Touch screen 4. IR receiver | ||
| 2. Writing pen placements (x2) 5. USB 2.0 ports (x2) | ||
| 3. Power button with LED indicator |
Note: The front USB 2.0 ports are full channel USB ports. USB ports can be used irrespective of the chosen input source.
INTRODUCTION
Rear View
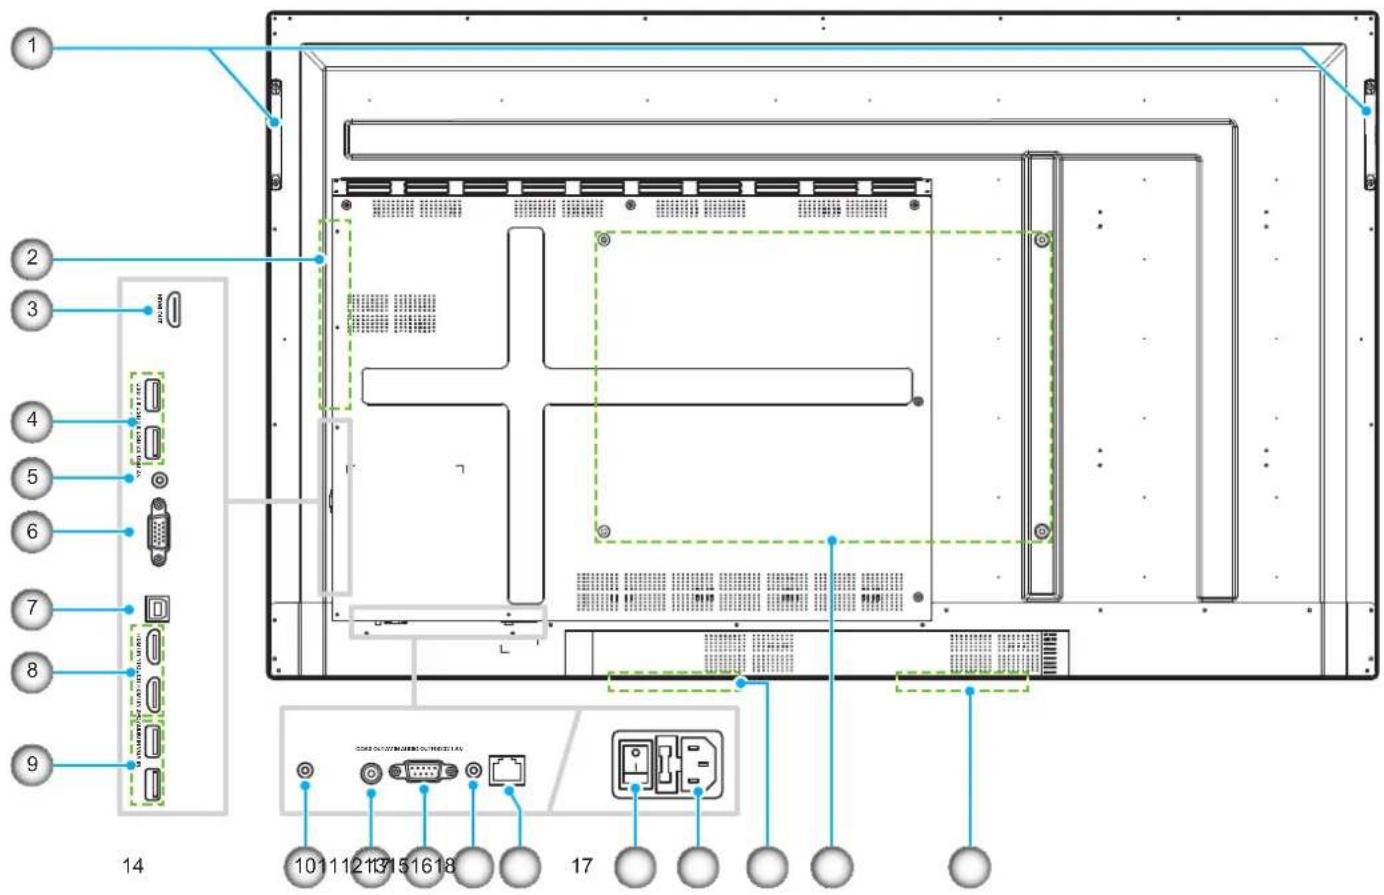
| No. | Item |
| 1. | Handles (x2) |
| 2. | OPS slot |
| 3. | HDMI Out port |
| 4. | USB 3.0 ports (x2) |
| 5. | Audio In jack |
| 6. | VGA port |
| 7. | Touch USB port |
| 8. | HDMI 2.0 ports (x2) |
| 9. | USB 2.0 ports (x2) |
| No. | Item |
| 10. | Composite Video jack |
| 11. | Coaxial Out jack |
| 12. | RS232 port |
| 13. | Audio Out jack |
| 14. | LAN port |
| 15. | Power switch |
| 16. | AC In socket |
| 17. | 12W speakers (x2) |
| 18. | Mounting holes for wall mount |
INTRODUCTION
Remote Control
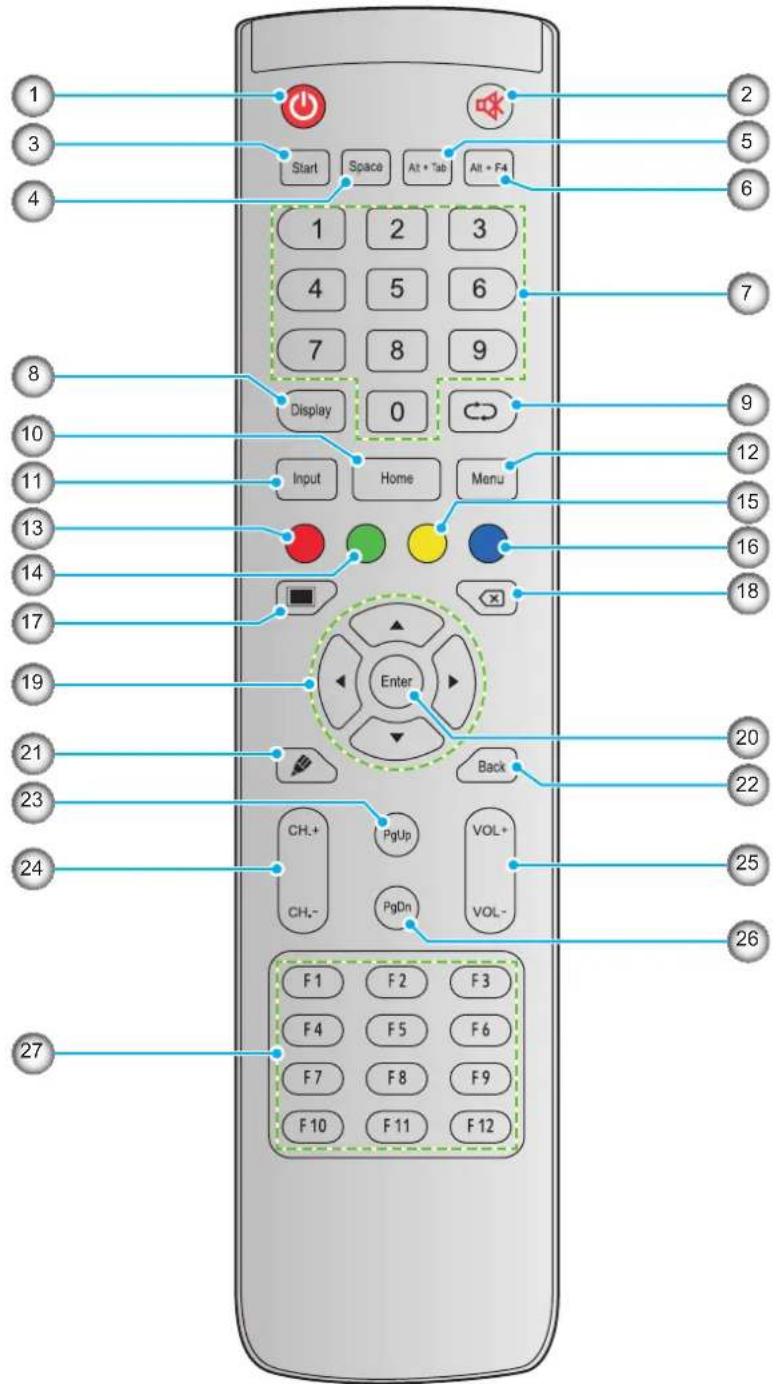
| No. | Button Description | |
| 1. | Power (💡) | Turn on/off the device. |
| 2. | Mute (💡) | Turn off the sound temporarily. |
| 3. | Start Perform the same function as theWindowskey on a computer keyboard. | |
| 4. | Space Perform the same function as theSpacekey on a computer keyboard. | |
| 5. | Alt+Tab | Perform the same function as theAltandTabkeys on a computer keyboard.Pressing both keys, you can switch between all open applications (windows). |
INTRODUCTION
| No. | Button Description | |
| 6. | Alt+F4 | Perform the same function as the Alt and F4 keys on a computer keyboard. Pressing both keys, you can close the current window. |
| 7. | Numeric keys Numeric input keys | |
| 8. | Display Show the current input source and information. | |
| 9. | Repeat (∅) | No function. |
| 10. | Home Return to the Home screen. | |
| 11. | Input Select the input source. | |
| 12. | Menu Display or hide the OSD menu. | |
| 13. | Red (●) | Lock or unlock the Power button (on the device) and touch functions. |
| 14. | Green (●) | Lock or unlock the Power button (on the device) function. |
| 15. | Yellow (●) | Lock or unlock the touch function. |
| 16. | Blue (●) | Freeze the screen. |
| 17. | Blank (■) | Blank the screen. |
| 18. | Backspace (×) | Perform the same function as the Backspace key on a computer keyboard. |
| 19. | Navigation keys (▲▼◀▶) | Select an item or option. |
| 20. | Enter Confirm the selection. | |
| 21. | Note(√) | Launch the Note app. |
| 22. | Back Return to the previous screen. | |
| 23. | PgUp Perform the same function as the PgUp key on a computer keyboard. | |
| 24. | Channel keys No function. | |
| 25. | Volume keys | Adjust the volume level. |
| 26. | PgDn Perform the same function as the PgDn key on a computer keyboard. | |
| 27. | Function keys (F1 ~ F12) | Perform the same function as the F1 ~ F12 function keys on a computer keyboard. |
Note: If the PC module is not installed into the OPS slot, all computer-related keys will have no function.
SETUP AND INSTALLATION
Wall Mounting Installation
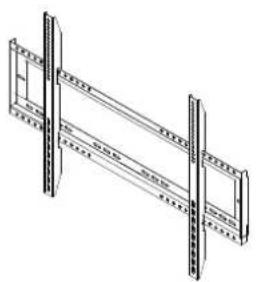
Use only the supplied wall mount kit. It includes the following items:
natural_image
Technical line drawing of a dual-panel rack structure with no visible text or symbols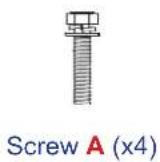
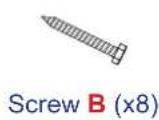
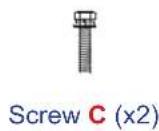


Dual mounting brackets and wall mount Anchor (x8) Washer (x8)
Wall Mount Specifications
| Model Name | VESA Grid Screw Type & Length |
| 65-inch 600 | x 400 mm M8*25L |
| 75-inch 800 | x 400 mm M8*25L |
| 86-inch 800 | x 600 mm M8*25L |
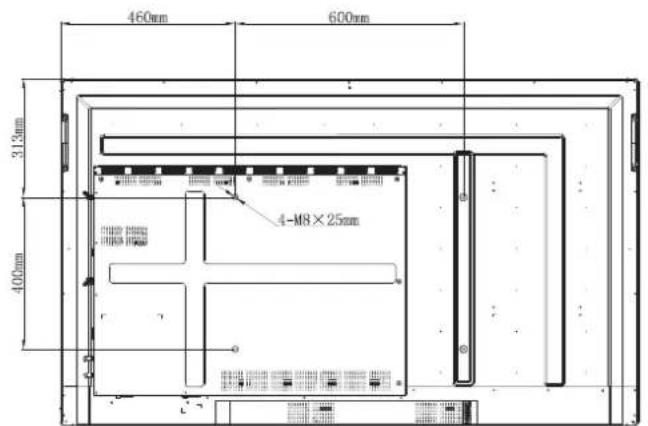
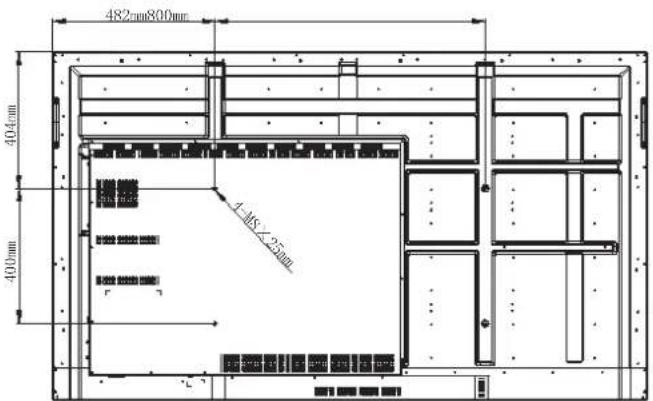
65-inch 75-inch
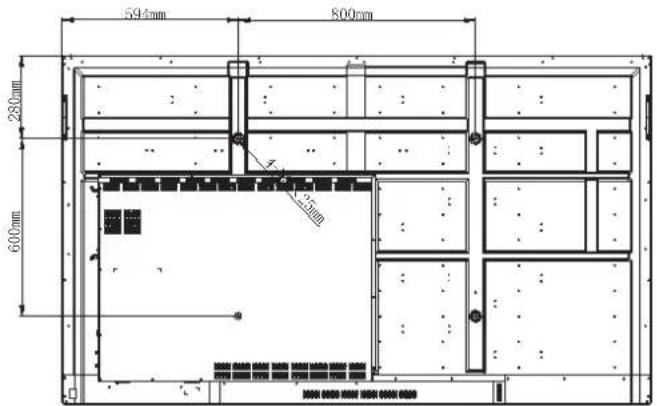
86-inch
SETUP AND INSTALLATION
To mount the device on the wall, complete the following steps:
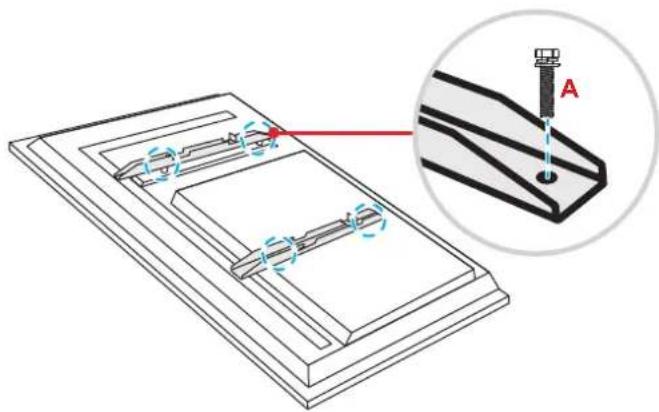
- Install the dual mounting brackets on the rear of the device. Then secure the brackets with four screws (A).
natural_image
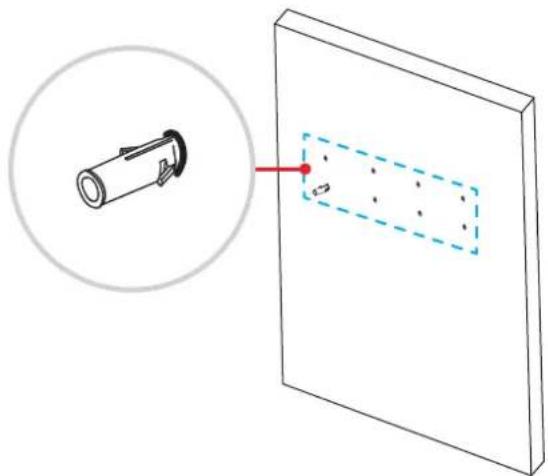
Technical diagram of a mechanical assembly with a magnified inset showing a screwdriver inserted into a component (no text or symbols present)- Drill eight small holes on the mounting location and insert the anchors into the holes.
natural_image
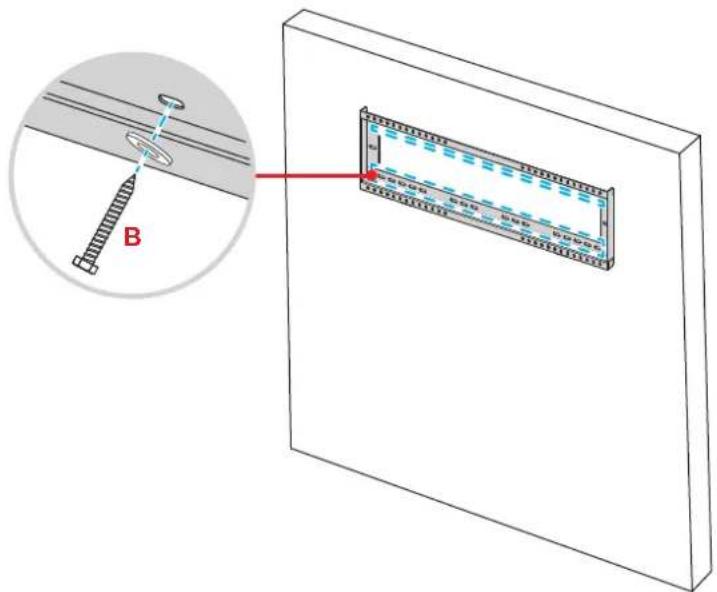
Diagram showing a cylindrical device with a ring attached to a wall, and a dashed rectangular box with a red arrow pointing to it (no text or symbols present)- Position the wall mount on the wall. Then secure the wall mount with eight screws (B) through the washers into the installed anchors on the wall.
SETUP AND INSTALLATION
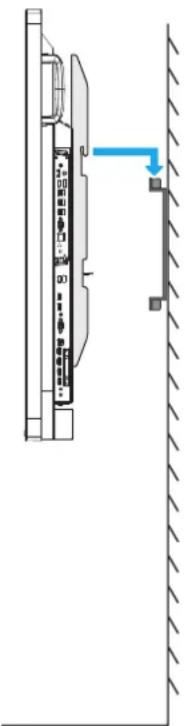
- Align and hook the dual mounting brackets to the wall mount.
natural_image
Diagram of a device mounted on a wall, showing a vertical panel with a blue arrow pointing to a bracket (no text or symbols present)- Secure the dual mounting brackets and the wall mount with two screws (C).
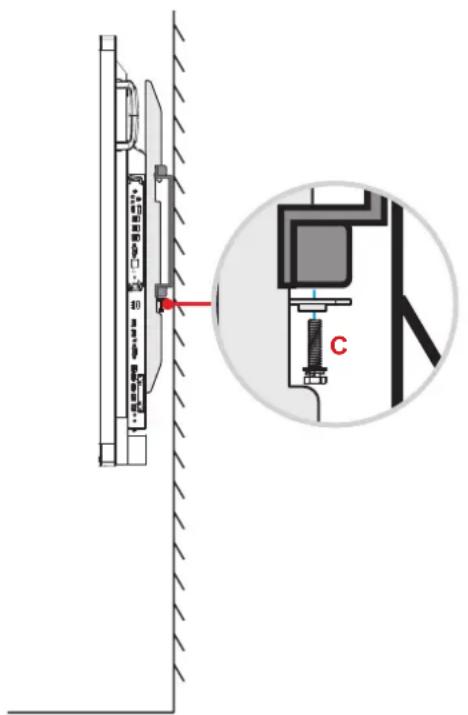
Note:
• The maximum wall mount kit load capacity:160kg (352lbs).
• The wall mount should be installed into concrete wall to ensure installation firmness.
- Screws must be tightly secured. However, to avoid damage to the mounting brackets, wall mount, or device, do not overtighten the screws.
• The installation should only be performed by qualified technicians. Improper installation may cause the device to fall or malfunction.
• Please note that damage resulting from incorrect installation will void the warranty.
SETUP AND INSTALLATION
Installing an External Mini Computer
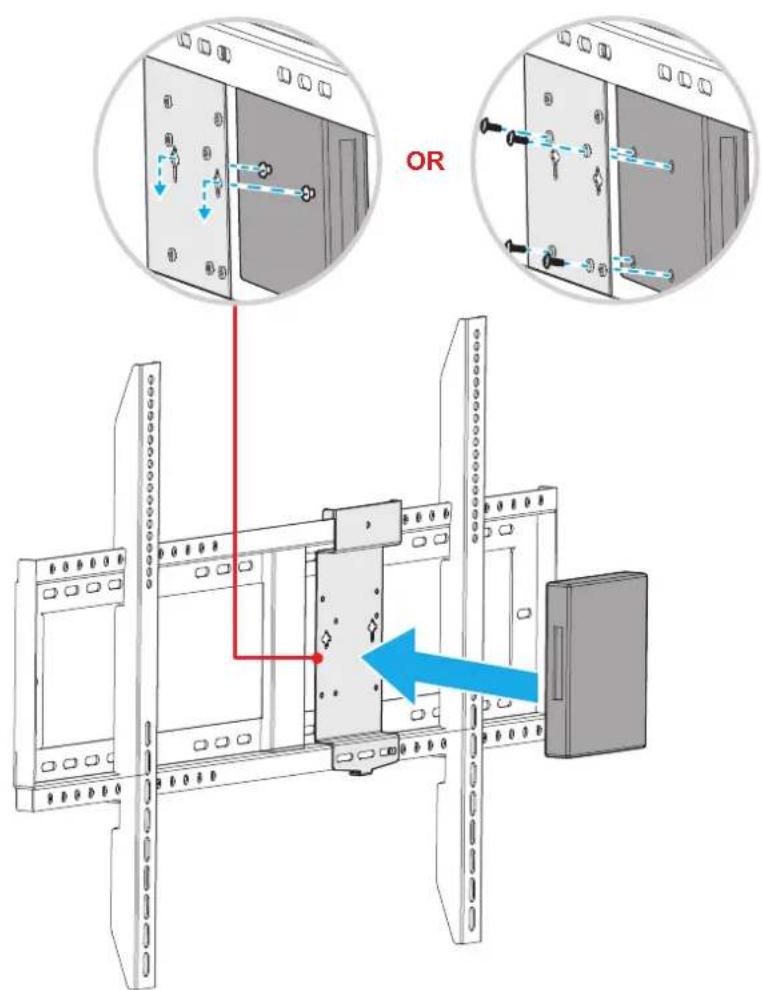
Install the mini PC bracket on the rear side of the wall mount. Then complete one of the following to install the mini computer:
• Install the screws onto the mini computer. Then align and hook the mini computer to the mini PC bracket.
- Align and install the mini computer to the mini PC bracket. Then secure it with four screws.
SETUP AND INSTALLATION
Stand Mounting Installation (Optional)
The stand mount kit includes the following items:
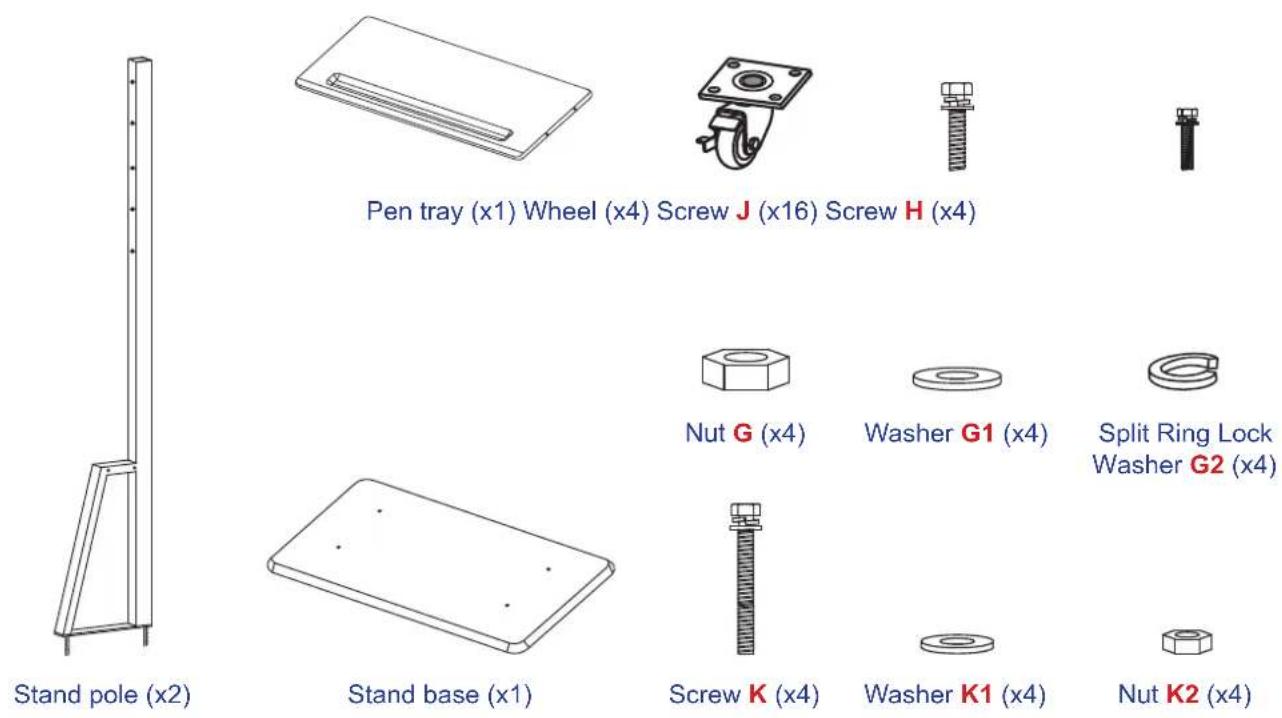
To mount the device on the stand, complete the following steps:
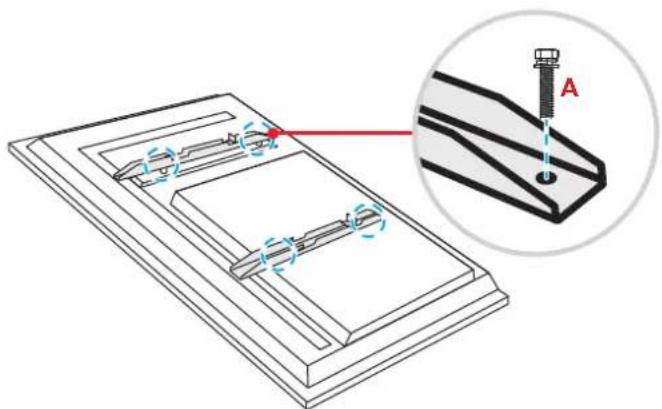
- Install the dual mounting brackets on the rear of the device. Then secure the brackets with four screws (A).
natural_image
Technical diagram of a mechanical assembly with a magnified inset showing a screw inserted into a bracket (no text or symbols present)Note: Dual mounting brackets, wall mount, and screws (A) are included in the wall mount kit. Refer to "Wall Mounting Installation" on page 12.
SETUP AND INSTALLATION
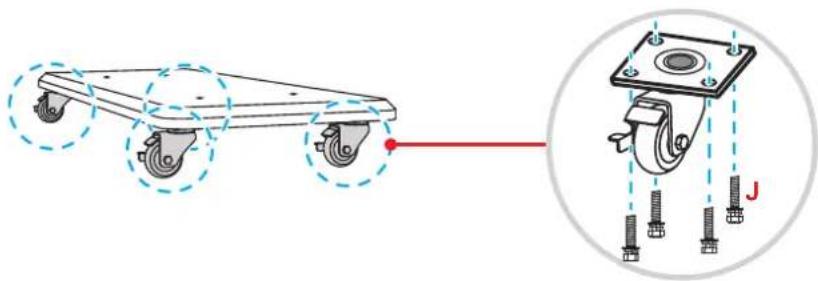
- Flip the stand base so that you can see the screw holes for the wheel. Then install the wheel onto its slot and secure it with four screws (J).
Repeat the same procedure to install the remaining three wheels.
natural_image
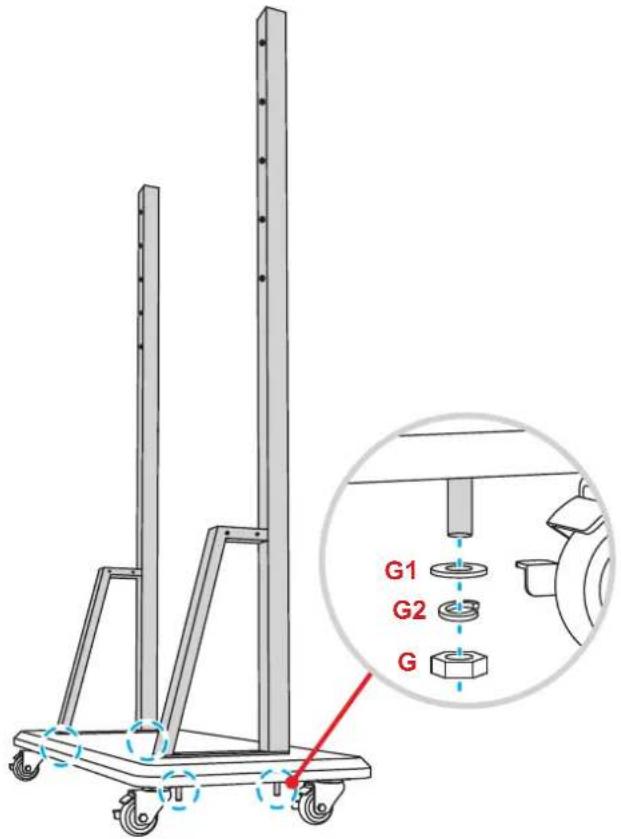
Diagram showing a wheeled cart with wheels and a close-up of its mounting bracket (no text or symbols present)- Place the stand base on the stable surface. Then install the stand pole onto its slot and secure both standoffs with two nuts (G) through the washers (G2 and G1).
Repeat the same procedure to install another stand pole.
SETUP AND INSTALLATION
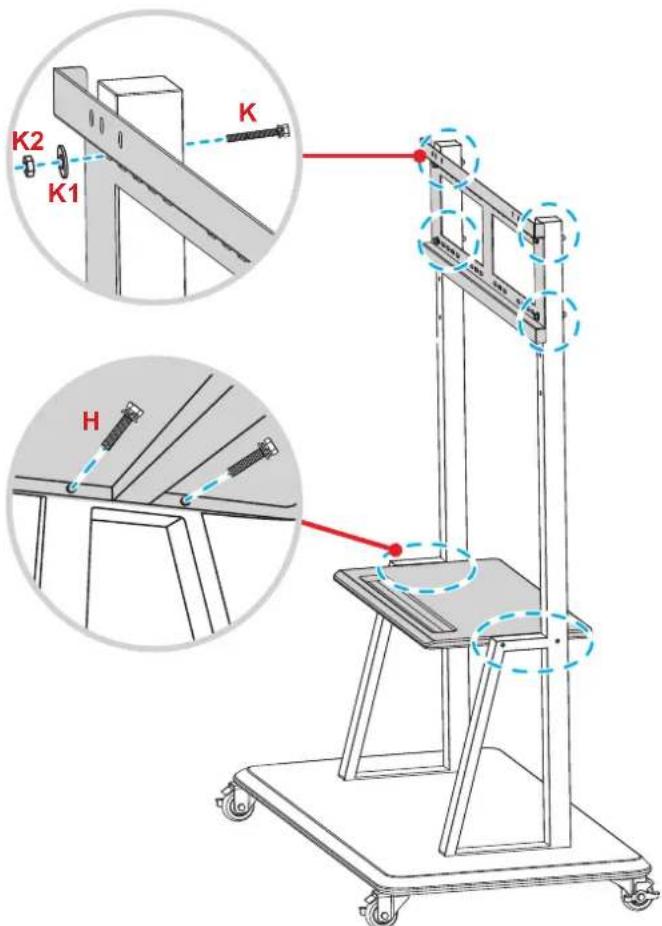
- Align the pen tray with the screw holes on the middle part of the poles. Then secure the pen tray with four screws (H).
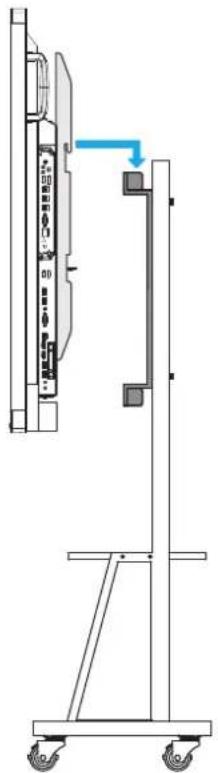
- Install the wall mount on the upper part of the poles. Then insert the screws (K) through the screw holes from the rear side of the poles.
- Place the washers (K1) and the nuts (K2) into the screws. Then tighten the nuts (K2) to secure the wall mount in place.
- Align and hook the dual mounting brackets to the installed wall mount on the stand poles.
natural_image
Technical line drawing of a vertical mechanical device with wheels and a blue arrow indicating direction (no text or symbols)SETUP AND INSTALLATION
Using the Remote Control
Installing/Replacing the Remote Control Batteries
Two AAA size batteries are supplied for the remote control.
IMPORTANT! Replace only with the same or equivalent type batteries.
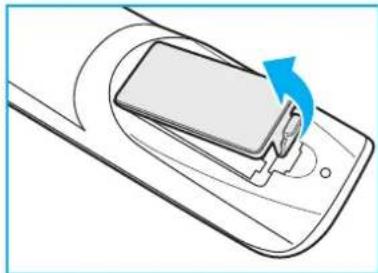
- Remove the cover of the battery compartment.
natural_image
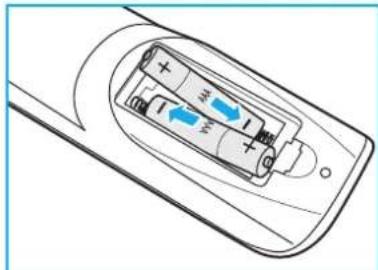
Diagram of a smartphone with a scroll wheel and blue arrow indicating rotation (no text or symbols)- Insert the two batteries with correct polarity (+/-) as shown inside the battery compartment.
natural_image
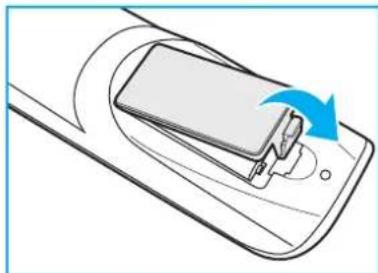
Diagram of a remote control panel with battery and charging mechanism (no text or symbols)- Replace the cover.
natural_image
Diagram of a smartphone with a blue arrow indicating rotation or change, showing the battery inside (no text or symbols)CAUTION
Improper use of batteries can result in chemical leakage or explosion. Be sure to follow the instructions below.
• Do not mix batteries of different types. Different types of batteries have different characteristics.
- Do not mix old and new batteries. Mixing old and new batteries can shorten the life of new batteries or cause chemical leakage in old batteries.
- Remove batteries as soon as the are depleted. Chemicals that leak from batteries that come in contact with skin can cause a rash. If you find any chemical leakage, wipe thoroughly with a cloth.
• The batteries supplied with this product may have a shorter life expectancy due to storage conditions.
• If you will not be using the remote control for an extended period of time, remove the batteries.
• When you dispose of the batteries, you must obey the law in the relative area or country.
SETUP AND INSTALLATION
Remote Control Operating Range
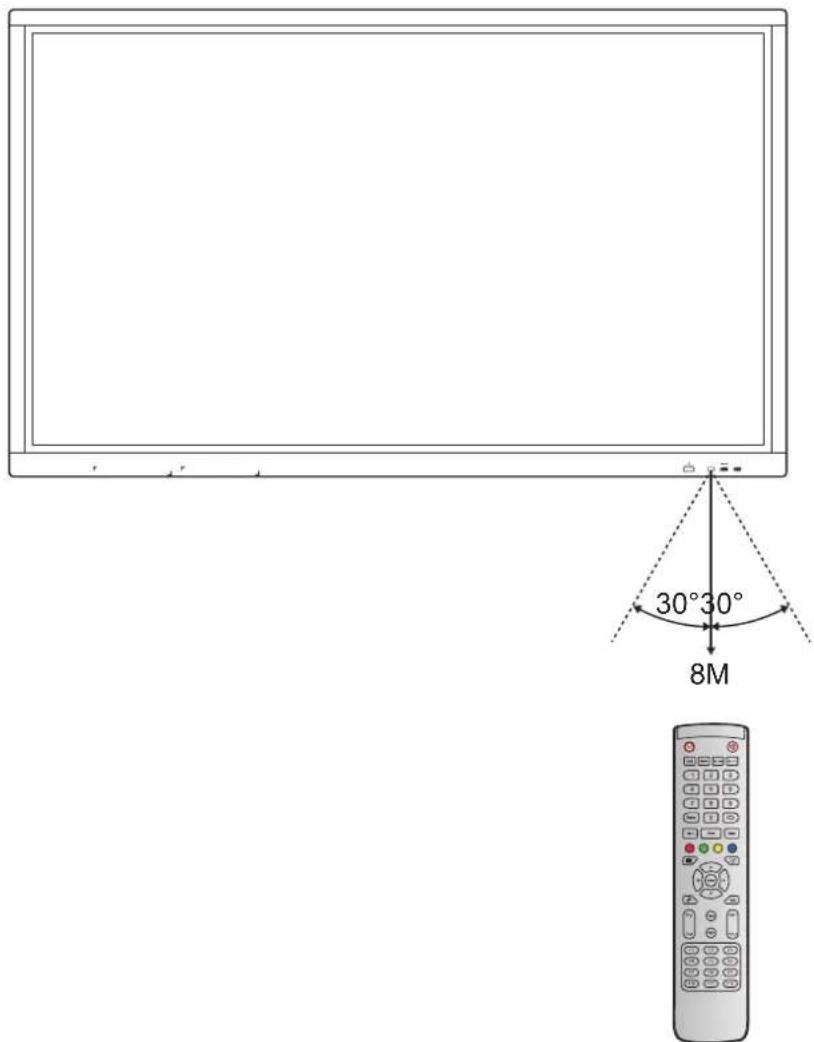
When using the remote control, make sure to point it within ±30^ to the IR receiver on the device. The distance between the remote control and the IR sensor window should not be longer than 8 meters.
• Make sure that there are no obstacles between the remote control and the IR sensor window on the device that might obstruct the infra-red beam.
• Make sure the IR transmitter of the remote control is not being used in sunlight or fluorescent lamps directly.
• If the remote control is closed to Inverter-Type fluorescent lamps, it might become ineffective from time to time.
• If the remote control and the device are within a very short distance, the remote control might become ineffective.
SETUP AND INSTALLATION
Making Connection
Connecting to Power
- Connect one end of the power cord to the AC In socket of the device.
- Connect the other end of the power cord to a power outlet or a power supply.
- Set the Power switch to ON (I). The device will automatically enter standby mode.

Connecting External Devices
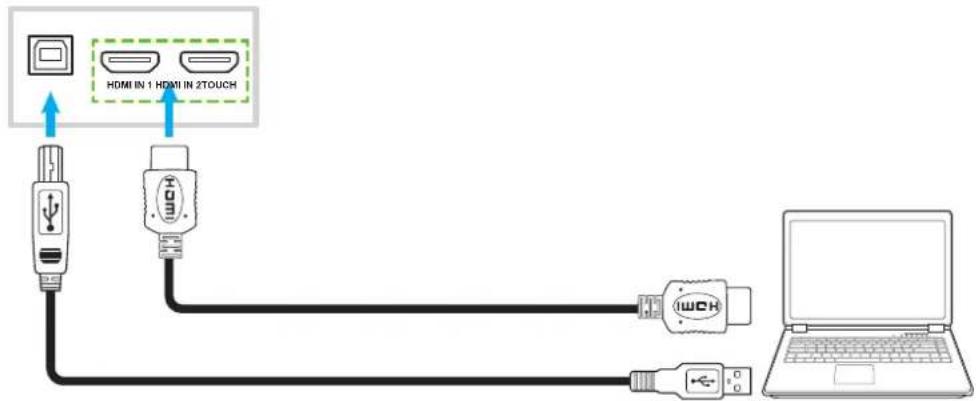
IMPORTANT! To use the touch screen function, make sure to connect one end of the USB cable to the Touch USB port of the device and the other end of the cable to the USB port of your external device.
HDMI input connection
- Connect your computer to the device using an HDMI cable.
flowchart
graph TD
    A["Input"] --> B["USB"]
    B --> C["USB"]
    C --> D["Laptop"]
    style A fill:#f9f,stroke:#333
    style D fill:#ccf,stroke:#333
    note1["HDMI IN 1 HDMI IN 2TOUCH"]
    note2["USB IN 1 HDMI IN 2TOUCH"]
    note3["USB IN 1 HDMI IN 2TOUCH"]
    note4["USB IN 1 HDMI IN 2TOUCH"]
    note5["USB IN 1 HDMI IN 2TOUCH"]
    note6["USB IN 1 HDMI IN 2TOUCH"]
    note7["USB IN 1 HDMI IN 2TOUCH"]
    note8["USB IN 1 HDMI IN 2TOUCH"]
    note9["USB IN 1 HDMI IN 2TOUCH"]
    note10["USB IN 1 HDMI IN 2TOUCH"]
    note11["USB IN 1 HDMI IN 2TOUCH"]
    note12["USB IN 1 HDMI IN 2TOUCH"]
    note13["USB IN 1 HDMI IN 2TOUCH"]
    note14["USB IN 1 HDMI IN 2TOUCH"]
    note15["USB IN 1 HDMI IN 2TOUCH"]
    note16["USB IN 1 HDMI IN 2TOUCH"]
    note17["USB IN 1 HDMI IN 2TOUCH"]
    note18["USB IN 1 HDMI IN 2TOUCH"]
    note19["USB IN 1 HDMI IN 2TOUCH"]
    note20["USB IN 1 HDMI IN 2TOUCH"]
    note21["USB IN 1 HDMI IN 2TOUCH"]
    note22["USB IN 1 HDMI IN 2TOUCH"]
    note23["USB IN 1 HDMI IN 2TOUCH"]
    note24["USB IN 1 HDMI IN 2TOUCH"]
    note25["USB IN 1 HDMI IN 2TOUCH"]
    note26["USB IN 1 HDMI IN 2TOUCH"]
    note27["USB IN 1 HDMI IN 2TOUCH"]
    note28["USB IN 1 HDMI IN 2TOUCH"]
    note29["USB IN 1 HDMI IN 2TOUCH"]
    note30["USB IN 1 HDMI IN 2TOUCH"]
    note31["USB IN 1 HDMI IN 2TOUCH"]
    note32["USB IN 1 HDMI IN 2TOUCH"]
    note33["USB IN 1 HDMI IN 2TOUCH"]
    note34["USB IN 1 HDMI IN 2TOUCH"]
    note35["USB IN 1 HDMI IN 2TOUCH"]
    note36["USB IN 1 HDMI IN 2TOUCH"]
    note37["USB IN 1 HDMI IN 2TOUCH"]
    note38["USB IN 1 HDMI IN 2TOUCH"]
    note39["USB IN 1 HDMI IN 2TOUCH"]
    note40["USB IN 1 HDMI IN 2TOUCH"]
    note41["USB IN 1 HDMI IN 2TOUCH"]
    note42["USB IN 1 HDMI IN 2TOUCH"]
    note43["USB IN 1 HDMI IN 2TOUCH"]
    note44["USB IN 1 HDMI IN 2TOUCH"]
    note45["USB IN 1 HDMI IN 2TOUCH"]
    note46["USB IN 1 HDMI IN 2TOUCH"]
    note47["USB IN 1 HDMI IN 2TOUCH"]
    note48["USB IN 1 HDMI IN 2TOUCH"]
    note49["USB IN 1 HDMI IN 2TOUCH"]
    note50["USB IN 1 HDMI IN 2TOUCH"]
    note51["USB IN 1 HDMI IN 2TOUCH"]
    note52["USB IN 1 HDMI IN 2TOUCH"]
    note53["USB IN 1 HDMI IN 2TOUCH"]
    note54["USB IN 1 HDMI IN 2TOUCH"]
    note55["USB IN 1 HDMI IN 2TOUCH"]
    note56["USB IN 1 HDMI IN 2TOUCH"]
    note57["USB IN 1 HDMI IN 2TOUCH"]
    note58["USB IN 1 HDMI IN 2TOUCH"]
    note59["USB IN 1 HDMI IN 2TOUCH"]
    note60["USB In 1 HDMI IN 2TOUCH"]
    note61["USB In 1 HDMI IN 2TOUCH"]
    note62["USB In 1 HDMI IN 2TOUCH"]
    note63["USB In 1 HDMI IN 2TOUCH"]
    note64["USB In 1 HDMI IN 2TOUCH"]
    note65["USB In 1 HDMI IN 2TOUCH"]
    note66["USB In 1 HDMI IN 2TOUCH"]
    note67["USB In 1 HDMI IN 2TOUCH"]
    note68["USB In 1 HDMI IN 2TOUCH"]
    note69["USB In 1 HDMI IN 2TOUCH"]
    note70["USB In 1 HDMI IN 2TOUCH"]
    note71["USB In 1 HDMI IN 2TOUCH"]
    note72["USB In 1 HDMI IN 2TOUCH"]
    note73["USB In 1 HDMI IN 2TOUCH"]
    note74["USB In 1 HDMI IN 2TOUCH"]
    note75["USB In 1 HDMI IN 2TOUCH"]
    note76["USB In 1 HDMI IN 2TOUCH"]
    note77["USB In 1 HDMI IN 2TOUCH"]
    note78["USB In 1 HDMI IN 2TOUCH"]
    note79["USB In 1 HDMI IN 2TOUCH"]
    note80["USB In 1 HDMI IN 2TOUCH"]
    note81["USB In 1 HDMI IN 2TOUCH"]
    note82["USB In 1 HDMI IN 2TOUCH"]
    note83["USB In 1 HDMI IN 2TOUCH"]
    note84["USB In 1 HDMI IN 2TOUCH"]
    note85["USB In 1 HDMI IN 2TOUCH"]
    note86["USB In 1 HDMI IN 2TOUCH"]
    note87["USB In 1 HDMI IN 2TOUCH"]
    note88["USB In 1 HDMI IN 2TOUCH"]
    note89["USB In 1 HDMI IN 2TOUCH"]
    note90["USB In 1 HDMI IN 2TOUCH"]
    note91["USB In 1 HDMI IN 2TOUCH"]
    note92["USB In 1 HDMI IN 2TOUCH"]
    note93["USB In 1 HDMI IN 2TOUCH"]
    note94["USB In 1 HDMI IN 2TOUCH"]
    note95["USB In 1 HDMI IN 2TOUCH"]
    note96["USB In 1 HDMI IN 2TOUCH"]
    note97["USB In 1 HDMI IN 2TOUCH"]
    note98["USB In 1 HDMI IN 2TOUCH"]
    note99["USB In 1 HDMI IN 2TOUCH"]
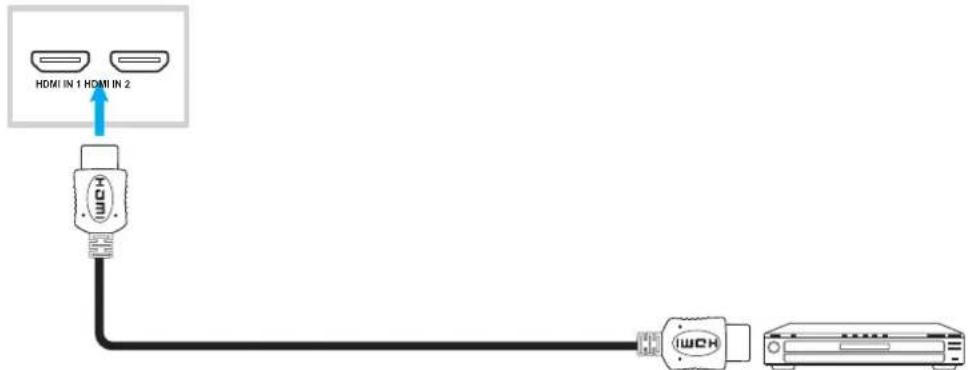
- Connect your video source to the device using an HDMI cable.
SETUP AND INSTALLATION
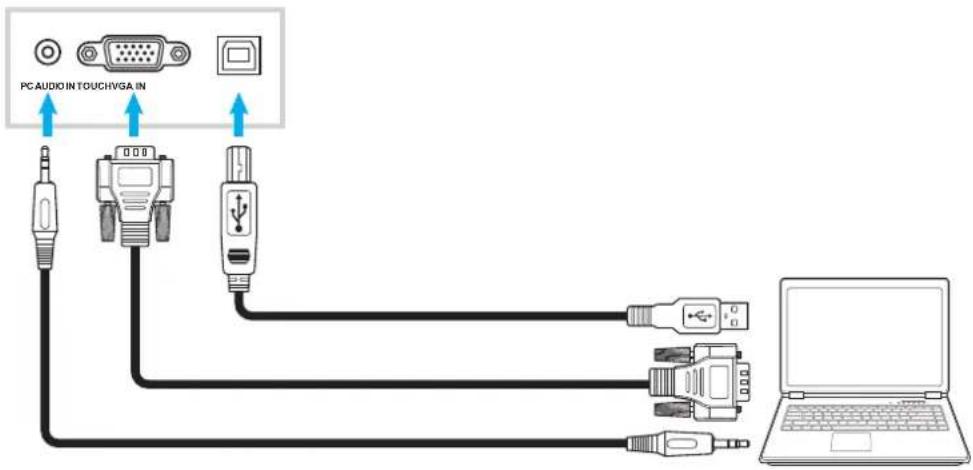
VGA input connection
Connect your computer to the device using a VGA cable.
Note: For audio input, connect one end of an audio cable to the Audio In jack of the device and the other end of the cable to the audio jack of your computer.
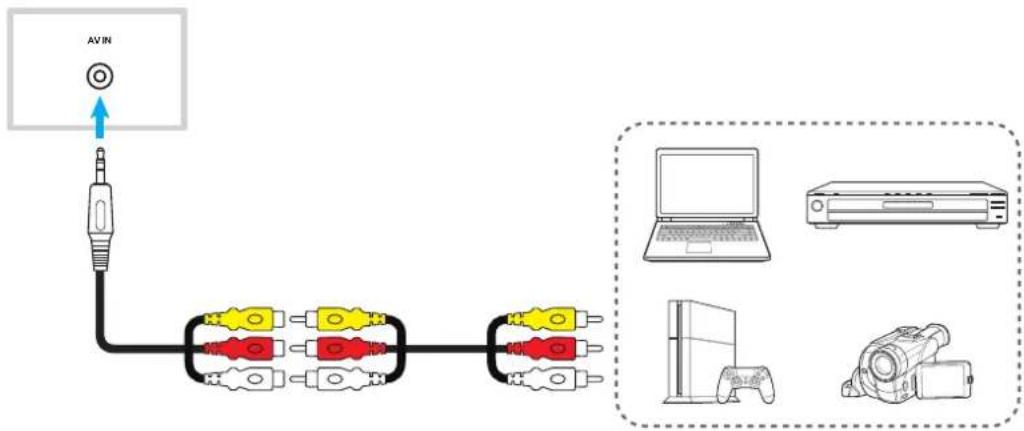
AV input connection
Connect your A/V device to the device using an appropriate video cable.
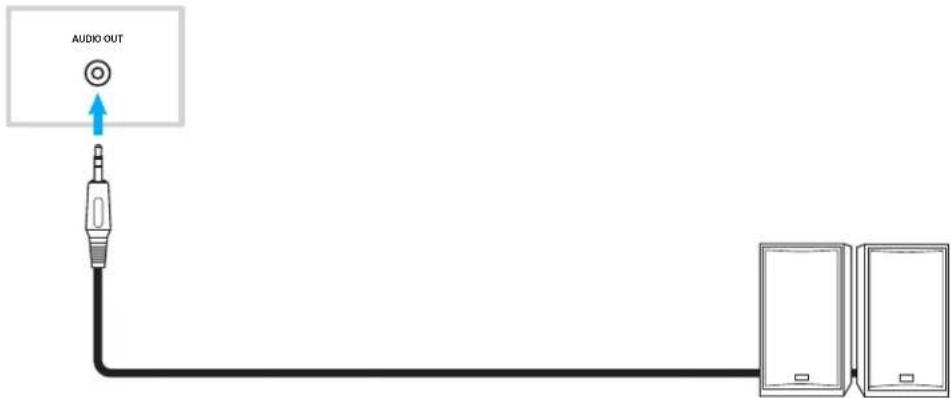
Audio output connection
Connect your external speakers to the device using an audio cable.
SETUP AND INSTALLATION
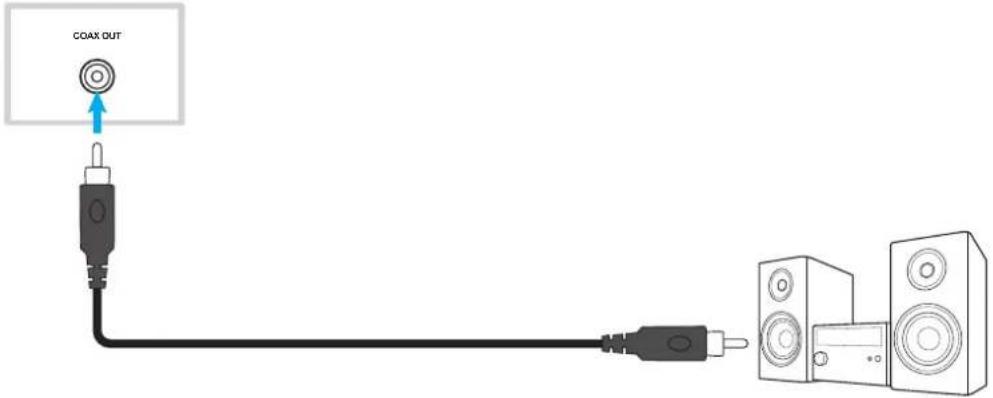
Coaxial output connection
Connect your audio equipment to the device using a coaxial cable.
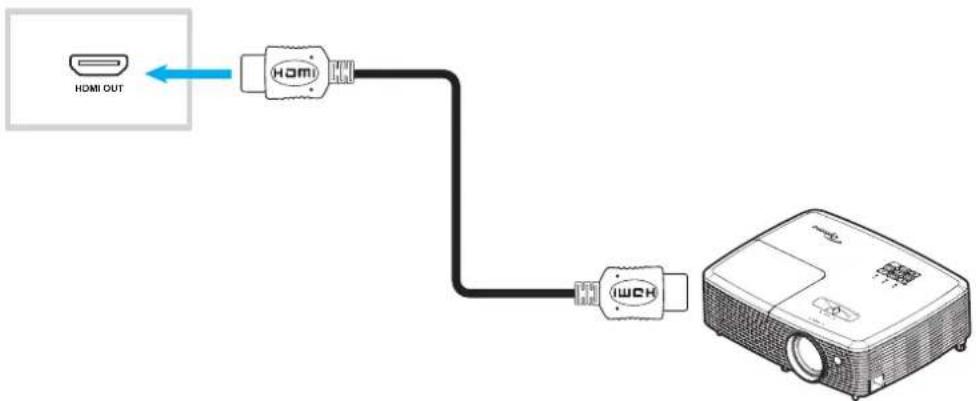
HDMI output connection
Connect your projector to the device using an HDMI cable.
flowchart
graph TD
    A["HDMI OUT"] --> B["USB Cable"]
    B --> C["IWH Cable"]
    C --> D["Provision"]
USB connection
Connect your USB peripheral device to the device using a USB cable.
Note: For the USB disk drive or Wi-Fi dongle connection, simply plug it into one of the available USB ports.
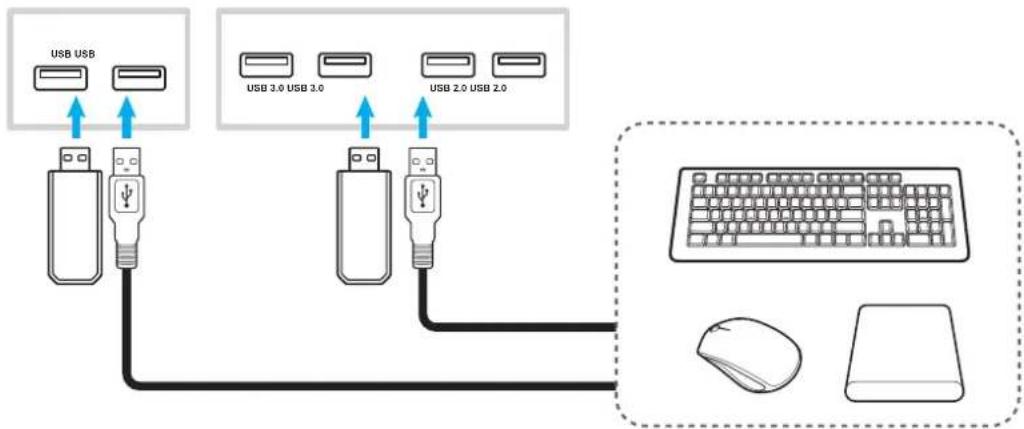
flowchart
graph TD
    A["USB USB"] --> B["USB 3.0 USB 3.0"]
    B --> C["USB 2.0 USB 2.0"]
    C --> D["Computer with keyboard"]
SETUP AND INSTALLATION
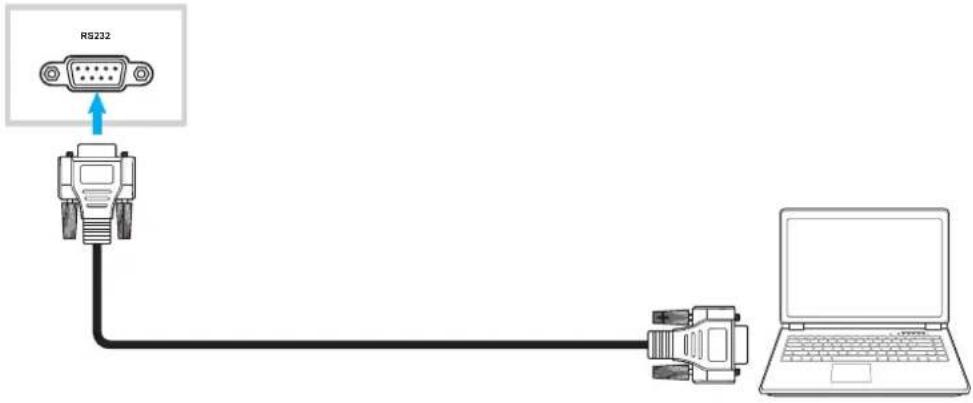
RS232 connection
Connect your computer to the device using a RS232 cable.
LAN connection
Connect your router to the device using an Ethernet cable.

flowchart
graph LR
    A["LAN"] --> B["USB Cable"]
    B --> C["Port"]
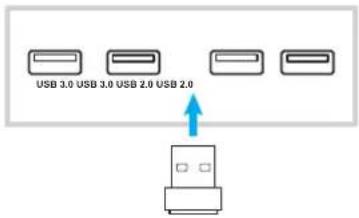
Wi-Fi connection
Plug the Wi-Fi dongle into one of the rear USB ports. It can receive the signal in the area where there is Wi-Fi network.
USING THE DEVICE
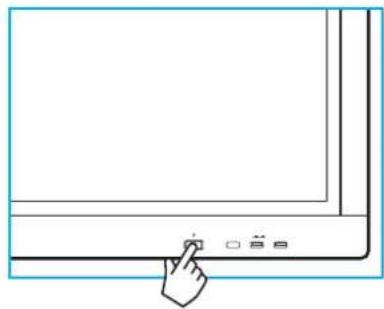
Turning the Power On/Off
Powering on
Note: After the power cord is properly connected, make sure the Power switch to ON (1).

Press the Power button to turn on the device. The LED indicator lights blue, indicating it is ready to use.
Note: You can also press the ⏻ button on the remote control to turn on the device.
natural_image
Line drawing of a hand pressing a button on a computer monitor (no text or symbols)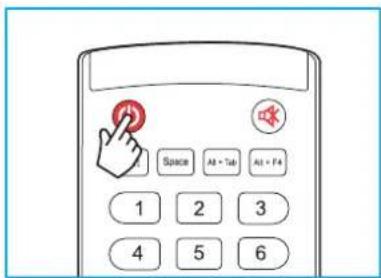
Powering off
Press the Power button for 3 seconds to turn off the device. When the LED indicator lights red, this indicates the device has entered standby mode.
Note:
• You can also press the ⏻ button on the remote control to turn off the device.
• The device still consumes power when it is in standby mode. It is highly recommended to unplug the power cord from the power outlet if the device will not be used for an extended period of time.
USING THE DEVICE
Setup Wizard
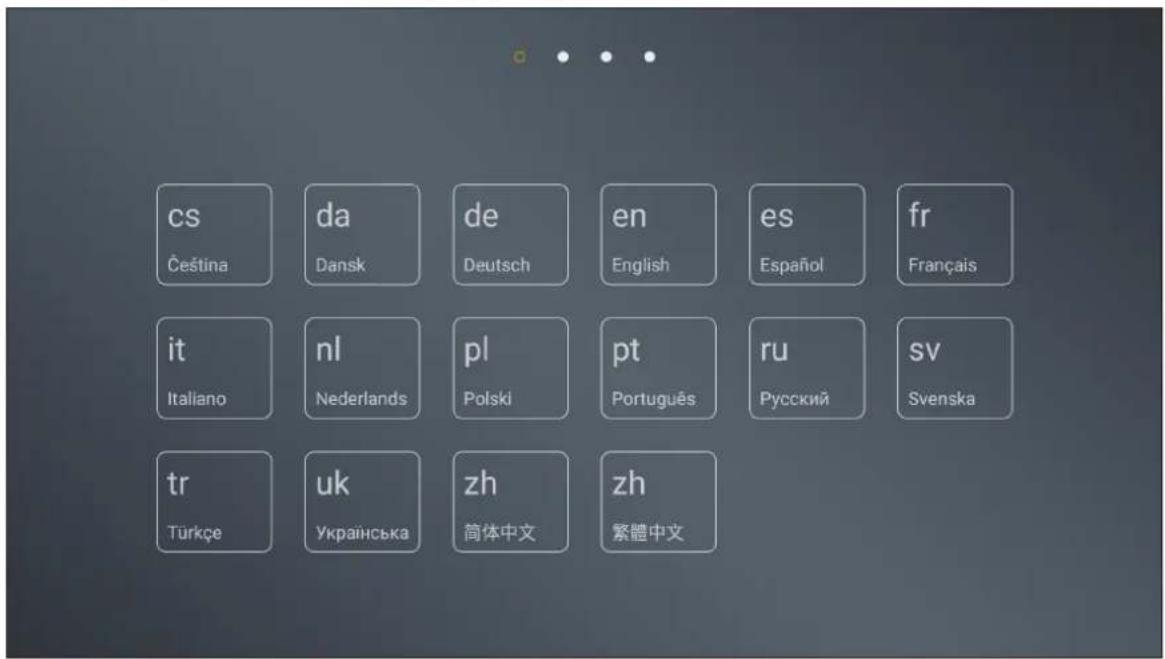
The Setup Wizard will appear on the screen when you turn on your device for the first time.
Note: This device is equipped with a touch-sensitive screen. You can simply tap the touch screen to operate your device.
- Select the language for the on-screen display (OSD) menu.
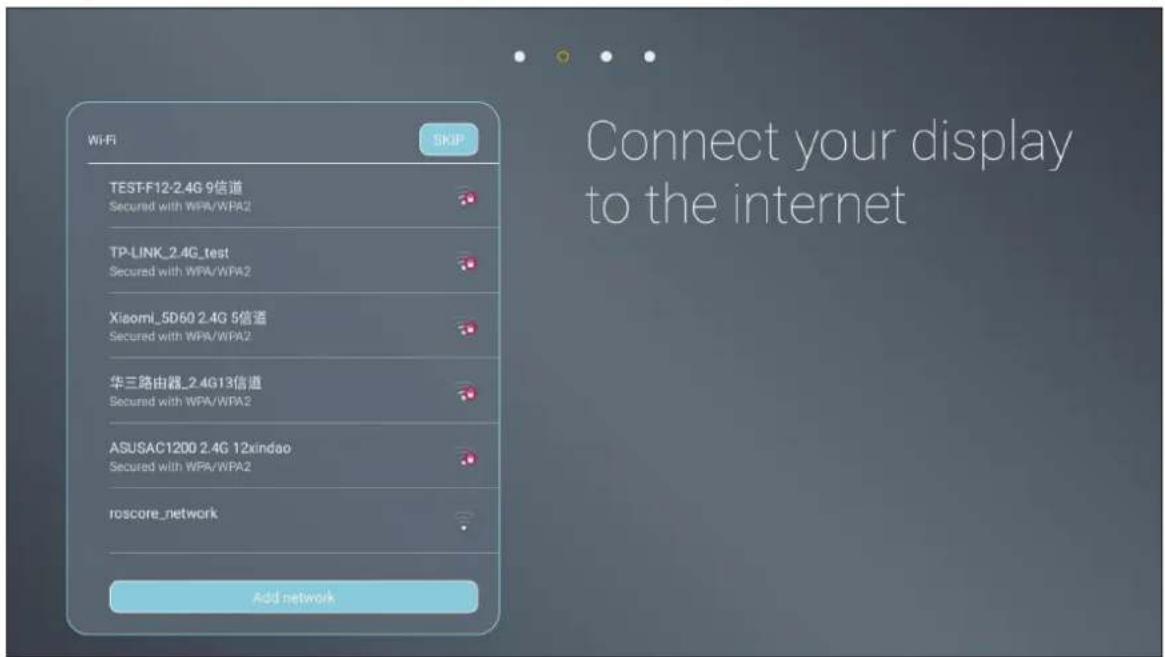
- If you want to connect your device to the Internet, select one of the available networks and tap CONNECT. Otherwise, select SKIP.
IMPORTANT!
• To connect to a wireless network, make sure the Wi-Fi dongle is properly plugged into one of the USB ports.
• If you connect to a secure network, you have to enter the password at first-time connection only.
USING THE DEVICE
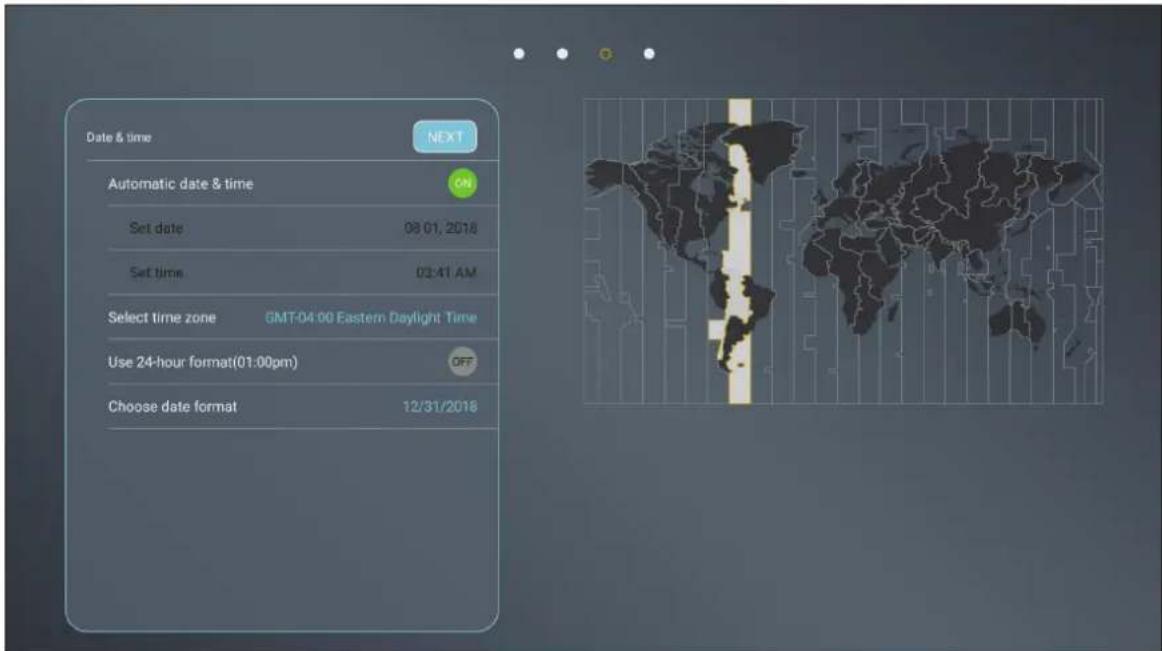
- Configure the date and time related settings. Then select NEXT to continue.
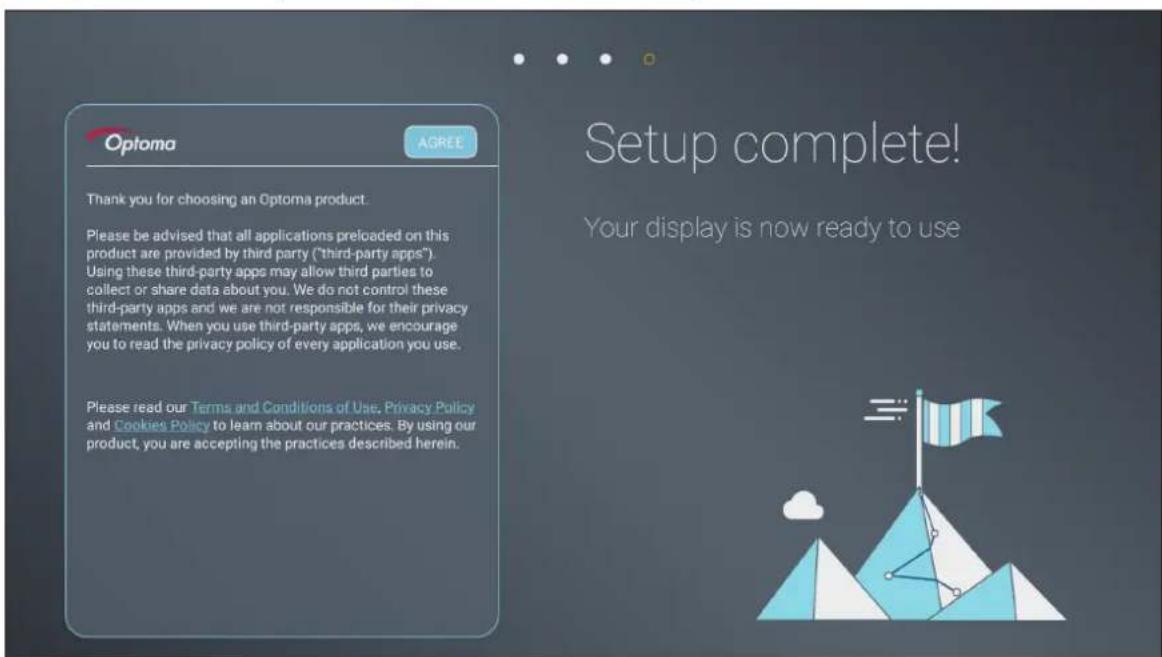
- Read Optoma practices, including Terms and Conditions of Use, Privacy Policy, and Cookie Policy. Then tap AGREE to complete setup. The device is now ready to use.
BASIC OPERATIONS
Home Screen Overview
The Home screen is displayed every time you start the device.
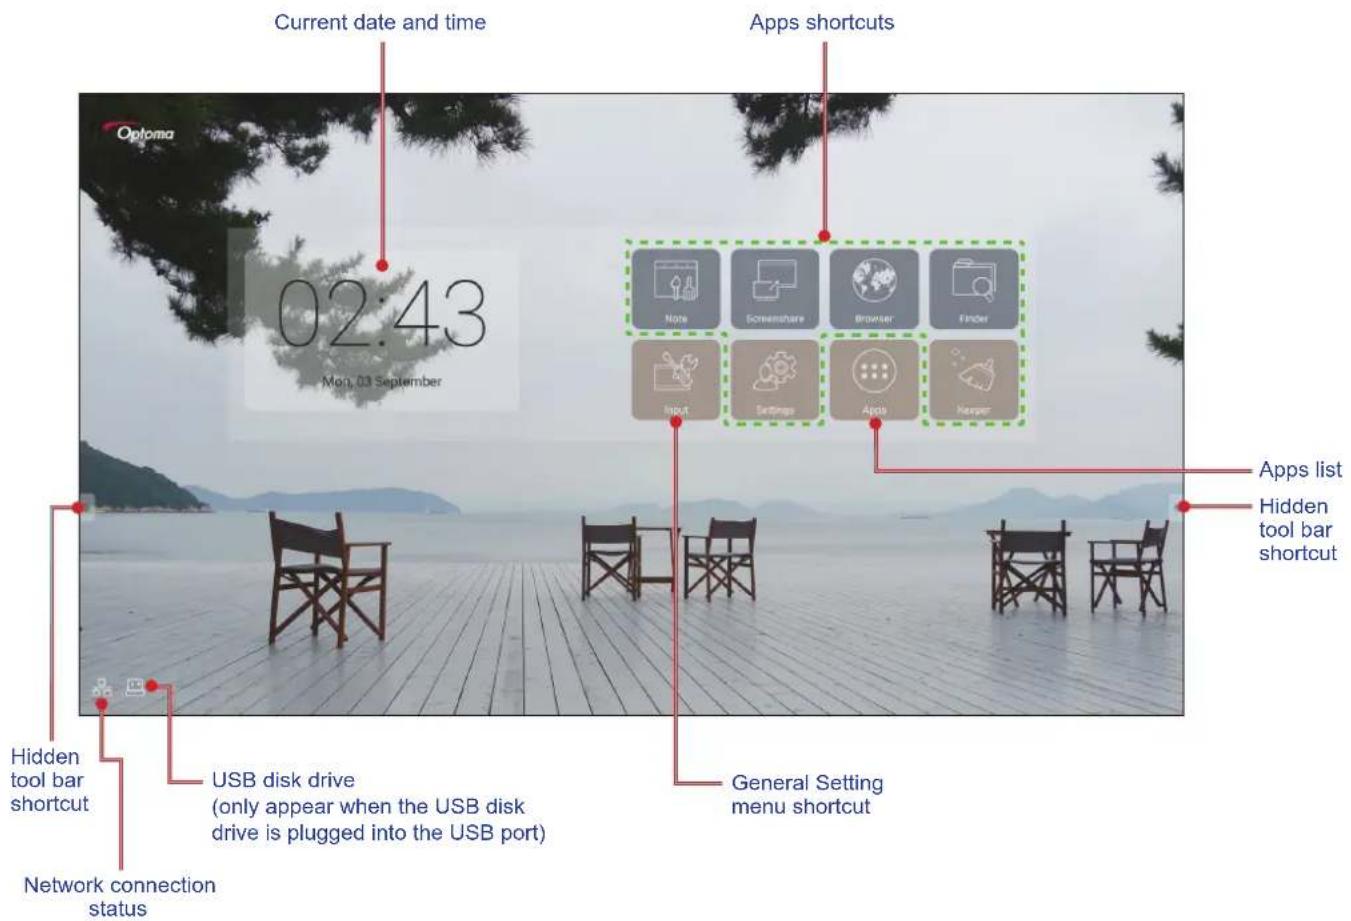
To navigate the Home screen, you can do the following:
- Select an option: simply tap the desired item.
- Adjust the setting: drag the slider to the left/right or clockwise/counter-clockwise.
- Open the hidden toolbar: tap or on the left/right side on the screen.
Note:
• Unless otherwise specified, this section describes the device operations using the touch gesture.
• As an alternative, you can also use the remote control to operate the device.
BASIC OPERATIONS
General Settings
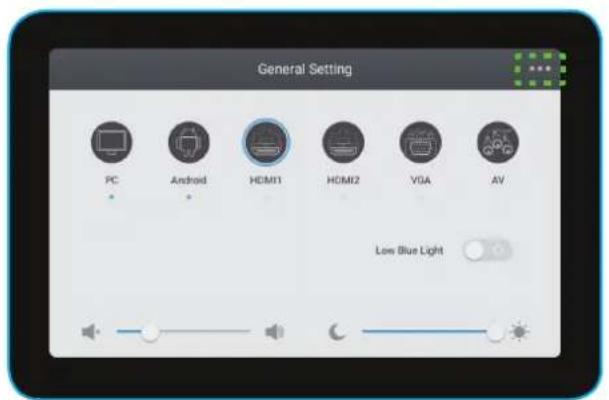
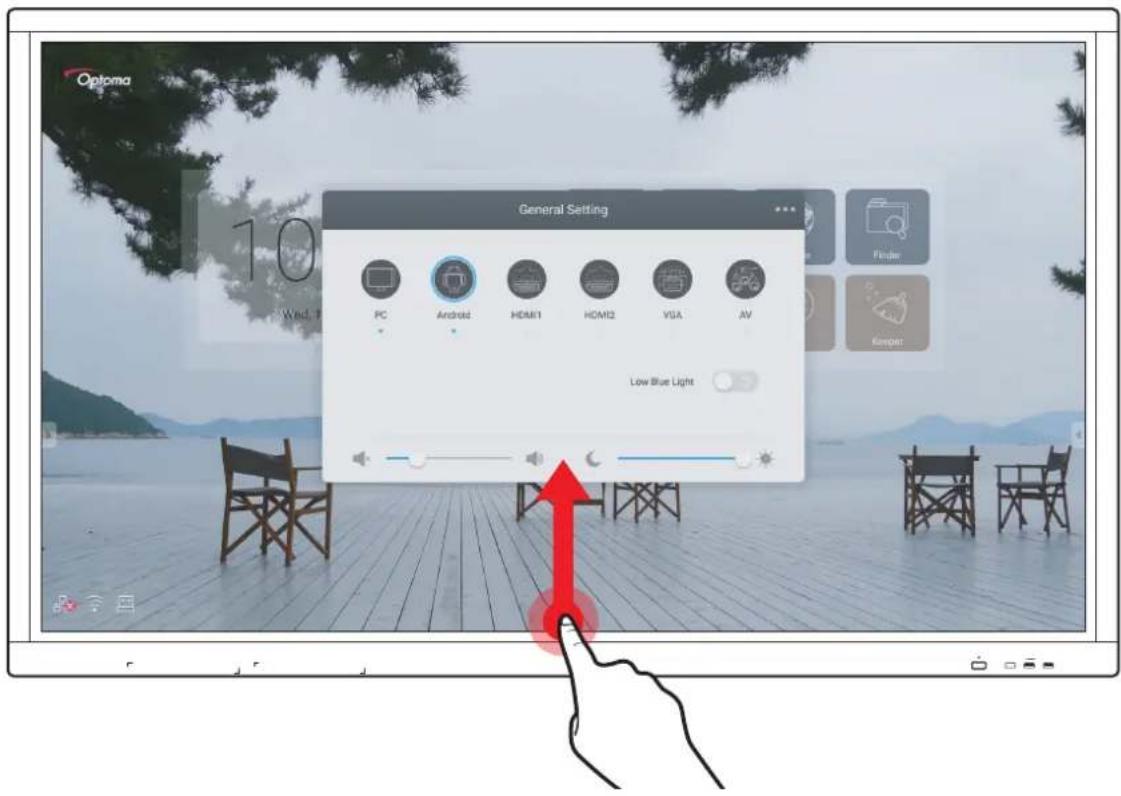
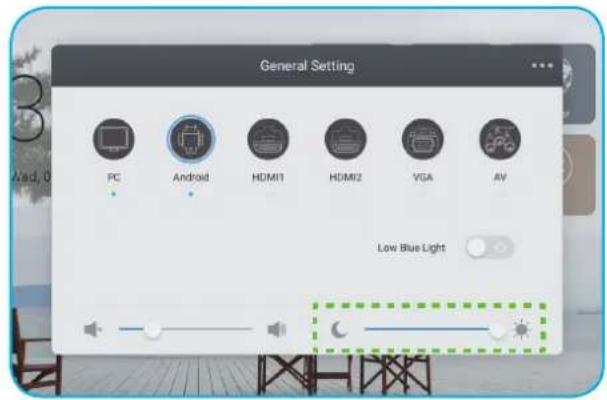
For the Home screen, tap Input to open the General Setting menu. The General Setting menu consists of 2 pages.
To switch to the second page, tap ● ● ● on the top right of the main page.
Main Page Second Page
Note: You can also access the General Setting menu regardless of what page you are on. Simply drag the bottom of the screen upwards.
BASIC OPERATIONS
Selecting an Input Source
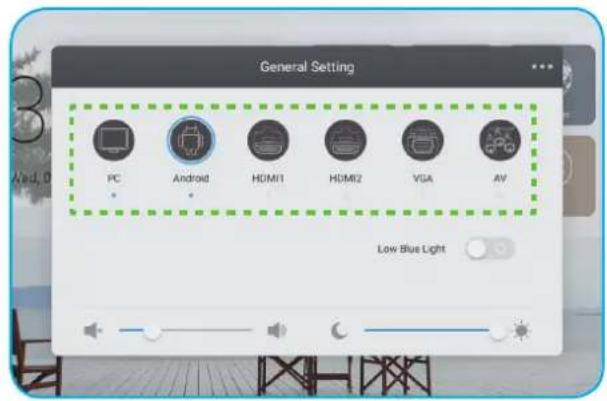
On the General Setting main page, the available the input source is indicated by the • icon. To change the input source, simply tap the desired input source.
Note:
• For more information about the device connections, refer to the "Making Connection" section.
• The PC option is only available if the PC module is properly installed into the OPS slot of the device.
Activating the Low Blue Light Function
IMPORTANT! Studies have shown that just as the ultra-violet rays can cause eye damage, the shortwave-length blue light rays from the displays can cause eyestrain, retina damage, and affect vision over time. Optoma Low Blue Light is an eye protection feature that can reduce the blue light.
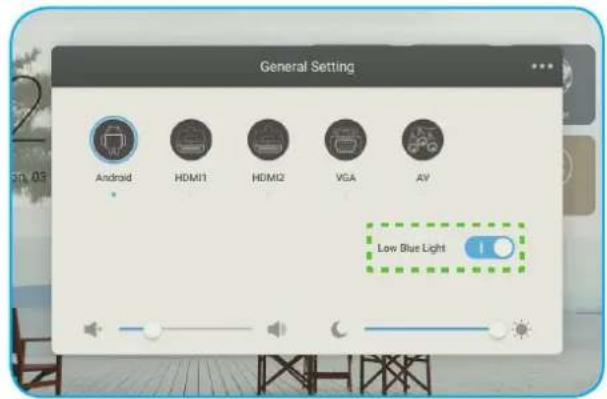
On the General Setting main page, slide the Low Blue Light switch to the right to enable the function.
Note: For protecting your eyes against prolonged display use, we highly recommend you to do the following:
- Letting your eyes idle for 10 minutes after 2 hours continuous use.
• Roll your eyes upward towards your eyebrows, and then roll your eyes in a large circle every few hours.
• For every 20 minutes of display viewing, look into the distance for 20 seconds. - When your eyes get sore, close your eyes for a minute.
BASIC OPERATIONS
Adjusting the Volume Level
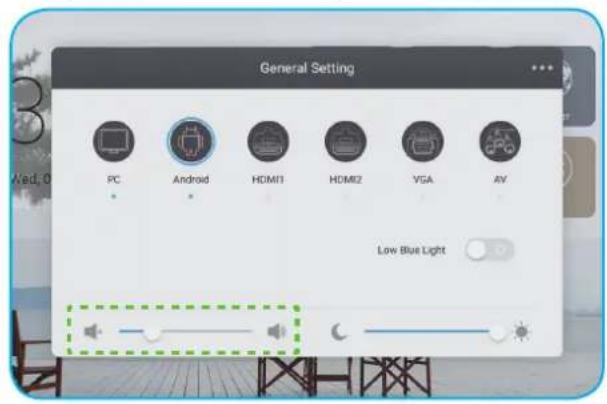
On the General Setting main page, drag the slider bar to the right/left to adjust the volume level.
Adjusting the Backlight Level
On the General Setting main page, drag the slider bar to the right/left to adjust the backlight level.
BASIC OPERATIONS
Configuring the Audio Settings
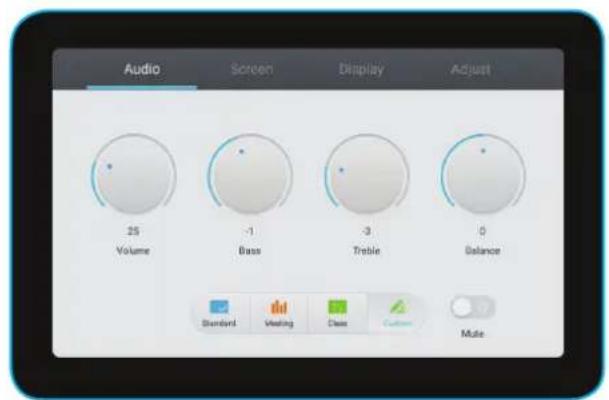
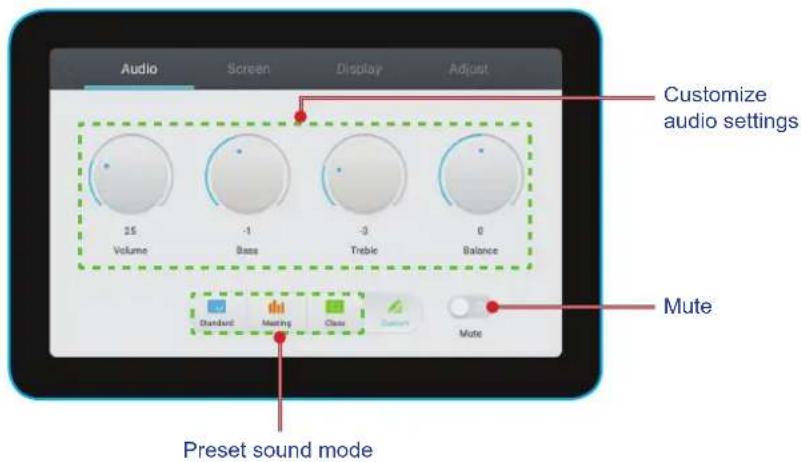
On the General Setting second page, select Audio to configure the audio settings. Then complete the following steps:
- Select the desired sound mode from one of the available options: Standard, Meeting, Class, or Custom.
Note: If the sound mode setting is set to Custom, you can customize the audio settings by adjusting the volume, bass, treble, or balance level according to your preference.
- Slide the Mute switch to the right to enable the mute function.
Configuring the Screen Settings
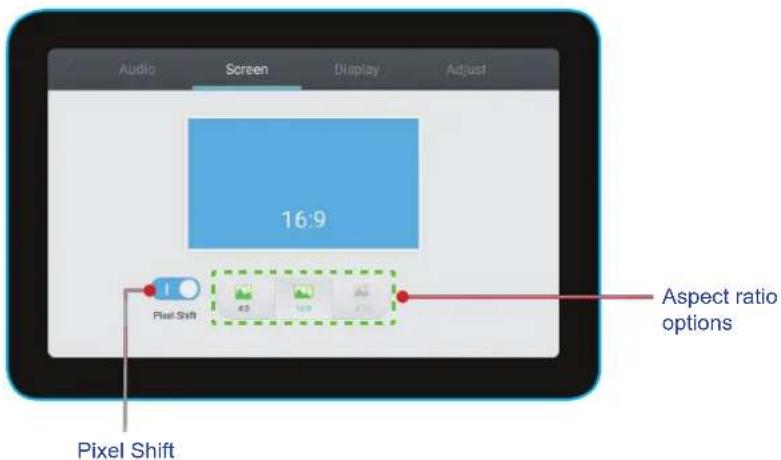
On the General Setting second page, select Screen to configure the screen settings. Then complete the following steps:
- Select the desired aspect ratio from one of the available options: 4:3, 16:9, or PTP.
- Slide the Pixel Shift switch to the right to enable the pixel shift function.
Note: When the function is enabled, it helps to prevent image retention.
BASIC OPERATIONS
Configuring the Display Settings
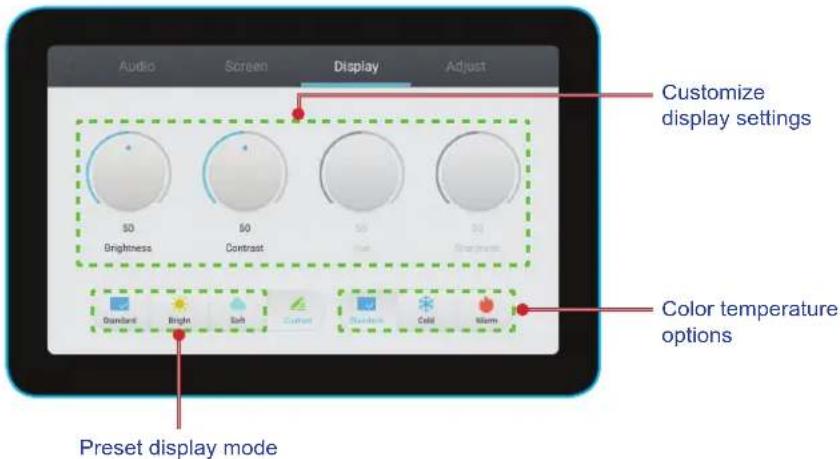
On the General Setting second page, select Display to configure the display settings. Then complete the following steps:
- Select the desired display mode from one of the available options: Standard, Bright, Soft, or Custom.
Note: If the display mode setting is set to Custom, you can customize the display settings by adjusting the brightness, contrast, hue (available for AV input only), or sharpness (available for AV input only) level according to your preference.
- Select the desired color temperature from one of the available options: Standard, Cold, or Warm.
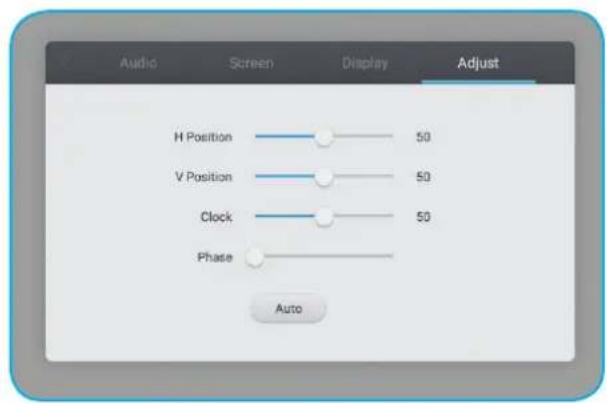
Configure the Adjust Settings (for VGA input only)
On the General Setting second page, select Adjust to configure the screen settings for the VGA input source. Then complete the following steps:
- Select H Position or V Position to adjust the horizontal position and the vertical position of the image.
- Select Clock to adjust the vertical noise of the image.
- Select Phase to adjust the horizontal noise of the image.
- Select Auto to automatically adjust the image to its optimized position, clock, and phase.
BASIC OPERATIONS
Side Toolbar
Tap for to open the side toolbar. You can drag the panel to change its position on the screen.
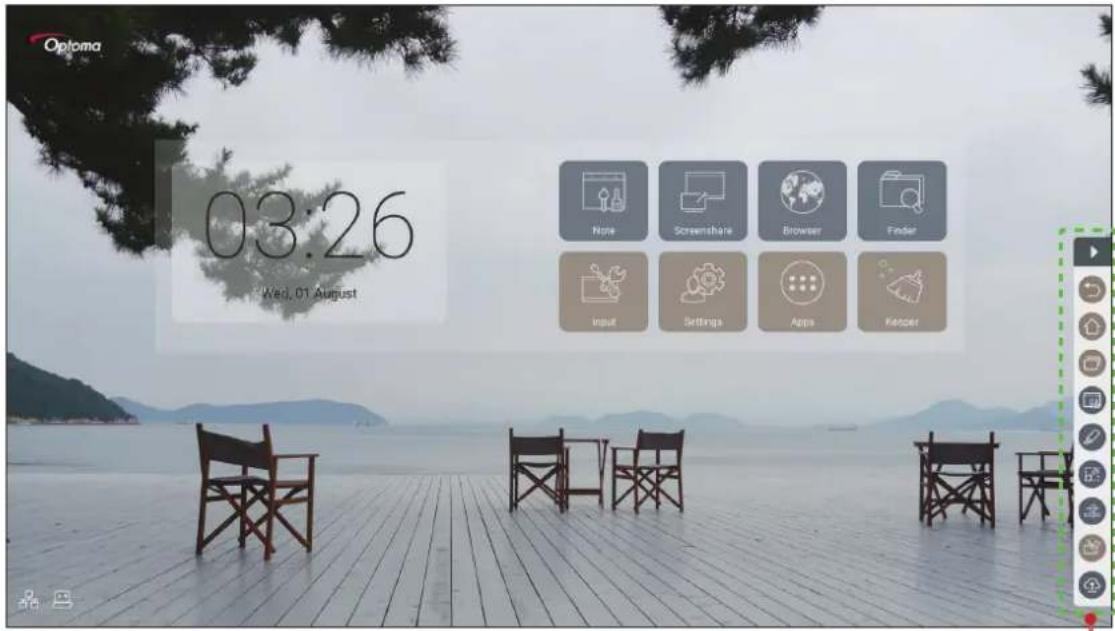
Side toolbar
• To hide the toolbar, tap ▶
• To return to the previous screen, tap
• To return to the Home screen, tap
• To access the General Setting menu, tap
Viewing the Recent Tasks
Tap to view all of your recently used apps.
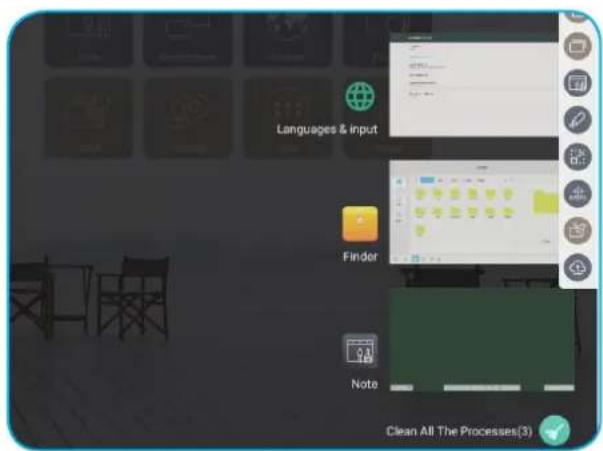
- Tap on the app you want to launch.
• To remove the app from the list, swipe it left or right.
• To clear the list, tap.
BASIC OPERATIONS
Annotations Tool
Tap to open the annotation tool.
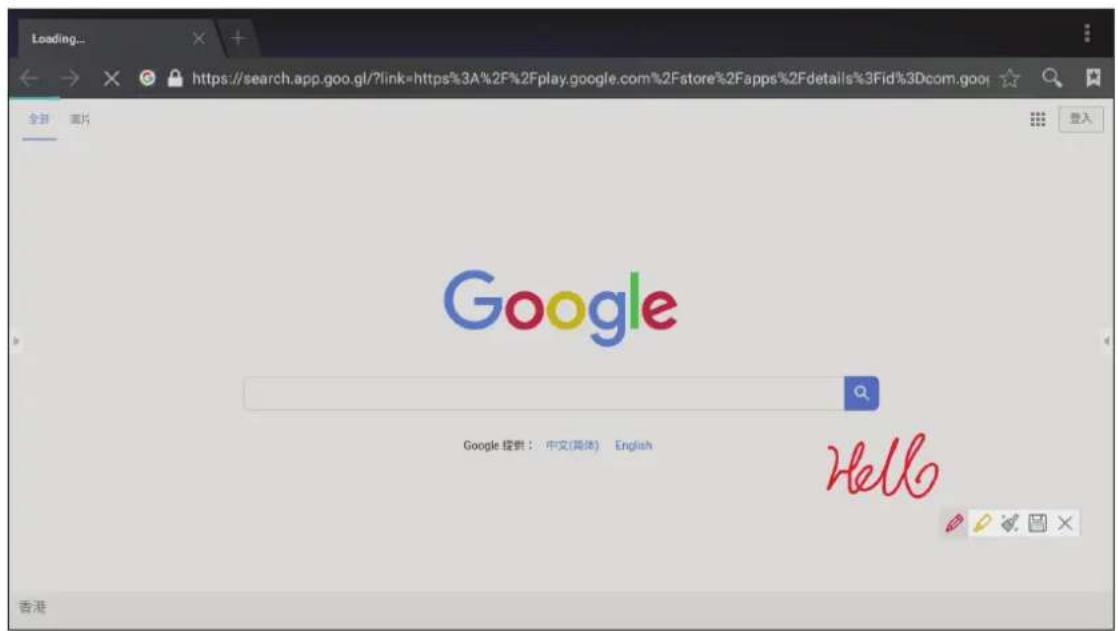
In this mode, you can do the following:
- Tap to write and draw on the screen.
Note: You can change the pen color by tapping repeatedly.
- Tap to highlight the item on the screen.
Note: You can change the highlighter color by tapping repeatedly.
• To erase all annotations on the screen, tap.
Note: You can also use the palm of your hand to erase the areas of your written texts or drawings.
• To capture a screenshot of the entire screen, tap
• To exit the current mode, tap✗
BASIC OPERATIONS
Screen Freezing
Tap to freeze the current screen.
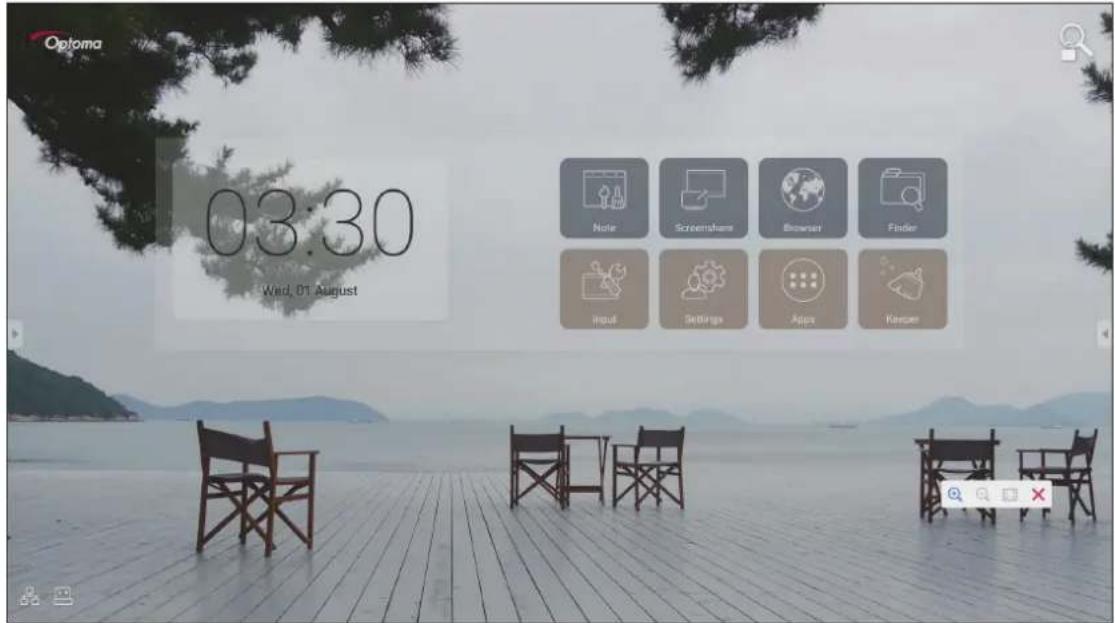
In this mode, you can do the following:
• To zoom in, tap+ Then you can pan and move around the image.
Note: Each tap increases the magnification.
• To zoom out, tap
• To restore the image to its original size, tap
• To exit the current mode, tap✗
BASIC OPERATIONS
Other Utilities
Tap to access other utilities such as Spotlight, Countdown, Stopwatch, and AirShare.
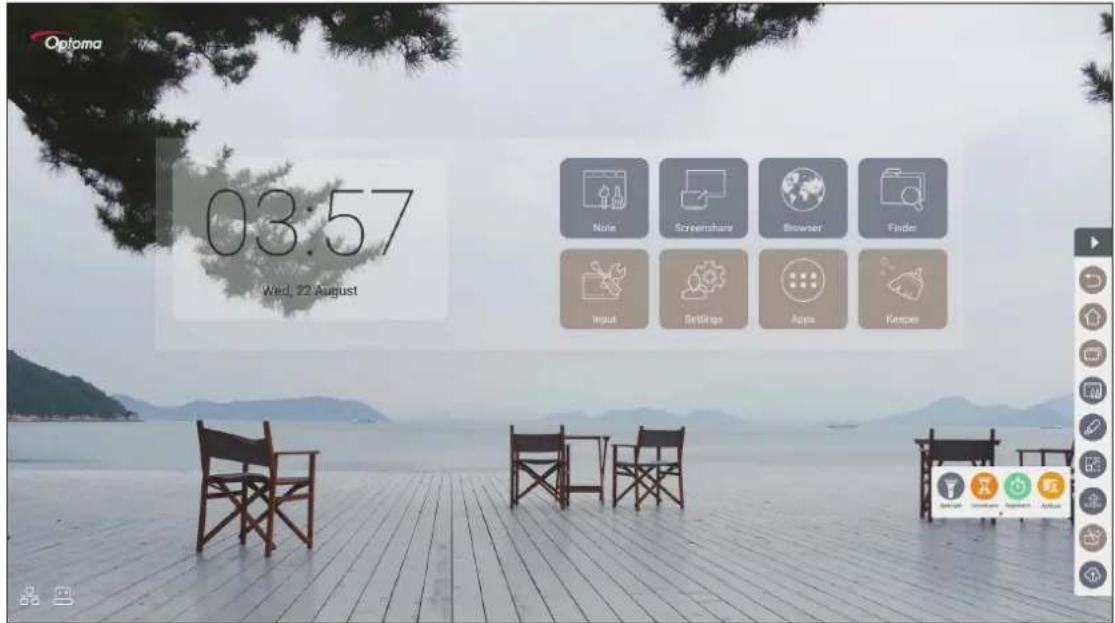
- Tap 📋 to activate the spotlight function. The spotlight can be used to direct the audience's focus to a specific part of the board.
- Tap to use the countdown function.
- Tap to use the stopwatch function.
AirShare
Tap to enter AirShare. A QR code appears on the screen.
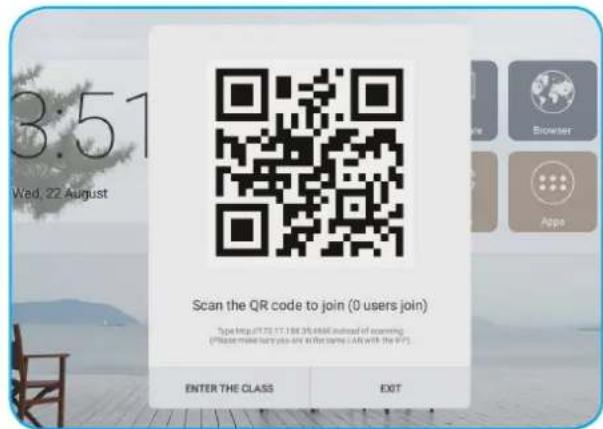
To join the virtual classroom, complete the following steps:
-
Connect the device to an available network.
-
On your mobile device, enable the Wi-Fi function. Then connect to the same network as the device.
IMPORTANT!
• The device and your mobile device must be connected to the same Wi-Fi network.
• During the operation, make sure that you have access to the internet.
BASIC OPERATIONS
- Scan the QR code. Then enter your name and tap Enter to join the class.
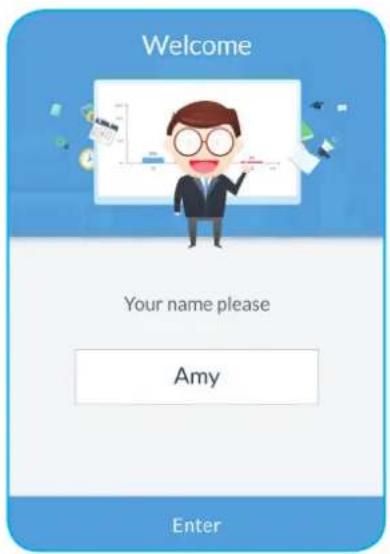
- On the device, tap ENTER THE CLASS to start the class session.
To participate in the class, do the following:
Launch the Note app to open virtual blackboard. Then you can use the following functions:
a. Voter
-
Tap to enter the Voter interface.
-
Select Single choice or Multiple choice to define the answer type.
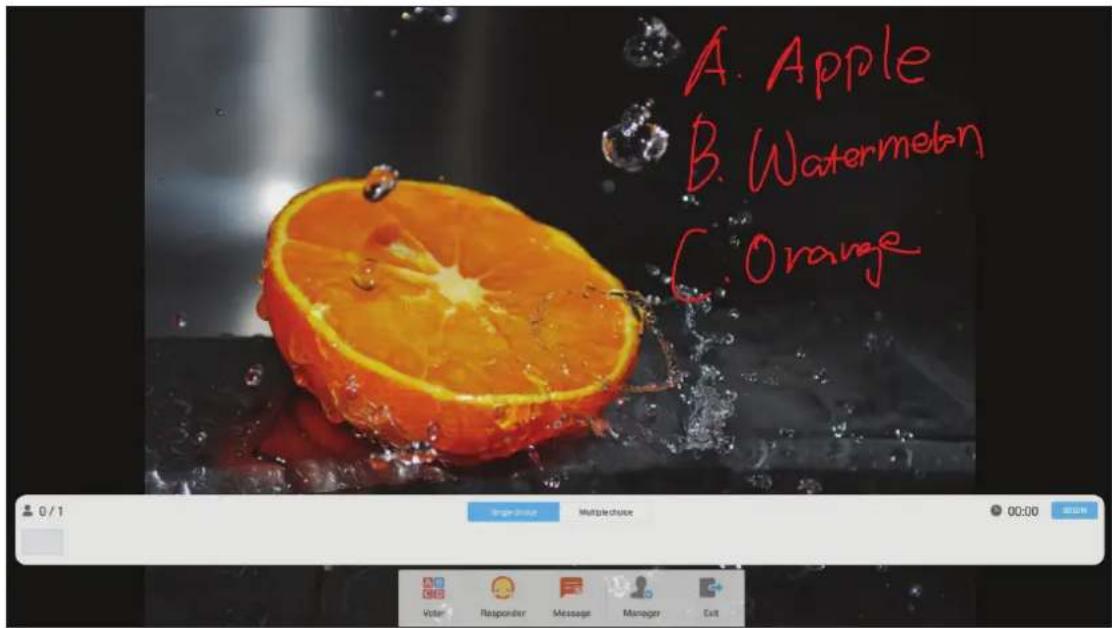
BASIC OPERATIONS
- Tap BEGIN to start answering question.
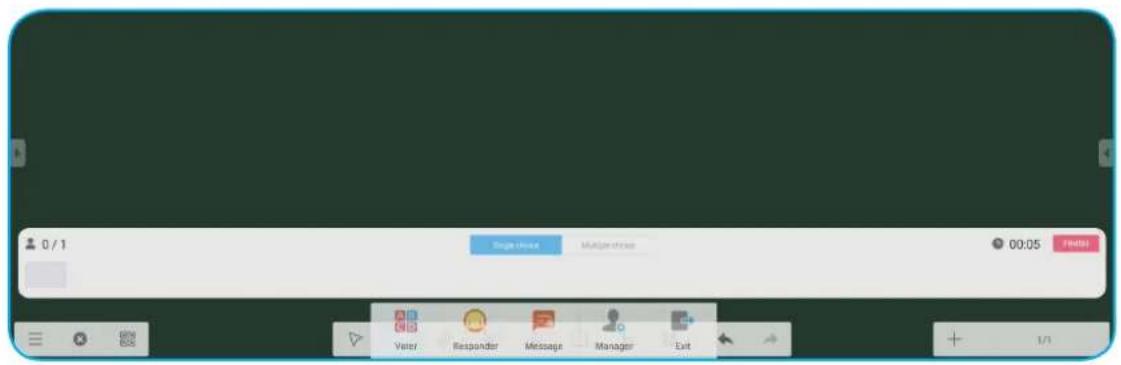
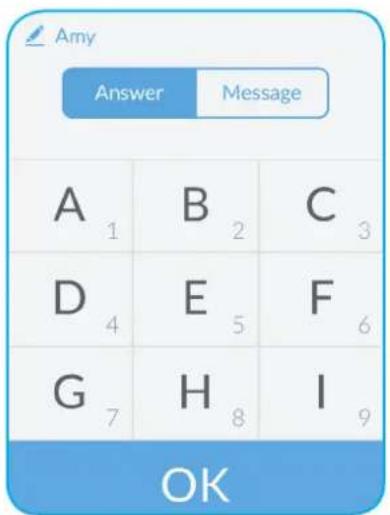
- The participant can respond by selecting the answer on the mobile device screen and tap OK.
- To close the answering session, tap FINISH. The Answer statistics will be displayed on the screen.
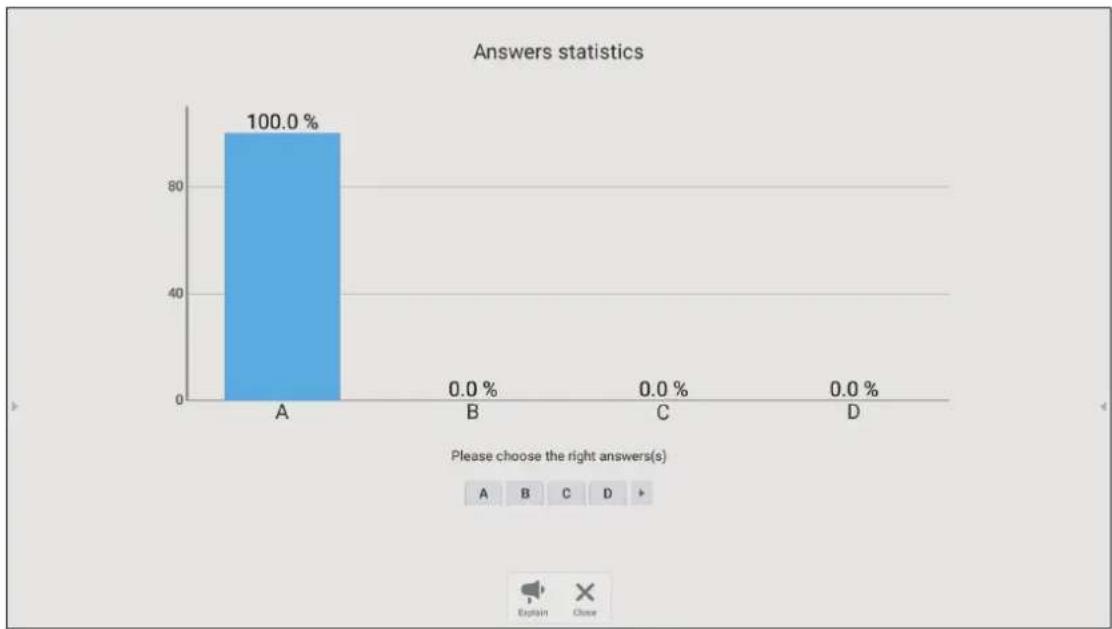
bar
Answers statistics | Category | Percentage (%) | |---|---| | A | 100.0 | | B | 0.0 | | C | 0.0 | | D | 0.0 | Please choose the right answers(s) Explain Close- Tap 🔔 to switch to the explanation session. Then the instructor can explain to the participant(s) the solution for the question.
- Tap ✗ to close the Answer statistics page.
BASIC OPERATIONS
b. Responder
- Tap to enter the Responder mode. Then tap GO! to start the Answer mode.
![Responder Press [OK] to responder 823 Voter Responder Message Manager Exit](/content/2026/05/831557/images/cfb618cbac3b6e5754793c2133a94d3cf1e657d1d2ae8cf458027f9c029c25d1.jpg)
- When the function is activated, the person who taps OK first will get the right to answer. For example, if Sawyer first taps OK, then he gets the right to answer the question.
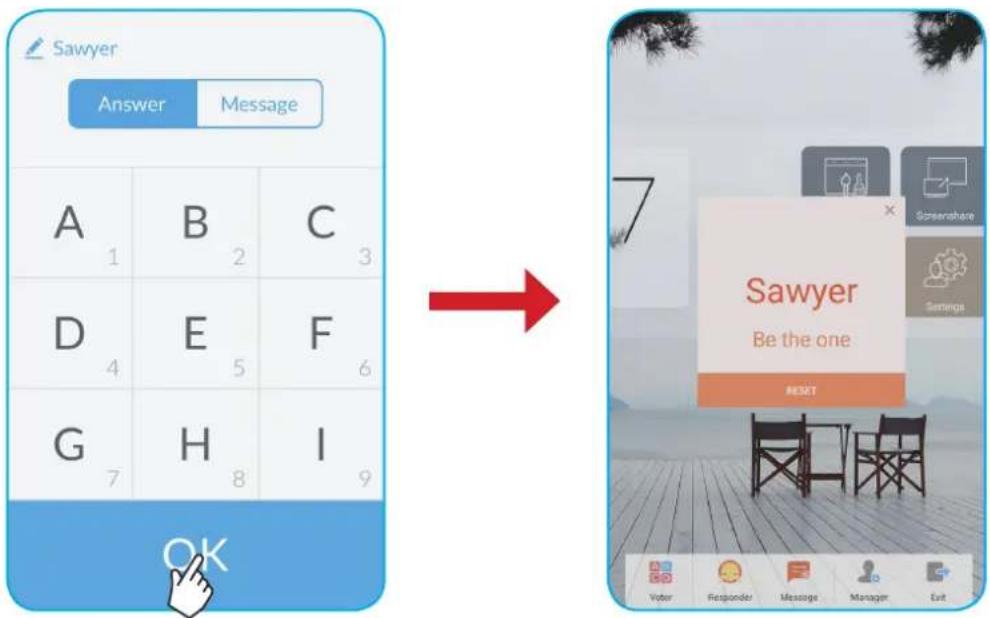
BASIC OPERATIONS
c. Message
- Tap to enable the message function. By default, this function is disabled.
- On the mobile device, tap Message to switch to the Message screen. Then enter your message in the comment text box and tap Send.
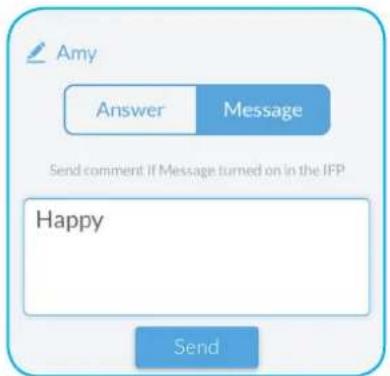
The broadcast message will appear on the device screen.
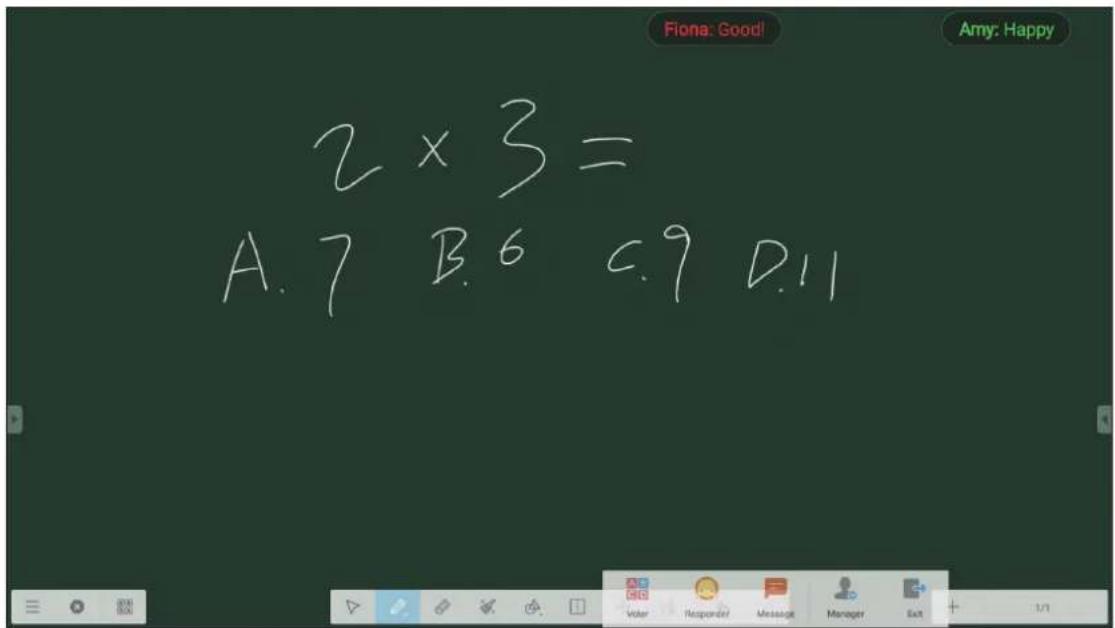
Note:
• Tap 🙏 to display the QR code and allow more participants to join the class.
- Tap to exit AirShare.
BASIC OPERATIONS
Cloud Drive
Tap to create an account to access the Cloud Drive.
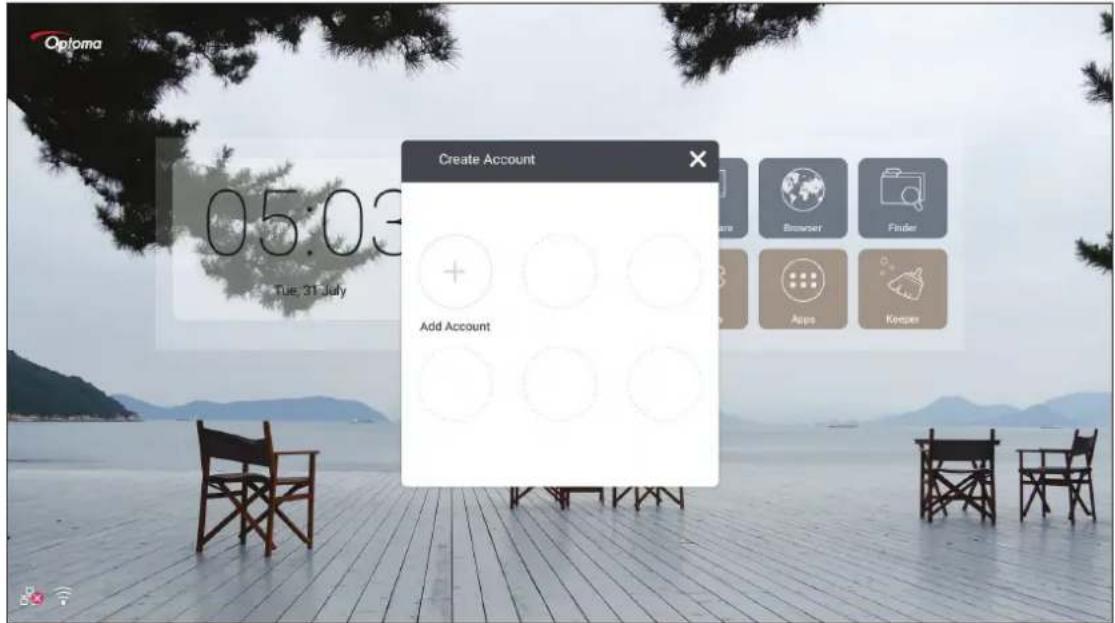
To create an account:
- Tap Add Account.
- Select the drive type.
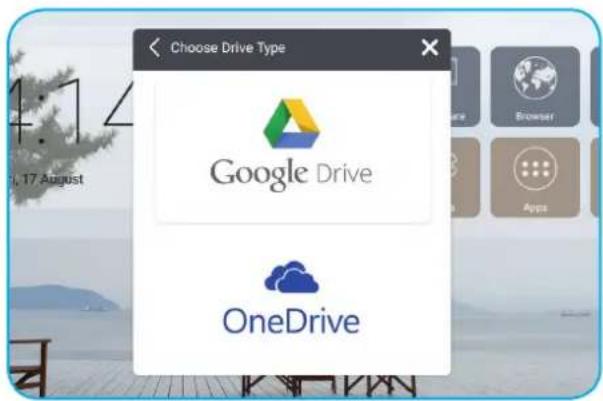
- Follow the on-screen instructions to create an account or sign in to your existing account. Your account will appear in the list after successful login.
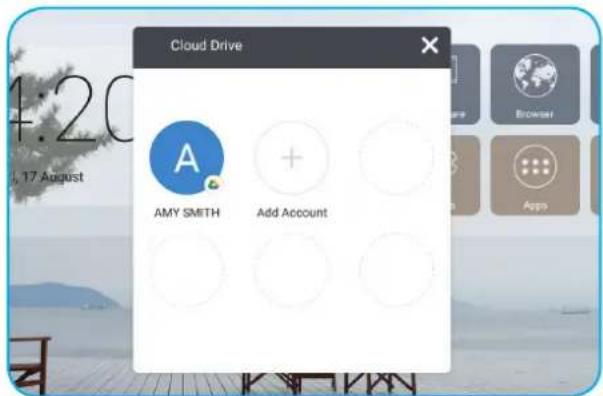
Note: To protect your personal data, you will be logged out automatically from Google Drive/OneDrive when the device is turned off.
BASIC OPERATIONS
Advanced Settings
For the Home screen, tap Settings to open the Settings menu.
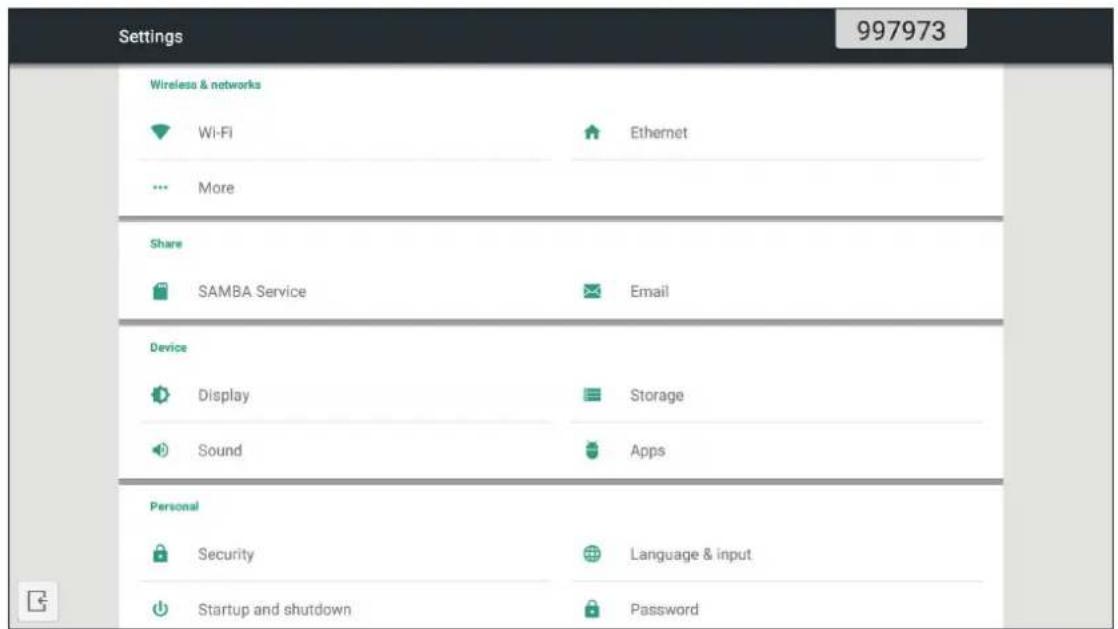
| Category Options Description | ||
| Wireless & Network | Wi-Fi Configure the | wireless network settings. |
| Ethernet Configure | the wired network settings. | |
| More Access more | functions. | |
| Share | SAMBA | Enable/Disable the SAMBA service. When enabled, you can share the folders in IFPs to other devices under the same network.To download data in IFPs to PCs, you have to establish a connection through the IP address. Then you can set a password for the account for security. |
| Email Configure the | SMTP mail server settings. | |
| Device | Display Set the wall | paper and execute the pixel shift function. |
| Storage View the total space/free space of the device/portable storage. | ||
| Sound Turn on or off the touch sound. | ||
| Apps View the memory usage, permissions, and other information for each app. | ||
| Personal | Security | Access the advanced security settings and set the third party apps installation authority. |
| Language & input Set the on-screen display language and configure other input options. | ||
| Startup and shutdown | Configure the Startup channel, Standby after startup, and set schedule timer to turn on/off the device regularly. | |
| Password Set or change screen lock password. | ||
| Input Setting Change the name of input sources. | ||
| Other Settings Configure the side toolbar channel and Note writing settings. | ||
| System | Date & Time | Configure the date and time settings. |
| About device | View the system information. | |
Note: Tap ☐ to exit the Settings menu.
BASIC OPERATIONS
Configuring the Network Settings
Wireless network
IMPORTANT! To connect to a wireless network, make sure the Wi-Fi dongle is properly plugged into one of the rear USB ports.
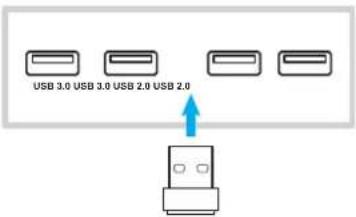
- From the Home screen, select Settings → Wi-Fi. Then slide the Wi-Fi switch to right to enable the Wi-Fi function.
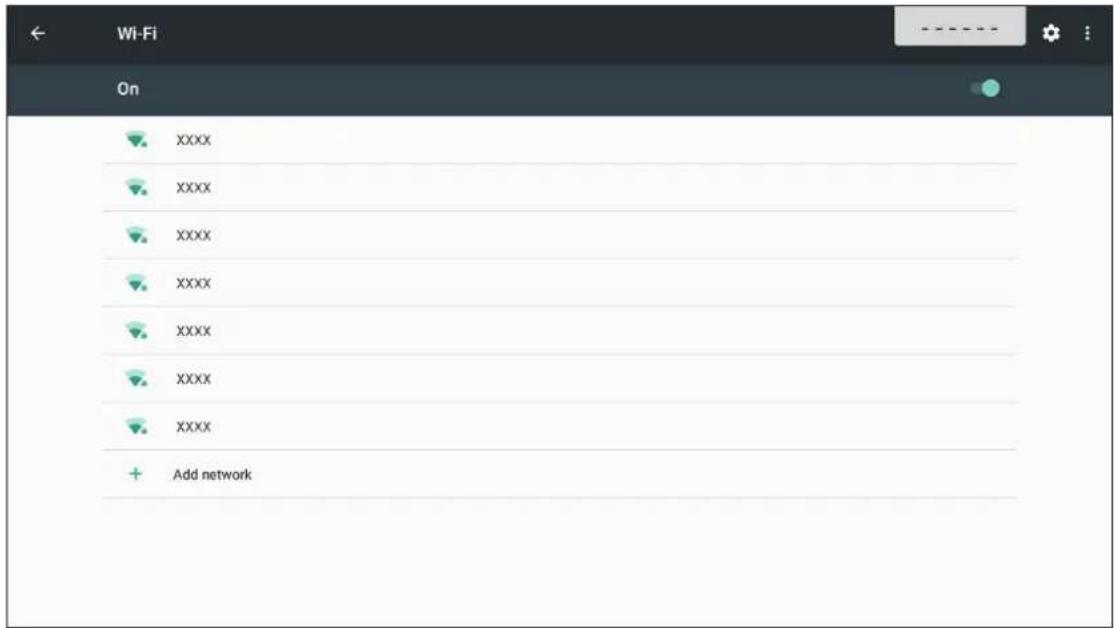
- Select one of the available network and tap CONNECT.
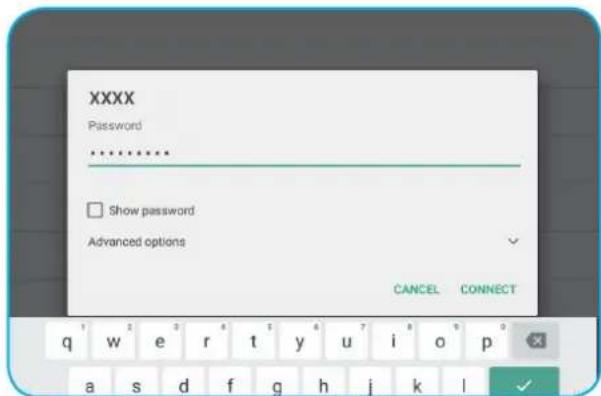
Note: If you connect to a secure network, you have to enter the password at first-time connection only.
BASIC OPERATIONS
Wired network
- Connect one end of the Ethernet cable to the LAN port of the device.
- Connect the other end of the Ethernet cable to the router.

flowchart
graph LR
    A["LAN"] <--> B["USB Cable"]
    B --> C["Port"]
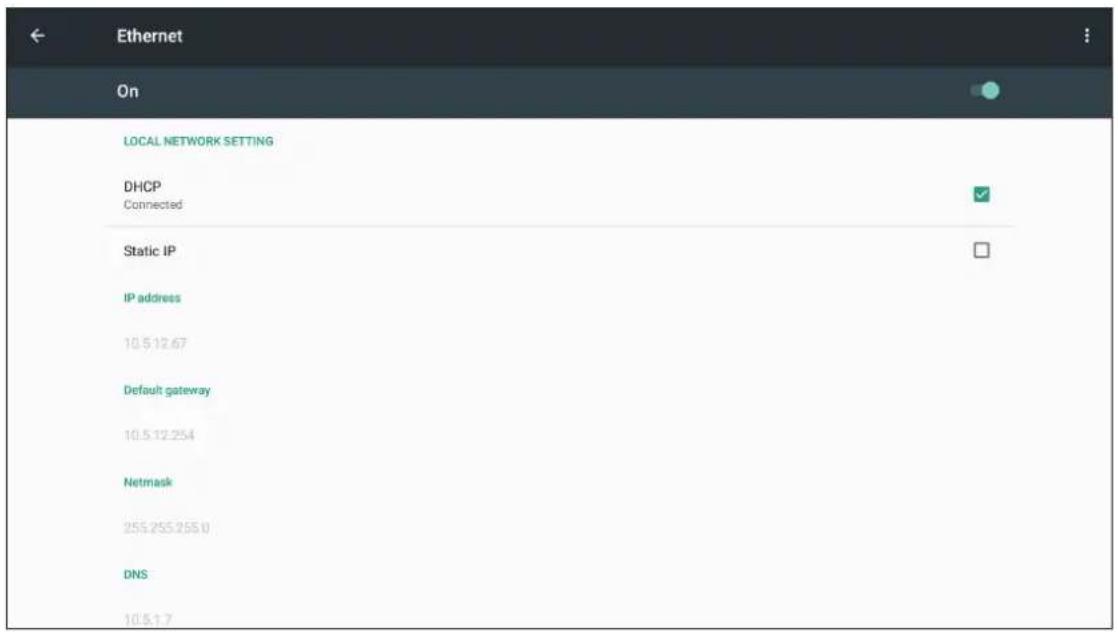
- From the Home screen, select Settings → Ethernet. Then slide the Ethernet switch to right to enable the wired network function.
- Configure the necessary network settings.
- Select the DCHP checkbox to allow the device to obtain an IP address automatically from your network.
- Select the Static IP checkbox to configure the IP address, gateway, netmask, DNS, and proxy parameters manually.
USING THE APPS
From the Home screen, tap Apps to view the Apps list.
IMPORTANT! The embedded Android 7.0 operation system is not standard Android. As such, Google Play is not available in the Apps list. The installed third party application might not work properly if it is not designed for IFP. Optoma will not guarantee that these self-installed Apps can work.
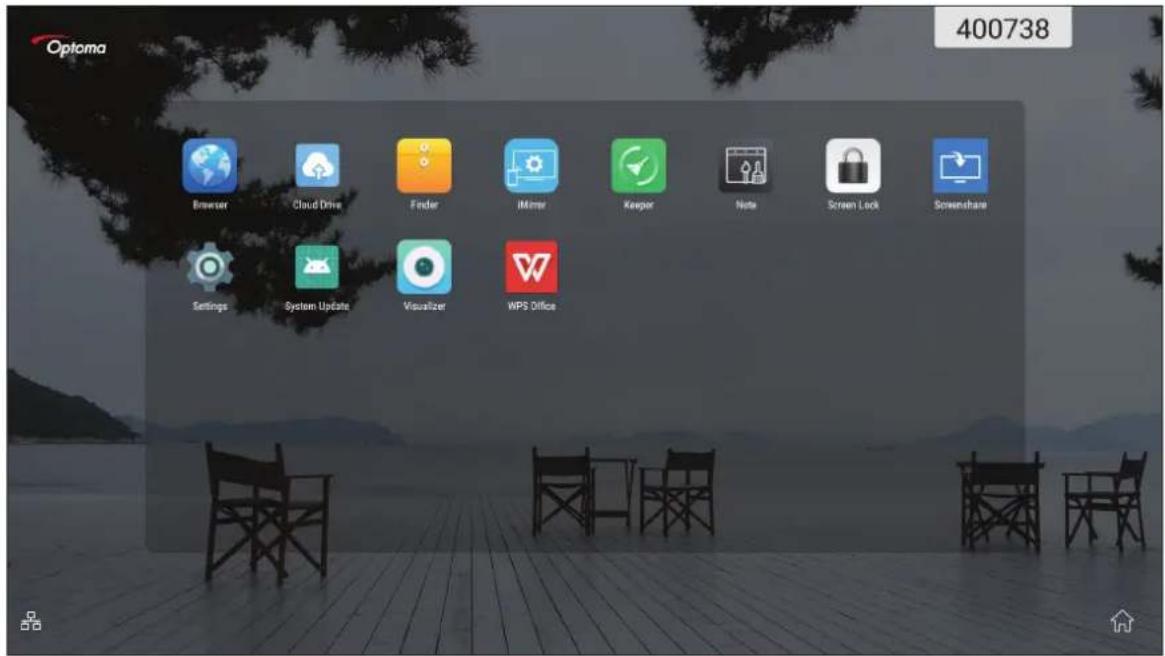
Note: To install a third party application, you have to enable the Unknown sources setting (Settings → Security → Unknown sources) first.
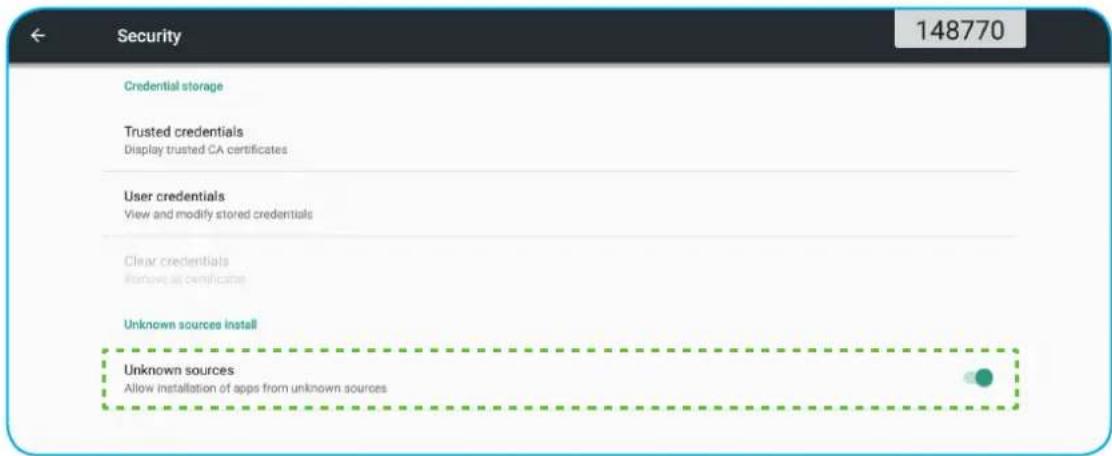
Then you can install the downloaded APK (Android Package) file into your system.
USING THE APPS
Note

With Note app, you can can write, scribble, or draw on the virtual blackboard.
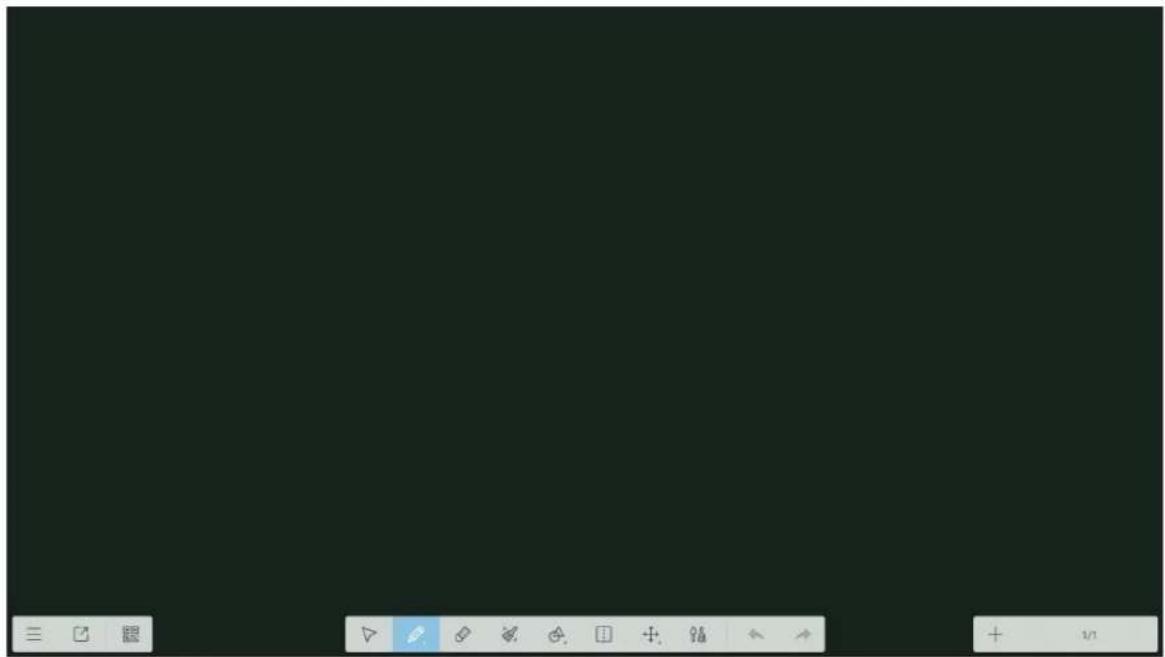
| Item Description | ||
| ≡ | Menu Display more options. For details, refer to the “Advanced Options” section. | |
| ↗ | Exit Exit the Note app. | |
| QR code | Export the file and create a QR code.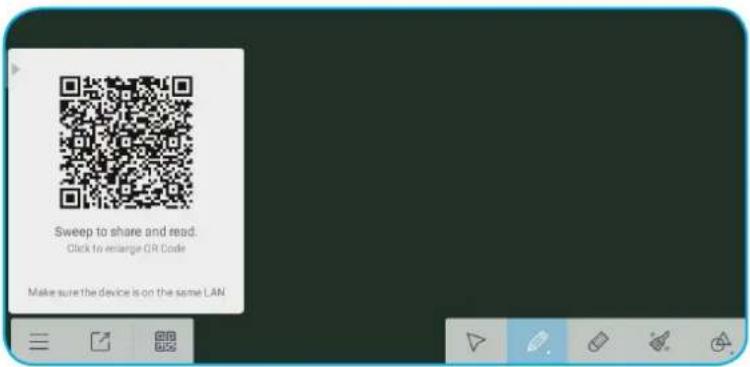 Note: Before scanning the QR code to view the file, make sure the device and your mobile device are connected to the same Wi-Fi network. Note: Before scanning the QR code to view the file, make sure the device and your mobile device are connected to the same Wi-Fi network. | |
| ↘ | Select Select any object on the blackboard. | |
USING THE APPS
| Item Description | ||
| Pen | Write or draw a freeform line.Tap to select the desired pen type and configure the line style, including its thickness and color.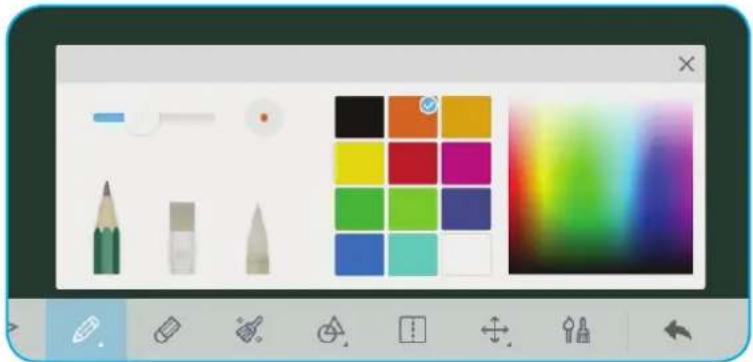 | |
| Eraser | Erase the areas of your written texts or drawings. Select by drawing a circle around the area you want to erase.Note: You can also use the palm of your hand to erase the item on the blackboard.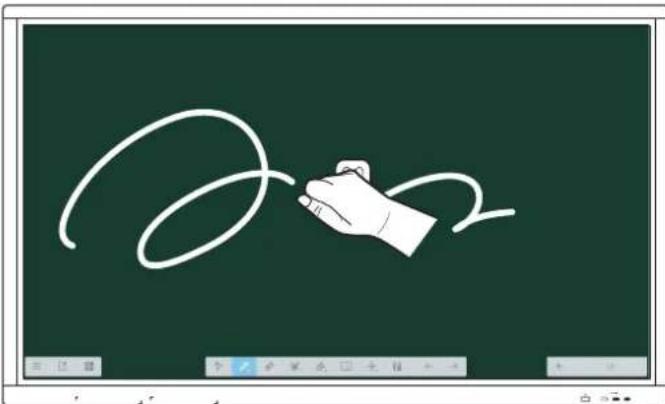 | |
| Erase All Erase all | written texts or drawings on the virtual blackboard. | |
| Geometric shape | Draw a geometric shape.Tap to select the desired 2D or 3D shape with several color options.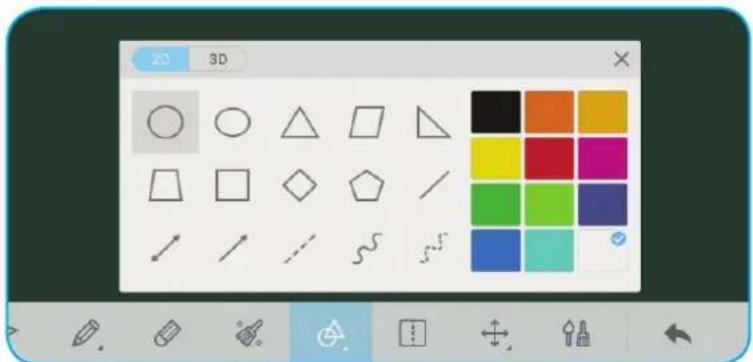 | |
USING THE APPS
| Item Description | ||
| ☐ | Split screen | Split the screen to two sections.Note: You can set different pen color and thickness to write in each section. |
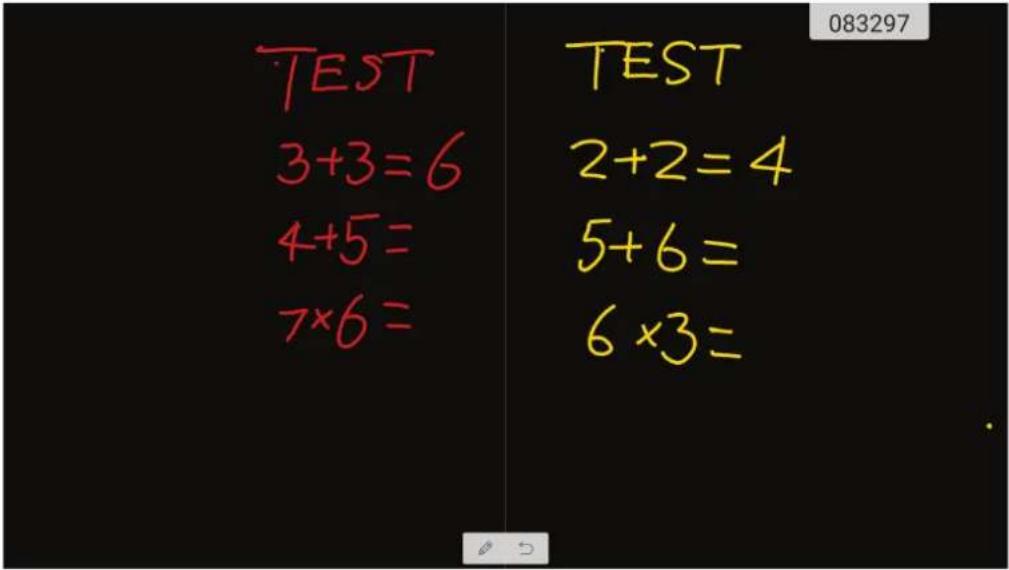 | ||
| + | Pan and Zoom | Drag to pan and move around the image. Then tap to zoom in or out. |
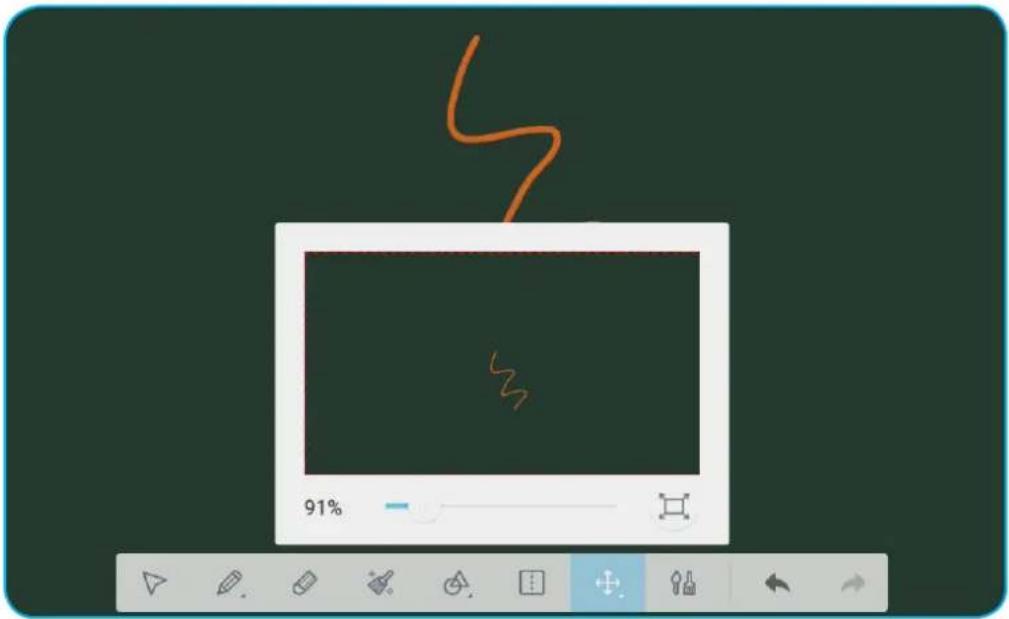 | ||
USING THE APPS
| Item Description | ||
| ↑↓ | Painting | Access the painting board.In the painting board, you can change the pen/brush style and its color, and also customize the color settings.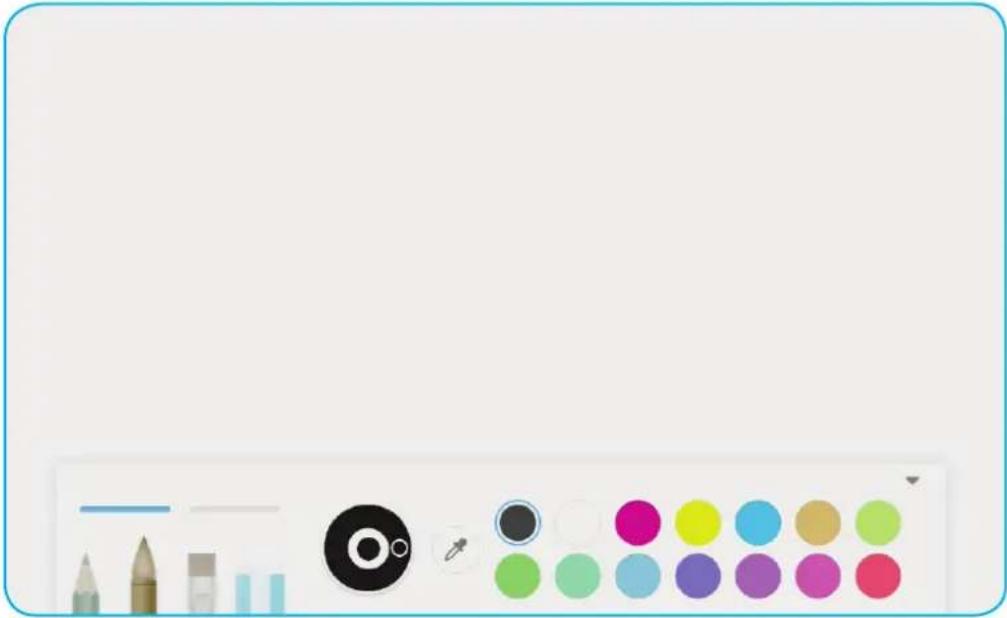 |
| ← | Undo Cancel the last change. | |
| → | Redo Revert the last undo. | |
| + | Add page Add a new page. | |
USING THE APPS
Advanced Options
Tap to access more options.
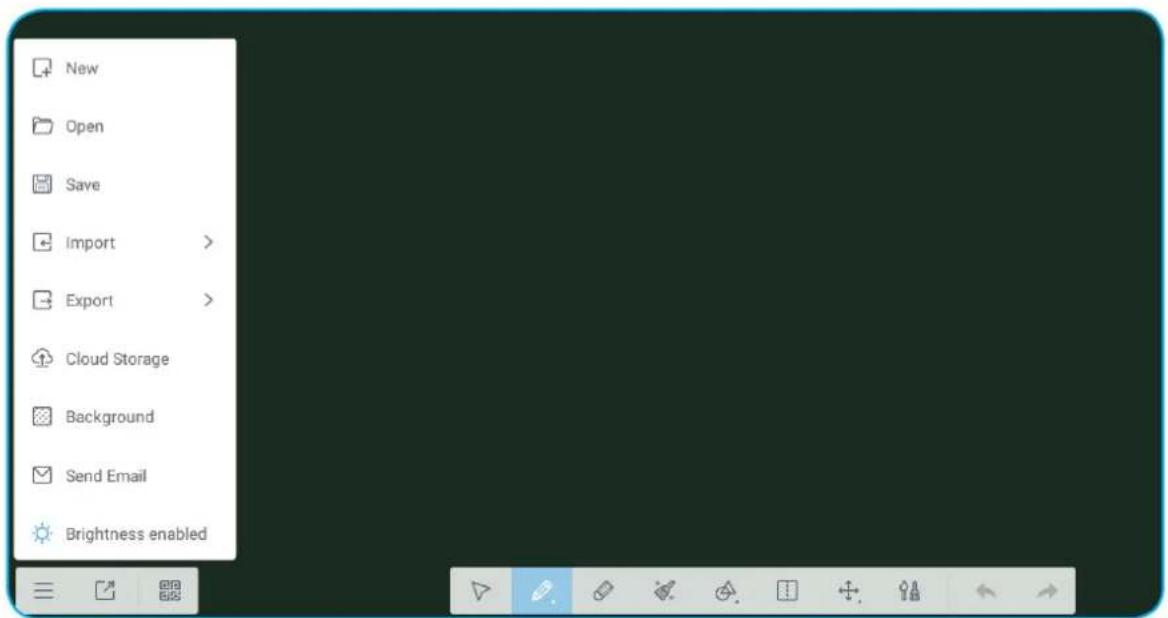
| Options Description | |
| New Create a new file. | |
| Open Open the *.enb format file. | |
| Save Save the current content as an ENB file. | |
| Import Import a IMG, PDF, or SVG file to the courseware. | |
| Export Export the current content as an IMG, PDF, SVG, or IWB file. | |
| Cloud Storage Export and upload the current file to Google Drive or OneDrive. | |
| Background Change the current board background color and its template. | |
| Send Email Share the current content via e-mail. | |
| Brightness enabled / Brightness disabled | Enable/disable the automatic brightness adjustment function. |
USING THE APPS
Screenshare

Select Screenshare to project your mobile device or your computer display to the device through the Wi-Fi connection.
IMPORTANT!
• The device and your mobile device/computer must be connected to the same Wi-Fi network.
• During the operation, make sure that you have access to the internet.
ShareSender App Compatibility Table
| Operating System Available Version | |
 Windows Windows XP/Vista/7/8/10 Windows Windows XP/Vista/7/8/10 | |
 Mac OSX 10.8 or later Mac OSX 10.8 or later | |
 iPhone iOS 8.0 or later iPhone iOS 8.0 or later | |
 Android Android 2.3 or later Android Android 2.3 or later |
Mobile Device
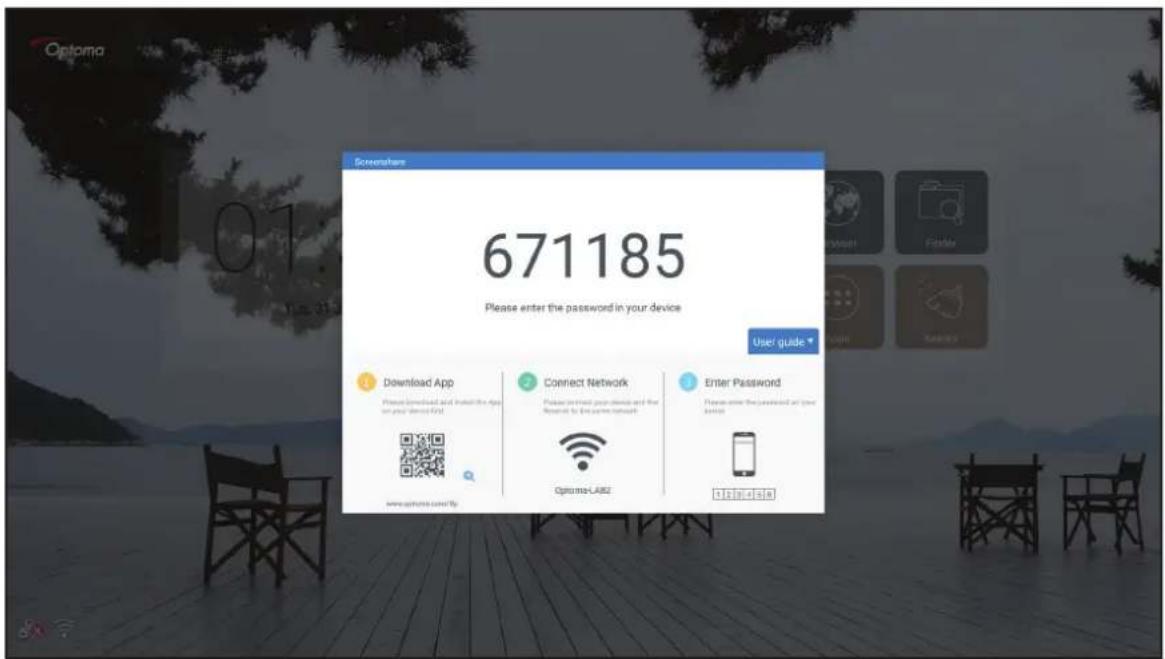
When the setup guideline screen appears, scan the QR code to download and install the Share Sender (Screenshare) app into your mobile device.
USING THE APPS
To share the screen, complete the following steps:
- Launch the Share Sender app. Then enter the password to establish the connection.
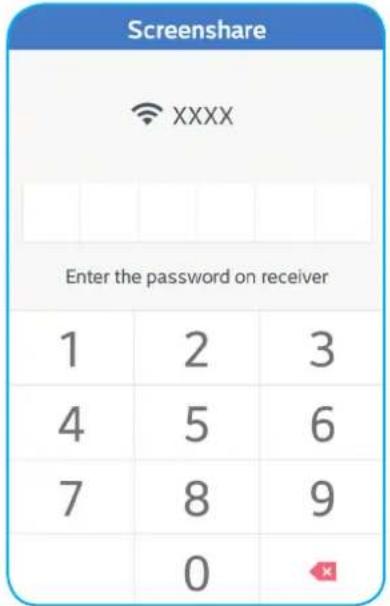
Note: You can obtain the password for the wireless connection setup on the setup guideline screen.
- Tap Start. When a pop-out message appears on the screen, tap START NOW to continue.
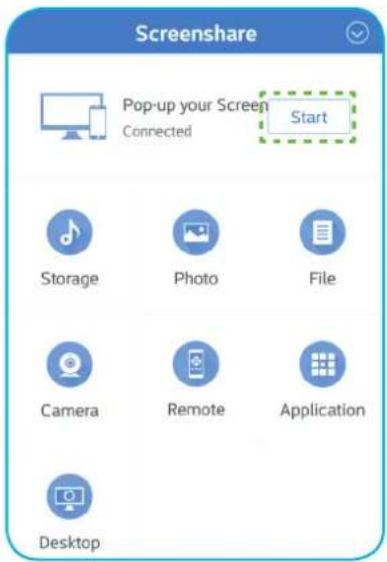
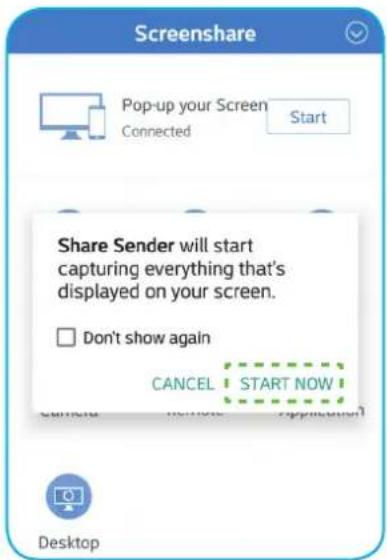
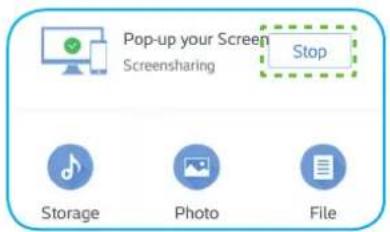
Your mobile device display will be projected automatically on the device screen. To stop sharing the screen, tap Stop.
USING THE APPS
The available functions in this app are the following:
| Options Description | |
| Storage Listen to music stored in your mobile device. | |
| Photo View the photos stored in your mobile device. | |
| File View the files stored in your mobile device. | |
| Camera | Turn on the camera of your mobile device and transfer the image captured by the camera to the device. |
| Remote Use your mobile device as a remote control to control the device. | |
| Application Your mobile phone remotely launches the apps installed in the device. | |
| Desktop | Mirror the device screen to your mobile device. You can use your mobile device to operate the device. |
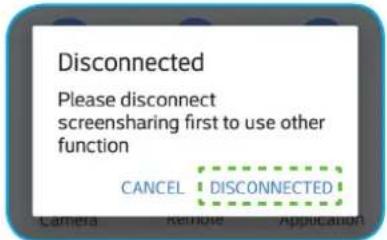
Note: To use the available functions in this app, select an option and tap DISCONNECTED to continue using the wireless display function.
Computer
Go to https://www.optoma.com/ifp/ to download the Share Sender app. Then install the app onto your computer.
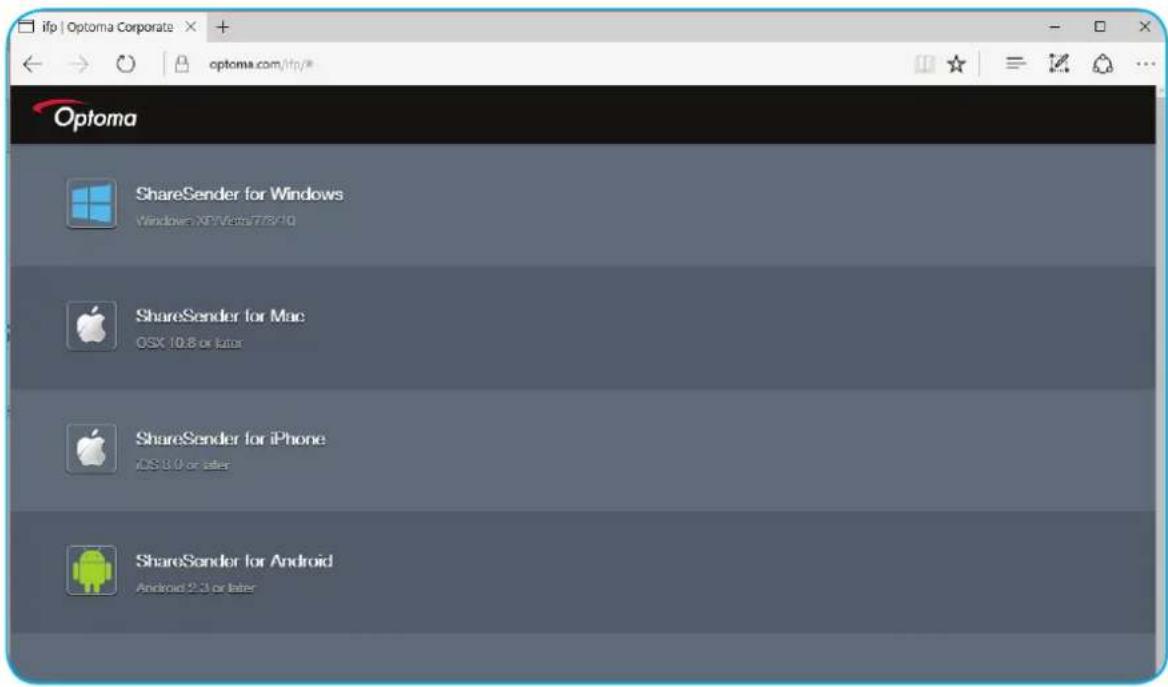
USING THE APPS
To share the screen:
- Launch the Share Sender app. Then enter the password to establish the connection.
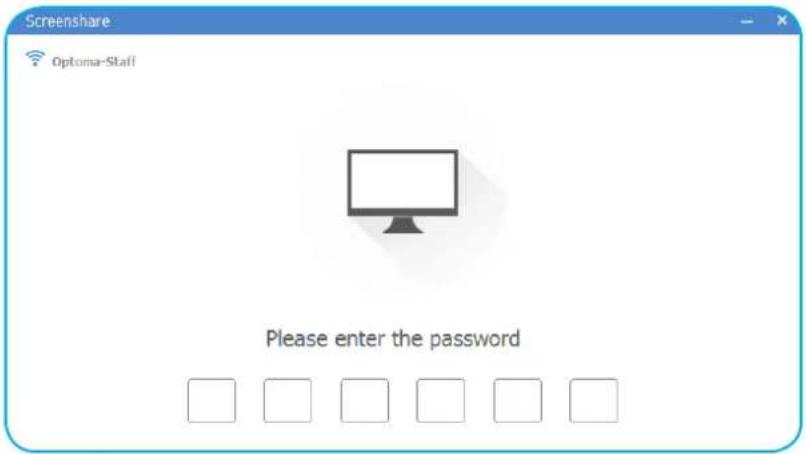
Note: You can obtain the password for the wireless connection setup on the setup guideline screen.
- Once connected, tap Share Screen. Your computer display will be projected automatically on the device screen.
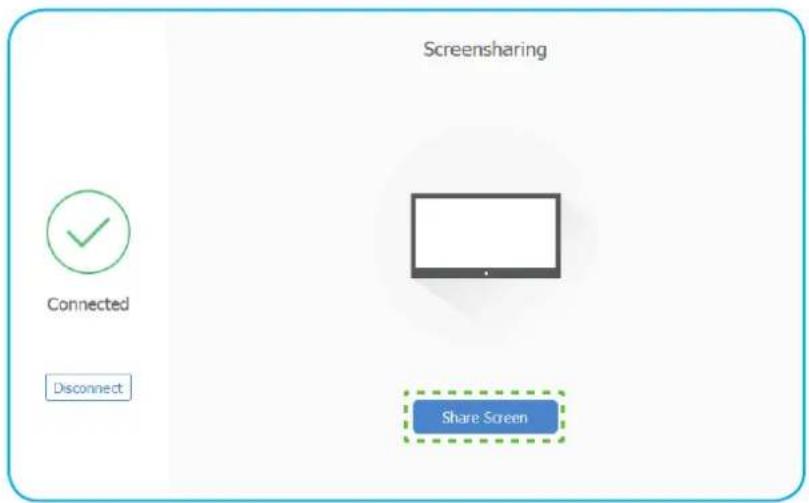
To stop sharing the screen, tap Stop.
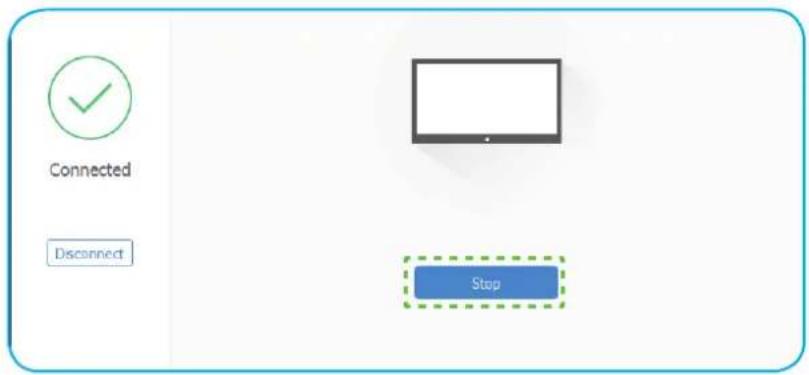
USING THE APPS
Finder

Select Finder to manage the files and applications.
Managing the Files
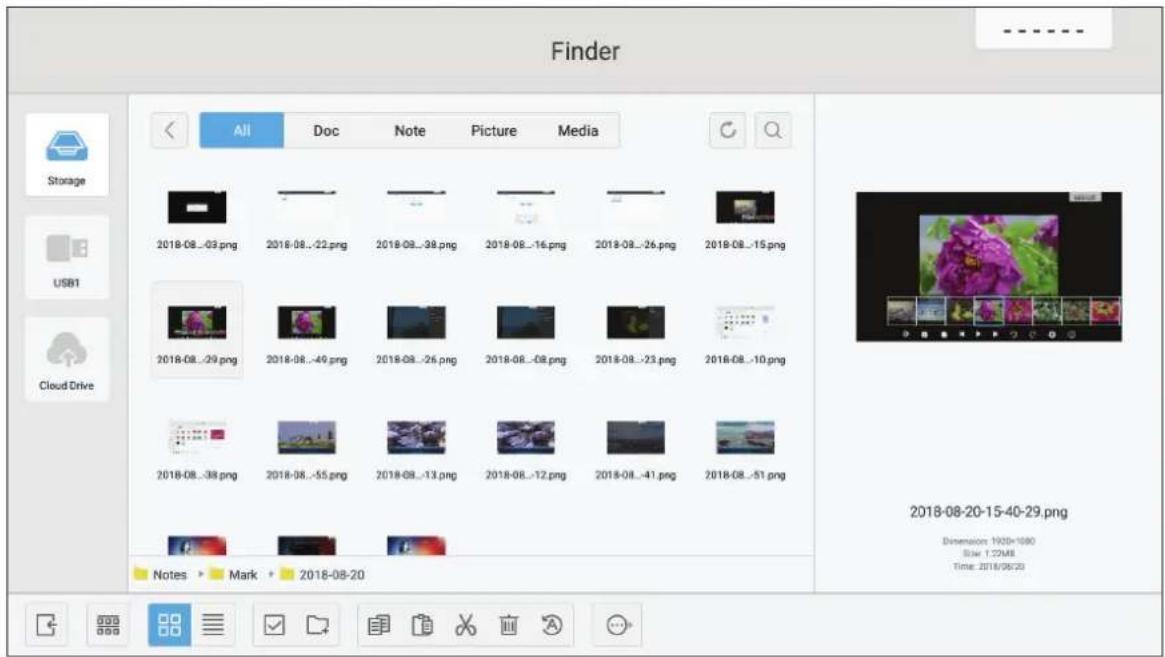
Browse the file or folder you want to view. Then you can do the following:
| Item Description | |
| Exit Exit the Finder app. | |
| Sort Select the sorting type. | |
| Thumbnails Display the files/folders in Thumbnails view. | |
| List Display the files/folders in List view. | |
| Select Switch to multiple selection mode. | |
| New Folder Create a new folder. | |
| Copy Copy the selected item(s). | |
| Paste Paste the selected item(s). | |
| Cut Cut the selected item(s). | |
| Delete Delete the selected item(s). | |
| Rename Rename the file/folder. | |
| Send Copy the selected item(s) to another storage media. | |
| Deselect Deselect the selected item(s). | |
| Select All Select all selected items. | |
Note: If you log into Cloud Drive, you can also access the files in your cloud storage here.
Playing Multimedia Files
Multimedia support format
| Media Type Supported Format | |
| Video | Video support format (codec) up to 4K resolution:*.avi (MPEG-1, MPEG-2 MP@HL, MPEG-4 SP@L0-3, ASP@L0-5, H.264, MP, HP@Level 4.1,H263, VP6, MJPEG)*.ts (MPEG-2 MP@HL, MPEG-4 SP@L0-3,ASP@L0-5, H.264 MP, HP@Level 4.1, VC1 AP, H265)*.mpg, *.mpeg (MPEG-1, MPEG-2 MP@HL, H.264 MP, HP@Level 4.1)*.mp4 (MPEG-4 SP@L0-3, ASP@L0-5, H.264 MP, HP@Level 4.1, H265)*.mov (MPEG-4 SP@L0-3, ASP@L0-5, MJPEG, H.264 MP, HP@Level 4.1, H265)*.mkv (VP9, H.265)*.3gp (H.264 MP, HP@Level 4.1, H263, MPEG-4 SP@L0-3, ASP@L0-5) |
| Audio | Audio support format (codec):*.wma (WMA/WMAPro: 128Kbps~320Kbps, 8KHz~48KHz sampling rate)*.mp3 (MPEG Layer 3: 32Kbps~320Kbps, 32KHz~48KHz sampling rate)*.wav (PCM: Max 320Kbps, Max 48kHz sampling rate / ADPCM: 384Kbps, 8KHz ~ 48Khz sampling rate)*.m4a (ACC: 24kbps ~ 384kbps, 16KHz~48KHz sampling rate)*.ogg (Vorbis: Max 320Kbps, 8KHz~48KHz sampling rate) |
| Image | Supported image format (with the maximum resolution):*.png(8k*8k)*.jpeg(baseline 8k*8k; progressive 4k*4k)*.bmp(8k*8k)*.gif(4k*4k) |
USING THE APPS
Playing videos
Select the video you want play and tap to start the playback.
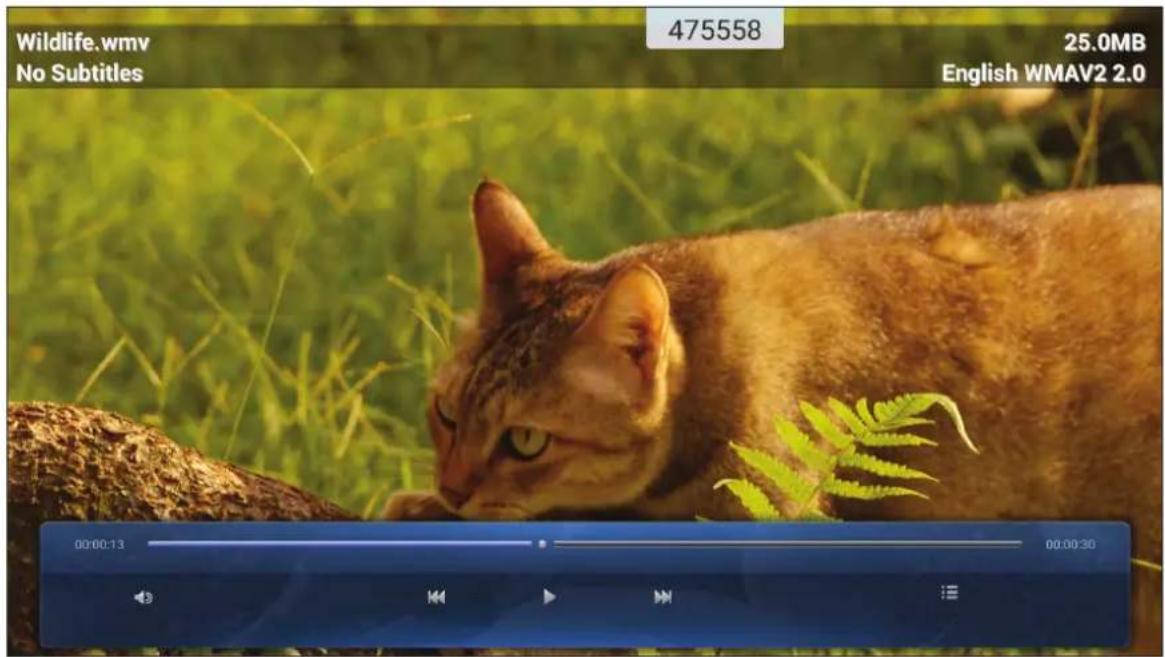
During the playback, you can do the following:
| Item Description | ||
| Volume Adjust the volume level. | ||
| Previous video Skip to the previous video. | ||
| Pause | Pause the playback. To resume, tap ▶ | |
| Next video Skip to the next video. | ||
| Playlist/Multiple Playback | View the playlist. To enable multiple playback, select a video from the list.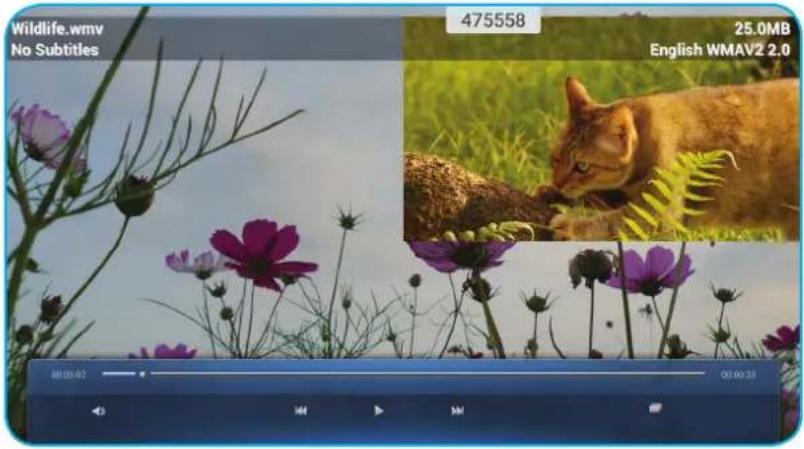 To exit the multiple playback, tap and YES. To exit the multiple playback, tap and YES. | |
Note: To stop playback at any time, tap ☐ or ☑ to display the side toolbar. Then tap ⏻.
USING THE APPS
Playing music
Select the song you want play and tap to start the playback.
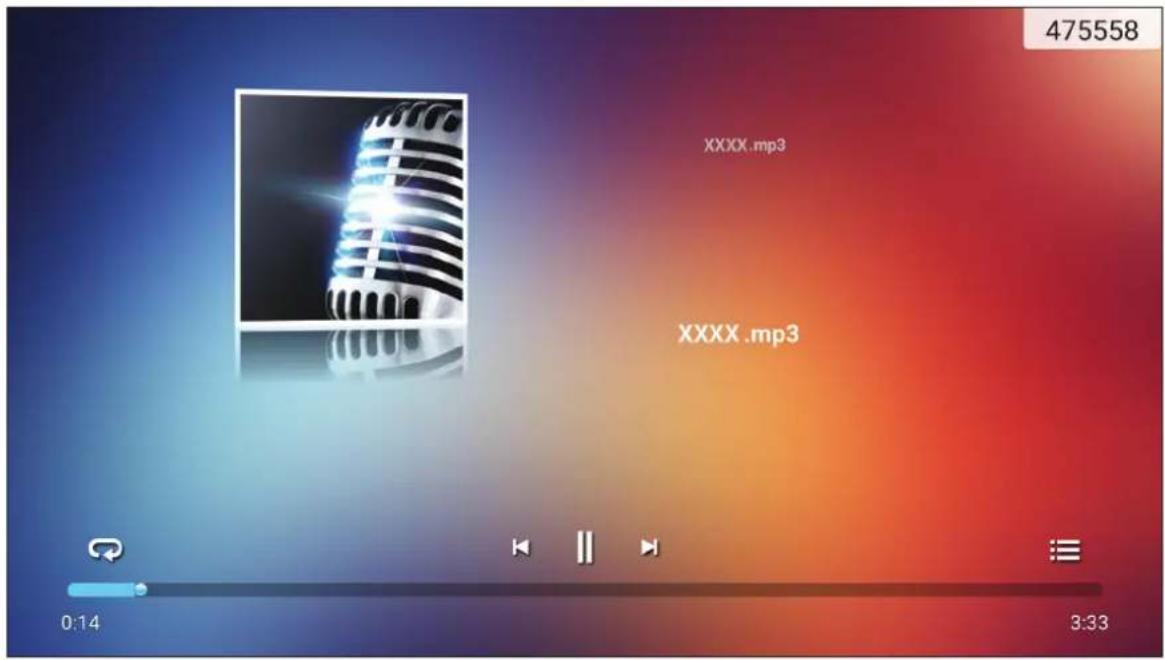
During the playback, you can do the following:
| Item Description | ||
| Repeat Select the repeat mode. | ||
| Pause | Pause the playback. To resume, tap ▶ | |
| Previous track Skip to the previous track. | ||
| Next track Skip to the next track. | ||
| Playlist View the playlist. | ||
Note: To stop playback at any time, tap or to display the side toolbar. Then tap ↻.
USING THE APPS
Viewing photos
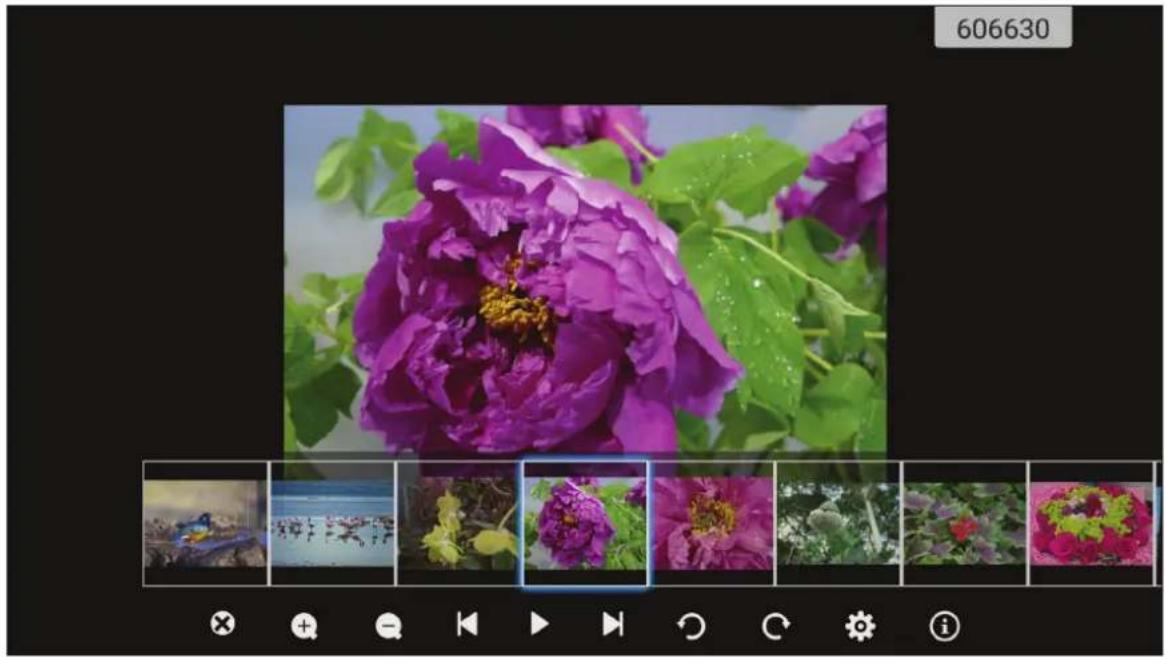
Tap to select a photo and view the selected photo in full screen.
natural_image
Close-up of a vibrant purple peony flower with green leaves, surrounded by small photos and UI buttons at the bottom (no readable text or symbols)| Item Description | ||
| Exit Exit full screen mode. | ||
| Zoom in Magnify the photo. | ||
| Zoom out Zoom out on the magnified photo. | ||
| Previous photo Skip to the previous photo | ||
| Slide show | Start the slide show. To stop, tap !! | |
| Next photo Skip to | the next photo. | |
| Rotate Left Rotate | the photo 90-degree counter-clockwise. | |
| Rotate Right Rotate | the photo 90-degree clockwise. | |
| Settings Configure | the wallpaper and slide show settings. | |
| Information Display | the photo information. | |
USING THE APPS
Set a wallpaper
- Select your desired photo and tap .

- Select Set to wallpaper.
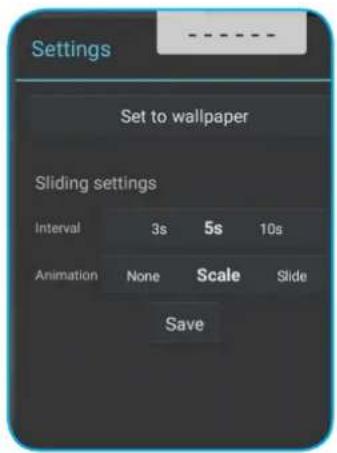
- Drag the white circles at each corner to resize the crop area and tap SAVE to set the photo as the wallpaper.
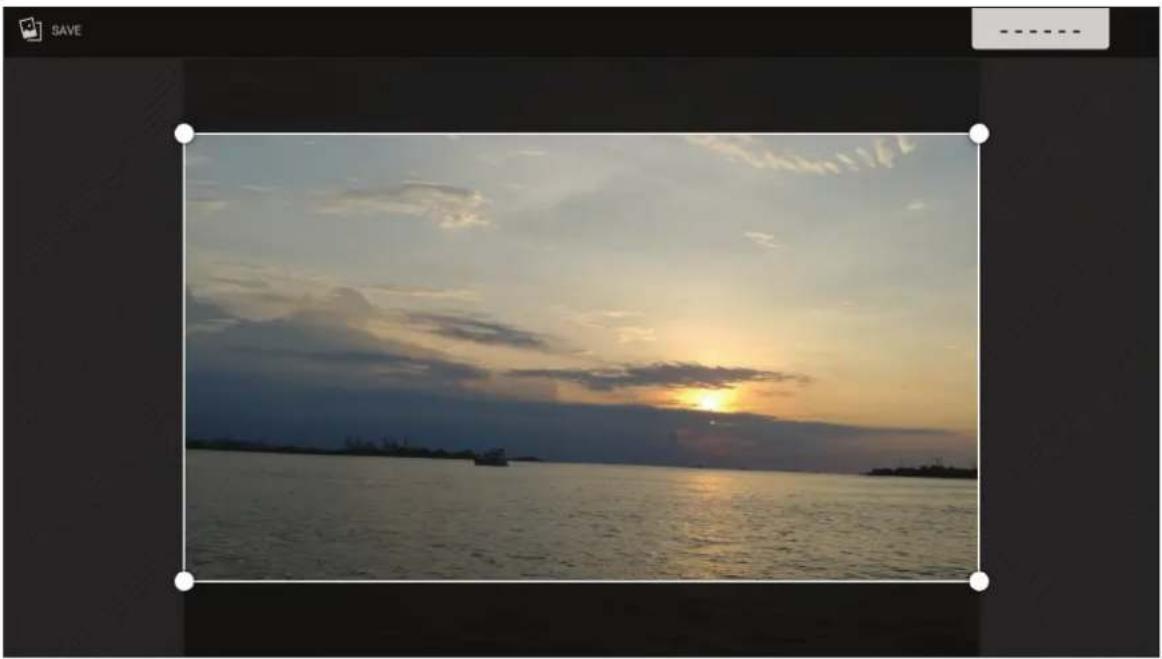
natural_image
Sunset over a calm lake with distant ships and distant land (no text or symbols visible)USING THE APPS
Screen Lock

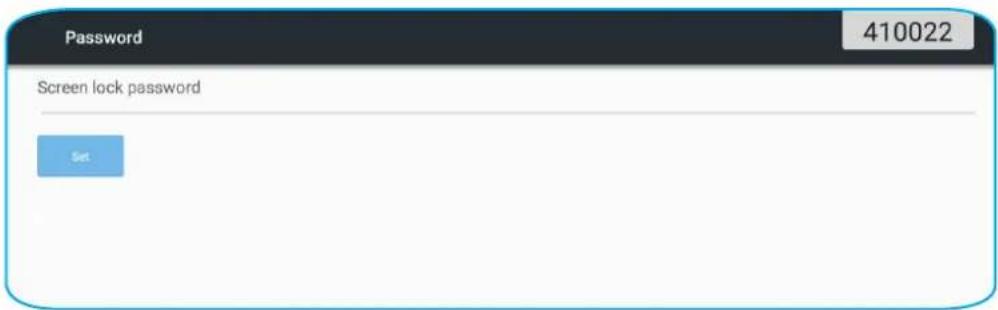
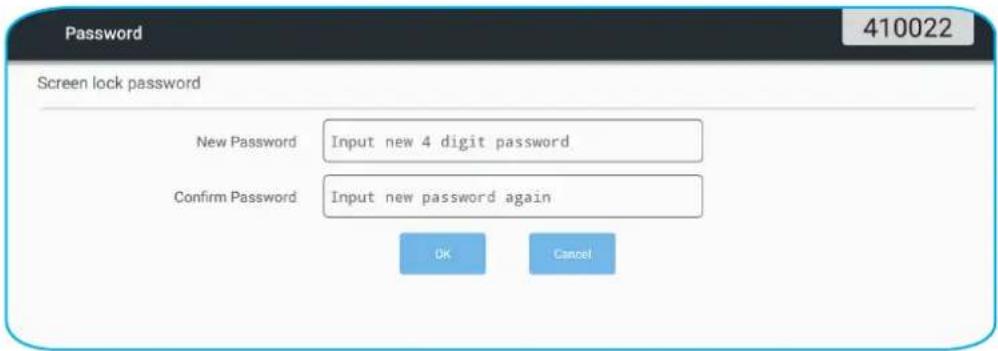
Select Screen Lock to set the 4-digit pin code. Using the pin code, you can block the device from unauthorized use.
To set the pin code for the first time:
- Launch the Screen Lock app. Then tap Set password.
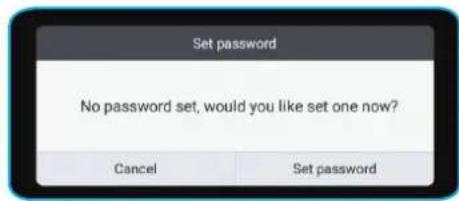
- Tap Set to set the pin code.
- Enter the 4-digit pin code in the New Password and Confirm Password fields. Then tap OK.
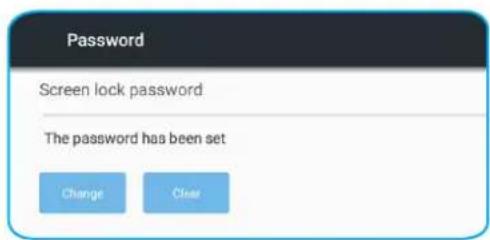
• If you want to change the password, tap Change.
• If you want to remove the password, tap Clear.
USING THE APPS
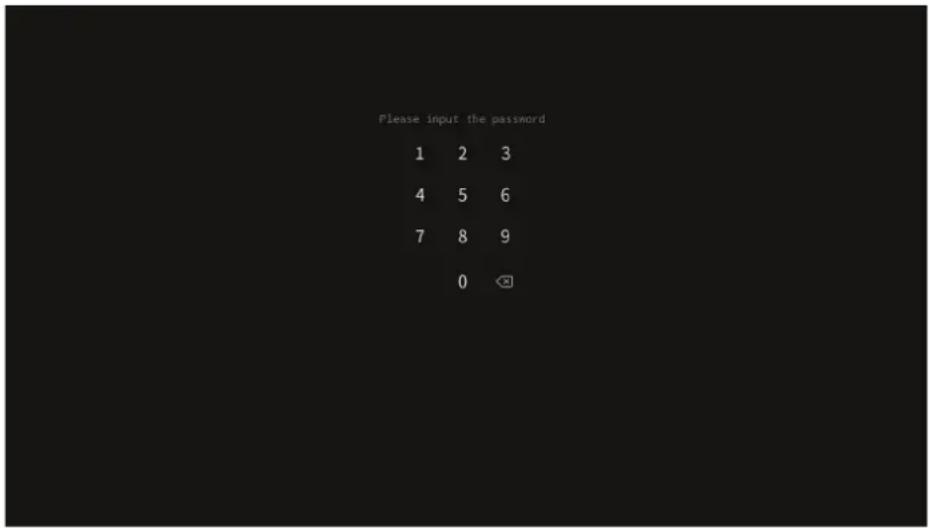
Once the password is set, open the Screen Lock app when you want to leave the device unattended for a while. Only the person who knows the password can access the device.
USING THE APPS
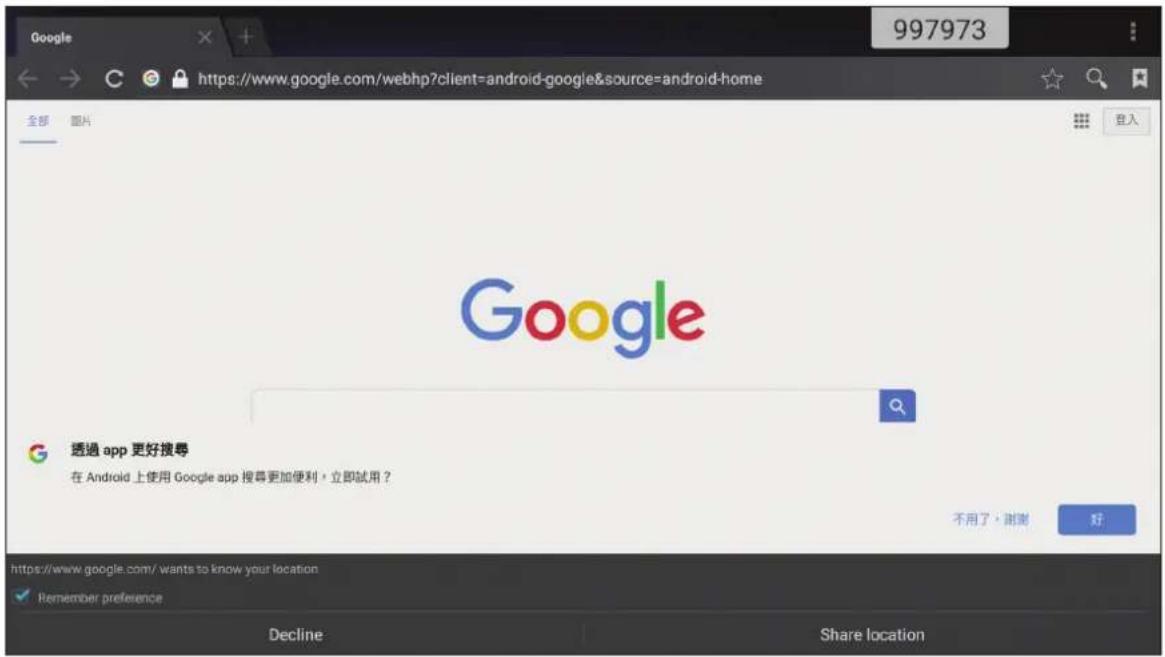
Browser

Select Browser to access the web pages.
Keeper

Select Keeper to clean and optimize the data on the device.
Tap One Key Optimize to clean the memory and delete the temporary and junk files simultaneously.
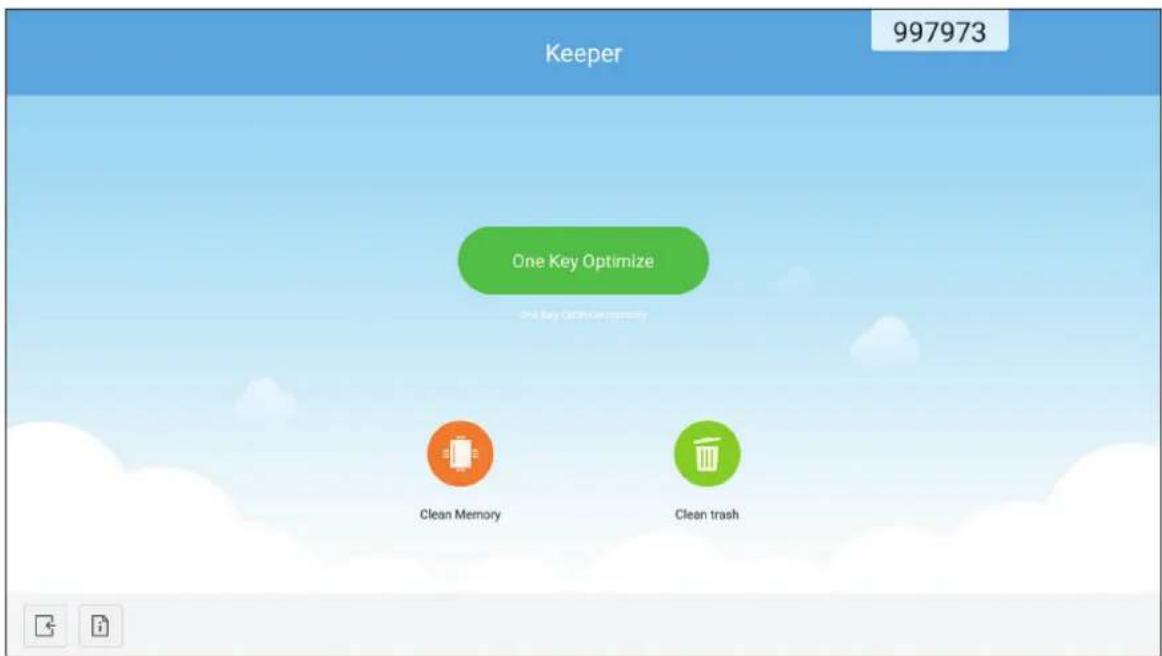
Otherwise, tap or to perform the cleaning task separately.
USING THE APPS
System Update

Select System Update to check and download the latest firmware version. Every time you turn on the device, the system will automatically check if a newer firmware version is available when the device is connected to the Internet.
IMPORTANT!
- When you open the System Update app for the first time, the two permission messages will appear on the screen. Tap Allow to continue. Then the app will have IFP's authorization to check if there is any new firmware in the server and remind the user to update.
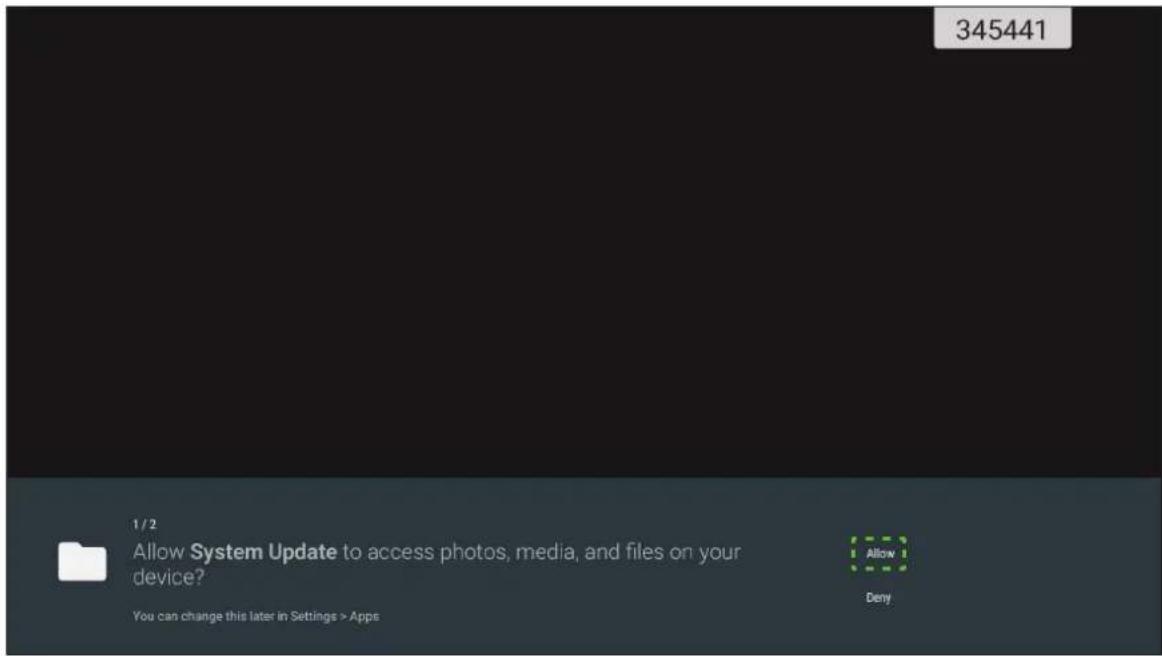
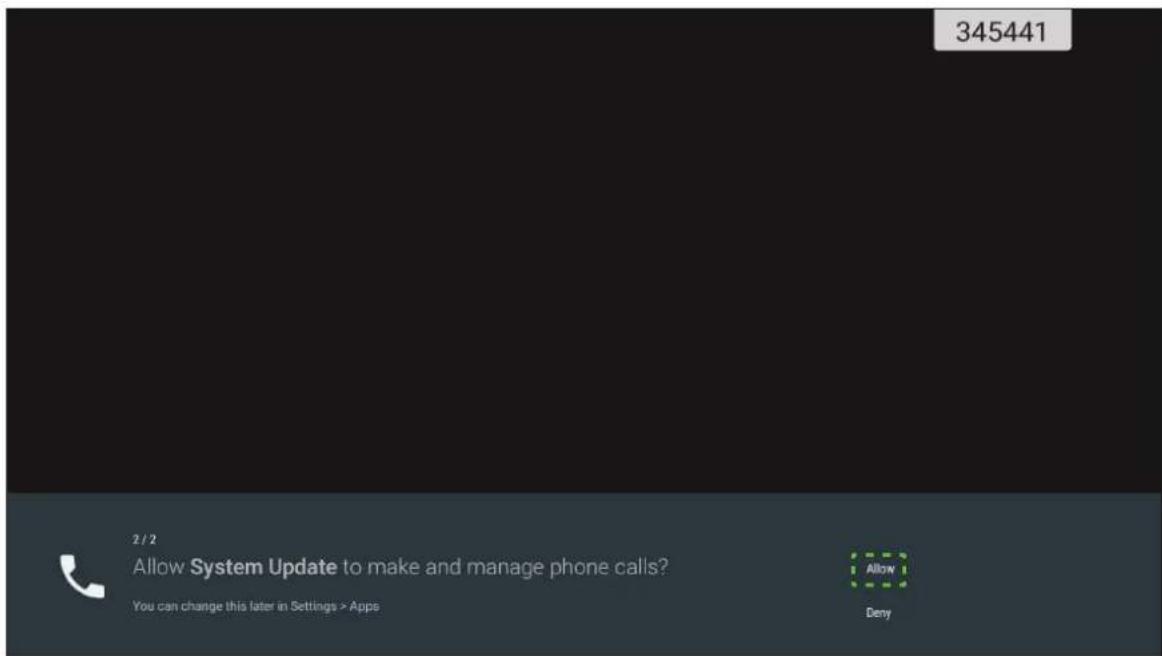
• You can also change this setting later (in Settings → Apps → System Update → Permission).
• The system can only check availability of new firmware if the device is properly connected to the Internet.
USING THE APPS
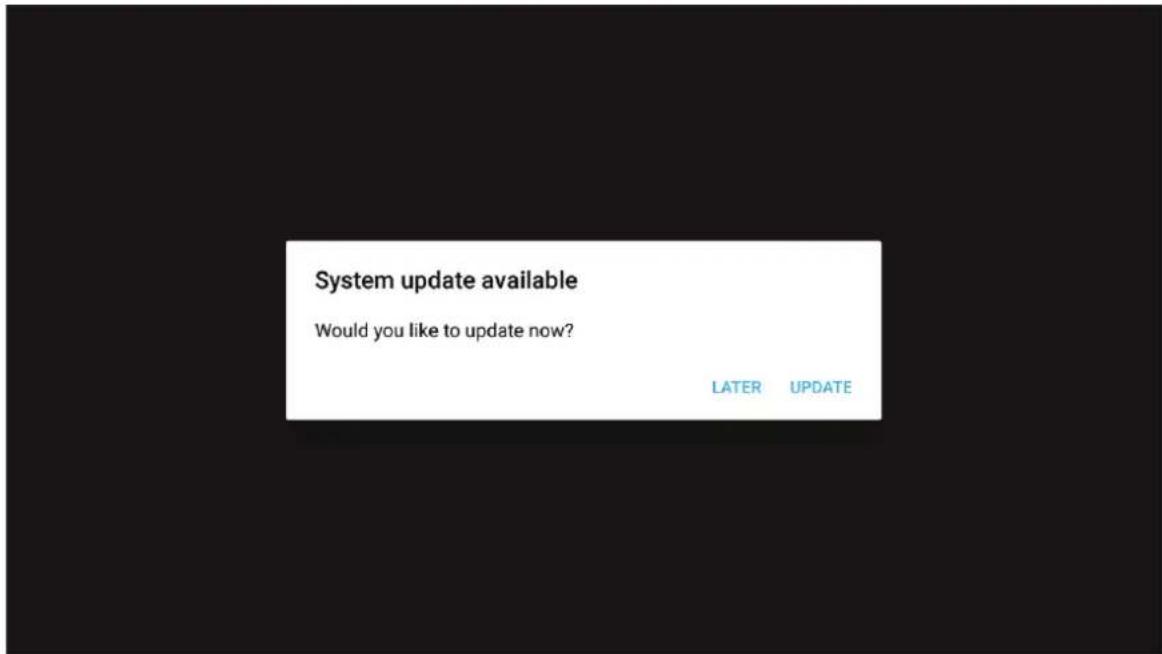
- Whenever a new version of firmware is available, the system will automatically detect the update and will prompt you to download it. Select UPDATE to proceed with the update process.
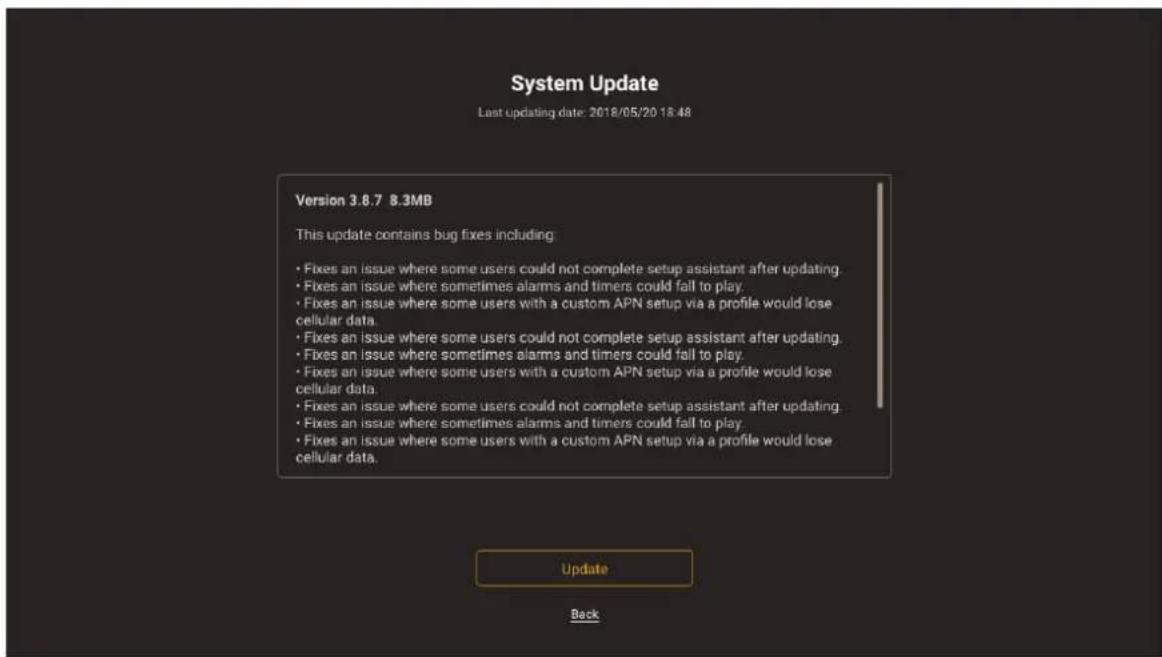
- A list of issues fixed in the latest update will appear on the screen. To continue, select Update.
USING THE APPS
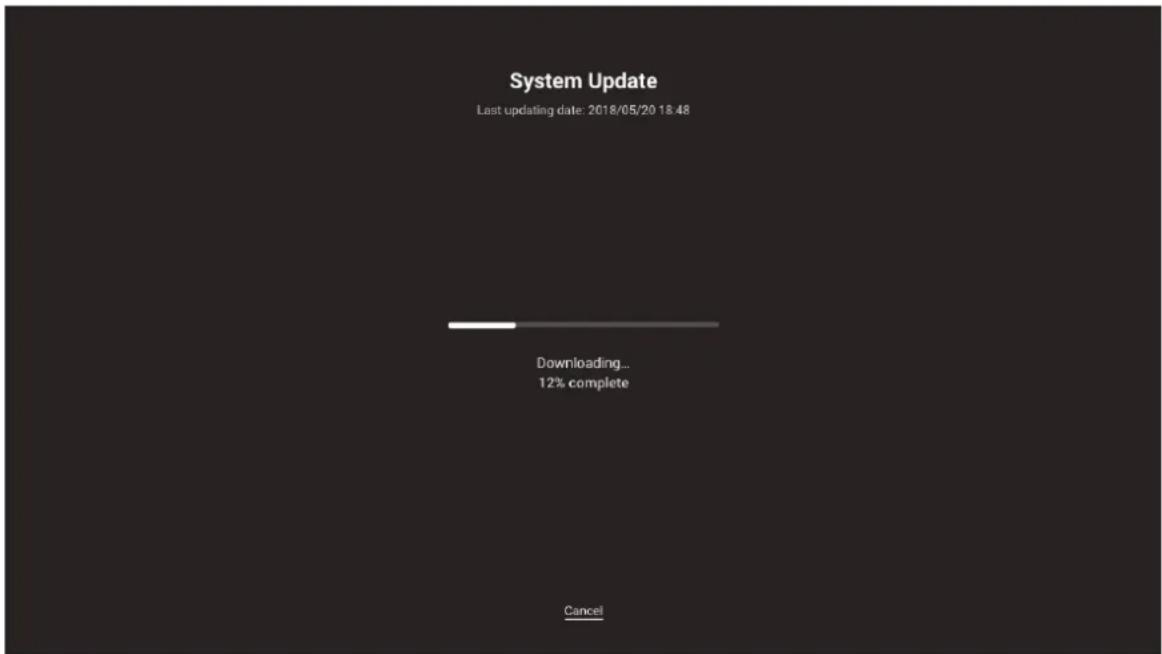
The system will automatically download the latest firmware to the device.
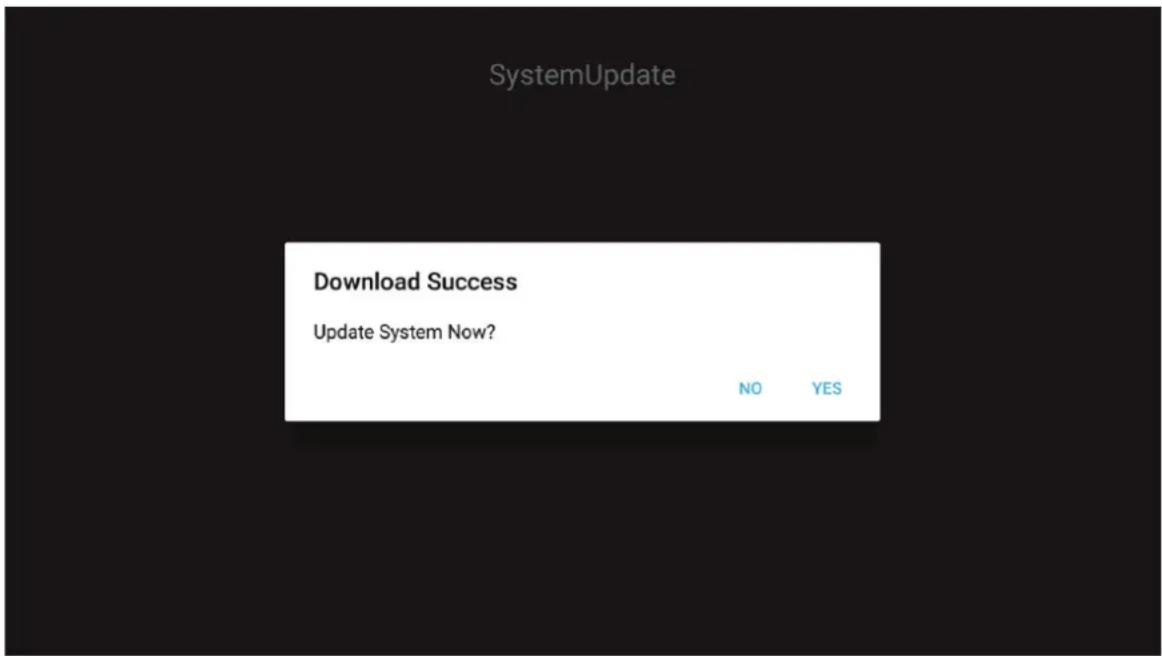
- Once the firmware has been downloaded, select YES to continue updating the system.
USING THE APPS
- The device will restart in 30 seconds and the firmware installation will begin automatically. Wait until the installation process is complete.
IMPORTANT! During the update process, do not turn off your device. Any interruption would bring damage to the device.
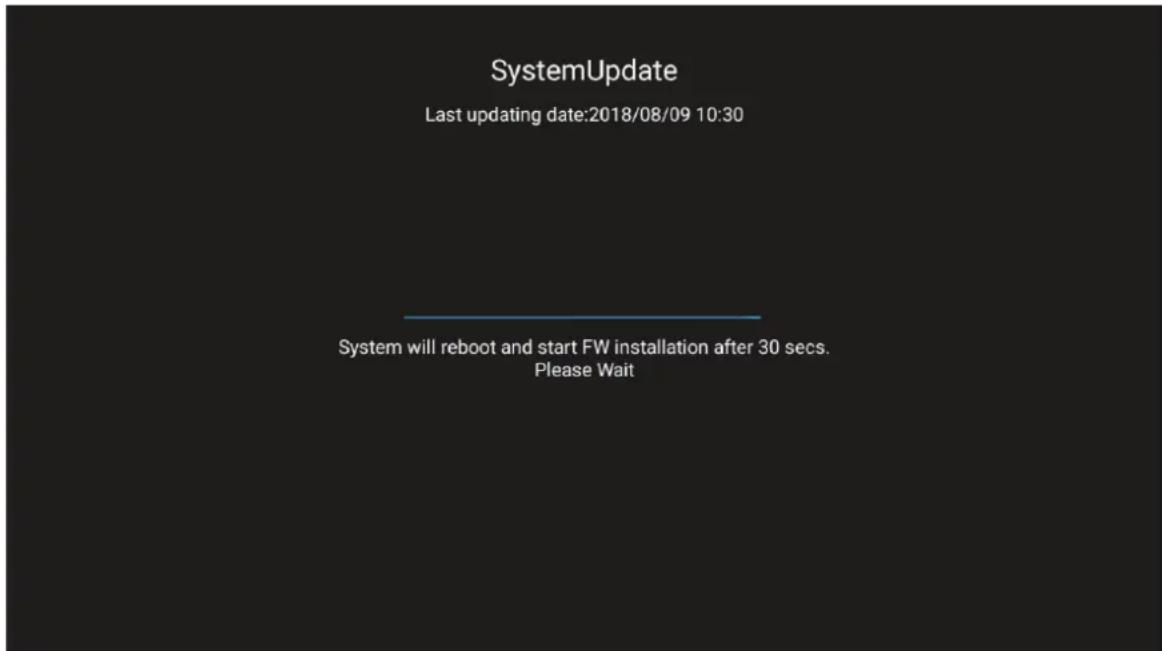
- After the new firmware is installed, the system will restart again to complete the whole update process.
ADDITIONAL INFORMATION
Specifications
| Item 65” 4K 75” 4K 86” 4K | |||
| Display | |||
| Backlight LED LED LED | |||
| Resolution 3840 x 2160 (4K UHD) | 3840 x 2160 (4K UHD) | 3840 x 2160 (4K UHD) | |
| Brightness (cd/m2) 350 350 350 | |||
| Contrast 1,200:1 1,200:1 | 1,200:1 | ||
| View Angle | 178° | 178° | 178° |
| Response Time (ms) | 6 | 8 | 8 |
| Life Time | 30,000 hr | 30,000 hr | 30,000 hr |
| Display Colors | 1.07 B | 1.07 B | 1.07 B |
| Audio | 2x 12W | 2x 12W | 2x 12W |
| Surface Hardness | 7H 7H | 7H | |
| Glass | Anti glare | Anti glare | Anti glare |
| Power | |||
| Power Supply | AC 100v-240v | AC 100v-240v | AC 100v-240v |
| Power Source (Hz) | 50/60Hz | 50/60Hz 50/60Hz | |
| Power Consumption 300W | 450W | 500W | |
| Standby Power Consumption | ≤ 0.5W ≤ 0.5W ≤ 0.5W | ||
| Dimensions | |||
| Dimension | 59.88" x 35.98" x 3.86" | 69.41" x 40.71" x 3.94" | 78.27" x 46.38" x 3.94" |
| Packing Dimension | 66.81" x 42.17" x 8.66" | 5.32" x 48.23" x 11.02" | 87.05" x 53.94" x 11.02" |
| Net Weight | 100.5 lb | 129.2 lb 166.4 lb | |
| Gross Weight | 121.3 lb | 172.0 lb 231.5 lb | |
| Connectivity | |||
| VGA IN | 1 | 1 | 1 |
| HDMI 2.0 IN | 2 | 2 | 2 |
| HDMI OUT 1.4 | 1 | 1 | 1 |
| AUDIO IN | 1 | 1 | 1 |
| AUDIO OUT | 1 | 1 | 1 |
| COAX OUT | 1 | 1 | 1 |
| USB 2.0 | 4 | 4 | 4 |
| USB 3.0 | 2 | 2 | 2 |
| RS232 | 1 | 1 | 1 |
| RJ45 | 1 | 1 | 1 |
| USB TOUCH OUT | 1 | 1 | 1 |
| AV IN | 1 | 1 | 1 |
| MODULE SLOT | 1 | 1 | 1 |
ADDITIONAL INFORMATION
| Item 65” 4K 75” 4K 86” 4K | |||
| Compatible Operation System | |||
| Touch Type IR IR IR | |||
| System Compatibility | Windows 10Windows 8Windows 7Windows VistaWindows XPWindows 2000/LinuxMac/Android | Windows 10Windows 8Windows 7Windows VistaWindows XPWindows 2000/LinuxMac/Android | Windows 10Windows 8Windows 7Windows VistaWindows XPWindows 2000/LinuxMac/Android |
| Touch Point | Up to 20 points touchNote: The number of touch points can vary depending on operating system and application. | ||
| OS System | |||
| Android Android 7.0 Android 7.0 | Android 7.0 | ||
| CPU | ARM Cortex A73Dual Core | ARM Cortex A73Dual Core | ARM Cortex A73Dual Core |
| GPU Mali-450 (5 Core) | Mali-450 (5 Core) | Mali-450 (5 Core) | |
| RAM | 2GB | 2GB | 2GB |
| Storage | 16GB | 16GB | 16GB |
| Wi-Fi | 802.11 b/g/n(via USB adapter) | 802.11 b/g/n(via USB adapter) | 802.11 b/g/n(via USB adapter) |
Note: All specifications are subject to change without notice.
ADDITIONAL INFORMATION
Dimensions
65-inch
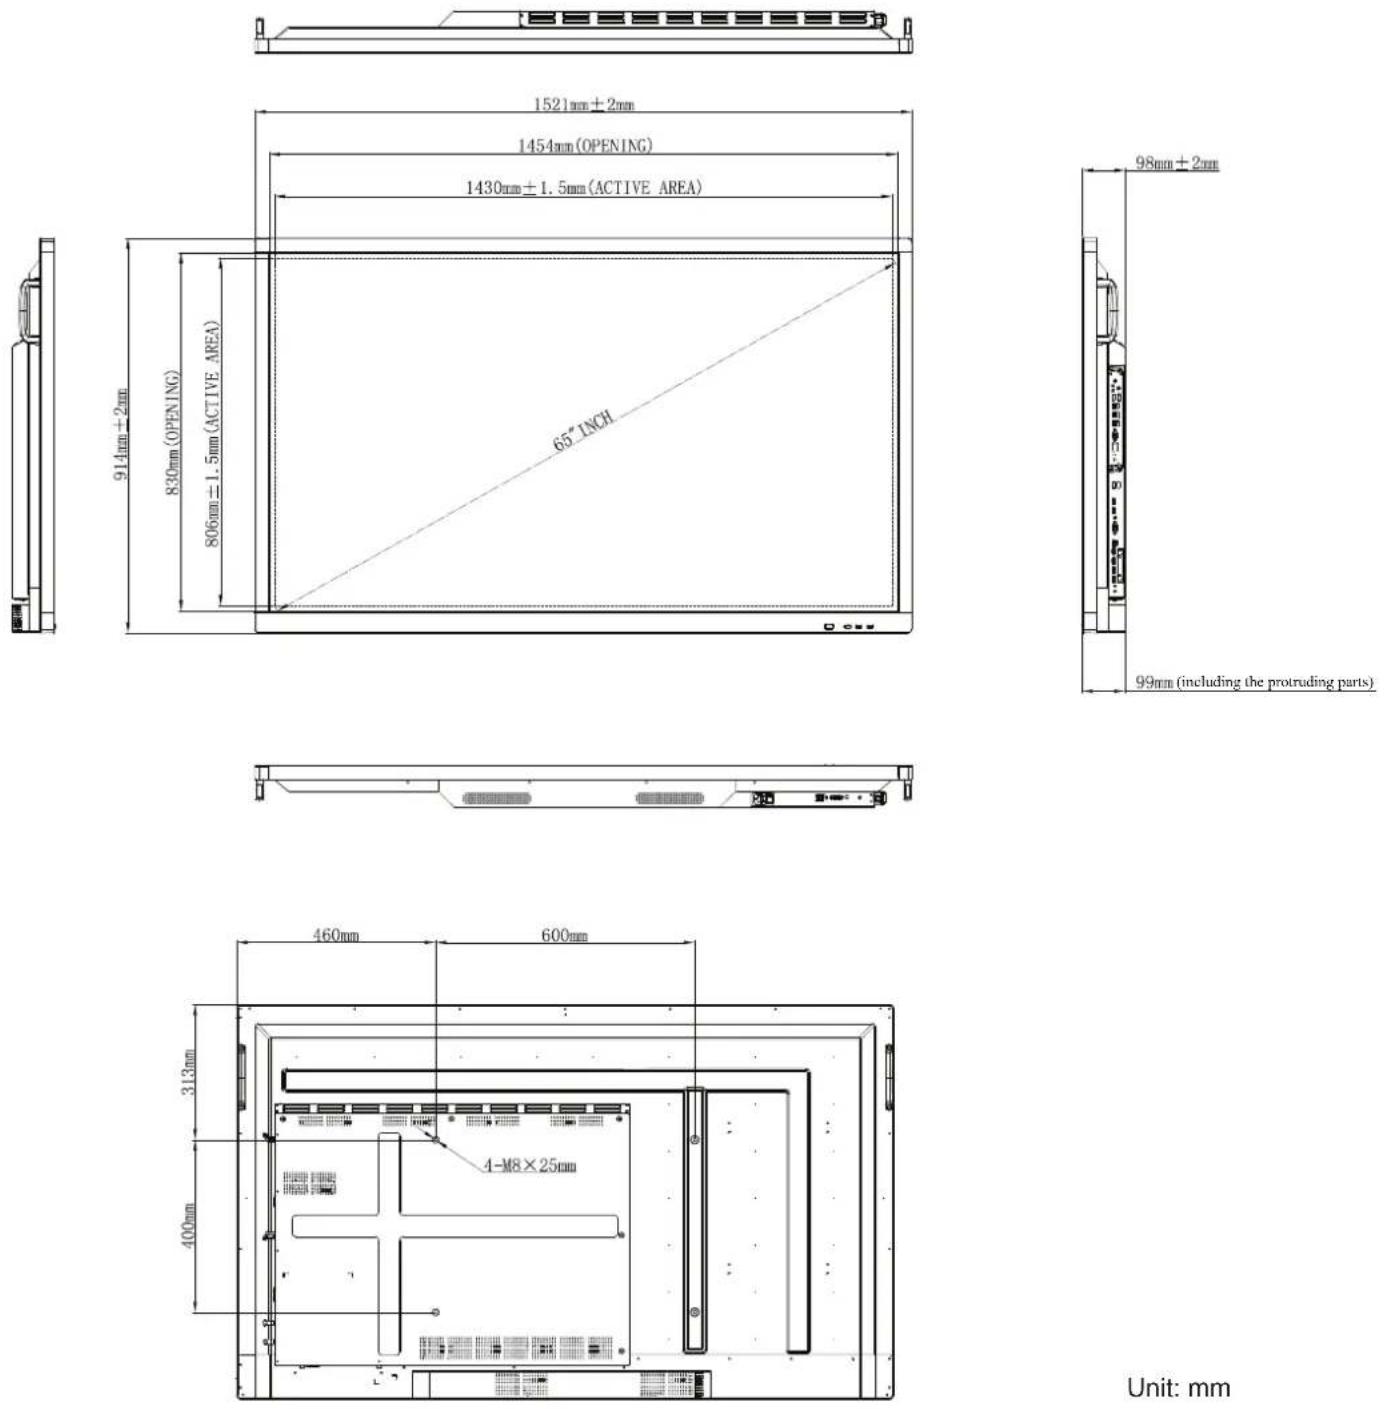
Unit: mm
ADDITIONAL INFORMATION
75-inch
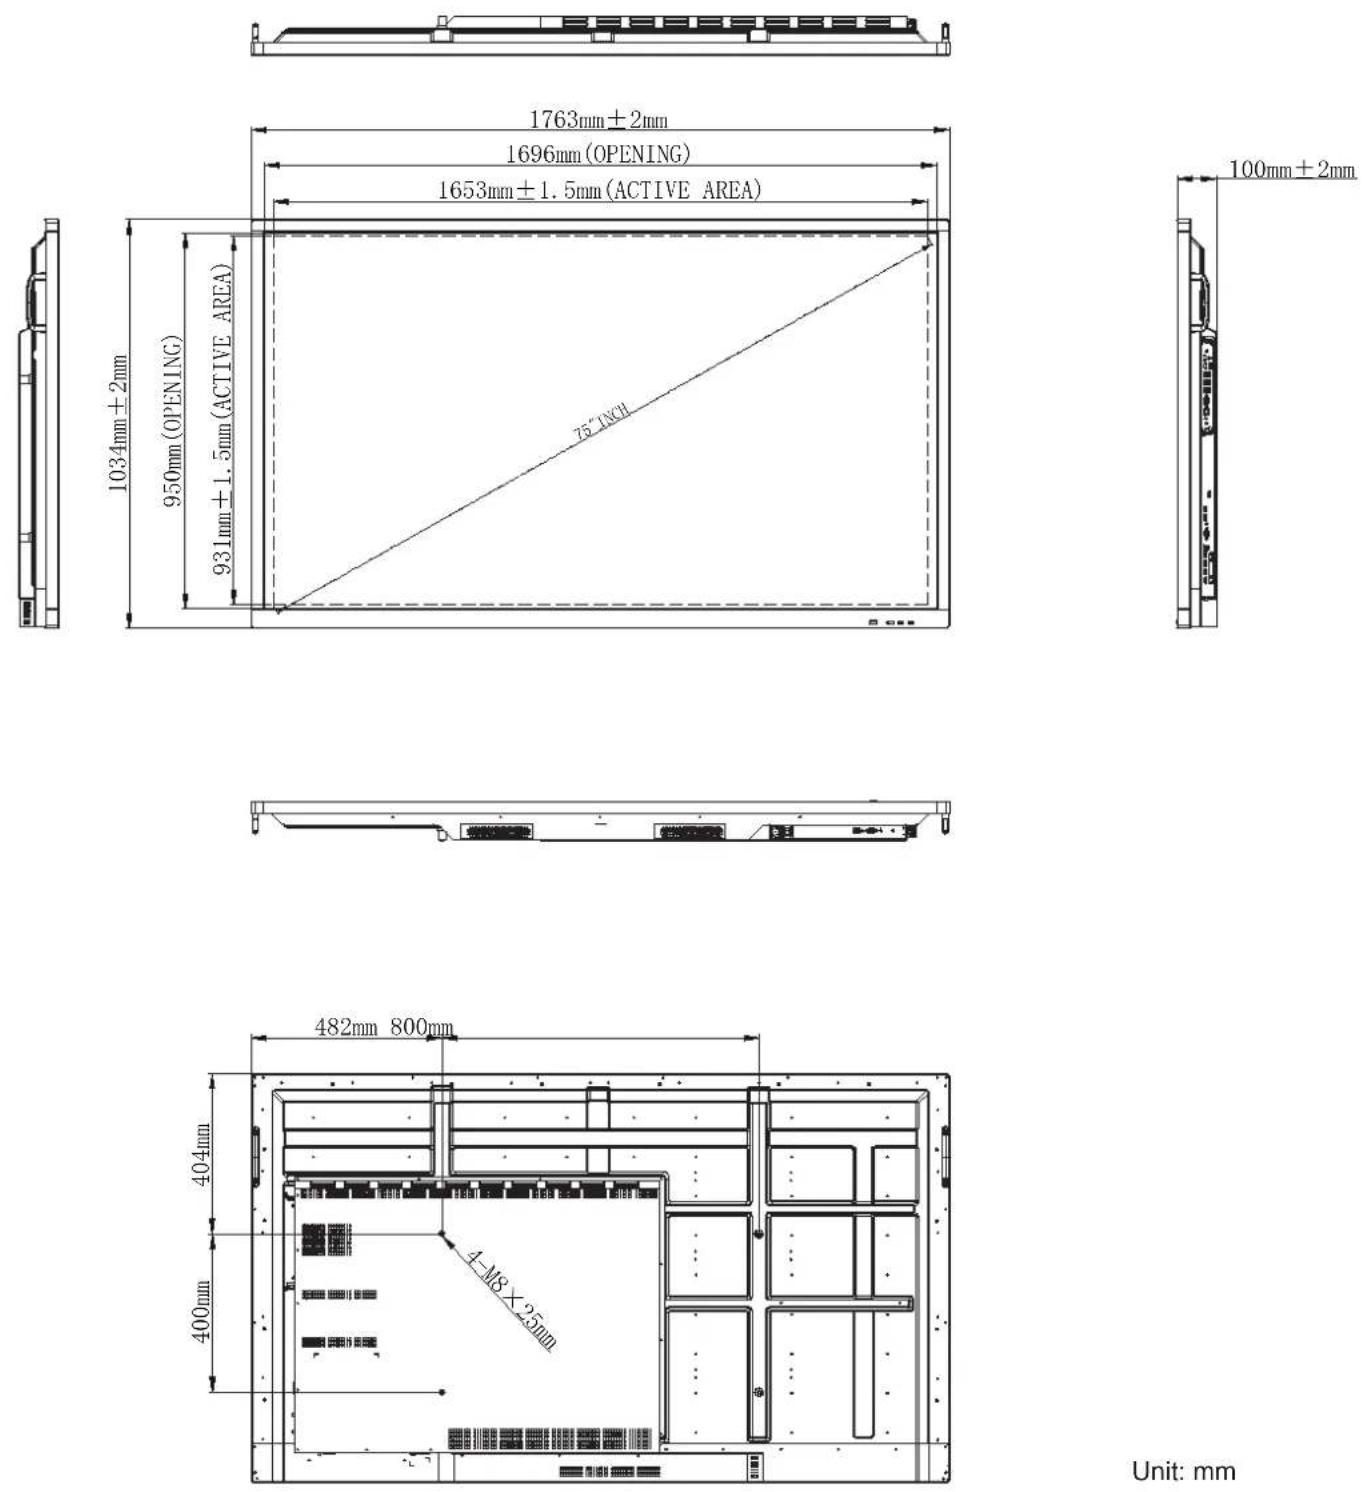
Unit: mm
ADDITIONAL INFORMATION
86-inch
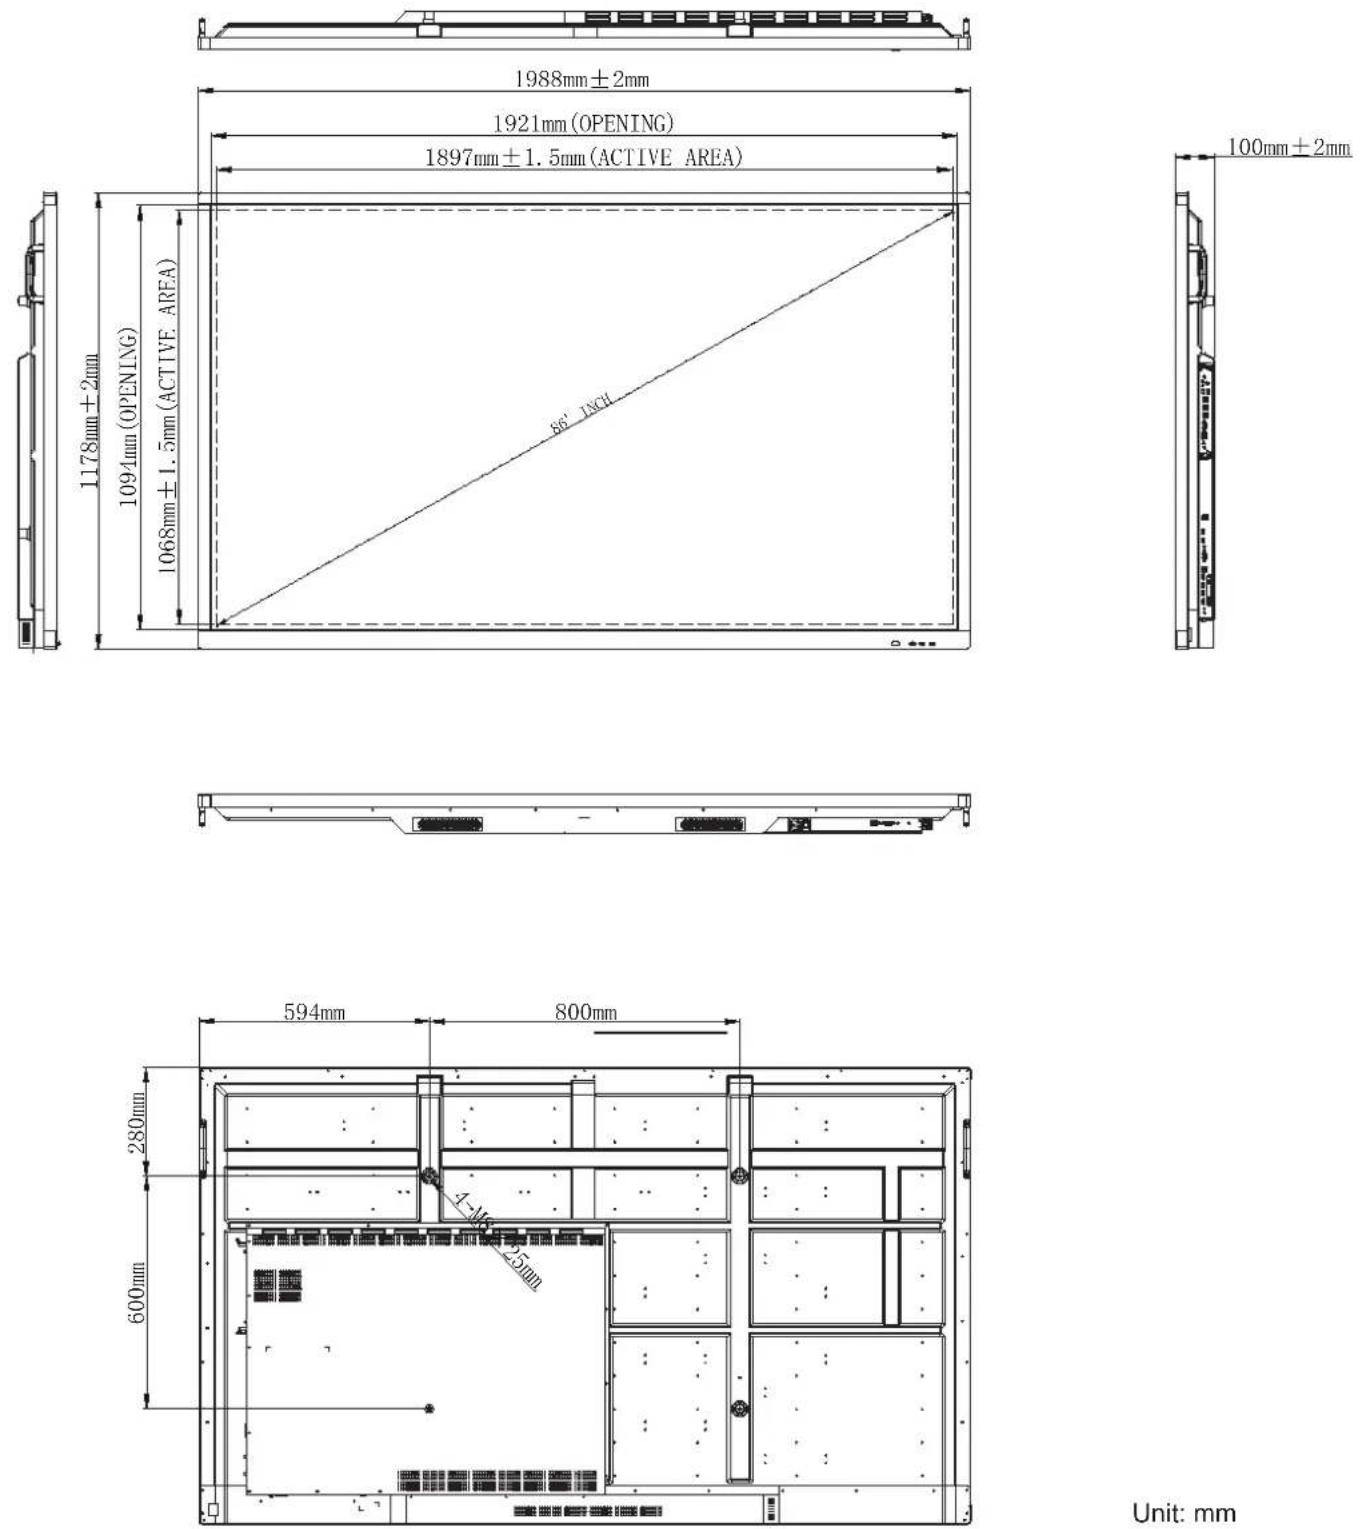
Unit: mm
ADDITIONAL INFORMATION
Supported Timing List
| Resolution | Input Source | ||
| HDMI VGA AV | |||
| 640 x 480 @60Hz √ √ - | |||
| 720 x 400 @70Hz √ √ - | |||
| 800 x 600 @60Hz √ √ - | |||
| 1024 x 768 @60Hz √ √ - | |||
| 1024 x 768 @75Hz √ √ - | |||
| 1280 x 720 @60Hz √ √ - | |||
| 1280 x 768 @60Hz √ √ - | |||
| 1280 x 800 @60Hz √ √ - | |||
| 1280 x 960 @60Hz √ √ - | |||
| 1280 x 1024 @60Hz √ √ - | |||
| 1366 x 768 @60Hz √ √ - | |||
| 1440 x 900 @60Hz √ √ - | |||
| 1600 x 1200 @60Hz √ √ - | |||
| 1680 x 1050 @60Hz √ √ - | |||
| 1920 x 1080 @50Hz √ √ - | |||
| 1920 x 1080 @60Hz √ √ - | |||
| 3840 x 2160 @30Hz √ - - | |||
| 3840 x 2160 @50Hz √ - - | |||
| 3840 x 2160 @60Hz √ - - | |||
| NTSC-M - - √ | |||
| NTSC-J - - √ | |||
| PAL-BDGHI - - √ | |||
| 480i (60Hz) √ - - | |||
| 480p (60Hz) √ - - | |||
| 576i (50Hz) √ - - | |||
| 576p (50Hz) √ - - | |||
| 720p (50Hz) √ - - | |||
| 720p (60Hz) √ - - | |||
| 1080i (50Hz) √ - - | |||
| 1080i (60Hz) √ - - | |||
| 1080p (24Hz) | √ - - | ||
| 1080p (50Hz) | √ - - | ||
| 1080p (60Hz) | √ - - | ||
| 2160p (50Hz) | √ - - | ||
| 2160p (60Hz) | √ - - | ||
Note: “−” indicates the current input timing is not supported by the device.
ADDITIONAL INFORMATION
RS232 Protocol Function List
RS232 Pin Assignments
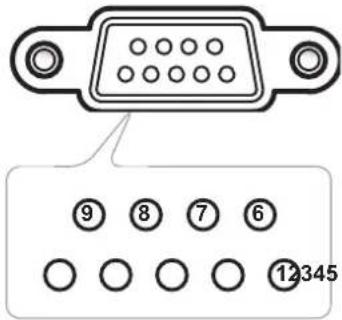
| Pin No. | Spec.(from IFP side) |
| 1 N/A | |
| 2 TXD | |
| 3 RXD | |
| 4 N/A | |
| 5 GND | |
| 6 N/A | |
| 7 N/A | |
| 8 N/A |
RS232 RJ45 Control Connection
| RS232 Settings LAN Control Settings | |
| Baud Rate 9600 IP Machine IP | |
| Data Bits 8 Port 4664 | |
| Parity None | |
| Stop Bits 1 | |
| Flow Control None |
| : | 0 | 1 | S | X | X | X | X | CR |
| Lead Code | Set command | Command ID | Variable | carriage return | ||||
| : | 0 | 1 | G | X | 0 | 0 | 0 | CR |
| Lead Code | Get command | Command ID | Fixed number | carriage return | ||||
ADDITIONAL INFORMATION
SET Command
| Type | Category | Parameter | CMD Hex Code CMD | Response | |||||
| Success | Failed | Success (Hex) | Failed (Hex) | ||||||
| SET | Power | Backlight off | :01S0n | n=000 | 3A 30 31 53 30 30 30 30 0d 40 | 01+ 401- | 34 30 31 | 2B 0D 34 30 31 | 2D 0D |
| Backlight on | n=001 | 3A 30 31 53 30 30 30 31 0d 40 | 01+ 401- | 34 30 31 | 2B 0D | 34 30 31 2D 0D | |||
| Power off | n=002 | 3A 30 31 53 30 30 30 32 0d 40 | 01+ 401- | 34 30 31 | 2B 0D 34 30 31 | 2D 0D | |||
| Power on | n=003 | 3A 30 31 53 30 30 30 33 0d 40 | 01+ 401- | 34 30 31 | 2B 0D 34 30 31 | 2D 0D | |||
| SET | Treble 000 ~ 100 :01S1n | n=000-100 | 3A 30 31 53 31 30 30 30 0dto3A 30 31 53 31 31 30 30 0d | 401+ 401- | 34 30 31 2B 0D | 34 30 31 2D 0D | |||
| SET | Bass 000 ~ 100 :01S2n | n=000-100 | 3A 30 31 53 32 30 30 30 0dto3A 30 31 53 32 31 30 30 0d | 401+ 401- | 34 30 31 2B 0D 34 30 31 2D 0D | ||||
| SET | Balance 000 ~ 100 :01S3n | n=000-100 | 3A 30 31 53 33 30 30 30 0dto3A 30 31 53 33 31 30 30 0d | 401+ 401- | 34 30 31 2B 0D 34 30 31 2D 0D | ||||
| SET | Contrast 000 ~ 100 :01S4n | n=000-100 | 3A 30 31 53 34 30 30 30 0dto3A 30 31 53 34 31 30 30 0d | 401+ 401- | 34 30 31 2B 0D 34 30 31 2D 0D | ||||
| SET | Brightness 000 ~ 100 :01S5n | n=000-100 | 3A 30 31 53 35 30 30 30 0dto3A 30 31 53 35 31 30 30 0d | 401+ 401- | 34 30 31 2B 0D 34 30 31 2D 0D | ||||
| SET | Sharpness 000 ~ 100 :01S6n | n=000-100 | 3A 30 31 53 36 30 30 30 0dto3A 30 31 53 36 31 30 30 0d | 401+ 401- | 34 30 31 2B 0D 34 30 31 2D 0D | ||||
| SET | Sound Mode | Standard | :01S7n | n=001 | 3A 30 31 53 37 30 30 31 0d 40 | 01+ 401- | 34 30 31 | 2B 0D 34 30 31 | 2D 0D |
| Custom | n=002 | 3A 30 31 53 37 30 30 32 0d 40 | 01+ 401- | 34 30 31 | 2B 0D 34 30 31 | 2D 0D | |||
| Classroom | n=003 | 3A 30 31 53 37 30 30 33 0d 40 | 01+ 401- | 34 30 31 | 2B 0D 34 30 31 | 2D 0D | |||
| Meeting n=004 3A 30 | 31 53 | 37 30 30 34 0d 401+ 401- 34 | 80 31 2B | 0D 34 30 | 31 2D 0D | ||||
| SET | Volume 000 ~ 100 :01S8n | n=000-100 | 3A 30 31 53 38 30 30 30 0dto3A 30 31 53 38 31 30 30 0d | 401+ 401- | 34 30 31 2B 0D 34 30 31 2D 0D | ||||
| SET | Mute | Off | :01S9n | n=000 | 3A 30 31 53 39 30 30 30 0d 40 | 01+ 401- | 34 30 31 | 2B 0D 34 30 31 | 2D 0D |
| On | n=001 | 3A 30 31 53 39 30 30 31 0d 40 | 01+ 401- | 34 30 31 | 2B 0D 34 30 31 | 2D 0D | |||
| SET | Video Source | VGA | :01S:n | n=000 | 3A 30 31 53 3A 30 30 30 0d | 401+ | 401- | 34 30 31 2B 0D | 34 30 31 2D 0D |
| HDMI1 | n=001 | 3A 30 31 53 3A 30 30 31 0d | 401+ | 401- | 34 30 31 2B 0D | 34 30 31 2D 0D | |||
| HDMI2 | n=002 | 3A 30 31 53 3A 30 30 32 0d | 401+ | 401- | 34 30 31 2B 0D | 34 30 31 2D 0D | |||
| AV | n=003 | 3A 30 31 53 3A 30 30 33 0d | 401+ | 401- | 34 30 31 2B 0D | 34 30 31 2D 0D | |||
| Android | n=101 | 3A 30 31 53 3A 31 30 31 0d | 401+ | 401- | 34 30 31 2B 0D | 34 30 31 2D 0D | |||
| Slot in PC | n=103 | 3A 30 31 53 3A 31 30 33 0d | 401+ | 401- | 34 30 31 2B 0D | 34 30 31 2D 0D | |||
| SET | Aspect Ratio | 16:9 | :01S;n | n=000 | 3A 30 31 53 3B 30 30 30 0d | 401+ | 401- | 34 30 31 2B 0D | 34 30 31 2D 0D |
| 4:3 | n=001 | 3A 30 31 53 3B 30 30 31 0d | 401+ | 401- | 34 30 31 2B 0D | 34 30 31 2D 0D | |||
| PTP | n=002 | 3A 30 31 53 3B 30 30 32 0d | 401+ | 401- | 34 30 31 2B 0D | 34 30 31 2D 0D | |||
ADDITIONAL INFORMATION
| Type | Category | Parameter | CMD Hex Code CMD | Response | ||||
| Success | Failed | Success (Hex) | Failed (Hex) | |||||
| SET | Language | English | 001 3A 30:01S | n=000 3A 30 31 53 3C 30 30 30 0d 401+ 401-34 30 31 2B 0D 34 30 31 2D 0D | 401+ 401-34 30 31 2B 0D 34 30 31 2D 0D | |||
| Français n=002 3A 30 | 30 31 53 3C 30 30 31 0d 401+ 401-34 30 31 2B 0D 34 30 31 2D 0D | |||||||
| Español n=006 3A 30 | 30 31 53 3C 30 30 32 0d 401+ 401-34 30 31 2B 0D 34 30 31 2D 0D | |||||||
| Traditional Chinese | n=003 3A 30 31 53 3C 30 30 33 0d 401+ 401-34 30 31 2B 0D 34 30 31 2D 0D | |||||||
| Simplified Chinese | n=004 3A 30 31 53 3C 30 30 34 0d 401+ 401-34 30 31 2B 0D 34 30 31 2D 0D | |||||||
| Português | n=005 3A 30 31 53 3C 30 30 35 0d 401+ 401-34 30 31 2B 0D 34 30 31 2D 0D | |||||||
| German n=007 3A 30 31 53 3C 30 30 36 0d 401+ 401-34 30 31 2B 0D 34 30 31 2D 0D | 30 31 53 3C 30 30 36 0d 401+ 401-34 30 31 2B 0D 34 30 31 2D 0D | |||||||
| Dutch | n=007 3A 30 31 53 3C 30 30 37 0d 401+ 401-34 30 31 2B 0D 34 30 31 2D 0D | |||||||
| Polish | n=008 3A 30 31 53 3C 30 30 38 0d 401+ 401-34 30 31 2B 0D 34 30 31 2D 0D | |||||||
| Russia | n=009 3A 30 31 53 3C 30 30 39 0d 401+ 401-34 30 31 2B 0D 34 30 31 2D 0D | |||||||
| Czech | n=010 3A 30 31 53 3C 30 31 30 0d 401+ 401-34 30 31 2B 0D 34 30 31 2D 0D | |||||||
| Danish | n=011 3A 30 31 53 3C 30 31 31 0d 401+ 401-34 30 31 2B 0D 34 30 31 2D 0D | |||||||
| Swedish | n=012 3A 30 31 53 3C 30 31 32 0d 401+ 401-34 30 31 2B 0D 34 30 31 2D 0D | |||||||
| Italian | n=013 3A 30 31 53 3C 30 31 33 0d 401+ 401-34 30 31 2B 0D 34 30 31 2D 0D | |||||||
| Turkish | n=018 3A 30 31 53 3C 30 31 38 0d 401+ 401-34 30 31 2B 0D 34 30 31 2D 0D | |||||||
| Arabic | n=019 3A 30 31 53 3C 30 31 39 0d 401+ 401-34 30 31 2B 0D 34 30 31 2D 0D | |||||||
| Ukrayina | n=021 3A 30 31 53 3C 30 32 31 0d 401+ 401-34 30 31 2B 0D 34 30 31 2D 0D | |||||||
| SET | Picture Mode | Standard | :01S=n | n=000 3A 30 31 53 3D 30 30 30 0d 401+ 401-34 30 31 2B 0D 34 30 31 2D 0D | ||||
| Bright | n=001 3A 30 31 53 3D 30 30 31 0d 401+ 401-34 30 31 2B 0D 34 30 31 2D 0D | |||||||
| Soft | n=002 3A 30 31 53 3D 30 30 32 0d 401+ 401-34 30 31 2B 0D 34 30 31 2D 0D | |||||||
| Customer | n=003 3A 30 31 53 3D 30 30 33 0d 401+ 401-34 30 31 2B 0D 34 30 31 2D 0D | |||||||
| SET | Hue(Color) | 000 ~ 100 :01S>n | n=000-100 | 3A 30 31 53 3E 30 30 30 0dto3A 30 31 53 3E 31 30 30 0d | 401+ 401-34 30 31 2B 0D 34 30 31 2D 0D | |||
| SET | Backlight | 000 ~ 100 :01S?n | n=000-100 | 3A 30 31 53 3F 30 30 30 0dto3A 30 31 53 3F 31 30 30 0d | 401+ 401-34 30 31 2B 0D 34 30 31 2D 0D | |||
| SET | Color Temp | Cool | :01S@n | n=000 3A 30 31 53 40 30 30 30 0d | 401+ 401-34 30 31 2B 0D 34 30 31 2D 0D | |||
| Standard | n=001 3A 30 31 53 40 30 30 31 0d | 401+ 401-34 30 31 2B 0D 34 30 31 2D 0D | ||||||
| Warm | n=002 3A 30 31 53 40 30 30 32 0d | 401+ 401-34 30 31 2B 0D 34 30 31 2D 0D | ||||||
| SET | Remote control command | Vol + | :01SAn | n=000 3A 30 31 53 41 30 30 30 0d | 401+ 401-34 30 31 2B 0D 34 30 31 2D 0D | |||
| Vol - | n=001 3A 30 31 53 41 30 30 31 0d | 401+ 401-34 30 31 2B 0D 34 30 31 2D 0D | ||||||
| Remote UP | n=010 3A 30 31 53 41 30 31 30 0d | 401+ 401-34 30 31 2B 0D 34 30 31 2D 0D | ||||||
| Remote DOWN | n=011 3A 30 31 53 41 30 31 31 0d | 401+ 401-34 30 31 2B 0D 34 30 31 2D 0D | ||||||
| Remote LEFT | n=012 3A 30 31 53 41 30 31 32 0d | 401+ 401-34 30 31 2B 0D 34 30 31 2D 0D | ||||||
| Remote RIGHT | n=013 3A 30 31 53 41 30 31 33 0d | 401+ 401-34 30 31 2B 0D 34 30 31 2D 0D | ||||||
| Remote OK | n=014 3A 30 31 53 41 30 31 34 0d | 401+ 401-34 30 31 2B 0D 34 30 31 2D 0D | ||||||
| Remote Menu Key | n=020 3A 30 31 53 41 30 32 30 0d | 401+ 401-34 30 31 2B 0D 34 30 31 2D 0D | ||||||
ADDITIONAL INFORMATION
| Type | Category | Parameter | CMD Hex Code CMD | Response | |||||
| Success | Failed | Success (Hex) | Failed (Hex) | ||||||
| SET | Remote control command | Remote Input source | :01SAn 3A 30 32 3A 30 | n=021 | 3A 30 31 53 41 30 32 31 0d 4 | 01+ 401- | 34 30 31 | 2B 0D 34 30 31 | 2D 0D |
| Remote Exit | n=022 | 3A 30 31 53 41 30 32 32 0d 4 | 01+ 401- | 34 30 31 | 2B 0D 34 30 31 | 2D 0D | |||
| Blank n=03 | 31 53 41 | 30 33 31 0d 401+ 401- 34 30 | 31 2B 0D | 34 30 | 31 2D 0D | ||||
| Freeze n=0 | 31 53 41 | 30 33 32 0d 401+ 401- 34 30 | 30 31 2B 0D | 34 30 | 31 2D 0D | ||||
| SET | Remote control (IR LOCK) | Disable | :01SBn 01 3A 30 | n=000 | 3A 30 31 53 42 30 30 30 0d 4 | 01+ 401- | 34 30 31 | 2B 0D 34 30 31 | 2D 0D |
| Enable n=0 | 31 53 42 | 30 30 31 0d 401+ 401- 34 30 | 30 31 2B 0D | 34 30 | 31 2D 0D | ||||
GET Command
| Type | Category | CMD Hex | Code CMD | Response | ||
| Success Parameter Failed | ||||||
| GET | Power | :01G0000 | 3A 30 31 47 30 30 30 0d | :01r0000 | Backlight off | 401- |
| :01r0001 | Backlight on | 401- | ||||
| :01r0002 | Power off | 401- | ||||
| GET | Treble | :01G1000 | 3A 30 31 47 31 30 30 0d | :01r1000 ~ :01r1100 | 000 ~ 100 | 401- |
| GET | Bass | :01G2000 | 3A 30 31 47 32 30 30 0d | :01r2000 ~ :01r2100 | 000 ~ 100 | 401- |
| GET | Balance | :01G3000 | 3A 30 31 47 33 30 30 0d | :01r3000 ~ :01r3100 | 000 ~ 100 | 401- |
| GET | Contrast | :01G4000 | 3A 30 31 47 34 30 30 0d | :01r4000 ~ :01r4100 | 000 ~ 100 | 401- |
| GET | Brightness | :01G5000 | 3A 30 31 47 35 30 30 0d | :01r5000 ~ :01r5100 | 000 ~ 100 | 401- |
| GET | Sharpness | :01G6000 | 3A 30 31 47 36 30 30 0d | :01r6000 ~ :01r6100 | 000 ~ 100 | 401- |
| GET | Sound Mode | :01G7000 | 3A 30 31 47 37 30 30 0d | :01r7001 | Standard | 401- |
| :01r7002 | Custom | 401- | ||||
| :01r7003 | Classroom | 401- | ||||
| :01r7004 | Meeting | 401- | ||||
| GET | Volume | :01G8000 | 3A 30 31 47 38 30 30 0d | :01r8000 ~ :01r8100 | 000 ~ 100 | 401- |
| GET | Mute | :01G9000 | 3A 30 31 47 39 30 30 0d | :01r9000 | Off | 401- |
| :01r9001 | On 401- | |||||
| GET | Video Source | :01G:000 3A | 30 31 47 3A 30 30 0d | :01r:000 | VGA | 401- |
| :01r:001 | HDMI1 | 401- | ||||
| :01r:002 | HDMI2 | 401- | ||||
| :01r:003 | AV | 401- | ||||
| :01r:101 | Android | 401- | ||||
| :01r:103 | Slot in PC | 401- | ||||
| GET | Aspect Ratio | :01G:000 | 3A 30 31 47 3B 30 30 0d | :01r:000 | 16:9 | 401- |
| :01r:001 | 4:3 401- | |||||
| :01r:002 | PTP | 401- | ||||
ADDITIONAL INFORMATION
| Type | Category | CMD Hex | Code CMD | Response | ||
| Success Parameter Failed | ||||||
| GET | Language :01G<000 3A 30 31 | 47 3C 30 30 0d | :01r<000 English | 401- | ||
| :01r<001 Français | 401- | |||||
| :01r<002 Español | 401- | |||||
| :01r<003 Traditional Chinese | 401- | |||||
| :01r<004 | Simplified Chinese | 401- | ||||
| :01r<005 | Português | 401- | ||||
| :01r<006 German | 401- | |||||
| :01r<007 | Dutch | 401- | ||||
| :01r<008 | Polish | 401- | ||||
| :01r<009 | Russia | 401- | ||||
| :01r<010 | Czech | 401- | ||||
| :01r<011 | Danish | 401- | ||||
| :01r<012 | Swedish | 401- | ||||
| :01r<013 | Italian | 401- | ||||
| :01r<018 Turkish | 401- | |||||
| :01r<019 | Arabic | 401- | ||||
| :01r<021 | Ukrayina | 401- | ||||
| GET | Picture Mode | :01G=000 3A 30 31 47 3D 30 30 0d | :01r=000 | Standard | 401- | |
| :01r=001 | Bright | 401- | ||||
| :01r=002 | Soft | 401- | ||||
| :01r=003 | Customer | 401- | ||||
| GET | Hue (Color) | :01G>000 | 3A 30 31 47 3E 30 30 30 0d | :01r>000 ~ :01r>100 | 000 ~ 100 | 401- |
| GET | Backlight | :01G?000 | 3A 30 31 47 3F 30 30 30 0d | :01r?000 ~ :01r?100 | 000 ~ 100 | 401- |
| GET | Color Temp | :01G@000 | 3A 30 31 47 40 30 30 30 0d | :01r@000 | Cool | 401- |
| :01r@001 | Standard | 401- | ||||
| :01r@002 | Warm | 401- | ||||
| GET | Remote control (IR LOCK) | :01GB000 | 3A 30 31 47 42 30 30 30 0d | :01rB000 | Disable | 401- |
| :01rB001 | Enable | 401- | ||||
ADDITIONAL INFORMATION
LED Indicator
| Power LED Color & Behavior Status | |
| Solid Red Standby mode | |
| Solid Blue Power on | |
| Flash Red then Blue continuously Backlight off | |
Troubleshooting
If you experience a problem with your device, please refer to the following information. If a problem persists, please contact your local reseller or service center.
No picture or sound.
- Make sure all signal and power connection are properly connected.
• Make sure the correct input mode is selected. Refer to the “Selecting an Input Source” section. - Make sure the device is not turned off.
- Turn off the mute function.
- Make sure the volume is not set to the minimum level.
The device is automatically shut down.
- Check whether there is sudden power outage.
- Make sure the power cord is not disconnected.
The signal out of range
• The signal may be incompatible. Refer to the "Supported Timing List" section.
- For the VGA input source, try the automatic screen adjustment or adjust the Clock and Phase settings from the Adjust menu. Refer to the "Configure the Adjust Settings (for VGA input only)" section.
The touch panel does not respond
• Make sure the screen is not exposed to direct sunlight or other strong light.
- For the external device connection, make sure the USB cable is properly connected to the Touch USB port of the device.
If the remote control does not work
- Check the operating angle of the remote control is pointed within ± 30^ to the IR receiver on the device.
• Make sure there are not any obstructions between the remote control and the device. The distance between the remote control and the IR sensor window should not be longer than 8 meters.
• Make sure batteries are inserted correctly and replace the batteries if they are depleted. Refer to the "Installing/Replacing the Remote Control Batteries" section.
ADDITIONAL INFORMATION
Maintenance
Proper routine maintenance can help with early fault detection and keep the device looking like new.
IMPORTANT! Before cleaning and performing any maintenance task, make sure to unplug the power cord from the power outlet to prevent electric shock.
Cleaning the Screen
- When the screen requires cleaning, please unplug the power cord first.
- Please use a soft, dust-free, dry cloth to wipe the screen.
- Do not use water or a spray cleaner to clean the device.
- Please contact the service center for internal cleaning of the device.
Clean the Front Frame
Use a dry, soft, lint-free cloth to wipe the front frame.
ADDITIONAL INFORMATION
Optoma Global Offices
For service or support, please contact your local office.
USA
47697 Westinghouse Drive, 888-289-6786
Fremont, CA 94539, USA 510-897-8601
www.optomausa.com services@optoma.com
Canada
47697 Westinghouse Drive, 888-289-6786
Fremont, CA 94539, USA 510-897-8601
www.optomausa.com services@optoma.com
Latin America
47697 Westinghouse Drive, 888-289-6786
Fremont, CA 94539, USA 510-897-8601
www.optomausa.com services@optoma.com
Europe
Unit 1, Network 41, Bourne End Mills,
Hemel Hempstead, Herts,
HP1 2UJ, United Kingdom +44 (0) 1923 691 800
www.optoma.eu +44 (0) 1923 691 888
Service Tel : +44 (0)1923 691865 service@tsc-europe.com
Benelux BV
Randstad 22-123 +31 (0) 36 820 0252
1316 BW Almere +31 (0) 36 548 9052
The Netherlands
www.optoma.nl
France
info@os-worldwide.com
www.os-worldwide.com
Taiwan
12F., No.213, Sec. 3, Beixin Rd.,
Xindian Dist., New Taipei City 231,
Taiwan, R.O.C.
www.optoma.com.tw

+886-2-8911-8600

+886-2-8911-6550

services@optoma.com.tw
asia.optoma.com
Hong Kong
Unit A, 27/F Dragon Centre,
79 Wing Hong Street,
Cheung Sha Wan,
Kowloon, Hong Kong

+852-2396-8968

+852-2370-1222
www.optoma.com.hk
China
5F, No. 1205, Kaixuan Rd.,
Changning District
Shanghai, 200052, China

+86-21-62947376

+86-21-62947375
www.optoma.com.cn



- Interactive Flat Panel
- TABLE OF CONTENTS
- SAFETY 4
- INTRODUCTION 7
- SETUP AND INSTALLATION....12
- USING THE DEVICE.... 25
- BASIC OPERATIONS....28
- USING THE APPS 46
- ADDITIONAL INFORMATION 69
- SAFETY
- Safety Instructions
- Copyright
- Disclaimer
- Trademark Recognition
- FCC
- Notice: Shielded cables
- Caution
- Operation Conditions
- Notice: Canadian users
- Declaration of Conformity for EU Countries
- WEEE
- Disposal instructions
- INTRODUCTION
- Package Contents
- Optional Accessories
- Product Overview
- Front View
- SETUP AND INSTALLATION
- Wall Mounting Installation
- Note:
- Installing an External Mini Computer
- Stand Mounting Installation (Optional)
- Using the Remote Control
- Installing/Replacing the Remote Control Batteries
- Remote Control Operating Range
- Making Connection
- Connecting to Power
- Connecting External Devices
- HDMI input connection
- VGA input connection
- AV input connection
- Audio output connection
- Coaxial output connection
- HDMI output connection
- USB connection
- RS232 connection
- LAN connection
- Wi-Fi connection
- USING THE DEVICE
- Turning the Power On/Off
- Powering on
- Powering off
- Setup Wizard
- IMPORTANT!
- BASIC OPERATIONS
- Home Screen Overview
- General Settings
- Selecting an Input Source
- Activating the Low Blue Light Function
- Adjusting the Volume Level
- Adjusting the Backlight Level
- Configuring the Audio Settings
- Configuring the Screen Settings
- Configuring the Display Settings
- Configure the Adjust Settings (for VGA input only)
- Side Toolbar
- Viewing the Recent Tasks
- Annotations Tool
- Screen Freezing
- Other Utilities
- AirShare
- a. Voter
- b. Responder
- c. Message
- Cloud Drive
- Advanced Settings
- Configuring the Network Settings
- Wireless network
- Wired network
- USING THE APPS
- Note
- Advanced Options
- Screenshare
- Mobile Device
- Computer
- Finder
- Playing Multimedia Files
- Playing videos
- Playing music
- Viewing photos
- Set a wallpaper
- Screen Lock
- Browser
- Keeper
- System Update
- ADDITIONAL INFORMATION
- Dimensions
- RS232 Protocol Function List
- LED Indicator
- Troubleshooting
- Maintenance
- Cleaning the Screen
- Clean the Front Frame
- Optoma Global Offices
- USA
- Canada
- Latin America
- Europe
- Benelux BV
- France
- Taiwan
- Hong Kong
- China
Brand : OPTOMA
Model : OP861RK
Category : Monitor