
UWTS56-20G - Wine cellar PKM - Free user manual and instructions
Find the device manual for free UWTS56-20G PKM in PDF.


| Product Type | Wine Conditioning Unit (Undercounter or Freestanding) |
| Model | PKM UWTS56-20G |
| Total Capacity | 20 standard Bordeaux bottles (750 ml) |
| Net Volume | 56 L |
| Dimensions (H × W × D) | 820 × 295 × 570 mm |
| Net Weight | 26.5 kg |
| Gross Weight | 28.5 kg |
| Power Supply | 220-240 V AC / 50 Hz |
| Energy Efficiency Class | G |
| Annual Energy Consumption | 135 kWh/year |
| Temperature Range | 5 °C to 20 °C (41 °F to 68 °F) |
| Default Temperature | 12 °C (53.6 °F) |
| Number of Temperature Zones | 1 |
| Noise Emission | 41 dB(A) re 1 pW, Class C |
| Refrigerant | R600a (18 g) |
| Climate Class | SN/N/ST (10 °C to 38 °C ambient) |
| Control Panel | Touch Control (ON/OFF, Illumination, Lock, Increase/Decrease, °C/°F) |
| Interior Light | LED (replaceable by qualified professional) |
| Shelves | 5 wooden shelves |
| Door | Tempered safety glass, reversible hinge |
| Door Handle | External, included (requires installation) |
| Child Safety Lock | Yes (auto-activation after 15 s inactivity) |
| Defrosting | Automatic |
| Adjustable Feet | 2 front feet for levelling |
| Installation Type | Freestanding or undercounter (requires ventilation clearance) |
| Guarantee | 24 months (subject to conditions) |
Frequently Asked Questions - UWTS56-20G PKM
User questions about UWTS56-20G PKM
0 question about this device. Answer the ones you know or ask your own.
Ask a new question about this device
Download the instructions for your Wine cellar in PDF format for free! Find your manual UWTS56-20G - PKM and take your electronic device back in hand. On this page are published all the documents necessary for the use of your device. UWTS56-20G by PKM.
USER MANUAL UWTS56-20G PKM
INSTRUCTION MANUAL WINE CONDITIONING UNIT
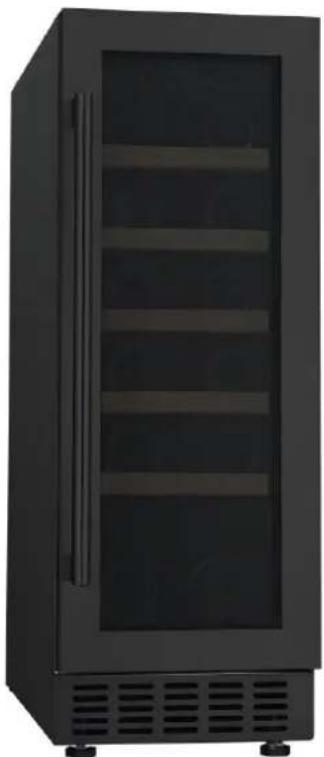
UWTS56-20G
natural_image
Black refrigerator with glass doors and ventilation slots (no visible text or labels)natural_image
Diagram showing a mechanical assembly with rotating components and a separate view of a device (no text or symbols)natural_image
Technical line drawing of a window frame with a 5-pin bracket and mounting bracket (no text or symbols)5
SCHARNIERPLATTE MIT SCHARNIERACIUSE
natural_image
Diagram of a window frame with an arrow pointing to a small bracket labeled '5' (no text or symbols beyond the number)| 5 | SCHARNIERPLATTE MIT SCHARNIERACHSE |
natural_image
Line drawing of two bottles with a central container and a side outlet (no text or symbols)natural_image
Line drawing of a multi-level refrigerator with cooling fans and rows of circular components (no text or symbols)MAX. 20 FLASCHEN
natural_image
Diagram of aircraft wing rotation showing propeller and rotor blades (no text or labels)7.1 Abtauen
Dear customer! We would like to thank you for purchasing a product from our wide range of domestic appliances. Read the complete instruction manual before you operate the appliance for the first time. Retain this instruction manual in a safe place for future reference. If you transfer the appliance to a third party, also hand over this instruction manual.
Index
- Safety information....45
1.1 Abbreviation....46
1.2 Signal words ......46
1.3 Safety instructions....46
-
Climatic classes ....50
-
Installation 51
3.1 Unpacking and positioning....51
3.2 Dimensions and installation drawing....52
3.2.1 Dimensions of the appliance....52
3.2.2 Installation drawing....52
3.3 Levelling....53
3.4 Installation of the door handle....54
3.5 Change of the hinge position .... 55
- Description of the appliance / control panel....60
4.1 Description of the appliance ....60
4.2 Control panel: operating buttons and indicators of the display....61
- Operation....62
5.1 Before initial operation....62
5.2 «On / Off»-button 63
5.3 «Illumination»-button 64
5.4 Child safety lock....64
5.5 Setting of the temperature 65
5.5.1 Selection of the temperature unit....66
5.5.2 Setting of the temperature of the wine storage zone....67
5.6 Capacity of the appliance....67
5.7 Recommended storage / arrangement of wine bottles....68
5.7.1 Recommended storage and drinking temperatures....69
5.8 Acoustic alarm signal....69
- Environmental protection 69
6.1 Environmental protection: disposal....69
6.2 Energy saving....70
6.3 Operational parameters....70
- Cleaning and maintenance....70
7.1 Defrosting....72
7.2 Replacing of the illuminant....72
- Troubleshooting....72
8.1 Error codes....75
-
Decommissioning....75
-
Technical data....76
-
Waste management 78
-
Guarantee conditions ....79

Do not dispose of this appliance together with your domestic waste. The appliance must be disposed of at a collecting centre for recyclable electric and electronic appliances. Do not remove the symbol from the appliance.
The figures in this instruction manual may differ in some details from the current design of your appliance. Nevertheless, follow the instructions in such a case. Delivery without content.
i Any modifications, which do not influence the functions of the appliance. shall remain reserved by the manufacturer.
i Please dispose of the packaging with respect to your current local and municipal regulations.
The appliance you have purchased may be an enhanced version of the unit this manual was printed for. Nevertheless, the functions and operating conditions are identical. This manual is therefore still valid. Technical modifications as well as misprints shall remain reserved.
EU - DECLARATION OF CONFORMITY
★ The products, which are described in this instruction manual, comply with the harmonised regulations.
★ The relevant documents can be requested from the final retailer by the competent authorities.
MAKE SURE THAT THIS MANUAL IS AVAILABLE TO ANYONE USING THE APPLIANCE AND MAKE SURE THAT IT HAS BEEN READ AND UNDERSTOOD PRIOR TO USING THE DEVICE.
1. Safety information
READ THE SAFETY INFORMATION AND THE SAFETY INSTRUCTIONS CAREFULLY BEFORE YOU OPERATE THE APPLIANCE FOR THE FIRST TIME.
All information included in those pages serve for the protection of the operator. If you ignore the safety instructions, you will endanger your health and life.
Store this manual in a safe place so you can use it whenever it is needed. Strictly observe the instructions to avoid damage to persons and property.
Check the technical periphery of the appliance! Do all wires and connections to the appliance work properly? Or are they time-worn and do not match the technical requirements of the appliance? A check-up of existing and newly-made connections must be done by an authorised professional. All connections and energy-leading components (incl. wires inside a wall) must be checked by a qualified professional. All modifications to the electrical mains to enable the installation of the appliance must be performed by a qualified professional.
The appliance is intended for private use only as well as to be used (1) in staff kitchen areas of shops, offices and other working environments; (2) by clients in hotels, motels, B&B and other residential type environments; (3) for catering and similar non-retail applications.
The appliance is intended for the cooling of wine bottles only.
The appliance is intended for indoor-use only.
The appliance is not intended to be operated for commercial purposes, during camping and in public transport.
i Operate the appliance in accordance with its intended use only.
Do not allow anybody who is not familiar with this instruction manual to operate the appliance.
This appliance may be operated by children aged from 8 years and above as well as by persons with reduced physical, sensory and mental capabilities or lack of experience and knowledge if they are supervised or have been instructed concerning the safe use of the appliance and do comprehend the hazards involved. Children must not play with the appliance. Cleaning and user-maintenance must not be carried out by children unless they are supervised.
1.1 Abbreviation
SENSOR BUTTON(S)
▶ BUTTON(S)
1.2 Signal words
⚠️ DANGER! indicates a hazardous situation which, if ignored, will result in death or serious injury.
⚠ WARNING! indicates a hazardous situation which, if ignored, could result in death or serious injury.
CAUTION! indicates a hazardous situation which, if not avoided, may result in minor or moderate injury.
NOTICE! indicates possible damage to the appliance.
1.3 Safety instructions
DANGER!
To reduce the risk of electrocution.
- Non-compliance of the orders of this instruction manual will endanger the life and health of the operator and/or can result in damages to the appliance.
- Do not connect the appliance to the mains if the appliance itself or the power cord or the plug are visibly damaged.
- The technical data of your energy supplier must meet the data on the rating plate of the appliance.
- Do not modify the plug provided with the appliance, if it will not fit the outlet, have a proper outlet installed by a qualified electrical technician (not covered by the guarantee).
- Never try to repair the appliance yourself. If the appliance does not operate properly, please contact the aftersales service or the shop you purchased the appliance at. ^17 Original spare parts should be used only.
- Always check that the power cord is not placed under the appliance or damaged by moving the appliance.
-
When the power cord is damaged, it must be replaced by the manufacturer or an authorised aftersales service or a qualified professional only.
-
Never pull the power supply cable to unplug the appliance. Always use the power plug itself to unplug the appliance. RISK OF ELECTRIC SHOCK!
- Never touch the power plug, the power switch or other electrical components with wet or damp hands. RISK OF ELECTRIC SHOCK!
⚠ WARNING!
To reduce the risk of burns, electrocution, fire or injury to persons.
- This appliance is equipped with the environmental-friendly refrigerant R600a. The refrigerant R600a is inflammable. The components of the cooling circuit must neither be damaged during transport nor use.
- If any part of the cooling circuit is damaged, the appliance must not stand near a fire, naked light or spark-generating devices. Contact the aftersales service or the shop you purchased the appliance at immediately. ^18
- If gas is set free at the installation site:
a) open all windows.
b) do not unplug the appliance and do not use the control panel or thermostat.
c) do not touch the appliance until all the gas has gone.
d) otherwise, sparks can be generated which will ignite the gas.
- Keep all components of the appliance away from fire and other sources of ignition when you dispose of or decommission the appliance.
- Do not install the appliance near of volatile or combustible materials (e.g., gas, fuel, alcohol, paints) and in rooms which may have poor air circulation (e.g., garage).
- EXPLOSION HAZARD! Do not store any explosive materials or sprays, which contain flammable propellants, in your appliance. Explosive mixtures can explode there.
- While unpacking, the packaging materials (polythene bags, polystyrene pieces, etc.) should be kept away from children and pets. CHOKING HAZARD! RISK OF INJURY!
- Always observe the required minimum distances for proper ventilation.
- Do not connect the appliance to the electric supply unless all packaging and transit protectors have been removed.
-
Operate the appliance with 220\~240 V/50 Hz/AC only. All connections and energy-leading components must be replaced by an authorised professional.
-
Do not use a socket board or a multi socket when connecting the appliance to the mains.
- Never place portable multiple sockets or portable power supplies behind the appliance. RISK OF FIRE!
- Do not connect the appliance to an energy saving plug (e.g., Sava Plug) and to inverters which convert direct current (DC) into alternating current (AC), e.g., solar systems, power supply of ships.
- A dedicated and properly grounded socket meeting the data of the plug is required to minimise any kind of hazard. The appliance must be grounded properly.
- Always check that the power cord is not placed under the appliance or damaged by moving the appliance.
- The technical data of your energy supplier must meet the data on the model plate of the appliance.
- Your domestic circuit must be equipped with an automatic circuit breaker.
- Do not modify the appliance.
- Turn off the power before you install the appliance and before you connect it to the mains. RISK OF FATAL ELECTRIC SHOCK!
- Disconnect the appliance from the mains before you clean or maintain it. RISK OF ELECTRIC SHOCK!
- In the event of power failure disconnect the appliance from the mains.
- Remove dust accumulation at the power plug, at the safety power socket and at all plug connectors regularly. RISK OF FIRE!
- Keep the cord away from heated surfaces.
- The power plug must always be accessible after installation.
- Do not use any electric appliances inside your appliance unless they are recommended by the manufacturer of your appliance.
- Do not put any heat-radiating appliances onto your appliance.
- Do not install the appliance in a place where it may come in contact with water/rain; otherwise, the insulation of the electrical system will be damaged.
- Do not put a water-boiler or vases onto your appliance. The electrical components of your appliance can be seriously damaged by water over-boiling or spilled water.
- Do not use any steam cleaners to clean or defrost the appliance. The steam can get into contact with the electrical parts and cause an electrical short. RISK OF ELECTRIC SHOCK!
- Never use mechanic devices, knives or other sharp-edged items to remove encrusted ice inside the appliance. RISK OF ELECTRIC SHOCK caused by damaging the interior of the appliance.
-
Children must never play with the appliance.
-
If you decommission your appliance (even temporarily), ensure that children cannot get into the appliance. Strictly observe the corresponding safety instructions numbers. 1 and 4, chapter DECOMMISSIONING, ultimate
-
Strictly observe the instructions in chapter « INSTALLATION ».
CAUTION!
- The condenser and the compressor, located at the rear of the appliance, can reach high temperatures during ordinary operation. Carry out the installation according to this manual. An insufficient ventilation of the appliance will impair its operation and will damage the appliance. Do not cover or block the ventilation slats at any time.
- Do not touch extremely cooled surfaces with wet or damp hands, because your skin may stick on these surfaces. RISK OF INJURY!
- Always ensure that your fingers are not between the door and the housing of the appliance while closing the door. RISK OF CRUSHING!
NOTICE
- Do not store dry ice in the appliance.
- When you move the appliance, hold it at its base and lift it carefully. Keep the appliance in an upright position.
- When you move the appliance using the rollers (depending on model), only move it forwards or backwards as the rollers are not pivotable and do not allow any lateral motion. Lateral motion can damage the appliance and floor seriously.
- Do not tilt the appliance more than 45^ .
- If the appliance is transported in a horizontal position, some oil may flow from the compressor into the refrigerant circuit.
- Leave the appliance in an upright position for at least 2 hours before you switch it on to ensure, that the oil has flowed back into the compressor.
- If you use the appliance for the first time or the appliance has been disconnected from the mains for a longer period of time, allow the appliance to cool down for approx. 1 hour before you store wine bottles in the appliance.
- Never use the door for moving the appliance as you will damage the hinges.
- The appliance must be transported and installed by at least two persons.
- When you unpack the appliance, you should take note of the position of every part of the interior accessories in case you have to repack
and transport it at a later point of time.
- Do not operate the appliance unless all components are installed properly.
- Do not stand or lean on the base, the drawers, the doors etc of the appliance.
- Never close the doors of the appliance while shelves or drawers are extended, otherwise you will damage the shelves / drawers and the appliance.
- Do not put hot liquids or hot foodstuff into the appliance.
- The air vents of the appliance or its built-in structure (if the appliance is suitable for being built-in) must be completely open, unblocked and free of any kind of dirt.
- Do not place the wine bottles directly against the air outlet on the rear wall ^19 .
- Do not overfill the shelves to protect them from damage.
- The appliance has a capacity of 20 wine bottles (standard Bordeaux bottles / 750 ml).
- Never store more than 2 layers of wine bottles on one shelf. RISK OF DAMAGE!
- Clean the appliance at least once a month (s. chapter CLEANING AND MAINTENANCE).
- If you do not use the appliance for a longer period of time, switch it off, disconnect it from the mains, clean it carefully and open the door to ventilate the interior of the appliance.
- The rating plate must not be removed or made illegible, otherwise all terms of the warranty become invalid!
SAVE THESE INSTRUCTIONS.
★ The manufacturer and distributor are not responsible for any damage or injury in the event of failure to comply with these instructions.
2. Climatic classes
Look at chap. «TECHNICAL DATA» for information about the CLIMATIC CLASS of your appliance. Your appliance can be operated in rooms with relevant room temperatures as named below.
| CLIMATIC CLASS | AMBIENT TEMPERATURE | |
| SN | +10°→+32 °C | e.g., unheated cellar |
| N | +16°→+32 °C | inner home temperature |
| ST | +16°→+38 °C | inner home temperature |
| T | +16°→+43 °C | inner home temperature |
3. Installation
i All dimensions in these chapters are given in millimetres.
3.1 Unpacking and positioning
⚠ WARNING! While unpacking, the packaging materials (polythene bags, polystyrene pieces, etc.) should be kept away from children and pets. CHOKING HAZARD! RISK OF INJURY!
- This appliance is designed for under-counter installation but can also be used as a free-standing appliance.
- Unpack the appliance carefully. Dispose of the packaging as described in chapter waste management.
- Remove all packaging materials.
- The accessories of your appliance can be protected from damage due to transportation (adhesive tapes etc.). Remove such tapes very carefully. Remove remains of such tapes with a damp cloth using lukewarm water and a mild detergent (see also chapter CLEANING AND MAINTENANCE). Never remove any components of the back of the appliance!
- Install the appliance in a suitable position with an adequate distance from sources of heat and cold.
- If installation near a heat source is unavoidable, use a suitable insulation plate or keep the following minimum distances to the heat source:
| To electric cookers | at least 30 mm |
| To radiators or ovens | at least 300 mm |
| To another refrigerators | at least 20 mm |
- Install the appliance in a dry and well-ventilated place.
- Protect the appliance from direct sunlight.
- The door(s) must open completely and without hindrance.
-
Install the appliance on a level, dry and solid floor. Check the correct installation with a bubble level.
-
Check that the appliance and the power cord are not damaged.
- Connect the appliance to the mains properly.
- The rating plate is inside the appliance or at the back.
3.2 Dimensions and installation drawing
3.2.1 Dimensions of the appliance
DIMENSIONS OF THE APPLIANCE
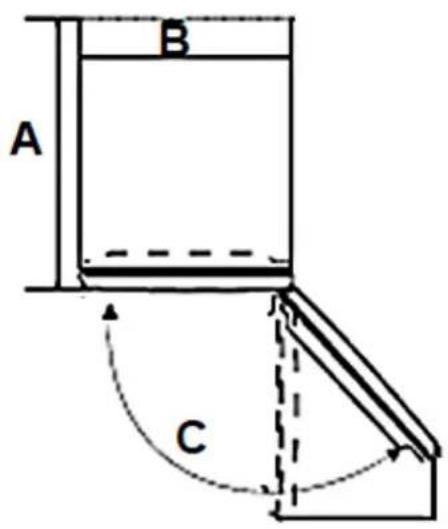
| A = DEPTH / B = WIDTH / C = DOOR OPENING ANGLE | ||
| A | B | Height |
| 570 mm | 295 mm | 820 mm |
i Please observe the additional front and lateral space requirement of the open door(s) relevant to the door opening angle (C) of your appliance.
3.2.2 Installation drawing
i Observe the required minimum distances for proper ventilation (s. fig. below, dimensions).
i All dimensions are given in millimetres.
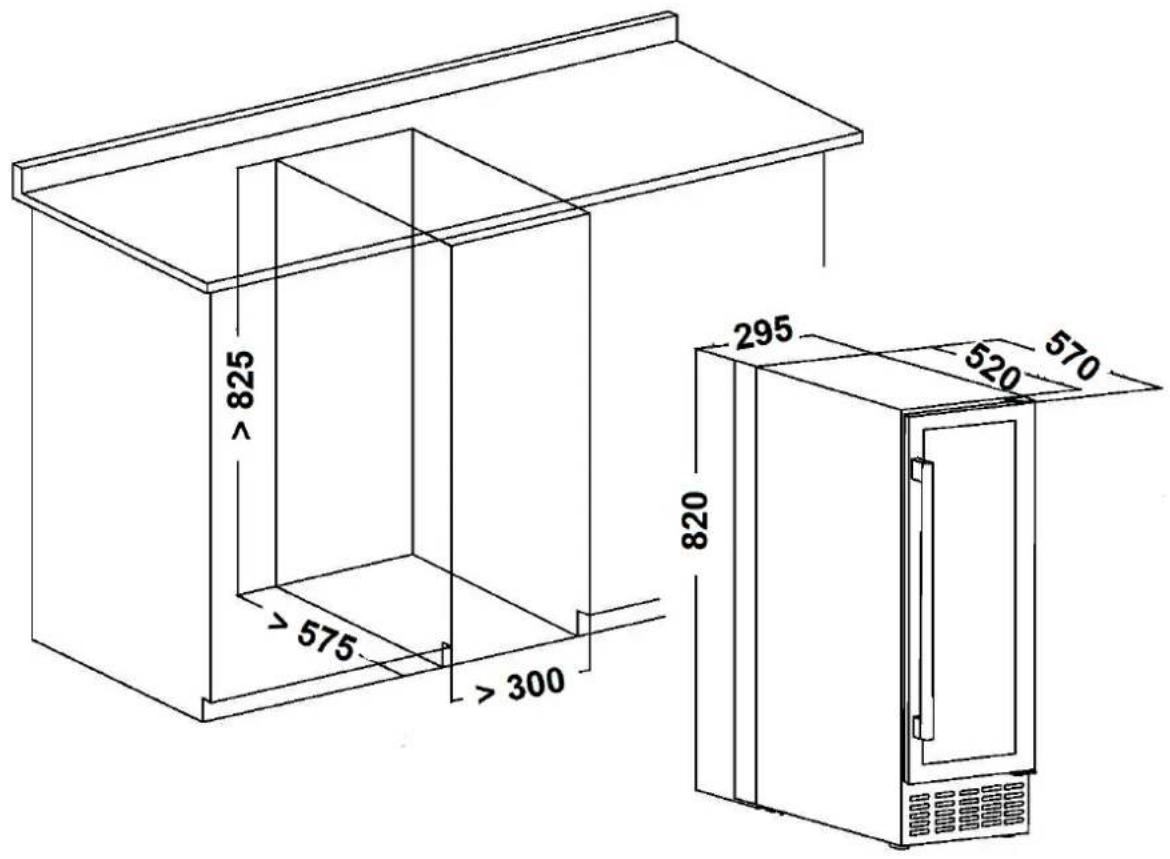
NOTICE! Damages to the appliance caused by improper ventilation are not subject to the guarantee or the warranty!
3.3 Levelling
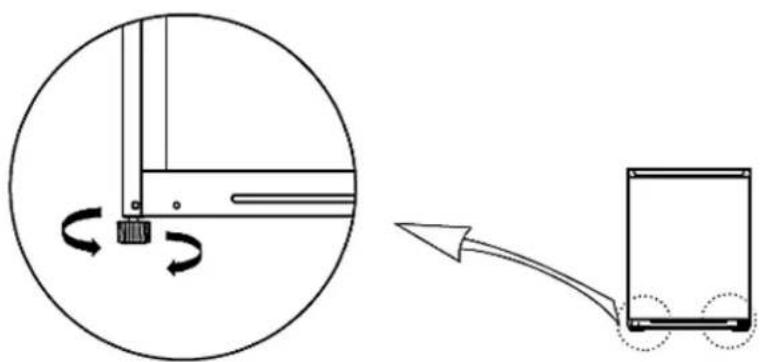
Use the adjustable supporting feet for proper levelling and for proper air circulation in the lower sectors of the appliance. Adjust the supporting feet using a suitable spanner.
natural_image
Diagram showing a mechanical assembly with rotating components and a separate view of a device (no text or symbols)Fig. similar: fig. serves as an example only.
The appliance must stand in a stable and level position to ensure proper operation. The supporting feet must stand firmly on the ground so that the appliance does not wobble. Adjust the supporting feet accordingly. The firm contact of the supporting feet with the ground also ensures that the appliance does not vibrate or move unintentionally.
When the appliance is not levelled, the door and the magnetic seals will not close properly.
3.4 Installation of the door handle
◆ Install the door handle on the door frame of the appliance.
The door handle (incl. screws) is in a separate package inside the appliance packaging.
HOW TO INSTALL THE DOOR HANDLE
-
Carefully pull out the door seal (1) a little to uncover the two prepared installation holes (2) on the inside of the door frame (3 / s. fig. below).
-
Align the door handle (4) with the prepared installation holes (2) from the outside, insert the supplied screws (5) into the installation holes and the door handle from the inside (s. fig. below) and screw them tight using a screwdriver.
-
Reinstall the door seal properly.
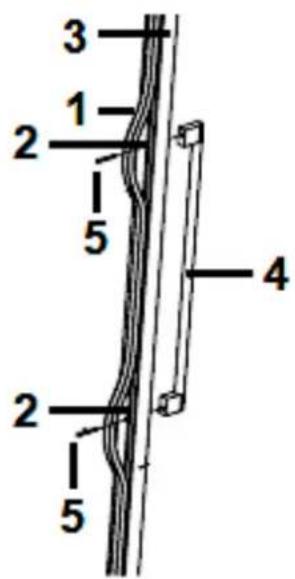
| 1 | DOOR SEAL |
| 2 | PREPARED INSTALLATION HOLES |
| 3 | INSIDE OF THE DOOR FRAME |
| 4 | DOOR HANDLE |
| 5 | SCREWS (supplied) |
NOTICE! Ensure that the door seal is properly in place!
3.5 Change of the hinge position
⚠ WARNING! Switch off and unplug the appliance before changing the hinge position. RISK OF ELECTRIC SHOCK!
⚠️ CAUTION! The change of the position must be carried out by at least two persons; otherwise, you may hurt yourself or damage the appliance.
NOTICE! You should contact a qualified technician if you want to have the door swing reversed. Only try to carry out the steps described below when you believe that you are qualified to do so.
NOTICE! Adjust the door properly before you finally tighten the screws of the hinges. The seals must close properly.
PREPARATORY MEASURES
▶ Empty the appliance.
If possible ^20 , remove all shelves / trays from the appliance so that they cannot be damaged.
➢ Do not lay the appliance flat as this can damage the cooling system.
➢ All parts removed must be saved for proper reinstallation of the door.
➢ Always remove the door carefully. Keep the door in a safe place so that they cannot be damaged.
| ACCESSORIES INCLUDED IN THE SCOPE OF DELIVERY(in the plastic bag supplied) |
| TOP LEFT DOOR HINGE |
| BOTTOM LEFT DOOR HINGE |
HOW TO CHANGE THE HINGE POSITION
-
Disconnect the appliance from the power supply (unplug).
-
Open the door 90 degrees and hold it firmly.
-
Unscrew the two screws (1) of the bottom right door hinge (2) and remove them (s. fig. below). Keep the screws in a safe place.
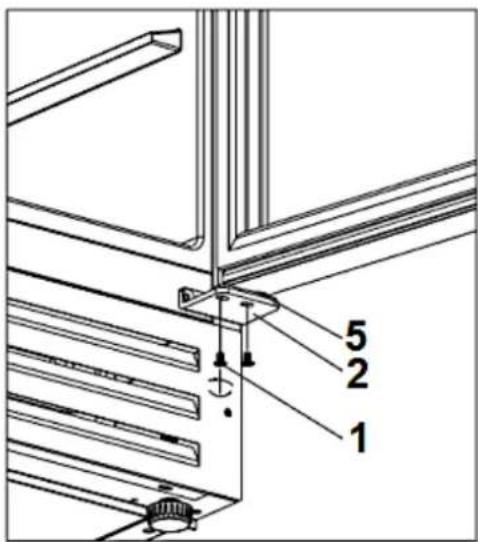
| 1 | SCREWS |
| 2 | BOTTOM RIGHT DOOR HINGE |
| 5 | HINGE PLATE INCL. HINGE PIN (is located between the bottom door hinge and the underside of the door) |
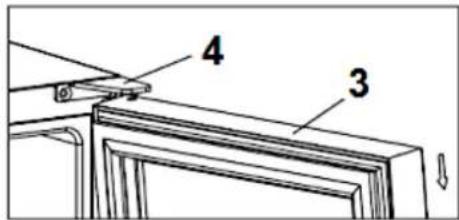
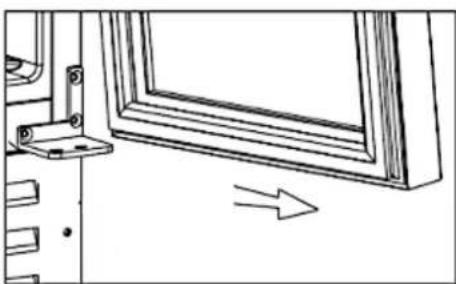
- Pull the door (3) outwards slowly and carefully (s. fig. below / note the direction of the arrow) to release the bottom door hinge (2). Then pull the door (3) downwards slowly until you release it from the top right door hinge (4). Remove the door.
natural_image
Technical line drawing of a window frame with an arrow indicating direction (no text or symbols)| 3 | DOOR |
| 4 | TOP RIGHT DOOR HINGE |
- Remove the bottom hinge plate incl. hinge pin (5) from the door hinge hole (se. fig. below).
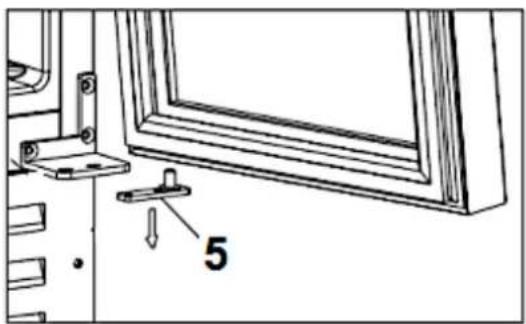
natural_image
Technical line drawing of a window frame with a labeled component (no text or symbols beyond the number 5)5
HINGE PLATE INCL. HINGE PIN
- Unscrew the top right door hinge (4) and the bottom right door hinge (2 / s. fig. below).
- Keep the two door hinges in the plastic bag: for possible future use.
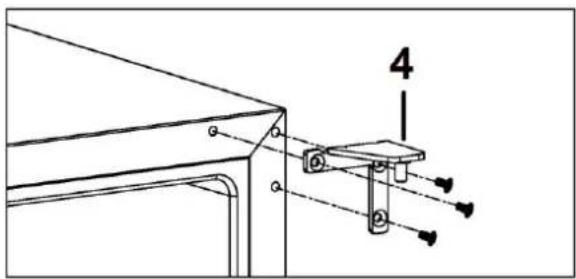
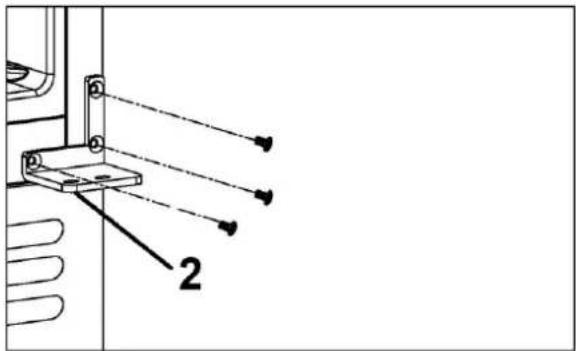
| 2 | BOTTOM RIGHT DOOR HINGE |
| 4 | TOP RIGHT DOOR HINGE |
-
Remove the top left door hinge and the bottom left door hinge from the plastic bag.
-
Align the top left door hinge (6) and the bottom left door hinge (7) with the prepared holes on the left side of the appliance properly and screw both door hinges tight (s. fig. below).
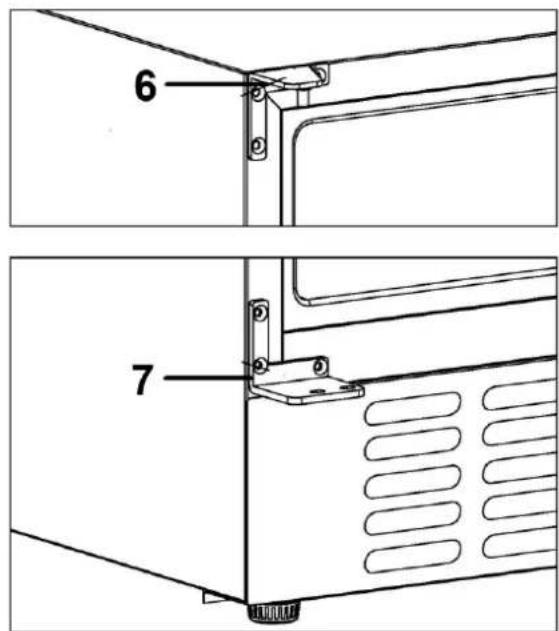
| 6 | TOP LEFT DOOR HINGE |
| 7 | BOTTOM LEFT DOOR HINGE |
- Turn the door upside down by 180 degrees and insert the hinge pin of the bottom hinge plate (5) into the bottom left hinge hole of the door (s. fig. below).
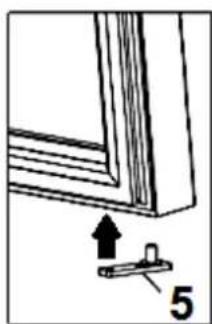
natural_image
Diagram of a window frame with an arrow pointing to a small bracket labeled '5' (no text or symbols beyond the number)| 5 | HINGE PLATE INCL. HINGE PIN |
-
Carefully insert the hinge pin of the top door hinge (6) into the top hinge hole of the appliance door. Meanwhile, hold the appliance door with your hand so it cannot drop down.
-
Now slowly slide the door with the bottom hinge plate (5) onto the bottom left door hinge (7 / s. fig. below). Align the holes of the hinge plate (5) with the holes of the bottom door hinge (7). The hinge plate is now between the bottom door hinge and the underside of the door.
-
Now fix the bottom left door hinge using the two screws.
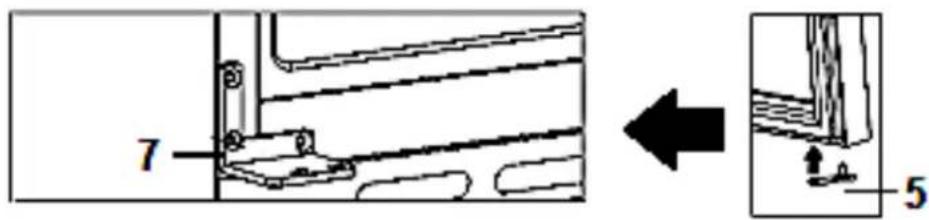
| 5 | HINGE PLATE INCL. HINGE PIN (installed in the door) |
| 7 | BOTTOM LEFT DOOR HINGE |
NOTICE! Adjust the door properly before you finally tighten the screws of the hinge. The seal must close properly.
- Ensure that the door of the appliance is fixed safely and properly by the hinges.
4. Description of the appliance / control panel
4.1 Description of the appliance
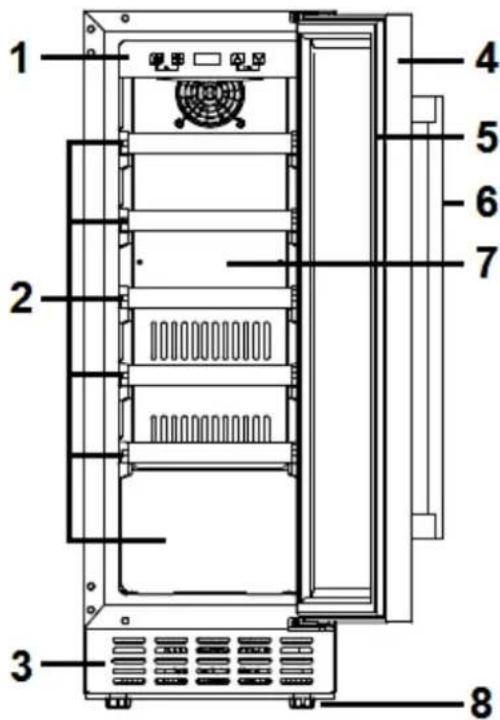
Fig. similar: modifications are possible.
| 1 | CONTROL PANEL |
| 2 | WINE STORAGE ZONE / WOODEN SHELVES |
| 3 | VENTILATION GRID |
| 4 | DOOR OF THE APPLIANCE |
| 5 | SEAL OF THE DOOR |
| 6 | EXTERNAL DOOR HANDLE |
| 7 | COVER PLATE |
| 8 | ADJUSTABLE FEET |
4.2 Control panel: operating buttons and indicators of the display
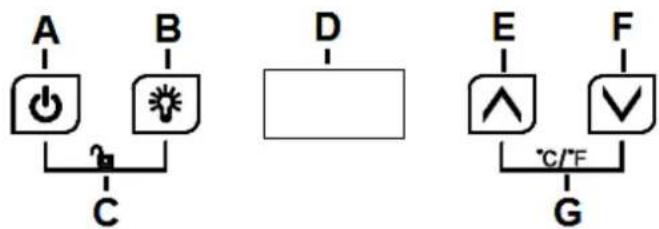
Fig. similar: modifications are possible.
| OPERATING BUTTONS OF THE CONTROL PANEL | |
| A | «ON/OFF»-BUTTON➢ Use this button to switch ON/OFF the appliance (OFF = STANDBY MODE).➢ See chapter 5.2 «ON/OFF»-BUTTON. |
| B | «ILLUMINATION»-BUTTON➢ Use this button to switch on/off the INTERIOR ILLUMINATION of the appliance.➢ See chapter 5.3 «ILLUMINATION»-BUTTON. |
| C | «LOCK»-BUTTON➢ Button combination «A+B» (touch these buttons simultaneously).➢ Use these buttons to activate the CHILD SAFETY LOCK.➢ See chapter 5.4 CHILD SAFETY LOCK. |
| E | «INCREASE»-BUTTON➢ Use this button to INCREASE the temperature in the wine storage zone.➢ See chapter 5.5 SETTING OF THE TEMPERATURE. |
| F | «DECREASE»-BUTTON➢ Use this button to DECREASE the temperature in the wine storage zone.➢ See chapter 5.5 SETTING OF THE TEMPERATURE. |
| G | «CELSIUS/FAHRENHEIT»-BUTTON➢ Button combination «E+F» (touch these buttons simultaneously).➢ Use these buttons to change between the TEMPERATURE UNITS degree Celsius and degree Fahrenheit.➢ See chapter 5.5 SETTING OF THE TEMPERATURE. |
INDICATORS OF THE DISPLAY
D
Indicator of the temperature of the wine storage zone in ^ C or ^ F.
5. Operation
⚠ WARNING! To disconnect the appliance from the mains, you must unplug the appliance or use a cut-off device.
NOTICE! When you connect the appliance to the mains for the first time, it is switched on immediately and ready for operation.
◆ Operate the appliance according to the instructions about the control of the functions described in the following chapters.
WHEN YOU OPERATE THE APPLIANCE FOR THE FIRST TIME, THE DEFAULT TEMPERATURE IS:
IN THE WINE STORAGE ZONE
$$ + 1 2 ^ {\circ} \mathrm{C} (+ 5 3. 6 ^ {\circ} \mathrm{F}) ^ {2 1} $$
If required, the temperature setting of the wine storage zone can be adjusted manually (s. chapter 5.5 SETTING OF THE TEMPERATURE).
5.1 Before initial operation
⚠ WARNING! While unpacking, the packaging materials (polythene bags, polystyrene pieces, etc.) should be kept away from children and pets. CHOKING HAZARD! RISK OF INJURY!
NOTICE! Leave the appliance in an upright position for at least 2 hours before you connect it to the mains to ensure, that the oil has flowed back into the compressor.
NOTICE! If you use the appliance for the first time or the appliance has been disconnected from the mains for a longer period of time, allow the appliance to cool down for 1 hour before you store wine bottles in the appliance.
- Remove all packaging materials.
- Adjust the feet and clean the appliance (see chapter CLEANING AND MAINTENANCE).
- Do not start the appliance immediately after installation. Wait at least 2 hours to ensure proper operation.
- The temperature of the wine storage zone can be adjusted manually by touching the relevant buttons until the desired value is indicated (s. chapter 5.5 SETTING OF THE TEMPERATURE).
- If operation was interrupted, wait at least 5 minutes before restart.
- The appliance needs some time to balance the temperature when you have changed the setting before or when you have stored additional wine bottles in the appliance. The duration of this period of time depends on the range of the change, the ambient temperature, the amount of wine bottles and the frequency of door-openings. When you set the temperature, these aspects should be taken into account.
- Operate the appliance according to the instructions described in the following chapters.
⚠ WARNING! To disconnect the appliance from the mains completely, you must unplug the appliance or use a cut-off device.
NOTICE! When you connect the appliance to the mains for the first time, it is switched on immediately and ready for operation. ^22
NOTICE! In standby mode (appliance is switched off), the appliance is supplied with power, but it does not operate and you cannot carry out any settings.
The appliance is equipped with an «ON/OFF»-BUTTON.
HOW TO SWITCH OFF THE APPLIANCE (STANDBY MODE)
- The child safety lock must be deactivated (s. chapter 5.4 CHILD SAFETY LOCK).
- Touch and hold the «ON / OFF ⏻»-BUTTON (A) for 3 seconds to switch off the appliance. The appliance switches to STANDBY MODE.
HOW TO SWITCH ON THE APPLIANCE (WORKING MODE)
- The child safety lock must be deactivated.
- Touch and hold the «ON/OFF ⏻»-BUTTON (A) for 3 seconds again to switch on the appliance. The appliance switches to WORKING MODE.
The appliance is equipped with an interior illumination (LED) which can be switched on or off manually.
NOTICE! In standby mode (appliance is switched off), this function is not available.
HOW TO SWITCH ON THE INTERIOR ILLUMINATION
- The child safety lock must be deactivated (s. chapter 5.4 CHILD SAFETY LOCK).
- Touch the «ILLUMINATION»-BUTTON (B) once briefly to switch on the interior illumination of the appliance.
HOW TO SWITCH OFF THE INTERIOR ILLUMINATION
- The child safety lock must be deactivated.
- Touch the «ILLUMINATION»-BUTTON (B) once briefly again to switch off the interior illumination of the appliance.
5.4 Child safety lock
◆ The appliance is equipped with a CHILD SAFETY LOCK.
The CHILD SAFETY LOCK serves to protect your children and disables all operating buttons.
After 15 seconds without using any operating buttons, the child safety lock of the appliance is activated automatically. ^23 However, you can also activate the key lock manually.
NOTICE! When the child safety lock is activated, all operating buttons of the control panel are locked. Before you can carry out further settings you must always unlock the buttons first.
HOW TO ACTIVATE THE CHILD SAFETY LOCK MANUALLY
- Touch and hold the «ON/OFF»-BUTTON (A) and the «ILLUMINATION»-BUTTON (B) simultaneously for 3 seconds to activate the child safety lock.
- The corresponding operational status indicator goes on. ^4
- All operating buttons are locked.
HOW TO DEACTIVATE THE CHILD SAFETY LOCK
- Touch and hold the «ON/OFF»-BUTTON (A) and the «ILLUMINATION»-BUTTON (B) simultaneously for 3 seconds again to deactivate the child safety lock.
- The corresponding operational status indicator goes off. ^25
- All operating buttons are released again.
5.5 Setting of the temperature
⚠ WARNING! To disconnect the appliance from the mains, you must unplug the appliance or use a cut-off device.
NOTICE! If you want to switch off the appliance for a longer period of time, disconnect it from the mains (unplug!). S. also chapter DECOMMISSIONING, TEMPORARILY.
The temperature setting of the wine storage zone can be adjusted manually by touching the relevant buttons (buttons «E» and «F» to increase or decrease the temperature) until the desired temperature value is indicated on the display (s. chapter 4.2 CONTROL PANEL: OPERATING BUTTONS AND INDICATORS OF THE DISPLAY).
When you set a temperature, you set an average temperature for the wine storage zone. The temperature inside the wine storage zone may vary from the set temperature, depending on how many wine bottles you store and where you place
them. Ambient temperature may also affect the set temperature. When you set the temperature, these aspects should be taken into account.
WHEN YOU OPERATE THE APPLIANCE FOR THE FIRST TIME, THE DEFAULT TEMPERATURE IS:
IN THE WINE STORAGE ZONE
$$ + 1 2 ^ {\circ} \mathrm{C} (+ 5 3. 6 ^ {\circ} \mathrm{F}) ^ {2 6} $$
i These setting can be changed as needed.
When the ambient temperature is very high, it is recommended to set the temperature of the wine storage zone to a colder setting if needed. If the colder setting should cause formation of encrusted ice, please select a warmer setting.
i High ambient temperatures and simultaneously operating at the coldest setting may make the compressor operate permanently to keep the temperature constant inside the appliance.
5.5.1 Selection of the temperature unit
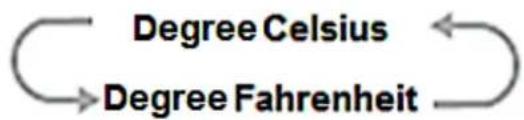
The temperature of the appliance can be indicated in °C (degree Celsius) or in °F (degree Fahrenheit).
HOW TO SELECT THE TEMPERATURE UNIT
- Touch the «INCREASE △»-BUTTON (E) and the «DECREASE ▼»-BUTTON (F) simultaneously and repeatedly to change between the temperature units (s. fig. below).
flowchart
graph TD
    A["Degree Celsius"] --> B["Degree Fahrenheit"]
    B --> A
- According to the pre-set temperature unit, the temperature indicator of the wine storage zone (D) displays ^ C or ^ F.
- The corresponding operating status indicator goes on. ^27
5.5.2 Setting of the temperature of the wine storage zone
The default temperature of the wine storage zone is +12 °C (+53.6 °F). ^28
The adjustable temperature range of the wine storage zone is from +5 °C to +20 °C (+41 - +68 °F).
HOW TO SET THE TEMPERATURE OF THE WINE STORAGE ZONE
- If the operating buttons of the display are locked, touch and hold the «ON/OFF 🔒»-BUTTON (A) and the «ILLUMINATION 🔒»-BUTTON (B) simultaneously for 3 seconds. The corresponding operational status indicator goes off. ^29 All operating buttons are released.
- Touch the «INCREASE △»-BUTTON (E) or the «DECREASE √»-BUTTON (F) repeatedly until the desired temperature of the wine storage zone is displayed (D).
- After 5 seconds without using any operating buttons, the set temperature is activated.
- The temperature indicator of the wine storage zone (D) displays the current temperature.
If you touch the «INCREASE ▲»-BUTTON (E) or the «DECREASE √»-BUTTON (F) once, the temperature indicator on the display flashes and indicates the current temperature of the wine storage zone. If you touch the respective button repeatedly, you set the temperature of the wine storage zone.
i Each time you touch the «INCREASE ▲»-BUTTON (E) the temperature in the wine storage zone increases by 1 °C.
i Each time you touch the «DECREASE △»-BUTTON (F) the temperature in the wine storage zone decreases by 1 °C.
5.6 Capacity of the appliance
The appliance is equipped with 5 wooden shelves and has a total storage capacity of 20 wine bottles (standard Bordeaux bottles / 750 ml).
NOTICE! Do not overfill the shelves to protect them from damage. Never store more than 2 layers of wine bottles on one shelf. RISK OF DAMAGE!
5.7 Recommended storage/arrangement of wine bottles
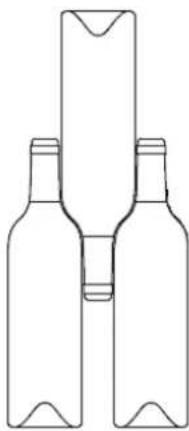
To simplify the storage of the wine bottles, each shelf can be pulled out partially.
Open the door of the appliance wide enough before you pull out the shelves; otherwise, the shelves and / or the door can be damaged seriously.
RECOMMENDED ARRANGEMENT OF WINE BOTTLES
natural_image
Line drawing of two wine bottles with a rectangular container on top (no text or symbols)WINE BOTTLES CAN BE STORED AS FOLLOWS:
| NUMBER OF BOTTLES | 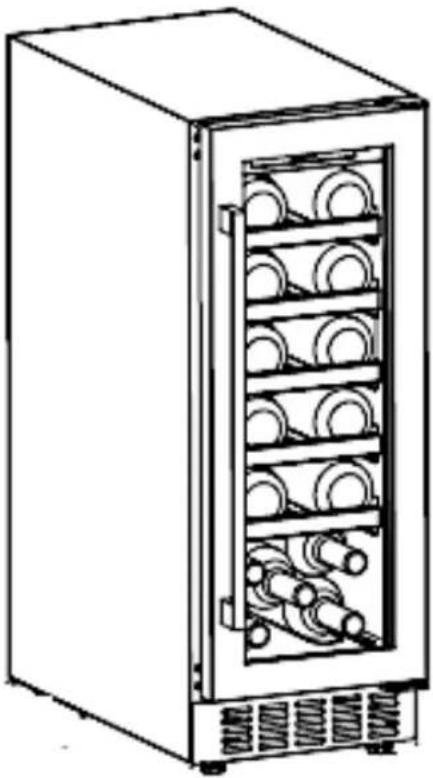 | |
| 3 |  | |
| 3 |  | |
| 3 |  | |
| 3 |  | |
| 3 |  | |
| 5 |  | |
| 20 BOTTLES MAX. | ||
NOTICE! Do not overfill the shelves to protect them from damage. Never store more than 2 layers of wine bottles on one shelf. RISK OF DAMAGE!
NOTICE! If you do not use the appliance for a longer period of time, switch it off, disconnect it from the mains, clean it carefully and open the door to ventilate the interior of the appliance.
5.7.1 Recommended storage and drinking temperatures
| WINE VARIETIES | RECOMMENDED TEMPERATURES IN °C | RECOMMENDED TEMPERATURES IN °F |
| RED WINE | 15 - 18 °C | 59 - 64.4 °F |
| WHITE WINE | 9 - 14 °C | 48.2 - 57.2 °F |
| ROSÉ WINE | 10 - 11 °C | 50 - 51.8 °F |
| CHAMPAGNE SPARKLING WINE | 5 - 8 °C | 41 - 46.6 °F |
5.8 Acoustic alarm signal
The appliance is equipped with an acoustic alarm signal which indicates a malfunction of the appliance (s. chapter 8.1 ERROR CODES).
➢ Touch any operating button on the control panel to stop the acoustic alarm signal.
➢ Check the appliance as described in chapter 8. TROUBLESHOOTING et seq.
6. Environmental protection
6.1 Environmental protection: disposal
Appliances bearing this symbol « — » must not be disposed of together with household waste throughout the EU. To prevent potential damage to the environment or human health from uncontrolled waste disposal and to promote the sustainable reuse of material resources, responsibly supply the appliance to a recycling centre.
6.2 Energy saving
- Install the appliance in a dry and well-ventilated place.
- Install the appliance in a suitable position with an adequate distance from sources of heat and cold.
◆ Protect the appliance from direct sunlight.
Do not overfill your appliance.
✿ Try opening the door as little as possible, especially when the weather is warm and humid. If you open the door, close it as fast as possible. - Permanently check, that the appliance is well-ventilated. The appliance must be well-ventilated from all sides.
NOTICE! In order to save energy a prolonged opening of the door(s) should be avoided.
6.3 Operational parameters
The appliance can only reach the relevant temperatures when:
- the ambient temperature meets the climatic class.
- the doors close properly.
- you do not open the doors too often or too long.
- the door seals are in proper condition.
- the appliance is positioned properly.
- you have not overfilled the appliance.
7. Cleaning and maintenance
⚠️ DANGER! Never touch the power plug, the power switch or other electrical components with wet or damp hands. RISK OF ELECTRIC SHOCK!
⚠ WARNING! Disconnect the appliance from the mains before you clean or maintain it. RISK OF ELECTRIC SHOCK!
⚠ WARNING! To disconnect the appliance from the mains, you must unplug the appliance or use a cut-off device.
⚠ WARNING! Remove dust accumulation at the power plug, safety power socket and all plug connectors regularly. RISK OF FIRE!
NOTICE! Take off all rings and bracelets before cleaning or maintaining the appliance; otherwise, you will damage the surface of the appliance.
NOTICE! Clean the appliance at least once a month.
NOTICE! Any damage caused to your appliance by a cleaning product will not be fixed free of charge, even if the guarantee period of the appliance is still valid.
- Always keep the appliance clean so that unpleasant odours do not occur.
- Dust deposits on the condenser will increase the energy consumption. Clean the condenser twice a year with a vacuum cleaner or a soft brush.
- Take off all rings and bracelets before cleaning or maintaining the appliance; otherwise, you will damage the surface of the appliance.
DETERGENT
➢ Do not use any harsh, abrasive or aggressive detergents.
Do not use any solvents.
Do not use any abrasive detergents!
Do not use any organic detergents! ^30
Do not use essential oils!
These instructions are valid for all surfaces of your appliance.
EXTERNAL CLEANING
- Use a moist cloth and a mild, non-acidic detergent. Use a suitable detergent for stubborn stains.
- Use clear water to rinse.
- Dry the cleaned surfaces with a cloth.
INTERNAL CLEANING
- Clean the shelves and the inside with warm water and a mild detergent.
- Use clear water to rinse.
- Dry the cleaned surfaces with a cloth.
- Check the water drain and clean it if needed.
DOOR SEALS
➢ Clean with warm water and a mild, non- acidic detergent. Do not restart the appliance until the door seals have dried completely.
DRAIN HOLE (depending on model)
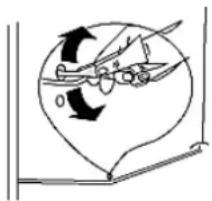
Clean the drain hole at the back of the cooling compartment periodically; otherwise defrost water can get into the cooling compartment. Use a suitable device such as a pipe cleaner.
natural_image
Diagram of aircraft wing rotation and movement inside a heart shape (no text or symbols)7.1 Defrosting
- The appliance is equipped with an automatic defrost-system.
- The water is drained at the back inside the appliance. ^31
- The water is collected in a container underneath the compressor. The water evaporates in this container
- The drain must not be blocked.
- Clean the drain carefully with a pipe cleaner.
7.2 Replacing of the illuminant
⚠ WARNING! The LED-illuminant must be replaced by a qualified professional (electrical technician) only. If the LED-illuminant is damaged, please contact a qualified professional (not covered by the guarantee).
8. Troubleshooting
⚠ WARNING! Before you start troubleshooting, disconnect the appliance from the mains. Any work not described in this instruction manual must be carried out by a qualified professional only.
| MALFUNCTION | |
| POSSIBLE CAUSE(S) | MEASURE(S) |
| CONDENSATE ON THE GLASS DOOR. | |
| 1. The door(s) is / are opened too often or too long.2. The temperature is set too low. | 1. Do not open the door(s) too often or too long.2. Increase the temperature (warmer). |
| THE APPLIANCE DOES NOT WORK AT ALL. | |
| 1. The plug of the appliance is not connected to the socket.2. The plug has become loose.3. The socket is not supplied with energy.4. The fuse is switched off.5. The voltage is too low. | 1. Connect the appliance to the mains properly.2. Check the plug.3. Check the corresponding socket by connecting it with another appliance.4. Check the fuse box.5. Compare the data on the model plate with the data of your energy supplier. |
| THE COMPRESSOR DOES NOT WORK AT ALL. | |
| 1. Incorrect energy supply. | 1. Check the energy supply. |
| THE COMPRESSOR OPERATES FOR TOO LONG. | |
| 1. The appliance has been switched off for a while.2. The door(s) is / are opened too often or too long. | 1. The appliance needs some time to reach the set temperature.2. Do not open the door(s) too often or too long. |
| THE DOOR MAKES A STRANGE SOUND WHEN OPENED. | |
| 1. The door seals are soiled. | 1. Clean the door seals. |
| UNCOMMON NOISE. | |
| 1. The appliance is not installed on a flat and level ground. The appliance touches a wall or another object.2. Items have dropped behind the appliance. | 1. Install the appliance properly.2. Remove the items. |
| THE APPLIANCE DOES NOT COOL PROPERLY. | |
| 1. The temperature is set too high.2. The environment is too warm.3. The door(s) is / are opened too often or too long. | 1. Decrease the temperature (colder).2. Keep the appliance away from direct sunlight and other sources of heat. Always observe the climatic class of your appliance in chapter «TECHNICAL DATA».3. Do not open the door(s) too often or too long. |
MALFUNCTION
POSSIBLE CAUSE(S)
MEASURE(S)
THE ILLUMINATION IS NOT WORKING.
- The illuminant may be damaged.
-
Incorrect energy supply.
-
Refer to chapter «REPLACING OF THE ILLUMINANT».
-
Check the energy supply.
If the appliance shows a malfunction not noted on the schedule above or if you have checked all items on the above schedule but the problem still exists, please contact the aftersales service.

THE OPERATING CONDITIONS DESCRIBED BELOW ARE NORMAL AND DO NOT INDICATE A MALFUNCTION.
The refrigerant generates a sound similar to flowing water.
- Sometimes you may hear a sound which is generated by the injection process of the cooling circuit.
The sides of the appliance may get warm while the appliance is running.
DISTINCT NOISE
When you operate the appliance for the first time or the temperature falls below a certain level, the appliance will operate with high power to reach the preset temperature.
CONDENSED WATER IN / ON THE APPLIANCE
may be generated inside or outside the appliance by high humidity or very warm ambient temperatures.
CLICKING
You will hear the compressor click if it is activated or deactivated.
HUM
is caused by the compressor while running.
KNOCKING / SNAPPING
may be generated by sequential expansion and shrinkage of the components of the cooling system. It is caused by variation of temperature before and after the compressor is activated or deactivated.
8.1 Error codes
| ERROR CODE | DESCRIPTION | MEASURE |
| E 1 | Failure of the temperature sensor of the wine storage zone: open circuit. | Please contact the aftersales service. |
| E 2 | Failure of the temperature sensor of the wine storage zone: short circuit. | Please contact the aftersales service. |
| E 3 | Failure of the defrost sensor: open circuit. | Please contact the aftersales service. |
| E 4 | Failure of the defrost sensor: short circuit. | Please contact the aftersales service. |
9. Decommissioning
DECOMMISSIONING, TEMPORARILY
IF THE APPLIANCE IS NOT USED FOR A LONGER PERIOD OF TIME
- disconnect the appliance from the mains. To disconnect the appliance from the mains, you must unplug the appliance or use a cut-off device.
- remove all stored wine bottles in the appliance.
- dry the inside of the appliance with a cloth and leave the door open for a few days.
WHILE AWAY ON AN AVERAGE VACATION / HOLIDAY (14-21 DAYS):
- do the same as described above or
- let the appliance operate.
IF YOU WANT TO MOVE THE APPLIANCE:
- secure all removable parts and the content of the appliance. Pack them separately if necessary.
- transport the appliance in an upright position only. All other positions can cause damage to the compressor.
- do not damage the adjustable feet of the appliance.
DECOMMISSIONING, ULTIMATE
- Disconnect the appliance from the mains. To disconnect the appliance from the mains, you must unplug the appliance or use a cut-off device.
- Cut off the power cord at the appliance.
- Completely remove every door of the appliance.
- Leave the shelves in their position so that children are not able to get into the appliance.
- Follow the advice for the disposal of the appliance in chapter WASTE MANAGEMENT.
10. Technical data
TECHNICAL DATA*
| Model | Wine conditioning unit (undercounter installation or free-standing) |
| Household refrigerator model category | 2 - Fridge with cellar zone, cellar compartment fridge and wine cabinet. |
| Front colour | Black |
| Colour of the side panels | Black |
| Climatic class | SN / N / ST(ambient temperature 10 - 38 °C) |
| Temperature zones | 1 |
| Energy efficiency class** | G |
| Annual energy consumption in kW/h*** | 135.00 |
| Voltage / frequency | 220 - 240 V AC / 50 Hz |
| Total net volume in l | 56 |
| Net volume: cooling in l | 56 |
| Wine storage in l | 56 |
| Total storage capacity(standard Bordeaux bottles / 750 ml) | 20 |
| Temperature adjustable / from - to | ✓ / 5 -20 °C / 41 - 68 °F |
| Indicator of the temperature | ✓ |
| Temperature control | ✓ |
| Max. storage time / malfunction | - |
| Noise emission | 41 dB/A re 1 pW |
| Noise emission class**** | C |
| Adjustable thermostat | ✓ |
| Compressor | 1 |
| Refrigerant / total quantity | R600a / 18 g |
| External handle | √ |
| Control panel | Touch Control |
| Internal light | √ / LED |
| Shelves / Material | 5 / wooden shelves |
| Door incl. tempered safety glass | √ |
| Changeable hinge position | √ |
| Adjustable feet | √ / 2 in front |
| Defrosting cooling comp. | automatic |
| Dimensions appliance H*W*D in cm | 82.00*29.50*57.00 |
| Weight net / gross in kg | 26.50 / 28.50 |
◆ Technical modifications reserved.
| * | According to regulation (EU) No. 2019/2016 |
| ** | On a scale from A (highest efficiency) to G (lowest efficiency) according to the new EU standard. |
| *** | Based on standard measurement results within 24 hours. The actual energy consumption depends on the type of use as well as the installation location of the appliance. |
| **** | On a scale from A (highest) to D (lowest). |
11. Waste management
- Dispose of the appliance relevant to the current legislation in view of explosive gases. The cooling systems and insulation of refrigerators and freezers contain refrigerants and gases which must be deposed of properly. Do not damage the cooling fins and tubes. If refrigerants escape, there is FIRE HAZARD!
- While unpacking, the packaging materials (polythene bags, polystyrene pieces, etc.) should be kept away from children and pets. CHOKING HAZARD! RISK OF INJURY!
- Old and unused appliances must be sent for disposal to the responsible recycling centre. Never expose to open flames.
- Before you dispose of an old appliance, render it inoperative. Unplug the appliance and cut off the entire power cord. Dispose of the power cord and the plug immediately. Remove the door completely so children are not able to get into the appliance as this endangers their lives!
- Dispose of any paper and cardboard into the corresponding containers.
- Dispose of any plastics into the corresponding containers.
- If suitable containers are not available at your residential area, dispose of these materials at a suitable municipal collection point for waste-recycling.
- Receive more detailed information from your retailer or your municipal facilities.
REFRIGERANT
- The refrigerant circuit of the appliance contains the refrigerant R600a, a natural gas of high environmental compatibility.
- ⚠ WARNING! Do not damage any components of the refrigerant circuit while transporting the appliance. FIRE HAZARD!
Materials marked with this symbol are recyclable.
Please contact your local authorities to receive further information.
The refrigerant R600a is flammable!
This appliance includes a 24-month guarantee for the consumer given by the manufacturer, dated from the day of purchase, referring to its flawless material-components and its faultless fabrication. The consumer is accredited with both the dues of the guarantee given by the manufacturer and the vendor's guarantees. These are not restricted to the manufacturer's guarantee.
Any guarantee claim has to be made immediately after the detection and within 24 months after the delivery to the first ultimate vendee. The guarantee claim has to be verified by the vendee by submitting a proof of purchase including the date of purchase and/or the date of delivery. The guarantee does not establish any entitlement to withdraw from the purchase contract or for a price reduction. Replaced components or exchanged appliances demise to us as our property.
The guarantee claim does not cover:
- fragile components as plastic, glass or bulbs;
- minor modifications of the PKM-products concerning their authorised condition if they do not influence the utility value of the product;
- damage caused by handling errors or false operation;
- damage caused by aggressive environmental conditions, chemicals, detergents;
- damage caused by non-professional installation and haulage;
- damage caused by non common household use;
- damages which have been caused outside the appliance by a PKM-product unless a liability is forced by legal regulations.
The validity of the guarantee will be terminated if:
- the prescriptions of the installation and operation of the appliance are not observed.
- the appliance is repaired by a non-professional.
- the appliance is damaged by the vendor, the installer or a third party.
- the installation or the start-up is performed inappropriately.
- the maintenance is inadequately or incorrectly performed.
- the appliance is not used for its intended purpose.
- the appliance is damaged by force majeure or natural disasters, including, but with not being limited to fires or explosions.
Please provide the following information for the registration of your guarantee claim:
- the complete address of the location of the appliance.
- phone number(s) and e-mail contact.
- model name.
- serial number/photo of the rating plate.
- type of malfunction.
If you do not provide the above data, your guarantee claim cannot be handled immediately.
SPECIAL NOTE
Please photograph the rating plate of the appliance before installation and save the photo for possible later use.
You find the rating plate on the following locations.
- Fridges/freezer: inside or on the back side.
- Dishwasher/washer/dryer: on the door area or the back side.
- Hobs: on the bottom side.
- Ovens: on the door area.
- Hob/oven combinations have 2 rating plates (oven and hob).
- Extractor hoods: inside near the motor.
The guarantee claims neither extend the guarantee period nor initiate a new guarantee period. The geographical scope of the guarantee is limited with respect to appliances, which are purchased and used in Germany, Austria, Belgium, Luxembourg and the Netherlands.

August 2014
Aftersales service information on the leaflet inside this instruction manual.

- Abtauen
- Index
- EU - DECLARATION OF CONFORMITY
- Safety information
- READ THE SAFETY INFORMATION AND THE SAFETY INSTRUCTIONS CAREFULLY BEFORE YOU OPERATE THE APPLIANCE FOR THE FIRST TIME.
- Abbreviation
- Signal words
- Safety instructions
- DANGER!
- To reduce the risk of electrocution.
- ⚠ WARNING!
- To reduce the risk of burns, electrocution, fire or injury to persons.
- CAUTION!
- NOTICE
- SAVE THESE INSTRUCTIONS.
- Climatic classes
- Installation
- Unpacking and positioning
- Dimensions and installation drawing
- Dimensions of the appliance
- Installation drawing
- Levelling
- Installation of the door handle
- HOW TO INSTALL THE DOOR HANDLE
- NOTICE! Ensure that the door seal is properly in place!
- Change of the hinge position
- PREPARATORY MEASURES
- HOW TO CHANGE THE HINGE POSITION
- Description of the appliance / control panel
- Description of the appliance
- Control panel: operating buttons and indicators of the display
- INDICATORS OF THE DISPLAY
- Operation
- Before initial operation
- HOW TO SWITCH OFF THE APPLIANCE (STANDBY MODE)
- HOW TO SWITCH ON THE APPLIANCE (WORKING MODE)
- NOTICE! In standby mode (appliance is switched off), this function is not available.
- HOW TO SWITCH ON THE INTERIOR ILLUMINATION
- HOW TO SWITCH OFF THE INTERIOR ILLUMINATION
- Child safety lock
- HOW TO ACTIVATE THE CHILD SAFETY LOCK MANUALLY
- HOW TO DEACTIVATE THE CHILD SAFETY LOCK
- Setting of the temperature
- WHEN YOU OPERATE THE APPLIANCE FOR THE FIRST TIME, THE DEFAULT TEMPERATURE IS:
- Selection of the temperature unit
- HOW TO SELECT THE TEMPERATURE UNIT
- Setting of the temperature of the wine storage zone
- HOW TO SET THE TEMPERATURE OF THE WINE STORAGE ZONE
- Capacity of the appliance
- Recommended storage/arrangement of wine bottles
- Acoustic alarm signal
- Environmental protection
- Environmental protection: disposal
- Energy saving
- Operational parameters
- Cleaning and maintenance
- DETERGENT
- EXTERNAL CLEANING
- INTERNAL CLEANING
- DOOR SEALS
- DRAIN HOLE (depending on model)
- Defrosting
- Replacing of the illuminant
- Troubleshooting
- MALFUNCTION
- THE ILLUMINATION IS NOT WORKING.
- THE OPERATING CONDITIONS DESCRIBED BELOW ARE NORMAL AND DO NOT INDICATE A MALFUNCTION.
- DISTINCT NOISE
- CONDENSED WATER IN / ON THE APPLIANCE
- CLICKING
- HUM
- KNOCKING / SNAPPING
- Error codes
- Decommissioning
- DECOMMISSIONING, TEMPORARILY
- IF THE APPLIANCE IS NOT USED FOR A LONGER PERIOD OF TIME
- WHILE AWAY ON AN AVERAGE VACATION / HOLIDAY (14-21 DAYS):
- IF YOU WANT TO MOVE THE APPLIANCE:
- DECOMMISSIONING, ULTIMATE
- Technical data
- Waste management
- REFRIGERANT
- The guarantee claim does not cover:
- The validity of the guarantee will be terminated if:
- Please provide the following information for the registration of your guarantee claim:
- SPECIAL NOTE
Brand : PKM
Model : UWTS56-20G
Category : Wine cellar