
GTi5.2C - Loudspeaker Crunch - Free user manual and instructions
Find the device manual for free GTi5.2C Crunch in PDF.


| Product Type | Component Speaker System |
| Speaker Size | 5.25 inches (13.3 cm) |
| Peak Power | 200 watts |
| RMS Power | 100 watts |
| Impedance | 4 ohms |
| Sensitivity | 91 dB |
| Frequency Response | 50 Hz - 20 kHz |
| Mounting Depth | 1.9 inches (48 mm) |
| Tweeter Type | Silk Dome |
| Crossover | External (included) |
| Woofer Cone Material | Polypropylene |
| Surround Material | Rubber |
| Overall Diameter | 6.3 inches (160 mm) |
| Mounting Hole Diameter | 4.9 inches (125 mm) |
| Weight per Pair | 3.3 lbs (1.5 kg) |
| Color | Black |
| Installation Location | Car doors or custom enclosures |
| Warranty | 1 year |
| Recommended Amplifier Power | 50-150 watts RMS per channel |
| Connector Type | Spring clips for speaker wire |
Frequently Asked Questions - GTi5.2C Crunch
User questions about GTi5.2C Crunch
0 question about this device. Answer the ones you know or ask your own.
Ask a new question about this device
Download the instructions for your Loudspeaker in PDF format for free! Find your manual GTi5.2C - Crunch and take your electronic device back in hand. On this page are published all the documents necessary for the use of your device. GTi5.2C by Crunch.
USER MANUAL GTi5.2C Crunch
natural_image
Product display of a CRUNCH speaker system with visible speaker, power supply, and control unit (no text or symbols on main components)GTi5.2C GTi6.2C
COMPONENT SYSTEMS
BENUTZERHANDBUCH
OWNER'S MANUAL
DEUTSCH
INSTALLATION DER LAUTSPRECHER
The first step of installing a speaker system is a well-thought-out planning. Choose a suitable location for your speaker components carefully. Please observe the following suggestions to ensure proper results and best performance:
- Choose a location which offers none or just a minimum of obstacles between the components and your ears. Please observe at thereto, the positions of the driver's seat, the headrests and other constructions of the inside of vehicle interior.
- Mount the left and right speakers in the same array on each side, which means that they are installed at the same height and directly across from each other. Do not install one speaker higher, lower, further forward or further back from the opposite speaker.
- Always check what's behind the chosen mounting locations to ensure that there is proper clearance for the back of the speaker components and avoid obstructions such as window tracks, wire harnesses, gas tank etc.
- The best performance will be achieved, when the speakers are securely mounted to a designated speaker opening in a door panel or a rear speaker shelf. There should be no gaps between the speaker basket and the mounting surface.
ENGLISH
MIDRANGE WOOFER INTERCONNECTION
- Connect the positive terminals (+") and the negative terminals (-") of the midrange woofers with the according terminals "WF" of the crossover.
- Use for the interconnection the supplied cables with jacks.
TWEETER INTERCONNECTION
- Connect the positive connectors (+") and the negative connectors (−") of the tweeters with the according terminals "TW" of the crossover.
CROSSOVER INTERCONNECTION
- Connect the positive terminals (+") and the negative terminals (-") of the amplifier speaker outputs with the according terminals "IN" of the crossover.
- Use for the interconnection the supplied cables.
Repeat all three steps for the channel pair on the opposite side of the vehicle.
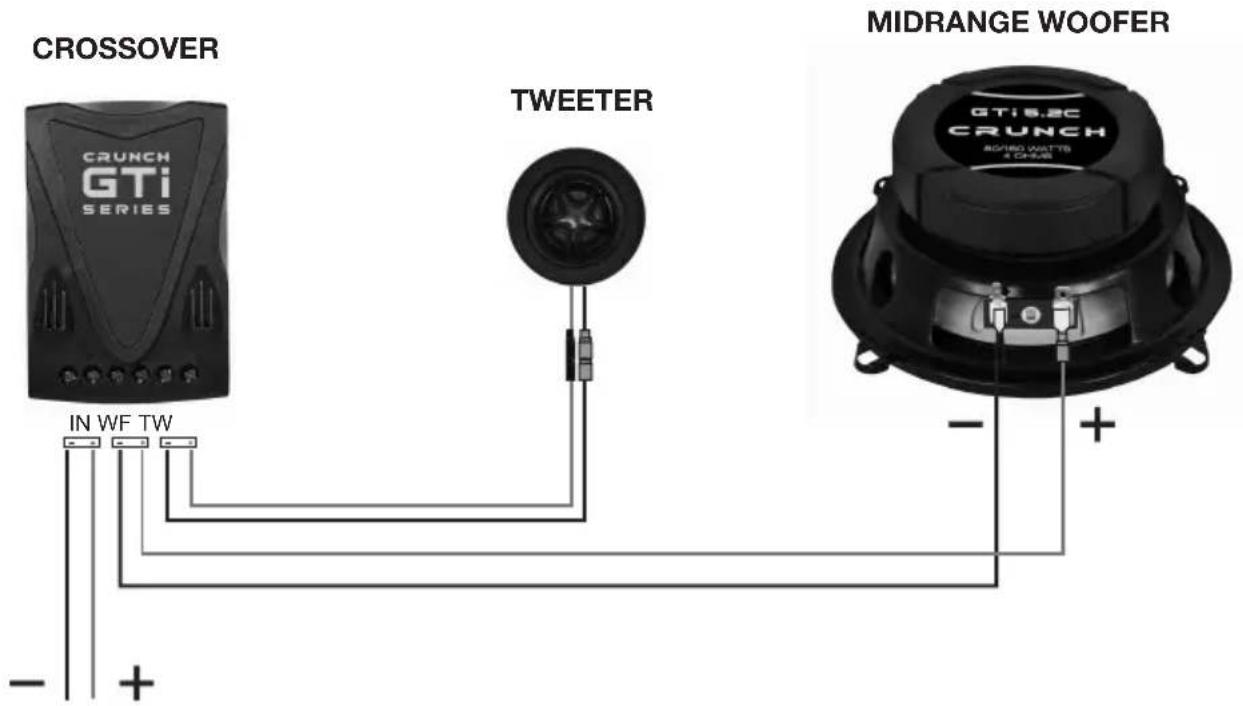
TO THE SPEAKER OUTPUTS OF THE AMPLIFIER
TWEETER LEVEL ADJUSTMENT OF THE CROSSOVER
The GTi crossovers offer the opportunity to match the tweeter level of the loudspeaker system with the characteristics of the interior environment and the complete soundsystem. Please remove carefully the cover of the crossover housing.
To adjust the tweeter level change the jumper by changing its position like following:
POS. 1 left: 0dB higher level POS. 2 center: -3dB" mid level POS. 3 right: -6dB lower level
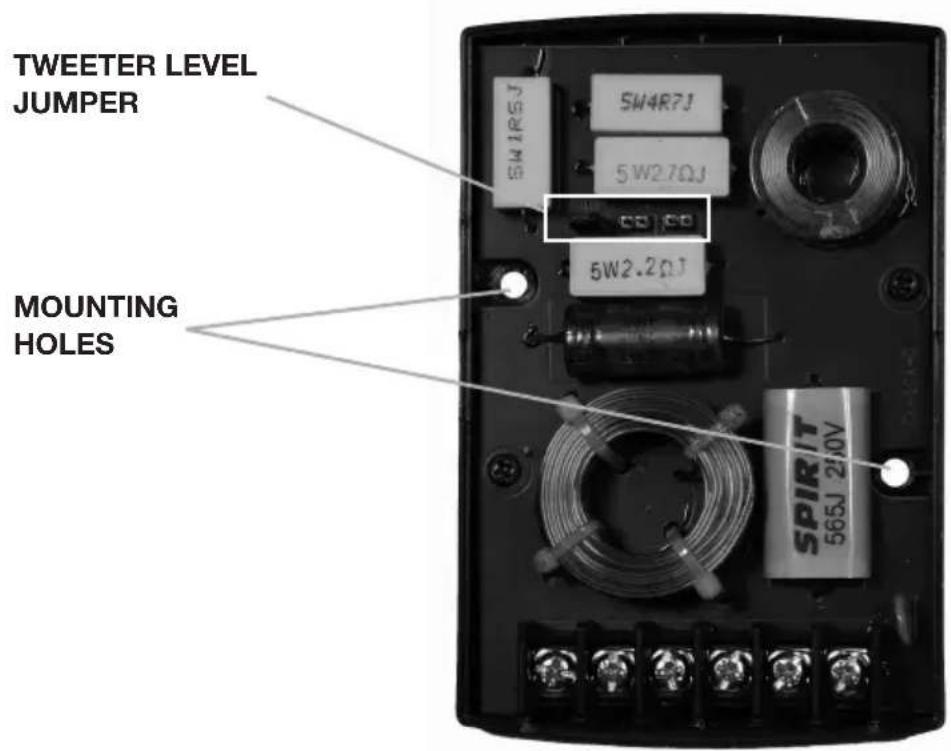
INSTALLATION OF THE CROSSOVER
Under specific circumstances it will be necessary to mount the crossover to the vehicle. The mouting holes sit on the left and right. Use appropriate screws, depending on the surface, where the housing will be installed on.
CAR AUDIO UNLIMITED
CRUNCH
turn up your life

Audio Design GmbH · www.audiodesign.de
Am Breilingsweg 3 · D-76709 Kronau (Germany)
Tel. +49 (0)7253 - 9465-0 · Fax +49 (0)7253 - 946510

Brand : Crunch
Model : GTi5.2C
Category : Loudspeaker