
CN 06 200 EА CLOUD AS W - Electric heater Tesy - Free user manual and instructions
Find the device manual for free CN 06 200 EА CLOUD AS W Tesy in PDF.


| Product Type | Electric Panel Heater |
| Brand | Tesy |
| Model | CN 06 200 EA CLOUD AS W |
| Power Supply | 230 V ~ 50 Hz |
| Nominal Heat Output | 2.00 kW |
| Heated Volume | 46 – 65 m³ |
| Heated Area | 19 – 26 m² |
| Dimensions (W x H x D) | 1070 x 450 x 100 mm (approx.) |
| IP Rating | IP24 (splash-proof) |
| Control Type | Electronic with touch buttons and display |
| Programmable Timer | Weekly program (24/7) with up to 300 time periods |
| Heating Modes | Comfort, Eco, Sleep, Anti-frost, Delay start |
| Wi-Fi Enabled | Yes (remote control via app) |
| AirSafe Function | UVA LED for air hygiene (bactericidal effect) |
| Open Window Detection | Yes (automatic shutdown if temperature drops >5°C) |
| Adaptive Start | Yes (predicts optimal start time) |
| Child Lock | Yes (keyboard lock) |
| Tip-over Protection | Yes (auto shut-off at >45° tilt) |
| Thermal Cut-out | Yes (safety overheating protection) |
| Mounting | Wall-mounted (brackets included) |
| Minimum Clearances (side/top/bottom) | 150 mm / 100 mm / 150 mm |
| Display | Digital with backlight (auto-off after 5s) |
| Sound Option | Adjustable volume (5 levels or mute) |
| Cleaning | Wipe with damp cloth; vacuum vents regularly |
Frequently Asked Questions - CN 06 200 EА CLOUD AS W Tesy
User questions about CN 06 200 EА CLOUD AS W Tesy
0 question about this device. Answer the ones you know or ask your own.
Ask a new question about this device
Download the instructions for your Electric heater in PDF format for free! Find your manual CN 06 200 EА CLOUD AS W - Tesy and take your electronic device back in hand. On this page are published all the documents necessary for the use of your device. CN 06 200 EА CLOUD AS W by Tesy.
USER MANUAL CN 06 200 EА CLOUD AS W Tesy
natural_image
Abstract gray arrow shape pointing right, no text or symbols presentEN ELECTRIC PANEL HEATER 2-12 Operation and Storage Manual of Panel Heater
IMPORTANT SAFETY MEASURES AND INSTRUCTIONS:

WARNING!
- Please read this manual before operating the appliance and keep it at a safe place for future reference. In case the appliance is obtained by a new owner, it should be transferred together with its manual.
- CAUTION: Children under 3 years of age should be kept away from the appliance unless they are under constant supervision.
Children from 3 to 8 years of age are allowed to operate the on/off button ONLY, provided that the appliance is installed and ready for operation and such children have been supervised and instructed in safe operation of the appliance and they understand all related risks.
Children from 3 to 8 years of age MUST NOT: connect the plug to power sockets, make adjustments, clean it or carry out user maintenance operations.
This appliance can be used by children older than 8 years of age and by people with reduced physical, sensor and mental capabilities, as well as by people with insufficient experience and knowledge provided they are supervised or instructed in safe operation of the appliance and understand the related risks. Children should not be allowed to play with the appliance. Cleaning and user maintenance operations must not be carried out by children without supervision.
- CAUTION: Some of the appliance parts may get very hot during operation and thus cause burns to users. In case there are children and vulnerable people in the room, special attention should be paid.
- WARNING: Do not cover the appliance in order to prevent overheating!

• The appliance must not be placed right under a socket box!
- If the supply cord is damaged, it must be replaced by the manufacturer, its service agent or similarly qualified persons in order to avoid a hazard.
- Before connecting the appliance to the mains, check if the voltage indicated on its technical plate corresponds to the voltage of the electricity, supplied to your house.
- This appliance shall be used only for the purpose it has been designed and intended for, i.e. heating of domestic premises. The appliance is not intended for commercial/industrial application. Every other use is to be considered improper, and therefore dangerous. The manufacturer doesn't bear responsibility for damages arising from improper and irrational use. Non-adherence to these instructions would render the warranty invalid!
- Do not leave your home while the heater is operating: make sure that the power switch is in OFF position (panel heaters with mechanical control).
- Keep inflammable objects, such as furniture, pillows, bedding, paper, clothes, curtains etc. at a safe distance of at least 100 cm away from the panel heater.
- Do not operate the appliance in areas of use or storage of combustible substances. Do not operate the appliance in areas of combustible media (for example in close proximity to inflammable gases or aerosols) – there is great risk of explosion and fire!
- Do not insert and do not allow foreign objects to enter the ventilation openings (inlet and outlet) because this will cause electric shock, fire or will damage the appliance.
- The appliance is not suitable for animal breeding. The panel heater is intended for domestic/indoor operation only.
- When positioning the appliance, do not cover the safety grilles; do not hamper the incoming and outgoing air flow. All objects must be at a safe distance of at least 1 meter away from the appliance front and sides.
- The most common reason for overheating is dust and fluff deposits in the appliance. Clean the ventilation openings on a regular basis with a vacuum cleaner, but before that it is very important to disconnect the heater from the mains.
- Never touch the appliance with wet or moist hands – there is risk for your life!
- The power socket should be accessible all the time in order to disconnect the power plug when needed as fast as possible! Never pull the power cord or the appliance itself in order to disconnect it from the mains.
- PAY ATTENTION! Outgoing air gets heated during appliance operation (up to more than 100°C).
- If you decide to stop using an appliance of this kind, it is recommended to make it unusable by cutting its power cord after you have disconnected it from the mains. It is advisable all possible risks related to the appliance to be secured,
especially in relation to children that may play with out-of-use appliances.
- Warning: Do not use this appliance with a programmer, counter or any other mechanism which could automatically turn on the heater – if the appliance is covered or positioned incorrectly there is a risk of fire.
- Position the power cord in such a way that it does not obstruct the free movement of people and cannot be stepped on! Use only approved extension cords, which are suitable for this appliance, i.e. they have a compliance sign!
- Never move the appliance by pulling its power cord; do not use the power cord for carrying other objects!
- Do not bend the power cord and do not pull it against sharp edges; do not place the power cord on hot surfaces or open fire!
- The scattered UVA light emitted by the device is harmless to the eyes. Looking directly at UVA light is not recommended.
PACKING
• After unpacking the appliance, check if its contents are intact and if it has not been damaged during transportation! In case a damage or incomplete delivery is found, contact your authorized retailer!
- Do not dispose of the original packing box! It could be used for storage and transportation purposes in order to avoid damages during transportation!
- Disposal of packing material should be done in the appropriate way! Children must be prevented from playing with polyethylene bags!
INSTALLATION INSTRUCTIONS
- This panel heater is designed to be used indoors, mounted on a wall.

Important: In premises bigger than 45 m3 , it is recommended to use a combination of 2 or more panel heaters.
- Do not position the panel heater under a power socket or electricity connection box.
-
DO NOT install/operate the panel heater:
-
in places where a draught is present, which could influence the control settings;
- right under a power socket;
- in "Volume 1" for bathrooms;
- in "Volume 2" if the control board can be reached by a person who is in a shower or in a bathtub;
- for the wall-mounting of the panel heater, only the wall braces must be used which are delivered together with the appliance. When installing the panel heater, minimum safe distances must be observed

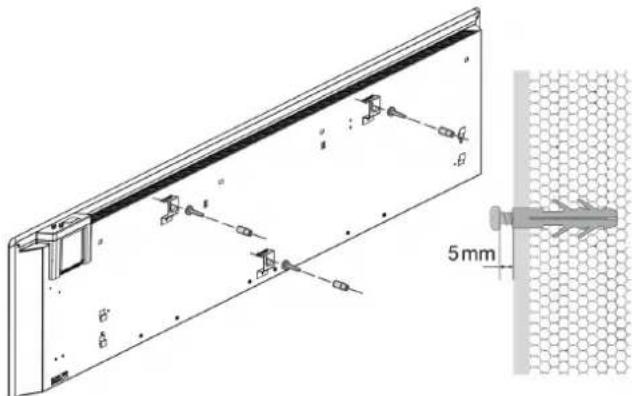
- Select position, and then select 3 points, from the suggested dimensions of the position for drilling (from the attached mounting template), then drill with a suitably drill bit holes in the marked locations on the wall.
natural_image
Technical diagram of a mechanical assembly with 5mm dimension标注 (no text or symbols on the diagram itself)- Insert plastic dowels into the holes.
- Screw the screws into the dowels, and let them be submitted at least 5 mm.
- Attach the unit on the screws.

natural_image
Diagram showing two opposing arrows pointing downward from a rectangular panel, placed on a grid base (no text or symbols)- Move slightly to the left of the appliance and then lower the down to make sure that the screws are right at the top of the channels.
Second installation option:
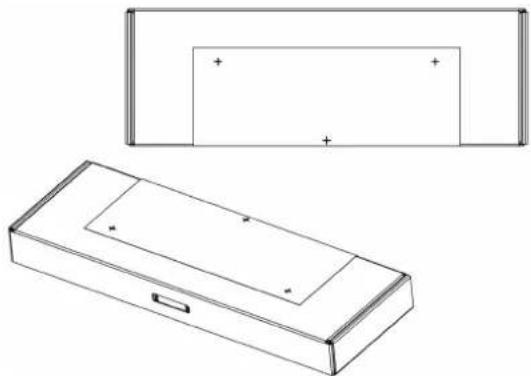
- Place the enclosed mounting template on the box, drill the holes on the top flap of the box, marked with +, in the direction shown in the figure below.
natural_image
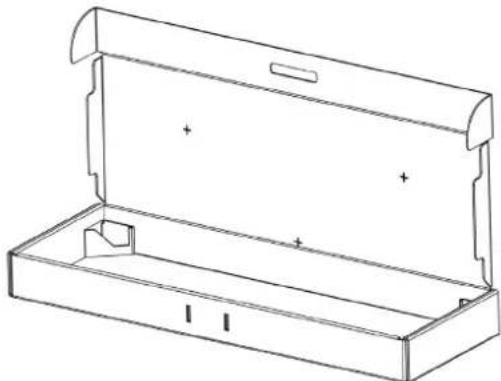
Technical line drawing of a rectangular box with a handle, shown from two different angles (no text or symbols)- Open the box and place it on the wall as shown in the figure below. Transfer the marked holes to the wall.
natural_image
Technical line drawing of a rectangular mechanical housing with mounting holes and internal cavity (no text or symbols)BATHROOM OPERATION
- The panel heater must be installed in accordance with the normal trade practices and in compliance with the national legislation (EU electricity directives and regulations concerning special installations and places of operation including bathrooms, shower cabins HD60364-7-701(IEC 60364-7-701:2006)).

- In case this panel heater is to be used in a bathroom or other similar room, the following installation requirements must be observed: the panel heater is with IP24 protection (water drops protection). Hence it can be installed in "Volume 2" (see the diagram below) in order to avoid the risk of the control board (power switch and thermo regulator) being reached by a person who is in a shower or a bathtub. The minimum distance between the appliance and a water source should be not less than 1 meter and it is compulsory the appliance to be wall-mounted! If you do not feel sure about the installation of this panel heater in a bathroom, we recommend you to consult a professional electrician.
Note: If the above-mentioned instructions cannot be implemented, it is recommended to install the appliance in "VOLUME 3".
- In wet premises the power source must be installed at a height of at least 25 cm above the floor (bathrooms and kitchens).
- The installation must be equipped with a safety fuse, and the distance between the fuse contacts in disconnected condition should be at least 3 mm.
Thank you for choosing CN06 panel heater. This is a product providing heating in winter depending on the consumers' needs for comfortable room temperature. If operated and taken care of properly in accordance with these instructions, the appliance will provide you with many years of useful operation.
OPERATION INSTRUCTIONS
- Hold for 1.5 sec ON/OFF button for OFF or ON the heater.
- Step back – push the ON/OFF button until 1 seconds
- Quick menu/Confirmation - push the Mode button until 1 seconds
• Full menu - hold the Mode button over 3 seconds

- Predefined functions:
1.1. Comfort mode - with On/Off option - allows the user to set a desired temperature when being at home. After once set it and the function is switched On, the appliance will keep the same room temperature each time of usage. This temperature to be set at 23°C by default.
Activation of „Comfort mode“ :
- Push the button "Mode" four sec and select "Comfort mode" by pushing any of the buttons: and and confirm with "Mode" button
EN
. After that you should set the comfort temperature
- by pushing any of the buttons or set the desired temperature.
Confirm with "Mode" button
- The "Comfort" mode is activated.
Deactivation of „Comfort mode“ :
- To deactivate the "Comfort" mode press "On/Off" button for 1.5 sec. Then the heater turns off. The display will continue showing the set temperature. Or press "Mode" button to choose different mode.
Visualization on Display in "Comfort" mode settings :
- Set temperature
The display shows "Comfort" in the top and the set temperature

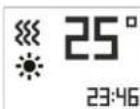
When the convector is in „Heating mode“, sign „sun“, appears on the display.

1.2. Eco mode E - with On/Off option - allows the user to set a desired temperature when being out of home. After once set it and the function is switched On, the appliance will keep the same room temperature each time of usage. This temperature will be set at 18irc C by default. User could also set the time when the appliance to switch to Comfort mode.
Activation of „Eco„ mode

Push the button "Mode" for 3 sec and select "Eco" mode by brushing any of the buttons: on and confirm with "Mode" button. After that you should set the temperature – by pushing any of the buttons on set the desired temperature. Confirm with "Mode" button
If you want you can set the clock time:
-Select by pushing any of the buttons: on reach actual hour time. Confirm with "Mode" button
- The minute icon is flashing and by pushing any of the buttons: on reach actual minute time. Confirm with "Mode" button range 00.00-24.00).
When the set time has elapse, the appliance going to Comfort mode
Deactivation of „Eco„ mode e
- You can exit "Eco" mode by pushing "On/Off" button for 1.5 sec. Then the heater turns off. The display will continue showing the set temperature. Or press "Mode" button to choose different mode.
Visualization on Display in "Eco" mode settings : e
- Set temperature
The display shows "Eco" in the top and the set temperature
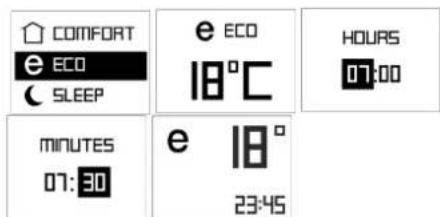
1.3. Sleep mode with On/Off option – two hours after activation, the convector decreases the set temperature with -3irc C under the set temperature in Comfort mode. User could set the time range for operating in Sleep mode then the appliance switches to Comfort mode. By default: 6 hours.
Activation of „Sleep mode„

Push the button "Mode" for 3 sec and select "Sleep mode" by pushing any of the buttons: on, and confirm with "Mode" button

. If you want you can set the clock time: select by pushing any of the buttons: or, reach actual hour time. Confirm with "Mode" button. The minute icon is flashing and by pushing any of the buttons: or, reach actual minute time. Confirm with "Mode" button (range 00.00-24.00). When the set time has elapse, the appliance going to Comfort mode!
Deactivation of "Sleep mode"

User can exit "Sleep mode" by pushing "On/Off" button for 1.5 sec. Then the heater turns off. The display will continue showing the set temperature. Or press "Mode" button to choose different mode.
Visualization on Display in "Sleep" mode settings :
- Set temperature
The display shows "Sleep" in the top and the set temperature

- Basic modes
"Heating" mode
Start "Heating" mode

When the panel heater is switched-off its digital display shows

By pushing the ON/OFF button for 1.5 sec the appliance goes into "Heating" mode, then the display indicates mode. The set temperature is indicating in the right. If the room temperature is lower than the set one, the heater will switch automatically on, and a heating sign appear on the display.
The display shows in the top and the set temperature
Deactivation of "Heating" mode

User can exit "Heating" mode by pushing "On/Off" button for 1.5 sec. Then the heater turns off. The display will be showing OFF.
Temperature adjustment
By pushing any of the buttons: on the user enters "Temperature adjustment" mode and the user can change the temperature settings in the desired direction. The new settings are saved and the heater goes automatically into "Heating" mode. Many of or buttons get pressed longer than 0.5 sec., the temperature settings will start automatically increase or decrease at a rate of 6 units per second. The range of available temperature settings is from 10 up to 30 degrees.
Delay start function
The delay start function allows the user to set the time at which the convector will switch on and start heating.
Push the "Mode" button for 3 sec and select "Delay Start" by pushing
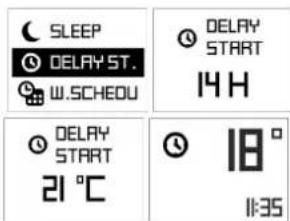
any of the buttons: ▲ or and confirm with "Mode" button, user can enter the time and temperature, when it will automatically go to "Heating" mode. Initially a setting of 12 hours is set by default and by pushing ▲ or buttons user can change the time settings in the desired direction. After the hour of "delay start" mode is chosen, press "Mode" button for confirmation. After that set the temperature at which the convector will start operating by pushing of any of buttons: ▲ or ▲ Confirm with "Mode" button in any of ▲ or buttons is held for more than 0.5 seconds, the time and temperature settings start automatically increase or decrease at a rate of 4 units per second. Confirm with "Mode" button on don't press any button for 3 seconds.
If user enters time – 00, this mode will not be implemented. If the "Delay start" mode is already enabled and user selects the "Delay Start" mode again, it can be changed the remaining time in both possible directions. You can exit this mode by pushing the "On/Off" button. Then panel heater will go into "Heating" mode. The "Delay start" needs to be set from 0 to 96 hours.
Visualization on Display in "Delay start" settings :
The display shows "Delay start" in the top and the set temperature
Anti-frost mode

If the room temperature falls below 5°C and the panel heater is off, the heater will turn on automatically in order to prevent freezing of the area. Indication – in left top corner - only when work the anti-frost mode
Factory settings of the function is ON (switched On).
Activation and deactivation of Anti-frost mode

- If the customer wants to change it – push "Mode" button for 3 sec and select "Anti-frost" mode by pushing any of the buttons: ▲ or √. Confirm with "Mode" button and user can push "button to reach "OFF". Confirm with "Mode" button
To activate the function – push "Mode" button for 3 sec and select "Antifrost" mode, pushing any of the buttons: or √. Confirm with "Mode" button starts blinking and user has to push button to reach "ON". Confirm with "Mode" button
Visualization on Display in "Anti-frost" settings :


"Temperature correction for the sensor" function
Due to the specifics of the temperature profile in some premises there may be difference from the temperature shown on the display and the actually measured temperature in the various locations of the heating appliance in the room.
See the temperature shown on the display of the appliance
Measure the temperature at a place where the temperature is "comfortable" enough for you (usually at a height of 60 cm from the floor, in sitting position). If you find a difference within a range of ±4ircC , you can set the necessary correction in the convector's menu (It is important to note that this function can be set only after the temperature has become the same all around the room, and depending on the room type, the minimum required time is 7
hours) by entering the temperature difference resulting between the value on the display and the actually measured temperature.
This function is used with the purpose of providing better temperature comfort and energy saving for the user of the electric convector in the room which it is in. A temperature difference greater than ±4 °C from the measured temperature in a specific location in the room indicates that the room where you use the convector in is not well insulated or the temperature is not the same all around the room.
Example: a convector in a room on a stone floor – the convector displays 18°C (the set temperature is 22°C), the actually measured temperature (feeling of reached comfort temperature) is 22°C at a height of 60 cm from the floor -> in this case the convector continues to overheat the room (this is a direct energy loss, but the convector cannot reach the set temperature because it measures the temperature at a low height close to the floor) and it will never switch off. In this case a temperature correction of +4°C needs to be applied to the sensor, thus the convector will display 22°C and it will start switching off, and eventually it will maintain the set temperature of 22°C).
The normal status of the function is 0°C by default
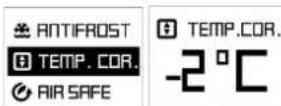
If the customer wants to change it - by pushing "Mode" button for 3 sec and select "Temperature correction" mode by pushing any of the buttons: or Confirm with "Mode" button - by pushing or "button user can reach a temperature correction in the diapason from "-4°C" up to "+4°C". Confirm with "Mode" button
If user wants to see the already set correction, should press "Mode" button for 3 sec and select "Temperature correction" mode by pushing any of the buttons: or Confirm with "Mode" button. User can change it by pushing button or to give a new value of correction in the diapason ±4°C. Confirm with "Mode" button.
If the factory reset function is used, the temperature correction has to be set again. The factory setting of its value is 0irc C.
Visualization on Display in "Temperature correction" settings :
Function Adaptive start (A)
Adaptive start is a function which predicts and initiates the optimal start of heating in order to reach the set-point temperature at the desired time;
Test according to user instruction / documentation. The function is tested in a room with a continuous heat demand of 50 - 60% with reference to the wattage of the test device. The product is working at a comfort temperature 23ircC ± 3ircC setpoint until stable conditions. This temperature is the reference comfort temperature "Ct". Activate a set-back period of 7h +2h/-0h per 24h with a set-back of 4ircC ± 1ircC . The comfort period being 17 -2h/+0h hours. With the adaptive control activated - let the heater thermostat working during 4 periods (4 x 24 hours) of comfort and low setback cycles. After the latest low setback period finishes the comfort temperature "Ct" should be reached within ± 30 minutes deviation to the time target - with a maximal difference of ± 1ircC from the reference comfort temperature "Ct".
- Factory settings of the function is "ON"
Deactivation of function Adaptive start : Ⓐ
- If the customer wants to change it – by pushing the "Mode" button or 3 sec and select "Adaptive start" - Mode by pushing any of the buttons: or . Confirm with "Mode" button and user can push button to reach "OFF". Confirm with "Mode" button, in this case, the function adaptive start is switched OFF.
Activation of function Adaptive start :
To return again in condition "ON" – by pushing the "Mode" button for 3 sec and select "Adaptive start" Mode by pushing any of the buttons: or. Confirm with "Mode" button and user can push button to reach "ON". Confirm with "Mode" button in this case the function Adaptive start is switched ON.

RESET to default settings
If the customer wants reset the convector to factory settings – by pushing the
"Mode" button for 3 sec and select "RESET" mode by pushing any of the buttons: . . . Confirm with "Mode" button.
Visualization on Display in "RESET" settings :

④ AD. START
× RESET
OPEN WIN.
RESET TO
FACTORY
DEFAULT?
CONFIRM
RESET?
SETTINGS
CLEARED
After using the reset function, the following functions will be re-set:
- clock time
- temperature correction value 0°C
- function Anti-frost mode is activated
- adaptive start is activated
- weekly program - 24/7 is reset.
Open window/door function

Room temperature control with open window detection - the product is equipped with an integrated electronic device that reduces the heat output when detects an open window or door. A sensor is used to detect eventual drop in the room temperature. If the temperature falls more than 5°C, the convector will switch off by itself. Within 15 min the open window detection should turn the appliance off. When the room temperature rises by at least 0.5°C and the difference from the initial set point is below 5°C, the convector switches itself on with the settings already made. If the temperature does not rise for more than 60 minutes, the convector enters Standby mode. The function is allowed to be cancelled manually.
The function can be switched Off manually.
Deactivation of Open window/door function :

If the customer wants to change it - by pushing the "Mode" button
3 sec and select "Open window" mode by pushing any of the buttons:
or . Confirm with "Mode" button. User has to push button
to reach "OFF". Confirm with "Mode" Button. In this case function "Open window" is switched OFF.
Activation of Open window/door function :

To return again in condition "ON" – by pushing the "Mode" button for
3 sec and select "Open window" mode by pushing any of the buttons:
or . Confirm with "Mode" button. User has to push button to reach "ON". Confirm with "Mode" button. In this case function "Open window" is switched ON.
Note: When the "Open window" function is enabled, the "Anti-frost" function does not work!
Visualization on Display in "Open window" settings :

× RESET
OPEN WIN.
DRY TIME
OPENWIN.
● on
OFF
Keyboard lock (Protection from children)
When user turns on this function, all keys of the control panel remain locked. Hold buttons and "Mode" together for 3 seconds. The display should show a message when this mode is activated. When user wants to turn off this function has to hold the same button combination for 3 seconds.
Activation/deactivation: Holding and "Mode" buttons for 3 seconds the keyboard gets locked.
To unlock the control panel, hold and "Mode" buttons for 3 seconds.
Visualization on Main Display when activating and deactivating the function "Protection from children":


Day and time - settings
First step or use after factory reset function
Set the current time and day by pushing the "Mode" button for 3 sec and select "DAY TIME" mode by pushing any of the buttons: . . . Confirm
with "Mode" button
Set a schedule for the first day of the week
Select "DAY OF THE WEEK" mode by pushing any of the buttons:
Confirm with "Mode" button
Select by pushing any of the buttons: on reach current day of the week (Monday, Tuesday, Wednesday, Thursday, Friday, Saturday, Sunday).
Confirm with "Mode" button
OPEN WIN.
DAY TIME
山- FI
DAY OF THE WEEK
TIME
MONDAY
TUESDAY
WEDNESDAY
Set time
Select "TIME" mode by pushing any of the buttons: . Confirm with "Mode" button
The hour icon is flashing and by pushing any of the buttons: on reach actual hour time. Confirm with "Mode" button at the minute icon is flashing and by pushing any of the buttons: on reach actual minute time. Confirm with "Mode" button (range 00.00-24.00)
OPEN WIN
DRY TIME
- WIF
DAY OF THE WEEK
TIME
HOURS
II:16
MINUTES
12:45
Weekly program (timer) 24hours/7days

Min 300 sets of time periods
Electronic thermoregulator with weekly program (timer) 24/7 - electronic room temperature control plus weekly timer means the product is equipped with an electronic device, either integrated or external, which allows the product automatically to vary its heat output over a certain time period. In relation with a certain required level of indoor heating comfort. It allows the setting of timing and temperature levels for a full week. During the 7-day period the settings must allow a variation on a day-to-day basis;
Deactivation
If the customer wants to deactivate it, he/she has to push ON/OFF button(The heater goes into "heating" mode.) or press for 1.5 sec ON/OFF button for OFF the heater.

Activation
If the customer wants to set "Weekly shedule (timer)" mode-by pushing the "Mode" button to 3 sec and select "Weekly shedule" mode by pushing any of the buttons: . . . Confirm with "Mode" button.

Delray ST.
W.SCHEDULE
ANTIFROST
There have three options:
- CREATE PROGRAM
- ERASE PROGRAM
- VIEW PROGRAM
CREATE PROGRAM
ERASE PROGRAM
VIEW PROGRAM
Create program
Select "Create program" by pushing any of the buttons: on √. Confirm with "Mode" button
- Set "DAY OF THE WEEK" by pushing any of the buttons: ▲ or ▼ reach current day of the week (Monday, Tuesday, Wednesday, Thursday, Friday, Saturday, Sunday). Confirm with "Mode" button
- Set "TIME PERIOD" by pushing any of the buttons: or √ reach the desired Start time (range 00.00-24.00). Confirm with "Mode" button by pushing any of the buttons: or √ reach the desired End time (range 00.00-24.00). Confirm with "Mode" button
- Set "DESIRE TEMPERATURE" by pushing any of the buttons: on reach the desired temperature (10-30 °C). Confirm with "Mode" button

The temperature of 22 °C started at 12.30 to 15.00 on Sunday. The convector will heat till reach the settings of the next given point.
If the TIME PERIOD is empty (no time set) – visualization should be OFF

- One step back – with single pushing of ON/OFF button - No limit of time periods – step is 0.5 hour (30 minutes). - Adaptive start function is switched on by default.
Erase program
Select "Erase program" by pushing any of the buttons: or. Confirm with "Mode" button. Select the program by pushing any of the buttons or and confirm with "Mode" button. Checking the schedule program
View program
Select "View program" by pushing any of the buttons on. Confirm with "Mode" button. Select a day of the week (Monday, Tuesday, Wednesday, Thursday, Friday, Saturday and Sunday) by pushing any of the buttons on and confirm with "Mode" button. You can view the programs for the selected day by pushing any of the buttons on. One step back – with single pushing of ON/OFF button.
MONDAY 22° 12:30 - 15:00
Function AirSafe – only for models CN 06 xxx EA CLOUD AS W and CN 06 xxx EA AS W
Function Air Safe
The Air safe function is a result of working together of the module, composed of UVA LEDs and the convector heater.
Advantages of the function:
- Better air hygiene and a healthier environment, thanks to the bactericidal effect of the function.
- Safe operation, even in the presence of people and animals - the light emitted by the module is UVA, which is 95% of the UV light passing through the atmosphere. The reflected UV light in the volume of the housing in which the heater is located has a very low intensity and energy and has no harmful effects on humans, plants and animals.
- Without generation of ozone, hydrogen peroxide, organic or inorganic molecules or ions
- High degree of reduction of bacteria and fungi
- Extremely long service life - over 50,000 hours (over 12 years).
- Quite working mode – natural air flow, through the convector heater
Principle of work of Air safe function
The Air Safe function can be switched on and off by the user through the convector control menu. In order to work, it is necessary the convector to be switched on and heated (the set temperature is higher than the ambient temperature).
When the temperature of the heater rises, the natural air flow starts in the room.
Colder air enters through the lower openings of the convector and passes by the UVA LEDs.
Due to this movement, the molecules of gases, bacteria, micromycetes (fungi) and other microorganisms contained in or carried by the air are irradiated by the combined effect of UVA LED radiation and the infrared radiation of the heater. The continuous passage of the air flow through the volume of the convector provides enough energy to break the connections supporting the structure of harmful microorganisms carried by the air.
As a result of natural convection, after a certain period of time, the air contained in the room completely passes through the volume of the convector, which leads to a reduction of the bacteria and micromycetes contained in it.
Function Air Safe is a protection against harmful organisms such bacteria and fungi. Provides better air hygiene and benefits to a healthier environment.
The function can be switched Off manually.
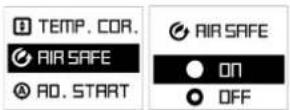
If the customer wants to change it- by pushing the "Mode" button for 3 sec and select "Air Safe" mode by pushing any of the buttons: or . Confirm with "Mode" button . User has to push button to reach "OFF". Confirm with "Mode" button is this case the function is switched OFF.
To return again in condition "ON" – by pushing the "Mode" button for 3 sec and select "Air Safe" mode by pushing any of the buttons: or Confirm with "Mode" button. User has to push button to reach "ON". Confirm with "Mode" button. In this case the function is switched ON.
Operation of Air Safe must continue for 2 minutes after stopping the heating element, and then turn off.
Built in tip-over switch – if the convector tilts with more than 45irc or falls down, the power must switch Off and indicate on display "tilt". After restoring the device to its normal position, operation of the last set function must continue.

Function Wi-Fi - only for models CN 06 xxx EA CLOUD AS W and CN 06 xxx EA CLOUD W
Function Wi-Fi
If the customer wants to switch off Wi-Fi function - by pushing the "Mode" button 3 sec and select "WI-Fi" mode, pushing any of the buttons: . Confirm with "Mode" button . User has to push
√ button to reach "Wi-Fi OFF". Confirm with "Mode" button. In this case function "WI-FI" is switched OFF.
To return again in condition "Wi-Fi ON" – by pushing the "Mode" button for 3 sec and select "WI-FI" mode by pushing any of the buttons: or. Confirm with "Mode" button user has to push
button to reach "Wi-Fi ON". Confirm with "Mode" button. In this case function "WI-FI" is switched ON.
To turn "Wi-Fi LOCAL" on by pushing the "Mode" button, for 6 sec and select "WI-FI" mode by pushing any of the buttons: for .. Confirm with "Mode" button. User has to push a button to reach
Wi-Fi LOCAL". Confirm with "Mode" button ◆. In this case function "WI-FI LOCAL" is switched ON.
Visualization on Display in "Wi-fi" settings:

Work mode of display:
When pressed - backlight intensity - 100%; after 5s - OFF
Sound option

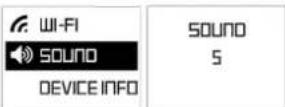
If the customer wants to deactivate sound function - push the "Mode" button for 3 sec and select "Sound" mode by pushing any of the buttons: on and confirm with "Mode" button. To turn off the sound, choose degree 0 through the buttons run. Confirm with "Mode" button
- If the customer wants to activate sound function – push the "Mode" button to 3 sec and select "Sound" mode by pinning any of the buttons: . Confirm with "Mode" button . The user can select 5 degrees of sound volume via the buttons on . Confirm with "Mode" button. In this case, the sound function is turned on at the level you selected.
Visualization on Display in "Sound" settings
Device info
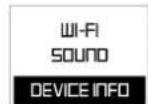
If the customer wants to view "Device info" - by pushing the "Mode" button for 3 sec and select "Device info" by pushing any of the buttons: or Confirm with "Mode" button. Visualization on Display in "Device info"
- ID
- MAC address
- Firmware version
Quick menu
Push the "Mode" button to start quick already configured program. Select by pushing any of the buttons: ▲ or ▼ and confirm with "Mode" button □. The program going to start to work.
Content function:
- Comfort
- Eco
- Sleep
- Delay start
- Weekly schedule
Exit from the any mode – with single pushing of ON/OFF button

Errors mode:
If the display shows "t1" or "t2", this means that the self-diagnostic system has found a problem with the temperature sensor. "t1" indicates a disconnected cable at the sensor, while "t2" indicates short circuit at the sensor. In this case the electric convector will be automatically switched off and it can be switched on again only after the problem has been fixed. The problem has to be handled
by a qualified specialist.
DISCONNECTION FROM THE POWER SUPPLY:
If the electric convector is disconnected from the mains, this will not affect the set temperature and the mode of operation which has been active prior to its disconnection. If for example the convector has been in "Heating" mode, after it has been disconnected and reconnected to the mains, it will continue operating in the same mode with the same set temperature.
The principle of operation of the electric convector with energy-independent memory is to store the settings for 120 minutes guaranteed, and up to 180 minutes not guaranteed.
If the time is more than 120 min the appliance going to Stand by mode.
PROTECTION
- The appliance is equipped with a safety thermo turn-off device, which automatically turns the heater off in cases of extreme temperature of the panel heater /i.e. overheating of the appliance/.
- The safety thermo turn-off device will automatically restore the heater operation when the temperature of the appliance falls below the permissible ultimate values.
CLEANING
- It is compulsory first to turn off the appliance through its power switch and to disconnect it from the power socket. Before starting the cleaning session you should wait until the panel heater cools down in a disconnected state.
- Clean the heater body with damp cloth, vacuum cleaner or a brush.
- Never immerse the appliance into water – there is danger for your life from electric shock!
- Never use gasoline, thinner or hard abrasive products to clean the appliance, because they will damage the appliance coating.
STORAGE
- Before putting the panel heater away let it cool down after you have disconnected it from the power socket
- Use the appliance original packing to store it, if the panel heater will not be in use for a long period of time. By storing the product in its original packing you protect it from excessive dirt and dust accumulation.
- Never put a hot panel heater in its packing!
- It is necessary the product to be stored at a dry and dark place, protected from direct sun light.
• It is explicitly forbidden to store the panel heater in damp and wet premises.
MAINTENANCE OPERATIONS OF THE APPLIANCE
- In case of appliance malfunction, please contact the authorized service center closest to your location. /service centers are indicated in appliance warranty documents/.
- Important: In case of a claim and/or violation of your consumer rights, please contact the supplier of this appliance at the indicated locations or via the Internet page of the company: www.tesy.com
DIMENSIONS OF HEATED VOLUME AND HEATED AREA OF A ROOM / APPLIANCE MODELS
| Model | Heated volume | Heated area |
| CN 06 060 EA [CLOUD] [AS] W - 600W | 10* - 23 m3 | 4* - 9 m3 |
| CN 06 100 EA [CLOUD] [AS] W - 1000W | 24* - 33 m3 | 10* - 13 m2 |
| CN 06 140 EA [CLOUD] [AS] W - 1400W | 34* - 45 m3 | 14* - 18 m3 |
| CN 06 200 EA [CLOUD] [AS] W - 2000W | 46* - 65 m3 | 19* - 26 m3 |
* Minimum guaranteed heated volume (area) for heating at an average capacity of heat transmission factor λ = 0.5W / (m2K) for a heated room. Higher values of heated volume (area) can be achieved at an average value of λ = 0.35W / (m2K) . Standard height of heated rooms - 2.5 meters.


Environment protection instructions
Obsolete electric appliances contain valuable materials and consequently they should not be treated as domestic wastel. We ask for your cooperation and your active contribution to protect the resources and the environment. Please submit your out-of-use appliances to the organized buy-back stations (if there are such).
EN
TABLE 2: INFORMATION REQUIREMENTS FOR ELECTRIC LOCAL SPACE HEATERS
Model identifier(s): 1.CN06 060 EA W; 2.CN06 100 EA W; 3.CN06 140 EA W; 4.CN06 200 EA W 230V\~50Hz
| Item | Symbol | Value 1 | Value 2 | Value 3 | Value 4 | Unit | Item | Unit |
| Heat output Type of heat input for electric storage local space heaters only (select one) | ||||||||
| Nominal heat output P | nom | 0.60 | 1.00 | 1.40 | 2.00 | kW | Manual heat charge control, with integrated thermostat | [no] |
| Minimum heat output (indicative) P | min | 0.00 | 0.00 | 0.00 | 0.00 | kW | Manual heat charge control, with room and/or outdoor temperature feedback | [no] |
| Maximum continuous heat output (indicative) | Pmax,C | 0.60 | 1.00 | 1.40 | 2.00 | kW | Electric heat charge control, with room and/or outdoor temperature feedback heat charge control, with integrated thermostat | [no] |
| Auxiliary electricity consumption Fan assisted heat output [no] | ||||||||
| At nominal heat output el | max | 0.57 | 0.92 | 1.32 | 1.93 | kW | Type of heat output/room temperature control (select one) | - |
| At minimum heat output el | min | 0.00 | 0.00 | 0.00 | 0.00 | kW | Single stage heat output and no room temperature control | [no] |
| In standby mode | el SB | 0.0002 | kW | Two or more manual stages, no room temperature control | [no] | |||
| With mechanic thermostat room temperature control | [no] | |||||||
| With electronic room temperature control | [no] | |||||||
| With electronic room temperature control plus day timer | [no] | |||||||
| With electronic room temperature control plus week timer | [yes] | |||||||
| Other control options (multiple selections possible) | ||||||||
| Room temperature control, with presence detection | [no] | |||||||
| Room temperature control, with open window detection | [yes] | |||||||
| With distance control option | [no] | |||||||
| With adaptive start control | [yes] | |||||||
| With working time limitation | [no] | |||||||
| With black bulb sensor | [no] | |||||||
Model identifier(s): 1. CN06 060 EA AS W; 2. CN06 100 EA AS W; 3. CN06 140 EA AS W; 4. CN06 200 EA AS W 230V\~50Hz
| Item | Symbol | Value 1 | Value 2 | Value 3 | Value 4 | Unit | Item | Unit |
| Heat output Type of heat input for electric storage local space heaters only (select one) | ||||||||
| Nominal heat output P | nom | 0.60 | 1.00 | 1.40 | 2.00 | kW | Manual heat charge control, with integrated thermostat | [no] |
| Minimum heat output (indicative) P | min | 0.00 | 0.00 | 0.00 | 0.00 | kW | Manual heat charge control, with room and/or outdoor temperature feedback | [no] |
| Maximum continuous heat output (indicative) | Pmax,C | 0.60 | 1.00 | 1.40 | 2.00 | kW | Electric heat charge control, with room and/or outdoor temperature feedback heat charge control, with integrated thermostat | [no] |
| Auxiliary electricity consumption Fan assisted heat output [no] | ||||||||
| At nominal heat output el | max | 0.58 | 0.93 | 1.34 | 1.94 | kW | Type of heat output/room temperature control (select one) | - |
| At minimum heat output el | min | 0.00 | 0.00 | 0.00 | 0.00 | kW | Single stage heat output and no room temperature control | [no] |
| In standby mode | el SB | 0.0002 | kW | Two or more manual stages, no room temperature control | [no] | |||
| With mechanic thermostat room temperature control | [no] | |||||||
| With electronic room temperature control | [no] | |||||||
| With electronic room temperature control plus day timer | [no] | |||||||
| With electronic room temperature control plus week timer | [yes] | |||||||
| Other control options (multiple selections possible) | ||||||||
| Room temperature control, with presence detection | [no] | |||||||
| Room temperature control, with open window detection | [yes] | |||||||
| With distance control option | [no] | |||||||
| With adaptive start control | [yes] | |||||||
| With working time limitation | [no] | |||||||
| With black bulb sensor | [no] | |||||||
TESY Ltd
48 Madara Blvd,
Shumen, 9700,
Bulgaria
TABLE 2: INFORMATION REQUIREMENTS FOR ELECTRIC LOCAL SPACE HEATERS
Model identifier(s): 1. CN06 060 EA CLOUD W; 2. CN06 100 EA CLOUD W; 3. CN06 140 EA CLOUD W; 4. CN06 200 EA CLOUD W 230V\~50Hz
| Item | Symbol | Value 1 | Value 2 | Value 3 | Value 4 | Unit | Item | Unit |
| Heat output Type of heat input for electric storage local space heaters only (select one) | ||||||||
| Nominal heat output P | nom | 0.60 | 1.00 | 1.40 | 2.00 | kW | Manual heat charge control, with integrated thermostat | [no] |
| Minimum heat output (indicative) P | min | 0.00 | 0.00 | 0.00 | 0.00 | kW | Manual heat charge control, with room and/or outdoor temperature feedback | [no] |
| Maximum continuous heat output (indicative) | Pmax,C | 0.60 | 1.00 | 1.40 | 2.00 | kW | Electric heat charge control, with room and/or outdoor temperature feedback heat charge control, with integrated thermostat | [no] |
| Auxiliary electricity consumption Fan assisted heat output [no] | ||||||||
| At nominal heat output el | max | 0.57 | 0.92 | 1.32 | 1.93 | kW | Type of heat output/room temperature control (select one) | - |
| At minimum heat output el | min | 0.00 | 0.00 | 0.00 | 0.00 | kW | Single stage heat output and no room temperature control | [no] |
| In standby mode | el SB | 0.00054 | kW | Two or more manual stages, no room temperature control | [no] | |||
| With mechanic thermostat room temperature control | [no] | |||||||
| With electronic room temperature control | [no] | |||||||
| With electronic room temperature control plus day timer | [no] | |||||||
| With electronic room temperature control plus week timer | [yes] | |||||||
| Other control options (multiple selections possible) | ||||||||
| Room temperature control, with presence detection | [no] | |||||||
| Room temperature control, with open window detection | [yes] | |||||||
| With distance control option | [yes] | |||||||
| With adaptive start control | [yes] | |||||||
| With working time limitation | [no] | |||||||
| With black bulb sensor | [no] | |||||||
Model identifier(s): 1. CN06 060 EA CLOUD AS W; 2. CN06 100 EA CLOUD AS W; 3. CN06 140 EA CLOUD AS W; 4. CN06 200 EA CLOUD AS W 230V\~50Hz
| Item | Symbol | Value 1 | Value 2 | Value 3 | Value 4 | Unit | Item | Unit |
| Heat output Type of heat input for electric storage local space heaters only (select one) | ||||||||
| Nominal heat output P | nom | 0.60 | 1.00 | 1.40 | 2.00 | kW | Manual heat charge control, with integrated thermostat | [no] |
| Minimum heat output (indicative) P | min | 0.00 | 0.00 | 0.00 | 0.00 | kW | Manual heat charge control, with room and/or outdoor temperature feedback | [no] |
| Maximum continuous heat output (indicative) | Pmax,C | 0.60 | 1.00 | 1.40 | 2.00 | kW | Electric heat charge control, with room and/or outdoor temperature feedback heat charge control, with integrated thermostat | [no] |
| Auxiliary electricity consumption Fan assisted heat output [no] | ||||||||
| At nominal heat output el | max | 0.58 | 0.94 | 1.34 | 1.96 | kW | Type of heat output/room temperature control (select one) | - |
| At minimum heat output el | min | 0.00 | 0.00 | 0.00 | 0.00 | kW | Single stage heat output and no room temperature control | [no] |
| In standby mode | el SB | 0.00054 | kW | Two or more manual stages, no room temperature control | [no] | |||
| With mechanic thermostat room temperature control | [no] | |||||||
| With electronic room temperature control | [no] | |||||||
| With electronic room temperature control plus day timer | [no] | |||||||
| With electronic room temperature control plus week timer | [yes] | |||||||
| Other control options (multiple selections possible) | ||||||||
| Room temperature control, with presence detection | [no] | |||||||
| Room temperature control, with open window detection | [yes] | |||||||
| With distance control option | [yes] | |||||||
| With adaptive start control | [yes] | |||||||
| With working time limitation | [no] | |||||||
| With black bulb sensor | [no] | |||||||
TESY Ltd
48 Madara Blvd,
Shumen, 9700,
Bulgaria
Prior to contacting the Customer Service Center, please check the items in the table below.
| PROBLEM CAUSE SOLUTION | ||
| The appliance doesn't work No power supply from the grid. | Plug into the power outlet and check position of the ON/OFF switch. | |
| Be sure that the product is plugged in and that the electrical outlet is working. | ||
| The temperature may be set too low. Set the temperature to a higher position. | ||
| The "Protection from children" may be activated. See the section "Protection from children" in the user manual. | ||
| The delayed start is working. Press the Turn ON button from control board. | ||
| Room does not get warm enough although the appliance is hot | Appliance overheating. High limit safety cut-out limits heating output. | Eliminate the cause (cover, dirt or obstructions at the air inlet or outlet).Observe minimum clearances according to mounting instructions. |
| Check the Temperature correction for the sensor | See the temperature shown on the display of the appliance. Measure the temperature at a place where the temperature is "comfortable" enough for you. If you find a difference within a range of ±4°C, you can set the necessary correction in the convector's menu by entering the temperature difference resulting between the value on the display and the actually measured temperature. | |
| The heat demand of the room is higher than the appliance output. | Remove heat losses (Close windows and doors. Avoid constant venting.) | |
| Check if the power of your device is adapted to the size of your room. | Recommended an average of 100 W/m2 for a ceiling height of 2,50m or 30W/m3 | |
| Open window/door detection does not respond | Appliance does not detect a pronounced temperature drop due to venting. (Open window/door detection requires previously stable room temperature.) | Avoid obstructions that may prevent normal air exchange between the appliance and the indoor air. |
| Open window/door detection is not enabled Switch on open window/door detection. | ||
| „Adaptive start" function does not work as required | This function works only in weekly mode. Switch on Adaptive start function. | |
| Severely fluctuating room temperature or the appliance learning procedure has not been completed. | Wait a few days for behavior to stabilize. | |
| "Adaptive start" function is not enabled. Switch on the „Adaptive start" function in the menu. | ||
| Display shows "t1" or "t2" | The self-diagnostic system has found a problem with the temperature sensor "t1" indicates a disconnected cable at the sensor "t2" indicates short circuit at the sensor | In this case the electric convector will be automatically switched off and it can be switched on again only after the problem has been fixed by the authorized service representatives. Contact the authorized service center or the retailer you bought the product from. |
| Dirty marks appear on the wall around the device | The dirty marks come as a result of air contamination. Make sure that some fresh air enters the room regularly, especially if it is used for smoking. | |
| The device does not follow internal programming commands | The date and time are not set correctly. | Check the set date and time. |
| The appliance is under Open window/door detection. | Switch off the Open window/door detection. | |
| Sounds/Noises | Emitting faint noises during the heating process and shortly after the set temperature is reached, is not something unusual. | Such effect is in result of the natural materials expansions during the rapid temperature increase and following cooling of the metals used for the product manufacturing. |
| Yellowish stains on the grid | Such stains could be in result of covering the product with wet clothes. | Do not cover the product! Such actions are not allowed, because they block the air convection and will damage the product irreparably, leading to serious risk for your health and properties. |
natural_image
Diagram showing a device with two opposing arrows pointing downward, placed on a grid-patterned base (no text or symbols)natural_image
Technical line drawing of a rectangular box with a side panel and a separate view showing internal structure (no text or symbols)natural_image
Technical line drawing of a rectangular mechanical housing with mounting brackets and internal cavities (no text or symbols)ИЗПОЛЗВАНЕ В БАНЯ
natural_image
Technical diagram of a mechanical assembly with 5mm dimension标注 (no text or symbols on the diagram itself)natural_image
Diagram showing two opposing arrows pointing downward on a rectangular panel, with a grid base and an arrow symbol (no text or labels)natural_image
Technical line drawing of a rectangular box with a side view showing internal structure and mounting holes (no text or symbols)natural_image
Technical line drawing of a rectangular metal enclosure with mounting holes and internal compartments (no text or symbols)FOLOSIRE ÎN BAIE
- Moduri de program presetate:
Mod Confort (Comfort mode) ; Mod Eco (Eco mode) ; Mod „Somn“ (Sleep mode)
natural_image
Technical diagram of a mechanical assembly with hexagonal lattice structure and 5mm dimension label (no readable text or symbols)natural_image
Diagram showing a device with two opposing arrows pointing downward, placed on a grid base (no text or symbols)natural_image
Technical line drawing of a rectangular box with a side view showing internal structure and mounting holes (no text or symbols)natural_image
Technical line drawing of a mechanical housing or enclosure with mounting brackets and internal features (no text or symbols)УПОТРЕБА У КУПАТИЛУ
natural_image
Abstract geometric shape resembling a stylized letter 'C' or arrowhead, rendered in gray with no text or symbols.TESY
TESY Ltd - Head office
1166 Sofia, Sofia Park,
Building 16V, 2nd Floor
PHONE: +359 2 902 6666,
FAX: +359 2 902 6660,
office@tesy.com

- IMPORTANT SAFETY MEASURES AND INSTRUCTIONS:
- WARNING!
- PACKING
- INSTALLATION INSTRUCTIONS
- BATHROOM OPERATION
- OPERATION INSTRUCTIONS
- EN
- Activation of „Eco„ mode
- Deactivation of "Sleep mode"
- Deactivation of "Heating" mode
- Temperature adjustment
- Visualization on Display in "Delay start" settings :
- Anti-frost mode
- Activation and deactivation of Anti-frost mode
- Visualization on Display in "Anti-frost" settings :
- "Temperature correction for the sensor" function
- Visualization on Display in "Temperature correction" settings :
- Function Adaptive start (A)
- Deactivation of function Adaptive start : Ⓐ
- Activation of function Adaptive start :
- RESET to default settings
- Open window/door function
- Deactivation of Open window/door function :
- Activation of Open window/door function :
- Visualization on Display in "Open window" settings :
- Keyboard lock (Protection from children)
- Visualization on Main Display when activating and deactivating the function "Protection from children":
- Day and time - settings
- Set a schedule for the first day of the week
- Set time
- Weekly program (timer) 24hours/7days
- Deactivation
- Activation
- Create program
- Erase program
- View program
- Function AirSafe – only for models CN 06 xxx EA CLOUD AS W and CN 06 xxx EA AS W
- Function Air Safe
- Advantages of the function:
- Principle of work of Air safe function
- Function Wi-Fi - only for models CN 06 xxx EA CLOUD AS W and CN 06 xxx EA CLOUD W
- Function Wi-Fi
- Visualization on Display in "Wi-fi" settings:
- Work mode of display:
- Sound option
- Visualization on Display in "Sound" settings
- Device info
- Quick menu
- Errors mode:
- DISCONNECTION FROM THE POWER SUPPLY:
- PROTECTION
- CLEANING
- STORAGE
- MAINTENANCE OPERATIONS OF THE APPLIANCE
- DIMENSIONS OF HEATED VOLUME AND HEATED AREA OF A ROOM / APPLIANCE MODELS
- Environment protection instructions
- ИЗПОЛЗВАНЕ В БАНЯ
- FOLOSIRE ÎN BAIE
- УПОТРЕБА У КУПАТИЛУ
- TESY
Brand : Tesy
Model : CN 06 200 EА CLOUD AS W
Category : Electric heater