
HMSF-9BK - Fan Heinner - Free user manual and instructions
Find the device manual for free HMSF-9BK Heinner in PDF.


| Product Type | Stand fan |
| Model | HMSF-9BK |
| Brand | Heinner |
| Color | Black and white |
| Power Consumption | 19 W |
| Voltage | 220-240 V |
| Frequency | 50 Hz |
| Blade Diameter | 40 cm |
| Oscillation Angles | 60°, 90°, 120° |
| Remote Control | Yes, included |
| Wind Modes | Normal, gentle, sleep, temperature-varying |
| Speed Settings | 9 speeds (normal wind), 3 speeds (gentle/sleep) |
| Timer | Up to 8 hours |
| Display | LED display on body |
| Adjustable Height | Yes, with telescopic pole |
| Safety Features | Overheating protection, stable base, child supervision advised |
| Cleaning | Wipe with damp cloth; do not immerse; do not disassemble grille |
| Usage | Indoor only |
| Package Contents | Fan, remote control, user manual, warranty card |
Frequently Asked Questions - HMSF-9BK Heinner
User questions about HMSF-9BK Heinner
0 question about this device. Answer the ones you know or ask your own.
Ask a new question about this device
Download the instructions for your Fan in PDF format for free! Find your manual HMSF-9BK - Heinner and take your electronic device back in hand. On this page are published all the documents necessary for the use of your device. HMSF-9BK by Heinner.
USER MANUAL HMSF-9BK Heinner
natural_image
Modern outdoor fan with black and white design, standing on a stand (no visible text or symbols)natural_image
Line drawing of a standard electric fan with visible blades and body (no text or symbols)Pornire/Standby
natural_image
Exterior view of a modern office air conditioner with a black fan and white base (no visible text or symbols)- Fan
- Power: 19W
• Color: black and white
Thank you for purchasing this product!
I. INTRODUCTION
Before using the appliance, please read carefully this instruction manual and keep it for future reference.
This instruction manual is designed to provide you with all required instructions related to the installation, use and maintenance of the appliance.
In order to operate the unit correctly and safety, please read this instruction manual carefully before installation and usage.
II. CONTENT OF YOUR PACKAGE

Fan
User manual
Warranty card
Remote control
III. SAFETY PRECAUTIONS
Read all instructions carefully and keep this manual for future reference.
- If the supply cord is damaged, it must be replaced by manufacturer or its service agent or a similarly qualified person in order to avoid a hazard.
- To protect against the risk of electrical shock, do not immerse the unit, cord or plug in water or other liquid.
- This appliance is not intended for use by persons (including children) with reduced physical, sensory or mental capabilities, or lack of experience and knowledge, unless they have been given supervision or instruction concerning use of the appliance by a person responsible for their safety. Children should be supervised to ensure that they do not play with the appliance.
- When the appliance is not in use and before cleaning, unplug the appliance from the outlet.
- Keep electrical appliances out of reach from Children or infirm persons. Do not let them use the appliances without supervision.
- When the fan was assembled, the rotor blade guard shall not be taken off anymore.
- Prior cleaning unplug the fan.
- The rotor guard shall not be dissembled/opened to clean the rotor blades.
- Wipe the fan enclosure and rotor blade guard with a slightly damp cloth.
- Never insert fingers, pencils, or any other object through the grille when fan is running.
- Disconnect fan when moving from one location to another.
- Be sure fan is on a stable surface when operating to avoid overturning.
- DO NOT use fan in window, rain may create electrical hazard.
- Indoor use only.
V. PRODUCT DESCRIPTION
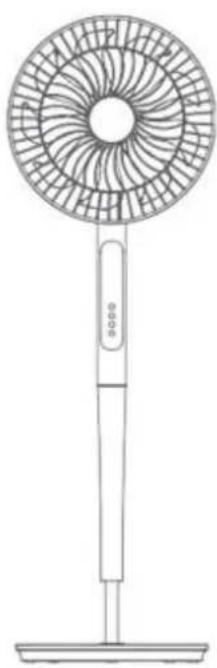
natural_image
Line drawing of a standard electric fan with a circular top and stand (no text or symbols)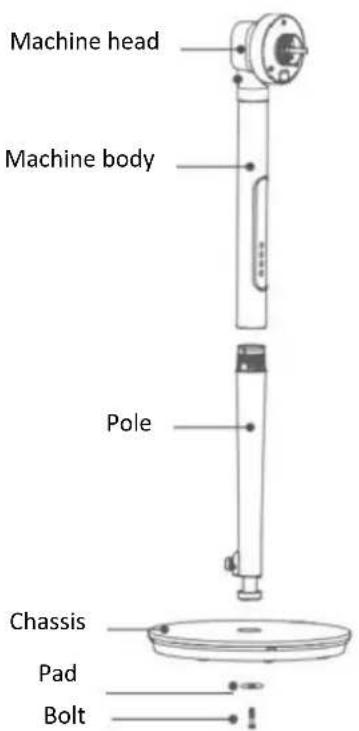
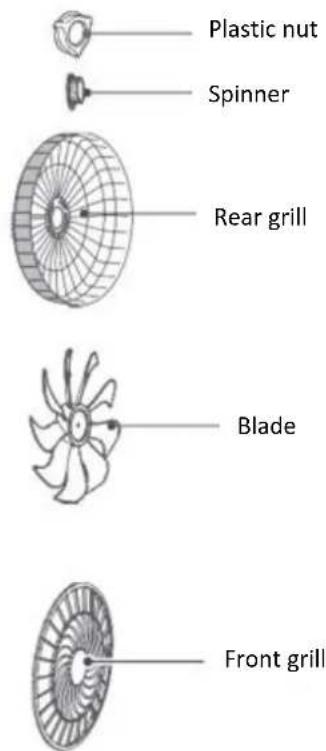
VI. HOW TO ASSEMBLE THE FAN
WARNING: Please unplug the fan before installing to the wall and the grid, and please install the fan impeller and grid completely (detail as graph) before using.
- Attach the stand pipe to the fan base with the attached screws.
- Pull out the extension pipe to required height and fasten the pipe locking nut tightly.
- Mount the fan head assembly to the fan-stand assembly and fasten the thumb screw.
- Remove the blade locking nut and the rear guard locking nut from the motor shaft, attach the rear guard to the head by tightening the locking nut firmly.
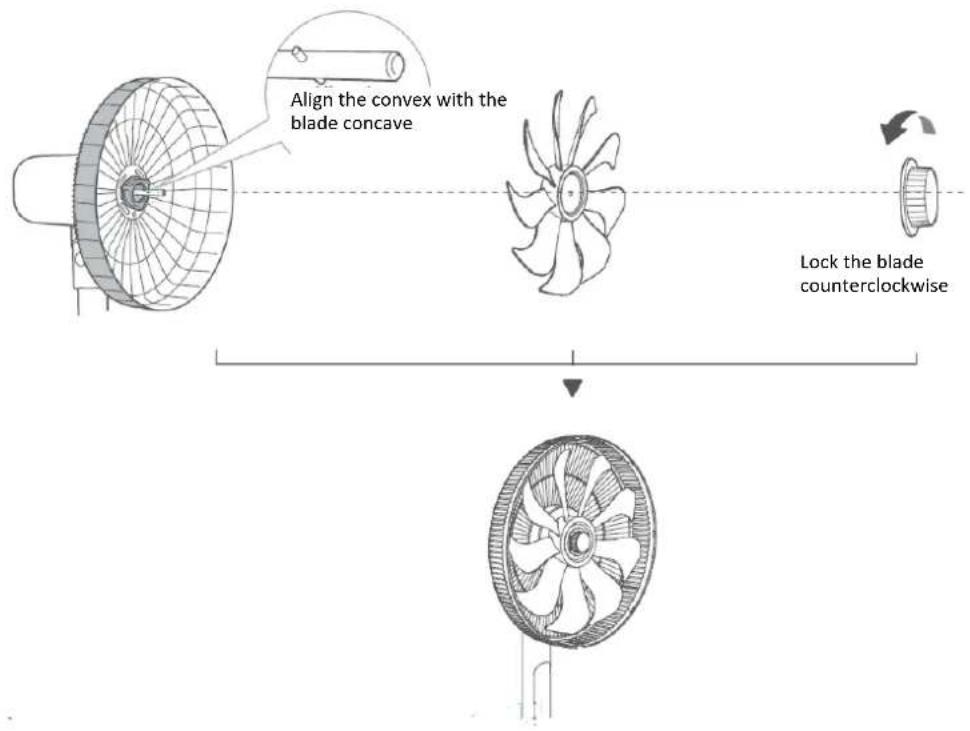
- Attach the fan blade to motor shaft and tighten the blade locking nut firmly.
- Mount the front guard to rear guard with plastic hoop and tighten the screw on the firmly.
Note
Please screw the plastic nut out of the machine head thread counterclockwise.
- CHASSIS INSTALLATION
Align the lower pole assembly with the chassis, clamp them stably and then fix them with bolts and pads
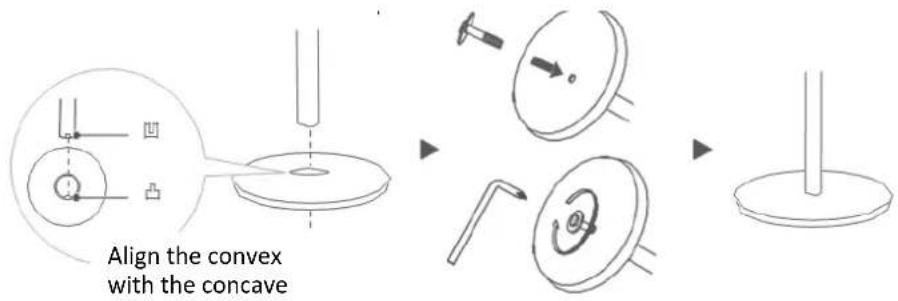
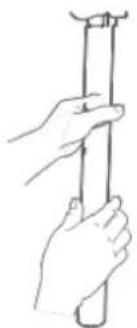
- INSTALLATION OF MACHINE BODY AND LOWER POLE ASSEMBLY
Firstly align the machine body with the hole position of the lower pole assembly, then rotate it clockwise and finally fix it.
natural_image
Line drawing of a hand holding a vertical rod or wire (no text or symbols)3. REAR GRILL INSTALLATION AND LOCKING
Align the machine head with the rear grill, hang up and then lock it with plastic nut.
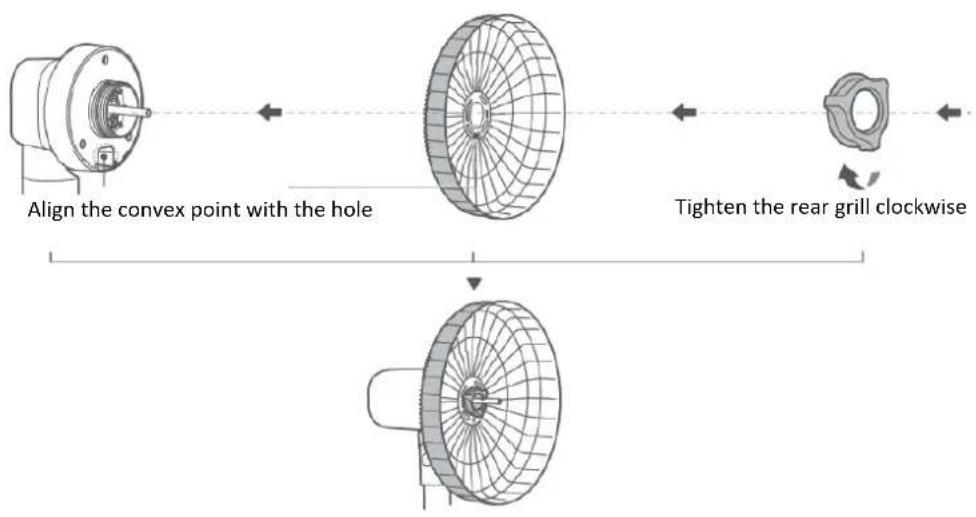
flowchart
graph TD
    A["Align the convex point with the hole"] --> B["Converging to a circular component"]
    B --> C["Tighten the rear grill clockwise"]
    C --> D["Final fan-shaped component"]
4. BLADE INSTALLATION AND LOCKING
Align the 3 blade with the motor shaft, complete the passing through of them and then fix the blade with 5 spinner.
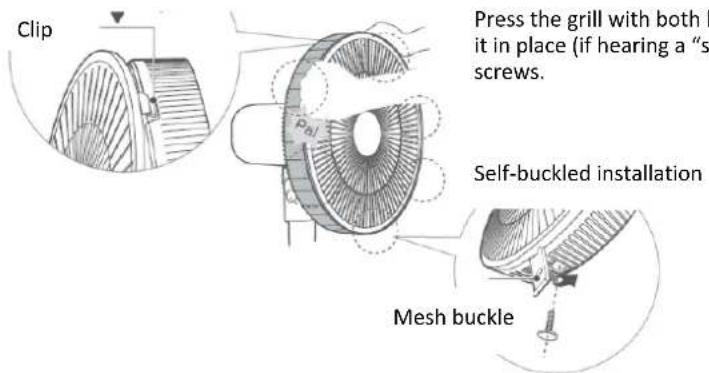
5. FRONT GRILL INSTALLATION AND FIXING
Installation essentials: Find the front grill clip and place the Heinner logo uprightly.
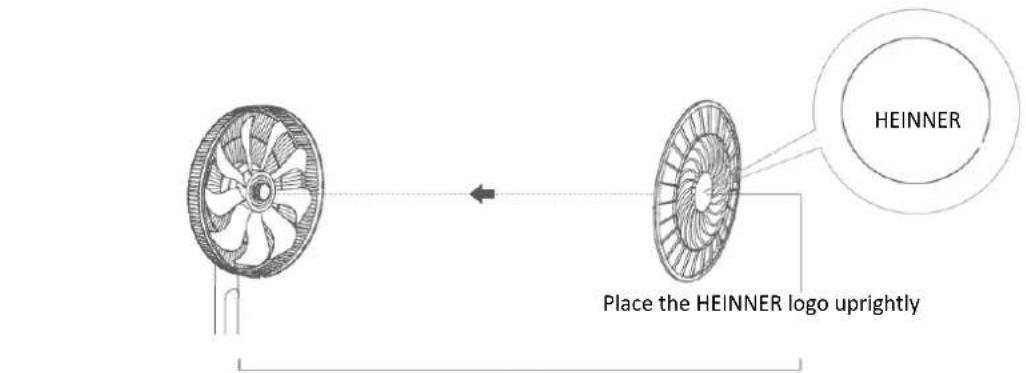
Buckle the front mesh enclosure with the rear mesh stably
VII. HOW TO OPERATE
Operations instructions of the machine body
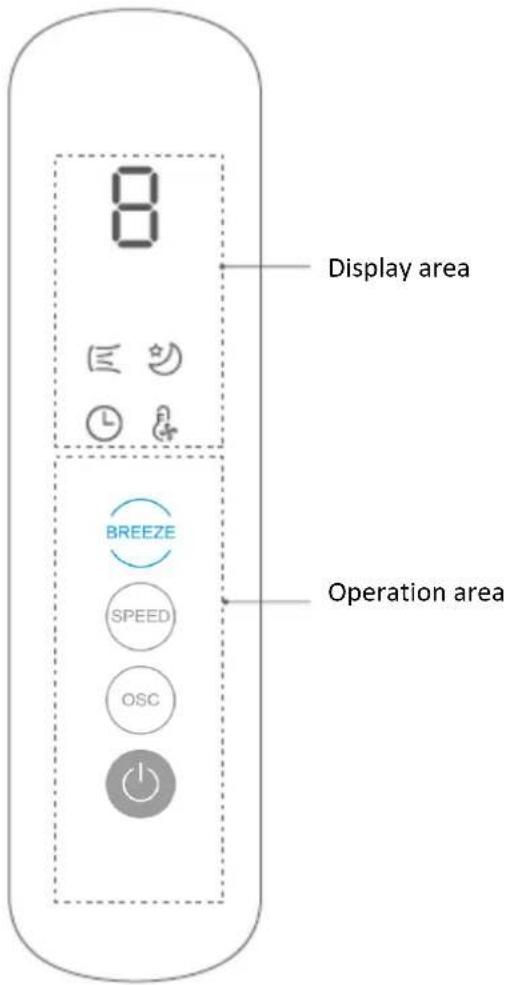
| Functions | Operation instructions |
 | Click  standby. standby. |
  | The oscillating angle can be switched after pressing the oscillating key repeatedly in the startup state, i.e.angle: 60^ shutdown 90^ shutdown 120^ shutdown...cycle switching. \( 60^{\circ}, 90^{\circ} and 120^{\circ} are displayed accordingly and respectively . (Remark: the screen will not display the oscillating stop state)This key can be short pressed to switch the wind speedThis key can be long pressed to switch the wind type (cycle: normal wind-gentle wind-sleep wind-normal wind). |
 Normal wind Normal wind | The numbers “1, 2, ..., 8, 9” on the display indicate the normal wind speed and gear.(Remark: There is no icon displayed for normal wind). |
 | This key can be short pressed to start up / shut down the gentle wind. This key can be long pressed to start up / shut down the mode of the wind changing with the temperature. |
 | In the gentle wind mode, the indicator will be turned on, and it can be cycled among gear 1, 2, and 3.The required gentle wind speed can be adjusted by pressing the wind speed key. |
 | In sleep wind mode, this indicator will be turned on and the wind speed of the fan can be automatically adjusted according to the established program. There are three gears, i.e. "1, 2, 3", and the required sleep wind speed can be adjusted by pressing wind speed key. |
 | This indicator will be lit up in the mode of the wind changing with the temperature.This mode can intelligently adjust the wind power according to the change of ambient temperature. |
 | The time of the machine can only be set on the remote control, and this indicator will be turned on in the timing state. |
Remote Control Panel
Note:
- The remote control should be normally used within 5 meters of the front of the product and 30 degrees of the deviation angle.
- The battery contains many heavy metals, acids and bases, etc., which may threaten human's health. Waste batteries should be recycled separately.
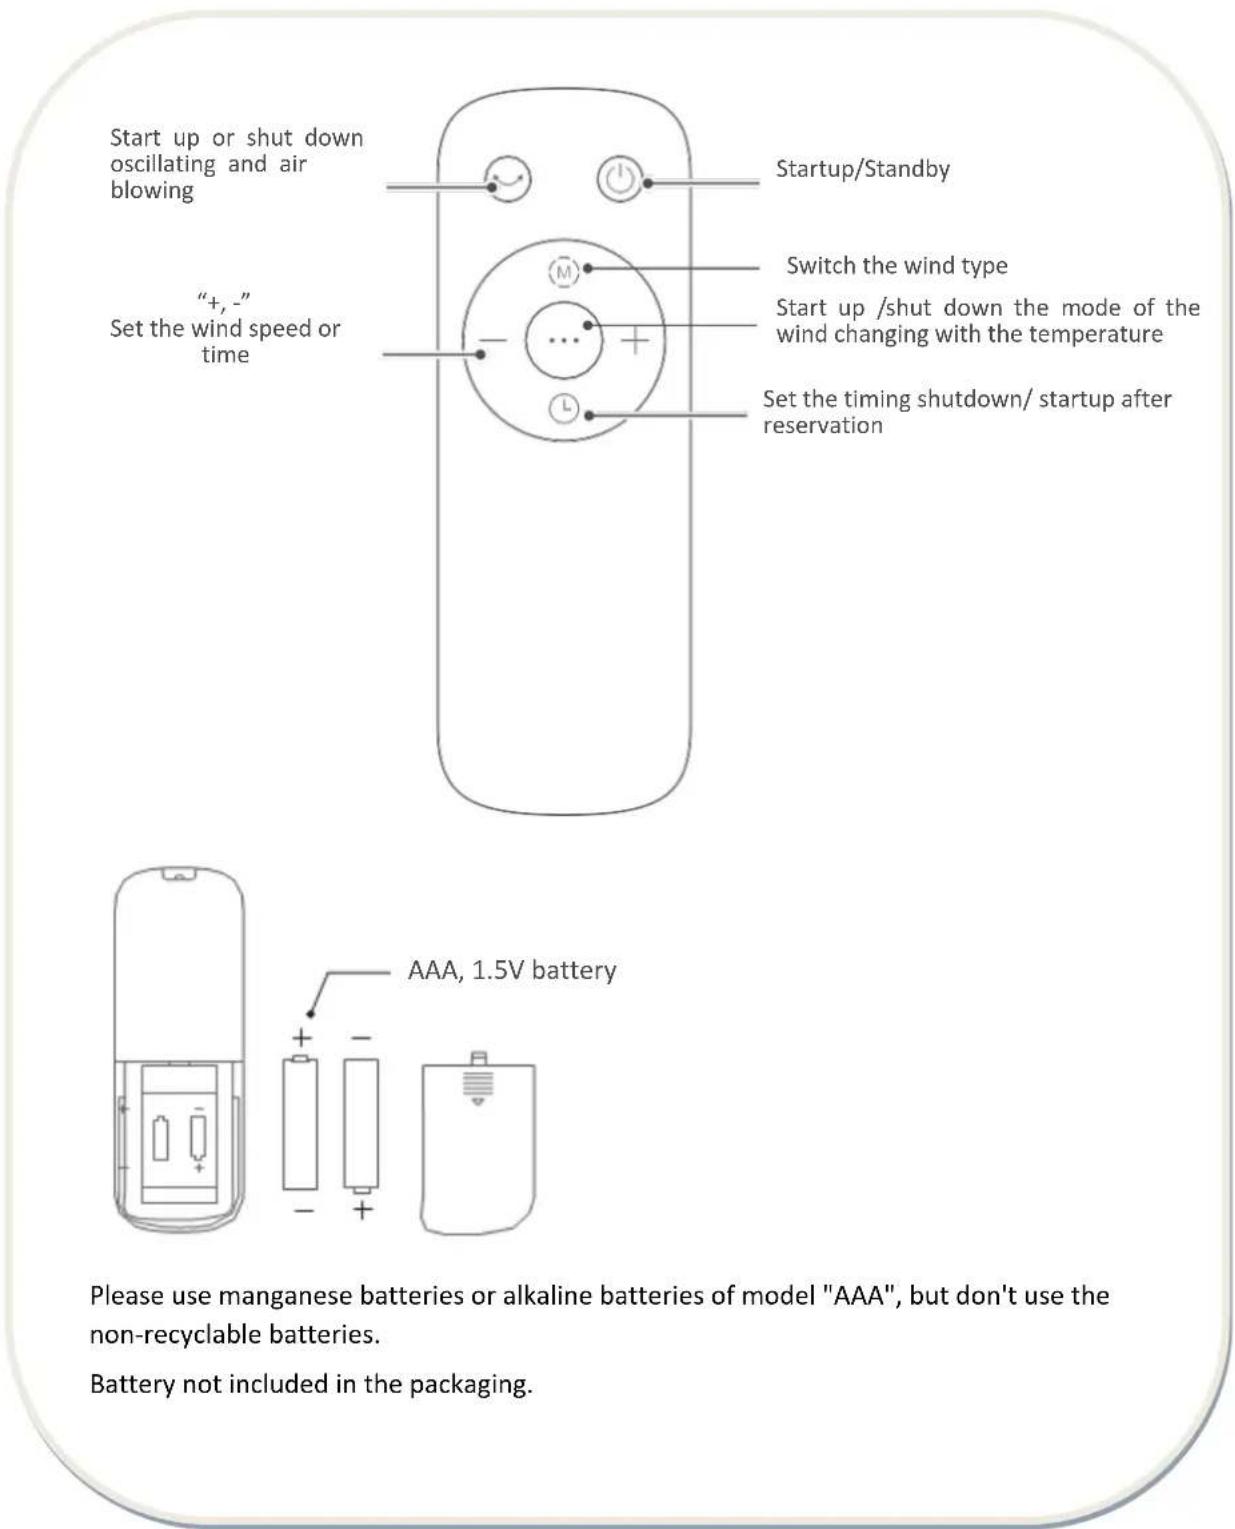
| Functions | Operation Instructions |
 | Startup/Standby. |
 | Start up or shut down oscillating and air blowing. |
 | Switch the wind type. |
 | Set the wind speed or time. |
 | Start up or shut down the mode of the wind changing with the temperature. |
 | It can only be shut down at the set time when it is started up, and the machine can only be started up after reservation in standby state;After clicking ,the time can be set by pressing or "+ and -"(cycle: 0-1-2 -... 8-0h), and the timing will be determined after the indicator has been flashed for 3 times.If the set time displays 0, meaning the timing / reservation is cancelled. |
VIII. CLEANING AND MAINTENANCE
The fan requires little maintenance. Do not try to fix it by yourself. Refer it to qualified service personnel if service is needed.
- Before cleaning and assembling, fan must be unplugged.
- To ensure adequate air circulation to the motor, keep vents at the rear of the motor free of dust. Do not disassemble the fan to remove dust.
- Please wipe the exterior parts with a soft cloth soaking a mild detergent.
- Do not use any abrasive detergent or solvents to avoid scratching the surface. Do not use any of the following as a cleaner: gasoline, thinner.
- Do not allow water or any other liquid into the motor housing or interior parts.
CLEANING
- Be sure to unplug from the electrical supply source before cleaning.
- Plastic parts should be cleaned with a soft cloth moisten with mild soap. Thoroughly remove soap film with dry cloth.
IX. TECHNICAL FICHE
| Power | 19W |
| Voltage | 220-240V, 50Hz |
| Diameter | 40 cm |
| Color | Black and white |
Environment friendly disposal
You can help protect the environment!
Please remember to respect the local regulations: hand in the non-working electrical equipment's to an appropriate waste disposal center.

HEINNER is a registered trademark of Network One Distribution SRL. Other brands and product names are trademarks or registered trademarks of their respective holders.
No part of the specifications may be reproduced in any form or by any means or used to make any derivative such as translation, transformation, or adaptation without permission from NETWORK ONE DISTRIBUTION.
Copyright © 2013 Network One Distribution. All rights reserved.
www.heinner.com, http://www.nod.ro
http://www.heinner.com, http://www.nod.ro

This product is in conformity with norms and standards of European Community
Importer: Network One Distribution
Marcel Iancu Street, no 3-5, Bucharest, Romania
Tel: +40 21 211 18 56, www.heinner.com, www.nod.ro
HEINNER
natural_image
Modern outdoor fan with black and white design, standing on a stand (no visible text or symbols)natural_image
Line drawing of a standard electric fan with visible blades and body structure (no text or symbols)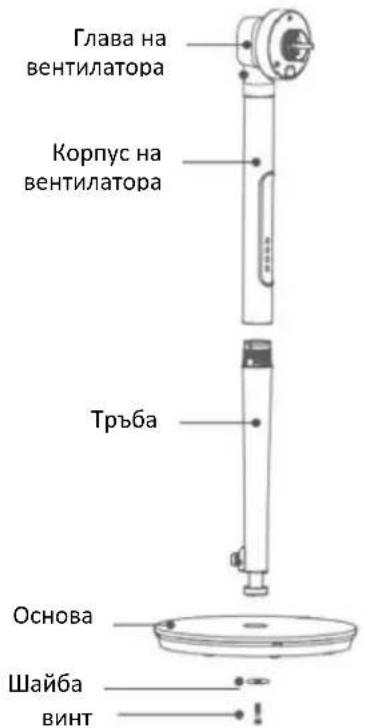
natural_image
Modern outdoor fan with black and white design, standing on a stand (no visible text or symbols)natural_image
Line drawing of a standard electric fan with visible blades and body (no text or symbols)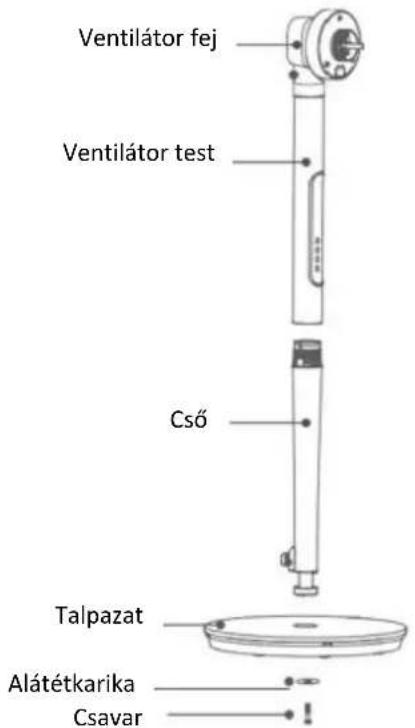
- Thank you for purchasing this product!
- INTRODUCTION
- CONTENT OF YOUR PACKAGE
- SAFETY PRECAUTIONS
- PRODUCT DESCRIPTION
- HOW TO ASSEMBLE THE FAN
- Note
- REAR GRILL INSTALLATION AND LOCKING
- BLADE INSTALLATION AND LOCKING
- FRONT GRILL INSTALLATION AND FIXING
- HOW TO OPERATE
- Remote Control Panel
- Note:
- CLEANING AND MAINTENANCE
- CLEANING
- TECHNICAL FICHE
- Environment friendly disposal
- HEINNER
Brand : Heinner
Model : HMSF-9BK
Category : Fan