KW-NT3E - Car stereo JVC - Free user manual and instructions
Find the device manual for free KW-NT3E JVC in PDF.

User questions about KW-NT3E JVC
0 question about this device. Answer the ones you know or ask your own.
Ask a new question about this device
Download the instructions for your Car stereo in PDF format for free! Find your manual KW-NT3E - JVC and take your electronic device back in hand. On this page are published all the documents necessary for the use of your device. KW-NT3E by JVC.
USER MANUAL KW-NT3E JVC
For installation and connections, refer to the separate manu
Thank you for purchasing a JVC product.
Please read all instructions carefully before operation, to ensure your complete understanding and to obtain the best possible performance from the unit.
IMPORTANT FOR LASER PRODUCTS
- CLASS 1 LASER PRODUCT
- CAUTION: Do not open the top cover. There are no user serviceable parts inside the unit; leave all servicing to qualified service personnel.
- CAUTION: Visible and/or invisible class 1M laser radiation when open. Do not view directly with optical instruments.
- REPRODUCTION OF LABEL: CAUTION LABEL, PLACED OUTSIDE THE UNIT.
| CAUTION | ATTENTION | AVISO | VARNING | 注章 | CAUTION |
| VISIBLE AND/OR INVISIBLE CLASS 1M | RAYONDEMENT LASER VISIBLE ET/OU | RADIANCO LASEN DERCLAGE 1M | SYNLIG OCH/EILLER OSYNGLY | 二元表(上可写) 及该字不许写 | |
| LASER DIAZION | INVERBE DE CLASSES | VISIBLE VO INVERBE | LASER STRALING, CLASS 1M, NAR DENNA PASTA, PAPER | OMLA 2KAM | LASER DIAZION |
| WHEN OPEN, DO NOT | UNI FOGS OUVERT. VIEW DIRECTLY TO | CUCYO ESTA NO MIPAR DIRECTAMETA | PAPER | 一元表(一般数) 或非一元表 | WHEN OPEN, DO NOT SDRAM INTEEM, FA 2CPR |
| OPTICAL INSTRUMENTS | DIRECTED/DECENT DES INSTRUMENTS | CON INSTRUMENTAL OPTICO. (ESP) | BETRAKJA E STRALEN MED OPTISKA INSTRUMENT. (SWF) | 本表请寄送 或按以下格式 (UPN) | |
| ECO8000-1251 | OPTICINES (FRA) | (ENG) | |||
Information for Users on Disposal of Old Equipment and Batteries
[European Union only]
These symbols indicate that the product and the battery with this symbol should not be disposed as general household waste at its end-of-life.
If you wish to dispose of this product and the battery, please do so in accordance with applicable national legislation or other rules in your country and municipality.
By disposing of this product correctly, you will help to conserve natural resources and will help prevent potential negative effects on the environment and human health.
Notice:
The sign Pb below the symbol for batteries indicates that this battery contains lead.


Products
Battery
Cautions on the monitor:
- The monitor built in this unit has been produced with high precision, but it may have some ineffective dots. This is inevitable and is not malfunction.
- Do not expose the monitor to direct sunlight.
- Do not operate the touch panel using a ball-point pen or similar tool with the sharp tip. Touch the buttons on the touch panel with your finger directly (if you are wearing a glove, take it off).
- When the temperature is very cold or very hot...
- Chemical changes occur inside, causing malfunction.
- Pictures may not appear clearly or may move slowly. Pictures may not be synchronized with the sound or picture quality may decline in such environments.
WARNING:
To prevent accidents and damage
- DO NOT install any unit or wire any cable in a location where;
- it may obstruct the steering wheel and gearshift lever operations.
- it may obstruct the operation of safety devices such as air bags.
-it may obstruct visibility. - DO NOT operate the unit while driving. If you need to operate the unit while driving, be sure to look around carefully.
- The driver must not watch the monitor while driving.
For security reasons, a numbered ID card is provided with this unit, and the same ID number is imprinted on the unit's chassis. Keep the card in a safe place, as it will help the authorities to identify your unit if stolen.
- Manufactured under license from Dolby Laboratories. Dolby and the double-D symbol are trademarks of Dolby Laboratories.
- "DVD Logo" is a trademark of DVD Format/Logo Licensing Corporation registered in the US, Japan and other countries.
- DivX® is a registered trademark of DivX, Inc., and is used under license.
- ABOUT DIVX VIDEO: DivX® is a digital video format created by DivX, Inc. This is an official DivX Certified device that plays DivX video. Visit www.divx.com for more information and software tools to convert your files into DivX video.
- ABOUT DIVX VIDEO-ON-DEMAND: This DivX Certified® device must be registered in order to play DivX Video-on-Demand (VOD) content. To generate the registration code, locate the DivX VOD section in the device setup menu. Go to vod.divx.com with this code to complete the registration process and learn more about DivX VOD. (page 56)
DivX Certified to play DivX video, including premium content - Microsoft and Windows Media are either registered trademarks or trademarks of Microsoft Corporation in the United States and/or other countries.
-
The Bluetooth word mark and logos are owned by the Bluetooth SIG, Inc. and any use of such marks by Victor Company of Japan, Limited (JVC) is under license. Other trademarks and trade names are those of their respective owners.
-
"Made for iPod", and "Made for iPhone" mean that an electronic accessory has been designed to connect specifically to iPod, or iPhone, respectively, and has been certified by the developer to meet Apple performance standards. Apple is not responsible for the operation of this device or its compliance with safety and regulatory standards. iPhone, iPod, iPod classic, iPod nano, and iPod touch are trademarks of Apple Inc., registered in the U.S. and other countries.
- This product incorporates copyright protection technology that is protected by U.S. patents and other intellectual property rights. Use of this copyright protection technology must be authorized by Rovi Corporation, and is intended for home and other limited viewing uses only unless otherwise authorized by Rovi Corporation. Reverse engineering or disassembly is prohibited.
- Google Maps™ is a trademark of Google Inc.
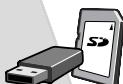
- SD Logo is a trademark.
For safety...
- Do not raise the volume level too much, as this will block outside sounds, making driving dangerous.
- Stop the car before performing any complicated operations.
Temperature inside the car...
If you have parked the car for a long time in hot or cold weather, wait until the temperature in the car becomes normal before operating the unit.
When replacing/rotating the tyres:
It is required to clear all the accumulated calibration data which is important for accurate navigation. To clear the data, perform

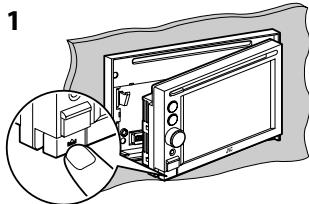
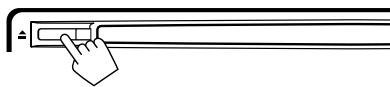
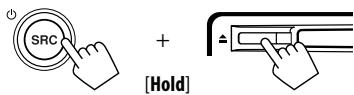
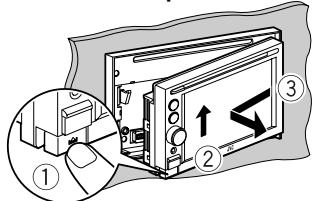
How to forcibly eject a disc
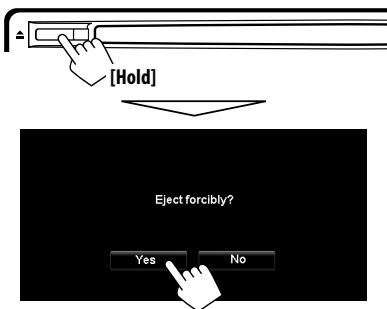
- Be careful not to drop the disc when it ejects.
- If this does not work, detach the monitor panel then attach it (right).

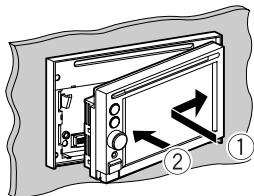
Detaching/attaching the monitor panel
Detaching

3
Attaching
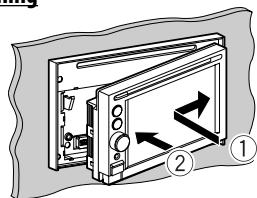
Caution:
- Hold the monitor panel securely so as not to drop it accidentally.
- Fit the monitor panel onto the attaching plate until it is firmly locked.
How to read this manual:
- < > indicates the variable screens/menu operations/ settings that appear on the touch panel.
- [ ] indicates the buttons on the touch panel.

How to forcibly eject a disc 4
Detaching/attaching the monitor panel 4
Introduction 8
Parts identification. 8
Installation settings 9
Basic operations 10
- Turning on the power 10
- Messages about the status of GPS signal reception. 10
- Turning off/on the screen 10
Operations on the touch panel. 11
Switching screens 12

Navigation System 14
Safety instructions/information for the Navigation System.....14
Information/Icons on the map 14
Basic operations 15
About the current position screen 15
To change the map scale. 15
To scroll the map. 16
To display your current position. 16
To change the map view 16
Registering your home/favourite points 17
Searching for a place. 18
- Setting a destination by scrolling the map. 18
About the search result screen 18 - Setting a destination using the
19
About search screens and input screens 20 - By address 21
- By telephone number
22
From the list of POI23 - POI near a place/route
. 24
By coordinates25
From the list of POIs imported by yourself25 - Quick Search 26
How you are guided 28
Starting guidance to the destination or via point 28
Changing route options 29
- Canceling guidance 29
- Adjusting the volume of the voice guidance 29
About route guidance screen 30
- Getting information on your route and places 31

Arranging your route 32
- Changing the sequence of the destination/ via points 32
Avoiding a congestion ahead 33 - Adjusting the vehicle position 33
Editing registration of home/favourite points 34
Using traffic information service - TMC. 35
How TMC information is reflected in navigation 35
- Checking the TMC information 36
Checking the information of the navigation system 37
Initializing memories/navigation settings 38
Navigation menu items. 39
Additional information 41


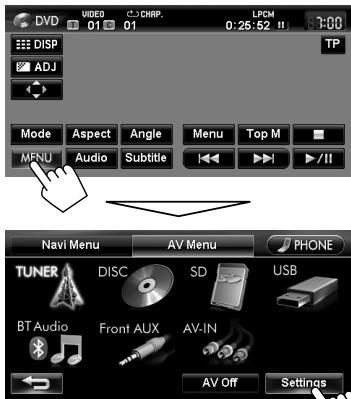
AV Operations 43
Common operations on AV screens 43
- Selecting the playback source 43
- Turning off the AV source 43
Listening to the radio 44
- Storing stations in memory 45
- Selecting a preset station 45
- Reducing the interference. 46
- Searching for FM Radio Data System programme—PTY Search.... 46
- Activating/deactivating TA/PTY Standby Reception. 47
- Tracing the same programme—Network-Tracking Reception……… 48
Automatic station selection-Programme Search 48
Disc operations 49
- Playable disc types 50
- Selecting playback modes. 55
- Settings for the disc playback 56
SD/USB operations 57
Listening to the iPod/Phone device 59
- Selecting a track/video from menu on the iPod/iPhone 61
Using other external components 62
·Front AUX. 62
AV-IN 62


Sound equalization 63
Changing illumination colour 64
Settings for video playback 65
- Picture adjustment 65
- Changing the aspect ratio 65
AV menu items 66
Additional information 69
Bluetooth Operations 72
Information for using Bluetooth device. 72
Using Bluetooth device 73
- Registering a Bluetooth device 73
- Connecting/disconnecting a registered Bluetooth device 74
- Deleting a registered Bluetooth device 74
Using Bluetooth mobile phone 75
Receiving a call 75
- Adjusting the volume of calls/earpiece 75
- Switching between handsfree mode and phone mode. 76
Making a call. 76
- Copying the phone book 77
- Searching for a phone number from phone book. 77
- Deleting the phone number memory in the unit 78
- About mobile phone compatible with Phone Book Access Profile (PBAP) 78
Using Bluetooth audio player 79
Bluetooth device settings 80
Rear View Camera Operations. 81
Using a rear view camera 81
- Activating the rear view camera 81
- Displaying the picture from the rear view camera. 81
References 82
Maintenance 82
Troubleshooting/errormessagese 83
Specifications 89
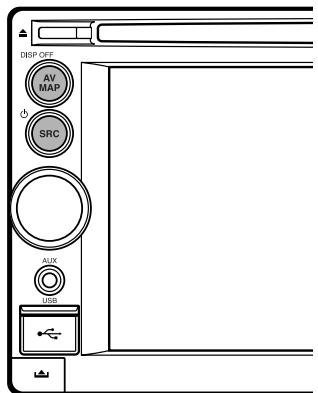
Parts identification
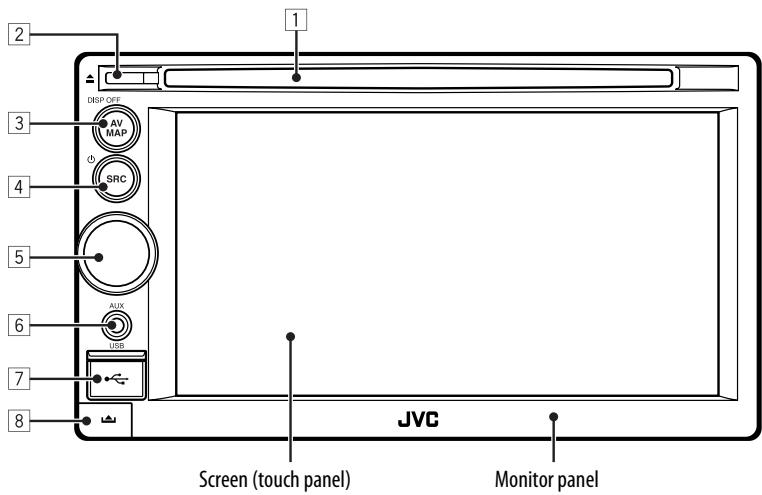
1 Loading slot
2 (Eject) button
Ejects the disc.
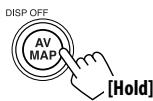
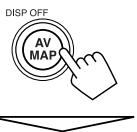
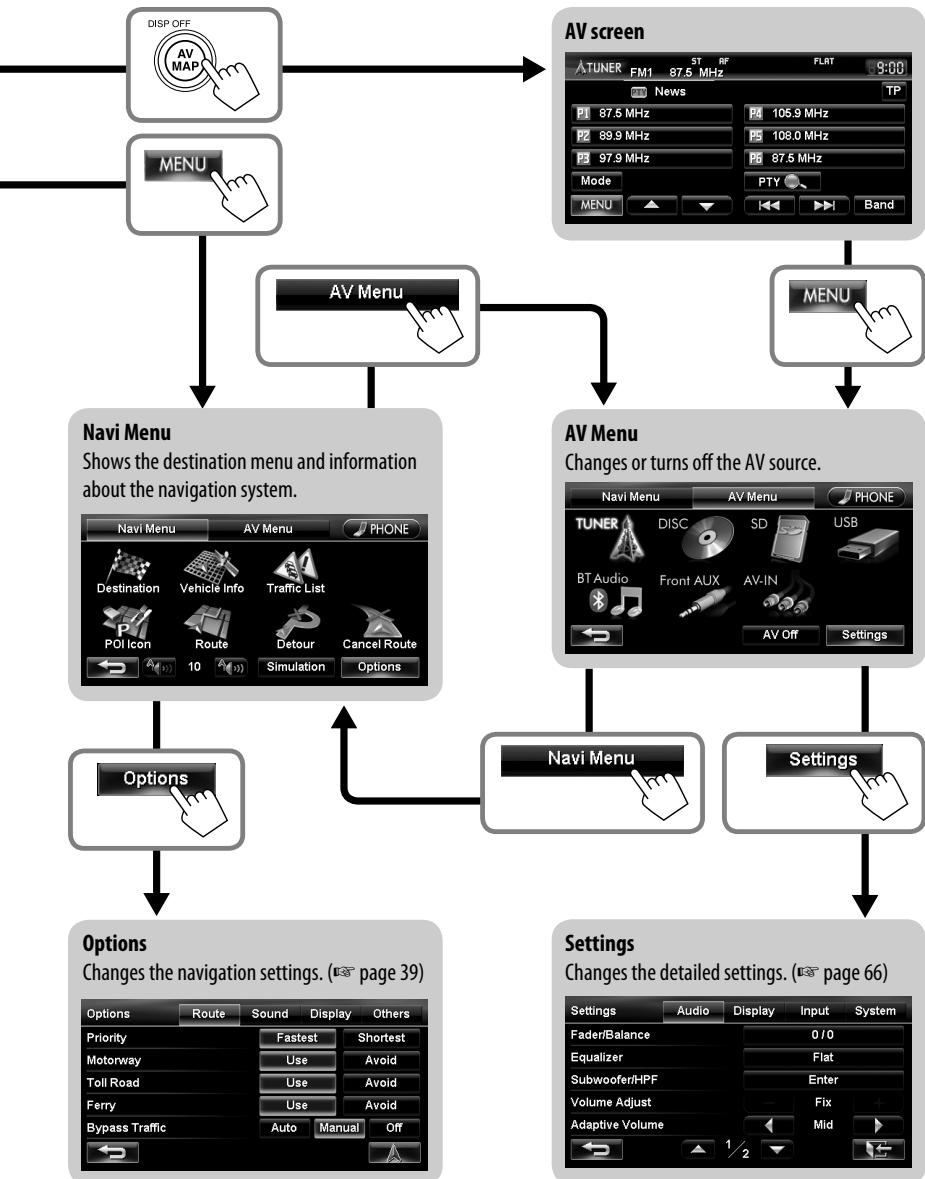
3 AV MAP/DISP OFF button
- Switches the screen between the map screen and AV screen. (E88 page 12)
Turns off/on the screen. [Hold] (e page 10)
4 SRC/按钮
- Selects the source. (E3 page 43)
Turns off/on the AV function. [Hold] (e page 43)
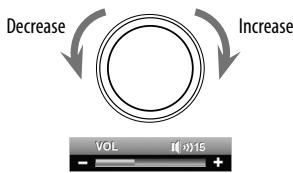
Volume adjustment knob
Adjusts the audio volume.
- About the adjustable volume range, page 67 (
).
To adjust the guidance volume, page 29.
AUX input terminal
7 USB 一 input terminal
8 (Detach) button Detaches the monitor panel. ( page 4)
You can change the colour of the buttons on the monitor panel. ( page 64)
Installation settings
When you turn on the unit for the first time, the initial setup screen appears.
1 Turn on the ignition switch.
The power is turned on, and the startup screen is displayed for about 5 seconds.
2 Select the language you want for the display and the voice guidance.
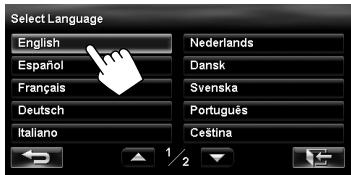
- You can also select the system language through the AV menu (
- - , page 68).
3 Display installation settings screen.
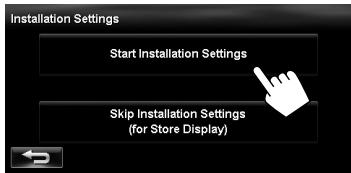
-
If you select [Skip Installation Settings (for Store Display)], the System starts in the store display mode. You need to make the installation settings next time you turn on the power.
-
When you turn on the power,
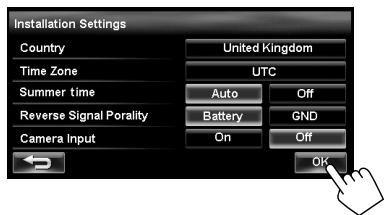
4 Adjust the settings.
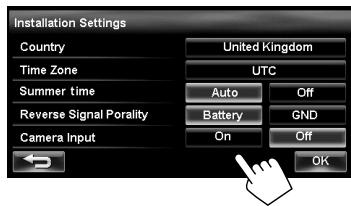
| Country | Select the country where you are now. |
| Time Zone* | Select your residential area for automatic clock adjustment by GPS signal. |
| Summer time* | Select <Auto> if your residential area is subject to Summer time. |
| Reverse Signal Polarity* | Select the reverse signal polarity (<Battery> or <GND>) according to the connection of your car. |
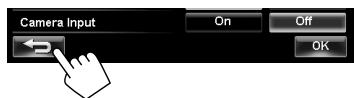
| Camera Input* | Select <On> when connecting the rear view camera to the CAMERA IN jack. |
- You can also change these settings through the AV menu (
, page 68).
5
6
To cancel the display demonstration, page 67 (
Basic operations
Turning on the power
Turn on the ignition switch.
Startup screen appears for about 5 seconds.
- You can change the startup screen. ( page 69)
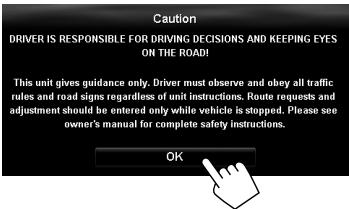
- When displaying the map screen for the first time after turning on the power, the screen below appears. Press [OK] to use the map screen.
- The power is turned off when the ignition switch is turned off.
Messages about the status of GPS signal reception
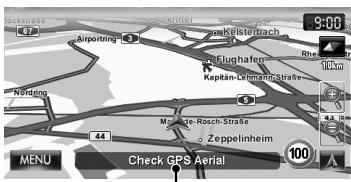
Current status of the GPS signal reception
| "Check GPS Aerial" | Check the connection of the GPS aerial. |
| "Acquiring GPS Signal" | • Acquiring GPS signals. Wait until signal reception is completed. • GPS signals cannot be received. Move to the place where the System receives the GPS signals. |
Turning off/on the screen


The screen is turned on.
- You can erase the clock display while the screen is turned off. (
, page 67)
Operations on the touch panel
When items on the menu are not available
Non-available items will be shaded
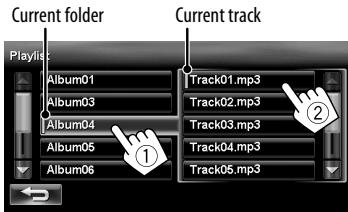
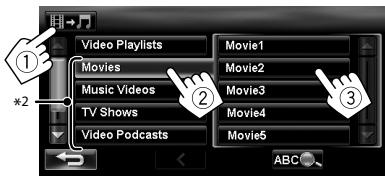
To select folder/track on the list
Select a folder (①), then a track (②).
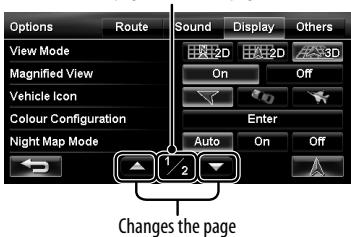
To change the page of menu/list Menu
Current page/total menu pages
List
Ex.: Folder/track list

Scrolling the track/song information
When all the text is not shown at once...

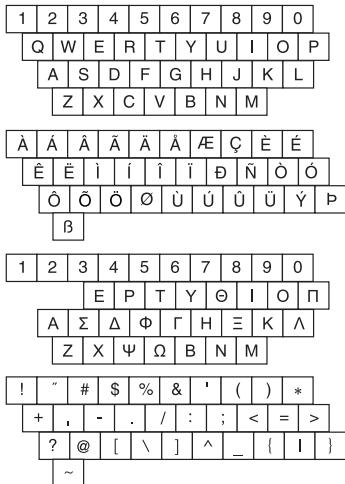
Characters you can use
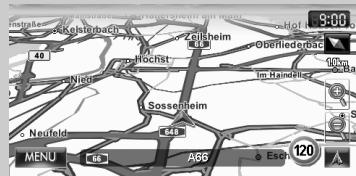
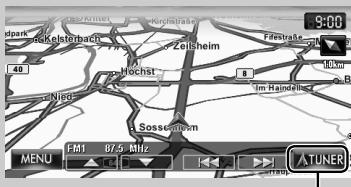
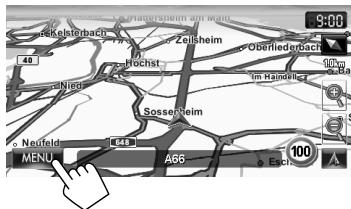
Map screen
The AV control bar is displayed on the map screen. You can perform AV source operations using the AV control bar.
- Pressing (SPC) also displays the AV control bar. In this case, the AV control bar disappears automatically after 5 seconds.
Erases the AV control bar
- You can change the source by pressing (SNC) while the AV control bar is displayed.
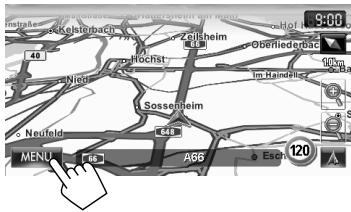
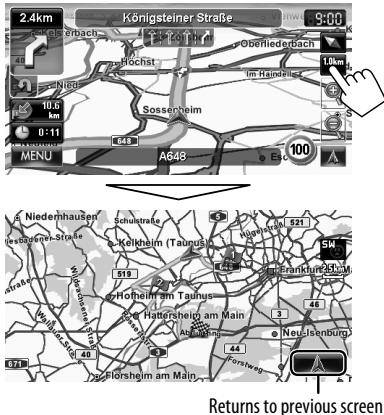
While driving at a speed greater than 10km / h , some screens on the navigation menus are not available.
- Press to return to the previous screen.
- On navigation screens only: press to display the current position on the map.
- On
on only: press to display the current source screen.
Safety instructions/information for the Navigation System
SAFETY INSTRUCTIONS
Use of the Navigation System is only permitted if the traffic conditions are suitable and you are absolutely sure that no risk, obstruction or inconvenience will be incurred to you, your passengers or other road users. The requirements of the Road Traffic Regulations must always be followed. The destination must not be entered while driving the car.
The Navigation System serves solely as an aid to navigation. It never releases the drivers from their duties to drive carefully and to make own judgement in road traffic. Inaccurate or incorrect instructions may happen to be given due to changing traffic conditions. The actual road signs and traffic regulations must therefore always be observed. In particular, the Navigation System cannot be used as an aid to orientation when visibility is poor.
This Navigation System must only be used for its intended purpose. The volume of the car radio/ Navigation System must be adjusted so that external noise is still audible.
Navigation guidance is performed, based on the database, therefore, it may not be applicable to the current situation because of changes in traffic conditions (e.g. changes in tollroads, principal roads, one-way traffic, or other traffic regulations). In this case, observe the current traffic signs or regulations.
- Traffic signs should be observed carefully while driving using the Navigation System. Navigation System is only an aid. Driver must always decide whether or not to heed the information provided. JVC does not accept liability for erroneous data provided by the Navigation System.
- Traffic guidance is restricted to passenger vehicles only. Special driving recommendations and regulations for other vehicles (e.g. commercial vehicles) are not included.
- Do not operate the unit while driving.
Terms of licence
You are granted a non-exclusive licence to use the database for your personal purposes. The present licence does not authorise the granting of licences. Use of the data is only permitted in this specific JVC system. It is forbidden to extract or make further use of significant parts of the database content, or to duplicate, modify, adapt, translate, analyse, decompile or reverse-engineer any part thereof.
WARNING:
Road traffic regulations always take priority when a vehicle is being driven in traffic. Navigation System is only an aid. Errors may occur in individual data items/ entries. At all times, the driver must decide whether or not to heed the information provided.
JVC does not accept liability for erroneous data provided by the Navigation System.
© Tele Atlas BV. 2009 All rights reserved.
Information/Icons on the map
- The information on the map (such as street name, the POI information, and speed limit) may not be always displayed (for example, if the System does not have the information of the position).
- Home ( ) and favourite point ( ) icons are displayed after home/favourite points are registered.
-
POI icons are displayed on the map depending on the
setting ( page 15) and the map scale is between 25 m and 250 m. -
The following icons are displayed when the map scale is between 25m and 1km :
-
Airport and ferry terminal icons in the travel category
Golf course icon in the leisure category -
Petrol station icons
-
POI icons may not be displayed correctly when the System displays the wide area of map. In this case, zoom in the map to display the detailed map.
About the current position screen
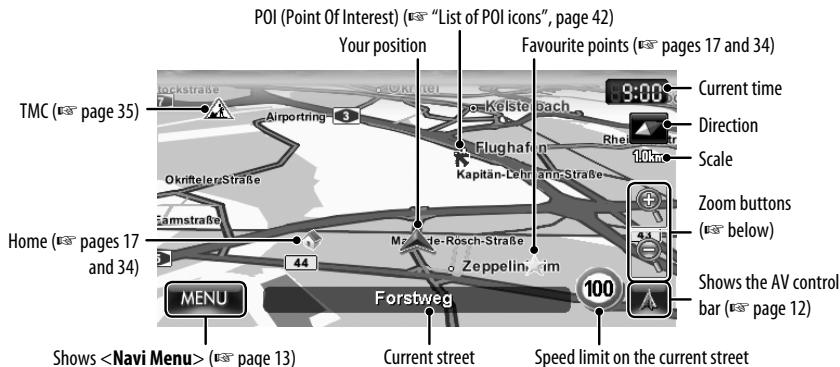
To display/hide POI icons on the map
1 On
2 Select categories (①) and sub-categories (②) of POI which you want to be displayed on the map.
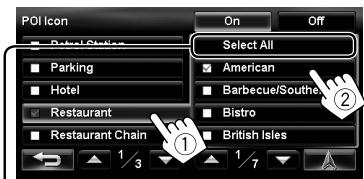
[Select All]: Selects all sub-categories [Deselect All]: Deselects all sub-categories.
- The selected items are marked with "√."
3 Activate or deactivate the POI icons of the selected categories.

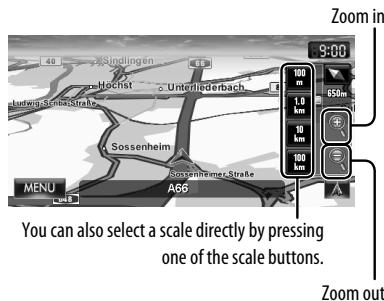
To change the map scale
1 Display the zoom buttons and scale buttons.

- When the AV control bar is displayed, the zoom buttons are not shown. Erase the AV control bar by pressing the source icon on the bar. (E5 page 12)
2
To scroll the map
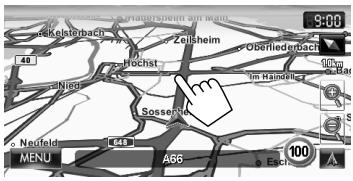
The position you touched is centred on the map.
Direction and distance from your current position
- Touch and hold the map to keep scrolling the map.
-
The scrolling speed varies depending on the position you are touching and holding:
-
Inner area: slow
- Outer area: fast
To display the current position
To display your current position
To change the map view

3D Map
The three dimensional map is displayed in "heading up."
- The icon shows the direction of north.

2D North Up
The map view is oriented with north "upwards," as in usual paper maps.
- The icon shows the direction of the car.

2D Heading Up
The map rotates so that you are always displayed heading "upwards."
The icon shows the direction of north.
- You can also change the map view through the navigation menu (
- - , page 40).
Registering your home/favourite points
You can register one point as your home or 100 favourite points.
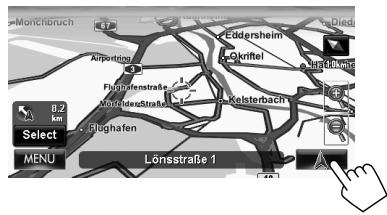
1 Scroll the map to select the position you want to select as a destination.
To search the destination using
2
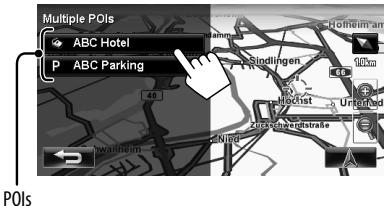
- If there are several POIs on the selected position, select one from the list.
- The list appears only when < POI is set to < 0n > . (E8 page 15)
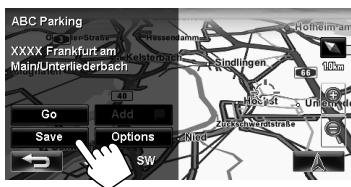
3
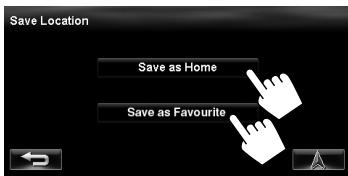
4
[Save as Home]:
The selected position is saved as home and the home is marked with icon on the map.
- When the home is already registered, you are asked if you want to replace the old home. Press [Yes] to replace, or press [No] to cancel.
[Save as Favourite]:
The selected position is saved as a favourite point and the favourite point is marked with icon on the map.
To edit the registration, page 34.
Searching for a place
Setting a destination by scrolling the map
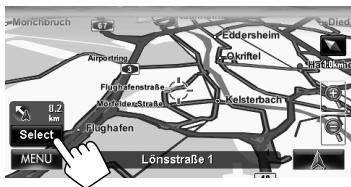
1 Scroll the map to select the position you want to select as a destination. (E88 page 16)
2
- If there are several POIs on the selected position, select one from the list.
- The list appears only when <POI Icon> is set to <0n> . (E8 page 15)
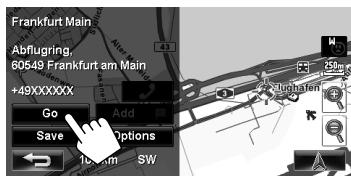
The search result is displayed.
Guidance starts.
To cancel guidance, page 29.
- To set the selected position as via point, page 28.
To change route options, page 29.
- For details about the search result screen, right.
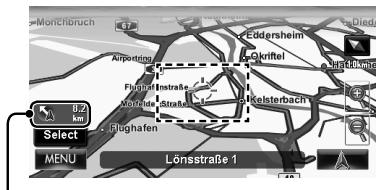
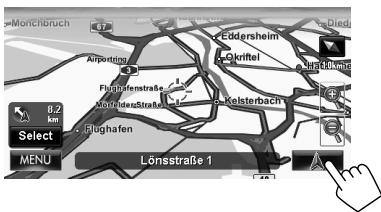
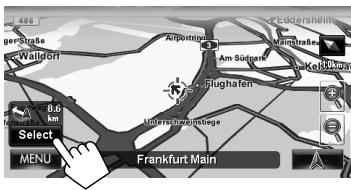
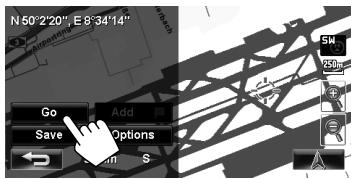
About the search result screen
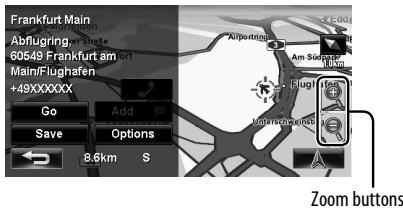
- You can change the map scale by pressing the zoom buttons.
- You can display the map of selected area on whole screen by touching the map part once. (If you press more than once, the map scrolls.) To display the information screen again, press [Select].
- The information screen is always displayed with the 2D North Up map view regardless of the current map view setting.
Setting a destination using the
1
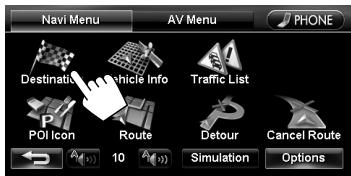
2
3 Select a method to search for a destination.
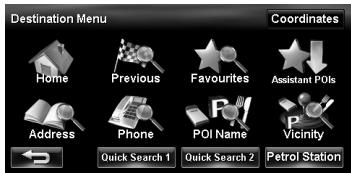
| Home* | Goes to your home. • To register your home, page 17. |
| Previous* | Searches from the history of previous destinations and via points. • You can select a place from the last 50 destinations and via points. • To delete the history, page 38. |
| Favourites* | Searches from your favourite points. • To register your favourite points, page 17. • To edit the information about the favourite points, page 34. |
| Assistant POIs | Searches from the list of POIs (Point Of Interest) saved on the SD card using Street Director Assistant. (page 25) |
| Address | Searches by an address. (page 21) |
| Phone | Searches by a telephone number. (page 22) |
| POI Name | Searches from the database of POI. (page 23) |
| Vicinity | Searches for POIs (Point Of Interest) around your current position, the position selected on the map, the destination, or the route you are taking. (page 24) |
| Coordinates | Searches by coordinates of the destination. (page 25) |
| Quick Search | Searches for POIs of a registered category — [Quick Search 1]/[Quick Search 2]/[Petrol Station] (Initial). (page 26) |
- Selectable only when at least one place is registered.
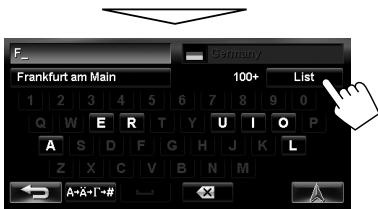
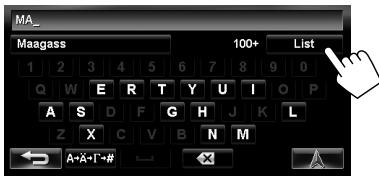
About search screens and input screens
Read through the following instructions for using search screens and input screens before using
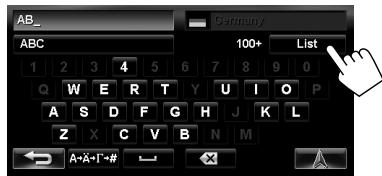
To enter names, addresses, or numbers
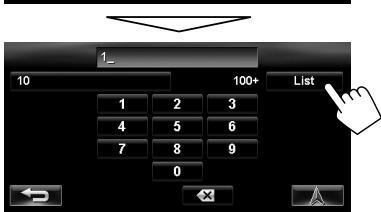
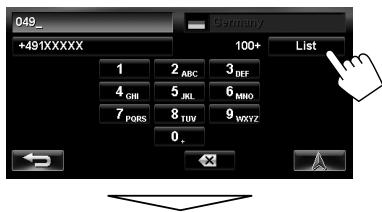
Number of matches
- When there are more than 100 matches, "100+" is displayed and only first 100 matches are displayed.
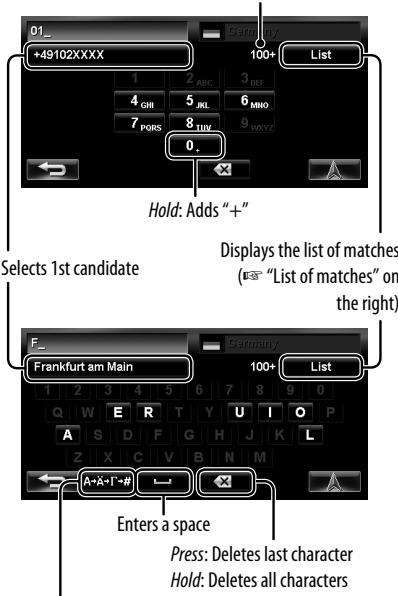
Displays other keyboards
- For available characters, page 11.
- Buttons vary depending on the input item.
- Non-available items will be shaded on the menu screen.
- For some input screens, available characters are automatically narrowed down as the System searches its database for matches.
- Lower cases are not available.
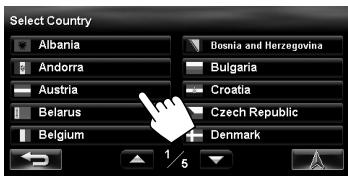
Country selecting screen
You can change the country if the selecting button appears on the screen.
List of matches
When you press [List] on the input screen, the list of matches appears. Select desired item from the list.
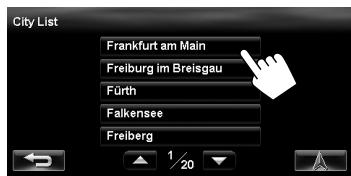
- When the number of matches is 5 or less, the list of matches automatically appears.
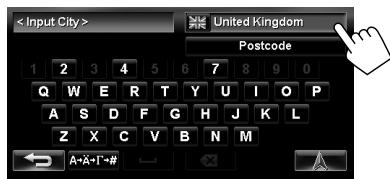
By address

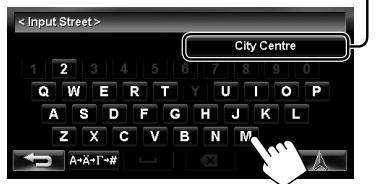
2 Enter the city name, then select from the list ( page 20).
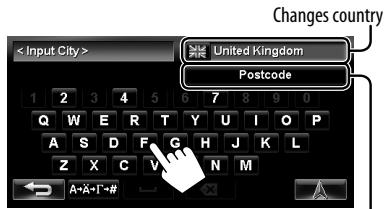
Specifies the postcode (To specify the postcode below)
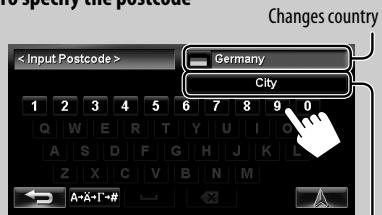
To specify the postcode
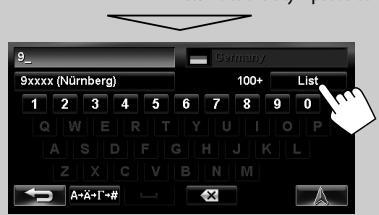
Returns to the city input screen
3 Enter the street name, then select from the list (E3 page 20).
Selects the centre of the city (Then, go to step 5.)
4 Enter the house number, then select from the list ( page 20).
- If no data of house number for the selected street is available in the database, select [Middle of the Road] or [Intersection].

To select the centre of the street or intersection on the street
Specifies the crossing street to select intersection on the street
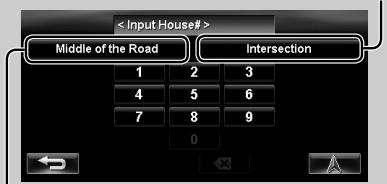
Selects the centre of the street
5
Guidance starts.
To cancel guidance, page 29.
To set the selected position as via point, page 28.
To change route options, page 29.
- For details about the search result screen, page 18.
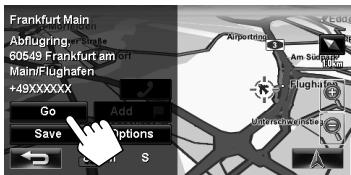
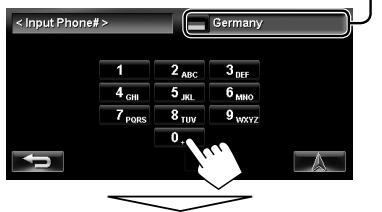
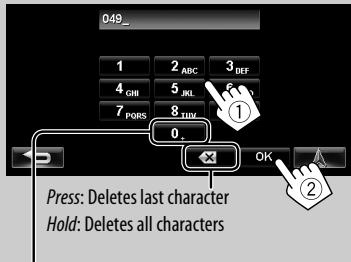
By telephone number

1

2 Enter the telephone number, then select from the list (v8 page 20).
Changes country
The search result is displayed.
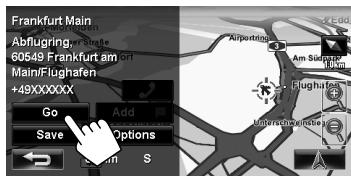
Guidance starts.
To cancel guidance, page 29.
To set the selected position as via point, page 28.
To change route options, page 29.
For details about the search result screen, page 18.
From the list of POI
1

2 Enter the POI name, then select from the list (v8 page 20).
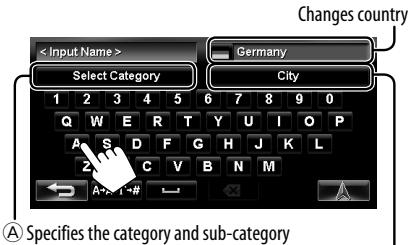
B Specifies the city
A To specify the category and sub-category
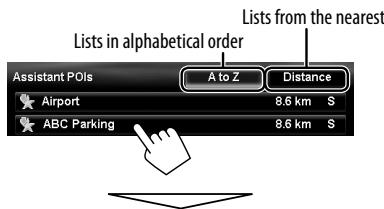
To specify the city


Lists from the nearest
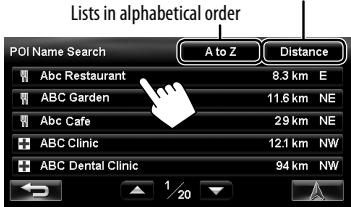
The System displays up to 100 POIs.
The search result is displayed.
Guidance starts.
To cancel guidance, page 29.
To set the selected position as via point, page 28.
To change route options, page 29.
- For details about the search result screen, page 18.
POI near a place/route
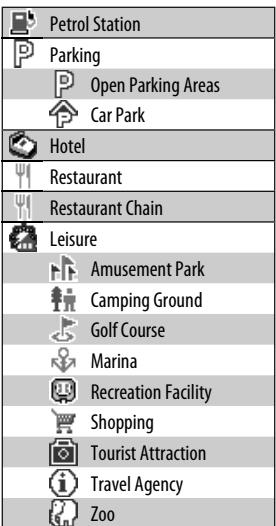
The System has a huge database of POIs (Point Of Interest), such as restaurants, petrol stations, hospitals, etc.
You can search for a POI around the place where you are now. While guided, you can also search for a POI near the destination or along the route.
1

2 Select the area to search.
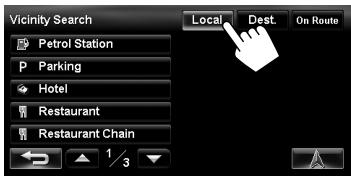
| Local | Within 20 km of your current position or the position selected on the map. If no POI is found in this area, the System expands the area to search. |
| Dest. | Within 20 km of the destination. If no POI is found in this area, the System expands the area to search. |
| On Route | • On motorway: 300 km along the route you are taking. • Others: 25 km along the route you are taking. |
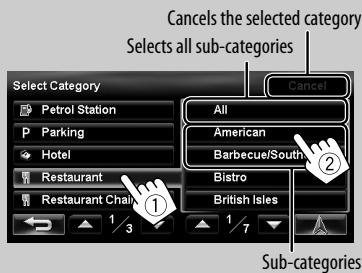
3 Select a category (①), then a sub-category (②) for the POI.
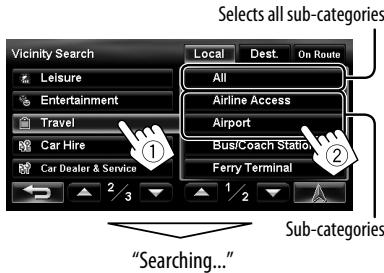
4 Select a POI from the list.
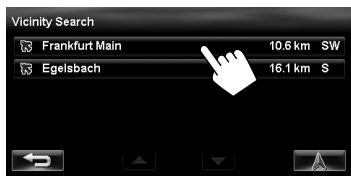
- The System displays up to 50 POIs.
The search result is displayed.
Guidance starts.
To cancel guidance, page 29.
To set the selected position as via point, page 28.
To change route options, page 29.
For details about the search result screen, page 18.
By coordinates
1

The search result is displayed.
Guidance starts.
To cancel guidance, page 29.
- To set the selected position as via point, page 28.
To change route options, page 29.
For details about the search result screen, page 18.
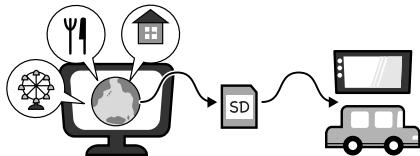
From the list of POIs imported by yourself
Importing POI information on Google Maps
You can import POI information on Google Maps through an SD card.
For details about Street Director Assistant, visit http://www.jvc.co.jp/english/car/ (English website only).
- When the SD card is ejected, the imported POI cannot be used.
1


2
The search result is displayed.
Guidance starts.
To cancel guidance, page 29.
To set the selected position as via point, page 28.
To change route options, page 29.
- For details about the search result screen, page 18.
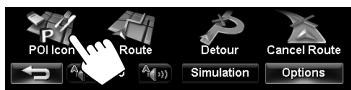
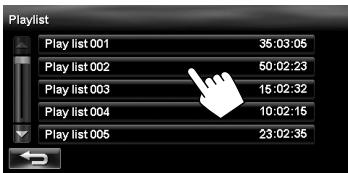
Quick Search
You have three [Quick Search] buttons in
- [Petrol Station] is registered to one of the three buttons when shipped from the factory. You can also change the registered category of this button.
To register a category to the buttons
1 Select one of the [Quick Search] buttons to register the category.
![JVC KW-NT3E - Select one of the [Quick Search] buttons to register the category. - 1](/content/2020/04/82915/images/e3b17f90362f4856c3cff95b8ffe3e0cc096d9e8a8c5bca312d54ac871017ac6.jpg)
2 Select a category (①), then a sub-category (②) of the POI.
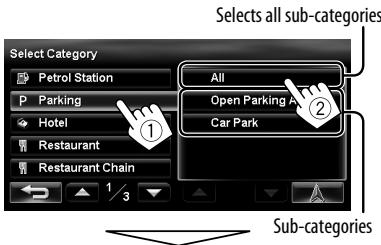
The search for the selected category starts to register it to the [Quick Search] button.

4 Repeat steps 1 to 3 until three categories are registered.
The selected category (or sub-category) name is assigned to the button.
- The selected category is registered to the [Quick Search] button even if you cancel the searching before the search is completed.
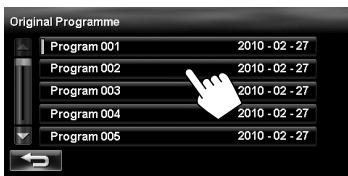
To change a category assigned to the [Quick Search] button
1 Select one of the [Quick Search] buttons whose category you want to change.
![JVC KW-NT3E - Select one of the [Quick Search] buttons whose category you want to change. - 1](/content/2020/04/82915/images/656b169634f575020254576b2ce8674d91cc02fdbfc7c468786f6e18be6e7d60.jpg)
![JVC KW-NT3E - Select one of the [Quick Search] buttons whose category you want to change. - 2](/content/2020/04/82915/images/192d3bf70c346245e730720f62debd185d83b7a3efa67ba7e3732cb1b818d71c.jpg)
![JVC KW-NT3E - Select one of the [Quick Search] buttons whose category you want to change. - 3](/content/2020/04/82915/images/7c3bac1326500f88cca9cc13e2caf463b27353c71f20ee2b50cf08e226c43398.jpg)
2 Perform steps 2 and 3 of "To register a category to the buttons" (E8 page 26).
To use Quick Search
1
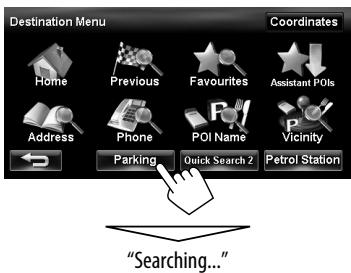
2 Select a POI from the list.
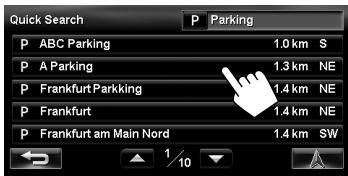
- The System displays up to 50 search results.
The search result is displayed.
Guidance starts.
To cancel guidance, page 29.
To set the selected position as via point, page 28.
To change route options, page 29.
- For details about the search result screen, page 18.
How you are guided
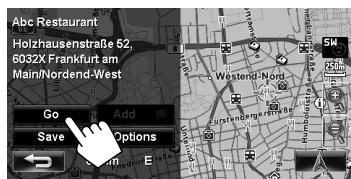
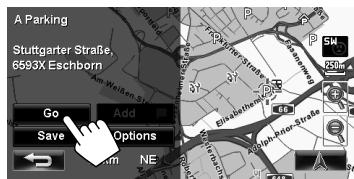
Starting guidance to the destination or via point
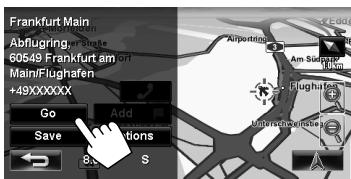
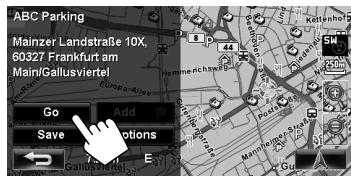
1 Select a destination or via point. (pages 18 to 27)
2 To set as destination
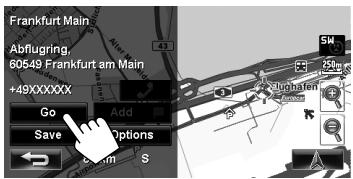

To change the destination
To set as via point
You can add the via points only after selecting your destination.
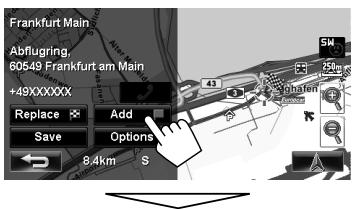
Via point
- You can select up to four via points.
- For editing your route, page 32.
The System starts calculating the route to the selected destination, and guidance starts.
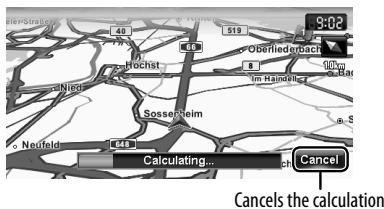
To cancel guidance, page 29.
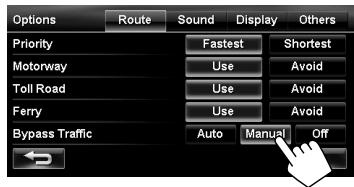
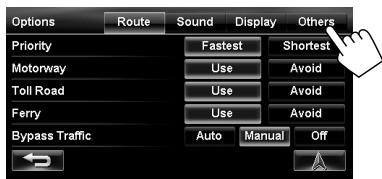
Changing route options
1 On the search result screen:
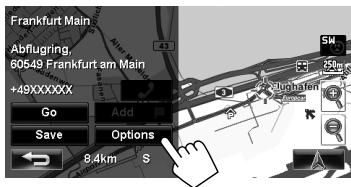
2 Set options.
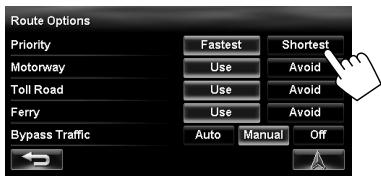
| Priority | Select the priority for route calculation ([Fastest]: fastest route/[Shortest]: shortest route). |
| Motorway | Select whether to use ([Use]) or avoid ([Avoid]) these types of options to go to the destination. |
| Toll Road | |
| Ferry | |
| Bypass Traffic | Select the route calculation method with TMC information. (U page 35) |
- You can also change these settings through the navigation menu (
- , page 39). - The settings are effective next time the System calculates a route.
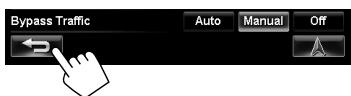
3
Canceling guidance
1
2
A confirmation message appears.
Adjusting the volume of the voice guidance

- About the adjustable volume range, page 67 (
). - You can also adjust the volume through the navigation menu (
, page 39).
About route guidance screen
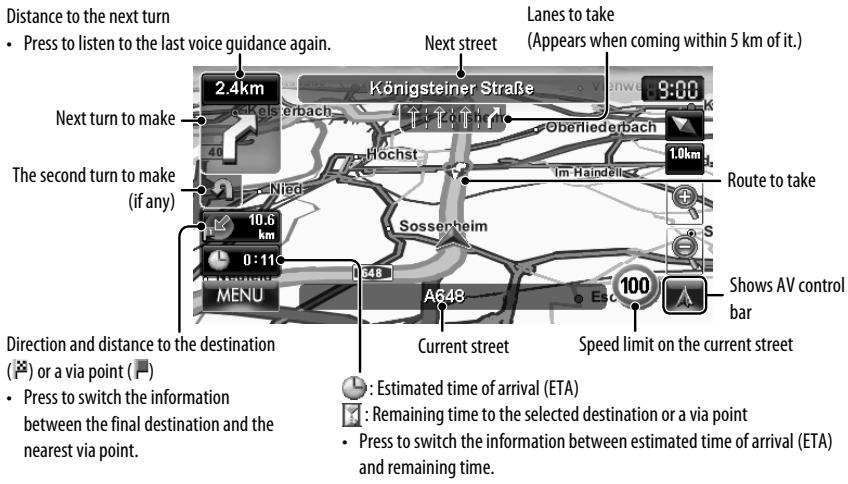
Guidance at turns
When you approach a turn, the System guides you with voice guidance and indications on the screen.
- Guidance voice comes out only through the front speakers (and the F OUT jacks on the rear).
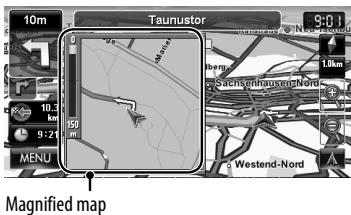
- You can select whether or not to display the magnified map through the navigation menu (
- - , page 40).
To remove the magnified map, touch the map part on the right side of the screen.
What if I miss a turn?
Don't worry. The System calculates a new route quickly.
- When you reach the area approximately within 40m around the destination/ via point, the Navigation System considers you to have reached your destination/ via point.
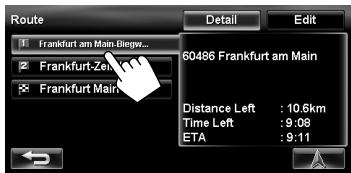
Getting information on your route and places
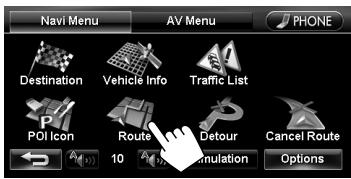
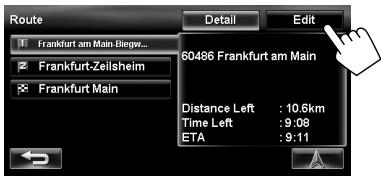
To check the entire route
To check the information on the destination and via points
1
2 Select a desired point to check its detailed information.
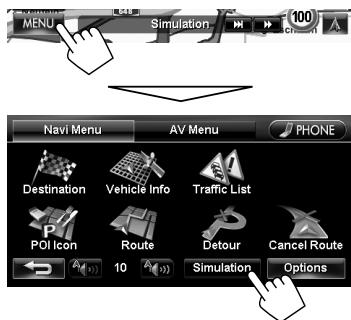
To confirm how your trip will go
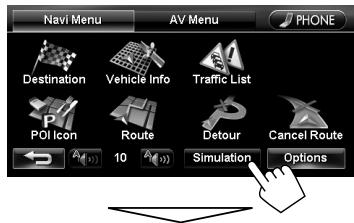
Drive simulation starts.
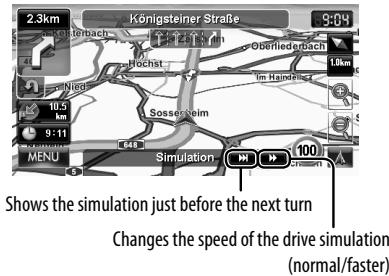
To cancel the simulation and resume guidance
A confirmation message appears.
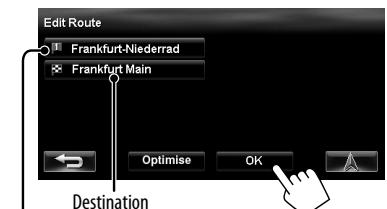
Arranging your route
Changing the sequence of the destination/ via points
- Motorways are always used to calculate the route if distance to a destination exceeds a certain distance.
- If the destination cannot be reached without using motorways, ferries, or toll roads, they are used to calculate the route without respect to the
settings. (143 page 39)
1
2
3 Change the sequence of the destination/via points.
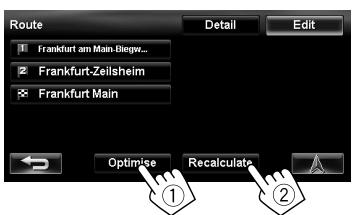
To optimise the sequence
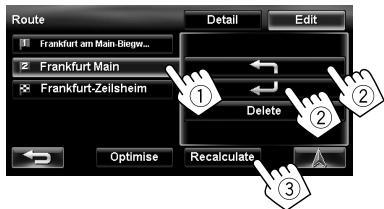
To rearrange the sequence manually
[←]: Moves up the order of selected point.
[←]: Moves down the order of selected point.
- Repeat ① and ② to move other via points before pressing [Recalculate].
The System starts calculating the new route, and guidance starts.
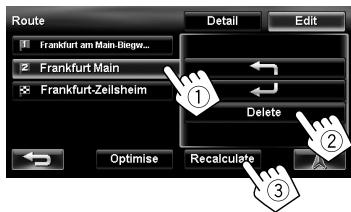
To delete a via point
Press [Delete] after selecting the item you want to delete, then press [Recalculate].
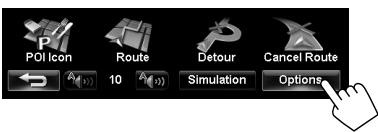
Avoiding a congestion ahead
If you realize a congestion exists ahead...
1
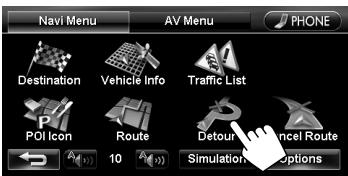
2 Select the distance to avoid.
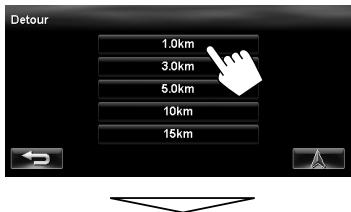
A detour is calculated, and guidance starts.
- A detour may not be calculated depending on the route.
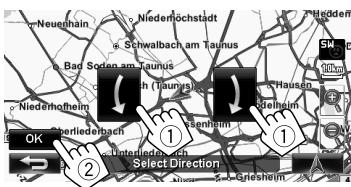
Adjusting the vehicle position
If you find your current position is displayed on a wrong place on the map, use this setting to correct your position.
1
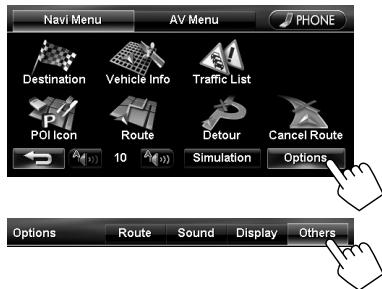
3
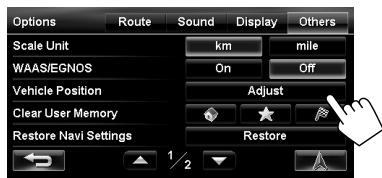
4 Move the cursor to the position where you want to set as current position.
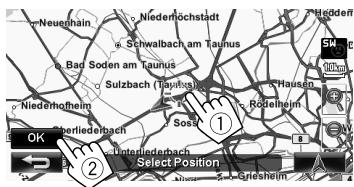
5 Adjust the direction.
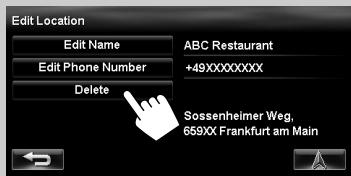
Editing registration of home/favourite points

1
2 Select a registered point you want to edit.

Displays the favourite point list and select one to edit on the list.
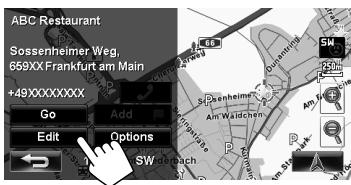
3
4 Edit the information.
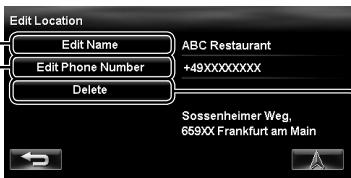
Displays the name editing screen
B Displays the phone number editing screen
C Deleted the registration
A To edit the name
- You can use up to 30 characters.
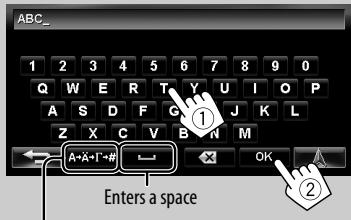
Displays other keyboards
- For available characters, page 11.
To edit the phone number
Hold:Adds "+"
To delete the registration
A confirmation message appears.
To delete all registered items, page 38.
Using traffic information service — TMC
What is TMC?
TMC (Traffic Message Channel) is a technology for delivering real-time traffic information to drivers.
The traffic information sent by a TMC radio station is received and analyzed by the System.
This unit can receive the TMC information provided by Trafficmaster and V-Trophic. It can also receive free TMC information.
- TMC is not available in some countries.
- You do not have to tune in to a special radio station to receive the TMC information.
As the TMC information is transmitted by radio stations, JVC cannot assume responsibility for the completeness or accuracy of the information.
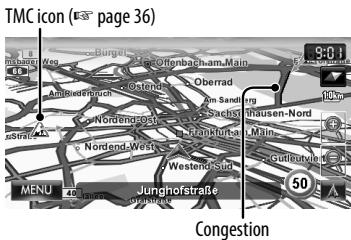
TMC information on the map
- TMC icons are displayed on the map when its scale is between 25m and 2.5km with
setting activated ( page 40).
How TMC information is reflected in navigation
The TMC information is reflected in navigation differently according to
1
2
| Auto | The System automatically calculates a new route when you approach a traffic event. |
| Manual | Operating buttons appear on the screen when you approach a traffic event. Recalculate the route manually. (←< below) |
| Off | The System does not take TMC information into account. |
- It may not avoid a congestion even if < Auto > is selected.
When
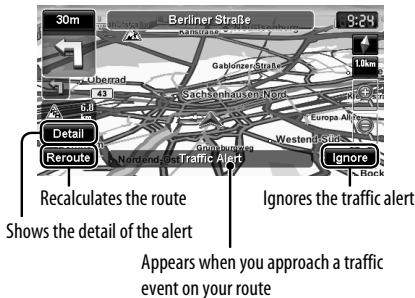
- The traffic alert indication disappears while you are checking due to a change of traffic conditions. The traffic alert indication also disappears if you do not confirm the rerouting in one minute.
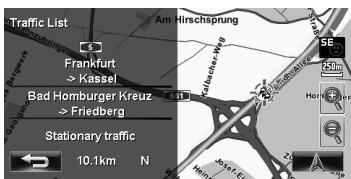
Checking the TMC information
From
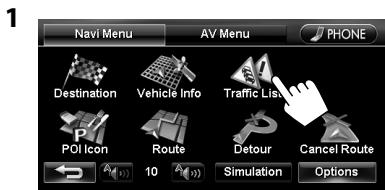
2 Select a list (①), then a traffic alert (②).
The icons of traffic alert which are not on your route are shown in grey when all the information is displayed.
[All]: Lists all the information.
[On Route]: Lists the information on your route.
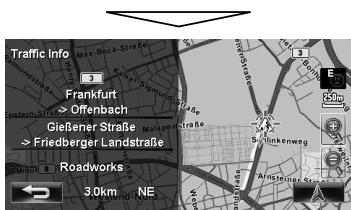
Details of the selected alert are displayed.
On the map
1 Touch the TMC icon.
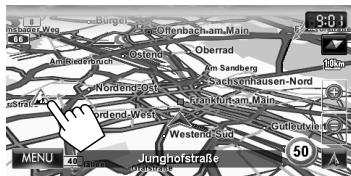
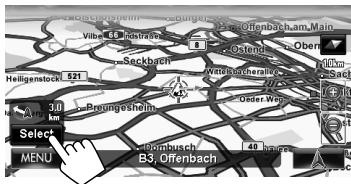
2
- If there are several POIs on the selected position, select one from the list.
- The list appears only when <POI Icon> is set to <0n> . (e.g. page 15)
List of TMC icons

Traffic jam

Roadworks

Road is blocked or closed

Narrow lanes

Accident

Condition

Other caution event

Information
Checking the information of the navigation system

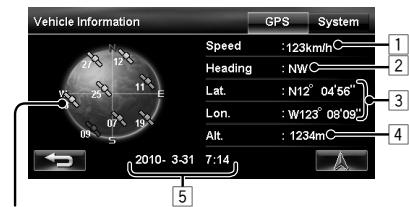
GPS
Satellites
(Green): Receiving the GPS signals and used for the positioning.
(Yellow): Receiving the GPS signals.
(Grey): Not receiving the GPS signals.
Current speed*1
2 Direction of the car*1
Latitude and longitude of your current position*1
4 Altitude of your current position*1
Date/Local time
- When the System cannot receive the GPS signals, the value of each item above are shown as "---".
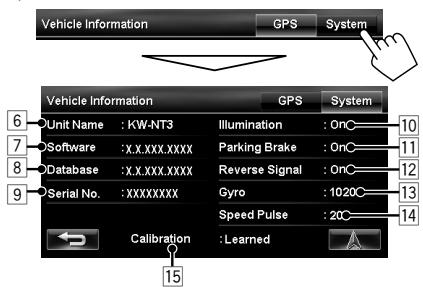
System
6 Name of the unit
7 Version of the software
8 Version of the map database
9 Serial number
Connection status of the illumination control lead
11 Connection status of the parking brake lead
12 Connection status of the reverse gear signal lead < 0n> : Reverse gear signal is detected.
- If the rear view screen is displayed when shifting the gear to the reverse (R) position, the reverse gear signal is detected (<0n>).
[3] Status of the gyroscope
14 Speed pulse rate
15 Status of calibration*2*3
1 These information may not be shown correctly when the reception of GPS signals is poor.
2 The calibration does not function without the connection of GPS aerial and the speed signal lead. For the connection, Installation/Connection Manual (separate volume).
*3 Driving under various conditions completes the calibration faster. If
Initializing memories/observation settings
1
2
Memories of home, favourite points or previous destination/via points
| ◇ | Deletes your home. |
| × | Deletes all favourite points. |
| ® | Deletes all the places in the list of previous destinations/via points. |
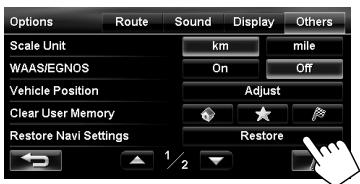
Navigation settings
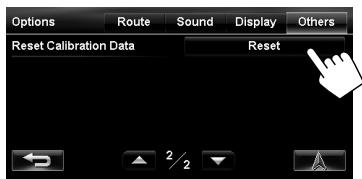
Calibration Data
The Navigation System is gradually optimised by automatic calibration.
Reset the calibration data in the following cases:
- When you reinstall the unit in another car.
- When you replace or rotate the tyres.
The initial settings of the navigation menu are restored.
A confirmation message appears.
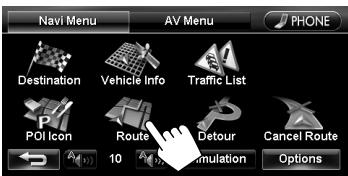
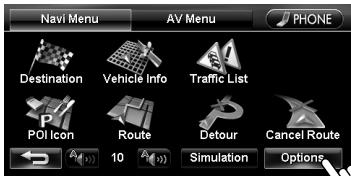
Navigation menu items
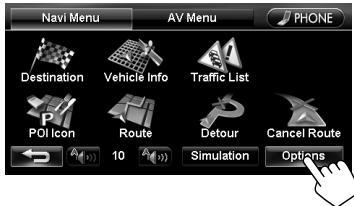
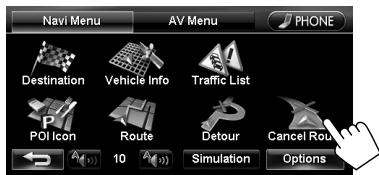
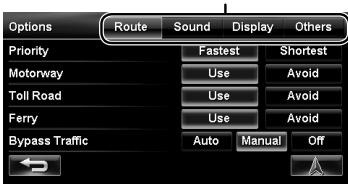
Navi Menu—Options
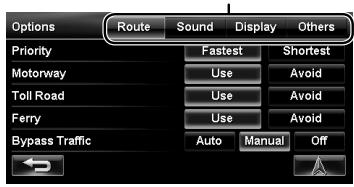
Switches the category by pressing the corresponding tab
| Menu items | Selectable settings | Initial: Underlined | |
| Route | Priority | Fastest, Shortest (E-e page 29) | |
| Motorway/Toll Road/Ferry | Use, Avoid (E-e page 29) | ||
| Bypass Traffic | Auto, Manual, Off (E-e page 35) | ||
| Sound | Attention tone* | Select the type of attention tone, coming out before the voice guidance by pressing [▲] or [▶].Off, Normal, Prompt, A.I. | |
| Guidance Volume* | Adjust the volume of the voice guidance. (The adjustment does not affect the audio volume.)0 to 20; Initial 10 | ||
| Output* | Select the guidance output channel (for front channel only). (This setting does not affect the output balance (Fader setting) of AV source.)L ch., L+R ch., R ch. | ||
| Music Mix | You can turn down the volume of the AV source while voice guidance is produced.Muting: The AV source sound does not come out.At: The AV source sound is lowered.Normal: The AV source sound is not affected. | ||
| Speed Alert | The System sounds an alarm when you surpass the speed limit of the current road by the set value. Press [+] or [−] to select the value. The unit ("km/h" or "mph") follows the <Scale Unit> setting. (E-e page 41)Off, 5km/h (3mph), 10km/h (6mph), 15 km/h (10mph), 25km/h (15mph), 35km/h (20mph) | ||
| POI Alert | Alert sounds when you approach within 300 m of a POI of the selected category. (You can select any categories from the following; Petrol Station, Parking, Car Hire and Car Dealer & Service.)To select categories for POI alert, press [Edit], then select categories and sub-categories (the selected items are marked with “✓”). To activate POI alert for selected categories, press [On]. To deactivate it, press [Off]. |
- When adjusting these items, test tone is produced.

Switches the category by pressing the corresponding tab
| Menu items | Selectable settings | Initial: Underlined | |
| Display | View Mode | EN2D, EN2D, AEDSD (page 16) | |
| Magnified View (e page 30) | On: A magnified map is displayed when approaching the next turn. Off: No magnified map is displayed. | ||
| Vehicle Icon | , , , | ||
| Colour Configuration | Change the colour of the map and the route you take for day time and night time. Press [Enter] to display the adjustment screen, then change the following settings: · Day Map Colour/Night Map Colour: Normal, Soft, Vivid · Day Route Colour/Night Route Colour: Select from 3 colours. To switch between the day colour setting and night colour setting, press [OK]. | ||
| Night Map Mode | Auto: Switches to the night screen when you turn on the headlights. · The illumination control lead connection needs to be completed. (Installation/Connection Manual) On: Activates night screen. Off: Deactivates night screen. | ||
| Current Street Name | Select whether to show or hide the current street name on the map. Show, Hide (e page 15) | ||
| Speed Limit Sign | Select whether to show or hide the speed limit icon on the map. Show, Hide (e page 15) | ||
| One Way | Select whether to show or hide the information of one way road on the map. Show, Hide | ||
| Traffic Icon | Select whether to show or hide the TMC icon on the map. Show, Hide (e page 36) | ||
| Others | Scale Unit | Select the measuring units for distance. km, mile · The unit setting you find at your first access to the menu varies depending on your country selection in the initial settings (€5 page 9); when <United Kingdom> was selected, <mile> was set; when other countries, <km>. Regardless of this setting, the distance unit for the voice guidance is always kilometers in languages other than <English>. (€5 page 68) | |
| WAAS /EGNOS | Select whether to use WAAS and EGNOS to increase the accuracy of positioning. · For some areas or conditions, the position accuracy may not be improved even if <On> is selected. In this case, select <Off>. On, Off | ||
| Vehicle Position | €3 page 33 | ||
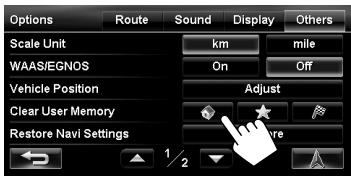
| Clear User Memory | €3 page 38 | ||
| Restore Navi Settings | €3 page 38 | ||
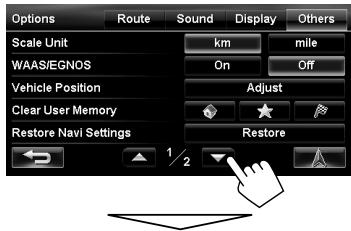
| Reset Calibration Data | €3 page 38 | ||
Additional information
How you are guided
- If GPS signal reception is poor, navigation guidance may not be correct.
-
The System may not receive GPS signals in the following places...
-
in a tunnel or car park in a building
under an overhead road -
in a place surrounded by high buildings or by closely standing trees
-
Make sure to connect reverse signal lead (E installation/Connection Manual); otherwise, your current position may not be displayed correctly.
-
The position of your car may not be detected correctly in the following cases...
-
when driving on a road close to the other one (e.g. a motorway and ordinary road running in parallel)
-
when turning at an almost straight fork in the road
- when driving on a gridiron road
- after taking a ferry, etc.
- when driving on a steep mountain road
- when driving on a spiral road
- when turning left or right after running on a long straight road
- when driving in a zigzag line on a broad road
- when starting your car shortly after starting the engine
- when driving for the first time after installing the unit
- when changing tyres or attaching chains on the tyres
Additional information
- when tyre slip occurs continuously and frequently
- after driving on areas other than a road (e.g. private lands or car parks)
- after driving in underground or tower type car parks
- after rotating your car on a turntable
- after frequent stops and starts in a congestion
- when the accuracy of GPS is deteriorated intentionally
-
when driving on a road constructed recently
-
The route calculated by the System is one of the possible routes to your destination. The route is not always the most appropriate one.
-
If no-exit roads (only entering the roundabout from the roads is allowed) exist on the roundabout, the no-exit roads can neither be shown in the route guidance on the display nor counted in the route guidance voice message.
-
The following phenomena may occur even if the System is working correctly...
-
It may guide to a closed road or to a route requiring U-turn.
- It may not guide to your destination if there is only a narrow road or no road to your destination.
- It may show a different road name.
- It may not ask you to turn at a junction even if you need to.
- It may give guidance different from the actual road conditions.
- It may give incorrect distance information.
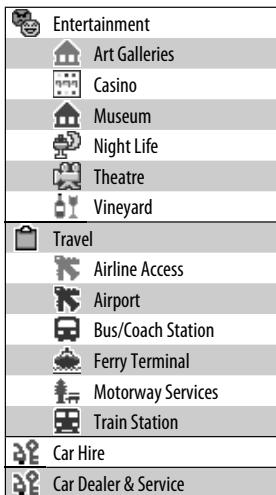
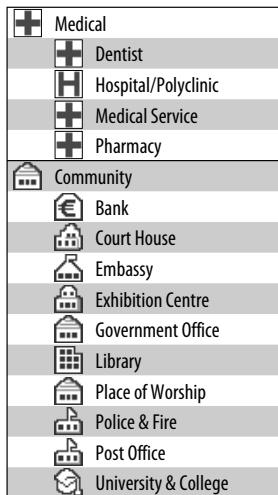
List of POI icons
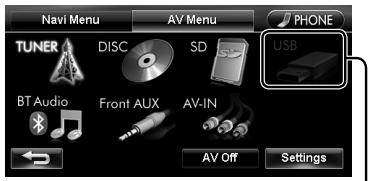
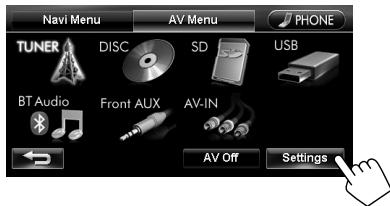
Common operations on AV screens
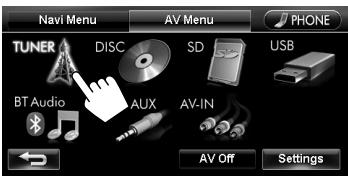
Selects the source (below)
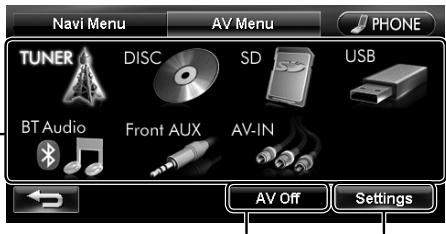
Turns off the AV source (below)
Displays
Selecting the playback source
| TUNER | Switches to the radio broadcast. (pages 44 to 48) |
| DISC | Plays a disc. (Pages 49 to 56) |
| SD | Plays files on an SD card. (Pages 57 and 58) |
| USB* | Plays files on a USB device. (Pages 57 and 58) |
| iPod* | Plays an iPod/iPhone. (Pages 59 to 61) |
| BT Audio | Plays a Bluetooth audio player. (Pages 79) |
| Front AUX | Switches to an external component connected to the AUX input terminal on the monitor panel. (Pages 62) |
| AV-IN | Switches to an external component connected to VIDEO IN/LINE IN jacks on the rear panel. (Pages 62) |
-
"iPod" is shown as the source instead of "USB" when an iPod/iPhone is connected.
-
Available sources depend on the external components you have connected, media you have attached and the
, or settings you have made (133 pages 67 and 68). - You can erase the clock display while a video source is played back (such as DVD, video from an external component, or iPod video). (
, page 67)
You can also change the source by pressing repeatedly.
Turning off the AV source

To activate the AV function, press
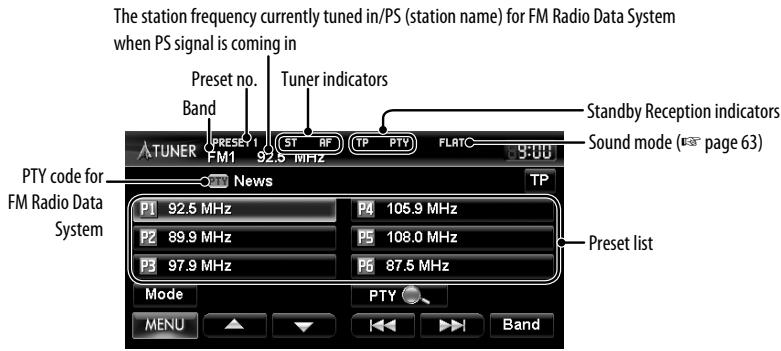
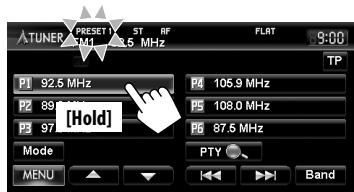
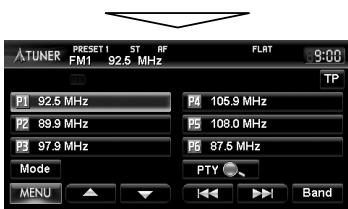
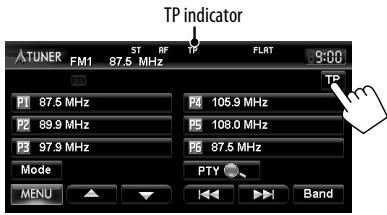
| [Band] | Selects the band. →FM1→FM2→FM3→AM |
| [I←] [▶→] | • Searches for a station. Press: Auto search. Hold: Manual search. |
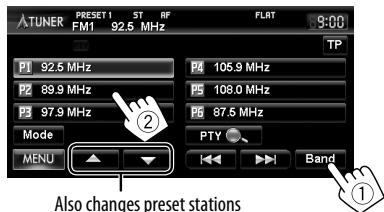
| [▲] [▼] | Selects a preset station. |
| [PTY]* | Enters FM Radio Data System programme search mode. (https://page 46) |
| [TP]* | Activates/deactivates TA standby reception mode. (https://page 47) |
| [Mode]* | pages 45 to 48 |
-
The ST indicator lights up when receiving an FM stereo broadcast with sufficient signal strength.
-
Appears only when FM is selected as the source.
Storing stations in memory
You can preset six channels for each band.
Automatic presetting—SSM (Strong-station Sequential Memory) (For FM only)
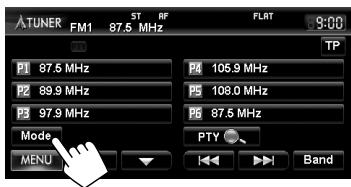
1
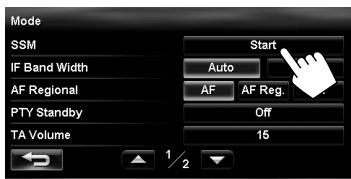
2
A confirmation message appears.
Local FM stations with the strongest signals are searched and stored automatically in the FM band.
To stop searching, press [I] or [▶].
Manual presetting
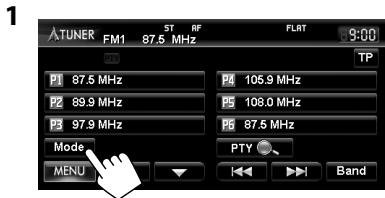
1 Tune in to a station you want to preset. (page 44)
Band The station frequency you want to preset
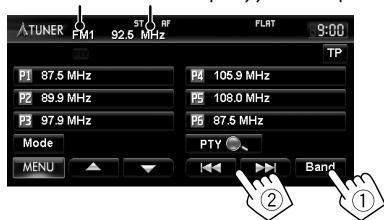
2 Select a preset number.
The station selected in step 1 is stored.
Selecting a preset station
Reducing the interference
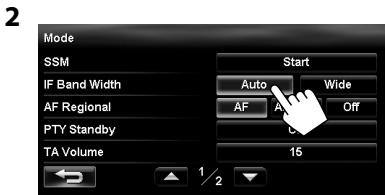
| Auto | Increases the tuner selectivity to reduce interference noises between adjacent stations. (Stereo effect may be lost.) |
| Wide | Subject to the interference from adjacent stations, but sound quality will not be degraded and the stereo effect will remain. |
The following features are available only for FM Radio Data System stations.
Searching for FM Radio Data System programme—PTY Search
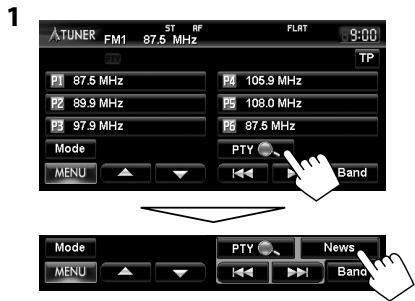
2 Select a PTY code
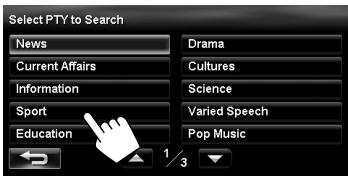
PTY Search starts.
If there is a station broadcasting a programme of the same PTY code as you have selected, that station is tuned in.
To erase PTY search operation buttons, press

Activating/deactivating TA/PTY Standby Reception
The following functions are not available when AM is selected as the source.
TA Standby Reception
| TP indicator | TA Standby Reception |
| Lights up | The System will temporarily switch to Traffic Announcement (TA) if available. · The volume changes to the preset TA volume level if the current level is lower than the preset level (To adjust the TA volume below). |
| Flashes | Not yet activated. Tune in to another station providing the Radio Data System signals. |
| Goes off | Deactivated. |
To adjust the TA volume
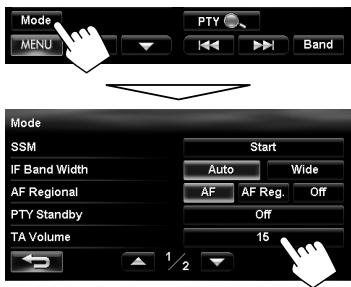
Adjust the TA volume level between 00 to 30 or 50^* (initial: 15) by pressing [+] or [-] .
- Depends on the amplifier gain control. (
, page 67)
PTY Standby Reception
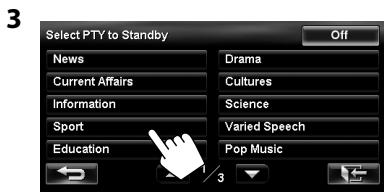
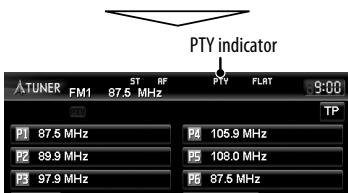
| PTY indicator | PTY Standby Reception |
| Lights up | The System will temporarily switch to your favourite PTY programme. |
| Flashes | Not yet activated. Tune in to another station providing the Radio Data System signals. |
| Goes off | To deactivate, press [Off] in step 3. |
To change the PTY code for PTY Standby Reception, repeat the above procedure.
Tracing the same programme—Network-Tracking Reception
When driving in an area where FM reception is not sufficient enough, this unit automatically tunes in to another FM Radio Data System station of the same network, possibly broadcasting the same programme with stronger signals.
Programme A broadcasting on different frequency areas (01-05)
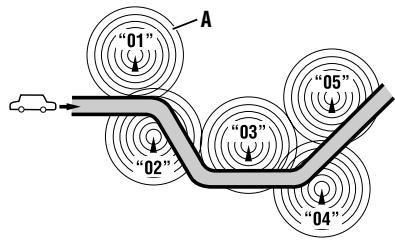
When shipped from the factory, Network-Tracking Reception is activated.
To change the Network-Tracking Reception setting
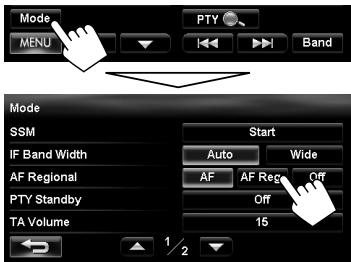
| AF | Switches to another station. The programme may differ from the one currently received (the AF indicator lights up). |
| AF Reg. | Switches to another station broadcasting the same programme. The REG indicator lights up. |
| Off | Cancels. |
Automatic station selection—Programme Search
Usually when you select preset stations, the preset station is tuned in.
If the signals from the FM Radio Data System preset station are not sufficient for good reception, this unit, using the setting of <AF Regional> , tunes in to another station broadcasting the same programme as the original preset station is broadcasting.
To activate Programme Search

does not function when is set to . - The unit takes some time to tune in to another station using programme search.
To deactivate, select
1 Insert a disc.
The source changes to "DISC" and playback starts.

Caution on volume setting:
Discs produce very little noise compared with other sources. Lower the volume before playing a disc to avoid damaging the speakers by the sudden increase of the output level.
- If a disc does not have any disc menu, all tracks on it will be played repeatedly until you change the source or eject the disc.
If "O" appears on the screen, the unit cannot accept the operation you have tried to do.
- In some cases, without showing “ ”, operations will not be accepted.
When playing back a multi-channel encoded disc, the multi-channel signals are downmixed.
To eject a disc
- You can eject a disc when playing another AV source.
- If the ejected disc is not removed within 15 seconds, the disc is automatically inserted again into the loading slot to protect it from dust.
- If the disc cannot be ejected, page 4.
To prohibit disc ejection
A confirmation message appears.
To cancel the prohibition, repeat the same procedure.
Playable disc types
| Disc type | Recording format, file type, etc. | Playable |
| DVD • DTS sound cannot be reproduced or output from this unit. | DVD Video (Region Code: 2)*1 | ✓OK |
| DVD Audio | ×NO | |
| DVD-ROM | ||
| DVD Recordable/Rewritable (DVD-R/-RW*2, +R/+RW*3) • DVD Video: UDF bridge • DVD-VR • DivX/MPEG1/MPEG2/MP3/WMA/WAV: ISO 9660 level 1, level 2, Romeo, Joliet | DVD Video | ✓OK |
| DVD-VR*4 | ||
| DivX/MPEG1/MPEG2 | ||
| MP3/WMA/WAV | ||
| JPEG | ×NO | |
| AAC | ||
| MPEG4 | ||
| DVD+VR | ||
| DVD-RAM | ||
| Dual Disc | DVD side | ✓OK |
| Non-DVD side | ×NO | |
| CD/VCD | Audio CD/CD Text (CD-DA) | ✓OK |
| VCD (Video CD) | ×NO | |
| DTS-CD | ||
| SVCD (Super Video CD) | ||
| CD-ROM | ||
| CD-I (CD-I Ready) | ||
| CD Recordable/Rewritable (CD-R/-RW) • ISO 9660 level 1, level 2, Romeo, Joliet | CD-DA | ✓OK |
| DivX/MPEG1/MPEG2 | ||
| MP3/WMA/WAV | ||
| AAC | ×NO | |
| JPEG | ||
| MPEG4 |
1 If you insert a DVD Video disc of an incorrect Region Code, "Region code error" appears on the screen.
2 DVD-R recorded in multi-border format is also playable (except for dual layer discs).
DVD-RW dual layer discs are not playable.
3 It is possible to play back finalized +R/ + RW (Video format only) discs. "DVD" is selected as its disc type when a
+R / + RW disc is loaded. +RW double layer discs are not playable.
4 This unit cannot play back contents protected with CPRM (Content Protection for Recordable Media).
Only for DVD Video/DVD-VR/DivX/MPEG1/MPEG2:
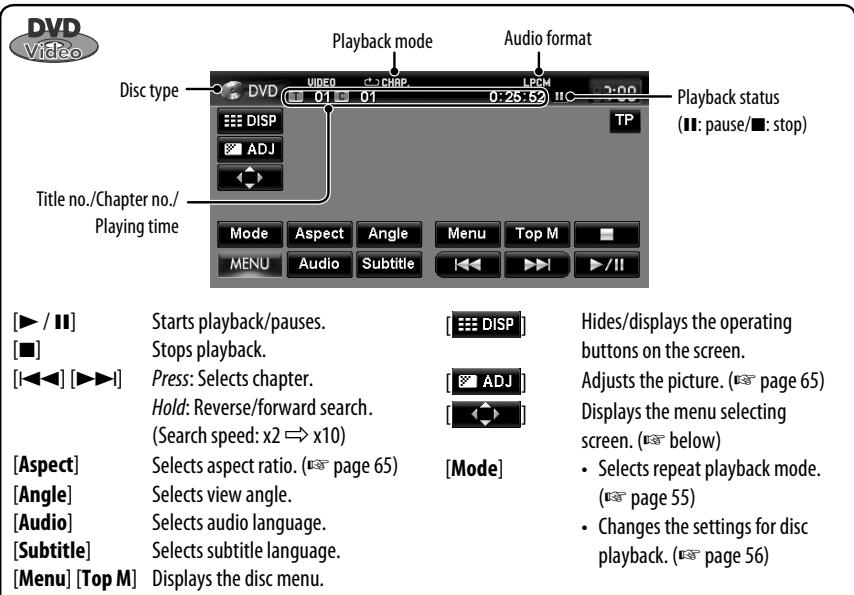
Pressing DISP or touching the screen shows the operating buttons and playback information on the screen. The operating buttons and playback information disappear by pressing DISP or when no operation is done for about 5 seconds.
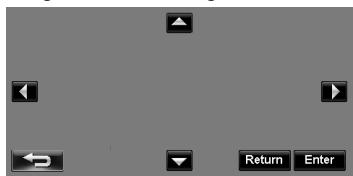
Using the menu selecting screen

Caution for DualDisc playback
The Non-DVD side of a "DualDisc" does not comply with the "Compact Disc Digital Audio" standard. Therefore, the use of Non-DVD side of a DualDisc on this product may not be recommended.

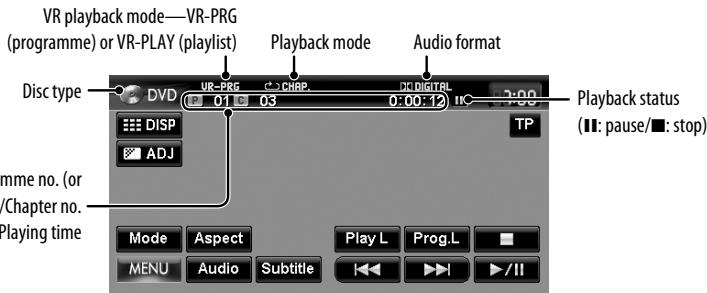
Programme no. (or Playlist no.)/Chapter no. (or file no.)/Playing time
[▶/II]

Starts playback/pauses.
Stops playback.

Press: Selects chapter.
Hold: Reverse/forward search. (Search speed: x2 x10 )
[Aspect]
Selects aspect ratio. (page 65)
[Audio]
Selects audio channel (ST: stereo, L: left, R: right).
[Subtitle]
Shows (ON)/hides (OFF) the subtitle. Displays the Playlist.
- For details about DVD-VR format and Playlist, refer to the instructions supplied with the recording equipment.

Hides/displays the operating buttons on the screen.

Adjusts the picture. (page 65)
[Mode]
- Selects repeat playback mode.
(15 page 55)
Changes the settings for disc playback. (E5 page 56)
[Prog.L]
Displays the Original Programme.


Video format
(DivX/MPEG)
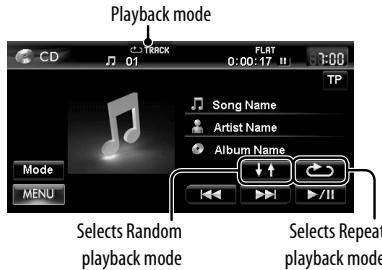
Playback mode
Audio format
Disc type
Folder no./Track no./Playing time
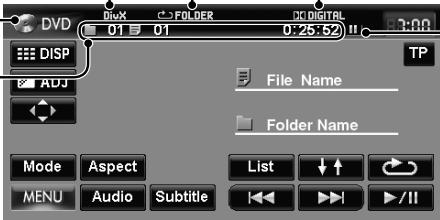
Playback status (II: pause)
[▶/II]
[1]
Starts playback/pauses.
Press: Selects track.
Hold: Reverse/forward search.
(Search speed: 1 2
3)
[Aspect]
[Audio]*
[Subtitle]*
Selects aspect ratio. (page 65)
Selects audio language.
Selects subtitle language.
DISP

[Mode]

[List]
Hints/displays the operating buttons on the screen.
Adjusts the picture. ( page 65)
Displays the skip buttons. (below)
Changes the settings for disc playback. (148 page 56)
Selects playback modes. (E88 page 55)
Displays Folder/Track Lists. (E page 11)

Using the skip buttons
[△][
Skips back or forward by about 5 minutes.
-
You can use only [] , [] and [] . When you press other buttons, "O" appears on the screen.
-
For MPEG1/MPEG2, these buttons do not work.

Disc type
Track no./Playing time
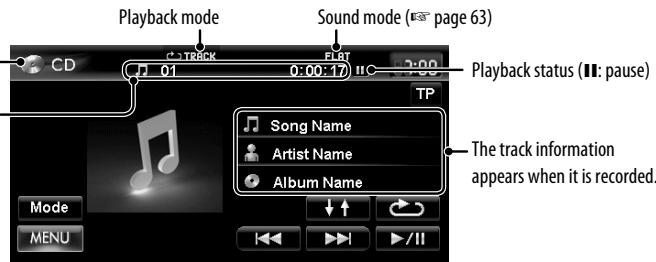
[▶/II]
[←] [→]
Starts playback/pauses.
Press: Selects track.
Hold: Reverse/forward search.
(Searesh speed: x2 x10


Selects playback modes.
( page 55)
[Mode]
Changes the settings for disc
playback. (page 56)

MP3/WMA/
Audio format
(MP3/WMA/WAV) Playback mode Sound mode ( page 63)
Folder no./Track no./
Playing time
While playing, "Jacket picture" is shown if the file has the tag data including "Jacket picture."
Mode
7MENU


List


fold
recorded.)
[▶/II]
[14] [▶▶]
Starts playback/pauses.
Press: Selects track.
Hold: Reverse/forward search.
(Searesh speed: x2 x10
[△][▼]
Selects folder.


* When switching the folder, the folder name and file name appear for about 5 seconds even if tag data is recorded.
Selects playback modes.
(1 page 55)
[Mode]
Changes the settings for disc
playback. (e page 56)
[List]
Displays Folder/Track Lists.
page 11)
Playing Recordable/Rewritable discs
- This unit can recognize a total of 5000 files and 250 folders (a maximum of 999 files per folder).
- Use only "finalized" discs.
- This unit can play back multi-session discs; however, unclosed sessions will be skipped while playing.
- Some discs or files may not be played back due to their characteristics or recording conditions.
Selecting playback modes
For DVD/DVD-VR
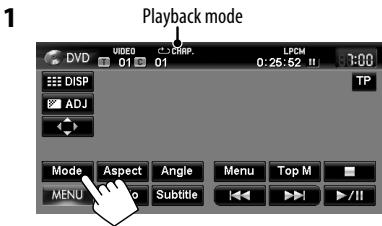
2 Select Repeat mode.
- For DVD:
| Chapter | Repeats current chapter. |
| Title | Repeats current title. |
For DVD-VR
| Chapter | Repeats current chapter. |
| Programme | Repeats current programme (not available for Playlist playback). |
To cancel, select <Off> .
For CD/DivX/MPEG1/MPEG2/MP3/WMA/WAV
- You cannot activate the repeat mode and the random mode at the same time.
For CD:
| TRACK | Repeats current track. |
| ↓ ↑ DISC | Randomly plays all tracks. |
For DivX/MPEG1/MPEG2/MP3/WMA/WAV:
| TRACK | Repeats current track. |
| FOLDER | Repeats all tracks of the current folder. |
| ↑ FOLDER | Randomly plays all tracks of current folder, then tracks of next folders. |
| ↓ DISC | Randomly plays all tracks. |
- Press the button repeatedly until the desired playback mode is selected.
To cancel, press the button repeatedly until the indicator disappears.
Settings for the disc playback

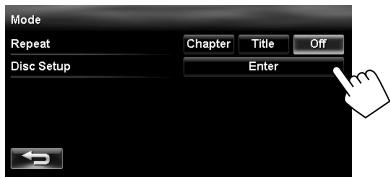
| Disc Setup items | Selectable settings | Initial: Underlined |
| Menu Language | Select the initial disc menu language; Initial English (E) also page 71). | |
| Audio Language | Select the initial audio language; Initial English (E) also page 71). | |
| Subtitle Language | Select the initial subtitle language or erase the subtitle (Off); Initial English (E) also page 71). | |
| Video Output Format | Select the colour system of the external monitor. NTSC, PAL · This setting is valid only to the external monitor connected. | |
| Monitor Type | Select the monitor type to watch a wide screen picture on the external monitor. 16:9: Select when the aspect ratio of the external monitor is 16:9. 4:3LB (Letterbox)/4:3PS (Pan Scan): Select when the aspect ratio of the external monitor is 4:3. · When you select <16:9> for a picture whose aspect ratio is 4:3, the picture slightly changes due to the process for converting the picture width. · Even if <4:3PS> is selected, the screen size may become <4:3LB> for some discs. | |
| D. Range Compres. | You can enjoy a powerful sound at a low volume level while playing Dolby Digital software. Auto: Select to apply the effect to multi-channel encoded software. On: Select to always use this function. | |
| DivX (R) VOD | This unit has its own Registration Code. Once you have played back a file with which the Registration Code recorded, this unit's Registration Code is overwritten for copyright protection. Press [Enter] to check the Registration Code. To return to the previous screen, press [OK]. | |
SD/USB operations
This unit can play the MP3/WMA files stored in SD card/USB mass storage class device.
- All tracks in the SD card/USB device will be played repeatedly until you change the source.
- Make sure all important data has been backed up.
Inserting SD card
1 Detach the monitor panel.
2 Insert an SD card.
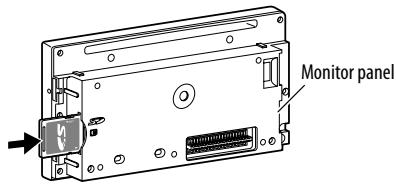
Push in the SD card until you hear a clicking sound.
3 Attach the monitor panel.
The source changes to "SD" and playback starts.
To eject the SD card
Detach the monitor panel, then push in the SD card lightly.
Connecting USB device
You can connect a USB mass storage class device such as a USB memory, Digital Audio Player, etc. to the unit.
- You cannot connect a computer or portable HDD to the USB (●) terminal of the unit.
- When connecting a USB device, refer also to its instructions.
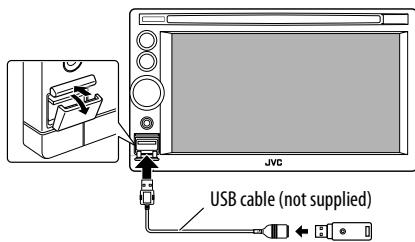
The source changes to "USB" and playback starts.
Caution:
- Avoid using the USB device if it might hinder your safety driving.
- Do not start the car engine if a USB device is connected.
- Do not pull out and attach the USB device repeatedly while "File check" is shown on the screen.
- Disconnect a USB device while playback is paused or another source is selected.
- Electrostatic shock at connecting a USB device may cause abnormal playback of the device. In this case, disconnect the USB device then reset it and detach the monitor panel (then attach it).
- Do not leave a USB device in the car, expose to direct sunlight, or high temperature to avoid deformation or cause damages to the device.
- For more details about USB operations, page 70.


Source type ("SD" or "USB")
Folder no./Track no./ Playing time
While playing, "Jacket picture" is shown if the file has the tag data including "Jacket picture."
Audio format
(MP3/WMA)
Playback mode
Sound mode (page 63)
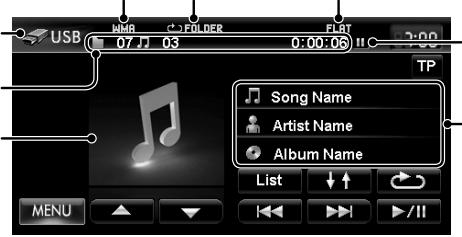
Playback status (I: pause)
Tag data appears only when it is recorded.*1 (Current folder name and file name appear if not recorded.)
[▶/II]
Starts playback/pauses.

Selects Repeat playback mode. 23

Press: Selects track.
Hold: Reverse/forward search.
Search speed: x10

Selects folder.
Selects Random playback mode. 23
-
FOLDER: Randomly plays all tracks of the folder.
-
↑SD/↓ ↑USB: Randomly plays all tracks.

- TRACK: Repeats current track.
FOLDER:Repeats all tracks of the current folder.
Displays Folder/Track Lists. (E page 11)
1 When switching the folder, the folder name and file name appear for about 5 seconds even if tag data is recorded.
2 To cancel random or repeat mode, press the button repeatedly until the indicator disappears.
*3 You cannot activate the repeat mode and the random mode at the same time.
- While playing from a USB device, the playback order may differ from other players.
- This unit may be unable to play back some USB devices or some files due to their characteristics or recording conditions.
- This unit may not play back files in a USB device properly when using a USB extension cord.
-
This unit cannot assure proper functions or supply power to all types of the devices.
-
This unit can recognize a total of 5000 files and 999 folders (a maximum of 999 files per folder).
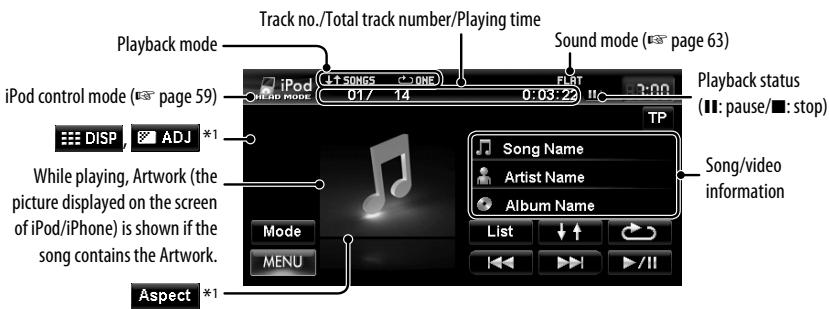
Listening to the iPod/iPhone device
Connecting iPod/iPhone
-
Use the following cables:
-
To listen to the music: USB 2.0 cable (accessory of the iPod/iPhone)
- To watch the video: USB Audio and Video cable for iPod/iPhone—KS-U29 (not supplied)
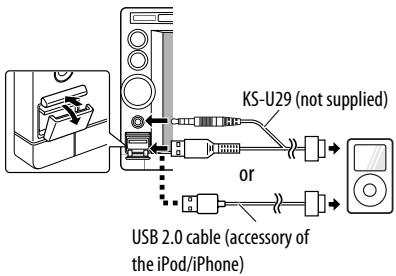
- When you turn on this unit, the iPod/iPhone is charged through the unit.
-
You can control the following iPod/iPhone models: - iPod with video (5th Generation)*
-
iPod classic*
-iPod nano (1st Generation) - iPod nano (2nd Generation)
- iPod nano (3rd Generation)*
- iPod nano (4th Generation)*
- iPod nano (5th Generation)*
- iPod touch (1st Generation)*
- iPod touch (2nd Generation)*
-
iPhone
iPhone 3G
iPhone 3GS* -
To watch the video with its audio, connect the iPod/ iPhone using USB Audio and Video cable (KS-U29, not supplied).
Setting the iPod control mode and the speed of the audio books
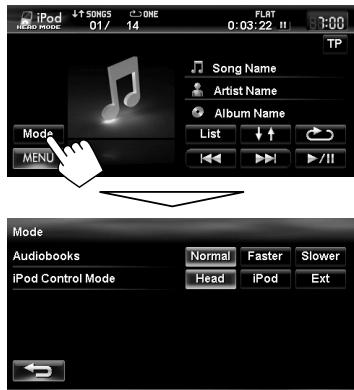
Audiobooks
Select the speed of audio books.
iPod Control Mode
- When using iPod nano (1st Generation) or iPod with video (5th Generation), only mode is selectable.
| Head | Controls playback from this unit. |
| iPod HEADC MODE | |
| iPod | Controls audio/video playback from the iPod/iPhone. •Playback information is shown. |
| iPod iPod MODE | |
| Ext | Allows any audio/video signals from iPod/iPhone. •No information is shown. |
| iPod EXT MODE |
- The operations explained in this manual are under mode (page 59).
- When <iPod> or <Ext> mode is selected, only [Mode] is displayed.
- You cannot resume playback for video sources under some conditions.

Starts playback/pauses.

Press: Selects track/video.
Hold: Reverse/forward search.

Displays the Music/Video menu on the iPod/iPhone. (page 61)

Selects aspect ratio. (page 65)
Selects Random playback mode.*
- ↓ ↑ SONGS: Functions the same as "Shuffle Songs."
- ↓ ↑ ALBUMS: Functions the same as "Shuffle Albums."

Selects Repeat playback mode.*2
- ONE: Functions the same as "Repeat One."
ALL: Functions the same as "Repeat All."

Hides/displays the operating buttons on the screen.

[Mode]
Adjusts the picture. (page 65) Changes the iPod control mode or
1 Appears only when video is played back.
2 To cancel random or repeat mode, press the button repeatedly until the indicator disappears.
- When playing back a track containing Artwork, operating buttons temporarily disappear while loading its Artwork.
Notice:
When operating an iPod/iPhone, some operations may not be performed correctly or as intended. In this case, visit the following JVC web site: http://www.jvc.co.jp/english/car/ (English website only)
If the iPod/iPhone does not play correctly, update your iPod/iPhone software to the latest version. For details about updating your iPod/iPhone, visit http://www.apple.com/.
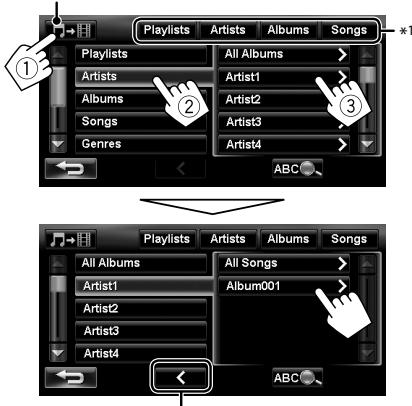
Selecting a track/video from menu on the iPod/iPhone
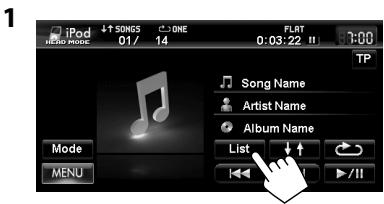
2 Select the menu (Music or Video) (①), a category (②), then a desired item (③).
Music menu:
Select the item in the selected layer until a desired track starts playing.
Corresponding icon lights in orange. (Music / Video)
Returns to the previous layer
Video menu:
- Available categories depend on the type of your iPod/ iPhone.
1 You can also select the category by pressing the corresponding tab.
2 These categories are shown in the language selected on your iPod/iPhone.
Searching items in the selected category by alphabet and number

2 Display the first character of the title of the item you want to search for (①), then search for an item (②).
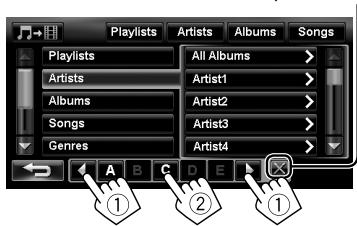
Erases the search operation buttons
Press the character button repeatedly until the desired item is displayed.
- Only available characters are selectable.
- When selecting other character than the alphabet, press [#].
3 Select the desired item from the list.
Using other external components
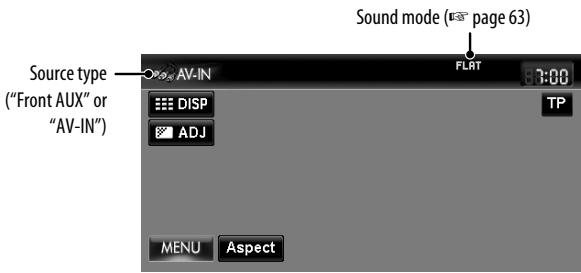
The following buttons appear while playing video with "AV-IN" selected as the source.
[Aspect]
Selects aspect ratio. (page 65)

Hides/displays the operating buttons on the screen.

Adjusts the picture. (v- page 65)
- Select an appropriate setting on < Front Aux Input> or < AV Input>. (pages 67 and 68)
Front AUX
1 Connect an external component.
2 Select "Front AUX" as the source.
page 43
3 Turn on the connected component and start playing the source.
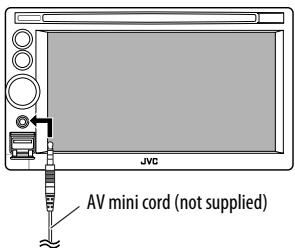
AV-IN
You can connect an external component to the LINE IN/VIDEO IN jacks. (Installation/Connection Manual)
1 Select "AV-IN" as the source. ( page 43)
2 Turn on the connected component and start playing the source.
Sound equalization
You can select a preset sound mode suitable to the music genre.
You can also customize the sound mode.
1
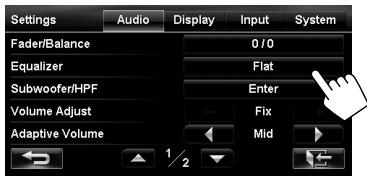
2
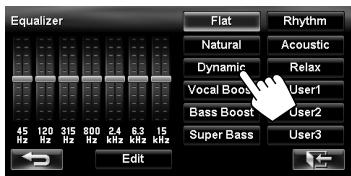
3 Select a sound mode.
Storing your own adjustments
You can store your adjustments into <User1> , <User2> , and <User3> .
1 Repeat steps 1 and 2, then in step 3 on the left...
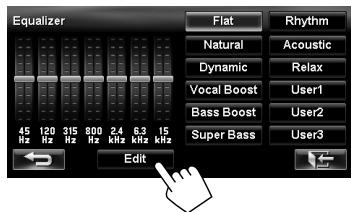
2 Select the frequency (①), then adjust the frequency level (②).
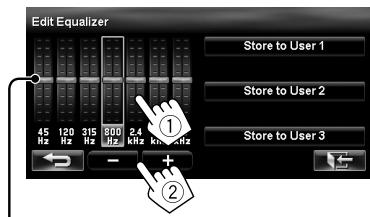
Also adjusts the frequency level
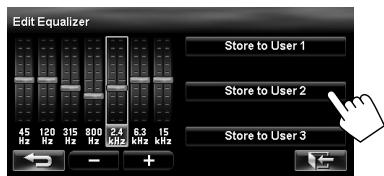
3 Store the adjustment.
Changing illumination colour
You can change the illumination colour of the buttons on the monitor panel.
1

2
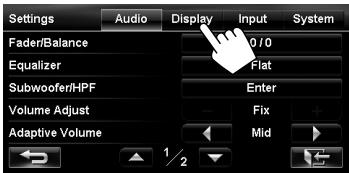
3
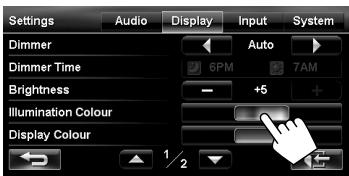
4 Select a colour.

Variable colour illumination
- Illumination colour changes gradually.
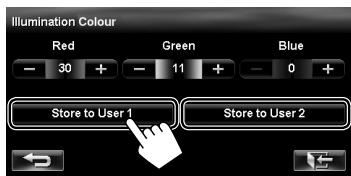
Storing your own adjustments
- When variable colour illumination is selected, you cannot adjust the colour.
1 After selecting a colour in step 4 on the left...
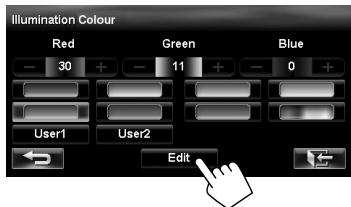
2 Adjust the colour.
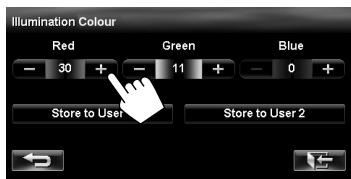
3 Store the adjustment into <User1> or <User2> .
Settings for video playback
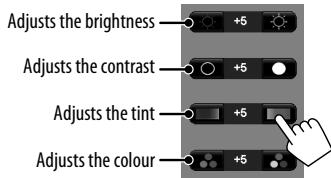
Picture adjustment
You can adjust the picture quality for video playback such as DVD, iPod video, video from an external component or camera.
1 Display the adjustment menu.
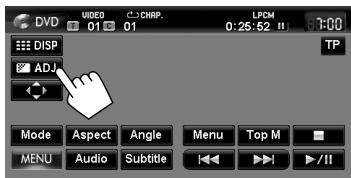
2 Adjust the picture (-5 to +5)
- When
Changing the aspect ratio
You can change the aspect ratio for video playback.

| 4:3 signal | 16:9 signal | |
| Full: For 16:9 original pictures | ||
| Zoom: For 4:3LB original pictures | ||
| Regular: For 4:3 original pictures | ||
| Auto: | ·For "DISC" only: Aspect ratio is automatically selected to match to the incoming signals. | |

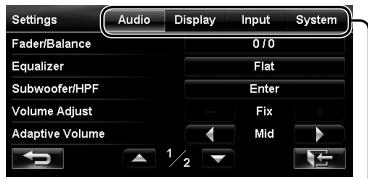
Switches the category by pressing the corresponding tab
| Menu items | Selectable settings | Initial: Underlined | |
| Audio | Fader/Balance | Fader: Adjust the front and rear speaker output balance. · F6 to R6; Initial 0 - When using a two-speaker system, set the fader to the centre (0). Balance: Adjust the left and right speaker output balance. · L6 to R6; Initial 0 Press [▲/▼/←/▶] or drag the cursor to adjust. · To set the fader and balance to the centre (0), press [Centre]. | |
| Cursor | Flat/Natural/Dynamic/Vocal Boost/Bass Boost/Super Bass/Rhythm/Acoustic/Relax/User1/User2/User3 (68 page 63) | ||
| Subwoofer/HPF | Adjust the subwoofer output level, Low Pass Filter, and High Pass Filter. Press [Enter] to adjust each setting. · Subwoofer Level: Adjust the subwoofer output level. Off, -24 to +20; Initial 0 · LPF Frequency: Adjust the cut-off frequency of low pass filter. * 50Hz to 150Hz (in 10 Hz intervals); Initial 100Hz · LPF Slope: Adjust the Q-slope for the low pass filter. * -24dB, -18dB, -12dB, -6dB · HPF Frequency: Adjust the cut-off frequency of high pass filter. Off, 50Hz to 150Hz (in 10 Hz intervals) · HPF Slope: Adjust the Q-slope for the high pass filter. - Not selectable when <HPF Frequency> is <Off>. -24dB, -18dB, -12dB, -6dB | ||
| Volume Adjust | Adjust and store the auto-adjustment volume level for each source, comparing to the FM volume level. The volume level will automatically increase or decrease when you change the source. · <Fix> appears if an FM broadcast is selected as the source. -12 to +12; Initial 0 | ||
| Adaptive Volume | When this function is activated, the System automatically increases the volume level (both for guidance and for audio) as the car speeds up. Off, Min, Mid, Max | ||
- Not selectable when the
is .
| Menu items | Selectable settings | Initial: Underlined | |
| Audio | Amplifier Gain | You can change the maximum volume level of this unit. High: VOL 0 to 20 (for guidance)/VOL 00 to 50 (for audio) Low: VOL 0 to 15 (for guidance)/VOL 00 to 30 (for audio) (Select this if the peak power of the speakers is less than 50 W.) Off: Deactivates the built-in amplifier (VOL 0 to 20 for guidance/VOL 00 to 50 for audio.) ·If you change this setting from <High>/<Off> to <Low> while the volume level is set higher than the maximum level of <Low>, the unit automatically lowers the volume level (guidance: VOL 15/ audio: VOL 30). | |
| Display | Dimmer | Off: Cancels. On: Activates dimmer. Auto: Dims the screen and the button illumination when you turn on the headlights. ·The illumination control lead connection is required. (Installation/Connection Manual) Time: Activates the Dimmer Time setting below. | |
| Dimmer Time | Sets the Dimmer On/Off times. | ||
| Brightness | Adjust the display brightness. -5 to +5; Initial +5 | ||
| Illumination Colour | # page 64 | ||
| Display Colour | Select the colour of the bars and buttons on the touch panel. | ||
| Clock on Video/Screen-Off | On: The clock time is displayed while video source is played back or the screen is turned off. Off: Cancels. | ||
| Off-axis Viewing | Select <On> if the screen is hard to see due to the installation angle or position. On, Off | ||
| Demonstration | This setting will be deactivated and disappear from the menu when the System detects the first car movement. On, Off | ||
| Input | Front Aux Input | On: Select when connecting an audio component to the AUX input terminal on the monitor panel. Off*: Select when no audio component is connected ("Front AUX" is not selectable). | |
- Not selectable when the input is selected as the source.

Switches the category by pressing the corresponding tab
| Menu items | Selectable settings | Initial: Underlined | |
| Input | AV Input | You can determine the use of the LINE IN and VIDEO IN jacks. (EV page 62) AV: Select when connecting an AV component such as a camcorder. Audio: Select when connecting an audio component such as a portable audio player. Off *1: Select when no component is connected ("AV-IN" is not selectable). | |
| Bluetooth Audio | On: Activates "BT Audio" for source selection. Off *1: Deactivates "BT Audio" for source selection ("BT Audio" is not selectable). | ||
| Camera Input *2 | On, Off (EVT page 81) | ||
| Reverse Signal Polarity *2 | Battery, GND (EVT page 9) | ||
| System | Language | Select the language used for on-screen information and voice guidance. English, Espanol, Francais, Deutsch, Italiano, Nederlands, Dansk, Svenska, Português, Ceşina, Suomi, Norsk, Polski, Türçę, Ελληνικα, Magyar | |
| Time Format | 12 Hours, 24 Hours | ||
| Time Zone *2 | Select your time zone for clock adjustment. Auto: Selects a time zone automatically. UTC, UTC+01:00, UTC+02:00: Manually select a time zone. · When the clock is not adjusted correctly with <Auto> selected, manually select a time zone. · When <Auto> is selected, summer time is also set automatically. In this case, the <Summer time> setting is not selectable. (EVT below) | ||
| Summer time *2 | Activate this if your residential area is subject to summer time. Auto: Activates summer time. Off: Cancels. | ||
1 Not selectable when the input is selected as the source.
2 The setting varies depending on the installation settings (C# page 9).
| Menu items | Selectable settings | Initial: Underlined | |
| System | Beep | Adjust the volume of the key-touch tone. Off, 1 to 10; Initial 5 | |
| Startup Message | Edit the voice message at startup/shutdown of the unit. | ||
| Shutdown Message | • To edit the message, press [Edit], enter the message, then press [OK]. You can listen to the edited message by pressing [Test]. - For entering the characters, page 11. • The languages available for the message are: English, Spanish, French, German, Italian, Dutch, Portuguese, Danish and Swedish. | ||
| Start-up Screen | Select the startup screen when the power is turned on. | ||
| Restore Factory Default | Initialize all settings you have made. Press [Restore] to initialize the settings. • When restoring the settings, adjust the settings on installation setting screen (page 9). | ||
Additional information
File playback
Playing DivX files (Discs only)
- This unit can play back DivX files with the extension code <. divx> , <. div> , or <. avi> (regardless of the letter case—upper/lower).
Audio stream should conform to MP3 or Dolby Digital. - The file encoded in the interlaced scanning mode may not be played back correctly.
- The maximum bit rate for video signals (average) is 4 Mbps.
Playing MPEG1/MPEG2 files (Discs only)
-
This unit can play back MPEG1/MPEG2 files with the extension code < .mpg>, < .mpeg>, or < .mod>*.
-
<.mod> is an extension code used for the MPEG2 files recorded by JVC Everio camcorders. The MPEG2 files with the <.mod> extension code cannot be played back when stored on a USB mass storage class device.
-
The stream format should conform to MPEG system/programme stream.
The file format should be MP@ML (Main Profile at Main Level)/SP@ML (Simple Profile at Main Level)/MP@LL (Main Profile at Low Level).
Audio streams should conform to MPEG1 Audio Layer-2 or Dolby Digital. - The maximum bit rate for video signals (average) is 4 Mbps.
Playing MP3/WMA/WAV* files
- WAV files are played only when recorded on a disc.
-
This unit can play back files with the extension code <.mp3> , <.wma> , or <.wav> (regardless of the letter case—upper/lower).
-
This unit can play back the files meeting the conditions below:
Bit rate:
MP3/WMA: 32 kbps — 320 kbps
- Sampling frequency:
MP3: 48 kHz, 44.1 kHz, 32 kHz
24 kHz, 22.05 kHz, 16 kHz
WMA: 48kHz , 44.1kHz , 32kHz , 22.05kHz
WAV: 44.1 kHz
- This unit can show ID3 Tag Version
1.0/1.1/2.2/2.3/2.4 (for MP3). - ID3 Tag Version 2.4 is not available for SD/USB playback.
- This unit can also show WAV/WMA Tag.
- This unit can play back files recorded in VBR (variable bit rate).
- Files recorded in VBR have a discrepancy in elapsed time indication.
-
This unit cannot play back the following files:
-
MP3 files encoded with MP3i and MP3 PRO format.
- MP3 files encoded with Layer 1/2.
WMA files encoded with lossless, professional, and voice format.
WMA files which are not based upon Windows Media® Audio.
WMA files copy-protected with DRM.
USB
- This unit cannot recognize a USB device whose rating is other than 5V and exceeds 500mA .
- USB devices equipped with special functions such as data security functions cannot be used with the unit.
- Do not use a USB device with 2 or more partitions.
Depending on the shape of the USB devices and connection ports, some USB devices may not be attached properly or the connection might be loose. -
This unit may not recognize a memory card inserted into the USB card reader.
-
Connect only one USB device to the unit at a time. Do not use a USB hub.
- When connecting with a USB cable, use the USB 2.0 cable.
Disc information shown on the external monitor
The following screens appear only on the external monitor.
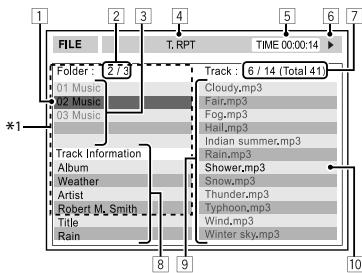
Current folder (highlighted) *2
2 Current folder number/total folder number*2
3 Folder list *2
4 Selected playback mode
5 Elapsed playing time of the current track
6 Operation status
7 CD: Current track number/total number of tracks on the disc MP3/WMA/WAV: Current track number/total number of tracks in the current folder
Track information (only for CD/MP3/WMA/WAV)
9 Track list
Current track (highlighted)
1 If tag data includes "Jacket Picture" (baseline JPEG), it will be displayed.
2 Only for MP3/WMA/WAV
Sound signals emitted through the rear terminals
Through the analog terminals (Speaker out/F OUT/R OUT)
2-channel signal is emitted. When playing multi-channel encoded disc, multi-channel signals are downmixed.
- DTS sound cannot be reproduced.
Language codes (for DVD/DivX language selection)
| Code | Language | Code | Language | Code | Language | Code | Language | Code | Language |
| AA | Afar | FA | Persian | KK | Kazakh | NO | Norwegian | ST | Sesotho |
| AB | Abkhazian | FI | Finnish | KL | Greenlandic | OC | Occitan | SU | Sundanese |
| AF | Afrikaans | FJ | Fiji | KM | Cambodian | OM | (Afan) Oromo | SW | Swahili |
| AM | Ameharic | FO | Faroese | KN | Kannada | OR | Oriya | TA | Tamil |
| AR | Arabic | FY | Frisian | KO | Korean (KOR) | PA | Panjabi | TE | Telugu |
| AS | Assamese | GA | Irish | KS | Kashmiri | PL | Polish | TG | Tajik |
| AY | Aymara | GD | Scots Gaelic | KU | Kurdish | PS | Pashto, Pushto | TH | Thai |
| AZ | Azerbaijani | GL | Galician | KY | Kirghiz | QU | Quechua | TI | Tigrinya |
| BA | Bashkir | GN | Guarani | LA | Latin | RM | Rhaeto-Romance | TK | Turkmen |
| BE | Byelorussian | GU | Gujarati | LN | Lingala | RN | Kirundi | TL | Tagalog |
| BG | Bulgarian | HA | Hausa | LO | Laothian | RO | Rumanian | TN | Setswana |
| BH | Bihari | HI | Hindi | LT | Lithuanian | RW | Kinyarwanda | TO | Tonga |
| BI | Bislama | HR | Croatian | LV | Latvian, Lettish | SA | Sanskrit | TR | Turkish |
| BN | Bengali, Bangla | HU | Hungarian | MG | Malagasy | SD | Sindhi | TS | Tsonga |
| BO | Tibetan | HY | Armenian | MI | Maori | SG | Sangho | TT | Tatar |
| BR | Breton | IA | Interlingua | MK | Macedonian | SH | Serbo-Croatian | TW | Twi |
| CA | Catalan | IE | Interlingue | ML | Malayalam | SI | Singhalese | UK | Ukrainian |
| CO | Corsican | IK | Inupiak | MN | Mongolian | SK | Slovak | UR | Urdu |
| CS | Czech | IN | Indonesian | MO | Moldavian | SL | Slovenian | UZ | Uzbek |
| CY | Welsh | IS | Icelandic | MR | Marathi | SM | Samoan | VI | Vietnamese |
| DZ | Bhutani | IW | Hebrew | MS | Malay (MAY) | SN | Shona | VO | Volapuk |
| EL | Greek | JA | Japanese | MT | Maltese | SO | Somali | WO | Wolof |
| EO | Esperanto | JI | Yiddish | MY | Burmese | SQ | Albanian | XH | Xhosa |
| ET | Estonian | JW | Javanese | NA | Nauru | SR | Serbian | YO | Yoruba |
| EU | Basque | KA | Georgian | NE | Nepali | SS | Siswati | ZU | Zulu |
Information for using Bluetooth® devices

Bluetooth
Bluetooth is a short-range wireless radio communication technology for the mobile device such as mobile phones, portable PCs, and other devices. The Bluetooth devices can be connected without cables and communicate with each other.
- Refer to pages i and ii at the end of manual to check the countries where may use the Bluetooth® function.
Bluetooth profile
This unit supports the following Bluetooth profiles;
HFP (Hands-Free Profile) 1.5
- OPP (Object Push Profile) 1.1
PBAP (Phonebook Access Profile) 1.0
A2DP (Advanced Audio Distribution Profile) 1.2
AVRCP (Audio/Video Remote Control Profile) 1.3
- Some operations are not available while driving. When you perform operations, stop your car in a safe place.
- Some Bluetooth devices may not be connected to this unit depending on the Bluetooth version of the device.
- This unit may not work for some Bluetooth devices.
- Connecting condition may vary depending on circumstances around you.
- When the unit is turned off, the device is disconnected.
Warning messages for Bluetooth operations
| “Cannot connect. Please connect from your device.” | The device is registered but the connection has failed. Connect from your phone, or use <Connect> to connect the device again (€8 page 74). |
| “System can not connect with this device. Please disconnect current device, then connect from this device.” | Disconnect the current device, then operate another device to connect. |
| “System can not connect with this device. Please connect from the device.” | Operate the device to connect. |
| “Pairing Error.” | The operation you have tried cannot be completed. Try the operation again. |
| “Connect error.” | |
| “Disconnect error.” | |
| “Delete error.” | |
| “Memory full.” | You have tried to copy a 501st phone book entry. Delete unwanted names before copying. |
Bluetooth Information:
If you wish to receive more information about Bluetooth, visit the following JVC web site: http://www.jvc.co.jp/english/car/ (English website only)
To check the connection status of a Bluetooth device

indicator appears when a Bluetooth device is connected

Using Bluetooth device
Registering a Bluetooth device
To connect a Bluetooth device for the first time
When you connect a Bluetooth device to the unit for the first time, make pairing between the unit and the device. Pairing allows Bluetooth devices to communicate each other.
- Once you register a Bluetooth device, the device remains registered until the registration is deleted. (E3 page 74)
- Up to 5 devices can be registered in total.
- Only one device for Bluetooth phone and one for Bluetooth audio can be connected at a time.
- To use the Bluetooth function, you need to turn on Bluetooth function of the device.
1 Operate the Bluetooth device to turn on its Bluetooth function.
2 Display the Bluetooth setting screen. For connecting a Bluetooth mobile phone

For connecting a Bluetooth audio player
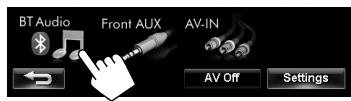
To activate "BT Audio" for source selection, page 68 (
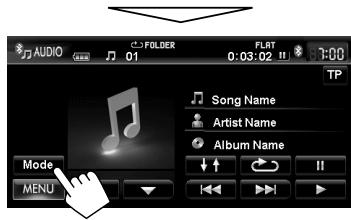
3 Change the PIN code.
- If you skip changing PIN code, go to step 4.
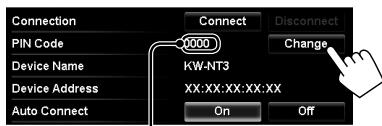
PIN code (initial: 0000)
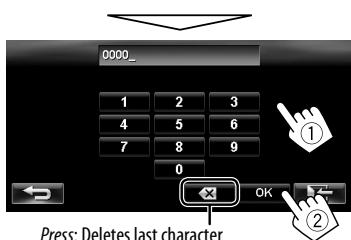
Hold: Deletes all characters
4
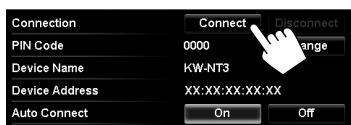
Continued on the next page
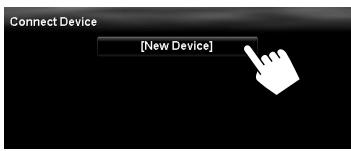
5
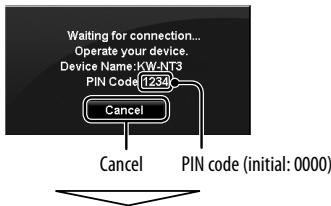
6 Operate the Bluetooth device to connect.
"Connected." appears. Press [OK] to confirm the operation.
Now connection is established and you can use the Bluetooth device through the unit.
Connecting/disconnecting a registered Bluetooth device
1 Display the Bluetooth setting screen. (E88 page 80)
- For Bluetooth mobile phone:
- For Bluetooth audio player:
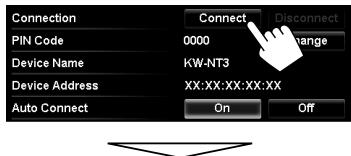
2 To connect
Select the device you want to connect.
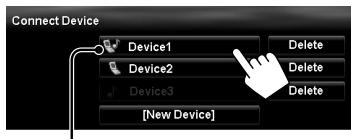
-
mobile phone / √: audio player √: both mobile phone and audio player
-
All registered devices (mobile phone and audio player) are listed on
. - Selectable items depend on the device you are operating.

To disconnect
A confirmation message appears.
Deleting a registered Bluetooth device
Select a device whose registration you want to delete on
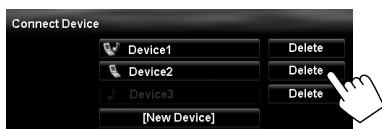
A confirmation message appears.
Using Bluetooth mobile phone
Receiving a call
When a call comes in/making a call...
On map screen:
The mobile phone control bars appear.
Status of the device/Battery reminder (only when the information comes from the device)

On AV screen:
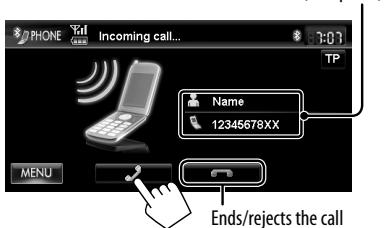
Call information (if acquired)
- Phone operation is not available while the picture from the rear view camera is displayed ( page 81).
When is set to
The unit answers the incoming call automatically.
(8 page 80)
Adjusting the volume of calls/earpiece
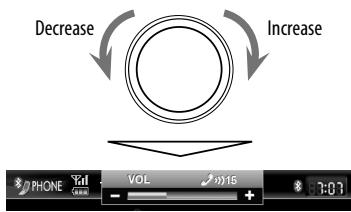
- This adjustment does not affect the volume level of the other sources.
- About the adjustable volume range, page 67 (
).
This adjustment does not affect the microphone volume. It is adjusted automatically.
About icons for category of the phone number
Icons which indicate the category of the phone number appear when the phone number is shown.
The category icons shown may differ depending on the connected mobile phone.
Category icon
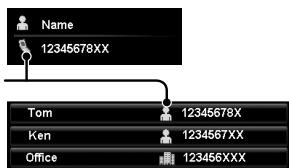
Switching between handsfree mode and phone mode
While talking...
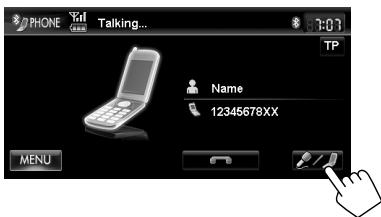
Each time you press the button, the talking method is switched. The corresponding indicator lights in orange (♀: handsfree mode / ♀: phone mode).
- The call may end automatically when switching to the phone mode, depending on the type of mobile phone.
Making a call

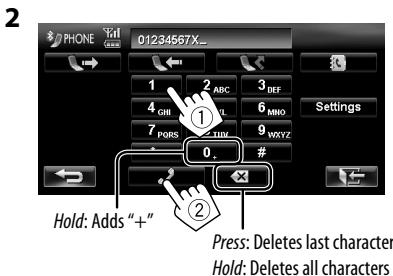
- You can enter up to 30 numbers.
Using the phone book/call lists
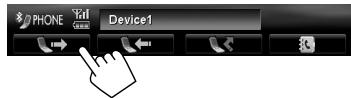
| [ ] | From dialled call list. |
| [ ] | From received call list. |
| [ ] | From missed call list. |
| [ ] | From phone book. • For copying the phone book, page 77. • For searching for a number, page 77. |
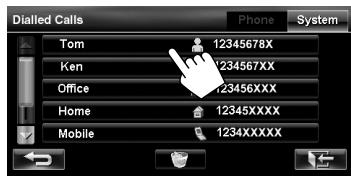
- If your mobile phone is compatible with Phone Book Access Profile (PBAP), page 78.
Making a call while operating on the navigation system
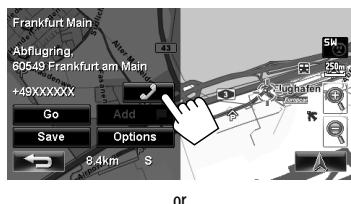
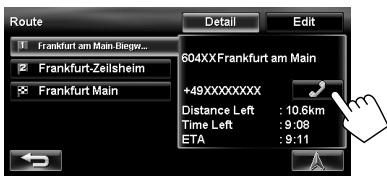
Copying the phone book
You can copy the phone book memory of a mobile phone into the unit (up to 500 memories).
1 Display .
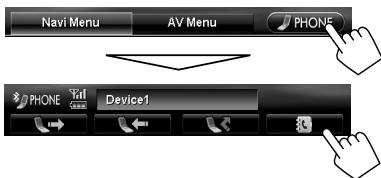
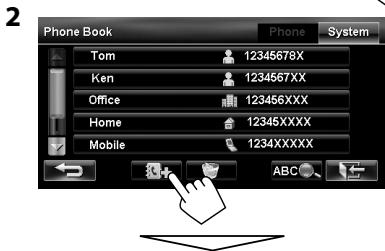
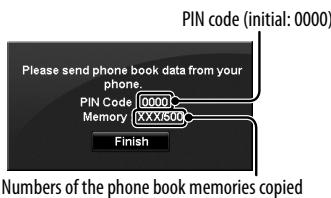
3 Operate the target mobile phone.
Refer to the instruction manual supplied with your mobile phone.
- To cancel the transfer, press [Finish].
4 Finish the procedure.

The phone book memory is copied from the mobile phone.
Searching for a phone number from phone book

2 Display the first character of the name you want to search for (①), then search for a name (②).
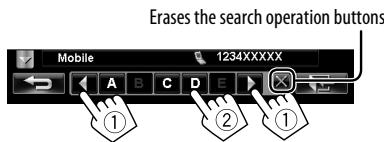
Press the character button repeatedly until the desired item is displayed.
- Only available characters are selectable.
- When selecting other character than the alphabet, press [#].
3 Select the phone number to call from the list.
Deleting the phone number memory in the unit
1 Display the phone book/call list you want to delete. ( page 76)
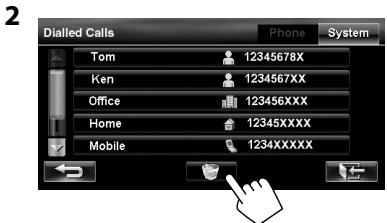
3 Select the items to delete (①), then delete them (②).
- The selected items are marked with "✔."
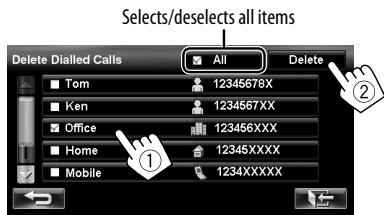
A confirmation message appears.
About mobile phone compatible with Phone Book Access Profile (PBAP)
If your mobile phone supports PBAP, the phone book and call lists are automatically copied to the unit when the mobile phone is connected.
- Phone book: up to 5000 entries
- Dialled calls, received calls, and missed calls: up to 50 entries each
To display the phonebook/call lists of the mobile phone or the unit
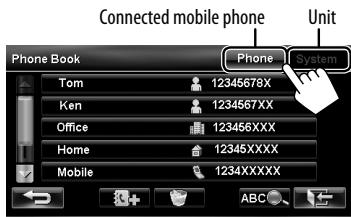
Using Bluetooth audio player
To activate "BT Audio" for source selection, page 68 (
To register a new device, page 73.
To connect/disconnect a device, page 74.
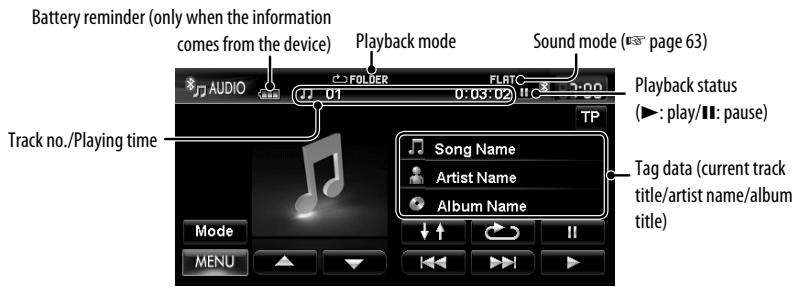
- The operating buttons, indicators and information displayed on the screen differ depending on the connected device.
[ ]
[1]
[14] [▶▶]
[△][▼]
Starts playback.
Pauses.
Selects track.
Selects the group. (Works only when the device supports the function.)
[↓↑]
[O]
[Mode]
Selects Random playback mode.
Selects Repeat playback mode.
Displays the Bluetooth setting
screen. ( page 80)
- To cancel random or repeat mode, press the button repeatedly until the indicator disappears.
Bluetooth device settings
For Bluetooth mobile phone
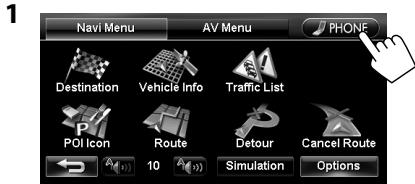
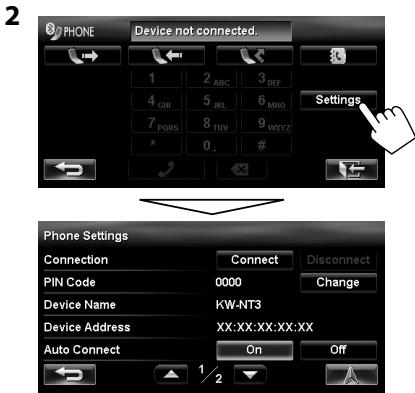
For Bluetooth audio player
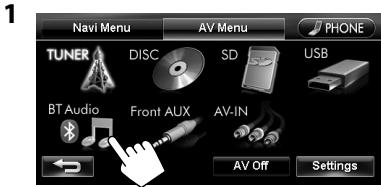
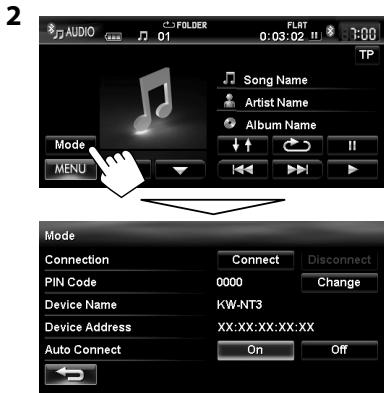
| Menu items | Selectable settings | Initial: Underlined |
| Connection | Connect: page 74Disconnect: page 74 | |
| PIN Code | Displays the PIN code of the unit. • To change the PIN code, press [Change], enter a new PIN code, then press [OK]. | |
| Device Name | Shows the device name to be shown on the Bluetooth device — “KW-NT3.” | |
| Device Address | Shows the MAC address of the unit. | |
| Auto Connect | On: The connection is automatically established with the last connected Bluetooth device when the unit is turned on. Off: Cancels. | |
| Auto Answer* | On: The unit answers the incoming calls automatically. Off: The unit does not answer the calls automatically. Answer the calls manually. |
- Appears only for
.
Rear View Camera Operations
Using a rear view camera
- To use a rear view camera, the reverse gear signal lead connection is required. For connecting a rear view camera, Installation/Connection Manual.
Activating the rear view camera
1

2
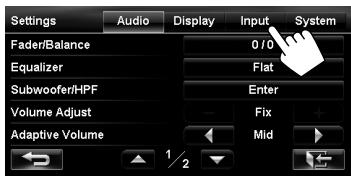
3
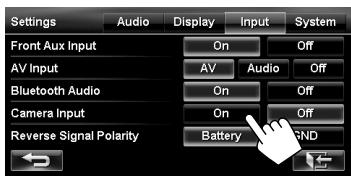
To deactivate the rear view camera, select
Displaying the picture from the rear view camera
The rear view screen is displayed when you shift the gear to the reverse (R) position.
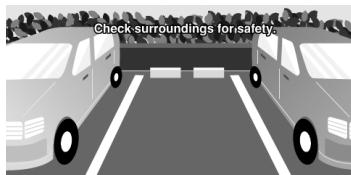
To display the operating buttons, touch the screen.
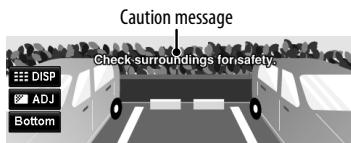

Hides/displays the operating buttons on the screen.

Adjusts the picture. (page 65)
[Bottom][Top] Adjusts the position of the caution message.
- While picture from the rear view camera is displayed, only volume adjustment and disc ejection are available.
-
If the picture from the rear view camera is displayed even though the gear lever is in a position other than reverse (R), press and hold () or () to erase the picture from the rear view camera, then try one of the following:
-
Perform steps 1 and 2 in "Activating the rear view camera" (E left), then change the
setting in step 3. - Check the connection of the reverse gear signal lead.
Maintenance
Caution on cleaning the unit
Do not use any solvent (for example, thinner, benzine, etc.), detergent, or
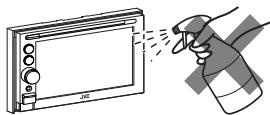
insecticide. This may damage the monitor or the unit.
Recommended cleaning method:
Gently wipe the panel with a soft, dry cloth.
How to clean the connector
Frequent detachment will deteriorate the connectors. To minimize this possibility, periodically wipe the connectors with a cotton swab or cloth moistened with alcohol, being careful not to damage the connectors.
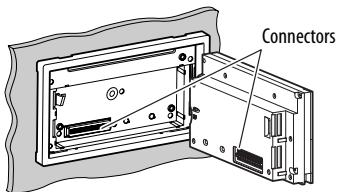
Moisture condensation
Moisture may condense on the lens inside the unit in the following cases:
After starting the heater in the car.
If it becomes very humid inside the car.
Should this occur, the unit may malfunction. In this case, eject the disc and leave the unit turned on for a few hours until the moisture evaporates.
How to handle discs
When removing a disc from its case, press down the
centre holder of the case and lift the disc out, holding it by the edges.
Always hold the disc by the edges.
Do not touch its recording surface.
Centre holder
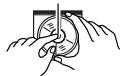
When storing a disc into its case,
gently insert the disc around the centre holder (with the printed surface facing up).
- Make sure to store discs into the cases after use.
To keep discs clean
A dirty disc may not play correctly.
If a disc does become dirty, wipe it with a soft cloth in a straight line from centre to edge.

- Do not use any solvent (for example, conventional record cleaner, spray, thinner, benzine, etc.) to clean discs.
To play new discs
New discs may have some rough spots around the inner and outer edges. If such a disc is used, this unit may reject the disc.

To remove these rough spots, rub the edges with a pencil or ball-point pen, etc.
Do not use the following discs:
Single CD—8 cm disc

Unusual shape

Warped disc
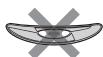
C-thru Disc (semi-transparent disc)

Sticker and sticker residue

Stick-on label

Transparent or semi-transparent on its recording area

Troubleshooting/errormessage
What appears to be trouble is not always serious. Check the following points before calling a service centre.
- For operations with the external components, refer also to the instructions supplied with the adapters used for the connections (as well as the instructions supplied with the external components).
| Symptoms | Remedies/Causes | |
| General | No sound comes out of the speakers. | ·Adjust the volume to the optimum level. ·Check the cords and connections. |
| The screen is not clear and legible. | Sunshine from the windscreen may cause this symptom. Adjust the picture. (€8 page 65) | |
| The unit does not work at all. | Detach the monitor panel, then attach it. (€8 page 4) | |
| The touch panel does not respond properly. | ·Keep your hands and the touch panel clean and dry. ·Eliminate static electricity and do not place magnetic items near the unit. ·Leave the unit until the temperature becomes stable in the car. ·A rubber mat on the floor may cause this symptom. In this case, do not use the rubber mat. | |
| Navigation guidance or AV source is hard to listen to. | Surround noise interferes. Increase the <Adaptive Volume> level. (€8 page 66) | |
| <Adaptive Volume> setting has no effect even though it is activated. | Reset the calibration data by selecting <Reset Calibration Data>. (€8 page 38) | |
| CD Text or Tag information of track or song, etc. is not displayed correctly. | The text may not be displayed correctly depending on the condition of recording or the type of the character, etc. though 2-byte and 1-byte characters can be displayed on the unit. | |
| “System start up failed.” | The System cannot start up. Detach the monitor panel, then attach it. (€8 page 4) | |
| Navigation | Guidance does not start. | The System proceeds calibration. Wait until calibration is completed. When calibration is completed, the guidance starts. |
| You cannot operate some functions of an AV source on the map screen. | On the map screen, you can operate some limited functions of the current source only. Press AV MAP and operate the source on the AV screen. | |
| Route calculation seems to have stopped. | Route calculation may take long depending on the route. Wait for a while. | |
| Navigation | Navigation voice cannot be heard from the speakers. | Guidance volume level is set to the minimum level. Adjust it to the optimum level. ( page 29) |
| The voice guidance does not come out from the speaker on the driver's side. | Change the <Output> setting. ( page 39) | |
| Navigation guidance is sometimes incorrect. | Reversing signal/speed signal leads are not connected. Connect them correctly ( Installation/Connection Manual). | |
| A POI found using <POI Name> in the <Destination Menu> is not within the selected city. | This is not a malfunction. The System may also search areas around the selected city. | |
| The current position displayed on the map remains wrong for more than 30 minutes. | Check the connection of the following leads. - GPS aerial - Speed signal lead If any disconnection is found, connect the lead again. - If no problems are found with connections, reset the calibration data by selecting <Reset Calibration Data>. ( page 38) | |
| The distance and estimated time in the guidance are inaccurate after replacing/rotating the tyres. | Perform <Reset Calibration Data> to clear the accumulated calibration data. ( page 38) | |
| "Check GPS Aerial" | Check the connection of the GPS aerial. | |
| "Acquiring GPS Signal" | • Acquiring GPS signals. Wait until signal reception is completed. • GPS signals cannot be received. Move to the place where the System receives the GPS signals. | |
| "Route calculation failed." | Failed to calculate the route. The destination/ via point is too far from any road. Select another destination/ via point where is close to a road. | |
| "Route calculation is aborted because destination is too far." | The destination/ via point is too far from the current position. Select another destination/ via point where is nearer to the current position. | |
| "Specified destination is not found." | Valid information is not found in the database. Search for another place. Press [ ] and search again with different conditions ( such as different category or place). | |
| "Speed pulse not detected. System works as GPS only mode until speed pulse is detected." | Check the connection of the speed signal lead. | |
| Symptoms | Remedies/Causes | |
| Navigation | “There is no available traffic information now.” | No valid TMC information is available now. Try one of the followings:·Move to the place where you can receive TMC service.·No TMC information on your route. Display the list of all TMC information. (€- page 36) |
| “Selected coordinates are out of map area. Please input again.” | The coordinates you have entered are not available. Press [OK] and input the coordinates again. | |
| Disc in general | Disc can be neither recognized nor played back. | Eject the disc forcibly. (€- page 4) |
| Disc cannot be ejected. | Unlock the disc. (€- page 49) | |
| ·Recordable/Rewritable discs cannot be played back. ·Tracks on the Recordable/Rewritable discs cannot be skipped. | ·Insert a finalized disc. ·Finalize the discs with the component which you used for recording. | |
| Playback does not start. | ·Insert the disc correctly again. ·The format of files is not supported by the unit. | |
| Sound and pictures are sometimes interrupted or distorted. | ·Stop playback while driving on rough roads. ·Change the disc. | |
| No playback picture is shown and caution message about parking brake appears on the screen, even when the parking brake is engaged. | Parking brake lead is not connected properly. (€- Installation/Connection Manual) | |
| No picture appears on the external monitor. | ·Connect the video cord correctly. ·Select the correct input on the external monitor. | |
| “Read error” | ·A disc is inserted upside down. Replace the disc. ·A disc has no playable files. | |
| “No Disc” | Disc is not inserted. Insert a disc or select another playback source. | |
| ·“Eject Error” ·“Loading Error” | ·Eject the disc forcibly. (€- page 4) ·Check the disc. | |
| “Region code error” | Region code is not correct. (€- page 50) | |
| DivX/MPEG1/MPEG2/MP3/WMA/NAV | Disc cannot be played back. | ·Change the disc. ·Record the tracks using a compliant application on the appropriate discs. (E-3 page 50) ·Add appropriate extension codes to the file names. |
| Noise is generated. | The track played back is not a playable file format. Skip to another file. | |
| Tracks are not played back as you have intended them to play. | Playback order may differ from the one played back using other players. | |
| Elapsed playing time is not correct. | This sometimes occurs during playback. This is caused by how the tracks are recorded. | |
| “Error” | The track is unplayable. | |
| SD/USB | Noise is generated. | The track played back is not a playable file format. Skip to another file. |
| Tracks cannot play back as you have intended them to play. | Playback order may differ from the one played back using other players. | |
| While playing a track, sound is sometimes interrupted. | The tracks are not properly copied into the SD card/USB device. Copy tracks again, and try again. | |
| “No Files” | The SD card/USB device has no playable files. Change the SD card/USB device. | |
| “No SD Card” | No SD card is inserted. Insert an SD card or select another playback source. | |
| “No USB Device” | No USB device is connected. Connect a device or select another playback source. | |
| “Read error” | The file has not been formatted correctly. | |
| “Error” | The track is unplayable. | |
| iPod/iPhone | The iPod/iPhone does not turn on or does not work. | ·Check the connection. ·Charge the battery. ·Check whether <Head>, <iPod> or <Ext> is correctly selected for <iPod Control Mode>. (v8 page 59) ·Reset the iPod/iPhone. |
| Sound is distorted. | Deactivate the equalizer either on this unit or the iPod/iPhone. | |
| Playback pauses. | The headphones are disconnected during playback with <iPod Control Mode> set to <iPod> or <Ext> (v8 page 59). Restart playback. | |
| No operations are available when playing back a track containing artwork. | It takes a long time to loading an artwork. Operate the unit after the artwork is loaded. (v8 page 60) | |
| Video is not played back. | Check the connection of USB Audio and Video cable (KS-U29, not supplied). | |
| "Disconnected" | Check the connection. | |
| AV-IN/ Front Aux | "No Signal" | ·Turn on the external component if it is not on. ·Connect the external component correctly. ·Check whether <AV Input> setting is correct for "AV-IN". (v8 page 68) |
Troubleshooting/errormessage
| Symptoms | Remedies/Causes | |
| Bluetooth | Bluetooth device does not detect the unit. | This unit can be connected with one Bluetooth device at a time. While connected to a device, this unit cannot be detected from another device. Disconnect currently connected device and search again. |
| The unit does not detect the Bluetooth device. | Check the Bluetooth setting of the device. | |
| Echo or noise occurs. | Adjust the microphone unit position. | |
| Phone sound quality is poor. | • Reduce the distance between the unit and the Bluetooth mobile phone. • Move the car to place where you can get a better signal reception. | |
| The sound is interrupted or skipped while using a Bluetooth audio player. | • Reduce the distance between the unit and the Bluetooth audio player. • Disconnect the device connected for Bluetooth phone. • Turn off, then turn on the unit. • (When the sound is not yet restored) connect the player again. | |
| The connected audio player cannot be controlled. | Check whether the connected audio player supports AVRCP (Audio Video Remote Control Profile). | |
| The unit does not response when you tried to copy the phone book to the unit. | You may have tried to copy the same entries (as stored) to the unit. | |
| Rear view camera | The rear view screen is not displayed when the gear is shifted to the reverse (R) position. | • Check <Camera Input> setting. ( page 81) • Check the connection. |
| “No Signal” | Check the connection. |
Design and specifications are subject to change without notice.
| NAVIGATION SYSTEM | System & Service | L1, C/A code Global Positioning System Standard Positioning Service | |
| Reception System | 12-channel multi-channel reception system | ||
| Reception Frequency | 1 575.42 MHz | ||
| Sensitivity | -130 dBm | ||
| Update Rate | 1/second, continuous | ||
| GPS Aerial | Polarization | Right Handed Circular Polarization | |
| Dimensions (approx.) (W × H × D) | 30.4 mm × 11.7 mm × 35.5 mm | ||
| Cable (approx.) | 5.0 m | ||
| Voice Guidance | English, Espanol, François, Deutsch, Italiano, Nederlands, Português, Ceština, Magyar, Dansk, Suomi, Norsk, Polski, Svenska, Türçce,Ελληνικa | ||
| Text to Speech | English, Espanol, François, Deutsch, Italiano, Nederlands, Português, Dansk, Svenska | ||
| AMPLIFIER | Maximum Power Output | Front/Rear | 50 W per channel |
| Continuous Power Output (RMS) | Front/Rear | 20 W per channel into 4 Ω, 40 Hz to 20 000 Hz at no more than 0.8% total harmonic distortion | |
| Load Impedance | 4 Ω (4 Ω to 8 Ω allowance) | ||
| Equalizer Control Range | Frequencies | 45 Hz, 120 Hz, 315 Hz, 800 Hz, 2.4 kHz, 6.3 kHz, 15 kHz | |
| Level | ±10 dB | ||
| Signal-to-Noise Ratio | 70 dB | ||
| Audio Output Level | Line-Out Level/Impedance | 2.5 V/20 kΩ load (full scale) | |
| LINE OUT (F OUT/R OUT), SUBWOOFER | Output Impedance | 1 kΩ | |
| Video Output (composite) | Colour System | PAL/NTSC | |
| VIDEO OUT | Video-Out Level/Impedance | 1 Vp-p/75 Ω | |
| Other Terminals | Input | USB (●←), Front AUX, LINE IN, VIDEO IN, CAMERA IN, Aerial input, MIC IN | |
| Others | OE REMOTE | ||
| FM/AM TUNER | Frequency Range | FM | 87.5 MHz to 108.0 MHz |
| AM | (MW) 522 kHz to 1 620 kHz(LW) 144 kHz to 279 kHz | ||
| FM Tuner | Usable Sensitivity | 10.3 dBf (0.8 μV/75 Ω) | |
| 50 dB Quieting Sensitivity | 14.3 dBf (1.4 μV/75 Ω) | ||
| Alternate Channel Selectivity (400 kHz) | 65 dB | ||
| Frequency Response | 40 Hz to 15 000 Hz | ||
| Stereo Separation | 50 dB | ||
| MW Tuner | Sensitivity/Selectivity | 15 μV/80 dB | |
| LW Tuner | Sensitivity | 22 μV | |
| DVD/CD | Signal Detection System | Non-contact optical pickup (semiconductor laser) | |
| Frequency Response | DVD, fs=48 kHz/96 kHz | 16 Hz to 20 000 Hz | |
| CD | |||
| Dynamic Range | 93 dB | ||
| Signal-to-Noise Ratio | 95 dB | ||
| Wow and Flutter | Less than measurable limit | ||
| SD | Compatible File System | FAT 32/16/12 | |
| Capacity | 8 Mbytes to 2 Gbytes | ||
| Data Transfer Rate | Maximum 10 Mbps | ||
| USB | USB Standards | USB 2.0 High Speed | |
| Data Transfer Rate | High Speed: Maximum 480 MbpsFull Speed: Maximum 12 MbpsLow Speed: Maximum 1.5 Mbps | ||
| Compatible Device | Mass storage class | ||
| Compatible File System | FAT 32/16/12 | ||
| Max. Current | DC 5 V = = 500 mA | ||
| BLUETOOTH | Version | Bluetooth 1.2 certified | |
| Output Power | +4 dBm Max. (Power class 2) | ||
| Service Area | Within 10 m | ||
| Profile | HFP (Hands-Free Profile) 1.5 OPP (Object Push Profile) 1.1 PBAP (Phonebook Access Profile) 1.0 A2DP (Advanced Audio Distribution Profile) 1.2 AVRCP (Audio/Video Remote Control Profile) 1.3 | ||
| MONITOR | Screen Size | 6.1 inch wide liquid crystal display | |
| Number of Pixel | 336 960 pixels: 480 × 3 (horizontal) × 234 (vertical) | ||
| Drive Method | TFT (Thin Film Transistor) active matrix format | ||
| Colour System | PAL/NTSC | ||
| Aspect Ratio | 16:9 (wide) | ||
| GENERAL | Power Requirement | Operating Voltage | DC 14.4 V (11 V to 16 V allowance) |
| Grounding System | Negative ground | ||
| Allowable Storage Temperature | -10°C to +60°C | ||
| Allowable Operating Temperature | 0°C to +40°C | ||
| Dimensions (W × H × D) | Installation Size (approx.) | 182 mm × 111 mm × 161 mm | |
| With trim plate and sleeve attached | Panel Size (approx.) | 188 mm × 117 mm × 10 mm | |
| Mass (approx.) | 2.9 kg (including trims/sleeve/brackets) | ||
WICHTIG FÜR LASER-PRODUKTE
m = 311 ;
Song Name

Artist Name

Album Name
Liste


Wiedergabestatus
(II: Pause)
MP3: 48 kHz, 44,1 kHz, 32 kHz
24 kHz, 22,05 kHz, 16 kHz
WMA: 48 kHz, 44,1 kHz, 32 kHz, 22,05 kHz
WAV: 44,1 kHz
HFP (Hands-Free Profile) 1.5
- OPP (Object Push Profile) 1.1
PBAP (Phonebook Access Profile) 1.0
A2DP (Advanced Audio Distribution Profile) 1.2
AVRCP (Audio/Video Remote Control Profile) 1.3