
Cleaner 1020 - Robot vacuum Infiniton - Free user manual and instructions
Find the device manual for free Cleaner 1020 Infiniton in PDF.


| Product Type | Robot Vacuum Cleaner |
| Brand | Infiniton |
| Model | Cleaner 1020 |
| Dimensions (L x W x H) | 340 x 340 x 90 mm |
| Weight | 2.8 kg |
| Power Supply | 14.4V Li-ion battery, 2600 mAh |
| Suction Power | 2000 Pa |
| Dustbin Capacity | 300 ml |
| Runtime | Up to 90 minutes |
| Charging Time | Approx. 4-5 hours |
| Navigation System | Random bump navigation |
| Cleaning Modes | Auto, Spot, Edge, Schedule |
| Filter Type | HEPA washable |
| Sensors | Drop sensors, bump sensors, infrared |
| Remote Control | Included |
| WiFi / App Control | Not available |
| Maintenance Frequency | Clean brush and filter weekly |
| Safety Features | Auto return to dock, anti-fall, low noise |
| Spare Parts Available | Side brushes, filters, main brush |
Frequently Asked Questions - Cleaner 1020 Infiniton
User questions about Cleaner 1020 Infiniton
0 question about this device. Answer the ones you know or ask your own.
Ask a new question about this device
Download the instructions for your Robot vacuum in PDF format for free! Find your manual Cleaner 1020 - Infiniton and take your electronic device back in hand. On this page are published all the documents necessary for the use of your device. Cleaner 1020 by Infiniton.
USER MANUAL Cleaner 1020 Infiniton
natural_image
Circular diagram with a central circular component and two labeled buttons, no text or symbols present.Contents
Safety Instructions....4
Product Parts....6
Main body and accessories....6
Robot anatomy....7
Charging base and remote control....9
CLEAN button satus....5
Product Operating....11
Notes before cleaning....11
Clean mode selection....14
Programming the robot....16
Install water tank module....18
Product Maintenance....19
Main brush, side brushes and cleaning mop....19
Dust bin and filters....19
Cliff sensors and auto charing pin....19
Troubleshooting....20
Error sheet....20
Product Specifications....21
Before using an electrical appliance, basic precautions should alwasy be followed, including the following:
READ ALL INSTRUCITONS BEFORE USING THIS APPLIANCE. SAVE THESE INSTRUCTIONS.
- Only the certified technician may disassemble the product. Users are not allowed to disassemble or repair the product.
- Only use the adapter provided by the factory. Using other un-matched adapter may cause electric shock, fire or product damage.
- Do not touch the power cord, plug or adapter when your hands are wet.
- Do not make clothes or part of a body drawn into the product's wheels.
- Do not make this product close to cigarette, lighter, match or any flammables.
- If the product is needed to clean, clean it after charging is stopped.
- Do not over-bend the power cord or pressure the power cord with heavy or sharp objects.
- This product is used only indoors, do not use it outdoors.
- Do not sit on top of this product or attach an object on the top of it.
- Do not use this product in wet or moist environment (any environment with liquid).
- Before use, remove all the damageable objects (textile, glass, lighting, etc) and objects that could get caught in the brushes or suck passage(cords, clothing, papers, drapes, blinds, etc).
- Do no place this product where it is easy to drop off (tables, chairs, etc).
- Turn off the power switch during transportation or when you don't need to use this product for a long time.
- Before use, check whether adapter and outlet are properly connected. Or else the battery may be damaged.
-
To avoid tripping, inform all the people in the house when this product is working.
-
Do not use this product when dust bin is full.
- Use this product in temperature from -10° to 50°(centigrade degree).
- Do not place this product in high-temperature environment.
- The battery must be removed from the product before it is scrapped.
- The product must be disconnected from the supply mains when removing the battery.
- The battery is to be disposed of safety.
- Use factory-authorized battery only, do not use unmatched battery.
NOTE: This appliance can be used by children aged from 8 years and above and persons with reduced physical, sensory or mental capabilities or lack of experience and knowledge if they have been given supervision or instruction concerning use of the appliance in a safe way and understand the hazards involved. Children shall not play with the appliance. Cleaning and user maintenance shall not be made by children without supervision.
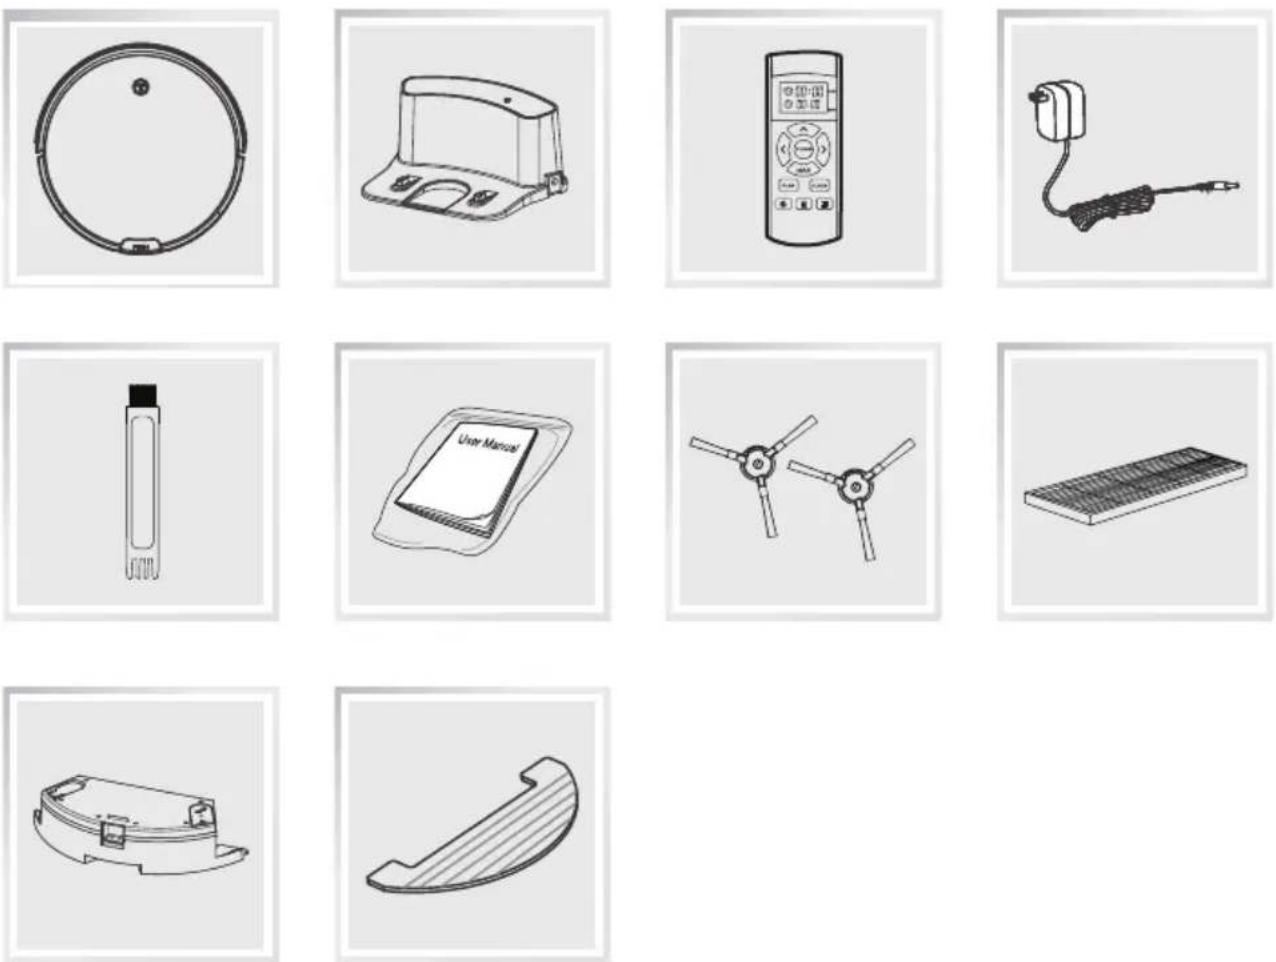
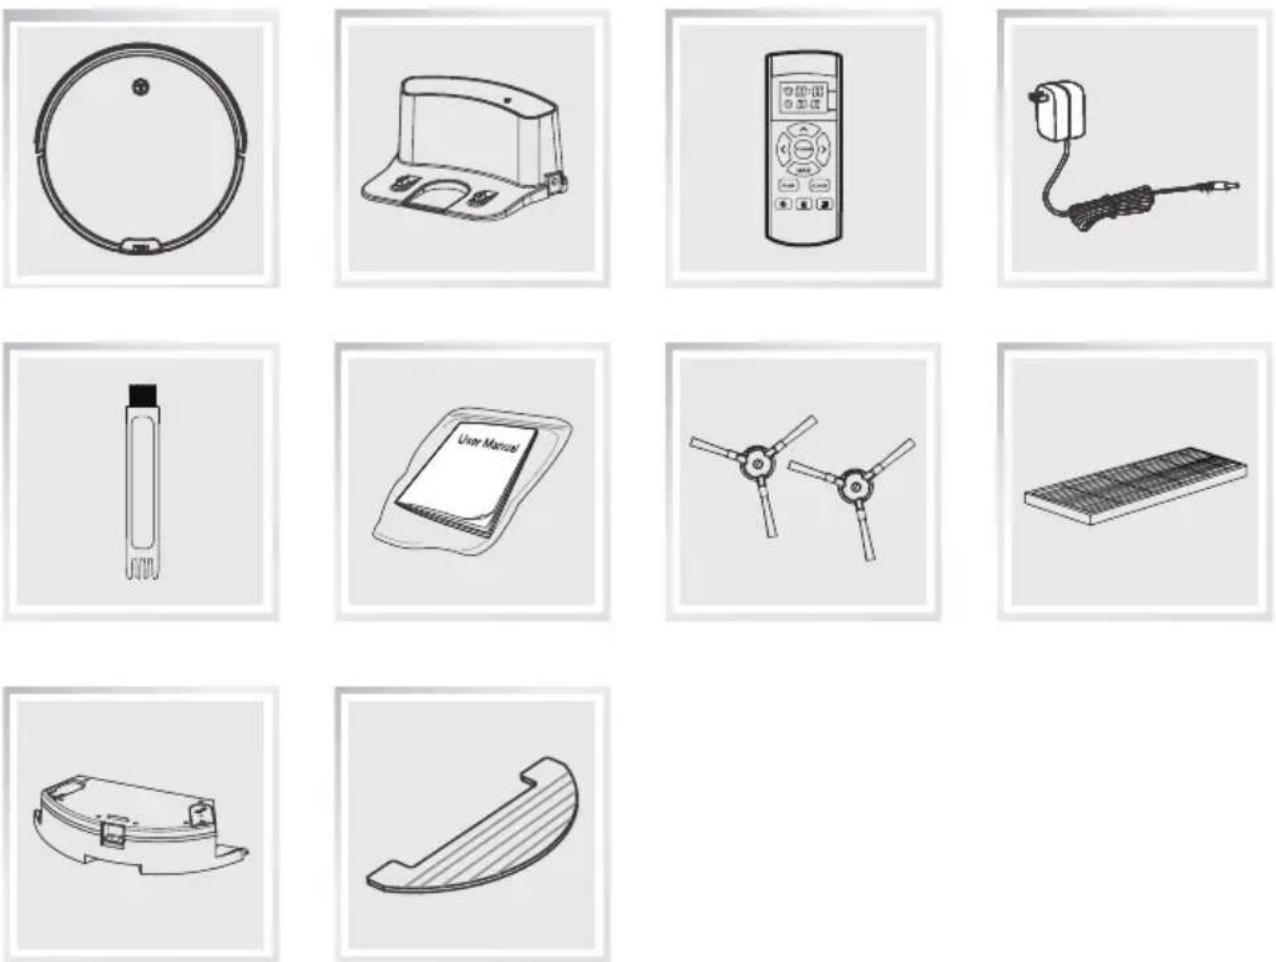
Main body and accessories
| NO. | Description | Q'ty |
| 1 | Main Body | 1 |
| 2 | Charging Home Base | 1 |
| 3 | Remote Control (battery not included) | 1 |
| 4 | Adapter | 1 |
| 5 | Cleaning Tool | 1 |
| 6 | User Manual | 1 |
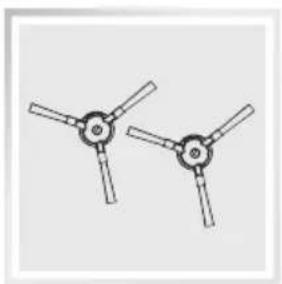
| 7 | Extra Side Brushes (pair) | 1 |
| 8 | Extra High-performance Filter | 1 |
| 9 | Water Tank | 1 |
| 10 | Extra Mop | 1 |
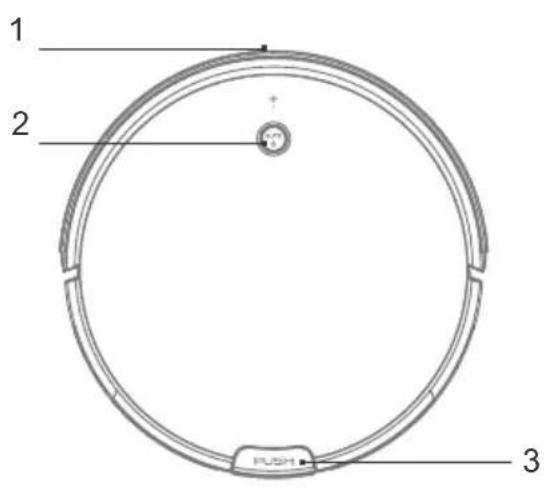
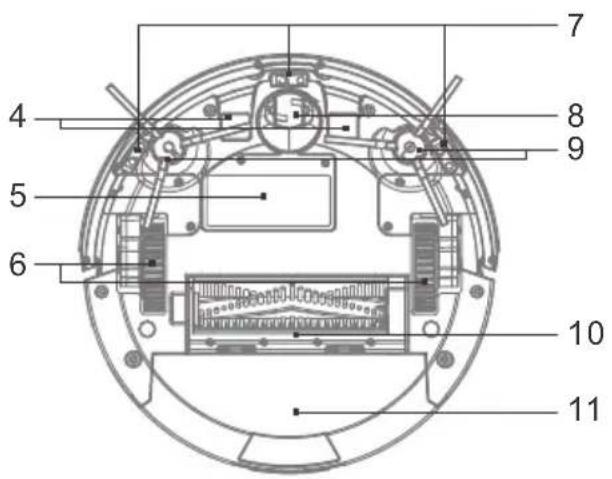
Robot anatomy
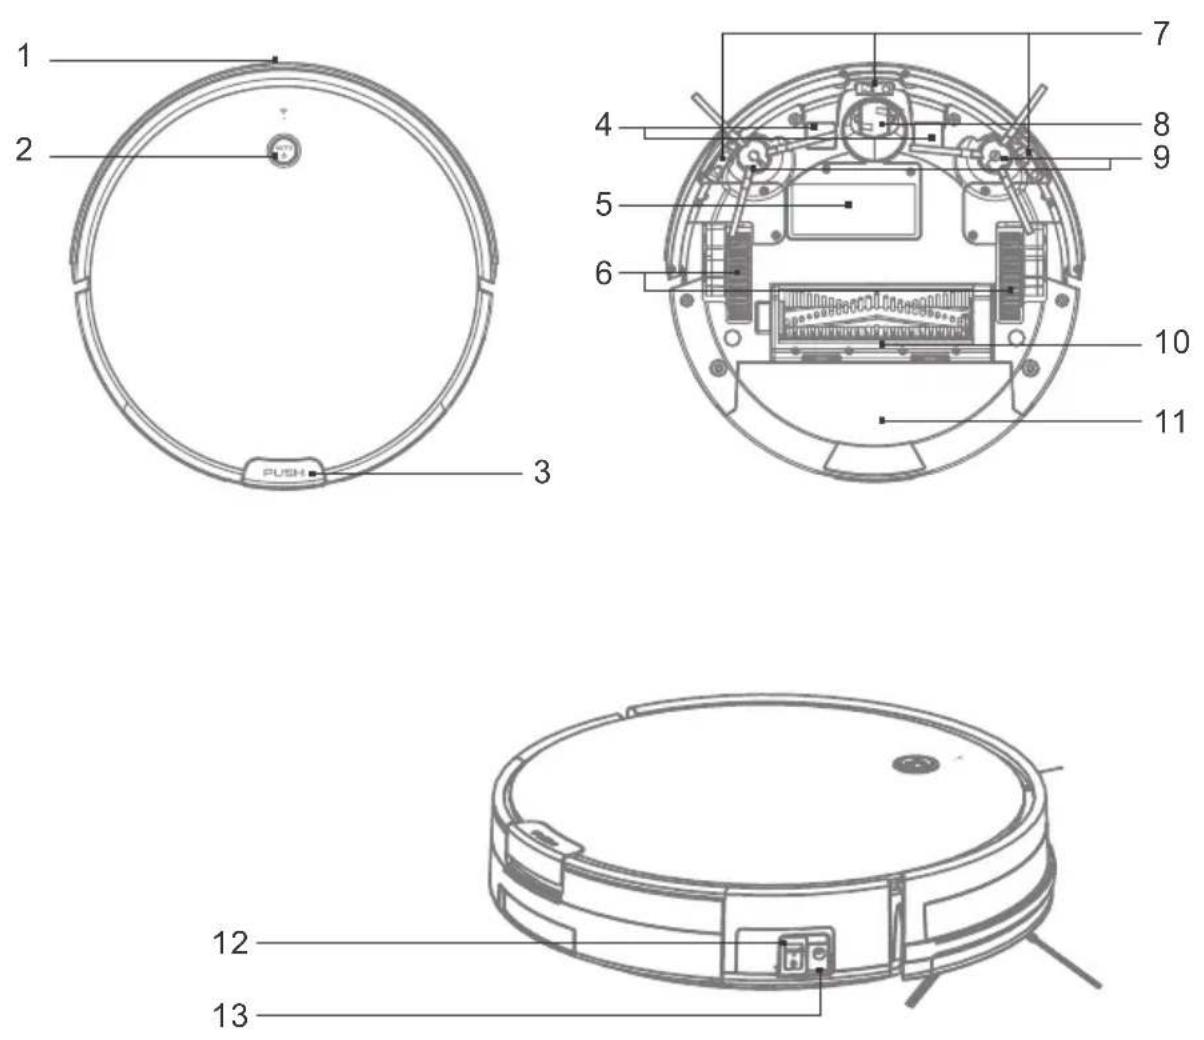
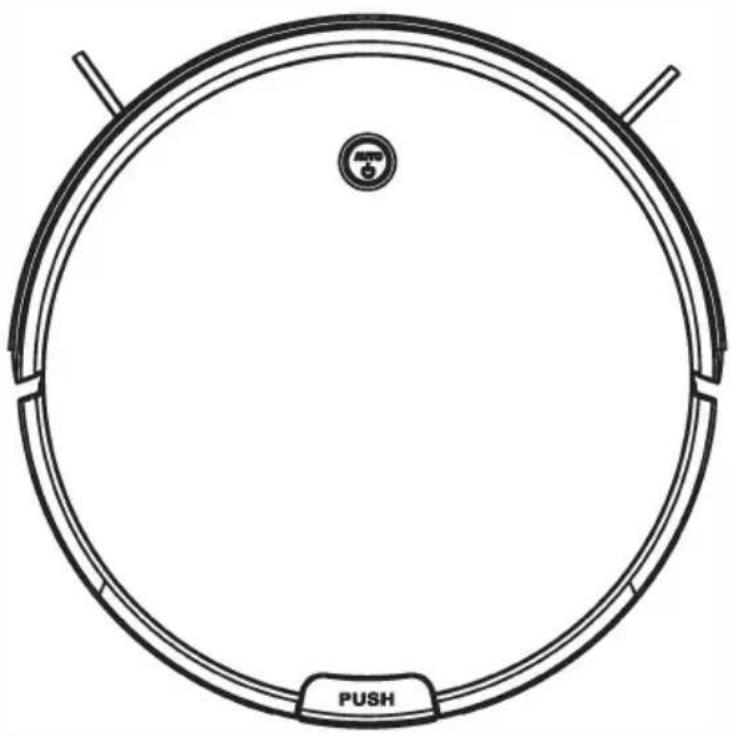
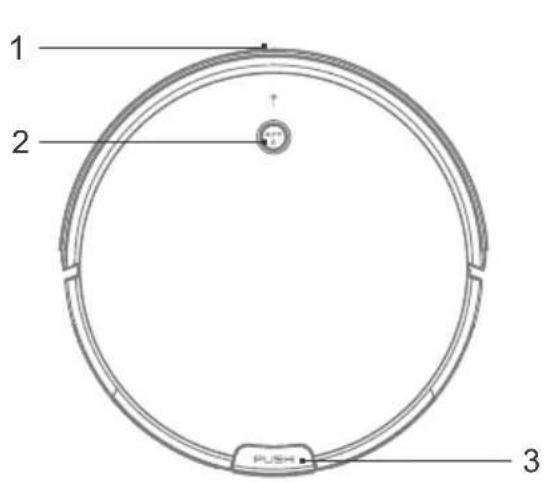
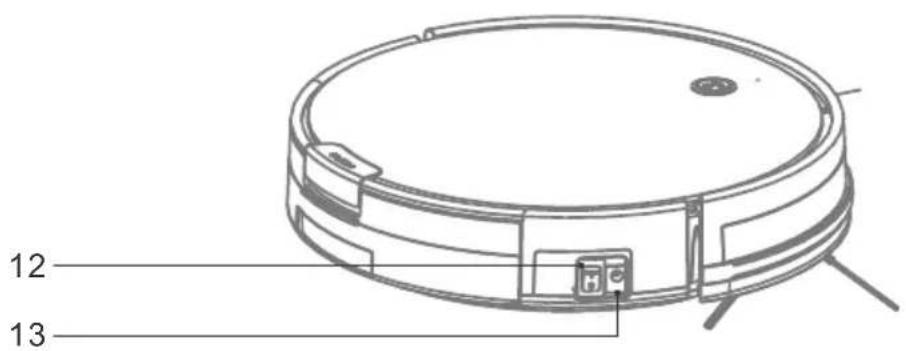
- Front bumper
- Auto button
- Dust bin button
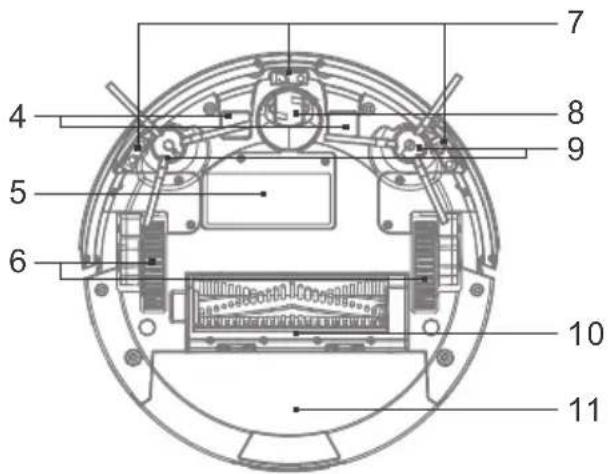
- Charging pin
-
Battery lid
-
Right / left wheel
- Cliff sensor
- Nose wheel
-
Side brush
-
Main brush
- Dust bin
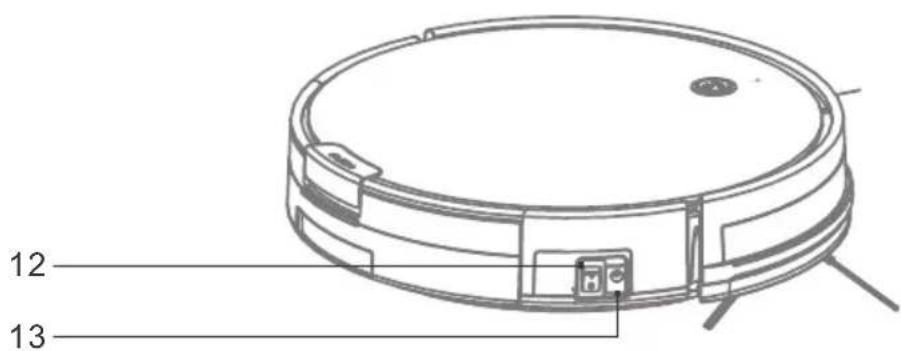
- Charging port
- Power switch
Dust bin
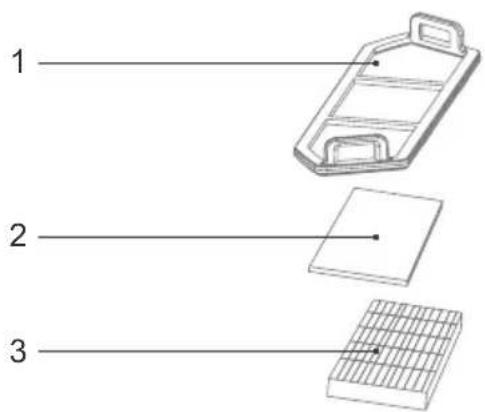
- Primary filter
- Sponge
- High-performance filter
- Dust bin lid
- Dust bin
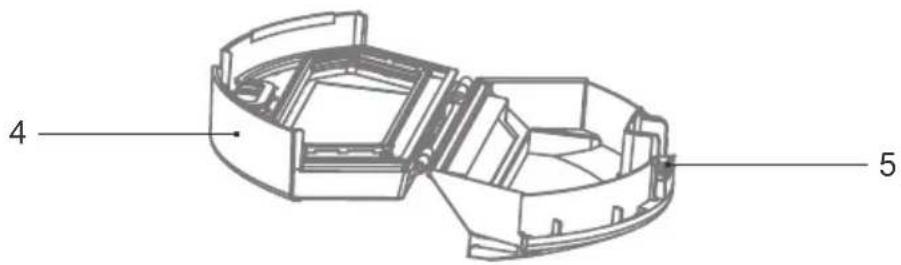
Water tank
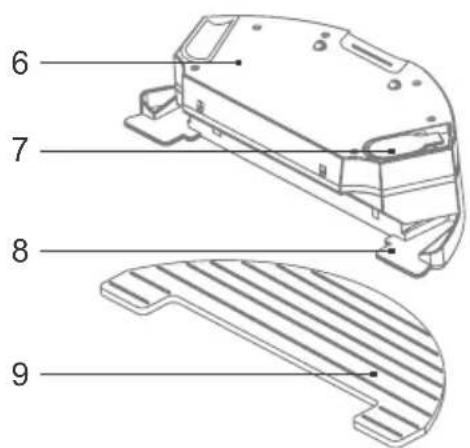
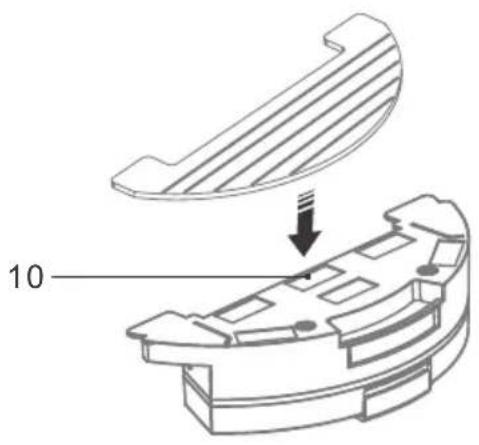
- Water tank
-
Water inlet
-
Mop holder
-
Mop cloth
-
Sticker
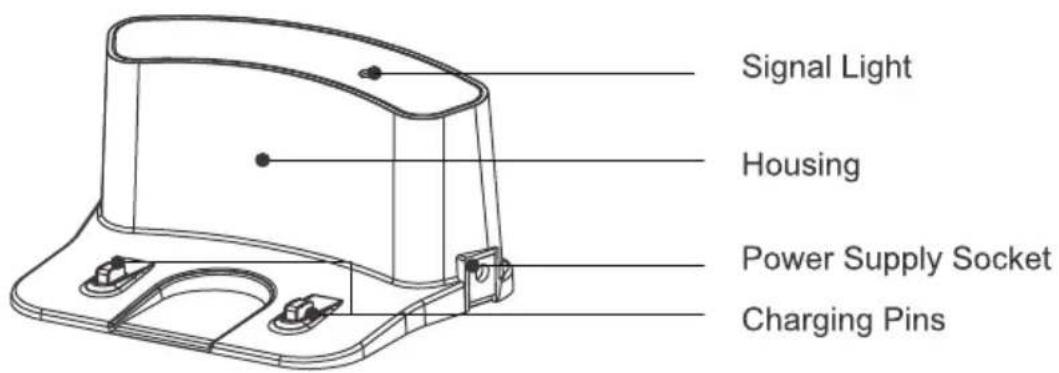
Charging Base
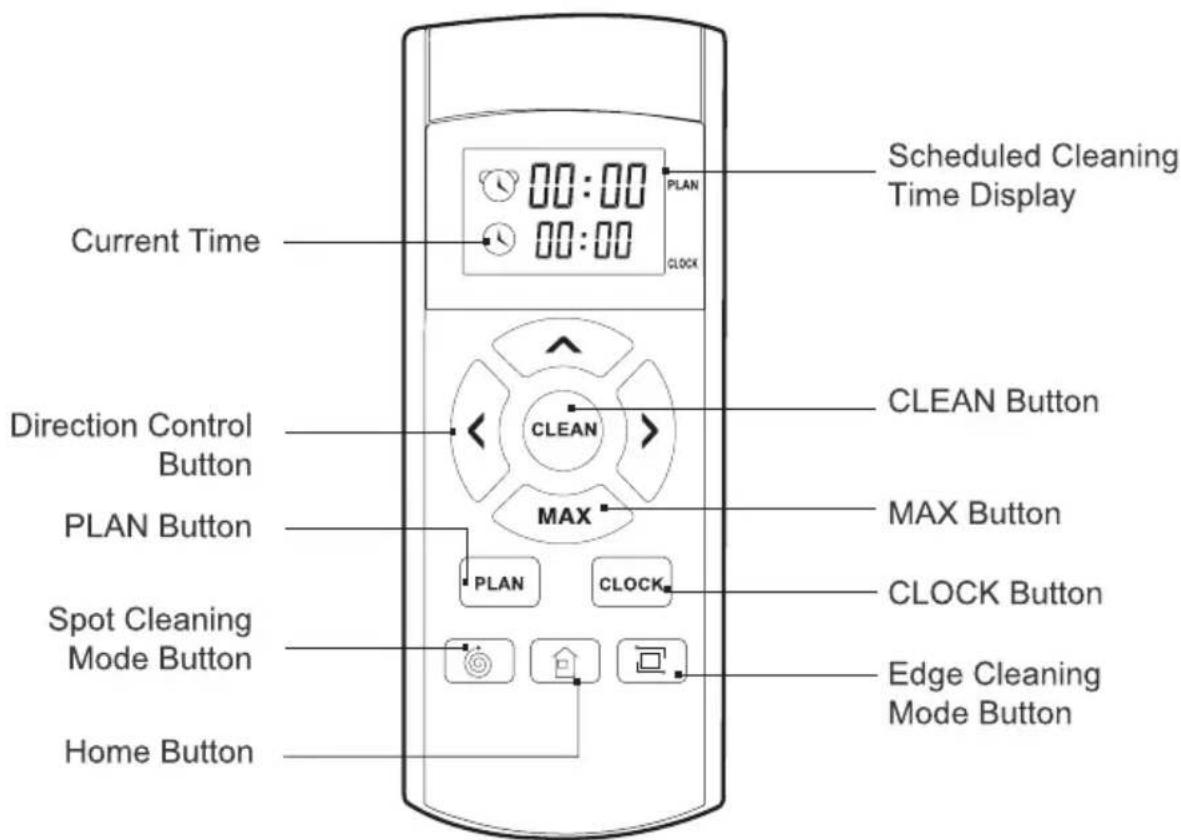
Remote Control
CLEAN button status
| Robot status | Light Status |
| Charging | Orange light flash |
| Charging finished | Green light turn solid |
| Selecting mode | Green light flash |
| When robot in error | Red light turn solid |
| Low battery | Orange light turn solid |
| In cleaning mode | Green light turn solid |
Due to the complexity of home environment, the robot may miss some area not cleaning. In order to achieve a better cleaning effect, it is recommended that you use it daily and remove some unfriendly obstacles before cleaning.
Precautions
You can refer to the following guidelines. Check the cleaning area and learn about the home environment to let the robot perform a better cleaning.
natural_image
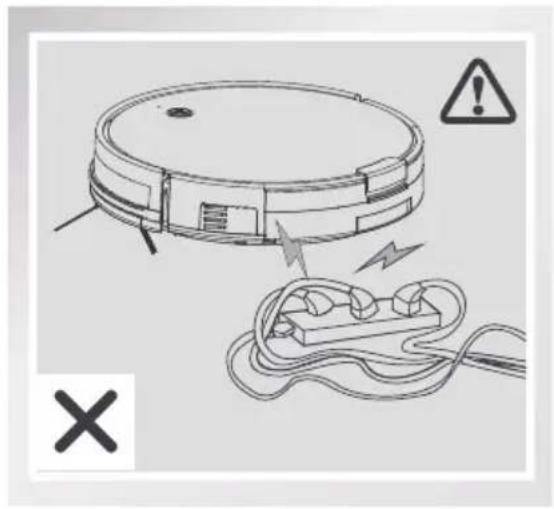
Diagram of a robotic vacuum cleaner with warning symbols and wiring, no readable text or labels presentPlease to remove unfriendly obstacles in cleaning area.
natural_image
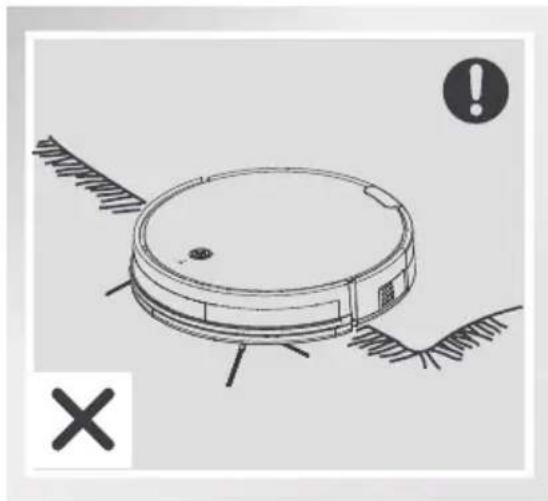
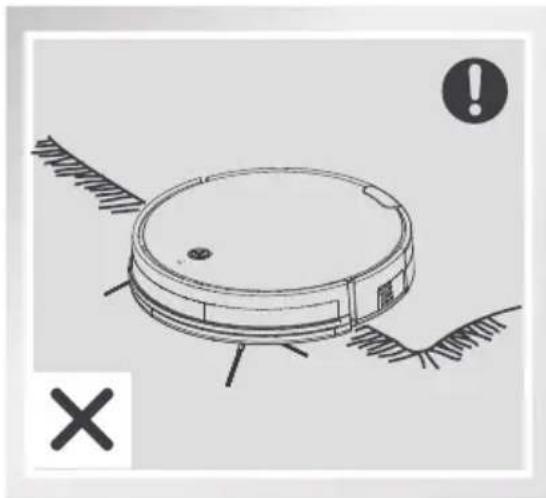
Diagram of a robotic vacuum cleaner with warning symbol and cross mark (no text or labels)Please roll up the tassels of the carpet and use the robot on short-haired carpets. Do not use mopping (water tank) on carpets.
natural_image
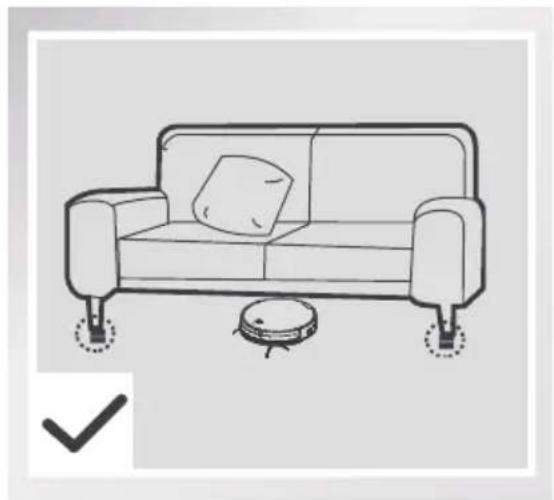
Line drawing of a sofa with a vacuum cleaner on the floor, no text or symbols presentA gap less than 8cm at the bottom of the home may jam the robot. If you need to clean it, please raise the furniture.
natural_image
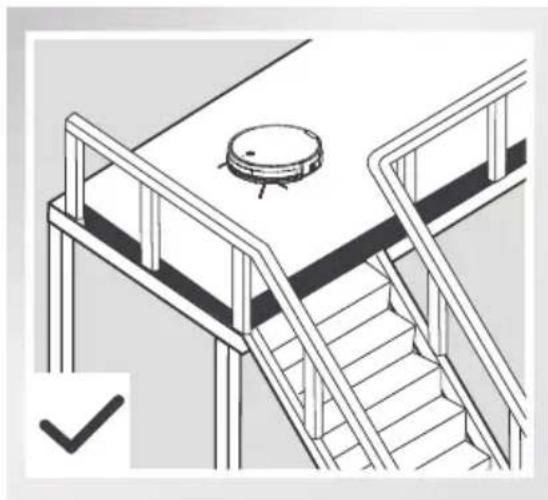
Line drawing of a staircase with a circular vent on top, no text or symbols presentPlease place a fence while machine is to perform tasks such as landing on a multistory staircase, step edge or small area between furniture, etc.
Product Operation
Quick Start
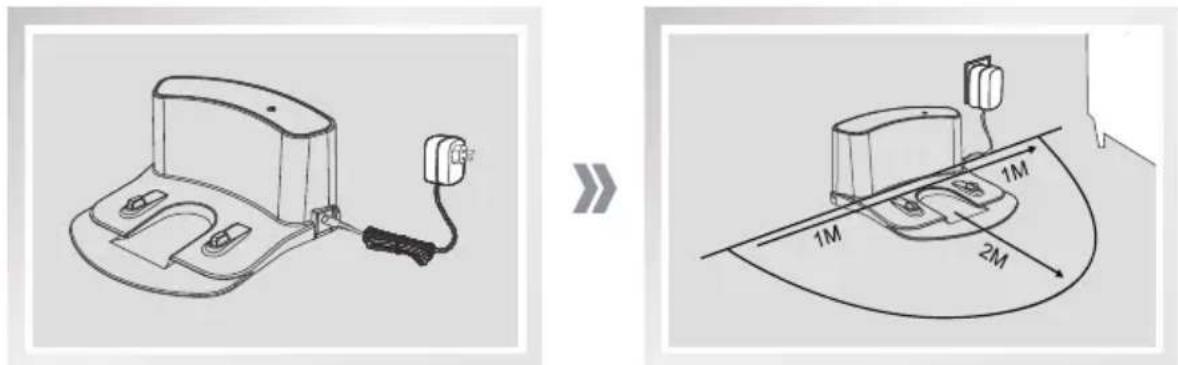
1 Place the charging base and connect the power supply
Connect the adapter and charging base. Don't place any objects 1.0m to its left/right side and 2m to its front side.
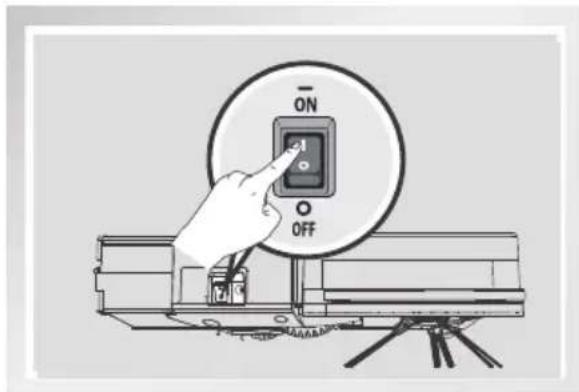
2 Turn on the robot
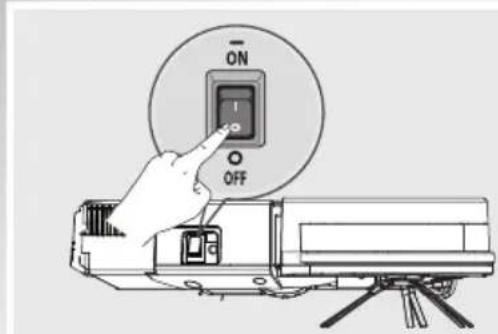
Power switch at side of the cleaner, "I" is turn on, "O" is off.
Please do not turn off the cleaner after cleaning finished. Keep it in charge so that it can better performance next cleaning task.
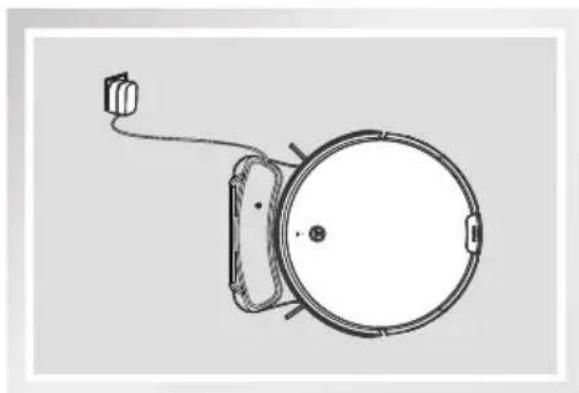
3 Start charging
Put the robot on the charging base and align to the charging pin.
AUTO button orange light flash, charging; AUTO button in green light, charging finished; For first charging, please charge continuously for more than 12 hours.
natural_image
Simple line drawing of a circular device with a cable and connector, no text or symbols present4 Start
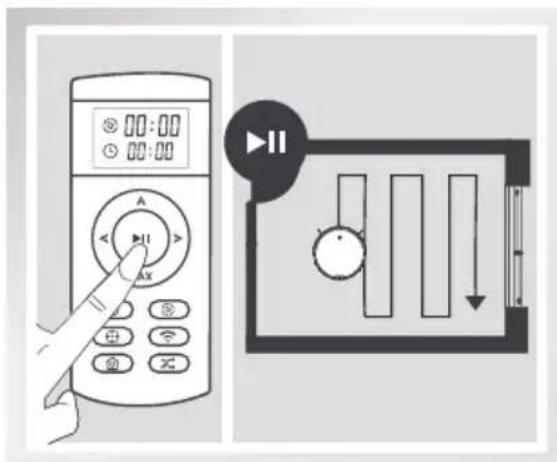
- Press the AUTO button on robot or the CLEAN button on the remote control. Robot starts to work immediately in auto cleaning mode.
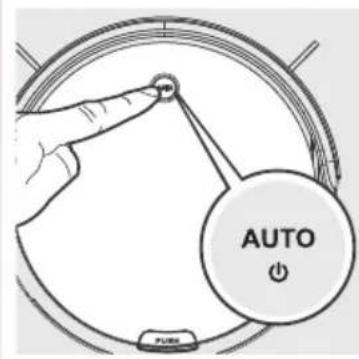
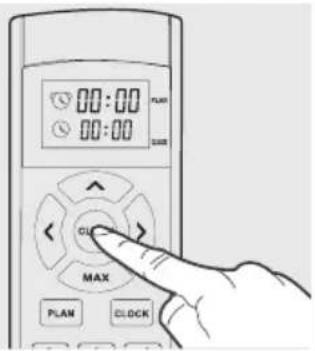
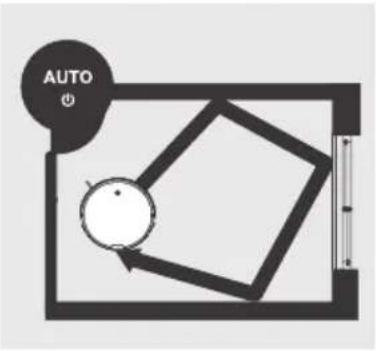
* To choose another Cleaning Mode, please refer to section 3.3 Cleaning Mode Selection for details.
5 Pause
■ Pause robot by pressing the AUTO button on robot or CLEAN button the remote control.
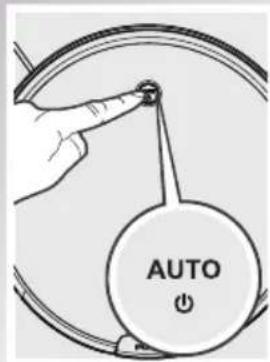
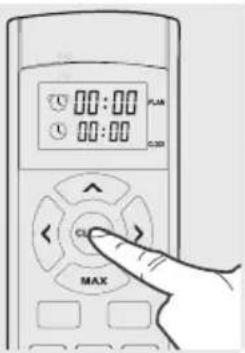
*If robot is paused for more than 45 seconds it goes to sleep to save battery power, the AUTO button on the robot does not flash and buttons on the remote control are disabled. To wake up robot, press the AUTO button on the robot or the CLEAN button on the remote control.
6 Power OFF
■ Pause robot, Move the side power switch to the OFF position.
* When robot is not cleaning, it is suggested to keep it powered ON and charging instead of powered OFF.
Cleaning Mode Selection
Robot has several cleaning modes to choose from effectively clean different floors. Cleaning modes are selected using the remote control or the AUTO mode button on the robot.
* Before slecting a cleaning mode, make sure the AUTO button the robot flashes Green. If not, press AUTO button on robot or CLEAN button on the remote control to wake up the robot.
AUTO Cleaning Mode
■ This is the most commonly used mode. In AUTO cleaning mode, robot cleans in a straight line and changes direction when it meets an obstacles.
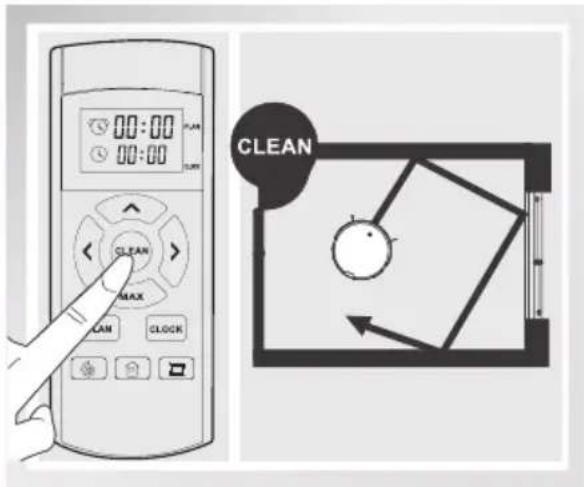
2 Spot Cleaning Mode (1 Minute)
This mode is applicable for an area of highly concentrated dirt or dust. In spot cleaning mode, robot focuses on a specific area to clean.
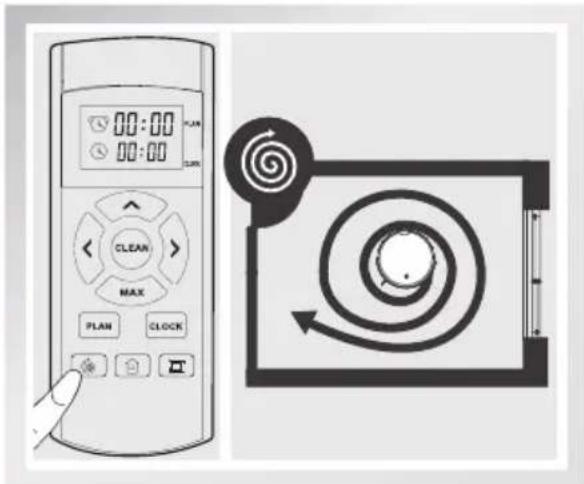
Edge Cleaning Mode
■ This mode is good for cleaning the edges and comers of a room. In edge cleaning mode, roobt cleans along a border (e.g.wall)
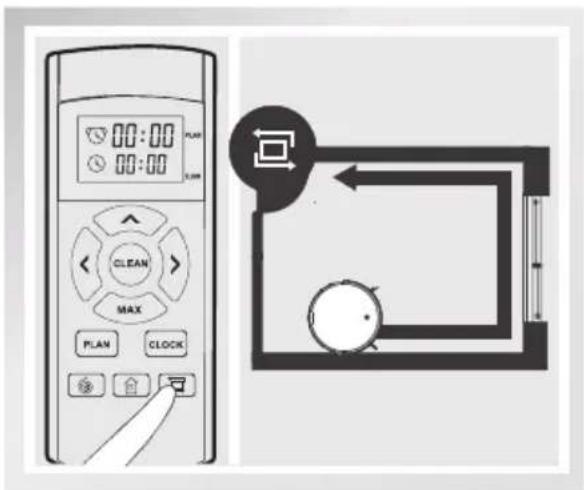
Single Room Mode
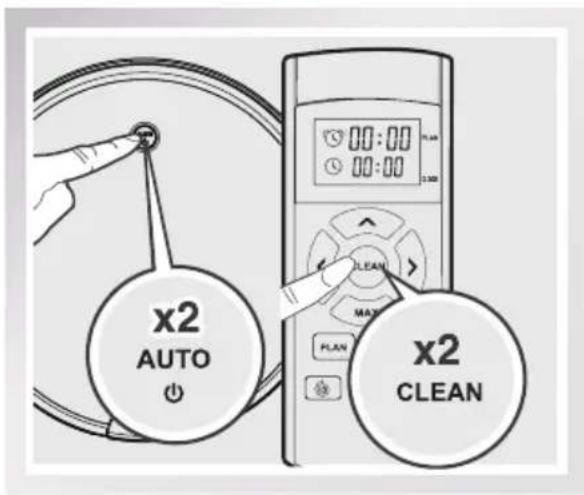
■ This mode is used if robot only needs to clean a single room. Press the AUTO button on the robot twice or the CLEAN button on the remote control twice to enter single room mode, robot stops and beeps when it completes cleaning.
* The room must be contained for Single Room Mode to function properly. Close doors to the room entrance and exit to contain the room.
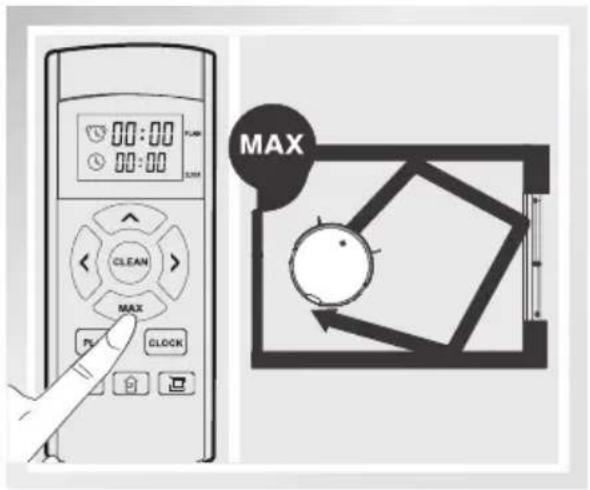
MAX Cleaning Mode
■ This mode is AUTO cleaning with increased suction power for deep cleaning.
Programming the Robot
This robot has a time scheduling function. It can be programmed to automatically clean once per day, at a specific time even if nobody is at home. The current time of day and the cleaning time are scheduled using the remote control.
* Before programming the robot, make sure the AUTO mode button flashes GREEN. If not, press the AUTO button on the robot or the CLEAN button on remote control to wake up the robot.
1 Set the Current Time of Day
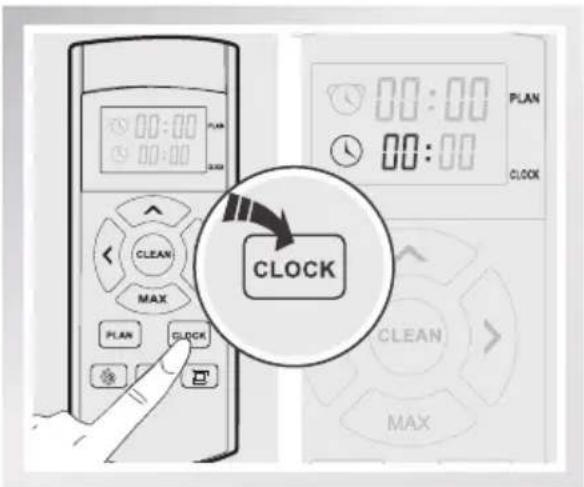
Press CLOCK button on the remote control. The hour in the second line on the screen flashes.
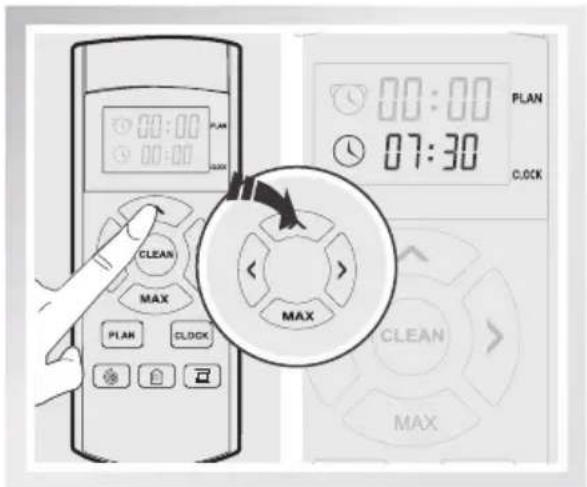
Press the up and down direction control buttons to adjust hour and minutes number.
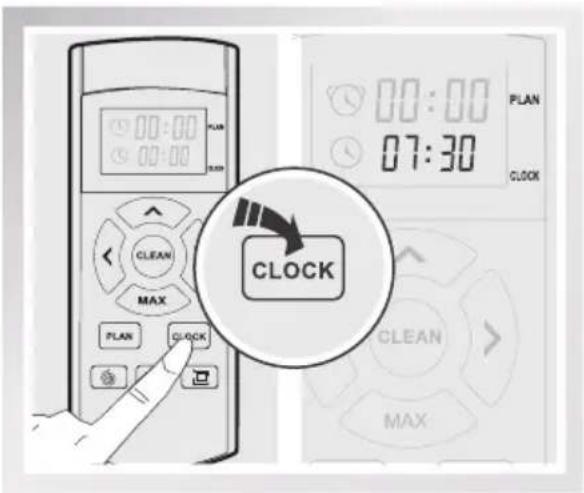
Press the CLOCK button on the remote control to confirm and save the current time of day.
2 Schedule the Cleaning Time
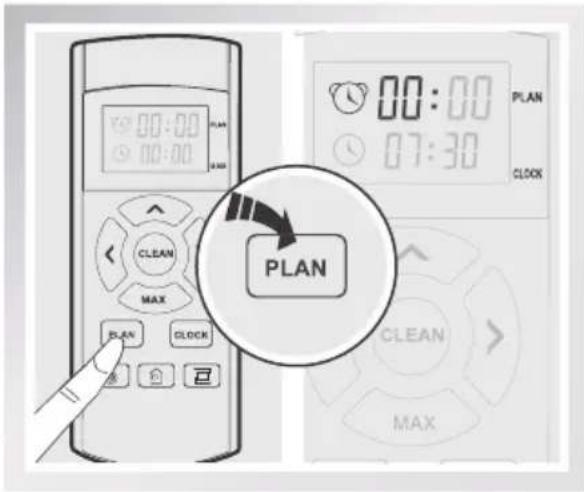
Press the PLAN button on the remote control to schedule automatic cleaning. The hour in the first line on the screen flashes.
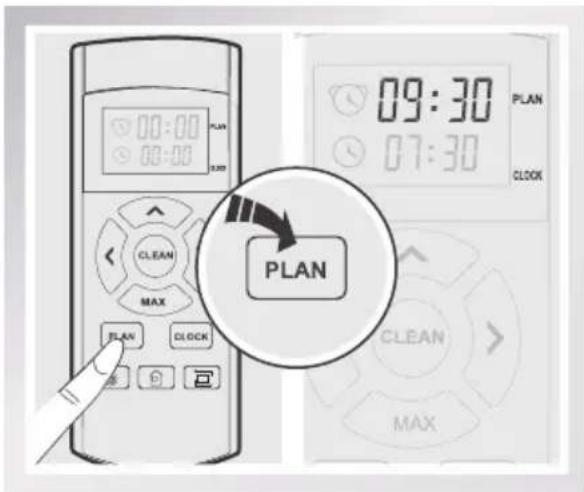
Press the PLAN button on the remote control to confirm and save the schedule.
3 Cancel Scheduled Cleaning Time
Adjust the time in the first line on the remote control screen to "00:00" and save. The scheduled cleaning time is cancelled.
* After replacing batteries in the remote control, reset the current time and scheduled cleaning time.
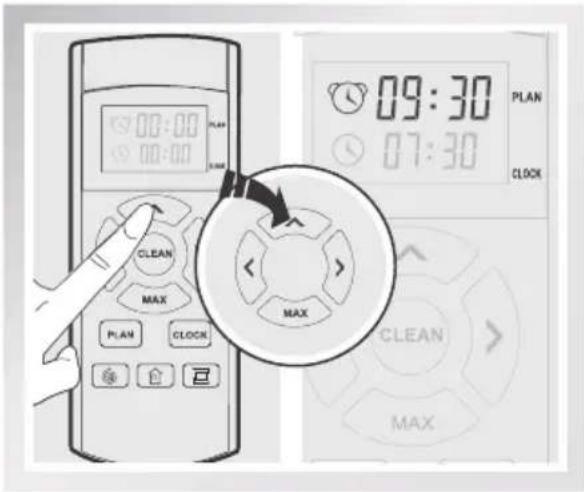
Press the up or down direction control buttons to adjust hour and minute number. Press the left and right direction control buttons to switch between hour and minute.
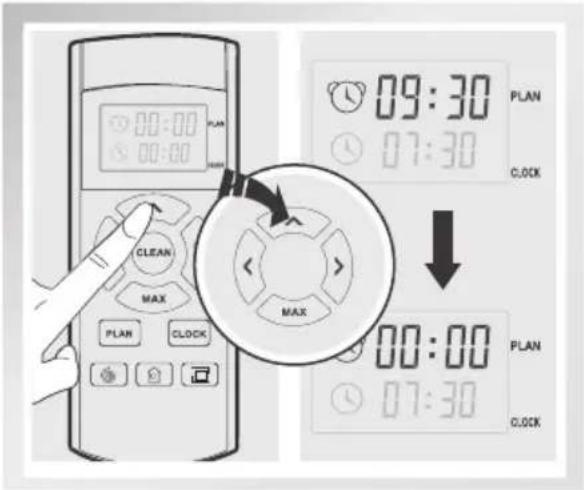
Install Water Tank Module
( Water tank is a optional part for this robot, so some of the model may not include this module.)
This product is equipped with water tank. After cleaning work is completed, the dust bin can be changed to water tank for mopping.
- Please don't use the water tank on carpet. If you have a carpet in your home, roll up the edge of the carpet to prevent the robot from climbing and soiling the carpet.
* Please add water in time, and remove the water tank when adding water.
* Please remove the water tank while charging.
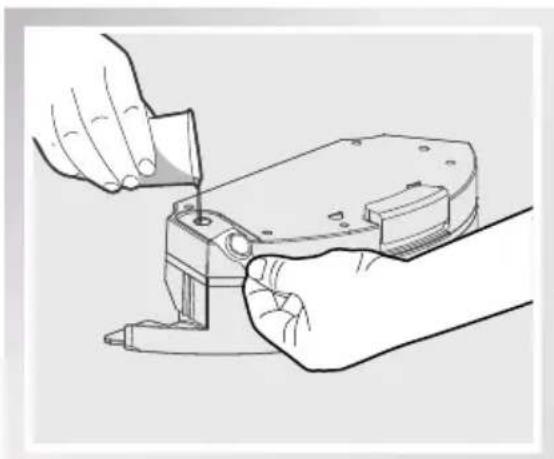
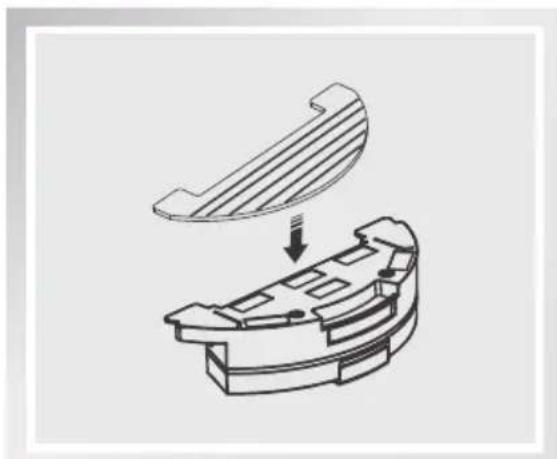
1 Add water Install the mop cloth
natural_image
Illustration of hands using a tool to adjust or install a mechanical component (no text or symbols visible)Open the injection rubber plug, slowly pour into clean water.
2
natural_image
Technical line drawing of a mechanical component with an arrow indicating a downward motion (no text or symbols present)Seal the lid and stick the mop cloth on the bottom of the water tank.
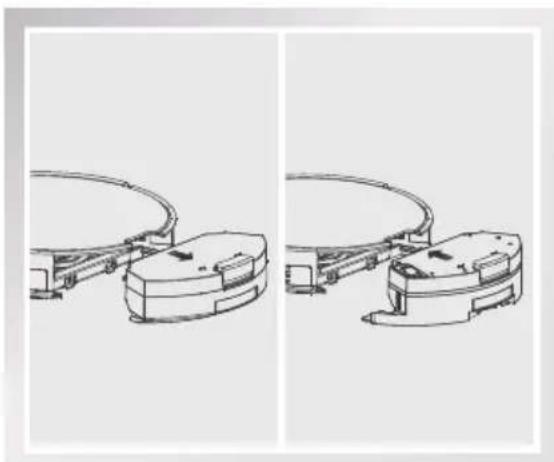
3 Install water tank
natural_image
Technical line drawing of two mechanical components with curved and flanged surfaces (no text or symbols)Take out the dust bin and install the water tank.
4 Mop function
Choose the cleaning mode based on demand, robot will start mopping.
Product Maintenance
Main Brush, Side Brushes and Cleaning Mop
Clean the main brush, side brushes and cleaning mop when they are dirty and replace if they are damaged.
* Push the two tabs on the main brush cover to remove the cover, then remove the main brush.
Dust Bin and Filter
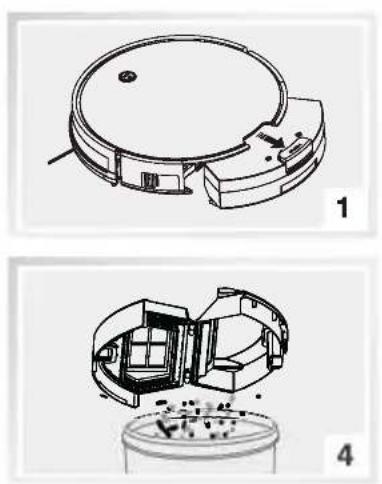
Clean and empty dust bin after each use, steps are as shown in below figures.
natural_image
Technical line drawings of a mechanical device showing cross-sectional and exploded views (no text or symbols)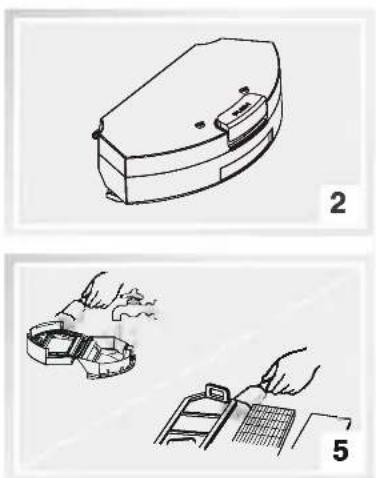
natural_image
Illustration of a robotic device with two views: top view shows a closed box, bottom view shows hands holding a tool and cleaning a surface (no text or symbols)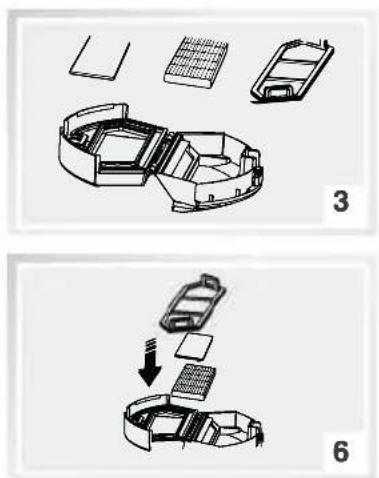
natural_image
Two-step diagram showing a car interior with internal compartments and a battery stack, labeled 3 and 6 (no text or symbols on the diagrams themselves)* After taking out dust bin, check whether there is foreign matter stuck in suck passage and clean it.
* Wash primary filter after 15-30 days' use. Install primary filters when it is dry.
* Do not wash High-performance filter. And replace it after use for 6 months at maximum.
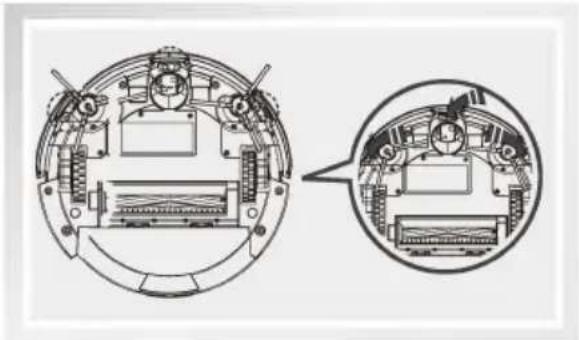
Cliff sensors and auto charging pins
Slightly clean the sensor window and auto charging pins with a soft dry cloth as shown in below figures.
natural_image
Technical diagram of a mechanical device showing cross-sectional and top views (no text or labels)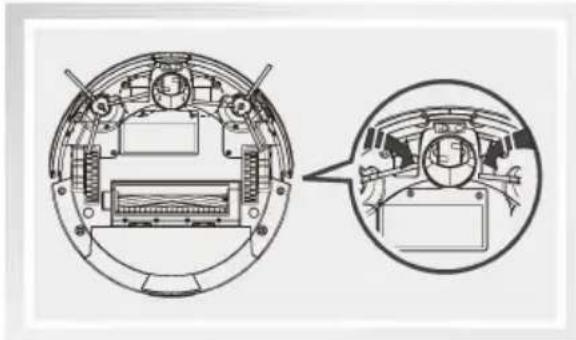
natural_image
Technical diagram of a mechanical assembly with cross-sectional views (no text or labels)* Charge connecting points on charging home base need to clean if dirty.
Error sheet
When the robot meets with some routine troubles, it will remind by beep sound.
| No. | Prompt Tone | Reason Method | |
| 01 | ● | Left/right wheel abnormal | Check left/right wheel |
| 02 | ●● | Cliff sensor/ front bumper abnormal | Check cliff sensor/ front bumper |
| 03 | ●●● | Robot gets stuck | Move robot to open place, and restart it |
| 04 | ●●●● | Main brush abnormal | Check main brush |
Note
If all above solutions don't work, please take below actions:
- Please restart robot by turning on the power switch.
- If problem is not solving, please contact our after-sales staff.
Product Specification
| Classification Item Detail | ||
| Mechanical Specifications | Diameter | 310mm |
| Height | 76mm | |
| Weight | 2.5kg | |
| Electrical Specifications | Voltage | 14.4V-14.8V |
| Battery specifications | Lithium ion 2600mAh | |
| Cleaning Specifications | Dust bin capacity | 0.45 L |
| Charging type | Auto Charging / Manual Charging | |
| Cleaning mode | Auto, Spot, Edge, Daily Schedule | |
| Charging time | About 300 min | |
| Cleaning time | 100-120min | |
| Main Body Button Type | Mechanical Button | |
Remark: The storage temperature of this product is -20 to 60 °C.
INFINITON CLEANERIO2O
Manual de usuario
natural_image
Circular diagram with a central circular symbol and a labeled 'PUSH' button, no text or numbers present.Contenido
natural_image
Simple circular diagram with a small dot at the top center and a small rectangular base at the bottom (no text or symbols)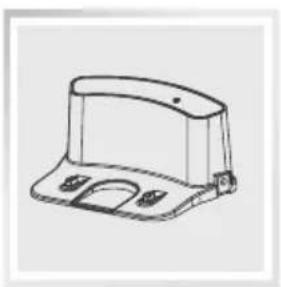
natural_image
Line drawing of a mechanical component with a curved top and side ports (no text or symbols)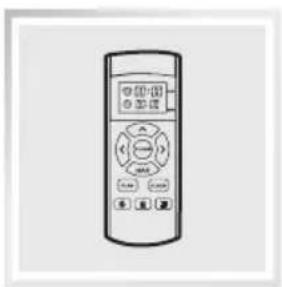
natural_image
Line drawing of a remote control device with buttons and display screen (no text or symbols)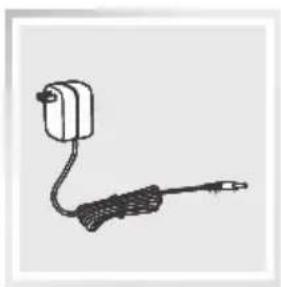
natural_image
Simple line drawing of a mechanical device with a curved cable and connector (no text or symbols)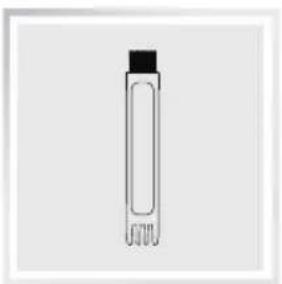
natural_image
Simple line drawing of a test tube with a black cap and white end cap (no text or symbols)
natural_image
Two identical mechanical components with three blades, no text or symbols visible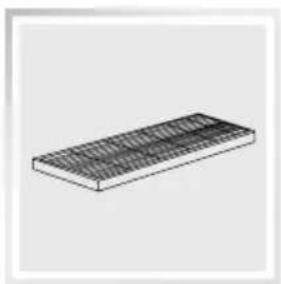
natural_image
Isometric view of a rectangular metal plate with grid pattern (no text or symbols)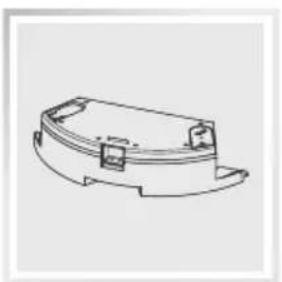
natural_image
Line drawing of a mechanical component or housing (no text or symbols)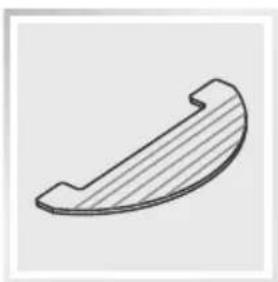
natural_image
Simple 3D geometric shape with hatched fill, no text or symbols presentAnatomía del robot
Cuerpo principal
natural_image
Diagram of a robotic vacuum cleaner with warning symbol and cross mark (no text or labels)natural_image
Line drawing of a sofa with a vacuum cleaner placed on the floor, no text or symbols presentnatural_image
Isometric line drawing of a staircase with railings and a circular object on top (no text or symbols)2 Encender el robot
natural_image
Simple line drawing of a circular device with a cable and connector, no text or symbols present.4 Start
natural_image
Line drawing of hands using a tool to adjust or install a mechanical component (no text or symbols present)natural_image
Technical line drawing of a mechanical component with an arrow indicating a downward motion (no text or symbols present)natural_image
Technical line drawing of a mechanical component with curved and flanged sections (no text or symbols)natural_image
Technical line drawing of a circular mechanical component with internal components and mounting holes (no text or symbols)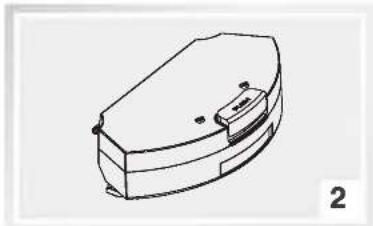
natural_image
Line drawing of a mechanical component with a curved top and side slots (no text or symbols)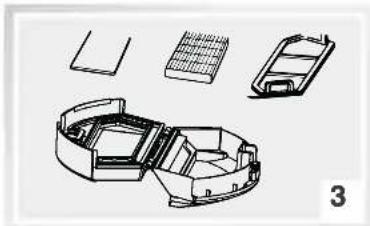
natural_image
Technical line drawing of a mechanical housing assembly with no visible text or symbols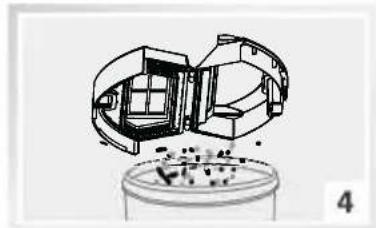
natural_image
Technical illustration of a mechanical assembly with internal components and a base plate (no text or symbols)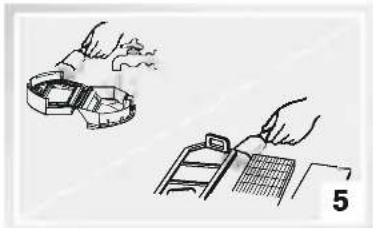
natural_image
Illustration showing a hand using a tool to clean or inspect a device, with no visible text or symbols.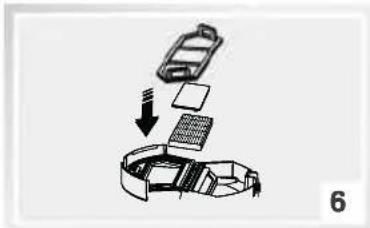
natural_image
Diagram showing a car being lifted by a battery into a battery pack (no text or symbols)natural_image
Technical diagram of a mechanical assembly with cross-sectional and top views (no text or labels)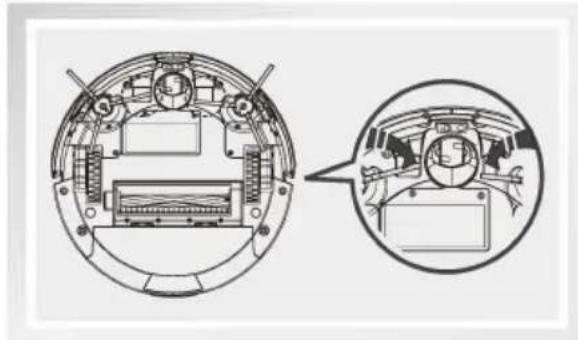
natural_image
Technical diagram of a mechanical component with cross-sectional view and close-up detail (no text or labels)natural_image
Circular diagram with two labeled components: a circular icon with 'T' and a 'PUSH' button, no readable text or symbols beyond the label.Main body and accessories
| NO. | Description | Q'ty |
| 1 | &RUSR□SULQFLSD0 | 1 |
| 2 | %DVH□GH□FDUJD | 1 |
| 3 | &RQWURCH□UHP RWR□□EDVHULD□QmR□LQFOXtGD□ | 1 |
| 4 | GDSWDGRU | 1 |
| 5 | ) HUUDP HQXDVGHG□CLP SH] D | 1 |
| 6 | O DQXD□GH□XVXi ULR | 1 |
| 7 | ( VFRYDV□CDWHUDLV□H[ WUDV□□SDU□ | 1 |
| 8 | ) LONUR□+( 3 | 1 |
| 9 | 7DQTXHG□GH□i JXD | 1 |
| 10 | Mopa extra | 1 |
Por favor, remova os obstáculos hostis na área de limpeza.
natural_image
Diagram of a robotic vacuum cleaner with warning symbol and cross mark (no text or labels)natural_image
Line drawing of a sofa with a pillow placed on the back and a robotic vacuum cleaner nearby (no text or symbols)natural_image
Isometric line drawing of a staircase with railings and a circular object on top (no text or symbols)2 Ligue o robô
natural_image
Simple line drawing of a circular device with a cable and a small rectangular component attached (no text or symbols)4 Start
natural_image
Illustration of hands using a tool to adjust or install a mechanical component (no text or symbols visible)natural_image
Technical line drawing of a mechanical component with curved and flat surfaces (no text or symbols)natural_image
Technical line drawing of a mechanical component with an arrow indicating downward motion (no text or symbols)natural_image
Technical line drawings of a mechanical device showing cross-sectional and exploded views (no text or symbols)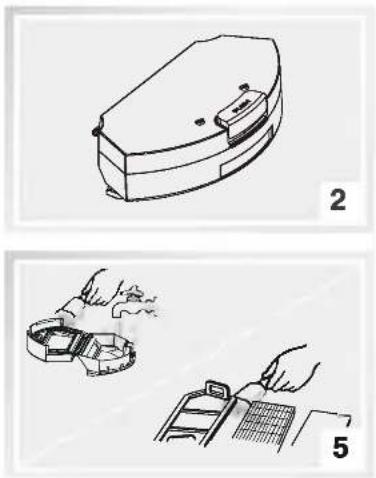
natural_image
Illustration of three different cleaning or repair steps: a box-shaped device, a hand holding a tool, and a tool on a surface (no text or symbols)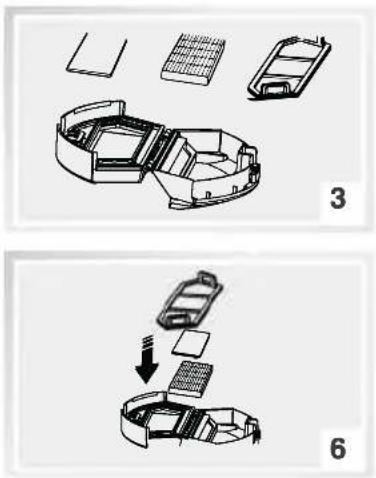
natural_image
Two-step diagram showing a device assembly process: top panel shows internal components, bottom panel shows a component with a downward arrow indicating assembly (no text or symbols present)natural_image
Technical diagram of a mechanical assembly with cross-sectional and top views (no text or labels)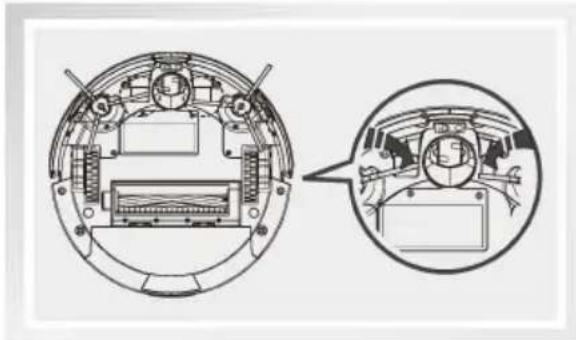
natural_image
Technical diagram of a mechanical assembly showing internal components and a close-up view (no text or labels)It has been determined that this product complies with the LOW VOLTAGE directive (2006/95/ec), Electromagnetic Compatibility directive (2004/108/EC), and RoHS directive.
For more information related to declarations and certificates of conformity, please contact us through the mail info@infiniton.es and in the web www.infiniton.es
TECHNICAL SERVICE
If you have any questions regarding this device, please contact us: info@infiniton.es and www.infiniton.es
You can also contact our official technical service - MEGAEXIT, S.L tel: (+34) 958 087 169
Repairs e-mail: rma@megaexit.com
www.megaexit.com
INFINITON
- Contents
- READ ALL INSTRUCITONS BEFORE USING THIS APPLIANCE. SAVE THESE INSTRUCTIONS.
- Robot anatomy
- Dust bin
- Water tank
- Charging Base
- Remote Control
- CLEAN button status
- Precautions
- Product Operation
- Quick Start
- Place the charging base and connect the power supply
- Turn on the robot
- Start charging
- Start
- Pause
- Power OFF
- Cleaning Mode Selection
- AUTO Cleaning Mode
- Spot Cleaning Mode (1 Minute)
- Edge Cleaning Mode
- Single Room Mode
- MAX Cleaning Mode
- Programming the Robot
- Set the Current Time of Day
- Schedule the Cleaning Time
- Cancel Scheduled Cleaning Time
- Install Water Tank Module
- Add water Install the mop cloth
- 2
- Install water tank
- Mop function
- Product Maintenance
- Main Brush, Side Brushes and Cleaning Mop
- Dust Bin and Filter
- Cliff sensors and auto charging pins
- Error sheet
- Note
- INFINITON CLEANERIO2O
- Manual de usuario
- Contenido
- Anatomía del robot
- Encender el robot
- Ligue o robô
- TECHNICAL SERVICE
- INFINITON
Brand : Infiniton
Model : Cleaner 1020
Category : Robot vacuum