
Reserve VRCPAA-106F - Receiver Soundstream - Free user manual and instructions
Find the device manual for free Reserve VRCPAA-106F Soundstream in PDF.


| Type | 2-DIN Car Multimedia Receiver |
| Dimensions (W x D x H) | 253 mm x 210 mm x 146 mm |
| Power Supply | DC 10-16 V, Negative Ground |
| Current Drain | 15 A (Max) |
| Output Power (4Ω, Max) | 4 x 45 W |
| Output Power (4Ω, RMS) | 4 x 28 W |
| Output Power (2Ω, Max) | 4 x 75 W |
| Output Power (2Ω, RMS) | 4 x 48 W |
| Display Type | 10.6-inch TFT LCD |
| Display Resolution | 1024 x 600 pixels |
| FM Frequency Range (USA) | 87.5 – 107.9 MHz |
| AM Frequency Range (USA) | 530 – 1710 kHz |
| Disc Playback | DVD, CD, supports multiple formats |
| Bluetooth | Built-in (HFP, A2DP, AVRCP) |
| Smartphone Integration | Apple CarPlay, Android Auto |
| Satellite Radio | SiriusXM Ready (tuner required, sold separately) |
| Audio Outputs | Front, Rear, Subwoofer (RCA) |
| Video Inputs | Front camera, Rear camera, Auxiliary AV |
| Equalizer | 10-band, plus presets |
| Amplifier Type | MOSFET Quad Bridge |
| Warranty | 90-day limited; 1-year if installed by authorized Soundstream retailer |
Frequently Asked Questions - Reserve VRCPAA-106F Soundstream
User questions about Reserve VRCPAA-106F Soundstream
0 question about this device. Answer the ones you know or ask your own.
Ask a new question about this device
Download the instructions for your Receiver in PDF format for free! Find your manual Reserve VRCPAA-106F - Soundstream and take your electronic device back in hand. On this page are published all the documents necessary for the use of your device. Reserve VRCPAA-106F by Soundstream.
USER MANUAL Reserve VRCPAA-106F Soundstream
Support Android Auto ™
Support Bluetooth
SiriusXM READY

DVD

Bluetooth



Content
- Appearance____ 3
- Accessories and Installation 3
- Wiring Connection 5
- Front panel Description____ 7
- Remote Control 8
- Main Menu ____ 9
- Settings ____ 9
- Apple CarPlay & Android auto 12
- Radio ____ 13
- USB 14
- Disc 15
- BT Music 16
- BT Phone ____ 17
- Siriusxm 19
- Specification____ 24
- AV IN ____ 25
- Camera____ 25
- Trouble Shooting 26
FCC Notes 27
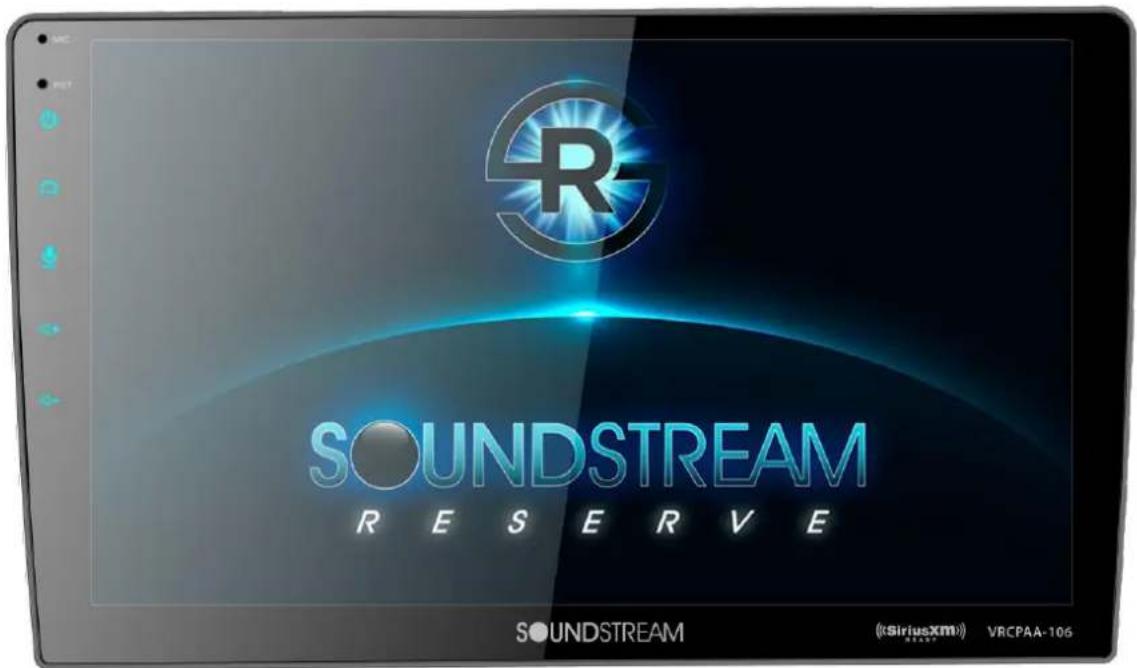
Appearance
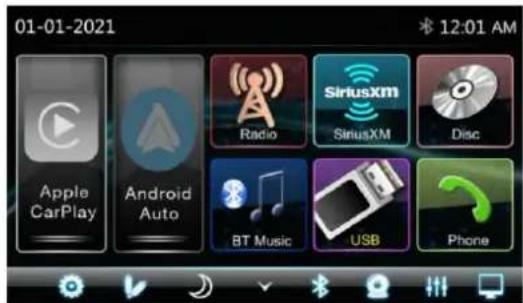
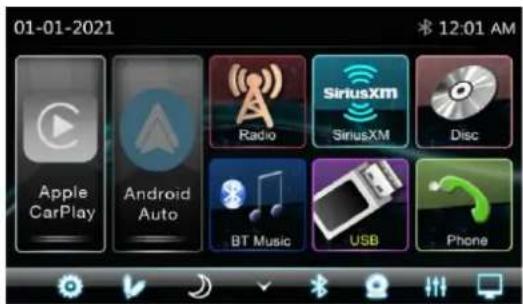
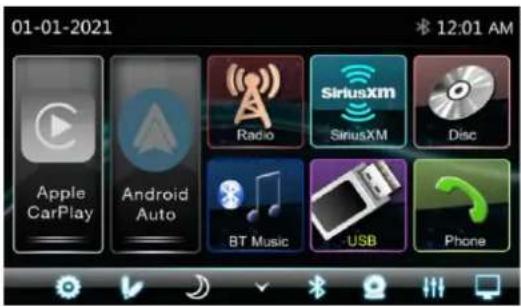
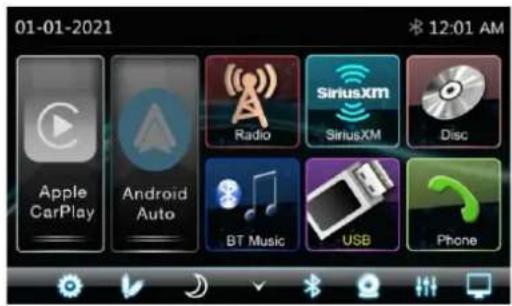
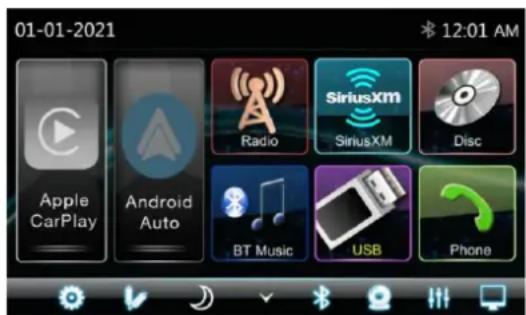
Main Menu
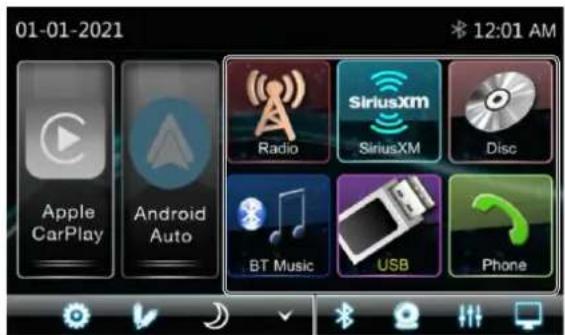
Slide Left to display 2nd page
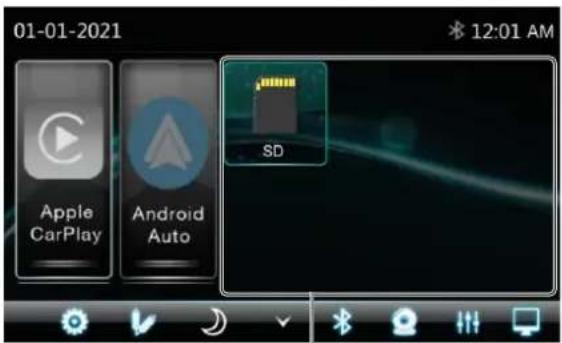
Slide right to display 1st page
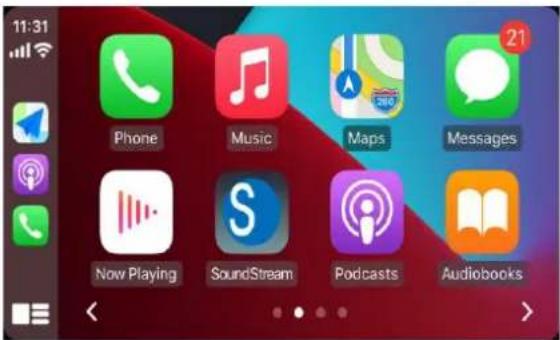
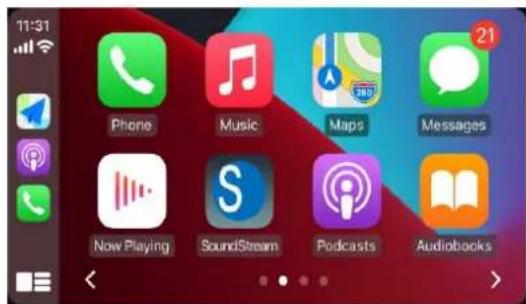
Carplay Menu
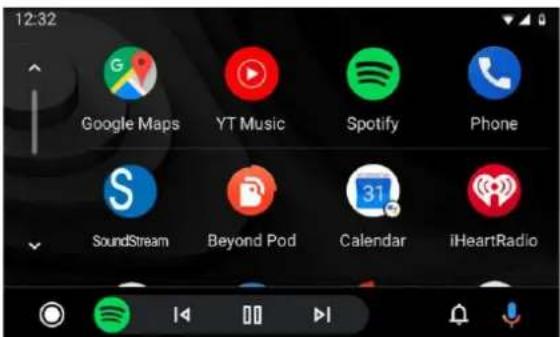
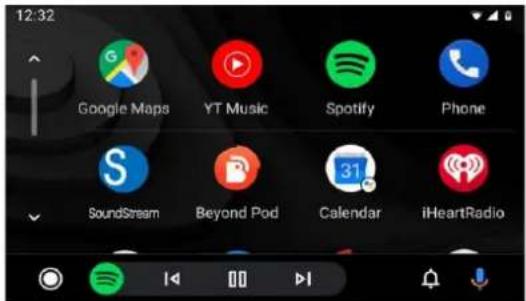
Android Auto Menu
Accessories & Installation
Package contains the following accessories for installation and operation of the unit.
| (1) Mounting bracket | 2 | 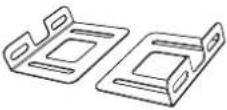 |
| (2) Screw 8 | 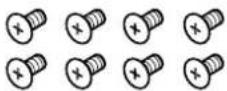 | |
| (3) Remote | 1 | 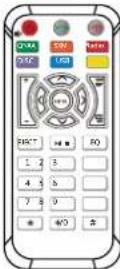 |
| (4) User Manual | 1 |  |
| (5) Warranty Card | 1 |  |
| (6) ISO Cable | 2 | 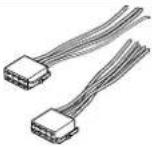 |
| (7) Harness cable | 1 | 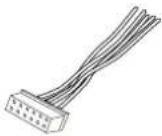 |
| (8) USB Cable | 1 | 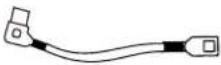 |
2. Accessories & Installation
Installation
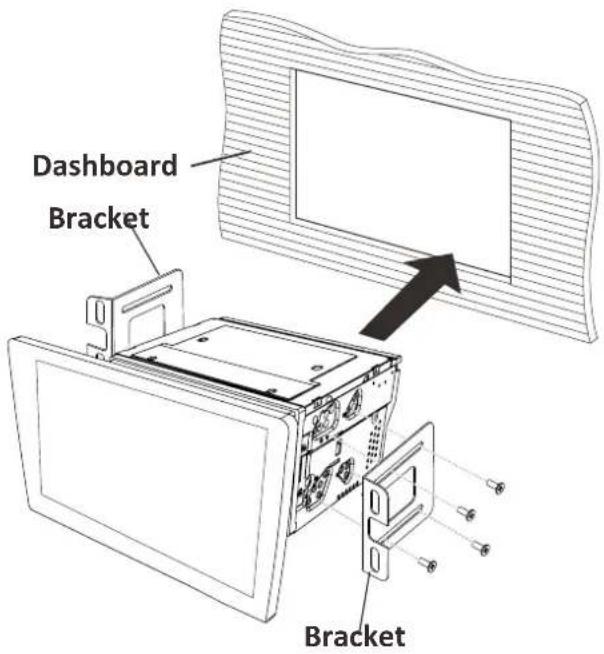
Installation
- Put the 2 brackets to the left and right side of the headunit.
- Use screws to fix the brackets to the unit.
- Install the body chassis into the dashboard via the 2 brackets.
Note:
- Make sure the ignition is turned off, and disconnect the cable from the vehicle battery's negative (-) terminal.
You never want electricity running when you install this 2-DIN car receiver. - Before installation, disconnect the wire harness and the antenna.
-
Attach the brackets on the both sides of the car receiver with screws as shown as the installation drawing. Please buy from your dealer according to the drilling of holes size.
-
Consult with your nearest dealer if installation requires the drilling of holes or other modification of the vehicle.
- Install the car receiver in the dashboard.
- Connect the wire harness & antenna to the car receiver being carefully not to pinch any wires or cables.
- Install the plastic outer trim ring onto the car receiver.
- Reconnect the battery and run through all of the options on this car recei ar you intend to install it in. Please choose the correct installation method according to the actual situation of your car. Always contact the car dealer or manufacturer if you have any questions.
Faceplate Adjustable Position
1.Vertical
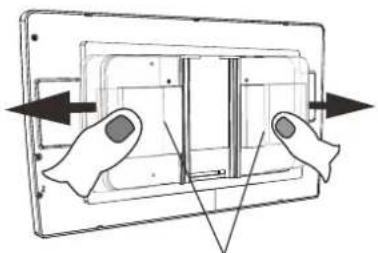
natural_image
Diagram of a device with two fingers interacting, showing internal components and directional arrows (no text or symbols)1). Release the Panel Lock System
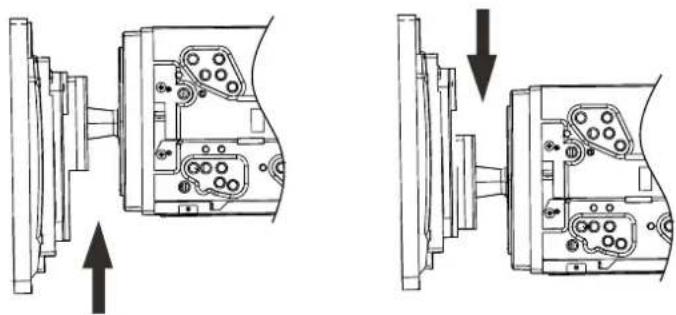
natural_image
Technical line drawing showing mechanical assembly with arrows indicating assembly direction (no text or symbols)2). Adjust the Panel Position in Vertical Direction Lock System
3. Wiring
- Tilt
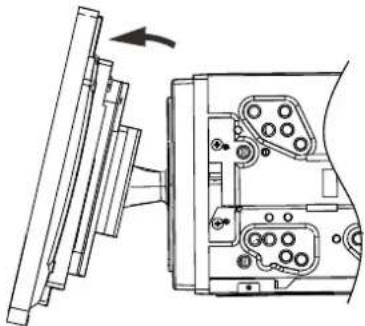
natural_image
Technical line drawing of a mechanical assembly with no visible text or symbols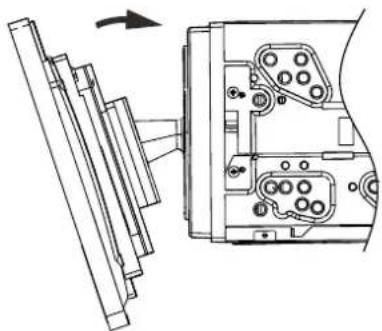
natural_image
Technical line drawing of a mechanical assembly with exploded view and internal components (no text or symbols)- Swivel
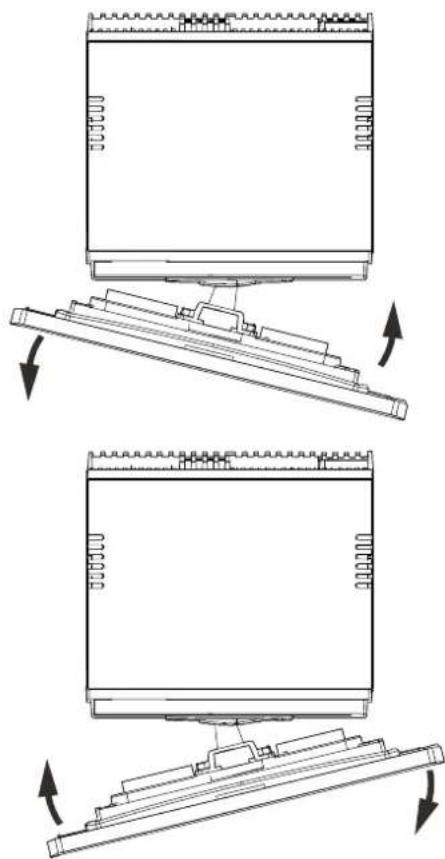
natural_image
Technical line drawing showing a mechanical assembly with two views of a device (no text or symbols present)Parking wire
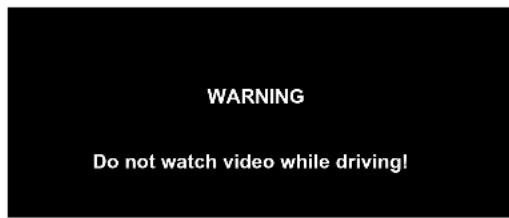
Note: The parking wire is connected with brake signal; for safety, the programs can be seen on the monitor after braking the car..
Note: To watch video the parking wire should be connected to brake signal.
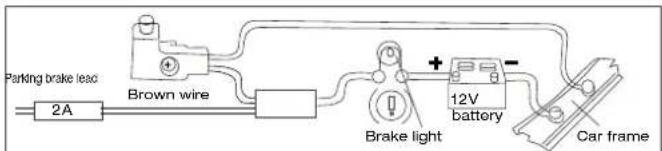
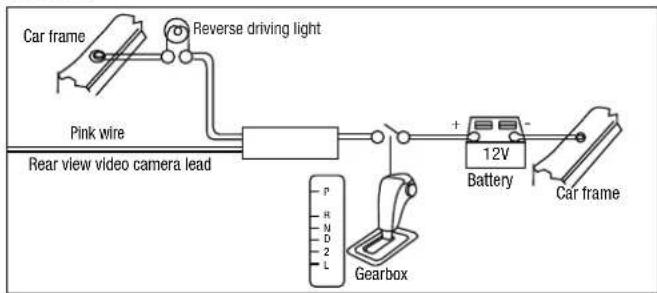
Connecting the reversing line to taillight on the car
flowchart
graph TD
    A["Car frame"] --> B["Reverse driving light"]
    B --> C["Pink wire"]
    C --> D["Rear view video camera lead"]
    D --> E["Gearbox"]
    E --> F["Battery"]
    F --> G["12V"]
    G --> H["Car frame"]
    style A fill:#f9f,stroke:#333
    style H fill:#f9f,stroke:#333
After connecting, when you start up the reverse gear, the unit will receive the picture from car rear view camera.
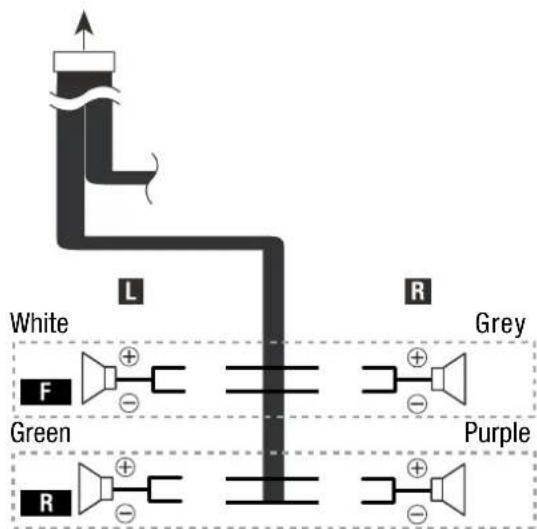
Speaker Connection
Connect the speakers according the following diagram, incorrect connections will damage the unit or your loudspeakers.
flowchart
graph TD
    A["White"] --> B["L"]
    B --> C["R"]
    C --> D["Grey"]
    D --> E["Green"]
    E --> F["Purple"]
    F --> G["R"]
    G --> H["Blue Light"]
    style A fill:#f9f,stroke:#333
    style B fill:#ccf,stroke:#333
    style C fill:#cfc,stroke:#333
    style D fill:#fcc,stroke:#333
    style E fill:#cff,stroke:#333
    style F fill:#ffc,stroke:#333
    style G fill:#cfc,stroke:#333
    style H fill:#fcc,stroke:#333
3. Wiring
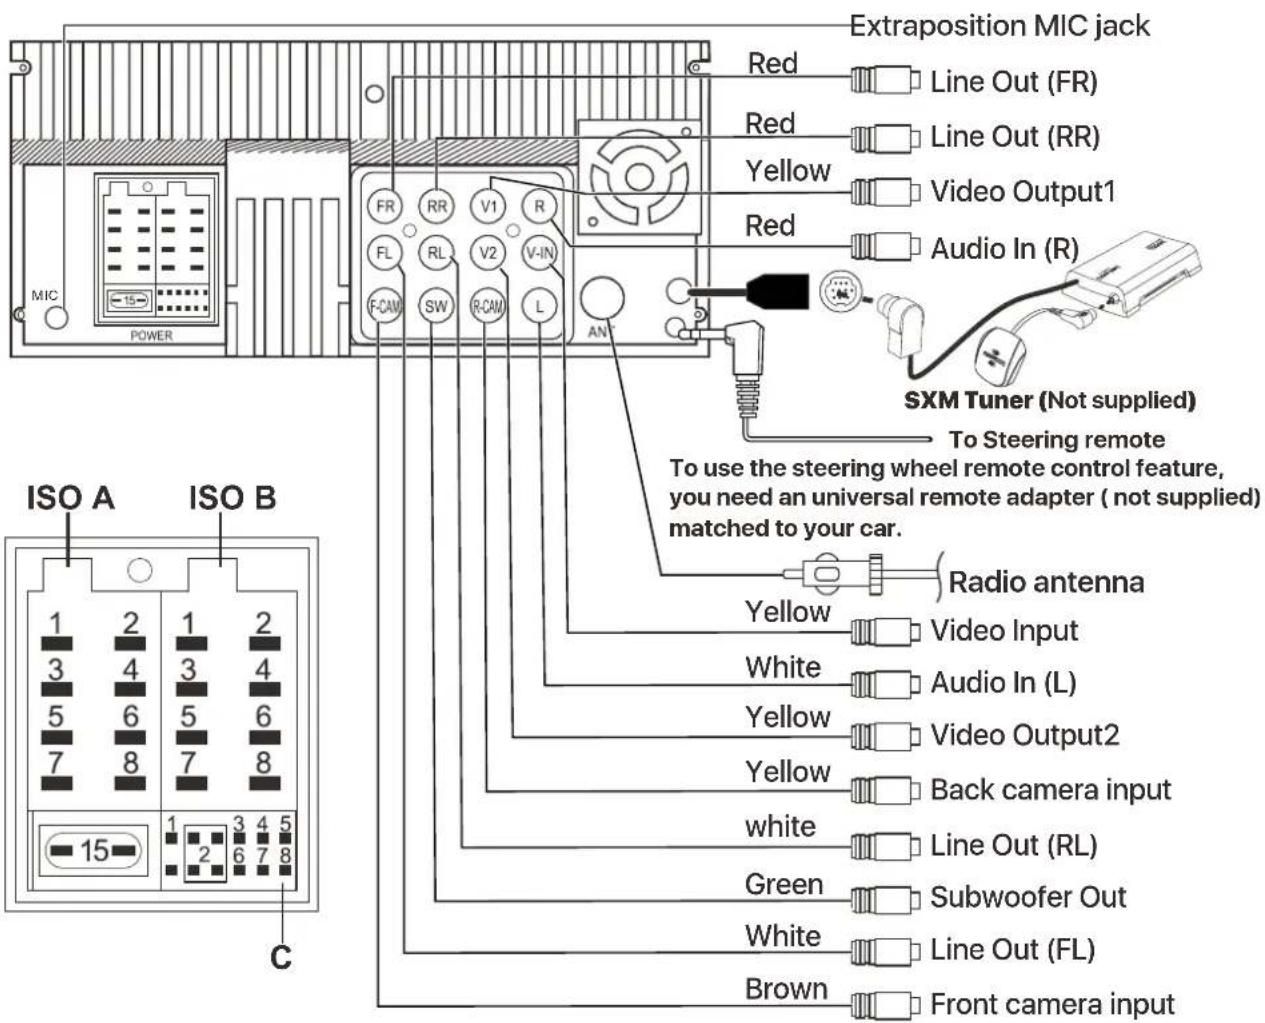
| Portion | Colour | Connection | |
| ISO A | A3 | Yellow | Battery B+ |
| A5 | Orange | ILL B+ | |
| A6 | Blue | Antenna | |
| A7 | Black | Ground | |
| A8 | Red | ACC B+ | |
| ISO B | B2 | Purple | Rear right speaker(+) |
| B1 | Purple / Black | Rear right speaker(-) | |
| B4 | Grey | Front right speaker(+) | |
| B3 | Grey / Black | Front right speaker(-) | |
| B6 | White | Front left speaker(+) | |
| B5 | White / Black | Front left speaker(-) | |
| B8 | Green | Rear left speaker(+) | |
| B7 | Green / Black | Rear left speaker(-) | |
| 8 Pin connector | C1 | Blue / White | Amplifier control(B+) |
| C3 | Brown | Brake detect (Ground) | |
| C4 | Pink | Back car control(Back camera B+) | |
| C5 | Pink / Black | Front camera(B+) | |
| C6 | Black | Ground | |
| C7 | |||
| C8 | |||
4. Front panel Description
Front panel
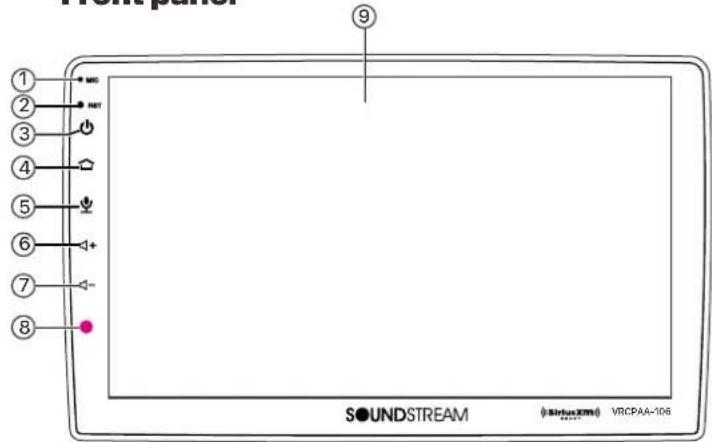
Mic
Build in Microphone.
Reset button
② Reset button Press to default factory settings.
Power On/Off button
③ Short press to switch On the source unit. Long press to switch Off the source unit (When unit is working).
Mute button
Short press to mute the sound, press again to un-mute (When unit is working).
HOME button
④ Press to back to Main menu.
Siri button
⑤ When Apple CarPlay or Android Auto available, press Siri button to start the voice control function.
VOL+
⑥ Volume increase
⑦ VOL-
⑦ Volume decrease
IR Sensor of Remote
⑧ IR remote control signal receiving window.
⑨ 10.6 inch TFT LCD
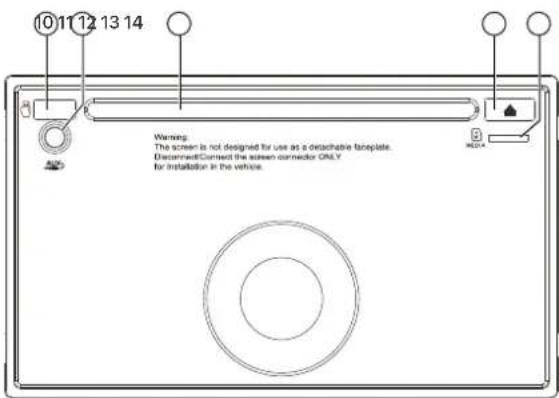
⑩ USB port
Connect USB for digital playback. Connect your iPhone for Apple CarPlay.
Connect your Android Phone for Android Auto.
⑪ AUX in jack
Insert an extremal device to this port in order to have sound output of that external device through the unit.
⑫ Slot-in
Disc slot-in.
⑬ Eject Button
Press to eject the disc.
⑭ Micro SD slot
Insert micro SD for playback.
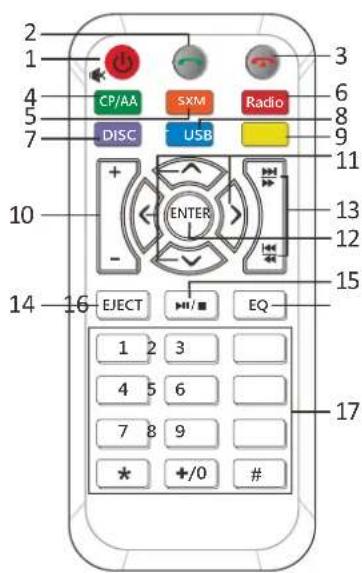
1.
Press and hold to power it on or off. Short press this button mute the volume output when unit turn on. Long press is Power OFF function when unit turn on.
2.
[Bluetooth]: Press it to make a call after inputted a phone number or answer an incoming call.
3.
[Bluetooth]: Press it to reject a coming call or hangup while calling
- CP/AA
Press it to switch to CarPlay or Android Auto mode; Head Unit will show string "invalid operation" when CP/AA is not plugged in Head Unit.
- SXM
Press it to switch to SXM mode.
- Radio
Press it to switch to RADIO mode.
- DISC
Press it to switch to DVD mode.
8. BT
Press it to switch to Bluetooth mode.
9. USB
Press it to switch to USB mode.
-
Press it to increase or decrease the volume level. VOL+/-
-
It is UP /Down/Left/Right Arrow, use this button to select the menu item, the title track or to show next frame.
/< [Radio] Press to seek upward/downward.
-
ENTER Press it to confirm selection.
[Radio] Press to select next/previous preset radio station for broadcasting.
-
[DVD/USB/SD]: short press it to skip to the next track or previous functions. Long press to activate fast forward or fast review in a track. [Bluetooth Music]: short press it to skip to the next track or previous functions.
-
Press it to eject the disc. EJECT
-
[DVD/USB/SD]: short press it to switch play or pause.
-
Press it to Equalizer functions. EQ
17. 0-9 [Radio ]: Select 1-6 desired preset station. *
[DVD/SUB/SD ]: Input 0-9 for selecting track number.
[BT Phone ]: Input 0-9/*/# for desired phone number.
Note: 1. SXM just for include SiriusXM function models. 2. * # these functions for Bluetooth.
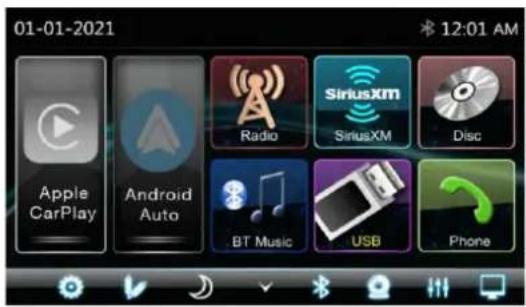
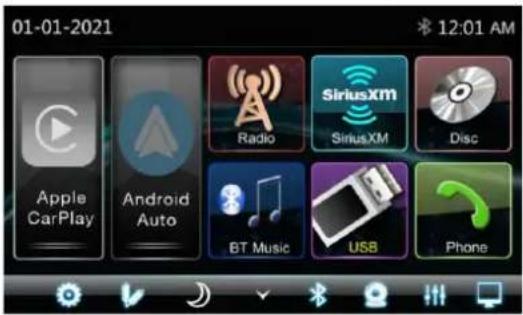
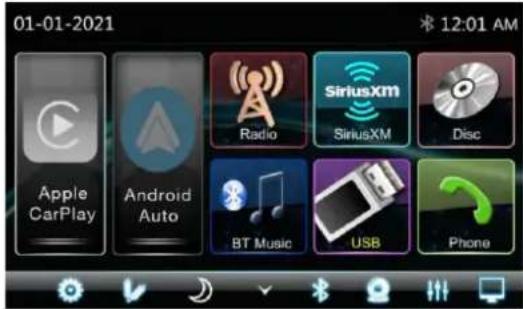
VRCPAA-106 is a 2-DIN car audio with following functions:
Apple CarPlay, Google Android Auto, Radio, SXM ready, Disc, Bluetooth, USB, SD. The Mode icon in gray means the corresponding function is not ready or proper device have not been connected. Touch the corresponding Mode icon to enter playing mode.
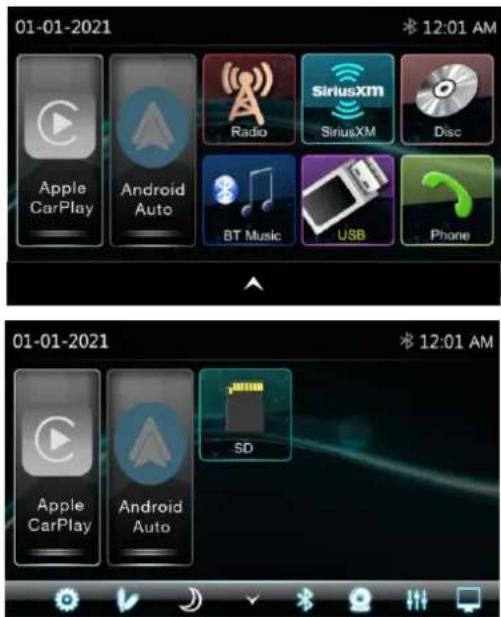
Hidden soft button bar
A hidden pop up soft button bar is located at the bottom. Touch the icon to shown the soft button bar. Touch the to hidden.

Hidden the pop up soft button bar.

Pop up the soft button bar.

Setup, to enter the Settings Menu.

AUX IN, to enter the AUX and A/V IN interface

Dimming, to change Daylight or Night (If lighting detect is OFF in Display Setting)

Bluetooth pairing.

Front Camera, to enter the front camera.

EQ, to enter the Equalizer setting mode.

Turn off TFT display. TFT enter black mode touch any zone return to TFT on.
Touch the 📄 icon to enter the Setup menu. The Setup menu is included System Settings, Display Settings, Audio & EQ Settings, Disc & DVD Settings, Bluetooth Settings and Rear Camera Settings
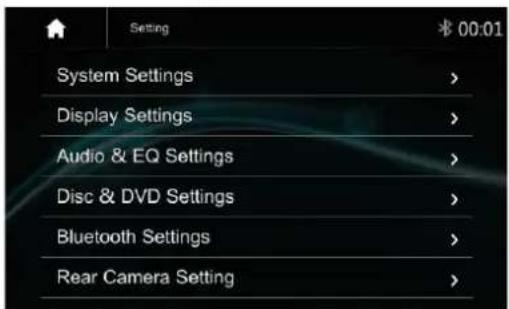
System Settings
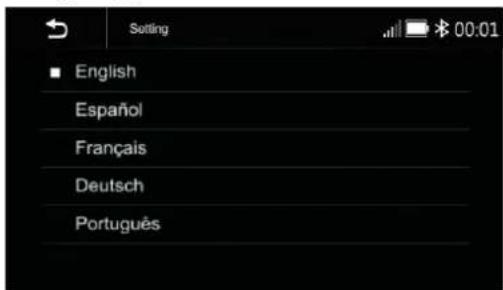
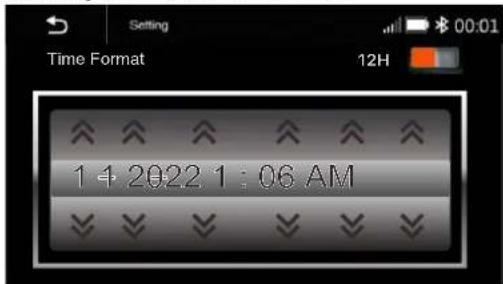
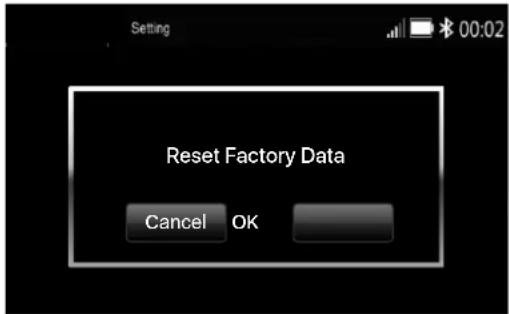
The System Settings allow the user to set up the Language, Date & Time, Key Beep, SWC, Factory Reset and About
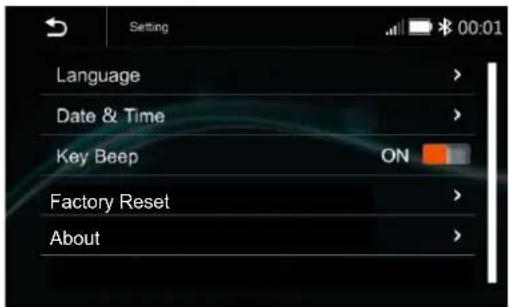
Language
Date & Time:
To setting Time display format (12H or 24H), setting the date and time
Key Beep : On/Off
To set the touch button beep tone On or Off.
Factory Reset
To reset the default factory setting.
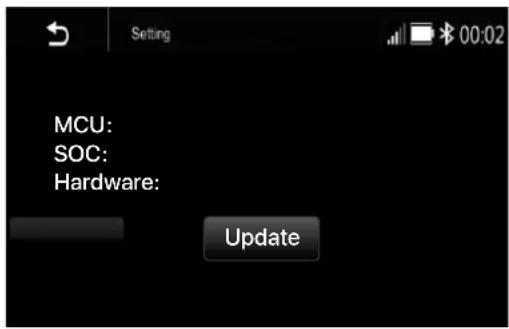
About
To display the Unit Hardware and Firmware version.
Display Settings :
Below is the Display setting menu, user can select Lighting Detect, Daylight Dimming Level, Night Dimming Level, Illumination and Wallpaper.
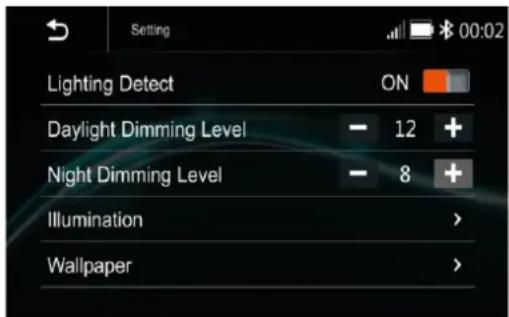
Lighting Detect: On/Off
Daylight Dimming Level: 8 – 15
Night Dimming Level: 0 – 8
Illumination
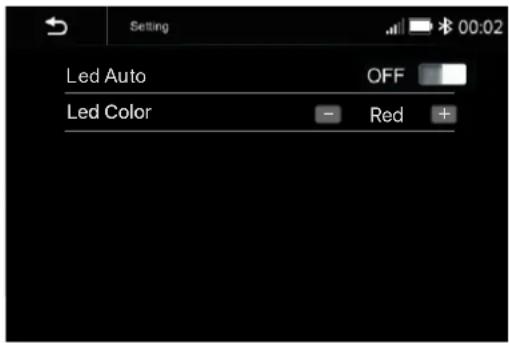
Led Auto: On/Off.
ON: The Led color will change automatically.
OFF: You press the button to select desired color

or

Color: White / Red / Yellow / Blue / Green / Purple / Light Green
Wallpaper
User can select the preset wallpaper or select the picture in USB driver as the wallpaper.
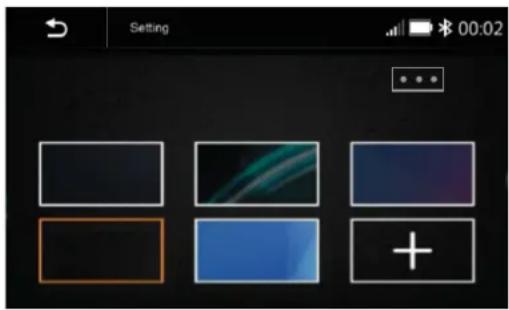
Touch the corresponding picture to select the prefer background.
Touch " + ", the head unit will search the USB photo file for wallpaper.
Select a picture and touch OK to add the wallpaper.

Touch to select other picture for wallpaper.
Audio & EQ Settings:
Below shown is the Audio Setting Menu.
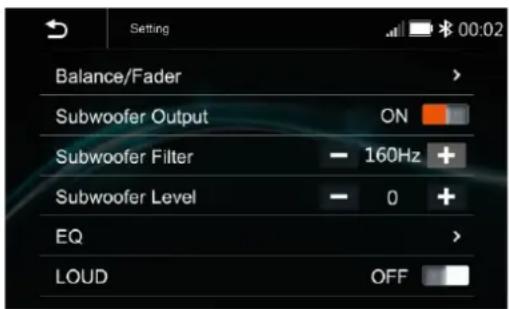
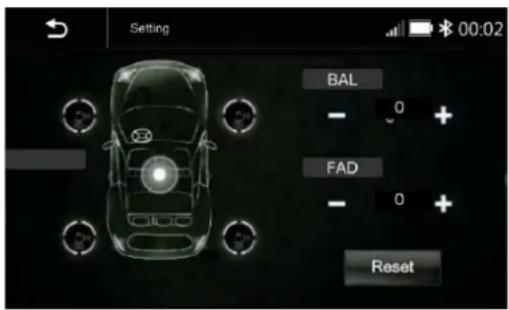
Balance/Fader:
Touch the + or - of Balance/Fade to tune for the driver and passenger preference.
The value of Balance (Left 12 – Right 12) and Fade (Front 12 – Rear 12)
Touch Reset to set both Balance and Fade to zero.
Subwoofer Output: On/Off
Subwoofer Filter: 50Hz/80Hz/
120Hz/ 160Hz
Subwoofer Level: -10 - +10
10-Band Equalizer :
10 band of EQ tuning, slide the EQ bar to tune each band frequency level according to user preference.
Touch Reset to set all Band to 0.
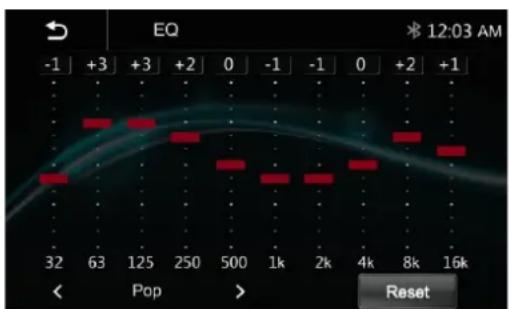
Or user can touch "<" or "> " at the bottom to select the following preset EQ:
off/ Soft Rock/ Pop/ Electric/ Jazz/ EQ Custom.
LOUD: On/Off
Disc & DVD Settings :
Touch the Disc/DVD Settings from the menu to enter the Disc/DVD setting interface.
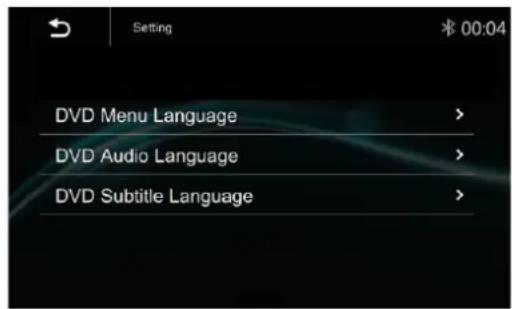
Touch to select the desired language.
Bluetooth Settings :
Touch the Bluetooth Settings from the setting menu will be shown below.
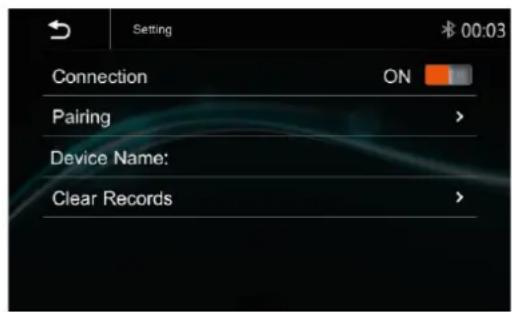
Connection: On/Off (Select Bluetooth connection on or off)
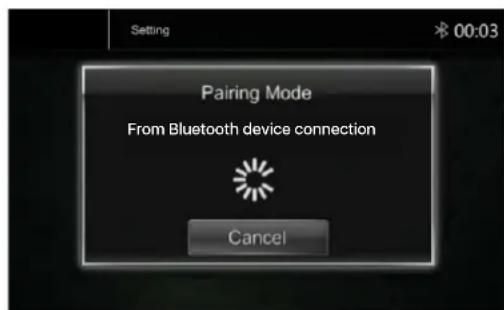
Pairing : (To start the pairing)
Device Name: shown the connected phone or device
Clear Records: (To clear the device list records)
Rear Camera Setting:
Touch Rear View Camera in the Setting Menu to enter rear camera setting interface as follow:
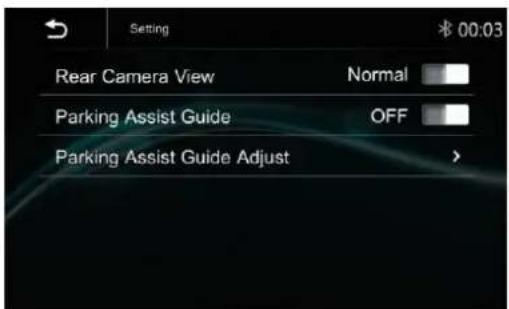
Rear Camera View: Normal/Reverse Parking Assist Guide: On/Off Parking Assist Guide Adjustment
Touch ">"to enter Parking Assist Guide Adjustment interface to show the below screen:
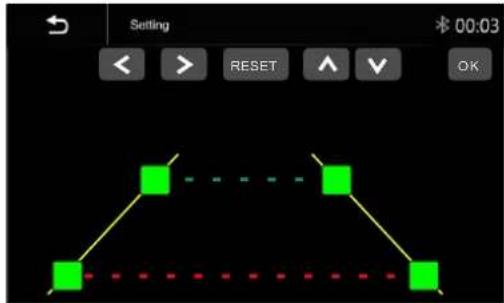
Select the adjust position and Touch < / > / ∧ / ∨ to adjust.
Touch OK to confirm. Touch Reset to resume the default Parking Assist Line.
8.1 Apple Carplay
Plug the iPhone (iPhone 5 or latter models, and IOS 7.1 or above) through the lightening cable to the USB port of the source unit. The iPhone will be shown the "CarPlay". The source unit will enter the CarPlay interface, the APP that support the CarPlay feature will be displayed on the source unit as shown below. Touch the corresponding
APP can operate, touch button to go back the CarPlay interface.
Siri
In Carplay mode, user can talk to SIRI to
control the CarPlay functions. Press to start the SIRI function, or touch the button for 2 seconds or the HOME button of iPhone. Now you can talk to Siri for playing music, I am going.... Note: For SIRI function in the source unit, the Micriphone has to be connected. In CarPlay mode, touc"Home" button or
S icon to go back the main menu of source unit.
8.2 Android auto Operations
Android Auto enables you to use functions of your Android device convenient for driving. You can easily access route guidance, make calls, listen to music, etc. For details about Android Auto, visit https://www.android.com/auto or
https://support.google.com/androidauto.,
Compatible Android devices
You can use Android Auto with Android devices of Android version 5.0 or later.
Note: Android Auto may not be available on all devices and is not available in all countries or regions.
Operations:
-
Connect an Android device via USB terminal. To use the hands-free function, connect the Android device via Bluetooth. When an Android device compatible with Android Auto is connected to USB terminal, the device is connected iva Bluetooth automatically, and the Bluetooth smartphon currently connected is disconnected.
-
Unlock your Android device
-
To enter Android Auto mode, touch Android Auto icon in the head unit screen. You can perform the operations of the Apps of the connected Android device.
-
In Android Auto model, touch "Home" to the head unit main menu.
Radio mode
Touch the Radio mode icon to enter Radio.
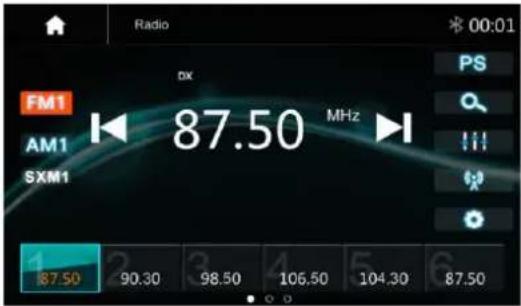
FM1 Touch FM can change between FM1=>FM2=>FM3.
AM1 Touch AM can change between AM1=>AM2.
PS Touch for Pre-scan search, each scanned station will be play for 10 seconds, touch again to stop.
Touch to auto scan searching.
Touch to enter EQ settings.
Touch to enter Radio settings.
Short touch to Seek-, long touch for Tune -
Short touch to Seek+, long touch for Tune+
Preset channel, Six preset buttons store and recall stations for each band. Touch and slide the preset channel can switch to next band FM1 / FM2 / FM3 or AM1 / AM2.
Store a Station
- Tune radio to desired station.
- Touch and hold the one of the preset station for more than 3 seconds, then the preset button will be highlighted on the screen, and the preset station will be stored.
Radio Setting
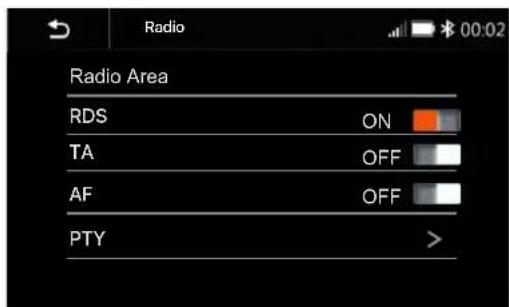
Radio Area: select the region, America/Europe/Eastern Europe/Japan/Southeast Asia/Latin America/Asia / Australia.
RDS: Swithc ON or OFF.
TA: Swithc ON or OFF.
AF: Swithc ON or OFF.
PTY: Select PTY list.
Note: AF is only for Europe region.
USB
Plug the USB, the USB icon will be colorful. Touch the USB icon to enter the USB playback mode. The source unit default the play the Audio in the USB device.
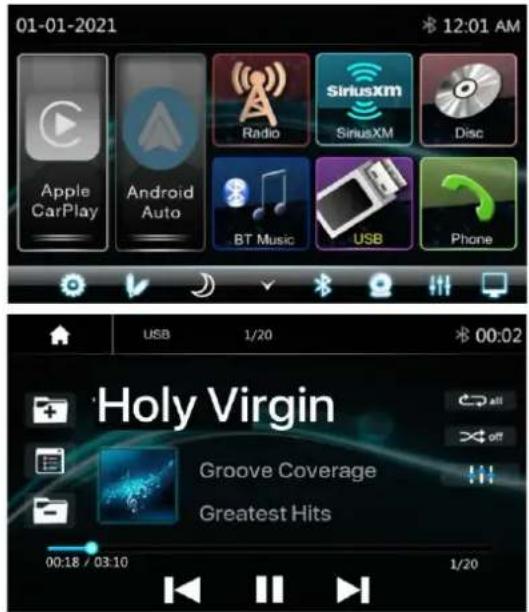

Press to go to the next folder.

Press to search Audio, Video or Picture files.

Press to go to the previous folder.

Short press to skip previous track, Long press to fast reverse.

Play or pause button.

Short press to skip next track, Long press to fast forward.

Press to select Repeat All > Repeat 1> Repeat directory> Repeat all.

Press to switch Random is On or Off.

Press to select Audio setting or set the prefer EQ of each band in custom mode.
File List browsing
Support to play picture and video. If there is other multimedia files in the USB, touch to browse the folder and file list of the USB driver. Select the multimedia type
Touch to browse the folder and file list of the USB device.
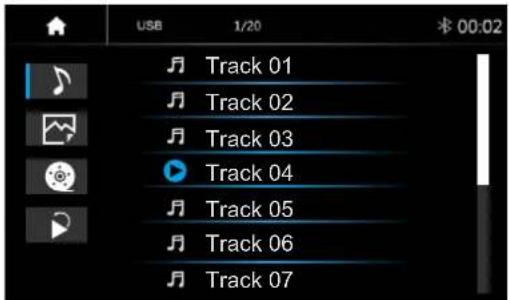

Select Audio or Music files.

Select Picture files.

Select Movie or Video files.

Return to playing previous file.
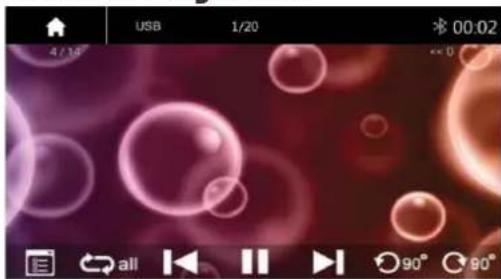
Picture Playback
natural_image
Digital photo of pink bubbles on a purple background with UI icons and playback controls (no readable text or symbols)
Touch to rotate the picture anti-clockwise for 90 degree (for picture playback)

Touch to rotate the picture clockwise for 90 degree (for picture playback)
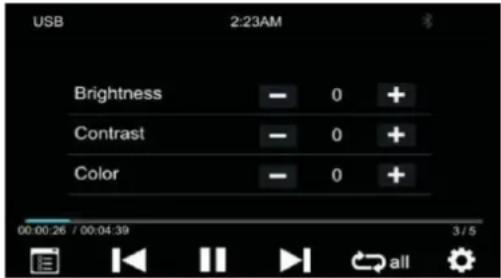

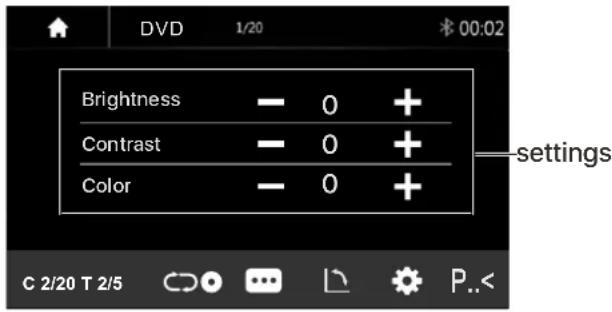
Touch to set the video Brightness, Contrast and Color (for video playback)
DISC
Inserting a Disc
Insert a Disc to the slot of the head unit, pull the disc or press the Eject button to make the disc into the deck. Touch the Disc to perform Disc playing function.
Ejecting a Disc
During disc playing or inside the deck, press the Eject button to stop playing the disc and eject the disc. After the disc is ejected and press the Eject button, the disc will go inside to the unit.
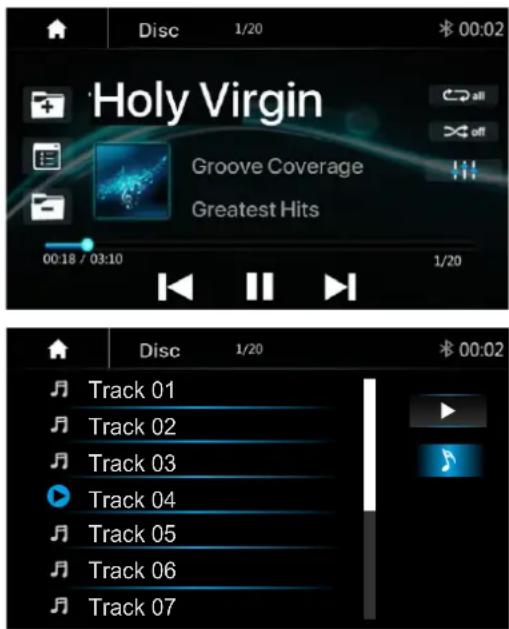
Note: The operation for buttons will be same as USB music playback.
DVD Playback
The Video display can be watched only during the Car is Parked.
Parking wiring: High level (+12v or NC) is driving; low level (ground) is parking.
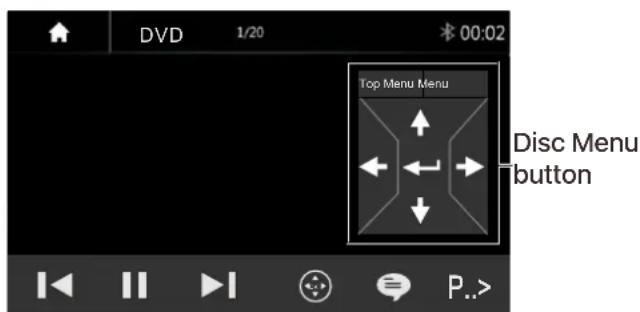
Short press it to skip to the previous track, long press it to fast reverse.
▶/II Pause/Play button.
▶ Short press it to skip to the next track, long press it to fast forward.
Touch it to select subtitle language.
Touch to this button and touch again on screen to pop-up the disc menu.
P..> Touch it to show the tools bar.
c 2/20 Touch it to select Chapter
T2/5 Touch it to select Title.
Press it to select repeat All, Repeat One and Repeat Off
Touch it to select Sub-Title.
☐ Touch it to change the viewing angle.
P.< Touch it to hide the tools bar.
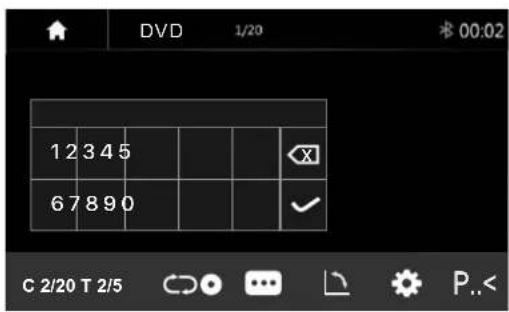
Direct search
- Touch the button "C 1/2" or "T3/3" to select a chapter or title directly using the on-screen display direct entry menu display. Enter the Direct Search menu,
- Enter the chapter or Title Digital, touch √ to confirm.
Playing Multimedia Files in Disc
Source unit is supporting the below disc types and Multimedia file format.
Note:
the operation for buttons will be same as USB playback.
Bluetooth Music
Touch the BT Music icon to enter Bluetooth Music playing mode. If the Bluetooth is connected, the music will be playing as following shown:
Bluetooth Music Playback
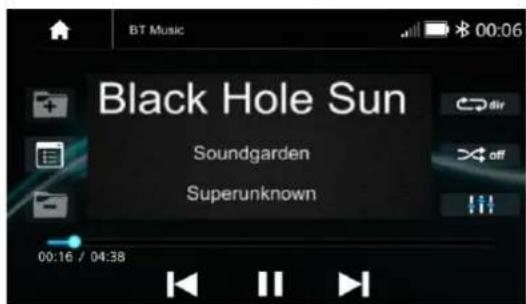

Press to go to the next folder.

Press to search Audio, Video or Picture files.

Press to go to the previous folder.

Short press to skip next track, Long press to fast forward.

Play or pause button.

Short press to skip next track, Long press to fast forward.

Press to select Repeat All > Repeat 1> Repeat directory> Repeat all.

Press to switch Random is On or Off.

Press to select Audio setting or set the prefer EQ of each band in custom mode.
Bluetooth Connect
If the Bluetooth is not connected, press Re-connect the paired phone or paring to pair the new device.
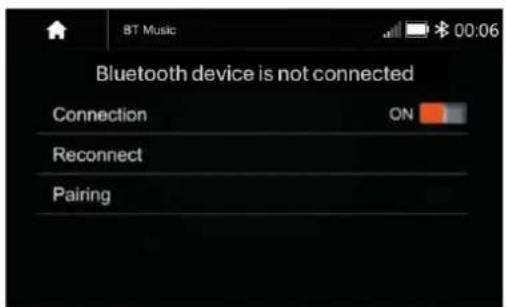
Bluetooth Pairing
Press Pairing the Pairing Mode screen will be shown as below:
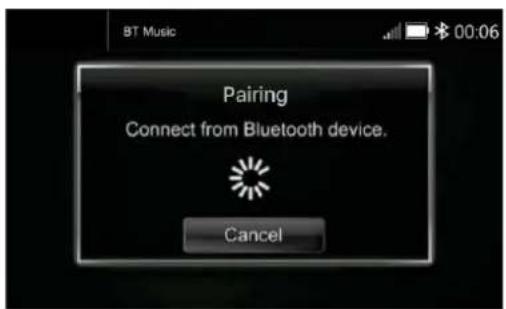
Turn On the Bluetooth of the Mobile phone/Bluetooth device, you can see the VRCPAA-106. Select the VRCPAA-106 for pairing and connection.
Bluetooth Phone
Touch the Phone icon in main menu to go to Phone mode. After the mobile phone is connected with the source unit via Bluetooth (HFP), user can through the source unit to make a phone call. Please note it needs to connect the microphone for phone call.
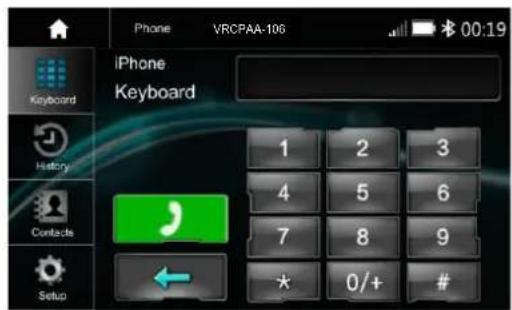

Keyboard. tap it to enter call mode.

History, to show the call record, missed, received and dialed calls

Contact, tap to show the phone-book connected phone.

BT Setup, to set auto answer and microphone gain.

Make a Call or Accept the Incoming Call.

Backspace, to clear the pervious dial digit.
Make a Call
- Touch the 📄 keyboard icon to enter below screen.
- Using the keypad, touch 0-9,*,#, enter the phone number you wish to dial. If you input an incorrect number, touch the ← icon on the keypad to delete the incorrect number.
-
Once the correct number appears on the screen, touch the 📋 icon. To go to dialing interface.
-
To end the call, touch the icon on the screen.

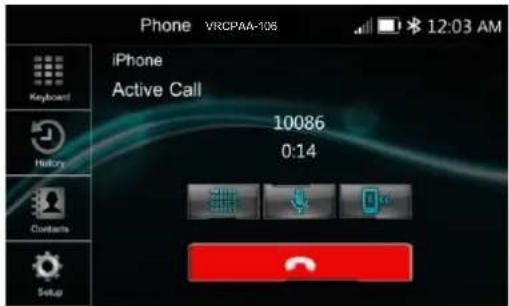
Receive an incoming call
If the Phone is connected with the source unit via Bluetooth, when an incoming call, below screen will be shown:
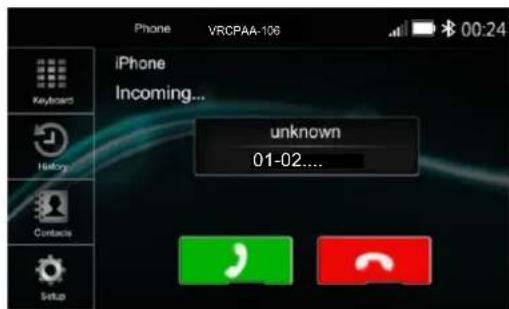
Press 📞 to answer the incoming call.
Press 📞 to reject the incoming call.
SiriusXM Ready
Your Favorite Stations Wherever You Go, Wherever you are, this Receiver is SiriusXM-Ready® so you can get over 140 channels, Including commercial-free music, plus the best sports and live events, comedy, news, exclusive talk, and entertainment. SiriusXM programming is received through the SiriusXM Connect Vehicle Tuner (SiriusXM SXV300 Tuner sold separately, SiriusXM subscription required).
For more information, visit www.siriusxm.com.
After installing your SiriusXM Connect Vehicle Tuner and antenna, power on your VRCPAA-7D and select SiriusXM mode. You should be able to hear the SiriusXM preview channel on Channel 1. If you cannot hear the preview channel, please check the installation instructions to make sure your SiriusXM Connect tuner is properly installed.
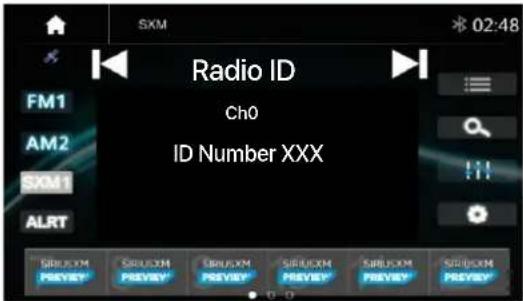
After you can hear the preview channel, tune to Channel 0 to find the Radio ID of your tuner. In addition, the Radio ID is located on the bottom of the SiriusXM Connect Vehicle Tuner and it packaging. You will need this number to activate your subscription. Write the number down for reference.
Note: the SiriusXM Radio ID does not include the letters I, O, S or F.
In the USA, you can activate online or by calling SiriusXM Listener care:
Visit www.siriusxm.com/activatenow
Call SiriusXM Listener Care at
1-866-635-2349
For Canadian Subscriptions, please contact: Visit www.siriusxm.ca/refresh
Call XM Customer Care at 1-877-438-9677
As part of the activation process, the SiriusXM satellites will send an activation message to your tuner. When your radio detects that the tuner has received the activation message, your radio will display "Subscription Updated". Once subscribed,
you can tune to channels in your subscription plan. Note, the activation process usually takes 10 to 15 minutes, but may take up to an hour. Your radio will need to be powered on and receiving the SiriusXM signal to receive the activation message.
To enter SiriusXM Mode, touch the SXM icon on the Main Menu.
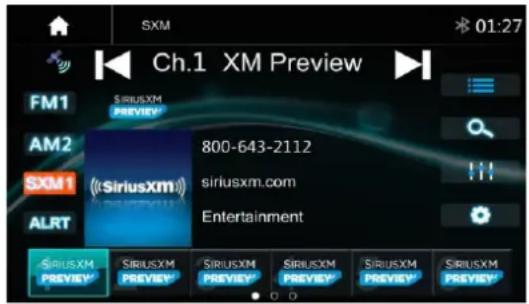
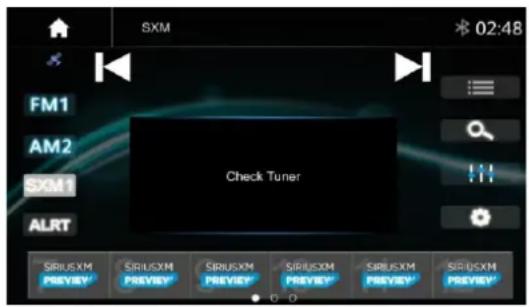
If the screen is shown "Check Tuner" as below, check the SiriusXM tuner connection.
Signal Strength
The Top Left corner of the screen is showing the Signal Strength of the SiriusXM satellite

SiriusXM Signal is Excellent

SiriusXM Signal is Good.

SiriusXM Signal is Weak.

No SiriusXM Signal.
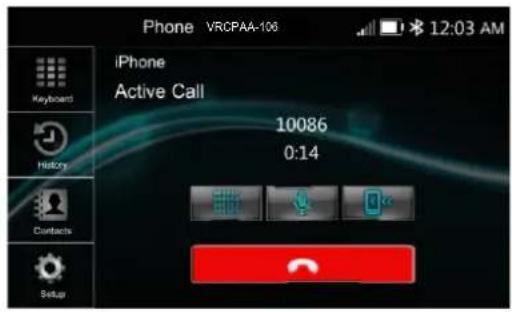
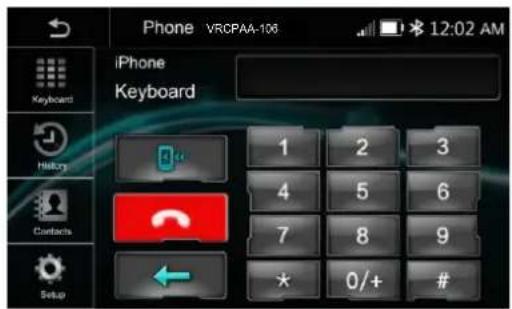

Interchange between phone and source unit

ON/OFF the Microphone function

Display the Keypad.
Call History
Touch the icon combined list.

to display the Call
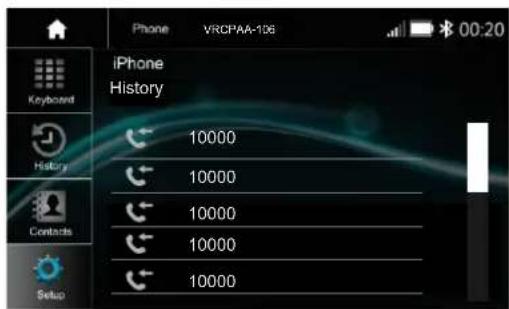
Slide the bar at right side up and down to display a call logs up to 20 records.
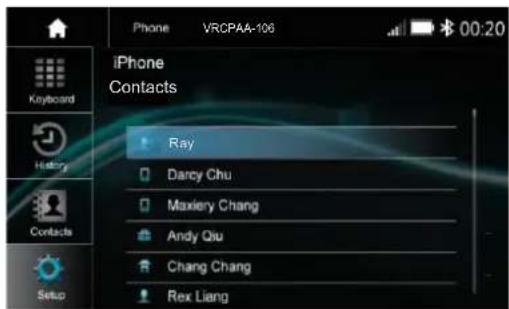
Contacts
Touch the icon

to access the phone
book of the connected mobile phone.
To make a call from the phonebook, simply touch the contact name.
BT Setup
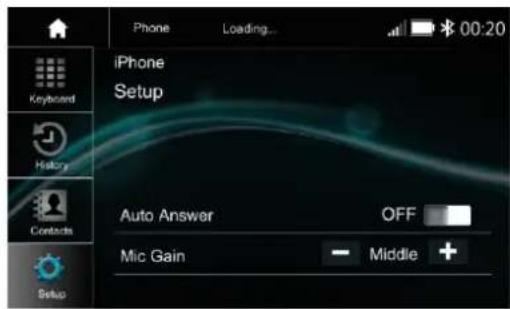
Auto Answer
On /OFF, incoming call auto answer.
MIC Gain,
Low / Middle / High
14. Sirius XM operation
In SiriusXM mode, SiriusXM icon is highlighted.
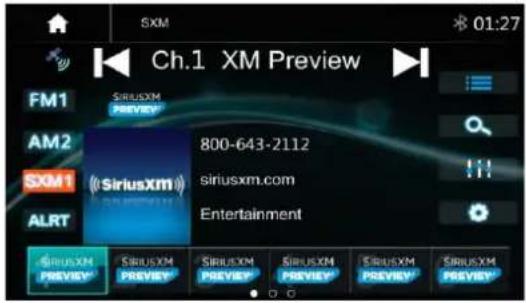

Touch SXM can change between SXM1=>SXM2=>SXM3.

Artist & Song Alerts

Browse List function

Direct Tune function

EQ Setting function

SiriusXM Setting Menu

Go to the pervious channel

Go to the next channel
Preset channel, Six preset buttons store and recall stations for each band. Touch and slide the preset channel can switch to next band SXM1 /SXM2 / SXM3.
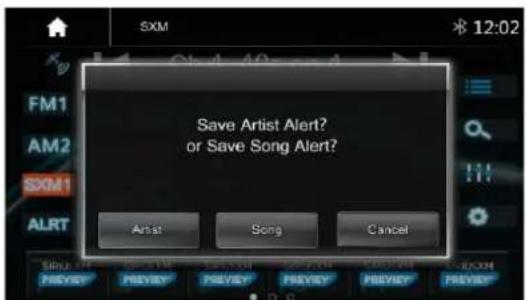
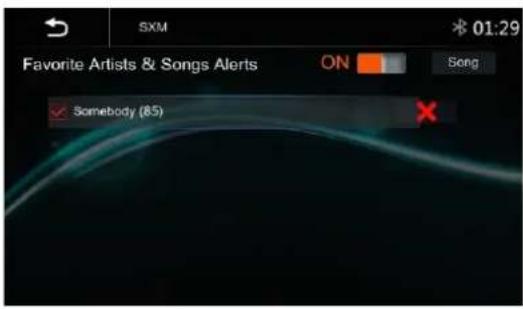
Artist and Song Alert
While listening to SiriusXM Satellite Radio, user can mark Artists and/or Songs for which you wish to be alerted. The radio will display an Alert message when a matching artist or song is found on another channel. Then user can choose if you want to tune to that favorite or user can ignore the alert and stay on your current channel. To store an artist or song title, touch on the "artist" or Song" metadata on the display. User will then be prompted to set the alert for the Artist or the Song Title. User will be alerted when one of your stored artists or songs is playing on another channel. If multiple alerts happen at the same time, or the alert gets dismissed, user can touch the ALRT button to list the channels that are currently playing your artist or song.
![1 [Artist Alert] 10,000 Maniacs Ch 22: Ch0022Sid362Cat01 2 [Artist Alert] Pearl Jam Ch 21: Ch0021Sid363Cat01](/content/2026/05/825829/images/bae7ccf64ee0250eb17842067723aac29ef8a6d62d719cbc71e4f2e183f07ee2.jpg)
Channel Browse

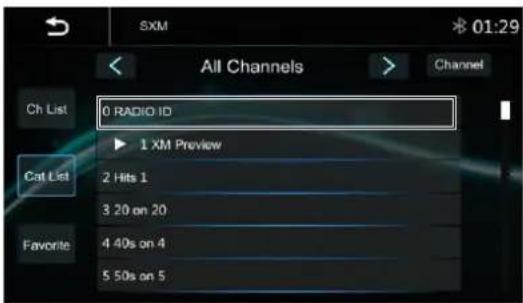
Touch to browse the channel listing. User can browse by select the Channel List and Category List.
Channel List
Touch "Channel" button at Left side to show the channel listing
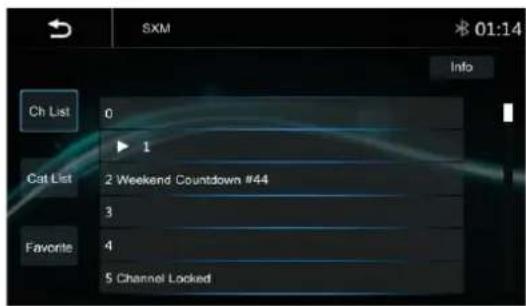
Slide the bar at right to browse the channel

Touch "Info" button at top right corner to change the display different Metadata as Channel Name, Artist, Song Title, Info, Category Name.
Category List
Touch the "Category" for the Category list
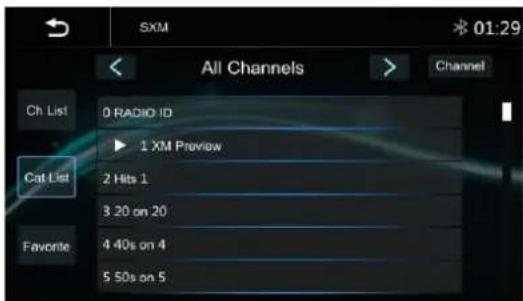
The channel will be shown according to different Category. Touch < or > to select different Category.
Touch "Channel" button at top right corner to change the display different Metadata as Channel Name, Artist, Song Title, Info, Category Name.
Favorite
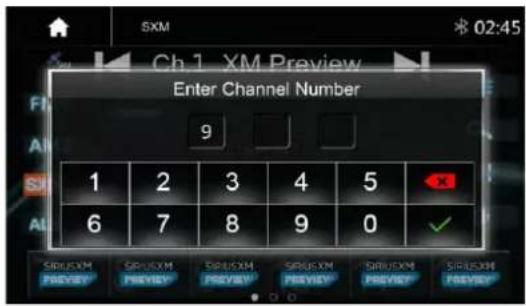
Direct Tune
Press 🔒 to shown the direct tune interface, user can direct enter the channel number and touch √ to go to the desire channel.
Press backspace to clear the pervious digit.
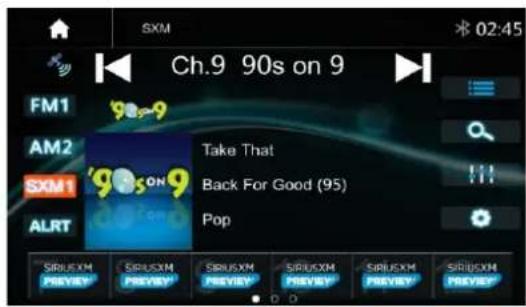
SiriusXM Setting Menu
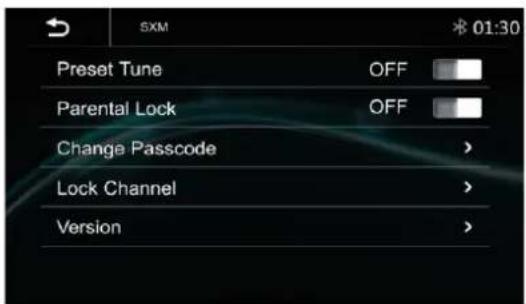
Touch 📋 to enter the SiriusXM setting menu.
It allows user to Preset Tune, Parental Lock, Change Passcode, Lock Channel and check the Version.
Change Pass Code
Touch " > of the Change Passcode" to show the below screen. Input the passcode by using the keypad.
Press ☐ to clear the pervious digit if input wrong. Touch ☑ to confirm input.
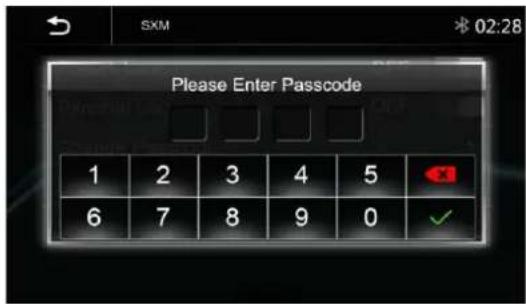
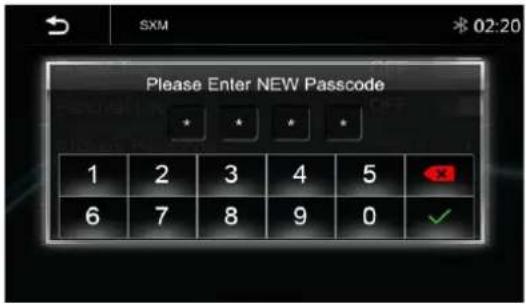
If the pass code is correct, allow user to Enter NEW Passcode.
Input a new 4 digits passcode and select ☑ to confirm the new passcode.
Input the passcode again and press √ to confirm, then the passcode can be successfully changed.
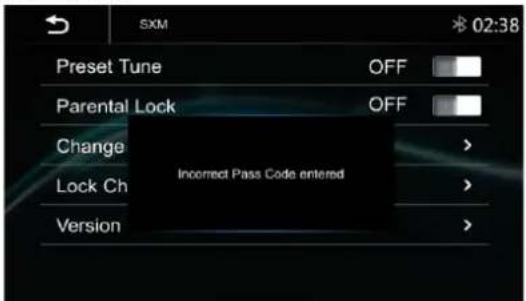
If the pass code is incorrect, below screen will be displayed.
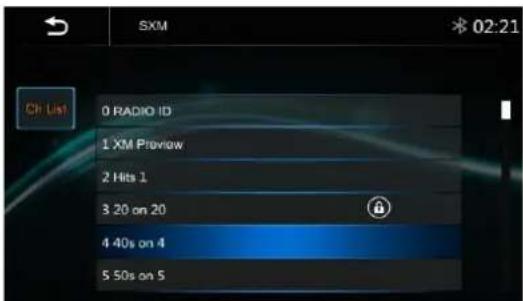
Lock Channel
Press "> of the Lock Channel" in SiriusXM setting menu to enter the Lock channel interface as below. Input the passcode and touch √ to confirm, press 🔍 to backspace to remove the pervious digit if input wrongly
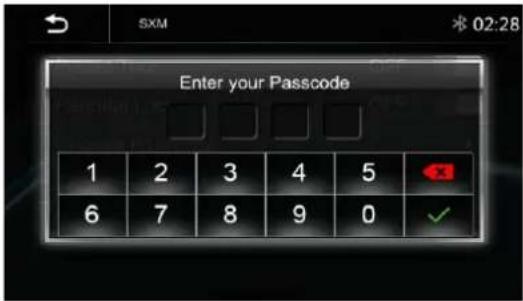
If the passcode is correct, the unit will enter the lock channel list, select the channel for any channel that has been locked.
Tap the locked channel again to remove from the locked channel list. The lock icon will be shown that you would like to lock.
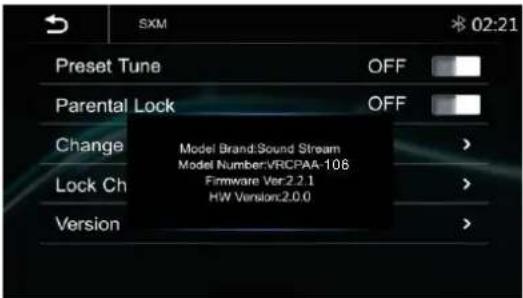
Version
Press Version in the menu, the below screen will be shown the VRCPAA-106 Software version information:
Note:
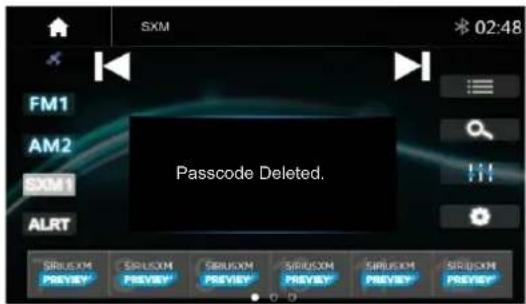
Reset SiriusXM passcode The default SiriusXM passcode is 0000, If you forget the passcode, follow the steps below to restore the unit to the default.
- Enter Settings
- Set the time format is 24H and the date/time to 2000-1-1 01:01
- Enter SiriusXM mode and select direct tune;
- Input the channel number 9992 the display only can show 999.
- Press confirm to reset the SiriusXM passcode to default.
Radio ID
Press channel 0 to display the Radio ID. You can use channel up/down or direct tune.
| On-Screen Display | Advisory Message | Cause Explanation/Solution | |
| Check Antenna Check Antenna | The radio has detected a fault with the SiriusXM antenna. The antenna cable may be either disconnected or damaged. | ·Verify that the antenna cable is connected to the SiriusXM Connect Vehicle Tuner.·Inspect the antenna cable for damage and kinks. Replace the antenna if the cable is damaged. | |
| Check Tuner Check Tuner | ·The radio has difficulty communicating with the SiriusXM Connect Vehicle Tuner.·The tuner may be disconnected or damaged. | ·Verify that the SiriusXM Connect Vehicle Tuner cable is securely connected to the radio SiriusXM connector/cable.·If the problem persists, disconnect and reconnect the tuner and then contact your dealer. | |
| No Signal No Signal | The SiriusXM Connect Vehicle Tuner has difficulty receiving the SiriusXM satellite signal. | ·Verify that your vehicle is outdoors with a clear view of the southern sky.·Verify that the SiriusXM magnetic mount antenna is mounted on a metal surface on the outside the vehicle.·Move the SiriusXM antenna away from any obstructions.·Inspect the antenna cable for damage and kinks. Replace the antenna if the cable is damaged.·If the problem persists, disconnect and reconnect the tuner and then contact your dealer. | |
| Channel Not Available | Channel Not Available | The channel that you have requested is not a valid SiriusXM channel or the channel that you were listening to is no longer available. You may also see this message briefly when first connecting a new SiriusXM Connect Vehicle tuner. Visit www.siriusxm.com for more information about the SiriusXM channel lineup. | The channel that you have requested is not a valid SiriusXM channel or the channel that you were listening to is no longer available. You may also see this message briefly when first connecting a new SiriusXM Connect Vehicle tuner. Visit www.siriusxm.com or www.siriusxm.ca for more information about the SiriusXM channel lineup. |
| Channel Not Subscribed | Channel Not Subscribed | The channel that you have requested is not included in your SiriusXM subscription package or the channel that you were listening to is no longer included in your SiriusXM subscription package | ·Questions about your subscription in the United States please visit http://www.siriusxm.com/activatenow or call SiriusXM Listener Care at 1-866-635-2349.·Questions about your subscription in Canada please visit http://www.siriusxm.ca/help/activation-help/ or call XM Listener Care at 1-877-438-9677 |
| Channel Locked Channel | Channel Locked | The channel that you have requested is Locked by the radio | ·See the section on Lock Channel, more information on the Lock Channel feature and how to access locked channels |
| Please Enter the Lock Code | Please Enter the Lock Code | User prompted to enter the lock/unlock code. | ·Enter the four digit code to unlock the channel |
| Incorrect Passcode Entered | Incorrect Passcode Entered | The unlock code entered by the user is incorrect | ·Input the correct four digit code to unlock the channel.·Reset lock code to default following instructions. |
General
Power Supply ...... DC10\~16Volts
Grounding System ...... Negative Ground
Current Drain 15A(Max.)
High Output Power Capability....4x45W/4Ω Max
4x28W/4Ω RMS
4x75W/2Ω Max
4x48W/2Ω RMS
MOSFET Quad Bridge Power Amplifier
Excellent 2Ω capability
Frequency Response.... 20Hz\~20KHz
Operating Temperature -20+60^
Dimensions 253mm(W)x210mm(D)x146mm(H)
TFT Display
TFT Screen size.... 10.6inch
Resolution....1024x600 pixels
FM Radio
Frequency Range (USA) 87.5\~107.9MHz
Frequency Range (Europe) 87.5\~108MHz
Usable Sensitivity (S/N=30dB)....≤15dB
S/N Ratio≥55dB
Stereo Separation.....≥30dB
AM
Frequency Range (USA) 530\~1710KHz
Frequency Range (Europe) 522\~1620KHz
Usable Sensitivity(S/N=20dB)≤40dB
S/N Ratio≥45dB
DVD/CD
S/N Ratio≥60dB
Channel Separation ....>50dB
Line-Out/Subwoofer Output
Maximum Output Level (10K ohms load)≥4Vrms
Subwoofer Time Align....24....0\~18ms
AV IN
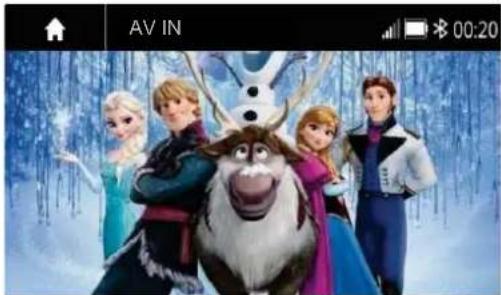
The Audio/Video source with RCA cable can through the source unit to play the Audio/Video. Plug the RCA to the corresponding A/Vsocket.
Touch the ▲ to pop up the function bars and touch ▼ to view the playing Audio/Video.
The Audi and Video will via the RCA cable to the source unit.
natural_image
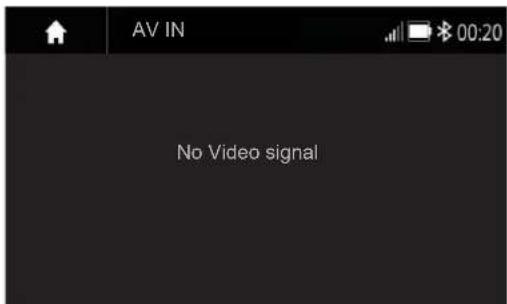
Animated character scene with four characters in winter clothing, set against a snowy forest background (no text or symbols visible)If there is no Video signal the below screen will be shown:
Camera
There is a RCA socket for the Front camera video signal to display on the Head unit. The Reverse wire in High level (+12V) is reverse; low level (ground or NC) is normal
Touch the ▲ to pop up the function bars and touch 🔒 to view the playing Front camera.
Rear Camera Setting:
Touch Rear View Camera in the Setting Menu to enter rear camera setting interface as follow:
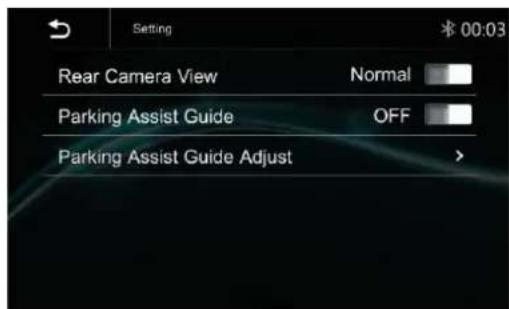
Rear Camera View: Normal/Reverse Parking Assist Guide: On/Off Parking Assist Guide Adjustment
Touch ">to enter Parking Assist Guide Adjustment interface to show the below screen:
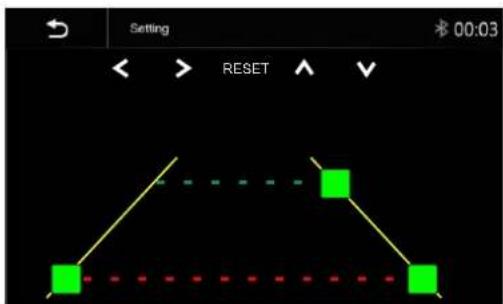
Select the adjust position and Touch < / > / ∧/ √ to adjust.
Touch Reset to resume the default Parking Assist Line
| General CD | Symptom | Cause | Remedy |
| General power does not turn on.(No sound is produced.) | Fuse is blown | Replace with fuse of the same amperage. If the fuse blows again, consult your store of purchase | |
| In correct wiring | Consult your local retailer. | ||
| No sound output when operating the unit with amplifiers or power antenna attached. | Power antennal lead is shorted to ground excessive current is required or remote on the amplifiers or power antenna. | 1. Turn off the unit.2. Remove all wires attached to the power antenna lead. Check each wire for a possible short to ground using an ohm meter.3. Turn on the unit.4. Reconnect each amplifier remote wire to the power antenna lead one by one. If the amplifiers turn off before all wires are attached, use an external replay to provide remote-on voltage (excessive current required). | |
| Nothing happens when buttons are pressed.Display is not Accurate. | The microprocessor has malfun-ctioned due to noise, etc. | Turn off the power, Then press the button . Press the reset button for about 2 seconds with a thin rod. | |
| Sound is bad directly after power is turned on. | Compact disc is dirty | Clean the compact disc without scratches | |
| Compact disc is heavily scratched or warped | Replace with a compact disc without scratches. | ||
| Others | No Power | The car ignition is not on. | If the power supply is properly connected to the caraccessory switch the ignition key to “ACC”. |
| The fuse is blown. | Replace the fuse. | ||
| Disc cannot be loaded. | Presence of disc inside the player | Remove the disc in the player then put a new upward. | |
| Disc cannot be read. | Inserting the disc in upside down. | Insert the compact disc with the label facing upward. | |
| Compact disc is extremely dirty or defective. | Clean the disc or try to play a new one. | ||
| Temperature inside is too high. | Cool off until the ambient temperature returns to normal. | ||
| No sound | Volume is in minimum | Adjust volume to a desired level. | |
| Wiring is not properly connected. | Check wiring connection. | ||
| The operation keys do not work. | The built-in microcomputer is not operating properly due to noise. | Press the reset button for about 2 seconds with a thin rod. | |
| Sound skips. | The installation angle is more than 30 degrees.not operating properly due to noise.The disc is extremely dirty or defective. | Adjust the installation angle to less than 30 degrees.Clean the compact disc/try to play a new one. | |
| The radio does not work, the radio station automatic selection does not work. | The antenna cable is not connected the signals are too weak. | Insert the antenna cable firmly select a station manually. |
WARNING! Changes or modifications to this unit not expressly approved by the party responsible for compliance could void the user's authority to operate the equipment.
NOTE: This equipment has been tested and found to comply with the limits for a Class B digital device, pursuant to Part 15 of the FCC Rules. These limits are designed to provide reasonable protection against harmful interference in a residential installation.
This equipment generates, uses and can radiate radio frequency energy and, if not installed and used in accordance with the instructions, may cause harmful interference to radio communications.
However, there is no guarantee that interference will not occur in a particular installation. If this equipment does cause harmful interference to radio or television reception, which can be determined by turning the equipment off and on, the user is encouraged to try to correct the interference by one or more of the following measures:
-Reorient or relocate the receiving antenna.
-Increase the separation between the equipment and receiver.
-Connect the equipment into an outlet on a circuit different from that to which the receiver is connected.
-Consult the dealer or an experienced radio/ TV technician for help.
SOUNDSTREAM® TECHNOLOGIES
LIMITED 90-DAY CONSUMER WARRANTY
LIMITED ONE-YEAR CONSUMER WARRANTY WITH PURCHASE AND INSTALLATION BY A SOUNDSTREAM AUTHORIZED RETAILER
Soundstream promises to the original purchaser, to repair or replace this product with a new or refurbished unit (at Soundstream's sole and absolute discretion) should it prove to be defective in workmanship or material under normal use, for a period of one-year from the date of purchase from the Soundstream authorized retailer, PROVIDED the product was purchased and installed by a Soundstream authorized retailer. During this one-year period, there will be no charge for product repair or replacement, PROVIDED the unit is returned to Soundstream, return shipping pre-paid, along with the required proof of installation, the bill of sale or other dated proof of purchase, and the consumer's contact information.
If the unit is installed by anyone other than a Soundstream authorized retailer, the warranty period will be 90-days from the date of purchase. This warranty is nontransferable and does not apply to any unit that has been modified or used in a manner contrary to its intended purpose, and does not cover damage to the unit caused by installation or removal of the unit. During this 90-day period, there will be no charge for the repair or replacement PROVIDED the unit is returned to Soundstream, return shipping prepaid, along with the bill of sale or other dated proof of purchase and the consumer's contact information.
This warranty is void if the product has been damaged by accident or unreasonable use, neglect, improper service or other causes not arising out of defects in materials or construction. This warranty does not cover the elimination of externally generated static or noise, or the correction of antenna problems or weak reception, damage to speakers, accessories, electrical systems, cosmetic damage or damage due to negligence, misuse, failure to follow operating instructions, accidental spills or customer applied cleaners, damage due to environmental causes such as floods, airborne fallout, chemicals, salt, hail, lightning or extreme temperatures, damage due to accidents, road hazards, fire, theft, loss or vandalism, damage due to improper connection to equipment of another manufacturer, modification of existing equipment, or Product which has been opened or tampered for any reason. Units which are found to be damaged by abuse resulting in thermally damaged voice coils are not covered by this warranty but may be replaced at the absolute and sole discretion of Soundstream. Unit must be returned to Soundstream, postage pre-paid, with bill of sale or other dated proof of purchase bearing the following information: consumer's name, telephone number, and address, authorized retailer's name and address, and product description. Please contact Soundstream warranty office at 800-724-1377, email to repairs@soundstream.com, or visit Soundstream.com/warranty to obtain a Return Authorization Number prior to shipping the product.
Note: This warranty does not cover labor costs for the removal and reinstallation of the unit. IN ORDER FOR THE ONE-YEAR WARRANTY TO BE VALID, YOUR UNIT MUST BE SHIPPED WITH PROOF OF PURCHASE & INSTALLATION BY A SOUNDSTREAM AUTHORIZED RETAILER. ALL UNITS RECEIVED BY SOUNDSTREAM FOR WARRANTY REPAIR WITHOUT PROOF OF SOUNDSTREAM AUTHORIZED DEALER INSTALLATION AND PURCHASE WILL BE COVERED BY THE LIMITED 90-DAY WARRANTY.
BY PURCHASING THIS PRODUCT, ALL WARRANTIES INCLUDING BUT NOT LIMITED TO EXPRESS WARRANTY, IMPLIED WARRANTY, WARRANTY OF MERCHANTABILITY, FITNESS FOR PARTICULAR PURPOSE, AND WARRANTY OF NON-INFRINGEMENT OF INTELLECTUAL PROPERTY ARE EXPRESSLY EXCLUDED TO THE MAXIMUM EXTENT ALLOWED BY LAW, AND SOUNDSTREAM NEITHER ASSUMES NOR AUTHORIZES ANY PERSON TO ASSUME FOR IT ANY LIABILITY IN CONNECTION WITH THE SALE OF THE PRODUCT. SOUNDSTREAM HAS ABSOLUTELY NO LIABILITY FOR ANY AND ALL ACTS OF THIRD PARTIES INCLUDING ITS AUTHORIZED DEALERS OR INSTALLERS. BY PURCHASING THIS PRODUCT, THE CONSUMER AGREES AND CONSENTS THAT ALL DISPUTES BETWEEN THE CONSUMER AND SOUNDSTREAM SHALL BE RESOLVED IN ACCORDANCE WITH CALIFORNIA LAWS IN LOS ANGELES COUNTY, CALIFORNIA. Some states do not allow limitation on how long an implied warranty lasts. In such states, the limitation or exclusions of this Limited Warranty may not apply. Some states do not allow the exclusion or limitation of incidental or consequential damages. In such states, the exclusion or limitation of this Limited Warranty may not apply to you. This Limited Warranty gives you specific legal rights, and you may have other rights which vary from state to state.
Owners Registration Card.
Please complete and return immediately to the address on the reverse side
Name:
Address:
City:
State:
Zip:
Vehicle Make/Model:
Product Model:
Serial Number:
Date Purchased:
Name of Dealer:
Dealer Address:
City:
State:
Zip:
Phone:
Email:
SOUNDSTREAM
TECHNOLOGIES
Please Keep This Information For Your Records
Product Model:
Serial Number:
Date Purchased:
Name of Dealer:
Dealer Address:
City: ____ State: ____ Zip: ____
STAMP
SoundStream Technologies
1550 S. Maple Ave.
Montebello, CA 90640
Attn. Customer Service
- Content
- Appearance
- Accessories & Installation
- Accessories & Installation
- Installation
- Note:
- Faceplate Adjustable Position
- Wiring
- Parking wire
- Speaker Connection
- Front panel Description
- Mic
- Reset button
- Power On/Off button
- Mute button
- HOME button
- Siri button
- VOL+
- ⑦ VOL-
- IR Sensor of Remote
- ⑩ USB port
- ⑪ AUX in jack
- ⑫ Slot-in
- ⑬ Eject Button
- ⑭ Micro SD slot
- [DVD/SUB/SD ]: Input 0-9 for selecting track number.
- Hidden soft button bar
- System Settings
- Language
- Date & Time:
- Key Beep : On/Off
- Factory Reset
- About
- Display Settings :
- Illumination
- Wallpaper
- Audio & EQ Settings:
- Balance/Fader:
- 10-Band Equalizer :
- Disc & DVD Settings :
- Bluetooth Settings :
- Rear Camera Setting:
- Rear Camera View: Normal/Reverse Parking Assist Guide: On/Off Parking Assist Guide Adjustment
- Apple Carplay
- Siri
- Android auto Operations
- Compatible Android devices
- Operations:
- Radio mode
- Store a Station
- USB
- File List browsing
- DISC
- Inserting a Disc
- Ejecting a Disc
- DVD Playback
- Direct search
- Playing Multimedia Files in Disc
- Bluetooth Music
- Bluetooth Music Playback
- Bluetooth Connect
- Bluetooth Pairing
- Bluetooth Phone
- Make a Call
- Receive an incoming call
- SiriusXM Ready
- Signal Strength
- Call History
- Contacts
- BT Setup
- Sirius XM operation
- Artist and Song Alert
- Channel Browse
- Channel List
- Category List
- Favorite
- Direct Tune
- SiriusXM Setting Menu
- Change Pass Code
- Lock Channel
- Version
- Radio ID
- General
- TFT Display
- FM Radio
- AM
- DVD/CD
- Line-Out/Subwoofer Output
- AV IN
- Camera
- SOUNDSTREAM® TECHNOLOGIES
- LIMITED 90-DAY CONSUMER WARRANTY
- Owners Registration Card.
- SOUNDSTREAM
- Please Keep This Information For Your Records
Brand : Soundstream
Model : Reserve VRCPAA-106F
Category : Receiver