
Trident Z Royal - RAM G.Skill - Free user manual and instructions
Find the device manual for free Trident Z Royal G.Skill in PDF.


| Product Type | DDR4 Desktop RAM |
| Brand | G.Skill |
| Model | Trident Z Royal |
| Memory Capacity | 16 GB (2 x 8 GB) |
| Memory Speed | 3600 MHz |
| CAS Latency | CL16 |
| Voltage | 1.35 V |
| Form Factor | 288-pin DIMM |
| RGB Lighting | Customizable via software |
| Heatsink | Aluminum heatspreader with crystalline design |
| Dimensions (per stick) | 133.35 x 44 x 8 mm |
| Weight (per stick) | Approx. 50 g |
| Compatibility | Intel Z490/Z590/Z690 and AMD X570/B550 |
| XMP Support | Intel XMP 2.0 |
| Cooling | Passive heatsink, fan optional |
| Safety | Avoid electrostatic discharge; handle by edges only |
| Maintenance | Clean with dry cloth; avoid liquids |
| Spare Parts | Not available separately; replace entire module |
| Repairability | Non-repairable; replacement only |
| General Information | High-performance DDR4 kit designed for enthusiasts |
Frequently Asked Questions - Trident Z Royal G.Skill
User questions about Trident Z Royal G.Skill
0 question about this device. Answer the ones you know or ask your own.
Ask a new question about this device
Download the instructions for your RAM in PDF format for free! Find your manual Trident Z Royal - G.Skill and take your electronic device back in hand. On this page are published all the documents necessary for the use of your device. Trident Z Royal by G.Skill.
USER MANUAL Trident Z Royal G.Skill
Trident Z Lighting Control Software Guide
for Trident Z RGB, Trident Z Royal, and Trident Z Neo
Introduction

About This Guide
This guide will help you understand and navigate the Trident Z Lighting Control software, which is designed to control the lighting effects for the Trident Z RGB, Trident Z Royal, and Trident Z Neo series memory kits.
Software Interface
- Profile selection
- Sync all module lighting, or control each module independently
- List of lighting effects
- Color settings
- Additional settings
- Reset/Apply buttons
- UI language
- LED off button
- Music mode button
Profiles

About Profiles
The Trident Z Lighting Control software allows you to save up to 4 independent profiles, each with its own set of lighting customizations.
How to Use Profiles
Once you have set up lighting for the current profile, clicking "Apply" will save the current settings to the current profile and apply the lighting effect to the memory modules.
If settings for the current profile has been changed, then switching to another profile without clicking "Apply" will prompt a pop-up window to ask if you want to save the current settings to the current profile. Click "OK" to save the settings, or click "Cancel" to discard the changes.
Lighting effects are not saved in the memory module. Upon a cold boot (booting the system after a shutdown), the memory modules will display the default rainbow wave effect. After entering the operating system, the software will run in the background and load the previously set lighting effect.
Example
- Click on "Breathing" to set the lighting effect to "Profile 1".
- Click on "Apply" to apply the lighting effect and save the settings under "Profile 1".
- Click on "Profile 2" to switch to "Profile 2". By default, an empty profile will be set to "Static". If "Apply" is not clicked before switching to "Profile 2", a pop-up window will ask if you want to save the changes to "Profile 1".
Sync All or Individual Modules


Sync All / Individual Module Lighting
The lighting of the memory modules can be controlled together ("SYNC") or as independent modules. By default, the modules are set to "SYNC".
To select individual modules, click on the memory module icon on the left side. A list of available modules will be displayed in a list. Choose "SYNC" to sync all modules to the same lighting effect, or choose "DRAM#" to choose one of the individual modules.
After choosing the lighting effect and customizing the settings for a single module, press "Apply" to save the setting to the current module.
If "Apply" is not clicked before switching to another DRAM module, the setting changes will be lost.
The software will automatically list the total quantity of RGB memory modules that are installed in the system. If only "DRAM" is displayed and no list appears after clicking the icon, that means the software does not detect any configurable memory modules.
Example
- Click on the memory module icon.
- Click "DRAM1" to choose the first memory module.
- Choose a lighting effect from the list and configure the settings.
- Click "Apply" to save the settings to the module.
- Click on the memory module icon to choose another module. Repeat until all modules are configured.
Lighting Effects
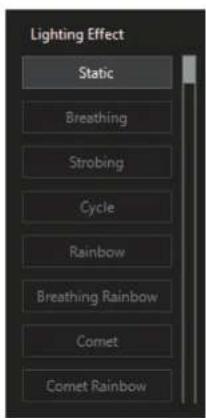

About Lighting Effects
The software has multiple lighting effects available for configuration. Click on the preferred lighting effect and the available settings will appear on the right for configuration.
To scroll down the list of lighting effects, use the mouse scroll wheel or drag the scroll bar on the right side of the list. Then click on the lighting effect and click "Apply" to apply the lighting effect.
Each lighting effect has its own set of available settings, so some lighting effects may have the option to customize "Speed" while other lighting effects do not. For example, "Static" will not have the option to change "Speed" or "Direction".
Reset to Default Values
To reset the settings of all lighting effects to default values, click on the "Reset" button on the bottom right.
The lighting effect settings for "SYNC" and each "DRAM#" module are stored independently, so clicking "Reset" in "DRAM1" will only reset the setting in "DRAM1" and will not affect any lighting effect settings in "SYNC" or other "DRAM#" modules.
Configuring Colors

Choosing the LED Zone
Click on "LED #" to choose the LED zone. To quickly change all LED zones to a single color, click the circle next to "Sync to LED 1" and all LED zones will be set to the color in "LED 1".
Changing the Color
After selecting an LED zone, there are multiple ways to change the color of the LED zone:
- Click and drag the dot in the color wheel.
- Click and drag the dot across the R / G / B color bars.
- Type in the R / G / B decimal value. (0-255)
- Type in the HEX color code in the "HEX #" box. (0-9, A-F)
- Click on a predefined color from the "Color Palette".
Saturation and Brightness
"S" (Saturation) and "Brightness" will automatically adjust as RGB values are changed. Saturation and brightness can also be manually adjusted by dragging the dot across the respective bar.
Common Colors in HEX and RGB Values
| Color #HEX (R, G, B) | ||
| Red #FF0000 (255, 0, 0) Blue #0000FF (0, 0, 255) | ||
| Orange #FFF000 (255, 128, 0) Purple #8000FF (128, 0, 255) | ||
| Yellow #FFFF00 (255, 255, 0) Magenta #FF00FF (255, 0, 255) | ||
| Green #00FF00 (0, 255, 0) Black #000000 (0, 0, 0) | ||
| Cyan #00FFFF (0, 255, 255) White #FFFFF (255, 255, 255) | ||
Additional Settings
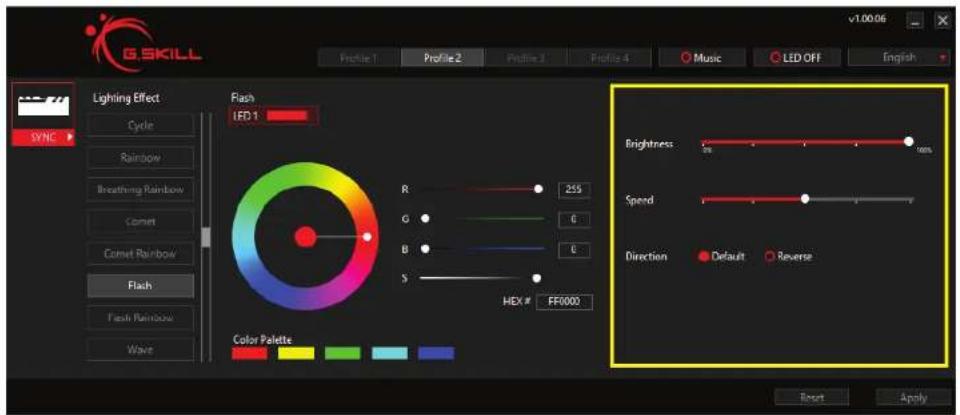
Additional Lighting Effect Settings
Some lighting effects have additional settings that can be changed, such as speed and direction.
Speed
Some lighting effects allow the speed to be customized. Drag the white dot on the bar left or right to adjust the speed faster or slower.
Direction
Some lighting effects allow the direction to be customized. Click on the circle to select "Default" direction or the "Reverse" direction.
Music Mode
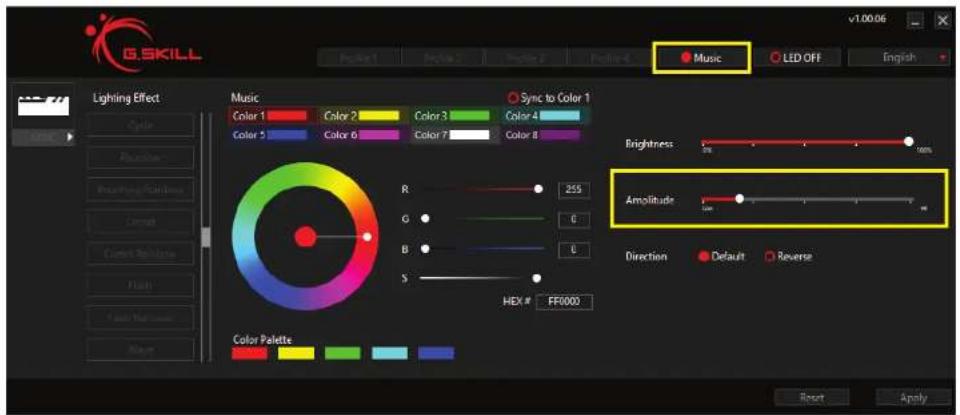
Enabling Music Mode
Click on the "Music" button and then click on the "Apply" button will activate music mode. A filled red circle will indicate that the music mode is activated.
Under music mode, all profiles are disabled.
You can customize the color of each lighting zone on the memory modules (8 zones for Trident Z Royal/Trident Z Neo and 5 zones for Trident Z RGB). All modules are synced to the same color setting.
Remember, music mode will require audio output to display the lighting effect. If there is no audio playing, then the memory modules will remain dark.
Amplitude
Adjust this setting to the left or right to change the sensitivity of the audio levels.
LED Off & UI Language

Turning LED Lighting Off
Click on the "LED OFF" button and then click on the "Apply" button to disable all the lighting on the memory modules. A filled red circle will indicate that the "LED OFF" function is activated.
Switching the UI Display Language
Clicking on the UI language button on the top right will display a dropdown menu of available UI language options. Click to select the desired language and the UI will automatically switch to the selected language.

Copyright © 2019 G.SKILL International Enterprise Co., Ltd. All rights reserved.


- Trident Z Lighting Control Software Guide
- About This Guide
- Software Interface
- Profiles
- About Profiles
- How to Use Profiles
- Example
- Sync All or Individual Modules
- Sync All / Individual Module Lighting
- Lighting Effects
- About Lighting Effects
- Reset to Default Values
- Configuring Colors
- Choosing the LED Zone
- Changing the Color
- Saturation and Brightness
- Additional Settings
- Additional Lighting Effect Settings
- Speed
- Direction
- Music Mode
- Enabling Music Mode
- Amplitude
- LED Off & UI Language
- Turning LED Lighting Off
- Switching the UI Display Language
Brand : G.Skill
Model : Trident Z Royal
Category : RAM