
Copia 9021 - Photocopier OLIVETTI - Free user manual and instructions
Find the device manual for free Copia 9021 OLIVETTI in PDF.


| Product Type | Plain paper photocopier |
| Dimensions (W x D x H) | 585 x 640 x 624 mm (basic configuration) |
| Weight | 77 kg (basic configuration) |
| Power Supply | 220/240 V, 50 Hz |
| Maximum Power Consumption | Less than 1.5 kW |
| Warm-up Time | 30 seconds (at 20 °C) |
| First Copy Time | Maximum 9.7 seconds (A4, 1:1, manual exposure, top cassette) |
| Copy Speed (A4) | 21 copies/min |
| Copy Speed (A3) | 11 copies/min |
| Zoom Range | 49% to 204% |
| Preset Copy Ratios | 50%, 70.7%, 100%, 141.4%, 200% |
| Paper Feed Capacity | 2 cassettes of 250 sheets each + stack bypass 50 sheets |
| Maximum Paper Capacity (with options) | Up to 3 cassettes (250 each), 1500-sheet paper deck, 50-sheet cassette module |
| Paper Sizes Supported | A3, A4, A4R, A5, A5R, A6R (bypass) |
| Copy Paper Weight | 64-80 g/m² (cassette), 64-128 g/m² (bypass) |
| Maximum Number of Copies | 1-99 (100 maximum) |
| Optional Feeders | Recirculating Document Feeder (RDF), Automatic Document Feeder (ADF) |
| Optional Output Devices | Sorter 10 bins, Stapler-Sorter 10 bins |
| Optional Access Control | Control Card Reader |
| Two-Sided Copying | Yes (1-to-2, 2-to-2, 2-to-1, book-to-2) |
| Image Combination/Separation | Yes (2 or 4 pages onto 1, or separate book pages) |
| Transparency Interleaving | Automatic insertion of blank or printed sheets between transparencies |
| Standard Features | Auto paper selection, auto exposure, auto clear, auto power-off, energy saving mode |
| Cleaning | Clean glass platen and document cover weekly with damp cloth |
| Toner | Black toner cartridge (replace when indicator blinks) |
| Safety Precautions | Do not disassemble; avoid liquids; use grounded outlet; keep away from heat sources |
| Consumables | Toner, copy paper (recommended Olivetti), staple cartridges (for stapler-sorter) |
| Repairability | Contact local Olivetti service centre; self-diagnostic error codes on display |
Frequently Asked Questions - Copia 9021 OLIVETTI
User questions about Copia 9021 OLIVETTI
0 question about this device. Answer the ones you know or ask your own.
Ask a new question about this device
Download the instructions for your Photocopier in PDF format for free! Find your manual Copia 9021 - OLIVETTI and take your electronic device back in hand. On this page are published all the documents necessary for the use of your device. Copia 9021 by OLIVETTI.
USER MANUAL Copia 9021 OLIVETTI
PUBLICATION ISSUED BY:
Olivetti Lexikon S.p.A.
Documentazione
77, Via Jervis - 10015 Ivrea (Italy)
Copyright© 1998 by Olivetti
All rights reserved
COPIA 9021
The mark affixed to the product certifies that the product satisfies the basic quality requirements.

Your attention is drawn to the following actions that could compromise the characteristics of the product:
- incorrect electrical supply;
- incorrect installation; incorrect or improper use, or, in any case, not in accordance with the warnings given in the User Manual supplied with the product;
- replacement of original components or accessories with others of a type not approved by the manufacturer, or carried out by unauthorized personnel.
CONTENTSCONTENTS
How to Use the Instruction Booklet 2
Installation Precautions 2
Operating Precautions 3
General Features 3
Basic Configuration 4
Control Panel 4
Recirculating Document Feeder - RDF 6
Automatic Document Feeder - ADF 6
Sorter 10 6
Stapler Sorter 10 6
Control Card Reader 6
Printer Unit 6
BASIC COPYING
Start-Up 7
Placement of the Original 7
Starting and Stopping a Copying Job 8
Copy Settings 8
Auto Cassette Selection 10
Auto Clear 10
Auto Power-off 10
Copy Output 10
Using the Stack Bypass 11
Interrupting a Copy Job (for urgent copies) 11
SPECIAL FEATURES
Two-Sided Mode 13
Auto Zoom 15
Image Separation Mode 15
Image Combination Mode 16
Transparency Interleaving Mode 18
ADDITIONAL FUNCTIONS
Changing the Standard Settings 19
PAPER ANERTONDERONER
Loading Copy Paper 24
Adding Toner 25
MESSAGIESGAS
When a Paper Jam Occurs 26
Self-Diagnostic Messages 29
CLEANING AND ACONSUMABLESAND CONSUMABLES
Routine Cleaning 30
Consumables 30
Control Card / Printer Unit 41
INDEX
Thank you for purchasing the OLIVETTI COPIA 9021 photocopier. This instruction manual describes the machine's functions and how to use them, the precautions to be taken to ensure safe operation and the basic maintenance operations.
Read the manual carefully before starting to use the machine, so as to familiarize yourself with its many functions and make the most of them. We recommend you keep the manual handy for consultation while using the photocopier.
INTRODUCTION INTRODUCTION
1. Advanced Features and Functions
- The photocopier uses special charging rollers that drastically reduce the amount of ozone emitted (up to 1/1000 with respect to a conventional photocopier).
• Automatic paper size and copy ratio selection. - Image combination and separation: enables the user to obtain a copy with a smaller or larger number of pages than the original.
- Transparency interleaving mode: when copying onto OHP transparencies, you can automatically insert blank sheets between the transparencies.
- Optional devices available (RDF, Stapler Sorter, Control Card, etc.) capable of enhancing the machine's performance to a considerable degree.
2. Special Features
- Its compact size will ensure that it will fit into any office environment.
- It holds a large quantity of paper (up to three 250-sheet cassettes, 1500-sheet paper deck and 50-sheet cassette module).
- Short warm-up time after power on: the machine is ready for use after 30 seconds.
- It takes just 7.4 seconds to obtain the first copy.
- New type of lens with a zoom feature permitting copy ratios from 49 to 204% .
- Clam opening to ease the removal of jammed paper.
3. Control Panel
- The COPIA 9021 has a large control panel which, by means of icons that represent all the machine's functions, provides you with all the information you need to make all kind of copies and displays error messages.
HOW TO USE THE INSTRUCTION BOOKLETHOW TO USE THE INSTRUCTION BOOKLET
1. Graphics and text layout
The illustrations are included in the text. On the inside cover you will find drawings (A-H) of the operating machine configuration, the control panel, the accessories and optional devices with the relevant reference numbers (see pages 4, 6).
References to operating messages that appear on the display are indicated in the text by the ⚙ symbol.
Important information is printed in bold face and is preceded by the ! symbol.
The symbol indicates a reference to another section associated with the current topic.
At the end of the manual there is an index which will enable you to locate topics quickly.
2. Keys and other parts of the control panel
In the instructions, the names of the keys and other elements are always followed by a letter and a number: the letter identifies the drawing and the number identifies the element.
example: START key (B38)
3. Components
The main title under which the parts are grouped is followed by the letter that identifies the drawing. Each part is preceded by the reference number that identifies it in the drawing on the inside cover.
example: BASIC CONFIGURATION (section A on the inside cover)
- Power switch
INSTALLATION PRECAUTIONS
To ensure that the photocopier works efficiently, observe the following precautions when selecting a site to install the photocopier.
- Avoid locations which are subject to extreme temperatures or excessive humidity.
- Do not install the photocopier in the direct sunlight (for example, coming through a window without curtains).
- Avoid locations where a considerable amount of dust accumulates.
- Avoid locations where there is the risk of exposure to ammonia or inflammable substances, such as alcohol or solvents.
- Avoid locations that are subject to vibrations.
- Avoid locations subject to sudden changes in temperature.
- Do not install the photocopier near computers, televisions, radios or other similar electronic equipment (risk of interference).
Select a safe power outlet
! Connect the photocopier to a 220/240V AC outlet. Make sure that the electrical system is properly grounded
- Do not plug other electrical equipment into the outlet to which the photocopier is connected.
- Do not connect the photocopier to a multi-plug power adapter.
The power cable may get damaged if trodden on or if heavy objects are placed on it; using a damaged power cable may cause accidents.
Leave adequate space around the photocopier
- Leave at least 10 cm between the photocopier and the wall to permit sufficient ventilation. Leave enough space on either side of the machine so that it can be operated with ease.
OPERATORERARECAUNICONSECTIONS
Do not attempt to disassemble or modify the structure of the photocopier. There are some areas inside the photocopier which are subject to high voltages and temperatures. Do not perform any operation not specified in this instruction manual.
- Do not pour liquids of any kind onto or into the photocopier, nor let foreign objects (e.g. paper clips) fall into it. Should a foreign object or liquid come into contact with a high voltage area inside the photocopier, it could cause a shortcircuit and set fire to the equipment.
- If the photocopier does not work normally, see the «Messages» section ( 3 p. 26). Should you notice an unusual noise, smoke or anything else that causes concern, switch the machine off immediately, unplug the power cable and call your nearest OLIVETTI service centre.
- Do not use inflammable spray products, such as adhesive sprays, near the photocopier.
- Do not switch the machine off or open it while copying is in progress as this may cause the paper to jam.
- If the photocopier is to be left idle for a long period of time, e.g. at night, switch it off.
- The photocopier is equipped with anticondensation and warm-up fans: even if the glass platen or the machine body is warm when the photocopier is switched off, this is not a sign of malfunctioning.
GENERAL FEATURESBRAESEA
| Type: | Plain paper photocopier |
| Glass platen: | Fixed |
| Photoconductor: | OPC |
| Cassette paper feed: | 64 to 80 g/m2plain paper |
| Stack bypass feed: | 64 to 128 g/m2plain paper |
| Originals | Printed sheets, books and three-dimensional objects (up to 2 kg) |
| Maximum size of original: | A3 |
| Copy sizes: | A3, A4, A4R, A5, A5R, A6R (from bypass) |
| Warm-up time: | 30 s (at 20 °C) |
| Time for first copy: | Maximum 9.7 s (A4 size, 1:1 copying, manual exposure control, top cassette feed) |
| Copy speed (100%): | A3 = 11 copies/minA4 = 21 copies/minA4R = 16 copies/minA5 = 21 copies/minA5R = 21 copies/min |
| Copying ratios: | Direct: 100% (1:1)Fixed reductions: 70.7% (A3 - A4 / A4 - A5); 50% /A3 - A5)Fixed enlargements: 141.4% (A4 - A3 / A5 - A4); 200% (A5 - A3)Zoom: 49 - 204 % |
| Paper feed: | 2 cassettes with a capacity of 250 sheets eachStack bypass: 50 sheets |
| Multicopies: | 1 - 100 |
| Power supply voltage: | 220/240 V, 50 Hz |
| Maximum power consumption: | less than 1.5 kW |
| Dimensions (mm): | Length 585, Width 640, Height 624 (basic configuration) |
| Weight: | 77 kg (basic configuration) |
BASIC CONFIGURATASINT(DONIFIC(R)atect de A.)
- Glass platen
- Control panel (see section B below)
- Front panel
- Paper cassette
- Document cover
- Power switch
- Stack bypass
- Anticondensation heater switches / fluorescent tube (Used by service engineers only)
- Copy tray
- Photocopier opening lever
- Exposure regulating knob
- Toner cartridge
- Brush for eliminating static charge
- Static charge eliminator
CONTRODRONER ANEle cover, sect. Sect.
- Stapler-sorter mode indicator
- Sorter mode indicator
- Operator message
- Operator message
- Two-Sided Mode key (left)
- Preset copy ratio indicator
- Operator message
- Control card indicator
- Paper jam indicator
- Paper out indicator
- Toner out indicator
- Display
- OK key
- Group mode indicator
- Sorter key
- Additional Function key (asterisk)
- Transparency Interleaving key
- Image Combination/Separation key
- Exposure indicator
- Manual Exposure key (lighter)
-
Automatic Exposure key
Blinks when stapler-sorter mode is selected
Blinks when sorter mode is selected
Blinks to signal an operating message
Blinks to signal an operating message
Enables you to make copies on to both sides of the sheet from individual originals (various options)
Indicates the selected preset copy ratio
Blinks to signal an operating message
Blinks when the control card (optional) is not inserted or is inserted incorrectly
Blinks when a paper jam occurs
Blinks when there is no paper left in the cassette or stack bypass or when the cassette is not inserted correctly
Blinks when the toner is about to run out
Indicates the number of copies, the copy ratio and the additional function settings
Confirms some settings
Blinks when group mode is selected
Selects the sorter and sorter mode
Enables you to select additional functions, to change the standard copy settings
Used for automatically inserting a sheet between every two transparencies copied
Enables you to copy two or four originals on to one page/select two page original copy
Indicates the exposure of the copies (lighter - darker)
Enables you to set the exposure of the copies manually (lighter copies)
Selects the automatic exposure function -
Manual Exposure key (darker)
-
Two-Sided Mode key (right)
-
Preset copy ratio key (reduction)
-
Direct copy key
-
Preset copy ratio key (enlargement)
-
Paper out/jam Indicator
-
Paper select key
-
Paper select indicators
-
Auto-zoom key
-
Zoom key (reduction)
-
Zoom key (enlargement)
-
Copy ratio key
-
Reset key
-
Stop key
-
Energy Saving Button
-
Power switch
-
Start copying key
-
Clear key
-
Numeric keys
-
Interrupt key
Enables you to set the exposure of the copies manually (darker copies)
Enables you to make copies on both sides of the sheet from a two-sided original or from a book; you can also make copies onto one side from the two sides of the original.
Selects a preset copy ratio (reduction)
Selects direct copy ratio (1 : 1 - 100%)
Selects a preset copy ratio (enlargement)
Indicates the cassette in which the paper has run out or the area in which a jam has occurred
Selects the individual cassettes, the stack bypass or automatic size selection
Indicate the paper size selected
Enables the copy ratio to be selected automatically
Provides access to zoom mode (in reduction)
Provides access to zoom mode (in enlargement)
Indicates the selected copy ratio on the display
Restores the standard copy settings
Stops copying
Enables you to disactivate the photocopier if it has not been used for a certain time. If the photocopier has not been used for the preset time then it will automatically go into the Energy Saving Mode.
Enables you to switch the photocopier ON and OFF.
Starts copying
Resets the number of copies to 1 or deletes a value entered by mistake
Enables you to set the number of copies and other numeric values
Temporarily interrupts copying so that urgent copies can be made
RECIRCULARING DOCUMENT FEEDER - RDFTING DOCUMENT FEEDER - RDF (Inside cover, Sect. C)(Inside cover, Sect. C)
- Separation lever
- Original placement indicator
- Top cover
- Document tray
- Adjustable paper guide
- Tilting auxiliary tray
AUTOMAOM DOCUMENT FEEDER - ADFA DOCUMENT FEEDER - (Inside cover, Sect. D)(Inside cover, Sect. D)
- Original placement indicator
- Separation lever
- Top cover
- Document tray
- Adjustable paper guide
SORSER10TER 10 (Inside cover, Sect. E)(Inside cover, Sect. E)
- Copy output bins
STAPLER SORARELROBRIO (Inside cover, Sect. F)(Inside cover, Sect. F)
- Copy output bins
- Load staples indicator
- Manual stapling key
- Stapler unit panel
CONTROL CARD READER (Inside cover, Sect. G)
Control card reader.
PRINTER UNIT (Inside cover, Sect. H)(Inside cover, Sect. H)
Printer unit.
BASIC COPYINGBASIC COPYING
START-UP-UP
! Make sure that the power plug is correctly inserted in the mains socket.
To switch the machine on or off, use the POWER SWITCH (B37). After 30 seconds the machine is operational. The following standard copy settings are activated (unless they have been changed).
Standard copying:
| Copy ratio: | Direct (100%) |
| Paper size: | Automatic selection |
| Exposure : | Automatic control |
| Number of copies: | 1 |
If the photocopier is set up to work with the optional control card (☐ «Control card / Printer unit», p. 41) the CONTROL CARD indicator (B8) starts to blink and you must insert a control card in the slot (inside cover, sect. G) or enter an enabled ID name.
PLACEMENT OF THE MENGOFALTHE ORIGINAL
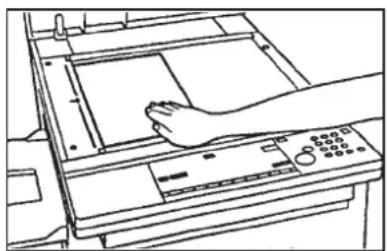
Original placement varies according to whether there is an automatic feeder (ADF or RDF) installed.
natural_image
Line drawing of a hand pressing down on a machine control panel (no text or symbols visible)If there is no automatic feeder:
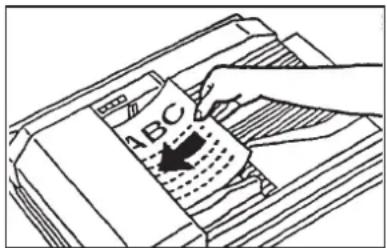
If there is an automatic feeder (ADF or RDF) installed:
The capacity of the feeder document tray is as follows:
Size ADF RDF
A3 15 25
A4, A5 30 50
Lift the cover of the glass platen and place the original with the side to be copied face down. Align the centre of the original with the arrow-shaped mark.
Gently lower the glass platen cover.
Adjust the paper guide in accordance with the size of the originals. Place the originals in the tray with the side to be copied facing upwards.
! A5 documents cannot be placed horizontally in the automatic feeder
If the standard copy settings of the photocopier (1:1 copying, automatic paper size selection, automatic exposure control, one copy) meet your requirements, you may now start copying. Otherwise, before proceeding, 3 «Copy Settings», p. 8.
Paper Feeding
The paper is automatically fed in from the cassettes or, if special paper is used, from the stack bypass ( 1 «Using the Stack Bypass», p. 11).
Press the START key (B38) to start the copy cycle. Once copying has started, it is no longer possible to change the number of copies, the size, the copy ratio or any other settings, but the exposure level may be changed by pressing the EXPOSURE keys (B20, B22).
To stop the photocopier before the end of the copy cycle, press the STOP key (B35).
COPY SETTINGSCOPY SETTINGS
Setting the number of copies
Before starting to copy, the desired number of copies can be set (1-100) by pressing the NUMERIC keys (B40). To change the number of copies set previously or to correct a typing error, press the CLEAR key (B39).
Adjusting Copy Exposure
There are two ways of adjusting the copy exposure:
1. Automatic Control
Make sure that indicator above the AUTOMATIC EXPOSURE key (B21) is on. If it is off, this means that manual exposure control is active (see below). To activate automatic mode, press the AUTOMATIC EXPOSURE key (B21).
When working with transparencies or other transparent originals, it may not be possible to use the automatic exposure function. Should this be the case, adjust the exposure manually.
2. Manual Control
To adjust the exposure manually, press the MANUAL EXPOSURE keys (B20 and B22).
- Press the B20 key to get a lighter copy or the B22 key to get a darker copy. The exposure indicator (B19) moving to the left or right represents a scale of the available exposure levels.
- If the MANUAL EXPOSURE keys (B20 and B22) are pressed when indicator A is on, automatic control is disabled and indicator A goes off.
To adjust the exposure, should the copies not correspond to the original, «If the copies are too light or too dark», p. 29.
Selecting the Paper Size
There are two ways of selecting the paper size:
1. Automatic selection
Automatic paper size selection cannot be used when working with transparencies or other transparent documents, documents with a dark background, A5 or smaller documents or when Auto Zoom mode is enabled («Auto Zoom», p. 15).
Automatic paper size selection is a standard setting, so no further setting is required. To disable it, press the PAPER SELECT key (B28) until AUTO PAPER is indicated by the paper select indicators (B29).
When the document cover (A5) is lowered to start copying, the display (B12) indicates the selected size. If you are using an optional ADF or RDF, this indication is given when you start copying by pressing the START key (B38).
2. Manual selection
* Press the PAPER SELECT key (B28) until the desired paper size is indicated by the paper select indicators (B29).
- The paper sizes indicated on the display vary according to the type and sizes of paper inserted in the photocopier's cassettes.
Selecting the copy ratio
In standard copying mode, the copying ratio is set for direct, 1:1 copying (100%).
There are two ways of changing to a different copy ratio:
1. Preset copy ratios

The preset copy ratios are:
| Reduction: | 50% (A3 - A5) |
| 70% (A3 - A4) | |
| Enlargement: | 141% (A4 - A3) |
| 200% (A5 - A3) |
Use the preset copy ratio method when changing from one standard size to another.
* Having placed the original on the glass platen or on the optional ADF or RDF, press the PRESET COPY RATIO key (B24 or B26) until the desired ratio is indicated by the preset copy ratio indicator (B6).
• The selected ratio also appears on the display (B12).
• To return the photocopier to 1:1 copying, press the DIRECT COPY key (B25).
When enlarging a document from A4R to A3, place the originals horizontally (i.e. at 90° to their normal position).
When reducing a document from A3 (set horizontally) to A4, select the A4R paper size.
2. Zoom (unlimited reduction/enlargement from 49 to 204%)
Images can be enlarged or reduced using this method with any copy ratio from 49 to 204% inclusive.
* Having placed the original on the glass platen or on the optional ADF or RDF, press the ZOOM key (B31 or B32): the copy ratio selected will appear on the display (B12).
- To return to 1:1 copying (100%), press the DIRECT COPY key (B25) or the RESET key (B34), which restores the standard copy settings.
With the standard copy settings, the photocopier automatically draws paper from the cassette containing the required size; in addition, if the paper in one cassette runs out during copying, the photocopier will automatically start taking paper of the same size, if loaded, from another cassette.
- Auto cassette selection can be disabled ( «Auto cassette switching», p. 21).
AUTO CLEARO CLEAR
When the photocopier is switched on and left idle (no key is pressed) for 2 minutes, the standard copy settings are restored automatically. This period of time is called «auto clear time».
- Auto clear time can be set from 1 to 9 minutes or the function can be disabled ( «Auto clear time», p. 20).
AUTO POWEROFFWER-OFF
If, while the photocopier is ON, no key is pressed for 5 minutes it automatically activates the ENERGY SAVING button (B36) which disactivates it. This time interval is called “auto power-off time”.
To restart the photocopier press the ENERGY SAVING button (B36).
- Various auto power-off time settings are available ( «Auto power-off time», p. 20).
- This function can be disabled (contact your local OLIVETTI service centre).
COPY OUTPUT COPY OUTPUT
The copies are fed out in different ways according to whether an optional sorter and/or RDF device are fitted.
- If the photocopier has a sorter fitted (sorter - [3] «Sorter 10», p. 34), the copies are fed out into the bins or onto the top tray.
- If the photocopier is not equipped with a sorter and the documents are positioned manually, the copies are fed out onto the copy tray in the order in which they were copied (to get the copies in the right order, you should start copying from the last page of the document – see figure). If an RDF (☐) «Recirculating Document Feeder - RDF», p. 31) is fitted and the sorter function is set, the copies are fed out onto the copy tray and are already sorted.

The stack bypass, located on the right-hand side of the photocopier (A7), holds up to 50 sheets, which the photocopier automatically feeds in for copying. The stack bypass should be used when you want to copy onto special paper, such as transparencies, cards, headed paper, labels or paper that does not fit the cassette.
Insert the paper in the stack bypass as shown below:
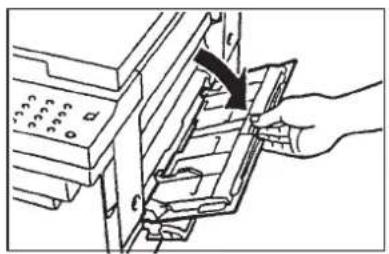
Open the stack bypass and, if necessary (i.e. for A4R or A3 size originals) remove the auxiliary tray.

natural_image
Hand inserting a card into a computer monitor (no text or symbols visible)Adjust the paper guides to fit the desired size.

Insert the sheets by placing them on the stack bypass tray with the side on which you want the copy to appear facing up.
- If you want the machine to take the paper from the stack bypass automatically, you must set the paper size before starting to make the copies (☐ «Setting the size for the stack bypass», pages 19 and 21).
* Having placed the original on the glass platen or on the optional ADF or RDF, press the PAPER SELECT key (B28) until the stack bypass icon appears on the paper out/jam indicator (B27), then proceed to make copies in the normal way.
- If you use the stack bypass in any of the following modes:
- Two-sided copying
– Image separation onto two pages - Transparency interleaving
and do not select the paper size beforehand, the paper select indicator (B29) will start to blink. Press the PAPER SELECT key (B28) until the desired paper size is indicated or, if the size of the paper in the stack bypass is different from all those indicated, until the indicator goes off. Then confirm by pressing the OK key (B13).
INTERRUMPENG KPOQNEY JOB (FOR URGENT COPIES) A COPY JOB (FOR URGENT COPIES)
This function enables you to interrupt the copying cycle in progress for the time necessary to make other, more urgent copies. When you have finished making your priority copies, the machine will resume the original copying cycle from the point where it left off.
- When the machine enters interrupt mode, neither the optional ADF or RDF may be used; place the documents on the glass platen manually. Also the functions linked to the IMAGE COMBINATION/SEPARATION key (B18), the TRANSPARENCY INTERLEAVING key (B17) and the SORTER (B15) are not available. The automatic restore and auto control off functions are also disactivated.
To set the machine in interrupt mode, press the INTERRUPT key (B41), which then starts to blink. When the copying cycle is interrupted, the key remains on.
Lift the glass platen cover (taking care that any originals present in the automatic feeder do not fall out), remove any document present and place the one you want to copy onto the glass platen.
Lower the cover, select the desired paper size and make copies in the ordinary way.
Having finished making copies, press the INTERRUPT key (B41) again to exit from interrupt mode. To resume the interrupted copying cycle, press the START key (B38).
SPECIAL FEAS DE BESTAUFESA
TWO-SIDED MODEO-SIDED MODE
The following two-sided copying functions may be used to make copies from and onto both sides of the sheet:
a) from 1 to 2 sides (from a one-sided original to a two-sided copy)
b) from 2 to 2 sides (from a two-sided original to a two-sided copy, only if the photocopier is equipped with an RDF)
c) from 2 to 1 side (from a two-sided original to a one-sided copy, only available if the photocopier is equipped with an RDF)
d) from a book to 2 sides (from adjacent pages of a book to a two-sided copy)
- In two-sided mode, a maximum of 10 copies in A4, A4R and A5 and 2 copies in A3 may be set (100 for any size if an RDF is fitted).
- The copy paper used for two-sided copying must respect the following specifications:
– Size: from A5 to A3 (A5R and non-standard sizes cannot be used).
- Weight: from 64 to 80g / m^2
a) From 1 to 2 sides (1 2)

This function enables you to make two-sided copies from one-sided originals.
To set two-sided mode, press the left TWO-SIDED MODE key (B5) until the icon appears.
If you place the originals manually, after setting the desired number of copies, place the first original on the glass platen and make a copy.
After the first original has been copied, a message (B4) prompting you to place the second original will blink. Having copied the second original, the photocopier will feed out the two-sided copy. Once this has been done, you may proceed to copy the following originals in the same way.
If you use the optional ADF or RDF, you must specify the number of originals so that, if there is an odd number, the back of the last sheet will be left blank.
To enable the automatic original count, check that the 🔊 A icon is selected and, if it is not, press the left TWO-SIDED MODE key (B5) until it appears.
- The automatic count is a standard setting: as soon as the START key (B38) is pressed, the ADF or RDF start to count the originals.
- If you are using the optional ADF, smooth out any folds in the sheets after the automatic count, having removed them from the document tray (D4) and then reposition them for copying.
To disable the automatic count, thus speeding up the copying cycle, you can indicate whether there is an even or odd number of originals yourself.
* Press the left TWO-SIDED MODE key (B5) until the 2·4… icon (even number) or the 3·5… icon (odd number) appears.
Then proceed to make copies in the normal way.
Having finished making copies, press the left TWO-SIDED MODE key (B5) until no icon is displayed or press the RESET key (B34) to exit from two-sided mode and restore the standard copy settings.
b) From 2 sides to 2 sides (2 2)

! To use this function, the photocopier must be fitted with an RDF (☐ «Recirculating Document Feeder - RDF», p. 31).
When this function is selected, two-sided originals are automatically turned over so that two-sided copies can be made.
* Press the right TWO-SIDED MODE key (B23) until the ② ▶ ③ icon appears on the display.
Place the originals in the RDF and proceed to make copies in the normal way.
Having finished making copies, press the right TWO-SIDED MODE key (B23) again until no icon is selected or press the RESET key (B34) to exit from two-sided mode and restore the standard copy settings.
c) From 2 sides to 1 side (2 1)

! To use this function, the photocopier must be fitted with an RDF (☐ «Recirculating Document Feeder - RDF», p. 31).
When this function is selected, two-sided originals are automatically turned over and one-sided copies are made.
* Press the right TWO-SIDED MODE key (B23) until the □ ▶ □ □ icon appears on the display.
Place the originals in the RDF and proceed to make copies in the normal way.
Having finished making copies, press the right TWO-SIDED MODE key (B23) again until no icon is selected or press the RESET key (B34) to exit from two-sided mode and restore the standard copy settings.
d) From a book to 2 sides

This function enables you to make two-sided copies from adjacent pages of a bound original, such as a magazine or book, on A4 or A5 paper.
Press the right TWO-SIDED MODE key (B23) until the □ ▶ 2 icon appears.
Place the original on the glass platen with the side to be copied facing downwards and the top left-hand corner in line with the top left-hand corner of the glass platen and then proceed to make copies in the normal way.
- If you want your copies to be sorted in the correct order, copy them in reverse order from the last page to the first.
Having finished copying, press the right TWO-SIDED MODE key (B23) again until no icon is selected or press the RESET key (B34) to exit from two-sided mode and restore the standard copy settings.
AUTO ZOOMO ZOOM
! To use this mode, the photocopier must be fitted with an optional ADF or RDF (☐ «Automatic Document Feeder- ADF», p. 33 and «Recirculating Document Feeder - RDF», p. 31).
When working in this mode, the photocopier automatically selects the appropriate copy ratio according to the size of the original and the selected copy paper size.
! This mode can only be used with originals of a standard size.
Transparencies and other transparent documents cannot be copied in Auto zoom mode. With this type of document, use Zoom mode or the preset ratios ( “ «Selecting the copy ratio», p. 9).
To activate this function, having placed the originals in the ADF or RDF, press the PAPER SELECT key (B28) until the desired paper size appears on the paper select indicator (B29).
Then press the AUTO-ZOOM key (B30), which will remain on, and proceed to make copies in the normal way.
To exit from the mode, press the AUTO ZOOM key (B30) again.
To restore the 1:1 copy ratio (100%), press the DIRECT COPY key (B25) or the RESET key (B34), which restores the standard copy settings.
IM ADEASEPATESTIAL MODETION MODE
This function enables you to copy adjacent pages of a book or magazine onto separate sheets in a single operation. The original does not have to be repositioned during copying.
* Press the IMAGE COMBINATION/SEPARATION key (B18): the □▶□ icon lights up.
Place the original on the glass platen with the side to be copied facing downwards and the top left-hand corner in line with the top left-hand corner of the glass platen and proceed to make copies in the normal way.
- If you want to get the copies sorted into correct page order, start with the last page and work towards the first.
Having finished making copies, press the IMAGE COMBINATION/SEPARATION key (B18) (the icon will go off) or the RESET key (B34) to exit from image separation mode and restore the standard copy settings.
This function automatically reduces two or four originals onto one or both sides of a sheet of the selected size.
To use image combination mode, the photocopier must be equipped with an optional ADF or RDF (☐) «Automatic Document Feeder - ADF», p. 33 and «Recirculating Document Feeder - RDF», p. 31).
- In image combination mode, the rear of two-sided originals cannot be copied.
- When you use the ADF for copying in this mode, Sorter-Stapler mode cannot be used ( «Stapler-Sorter 10», p. 36).
- Originals copied in image combination mode must all be of the same size.
- Only A4 and A5 sized originals (positioned vertically) may be used.
The following image combination functions are available:
a) 2 to 1: Reduces two originals and copies them onto one side of a sheet of paper. b) 2 to 1 / 2 sides: Reduces four originals and copies them onto both sides of a sheet of paper.
a) 2 to 1

This function enables you to reduce two originals and copy them onto one side of a sheet of paper.
To set image combination mode to 2 to 1, press the IMAGE COMBINATION/SEPARATION key (B18) until the 📄 ▶ 🎥 icon appears and remains on.
Place the originals in the ADF or RDF and set the desired number of copies. Now set the number of originals.
To enable automatic original count, check that the icon is selected; if it is not, press the left TWO-SIDED MODE key (B5) until it appears.
- If an ADF is fitted, be sure to eliminate any folded corners from the sheets after the automatic count has been made, pick them up from the document tray (D4) and rearrange them for copying.
To disable the automatic count, to speed up copying and reduce the risk of damage to the sheets caused by being fed into the machine several times, you may indicate whether the original has an even or odd number of pages.
* Press the right left TWO-SIDED MODE key (B5) until the 2·4… icon (even number) or 3·5… icon (odd number) appears.
Press the PAPER SELECT key (B28) until the desired size is indicated by the paper select indicator (B29).
- When working in image combination mode, automatic paper selection is not available: you must select the paper manually.
- The photocopier automatically selects the correct copy ratio according to the selected paper size ( 1 «Auto zoom», p. 15).
Proceed to make copies in the normal way.
Having finished making copies, press the IMAGE COMBINATION/SEPARATION key (B18) again until no icon is selected or press the RESET key (B34) to exit from image combination mode and restore the standard copy settings.
This function enables you to reduce four originals and copy them onto both sides of one sheet of paper.
To set image combination mode to 2 to 1/2, press the IMAGE COMBINATION/SEPARATION key (B18) until the icon is selected and remains on.
Place the originals in the ADF or RDF and specify the desired number of copies. Now specify the number of originals.
To enable automatic original count, check that the 🔊 A icon is selected; if it is not, press the left TWO-SIDED MODE key (B5) until it appears.
- If an ADF is fitted, be sure to eliminate any folded corners from the sheets after the automatic count has been made, pick them up from the original tray (D4) and rearrange them for copying.
To disable the automatic count, to speed up copying and reduce the risk of damage to sheets caused by them being fed into the machine several times, you may indicate whether the original has an even or odd number of pages.
* Press the left TWO-SIDED MODE key (B5) until the 2·4… icon (even number) or 3·5… icon (odd number) appears.
Press the PAPER SELECT key (B28) until the desired size is indicated by the paper select indicator (B29).
- When working in image combination mode, automatic paper selection is not available: you must select the paper manually.
- The photocopier automatically selects the correct copy ratio according to the selected paper size (☐ «Auto zoom», p. 15).
Proceed to make copies in the normal way.
Having finished making copies, press the IMAGE COMBINATION/SEPARATION key (B18) until no icon is selected or press the RESET key (B34) to exit from image combination mode and restore the standard copy settings.
When copying onto transparencies inserted in the stack bypass (A7), the photocopier can automatically insert a sheet of paper between two transparencies. The sheets inserted can be printed with the same images as the transparencies or left blank.
- In transparency interleaving mode, it is not possible to make more than one set of copies at a time, even if the photocopier is fitted with an optional sorter.
- Transparency interleaving mode can also be used in two-sided mode copying from 2 to 1 side (☐ «Two-sided mode», p. 13).
* To enter transparency interleaving mode, place the originals on the glass platen or in the optional ADF or RDF and press the TRANSPARENCY INTERLEAVING key (B17) until the 📄 icon (blank sheets) or the 📄 icon (printed sheets) appears: the selected icon starts to blink.
Place the originals in the stack bypass (A7) and adjust the guides to fit their size (A4 and A4R are available).
Press the PAPER SELECT key (B28) to select the size of the transparencies and confirm by pressing the OK key (B13). The ≡ or ≡ icon stops blinking and remains on.
Proceed to make copies in the normal way.
- The copy is printed with a separating sheet inserted before each transparency.
When you have finished making copies, press the TRANSPARENCY INTERLEAVING key (B17) until no icon is selected or press the RESET key (B34) to exit from transparency interleaving mode and restore the standard copy settings.
ADDITIONAL FUNCTIONSADDITIONAL FUNCTIONS
CHANGING THE STANDARD SETTINGS AND SETTINGS
The standard settings for the following functions can be changed on the basis of specific copy requirements:
01 Auto clear time
02 Auto power-off time
03 Fine zoom adjustment
04 Automatic cassette switching
05 Setting the size for the stack bypass
06 Automatic sorting
07 Cleaning the RDF
08 Standard copy settings
00 Restoring the standard copy settings
The numbers that appear beside the functions in the table above appear on the display (B12) to identify the selected function.
To activate the functions listed, press the ADDITIONAL FUNCTION key (B16), followed by the number of the function to be changed (without a leading zero for the first nine) using the NUMERIC keys (B40). Confirm your choice by pressing the OK key (B13).
- Whilst you are changing the additional functions, by pressing the ADDITIONAL FUNCTION key (B16), copies will not be made when the START key (B38) (lit in red) is pressed.
The display (B12) provides the information you need to set the functions, as shown below:

flowchart
graph LR
    A["001"] -->|PRESS OK KEY (B13)| B["1-2"]
    B -->|Number indicating the function being changed| A
    B -->|Current value of setting| C
Having made the desired changes, to exit from additional functions and restore the machine's copying functions, press the ADDITIONAL FUNCTION (B16) key. The START key (B38) changes to green again.
01) Auto clear time
When the photocopier is switched on and no key is pressed within a given period of time, the standard copy settings are restored automatically. This period of time, which is called «auto clear time» and is set initially to 2 minutes, can be changed.
Having selected the function as described previously, the display (B12) shows the numeric value currently in use (preceded by the - sign).
Set the desired auto clear time (from 1 to 9 minutes, in 1-minute steps) using the NUMERIC keys (B40) and press the OK key (B13) to confirm your choice.
- Incorrect entries can be corrected by pressing the numeric key corresponding to the desired value, which will take the place of the previous one, or the CLEAR (B39) to clear the display.
- To abort the new setting and restore the standard setting, press the RESET key (B34) before pressing the OK key (B13) to confirm your selection.
- To disable this function, set the value of 0 minutes.
02) Auto power-off time
When the photocopier is ON and no key is pressed for a certain period of time the ENERGY SAVING key (B36) is automatically enabled which shows that the machine is in standby state. This period of time, which is called the «auto power-off time» and is set initially to 5 minutes, can be changed.
- There are seven values available for the auto power-off time:
1 2 minutes
2 5 minutes
3 10 minutes
4 15 minutes
5 30 minutes
6 60 minutes
7 120 minutes
Once the function has been selected as described above, the display (B12) will show the number of the setting currently in use (preceded by the sign -).
Set the desired auto power-off time (from 1 to 7) using the NUMERIC keys (B40) and press the OK key (B13) to confirm your choice.
- Incorrect entries can be corrected by pressing the numeric key corresponding to the desired value, which will take the place of the previous one, or the CLEAR key (B39) to clear the display.
- To abort the new setting and restore the standard setting, press the RESET key (B34) before pressing the OK key (B13) to confirm your selection.
- To disable this function, contact your nearest OLIVETTI service centre.
03) Fine zoom adjustment
If you notice a slight difference in size between the original and the copy when working in 1:1 copying mode, use this function to correct the error. Adjustments can be made up to ±1% in 0.2% steps, both horizontally (X) and vertically (Y).
Once the function has been selected as described above, the display (B12) will show the value -1, which indicates that the function can be adjusted horizontally (X).
The adjustment values appear on the exposure level indicator (B19):
– each time the MANUAL EXPOSURE key (B20) is pressed, the image is reduced by 0.2%, indicated by the LEDs to the left of the central one (which corresponds to the preset value, 0%) lighting up in sequence;
– each time the MANUAL EXPOSURE key (B22) is pressed, the image is enlarged by 0.2%, indicated by the LEDs to the right of the central one (which corresponds to the preset value, 0%) lighting up in sequence.
Having completed the fine adjustment in the horizontal direction (X), press the OK key (B13) to confirm your choice.
The display (B12) shows the value -2, which indicates that you can now make the adjustment in the vertical direction (Y).
Proceed in making the fine adjustment in the vertical direction in the same way as for the horizontal direction and confirm your choice by pressing the OK key (B13).
- Incorrect entries can be corrected by pressing the numeric key that corresponds to the desired value, which will overwrite the incorrect one, or the CLEAR key (B39) to clear the display.
- To cancel the new setting and restore the standard setting, press the RESET key (B34) before pressing the OK key (B13) to confirm your choice.
04) Auto Cassette Switching
If the copy paper in the selected cassette runs out while copying, the photocopier automatically selects another cassette containing paper of the same size and continues copying. This function, which by default is ON for each cassette, may be disabled.
* Having selected the function as described above, the top cassette is selected on the paper out/jam indicator (B27) while the display (B12) shows the number of the current setting for the selected cassette (-1 = ON; -0 = OFF).
Switch automatic cassette selection for the top cassette ON or OFF by pressing the NUMERIC key (B40) that corresponds to your choice (1 = ON; 0 = OFF).
- It may be useful to turn it OFF if there is coloured or special paper of the same size, as is in the first cassette, and you do not want this to be used when the paper in the first cassette runs out.
* Press the PAPER SELECT key (B28) to select the bottom cassette and proceed as described for the top cassette.
Repeat the operation for the other cassettes present in your machine configuration and press the OK key (B13) at the end, to confirm your choice.
- Incorrect entries can be corrected by pressing the numeric key that corresponds to the desired value, which will overwrite the incorrect one, or the CLEAR key (B39) to clear the display.
- To cancel the new setting and restore the standard setting, press the RESET key (B34) before pressing the OK key (B13) to confirm your choice.
05) Setting the size for the stack bypass
When working in two-sided mode on paper inserted in the stack bypass, you must set the size of the paper. As the default setting is OFF, when you feed paper into the stack bypass, the message SELECT PAPER SIZE appears when you press the START key (B38). Instead, if you select ON, the paper size selection message is displayed whenever the paper is placed in the stack bypass (☐ «Using the stack bypass)», p. 11).
Once the function has been selected as described above, the display (B12) will show the number that corresponds to the current setting (-1 = ON; -0 = OFF) .
Switch paper size selection ON or OFF for the stack bypass by pressing the NUMERIC key (B40) that corresponds to your choice (1 = ON; 0 = OFF). Then press the OK key (B13) to confirm your choice.
- Incorrect entries can be corrected by pressing the numeric key that corresponds to the desired value, which will overwrite the incorrect one, or the CLEAR key (B39) to clear the display.
- To cancel the new setting and restore the standard setting, press the RESET key (B34) before pressing the OK key (B13) to confirm your choice.
If the photocopier is equipped with an ADF or RDF and Sorter or Stapler-Sorter (☐ «Sorter 10», p. 34 and «Stapler-Sorter 10», p. 36), all copies are fed out into the top bin if there is just one original or if the number selected for a group of originals is one. In these cases, the photocopier can be set to feed out the copies into a single bin (the top one) and the copies can be stapled manually.
- The default setting for automatic sorting is ON.
Once the function has been selected as described above, the display (B12) will show the number that corresponds to the current setting (-1 = ON: automatic sorting; -0 = OFF: the copies are fed out into the top bin or as indicated by the sorter indicators (B1-B2-B14)).
Switch automatic sorting ON or OFF by pressing the NUMERIC key (B40) that corresponds to your choice (1=ON; 0=OFF). Then press the OK key (B13) to confirm your choice.
- Incorrect entries can be corrected by pressing the numeric key that corresponds to the desired value, which will overwrite the incorrect one, or the CLEAR key (B39) to clear the display.
- To cancel the new setting and restore the standard setting, press the RESET key (B34) before pressing the OK key (B13) to confirm your choice.
07) Cleaning the RDF
This function automatically cleans the feeder roller of the optional ADF or RDF and should be activated if dark streaks appear on the originals or if they appear dirty after being fed through the ADF or RDF.
Having selected the function as indicated above, place 10 blank sheets of A4 paper in the ADF or RDF and press the START key (B38). The sheets will be fed through the ADF or RDF cleaning it without making copies.
08) Standard Copy Settings
The standard copy settings are those activated when the RESET key (B34) is pressed. You can change and store different standard copy settings or restore the settings made at the factory after changing them. The standard copy settings made at the factory are indicated in the table on p. 7.
! If you want to change the standard copy settings, before pressing the ADDITIONAL FUNCTION key (B15) to access all the editing functions, make the settings you wish to store as the standard ones.
Once the function has been selected as indicated above, the display (B12) will show the number -1, which indicates that the photocopier is ready to store the settings made as the standard copy settings.
Store or restore the standard copy settings by pressing the NUMERIC key (B40) that corresponds to your choice (1 = store; 0 = restore). Then press the OK key (B13) to confirm your choice.
- Incorrect entries can be corrected by pressing the numeric key that corresponds to the desired value, which will overwrite the incorrect one, or the CLEAR key (B39) to clear the display.
- To cancel the new setting and restore the standard setting, press the RESET key (B34) before pressing the OK key (B13) to confirm your choice.
00) Restoring the Standard Copy Settings
All changes made to functions 01 to 08 can be cancelled by restoring the standard copy settings (those made at the factory).
Having selected the function as described above, the display (B12) shows the value -1.
Enter 0 (zero) on the NUMERIC keys (B40) and press the OK key (B13) to confirm your choice.
- To cancel the restore operation and keep the changed settings, press the RESET key (B34) before pressing the OK key (B13) to confirm your choice.
PAPER ANDERTONDERONER
LOADING COPY PABERSCOPY P
When the paper in the selected cassette runs out, the paper out icon (B10) starts to blink on the control panel, and the cassette in which there is no paper left is indicated on the paper out/jam indicator (B27).
- The same indication is also given when the cassette is not correctly inserted.
- If the indication is given before you have finished copying, load the paper and press the START key (B38) a second time. The photocopier will print the remaining copies.
Loading paper into the cassettes
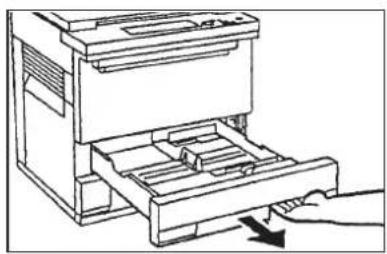
natural_image
Line drawing of a printer with an open drawer and a hand inserting a cable (no text or symbols)Grip the handle in the recess on the front part of the cassette and pull it out as far as it will go.
natural_image
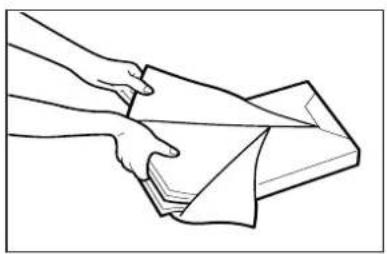
Line drawing of hands holding a folded paper or cloth (no text or symbols)Open a pack of copy paper and take out a stack of paper.

natural_image
Line drawing of a printer with a hand inserting a small object into the print (no text or symbols)Turn the stack over and place it in the cassette. The maximum paper level is indicated by the 📁 symbol. Push the cassette back in until it locks into position.
! If you want to load paper of a different size into a cassette, remember to adjust the position of the paper guides inside the cassette (「 «Adapting the cassettes to a different paper size», below).
Adapting the cassettes to a different paper size
If you want to change the size of paper in a cassette, proceed as described below.
- The cassettes can be adapted to the following standard paper sizes: A3, A4, A4R, A5, A5R. Use the stack bypass for other paper sizes (☐ «Using the stack bypass», p. 11).
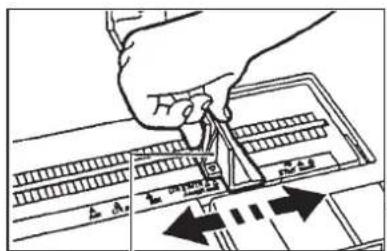
Length guide Width guide
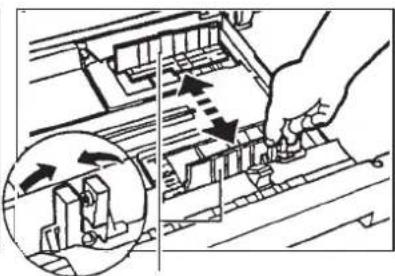
Having removed the cassette, press the lever on the guide used to regulate the length. Holding it pressed, slide the guide to the mark corresponding to the desired paper size.
Press the lever on the guide used to regulate the width. Holding it pressed, slide the guide to the mark corresponding to the desired paper size.
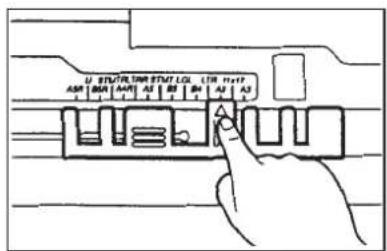
Press the paper size lever to select the desired paper size.
Replace the cassette size label with the one that corresponds to the new paper size.
Replacing a Cassette
To replace a cassette, proceed as follows.

natural_image
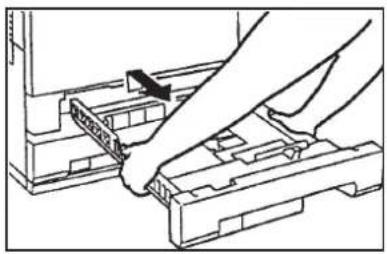
Line drawing of a printer's internal structure with a hand pressing a button (no text or symbols)Grip the handle on the cassette and pull it out as far as it will go.
natural_image
Line drawing of a hand inserting a component into a device (no text or symbols)Lift the cassette with both hands and pull it slowly out of the photocopier.

natural_image
Line drawing of hands inserting a component into a device (no text or symbols)Push the new cassette into the photocopier until it locks into position.
ADDING ADDINGER

When the toner runs out, the toner out icon 📄 (B11) starts to blink on the control panel. Take a new toner cartridge and follow the procedure described below.

natural_image
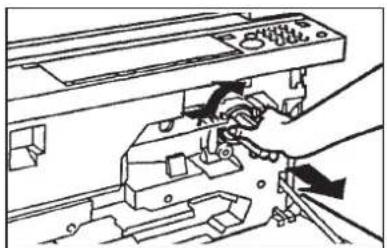
Technical line drawing of a mechanical assembly with a downward arrow indicating motion (no text or symbols)Open the front panel. Keep the empty cartridge lever pres-
natural_image
Line drawing of a hand operating a mechanical device with a handle (no text or symbols visible)sed, turn it clockwise until it reaches a horizontal position. Pull out the empty cartridge.
natural_image
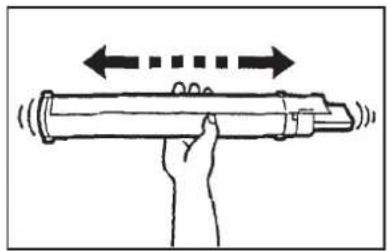
Illustration of a hand holding a cylindrical object with motion arrows indicating movement (no text or symbols)Pick up the new cartridge and holding it horizontally, shake it gently so as to distribute the toner evenly inside it.
natural_image
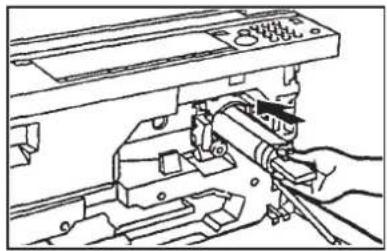
Technical line drawing of a mechanical assembly with a hand operating a tool (no text or symbols visible)Push the new cartridge in gently until it locks into position.

natural_image
Line drawing of hands operating a mechanical device with no visible text or symbolsSeal tab
Take hold of the orange seal tab and pull it out completely.
natural_image
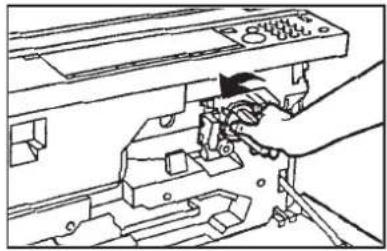
Line drawing of a hand operating a mechanical device with no visible text or symbolsTurn the cartridge handle anti-clockwise until it locks into position. Make sure that it is firmly in position to prevent leaks.
Close the front panel again.
MESSADESGAS
WHEN WRITER JARECCURSAMOCCURS
If paper gets jammed, the paper jam icon 8V (B9) starts blinking on the control panel and the point at which the paper jam has occurred is indicated by the paper out/jam indicator (B27).
The numbers displayed on the paper out/jam indicator icon (B27) correspond to the areas into which the photocopier is divided to identify where the jam has occurred.
Potential paper jam areas
1) Fixing unit and copy delivery area
2) Transfer unit
3) Optional sorter or stapler/sorter
4) Optional ADF or RDF
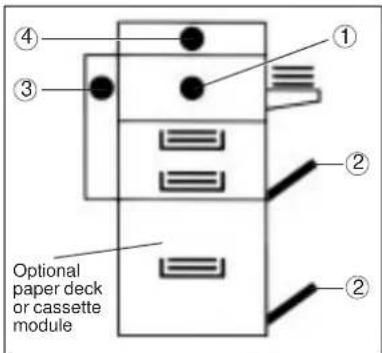
By referring to the drawing above, examine the areas indicated by the paper out/jam indicator (B27) and remove the jammed paper.
! The mechanical components in some areas are subject to high temperatures: DO NOT TOUCH any component unless expressly instructed to do so in this manual.
Paper jam in area ①
natural_image
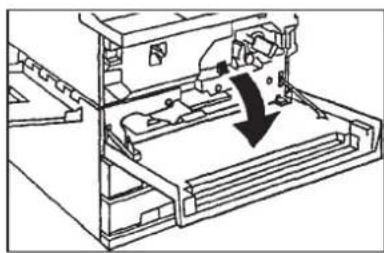
Technical line drawing of a mechanical assembly with a downward arrow indicating motion (no text or symbols)Open the front panel (A3).
natural_image
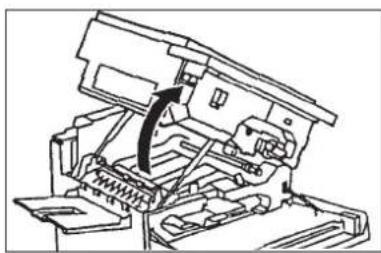
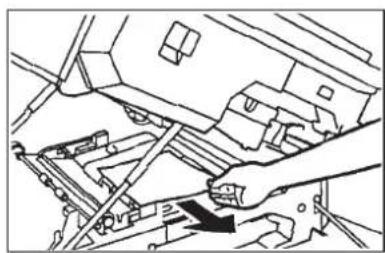
Technical line drawing of a mechanical assembly with no visible text or symbolsPress the green lever to open the Remove the jammed sheet taking photocopier (A10) and lift the top part care not to tear it. of the body of the machine.
natural_image
Technical line drawing of a mechanical assembly with a hand operating a component (no text or symbols visible)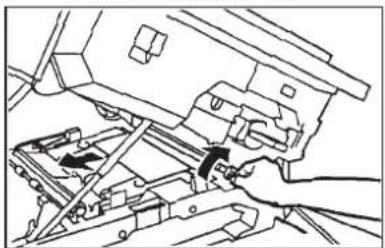
natural_image
Technical line drawing of mechanical assembly components (no text or symbols)If necessary, turn the green knob in the direction indicated by the arrow to free the sheet.
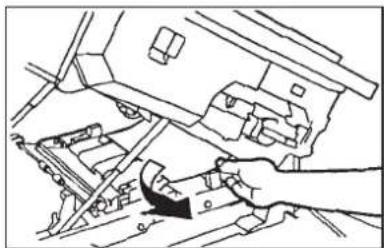
natural_image
Hand using a tool to adjust or install a vehicle component (no text or symbols visible)Remove the jammed sheet, taking care not to tear it.
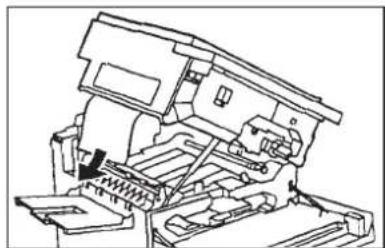
natural_image
Technical line drawing of a mechanical assembly with no visible text or symbolsIf the sheet is jammed in the top part of the body of the machine, remove it by pulling it gently downwards.
natural_image
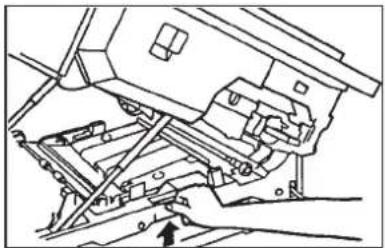
Technical line drawing of a mechanical assembly with hands and a bracket (no text or symbols)If you cannot see the jammed sheet, lift the lever in the central part of the body of the machine.
natural_image
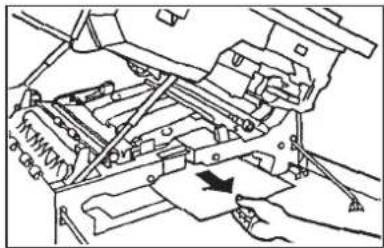
Mechanical assembly diagram showing a hand operating a paper with an arrow indicating motion (no text or symbols present)Having found the sheet, pull it out gently.
natural_image
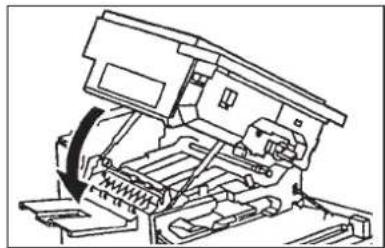
Mechanical assembly diagram showing a clamping mechanism with no visible text or symbolsLower the top part of the photocopier until it locks into position.
Paper jam while using the stack bypass

natural_image
Diagram showing a hand inserting a card into a device component with an arrow indicating direction (no text or symbols present)If paper gets jammed while you are using the stack bypass, start by removing the paper in the stack bypass and any paper jammed just inside the machine.

natural_image
Diagram of a computer tower with an open door and cable, showing internal components and directional arrows (no text or symbols)Close the stack bypass and open the panel just below it on the right-hand side of the photocopier.
natural_image
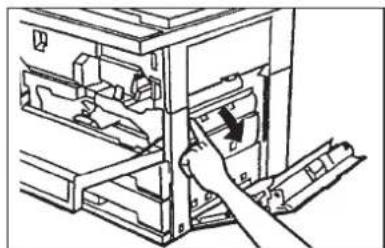
Technical line drawing of a mechanical assembly with no visible text or symbolsPull the panel marked in green forwards.

natural_image
Illustration of hands operating a computer rack with an arrow indicating motion (no text or symbols present)Remove the jammed sheet taking care not to tear it.
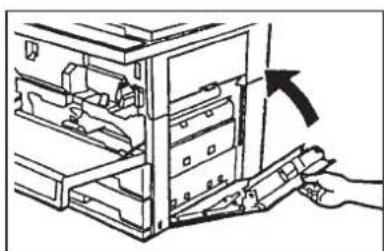
natural_image
Diagram of a computer tower with an arrow indicating a component or operation, showing internal structure without any text or symbols.Close the door until it locks into position.

natural_image
Technical line drawing of a mechanical assembly with no visible text or symbolsIf the paper out/jam indicator (B27) no longer indicates a jam, close the front panel (A3).
Paper jam in area ②
- If the numbers 1 and 2 blink simultaneously on the paper out/jam indicator (B27), check area 1 first and then area 2.

natural_image
Diagram of a computer tower with an open door and cable being inserted, showing mechanical components (no text or symbols)Open the front panel (A3) and the panel on the right-hand side of the machine. If the photocopier is fitted with an optional cassette module or paper deck, open the panel below it.

natural_image
Technical line drawing of a mechanical assembly with hands operating a bracket (no text or symbols)Pull the panel marked in green forwards.
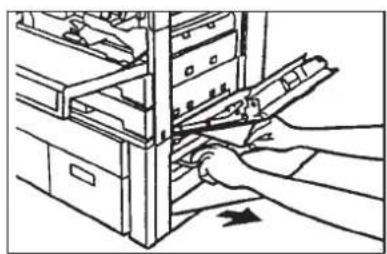
natural_image
Line drawing of hands installing or adjusting a mechanical component on a server rack (no text or symbols visible)If you can see jammed paper in the optional paper deck, pull the green handle and remove the jammed sheet.

natural_image
Line drawing of a computer monitor with an open lid and a hand inserting a button (no text or symbols)If the photocopier continues to indicate a jam, close the front panel and remove the cassette.
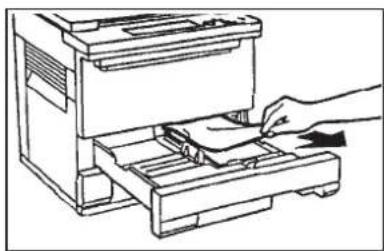
natural_image
Line drawing of a hand operating a printer with a paper being inserted (no text or symbols)Remove any jammed or incorrectly positioned paper from the cassettes.

natural_image
Line drawing of a printer with an open lid and paper feed, showing internal components and directional arrows (no text or symbols)Push the cassettes back in, close the side panels and open and close the front panel again.
If the area 2 icons continue to blink on the paper out/jam indicator (B27), check that the panels on the right-hand side of the machine are firmly closed.
If paper jams occur frequently
If paper often gets jammed, check that the paper in all the cassettes is positioned correctly, that none of it is folded or damp, and that the paper guides and paper size lever inside the cassettes are adjusted correctly ( «Adapting the cassettes to a different paper size», p. 24).
If the photocopier continues to malfunction, follow the procedure described below to clean the static charge eliminator (A14).

natural_image
Technical line drawing of a mechanical assembly with a hand operating a tool (no text or symbols visible)Having opened the front panel (A3) and lifted the top part of the body of the machine using the green lever to open the photocopier (A10), pull out the static charge eliminator (A14).

natural_image
Illustration of hands using a tool to measure a ruler, with an inset showing the measurement setup (no text or symbols)Using the brush to eliminate static charge (A13), clean the slot carefully.
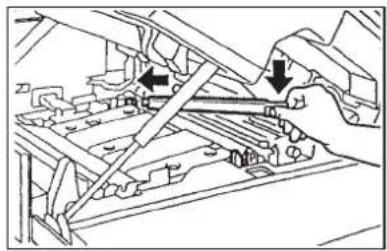
natural_image
Mechanical assembly diagram showing hands using a tool to adjust components (no text or labels visible)Reposition the static charge eliminator (A14) by pushing it using the handle until it locks into position, reinsert the brush, lower the top part of the body of the machine and close the front panel.
If the copies are too light or too dark
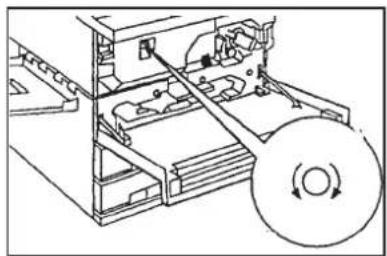
If, having checked that the glass platen is perfectly clean and that the exposure indicator (B19) does not indicate that a light or dark setting has been made manually, the copies are too light or dark, this is probably due to an incorrect exposure system adjustment. To adjust exposure, open the front panel (A3), turn the exposure regulating knob (A11) as indicated in the figure (clockwise = darker copies; anticlockwise = lighter copies).
Try making a copy and, if necessary, make further adjustments.
natural_image
Technical line drawing of a mechanical assembly with a rotating disc and internal components (no text or symbols)SELF-DIAGNOSTIC MESSAGESSELF-DIAGNOSTIC MESSAGES
If the machine malfunctions for any reason other than the paper or toner running out or paper jamming, the display (B12) will show a message comprising the letter E and a number blinking alternately.
In many cases, the problem can be solved by performing one of the following operations:
- Switching the machine off and on again.
- Removing and reinserting the toner cartridge ( «Adding toner», p. 25).
- Opening and closing the top part of the body of the machine by opening the front panel and using the green photocopier opening lever (A10).
If the photocopier continues to malfunction (the letter E and a number continue to blink alternately on the display (B12)), switch the machine off by using the power switch (A6), unplug the power cable from the mains and contact your nearest OLIVETTI service centre.
CLEANING AND CONSUMABLESCLEANING AND CC
ROUTINE CLEANINGOUTINE CLEANING
Clean the glass platen and the underneath surface of the document cover once a week or when the copies are dirty with a cloth dampened with water or a neutral detergent, and then wipe dry carefully.
When an ADF or RDF is fitted:
Slide the document feed belt manually and clean it with a cloth dampened with water or a neutral detergent, and then wipe dry carefully.

natural_image
Line drawing of a hand cleaning a surface with a cloth (no text or symbols)On the COPIA 9021, we recommend you use the consumables indicated below, which are available from all OLIVETTI dealers.
Copy paper
In addition to standard size copy paper, transparencies, labels and other types of paper are available. Contact your local OLIVETTI dealer.
• To obtain high-quality copies, use paper of the type recommended by OLIVETTI.
- To prevent the paper getting damp, keep it wrapped in its original packing.
Black toner for the COPIA 9021
When the toner runs out, the toner out icon (B11) starts blinking on the control panel. Use the specific toner for this photocopier which is available from all OLIVETTI dealers.
- Keep the toner in a cool place out of direct sunlight: maximum temperature 30 °C, humidity 80%.
- Do not throw empty toner cartridges away with your normal rubbish. Put them in a bag so that no residual toner is released into the environment and dispose of them in accordance with the regulations in force.
RECIRCULATING DOCUMENT FEEDER - RDFTING DOCUMENT FEEDER - RDF (inside cover, sect. inside) cover, sect.
This optional device automatically positions documents on the glass platen. The RDF is also capable of automatically turning the originals over so that two-sided originals can be copied. When the copying session is over, the originals are placed on the document tray (C4) and are thus ready for another copying cycle.
To locate the parts of this device, ☐ p. 6.
Main functions
As well as automatically turning over two-sided documents, the RDF enables copies to be sorted even if the photocopier does not have a sorter. In this case, the RDF makes complete copies of the group of originals and deposits them on the tray as many times as necessary in order to meet the desired number of copies, as shown in the figure to the right.

To enable the sorting function, having placed the originals in the RDF and set the printing parameters, press the SORTER key (B15) until the (B2) icon appears.

Usable Documents
| Unit weight of document: | from 50 to 105 g/m2 |
| Size of document: | from A5 to A3 (A5 documents cannot be set horizontally) |
| Capacity of document tray: | A3 25 sheets (80 g/m2)A5 or A 50 sheets (80 g/m2) |

Do not place the following kinds of document in the RDF:
- Documents that are torn or have large punched binding holes
• Excessively crumpled or rolled-up documents
• Documents held together with paper clips or staples
• Carbon paper or other documents that cannot be transported easily
• Transparencies or other highly transparent documents
Using the RDF
natural_image
Diagram showing a hand holding a device with arrows indicating movement, and an inset close-up of a device component (no text or symbols)
natural_image
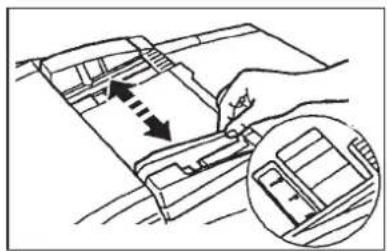
Technical line drawing of a mechanical component with an arrow indicating rotation (no text or symbols)Adapt the paper guide (C5) to the size of the documents.
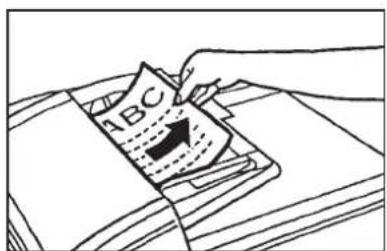
Place the documents (preferably of the same size) in the document tray (C4) with the side to be copied facing upwards.
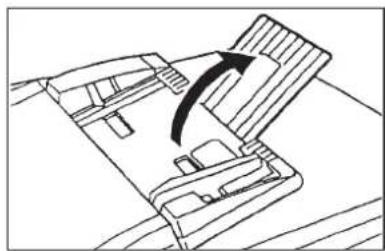
When using A3, A4R and A5 documents, open the auxiliary paper tray.
Removing jammed documents

If paper gets jammed in the RDF, the paper jam indicator 8 ^v (B9) and the paper out/jam indicator (B27) blink at the same time, the latter indicating area 4 (「 «When a paper jam occurs», p. 26).
To remove jammed documents from the glass platen or inside the RDF, follow the procedure described below:
Remove all documents from the RDF. Open the feeder cover and remove the jammed documents.

natural_image
Diagram of a hand using a tool to adjust or install a component, showing arrows indicating motion (no text or symbols present)
natural_image
Line drawing of a hand inserting a card into a device (no text or symbols)Open the internal cover and remove the jammed documents.
natural_image
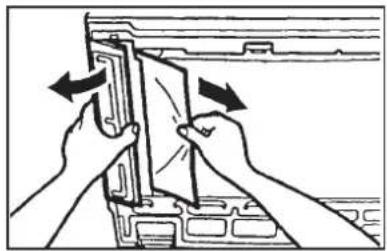
Illustration of hands installing or adjusting a component with arrows indicating direction (no text or symbols)Lift the RDF. Open the bottom left cover and remove the jammed document.
natural_image
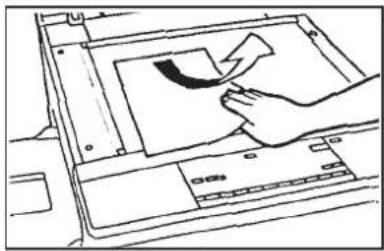
Line drawing of a hand pressing down on a computer monitor with a curved arrow indicating motion (no text or symbols)If there is a document on the glass platen, remove it. Lower the RDF.

Put the various pages of the document into order and put them back in the RDF. Press the START key (B38).
Technical Characteristics
Power supply voltage: 220/240 V, 50 Hz
Maximum power consumption: 170 W
Dimensions (mm): Length 616, Width 513, Height 149
Weight: approximately 12.5 kg
AUTOMAOM DOCUMENT FEEDER - AOF DOCUMENT FEEDER - (inside cover sectin) dD cover sect
This optional device automatically places documents on the glass platen. At the end of the copying cycle, the documents are placed in the tray.
To locate the parts of this device, ☐ p. 6.
Usable Documents
Unit weight of document:
from 50 to 105 g/m²
Size of document:
from A5 to A3 (A5 documents cannot be set horizontally)
Capacity of document tray:
A3 15 sheets (80 g/m
2)
A5 or A4 30 sheets (80 g/m²)
! Do not place the following kinds of document in the ADF:
- Documents that are torn or have large punched binding holes
• Excessively crumpled or rolled-up documents
• Documents held together with paper clips or staples
• Carbon paper or other documents that cannot be transported easily
• Transparencies or other highly transparent documents
Using the ADF

Adapt the paper guide (D5) to the size of the documents.

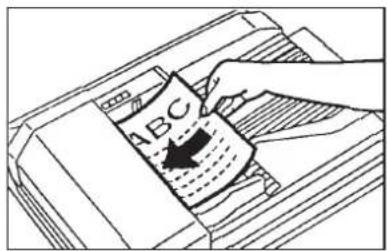
Place the documents (preferably of the same size) in the document tray (D4) with the side to be copied facing upwards.

Removing jammed originals
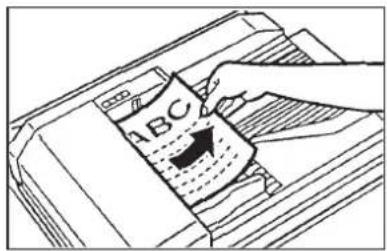
If paper gets jammed in the ADF, the paper jam indicator 8√ (B9) and the paper out/jam indicator (B27) blink at the same time, the latter indicating area 4 (☐ «When a paper jam occurs», p. 26).
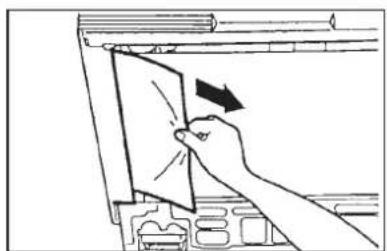
To remove jammed documents from the glass platen and inside the ADF, follow the procedure described below:

natural_image
Diagram of a mechanical component with internal channels and an arrow indicating direction (no text or symbols)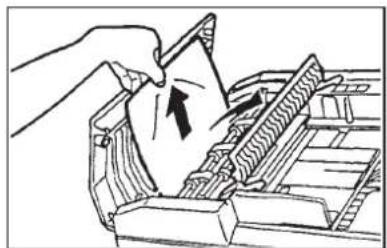
natural_image
Hand placing a plastic bag into a mechanical component (no text or symbols visible)Remove all documents from the ADF.
Open the feeder cover.
Open the internal cover and remove the jammed documents.
natural_image
Hand inserting a card into a printer (no text or symbols visible)Lift the ADF. Pull out the jammed document from the left-hand side. If there is a document on the glass platen, remove it. Lower the ADF.

natural_image
Line drawing of an open file or folder with a grid-like structure inside (no text or symbols)
Put the pages back into order and place them in the ADF. Press the START key (B38).
Technical Characteristics
Power supply voltage: 220/240 V, 50 Hz
Maximum power consumption: 170 W
Dimensions (mm): Length 585, Width 513, Height 120
Weight: approximately 11 kg
SORSERR10(### code,dece b d)
The sorter enables you to arrange multiple copies into ordered sets.
To locate the parts of this device, p. 6.
Sorter functions
- Sorter mode
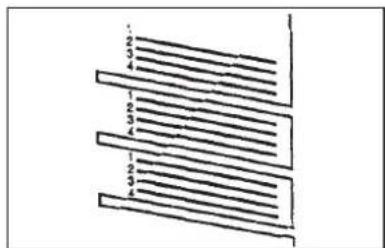
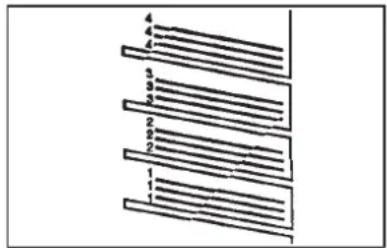
With this option enabled, when you copy a multipage document, the copies are automatically sorted into sets arranged in page order. These sets are fed out of the photocopier into the bins with the pages in order.
The sorter has 10 bins. If you try to make more than 10 sets of copies in sorter mode, the photocopier automatically changes the number of sets requested to 10.
natural_image
Pure diagram of parallel horizontal lines with numbered labels, no text or symbols present- Group mode
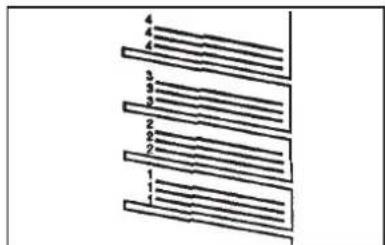
When you copy a multipage document, all the copies of the same page are grouped together in one bin. The copies are therefore fed out into the bins in groups of the same page.
The sorter has 10 bins. If you try to copy more than 10 pages, the copying cycle stops after the tenth page. To continue copying, remove the copies from the bins and press the START key (B38).
- If you do not activate sorter or group mode, the copies will be fed out into the top tray without being sorted.
Using the Sorter
Place the documents on the glass platen, or in the ADF or RDF and press the SORTER key (B15) until the icon that corresponds to the desired operating mode is selected:
Sorter mode:

Group mode:

Proceed to make copies in the normal way.
Removing jammed copy paper
If paper gets jammed in the sorter, the paper jam indicator 8V (B9) and the paper out/jam indicator (B27) blink at the same time, the latter indicating area 3 ( «When a paper jam occurs», p. 26).
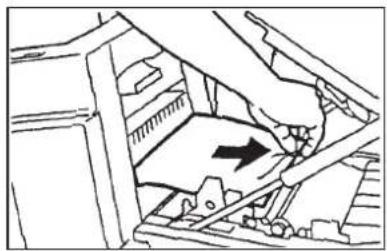
To remove the jammed sheets, follow the procedure described below:
natural_image
Mechanical assembly diagram showing a hand operating a component with an arrow indicating direction (no text or symbols present)
natural_image
Mechanical assembly diagram showing a gear mechanism with no visible text or symbols
natural_image
Line drawing of a mechanical device with no visible text or symbolsHaving opened the front panel and lifted the top part of the body of the machine by operating the green photocopier opening lever (A10) (the sorter tilts outwards), remove the jammed paper from the sorter, checking that there are no more sheets jammed inside the photocopier.
Lower the top part of the body of the machine, close the front panel and return the sorter to its original position.
Technical Characteristics
Paper:
From 64 to 80 g/m²
Capacity per bin:
• Non-sorter mode Top tray all sizes 100 sheets
- Sorter mode
From 1st to 10th bin
A4 or A5
30 sheets
A3
10 sheets
- Group mode
From 1st to 10th bin
A4 or A5
20 sheets
A3
10 sheets
Max. power consumption:
40 W
Dimensions (mm):
Length 333, Width 566, Height 358
Weight:
approximately 8.9 kg
As well as sorting multipage copies into sets, the stapler-sorter also staples the sets of copies made. To locate the parts of this device, p. 6.
Stapler-sorter functions
- Sorter mode
With this option set, when you copy a multipage document, the copies are automatically sorted into sets arranged in page order. These sets are fed out of the photocopier into the bins with the pages in order.
The stapler-sorter has 10 bins. If you try to make more than 10 sets of copies in sorter mode, the photocopier automatically changes the number of sets requested to 10.

natural_image
Pure diagram of parallel horizontal lines with numerical labels, no text or symbols present- Group mode
When you copy a multipage document, all the copies of the same page are grouped together in one bin. The copies are therefore fed into the bins in groups of the same page.
The stapler-sorter has 10 bins. If you try to copy more than 10 pages, the copying cycle stops after the tenth page. To continue copying, remove the copies from the bins and press the START key (B38).
- Stapler-sorter mode
When you copy a multipage document in the ADF or RDF, the copies are sorted into sets in page order. When you have finished copying, each set of copies is stapled automatically.
- If you do not activate stapler-sorter, sorter or group mode, the copies will be delivered into the top tray without being sorted.
Using the Stapler-Sorter
Place the documents on the glass platen, or in the ADF or RDF and press the SORTER key (B15) until the icon that corresponds to the desired operating mode is selected:
Sorter mode:
Group mode:
Stapler-sorter mode:
Proceed to make copies in the normal way.

When using stapler-sorter mode with documents placed directly on the glass platen, make sure that the side you want to copy is facing downwards and that the corner to be stapled is in the top right-hand corner.
When using stapler-sorter mode with the documents placed in the ADF or RDF, make sure that the corner to be stapled is in the top left-hand corner of the document tray.
- If the document was placed on the glass platen manually, at the end of the copying cycle, press the MANUAL STAPLING key (F3) to staple the sets of copies.
Stapling with Manual Document Insertion
This function enables you to manually insert the documents in the stapler-sorter for stapling. Up to 20 sheets may be stapled together.
Align the edges of the sheets to be stapled and place the sheets in the bin below the top tray.

Removing jammed copy paper
If paper gets jammed in the stapler-sorter, the paper jam indicator 84v (B9) and the paper out/jam indicator (B27) blink at the same time, the latter indicating area 3 (☐ «When a paper jam occurs», p. 26). To remove the jammed sheets, follow the procedure described below:

natural_image
Mechanical assembly diagram showing a hand pressing down a component with an arrow indicating direction (no text or symbols present)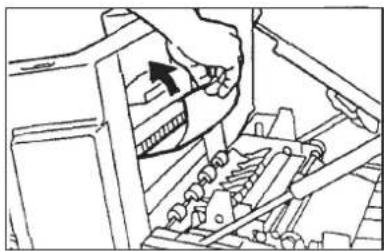
natural_image
Mechanical assembly diagram showing a hand operating a gear mechanism with no visible text or symbols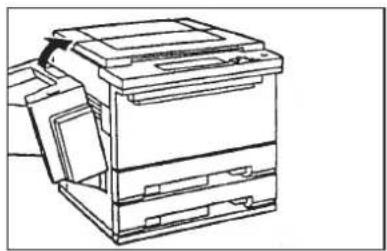
natural_image
Line drawing of a mechanical device with no visible text or symbolsHaving opened the front panel and lifted the top part of the body of the machine by operating the green photocopier opening lever (A10) (the stapler-sorter tilts outwards), remove the jammed paper from the stapler-sorter, checking that there are no more sheets jammed inside the photocopier.
Lower the top part of the body of the machine, close the front panel and return the stapler-sorter to its original position.
Replacing the Staple Cartridge
When there are no staples left in the stapler, the load staples indicator (F2) lights up. To replace the used staple cartridge, follow the procedure described below:
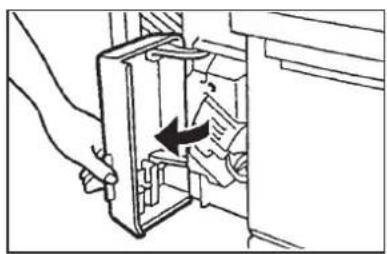
natural_image
Line drawing of a hand inserting a device into a container with an arrow indicating the internal mechanism (no text or symbols present)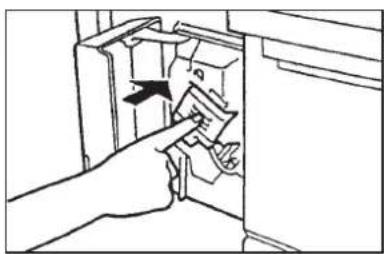
natural_image
Line drawing of a hand inserting a card into a cabinet (no text or symbols)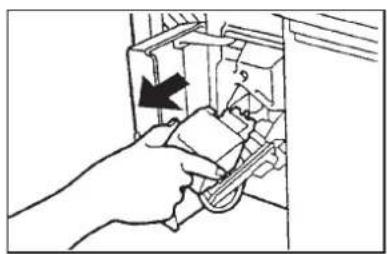
natural_image
Hand inserting a component into a device (no text or symbols visible)Open the stapler unit panel (F4) Press the stapler unit inwards and (there is a compartment for two spare remove your hand. cartridges inside it).
The stapler unit slides out. Remove it.
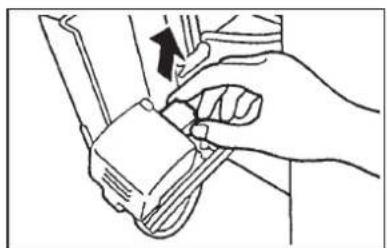
natural_image
Line drawing of a hand holding a car seatbelt, with a black arrow indicating the grip (no text or symbols present)
natural_image
Diagram of a device component being processed into a smaller internal part (no text or symbols visible)
natural_image
Line drawing of a hand holding a device with an arrow indicating the process (no text or symbols present)Remove the empty cartridge.
Remove the black cover from the new cartridge.
Insert the new cartridge and push the stapler unit in until it locks into position. Close the stapler unit panel (F4).
Removing Jammed Staples

If staples get jammed, the manual stapling key (F3) blinks. To eliminate the jam, follow the procedure described below:

natural_image
Hand inserting a component into a device (no text or symbols visible)Remove the stapler unit as described previously in «Replacing the staple cartridge» (p. 38),
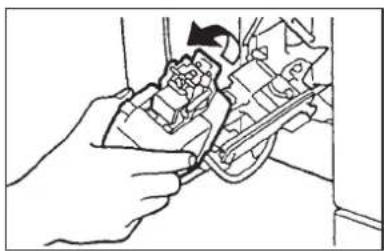
natural_image
Line drawing of a hand holding a device with a tool, no text or symbols presentGrip the stapler unit and lift it. With y our thumb, push catch 1 (green) down and, with your index finger, pull metal plate 2 out until it locks.


natural_image
Mechanical assembly diagram showing a lever mechanism with an arrow indicating motion (no text or labels)Remove any jammed staples. Return the metal plate to its original position, making sure that it is held in place by the green catch.
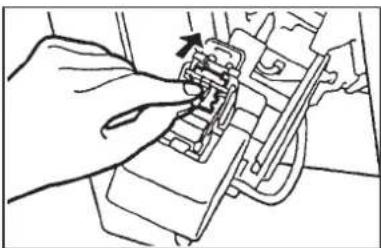
natural_image
Line drawing of a hand using a tool to adjust or install a mechanical component (no text or symbols visible)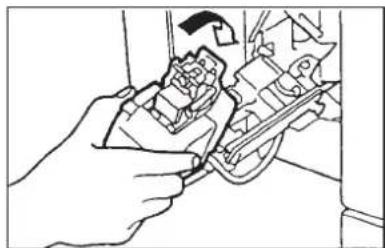
natural_image
Line drawing of a hand holding a small object with a tool, no text or symbols presentClose the stapler unit carefully, push it into its compartment until it locks into position and close the panel.
Technical Characteristics
Paper:
From 64 to 80g / m^2
Capacity per bin:
• Non-sorter mode Top tray all sizes 100 sheets
- Sorter mode From 1st to 10th bin A4 or A5 30 sheets
- Group mode
- Stapler-sorter mode
Max. power consumption:
Dimensions (mm):
Weight:
40 W
Length 333, Width 576, Height 358
approximately 9 kg
A3 10 sheets
A4 or A5
A3 10 sheets
A4 or A5
A3 10 sheets
20 sheets
20 sheets
In its basic configuration, the photocopier has two standard cassettes. By installing the paper deck, you can have an extra reserve of 1500 sheets of paper.
The paper loading procedure is similar as for the cassettes (☐ «Loading paper into the cassettes» p. 24).
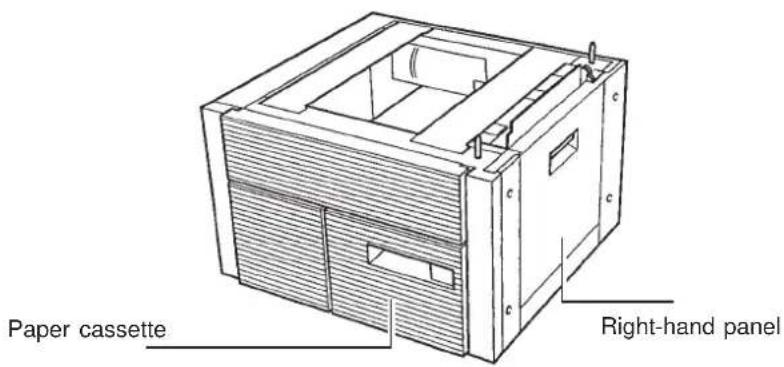
Removing jammed copy paper
If paper gets jammed in the Paper deck, the paper jam indicator 8V (B9) and the paper out/jam indicator (B27) blink at the same time, the latter indicating area 2 (☐ «When a paper jam occurs», p. 26).
Proceed to remove the jammed sheets as described previously (「 «Paper jam in area 2», p. 28).
Technical Characteristics
| Capacity of cassette: | 1500 sheets (80 g/m2) |
| Dimensions (mm): | Length 610, Width 614, Height 414 |
| Weight: | approximately 31.7 kg |
CASSETTE MODULEASSETTE MODULE
In its basic configuration, the photocopier has two standard cassettes. By installing the cassette module, you can have an extra reserve of 250 sheets of paper, for example, to use for a different paper size.
The paper loading procedure is the same as for the standard cassettes (☐ «Loading paper into the cassettes» and «Adapting the cassettes to a different paper size», p. 24)
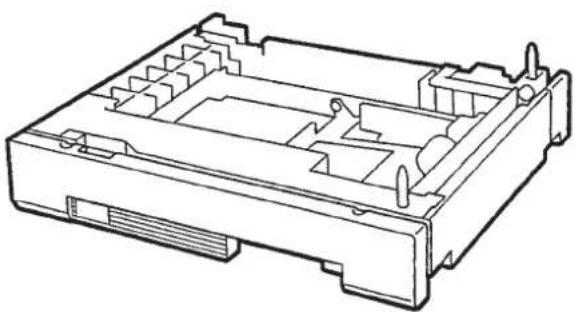
natural_image
Technical line drawing of a mechanical component with internal cavities and mounting holes (no text or symbols)Removing jammed sheets
If paper gets jammed in the cassette module, the paper jam indicator 84V (B9) and the paper out/jam indicator (B27) blink at the same time, the latter indicating area 2 (☐ «When a paper jam occurs», p. 26). Proceed to remove the jammed sheets as described previously (☐ «Paper jam in area 2», p. 28).
Technical Characteristics
| Capacity of cassette: | 250 sheets (80 g/m2) |
| Dimensions (mm): | Length 585, Width 572, Height 105 |
| Weight: | approximately 9 kg |
CONTROODNIC/ PRINTER UNIT AND/ PRINTER UNIT (inside cover, sectinSide).cover), sect
The control card enables you to manage the use of the photocopier more efficiently, by restricting access to authorized personnel only, and allowing you to check the number of copies made by each card holder and the total number of copies made.
Using the control card
If the (B8) icon blinks when the photocopier is switched on, insert the control card in the slot in order to use the photocopier.
- If the icon continues to blink even after the control card has been inserted, make sure that you have inserted it correctly, that it is not damaged, that the total number of copies has not reached the maximum limit and that it is not a card to which access is denied.
- If the photocopier cannot be activated when a valid control card has been inserted, call your local OLIVETTI service centre.
Printer Unit
By connecting the printer unit to the control card reader, you can keep a record of photocopier use for administrative purposes, such as cost per copy, cost per user, billing and inventory.
INDEXINDEX
A
ADF 6, 22, 33-34
Auto cassette switching 10, 21
Auto clear 10, 20
Auto power-off 10, 20
Auto zoom 15
Automatic Document Feeder see ADF
B
Basic configuration 4
Book see Copying from a book
Bypass see Stack bypass
C
Cassette module 40
Changing the standard copy settings 22
Clearing a stored copy job 23
Consumables 30
Control card 6, 41
Control panel 4
Copy counter 6, 41
Copy paper 24, 30
Copying from a book 14, 15, 19, 21
E
Exposure 5, 29
F
Four originals onto one copy 17
G
Group mode 34, 36
I
Installation 2
J
Jammed staples 39
L
Loading paper 11, 24
N
Number of copies 8
0
One original onto two copies 14, 15
P
Paper cassettes 24, 40
Paper deck 40
Paper jams 26-29, 32-34, 38, 39
Power supply 2
Precautions 3
Preset copy ratios 9
Printer unit 6, 41
R
RDF 6, 22, 31-32
s
Selecting the copy ratio 9
Selecting the paper size 8-9
Self-diagnostic test 29
Setting up the photocopier 2, 3
Sorter 10, 22, 31, 34, 36
Stack bypass 11, 18, 21
Standard copying 7, 22, 23
Standard copy settings 7, 22
Standard paper sizes 3
Staple cartridge 38, 39
Stapler 36-39
Storing a copy job 23
T
Toner 25, 30
Transparencies 18
Two originals onto one copy 13, 16, 17, 19
Two-sided mode 13-14, 29
Z
Zoom 9, 15, 20
A
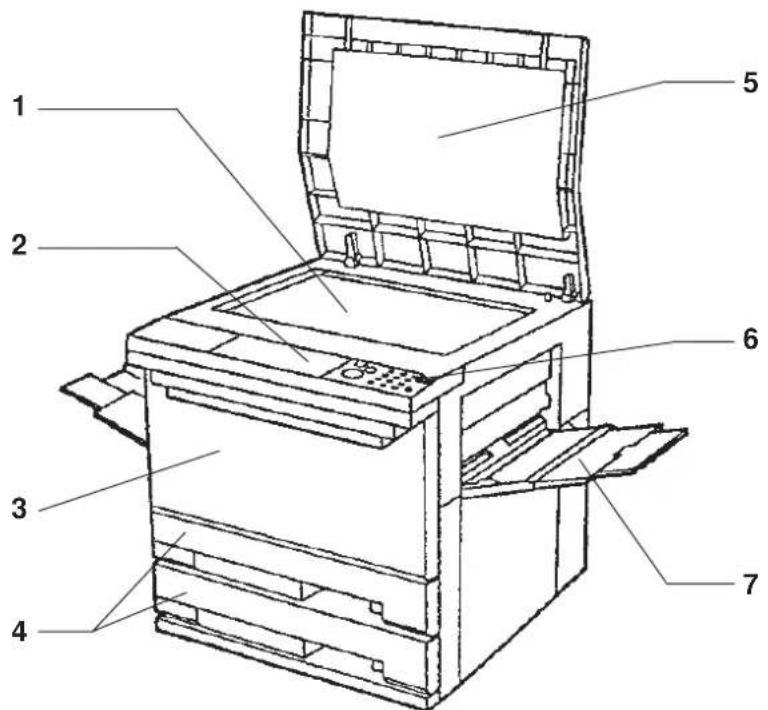

B
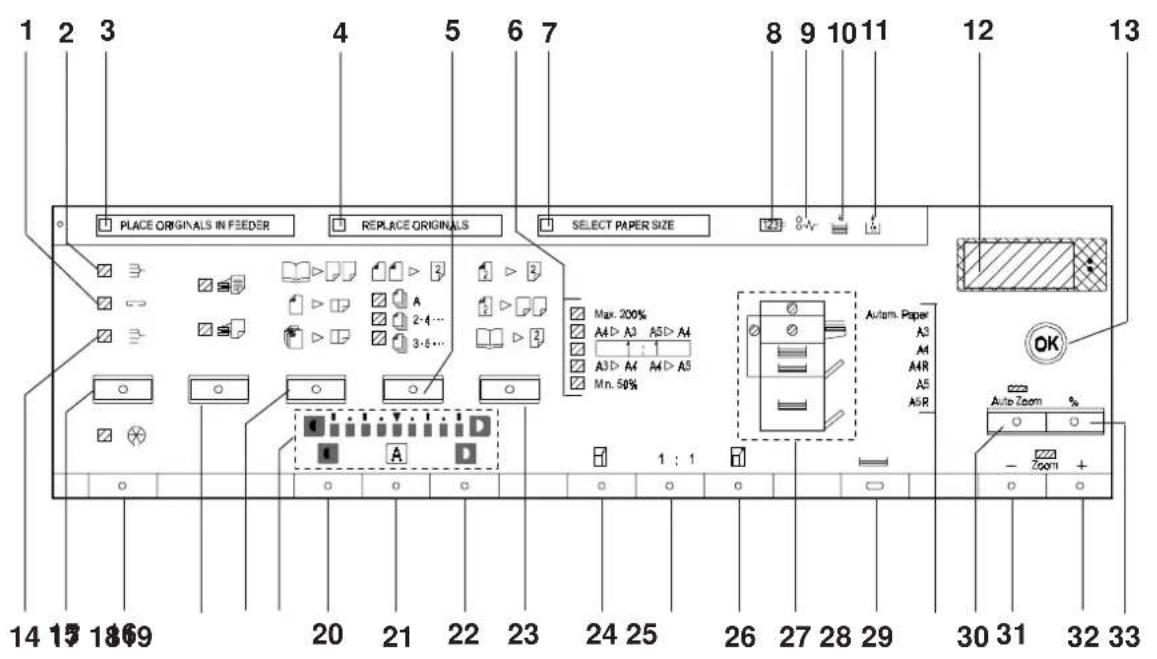
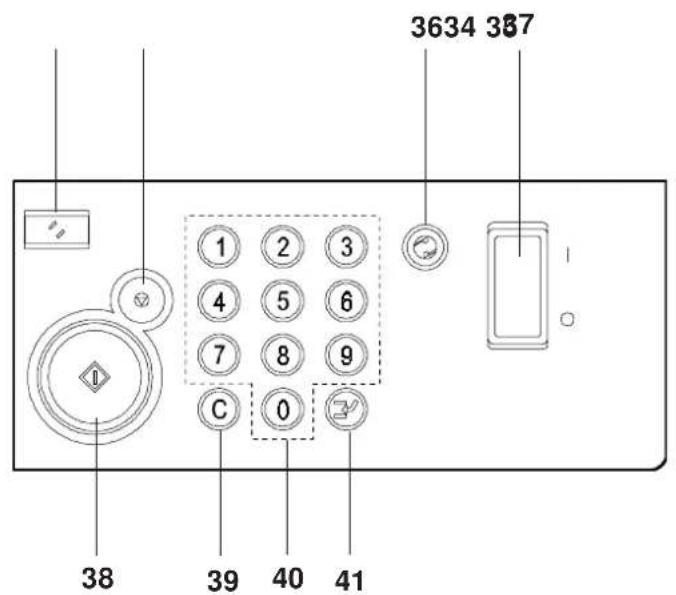
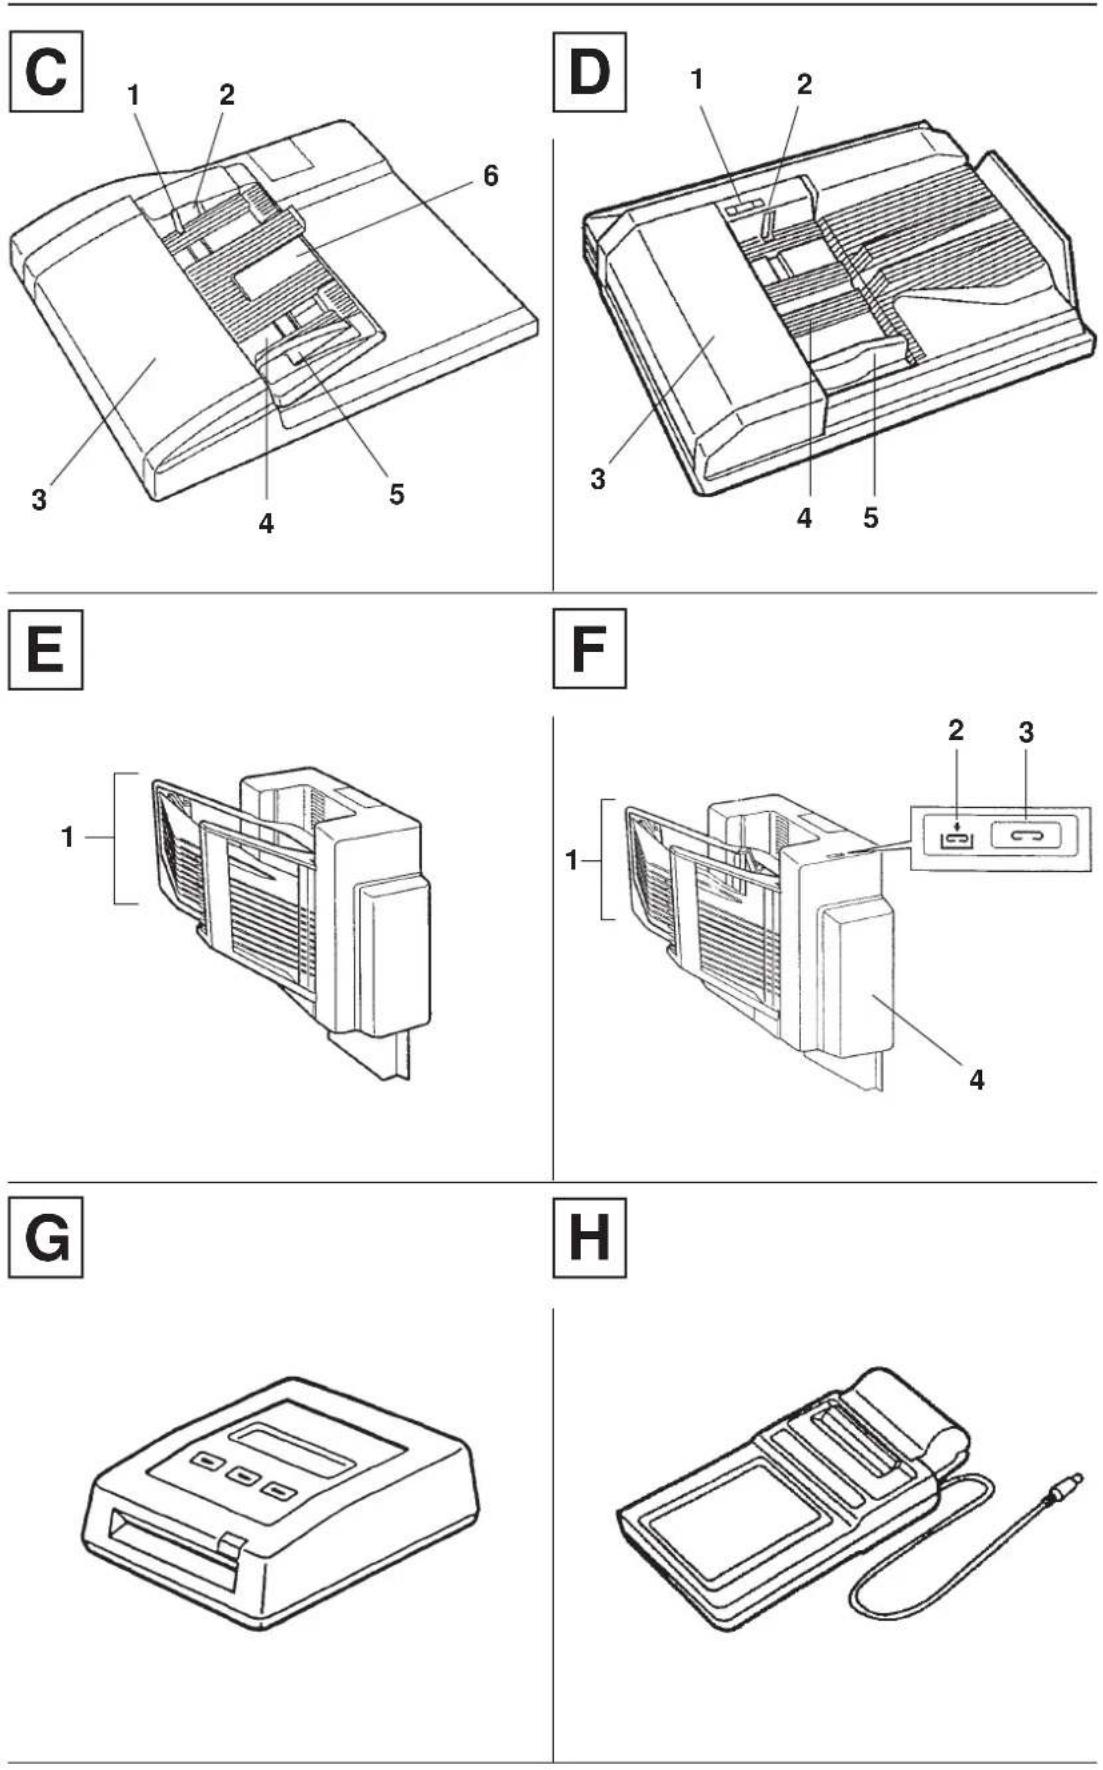

- COPIA 9021
- CONTENTSCONTENTS
- BASIC COPYING
- SPECIAL FEATURES
- ADDITIONAL FUNCTIONS
- PAPER ANERTONDERONER
- MESSAGIESGAS
- CLEANING AND ACONSUMABLESAND CONSUMABLES
- INDEX
- INTRODUCTION INTRODUCTION
- Advanced Features and Functions
- Special Features
- Control Panel
- HOW TO USE THE INSTRUCTION BOOKLETHOW TO USE THE INSTRUCTION BOOKLET
- Graphics and text layout
- Keys and other parts of the control panel
- Components
- INSTALLATION PRECAUTIONS
- Select a safe power outlet
- Leave adequate space around the photocopier
- OPERATORERARECAUNICONSECTIONS
- GENERAL FEATURESBRAESEA
- BASIC CONFIGURATASINT(DONIFIC(R)atect de A.)
- CONTRODRONER ANEle cover, sect. Sect.
- RECIRCULARING DOCUMENT FEEDER - RDFTING DOCUMENT FEEDER - RDF (Inside cover, Sect. C)(Inside cover, Sect. C)
- AUTOMAOM DOCUMENT FEEDER - ADFA DOCUMENT FEEDER - (Inside cover, Sect. D)(Inside cover, Sect. D)
- SORSER10TER 10 (Inside cover, Sect. E)(Inside cover, Sect. E)
- STAPLER SORARELROBRIO (Inside cover, Sect. F)(Inside cover, Sect. F)
- CONTROL CARD READER (Inside cover, Sect. G)
- PRINTER UNIT (Inside cover, Sect. H)(Inside cover, Sect. H)
- BASIC COPYINGBASIC COPYING
- START-UP-UP
- PLACEMENT OF THE MENGOFALTHE ORIGINAL
- Paper Feeding
- COPY SETTINGSCOPY SETTINGS
- Setting the number of copies
- Adjusting Copy Exposure
- Automatic Control
- Manual Control
- Selecting the Paper Size
- Automatic selection
- Manual selection
- Selecting the copy ratio
- Preset copy ratios
- Zoom (unlimited reduction/enlargement from 49 to 204%)
- AUTO CLEARO CLEAR
- AUTO POWEROFFWER-OFF
- COPY OUTPUT COPY OUTPUT
- INTERRUMPENG KPOQNEY JOB (FOR URGENT COPIES) A COPY JOB (FOR URGENT COPIES)
- SPECIAL FEAS DE BESTAUFESA
- TWO-SIDED MODEO-SIDED MODE
- a) From 1 to 2 sides (1 2)
- AUTO ZOOMO ZOOM
- IM ADEASEPATESTIAL MODETION MODE
- a) 2 to 1
- ADDITIONAL FUNCTIONSADDITIONAL FUNCTIONS
- CHANGING THE STANDARD SETTINGS AND SETTINGS
- 01) Auto clear time
- 02) Auto power-off time
- 03) Fine zoom adjustment
- 04) Auto Cassette Switching
- 05) Setting the size for the stack bypass
- 07) Cleaning the RDF
- 08) Standard Copy Settings
- 00) Restoring the Standard Copy Settings
- PAPER ANDERTONDERONER
- LOADING COPY PABERSCOPY P
- Loading paper into the cassettes
- Adapting the cassettes to a different paper size
- Replacing a Cassette
- ADDING ADDINGER
- MESSADESGAS
- WHEN WRITER JARECCURSAMOCCURS
- Potential paper jam areas
- Paper jam in area ①
- Paper jam in area ②
- If paper jams occur frequently
- If the copies are too light or too dark
- SELF-DIAGNOSTIC MESSAGESSELF-DIAGNOSTIC MESSAGES
- CLEANING AND CONSUMABLESCLEANING AND CC
- ROUTINE CLEANINGOUTINE CLEANING
- Copy paper
- Black toner for the COPIA 9021
- RECIRCULATING DOCUMENT FEEDER - RDFTING DOCUMENT FEEDER - RDF (inside cover, sect. inside) cover, sect.
- Main functions
- Usable Documents
- Using the RDF
- Removing jammed documents
- Technical Characteristics
- AUTOMAOM DOCUMENT FEEDER - AOF DOCUMENT FEEDER - (inside cover sectin) dD cover sect
- Using the ADF
- Removing jammed originals
- SORSERR10(### code,dece b d)
- Sorter functions
- - Sorter mode
- - Group mode
- Using the Sorter
- Removing jammed copy paper
- Stapler-sorter functions
- - Stapler-sorter mode
- Using the Stapler-Sorter
- Stapling with Manual Document Insertion
- Replacing the Staple Cartridge
- Removing Jammed Staples
- CASSETTE MODULEASSETTE MODULE
- Removing jammed sheets
- CONTROODNIC/ PRINTER UNIT AND/ PRINTER UNIT (inside cover, sectinSide).cover), sect
- Using the control card
- Printer Unit
- INDEXINDEX
- A
- B
- C
- E
- F
- G
- I
- J
- L
- N
- 0
- P
- R
- s
- T
- Z
Brand : OLIVETTI
Model : Copia 9021
Category : Photocopier