
DW452ED - Dishwasher KKT Kolbe - Free user manual and instructions
Find the device manual for free DW452ED KKT Kolbe in PDF.


| Product Type | Built-in Dishwasher |
| Brand | KKT Kolbe |
| Model | DW452ED |
| Dimensions (W x D x H) | 44.8 x 57.0 x 81.5 cm |
| Height Adjustable | Yes, via levelling feet (max 80.5 cm with feet fully extended) |
| Power Supply | 230 V, 50 Hz, 10 A fuse recommended |
| Water Pressure Range | 0.04 - 1 MPa |
| Energy Efficiency Class | E |
| Energy Consumption (ECO) | 0.704 kWh per cycle |
| Water Consumption (ECO) | 39 L per cycle |
| Capacity | 9 place settings |
| Number of Programs | 7 (Intensive, Universal, ECO, Glass, 90 Min, Rapid, Pre-Rinse) |
| Noise Level | 47 dB(A) |
| Noise Emission Class | C |
| Delay Start | Up to 24 hours (1 hour increments) |
| Special Functions | Half load, Extra drying, Key lock/Child lock |
| Water Softener | Adjustable with salt container |
| Rinse Aid Dispenser | Yes, adjustable dosage |
| Filter System | Multi-stage (coarse, main, fine filter) |
| Spray Arms | Upper and lower, removable for cleaning |
| Baskets | Upper rack height adjustable, lower rack with foldable spikes, cutlery basket, cup rack, cutlery rack |
| Safety Features | Aquastop inlet hose, child lock, condensation protection strip |
| Installation | Built-in, levelling feet, door panel compatible |
| Warranty | 24 months |
| Spare Parts Available Until | 12.04.2029 |
Frequently Asked Questions - DW452ED KKT Kolbe
User questions about DW452ED KKT Kolbe
0 question about this device. Answer the ones you know or ask your own.
Ask a new question about this device
Download the instructions for your Dishwasher in PDF format for free! Find your manual DW452ED - KKT Kolbe and take your electronic device back in hand. On this page are published all the documents necessary for the use of your device. DW452ED by KKT Kolbe.
USER MANUAL DW452ED KKT Kolbe
natural_image
Technical line drawing of a front-loading washing machine (no text or symbols)
natural_image
Line drawing of a woven basket with a handle and grid pattern (no text or symbols)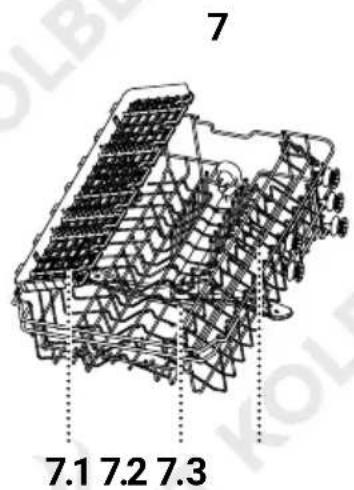
natural_image
Technical line drawing of a multi-tiered mechanical component with no visible text or symbolsnatural_image
Simple line drawing of a hand pouring liquid from a container into a pot (no text or symbols)natural_image
Illustration of a hand pressing down on a mechanical component with an arrow indicating rotation (no text or symbols)
2.3 Klarspüldosierer

Achtung!
natural_image
Diagram of a device with a handle inserting into a device (no text or symbols visible)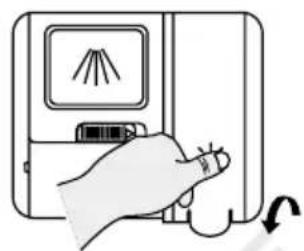
natural_image
Hand pressing a button on a device with a screen showing light rays (no text or symbols visible)natural_image
Simple line drawing of a baby with a crossed-out bottle and no text or symbolsHinweise
Hinweis
natural_image
Technical line drawing of a mechanical component with rollers and brackets (no text or symbols)Besteckablage

natural_image
Diagram of two mechanical assembly steps showing frame structure and rotation direction (no text or labels)natural_image
Four sequential line drawings of a car chassis with wheels, showing mechanical assembly and mounting details (no text or symbols)1 432
natural_image
Pure geometric diagram of parallel lines with no text, numbers, or symbolsnatural_image
Diagram showing a wire mesh structure before and after modification, with no visible text or symbols.Besteckkorb

Achtung!
natural_image
Circular diagram with grid pattern and crossed X marks, no readable text or symbolsnatural_image
Silhouette of various kitchen utensils including fork, knife, spoon, and fork (no text or symbols)12345678
natural_image
Technical line drawing of a mechanical component with internal flow arrows (no text or symbols)natural_image
Illustration of two hands holding a transparent tray with a circular component, no text or symbols present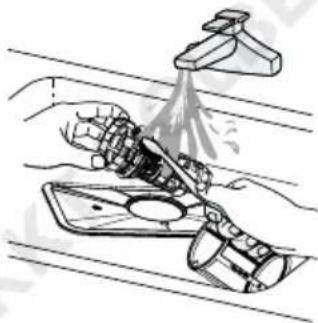
natural_image
Illustration of a hand using a tool to clean or spray liquid from a surface, with no visible text or symbols.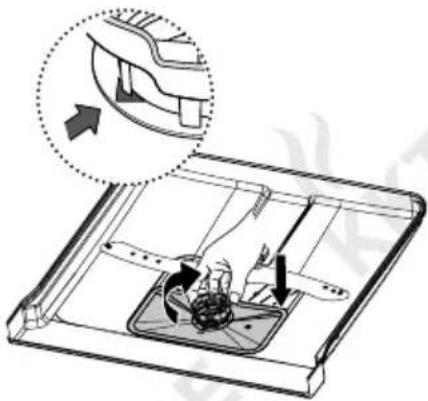
natural_image
Technical diagram of a mechanical assembly with an arrow indicating direction, showing internal components and a magnified inset (no text or symbols)4.3 Sprüharme

natural_image
Illustration of a kitchen sink with a hand using a tool to clean or wash the surface (no text or symbols)natural_image
Line drawing of a faucet with a valve (no text or symbols)natural_image
Diagram of a screwdriver inserted into a mechanical component, enclosed in a dotted circle (no text or symbols)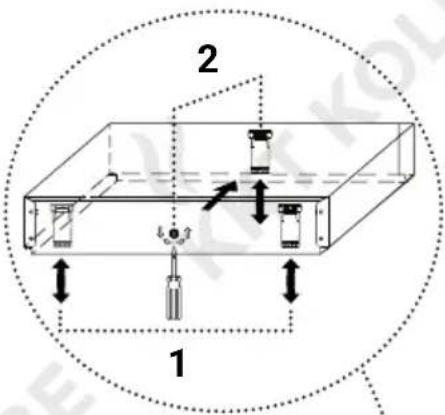
natural_image
Technical line drawing of a rectangular box with a circular top and internal structure, showing internal components and dotted lines indicating alignment (no text or symbols)2
natural_image
Diagram of a screwdriver inserted into a device with a close-up view (no text or symbols)natural_image
Technical line drawing of a mechanical component with no visible text or symbols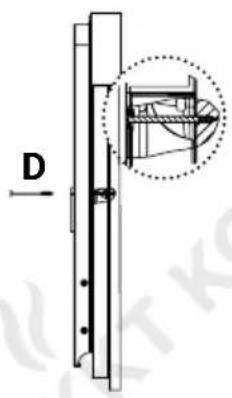
Maße der Türblende:
$$ B 4 3 9 \pm 1 \mathrm{mm} \times H 5 9 5 \pm 1 \mathrm{mm} $$
natural_image
Technical line drawing of a refrigerator with a close-up inset showing internal components (no text or symbols)natural_image
Diagram of a cabinet with internal components and directional arrows indicating movement (no text or symbols)6.8 Montage des Geschirrspülers
User's manual
for your dishwasher
Model: DW452ED
natural_image
Technical line drawing of a front-loading washing machine (no text or symbols)
Thank you for your confidence and congratulations on the purchase of your new gas hob.
Read this manual thoroughly, before unpacking the appliance.
It contains important information about safe installation, use and maintenance, as well as important warnings about the use of your appliance.
Mark the passages that are important for you, keep the manual so that you can refer to it at any time and also pass it on to other users.
In view of the constant further development, we reserve the right to make any necessary modifications to the appliance and/or the manual in order to better meet the requirements of user-friendliness, user protection and the current technical standard.
You can always find the latest version of your user's manual on the corresponding product page or in the "Questions & Answers" section of our online shop at www.kolbe.de.
You have chosen a good appliance that will serve you for many years with proper operation and care.
Should you have any complaints despite our through quality control, please contact our in-house customer service.
They will be happy to help you.
For a smooth process in the event of any queries, we recommend that you note the 20-digit serial number of your appliance in the field below.
This can be found on the rating plate on the side of the appliance door.
Your KKT KOLBE Team
Serial number of my appliance:
KKT KOLBE
User manual
Dishwasher, model DW452ED
Version 1.5
KKT KOLBE is a registered trademark.
Important Safety Instructions 4
Hints and Symbols 10
- Product Overview 14
1.1 Appliance components
1.2 Appliance specifications
1.3 Control panel
- Using the Dishwasher 18
2.1 Before first use
2.2 Water softener
2.3 Rinse aid dispenser
2.4 Detergent dispenser
2.5 Preparing and loading dishes
2.6 Crockery baskets and cutlery basket
- Operating the Dishwasher 33
3.1 Washing program overview
3.2 Dish washing operation
3.3 Additional features
3.4 Removing the dishes
- Cleaning and Maintenance 38
4.1 Cleaning the appliance
4.2 Filtering system
4.3 Spray arms
4.4 Caring vor the dishwasher
- Troubleshooting 44
5.1 Problems, possible causes and what to do
5.2 Error codes
- Installation 49
6.1 Water connection
6.2 Connection to the power supply system
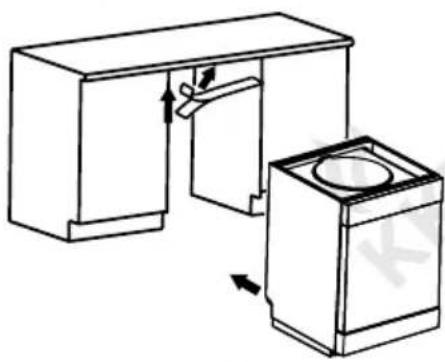
6.3 Positioning of the appliance
6.4 Levelling and height adjustment of the dishwasher
6.5 Mounting the door panel
6.6 Tension adjustment of the door spring
6.7 Attaching the condensation protection
6.8 Mounting the dishwasher
- Technical data 58
Declaration of conformity 59
Support and service 60

Important Safety Instructions
This manual is the basis for handling the appliance.
Read and follow the instructions described in it carefully before installing and operating your dishwasher.
The manufacturer is not responsible for damage or problems, which have been caused by not following the instructions, incorrect installation or improper handling.
Danger from explosive hydrogen gas
- If a hot water system has not been used for two weeks or more, explosive hydrogen gas may form under certain conditions.
Therefore, rinse pipes that have not been used for a long time by letting the water flow from each tap for a few minutes. This will release any accumulated hydrogen gas.
Since the gas is fl ammable, do not smoke or use an open fl ame during this time.
General safety
- This appliance is designed for indoor household use and is intended for cleaning dishes. Use it exclusively for its intended purpose.
- Never attempt to modify the product features of this appliance, the cord or the power plug.
- The appliance is not suitable for use by persons with reduced physical, sensory or mental capabilities or lack of experience and knowledge (including children) unless they are supervised or instructed in the safe use of the appliance.
- If the power cord or water hoses are damaged, the appliance must not be used. This also applies to damage to the worktop, control panel or in the floor area, as internal machine parts could become freely accessible.
- The power cord may only be replaced and the appliance repaired by a certified electrician.
- Always switch off and disconnect the appliance from the power supply before cleaning and maintenance.
- Do not pull the plug out of the socket by the cable and keep the cable dry to avoid damage and electric shock.
- During operation, the outer surfaces of the dishwasher may heat up.
Installation
- It is imperative that the installation is carried out in accordance with all relevant building regulations and requirements of the local waterworks.
- This appliance is equipped with a grounding plug and must be connected to an power outlet that is installed and grounded in accordance with all applicable regulations to prevent electric shock.
If in doubt, consult a qualified electrician. - Make sure that the surfaces surrounding the appliance (including the underside of the worktop, if applicable) are adequately protected against moisture to prevent damage from escaping steam.
- Make sure that the power cable is not bent or pinched during installation.
- If the plug is no longer accessible after installation, a disconnecting device must be integrated into the fixed wiring with at least 3 mm contact spacing in all poles.
- Connect the appliance to the main water valve with new hose sets. Do not reuse old sets.
Proper use
- Do not operate your dishwasher unless all enclosure panels are properly in place.
- This appliance is designed for normal household washing loads only.
- Only use detergents, rinse aid and salt suitable for automatic dishwashers and follow the manufacturer's dosage recommendations.
Do not use soap, hand dishwashing detergent or washing powder. - Some dishwashing detergents are highly alkaline and can be very dangerous if swallowed.
Also avoid skin and eye contact with detergents and water and keep children away from the dishwasher when the door is open.
Remove any detergent residue from the dispenser after use. - Place sharp objects so that they cannot damage the door seal.
- Knives and other sharp or pointed utensils must be placed in the basket with their tips pointing downwards or in a horizontal position to prevent cuts.
-
Only wash dishes that are labelled dishwasher-safe or follow the manufacturer's recommendations.
-
Do not wash objects with this appliance that have been in contact with corrosive, acidic or alkaline chemicals, paint, gasoline, iron or steel deposits.
- In case of broken dishes, do not use the appliance until all shards been removed to avoid damage.
- Open the appliance door very carefully during operation and only at the beginning of a washing programme.
Otherwise hot water and detergent could escape.
- Do not leave the appliance door fully open except when loading and unloading the dishwasher.
- Never stand or sit on the open appliance door or the dish rack and do not load them with heavy objects. Doing so may cause damage and unbalance the appliance.
- It is recommended to unplug the appliance and turn off the water supply when not in use.
Child safety and pets
- Keep small parts and packaging materials away from children and pets.
These can be very dangerous if swallowed or pulled over the head, for example. - Check the inside of the appliance before starting a washing cycle.
Children or pets may enter the appliance if the door is left open. - Keep all detergents in a safe place and out of reach of children and pets.
- Some water may remain in the dishwasher after the washing cycle is finished. This water is not potable and may contain detergent residues.
Notes and Icons
In this manual

Warning of danger to persons
Pay special attention to safety instructions marked with this icon and act with appropriate caution to avoid danger to life and health. Pass on these warnings to other users also.

Beware of damage
Follow the instructions marked with this icon especially to avoid damage to the appliance.
Also pass on these safety instructions to all users.

Informations and tips
Following the instructions marked with this icon will provide you with useful information, facilitate the respective procedure and may save you from many a problem.
Note on illustrations
The images in this manual are for illustrative purposes and may vary.
For appliances, components and accessories

EU conformity
The product complies with the applicable EU requirements regarding safety, environmental protection and health protection.

Follow the instructions for use provided
Read this manual carefully, especially the relevant sections, before using the product and pass on the relevant information to other users.
Environmental protection and disposal
Notes on disposal
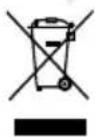
No disposal in household waste (WEEE marking)
Do not dispose of the product as unsorted waste.
Take it to a collection point for the recycling of electrical and electronic equipment for reuse and recovery.
To do this, disconnect the mains cable and make the door closing device unusable.

Recyclable material (Möbius loop)
Separate the relevant components of the product by type from the residual waste and dispose of them in accordance with local regulations.

Recyclable material (Triman icon)
Separate the product from residual waste for disposal according to the accompanying sorting instructions.
• The environment and health are endangered by incorrect disposal.
By ensuring that the appliance and its packaging are disposed of properly, you help to avoid possible hazards.
- The materials used are selected carefully and should be recycled in order to reduce the use of raw materials and waste.
Separate their components by type and dispose of them accordingly.
- For informations on current disposal methods and recycling,
contact your local council, your waste disposal company or the seller.
Notes on water and energy saving
- Always bear in mind that washing dishes in the dishwasher following this manual will mostly use less energy and water than washing them by hand.
- If possible, use the ECO programme. This is particularly energy-efficiient and environmentally friendly.
- To reduce the environmental impact of wastewater, pay attention to the composition of your cleaning products. For example, those labelled „Bio“ or „Eco“ are usually more environmentally friendly because they contain no or only small amounts of environmentally harmful active ingredients.
The cleaning effect may be limited as a result.
- To avoid unnecessarily high water and energy consumption, do not prewash the dishes manually.
This is normally not necessary.
- Note that water and energy can be saved by respecting the maximum loading capacity indicated in this manual.
Also follow the further instructions for loading the dishwasher in the corresponding chapter.
Notes on transporting the appliance
If you need to transport the appliance after unpacking / at a later time, observe the following instructions to avoid damage:
- Keep the original packaging of the product and always transport the appliance packed in it in the same way as when it was delivered. Observe the markings on it.
If the original packaging is not present:
- Secure all loose / removable parts, so that they cannot touch each other.
- Avoid impact on the appliance and its components and take appropriate protective measures if necessary.
- Ensure that the appliance is in a horizontal position when transporting it and when putting it down.
1. Product Overview
1.1 Appliance components
1 Inner pipe
2 Lower spray arm
3 Salt container
4 Detergent and rinse aid dispenser
5 Filter assembly
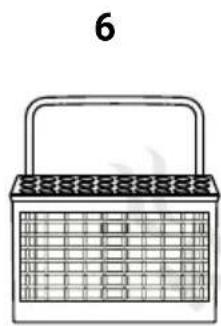
6 Cutlery basket
7 Upper crockery basket
7.1 Cutlery rack
7.2 Cup rack
7.3 Lower spray arm
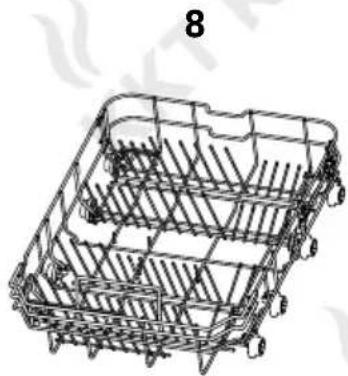
8 Lower crockery basket
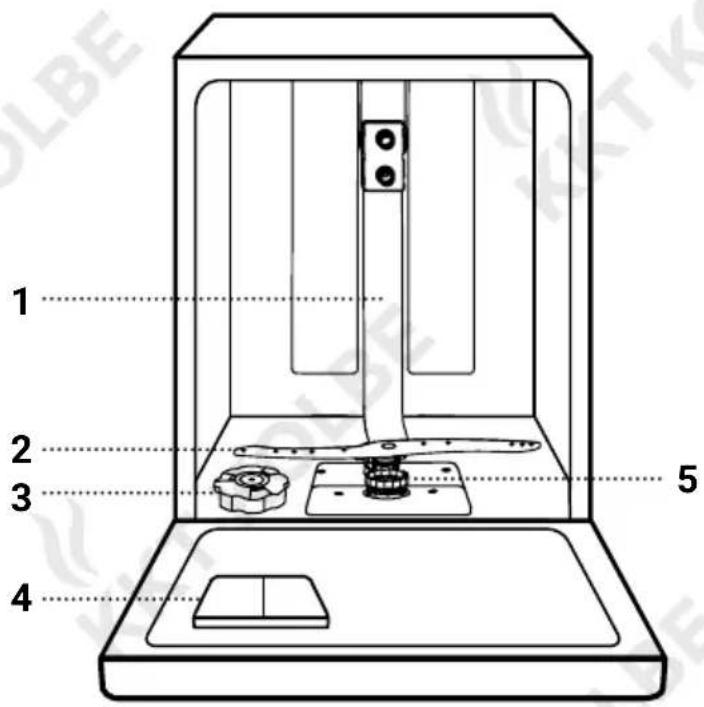
natural_image
Line drawing of a woven basket with a handle and grid pattern (no text or symbols)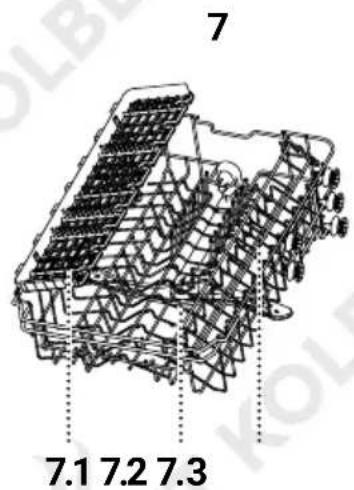
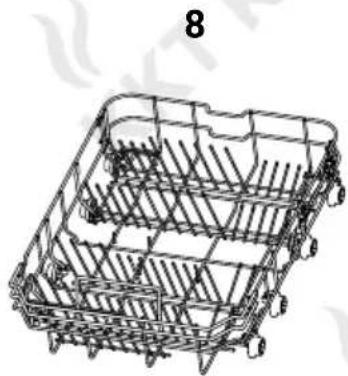
natural_image
Technical line drawing of a multi-tiered mechanical component with no visible text or symbols1.2 Appliance specifications
Product dimensions
Width (W) 44.8 cm
Depth (D1) 57 cm
Depth (D2)
incl. open door
Plinth recess (P) 4.6 cm
Height (H) 81.5 cm
Max. height
with turned out feet 80.5 cm
Power cable length 150 cm
Drain hose length 140 cm
Aquastop length 150 cm
Height of plinth panel 10 - 15 cm
Door panel dimensions W 43.9 ± 0.1 cm H 59.5 ± 0.1 cm
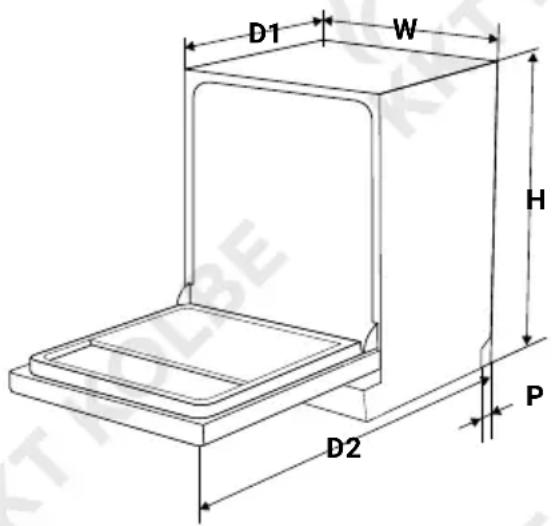
Hints on operation
• Maximum permissible water pressure / inlet: 1 MPa.
• Minimum permissible water pressure / inlet: 0.04 MPa.
- Load limit per wash cycle: 9 place settings.
- Energy saving function: In standby mode, the appliance switches off after 15 minutes without any input.
1.3 Control panel
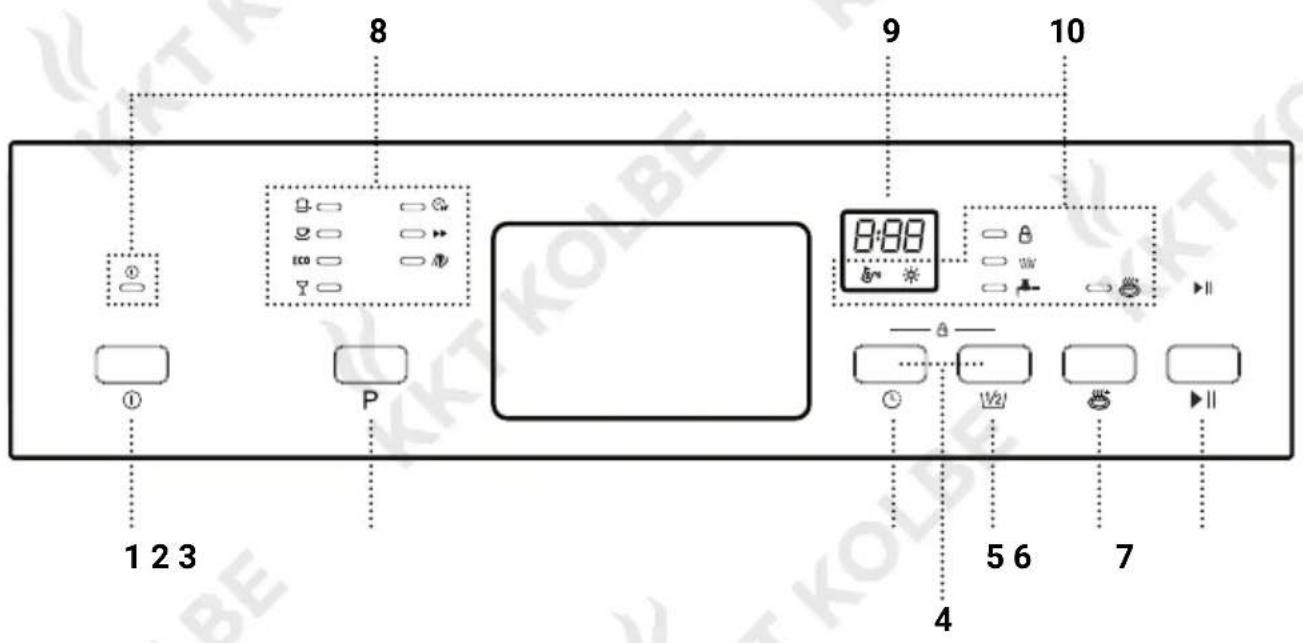
1 On Off
Switching the appliance on/off by pressing the button. Signal lamp indicates switched-on status.
2 P
Program Program selection by pressing the button repeatedly if necessary.
Corresponding program indicator lamp light s up.
3
Start time pre-selection Shifting the start time of the selected program by 1 hour each time the button is pressed (max. 24 h).
4
Key lock / Locking / Unlocking the control panel (except On/Off button) by holding down the ① and ② button (3sec). Indicator lamp lights up.
5 1/2
Half load Reduced energy and water consumption for washing cycles with half load by pressing the button. Indicator lamp lights up.
Selectable for programs 📁, 🌐 and 🍼
6
Extra drying Increased drying performance by pressing the button. Indicator lamp lights up.
7 ▶||
Start / Pause Starting / pausing the selected program by pressing the button.
8 Program indicators lamps
| Intensive | |
| Universal | |
| Eco | |
| Glass | Display of the currently selected program / Program details see table in the corresponding chapter. |
| 90 Minutes | |
| Rapid | |
| Pre-rinse | |
9 8:88 Display Time / status display / display of error codes.
10 Signal and indicator lamps
| 1 | On Indicates that appliance is switched on. |
| Salt Indicates when rinsing salt must be added. | |
| Rinse aid Indicates when rinse aid must be added. | |
 Indicates key lock activation. Indicates key lock activation. | |
| Half load Indicates currently selected „Half load“ fu | |
| Water failure Indicates when the water supply is sw does not work. | |
| Extra drying Indicates currently selected „Extra dryi |
V2 Half load Indicates currently selected „Half load“ function.
Water failure Indicates when the water supply is switched off / does not work.
Extra drying Indicates currently selected „Extra drying“ function.
2. Using the Dishwasher
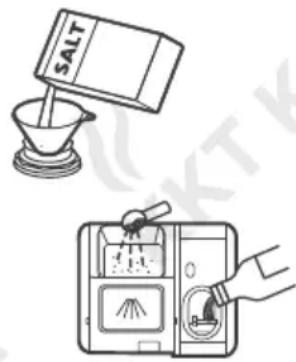
2.1 Before first use
- When installing the appliance, follow the installation instructions in this manual.
- Adjust the water softener according to your water hardness.
- Fill the salt container.
- Fill and adjust the rins aid dispenser.
- Fill the detergent dispenser.

Note
If your appliance smells slightly of solvent or similar at the beginning, this is normal.
With new appliances, plastic and synthetic odours can occur during the first 20 to 30 washing cycles due to heating. However, these odours will gradually dissipate.
2.2 Water softener

The water softener is designed to remove limescale, minerals and salts from the water,
to ensure optimum washing results and to prevent lime-scale residues on dishes, accessories and appliance parts, as well as harmful or adverse effects on the operation of the appliance due to deposits resulting from hard water.
For information about the hardness of your water supply, contact your local water authority.
Adjusting the salt dosage
The water softener must be adjusted manually according to the hardness of the water in your region.
- Switch on the appliance.
- Within 60 seconds after turning on the appliance, press and hold the program button P for more than 5 seconds to enter the water softener setting mode.
- Press the program button P repeatedly until the dosage setting corresponding to your water hardness appears on the display (sequence: H1→H2→H3→H4→H5→H6; see table)
- Press the on/off button ⏻ to confirm the setting.
| °dH (D) | Water hardness | Mmol/l | Dosage setting | Salt consumption | |
| °fH (F) | °Clarke (GB) | ||||
| 0 - 5 0 - 9 0 - 6 0 - 0.94 H1 0 | |||||
| 6 - 11 | 10 - 20 | 7 - 14 | 1.0 - 2.0 | H2 | 9 |
| 12 - 17 | 21 - 30 | 15 - 21 | 2.1 - 3.0 | H3 | 12 |
| 18 - 22 | 31 - 40 | 22 - 28 | 3.1 - 4.0 | H4 | 20 |
| 23 - 34 | 41 - 60 | 29 - 42 | 4.1 - 6.0 | H5 | 30 |
| 35 - 55 | 61 - 98 | 43 - 69 | 6.1 - 9.8 | H6 | 60 |
- 1^ = 1.25^ = 1.78^ = 0.178mmol / l
- Factory setting: H3
Filling the salt container

Attention! Risk of damage!
- Any type of salt not specifically intended for use in dishwashers, especially table salt, will damage the water softener.
Only use rinsing salt intended for dishwashers. - If any spilled grains of salt or salty water remain on the bottom of the machine for a long time, this can lead to corrosion.
To avoid this, do not fill the softener with salt until just before starting a wash cycle.
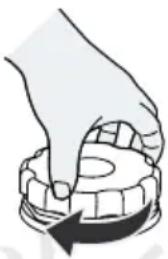
- Remove the lower basket and unscrew the cap of the salt container (Position see section Appliance components).
- Place the end of the supplied funnel into the hole and pour in about 1.5kg of dishwasher salt.
- Fill the salt container to its maximum limit with water. It is normal for a small amount of water to come out of the salt container.
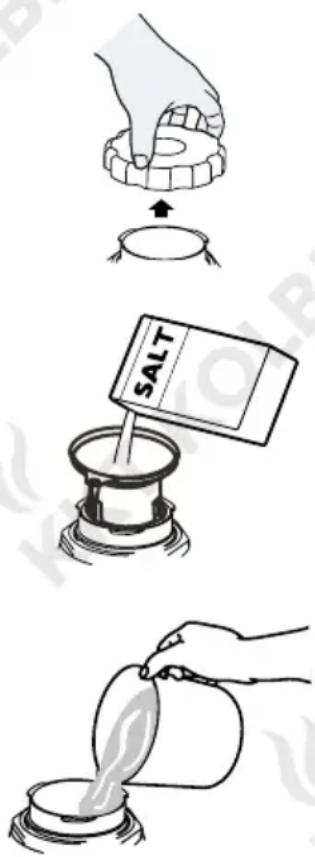
- Screw back the cap tightly
- Immediately after fi lling the salt into the salt container, a washing program should be started (We suggest to use a short program). Otherwise the fi lter system, pump or other important parts of the machine may be damaged by salty water.
Notes
- The salt container must only be refi lled when the salt icon lights up on the display.
- The salt icon will disappear from the display after the salt container has been filled with salt.
However, depending on how well the salt dissolves, it may remain lit for some time after the salt container is already filled.
- If salt has spilled, run a soak or quick program to remove it.
natural_image
Illustration of a hand pressing down on a dental tooth with a curved arrow indicating rotation (no text or symbols)
2.3 Rinse aid dispenser

Attention!
To avoid damaging the appliance, observe the following instructions:
- Your dishwasher is designed to use liquid rinse aids.
• Only use branded rinse aid for dishwashers. - Never fi ll the rinse aid dispenser with other substances (e.g. dishwasher cleaning agent, liquid detergent).

The rinse aid is released during the final rinse to prevent water from forming droplets on your dishes, which can leave spots and streaks.
It also improves drying by allowing water to roll off the dishes.
Notes
- The intervals after which the dispenser must be refi lled depend on the number of rinse cycles and the dosage setting.
- If rinse aid is required, this is indicated by the rinse aid indicator (*).
- Do not overfill the rinse aid dispenser.
Filling / Refilling the rinse aid dispenser
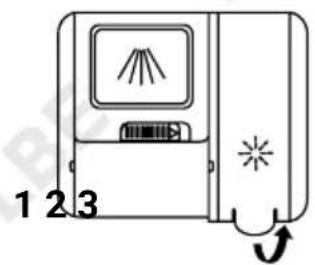
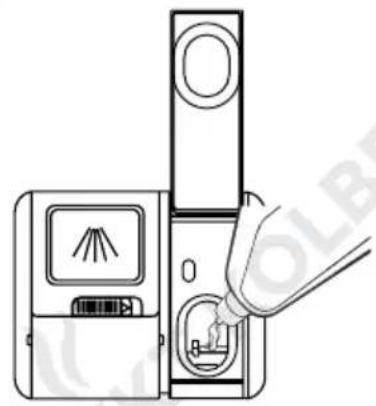
- Open the rinse aid reservoir cap by lifting up the handle (1).
- Pour the rinse aid into the dispenser (2), being careful not to overfi ll it.
- Close the cap again (3).
natural_image
Diagram of a device with a handle inserting into a box, showing internal components and a warning symbol (no text or labels present)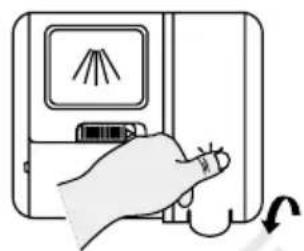
natural_image
Hand pressing a button on a device with a screen showing a light source (no text or symbols visible)Setting the rinse aid dosage
- Switch on the appliance.
- Within 60 seconds after switching on, press the program button P for more than 5 seconds and then press the start time preselection button Ⓤ to start the rinse aid dosing setting mode.
The rinse aid indicator ✦ fl ashes at a frequency of 1 Hz.
- Press the program button P repeatedly until the desired setting is displayed according to your usage habits (sequence: D1→D2→D3→D4→D5→D1; the higher the number, the higher the rinse dose).
- Wait 5 seconds or press the on/off button Ⓐ to confirm the setting.
2.4 Detergent dispenser

Warning!
Dishwashing detergent is corrosive and can result in death if swallowed!
Keep dishwashing detergents out of the reach of children and avoid eye and skin contact.

natural_image
Simple line drawing of a baby with a crossed-out bottle and no text or symbols
The chemical components that make up commercial dishwashing detergents are necessary to remove, dissolve and rinse out all types of soiling from the machine.
Cleaning products with labels such as „organic“ or „eco“ usually contain only small amounts of environmentally harmful active ingredients.
The cleaning effect may be limited as a result.
Notes
- Use only detergent specifically intended for use in dishwashers.
- Keep detergent powder fresh and dry.
- Do not add powdered detergent to the dispenser until just before starting a wash cycle.
Filling the detergent dispenser
- Open the dispenser lid by sliding the release catch to the right (1).
- Put the detergent for the main rinse cycle into the detergent compartment of the dispenser (2).
For a better cleaning result, especially when you have heavily soiled items, add a small amount of detergent for the pre-wash phase on the inside of the appliance door. - Close the flap by sliding it to the front and then pressing it down. (3).
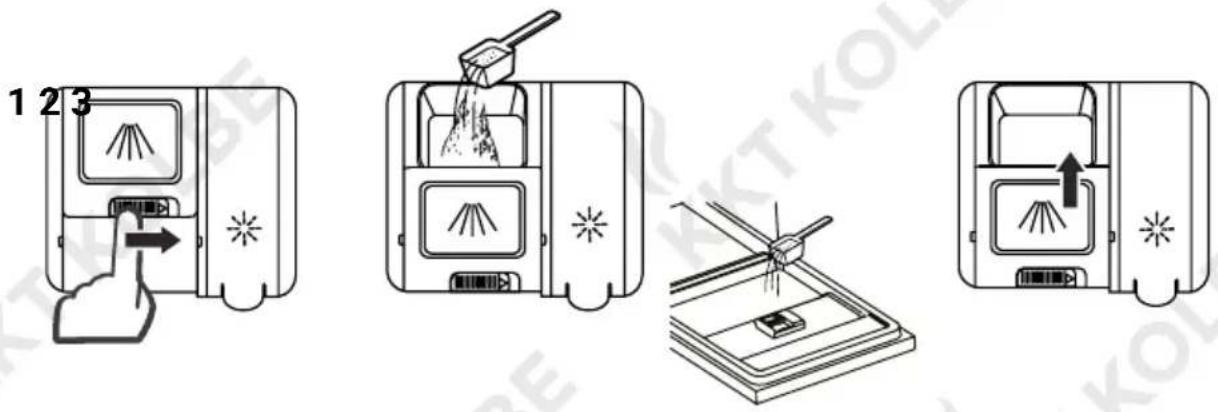
Note
The amount of detergent required depends on the degree of soiling and can vary.
Follow the manufacturer's recommendations.
2.5 Preparing and loading dishes
Recommendations and advice on tableware and utens is
- Consider buying utensils which are identified as dishwasher-proof.
- For particular items, select a program with the lowest possible temperature.
- To prevent damage, do not take glass and cutlery out of the dishwasher immediately after the program has ended.
Unsuitable for dishwashers
- Cutlery with wooden, horn, china or mother-of-pearl handles
- Plastic items that are not heat resistant
- Older cutlery with glued parts that are not temperature resistant
- Bonded cutlery items or dishes
- Pewter or cooper items
- Crystal glass
• Steel items subject to rusting - Wooden platters or chopping boards
- Items made from synthetic fi bres
Suitable for dishwashers
- Some types of glasses can become dull after a large number of wash cycles.
• Silver and aluminum parts have a tendency to discolour during washing. - Glazed patterns may fade if machine washed frequently.
Before loading the dishwasher
- Scrape off any large amounts of leftover food.
- Soak remnants of burnt food.
- It is not necessary to pre-rinse the dishes by hand (see also notes on water and energy saving).
Loading dishes and utensils

Caution!
Sharp or pointed utensils placed in an upright position represent a potential risk of injury!
Always place them into the cutlery basket with the tip pointing downwards or put them horizontally in the upper crockery basket.
- Place all dishes and utensils so that the spray arms can rotate freely.
- Make sure that the door seal is not touched by any item.
- To avoid damage, make sure that glasses do not touch each other.
- Place crockery and utensils so that they are stacked securely and cannot tip over or get moved by the spray of water.
- Point the openings of vessels such as cups, glasses, pots/pans etc. downwards and place curved or recessed objects (e.g. with recessed bottoms) aslantly so that the water can run off.
- Do not place dishes and outlery inside or on top of each other.
- Do not wash very small items in the dishwasher as they could easily fall out of the baskets.
- To optimise the washing result and energy consumption, take care not to overload the dishwasher.
2.6 Crockery baskets and cutlery basket
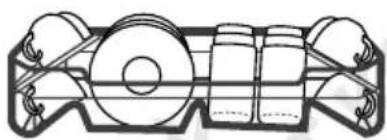
Upper crockery basket

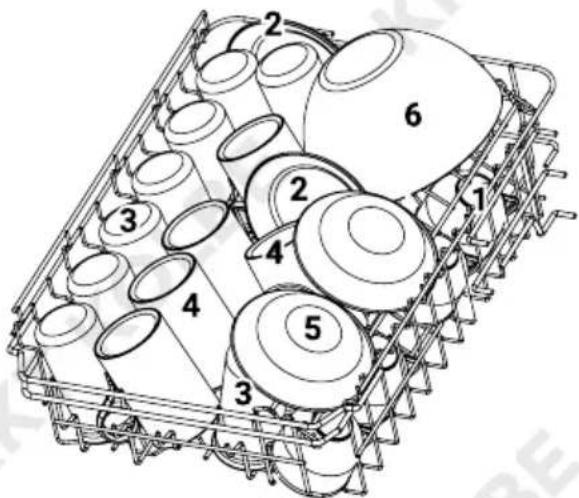
The upper basket intended for delicate and light dishware such as glasses, coffee and tea cups and saucers, as well as plates, small bowls and slightly soiled pans.
natural_image
Technical line drawing of a mechanical component with no visible text or symbolsExample of loading the upper basket \*
1 Cups
2 Saucers
3 Glasses
4 Mugs
5 Dessert / Salad bowls
6 Glass bowl
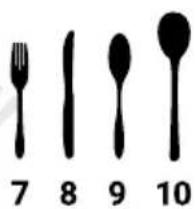
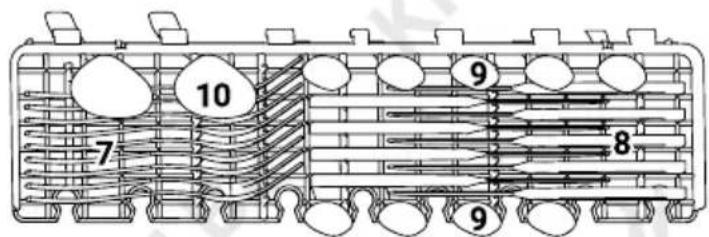
Cutlery rack

The cutlery rack is intended for fl at, light cutlery only.
The load limit of the reck is 1.5 kg.
7 Forks
8 Knifes
9 Dessert spoons
10 Serving spoons
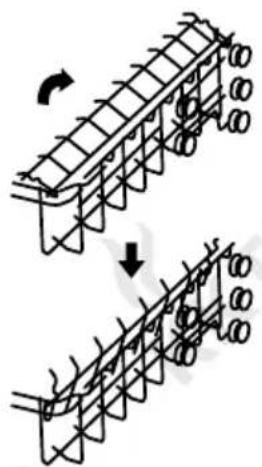
Cup rack

If you need more space in the upper basket, you can fold the cup rack upwards so that you can lean tall glasses against it, or you can remove it completely when you do not need it.
natural_image
Diagram of two mechanical assembly steps showing structural deformation (no text or symbols)Height adjustment of the upper basket
To place higher dishes in the upper or lower basket, you can easily adjust the height of the upper basket:
• Pull out the upper basket (1).
- Remove the upper basket (2).
- Re-attach the upper basket to upper or lower rollers (3).
- Push in the upper basket (4).

natural_image
Four sequential line drawings of a car chassis with wheels and arrows indicating motion (no text or symbols)1 432
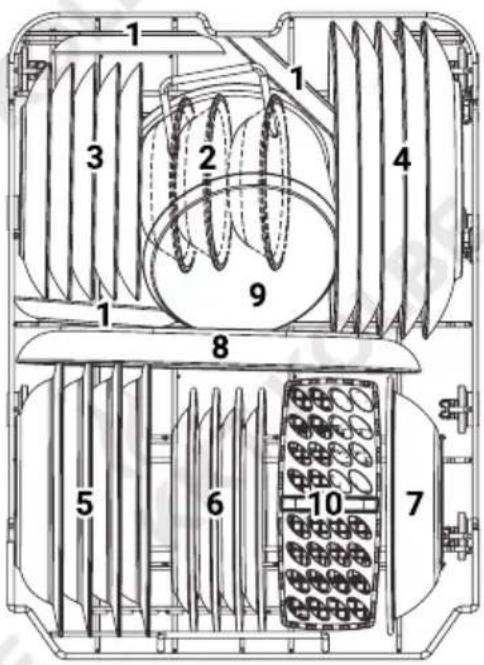
Lower basket

Large items and the most difficult to clean items should be placed into the lower basket, such as pots, pans, lids, serving dishes and bowls.
- Place serving dishes and lids on the sides in order to avoid blocking the rotation of the top spray arm.
- Observe the recommended maximum diameter of 19 cm for dishes placed at the front in one line with the detergent dispenser so as not to obstruct its opening.
natural_image
Pure geometric diagram of vertical planes intersecting a horizontal line, no text or symbols presentExample of loading the lower basket \*
1 Saucers
2 Dessert Salad bowls
3 Dessert plates
4 Dinner plates
5 Soup plates
6 Melamine dessert plates
7 Melamine bowl
8 Oval platter
9 Small pot
10 Cutlery basket
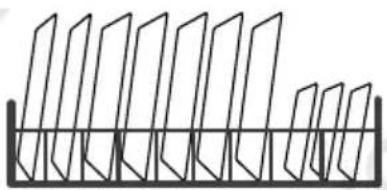
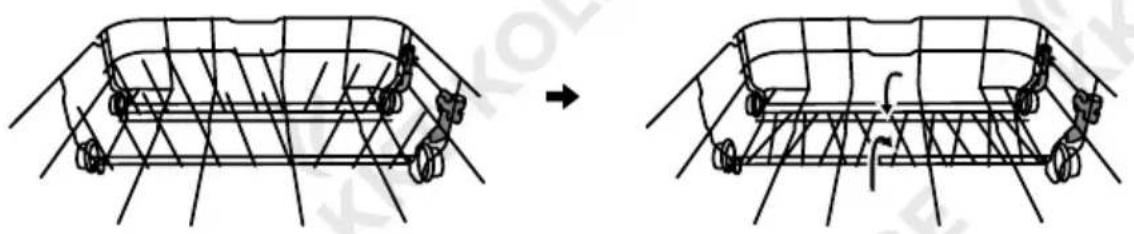
Folding back the rack shelves

The spikes of the lower basket are used for holding plates and a platters.
They can be lowered to make more room for large items.
natural_image
Diagram showing structural rebar assembly before and after modification, with no visible text or symbolsCutlery basket

Caution!
Sharp or pointed utensils represent a potential risk of injury!
Always place them with the tip pointing downwards and do not let any item extend through the bottom of the basket.

natural_image
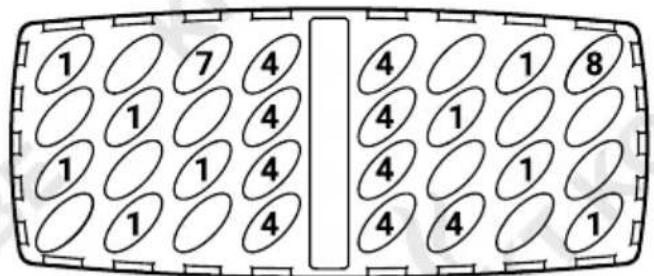
Circular diagram with grid pattern and crossed X marks, no text or symbols present- Insert the cutlery in the designated places in the cutlery basket.
• Make sure that they do not nest together, as this can affect the washing result.
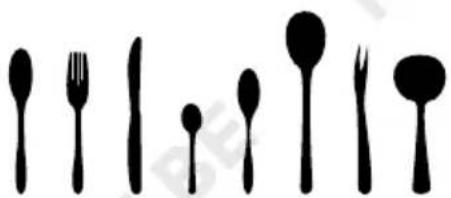
Example of loading the cutlery basket \*
1 Soup spoons
2 Forks
3 Knives
4 Tea spoons
5 Dessert spoons
6 Serving spoons
7 Serving fork
8 Gravy adlel
natural_image
Silhouette of various kitchen utensils including fork, knife, spoon, and fork (no text or symbols)12345678
3. Operating the Dishwasher
3.1 Washing program overview
| Program | Program information | Cycle description | Detergent Pre/Main | Running time | Energy consumption | Water consumption | Rinse aid needed |
 Intensive Intensive | For heaviest soiled crockery, and normally soiled pots, pans, dishes etc. with dried-on food. | Pre-wash (50°C)Wash (65°C)RinseRinseRinse (65°CDrying) | 4 / 13g | 205 min | 1.378 kWh | 15.3 I Yes | |
 Universal Universal | For normally soiled pots, plates, glasses and lightly soiled pans. | Pre-wash (45°C)Wash (55°C)RinseRinse (65°CDrying) | 4 / 13g | 175 min | 1.287 kWh | 13.1 I Yes | |
| ECO | Most efficient for normally soiled tableware in terms of energy and water consumption. | Wash (45°C)RinseRinse (60°C)Drying | 17g | 235 min | 0.704 kWh | 9.0 I Yes | |
 Glass Glass | For lightly soiled crockery and glass. | Pre-washWash (50°C)RinseRinse (65°CDrying) | 4 / 13g | 120 min | 0.934 kWh | 13.1 I Yes | |
 90 Min 90 Min | For normally soiled loads that need quick wash. | Wash (60°C)RinseRinse (65°C)Drying | 17g | 90 min | 1.234 kWh | 10.2 I Yes | |
 Rapid Rapid | A shorter wash for lightly soiled loads that do not need drying. | Wash (50°C)RinseRinse (45°C) | 12g | 30 min | 0.611 kWh | 10.0 I No | |
 Pre-Rinse Pre-Rinse | To pre-rinse dishes that you plan to wash later that day. | Pre-wash | - | 15 min | 0.020 kWh | 3.6 I No |

The ESG programme is best suited for cleaning normally soiled dishes and is the most efficient for this purpose in terms of combined energy and water consumption.
It is also used for the test cycle to check compliance with EU eco-design regulations.
The specifications of the other programmes serve as guidelines.
3.2 Dish washing operation
Program selection and operation
- Draw out the lower and upper basket, load the dishes as described before and push them in again completely. It is recommended to load the lower basket first.
- Fill the detergent dispenser according to your current needs.
- Make sure that the plug is inserted into the socket and the water supply is turned on to full pressure.
- Close the door, press the On/Off button ① to switch on the machine.
- Select the desired washing program by pressing the programme button P repeatedly until the corresponding program indicator lights up.
- Press the Start/Pause button ▶II. The dishwasher will start its cycle.
Changing the program in the middle of the cycle

A wash cycle can only be changed if it has been running for a short time, otherwise the detergent may have already been released and the dishwasher may have already drained the wash water.
If this is the case, the dishwasher needs to be reset and the detergent dispenser must be efi lled.
To reset the dishwasher, follow the instructions below:
- Press the Start/Pause button ▶II to pause the washing process.
- Press the Program button P for more than 3 seconds. The program will be canceled.
- Select the desired washing program as described before.
- Press the Start/Pause button ▶II. The wash cycle will start after 10 seconds.
Adding dishes after starting a cycle

Caution!
Steam escaping from the machine can be very hot and may cause scalds.
Open the door very carefully after starting a washing cycle.

A forgotten dish can be added any time before the detergent dispenser opens.
If this is the case, follow the instructions below:
- Press the Star /Pause button ▶II to pause the washing process.
- Wait 5 seconds, then open the door.
- Add the forgotten dish(es).
- Close the door.
- Press the Start/Pause button ▶II. The wash cycle will continue after r10 seconds.
3.3 Additional features
Start time preselection

This function allows you to shift the start time of the selected program by the specified time.

- Select a washing program as described above.
- Press the start time preselection button ☑ if necessary repeatedly, until the desired delay time is displayed. Each press of the button will extend the time period by 1 hour (max. 24 h).
- Press the start/pause but on ▶II
- After the set time has elapsed, the washing program is started automatically.
Half Load

Select this function when the appliance is only half loaded to reduce the energy and water consumption of the selected program.

- Select one of the following washing programs:



- Press the half load button 1/2 The corresponding indicator lamp indicates the activation of the function.
- Start the operation with the start/pause button ▶II
Extra drying

Select this function for extra effective drying performance. This increases the temperature and enhances the drying effect.

- Select a washing program as described before.
- Press the extra drying button. The corresponding indicator lamp indicates the activation of the function.
- Start the operation with the start/pause button ▶II
Key lock / Child lock

This function allows you to lock the control panel, to prevent unintentional operation, e.g. by children. All keys except the on/off button Ⓜwill then have no function.

- Press and hold the start time preselection and half load button simultaneously for 3 seconds.
The indicator lamp signals that the key lock is activated. The control panel is locked.
- To unlock the control panel, press and hold the ④ and buttons again for 3 seconds.
When the indicator light goes out, the key lock is deactivated and you can use the control panel again normally.
3.4 Removing the dishes

Caution!
Items will can be very hot immediately after the end of the washing cycle! Be careful not to burn yourself.


Attention!
Hot dishes are sensitive to shock.
To avoid damage, let them cool for about 15 minutes before removing them from the machine.
Note
To prevent water dripping from the upper basket into the lower basket, we recommend that you empty the lower basket first, followed by the upper basket.
4. Cleaning and Maintenance
To keep your appliance fully functional, maintain its appearance and prevent odours, always keep it clean and take good care of it. If possible, always remove dirt, deposits or foreign bodies immediately and clean all parts of the appliance at least once a week, as described below.

Caution!
To avoid electric shock and short circuits, disconnect the appliance from the power supply before cleaning and maintenance work.
4.1 Cleaning the appliance

Attention!
To avoid damage, follow the instructions below for cleaning:
- Make sure that liquids cannot penetrate into the door lock and the electrical components, and avoid the use of spray cleaners.
- Do not use abrasive cleaners or scouring sponges as these can damage the surfaces. This also applies to some paper towels.
- Do not use solvents for cleaning.
- Only use a cloth with warm soapy water to clean the outside and the door area.
Note: The sides of the appliance door will not be reached by the spray arms when washing up. If necessary, clean them before closing the door.
- Only clean the control panel with a soft, damp cloth.
- Clean the door seals regularly with a soft, damp cloth.
- To remove spots or stains from the surface of the interior, use a cloth dampened with water an a little vinegar, or a cleaning product made specifically for dishwashers.
4.2 Filtering system

Attention!
When using the dishwasher without or with improperly inserted filters, coarse dirt particles can enter the system and cause clogging, impair the performance of the appliance and damage dishes and utensils.
- Never use the dishwasher without the fi lter.
- Make sure that all parts of the filter module are correctly reinstalled.

The fi ltering system in the base of the wash cabinet retains coarse debris from the washing cycle. The collected coarse debris may cause the fi Iters to clog. Check the condition of the fi Iters regularly and clean them if necessary but at least once a week under running water as described in this chapter.
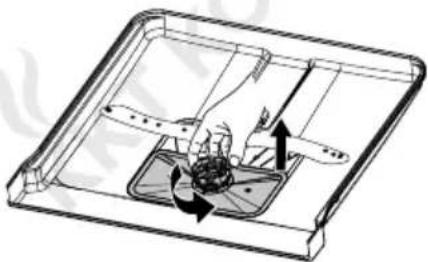
Removing the fi Iter module
- Hold the coarse fi Iter and rotate it anticlockwise to unlock the fi Iter assembly.
- Lift the filter assembly upwards and out of the dishwasher.
• Make sure that no foreign objects can get into the opening.
natural_image
Technical line drawing of a mechanical component with internal flow arrows (no text or symbols)Removing the fi Iter module
- Pull the fi ne fi Iter off the bottom of the fi Iter assembly.
- Detache the coarse fi Iter from the main fi Iter by gently squeezing the tabs at the top and pulling it out upwards.
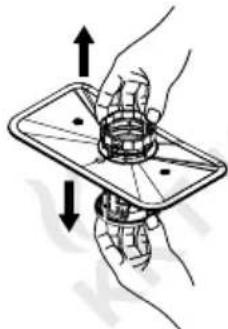
natural_image
Illustration of two hands holding a transparent tray with a circular component, no text or symbols present1 Coarse fi Iter
2 Main fi Iter
3 Fine fi Iter
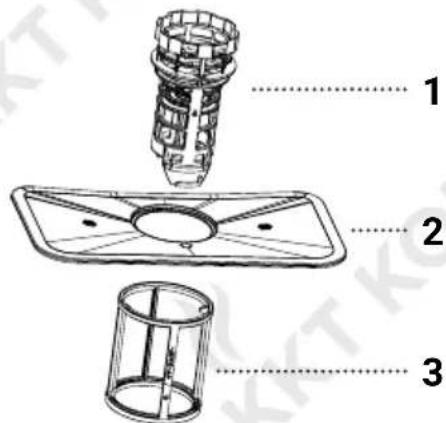
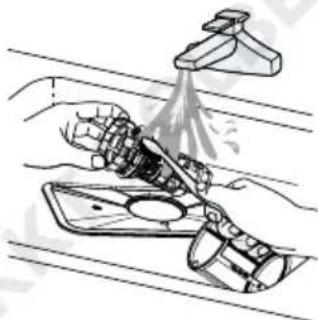
- Remove any foreign bodies from the fil ters and clean them of coarse food residues by rinsing them under running water.
- For thorough cleaning, use a soft cleaning brush.
Re-inserting the fi Iter assembly
- Reassemble the filters in the reverse order of the disassembly.
- Replace the fi Iter assembly.
- Rotate the coarse filter clockwise to the close arrow, but do not overtighten it.
natural_image
Technical line drawing of a mechanical assembly with spray and component (no text or symbols)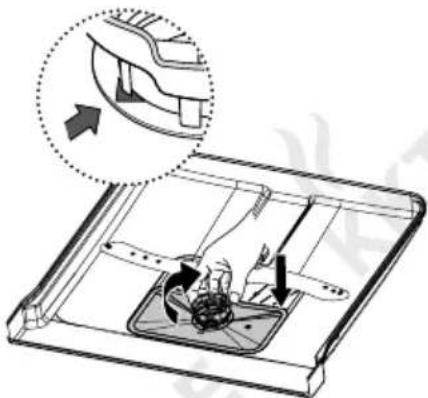
natural_image
Technical diagram of a mechanical component with arrows indicating motion or assembly (no text or symbols present)4.3 Spray arms

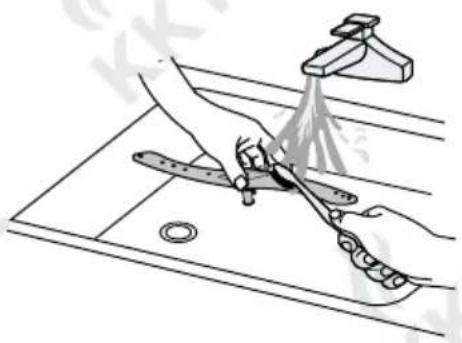
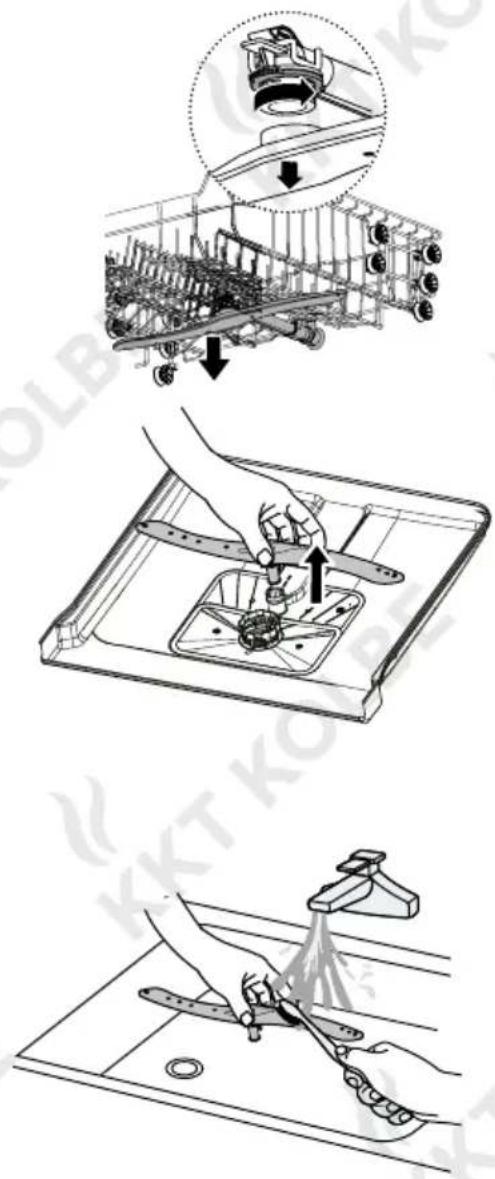
water chemicals can clog the nozzles of the spray arms and block the bearings. It is therefore necessary to clean the spray arms regularly.
Removing and cleaning the spray arms
- To remove the upper spray arm, hold the nut in the center still and rotate the spray arm counterclockwise.
- To remove the lower spray arm, pull out the spray arm upwards.
- Wash the arms in soapy and warm water and use a soft brush to clean the nozzles and remove any foreign bodies from them.
- Replace them after cleaning them thoroughly.
4.4 Caring for the dishwasher
After every wash
After every wash, leave the door slightly open for some time so that moisture and odors are not trapped inside.
Seals
One of the factors that cause odours to form in the dishwasher is food that remains trapped in the seals. Periodic cleaning with a damp sponge will prevent this from occurring.
Maintenance
During use of the dishwasher, deposits of dirt or limescale may form which can significantly affect the operation of the appliance.
To prevent this, observe the following instructions:
- Always ensure that the salt container is sufficiently full and that the correct dosage setting is used according to your water hardness (see relevant section).
- Clean the appliance components regularly as described before.
We recommend additional cleaning of the appliance with a commercial machine cleaner for dishwashers according to the manufacturer's instructions every 1-3 months.
Frost precaution
In winter, if necessary, take frost protection measures on the dishwasher after each wash cycle:
- Cut off the electrical power to the dishwasher at the supply source.
- Turn off the water supply and disconnect the water inlet pipe from the water valve.
- Drain the water from the inlet pipe and water valve. (Use a pan to gather the water)
- Reconnect the water inlet pipe to the water valve.
- Remove the filter at the bottom of the tub and use a sponge to soak up water in the sump.
When not in use for a longtime
It is recommend that you run a wash cycle with the dishwasher empty and then remove the plug from the socket, turn off the water supply and leave the door of the appliance slightly open.
This will help the door seals to last longer and prevent odors from forming within the appliance.
Moving the appliance
If the appliance must be moved, try to keep it in the vertical position. If absolutely necessary, it can be positioned on its back.
5. Troubleshooting
5.1 Problems, possible causes and what to do
Problem Possible Cause What to do
| Dishwasher doesn't start | Fuse blown, or the circuit break tripped. | Replace fuse or circuit breaker.Remove any other appliances sharing the same circuit with the dishwasher. |
| No power supply Make sure the dishwasher is turned on, the the power cord is properly plugged into the wall socket and there is no power outage. | ||
| Water pressure is low | Check that the water supply is connected properly and the water is turned on. | |
| Door of dishwasher not properly closed. | Make sure to close the door properly and latch it. | |
| Water not pumped form dishwasher | Blocked drain hose Check the drain hose for kinks or clamps. | |
| Filter clogged. Check coarse the filter | ||
| Drain pipe blocked. Check that the water of the kitchen sink drains well. If this is not the case, contact a certified installation specialist. | ||
| Suds in the tub Wrong detergent. Open the dishwash r. When the foam has dissolved, pour about 1 gallon of cold water into the drain. Close the door, start a program and stop it again after the pumping-out phase. If foam is still present, repeat the process. Use only the special dishwasher detergent. | ||
Problem Possible Cause What to do
| Stained tub interior Use of etergent with colourant | Make sure that the detergent has no colourant. | |
| White fi lm on inside surface | Hard water minerals | To clean the interior, use a damp sponge with dishwasher detergent and wear rubber gloves.To avoid foaming or suds, never use any other cleaners. |
| Rust stains on cutlery | Non stainless steel utensils or fl ash rust from such utensils | Avoid washing items that are not corrosion resistant in the dishwasher. |
| White salt stains on dishes and utensiles | Salt spilled during fi lling, not removed | Always run a wash program without any crockery immediately after adding salt. |
| Lid of the water softener loose | Check the softener lid is secure. | |
| To remove the salt stains, carry out another wash cycle. | ||
| White lime spots on dishes and glasses | Lime deposits from hard water | Add more detergent. |
| Cloudiness on glassware. | Combination of soft water and too much detergent | Use less detergent if you have soft water and select a shorter cycle to wash the glassware and to get them clean. |
| Black or grey marks on dishes | Aluminium utensils have rubbed against dishes | Use a mild abrasive cleaner to eliminate those marks. |
| Detergent left in dispenser | Dishes block detergent dispenser | Re-loading the dishes properly. |
Problem Possible Cause What to do
| The dishes are not clean | Dishes not loaded correctly | Follow the instructions in the corresponding chapter |
| The dishes are not clean. | Program not powerful enough | Select a more intensive program. |
| Not enough detergent | Use more detergent, or change your detergent. | |
| Items blocking movement of spray arms | Rearrange the items so that the spray arms can rotate freely. | |
| Filter module clogged or incorrectly inserted; may also cause the spray arm jets to get blocked. | Clean and/or fi t the fi lter correctly. | |
| Clogged spray arm jets | Clean the spray arm jets. | |
| The dishes are not dry. | Improper loading Load | the dishwasher as suggested in the directions. |
| Dishes removed too soon | Do not empty your dishwasher immediately after washing. Open the door slightly so that the steam can escape. Take out the dishes until the inside temperature is safe to touch. Unload the lower basket fi rst to prevent the dropping water from the upper basket. | |
| Wrong program With a short program, the washing temperature is lower, decreasing cleaning performance. Choose a program with a long washing time. | ||
| Use of cutlery with a low-quality coating | Cutlery or dishes of this type are not suitable for washing in the dishwasher. Water drainage is more diffi cult with these items. | |
Problem Possible Cause What to do
| Knocking noise in the dishwasher | Spray arm knocking against an item in a basket. | Interrupt the program and rearrange the items which are obstructing the spray arm. |
| Rattling noise in the dishwasher | Items of crockery are loose in the dishwasher | Interrupt the program and rearrange the items of crockery. |
| Knocking noise in the water pipes | Unfavourable installation or cross-section of the pipeline | This has no influence on the dishwasher function. If in doubt, contact a certified installation specialist. |
| The appliance door is very hard to close. | Unfavourable adjustment of the door spring tension | Adjust the door spring tension as described in the corresponding chapter. |
In case of failed attempts to find a solution

Warning!
Repairs and modifications to the appliance are dangerous for unqualified persons and can cause damage!
Never carry out repairs or modifications to the appliance yourself and never disassemble it!
If a problem cannot be solved by the solutions suggested above, contact the customer service or a certified electrician or installer.
5.2 Error codes

Attention!
• To avoid water damage:
If an overflow occurs, turn off the main water supply before taking other steps.
• To avoid damage to the appliance:
If there is water in the bottom tray due to overfilling or a small leak, remove it before restarting the dishwasher.
Error code Meaning Possible cause
| E1 Longer inlet time | ·Faucet not fully turne don·Water intake restricted·Water pressure too low |
| E3 Not reaching required temperature | ·Malfunction of heating element |
| E4 Overflow | ·Some element of dish-washer leaks |
| Ed Failure of communication between main PCB with display pcb | ·Open circuit·Broken communication wiring |
6. Installation
To install the dishwasher, follow the instructions below according to the chapter order.
6.1 Water connection

Attention!
To avoid damage and malfunctions, follow the following notes and instructions:
- Pipe installations and changes to the water supply must be carried out by a certified installation specialist
- If the water connection pipes are new or have not been used for a long period of time, let the water run and make sure that it is clear and free of impurities.
- Do not reuse old or used hose sets for installation.
- A hose that attaches to a sink spray can burst if it is installed on the same water line as the dishwasher. If your sink has one, it is recommended that the hose be disconnected and the hole plugged.
Cold water connection
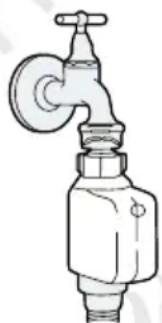
- Pull The safety supply hoses completely out from storage compartment located at the rear of the dishwasher.
- Tighten the screws of the safety supply hose to the cold water faucet with thread 3/4inch.
Make sure that it is firmly seated and tightly closed. - Turn the water fully on before starting the dishwasher.
Disconnection of the water supply
- Turn off the water supply.
- Unscrew the safety supply hose from the water connection.
natural_image
Line drawing of a faucet with a valve handle (no text or symbols)Connecting to the water drain
- Insert the drain hose into a drain pipe with a minimum diameter of 4 cm (A) or connect it to the sink siphon (B).
Doing this, observe the following specifications:
- The drain hose must be mounted correctly and fixed and must not be kinked or squeezed.
- The drain connection must not be higher than 1000 mm above the dishwasher's installation surface.
- The free end of the hose must not be immersed in water
• to avoid the back flow of it. - If an extension of the drain hose is necessary, use a similar drain hose with a maximum length of 4 meters, otherwise the cleaning effect of the dishwasher may be impaired.
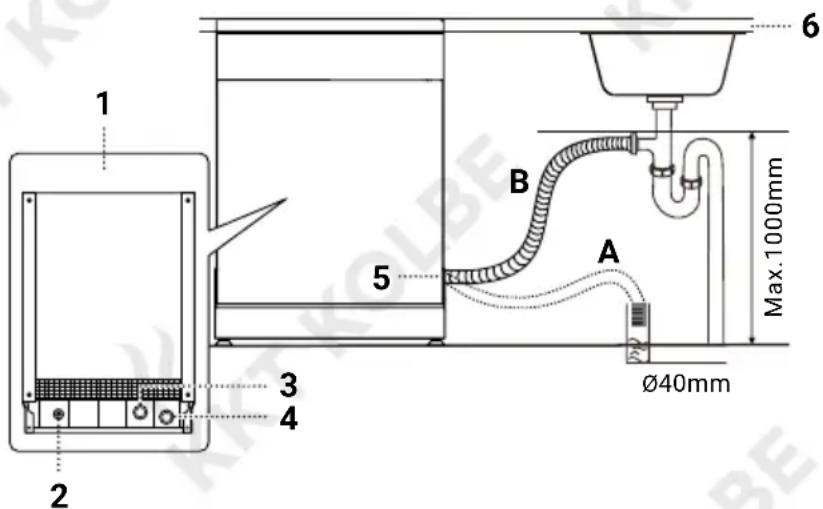
1 Dishwasher
rear side
2 Power supply
3 Water inlet
4 Water drain
5 Drain hose
6 Workspace
6.2 Connection to the power supply system

ger!
Failure to follow the instructions below may result in life threatening electric shock or short circuit:
- Disconnect the power supply before installing the dishwasher.
- Ensure that proper earthing exists before use and do not, under any circumstances, cut or remove the earthing connection from the power cord.
- Changes to the power supply and replacement of the socket may only be carried out by a certified electrician.

Caution!
To avoid overheating and burns, do not use an extension cord or adapter plug with this appliance.
Electrical requirements and power supply
- Only connect the appliance to a power supply whose voltage and frequency match the specifications on the rating plate.
- Provide a separate circuit for connecting the appliance and protect it with a 10A/13A/16A fuse, a time-delay fuse or a circuit breaker.
- Insert the plug into a properly grounded power outlet.
6.3 Positioning of the appliance

Attention!
Moisture escaping from the appliance (e.g. steam when opened the door after operation) can damage furniture parts and surfaces surrounding the appliance.
Protect them adequately against moisture, especially the underside of the worktop.
- Select an installation position for the dishwasher near the existing inlet and drain hoses and power supply.
Note: Depending on where your electrical outlet is, you may need to cut a hole in the opposite cabinet side.
- Also note the following notes and illustrations:
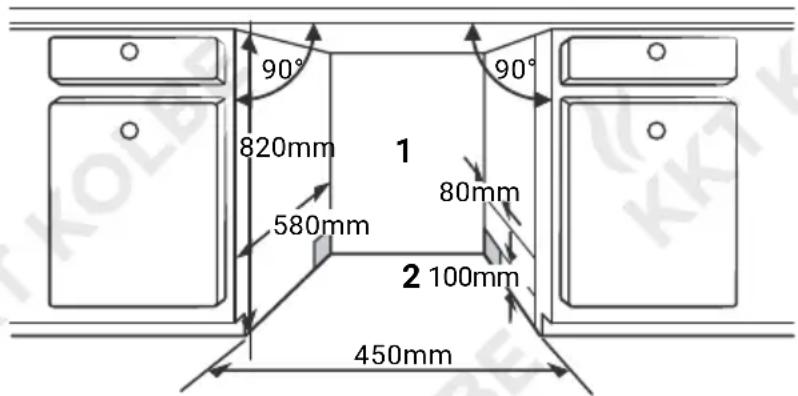
- The distance between the top of the dishwasher and the cabinet should be min. 5mm.
- If the dishwasher is installed at the corner of the cabinet, there should be some space to the side when opening the door (see illustration).
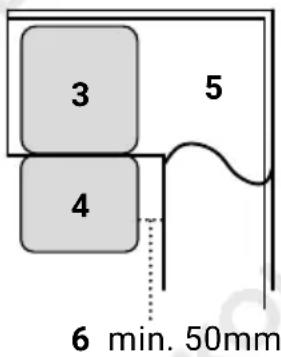
1 Electrical, drain and water supply
2 Space between cabi-
net bottom and floor
3 Dishwasher
4 Appliance door
5 Cabinet
6 Space between appl - i
ance door and cabinet
6.4 Levelling and height adjustment of the dishwasher / adjustment of the levelling feet

The dishwasher must be level to be able to guarantee a proper wash performance and dish rack operation.
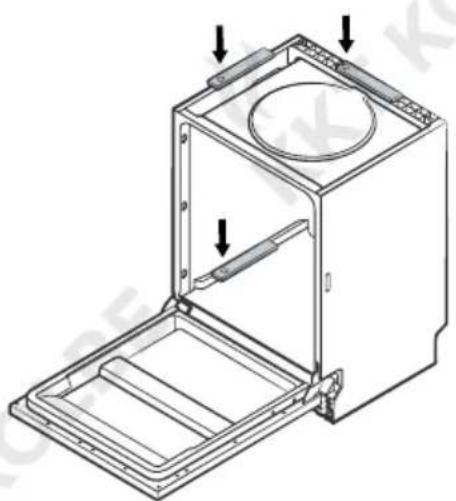
- Check the horizontal alignment of the appliance from side to side and from front to back by placing a spirit level crosswise and lengthwise on the upper edges of the appliance, or at the bottom of the rinse chamber as shown in the illustration.
- If this is not the case, level the dishwasher horizontally by adjusting the heights of the three levelling feet individually, as described in the following section.
natural_image
Technical line drawing of a multi-chamber refrigerator with mounting holes and ventilation slots (no text or symbols)Height adjustment of the levelling feet

Attention!
To avoid damage, when adjusting the foot heights, make sure that the appliance does not tip over and that the angle of inclination of the appliance does not exceed 2^ .

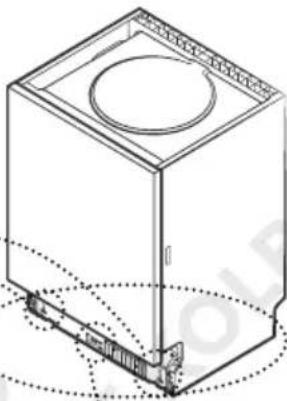
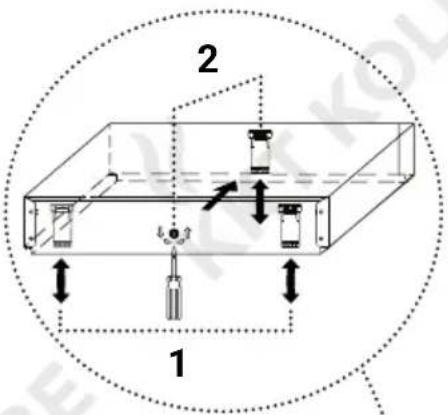
In the bottom of the dishwasher 3 levelling feet are integrated; two on the left and right at the front and one in the middle at the back.
These are completely screwed in on delivery and can be turned out individually to a maximum of 50 mm to adjust the height of the appliance or to level the dishwasher.
To adjust the foot heights individually, proceed as follows:
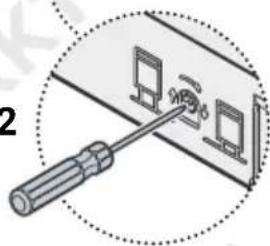
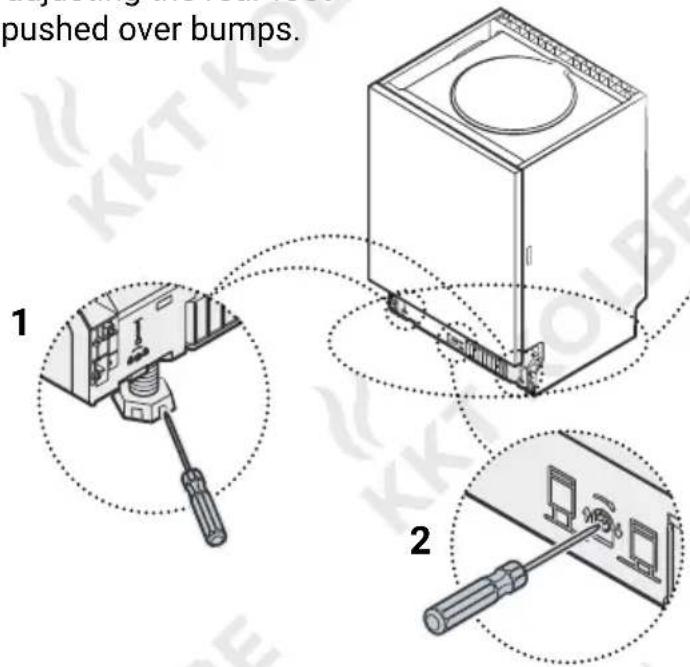
- First adjust the respective height of the two front feet by screwing them out by hand or with a fl at screwdriver to the desired height (1).
- Check that the appliance is correctly positioned.
- Then adjust the height of the rear foot from the front of the appliance by turning the adjusting screw in the middle of the dishwasher base with a Phillips screwdriver or an 8 mm socket spanner (2).

Attention!
Do not move the appliance after adjusting the rear foot. This can be damaged e.g. when pushed over bumps.
6.5 Mounting the door panel
To attach the door panel to the front of the appliance door, proceed as follows:
- Fix the door panel to the front of the appliance door with the Velcro strips supplied by fixing the rough side (A) at the top and bottom of the door panel to the rear of the door and the soft, felted side (B) on the front of the appliance door in the corresponding position (1).
- Remove the short screws from the appliance door (2/C), replace them with the long screws supplied (D) and connect the panel firmly to the door by tightening the screws (3).
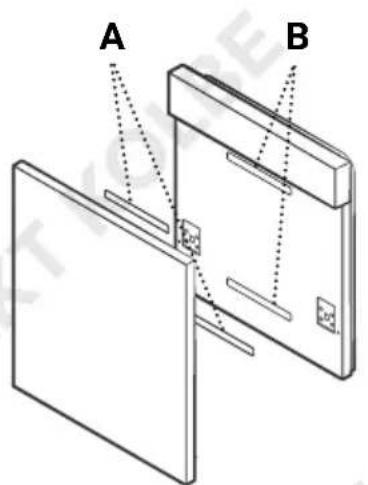
123
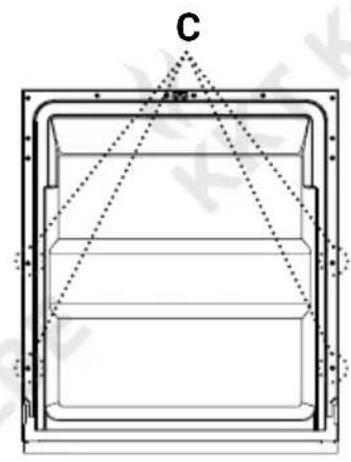
natural_image
Technical line drawing of a mechanical component with triangular load distribution (no text or symbols)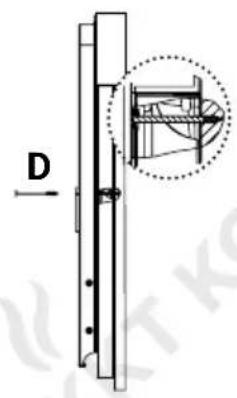
Dimensions of the door panel:
$$ W 4 3 9 \pm 1 \mathrm{mm} \times H 5 9 5 \pm 1 \mathrm{mm} $$
6.6 Tension adjustment of the door spring

door springs are set at the factory to the proper tension for the appliance door.
However, after installing the aesthetic wooden panel, you will have to adjust the door spring tension.
To do this, proceed as follows:
- Rotate the adjusting screw (see figure) to increase or decrease the tension of the right and left door spring.
- The door spring tension is correctly set when the door opens and closes easily and flips into the open position by itself smoothly.
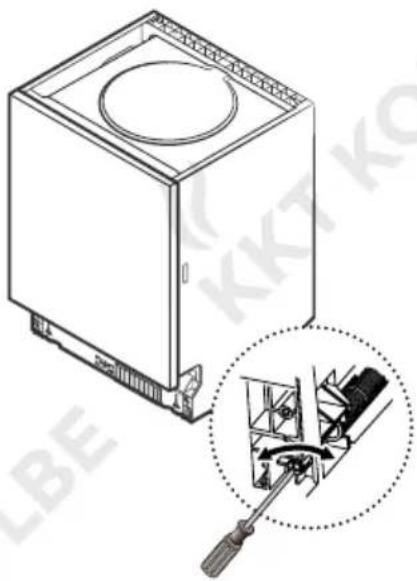
natural_image
Technical line drawing of a refrigerator with a close-up inset showing internal components (no text or symbols)6.7 Attaching the condensation protection
To protect the underside of the worktop from moisture (e.g. from steam escaping from the appliance) and to prevent damage, attach the supplied condensation protection strip under the worktop of the cabinet.
Proceed as follows:
• Make sure that the underside of the worktop is clean and dry.
- Glue the sealing tape to the underside of the worktop so that it is flush with edge of work surface.
natural_image
Line drawing of a cabinet with an open lid and a side-mounted unit, showing directional arrows indicating movement (no text or symbols)6.8 Mounting the dishwasher
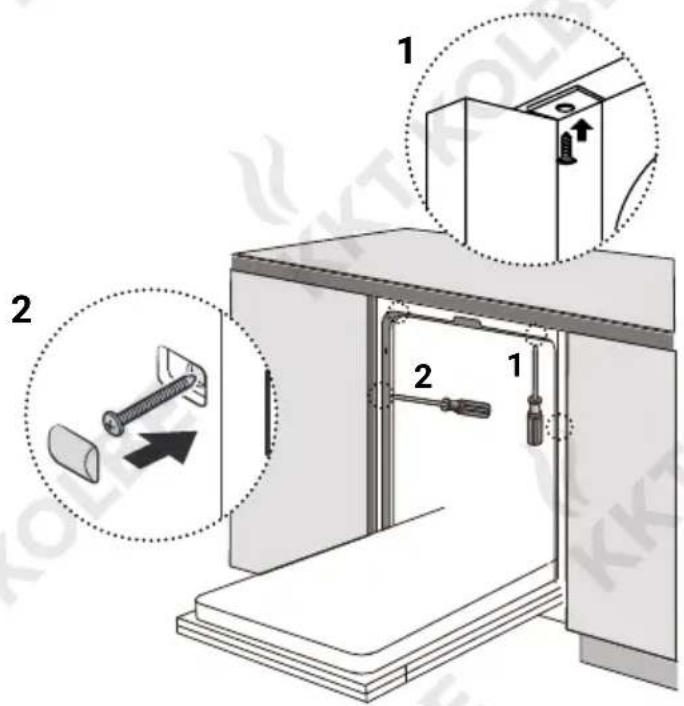
In order to guarantee a perfect and safe function, the di swasher must be connected to the cabinet and securely fastened.
The procedure depends on the type of work surface:
Conventional work surface:
- Put the installation hook into the slot of the side plane and secure it to the work surface with the wood screws (1).
Marble or granite work top:
• Fix the sides with the screws (2).
7. Technical Data \*
Manufacturer KKT KOLBE
Model identifier DW452ED
Rated capacity 1 9 place settings
Dimensions (W×D×H) 44.8 × 57.0 × 81.5 cm
Type Built-in
Energy efficiency class 1 E
Energy efficiency index 1 55.9
Cleaning performance index 1 1.13
Drying performance index 1 1.07
Energy consumption 2 0.704 kWh
Water consumption 391
Program duration 1 3 h 55 min
Airborne acoustical noise emissions 1 47 dB(A) re 1 pW
Airborne acoustical noise 1 c emission class
Off-mode 0.49 W
Standby mode -
Delay start 1.00 W
Networked standby -
1 Values based on operation in the ECO programme
2 Consumption value based on operation in the ECO programme using cold water fill. The actual energy consumption will depend on how the appliance is used.
3 Consumption value based on operation in the ECO programme using cold water fill. The actual energy consumption will depend on how the appliance is used and on the hardness of the water.
* according to EN standard
Note on the EC Declaration of Conformity

Product Description:
DW452ED
Built-in household dishwasher
Manufacturer:
For the product described in this manual, the corresponding EC Declaration of Conformity is available.
Some of the relevant documents can be viewed and downloaded from our website on the relevant product page.
You are welcome to obtain the complete documents on written request via the adjacent contact address.
Jan Kolbe
Head of Product Management

For more information on your model, use the following link or the QR code shown to access the official EU product database EPREL:
https://eprel.ec.europa.eu/qr/557966

Support and Service
is very important to KKT Kolbe.
We are happy to help if anything should be wrong.
During the 24-month warranty period, our customer service will provide remedy for all malfunctions that are due to material or manufacturing defects.
Directly on site and of course free of charge!
You will receive spare parts until at least 12.04.2029.
You can reach our customer service under:
KKT KOLBE Customer service
Tel. 0049 9502 6679390
→ You can find further data and documents on our website at Questions & Answers.

Have the following information ready for this:
- Customer number
- Date of invoice or delivery note
- Appliance type (model number)
- Serial number

You will find the 20-digit serial number on the type plate on the outside of the packaging box or on the side of the appliance door.
If noted, you will also find it on the first page of this manual.
Thanks for reading. We wish you lots of fun with your dishwasher.
- Klarspüldosierer
- Achtung!
- Hinweise
- Hinweis
- Besteckablage
- Besteckkorb
- Sprüharme
- Maße der Türblende:
- Montage des Geschirrspülers
- User's manual
- Thank you for your confidence and congratulations on the purchase of your new gas hob.
- You can always find the latest version of your user's manual on the corresponding product page or in the "Questions & Answers" section of our online shop at www.kolbe.de.
- Your KKT KOLBE Team
- KKT KOLBE
- User manual
- Important Safety Instructions
- Danger from explosive hydrogen gas
- General safety
- Installation
- Proper use
- Child safety and pets
- Notes and Icons
- In this manual
- Warning of danger to persons
- Beware of damage
- Informations and tips
- Note on illustrations
- For appliances, components and accessories
- EU conformity
- Follow the instructions for use provided
- Environmental protection and disposal
- Notes on disposal
- No disposal in household waste (WEEE marking)
- Recyclable material (Möbius loop)
- Recyclable material (Triman icon)
- Notes on water and energy saving
- Notes on transporting the appliance
- Product Overview
- Appliance components
- Appliance specifications
- Product dimensions
- Hints on operation
- Control panel
- On Off
- P
- 3
- 4
- 1/2
- 6
- ▶||
- Program indicators lamps
- Signal and indicator lamps
- Using the Dishwasher
- Before first use
- Note
- Water softener
- Adjusting the salt dosage
- Filling the salt container
- Attention! Risk of damage!
- Notes
- Rinse aid dispenser
- Attention!
- Filling / Refilling the rinse aid dispenser
- Setting the rinse aid dosage
- Detergent dispenser
- Warning!
- Filling the detergent dispenser
- Preparing and loading dishes
- Recommendations and advice on tableware and utens is
- Unsuitable for dishwashers
- Suitable for dishwashers
- Before loading the dishwasher
- Loading dishes and utensils
- Caution!
- Crockery baskets and cutlery basket
- Upper crockery basket
- Example of loading the upper basket \*
- Cutlery rack
- Cup rack
- Height adjustment of the upper basket
- Lower basket
- Example of loading the lower basket \*
- Folding back the rack shelves
- Cutlery basket
- Example of loading the cutlery basket \*
- Operating the Dishwasher
- Washing program overview
- Dish washing operation
- Program selection and operation
- Changing the program in the middle of the cycle
- Adding dishes after starting a cycle
- Additional features
- Start time preselection
- Half Load
- Extra drying
- Key lock / Child lock
- Removing the dishes
- Cleaning and Maintenance
- Cleaning the appliance
- Filtering system
- Removing the fi Iter module
- Re-inserting the fi Iter assembly
- Spray arms
- Removing and cleaning the spray arms
- Caring for the dishwasher
- After every wash
- Seals
- Maintenance
- Frost precaution
- When not in use for a longtime
- Moving the appliance
- Troubleshooting
- Problems, possible causes and what to do
- In case of failed attempts to find a solution
- Error codes
- Installation
- Water connection
- Cold water connection
- Disconnection of the water supply
- Connecting to the water drain
- Connection to the power supply system
- ger!
- Electrical requirements and power supply
- Positioning of the appliance
- Levelling and height adjustment of the dishwasher / adjustment of the levelling feet
- Height adjustment of the levelling feet
- Mounting the door panel
- Tension adjustment of the door spring
- Attaching the condensation protection
- Mounting the dishwasher
- Conventional work surface:
- Marble or granite work top:
- Technical Data \*
- Note on the EC Declaration of Conformity
- Product Description:
- Manufacturer:
- Support and Service
- KKT KOLBE Customer service
- Tel. 0049 9502 6679390
Brand : KKT Kolbe
Model : DW452ED
Category : Dishwasher