
IAN 270654 - Uncategorized Livarno Lux - Free user manual and instructions
Find the device manual for free IAN 270654 Livarno Lux in PDF.


| Product Type | LED Ceiling Light |
| Brand | Livarno Lux |
| Model | IAN 270654 |
| Dimensions (L x W x H) | 40 x 40 x 10 cm |
| Weight | 1.2 kg |
| Power Supply | 220-240 V ~ 50 Hz |
| Power Consumption | 36 W |
| Luminous Flux | 3200 lm |
| Color Temperature | 3000 K / 4000 K / 6500 K (adjustable) |
| Light Source | Built-in LED (non-replaceable) |
| Dimmable | Yes, via remote control |
| Remote Control | Included (battery CR2032) |
| Protection Class | IP20 |
| Safety Class | Class II |
| Material | Aluminum, Acrylic |
| Mounting | Ceiling (hardwired) |
| Operating Temperature | -20°C to +40°C |
| Maintenance | Wipe with a dry, soft cloth |
| Spare Parts | Remote control, mounting kit available |
| Repairability | LED module not user-replaceable; other parts serviceable |
Frequently Asked Questions - IAN 270654 Livarno Lux
User questions about IAN 270654 Livarno Lux
0 question about this device. Answer the ones you know or ask your own.
Ask a new question about this device
Download the instructions for your Uncategorized in PDF format for free! Find your manual IAN 270654 - Livarno Lux and take your electronic device back in hand. On this page are published all the documents necessary for the use of your device. IAN 270654 by Livarno Lux.
USER MANUAL IAN 270654 Livarno Lux
Operation and Safety Notes
GR CY
Before reading, unfold the page containing the illustrations and familiarise yourself with all functions of the device.
RO
GB / CY Operation and Safety Notes Page 5
flowchart
graph TD
    A["Step 1"] --> B["Intermediate State"]
    B --> C["Final State"]
    style A fill:#f9f,stroke:#333
    style B fill:#ccf,stroke:#333
    style C fill:#cfc,stroke:#333
9261-015L/9261-016L
Introduction
Proper use......Page 6
Scope of delivery....Page 6
Parts description Page 6
Technical Data Page 6
Safety
Safety notices Page 6
Preparation
Required tools and material Page 7
Prior to installation......Page 7
Installation
Replacing lamps....Page 8
Cleaning Page 8
Disposal Page 8
Warranty and Service
Warranty Page 9
Service address......Page 9
Declaration of conformity....Page 9
Manufacturer......Page 9
LED outdoor wall light
●Introduction
Congratulations on the purchase of your new product. You have selected a high quality product. These instructions are part of the product and contain important information on setup and handling. Always follow all safety instructions. Before using this product for the first time verify the correct voltage and that all parts are properly installed. Should you have any questions or you are unsure about operating the product, please contact the dealer or service centre. Please keep these instructions in a safe place and pass them on third parties as applicable.
Properuse
This light is suitable for indoor and outdoor use. The light can be fastened to any normally inflammable surface.
- Scope of delivery
1 LED outdoor wall light, model 9260-015L or 9260-016L or 9261-015L or 9261-016L
2 Wall plugs
2 Fixing screws
1 LED lamp, E27, 5.5 W
2 Protective tubes
1 Set of instructions for use
Partsdescription
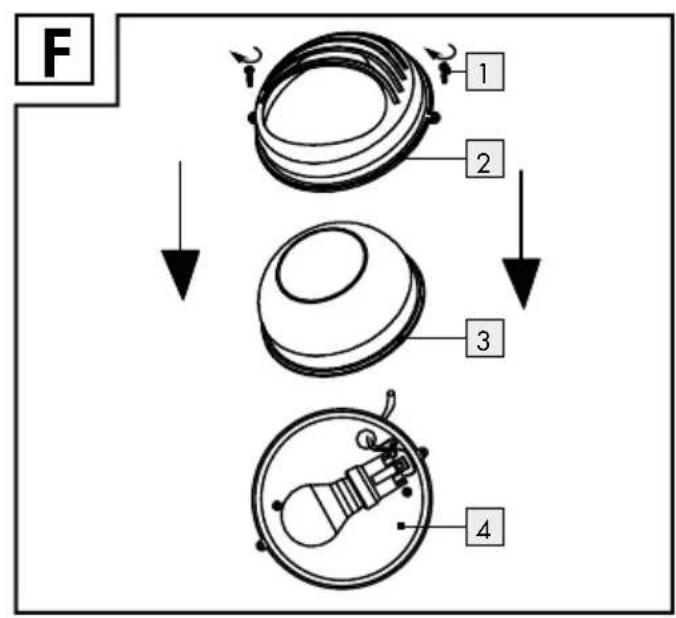
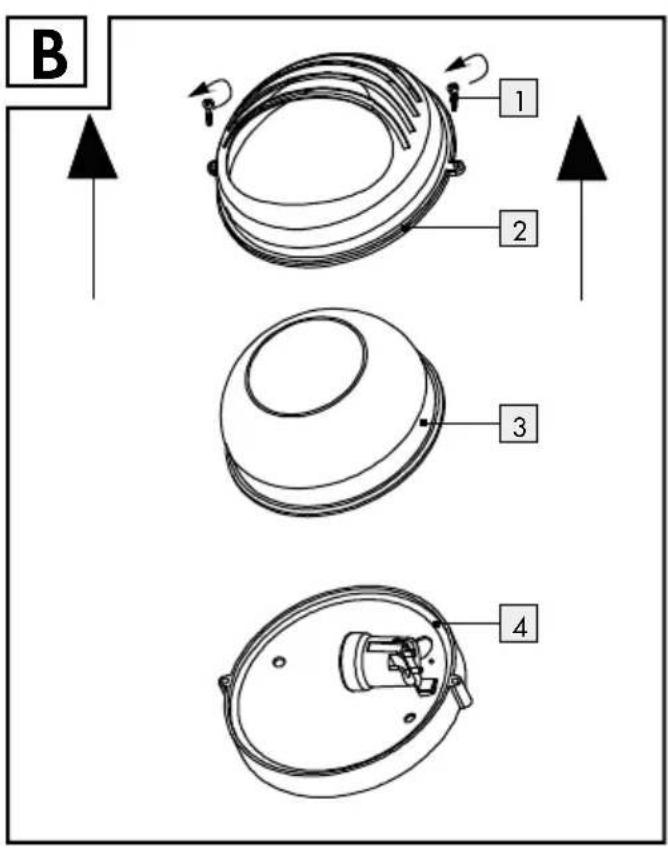
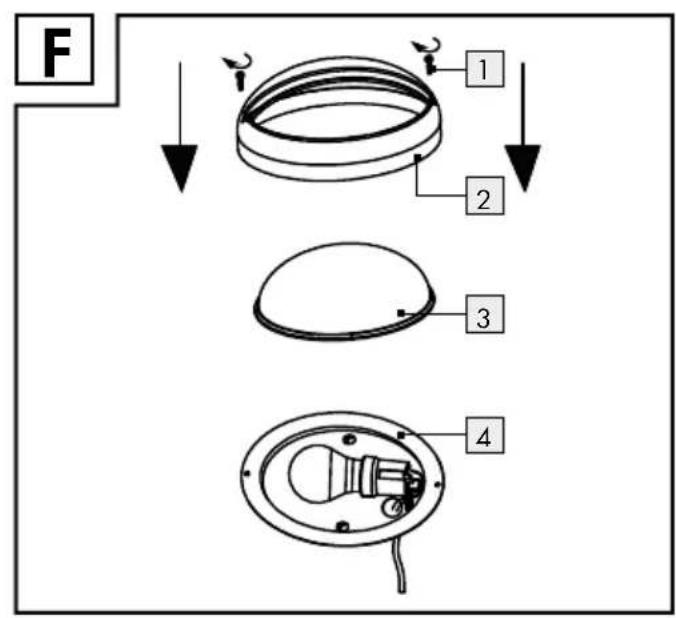
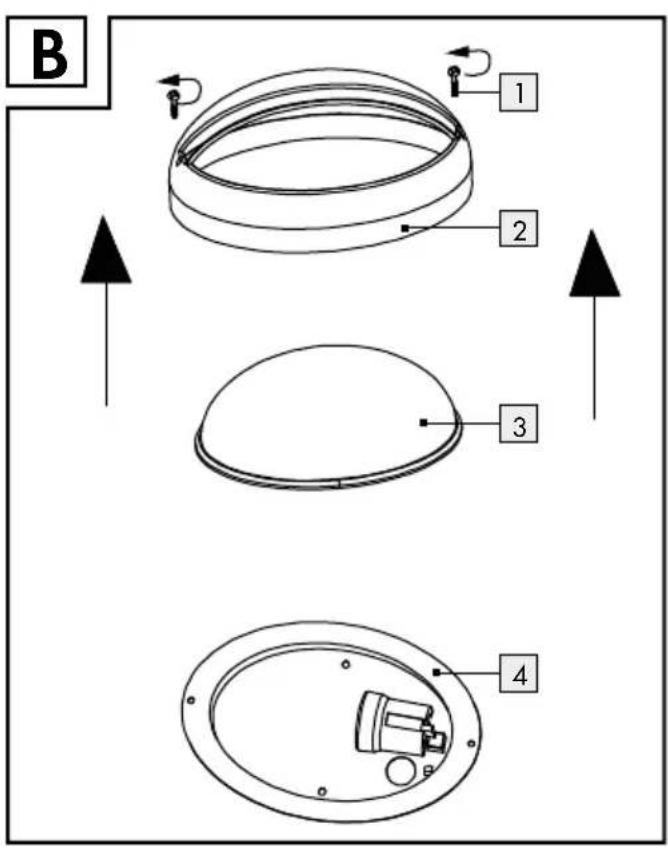
1 Screws (cover)
2 Cover
3 Glass
4 Connection housing
5 Screws (connection housing)
6 Wall plug
7 Membrane
8 Mains connection cable (external)
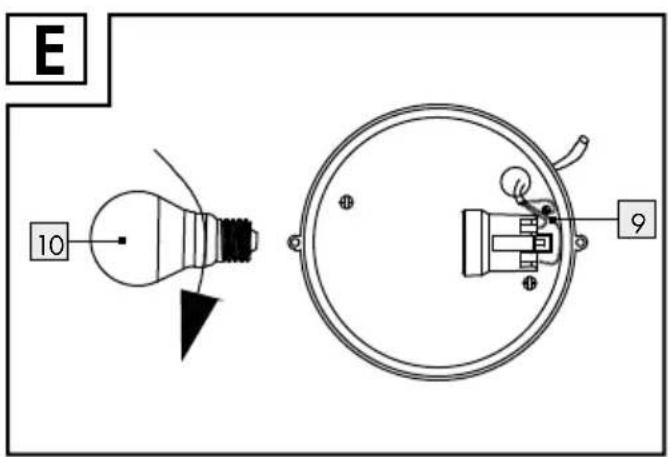
9 Protective tubes
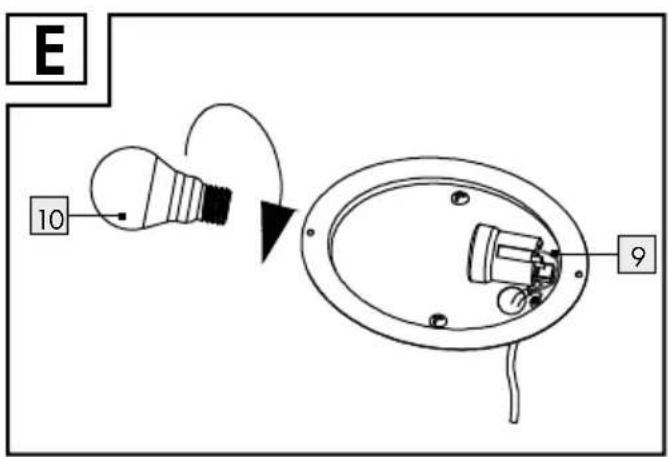
10 Lamp
●TechnicalData
Item no.: 9260-015L or 9260-016L or 9261-015L or 9261-016L
Operating voltage: 230V\~50Hz
Lamp: 220-240V, E27, 5.5W
Rated power max.: 1 x 5.5 W
Protectionclass:I/
Protectiontype: IP44
Dimensions: 9260-015L or 9260-016L, ∅ approx. 175 mm, height approx. 95 mm 9261-015L and 9261-016L: 213 x 142 x 100 mm
●Safety

Safety notices
Damage due to failure to comply with these operating instructions will invalidate the warranty! We assume no liability for consequential damage! We assume no liability for material damage or personal injury due to improper handling or failure to comply with the safety instructions!
DANGER TO LIFE AND ACCIDENT HAZARD FOR TODDLERS AND SMALL CHILDREN! Never
leave children unattended with the packaging material. The packaging material represents a danger of suffocation. Children frequently underestimate the dangers. Please keep children away from the product at all times.

Danger to life from electric shock!
■ Ensure that a qualified electrician, or a person trained to carry out electrical installations, performs the electrical installation.
We assume no liability for material damage or personal injury due to improper handling or failure to comply with the safety instructions!
■ Never use the light if any defects have been identified.
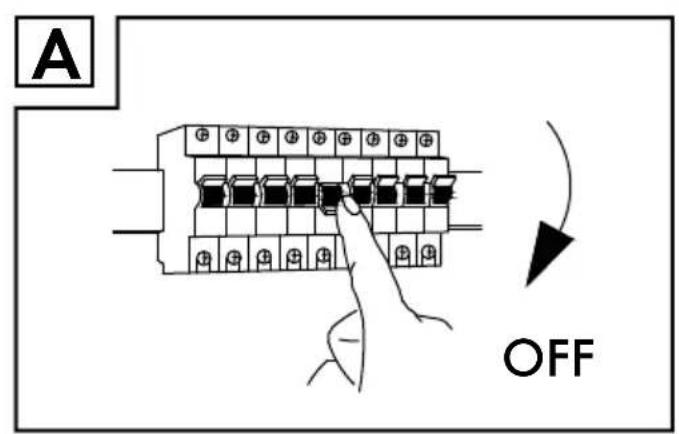
Prior to installation, remove the fuse or switch off the circuit breaker (0 setting) in the fuse box. Set the light switch to the "OFF" position (Fig. A).
Prior to installation, verify that the mains voltage on site corresponds with the operating voltage required for the light (230 V\~).
Before drilling, ensure that there are no gas or water pipes or cables where you intend to drill.
■ Installation may only be carried out by experts.
It is essential that you take note of the wall quality, as the included fittings are not suitable for all types of wall.
It is essential that you take note of the wall quality, as the included fittings are not suitable for all types of wall.
The manufacturer accepts no responsibility for an inappropriate wall plug connection and any resulting damage.
Risk of burns and injury!
Do not install the light, if it has a defective lamp glass. In this case contact the service centre for a replacement.
■ Only install the light on normally inflammable or non-inflammable surfaces. Excessive heat can result in a fire.
To prevent burns, ensure that the light is switched off and has cooled down before touching it. Lamps become very hot.
- Allow the light to cool down completely before replacing a defective bulb.
- Do not attach the light to a damp or conductive substrate.
- Replace defective bulbs with new ones immediately. Use only those bulbs as stated in the chapter on "Technical Data". Before changing bulbs, always first remove the fuse or switch off the circuit breaker.
■ The type of bulb included is not suitable for dimmer or electronic switches.
- Do not look directly into the light source (light bulb, LED etc.).
■ Only use the individual parts supplied, otherwise all warranty claims will become invalid.

Safe working
- Only use 220-240 V\~ lamps with E27 socket and a maximum output of 5.5 watt.
■ The outdoor light is splash-proof.
■ Always be attentive! Always pay attention to what you are doing and use common sense. Never install the light if you are having difficulty concentrating or do not feel well.
● Preparation
- Required tools and material
The tools and materials specified are not included. This information and these values are non-binding and are only provided as a reference. The nature of the material is determined by the individual local conditions.
- Pencil / marking tool
- Voltage tester
- Cross-tip screwdriver
- Electric drill
- Edge cutter
Prior to installation
Important: Ensure that a qualified electrician, or a person trained to carry out electrical installations, performs the electrical installation.
- Familiarise yourself with all the instructions and diagrams in this manual, as well as with the light itself, before you install it.
Before installation ensure that the circuit, to which the light will be connected, is not energised. To
do so, remove the fuse or switch off the circuit breaker in the fuse box (Position 0) (Fig. A).
■ Use the voltage tester to verify the de-energised status.
●Installation
☐ Unscrew the cover 2 and glass 3 from the connection housing 4 by loosening the screws 1 counter-clockwise.
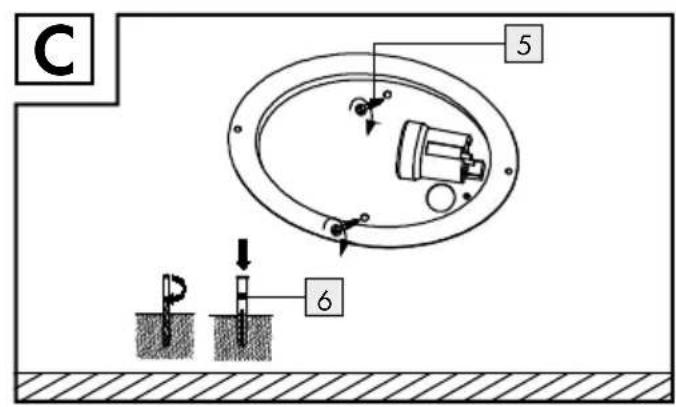
☐ Use the holes in the connection housing 4, which are intended for the screws, to mark the drill holes. Open these (if not already open) with a sharp object (e.g. screwdriver).
☐ Now drill the fixing holes ( 6 mm, depth approx. 40 mm). Be careful not to damage the supply line.
☐ Now insert the wall plugs 6 into the drill holes.
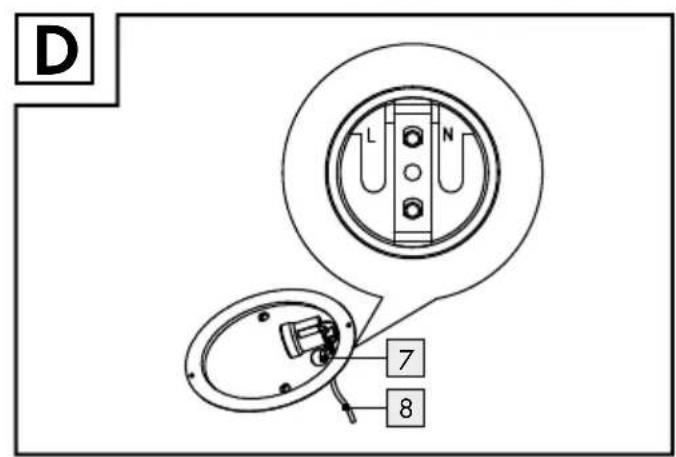
☐ Feed the power cord (external) 8 through the cable guide with membrane 7.
☐ Open these (if not already open) with a sharp object (e.g. screwdriver).
☐ Fasten the connection housing 4 using included screws 5 and wall plugs 6.
☐ Feed the power cord (external) through the cable guide 9.
☐ Connect the power cord (external) to the lamp socket.
☐ Also ensure that the colour connection of the wires is correct when connecting (L or 2 = black or brown, N or 1 = blue or white).
☐ Now connect the earth wire (3 = green-yellow) to the marked earth terminal ⏻.
☐ Check for correct fitting.
☐ Use a dry, lint-free cloth when inserting the lamp 10.
☐ Carefully insert the lamp 10 into the socket and tighten clockwise.
☐ Secure the cover 2 with glass 3 to the connection housing 4 by tightening the screws 1 clockwise.
☐ Your lamp is now ready for use.
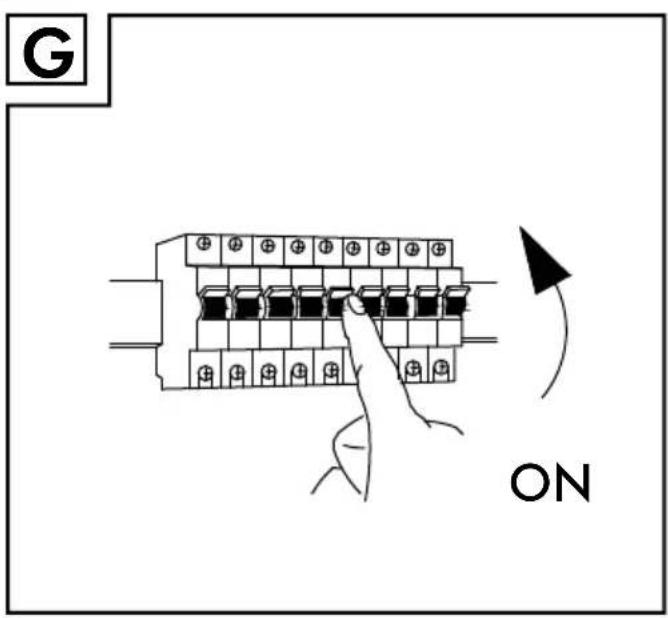
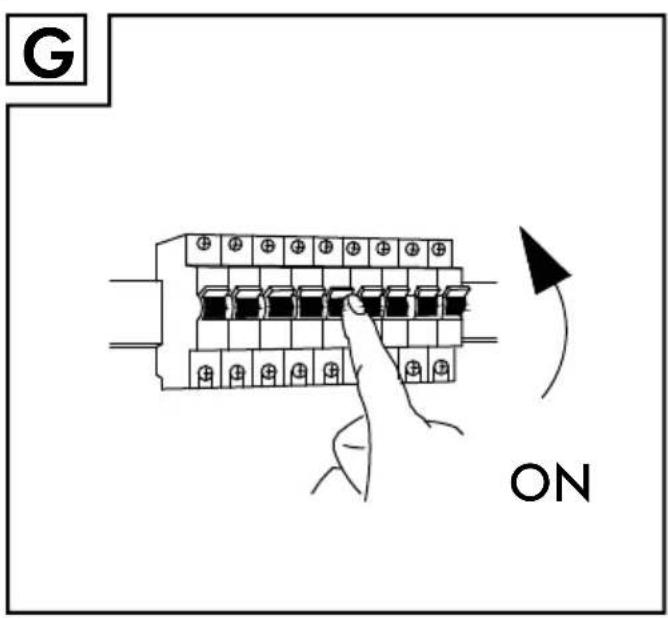
☐ Reinsert the fuse or switch the circuit breaker back on (Fig. G).
●Replacinglamps
CAUTION! RISK OF ELECTRIC SHOCK!
To replace the bulb, first of all disconnect the light from the mains circuit. To do so, remove the fuse or switch off the circuit breaker in the fuse box (position 0) (Fig. A).
- Allow the light to cool off completely.
☐ Use a dry, lint-free cloth to replace a bulb.
☐ Unscrew the cover 2 and glass 3 from the connection housing 4 by loosening the screws 1 counter-clockwise.
☐ Turn the defective lamp 10 counter-clockwise out of the socket.
☐ Insert a new lamp 10 into the socket and secure clock-wise.
□ Check for correct fitting.
☐ Secure the cover 2 with glass 3 to the connection housing 4 by tightening the screws 1 clockwise.
☐ Reinsert the fuse or switch the circuit breaker back on (Fig. G).
●Cleaning
CAUTION! RISK OF ELECTRIC SHOCK!
Disconnect the light from the mains circuit before cleaning. To do so, remove the fuse or switch off the circuit breaker in the fuse box (position 0) (Fig. A).
■ Only use a dry, lint-free cloth for cleaning. Do not use solvents, spirit or similar substances. They could damage the light.
☐ Allow the light to cool off completely.
☐ Reinsert the fuse or switch the circuit breaker back on (Fig. G).
●Disposal

The package and packaging materials consist entirely of environmentally friendly materials. They can be disposed of at your local recycling facility.
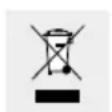
The symbol of the wheelie bin with the line through it means that, in the European Union, the product has to be disposed of in a separate refuse collection. This applies to the product and to all components bearing this symbol. Do not dispose of products bearing this symbol in your normal household waste, but instead they must be taken for recycling to a collection site for electrical and electronic appliances. Recycling helps to reduce the consumption of raw materials and protects the environment.
● Warranty and Service
Warranty
This product has a 3 year warranty from the date of purchase extended only to the original buyer, not transferable. Please keep your receipt as proof of purchase. The warranty only applies to defects in material or manufacturing and does not include wear parts or damage from improper use. Any modifications will void the warranty. This warranty does not limit your legal rights. Please phone the service centre for warranty claims. This is the only way to return your product free of charge.
Serviceaddress
Please have your receipt and the article number (e.g. IAN 12345) ready as your proof of purchase when enquiring about your product.
- Declaration of conformity CE
This product fulfils the requirements of the applicable European and national directives (Electromagnetic Compatibility 2004/108/EC, Low Voltage Directive 2006/95/EC, Ecodesign Directive 2009/125/EC, RoHS Directive 2011/65/EU). Conformity has been demonstrated. The relevant declarations and documents are held by the manufacturer.
Manufacturer
59929 Brilon (Germany)
- Introduction
- Safety
- Preparation
- Installation
- Warranty and Service
- LED outdoor wall light
- ●Introduction
- Properuse
- - Scope of delivery
- Partsdescription
- ●TechnicalData
- ●Safety
- Safety notices
- DANGER TO LIFE AND ACCIDENT HAZARD FOR TODDLERS AND SMALL CHILDREN! Never
- Danger to life from electric shock!
- Risk of burns and injury!
- Safe working
- ● Preparation
- - Required tools and material
- Prior to installation
- ●Installation
- ●Replacinglamps
- CAUTION! RISK OF ELECTRIC SHOCK!
- ●Cleaning
- ●Disposal
- ● Warranty and Service
- Warranty
- Serviceaddress
- - Declaration of conformity CE
- Manufacturer
Brand : Livarno Lux
Model : IAN 270654
Category : Uncategorized