
LS50 - Air conditioner Baxi - Free user manual and instructions
Find the device manual for free LS50 Baxi in PDF.


| Product Type | Split air conditioner (indoor/outdoor unit) |
| Control | Infrared remote control with LCD display |
| Operation Modes | Auto, Cool, Heat, Dry, Fan |
| Fan Speeds | Low, Mid, High, Auto |
| Temperature Setting Range | 16 °C to 32 °C (in 0.5 °C increments) |
| Timer | 24-hour programmable ON/OFF timer (0.5 to 24 hours) |
| Sleep Mode | 7-hour automatic operation; automatically adjusts temperature |
| Turbo Mode | Forces full capacity in Cool or Heat mode |
| ECO Mode | Energy-saving operation (Cool mode only, auto off after 8 hours) |
| Silent Mode | Ultra-quiet fan speed |
| iFEEL Function | Remote control senses room temperature for precise control |
| iCLEAN Self-Cleaning | Removes dust and dries evaporator (max 35 minutes) |
| Anti-Fungus Function | Dries heat exchanger to prevent mould and odours |
| Swing | Horizontal and vertical vane swing (manual and automatic) |
| Spot Swing | Adjust horizontal fins to desired position |
| Display | Can be turned off; shows ambient/set temperature after 5 seconds flash |
| Power Supply | 220-240 V ~ 50 Hz (typical) |
| Remote Control Batteries | 2 x AAA (included) |
| Indoor Unit Connection | White control connector to CN10 (mono) or CN13 (multi) on PCB |
Frequently Asked Questions - LS50 Baxi
User questions about LS50 Baxi
0 question about this device. Answer the ones you know or ask your own.
Ask a new question about this device
Download the instructions for your Air conditioner in PDF format for free! Find your manual LS50 - Baxi and take your electronic device back in hand. On this page are published all the documents necessary for the use of your device. LS50 by Baxi.
USER MANUAL LS50 Baxi
natural_image
Simple diagram with circles and symbols inside a rounded rectangle (no text or labels)
natural_image
Simple line drawing of a rectangular frame with two screws and a central rectangle, no text or symbols present.CONEXIONADO ELÉCTRICO
UNIDADES INTERIORES MONO→RZN(C/K/D)(50/70/100/120/140/160)
UNIDADES INTERIORES MONO→RZ(C/K/D)(50/70/100/120/140)
6. Pulsante "SWING" (SWING ♦ e SWING ↔)
7. Pulsante "HEALTH"
natural_image
Simple diagram with six symbols: circles, a pie, equals sign, a square, and a lightning bolt (no text or labels)
natural_image
Simple line drawing of a rectangular box with three pins and a central rectangle (no text or symbols)ELECTRICAL CONNECTION
UNITA' INTERNE MONOSPLIT→RZN(C/K/D)(50/70/100/120/140/160)
natural_image
Simple diagram with circles and symbols inside a rounded rectangle (no text or labels)
natural_image
Simple line drawing of a rectangular box with three vertical pins and a central rectangle (no text or symbols)UNIDADES INTERIORES MONO→RZ(C/K/D)(50/70/100/120/140)
Read and keep this manual.
PACKAGING CONTENT
| Remote Control | |
| Batteries | |
| Receiver |  |
| User and installation manual |  |
BUTTONS DESCRIPTION
RECEIVER

■ Power led: ON when the unit is connected to power source.
■ Operation led: ON when there is demand from user.
- Timer led: ON when there is some timer task.
REMOTE CONTROL
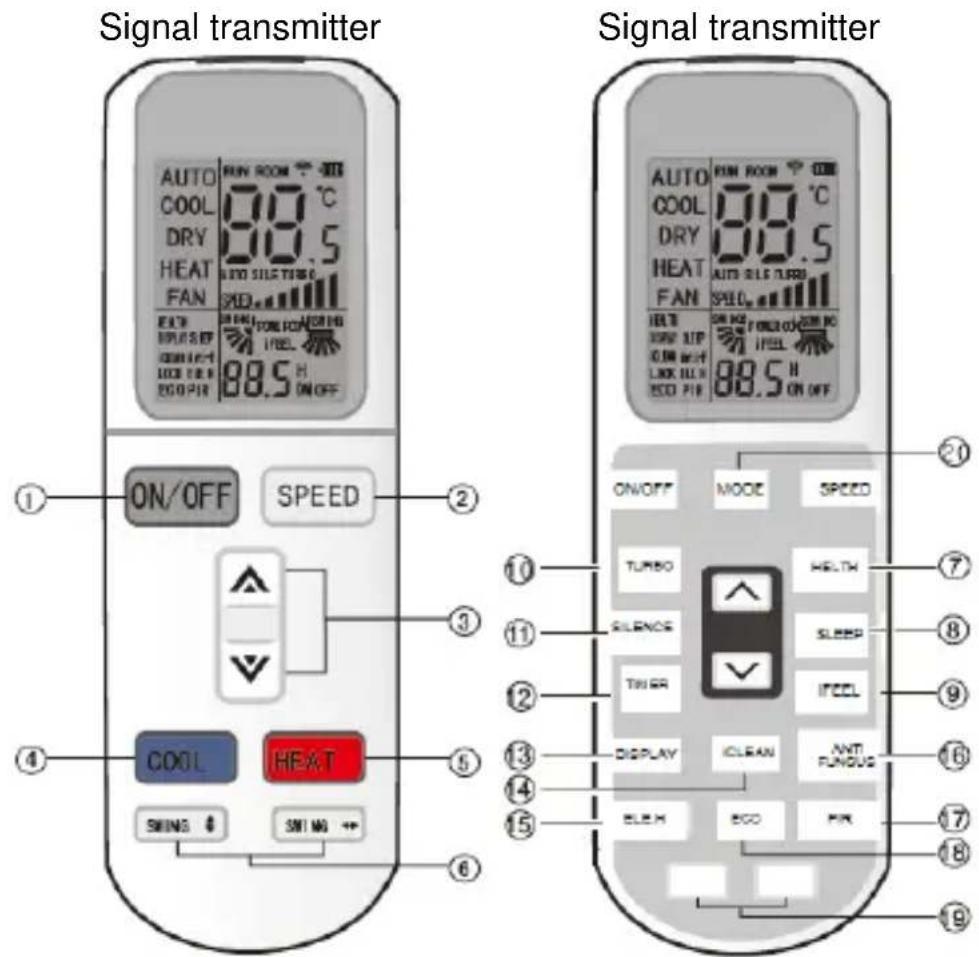
Note: 1 Remote controller outside buttons only valid when surface cover is closed
2 Two white buttons are only for addressing set. If it has been set, remember not to reset by yourself.
1. "ON/OFF" BUTTON
You can start the air-conditioner by pressing this button and stop its operation by pressing it again
2. "SPEED" button
You can select fan speed from "Low", "Mid", "High", "Auto".

flowchart
graph LR
    A["Low"] --> B["Mid"]
    B --> C["High"]
    C --> D["Auto"]
3. “A” and “V” buttons
When you press , the room temperature set will increase by 0.5 ^ C. When you press, the temperature will drop by 0.5 ^ C.
The temperature setting can be changed quickly by holding down the button. The temperature range is between 16 °C and 32 °C.
4. "COOL" button
Press the COOL button, you can directly enter cooling mode.
5. "HEAT" button
Press the HEAT button, you can directly enter heating mode.
6. "SWING" button (SWING and SWING )
Press this button, the horizontal wind direction vanes can swing automatically, when
you have the desired vertical wind direction, press it again, the horizontal wind direction vanes will be stopped at the situation of your choice.
NOTE: This function is not available for duct models
7. "HEALTH" button
Press this button, you can turn on or off the "HEALTH" function.
8. "SLEEP" button
Press “SLEEP” button, then display screen shows “SLEEP”. The sleeping function of the air conditioning is active.
- When night mode (SLEEP) is activated, the cooling mode automatically increases the set temperature by 1 °C after 1 hour and another 1 °C after another hour.
- When night mode (SLEEP) is activated, the heating mode automatically decreases the set temperature by 2 °C after 1 hour and another 2 °C after another hour.
- The air conditioner works in night mode (SLEEP) for 7 hours and stops automatically.
NOTE: If you press the "MODE" or "ON/OFF" buttons, the remote control turns night mode (SLEEP) off.
9. "iFEEL" button
Pressing this button activates the “iFEEL” function. When this function is enabled, the remote control display shows the current room temperature. If is it not activated, the remote control display shows the set temperature. This function is incompatible with fan mode (FAN).
10. "TIMER" button
This button is used to set the Timing On or the Timing Off function.
- With the remote control "OFF", press the "TIMER" button. The word "ON" appears on the display together with the timer, which can be adjusted in a range from 0.5 to 24 h.
- To adjust the timer, press the “A” or “V” buttons. Each time they are pressed, the time increases or decreases by 0.5 h for the first 10 hours. After the first ten hours, each time you press either button, the time
changes by 1 hour.
- Pressing the "TIMER" button again activates the on timer.
- You can activate other functions to regulate the air conditioning when the timer is activated (mode, temperature, oscillations of the fins, fan speed etc.). The remote control display shows all the settings and saves them. When the timer reaches the set time, the air conditioner starts to operate according to the settings in place.
11. "SILENCE" button
The silence function can be turned on or off by pressing this button (the "SILENCE" symbol will appear/disappear). This function allows you to select an ultra-quiet speed.
After changing the batteries, this function will turn off automatically.
12. "TURBO" button
- Pressing this button will turn the “TURBO” function on or off (the “TURBO” symbol will appear or disappear) in either cooling (COOL) mode or heating (HEAT) mode.
- This function forces the unit to run at full capacity, giving priority to reaching the setpoint quickly rather than ensuring efficient operation.
- After changing the batteries, this function will turn off automatically.
- This function cannot be set during automatic operation (AUTO), in dehumidification mode (DRY) or in fan mode (FAN). In these cases, therefore, the “TURBO” symbol will not appear on the LCD.
13. "DISPLAY" button
In display mode, press button once, switch off "DISPLAY". Press "DISPLAY" again.
LCD will show ambient & setting temperature after flashing 5s. It's convenient for
users to check ambient or setting temperature at any time in darkness
14. "iCLEAN" button
- With the remote control “OFF”, press the “iCLEAN” (self-cleaning) button. The fins that guide the flow of air go back to their initial position in cooling mode and the unit activates the “iCLEAN” function for a maximum of 35 minutes. The aim of this function is to remove the dust from the evaporator and dry the water contained in it, so as to prevent the formation of mould and consequent bad smells.
- After activating the "iCLEAN" function, pressing the "iCLEAN" or "ON/OFF" buttons cancels the function and reactivates the air conditioning.
- If you do not perform any operation, the self-cleaning function remains active for a maximum of 35 minutes.
NOTE: The “iCLEAN” function can be activated simultaneously with the on timer. In this case, the on timer starts after the end of the “iCLEAN” function.
15. "ELE.H" button
(Only for heat pumps with additional electrical supply).
In heating mode, pressing this button will change the operating mode, using the additional electrical supply.
16. "Anti-FUNGUS" button
- Pressing this button turns the "Anti-FUNGUS" function on or off.
- This function can be activated with the remote control when the unit is in cooling, dehumidification and automatic (cooling and dehumidification) mode.
- The fins that guide the flow of air go back to their initial position in cooling mode. If the air conditioner is in heating mode, the indoor unit fan runs for three minutes at low speed before stopping.
- The purpose of this function is to dry the heat exchanger in the indoor unit, and thus prevent condensation which can cause mould and bad smells.
NOTE:
a. This function is not factory-set. You can turn it on or off as you wish. To activate it, follow these steps: with the air conditioner and the remote control set to “OFF”, point the remote control at the indoor unit and hold down the “Anti-FUNGUS” button. The unit emits two series of five beeps to indicate that the function is ready. Once this function has been enabled, unless you turn off the air conditioner completely or turn off the function manually, the air conditioning keeps this default function.
b. To turn off this function, follow these steps:
Completely shut down the air conditioner. With the air conditioner and the remote control set to "OFF", point the remote control at the indoor unit and hold down the "Anti-FUNGUS" button. The unit will first emit five beeps, then three, indicating that the function has been disabled.
c. If the function is activated, it is advisable not to turn the air conditioner back on before the function has completely finished.
d. This function is not activated when the timer is activated or in night mode (SLEEP).
17. "SPOT SWING" button
When this button is pressed, the horizontal fins start to swing automatically. When the fins reach the desired position, press the button again so they are fixed in the selected position.
18. "ECO" button
In cooling mode (COOL), pressing the “ECO” button turns this function on or off. When the “ECO” function is on, the air conditioner gives priority to efficient operation
resulting in reduced power consumption.
After 8 hours, this function is turned off automatically. The function can be turned on again by pressing the "ECO" button.
NOTE:
The unit will turn off automatically if the timing mode is running out of time.
19. Two white buttons: Addressing set
With the controller off, pressing the two white button simultaneously 10 seconds or more to enter addressing setting. This status displays only temperature and time parameters, temperature display area shows “Serial number” parameters, the range is 0-99. Time display area shows “Set value” the range is 0-255. The initial value is 1. By pressing “A” or “V” to set serial number + and -. Parameters within the serial number displays from 0 to 99 in circulation.
By pressing “ECO” and “iCLEAN” to set value number + and -. Parameters within the value number displays from 0 to 255 in circulation. After setting the two numbers, press the MODE button to confirm the setting.
20. "MODE" button
This enables you to select different operation mode, after each pressing, the operation mode will be changed.
It shows in the following display.

flowchart
graph LR
    A["→AUTO"] --> B["COOL"]
    B --> C["DRY"]
    C --> D["FAN"]
    D --> E["HEAT"]
OPERATION DESCRIPTION
CHANGING THE BATTERIES

- Open the sliding cover in the direction of the arrow.
-
Insert two new batteries (AAA), observing the polarity (+/-).
-
Replace the cover.
- When the "ON/OFF" button is pressed, the air conditioner starts running.
- Press the "MODE" button and select automatic mode.
- Press the SPEED button to adjust the fan speed. You can select LOW, MID, HIGH and AUTO speeds.
- If you press the button again, the air conditioner stops.
COOLING AND HEATING OPERATION MODES
- When the "ON/OFF" button is pressed, the air conditioner starts running.
- Press the "MODE" button and select cooling or heating mode.
- Press the “A” and “V” buttons to adjust the temperature. Each press increases or decreases the temperature by 0.5^ C in a range from 16 to 32 ^ C.
- Press the SPEED button to adjust the fan speed. You can select LOW, MID, HIGH and AUTO speeds.
- If you press the button again, the air conditioner stops.
- When the "ON/OFF" button is pressed, the air conditioner starts running.
- Press the "MODE" button and select dehumidification (DRY) mode.
- Press the “A” and “V” buttons to adjust the temperature. Each press increases or decreases the temperature by 0.5 °C in a range from 16 to 32 °C.
- Press the SPEED button to adjust the fan speed. You can select LOW, MID, HIGH and AUTO speeds.
- If you press the button again, the air conditioner stops.
TIMER BUTTON MODE
1. Clock Function
Clock setting during using period, the method just like below:
1) Open the lid of the remote controller, then press Timer button, the clock function is activated.
2) Press the “A” and “V” button to set clock time. The time is 12-hour system with a.m.& p.m.
3) Press the TIMER button again to confirm the clock time
2. Timing ON Function
Timer ON function must be set when the airconditioner is off.
The method just like below:
1) Open the lid of the remote controller, then press TIMER button, the letter "ON" will be displayed and flicker.
2) Press the “▲” and “▼” button to set clock time. The time is 12-hour system with a.m.& p.m.
3) Press the TIMER button again to confirm the clock time
4) Press other button to select the operation condition (including mode, temperature, swing, fan, speed, etc.)
NOTE: When the Clock or Timing on setting is the same as the setting time, the air conditioner will automatically close or operate.
FAN MODE
- When the "ON/OFF" button is pressed, the air conditioner starts running.
- Press the "MODE" button and select fan mode.
- Press the SPEED button to adjust the fan speed. You can select LOW, MID and HIGH speeds.
- If you press the button again, the air conditioner stops.
NOTE: in circulation mode, adjusting the temperature makes no difference
- When the "ON/OFF" button is pressed, the air conditioner starts running.
- Press the "MODE" button to select cooling or heating status.
- Open the lid of the controller, press the SLEEP button, the display will show the sleeping function and it will be activated.
- Press SLEEP button again, the sleeping function will be cancelled. Then the air conditioner will keep its setting to operate.
- Press ON/OFF button, the air conditioners stops.
When the sleep function starts, it will operate like follows:
- Cooling mode:

flowchart
graph LR
    A["setting T(℃)"] --> B["T+1(℃) 1st hour"]
    B --> C["T+2(℃) 2nd hour"]
    C --> D["Keep running for another 5 hours"]
    D --> E["stop automatically"]
2.Heating mode:

flowchart
graph LR
    A["setting T(℃)"] --> B["T-2(℃) 1st hour"]
    B --> C["T-4(℃) 2nd hour"]
    C --> D["Keep running for another 5 hours"]
    D --> E["stop automatically"]
- The sleep mode will last for 7 hours, and then stop automatically.
NOTE:
This manual describes the functions of all the remote controls. If nothing happens when you press a button, this is because the appliance does not feature this function.
- Disconnect the base panel from the receiver.
- Use two screws to fix the base panel to the wall.

natural_image
Simple diagram with circles and symbols (circle, minus, square) without any text or labels
natural_image
Simple line drawing of a rectangular frame with two screws and a central rectangle, no text or symbols present.ELECTRICAL CONNECTION
INDOOR UNITS MONO→RZN(C/K/D)(50/70/100/120/140/160)
- In case of floor-ceiling and cassette, remote control is supplied as standard.
- Connect the white control connector of the receiver to the "CN10" connector of the indoor unit PCB as shown in the following schema:
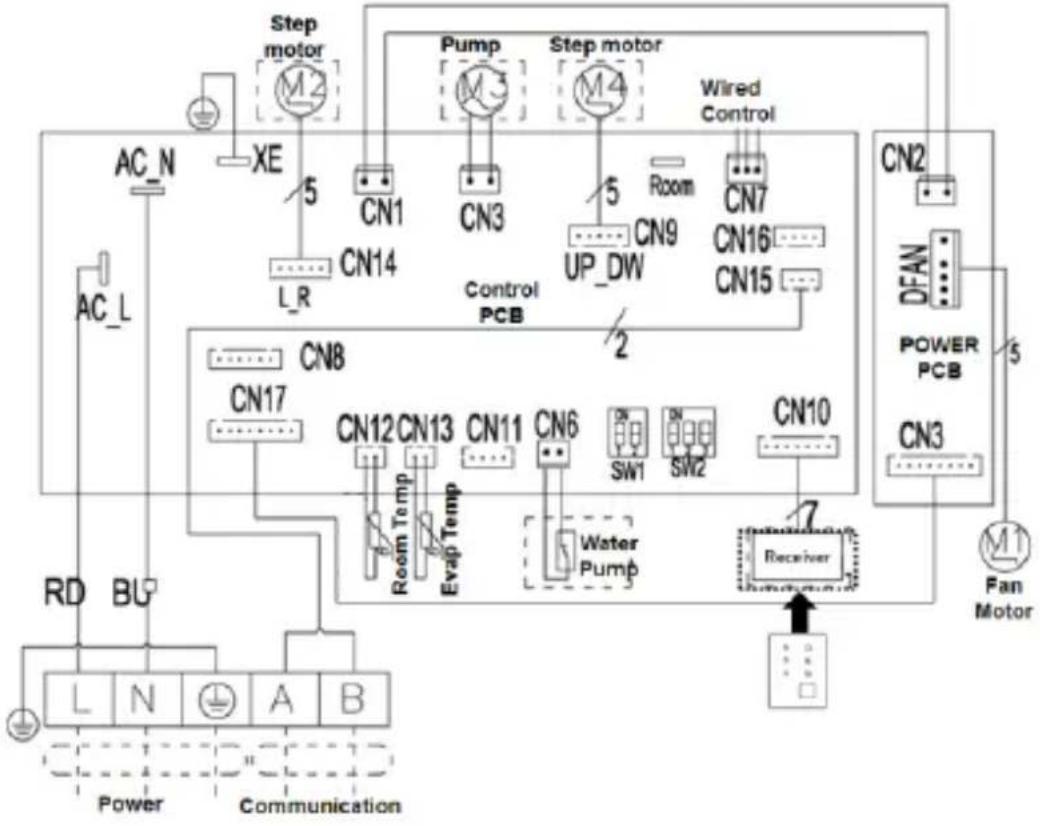
flowchart
graph TD
    A["AC_N"] --> B["XE"]
    B --> C["L_R"]
    C --> D["CN14"]
    D --> E["CN1"]
    E --> F["Pump"]
    F --> G["CN3"]
    G --> H["Control PCB"]
    H --> I["UP_DW"]
    I --> J["CN9"]
    J --> K["Wired Control"]
    K --> L["CN7"]
    L --> M["CN16"]
    M --> N["CN15"]
    N --> O["CN2"]
    O --> P["DFAN"]
    P --> Q["POWER PCB"]
    Q --> R["CN3"]
    R --> S["Fan Motor"]
    T["RD"] --> U["BU"]
    U --> V["L"]
    V --> W["N"]
    W --> X["A"]
    X --> Y["B"]
    Y --> Z["Power"]
    Y --> AA["Communication"]
    AB["CN8"] --> AC["CN12"]
    AC --> AD["CN13"]
    AD --> AE["CN11"]
    AE --> AF["CN6"]
    AF --> AG["SW1"]
    AG --> AH["SW2"]
    AH --> AI["CN10"]
    AI --> AJ["Receiver"]
    AK["Room Temp"] --> AL["Eval Temp"]
    AL --> AM["Water Pump"]
INDOOR UNITS MULTI→LSN(C/K/D)(25/35/50)-XM
- In case of floor-ceiling and cassette, remote control is supplied as standard.
- Connect the white control connector of the receiver to the "CN13" connector of the indoor unit PCB as shown in the following schema:

flowchart
graph TD
    A["Power"] --> B["AC_L3"]
    B --> C["HEAT"]
    C --> D["AC_N"]
    D --> E["Transformer"]
    E --> F["CN1"]
    F --> G["CN4"]
    G --> H["CN13"]
    H --> I["Receiver"]
    I --> J["Wired control"]
    I --> K["Evap Temp"]
    I --> L["CN8"]
    I --> M["CN11"]
    I --> N["CN9"]
    I --> O["CN7"]
    I --> P["CN12"]
    P --> Q["Step motor"]
    P --> R["Float switch"]
    P --> S["Room Temp"]
    T["Power"] --> U["L"]
    U --> V["N"]
    V --> W["C"]
    X["Communication"] --> Y["Y/G"]
    Y --> Z["RD"]
    Z --> AA["BU"]
    AA --> AB["BK"]
    AC["Fan motor"] --> AD["M1"]
    AD --> AE["M2"]
    AE --> AF["Drain pump"]
    AF --> AG["HMLN"]
    AG --> AH["CP10"]
    AH --> AI["5"]
    AI --> AJ["M3"]
    AJ --> AK["Step motor"]
    AJ --> AL["M4"]
    AL --> AM["Float switch"]
natural_image
Simple diagram with circles and symbols inside a rounded rectangle (no text or labels)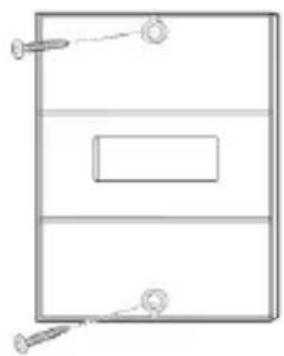
natural_image
Simple line drawing of a rectangular box with three vertical pins and a central rectangle (no text or symbols)INNENEINHEITEN MONO→RZN(C/K/D)(50/70/100/120/140/160)


- UNIDADES INTERIORES MONO→RZN(C/K/D)(50/70/100/120/140/160)
- UNIDADES INTERIORES MONO→RZ(C/K/D)(50/70/100/120/140)
- Pulsante "SWING" (SWING ♦ e SWING ↔)
- Pulsante "HEALTH"
- ELECTRICAL CONNECTION
- UNITA' INTERNE MONOSPLIT→RZN(C/K/D)(50/70/100/120/140/160)
- PACKAGING CONTENT
- BUTTONS DESCRIPTION
- RECEIVER
- REMOTE CONTROL
- "ON/OFF" BUTTON
- "SPEED" button
- “A” and “V” buttons
- "COOL" button
- "HEAT" button
- "SWING" button (SWING and SWING ↔ )
- NOTE: This function is not available for duct models
- "HEALTH" button
- "SLEEP" button
- "iFEEL" button
- "TIMER" button
- "SILENCE" button
- "TURBO" button
- "DISPLAY" button
- "iCLEAN" button
- "ELE.H" button
- "Anti-FUNGUS" button
- NOTE:
- "SPOT SWING" button
- "ECO" button
- The unit will turn off automatically if the timing mode is running out of time.
- Two white buttons: Addressing set
- "MODE" button
- OPERATION DESCRIPTION
- CHANGING THE BATTERIES
- COOLING AND HEATING OPERATION MODES
- TIMER BUTTON MODE
- Clock Function
- Timing ON Function
- FAN MODE
- INDOOR UNITS MONO→RZN(C/K/D)(50/70/100/120/140/160)
- INDOOR UNITS MULTI→LSN(C/K/D)(25/35/50)-XM
- INNENEINHEITEN MONO→RZN(C/K/D)(50/70/100/120/140/160)
Brand : Baxi
Model : LS50
Category : Air conditioner