
HXS 910 WIFI - Loudspeaker XORO - Free user manual and instructions
Find the device manual for free HXS 910 WIFI XORO in PDF.


| Product Type | Wireless Multiroom Speaker |
| Brand | Xoro |
| Model | HXS 910 WIFI |
| Output Power | 3+3+6W RMS |
| Power Supply | Integrated Li-Ion Battery (2x 2500mAh / 7.4V) or USB Cable (5V, 1000mA) |
| Charging Time | Approximately 6 hours |
| Battery Capacity | 2500mAh 7.4V (usable as power bank) |
| Connectivity | WiFi 2.4G (802.11 b/g/n), Bluetooth 2.1+EDR, NFC, AUX 3.5mm, USB (for MP3/WMA), Micro USB (charging) |
| Wireless Profiles | A2DP, AVCRP, HSP, HFP |
| Supported Audio Sources | WiFi streaming, Bluetooth, AUX input, USB stick, Internet radio, Spotify/Pandora (region dependent) |
| Multiroom | Yes, via Muzo app – group up to multiple speakers |
| Speakerphone | Yes, with built-in microphone |
| Operating Temperature | 10°C to 30°C |
| Safety | Keep away from water (not waterproof), keep 60cm from medical devices, do not cover |
| Cleaning | Use a soft cloth, never use solvents |
| Repair / Spare Parts | Only qualified personnel; contact support for warranty/RMA |
| Warranty | Repair or replacement at MAS Elektronik AG's choice; battery cover 6 months |
| Certification | CE, R&TTE 1999/5/EC |
Frequently Asked Questions - HXS 910 WIFI XORO
User questions about HXS 910 WIFI XORO
0 question about this device. Answer the ones you know or ask your own.
Ask a new question about this device
Download the instructions for your Loudspeaker in PDF format for free! Find your manual HXS 910 WIFI - XORO and take your electronic device back in hand. On this page are published all the documents necessary for the use of your device. HXS 910 WIFI by XORO.
USER MANUAL HXS 910 WIFI XORO


DE - 3

DE-5
Mulitroom

DE - 6
Nutzung
Wiedergabe

OFF | ON: Power Switch
USB for charging your mobile devices
playing MP3/WAV music direct from usb stick
Micro USB: to charge the speakers internal Battery
AUX: 3,5mm Stereo Jack
MIC: Microphone

ENG-2
Network it [WiFi]
There are two connection ways with Wifi :
Network Connection
Use Apple Store (IOS devices) or Google Play (Android devices) to search and download "Muzo" application (Wi-Fi connection and internet access are required).
- Enter WLAN setting of your device, and connect your network
- Turn on the speaker, it start by default in WiFi mode
-
Run the App and follow on screen guide to setup network To add the first speaker in your network:
-
Press Add Device button

- Press the WPS button on the speaker for 1 second then press next

-
Type the password of your wifi network and press connect
-
The App searches the speaker and automatically adds it to your network



ENG - 3
-
You can now select the Speaker's name or set a customized one
-
To add more speakers, press + on the top right and repeat steps 2-5
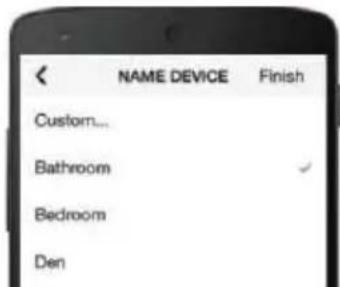
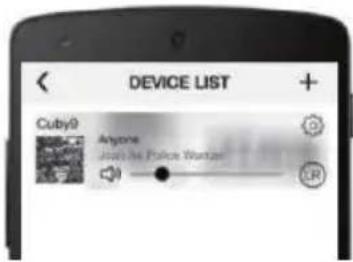
Direct Connection
If there is no Wi-Fi router available when you are outside(maybe you are at the Beach), you can connect your phone/tablet directly to the Speaker's Wifi signal network. First turn Speaker ON.
- Next go to Settings" "on your Smart Device and turn on your Wifi/WLAN. Your Smart Device will locate the Speaker and identify it by a Wifi name (HXS 910_xxxx). Click the Speaker name from the list of devices available. The Speaker will now connect directly to your Smart Device, and your Speaker has become a Router itself


- Go to your APP, it will discover Router speaker automatically, touch the "+" on right top of APP screen to add other speakers, like below
ENG - 4
- After push the + to add another speaker, the App will default to the Password Page. No need to enter a password - just click Next

- Press WPS on second speaker-then press Next

- The App searches the speaker and automatically adds it to your network


ENG - 5
4. Group it
- In the list of the available speakers, grab (holding your finger for two to three seconds until the dotted line to the left of the Speakers device icons appears) then drag the speaker to be slaved/paired to the master and
drop it on to the master speaker device icon. Note the slave/paired speaker has become part of the Master's group network. The Master's music is also
played through all the Slave/Paired speakers. You can play music that is only on your smart device.
- If you want to ungroup, just grab and drag the slave/paired speaker below the middle line. Note diagram below. Slave/ Paired speaker becomes Master speaker and can play its own music. You could use your Smart
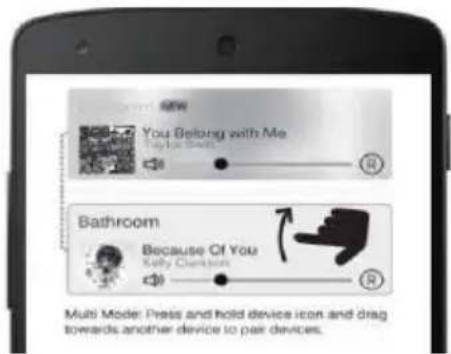

device to play two different songs via two speakers.

ENG - 6
Useful
- You can make one or more groups
- You can have multiple Slave/Paired speakers under the same Master Speaker
- You can simultaneously control the volume of all the speakers in a group by using Volume buttons of your phone/tablet
- For a Group configuration, choose which speaker can play Left (L), Right (R) or Left/Right (LR), by touching the relevant icon
Play it
Music Selection Now playing Available speakers

Select your local songs or USB songs through My Music
- Access Web Radio through TuneIn
• Search for online songs through Search - Access your Favorites through Favorites
- Access Web services (Pandora/Spotify) by touching the corresponding icons (region dependent)

ENG - 7
Mode Switch

flowchart
graph LR
    A["WiFi"] --> B["Bluetooth"]
    B --> C["Line IN"]
    C --> A
When turn on speaker, it will be WiFi Mode automatically
- The first time press “ ”, it will turn to Bluetooth mode
- The second time press it, will turn to Line-in mode
- The third time press it, will turn to WiFi mode
Each time press the switch key “ ”, mode will change as aboved steps.
6. Bluetooth Connection
Press mode switch key "to change the mode from WiFi to Bluetooth.
Then will see blue light" "flash. The speaker is in Bluetooth mode and waiting for connection.
- Navigate the Bluetooth function of your device (Select "Set Up" Bluetooth or turn "ON" Bluetooth)
- Select "Search" or "Discover" devices
- Select Bluetooth "HXS910"
- If required, type the password or PIN 0000
After completing the steps above, a message on your device will appear confirming that your device is now paired/connected.
In case of unsuccessful pairing, turn off the speaker and restart it.
The Bluetooth-Speaker support the following Bluetooth Profiles:
• A2DP
- AVCRP
• HSP
• HFP

ENG - 8
Using NFC to connect to the Speaker

Please activate the NFC function of your Bluetooth device. Bring your Bluetooth device close to the speakers NFC-Area. Your Bluetooth device will ask you whether you want to pair the speaker, confirm by "Yes" or "OK", then the pairing process is completed. Please read the instruction manual of your Bluetooth-Device.
Power Bank Usage
Battery capacity: 2500mAh 7.4V, you can charge your phone or other devices via USB port.

ENG - 9
Make a call
When you make a call from your mobile phone, the call will be (according to your phones settings) automatically transferred to the speaker. Please refer to the manual of your mobile phone.
Audio Input
Audio Input can be used for audio input from a device that does not support Bluetooth function (MP3 Player, Notebook etc.)
- Connect the speaker and your audio-source via the Audio-Cable.
- Set the Switch of the Bluetooth-Speaker to ON
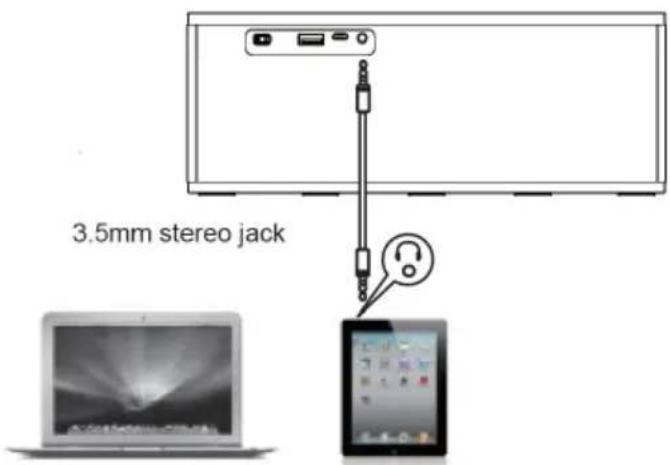
USB Direct for MP3 / WMA music.
Connect your device to the USB port of HXS910. Then playback your digital music directly through this devices.
Now you can enjoy your favorite music with family and friends.

ENG - 10
Status LED
The indicator light status display as below:
LED Display Light Indication

Blue light stable Under WiFi mode
White light Under Line-in mode

Red Light Flashing Low power
Red Light Stay solid Charging
Red Light off Charging finished

Blue light Flashing Under Bluetooth mode
and
waiting for connection
Blue light solid Bluetooth connected

ENG - 11
Charging the integrated Battery
Built-in lithium battery can be charged by Micro USB cable, see below picture:

Connect the Speaker (USB) to a USB-Port (Computer, Laptop etc.) Charging the Battery takes approx. 6 hours. Once the Battery is fully charged, the Status LED turns off.

ENG - 12
Charging of mobile Devices
You can connect your mobile devices to 5V OUT (USB Port) to charge their batteries.
• Set the Power Switch to ON.
- Connect your mobile device to 5V OUT using an appropriate USB-Cable.
Output: 5V DC, max. 1000mA
Safety Instruction
- The radio wave of this WiFi&Bluetooth Speaker may impair the operation of other electric or medical devices. Keep this Wifi&Bluetooth Speaker at least 60cm from pacemakers or other medical devices. Switch off the device in areas where the use is prohibited (For example: Aircraft, medical facilities, refuelling points or close to automatic controlled devices.)
- Keep the Speaker away from hard disc drives, floppy discs, credit cards and other objects that can be damaged by magnetic fields.
- Leaving the Device in hot or cold places, such as in a closed car in summer or winter conditions, will reduce the capacity and lifetime of the integrated battery. Always try to keep the battery between 15°C and 25°C (59°F and 77°F). A device with a hot or cold battery may not work temporarily, even when the battery is fully charged.

ENG - 13
- Keep batteries out of reach of small children. If swallowed, consult a health professional immediately. Should a battery leak, the device may become damaged. Clean the battery compartment immediately, avoiding contact with your skin.
- If the device is not used for a long period of time, the battery may lose its charge. Please recharge the battery.
- Do not attempt to open the Wifi&Bluetooth Speaker, the rechargeable battery or the battery pack.
- Do not dispose the Speaker in a fire as the internal batteries may explode.
- Do not drop, crush, bend, or apply excessive force to the device.
- Clean the unit with a soft cloth. Never use solvents.
- The unit must only be opened by qualified personnel.
- Keep the Speaker away from water. It is not water proof!
- Speaker and Power Supply unit may get warm during normal operation. Do not cover the device to avoid overheating.
- This symbol means that electrical and electronic equipment, at their end-of-life, shall be disposed of separately from your household waste.

Technical Data
Output Power: 3+3+6W (RMS), Supply: Integrated Li-Ion Battery (2x 2500mAh/7,4V)/USB Cable (5V 1000mA), Bluetooth 2.1+EDR,
Wifi 2.4G (802.11 b/g/n) Operating Temperature: 10°-30°C

ENG - 14
Warranty
In case the products delivered are not free from defects in material or workmanship, MAS Elektronik AG has the right to either repair or replace the defective product at its choice. The warranty for wearing parts (e.g. rechargeable batteries) is limited to 6 months. MAS Elektronik AG is not liable for any accessories not belonging to original package content such as DVDs, hard disc drives, Flash storage devices, batteries, etc. This limited warranty covers the warranty requirements set by authorities in your country. This limited warranty is valid in the country the product was purchased only. For a correct and frictionless completion of warranty or repairs you need a RMA No. You may obtain a RMA on the internet at www.xoro.de or by telephone.

MAS Elektronik AG
Weidegrund 3
21614 Buxtehude
Germany
Support: support@ersservice.de
Hotline: +49 (0) 4161 800 24 24
Konformität
Declaration of conformity
The following wireless features are delivered with this device: Bluetooth
MAS Elektronik AG hereby declares that this device conforms to the fundamental requirements and the remaining relevant regulations of the 1999/5/EC RTTE directive.
Declaration of conformity are available at www.xoro.de/downloads



- Mulitroom
- Nutzung
- Network it [WiFi]
- Network Connection
- Direct Connection
- Group it
- Useful
- Mode Switch
- Bluetooth Connection
- Using NFC to connect to the Speaker
- Power Bank Usage
- Make a call
- Audio Input
- USB Direct for MP3 / WMA music.
- Status LED
- Charging the integrated Battery
- Charging of mobile Devices
- Safety Instruction
- Technical Data
- Warranty
- Konformität
- Declaration of conformity
Brand : XORO
Model : HXS 910 WIFI
Category : Loudspeaker