
WA 7172 - Washing machine BOMANN - Free user manual and instructions
Find the device manual for free WA 7172 BOMANN in PDF.


| Product Type | Freestanding washing machine |
| Brand | Bomann |
| Model | WA 7172 |
| Capacity | 7.0 kg |
| Dimensions (H x W x D) | 85.0 x 60.0 x 53.0 cm |
| Net Weight | Approx. 67.0 kg |
| Rated Voltage | 220-230 V ~ 50 Hz |
| Rated Power | 2,200 W |
| Current | 10 A |
| Water Pressure | 0.05 - 1.0 MPa |
| Maximum Spin Speed | 1,400 rpm |
| Number of Programs | 15 (Cotton, Eco 40-60, Synthetics, Express 30', Memory, Duvet, Jeans, Self-clean, Delicate, Sport, Curtain, Wool, Allergy, Rinse Only, Drain/Spin) |
| Temperature Selection | Cold, 20°C, 30°C, 40°C, 50°C, 60°C, 90°C |
| Start Delay | 1 - 24 hours |
| Additional Options | Prewash, Extra Rinse, Soak (30/60 min), Rinse Stop, Eco |
| Child Lock | Yes (button combination) |
| Foam Detection | Yes (automatic extra rinse) |
| Self-Cleaning Program | Yes (Trommelreinigung / Self-clean) |
| Energy Efficiency Program | Eco 40-60 (complies with EU ecodesign) |
| Power Consumption (off-mode) | 0.09 W |
| Power Consumption (standby) | 0.36 W |
| Power Consumption (start delay) | 2.80 W |
| Noise Emission (spin) | Varies with spin speed; typically up to 76 dB(A) |
| Accessories Included | Inlet hose, transport locking covers, divider for detergent compartment |
| Optional Accessory | Inlet hose safety system (Art.-No. 8900 410) |
Frequently Asked Questions - WA 7172 BOMANN
User questions about WA 7172 BOMANN
0 question about this device. Answer the ones you know or ask your own.
Ask a new question about this device
Download the instructions for your Washing machine in PDF format for free! Find your manual WA 7172 - BOMANN and take your electronic device back in hand. On this page are published all the documents necessary for the use of your device. WA 7172 by BOMANN.
USER MANUAL WA 7172 BOMANN
natural_image
Simple line drawing of a washing machine with no text or symbols! Before putting the device into operation, carefully read the safety information and instructions for use!
Special safety Information for this Unit......Page 25
Transport and Packaging......Page 26
Appliance Equipment......Page 27
Installation......Page 27
Startup / Operation......Page 29
Cleaning and Maintenance......Page 37
Troubleshooting......Page 38
Technical Data......Page 39
natural_image
Illustration of a person using a device to observe a person's eye, with no visible text or symbols.natural_image
Architectural cross-section diagram of a building with structural elements and ground level markers (no text or symbols)natural_image
3D interior view of a mechanical housing with a blue bucket and plastic components (no text or symbols visible)natural_image
3D mechanical assembly diagram showing internal components and a blue component (no text or symbols visible)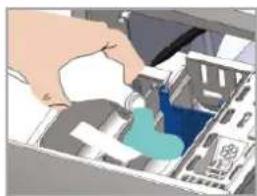
natural_image
Illustration of a hand inserting a device into an electronic device (no text or symbols visible)natural_image
3D mechanical assembly diagram showing internal components with no visible text or symbols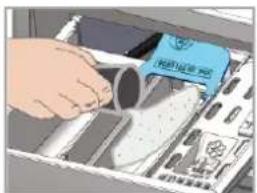
natural_image
Illustration of a hand inserting a plastic bag into a machine (no text or symbols visible)natural_image
Line drawing of a hand washing a washing machine (no text or symbols)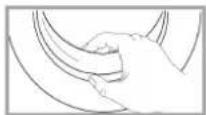
natural_image
3D mechanical assembly diagram showing internal components with no visible text or symbols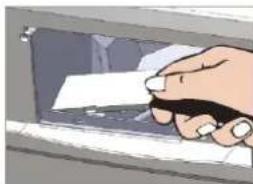
natural_image
Hand inserting a card into a banknote (no text or symbols visible)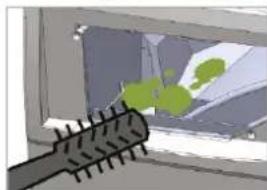
natural_image
Illustration of a brush applying green material to a window (no text or symbols visible)natural_image
Hand inserting a yellow coin into a device (no text or symbols visible)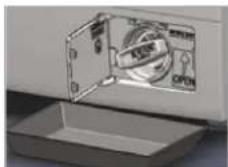
natural_image
Illustration of a mechanical device pouring liquid into a container (no text or symbols visible)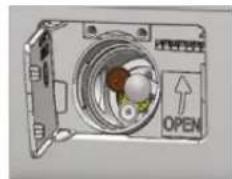
natural_image
Diagram of a camera with an open button labeled 'OPEN' and directional arrow (no text or symbols beyond the label)Thank you for choosing our product. We hope you will enjoy using the appliance.
Symbols in these Instructions for Use
Important information for your safety is specially marked. It is essential to comply with these instructions to avoid accidents and prevent damage:

WARNING:
This warns you of dangers to your health and indicates possible injury risks.

CAUTION:
This refers to possible hazards to the machine or other objects.

NOTE: This highlights tips and information.
General Notes

Read the operating instructions very carefully before putting the appliance into operation and keep the instructions including the warranty and the receipt. If you give this device to other people, also pass on the operating instructions.

NOTE:
- Due to constant product modifications, your device may differ slightly from these operating instructions; Functions and methods of use remain unchanged.
- The illustrations in these operating instructions may differ from the original device.
- The appliance is designed exclusively for private use and for the envisaged purpose. This appliance is not fit for commercial use.
- The appliance is only to be used as described in the user manual. Do not use the appliance for any
other purpose. Any other use is not intended and can result in damages or personal injuries.
- Do not use it outdoors. Keep it away from sources of heat, direct sunlight and humidity.
- Do not operate the appliance without supervision.
- When not in use, for cleaning, user maintenance works or with disruption, switch off the appliance and disconnect the plug (pull the plug itself, not the lead) or turn off the fuse.
- The appliance and if possible the mains lead have to be checked regularly for signs of damage. If damage is found the appliance must not be used.
- For safety reasons, alterations or modifications of the appliance are prohibited.
- To ensure your children's safety, please keep all packaging (plastic bags, boxes, polystyrene etc.) out of their reach.

WARNING:
Do not allow small children to play with the foil. There is a danger of suffocation!
Special safety Information for this Unit

WARNING: Hot surface! Danger of burns!
During operation the temperature of the unit drum may be very hot.
- This unit is intended to be used in household and similar applications such as
- staff kitchen areas in shops, offices and other working environments;
- farmhouses;
- by clients in hotels, motels and other residential type environments;
- bed and breakfast type environments.
- Before using, the transportation locking screws must be removed, otherwise it may cause serious damages.
- The dry weight of laundry must not exceed the max. loading of 7.0 kg capacity.
- The unit must be connected with a new set of hoses to the water supply; old hose sets should not be reused.
- The maximum / lowest permitted water inlet pressure is 1.0 / 0.05 MPa.
- The appliance is not intended for operation with an external timer or external remote-control system.
- In the appliance bottom are located ventilation openings (depending on model). These may not be blocked e. g. by carpet. Pay attention to free circulation of air.
- If the unit is used in the bathroom, unplug the power cord after using as the proximity of water presents a danger. This even applies when the unit is switched off.
- This appliance can be used by children aged from 8 years and above and persons with reduced physical, sensory or mental capabilities or lack of experience and knowledge if they have been given supervision or instruction concerning use of the appliance in a safe way and understand the hazards involved.
• Children shall not play with the appliance. - Children younger than 3 years should be kept away, unless they are constantly supervised.
- Cleaning and user maintenance shall not be made by children unless they are older 8 years and supervised.
- The appliance must be cleaned regularly. Follow the instructions in the chapter "Cleaning and Maintenance".
- Do not use any flammable/explosive cleaning agents such as benzene in the appliance.
- Do not try to repair the appliance on your own. Always contact an authorized technician. To avoid the exposure to danger, always have faulty cable be replaced only by the manufacturer, by our customer service or by qualified person and with a cable of the same type. Do not use the device if the device or plug is damaged.
Transport and Packaging
Transport the appliance

CAUTION:
Never transport the appliance without correctly installed transport locking screws.
Protect the appliance during transport against weather influences.
Unpacking the appliance
- Remove the appliance from its packaging.
- Remove all packaging material, such as foils, filler and cardboard packaging.
- To prevent hazards, check the appliance for any transport damage.
- In case of damage, do not put the appliance into operation. Contact your distributor.
NOTE:
Production residue or dust may have collected on the appliance. We recommend cleaning the appliance according to chapter "Cleaning and Maintenance".
Appliance Equipment
Appliance Overview
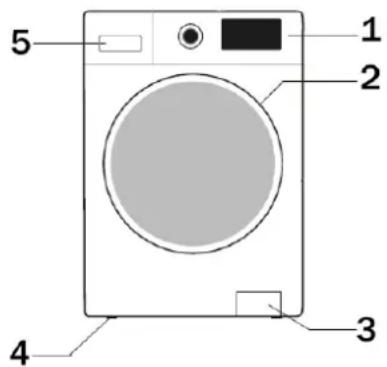
1 Control panel
4 Feet
2 Appliance door
5 Detergent dispenser
3 Maintenance cover
Delivery scope
1x inlet hose, 4x transport locking covers, 1x divider for detergent compartment
Installation
WARNING:
The unit must not be connected to the mains during installing. Otherwise there is danger to life or electric shock hazard!
CAUTION:
For a correct operation the appliance must be connected properly. The specifications for water supply and drain as well as the electrical connection must fulfill the required criteria.
Remove the transport locking screws
CAUTION:
- Before using, all transport locking screws must be removed from the appliance back. Otherwise it may cause serious damages.
- Keep the transport locking screws for later use / transport. Never transport the appliance without properly attached transportation safety!
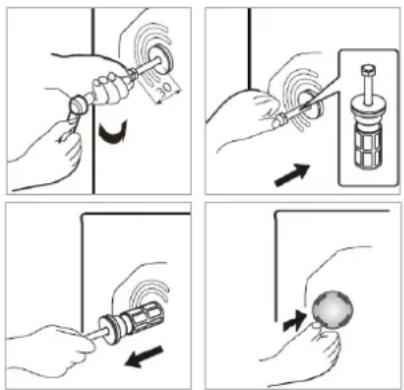
Remove the transport locking screws with a wrench. Insert the supplied transport locking covers.
Installation location
- The site should be located near the water inlet and outlet, as well as near a properly grounded power socket.
- Good ventilation around the appliance is required, to dissipate the heat properly. Enough clearance must be created for this purpose.
- The free space in front of the unit should be so that the appliance door can be opened without hindrance.
- Make sure that the floor on which the appliance is installed, is even, heat-resistant and clean.
- Take care of a solid and horizontal position of the appliance. If the appliance is not horizontally leveled, adjust the feet accordingly (see "Adjust the feet").
- Power cord and water hoses may not kinked or squashed.
- The wall socket must be freely accessible.
- Avoid the installation:
- near heaters, next to a stove, direct sunlight or any other heat sources;
- at locations with high humidity (e. g. outdoors), as metal parts would be susceptible to corrosion under such circumstances:
- in rooms where the temperature could drop below freezing. Do not expose the appliance any weather.
- near volatile or flammable materials (e. g. gas, fuel, alcohol, paint, etc.).
Adjusting the feet

CAUTION:
The feet must never be removed. Do not restrict the floor clearance through carpets, strips of wood or similar. Danger of heat accumulation!
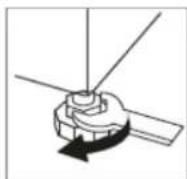
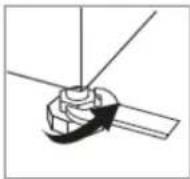
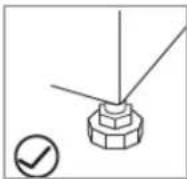
- Use a wrench to loosen the lock nuts.
- Rotate the feet to change the height.
- Tighten the lock nuts if the unit is aligned. The feet must have solid ground contact.
- Check with a spirit level whether the appliance is leveled horizontally. If the unit is not in balance, the feet must be adjusted again.
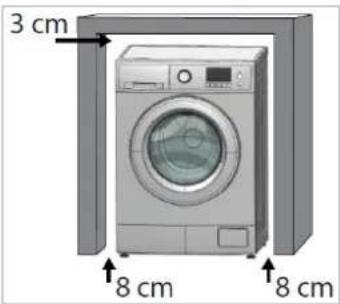
Installation under working plate

WARNING:
For reasons of electrical and mechanical safety, it is not allowed to remove the appliance top!
The appliance can only be positioned under a working plate if the minimum distances can be adhered as shown in the illustration.
Water connection

CAUTION:
- The Installation of the water supply must conform to the local laws and regulations.
• The appliance is not suitable for hot water supply. - Use the new supplied hose set to connect the appliance to the water supply. Do not reuse old or used connection sets.
- If the water pipe is new or long time not used, ensure before connecting to the water system, that the water is clear and free from contamination.
Notes on inlet hose safety system (delivery scope depending on model)
The safety system consists of a double-walled inlet hose. It guarantees to cut off the water supply when leakage of the inner hose. Switching off the water supply leads over an electronic contact.
If necessary, you can order an inlet hose safety system from your dealer or in our online accessories shop, www.bomann-germany.de. To order, use the reference number found under "Technical Data".
Connect the water inlet hose (cold water connection)
i NOTE:
The water pressure must be between 0.05-1.0 MPa. With higher pressure: use a pressure regulator.
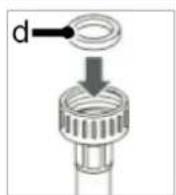
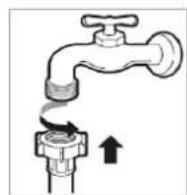
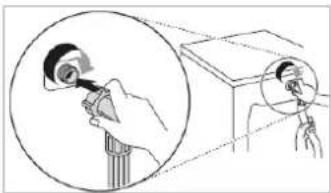
natural_image
Illustration showing a hand holding an object with magnified detail, next to a box (no text or symbols)- Check the tight fit of the rubber seals (d) at both ends of the inlet hose to prevent leakage.
- Connect the water inlet hose to a water thread with 34 ". Screw the hose firmly in the direction of the screw thread; pay attention for a tight fit.
- Connect the other end of the inlet hose to the inlet valve on the appliance back; pay attention for a tight fit too.
Connect the water drain hose
NOTE:
The drain hose has a length of approx. 1.5 m and, contrary to the recommendation, could be extended to a maximum of 4 m with a suitable hose connector.

CAUTION:
To prevent backflow of contaminated water, the free end of the hose must not come under the water level of the drain.
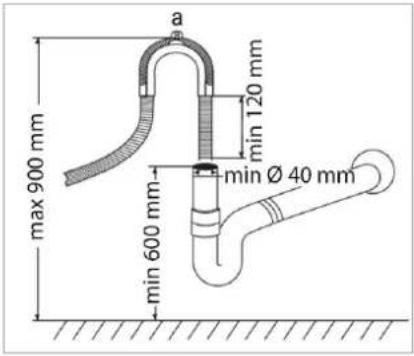
- Connect the drain hose to a drain pipe with a minimum diameter of 40 mm; alternatively, the drain hose can be fixed to a sink or directly to the drainage.
- Always make sure that the hose is not bent or squeezed. For this purpose, use a commercially available hose retaining sheet (a).
- The hose must be installed at a height of min. 600 mm and max. 900 mm above the floor.
- Secure the hose securely to avoid a change in position and with it a water leakage.
Electrical connection

WARNING:
- The installation to the mains supply must conform to the local standards and regulations.
- Improper connection may cause to an electric shock!
- Do not use multiple sockets or extension cords.
- It is not allowed to modify the plug provided with the appliance! If the plug does not fit properly to the outlet, let install a proper outlet by an authorized specialist.
-
The accessibility of the power plug must always be ensured to disconnect the device from the power supply in case of an emergency.
-
Make sure that the voltage supply matches the specifications on the rating label (appliance back) before connecting.
- Connect the mains cable to a properly installed and earthed wall outlet.
- If the plug after installation is not accessible, a corresponding disconnect device must be available to meet the relevant safety regulations.
Startup / Operation
Prior using for the first time
- Make sure that all transport securing devices has been removed.
- Remove the accessories and any material from the drum.
- Allow the appliance to wash the first time without any laundry, with the addition of some washing agent in the program [Self-clean] (see "Starting the program").
Preparation of clothes

CAUTION
- Do not wash any items that are declared as non-washable. Always follow the instructions on the care label of your laundry.
- Do not wash clothes soaked in petrol, thinners, alcohol, or solvents.
- Foreign objects (e. g. nails, coins) can cause damage to garments and components.
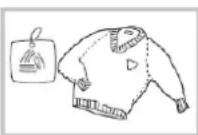
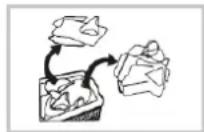
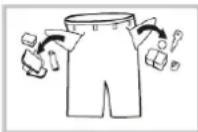
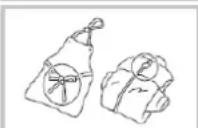
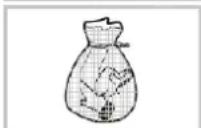
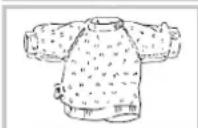
- Check the pockets of all garments on content and empty them completely.
- Sort your fabrics by color and the symbols contained on the care label. Separate white and colored laundry. All new colored clothes should be washed separately.
- Turn buttons and embroidery inside.
- Close zippers, buttons and hooks before washing. Tie any loose straps and loops.
- Wash bras e. g. in a pillowcase to prevent leakage of the steel bracket.
- Particularly delicate fabrics such as curtains, crochet or small items (socks, handkerchiefs, neckties, etc.) should be washed in a closed bag.
- Remove always all the hooks from curtains.
- Washing large and heavy parts such as bath towels, jeans, lined jackets and the like can cause the drum to run unbalanced. We recommend adding one or two smaller parts; this especially helps with the spinning cycle.
- The clothes which easily get fuzzed shall be washed separately; otherwise the other articles can be stained with dust and thrum etc. Preferably, black clothes and cotton clothes shall be
washed separately because they can easily get stained with the thrums of other colors when being washed together.
- Clean away dusts, stains and pet hairs from the clothes.
- For spot removing heavy soiling the laundry can be treated with a special prewash spray. Follow the operating instructions of the product packaging.
Select proper detergent

CAUTION:
Always consider the dosage and storage recommendations on the sales packaging.

WARNING:
Keep detergent and additives out of reach for children!
- Use only “slightly foaming” detergent for washing machines according to type of fabric (cotton, synthetics, lined or woolen products), color, washing temperature and degree of soiling. Otherwise foaming can cause overflowing.
- Bleach is alkaline and can damage your clothing, preferably does not use bleach.
- Detergents often leave residue in the clothes, which can cause bad odor if not rinsed properly.
- Detergent cannot easily get dissolved completely if there is too much detergent or water temperature is rather low. It can remain in clothes, pipes and washing machines to pollute the clothes.
- Washing shall follow the weight of clothes, dirty degrees, local water hardness as well as the recommendations from the detergent manufacturers. Consult the water company if you are not clear of water hardness.
Recommended detergent
| Type of laundry | Washing Temp. | Detergent |
| White textiles made of cotton or organic fibres | 20°C – 90°C | General purpose laundry detergent |
| Colorful textiles made of cotton or organic fibres | 20°C – 90°C | Color-care laundry detergent |
| Delicate textiles, e. g. silk | 20°C Mild | detergent |
| Textiles made from synthetic fibres or mixed textiles | 20°C – 60°C | Specialty laundry detergent |
| Microfiber sports-wear | 20°C – 40°C | Specialty laundry detergent |
| Woolen textiles 20°C | 40°C | Specialty or mild laundry detergent |
| Baby clothing 20°C - | 60°C | Specialty laundry detergent |
| Jeans / Denim 20°C | 90°C | General purpose or specialty laundry detergent |
- When washing heavily soiled whites, we recommend using cotton programs of 60°C or above and a normal washing powder (heavy duty) that contains bleaching agents that at medium/high temperatures provide excellent results.
- For washes between 40°C and 60°C, the type of detergent used needs to be appropriate for the type of fabric and level of soiling. Normal powders are suitable for „white“ or color fast fabrics with high soiling, while liquid detergents or „color protecting“ powders are suitable for colored fabrics with light levels of soiling.
- For washing at temperatures below 40°C we recommend the use of liquid detergents or detergents specifically labelled as suitable for low temperature washing.
Detergent dispenser
CAUTION:
The detergent drawer is designed exclusively for the use of detergents for washing machines!
i NOTE:
- Always add the detergent powder just before starting the wash cycle, otherwise it could get damp and will not dissolve properly.
- At the end of the wash cycle the drawer must be empty.
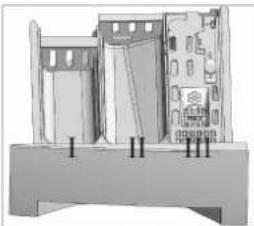
natural_image
Architectural cross-section diagram of a building with structural elements and supports (no text or labels)I Chamber for the prewash or soaking cycle. Detergent for the prewash or soak is added at the beginning of the wash program.
II Chamber for main wash cycle with powder or liquid detergent.
III Chamber for detergent additives (fabric softener, starch). Follow the manufacture's dosage recommendations. Do not exceed the MAX mark!
Checking the position of the divider in the main wash chamber
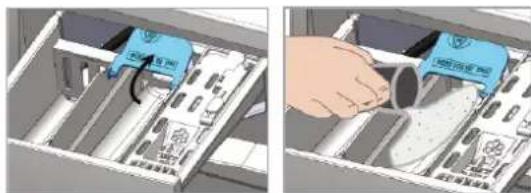
To switch between liquid and powder detergent, it is necessary to use the included divider
- to insert before first use and
- to position correctly before each washing cycle.
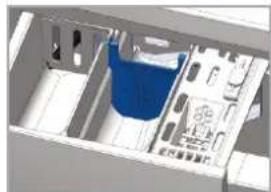
natural_image
3D rendering of a mechanical assembly inside a housing (no visible text or symbols)- Before first use, insert the divider into chamber II for the main wash cycle. It is not necessary to remove the divider again.
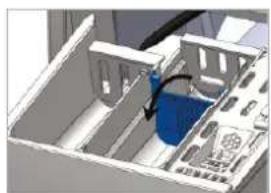
natural_image
3D diagram of a computer interior showing internal components and a blue component (no text or symbols visible)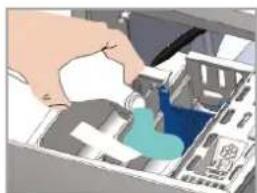
natural_image
Illustration of a hand inserting a device into a storage unit (no text or symbols visible)- Fold the divider down when using liquid detergent.
natural_image
Two-panel illustration showing a hand inserting a component into a device (no text or symbols visible)- Fold up the divider when using washing powder.
Foam detection
Excessive foam forms when too much detergent is used. This affects the wash and rinse cycle. The function automatically checks foaming; excessive foam is removed by an extra rinse and spin cycle.
Fill in the laundry
- Unravel the clothes before putting them into the machine.
- Each load should correspond to the nominal capacity of the appliance. Do not overload the appliance. Different strengths, sizes and types of laundry can affect the actual loading capacity. It is advisable to load the appliance just that a normal circulation during washing is possible.
- Make sure that no laundries are caught between the appliance door.
Control panel / Functional description
NOTE:
Note that the settings, functions and additional options are program-dependent!
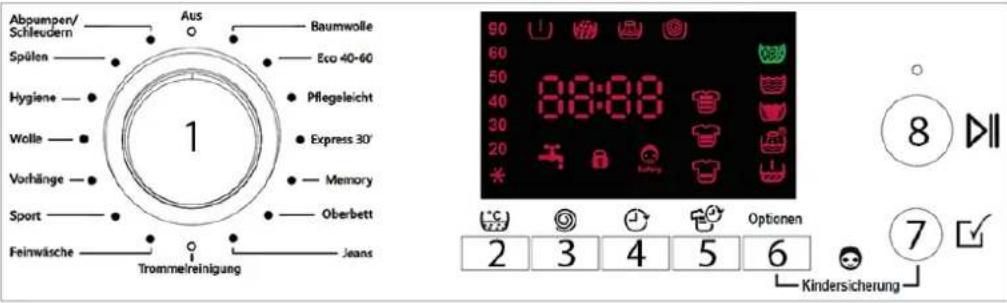
1 Program selector switch
To select a wash program, turn the program selector switch to the appropriate position. For details about the programs, see the "Program table".

Off-Position
To switch the appliance off, turn the program selector switch back to the off position.
2 Washing temperature
Press the button repeatedly to set the desired washing temperature.
* (cold) 20 30 40 50 60 90
3 Spin speed
Press the button repeatedly to select the speed for the spin cycle.
$$ \begin{array}{l}\rightarrow 1 4 0 0 \rightarrow 1 2 0 0 \rightarrow 1 0 0 0 \rightarrow 8 0 0 \rightarrow 6 0 0 \rightarrow 4 0 0 \rightarrow 1 0 0 \rightarrow 0 (\text { Spin }\\text { stop }) \leftrightarrow\end{array} $$
4 Start delay
The program start can be delayed about 1 – 24 hours by repeatedly pressing the button. Select and start a program, the device starts automatically after the selected time has elapsed.
$$ \rightarrow 1: 0 0 \rightarrow 2: 0 0 \rightarrow 3: 0 0 \rightarrow 4: 0 0 \rightarrow 5: 0 0 \rightarrow 6: 0 0 \rightarrow \dots \rightarrow 2 4: 0 0 \leftarrow $$
The expected end of the program (start delay + program duration) is shown on the display, the program is ended after [x:xx] hours.
5 Degree of soiling
Press the button repeatedly to select one of three intensity levels measured by the stain degree of the laundry.

Reduces or extends the washing time at the end of the washing program by -20, -10 or +20 minutes.
6 Options
Button for selecting the options [Prewash] [Extra Rinse] [Soak] [Rinse Stop] and [Eco].
The flashing symbol in the display indicates the selection. After confirming the option, the corresponding symbol lights up continuously.
Prewash
Additional wash cycle to the previously set main wash program, for particularly dirty laundry.
Extra Rinse
Additional rinse cycle to the previously set main wash program, detergent residues are rinsed out.
Soak
The laundry remains in the water for 30 or 60 minutes before the main wash phase, suitable for particularly stubborn stains.
The soaking duration is shown on the display for selection and final confirmation.
Rinse Stop
No draining or spinning after the last washing cycle. The laundry remains in the water, which reduces the formation of wrinkles. The draining and spinning process is started by pressing the Start/Pause button.
ECO Eco
The Eco option makes it possible to reduce energy consumption while maintaining the same washing performance the program running time is extended.
7 ☑ Confirm option
Button to confirm the selected option.
8 Start/Pause
Press the button to start / pause the selected or running washing program.
After the start of the washing program, the remaining time is shown in the display as [x:xx] hours and minutes.
If the device is in pause mode, the control lamp of the Start/Pause button and the symbol for the currently running program phase flashes on the display.
Safety child lock
To activate / deactivate the safety child lock, press the button combination for about 3 seconds after program start.
The symbol lights up when the safety child lock is activated.
Other control indicators on display
| No water supply | |
| Door lock active |
| Program sequence: | |
| Prewash cycle | |
| Main wash cycle | |
| Rinse cycle | |
| Spin cycle | |
- The end of the washing program is indicated with [End].
- Error codes are displayed in case of malfunction.
Program table
NOTE:
The shown values are approximate and recommendations under standard conditions and therefore not binding. The program times can vary depending on the water pressure, type of laundry, loading and water temperature.
| Program | Loading kg | max. Temp. °C | max. Spin speed rpm | Default time h:min | Options / Stain degree | |||||
| Baumwolle / Cotton | ≤7.0 | ≤90 | ≤1400 | 02:10 | √ | √ | √ | √ | ||
| Eco 40-60 | ≤7.0 | ≤60 | ≤1400 | 02:53 -- | -- | -- | -- | √ | ||
| Pflegeleicht / Synthetics | ≤3.5 | ≤60 | ≤800 | 01:31 | √ | √ | √ | √ | √ | √ |
| Express 30' | ≤3.5 | ≤30 | ≤1400 | 00:30 | -- | √ | -- | √ | ||
| Memory | ≤3.0 | ≤90 | ≤1400 | 01:57 | √ | √ | √ | √ | √ | √ |
| Oberbett / Duvet | ≤2.5 | ≤60 | ≤800 | 01:36 | -- | √ | √ | -- | √ | √ |
| Jeans | ≤3.0 | ≤60 | ≤1400 | 02:04 | √ | √ | √ | √ | √ | √ |
| Trommelreinigung / Self-clean | --- | 90 | ≤1400 | 01:44 | -- | -- | -- | -- | ||
| Feinwäsche / Delicate | ≤1.0 | ≤40 | ≤600 | 01:44 | √ | √ | √ | √ | √ | √ |
| Sport | ≤2.0 | ≤40 | ≤600 | 01:28 | √ | √ | √ | √ | √ | √ |
| Vorhänge / Curtain | ≤2.0 | ≤40 | ≤600 | 01:06 | -- | √ | -- | √ | √ | √ |
| Wolle / Wool | ≤2.0 | ≤40 | ≤1000 | 00:55 | -- | √ | -- | √ | √ | √ |
| Hygiene / Allergy | ≤7.0 | ≤40 | ≤1000 | 02:01 | √ | √ | √ | √ | √ | √ |
| Spülen / Rinse Only | ≤7.0 | cold | ≤1400 | 00:23 | -- | √ | -- | -- | ||
| Abpumpen/ Schleudern / Drain/Spin | ≤7.0 | cold | ≤1400 | 00:11 | -- | -- | -- | -- | ||
Below listed parameter except for the values for the "Eco 40-60" program, are only guide values:
| Program | Temp. °C | Loading kg | Time h:min. | Water-consump. L/cycle | Energy-consump. kWh/cycle | Spin speed rpm | Average residual damp % |
| Cotton | 60 7.0 | 02:10 51.21 | 0.601 1351 | 46 | |||
| 90 7.0 | 02:17 55.37 | 1.54 1382 | 48 | ||||
| Eco 40-60 | 35 7.0 | 03:31 41.82 | 0.636 1356 | 47 | |||
| 33 3.5 | 02:35 29.4 | 0.444 1275 | 48 | ||||
| 34 1.75 | 02:33 | 26.7 0.397 | 1249 53 | ||||
| Synthetics | 30 3.5 | 01:17 51.77 | 0.184 597 | 60 | |||
| 60 3.5 | 01:28 49.55 | 0.64 | 585 | 59 | |||
| Express 30' | 30 3.5 | 00:41 29.57 | 0.073 1389 | 49 | |||
| Jeans | 30 3.0 | 01:10 49.24 | 0.246 594 89 | ||||
| 60 3.0 | 01:25 50.01 | 0.501 591 87 |
The values measured under normal conditions with regard water, energy and residual moisture refer to the standard setting of the programs, without options.
General information to the program table!
- The program „Eco 40-60“ is able to clean normally soiled cotton laundry washable at 40°C-60°C, together in the same cycle. The program is used to check compliance with EU eco design legislation.
- The most efficient programs in terms of energy and water consumption are generally those that perform at lower temperatures and longer duration.
- Loading the household washing machine or household washing-dryer up to the capacity specified for the respective programs helps saving energy and water.
- Noise emissions and residual moisture are influenced by the spin speed: the higher the spin speed in the spin cycle, the higher the noise emissions and the lower the residual moisture.
| Program brief description | |
| Cotton | For your daily laundry. Recommended for hard wearing, heat resistant cotton textiles. |
| Eco 40-60 | Less energy is used to heat the water and less water is used to wash the same amount of laundry as in program [Cotton]. The program is used to check compliance with EU eco design legislation. |
| Synthetics Suitable for fine textiles, e. g. silk, satin, synthetic or mixed fabrics. | |
| Express 30' | Extra short program for a small load with light soiling without visible stains. |
| Memory | Set the operating conditions and start the program. Your favorite settings are registered for the next washing cycles. The settings remain stored until you change them using the same procedure. |
| Duvet | Machine washable items filled with synthetic fabrics, e. g. pillows, quilts and comforters, also suitable for items filled with down. |
| Jeans | Colored textiles made of cotton and dark easy-care textiles. |
| Self-clean | Suitable for self-cleaning of the appliance drum. You cannot wash any laundry. Drum cleaning will be perfect if you add the appropriate amount of chlorine bleach. |
| Delicate | Gentle wash cycle, also suitable for machine washable silk. Use appropriate detergent. |
| Sport | Especially gentle for lightly soiled sportswear made of cotton, microfibers, synthetics. |
| Curtain | Suitable for washable curtains and drapes. Reduce the spin speed for curtains that are particularly sensitive to creasing. |
| Wool | Suitable for “machine washable” wool. Observe the correct washing temperature and use a suitable detergent. |
| Allergy | An additional rinse makes it suitable for baby laundry and laundry by particularly sensitive people, e. g. allergy sufferers. |
| Rinse Only | Separate rinse cycle. Suitable for rinsing out detergent residues. |
| Drain/Spin | Separate spin cycle. Water is drained before the spin cycle. |
Wash temperature
Select the temperature corresponding to the textiles and pollution. Basically: the higher the temperature, the higher the power consumption.
90^ C : Heavily soiled pure white cotton or linen (e.g. tablecloths, sheets and towels).
50^_60^ : Moderately soiled colored cotton, linen and synthetic (e.g. shirts or underwear). Slightly soiled whites (e.g. underwear).
cold_20°C_30°C_40°C : Normally soiled laundry (including synthetic and wool).
Capacity
Do not overload the appliance otherwise the laundry is not getting clean. Refer to the information in the "Program table".
Starting the program
- Connect the appliance to the power supply and switch it on.
- The water supply must be opened to the maximum pressure.
- Load your laundry and fill in the detergent, if necessary.
- Close the appliance door properly.
- Set the required washing conditions.
- Start the operation.
Door lock
Once a wash program has been started, the appliance door cannot be opened.
When the wash cycle is finished, the door lock will automatically be unlocked.
Refill laundry
⚠️ WARNING:
Never attempt to force open the appliance door during operation.
For safety reasons, the appliance door remains locked after the program has started and it is not possible to refill laundry.
Changing the program
- To change the program, first interrupt the washing process.
- Switch the device briefly off and then on again.
- Select the desired program and start the new operation.
End of program
At the end of the wash cycle the display appears [End]. Several beeps sound; a few minutes later, the door lock is released and the appliance enters off-mode.
Switching off
- Switch off the appliance (turn the program selector switch to the Off-position).
- Close the water supply!
- Leave the appliance door slightly open until the next wash cycle to avoid odors.
- If the appliance is not in use for an extended period, disconnect the mains plug or switch off or turn out the fuse.
Power consumption in off-mode 0.09 W / in standby-mode 0.36 W / with start delay 2.80 W.
Energy saving tips
- If possible, avoid the selection of high wash temperatures. Modern detergents achieve good washing results even at low temperatures.
- Select the wash program depending on the type of laundry and the required degree of washing.
• Take advantage of the maximum capacity of each wash program. - Clean the filter regularly to avoid excessive washing and high energy consumption.
- Ventilate the room well. The room temperature should not rise above +35°C.
Cleaning and Maintenance

WARNING:
- Always switch off the appliance and disconnect it from the power supply before cleaning and user maintenance.
- Allow the appliance to cool down enough before cleaning. Scalding!
- Do not use steam cleaners for cleaning the appliance; moisture could enter electrical components. Risk of electric shock! Hot steam could damage the plastic parts. The appliance must be dry before restarting operation.

CAUTION:
- Do not use a wire brush or other sharp, abrasive items.
- Do not use any acidic or abrasive detergents.
NOTE:
Dirty or clogged filter degrades the washing result. Regularly check the filter and clean them if necessary.
Maintenance of the washing machine
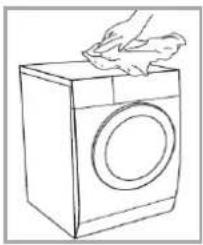
- Clean the appliance outer surfaces and the door sealing thoroughly with a soft, damp cloth. Use only mild cleaning agent.
natural_image
Line drawing of a washing machine with a hand cleaning it (no text or symbols)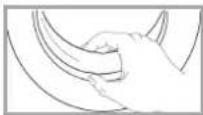
- Use a dampened cloth with a little white vinegar or a special detergent for washing machines to clean the appliance drum.
- Recommendation: allow the appliance to run regularly without loading in the program [Self-clean].
- Dry the outer surfaces thoroughly before taking in operation again.
Cleaning the detergent container
To avoid detergent deposits, the drawer must be cleaned regularly.
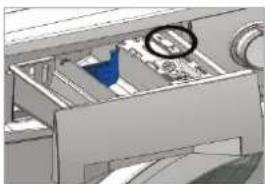
natural_image
Mechanical device interior showing a blue component being inserted into a drawer (no visible text or symbols)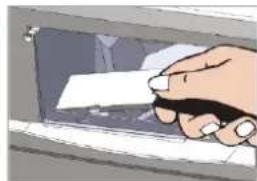
natural_image
Hand inserting a card into a device (no text or symbols visible)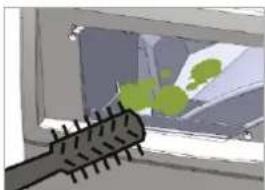
natural_image
Illustration of a vehicle with green foliage inside a vehicle, partially obscured by a brush (no text or symbols)- Pull out the drawer until it stops.
- Press in the area circled on the illustration and pull out the drawer completely at the same time.
- Remove the steam venting plate underneath.
- Carefully wash the chambers under running water. Use a soft brush for the housing if necessary.
- Replace the steam venting plate and the detergent drawer properly.
Cleaning the inlet filter

CAUTION:
- Close the water supply before cleaning!
- Always check if the water hoses are properly reinstalled and no water leaks.
Inlet filter at the tap
Clean the filter when not enough water is supplied with opened water valve.
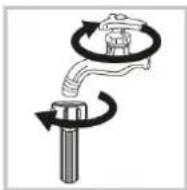
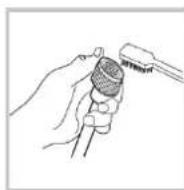
- Unscrew the inlet hose from the water valve.
- Wash the inlet filter under running water. Reconnect the inlet hose firmly.
Inlet filter at the appliance
Clean the filter regularly, approximately every one to three months.
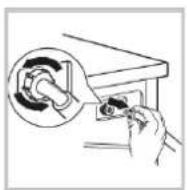
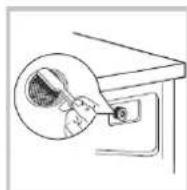
- Unscrew the inlet hose from the appliance back.
- Clean the filter with a small brush.
- Reconnect the inlet hose firmly.
Cleaning the filter of drain pump

CAUTION:
The appliance must never be used without the filter.
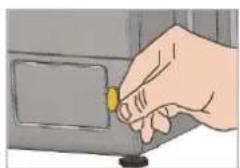
The foreign object trap in the drain pump prevents rinsed-out parts from blocking the drain pump system. Clean the pump regularly, approx. once a month; depending on use.
natural_image
Hand inserting a yellow coin into a device (no text or symbols visible)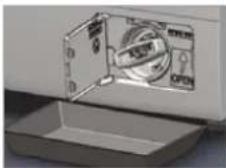
natural_image
Illustration of a mechanical device pouring liquid into a container (no text or symbols visible)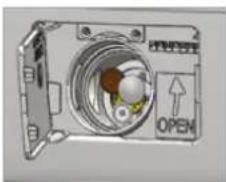
natural_image
3D technical diagram of a device casing with internal components and an 'OPEN' label (no readable text or symbols beyond the label)- Open the maintenance cover in the base of the unit. Caution! For this, the use of a tool could be necessary.
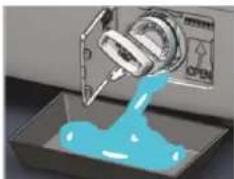
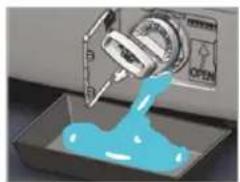
- Place a drip tray under to catch possible leaking water.
- Turn the cap counterclockwise. Look for leaking water! Turn the filter not completely out!
- Interrupt the water flow by turning the filter clockwise again.
- If the draining process is completed, turn out the filter completely.
- Take off the filter and remove any dirt and foreign objects.
- Insert the cap again and make sure it is tightened well and no water can escape.
- Close the maintenance cover.
Freezing protection
If the appliance is out of operation and exposed to temperatures below zero, observe the following measures:
- Disconnect the unit from the power supply.
- Close the water supply and remove the inlet hose from the water valve.
- Drain the water from the supply hose and from the water valve.
- Reconnect the supply hose to the water valve.
Troubleshooting
Before you contact an authorized specialist
For some malfunctions, the display shows error codes to warn you:
| CODE / Trouble Possible cause / measure | ||
| Appliance does not work or start | Check the power supply / water supply. Is the door closed, the device switched on or a program selected? | |
| F1 → Door lock fault | Door is not properly closed or blocked with laundry items. | |
| F2 → Water inlet fault | Faucet is not open, water supply not free or water pressure too low. Inlet filter blocked. Inlet hose is blocked, kinked, squeezed. | |
| F3 → Heating fault | Switch the device off and on again. If the error persists, call a specialist company. | |
| F4 → Drainage fault | Drain hose is blocked, kinked, squeezed, not correctly connected. Drain pump is blocked. | |
| F5 → Motor fault | Switch the device off and on again. If the error persists, call a specialist company. | |
| F6 → Software fault | ||
| F7 → Spin speed fault | Close the water supply and call a specialist company. | |
| F8 → Possible leakage | ||
| F9 → Pressure switch level fault | ||
| F10 → Pressure sensor fault | ||
| F11 → Transition belt deposition | ||
| Strong Vibration | Have the transport bolts been removed? The device must stand on a firm surface. Are the feet aligned? | |
| Device door cannot be opened | Door lock is active, washing operation not completed. | |
NOTE:
If a problem persists after following the steps above, contact your distributor or an authorized technician.
Technical Data
Electrical connection / Water supply......
Connection voltage: 220-230 V\~ / 50 Hz
Connection power: 2.200 W
Input power: 10 A
Water pressure: 0.05 – 1.0 Mpa
Dimension H x W x D / Weight......
Unit size: 85.0 x 60.0 x 53.0 cm
Net weight: ....approx. 67.0 kg
Accessories available......
Inlet hose safety system....Art.-No. 8900 410
For more information about the product, scan the QR code on the supplied energy label and/or visit the official website of the product data bank:
https://eprel.ec.europa.eu
The right to make technical and design modifications during continuous product development remains reserved.
This appliance has been tested according to all relevant current CE guidelines, such as electromagnetic compatibility and low voltage directives, and has been constructed in accordance with the latest safety regulations.
Disposal
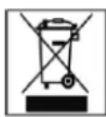
Meaning of the "Dustbin" Symbol
Protect our environment; do not dispose of electrical equipment in the domestic waste.
Please return any electrical equipment that you will no longer use to the collection points provided for their disposal.
This helps avoid the potential effects of incorrect disposal on the environment and human health.
This will contribute to the recycling and other forms of reutilization of electrical and electronic equipment.
Information concerning where these can be disposed of can be obtained from your local authority.

WARNING:
Remove or disable any existing snap and bolt locks if you take the unit out of operation or dispose it.
BOMANN®
C. Bomann GmbH
www.bomann-germany.de
Made in Italy
- WARNING:
- CAUTION:
- General Notes
- NOTE:
- Special safety Information for this Unit
- WARNING: Hot surface! Danger of burns!
- Transport and Packaging
- Unpacking the appliance
- Appliance Equipment
- Delivery scope
- Installation
- Remove the transport locking screws
- Installation location
- Adjusting the feet
- Installation under working plate
- Water connection
- Notes on inlet hose safety system (delivery scope depending on model)
- i NOTE:
- Electrical connection
- Startup / Operation
- Prior using for the first time
- Preparation of clothes
- CAUTION
- Select proper detergent
- Detergent dispenser
- Checking the position of the divider in the main wash chamber
- Foam detection
- Fill in the laundry
- Program selector switch
- Off-Position
- Washing temperature
- Spin speed
- Start delay
- Degree of soiling
- Options
- Prewash
- Extra Rinse
- Soak
- Rinse Stop
- ECO Eco
- ☑ Confirm option
- Start/Pause
- Safety child lock
- Program table
- General information to the program table!
- Wash temperature
- Capacity
- Starting the program
- Door lock
- Refill laundry
- ⚠️ WARNING:
- Changing the program
- End of program
- Switching off
- Energy saving tips
- Cleaning and Maintenance
- Maintenance of the washing machine
- Cleaning the detergent container
- Cleaning the inlet filter
- Inlet filter at the tap
- Inlet filter at the appliance
- Cleaning the filter of drain pump
- Freezing protection
- Troubleshooting
- Technical Data
- Disposal
- BOMANN®
Brand : BOMANN
Model : WA 7172
Category : Washing machine