
IAN 045936 - Uncategorized FLORABEST - Free user manual and instructions
Find the device manual for free IAN 045936 FLORABEST in PDF.

| Product Type | Round Charcoal Barbecue |
| Brand | Florabest |
| Model IAN | 045936 |
| Dimensions (assembled) | Approx. 82 x 52 x 69 cm |
| Weight | Approx. 6 kg |
| Fuel | Charcoal |
| Grill Grate Diameter | 47 cm |
| Firebowl Capacity | Max. 1.5 kg charcoal |
| Materials | Steel with enamel coating |
| Included Accessories | 2 wind protector sheets, keep-warm grate, grill grate with 2 handles, handle, 2 long legs, bottom shelf, 2 wheels, axle, 2 short legs, 4 leg caps, firebowl, screws, washers, nuts |
| Tools Required for Assembly | Phillips screwdriver, 8 mm and 13 mm open-jawed spanner, pliers |
| Intended Use | Outdoor domestic grilling only |
| Safety Features | Stable base, warning against spiritus/petrol, keep away from children, do not move when hot |
| Cleaning | Cool completely before cleaning; use mild detergent and water; enamel cleaner for heavy soiling |
| Warranty | 3 years |
| Service Contact (UK) | Tel: 0871 5000 720 (0.10£/min), Email: kompernass@lidl.co.uk |
| Service Contact (Malta) | Tel: 80062230, Email: kompernass@lidl.com.mt |
| Importer | KOMPERNASS GMBH, Burgstrasse 21, 44867 Bochum, Germany |
Frequently Asked Questions - IAN 045936 FLORABEST
User questions about IAN 045936 FLORABEST
0 question about this device. Answer the ones you know or ask your own.
Ask a new question about this device
Download the instructions for your Uncategorized in PDF format for free! Find your manual IAN 045936 - FLORABEST and take your electronic device back in hand. On this page are published all the documents necessary for the use of your device. IAN 045936 by FLORABEST.
USER MANUAL IAN 045936 FLORABEST
natural_image
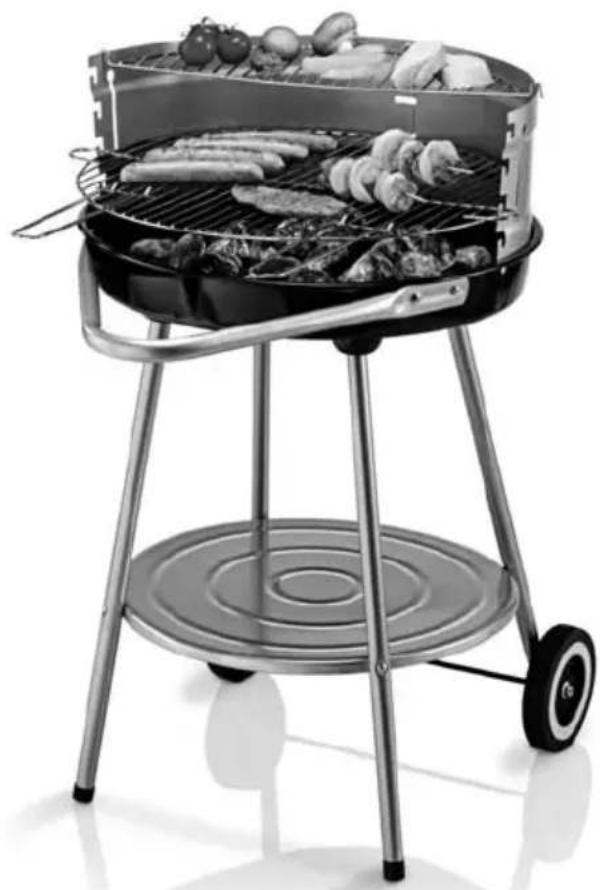
Black-and-white photo of a portable outdoor grill with various vegetables and meat, mounted on a stand (no text or symbols visible)BARBECUE ROTONDO FRG 45 A1
IT MT
BARBECUE ROTONDO
Operating instructions
PT
GRELHADOR REDONDO
Before reading, unfold the page containing the illustrations and familiarise yourself with all functions of the device.
DE AT CH
GB / MT Operating instructions Page 25
Indice
Introduzione....2
| M6x304x | M5x304x | M5x1210x | M514x | M82x | ∅610x | ∅64x | ∅82x |
Montaggio
Passaggio 4
Passaggio 5
Passaggio 6
Passaggio 7
natural_image
Technical line drawing of a mechanical component with internal channels and directional arrows (no text or symbols)Passaggio 8
AVVISO
Pericoo di ustioni!
| M6x304x | M5x304x | M5x1210x | M514x | M82x | ∅610x | ∅64x | ∅82x |
Montagem
Passo 4
Monte a pega ^4 com 4 parafusos M5 x 12, 4 arruelas planas ∅ 6 e 4 porcas M5 na bandeja para carvão ^11 .

Passo 5
PT
Passo 6
Aparafuse o corta-ventos montado ① com 5 parafusos M5 x 12, 5 arruelas planas ∅ 6 e 5 porcas M5 na bandeja para carvão ⑪.
Passo 7
♦ Engate ambas as pegas na grelha 3.
natural_image
Diagram of a mechanical component with internal channels and directional arrows, no readable text or symbols present.Passo 8
AVISO
Perigo de queimaduras!
Information for these operating instructions 26
Copyright....26
Intended use 26
Safety....27
Basic Safety Instructions....27
Items supplied 28
Connection elements 28
Assembly 28
Preparing for assembly 28
Required assembly material....29
Commissioning 34
Cleaning and Care 34
Disposal 35
Technical data 35
Appendix 36
Warranty 36
Service....36
Importer 36
Introduction
Information for these operating instructions
Congratulations!
With your purchase you have decided in favour of a quality product. Familiarise yourself with the product before installation and before taking it into use for the first time. In this regard, please read the following assembly instructions and safety notices attentively. Use the product only as described and only for the specified areas of application. Retain these instructions for future reference. In addition, pass these documents on, together with the product, to any future owner.
Copyright
This documentation is copyright protected.
All reproductions or duplications, also as extracts, as well as representations of the illustrations, even in an altered state, are only permitted with the written approval of the manufacturer.
Intended use
This round barbecue is intended exclusively for the preparation of grilled foods. It is suitable only for use outdoors. This round barbecue is intended for use only in domestic environments, not for commercial applications. No liability will be accepted for damage resulting from incorrect or improper usage, the application of force or unauthorised modifications.
WARNING
Risks from unintended use!
Risks can be engendered if the appliance is used for unintended purposes and/or other types of use.
▶ Use the appliance exclusively for its intended purposes.
▶ Observe the procedures described in these operating instructions.
The manufacturer assumes no responsibility for damage caused by improper use, inappropriate repairs, making unauthorised changes or for using unapproved replacement parts.
The user alone bears liability.
KOMPERNASS GMBH
Burgstraße 21
D-44867 Bochum
www.kompernass.com
In this chapter you will receive important safety information regarding the handling of the appliance.
This appliance complies with the statutory safety regulations.
Incorrect usage can lead to personal injury and property damage.
Basic Safety Instructions
WARNING
Warnings about burns!
- During use, place the grill on a secure, level and firm surface, otherwise it could tip over.
- CAUTION! For igniting and reigniting, do NOT use spiritus or petrol! Use only ignition aids complying with EN 1860-3. The defl agration could cause an uncontrollable development of heat.
- ATTENTION! During use the grill will become very hot and therefore may not be moved, otherwise it could tip over.
- ATTENTION! Keep children and pets well away from it!
- When grilling, wear appropriate grilling gloves and use grilling tongs.
- NEVER leave a heated up grill unsupervised.
- Allow the grill to cool down completely before cleaning it.
- NEVER use water to extinguish the glowing charcoal.
WARNING
Warning in regard to suff ocation!
▶ Use the grill ONLY outdoors!
▶ Do NOT operate the grill in enclosed spaces or roofed-over areas.

Items supplied
1 2 x Wind protector sheets
2 1 x Keep-warm grate
3 1 x Grill grate (including 2 handles)
4 1 x Handle
5 2 x Legs (long)
6 1 x Bottom shelf
⑦ 2 x Wheels
8 1 x Axle
9 2 x Legs (short)
10 4 x Leg Caps
11 1 x Firebowl
Connection elements
| M6x304x | M5x304x | M5x1210x | M514x | M82x | ∅610x | ∅64x | ∅82x |
Assembly
Preparing for assembly
Allow yourself plenty of time for the assembly of the round barbecue. Secure a level workplace of about two to three square meters. Remove all individual items from the packaging and place them where they are conveniently handy. Check the items to ensure that they are all present and without any damage.
Required assembly material

Pliers
Philips head screwdriver
Open-jawed spanner 8 mm / 13 mm
WARNING
▶ To avoid possible injury, the screw heads should always face outwards. First tighten all screw connections down when the assembly is complete, this will help avoid undesirable material tensions.
Step 1
IMPORTANT
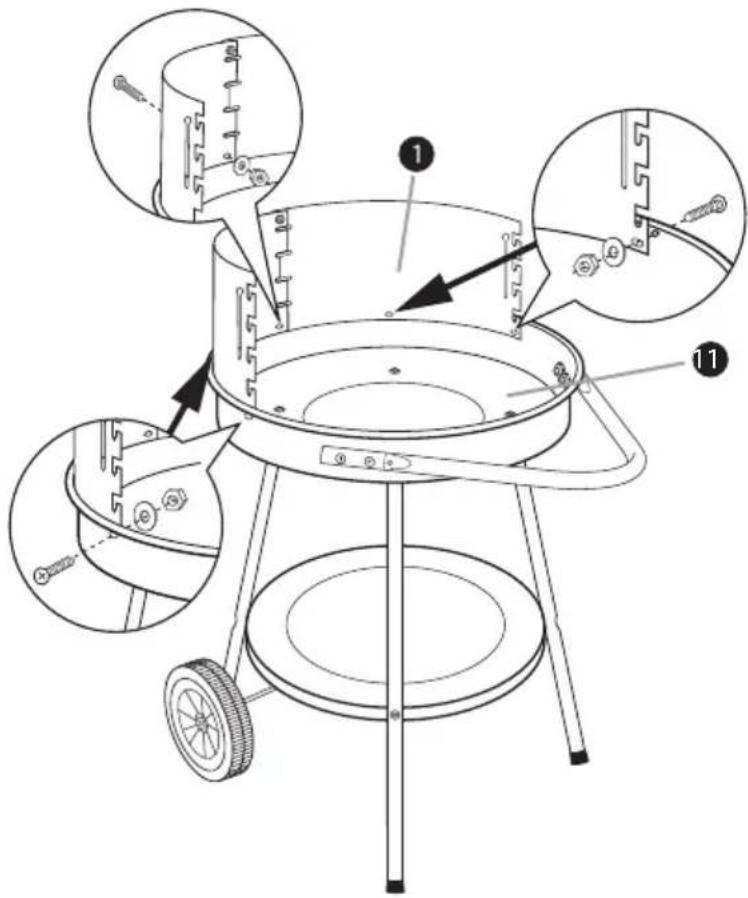
The two long legs 5 must be assembled on the side where the double holes in the fi rebowl 11 are located.
◆ Assemble the 4 legs (5 + 9), each with 1 screw M6 x 30, a washer ∅ 6 and a leg cap 10, onto the fi rebowl11.
Step 2
IMPORTANT
The edge of the bottom shelf ⑥ must face downwards. The legs (5 + 9) must be rotated such that the indentations of the boreholes face outwards, thereby enabling the screwheads to be accommodated within them.
Assemble and secure the bottom shelf⑥, using 4 M5 x 30 screws plus M5 nuts, to the 4 legs (⑤ + ⑨).
Step 3
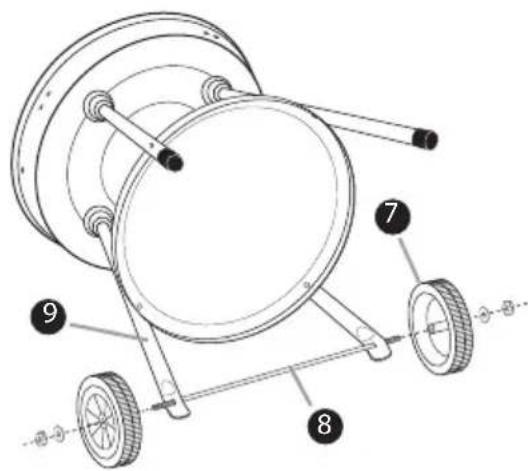
◆ Guide the axle 8 through the lower boreholes on the short legs 9.
◆ Place the wheels ⑦ on the axle ⑧ and secure both of them, each with a ∅ 8 washer and an M8 self-securing nut.
♦ Tighten the nuts with an 13 mm open-jawed spanner. If necessary, hold the axle ⑧ with the pliers. To prevent scratches, place a cloth between the pliers and the axle ⑧.
Step 4
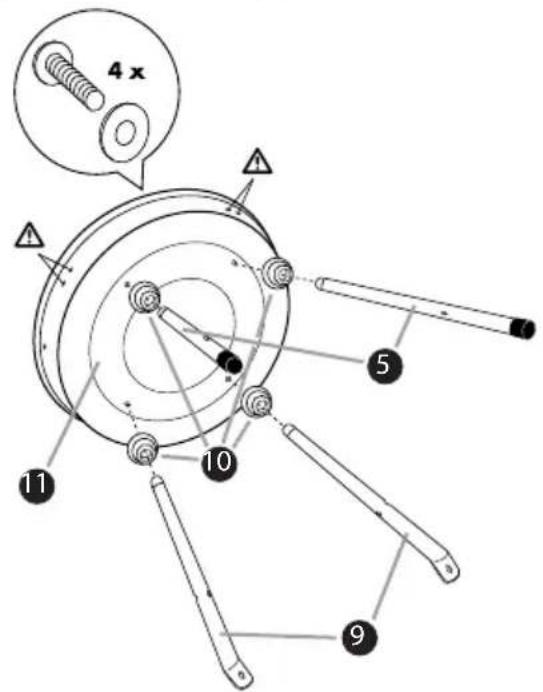
Assemble and secure the handle 4, using 4 M5 x 12 screws, 4 ∅ 6 washers and 4 M5 nuts, to the fi rebowl 11.

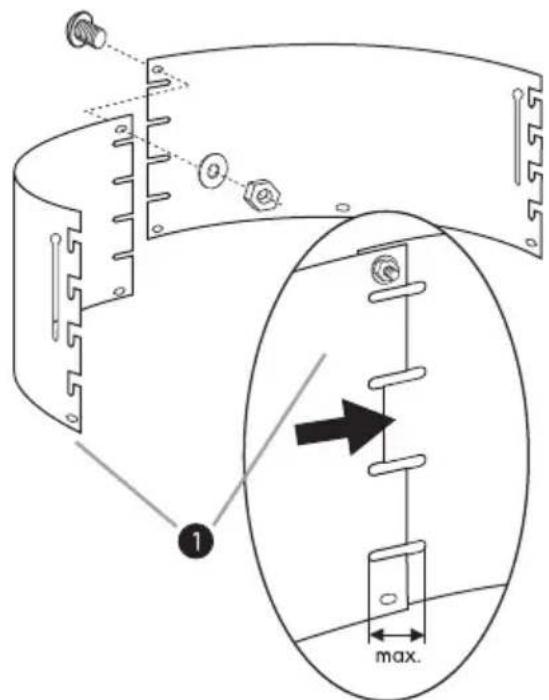
Step 5
Align the two wind-protector sheets ① with each other and fasten them together using an M5 x 12 screw, a ∅ 6 washer and an M5 nut. Thereby, make use of the maximum distance between the sheets, so that the grill grate fi ts between the slots of the wind-protector sheets ①.
Step 6
♦ Firmly secure the wind protector sheets 1 using 5 M5 x 12 screws, 5 ∅ 6 washer and 5 M5 nuts, to the fi rebowl 11.

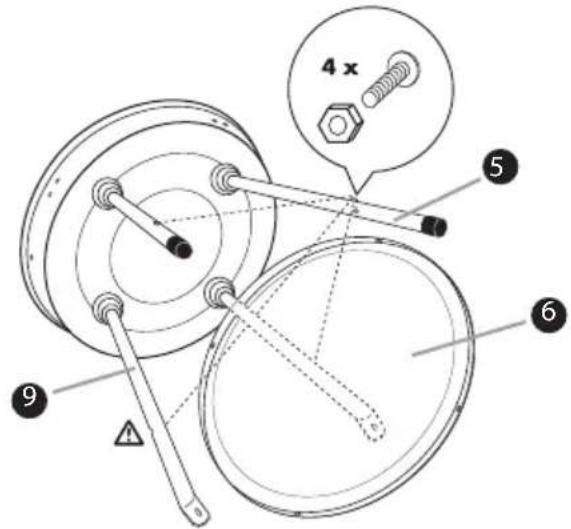
Step 7
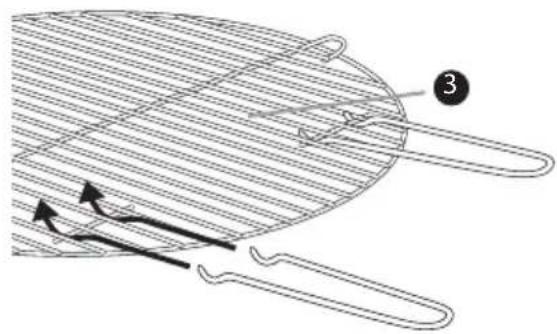
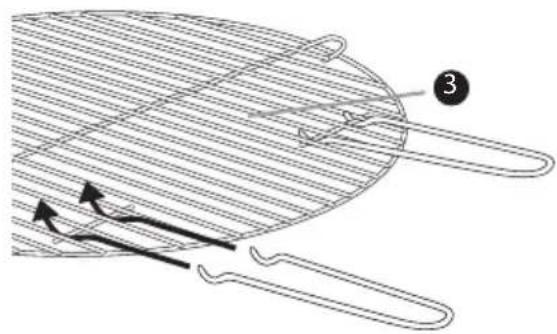
◆ Hook the two handles onto the cooking grill 3.
natural_image
Diagram of a mesh fan with internal blades and a numbered label (3), showing directional arrows indicating flow or movement (no text or symbols beyond labels)Step 8
◆ Attach the grill grate ③ at the desired location in the wind protector ① You can now remove the handles from cooking grill ③, so that they do not disturb when you are grilling.
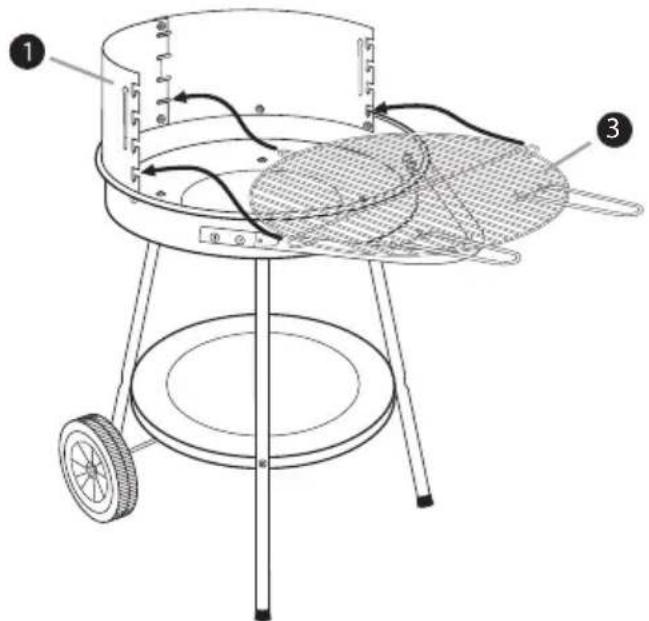
WARNING
Warning on the risk of burns!
The two brackets fitted on the sides of the grill grate are not handles and will become hot when it is in use!
▶ Do NOT grasp these brackets with your bare hands. To insert or adjust the height of the grill grate, use exclusively the supplied handles.
Step 9
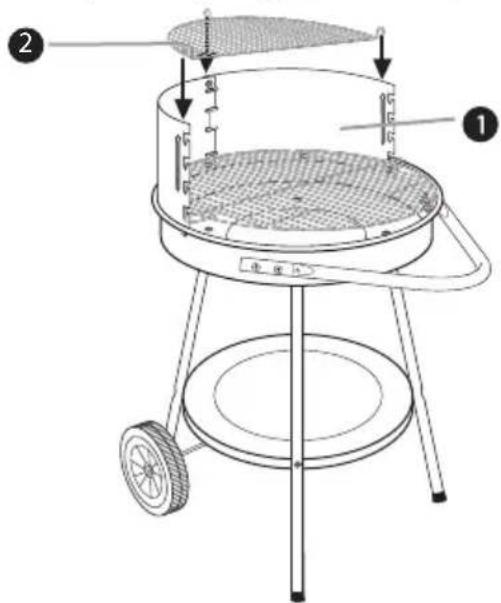
◆ Attach the keep-warm grate ^2 to the wind protector ^1
Commissioning
NOTICE
Before the first use, the grill must be warmed up for at least 30 minutes.
GB
WARNING
Warnings about burns!
Warning! For igniting and reigniting, do not use spiritus or petrol! Use only ignition aids complying with EN 1860-3. The defl agration could cause an uncontrollable development of heat.
■ Build up a small pile of charcoal in the fi rebowl.
■ Place one or two solid fi relighters on the existing layer of charcoal and ignite the solid fi relighters with a match or lighter.
- Allow the fi relighters to burn for 2 to 4 minutes. Then slowly start fi lling the fi rebowl with charcoal.
■ After about 20 minutes the charcoal will display a white coating of ash. The optimal burning temperature has now been reached.
■ Distribute the charcoal, using a suitable metallic implement, evenly in the firebowl.
■ Insert the grill grate and start the barbecue.
Cleaning and Care
WARNING
Warnings about burns!
▶ Before cleaning it or putting it into storage, allow the round barbecue to cool down completely. NEVER use water to extinguish the glowing charcoal.
Warning in regard to property damage!
▶ Do not use abrasive or aggressive cleaning agents, they can damage the enamelled surfaces.
For normal cleaning, use a cloth and water with standard detergent.
For heavy soiling on the enamelled parts, use a standard commercial enamel cleaner. Pay heed to the instructions supplied by the manufacturer of the cleaning agent being employed. Clean the grill grate with detergent and a household sponge.
Disposal
Dispose of fl ammable materials carefully and with regard to the environment. Fundamentally, dispose of such remaining waste ONLY into containers made of metal and intended for this purpose or those made of non-fl ammable materials.
Dispose of the Round Barbecue through an approved disposal centre or at your community waste facility. Observe the currently applicable regulations. In case of doubt, please contact your waste disposal centre.
Dispose of all packaging materials in an environmentally friendly manner.

Technical data
| Dimensions (assembled) approx. 82 x 52 x 69 cm | |
| Grill grate ∅ 47 cm | |
| Weight approx. 6 kg | |
| Fuel Charcoal | |
| Firebowl capacity max. 1.5 kg | |
Appendix
Warranty
You receive a 3-year warranty for this appliance as of the purchase date. This appliance has been manufactured with care and meticulously examined before delivery.
Please retain your receipt as proof of purchase. In the case of a warranty claim, please make contact by telephone with your Service Centre. Only in this way can a post-free despatch for your goods be assured.
NOTICE
The warranty covers only claims for material and manufacturing defects, not for transport damages, wearing parts or for damage to fragile components, e.g. switches.
This product is for private use only and is not intended for commercial use. The warranty becomes void in cases of abusive and improper handling, use of force and modifications not carried out by our authorized Service Centre.
Your statutory rights are not restricted in any way by this warranty. The warranty period is not extended by repairs effected under warranty. This applies also to replaced and repaired parts.
Damages and defects discovered on purchase are to be reported directly after unpacking, at the latest by two days after the date of purchase.
On the lapse of the warranty period, all repairs carried out are liable to charges.
Service
GB Service Great Britain
Tel.: 0871 5000 720 (£ 0.10/Min.)
E-Mail: kompernass@lidl.co.uk
IAN 86019
MT Service Malta
Tel.: 80062230
E-Mail: kompernass@lidl.com.mt
IAN 86019
Importer
KOMPERNASS GMBH
BURGSTRASSE 21
44867 BOCHUM, GERMANY
www.kompernass.com
Inhaltsverzeichnis
Einführung 38
| M6x304x | M5x304x | M5x1210x | M514x | M82x | ∅610x | ∅64x | ∅82x |
Montage
Montage vorbereiten
Maulschlüssel SW 8 mm / SW 13 mm
WARNING
Schritt 4
Schritt 5
Schritt 6
Schritt 7
natural_image
Diagram of a mesh fan with internal blades and a numbered label (3), showing directional arrows indicating flow or movement (no text or symbols beyond labels)Schritt 8
△WARNUNG
Inbetriebnahme
HINWEIS

- BARBECUE ROTONDO FRG 45 A1
- BARBECUE ROTONDO
- GRELHADOR REDONDO
- DE AT CH
- Indice
- Introduzione....2
- Montaggio
- Passaggio 4
- Passaggio 5
- Passaggio 6
- Passaggio 7
- Passaggio 8
- AVVISO
- Pericoo di ustioni!
- Montagem
- Passo 4
- Passo 5
- Passo 6
- Passo 7
- Passo 8
- AVISO
- Perigo de queimaduras!
- Safety....27
- Items supplied 28
- Assembly 28
- Commissioning 34
- Cleaning and Care 34
- Disposal 35
- Technical data 35
- Appendix 36
- Introduction
- Information for these operating instructions
- Copyright
- Intended use
- WARNING
- Risks from unintended use!
- Basic Safety Instructions
- Warnings about burns!
- Warning in regard to suff ocation!
- Items supplied
- Connection elements
- Assembly
- Preparing for assembly
- Required assembly material
- Step 1
- IMPORTANT
- Step 2
- Step 3
- Step 4
- Step 5
- Step 6
- Step 7
- Step 8
- Warning on the risk of burns!
- Step 9
- Commissioning
- NOTICE
- Cleaning and Care
- Warning in regard to property damage!
- Disposal
- Technical data
- Appendix
- Warranty
- Service
- Importer
- Inhaltsverzeichnis
- Einführung 38
- Montage
- Montage vorbereiten
- Schritt 4
- Schritt 5
- Schritt 6
- Schritt 7
- Schritt 8
- △WARNUNG
- Inbetriebnahme
- HINWEIS
Brand : FLORABEST
Model : IAN 045936
Category : Uncategorized