
Advanced Plus 41002 - Blender Gastroback - Free user manual and instructions
Find the device manual for free Advanced Plus 41002 Gastroback in PDF.


| Product Type | High-performance blender |
| Brand | Gastroback |
| Model | Advanced Plus 41002 |
| Dimensions (H x W x D) | 45 cm x 20 cm x 20 cm |
| Weight | 5.0 kg |
| Power Supply | 220-240 V, 50/60 Hz |
| Power Consumption | 1500 W |
| Jar Capacity | 2.0 L |
| Jar Material | Tritan copolyester |
| Blade Material | Stainless steel |
| Speed Settings | Variable with 10 speeds |
| Pulse Function | Yes |
| Auto-Clean Program | Yes |
| Overload Protection | Yes, thermal cut-off |
| Non-Slip Feet | Yes, suction feet |
| Dishwasher Safe Parts | Jar, lid, and blade assembly |
| Safety Lock | Motor will not run unless jar is correctly placed and lid is closed |
| Spare Parts Available | Jar, blade assembly, lid, seal |
| User Manual | 84 pages, available in multiple languages |
Frequently Asked Questions - Advanced Plus 41002 Gastroback
User questions about Advanced Plus 41002 Gastroback
0 question about this device. Answer the ones you know or ask your own.
Ask a new question about this device
Download the instructions for your Blender in PDF format for free! Find your manual Advanced Plus 41002 - Gastroback and take your electronic device back in hand. On this page are published all the documents necessary for the use of your device. Advanced Plus 41002 by Gastroback.
USER MANUAL Advanced Plus 41002 Gastroback
natural_image
Exterior view of a modern kitchen blender with black handle and digital display (no visible text or symbols)natural_image
Close-up of hands holding a mechanical component with a central hub and mounting holes (no visible text or symbols)natural_image
Close-up of hands holding a mechanical component with tools and a central body (no visible text or symbols)natural_image
Close-up of a mechanical component with internal structure, showing open and closed views (no text or symbols visible)natural_image
Plated lettuce with shrimp and tomato slices, accompanied by a glass bowl of yellow sauce (no text or symbols visible)DIPS, SAUCEN, DRESSING, CURRY-PASTEN
GUACAMOLE
Für 4 Personen
natural_image
Exterior view of a modern kitchen blender with black handle and digital display (no visible text or symbols)Art.-No. 41002 »Design Mixer Advanced Plus«
Read all provided instructions before first usage!
Model and attachments are subject to change
For household use only!
TABLE OF CONTENTS
Knowing Your Design Mixer Advanced Plus 50
Important Safeguards....51
Safeguards for Daily Operation 51
Movable and Sharp-edged Parts — Risk of Injury 55
Important Safeguards for all Electrical Appliances....56
Technical Specifications....58
Features of Your Design Mixer Advanced Plus ....58
Blender for Superior Requirements ....58
Unique Jug Design 58
Patented Extra Wide Blades — KINETIX Blade System ....58
Continuous Blending Action 59
Motor Overload Protection....59
Assembling and Disassembling the Appliance 59
Disassembling the Blender Jug 59
Assembling the Blender Jug 60
Operating 62
Before First Use 62
Tips for Operation....63
Speedcontrol 65
Suggested Uses for Your Blender....66
Directions for Use....66
Operating 67
Care and Cleaning....70
Cleaning the Blender Jug....70
Disassembling the Blender Jug and Removing Stubborn Residues ....71
Cleaning the Motorblock....71
Storage 72
Trouble shooting....72
Notes for Disposal 74
Information and Service 74
Warranty 74
Recipe Ideas....76
DEAR CUSTOMER!
Congratulations! A series of new possibilities come with your new Gastroback Design Mixer Advanced Plus. You have chosen not a simple kitchen appliance, but a mixer of a special kind.
Your new Design Mixer Advanced Plus impresses with its stylish and elegant design, but also by its fully automatic pulse-, ice-crush and smoothie-functions and 5 different mixing speeds for mixing fitness drinks, milk shakes and cocktails as well as pureeing soups, sauces and baby food. A special highlight is the elegant and heavy metal housing with countdown LCD display and illuminated sensor buttons and the 1,200-watt high-performance motor. The novel heat-and cold-resistant 1.5 liter glass jug with the revolutionary, ultra-wide Kinetix stainless steel blades provides an optimal and uniform mixing of the food and is tailored to the needs and demands of modern living.
The Design Mixer Advanced Plus satisfies all the safety features that should have a modern home appliance.
These instructions for use will inform you about the various functions and features, which make it easy to take pleasure in your new mixer.
We hope that you will enjoy your new Design Mixer Advanced Plus.
Your Gastroback GmbH
KNOWING YOUR DESIGN MIXER ADVANCED PLUS
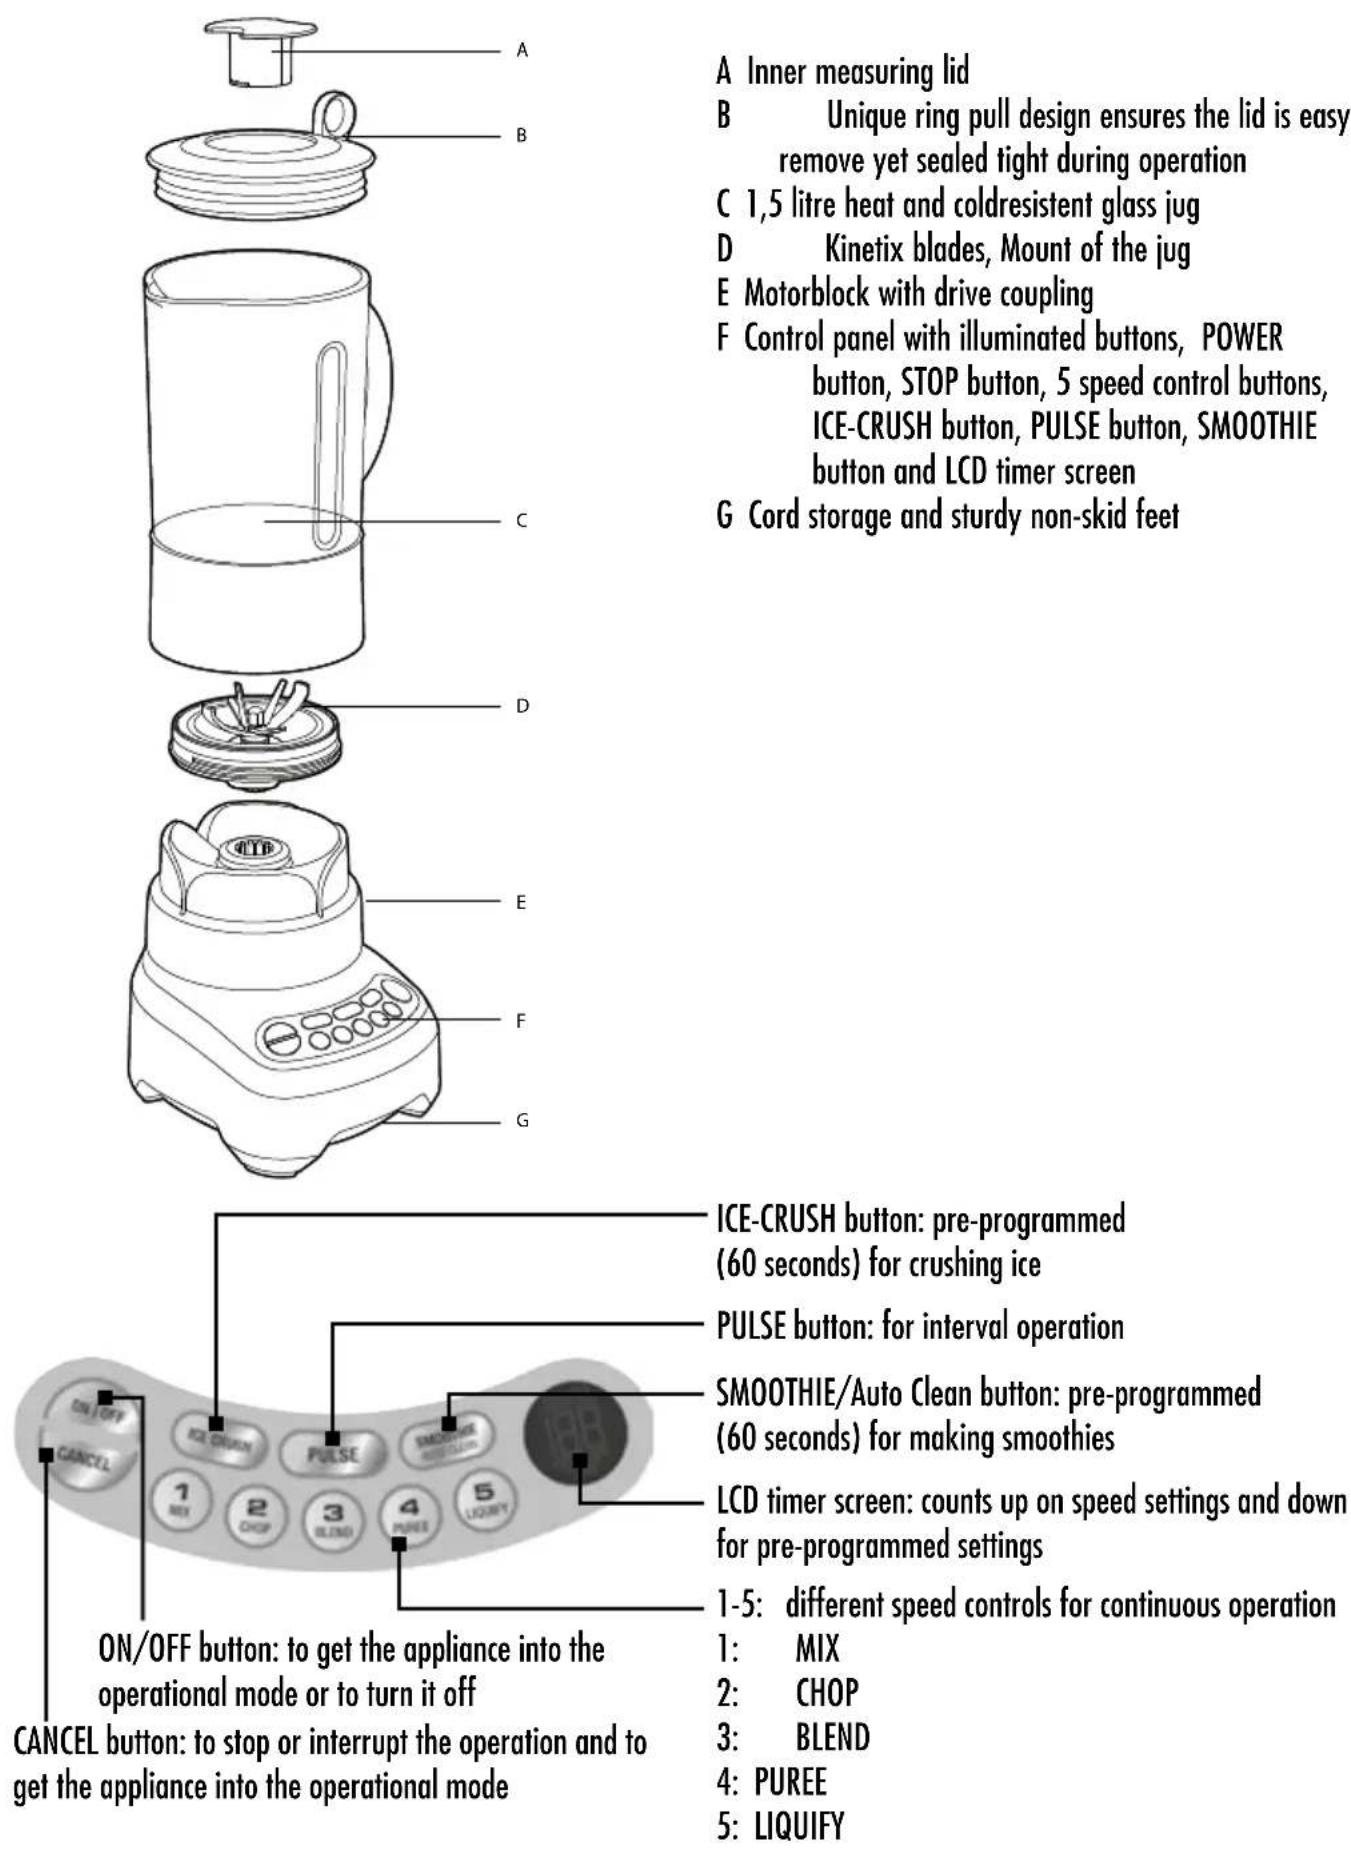
ON/OFF button: to get the appliance into the operational mode or to turn it off
CANCEL button: to stop or interrupt the operation and to get the appliance into the operational mode
A Inner measuring lid
B Unique ring pull design ensures the lid is easy to remove yet sealed tight during operation
C 1,5 litre heat and coldresistent glass jug
D Kinetix blades, Mount of the jug
E Motorblock with drive coupling
F Control panel with illuminated buttons, POWER button, STOP button, 5 speed control buttons, ICE-CRUSH button, PULSE button, SMOOTHIE button and LCD timer screen
G Cord storage and sturdy non-skid feet
ICE-CRUSH button: pre-programmed
(60 seconds) for crushing ice
PULSE button: for interval operation
SMOOTHIE/Auto Clean button: pre-programmed
(60 seconds) for making smoothies
LCD timer screen: counts up on speed settings and down for pre-programmed settings
1-5: different speed controls for continuous operation
1: MIX
2: CHOP
3: BLEND
4: PUREE
5: LIQUIFY
IMPORTANT SAFEGUARDS
Save the instructions for further reference. Do not attempt to use this appliance for any other than the intended use, described in these instructions. Any other use, especially misuse, can cause severe injury or damage by electric shock, fire or moving mechanical parts. These instruction is an essential part of the appliance. When passing on the appliance to a third person, ensure to include these instructions.
Never leave the appliance unattended when in operational mode. Any operation, repair and technical maintenance of the appliance or any part of it other than described in these instructions may only be performed at an authorised service centre. Please contact your vendor.
- The appliance is designed for normal household quantities. Do not operate or store the appliance outdoors or in damp or wet areas.
- Do not attempt to operate the appliance using any parts or accessories not recommended by the manufacturer (i.e. blade, sealing ring). Do not operate the appliance, when the appliance or any part of it is likely to be damaged, to avoid risk of fire, electric shock or any other damage or injury to persons. Do not attempt to open the motor housing or to repair the power cord. Check the entire appliance regularly for proper operation. The appliance is likely to be damaged if the appliance was subject to inadmissible strain (i.e. overheating, mechanical, or electric shock) or if there are any cracks, excessively frayed parts, distortions or the motor stalls or stucks. In this case, immediately unplug the appliance and return the entire appliance (including all parts and accessories) to an authorised service centre for examination and repair.
- Do not lift, pull or carry the appliance by the power cord. To move or operate the appliance, always grasp the motorblock.
- This appliance can be used by children aged from 8 years and above and persons with reduced physical, sensory or mental capabilities, or lack of experience and knowledge, if they have been given supervision or instruction concerning the use of the appliance in a safe way and understand the hazards involved. Do not let children play with the appliance. Cleaning and user maintenance must not be carried out by children without supervision.
• Always place the appliance on a clean, dry and stable surface where
it is protected from inadmissible strain (i.e. mechanical or electric shock, overheating, frost, moisture) and where young children cannot reach it.
- Operate the appliance on a well accessible, stable, level, dry, and suitable large surface. Do not place the appliance or any part of it on or near hot surfaces (heater, gas burner, grill, or oven). Do not place the appliance near the edge of the table or counter or on inclined or wet surfaces or where it can fall. Keep the entire appliance away from direct sunlight and sharp edges. Ensure the blender jug is locked securely onto the motorblock and that you can not knock the appliance over during operation to avoid personal injury.
- Never leave the appliance unattended when the plug is connected to the power outlet. Always IMMEDIATELY turn the appliance off, wait for the motor to stop completely, and then unplug the appliance, if the appliance is not in use (even for a short break) and before assembling, disassembling or cleaning. Never leave the appliance unattended when in operational mode.
- Do not leave any food dry on the surfaces of the appliance. Do not immerse the motor housing or power cord in water or any other liquid. Do not pour or drip any liquids on the motor housing or power cord. When liquids are spilled on the motor housing, immediately unplug the appliance and dry the motor housing to avoid risk of electric shock or fire. Do not attempt to operate the appliance, when liquids are on or in the motor housing.
- Do not place the motorblock in an automatic dishwasher!
- To avoid damage, do not use any abrasive cleaners, corrosive chemicals (i.e. disinfectants, bleach) or cleaning pads for operation or cleaning. Do not use any hard or sharp utensils for operation or cleaning. Always handle the entire appliance and all parts of it with care and without violence.
⚠ WARNING: The blades are very sharp. Pay attention when handling the blades. Only touch the blades on the blade assembly and handle with care when cleaning.
- Do not use the appliance if it is damaged or parts of the appliance are damaged. Do not use the appliance if it does not function properly or if
it was excessively loaded. The appliance is likely damaged if the appliance or parts of the appliance show cracks, exorbitant wearing down, alterations or leaks. It is also likely damaged if the drive wheel of the motorblock moves slowly. Take the appliance for technical maintenance and repair to an authorised specialised reparation shop.
⚠ WARNING: Do not overfill the blender jug. If necessary, take some food out of the blender jug, using a wooden or plastic spoon, before starting the appliance again.
- Do not chop extremely hard food, such as nuts with shell, bones to avoid overrunning, spurt out or that the motor stalls or stucks during operation because the blade is blocked.
⚠ WARNING: Do not fill ingredients into the blender jug which exceed a temperature of 60 degrees. After processing ice cubes slowly heat up the blender jug before processing hot ingredients. Otherwise the blender jug will crack or get damaged. Use gloves processing hot liquids and do not fill the blender jug up too high. Ensure not to burn yourself on the blender jug, on overrunning, spurt out or hot steam. Touch the handle only for lifting the blender jug.
⚠ WARNING: To avoid injury to persons and damage, always turn the appliance off, wait for the motor to stop completely and unplug the appliance, immediately after operation and before assembling/disassembling or cleaning the appliance. Never use force operating, assembling or disassembling the appliance.
⚠ WARNING: The blades are very sharp. Pay attention when handling the blades. Only touch the blade assembly housing when handling the blades. Handle with care when cleaning.
Note:
Ensure the appliance is properly assembled and the blade is properly attached before connecting the plug into the power outlet. Never turn the appliance on without the lid or refill lid. Never turn the appliance on without the blender jug properly placed on the motorblock. Never place only the holder or the blade only on the motorblock. Never touch the drive gear when the plug is connected to the power outlet.
⚠ WARNING: If the blade is mounted in the blender jug, the blender jug is positioned on the motorblock, and the plug is connected to the power outlet, do not insert your fingers, a wooden or plastic spoon or similar cooking utensils or foreign substances in the blender jug. Always take the blender jug off the motorblock before pushing the food down with a spoon.
⚠ WARNING: Never combine the blender jug and the holder without the blade. Without the blade the bottom of the blender jug is open. Liquids could spill and might damage the motorblock.
- Without the blender jug, the appliance does not work.
- IMPORTANT: Ensure the blender jug is locked securely onto the motor-block and that you can not knock the appliance over during operation. The motor will not start and the screen will turn on before the plug is plugged into the power outlet, the blender jug is securely locked onto the motorblock and the appliance is switched on.
- As a safety feature, the appliance automatically shuts off after operating for 2 minutes. If you want to operate again, wait 1 minute and then continue.
⚠ WARNING: Do not overfill the blender jug. If necessary, take some food out of the blender jug, using a wooden or plastic spoon, before starting the appliance again.
- Do not chop extremely hard food, such as nuts with shell or bones to avoid overrunning, spurt out or that the motor stalls or stucks during operation because the blade is blocked.
⚠ WARNING: Do not operate the appliance when the blender jug has a crack or any part of it is likely to be damaged. The appliance is likely to be damaged if the appliance was subject to inadmissible strain (i.e. overheating, mechanical, or electric shock) or if there are any cracks, excessively frayed parts, distortions or the motor stalls or stucks. In this case, immediately unplug the appliance and return the entire appliance (including all parts and accessories) to an authorised service centre for examination and repair.
⚠ WARNING: Do not fill ingredients into the blender jug which exceed a temperature of 60 degrees. After processing ice cubes slowly heat up the blender jug before processing hot ingredients. Otherwise the blender jug will
crack or get damaged. Use gloves processing hot liquids and do not fill the blender jug up too high. Ensure not to burn yourself on the blender jug, over-running, spurt out or hot steam.
- Never place anything other than food and liquids in the blender whilst the motor is running.
⚠ WARNING: Do not place blender in the freezer with food or liquids. This will freeze and damage the blade assembly housing, blender jug and motor. - CAUTION: DO NOT place the appliance in an automatic dishwasher.
- ATTENTION: The circular plastic surround attached to the base of the blender jug is not removable! Same with the plastic surround attached to the blades.
• The appliance is for household only. -
This appliance is intended to be used in household and similar applications such as:
-
staff kitchen areas in shops, offices and other working environments;
- farm houses;
- by clients in hotels, motels and other residential type environments;
- bed and breakfast type environments.
MOVABLE AND SHARP-EDGED PARTS - RISK OF INJURY
- Always turn the appliance off (all buttons are deactivated and the LCD timer screen is switched-off), wait for the motor to stop moving and then pull the plug before taking the blender jug off the motorblock or taking off the lid. It could take about 3 seconds until the motor has completely stopped. Never leave the appliance on when not in use.
- Never put your hands, wooden spoons or other foreign substance (such as hair, cloth, brush, towels) into the blender jug when the motor is running or the appliance is connected to the power outlet. Always take the blender jug off the motorblock first before you push down the food with a spoon or add new ingredients.
⚠ WARNING: The blades are very sharp. Pay attention when handling the
blades. Only touch the blade assembly housing when handling the blades. Handle with care when cleaning. Only store the appliance completely assembled. This way the blades will be out of reach.
Note:
Ensure the appliance is properly assembled and that the blade is properly attached before putting the plug into the power outlet. Never turn the appliance on without the lid or the refill lid. Never place only the holder or the blade only on the motorblock. Never touch the drive gear when the plug is connected to the power outlet.
- Always keep one hand on the lid while processing. Using solid ingredients (such as hard fruits or vegetable), overloading the blender jug or processing with a slow speed, the motor could stuck, stall or run very slow. In this case turn the appliance off to avoid overheating (see >Trouble shooting).
⚠ WARNING: If the blade is mounted in the blender jug, the blender jug is positioned on the motorblock, and the plug is connected to the power outlet, do not insert your fingers, a wooden or plastic spoon or similar cooking utensils or foreign substances in the blender jug. Always take the blender jug off the motorblock before pushing the food down with a spoon.
- Do not chop extremely hard food, such as nuts with shell or bones because the blade could stall or block. Do not overfill the blender jug to avoid overrunning, spurt out or that the motor stalls or stucks during operation. If the motor stalls or stucks turn off the appliance (all buttons are deactivated and the LCD timer screen is switched-off) to avoid overheating.
IMPORTANT SAFEGUARDS FOR ALL ELECTRICAL APPLIANCES
- Always operate the appliance near a suitable wall power outlet and connect the appliance directly to the power outlet. Do not use any extension cords or a multiple desk outlet.
- Ensure that the voltage rating of your mains power supply corresponds to the voltage requirements of the appliance (230/240 V, 50 Hz, AC). Always connect the appliance directly to a mains power supply wall socket with protective conductor (earth/ground) connected properly.
The installation of a residual current safety switch with a maximum rated residual operating current of 30 mA in the supplying electrical circuit is strongly recommended. If in doubt, contact your local electrician for further information.
- Do not leave the appliance unattended when connected to the power supply. Always turn the appliance off (all buttons are deactivated and the LCD timer screen is switched-off) and IMMEDIATELY unplug the appliance after operation and if it is not in use (even for a short break) and before cleaning and/or assembling or disassembling. Always grasp the plug to disconnect the appliance from the power outlet.
- Always handle the power cord with care. Do not pull or strain the power cord. The power cord may never be knotted or squeezed. Do not let the power cord hang over the edge of the table or counter. Take care not to entangle in the power cord. Do not touch the appliance with wet hands to avoid risk of electric shock. Do not touch the appliance, if it is damp or wet or is touching wet surfaces while connected to the mains power supply. In this case, immediately unplug the appliance and dry the appliance (see >Care and Cleaning<).
- Ensure that the holder is leak-proof before putting the blender jug on the motorblock. Always wipe off spilled liquids immediately. Do not immerse the motor or power cord in any liquids or spill any liquids on it or place the motor on wet surfaces. Never let any liquids run into the motorblock or underneath it to avoid electric shock. There are louvre underneath the motorblock. Ensure that no water can run into the louvre. When liquids are spilled on the motor housing, immediately unplug the appliance and dry the motor housing to avoid risk of electric shock or fire. Do not attempt to operate the appliance, when liquids are on or in the motor housing.
TECHNICAL SPECIFICATIONS
| Model: | Art. No. 41002 Design Mixer Advanced Plus |
| Power supply: | 230 - 240 V, 50 - 60 Hz |
| Power consumption: | 1,200 W |
| Length of power cord: | approx. 100 cm |
| Weight: | approx. 4.95 kg |
| Dimensions: | approx. 175 x 220 x 390 mm (diameter x depth x height) |
| Capacity, galss jug: | 1.5 litre |
| Revolutions: | 15,000 - 28,000 per minute |
| Certification: |  |
FEATURES OF YOUR DESIGN MIXER ADVANCED PLUS
Blender for Superior Requirements
The secret to the Kinetix Blade System is the continuous movement created inside the jug. It allows the blender to combine the functions of a blender with a mini food processor for the ultimate in versatility. Now you can use your blender to not only crush ice to a snow consistency and create super smooth frappés and smoothies, but to also process nuts, vegetables and herbs into evenly chopped pieces and perfect purees, and mince meat and fish for delicious homemade meals.
Combined with a powerful 1.200 watt motor and heavy duty commercial grade components, the blender is built for durability, reliability and professional results superior to all other blenders.
Unique Jug Design
The jug has been designed with dual ribs which assist the extra wide blades by creating movement of ingredients. Food is forced through the blades, up the sides of the jug, then mixed back down through the blades in a continuous circular movement ensuring perfectly blended results.
Patented Extra Wide Blades - KINETIX Blade System
The stainless steel ice-crushing blades are extra wide, reaching ingredients all the way to the sides of the blender jug. Combined with an additional set of dual blades, all ingredients are completely and evenly processed every time.
Continuous Blending Action
The Kinetix Blade System ensures there are no spaces for food to get caught or trapped. The patented extra wide blades are contoured to the base of the blender jug meaning food can never jam or escape the high speed blades. There are no dead zones, so food is 100% blended with no over or under blended ingredients.
Motor Overload Protection
Your blender is equipped with motor overload protection. If your blender is overloaded the motor will stop and the >Overload Protection< warning on the LCD will start to flash. Please do not attempt to use the blender while the >Overload Protection< warning is flashing.
Once the warning stops flashing the blender has cooled sufficiently and is ready to use again. Re-select the desired speed or function button. If you have turned off you will need to switch it back on, wait for the flashing to stop then re-select the desired speed or function.
We recommend removing a portion of the mixture, cutting food into smaller pieces of even size and/or processing a smaller amount per batch.
ASSEMBLING AND DISASSEMBLING THE APPLIANCE
DISASSEMBLING THE BLENDER JUG
- Always turn the appliance off (all buttons are deactivated and the LCD timer screen is switched-off), wait until the motor stops and unplug the appliance before assembling/disassembling. Always completely assemble your appliance before you put the plug into the power outlet.
- Remove the blender jug from the motor base by grasping the handle and lifting the jug in an upward direction.
- Take the lid off the blender jug and empty the blender jug.
- Take the clear refill lid and twist it anticlockwise to take it out.
Note:
The refill lid has two small guiding pins that fit in the matching gaps of the lid. Pull the inner lid up to remove it.
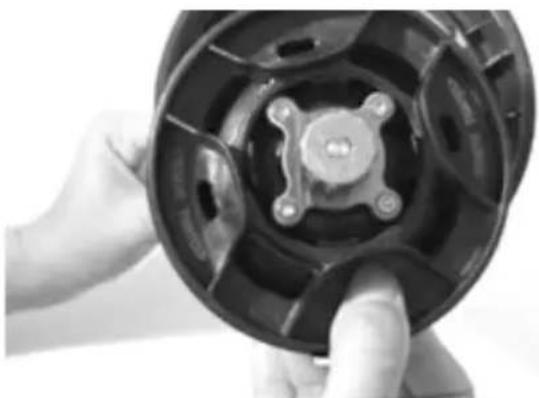
- Remove the blade assembly housing by upturning the blender jug and twisting the Blade Removal System clockwise to unlock, then lift upwards and away from the base of the blender jug.
natural_image
Close-up of hands holding a mechanical component with a central hub and mounting holes (no visible text or symbols)ATTENTION: The circular plastic surround attached to the base of the blender jug is not removable.
ATTENTION: The circular plastic surround attached to the blades is not removable.
⚠ WARNING: The blades are very sharp. Pay attention handling it and if possible only hold on to the blade assembly housing.
- Remove the silicon seal from the blade assembly housing for cleaning. Grip the lower half of the blade holder around the outer wall and press downwards in a sharp movement. the two parts will separate with a click.
- Clean the parts with a soft sponge in warm soapy water and dry them off afterwards. Pay attention not cutting yourself handling the blade. Do not use abrasive cleaners, cleaning pads, corrosive chemicals (disinfectants, bleach) or any sharp or hard objects (i.e. metal scouring pads) for cleaning, for this could damage the surfaces. Always handle the entire appliance with care and without violence.
Ensure that the blender jug and all parts are clean before you assemble the appliance and the lower part of the blade holder is clipped into place.
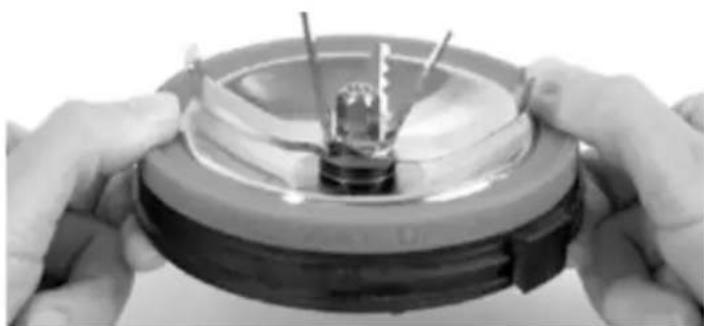
- To reassemble the blender jug, replace the silicon seal onto the blade assembly housing. Ensure the sealing ring is in proper position. The sealing ring has to be clean and show no crustifications, crinkles, cracks or look porous. You should be able to read THIS WAY UP on the gasket.
- Hold on to the blade assembly housing with your right hand and with your left hand hold on to the handle of the blender jug. Upturn the blender jug and insert the blade assembly housing into the jug base. Twist the Blade Removal System anticlockwise until firmly locked into position.
natural_image
Close-up of hands assembling a mechanical component with a central hub and screwdriver (no visible text or symbols)⚠ WARNING: The blades are very sharp. Pay attention handling it and if possible only hold on to the blade assembly housing.
Note:
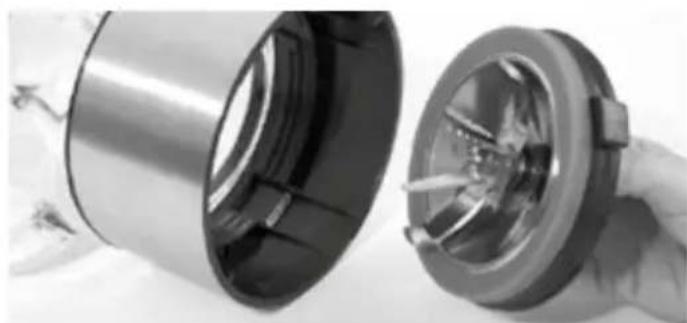
The blade assembly housing has two small guiding pins that fit in the matching gaps of the base of the blender jug. The blade assembly housing is in the right position if it seats solidly onto the base of the blender jug and when you can twist it anticlockwise.
natural_image
Close-up of a mechanical component with internal parts, showing open and closed views (no text or symbols visible)The blade assembly housing and the sealing ring should be properly connected to seal the bottom of the blender jug. Otherwise ingredients will run right into the motorblock.
IMPORTANT: Do not tighten them with force or too tight to avoid damaging the
appliance or the sealing ring. Ensure the sealing ring is in position and did not fall into the blender jug when assembling.
ATTENTION: Ensure the blender jug is leak-proof before putting the blender jug on the motorblock. Always wipe off spilled liquids immediately. Never let any liquids run into the motorblock or underneath it to avoid electric shock. When liquids are spilled on the motor housing, immediately unplug the appliance and dry the motor housing to avoid risk of electric shock or fire. Do not attempt to operate the appliance, when liquids are on or in the motor housing.
ATTENTION: Never place the holder or the blade only on the motorblock. Never touch the drive gear when the plug is connected to the power outlet. Without the blade assembly housing the bottom of the blender jug is open. Spilled liquids might run right into the motor.
ATTENTION: When liquids are spilled on the motor housing, immediately unplug the appliance and dry the motor housing to avoid risk of electric shock or fire. Do not attempt to operate the appliance, when liquids are on or in the motor housing.
- Place the proper assembled blender jug onto the motorblock. Turn the blender jug until it locks onto the motorblock. The handle of the blender jug should be positioned to the right hand side of the appliance in order to see the measuring scale.
The screen will turn on as soon as the plug is plugged into the power outlet, the blender jug is securely locked onto the motorblock and the appliance is switched on by pressing the power button.
- Place the clear refill lid onto the opening of the blender lid.
Note:
The refill lid has two small guiding pins that fit in the matching gaps of the lid. Twist it clockwise 14 of a turn until firmly locked into position. You can hear it click when the refill lid is in proper position.
- Load the blender jug with ingredients, pick a speed on the control panel and start processing.
ATTENTION: Always ensure the motorblock is turned off when placing the blender jug on the motorblock to avoid personal injury.
ATTENTION: Never try to sharpen the blade. Replace the blade if it is blunt. Please contact our service department for the replacement part.
OPERATING
BEFORE FIRST USE
⚠ WARNING: The blade is very sharp. Pay attention when handling the blade. Only touch the blade on the blade assembly housing. Do not leave young children play with the appliance or any part of it or the packing material.
After unpacking, remove all promotional and packing materials as well as any foreign objects.
Before first use and after a long period of storage, clean the appliance and all its parts with a damp soft cloth and warm soapy water (see >Care and Cleaning). The blender jug is dishwasher safe.
⚠ WARNING: The blade assembly is not dishwasher safe. The blender jug and lid can be washed in the dishwasher on a standard wash cycle. Ensure to remove the blade assembly housing and take the lid off the blender jug before placing the blender jug into the dishwasher.
Note:
When using your blender for the first time, you may notice an odour coming from the motor. This is normal and will dissipate with use.
TIPS FOR OPERATION
Place the blender jug on a suitable, stable, dry, and clean working surface. (see: >Safe-guards for Daily Operation). Always wipe off spilled liquids immediately. Never let any liquids run into the motorblock or underneath it to avoid electric shock. When liquids are spilled on the motor housing, immediately unplug the appliance and dry the motor housing to avoid risk of electric shock or fire. Do not attempt to operate the appliance, when liquids are on or in the motor housing.
⚠ WARNING: If the blade is mounted in the blender jug, the blender jug is positioned on the motorblock, and the plug is connected to the power outlet, do not insert your fin-
gers, a wooden or plastic spoon or similar cooking utensils or foreign substances in the blender jug. Always turn the appliance off and wait for the motor to stop before taking the blender jug off the motorblock, removing the lid, checking the food, pushing the food down with a spoon or filling in more ingredients. Use cutlery made of wood, rubber or plastic only. Never use force when trying to push the food down or trying to remove food that blocks the blade.
The Design Mixer Advanced Plus can not replace all of your kitchen appliances. The mixer can not be used for: beating the white of eggs or juicing fruits and vegetable. Also it is not possible to use it for stirring very firm batter or dough or for chopping very hard ingredients such as nuts with shell, bones or alike.
IMPORTANT: Do not leave any food dry on the surfaces of the appliance. Always clean the appliance right after use (see >Care and Cleaning).
- Use Low speeds (1 - 3 - Mix, Chop and Blend) for drink or cocktail making and emulsions such as mayonnaise, dressings, marinades and foods that require mixing until just combined, such as batters.
- Use High speeds (4 - 5 - Puree and Liquify) for pureeing soups and aerating liquids.
- Use PULSE for foods that only require short bursts of power such as chopping nuts.
- Use ICE CRUSH for ice crushing. The maximum amount of ice cubes the blender can blend at any one time is 1 standard ice try or 250 g.
- Use SMOOTHIE for drink making using both liquid and solid ingredients.
- Ensure all foods are cut into cubes (approx. 2 - 3 cm squares) where appropriate to achieve an even result.
- IMPORTANT: Do not overload the motor with food that is oversized or too hard. Turn the appliance off as soon as the motor stalls or stucks to avoid overheating of the motor (see >Trouble shooting). Fill liquid ingredients into the blender jug first unless it is described different in the recipe. Prepare your food before you fill it into the blender jug. Do not overfill the blender jug.
- Do not put more than 2 cups of warm ingredients into the blender before blending commences. After the blending process has begun and the blades are turning you may slowly add another 1 12 cups of ingredients through the opening in the lid if desired.
- Thick mixtures puree more efficiently if the blender is 14 to 14 full.
- When using several ingredients, place liquid ingredients in the blender jug before solid ingredients, unless specified in the recipe.
- When blending thick or dry mixtures it may be necessary to stop the blender and scrape down the sides of the blender jug with a plastic or rubber spatula, once or
twice during blending. Do not use metal utensils as they may damage the blades or blender jug.
⚠ WARNING: If the blender jug is positioned on the motorblock, and the plug is connected to the power outlet, do not insert your fingers, a wooden or plastic spoon or similar cooking utensils or foreign substances in the blender jug. Always take the blender jug off the motorblock before pushing the food down with a spoon.
- Process ingredients a few seconds only. Permanently check on the consistency of the food in between the operation to avoid getting food which is too fine and slushy.
Pick the speed for your needs: mixing (MIX 1 - 5) for permanent operation, ICE-CRUSH button, PULSE button (for interval operation) or the SMOOTHIE button.
- Do not operate a heavy mixture for more than 30 seconds.
- For normal blending tasks, for example, mayonnaise, dressings etc., do not operate for longer than 1 minute at one time without turning off the blender and stirring the ingredients, and then continue blending.
- Do not operate the blender without having the blender lid in position. To add additional ingredients whilst blending, remove the refill lid and place ingredients through the opening in the lid.
- Do not fill the blender jug above the MAX line. When the blender jug is filled at or near the MAX line, place one hand on the blender lid to avoid displacement of the lid during operation.
- Do not place any objects, other than food or liquid, into the blender whilst the motor is running.
- Do not use the blender jug to store food.
- The blender will not knead dough or mash potatoes.
- Do not remove the blender jug while the blender is operating. Always make sure the blender is off by pressing the Power button and unplug the power cord from the power outlet.
- Do not overload the blender with more than the specified quantity of ingredients as doing so could cause the motor to stall. Turn the blender is off by pressing the Power button on the control panel and unplug the cord. Remove a portion of the mixture from the blender jug before continuing.
- Do not place hot or boiling ingredients into the blender; allow to cool before placing into the blender jug.
SPEEDCONTROL
It is possible to process food with all kind of texture using the speedcontrol. The control panel has therefore different marks. You find some ideas and proposals on how to use the different speed.
| Pulse | Interval operation: ideal for processing nuts (i. e. almonds), for mincing boiled meat or fish. |
| Ice-Crush | For crushing ice. |
| Smoothie | For preparing milk-shakes, smoothies and Frappés |
| 1 MIX | To combine milkpowder, juice and gelatin or preparing eggs for omelettes. |
| 2 CHOP | Used for grinding hard and solid seeds such as beans, cafe, chickpea, or grinding sugar to make icing sugar, and for mincing meat or fish. |
| 3 BLEND | For preparing Frappé-ice, shakes, yogurt, ice cream |
| 4 LIQUIFY | For mixing harder ingredients |
| 5 PUREE | For onions, thick sauces, etc. It does not get a sauce foamy. For mashing fruit and vegetable. |
The length of mixing time depends on your personal preferences, the consistency of the ingredients and the recipe.
Interval-function: The Pulse button is a touch sensitive button which keeps the motor running only for the time you press the button down and which should be pressed in short intervals only. One interval takes 1 second.
Timer-function: The Ice-Crush and the SMOOTHIE button are pre-programmed cycles which automatically adjust the blending time and speeds to optimise blending results. The LCD timer screen will start counting downwards in one second increments until >00< is displayed. When >00< seconds is reached, the blender will automatically cease to operate. The ICE-CRUSH button is pre-programmed for 60 seconds and the SMOOTHIE button for 60 seconds.
Mixing: The 5 speed buttons are for permanent operation. The motor only stops when pressing the off-button or after 2 minutes of permanent operation.
Note:
As a safety feature, the appliance automatically shuts off after operating for 2 minutes. If you want to operate again, unplug the appliance, wait 1 minute and plug in again.
SUGGESTED USES FOR YOUR BLENDER
| Food Preparation & Usage Quantity Function Time | ||||
| Mayonnaise Mix the egg yolk and vinegar. Add the oil Use: dressings | 125 g 1 / MIX 60 seconds | |||
| Whipped cream Add sugar or vanilla if desired Use: topping | 200 g 1 / MIX 60 seconds | |||
| Lean meat/poultry Trim excess fat and sinew, cut into 2cm cubes Use: mince | 250 g 2 / CHOP 10-20 seconds | |||
| Fish/seafood Remove skin and bones and cut into 2cm cubes Use: mince | 300 g 2 / CHOP 10-15 seconds | |||
| Raw vegetable Peel and cut into 1.5-2cm cubes Use: stuffing, filling, puree, soup | 200 g 2 / CHOP 10-30 seconds | |||
| Nuts Remove skin Use: cakes, toppings, pastes | 200 g 2 / CHOP 10-30 seconds | |||
| Bread or biscuit crumbs | Cut bread into 2cm pieces, break up biscuits Use: cheesecake | 100 g 2 / CHOP 10-30 seconds | ||
| Herbs/spices Whole or halve Use: pastes, sauces | 1 cup 2 / CHOP 20-30 seconds | |||
| Smoothie Milk, whole fresh fruits, yogurt, ice cream Use: milkshake, frappé | max. 800 ml | Smoothie 3 / BLEND | 60 seconds | |
| Fresh fruit Whole, chopped berries Use: dessert sauce | 250 g 2 / CHOP 30 seconds | |||
| Dried fruit | Chopped dry fruit Use: fruit mince | 300 g 2 / CHOP 30 seconds | ||
| Ice | Crush Use: mixed drinks, cocktails, slurpies | 250 g Ice-Crush 2 / CHOP | 60 seconds | |
DIRECTIONS FOR USE
- The mixer proceeds fast and reliable when you add the ingredients one after the other in small portions.
- The mixer processes within seconds. Avoid processing food longer then necessary.
• Always ensure the lid is closed before starting the motor to avoid spilling. - You can add ingredients during the operation through the refill aperture. Never place your face or hands over the opening.
- If the motor slows down use the next faster speed.
• Always clean the appliance right after use.
If ingredients get stuck on the walls of the blender jug turn the appliance off, take the blender jug off the motorblock, open the lid and push the food down carefully using a spatula. Take care of the blade.
ATTENTION: Open the refill aperture when mixing hot food and cover it with a kitchen towel. This way excess pressure and steam can escape.
OPERATING
⚠ WARNING: Ensure the blender jug is locked securely onto the motor-block and that you can not knock the appliance over during operation to avoid personal injury.
Connected the plug to the power outlet. Press the Power-button on the far left of the control panel to turn the blender on. The Power-button will illuminate and flash. The LCD timer screen will illuminate with >00< displayed. The LCD timer screen shows the running time of the motor.
- If the appliance is properly assembled and securely locked onto the motorblock fill the ingredients into the blender jug. Do not fill the blender jug above the MAX line. When the blender jug is filled at or near the MAX line place one hand on the blender lid to avoid displacement of the lid during operation.
IMPORTANT: Cooked food should cool down before processing. Food with hard texture should be cut in pieces of 2 cm size before filling them into the blender jug. Fill liquids in first. Do not overload the blender jug to avoid spilling or overloading the motor.
- Place the lid on the blender jug and press the lid down to seal the top of the blender jug. Close the opening of the lid with the refill lid.
Note:
The refill lid has two small guiding pins that fit in the matching gaps of the lid. Twist it clockwise 14 of a turn until firmly locked into position. You can hear it click when the refill lid is in proper position.
Note:
The blender features a patented assist lid. This allows the lid to fit tightly onto the blender jug, avoiding displacement during operation. The ring pull design allows the user to easily remove the lid with a simple leverage action.
⚠ WARNING: Never take the blender jug off the motorblock, the lid of the blender jug or place a spoon or other foreign substance into the blender jug while the motor is running.
Always turn the appliance off first and wait for the motor to stop moving. Now you can take the blender jug off the motorblock remove the lid and check on the ingredients.
⚠ WARNING: Do not fill ingredients into the blender jug which exceed a temperature of 60 degrees. After processing ice cubes slowly heat up the blender jug before processing hot ingredients. Otherwise the blender jug will crack or gets damaged. Use gloves processing hot liquids. Ensure not to burn yourself on the blender jug, overrunning, spurt out or hot steam.
ATTENTION: If you are working with hot ingredients first take off the refill lid and cover the opening with a towel to release excess pressure and steam.
IMPORTANT: Ensure the blender jug is properly locked on the motorblock and stands securely. The appliance does not work if the blender jug is not in proper position on the motorblock.
- Place one hand on top of the lid. Press the Power-button on the far left of the control panel to turn the blender on. The Power-button will illuminate and flash. The LCD timer screen will illuminate with >00 displayed.
- Select the required speed (1 to 5) by pressing the corresponding speed button. The blender will start to operate and the selected speed button will illuminate. The Power-button will illuminate and cease to flash. The STOP-button will illuminate and flash. The LCD timer screen will start counting upwards in one second increments until 120 seconds is reached.
Note:
Using the pre-programmed functions such as the Ice-crush or the SMOOTHIE button the screen will start counting downwards in one second increments until >00< is displayed. When >00< seconds is reached, the blender will automatically cease to operate. The ICE-CRUSH button is pre-programmed for 30 seconds and the SMOOTHIE button for 40 seconds.
Important: The maximum amount of ice cubes the blender can blend at any one time is 1 standard ice tray or 250g.
Note:
The Pulse button is a touch sensitive button which keeps the motor running only for the time you press the button down and which should be pressed in short intervals only. One interval takes 1 second.
Note:
The speed can be changed at any time during the blending process. Each time a new speed is selected its button will illuminate and the previous speed button illumination will go out. The number of seconds on the LCD timer screen is not interrupted and will continue to count upwards to 120 seconds unless interrupted. If changing to a pre-programme function the LCD timer screen resets to the pre-programmed function time selected.
ATTENTION: If the motor slows down or stucks turn the appliance off immediately to avoid overheating (see >Trouble shooting).
- Turn the appliance off when the operation is finished.
Note:
Operate the blender only for the appropriate amount of time required – do not over process.
To stop blending at any time, press the STOP-button or the selected speed button. The selected speedcontrol button and STOP-button illumination will go out and the Power-button starts flashing. The appliance is set into the operational mode.
Note:
The Power-button can also be pressed, but this will also turn the appliance off and all illuminations will go out.
Important: The blender will automatically stop blending after 120 seconds (2 minutes) and the function button and STOP-button illumination will go out. The Power-button will illuminate and flash. This is a safety feature.
-
As soon as the motor stops moving you can take the blender jug off the motorblock holding on to the handle. Take off the lid to check the consistency of the food or to push down the food from the sides of the blender jug. You can fill in more ingredients through the refill aperture. Turn the refill lid anticlockwise and lift it. After adding the ingredients close the refill aperture, place the blender jug on the motorblock and make sure it is securely locked. Turn on the appliance. Process until the food has the favoured texture.
-
Turn the appliance off as soon as you are done with operating and take the blender jug off the motorblock. You can pour out liquid foods.
IMPORTANT: Do not leave any food dry on the surfaces of the appliance. Always clean the appliance right after use (see: >Care and Cleaning).
CARE AND CLEANING
⚠ WARNING: To avoid injury to persons and damage, always turn the appliance off, wait for the motor to stop completely and unplug the appliance, immediately after operation and before assembling/disassembling or cleaning the appliance.
⚠ WARNING: Wear oven gloves if processing hot food. Ensure not to get burned on spilled over liquids or steam.
ATTENTION: Do not use abrasive cleaners, cleaning pads, corrosive chemicals (disinfectants, bleach) or any sharp or hard objects (i.e. metal scouring pads) for cleaning, for this could damage the surfaces. Always handle the entire appliance with care and without violence.
Cleaning the Blender Jug
- Empty the blender jug and rise it with warm water.
- Replace the blender jug on the motorblock and ensure it is securely locked into position.
- Fill the blender jug with warm soapy water. The waterlevel should be high enough to cover the blade with water but not too high to avoid run over liquids. Close the lid and turn on the motor on >5. Let the motor run for a few seconds.
- Turn the motor off, wait for the blade to stop moving and take the blender jug off the motorblock.
- Pull the plug out of the power outlet.
- Take the lid off the blender jug and pour out the water. Stubborn residues you can remove using a nylon washing brush or sponge.
⚠ WARNING: Pay attention not to cut yourself cleaning around or cleaning the blade.
IMPORTANT: The blender jug should be clean now. In case that there are stubborn residues on the blender jug or the blade, disassemble the blender jug and clean the single part (see: >Assembling and disassembling the appliance). Soak the parts in warm soapy water.
7. Clean the lid and the refill lid with soapy water.
8. Rinse the blender jug, the lid, and the refill lid with clear water and dry the parts thoroughly and carefully with a cloth or leave all parts dry naturally where they are out of reach of young children.
Note:
The lid, refill lid and blade assembly housing are not dishwasher safe. Ensure to remove the blade assembly housing and take the lid off the blender jug before placing the blender jug into the dishwasher.
DISASSEMBLING THE BLENDER JUG AND REMOVING STUBBORN RESIDUES
⚠ WARNING: The blade is very sharp! Do not touch the blade. To handle the blade, always hold on to the blade assembly housing.
- Take the blender jug off the motorblock and hold it over the sink. Remove the holder turning it 14 of a turn clockwise. Take the holder off the blender jug and remove the blade.
ATTENTION: The blender jug might be connected really tight to the holder. Do not use force unscrewing it.
- Rinse all parts in warm soapy water. Soak stubborn residues for a few minutes and then remove them using a nylon washing brush or sponge. Do not cut yourself. Beware not to damage the sealing ring. If you can not get the sealing ring clean or if it is porous or damaged you have to replace it. Contact your vendor for replacement parts.
- After cleaning rinse all parts with clear water and dry them carefully. You can also leave all parts dry naturally where they are out of reach of young children. When the parts are dry assemble the blender jug for storage or usage.
CLEANING THE MOTORBLOCK
⚠ WARNING: Do not place the appliance in an automatic dishwasher or pour boiling water over it. Do not immerse the motor or power cord in any liquids or spill any liquids on it or place the motor on wet surfaces. Always wipe off spilled liquids immediately. Ensure that no water can run into the louvre. When liquids are spilled on the motor housing, immediately unplug the appliance and dry the motor housing to avoid risk of electric shock or fire. Do not attempt to operate the appliance, when liquids are on or in the motor housing.
- Always turn the appliance off, wait for the motor to stop completely, and unplug the appliance from the power outlet before you start cleaning the motorblock.
- Wipe the motor housing and power cord with a damp soft cloth. Take care not to spill or drip water or any other liquids on the motor housing.
ATTENTION: Ensure not to damage the drive gear. Never poke with anything into the motorblock. If necessary use a soft brush for cleaning. If any liquids run into the motorblock clean and dry the motorblock very carefully.
- Thoroughly dry the motor housing after each cleaning or leave it dry naturally where it is out of reach of young children. Afterwards assemble the appliance.
Attendance: You do not need to oil the motor. Clean the parts only as described in the instructions.
⚠ WARNING: Return the entire appliance (including all parts and accessories) to an authorised service centre for examination and repair.
TROUBLE SHOOTING
The Design Mixer Advanced Plus is reliable and robust and handling it with care it will operate properly. For the case that problems show up you can solve the problems on your own using the trouble shooting guide.
⚠ WARNING: Only use the appliance for the intended use. For attendance and repair take the appliance to an authorised service centre.
| Problem Solution | |
| Motor doesn’t start or blade doesn’t rotate | Check that the power plug is securely inserted into the power outlet and switched on. Check that the blender jug and lid are securely locked into position. Check that the Power-button and selected function or speed setting is illuminated. Be sure to press only one speed or function button at a time. |
| The motor stucks or slows down | Use a higher speed for processing. If necessary (because the blender jug is overloaded) pour out part of the content of the blender jug. Chop hard ingredients such as nuts or chocolate before putting them into the blender jug. |
| The motor stops or you can not turn the motor on again | Turn the appliance off, if the motor stops all of a sudden or stalls during operation to avoid overheating. Go through following checking list:— The appliance automatically shuts off after operating for 2 minutes. If you want to operate again, unplug the appliance, wait 1 minute and plug in again.— Take the blender jug off the motorblock and clear out firmly bounded food that blocks the blade using a spoon. Do not use force to avoid damaging the blade.— Chop hard ingredients such as nuts or chocolate before putting them into the blender jug. If necessary (because the blender jug is overloaded) pour out part of the content of the blender jug and try to restart the motor using a higher speed.— ATTENTION: Do not try to mix ingredients of very hard consistency or ingredients which are too big in size to avoid overloading the motor. Do not overfill the blender jug. Process very hard food in more then one go. The mixer is not intended for chopping nuts with shell, bones or similar hard ingredients. |
| The bottom of the blender jug untightens during operation; liquid leaks. | Turn the appliance off and pull the plug out of the power outlet. Empty the blender jug. Clean and dry the motorblock. If any ingress of moisture into the motorblock or through the louvre take the appliance for technical maintenance and repair to an authorised specialised reparation shop. |
| Ensure the blender jug is properly assembled. | |
| TIP: Before filling liquid into the blender jug check if the blender jug is leak-proof by filling it with water. Check the sealing ring. If necessary replace damaged parts by original spare parts of the manufacturer. | |
| It is not possible to get the blender jug leak-proof; Liquid leaks from the bot-tom of the blender jug. | Empty the blender jug. Disassemble the blender jug and check if there are crusts or damages on the single parts. Clean the parts if necessary. |
| Replace damaged parts by original spare parts of the manufacturer. Assemble the blender jug according to the instructions. | |
| ATTENTION: Never use the appliance with improper or damaged parts. Only use spare parts provided and made by the manufacturer. Contact your vendor for help. | |
| The blender jug is screwed on too tight to the holder. | Ensure to screw the holder clockwise to get it loose. |
| Slide your hand through the handle of the blender jug. The handle should be behind the back of your hand. Grab the holder with your other hand and screw the holder 1⁄4 turn clockwise. | |
| Ask someone to hold on to the blender jug while you screw the holder with both hands. | |
| TIP: It is easier to loosen the blender jug if you put a drop of vegetable oil onto the sealing ring. | |
| Food is unevenly chopped | Either too much food is being chopped at one time or the pieces are not small enough. Try cutting food into smaller pieces of even size and processing a smaller amount per batch. For best results the food should be chopped into pieces no larger than 2cm. |
| Food is chopped too fine or is watery | The food is over processed. Use brief pulses or process for a shorter time. |
| Food sticks to blade | Processing too much food. Turn the blender off by pressing the >POWER< button on the control panel. Then switch off at the power outlet and unplug the power cord. When the blade stops rotating, remove the blender lid and remove some food with a spatula. |
STORAGE
Always clean the appliance before storing (see >Care and Cleaning). Ensure to store the appliance where it is clean, dry and safe from frost, direct sunlight and inadmissible strain (mechanical or electric shock, heat, moisture) and where it is out of reach of young children. Place the appliance on a clean and stable surface, where it can not fall. Do not place any hard or heavy objects on the appliance. To avoid touching the blade unintentionally or to loose any accessories, it is good advice to store the blender completely and properly assembled.
NOTES FOR DISPOSAL
Dispose of the appliance and packaging must be effected in accordance with the corresponding local regulations and requirements for electrical appliances and packaging. Please contact your local disposal company.
Do not dispose of electrical appliances as unsorted municipal waste, use separate collection facilities. Contact your local government for information regarding the collection systems available. If electrical appliances are disposed of in landfills, dumps, or refuse incineration, hazardous substances can leak into the groundwater or can be emitted into air, thus getting into the food chain, and damaging your health and well-being as well as poisoning flora and fauna. When replacing old appliances with new once, the vendor is legally obligated to take back your old appliance for disposal at least for free of charge.
INFORMATION AND SERVICE
Please check www.gastroback.de for further information. For technical support, please contact Gastroback Customer Care Center by phone: +49 (0)4165/22 25-0 or e-mail info@gastroback.de.
Please refer to our home page for a copy of these operating instructions in pdf format.
WARRANTY
We guarantee that all our products are free of defects at the time of purchase. Any demonstrable manufacturing or material defects will be to the exclusion of any further claim and within 2 years after purchasing the appliance free of charge repaired or substituted. There is no Warranty claim of the purchaser if the damage or defect of the appliance is caused by inappropriate treatment, over loading or installation mistakes. The Warranty claim expires if there is any technical interference of a third party without a written agreement. The purchaser has to present the sales slip in assertion-of-claim and has to bear all charges of costs and risk of the transport.
Note:
Customers from Germany and Austria: For repair and service, please send Gastroback products to the following address: Gastroback GmbH, Gewerbestr. 20, D-21279 Hollenstedt, Germany.
Customers from other countries: Please contact your dealer.
Please agree that we cannot bear the charge of receipt. Submission of appliances: Please ensure packing the appliance ready for shipment without accessories. Add the sales slip and a short fault description. The processing time after receipt of the defective appliance will be approx. 2 weeks; we will inform you automatically. After the warranty period, please send defective appliances to the given address. You will get a free quotation and, thereafter, can decide, whether we shall repair the appliance to the costs possibly accrued, send back the defective appliance for free of charge, or dispose of the appliance for free of charge.
The appliance is intended for household use only and NOT suited for commercial usage. Do not attempt to use this appliance in any other way or for any other purpose than the intended use, described in these instructions. Any other use is regarded as unintended use or misuse, and can cause severe injuries or damage. There is no warranty claim of the purchaser if any injuries or damages are caused by unintended use.
RECIPE IDEAS
DIPS, SAUCES, DRESSINGS, CURRY PASTES
GUACAMOLE
» 1 large avocado, peeled, stone removed and chopped
»40 ml lemon juice
»½ cup sour cream
»1 tsp minced garlic
»1 tsp chilli
Place all ingredients into blender jug and use speed 2/chop, blend until smooth. Serve with crustini and crudités. TIP: Double the ingredients to serve 8.
PESTO DIP
»1 cup fresh basil leaves
»1 clove garlic, peeled and chopped
»40 ml lemon juice
»60 g pine nuts
»½ cup olive oil
»½ cup cottage cheese
»60 g fresh Parmesan cheese, grated
Place all ingredients into blender jug and use speed 2/chop, blend until smooth. Transfer mixture to a serving bowl. Chill until ready to use. Serve with toasted turkish bread.
RICOTTA AND OLIVE DIP
»1 bunch fresh coriander, stems trimmed
»200 g ricotta cheese
»200 g cottage cheese
»125 ml light cream
»2 tsp lemon juice
»½ cup fresh Parmesan cheese, grated
»1 tbsp drained capers
» ^1/4 cup chopped black olives
» ^1/4 cup toasted pine nuts
Place all ingredients into blender jug and use speed 2/chop, blend until smooth. Transfer mixture to a serving bowl. Chill until ready to use. Serve as a dip for a selection of raw vegetables.
SMOKED SALMON PATÉ
»1 tsp grated lemon rind
»1 tbsp lemon juice
»125 g cream cheese
» 100 g smoked fish, skin and bones removed (salmon, trout or mackerel)
»2 tsp horseradish cream
»1 tsp fresh parsley sprigs
»white pepper, to taste
Place lemon rind, juice and cream cheese into blender jug, using pulse, process until smooth. Scrape mixture from sides of bowl with a spatula. Add fish, horseradish cream, parsley and pepper. Blend on speed 2/chop for 30 seconds. Scrape mixture from sides of bowl with a spatula. Pulse in short bursts until smooth. Remove paté from blender jug and spoon into a serving dish, smooth top, cover and refrigerate until well chilled. Serve with water biscuits or melba toasts.
MAYONNAISE
»2 egg yolks
»1 tsp dry mustard
»1 tbspvinegar
»salt and white pepper, to taste
»125ml vegetable oil
Place egg yolks, mustard, vinegar, salt and pepper into blender jug and blend 10-15 seconds using speed 1/mix until light and fluffy. With blender running, slowly pour oil through inverted measuring cup in lid. Blend on speed 3/blend until mixture thickens. This should take about 1 minute.
Mayonaise variations:
Raspberry: replace 1 tablespoon vinegar with 1 tablespoon raspberry vinegar
Garlic: add 2 cloves garlic, peeled and chopped to the egg yolk mixture
Herb: add 12 cup chopped mixed fresh herbs (such as basil, chives, parsley, thyme) to the prepared mayonnaise.
AVOCADO DRESSING
»1 tbsp lemon juice
»½ cup sour cream
»3 tbsp cream
»2 drops tabasco sauce
»1 tsp honey
»1 avocado, peeled, stoned and chopped
»1 clove peeled garlic, chopped
Place all ingredients into the blender jug. Use speed 2/chop, blend until smooth. Use as a dressing with potato salad.
HERB DRESSING
» 34 cup mixed fresh herbs (parsley, coriander, mint, chives, rosemary, and basil)
»1 clove peeled garlic, optional
»2 tbsp olive oil
»3 tbsp balsamic vinegar
Place all ingredients into the blender jug. Use speed 1/mix, blend until combined. Serve with lamb, chicken, fish.
CREAMY ZUCCHINI SAUCE
»2 tsp oil
»3 zucchini, sliced
»2 onions, chopped
»165 ml cream
»freshly ground black pepper
»60 g butter, melted
»½ cupgrated parmesan cheese
»ground nutmeg
Heat oil in a medium fry pan and cook zucchini and onions for 4-5 minutes or until tender. Set aside to cool. Transfer mixture to blender jug. Use speed 3/blend, blend until smooth. Return mixture to fry pan, add remaining ingredients. Cook sauce over a low heat until it is almost boiling. Serve sauce immediately with cooked pasta.
TIP: Substitute zucchini for mushrooms, add 250g mushrooms, sliced to make mushroom sauce.
SPICY PEACH SAUCE
»410 g canned sliced peaches
»125 ml white wine
»2 cloves peeled garlic, chopped
»2 tsp grated fresh ginger
»1 small red chilli, chopped
»1 tbsp lemon juice
»2 tbsp sweet sherry
»2 tbsp honey
»2 tsp light soy sauce
Place all ingredients into the blender jug. Use speed 2/chop, blend until smooth. Serve with poultry or pork.
SATAY SAUCE
»2 cloves garlic, peeled
»1 small onion, peeled and quartered
»2 tsp peanut oil
»½ cup roasted peanuts
»1 small chilli, halved and seeded
»165 ml water
»2 tbsp lemon juice
»1 tbsp dark soy sauce
»2 tbsp coconut milk
»1 tsp brown sugar
Place garlic and onion into the blender jug, pulse until chopped. Heat peanut oil in a saucepan and cook garlic and onion mixture until lightly browned. Place remaining ingredients into the blender jug. Use speed 3/blend, blend until smooth. Pour combined mixture over garlic and onion mixture and stir over a gentle heat to warm through. Serve immediately or cover and store in the refrigerator.
TIP: Satay sauce may thicken on standing, if this happens stir in a little more warm water.
THAI GREEN CURRY PASTE
» 4 large green chillies, stems removed and roughly chopped
»1 tsp black peppercorns
»1 onion, roughly chopped
»2 cloves peeled garlic
» 1 bunch coriander, including root, washed and chopped
»1 stem lemongrass, trimmed and thinly sliced
»1 tsp salt
»2 tsp ground coriander
»1 tsp ground cumin
»2 tsp dried shrimp paste
»1 tsp ground turmeric
»250 mloil
Place all ingredients into blender jug. Use speed 3/blend, blend to a smooth paste.
TIP: Scrape sides of blender jug with a spatula and add a little extra oil or tablespoon of water if necessary.
TIP: Store curry paste in an airtight blender jug in the refrigerator.
TIP: Substitute 2 teaspoons chopped lemon rind for lemongrass.
TIP: This curry paste is best suited to poultry. Allow 2 tablespoons paste per 500g poultry.
MALAYSIAN CURRY PASTE
»½ cup coriander seeds
»1 tbsp cumin seeds
»2 tsp fennel seeds
»1/4 cup dried chillies, broken
»6 cloves garlic, peeled
»4 tsp chopped fresh ginger
»5 candle nuts, chopped
»2 tbsp desiccated coconut
»3 tsp blachan (shrimp paste)
»2 tsp tamarind paste
»2 tsp ground turmeric
»4 stems fresh lemon grass, thinly sliced
»400ml oil
Place all ingredients in blender jug. Use speed 3/blend, blend to a smooth paste.
TIP: Store curry paste an airtight blender jug in the refrigerator.
TIP: Candle nuts, blachan and tamarind paste are all available in the Asian section of most supermarkets or Asian grocery stores.
TIP: If candle nuts are difficult to find use another nut i.e. peanut, macadamia.
TIP: This curry paste is best suited to fish and shell-fish. Allow 2 tablespoons paste per 500g seafood or fish.
STARTERS
NACHOS
»155 g corn chips
»2 tomatoes, peeled and finely chopped
»½ cup grated tasty cheese
»½ cup grated romano cheese
Avocado topping
» 1 large avocado, stoned, peeled and chopped
»2 tsp lemon juice
»½ cup sour cream
»2 spring onions, chopped
»2 tsp minced garlic
»1 tsp chilli
Layer corn chips and tomatoes in an ovenproof dish, finishing with a layer of cheese. Bake at 200°C for 10-15 minutes, or until cheese melts and is golden. To make topping, place avocado, lemon juice, sour cream, spring onion, garlic, and chilli in blender jug. Use speed 2/chop, blend until smooth. Spoon the avocado topping onto corn chips and serve immediately.
CHEESE STICKS WITH PESTO
» 12 slices white sandwich bread, crusts removed
»2 tsp grain mustard
»4 tbsp grated parmesan cheese
»½ cup grated tasty cheese
»1 tbsp finely chopped fresh coriander
»cayenne pepper
»1 egg, lightly beaten
»vegetable oil for cooking
Pesto
»1 cup fresh basil leaves
»2 cloves garlic
»2 tbsp lemon juice
»60 g pine nuts
»½ cup olive oil
»60 g grated parmesan cheese
Roll each side of bread with a rolling pin, to flatten as much as possible. Combine mustard, parmesan cheese, tasty cheese, coriander and cayenne pepper to taste in a bowl. Divide mixture between bread slices and spread over half of each slice. Brush unspread sides of bread slices with beaten egg. Roll each slice up tightly using the egg to seal rolls. Arrange side by side on a tray. Cover and refrigerate until ready to cook.
Heat oil in a frypan and cook cheese sticks, a few at a time until golden all over. Drain on absorbent kitchen paper. To make pesto, place all pesto ingredients into blender jug, blend on speed 3/blend until finely chopped and smooth. Serve with cheese sticks.
TIP: Use wholemeal or grain bread instead of white bread.
PRAWN TOAST
»6 slices white bread, crusts removed
»250 g green prawns, shelled and deveined
»1 tbsp soy sauce
»2 tsp cornflour
»2 tsp snipped chives
»1 tsp finely chopped fresh ginger
»1 egg, lightly beaten
»1 cup sesame seeds
»oil for cooking
Cut each slice of bread into four, finger lengths. Set aside. Place prawns, soy sauce, cornflour, chives and ginger in blender jug. Use speed 2/chop. Blend until smooth. Spread mixture on one side of each piece of bread. Brush with egg and sprinkle with sesame seeds. Heat oil in a frypan and cook bread pieces a few at a time until golden. Remove from oil with a slotted spoon, drain on absorbent kitchen paper. Serve immediately with a soy sauce dipping sauce.
SOUPS
WONTON SOUP
» 125 g lean pork meat, trimmed and roughly chopped
»125 g green prawns, shelled and deveined
»2 cm piece ginger, peeled and sliced
»1 tbsp soy sauce
» 12 tsp salt
»1 clove garlic
» ^1/4 tsp sesame oil
»16 wonton wrappers
»1 × 60 g egg, lightly beaten
»1 litre chicken stock
»2 shallots, finely chopped
Place pork, prawns, ginger, soy sauce, salt, garlic and sesame oil in blender jug and pulse to a smooth paste. Place a teaspoon of mixture slightly below centre of wonton wrapper and brush edges of the wrapper with egg. Fold wrapper in half to make a triangle and press edges to seal, excluding any air. Moisten the two edges of the triangle with egg, bring together and pinch to seal. Drop wontons into boiling salted water and cook for 10 minutes. Meanwhile, bring chicken stock to the boil in a saucepan, reduce heat and simmer 2-3 minutes. Lift out wontons from boiling water and place four wontons each in four individual bowls, spoon over chicken stock. Garnish with chopped shallots.
SWEET CORN AND BACON SOUP
»1 tbsp oil
»1 onion, chopped
»4 cloves garlic, peeled and crushed
»2 tsp ground coriander
»1 tsp cajun seasoning
»2 cups fresh corn kernels, thawed
»3 cups chicken stock
»250 ml milk
»125 ml cream
»3 bacon rashers, rind removed and chopped
»2 tbsp snipped chives
Heat oil in a large saucepan and add onion, garlic, coriander and cajun seasoning. Cook over a medium heat, stirring constantly until onion is soft; add corn, stock, milk. Bring to boil, then reduce heat and simmer, covered for 30 minutes. Cook bacon in a separate pan until crisp, drain on absorbent kitchen paper. Allow mixtures to cool. Transfer mixture in two batches into blender jug using speed 5/liquify, blend until smooth. Return soup to pan, add cream, bacon and chives, heat through gently. Serve immediately.
PUMPKIN SOUP
»2 tbsp cooking oil
»1 brown onion diced
»2 cloves garlic, crushed
»400 g butternut pumpkin, peeled and diced
»1 litre chicken stock
Heat oil in a hot saucepan, add onions and garlic and sauté 5 minutes. Add pumpkin and toss to coat with the onion mixture, then add the stock and bring mixture to the boil. Reduce heat to simmer for 20 minutes and cook with the lid on until the pumpkin is cooked. Allow mixture to cool and transfer in batches to blender jug. Use speed 5/liquify, blend until smooth. Return pureed soup to saucepan to heat through, check seasoning before serving.
SWEET PEPPERED TOMATO SOUP
»1 tbsp oil
»2 cloves garlic, crushed
»2 leeks, sliced
»2 × 410 g canned tomatoes, mashed
»2 tsp chicken stock powder
»1 tbsp tomato paste
»2 tsp brown sugar
»1 bay leaf
» ^1/4 tsp dried thyme
»1 tsp chopped fresh mint
»1 tsp chopped fresh coriander
»1/4 tsp ground cloves
»pinch cayenne pepper
»2 tbspchopped fresh parsley
Heat oil in a large saucepan, add garlic and leeks, cook over medium heat for 2-3 minutes or until leeks are soft. Combine tomatoes, stock powder, tomato paste, brown sugar, bay leaf, thyme, mint, coriander, cloves and pepper. Pour into pan with leek mixture, bring to boil, then reduce heat and simmer, uncovered for 20 minutes or until liquid has reduced by one third. Allow the mixture to cool. Transfer mixture into two batches into blender jug, using speed 5/liquify, blend until smooth. Ladle soup into serving bowls, sprinkle with parsley and serve immediately.
SALADS
PRAWN SALAD WITH RASPBERRY SAUCE
»500 g cooked prawns, peeled and deveined
»100 g salad mix
»100 g snow pea sprouts
»1 orange, peeled and segmented
»2 kiwi fruit, peeled and sliced
Raspberry Sauce
»125 g fresh or frozen raspberries, thawed
»2 tbsp balsamic vinegar
»2 tbsp vegetable oil
»1 tsp finely chopped fresh mint
»1 tbsp sugar
Arrange prawns, salad mix, sprouts, orange segments and kiwi fruit attractively on a serving platter and chill until required. To make sauce, place raspberries into blender jug, using speed 2/chop, blend until smooth. Push through sieve to remove seeds. Combine raspberry puree with vinegar, oil, mint and sugar. Pour sauce over salad and serve immediately.
TIP: Substitute prawns for 2 lobster tails, cooked and shells removed. Cut lobster tail flesh into thick medallions approximately 1cm thick.
FRESH VEGETABLE SALAD WITH PEPITA DRESSING
»2 carrots, cut into thin strips
»1 parsnip, cut into thin strips
»125 g green beans, sliced
»1 cooked beetroot, cut into thin strips
»1 red apple, chopped
»2 tsp lemon juice
»1 tbsp chopped fresh coriander
Pepita dressing
» 100 g pepita (Mexican pumpkin) seeds, toasted
»1 tbsp lemon juice
»2 tbsp balsamic vinegar
»1 clove garlic, chopped
»1 tbsp dijonaise mustard
Combine carrots, parsnip, beans, beetroot, apple, lemon juice and coriander. Toss well then arrange in a serving bowl. Chill until required. To make dressing, place all ingredients into blender jug, use speed 1/mix and blend until smooth. Transfer to a bowl and serve with vegetable salad.
EGG SALAD WITH FRESH HERB DRESSING
»1 bunch rocket leaves, washed and trimmed
»6 hard boiled eggs, peeled and quartered
»2 italian tomatoes, quartered
»1 avocado, stoned, peeled and cut into slices
»12 black olives, pitted
Fresh Herb dressing
»1 cup light sour cream
»2 tbsp chopped fresh parsley
»1 tbsp chopped fresh basil leaves
»1 tbsp chopped fresh coriander
»2 tbsp apple juice
» ^1/4 tsp ground nutmeg
»ground black pepper
Arrange rocket leaves, eggs, tomatoes, avocado slices and olives attractively on a serving platter. Chill until required. To make dressing; place sour cream, parsley, basil, coriander, apple juice, nutmeg and pepper to taste into blender jug, using speed 2/chop, blend until smooth. Pour dressing over salad and serve immediately.
MAIN MEALS
THAI FISH CAKES
»1 small onion, peeled and quartered
»2 cloves garlic, peeled
»2 thick slices peeled ginger
»2 red chillies
»2 cm piecefresh lemongrass
»6 fresh kaffir lime leaves
»1/4 bunch coriander, roughly chopped
»350 g white boneless fish fillets, cubed
»1 × 60 g egg
»2 tbsp water
»1 tbsp fish sauce
»8 green beans, sliced
»oil for shallow frying
Place onion, garlic, ginger, chillies, lemongrass, lime leaves and coriander in blender jug, pulse until a smooth paste. Add fish, egg, water and fish sauce, use pulse and blend until smooth. Remove mixture from the bowl and stir in sliced beans. Shape mixture into 24 fish cakes. Heat oil in a large fry pan and cook fish cakes on a medium heat until golden on both sides and cooked through, approximately 10 minutes. Serve with cucumber sauce made by combining 1/3 cup warmed honey with 1 tablespoon lime juice and 1 tablespoon finely chopped, peeled cucumber.
ROSEMARY PARMESAN CRUSTED LAMB STEAKS
»4 slices white bread, crusts removed
»1/4 cup grated fresh parmesan cheese
»2 tsp fresh rosemary leaves
»4 lamb leg steaks
»plain flour
»1 egg, lightly beaten
»2 tbsp oil
»60 g butter
»1 tbsp lemon juice
»2 tbsp drained capers
Break bread slices into pieces, place into blender jug with parmesan cheese and rosemary leaves. Pulse until fine bread crumbs form. Transfer crumb mixture to a large plate. Toss meat in flour, shake away excess, dip into egg and coat with bread crumb mixture. Heat oil in a fry pan, add meat, cook over medium heat until golden brown. Remove from pan and drain on absorbent kitchen paper.
Set aside and keep warm. Wipe pan clean, heat butter, stir in lemon juice and capers, cook until heated through. Serve lamb steaks with lemon sauce.
FISH BITES WITH EGG AND LEMON SAUCE
»500 g white fish fillets, chopped
»3/4 cup stale breadcrumbs
»2 cloves garlic, chopped
» ^1/2 tsp turmeric
»1 tbsp paprika
»1 tsp ground cumin
»1 tbsp chopped fresh coriander
»1 tsp grated fresh ginger
»1 egg, lightly beaten
»3 cups chicken stock
Egg and lemon sauce
Place fish, garlic, turmeric, paprika, cumin, coriander and ginger into blender jug, using speed 2/chop, blend until smooth. Remove from blender, shape into small balls approximately 2-5cm in diameter. Place stock into a large saucepan, bring to the boil. Reduce heat to simmer, cook fish balls in batches for 5-6 minutes or until cooked through. Remove from pan with a slotted spoon. Set aside and keep warm. Reserve 12 cup of hot stock. To make sauce, beat egg and egg yolk in a small bowl until thick and creamy, gradually add lemon juice and reserved stock. Pour egg mixture into a pan, add fish bites, cook gently until heated through. Serve immediately.
LAMB AND TABBOULEH PITA POCKETS
»500 g minced lamb
»2 eggs, lightly beaten
» 1 cup stale breadcrumbs
»1 onion, finely chopped
»2 tbsp chopped fresh mint
»½ tsp ground cinnamon
»½ tsp ground coriander
»½ tsp ground cumin
»1 small red chilli, finely chopped
»2 ttsp turmeric
»½ tsp garam masala
»6 pita pockets
»1/2 cup plain yogurt
Tabbouleh
»2/3 cup bulgur
»2 cups chopped fresh parsley
»2 tbsp chopped fresh mint
»1 tomato, seeded, chopped
»1 yellow capsicum, seeded and chopped
» ^1/4 cup oil
»2 tbsp lemon juice
»2 cloves garlic, chopped
Place lamb mince, eggs, breadcrumbs, onion, mint, cinnamon, coriander, cumin, chilli and garam masala in a bowl. Mix well to combine, form into small sausage shapes. Grill or barbecue until cooked through. To make tabbouleh, place bulgur in a bowl, cover with hot water, stand for 30 minutes. Drain and squeeze dry. Place bulgur, parsley, mint, tomato, capsicum, oil, lemon juice and garlic into blender jug, pulse until ingredients are finely chopped. Transfer mixture to a bowl, cover and refrigerate until required. Open pita pockets, using the point of a sharp knife. Place spoonful of tabbouleh into each pocket, top with lamb sausage then drizzle with yogurt. Serve immediately.
TIP: Bulgur is cracked wheat and is available at health food stores and delis.
SWEET TREATS
CHILLED CHEESECAKE
»250 g pkt plain sweet biscuits, broken
»125 g butter, melted
»250 g cream cheese, cubed and softened
»400 g can sweetened condensed milk
»1/2 cup cream
»1 tbsp grated lemon zest
»1/3 cup lemon juice
»1 punnet raspberries, washed
Place biscuits in blender. Use speed 2/chop until finely crushed. Add melted butter to blender jug and continue to blend until well combined. Press biscuit mixture over base and sides of a greased
20cm spring form pan. Chill until firm. Place cream cheese, condensed milk, cream, lemon zest and juice in blender jug. Use speed 3/blend, blend until smooth. Pour into prepared crumb crust, cover and refrigerate for at least 24 hours before serving. Place raspberries into blender jug and puree. If desired, sweeten raspberry puree with a little icing sugar. Serve with whipped cream and raspberry puree.
TIP: Cream cheese is best softened at room temperature.
MIXED BERRY CREPES
»2 × 60 g eggs
»250 ml milk
»1 tbsp butter, melted
»1 cup plain flour
»2 tsp caster sugar
» ^1/4 cup caster sugar, extra
» ^1/4 cup water
» 250 g mixed fresh berries (strawberries, raspberries, blueberries), washed and hulled
Place eggs, milk, butter, flour and caster sugar into blender jug. Use speed 3/blend, blend until smooth. Allow to stand for 1 hour. Heat a small non stick frypan or crepe pan. Pour 1/4 cup batter into pan, swirling to cover base. Cook on medium heat until underside is golden, approximately 1 minute. Remove from pan and place on a plate. Repeat with remaining batter, stacking crepes onto plate and interweaving with grease proof paper. Set aside. To make mixed berry sauce, heat extra sugar and water in a small saucepan until dissolved. Add mixed berries and cook until soft. Place cooked mixture in blender jug and blend until smooth, using speed 3/blend. Fold crepes into quarters and arrange in an ovenproof dish overlapping layers. Pour over sauce and bake in a preheated oven at 200°C for 10-15 minutes. Serve with scoops of vanilla ice cream.
TIP: Brandy can be added to mixed berry sauce if desired.
COCKTAILS
MARGARITA
»60 ml tequila
»60 ml cointreau
»80 ml lime juice
»12 ice cubes
Place tequila, contreau, lime juice and ice cubes into blender jug. Use speed 2/chop or ice crush setting, blend until well combined and ice is crushed. Serve in salt rimmed glasses.
SUNSET COOLER
»375 ml sauternes
»2 cups frozen pears, peeled, cored and diced
»1 cup frozen apricots, de-seeded and diced
»1 tbsp lemon juice
Place all ingredients in blender jug. Use speed 2/chop or ice crush setting, blend until smooth.
TIP: Place diced fruit in a plastic bag and freeze until firm.
FROZEN SANGRIA
»250 ml fruity red wine, chilled
»125 ml cranberry or red grape juice
»125 ml lemon sorbet
»80 ml orange concentrate
»½ cup fresh seedless grapes, frozen
»1 cup tinned plums, drained
Place all the ingredients in a blender jug. Use speed 2/chop or ice crush, blend until smooth.
PINA COLADA
»2 tbsp white rum
»2 tbsp coconut cream
»2 tsp sugar
»3/4 cup unsweetened pineapple juice
»10 ice cubes
Place all ingredients into blender jug. Use speed 2/chop or ice crush, blend until well combined and ice is crushed. Serve immediately.
NON ALCOHOLIC DRINKS
WILD THING
»1 cup orange juice, chilled
»1 punnet strawberries, hulled
»½ tsp grated orange rind
»1 tbsp oatmeal
» 2 large scoops wildberry vitari or another frozen fruit based yogurt
Place all ingredients into blender jug. Use speed 2/chop or ice crush, blend until smooth and thick. Pour into two glasses and serve immediately.
GOLDEN ORCHARD
»1 cup apple juice
»1/2 cup thick plain yogurt
»310 g mandarin segments, drained
»11/2 tbsp golden syrup
Place all ingredients into blender jug. Use speed 3/blend, blend until smooth and thick. Pour and serve immediately.
TIP: Try using natural yogurts with live acidophilus and bifidus cultures. They promote a healthy intestinal system and good digestion.
FRUIT COCKTAIL
»250 ml pineapple juice
»1 banana, peeled and chopped
» 1 orange, skin and pith removed then quartered
»250 ml soda water
»2 tbsp passionfruit pulp
Place all ingredients in blender jug except soda and passionfruit. Use speed 3/blend, blend until well combined. Stir in passionfruit pulp and soda water and serve immediately in cocktail glasses.
FRAPPÉS, SMOOTHIES AND MILKSHAKES
ROCKMELON AND PINEAPPLE FRAPPÉ
»1 cup chopped rockmelon
»1 cup canned pineapple pieces
»1 cup ice
»mint leaves, to serve
Place rockmelon, pineapple and ice into the blender jug. Use speed 2/chop or ice crush, blend until all ingredients are crushed and mixture is smooth and thick. Serve with chopped mint leaves.
RASPBERRY, ORANGE AND PASSION-FRUIT FRAPPÉ
» 1 punnet fresh raspberries or 2 cups frozen (allow to thaw until just soft)
»Juice of 2 oranges
»Pulp of 2 passionfruit
»2 cups ice
Place all ingredients into blender jug. Use speed 2/chop or ice crush, blend until smooth and well combined. If desired, add honey or sugar to sweeten.
PEPPERMINT TEA AND CITRUS WHIP
»250 ml strong brewed peppermint tea, chilled
»1 cup lemon or citrus sorbet
»1 ½ cups fresh orange segments, frozen
»1 cup fresh grapefruit segments, frozen
Place all ingredients into blender jug. Use speed 2/chop, blend until smooth. Serve immediately.
TIP: Place citrus segments in a plastic bag and freeze until firm.
BANANA SMOOTHIE
»2 bananas, peeled and chopped
»1 cup unflavoured yogurt
»250 ml milk
»1/3 cup honey
Place banana, yogurt, milk and honey into blender jug. Use Smoothie function, until well combined. Serve immediately.
PEANUT SMOOTHIE
»500 ml milk
»2 large scoops ice cream
»2 tbsp smooth peanut butter
»1 tbsp protein powder
Place all ingredients into blender jug. Use smoothie function until well combined. Serve immediately.
POWER SHAKE
»2 tbsp cocoa powder
»1 tsp instant coffee
»2 tbsp boiling water
»2 tbsp sugar
»1 egg
»1 tsp wheat germ
»500 ml milk
Dissolve cocoa and coffee in boiling water. Combine with sugar, egg, wheat germ and milk. Pour into blender jug and blend on speed 3/blend until smooth and frothy. Serve immediately.
MANGO SMOOTHIE
»2 mangoes, peeled and sliced
»1 ½ cups unflavoured yogurt
»250 ml orange juice
Place all ingredients into blender jug. Use smoothie function until well combined. Serve immediately.
STRAWBERRY AND PASSIONFRUIT MILK-SHAKE
»1 punnet strawberries, hulled
»Pulp of 4 passionfruit
»500 ml milk, chilled
»4 scoops passionfruit ice cream
»2 tbsp strawberry topping
Place strawberries in blender jug. Use speed 2/chop, puree until smooth. Add half passionfruit pulp, milk, and two ice cream scoops. Use speed 3/blend, blend until smooth and thick. Pour into two glasses then top with remaining ice cream and passionfruit pulp and strawberry topping. Serve immediately.
CHOCOLATE Malted SMOOTHIE WITH CARAMEL SAUCE
»500 ml milk, chilled
»3 tbsp malted milk powder
»4 scoops vanilla ice cream
»4 scoops chocolate ice cream
»4 tbsp caramel sauce
»chocolate curls for garnish (optional)
Place milk, malted milk powder and vanilla ice cream in blender jug. Use smoothie function until well combined. Divide between 2 glasses and add chocolate ice cream. Top with caramel sauce and garnish with chocolate curls.
TIP: Create chocolate curls to garnish your drinks by using a potato peeler.
TIP: Substitute the dairy products to suit you: i.e. replace milk or ice cream with soy or low fat variations.
TIP: Milkshakes and smoothies are a great way to get your kids to eat fruit.
MEALS FOR BABIES
APPLE AND CARROT
»1 apple, peeled and cored
»1 carrot, peeled and chopped
Cook apple and carrot in a microwave oven or steamer until tender. Cool. Place ingredients into blender jug with a little water and use speed 5/ puree until smooth.
GOLDEN PUREE
»½ small sweet potato, peeled and sliced
»3 baby squash, trimmed and halved
Cook sweet potato and baby squash in a microwave oven or steamer until tender. Cool. Place ingredients into blender jug with a little water and use speed 5/liquify until smooth.
AVOCADO AND PEAR
»½ ripe pear, peeled and halved
»½ avocado, stoned and peeled
Place ingredients into blender jug and use speed 5/liquify until smooth.
TIP: Serve immediately to avoid fruit discolouring.
APPLE AND BANANA CUSTARD
»½ small apple, cored
»1 small banana, peeled and diced
»½ cup prepared baby custard
Cook apple until just soft. Cool. Place cooled apple and banana into blender jug and use speed 5/liguify until smooth. Fold fruit into custard.
TIP: Serve immediately to avoid fruit discolouring.
MEALS FOR TODDLERS
FAST FISH
» 100 g tuna or other cooked flaked fish, bones removed
»1 zucchini, sliced and cooked
»½ potato, diced and cooked
Place cooled ingredients into blender jug and use speed 5/liquify until smooth. Serve chilled or warm.
CREAMY CHICKEN AND APRICOT
»5 dried apricots
»75 g boneless chicken, diced
»200 ml chicken stock or water
»1 tbsp natural yogurt
Combine all ingredients in a small saucepan, except yogurt. Bring to boil, reduce heat and simmer 10-12 minutes or until chicken is cooked. Cool slightly. Place cooled ingredients into blender jug and use speed 5/puree until smooth. Warm before serving.
BABY MUESLI
»1 tbsp rolled oats
»2 tbsp baby rice cereal
»1 tsp sultanas
»½ small apple, peeled, sliced
»4 tbsp prepared formula milk
Place rolled oats, rice cereal, sultanas and apples in blender jug. Use speed 2/chop until roughly chopped. Warm before serving.
$$ \begin{array}{l} \mathrm{tsp} = \text { teaspoon } \ t b s p = t a b l e s p o o n \ \end{array} $$
GASTROBACK GmbH
Gewerbestraße 20. 21279 Hollenstedt / Germany Telefon +49(0)4165/2225-0. Telefax +49(0)4165/2225-29 info@gastroback.de . www.gastroback.de



- DIPS, SAUCEN, DRESSING, CURRY-PASTEN
- GUACAMOLE
- Für 4 Personen
- TABLE OF CONTENTS
- DEAR CUSTOMER!
- KNOWING YOUR DESIGN MIXER ADVANCED PLUS
- IMPORTANT SAFEGUARDS
- Note:
- MOVABLE AND SHARP-EDGED PARTS - RISK OF INJURY
- IMPORTANT SAFEGUARDS FOR ALL ELECTRICAL APPLIANCES
- TECHNICAL SPECIFICATIONS
- FEATURES OF YOUR DESIGN MIXER ADVANCED PLUS
- Blender for Superior Requirements
- Unique Jug Design
- Patented Extra Wide Blades - KINETIX Blade System
- Continuous Blending Action
- Motor Overload Protection
- ASSEMBLING AND DISASSEMBLING THE APPLIANCE
- DISASSEMBLING THE BLENDER JUG
- OPERATING
- BEFORE FIRST USE
- TIPS FOR OPERATION
- SPEEDCONTROL
- DIRECTIONS FOR USE
- CARE AND CLEANING
- Cleaning the Blender Jug
- DISASSEMBLING THE BLENDER JUG AND REMOVING STUBBORN RESIDUES
- CLEANING THE MOTORBLOCK
- TROUBLE SHOOTING
- STORAGE
- NOTES FOR DISPOSAL
- INFORMATION AND SERVICE
- WARRANTY
- RECIPE IDEAS
- DIPS, SAUCES, DRESSINGS, CURRY PASTES
- PESTO DIP
- RICOTTA AND OLIVE DIP
- SMOKED SALMON PATÉ
- MAYONNAISE
- Mayonaise variations:
- AVOCADO DRESSING
- HERB DRESSING
- CREAMY ZUCCHINI SAUCE
- SPICY PEACH SAUCE
- SATAY SAUCE
- THAI GREEN CURRY PASTE
- MALAYSIAN CURRY PASTE
- STARTERS
- NACHOS
- Avocado topping
- CHEESE STICKS WITH PESTO
- Pesto
- PRAWN TOAST
- SOUPS
- WONTON SOUP
- SWEET CORN AND BACON SOUP
- PUMPKIN SOUP
- SWEET PEPPERED TOMATO SOUP
- SALADS
- PRAWN SALAD WITH RASPBERRY SAUCE
- Raspberry Sauce
- FRESH VEGETABLE SALAD WITH PEPITA DRESSING
- Pepita dressing
- EGG SALAD WITH FRESH HERB DRESSING
- Fresh Herb dressing
- MAIN MEALS
- THAI FISH CAKES
- ROSEMARY PARMESAN CRUSTED LAMB STEAKS
- FISH BITES WITH EGG AND LEMON SAUCE
- Egg and lemon sauce
- LAMB AND TABBOULEH PITA POCKETS
- Tabbouleh
- SWEET TREATS
- CHILLED CHEESECAKE
- MIXED BERRY CREPES
- COCKTAILS
- MARGARITA
- SUNSET COOLER
- FROZEN SANGRIA
- PINA COLADA
- NON ALCOHOLIC DRINKS
- WILD THING
- GOLDEN ORCHARD
- FRUIT COCKTAIL
- FRAPPÉS, SMOOTHIES AND MILKSHAKES
- ROCKMELON AND PINEAPPLE FRAPPÉ
- RASPBERRY, ORANGE AND PASSION-FRUIT FRAPPÉ
- PEPPERMINT TEA AND CITRUS WHIP
- BANANA SMOOTHIE
- PEANUT SMOOTHIE
- POWER SHAKE
- MANGO SMOOTHIE
- STRAWBERRY AND PASSIONFRUIT MILK-SHAKE
- CHOCOLATE Malted SMOOTHIE WITH CARAMEL SAUCE
- MEALS FOR BABIES
- APPLE AND CARROT
- GOLDEN PUREE
- AVOCADO AND PEAR
- APPLE AND BANANA CUSTARD
- MEALS FOR TODDLERS
- FAST FISH
- CREAMY CHICKEN AND APRICOT
- BABY MUESLI
- GASTROBACK GmbH
Brand : Gastroback
Model : Advanced Plus 41002
Category : Blender