
HT11 - Screen HANNSPREE - Free user manual and instructions
Find the device manual for free HT11 HANNSPREE in PDF.


| Product Type | LED Monitor |
| Screen Size | 21.5 inches |
| Resolution | 1920 x 1080 (Full HD) |
| Aspect Ratio | 16:9 |
| Refresh Rate | 60 Hz |
| Panel Type | TN (Twisted Nematic) |
| Brightness | 250 cd/m² |
| Contrast Ratio | 1000:1 (typical) |
| Viewing Angles | 170° horizontal / 160° vertical |
| Response Time | 5 ms |
| Inputs | VGA, HDMI, DVI (optional) |
| Power Consumption | 25 W (typical) / < 0.5 W (standby) |
| Dimensions (with stand) | 20.1 x 7.1 x 14.7 inches |
| Weight (with stand) | 5.5 lbs (2.5 kg) |
| VESA Mount | 100 x 100 mm |
| Speakers | 2 x 1W built-in |
| Adjustability | Tilt only (-5° to +15°) |
| Cleaning | Wipe with dry soft cloth; use mild cleaner if needed |
| Safety | Do not open the casing; risk of electric shock |
| Warranty | 1 year limited |
Frequently Asked Questions - HT11 HANNSPREE
User questions about HT11 HANNSPREE
0 question about this device. Answer the ones you know or ask your own.
Ask a new question about this device
Download the instructions for your Screen in PDF format for free! Find your manual HT11 - HANNSPREE and take your electronic device back in hand. On this page are published all the documents necessary for the use of your device. HT11 by HANNSPREE.
USER MANUAL HT11 HANNSPREE
Regulatory Information 3
Description of Warning Symbols 3
Safety Notices....4
Preface 6
Warranty and Service 6
- Getting Started ....8
1.1 Package Contents 8
1.2 Introducing the TV 9
1.2.1 Features 9
1.3 Control Panel 10
1.4 Input and Output Jacks....11
1.5 Remote Control 12
- Setting up your TV 16
2.1 Basic Connections....16
2.1.1 Power Connection 16
2.1.2 Connecting an Antenna or Cable TV....16
2.2 Connecting External Devices 17
2.2.1 Connecting External Earphones 17
2.2.2 Connecting to AV Devices....18
2.2.3 Connecting a VCR/ STB/ DVD Player Using Component Video....19
2.2.4 Connecting a VCR/ STB/ DVD Player Using Composite Video 19
2.2.5 Connecting a Decoder or VCR/ STB/ DVD Player Using SCART 20
2.2.6 Connecting a PC 20
2.2.7 Connecting HDMI 21
2.3 Using the TV 22
2.3.1 Turning the TV On and Off 22
2.3.2 Switching Source Signals....22
2.3.3 Performing an Automatic Channel Search....22
2.3.4 Selecting Programs 22
2.3.5 Adjusting the Volume....22
- Adjusting On-Screen Display (OSD) Settings 23
3.1 OSD Setting Menus 24
3.2 Adjusting Picture Settings 24
HANNSpree
1
natural_image
Pure geometric crosshair symbols without any text or labels

English
Table of Contents
3.3 Adjusting Sound Settings 25
3.4 Adjusting Channel Settings (Analog TV) 25
3.5 Adjusting DTV Settings (Digital TV)....27
3.6 Adjusting PC Setup Settings 29
3.7 Adjusting Setup Settings 29
- Troubleshooting .... 31
- Specifications 32
5.1 PC Mode Support Timing 33
5.2 HDMI Mode Support Timing 33




2 HANNSpree




Regulatory Information
CE Conformity Statement
This device is in conformity with the requirements of EU Council Directive 2004/108/EC on the approximation of the laws of the Member States relating to electromagnetic compatibility and Directive 2006/95/EC on the harmonization of the laws of Member States relating to electrical equipment for use within certain voltage limits. Hannspree cannot accept responsibility for any failure to satisfy the requirements resulting from a non-recommended modification of the device.

Description of Warning Symbols

CAUTION
RISK OF ELECTRIC SHOCK DO NOT OPEN

WARNING

This symbol is used to alert users to pay attention to important descriptions regarding usage, maintenance (repair), and additional important information related to this TV.
CAUTION

This symbol is used to alert users to the risk of electric shocks due to dangerous and uninsulated components.
HANNSpree
English
Safety Notices

Installation Safety Notes
Location
Avoid allowing the TV to get prolonged exposure to sunlight or other strong sources of heat. Leave sufficient distance between the TV and the wall to provide enough space for the emission of heat.

WARNING
To reduce the risk of fire or electric shock, do not expose this apparatus to rain or moisture.
Apparatus shall not be exposed to dripping or splashing and no objects filled with liquids, such as vases, shall be placed on the apparatus.

CAUTION
These servicing instructions are for use by qualified service personnel only. To reduce the risk of electric shock, do not perform any servicing other than that contained in the operating instructions unless you are qualified to do so.
Notes:
- The LCD TV is for entertainment use only and visual display tasks are excluded.
- This device uses a VGA connector to connect to a PC. To reduce the influence of main frequency on the source signal, use a VGA monitor cable with ferrite shield.
4 HANNSpree





Personal Safety
- To avoid overloading the power supply, never plug too many electrical devices into an outlet, power strip, or extension cable.
- Dangerous high-voltage electric power components are located inside the TV. To avoid electric shock, do not disassemble the casing.
- Do not place or drop metals, small objects, or flammable materials into the vent of the TV.
- If the TV is dropped, falls down, or is otherwise damaged, unplug the power cord immediately and contact an authorized service technician.
- If any fluid is sprayed or dropped into the TV, contact an authorized service technician.
- The screen of the TV is made of glass. Avoid hitting or scraping it. If the screen is broken, do not touch the broken glass.
- Do not allow children to use the TV unattended.
- Be careful when disconnecting the power plug. Hold the plug. Do not attempt to disconnect the plug by pulling on the power cord.
Installation
- Do not place the TV in locations where there is excessive steam or dust.
- Avoid blocking the TV's vents, do not place the TV on a bed, sofa, carpet, or in a sealed cabinet.
- Install the outdoor antenna away from power transmission lines to avoid possible danger.








English
Preface
Thank you for purchasing a Hannspree Liquid Crystal Display Television (LCD TV). Your new TV will allow you to enjoy superior audio and video while enriching your lifestyle with advanced technology.
Please carefully read this manual in its entirety before setting up, using or operating your TV. To ensure the safe and correct installation and operations of the TV, it is important that the safety and operation instructions in this manual are followed.
This instruction manual is designed to assist you in setting up and using the TV. The information in this manual has been carefully checked for accuracy; however, no guarantee is given to the correctness of the contents. The information in this manual is subject to change without notice.

To the extent allowed by applicable law, Hannspree, Inc. ("Hannspree") shall not be liable for direct, indirect, special, exemplary, incidental or consequential damages arising from any defect or omission in this manual, even if advised of the possibility of such damages in advance.


Warranty and Service
For complete warranty service information, please refer to the "Warranty Card" enclosed with your TV.


HANNSpree




Copyright
© Copyright 2008 Hannspree, Inc.
All rights reserved. This manual is protected by copyright and distributed under licenses restricting its use, copying and distribution. No part of this manual may be reproduced in any form by any means without the prior written authorization of Hannspree. The TV described in this manual may include copyrighted software of Hannspree (or other third parties). Hannspree (or other third parties) preserves the exclusive rights for copyrighted software, such as the right to distribute or reproduce the copyrighted software. Accordingly, and to the extent allowed by applicable law, any copyrighted software contained in the product described herein shall not be distributed, modified, reverse engineered, or reproduced in any manner without the prior written authorization of Hannspree (or of other third parties).

The Hannspree logos presented herein are trademarks of Hannspree. All other product names, trademarks or logos mentioned herein are used for identification purpose only, and may be the trademarks or registered trademarks of their respective owners.

The purchase of the product described herein shall not be deemed to grant, either directly or by implication, estoppel or otherwise, any license under the copyrights, patents, patent applications or trademarks of Hannspree, except for the normal, non-exclusive use that arises by operation of law in the sale of a product.
Trademark Notice
HDMI
Hannspree products incorporate High-Definition Multimedia Interface (HDMI™) technology.
HDMI, the HDMI logo and High-Definition Multimedia Interface are trademarks or registered trademarks of HDMI Licensing LLC.



HANNSpree
7




English
1
Getting Started
1.1 Package Contents
Make sure the following components are included in the box. Please contact Hannspree Customer Service immediately if anything is missing or damaged.
• TV
- User's manual
- Quick start guide
- Warranty card
• Power cord
- Remote control and batteries


ME61

According to WEEE regulation, this TV can't be handled as normal trash in Europe when it is out of usage. Please refer to the recycle information from our website to handle it.

HANNSpree






1.2 Introducing the TV
You can watch PAL/ SECAM broadcast, cable or digital television channels, and easily connect a VCR, STB or DVD player to the standard CVBS, S-Video and SCART input ports (location of these ports depends on model). You can also use the TV as a monitor for your PC by connecting it through the D-sub port.
Convenient control buttons located on the TV and a handy remote control let you change channels, adjust the volume, and change display settings through an easy-to-use on-screen display menu system. The built-in stereo speakers provide full rich sound and a convenient audio output port lets you connect to an external audio system or earphones.
1.2.1 Features
• Built-in TV tuner
• Audio/ Video support:
- PC audio input
- YPbPr/CVBS video inputs
- SCART input/output
- 3.5 mm stereo earphone output
- VGA input
- HDMI input
- One set of R/ L audio inputs for YPbPr/CVBS
- On-Screen Display (OSD) menu system
• Teletext (TTX) 1.5v. 252 pages
• Built-in stereo speakers
- 3D Comb Filter
- Noise Reduction
Note:
The supporting devices mentioned in this manual may vary on different models. For more information, please refer to the manufacturer's user manual or the Quick Start Guide of your TV model.




HANNSpree
9




1.3 Control Panel
| Description ICON Function | ||
| Power Press to turn the on or off. | ||
| Source | INPUT | Press to display the input source list. |
| Menu MENU Press to open the OSD menu. | ||
| Program select P ▲ | Press to increase the program number or move upward to the previous item on the OSD menu. | |
| Program select P ▼ | Press to decrease the program number or move downward to the next item on the OSD menu. | |
| Volume adjust VOL + | Press to increase the volume or move to the right on the OSD menu. | |
| Volume adjust VOL - | Press to decrease the volume or move to the left on the OSD menu. | |
| Remote IR sensor | Receive incoming remote control commands. | |
| Power/ Standby indicator | Indicate power or standby status. | |
| Speakers Deliver high-quality sounds. | ||


1.4 Input and Output Jacks
| Description Connector Function | ||
| Cable/Antenna Connect to an antenna or cable TV. | ||
| Earphone Output | EAR PHONE | Connect to earphones or external speakers with built-in amplifier. |
| Audio for PC Input | PC LINE IN | Connect to a PC's line/ audio out port. |
| Audio Input | L AUDIO R | Connect to an external device, such as a VCR, STB, or a DVD player; YPbPr & CVBS shares one R/L |
| Composite Video Input | V | Connect to an external device, such as a VCR, STB, or a DVD player. |
| Component Video Inputs | Y PR Pr | Connect to an external device, such as a VCR, STB, or a DVD player. |
| SCART Input/Output | SCART IN / OUT | Connect to an external device, such as a VCR, STB, or a DVD player with composite/ RGB output. Audio Input (R/L) Video Input (RGB/V); S-Video Input Audio Output (R/L) Video Output (V) |
| VGA (PC) Input Connect to a PC's VGA port. | ||
| Service | SERVICE | RS-232 port for service purpose only. Not available for users. |
| HDMI Input | HDMI | Connect to devices such as a DVD player or set-top box. |
| Service | SERVICE | RS-232 port for service purpose only. Not available for users. |
| HDMI Input | HDMI | Connect to devices such as a DVD player or set-top box. |
Description Connector Function
Power Connector

AC IN
Connect to the provided power cord.
1.5 Remote Control
| Description Icon Function | ||
| Power Press to turn the TV on or off. | ||
| Source INPUT Press to display the input source list. | ||
| Keypad | 1 2 34 5 67 8 90 | Use to select a program directly. Press 0-9 to enter the program numbers (press 1 and 0 for program 10). |
| Pro.List Pro.LIST | Press to display the features contained.(For DTV only) | |
| Last | LAST | Press to return to the last channel selected. |
| Information INFO | Press to display current channel/program information. | |
| Menu MENU | Press to turn the on-screen display(OSD) menu on/off; confirm the setting. | |
| Arrows | Press up, down, left or right to scroll through the on-screen display menus. | |
| OK OK | Press to confirm the selection or setting and return to the previous menu when using OSD menus. | |
12
HANNSpree
| Description Icon Function | ||
| Electronic Program Guide | EPG | Press to display program information. (For DTV only) |
| Teletext mode | TEXT | Press to switch to the teletext mode. |
| Volume adjust | VOL+VOL - | Press VOL + to increase audio volume. Press VOL - to decrease audio volume. |
| Mute | MUTE | Press to eliminate sound. Press it again or press the volume adjust buttons to restore sound. |
| Dual sound | I-II | Press to change the multi sound selection of the TV channel. |
| Select program | P▲P▼ | Press P▲ to increase the program number. Press P▼ to decrease the program number. |
| Index INDEX | Press to display a table of the available teletext subjects. | |
| Mix MIX | Press to display the text over the program on the screen. | |
| Subpage SUB.PAGE | Press to go to the sub page. (Programmable in the teletext mode only) | |
| Switch size SIZE | Press to adjust screen size. (Programmable in the teletext mode only) | |
| Hold HOLD | Press to inactivate automatic page change which only happens when more than one teletext page exists. (Programmable in the teletext mode only) | |
| Reveal REVEAL | Press to display the hidden information, such as solutions to puzzles. (Programmable in the teletext mode only) | |
| Subtitle SUB.TITLE | Press to display the subtitles while watching DTV. | |
| Favorite channel FAV. | Press to select or store your favorite channels. (For DTV only) | |
| TV/Radio TV/RADIO | Press to select TV or radio source mode. (For DTV only) | |
| Aspect ratio ASPECT | Press to adjust the viewing angle with aspect ratio Auto, 16:9, or 4:3. (Not for PC mode) | |
| Picture mode PIC | Press to select Standard/ Vivid/ Soft/User mode. | |
| Sleep timer SLEEP | Press repeatedly to set the sleep timer (15, 30, 45, or 60 minutes).A countdown timer is displayed on the middle of the screen during the last minute to alert the user.Cancel the timer by pressing the button until the displayed time disappears. | |

Note:
- For best results, use the remote control within a proper distance from the front of the TV. Do not exceed an angle of 30 degrees when pointing at TV.
- The operational distance may be shortened when the signal sensor is directly exposed to strong light.
- Aim the transmitter on the remote control at the signal sensor and ensure that there are no obstacles between them.

CAUTION
- If the remote control is not used for a long period, remove the batteries and store them properly.
- Handle damaged or leaking batteries carefully, and wash hands with soap if they come in contact with leaked chemical fluids.
- If your remote control has two batteries, do not mix new and old batteries, or the life of the new batteries will be shortened. Chemical fluids may leak from the old batteries.
- Danger of explosion if battery is incorrectly replaced. Replace only with the same or equivalent type recommended by the equipment manufacturer. Discard used batteries according to manufacturer's instructions.
- Refer to your local recycling or waste disposal rules and contact a local waste disposal vendor to dispose of used batteries.
- The remote control cover may have a magnet in it, so do not place magnetic sensitive items such as watches, credit cards, or flash media close to the cover.
- Do not use force when pulling the remote control cover open; you may damage the hinge.





English
2
Setting up your TV
2.1 Basic Connections
2.1.1 Power Connection
1 Connect the power cord to the AC IN input jack on the rear of the TV.
2 Insert the plug at the other end of the power cord into a power outlet.
2.1.2 Connecting an Antenna or Cable TV
Connect one end of the VHF/UHF (Antenna) or CATV cable to TV/DTV jack on the rear of the TV.

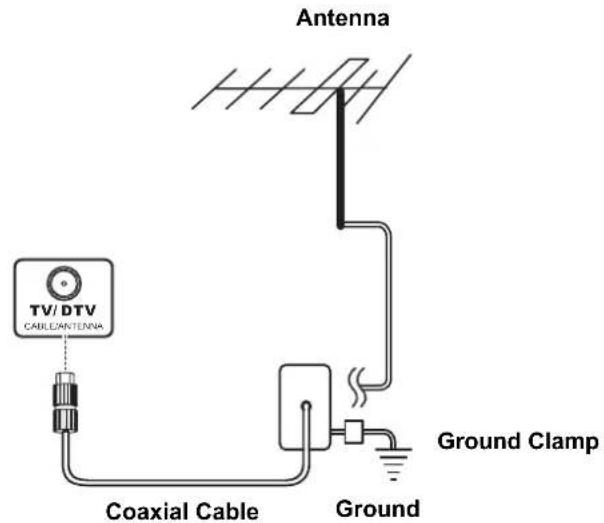
Note:
- Images are for illustration only and may vary by model or region.
- If you cannot receive channels after connecting to an antenna or cable TV line, try scanning for channels.
16
HANNSpree





2.2 Connecting External Devices
Connect external devices such as VCRs, STBs, DVD players, video game consoles, earphones, or a PC to the TV using the appropriate ports on the rear of the TV.
2.2.1 Connecting External Earphones
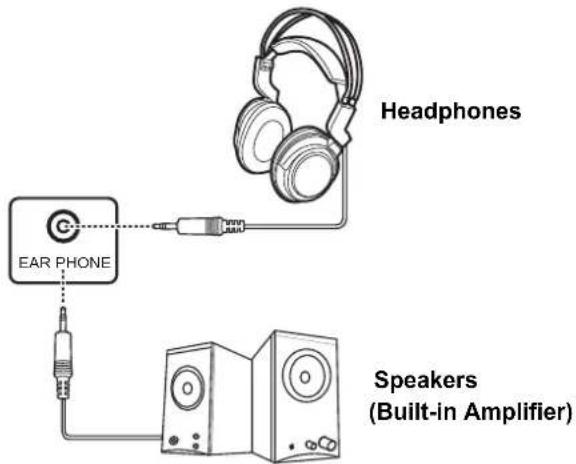


Note:
- External speakers or headphones are not included with the TV.
- The internal TV speakers will not output sound when earphones are plugged in.
- Use external speakers with built-in amplifiers only.
- Only one external device for sound can be connected at a time.



HANNSpree
17




English
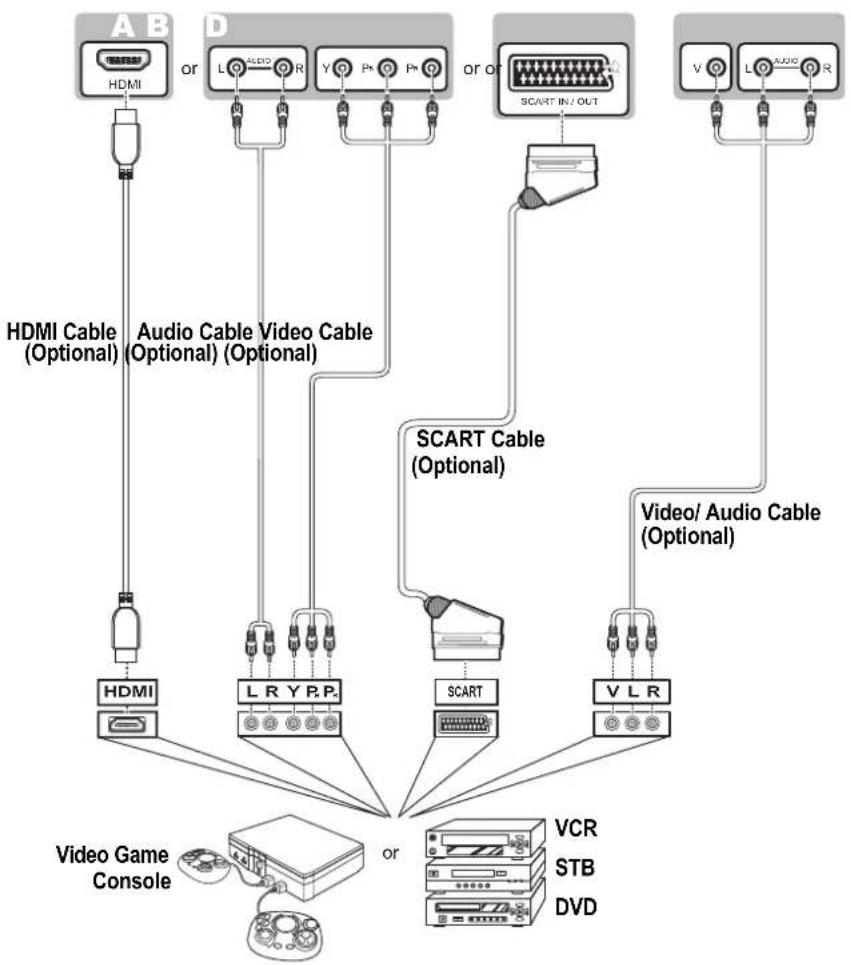
2.2.2 Connecting to AV Devices
The following diagram illustrates how to connect the AV devices to your TV via HDMI (A), Component (B), SCART (C), and Composite (D) ports.

flowchart
graph TD
    A["AB HDMI"] --> B["HDMI"]
    C["D OR L AUDIO R Y Px Px"] --> D["SCART Cable (Optional)"]
    E["OR OT SCART IN/OUT"] --> F["Video/ Audio Cable (Optional)"]
    G["V L L AUDIO R"] --> H["SCART"]
    I["HDMI"] --> J["L R Y R P"]
    K["Video Game Console"] --> L["or"]
    M["VCR STB DVD"] --> N["SCART"]


18 HANNSpree





2.2.3 Connecting a VCR/ STB/ DVD Player Using Component Video
Connect the TV to a VCR/ STB/ DVD player using the component video inputs.
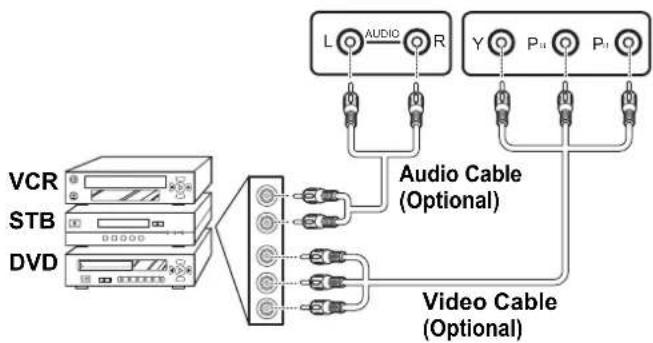
flowchart
graph TD
    A["VCR"] --> B["STB"]
    A --> C["DVD"]
    B --> D["Audio Cable (Optional)"]
    C --> D
    D --> E["Video Cable (Optional)"]
    F["L"] --> G["AUDIO R"]
    H["Y"] --> I["P1 P2"]
    J[" "] --> K[" "]
    L[" "] --> M[" "]
    N[" "] --> O[" "]

2.2.4 Connecting a VCR/ STB/ DVD Player Using Composite Video
Connect the TV to a VCR/ STB/ DVD player using the composite video input.
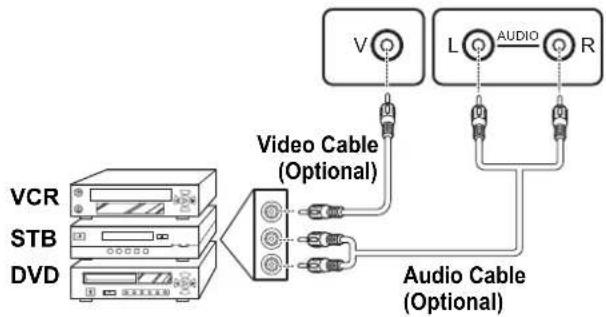
flowchart
graph LR
    A["VCR"] --> B["Video Cable (Optional)"]
    C["STB"] --> B
    D["DVD"] --> B
    B --> E["Audio Cable (Optional)"]
    F["L"] --> G["Audio Cable (Optional)"]
    H["R"] --> G
    I["V"] --> G






English
2.2.5 Connecting a Decoder or VCR/ STB/ DVD Player Using SCART
Connect the TV to a decoder or VCR/ STB/ DVD player using the SCART input. You can choose to use a SCART cable or adapter for the connection depending on the ports available on your decoder or player.
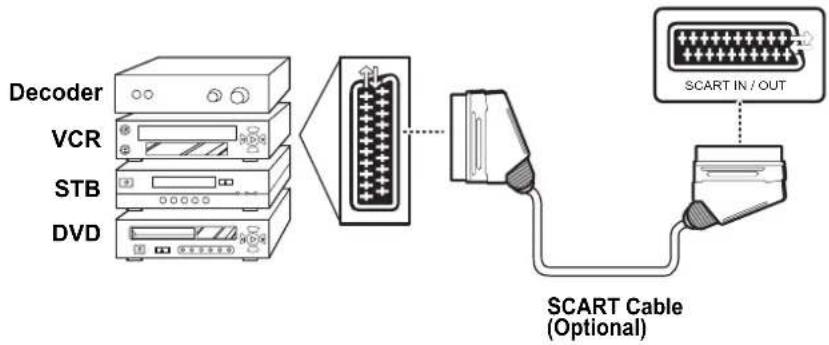
flowchart
graph LR
    A["Decoder"] --> B["VCR"]
    B --> C["STB"]
    C --> D["DVD"]
    D --> E["SCART Cable (Optional)"]
    E --> F["SCART IN / OUT"]
    F --> E
2.2.6 Connecting a PC
Connect the TV to your PC to use it as the monitor using the VGA port as shown.
1 Connect the VGA port of the TV to the VGA output of the PC.
2 Connect the line out port of the PC to the PC LINE IN port of your TV to listen to the audio from the PC.
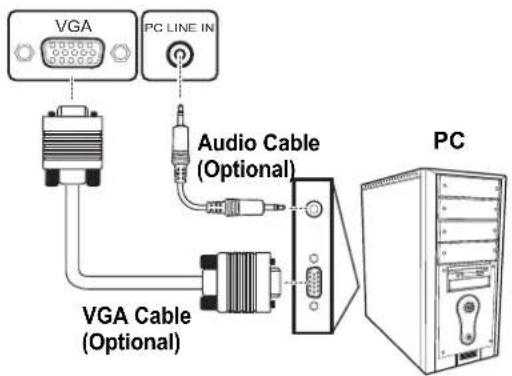
20
HANNSpree



natural_image
Pure geometric diagram with intersecting lines and circular shapes, no text or symbols present

19EU.book Page 21 Thursday, April 10, 2008 5:31 PM


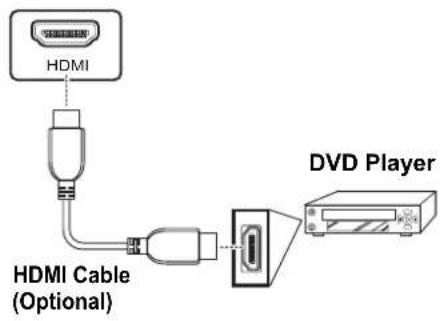
2.2.7 Connecting HDMI
HDMI (High Definition Multimedia Interface) assures that the best video signal is always sent from source to the TV.
Refer to the following illustration to connect an HDMI device to the TV.
English




HANNSpree
21




English
2.3 Using the TV
2.3.1 Turning the TV On and Off
1 Press ⏻ on the control panel or remote control. The power LED indicator on the front of the TV changes from amber to blue, indicating that the power is on.
2 Press again. The power LED changes from blue to amber, indicating that the TV is off. Wait 3-5 seconds before you do anything after the shut down.
2.3.2 Switching Source Signals
Press INPUT on the control panel or remote control to select the incoming source signal to set TV source for channel search. Press OK to confirm.
2.3.3 Performing an Automatic Channel Search
Before using the TV to view programs, you need to activate the automatic channel search first.
1 Press MENU on the control panel or remote control, then select to enter the Channel or DTV menu.
2 Select an appropriate area.
3 Select the Auto Search item to run the channel search.
2.3.4 Selecting Programs
- Press P▲ on the control panel or remote control to increase the program number. Press P▼ on the control panel or remote control to decrease the program number.
- Enter the specific program number by pressing the number buttons on the remote control.
2.3.5 Adjusting the Volume
1 Press VOL+ to increase the volume. Press VOL- to decrease the volume.
2 Press ✗ to eliminate sound, and press ✗ again or press the volume buttons to restore the original volume.
22 HANNSpree








3 Adjusting On-Screen Display (OSD) Settings
The On-Screen Display (OSD) menu system provides a quick and simple method to adjust the TV settings. The OSD menu can be accessed through the buttons either on the control panel or the remote control.
Before going to details of each OSD item, you may get acquainted with the placement of the OSD system:.
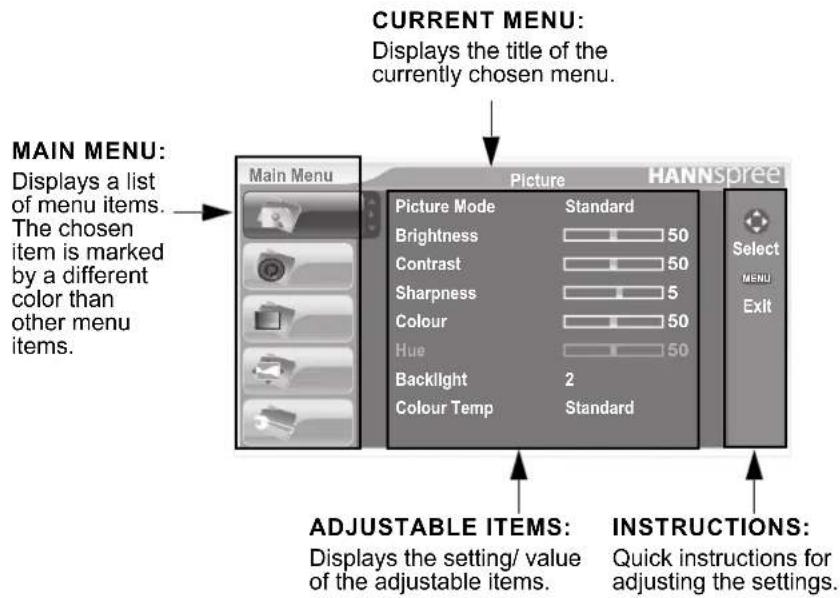
| Function TV Control Panel Remote Control | |
| OSD Menu MENU MENU | |
| Up P ▲ | Arrow ^ |
| Down P ▼ | Arrow √ |
| Select/ Increase VOL + | Arrow > |
| Select/ Decrease VOL - | Arrow < |
| Return MENU MENU | |
English
3.1 OSD Setting Menus
Follow the instructions indicated on the right side of the OSD Function Menu. Press P▲ / P▼ on the control panel or ▲ / ▼ arrow keys to scroll through the menus, VOL + on the control panel or the > arrow key to select an item, or MENU to exit the OSD menu.
The following menus can be set by different adjustment methods.
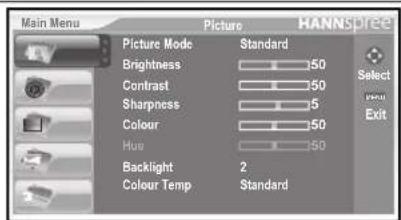
3.2 Adjusting Picture Settings
1 Press MENU to enter the OSD Main Menu screen.
2 Press to select Picture.
3 Press to enter the Picture Menu.
4 Press / to select an item.
5 Press or to change the mode setting or scales.
6 Press MENU to select the changed setting and return to the Picture Menu.
7 Press MENU to exit the Picture menu.
8 The Picture menu can be used to adjust the Picture Mode, Brightness, Contrast, Sharpness, Colour, Hue, Backlight, and Colour Temp settings.
• The Picture Mode can be set to Standard, Vivid, Soft, or User.
• The Colour Temp can be set to Standard, Cool, or Warm.
Note:
The items available on the OSD may vary depending on the input signal source.
24
HANNSpree





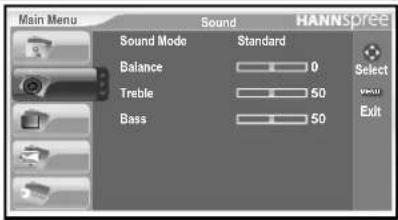
3.3 Adjusting Sound Settings
1 Press MENU to enter the OSD Main Menu screen.
2 Press to select Sound.
3 Press to enter the Sound Menu.
4 Press ∧ / ∨ to select an item.
5 Press or to change the mode setting or scales.
6 Press MENU to select the changed setting and return to the Sound Menu.
7 Press MENU to exit the Sound menu.
8 The Sound menu can be used to adjust the Sound Mode, Balance, Treble, and Bass settings.
• The Sound Mode can be set to Standard, Music, Movie, Speech, or User.
Note:
The items available on the OSD may vary depending on the input signal source.
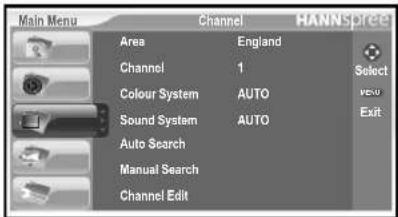
3.4 Adjusting Channel Settings (Analog TV)
1 Press MENU to enter the OSD Main Menu screen.
2 Press to select Channel.
3 Press to enter the Channel Menu.
4 Press ∧ / ∨ to select an item.
5 Press o< to change the mode setting or scales.
6 Press MENU to select the changed setting and return to the Channel Menu.
7 Press MENU to exit the Channel menu.
8 The Channel menu includes the following options: Area, Channel, Colour System, Sound System, Auto Search, Manual Search, and Channel Edit settings.
English
- The area can be set to England, Italy, France, Spain, Netherlands, Portugal, Turkey, Poland, Russia, and Germany*.
• The Colour System can be set to AUTO, PAL, or SECAM.
• The Sound System can be set to AUTO, BG, DK, I, L, or L'. - Select Auto Search to activate the automatic TV channel search.
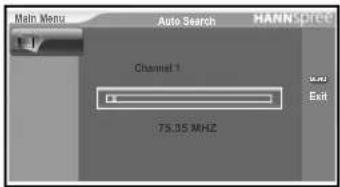
- Press to enter the Channel Edit item, the Channel Editor allows you to edit the detailed items including Channel, Name, Fine Tune, and Skip of each channel.
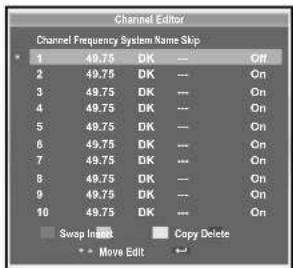
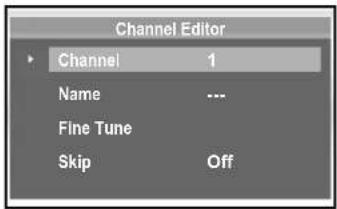
Notes:
- *If the desired area is not shown on the list, the suggested default is Germany.
- The Channel settings are available when the signal is set to TV source.
3.5 Adjusting DTV Settings (Digital TV)
1 Press MENU to enter the OSD Main Menu screen.
2 Press to select DTV.
3 Press to enter the DTV Menu.
4 Press / No select an item.
5 Press or to change the mode setting or scales.
6 Press MENU to select the changed setting and return to the DTV Menu.
7 Press MENU to exit the DTV menu.
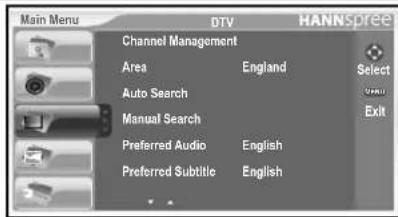
8 The DTV menu includes the following options: Area, Auto Search, Manual Search, Preferred Audio, Preferred Subtitle, Parental Lock, Parental Rating, and Time Settings.
- Press to enter the Channel Management item, the DTV Channel Manager allows you to organize, sort, group, or delete TV/ Radio channels.
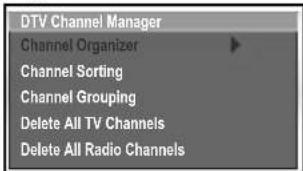
- The area can be set to England, Italy, France, Spain, Netherlands, Portugal, Turkey, Poland, Russia, and Germany* (default).
- Select Auto Search to activate the automatic TV/ Radio channel search.
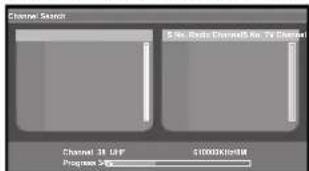
Notes:
- It is recommended to use the TV in the listed areas.
- *The recommend default is Germany if your area is not listed; channel reception is not guaranteed if used outside the listed areas.




English
- Select Manual Search to search the TV/ Radio channels manually.
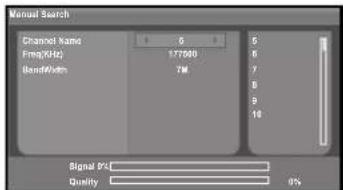
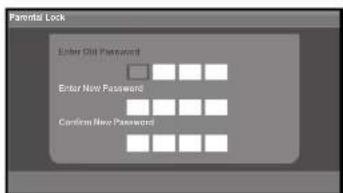
- Select Parental Lock to change the password. The old password is set to 0000 by default.
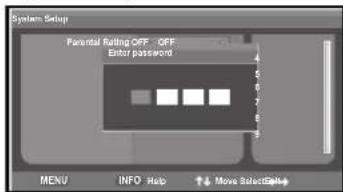
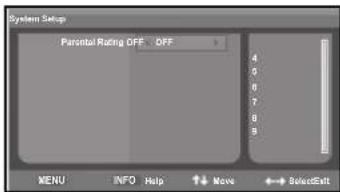
- Select Parental Rating to set the channel rate. Input the default password 0000 to enter the System Setup window.
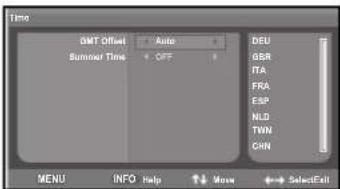
- Select Time to configure GMT Offset and Summer Time settings.
Note:
The DTV settings are available when the signal is set to DTV source.



28
HANNSpree




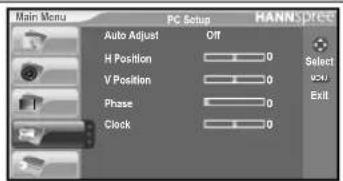
3.6 Adjusting PC Setup Settings
1 Press MENU to enter the OSD Main Menu screen.
2 Press to select PC Setup.
3 Press to enter the PC Setup Menu.
4 Press / to select an item.
5 Press or to change the mode setting or scales.
6 Press MENU to select the changed setting and return to the PC Setup Menu.
7 Press MENU to exit the PC Setup menu.
8 The PC Setup menu can be used to adjust the Auto Adjust, H Position, V Position, Phase, and Clock settings.
Note:
The PC Setup settings are available when the signal is set to PC source.
3.7 Adjusting Setup Settings
1 Press MENU to enter the OSD Main Menu screen.
2 Press to select Setup.
3 Press to enter the Setup Menu.
4 Press / to select an item.
5 Press or to change the mode setting or scales.
6 Press MENU to select the changed setting and return to the Setup Menu.
7 Press MENU to exit the Setup menu.
English
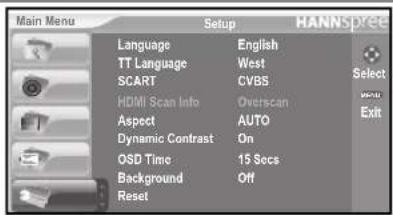
8 The Setup menu can be used to adjust the Language, TT Language, SCART, HDMI Scan Info, Aspect, Dynamic Contrast, OSD Time, Background, Reset settings.
• The available nine languages are English, Italian, Spanish, Portuguese, French, German, Russian, Polish, and Dutch.
• The available TT languages are West, East, Russian, Arabic, and Farsi.
- The SCART sockets selection can be set to AUTO, CVBS, RGB, or S-VIDEO.
- When connecting to an HDMI device, the TV will be automatically set to display at the full screen size.
• The Aspect ratio can be set to AUTO, 4:3, or 16:9. (Not for PC mode)
• The Dynamic Contrast can be set to On or Off.
• The OSD Time can be set to 5, 10, 15, 20, 25, or 30 Secs.
• The Background can be set to Off or blue. (Only for TV)
- Select Reset to restore to the default settings.

4
Troubleshooting
Situation Solution
| No picture and sound. | Connect the power cord properly.Check if the power LED is on or not.Press power on the control panel or remote control.Press source to cycle through connected video sources.Press program up or program down to switch to other TV stations.Make sure all cables are connected properly. |
| No picture, or poor picture, sound is OK. | Check the antenna and cable connections.Adjust the brightness in the OSD menus. |
| Picture is not in color. • Adjust the saturation in the OSD menus. | |
| Picture is OK, no sound. | Make sure the source device is functioning properly.Make sure the audio cable is connected securely.Turn the mute off.Press volume up on the control panel or remote control. |
| One of the speakers has no sound. | Adjust the balance in the Sound OSD menu. |
| Cannot receive some TV channels using cable TV. | Use the Auto Search function in the OSD menu. |
| Want to reset TV settings. • Use the Reset function in the Setup OSD menu. | |
| Cannot operate menus. | If OSD items are colored in gray, the system is in a state such that those settings are not available. |
| Screen image turns over. • Make sure the video signal cable is connected properly. | |
| Snow appears on the screen. | Adjust the location of the antenna, placing it far from roads or sources of interference.Check the antenna and the video signal line connections. |
| Blurred or overlapped images. | Readjust the sharpness setting.Choose programs with high quality signals.Adjust the direction of the antenna or change the video signal cable. |
| Remote control doesn't work. | Make sure the battery is inserted correctly.Replace the battery with a new one.Make sure the TV power cord is plugged in.Make sure the path between the remote control and the sensor is clear.Try operating the remote control at a closer distance to the TV. |
5
Specifications
| LCD Panel Size 19 inch TFT | ||
| Screen Format 5:4 | ||
| Panel Resolution 1280 (H) x 1024 (V) | ||
| TV System ATV: PAL, SECAM DTV: DVB-T | ||
| Video System | AV (Pal/ Secam/ NTSC) | |
| SCART (RGB/ CVBS/ S-Video) | ||
| HDMI | ||
| HDTV (YPBPR) | ||
| PC (VGA) | ||
| Audio System | AV / HDTV: (RCA x 2) R/L in | |
| SCART (R/L In; R/L Out) | ||
| HDMI: HDMI | ||
| PC Audio In: Phone jack (Green) | ||
| Audio out: Earphone jack (Pink) | ||
| Built-in Stereo Amplifier Output | 3W x 2 | |
| Power Consumption Standby mode under 1W, Power on 55W (Typical) | ||
| Power Supply AC Input: 100V~240V / 50Hz ~ 60Hz | ||
| Weight 4.5kg (Max.) | ||
5.1 PC Mode Support Timing
| Mode Resolution | Horizontal Frequency (kHz) | Vertical Frequency (Hz) | Pixel Frequency (MHz) | |
| VGA 60 | 640x480 @60 | 31.469 | 59.941 | 25.175 |
| SVGA 60 80 | 0x600 @60 37.879 | 60.317 40.000 | ||
| XGA 60 | 1024x768 @60 | 48.363 | 60.004 | 65.000 |
| SXGA 60 12 | 80x1024 @60 63.98 | 1 60.020 108.000 | ||
5.2 HDMI Mode Support Timing
Your TV supports video timing in the following resolutions:
• 480i
• 480p
• 576i
• 576p
• 720p
• 1080i
• 1080p
MEMO

- English
- Table of Contents
- HANNSpree
- Regulatory Information
- CE Conformity Statement
- Description of Warning Symbols
- CAUTION
- WARNING
- Safety Notices
- Installation Safety Notes
- Location
- Notes:
- HANNSpree
- Personal Safety
- Installation
- Preface
- Warranty and Service
- Copyright
- Trademark Notice
- HDMI
- 1
- Getting Started
- Package Contents
- Introducing the TV
- Features
- Note:
- Control Panel
- Description Connector Function
- Remote Control
- 2
- Setting up your TV
- Basic Connections
- Power Connection
- Connecting an Antenna or Cable TV
- 16
- Connecting External Devices
- Connecting External Earphones
- Connecting to AV Devices
- HANNSpree
- Connecting a VCR/ STB/ DVD Player Using Component Video
- Connecting a VCR/ STB/ DVD Player Using Composite Video
- Connecting a Decoder or VCR/ STB/ DVD Player Using SCART
- Connecting a PC
- Connecting HDMI
- Using the TV
- Turning the TV On and Off
- Switching Source Signals
- Performing an Automatic Channel Search
- Selecting Programs
- Adjusting the Volume
- Adjusting On-Screen Display (OSD) Settings
- OSD Setting Menus
- Adjusting Picture Settings
- Adjusting Sound Settings
- Adjusting Channel Settings (Analog TV)
- Adjusting DTV Settings (Digital TV)
- Adjusting PC Setup Settings
- Adjusting Setup Settings
- 4
- Troubleshooting
- 5
- Specifications
- HDMI Mode Support Timing
- MEMO
Brand : HANNSPREE
Model : HT11
Category : Screen