
CleanView Essential 20095 - Steam cleaner BISSELL - Free user manual and instructions
Find the device manual for free CleanView Essential 20095 BISSELL in PDF.


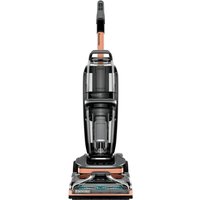
| Product Type | Upright Carpet Cleaner |
| Model | CleanView Essential 20095 |
| Brand | BISSELL |
| Power Supply | 220-240 V AC, 50-60 Hz |
| Water Tank Capacity | 3.7 L (2-in-1 clean/dirty tank) |
| Dimensions (approx.) | 43 x 33 x 99 cm (H x W x D) |
| Weight (approx.) | 7.5 kg |
| Cord Length | 6.1 m (approx.) |
| Cleaning Width | 25.4 cm (10 inches) |
| Brush Type | DirtLifter PowerBrush with EdgeSweep brushes |
| Spray Function | Trigger-activated spray |
| Ready Tools Dial | Floor Cleaning and Tools settings |
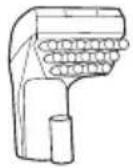
| Included Tools | Bare Floor Tool, Tough Stain Tool, 2-in-1 Crevice Tool, Deep Stain Tool, HydroRinse Tool |
| Compatible Formulas | BISSELL Wash & Protect, Wash & Refresh, Wash & Remove, Wash & Shine, Pretreats, Boost |
| Surfaces | Carpet, upholstery, sealed hard floors (hardwood, linoleum, vinyl, tile, granite, marble) |
| Safety Features | Float valve, automatic shut-off, grounded plug |
| Maintenance | Clean removable nozzle, lint screen, Ready Tools dial; use HydroRinse tool to flush hose |
| Warranty | 3-year limited guarantee (Australia/New Zealand) |
| Recommended Usage | Household use only |
Frequently Asked Questions - CleanView Essential 20095 BISSELL
User questions about CleanView Essential 20095 BISSELL
0 question about this device. Answer the ones you know or ask your own.
Ask a new question about this device
Download the instructions for your Steam cleaner in PDF format for free! Find your manual CleanView Essential 20095 - BISSELL and take your electronic device back in hand. On this page are published all the documents necessary for the use of your device. CleanView Essential 20095 by BISSELL.
USER MANUAL CleanView Essential 20095 BISSELL
CLEANVIEW™ ESSENTIAL
Model 20095
What's in the Box? 3
Assembly....3
Cleaning Formulas......4
Filling the 2-in-1 Water Tank....5
Cleaning Your Carpet....6
Using the Ready Tools....7
Cleaning Your Hard Floors....8
Emptying the 2-in-1 Water Tank....9
After-Cleaning Care....9
Storing Your Machine....11
Troubleshooting....11
Guarantee 12
Product Overview
-
Spray Trigger
-
Quick Release Cable Wrap
-
Upper Handle
-
Carry Handle
-
Tank Carry Handle
-
2-in-1 Water Tank
-
Ready Tools Dial
-
Removable Nozzle
-
DirtLifter PowerBrush
-
Belt Access Door (underside of machine)
-
EdgeSweep Brushes

Go online for a comprehensive walkthrough of your new purchase!
This guide has everything you need to get ready for first use, including setting up, using and maintaining your machine, but online you'll find additional resources like tips and troubleshooting, videos, product registration, parts, and more. Go to support.BISSELL.com.


IMPORTANT SAFETY INSTRUCTIONS
READ ALL INSTRUCTIONS BEFORE USING YOUR APPLIANCE.
When using an electrical appliance, basic precautions should be observed, including the following:
WARNING
TO REDUCE THE RISK OF FIRE, ELECTRIC SHOCK OR INJURY:
»This appliance can be used by children aged from 8 years and above and persons with reduced physical, sensory or mental capabilities or lack of experience and knowledge if they have been given supervision or instruction concerning use of the appliance in a safe way and understand the hazards involved. Cleaning and user maintenance shall not be made by children without supervision.
»Children should be supervised to ensure that they do not play with the appliance. »Unplug from electrical socket when not in use, before cleaning, maintaining, or servicing the appliance, and if your appliance has an accessory tool with a moving brush, before connecting or disconnecting the tool.
»Do not immerse in water or liquid. »Keep hair, loose clothing, fingers, and all parts of body away from openings and moving parts of the appliance and its accessories.
»Do not immerse. Use only on surfaces moistened by the cleaning process. Use only BISSELL® cleaning products intended for use with this machine. »Use only the type and amount of liquids
specified under the operations section of this guide.
»Use only on carpet moistened by the cleaning process.
»Liquid must not be directed towards equipment containing electrical components.
»Always connect to a properly earthed electrical socket. Do not modify earthed plug.
»Always install float before any wet pick-up operation.
»Plastic film can be dangerous. To avoid danger of suffocation, keep away from children.
»Use only as described in this user guide.
»Use only manufacturer's recommended attachments.
»If appliance is not working as it should, has been dropped, damaged, left outdoors, or dropped into water; do not attempt to operate it and have it repaired at an authorised service center.
»Do not put any object into openings.
»Do not use with any opening blocked; keep free of dust, lint, hair, and anything that may reduce air flow.
»Use extra care when cleaning on stairs.
»Do not use to pick up flammable or combustible liquids, such as petroleum, or use in areas where they may be present.
»Do not pick up toxic material (chlorine bleach, ammonia, drain cleaner, etc.).
»Do not use appliance in an enclosed space filled with vapours given off by oil-based paint, paint thinner, some moth-proofing substances, flammable dust, or other explosive or toxic vapours.
»Do not pick up hard or sharp objects such as glass, nails, screws, coins, etc.
»Do not pick up anything that is burning or smoking, such as cigarettes, matches or hot ashes.
»Do not use without filters in place.
»Use indoors only.
SAVE THESE INSTRUCTIONS
ORIGINAL INSTRUCTIONS.
FOR OPERATION ON A 220-240 VOLT A.C. 50-60 HZ POWER SUPPLY ONLY.
THIS MODEL IS FOR HOUSEHOLD USE ONLY.
IMPORTANT INFORMATION
»Keep appliance on a level surface.
» If your appliance has a motorised Brush Roll, do not leave machine running in the same spot without the handle fully upright.
» To reduce the risk of a leaking condition, do not store unit where freezing may occur. Damage to internal components may result.
What's in the Box?
Standard accessories may vary by model. To identify what should be included with your purchase, please refer to the "Carton Contents" list located on the carton top flap.
 | 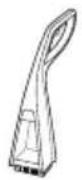 |  | 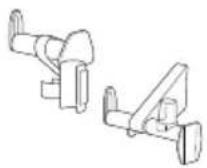 |  |
| Base | Handle | Screws | Tool Holders | Bare Floor Tool |
 | [2YAX] | [HBTX] | 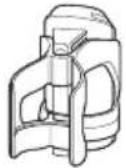 | |
| Tough Stain Tool | 2-in-1 Crevice Tool | Deep Stain Tool | HydroRinseTM Tool |
Assembly
Go to support.BISSELL.com for assembly videos.
Required for Assembly


Phillips-head Screwdriver


natural_image
Diagram showing two mechanical assembly steps with blue arrows indicating rotation or movement (no text or symbols)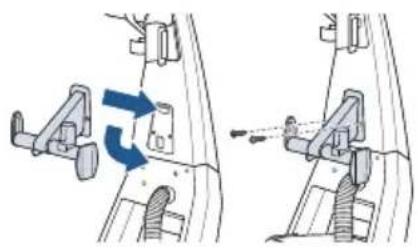
natural_image
Mechanical assembly diagram showing two views of a vehicle's handle mechanism with arrows indicating motion (no text or symbols)-
Slide Upper Handle onto lower base and secure with two long screws (taped to Upper Handle) into marked holes.
-
Attach upper hose/cable rack to the back of the handle by inserting hook into the slot and pressing up until it's seated flush with the back of the machine. Use 1 short screw to secure the bottom of the rack to the machine.
-
Attach lower hose/cable rack by inserting the hook into the slot and pressing up until it's seated flush with the back of the machine. Use 2 short screws to secure the bottom hose/cable rack.

natural_image
Mechanical assembly diagram showing a clamping mechanism with no visible text or symbols
natural_image
Diagram of a car wheel with two blue arrows indicating rotational direction (no text or symbols)
natural_image
Diagram showing two steps of car wheel assembly: one being inserted into a bracket, the other adjusting the component (no text or symbols present)-
Wrap hose around both hose/cable racks. Secure it by inserting the trigger hose grip into opening on the grip holder on the upper hose/cable rack.
-
Wrap cable around lower and upper hose/cable racks. Secure plug to cable with clip on plug.
-
Attach included tools to the appropriate storage locations on the machine.
Cleaning Formulas
Find more formulas at BISSELL.com.au.
Keep plenty of genuine BISSELL® formula on hand so you can clean whenever it fits your schedule.
Note: Always use genuine BISSELL formulas. Non-BISSELL formulas may harm the machine and may void the guarantee.
| WASH & PROTECT WASH & REFRESH | |||
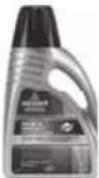 | 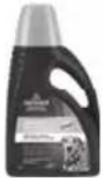 |  |  |
| Pro Stain & OdourProfessional strength to remove extra tough stains and odours. | Pet Stain & OdourRemoves tough pet stains and contains patented odour removal technology. | Stain & OdourRemoves tough stains and odours. | Blossom & BreezePowerful cleaning with a refreshing spring scent. |
| WASH & REMOVE WASH & SHINE | ||
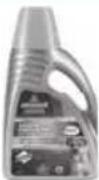 |  |  |
| Pro Pet Urine Eliminator + Oxy Permanently removes stains and odors at the source with the power of Oxy. | Allergen Helps remove pet dander, pollen and dust mite waste allergens. | Hard Floor Cleaner Removes tough dirt and grime, leaves a natural shine. |
Pretreat
Pretreat spots and stains to improve carpet cleaning performance.
 |  |
| Stain PretreatPretreat to penetrate and loosen tough stains | Pet Stain PretreatPretreat to help remove tough pet stains and odours |
Boost
Add Boost carpet cleaning formula enhancers to any formula to increase its effectiveness.
 |
| OXY BoostRemoves old, set-in stains permanently |
Certain trademarks used under license from The Procter & Gamble Company or its affiliates.
WARNING
To reduce the risk of fire, use only BISSELL® cleaning formula for full size machines in your carpet as that contain eucalyptus, lemon or pine oil may damage this appliance and void the guarantee.
Chemical spot cleaners or solvent-based soil removers should not be used. These products may react with the plastic materials used in your carpet washer causing cracking or pitting.
Filling the 2-in-1 Water Tank
More of a visual person? We've got video instructions for this step at support.BISSELL.com.
Note: Fill with warm (140°F/60°C MAX) tap water and add the appropriate BISSELL® formula. Do not use boiling water. Do not heat water or tank in microwave.
 |  |  |
| 1. Use Tank Carry Handle to remove tank from the machine and bring it to the sink. | 2. Pull up on the bottom edge of the latch on the tank to remove the lid. | 3. Pull up on bladder fill cover that says “Fill Here”. |
 |  |  |
| 4. Fill tank with hand hot (60°C/140°F MAX) tap water to the water fill line. Do not boil or microwave water as it can destroy the tank. | 5. Fill the provided measuring cup with formula to the fill line and pour into the bladder.Optional: Add 60ml of OXY Boost per 3.7L of water and carpet cleaning formula solution. For optimal results, use 74ml (1 capful) per 3.7L of water and carpet cleaning formula solution. The CleanViewTM Essential has a 3.7L Tank. | 6. Push down on bladder fill cover to close. |
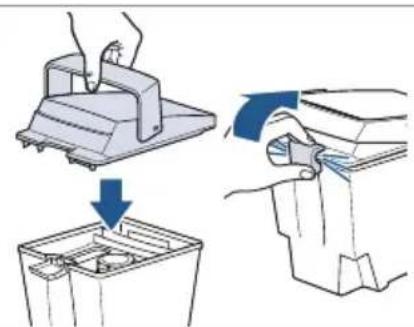 | 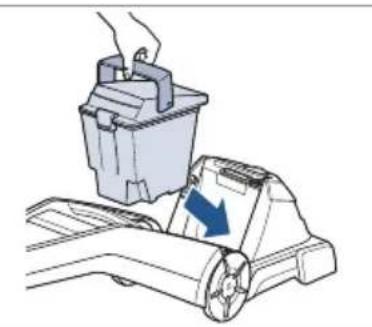 |
| 7. Replace the tank lid and latch. | 8. Place tank into machine base and seat firmly into place. |
Cleaning Your Carpet
Visit support.BISSELL.com for more carpet cleaning tips.

natural_image
Diagram of a plug inserted into a wall socket with a blue arrow indicating direction (no text or symbols)- Plug into a proper outlet.

natural_image
Line drawing of a vacuum cleaner with blue airflow arrow indicating motion (no text or symbols)- Set Ready Tools Dial to Floor Cleaning setting.

natural_image
Technical line drawing of a mechanical device with wheels and a handle (no text or symbols)- Use the red power pedal on the back of the machine to turn it ON.

natural_image
Technical line drawing of a mechanical component with no visible text or symbols- Push the gray pedal to recline the machine.

natural_image
Diagram of a mechanical component with a blue upward arrow indicating motion or force (no text or symbols present)- Press the Spray Trigger while making one slow forward and one slow backward pass. Do not overwet.

natural_image
Diagram of a mechanical component with a blue downward arrow indicating a force or direction (no text or symbols present)- Release trigger and make one slow forward and backward pass over same area.
natural_image
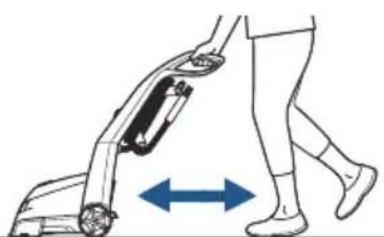
Line drawing of a person using a small cart with a blue double-headed arrow indicating left motion (no text or symbols)- Repeat cleaning passes until solution being suctioned up appears clean. Continue passes without pressing Spray Trigger until you can't see any more water being suctioned up. Repeated passes will help speed up dry time.
ATTENTION
» Take care not to run over loose objects or edges of area rugs. Stalling the brush may result in premature belt failure.
» Some Berber carpets have a tendency to fuzz with wear. Repeated strokes in the same area with an ordinary vacuum or deep cleaner may aggravate this condition.
Using the Ready Tools
Your carpet and upholstery cleaner comes equipped with a hose and at least one cleaning tool for cleaning stairs, upholstery and more. Find more tools at BISSELL.com.
Tips
»Check for colourfastness in an inconspicuous place before cleaning larger area.
»If possible, check upholstery stuffing. Coloured stuffing may bleed through fabric when wet.
»Vacuum thoroughly to pick up loose debris and pet hair.
»Check manufacturer's tag before cleaning. Do not use on velvet or silk. If manufacturer's tag is missing or not coded, check with your furniture dealer.
| 1. Set Ready Tools dial to TOOLS setting. This will allow spray and suction from hose. | 2. Attach cleaning tool of your choice to end of hose. | 3. Hold tool about 2.5 cm above soiled surface. Press Spray Trigger to apply cleaning solution. Release trigger, apply downward pressure, and pull toward you to suction up dirt and cleaning solution. Do not overwet. |
 | 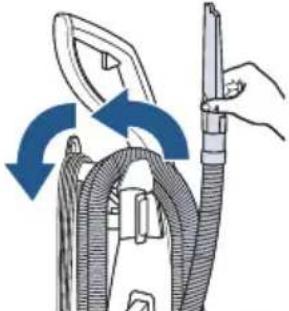 |
| 4. When finished cleaning, remove and rinse tool(s) and hose in clean, running water. | 5. Before wrapping the hose, lift and stretch the hose to make sure water is cleared. Wrap hose around rack. |
Cleaning Your Hard Floors
To see how else you can use your machine to clean your home, visit support.BISSELL.com.
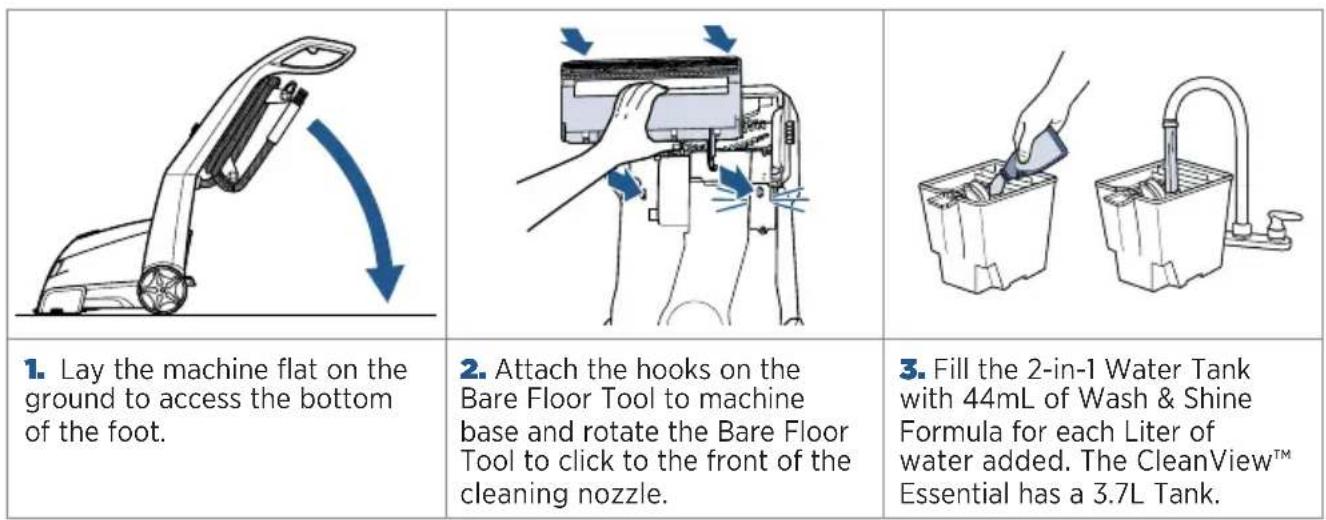
The Bare Floor Tool easily attaches to the bottom of your machine for use on hard floor surfaces. Safe for use on virtually all sealed hard floor surfaces including sealed hardwood, linoleum, vinyl, ceramic tile, granite & marble.
-
Lay the machine flat on the ground to access the bottom of the foot.
-
Attach the hooks on the Bare Floor Tool to machine base and rotate the Bare Floor Tool to click to the front of the cleaning nozzle.
-
Fill the 2-in-1 Water Tank with 44mL of Wash & Shine Formula for each Liter of water added. The CleanView™ Essential has a 3.7L Tank.
natural_image
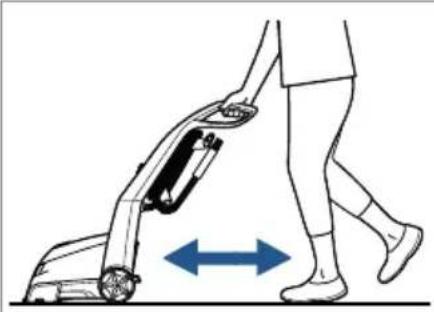
Line drawing of a person's legs and foot using a small vacuum cleaner, with blue double-headed arrows indicating left and right motion (no text or symbols)- Repeat cleaning passes until solution being suctioned up appears clean. Continue passes without pressing Spray Trigger until you can't see any more water being suctioned up. Repeated passes will help speed up dry time.
Emptying the 2-in-1 Water Tank
More of a video person? We've got you covered. Find these steps, and other how-to videos, at support.BISSELL.com.
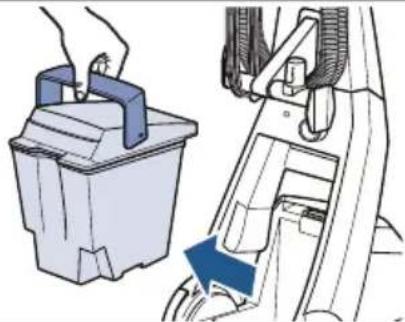 | 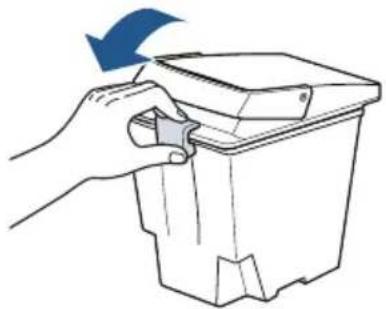 | 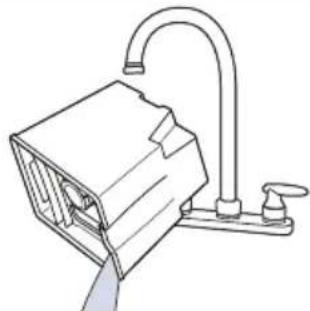 |
| 1. Turn machine OFF and remove the 2-in-1 Water Tank from the machine. Carry tank to a sink or outside to dispose of dirty water. | 2. Pull up on the bottom edge of the latch on the tank to remove the lid. | 3. Empty dirty water from back corner of tank. |
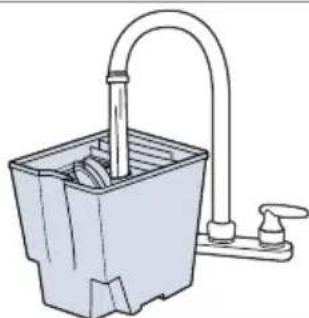
natural_image
Line drawing of a square bucket with a curved handle and side faucet (no text or symbols)
natural_image
Line drawing of a hand adjusting a mechanical component with a central knob (no text or symbols)
natural_image
Illustration of a hand placing a plastic container into a car trunk with a blue arrow indicating direction (no text or symbols)-
Rinse the tank with running, hand hot (60°C/140°F MAX) tap water, taking care to clean underneath and around heavy duty bladder.
-
After each use, remove any debris trapped in red lint screen on base of machine while tank is still removed.
-
Return 2-in-1 Water Tank to machine.
After-Cleaning Care
For a full list of machine maintenance tips and tricks, visit support.BISSELL.com.
Cleaning with the HydroRinse™ Tool


natural_image
Illustration of a hand holding a medical or surgical device with a blue arrow indicating direction (no text or symbols)-
Attach the HyrdoRinse tool to the hose. Turn the ready tools dial to tools and turn the machine ON.
-
Hold the hose and tool in an upright position. Hold down the trigger to rinse the hose for 30 seconds.
⚠ WARNING
To reduce the risk of electric shock, push power pedal OFF and disconnect plug from electrical tenance or troubleshooting checks.
After-Cleaning Care (continued)
Cleaning the Removable Nozzle
 | 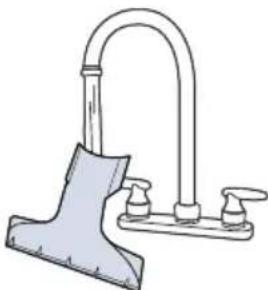 |  |
| 1. Grab the sides of the top of the nozzle and pull forward. | 2. Rinse nozzle under running water. | 3. When finished, replace nozzle by slightly raising front of machine to line up slots on each side of the base with hooks the nozzle. Push forward to click nozzle into place. |
Cleaning the Ready Tools Dial
If Ready Tools Dial is hard to turn, the diverter assembly that holds it may need to be cleaned.
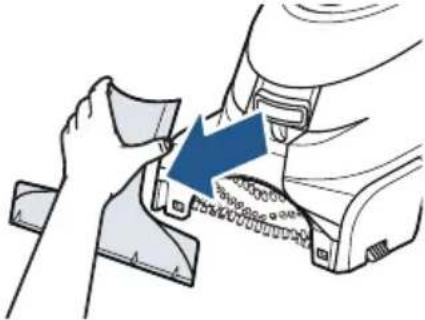 |  | 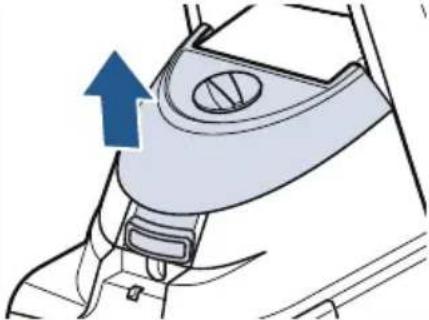 |
| 1. Remove the front nozzle. | 2. Use a Phillips-head screwdriver to remove the screws that hold the assembly in place. Set them aside. | 3. Remove assembly. |
 |  | 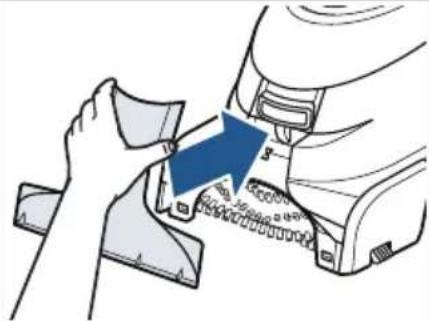 |
| 4. Hold assembly under running water. Make sure water flows through and around the dial. Turn the dial about 10 times each way to clear debris. | 5. Replace assembly and screw. | 6. Replace the front nozzle. |
⚠ WARNING To reduce the risk of electric shock, push power pedal OFF and disconnect plug from electrical outlet before performing maintenance or troubleshooting checks.
Storing Your Machine
We have additional machine maintenance tips for you at support.BISSELL.com.
Keep machine in a protected, dry area, like a closet or basement. Because it uses water, this machine should not be kept where there's a danger of freezing. Freezing will damage internal components and void the guarantee.
Troubleshooting
Below are some of the issues you may run into. If you don't see the issue you're experiencing below, visit BISSELL.com.
| Problem Possible | Cause Remedies | |
| Reduced spray OR no spray | Bladder may be empty. Push power pedal OFF; refill bladder with clean, hand hot (60°F/140°C MAX) tap water and formula. | |
| 2-in-1 Water Tank may not be seated properly. | Push power pedal off; remove and reseat tank. | |
| Pump may have lost prime. Push power pedal off; after 1 minute turn ON and press Spray Trigger. | ||
| Pump belt may be broken. Push power pedal off and unplug from outlet. Visit support.BISSELL.com for belt replacement instructions. | ||
| DirtLifter PowerBrush does not turn | Brush belt or pump belt is off or broken. | Push power pedal off and unplug from outlet. Visit support.BISSELL.com for belt replacement instructions. |
| Machine not picking up solution | Ready Tools Dial may be on wrong setting for cleaning job. | Set Ready Tools dial to either FLOOR CLEANING or TOOLS Setting. |
| Poor tool position (handheld attachments only). | Adjust angle; apply more downward pressure. | |
| Removable Nozzle may not be properly attached. | Make sure nozzle is on correctly by slightly raising front of machine to line up slots on each side of base of machine with hooks on each side of nozzle. Attach at base first and then click nozzle into place. Refer to image 6 on page 9. | |
| 2-in-1 Water Tank lid is not properly installed. | Re-install lid. | |
| 2-in-1 Water Tank is not properly seated. | Tank must be firmly seated to function; remove and reseat. | |
| 2-in-1 Water Tank has picked up maximum dirty water. | Empty 2-in-1 tank and refill. | |
| The lint screen may be clogged. | Clean out lint screen. | |
⚠ WARNING
To reduce the risk of electric shock, turn power OFF and disconnect plug from electrical outlet or troubleshooting checks.
Guarantee
This guarantee gives you specific legal rights, in addition to rights you may have under the Australian Consumer Law. If you need additional instruction regarding this guarantee or have questions regarding what it may cover, please contact your local BISSELL® Consumer Care on the details set out below.
BISSELL Three Year Guarantee
Subject to the *conditions identified below, BISSELL will repair or replace (with new, refurbished, lightly used, or remanufactured components or products), at BISSELL's option, free of charge from the date of purchase by the original purchaser, for three years any defective or malfunctioning part due to manufacturer defect. This guarantee applies to product used for personal purposes, and not commercial or rental service. This guarantee does not apply to fans or routine maintenance or consumable components such as filters, belts, brush rolls, etc., damage or malfunction caused by negligence, abuse, neglect, unauthorized repair, or any other use not in accordance with the user guide. BISSELL recommends that the original packaging be kept for the duration of the guarantee period in case such need arises within the guarantee period that the item needs re-packing and transportation.
\*Conditions of Guarantee
Subject to whether such loss is reasonably foreseeable, BISSELL and its in-country distributors are not liable for incidental or consequential damages of any nature associated with the use of this product.
For Australian Consumers Only: Our goods come with guarantees that cannot be excluded under the Australian Consumer Law. You are entitled to a replacement or refund for a major failure and for compensation for any other reasonably foreseeable loss or damage. You are also entitled to have the goods repaired or replaced if the goods fail to be of acceptable quality and the failure does not amount to a major failure.
This guarantee is in addition to other rights or remedies under law. Nothing in this guarantee excludes, limits or modifies any liability of BISSELL which is imposed by law, or limits or modifies any remedy available to the consumer which is granted by law. To make a claim under this guarantee contact BISSELL Australia PTY LTD (details above). Contact BISSELL prior to returning any goods. Where agreed, BISSELL will reimbues reasonable postage / handling costs (if any) for returning goods to BISSELL. To claim expenses incurred in making a claim under this guarantee please provide BISSELL with a copy of the receipt of the expenses by email or post.
Consumer Care
Australia
Telephone: 1300 247 735
Website: www.BISSELL.com.au
New Zealand
Telephone: 0800 247 735
Website: www.BISSELL.co.nz
But wait, there's more!
Join us online for a complete guide to your new product, including troubleshooting, parts and more.
Go to global.BISSEL.com.



VIDEOSINFO PARTS
- CLEANVIEW™ ESSENTIAL
- Product Overview
- Go online for a comprehensive walkthrough of your new purchase!
- IMPORTANT SAFETY INSTRUCTIONS
- READ ALL INSTRUCTIONS BEFORE USING YOUR APPLIANCE.
- WARNING
- TO REDUCE THE RISK OF FIRE, ELECTRIC SHOCK OR INJURY:
- SAVE THESE INSTRUCTIONS
- ORIGINAL INSTRUCTIONS.
- FOR OPERATION ON A 220-240 VOLT A.C. 50-60 HZ POWER SUPPLY ONLY.
- IMPORTANT INFORMATION
- What's in the Box?
- Assembly
- Cleaning Formulas
- Pretreat
- Boost
- Filling the 2-in-1 Water Tank
- Cleaning Your Carpet
- ATTENTION
- Using the Ready Tools
- Tips
- Cleaning Your Hard Floors
- Emptying the 2-in-1 Water Tank
- After-Cleaning Care
- ⚠ WARNING
- After-Cleaning Care (continued)
- Cleaning the Removable Nozzle
- Cleaning the Ready Tools Dial
- Storing Your Machine
- Troubleshooting
- Guarantee
- BISSELL Three Year Guarantee
- \*Conditions of Guarantee
- Consumer Care
- Australia
- New Zealand
- But wait, there's more!
Brand : BISSELL
Model : CleanView Essential 20095
Category : Steam cleaner