
PGWX-62L - Projector Barco - Free user manual and instructions
Find the device manual for free PGWX-62L Barco in PDF.


| Product Type | Video projector |
| Brand | Barco |
| Model | PGWX-62L |
| Technology | Single-chip DLP, 0.65" DMD |
| Resolution | 1,280 x 800 (WXGA) |
| Brightness | 6,000 ANSI lumens |
| Contrast Ratio | 11,000:1 |
| Aspect Ratio | 16:10 |
| Light Source | Laser diode |
| Light Source Lifetime | 20,000 hours (bright mode) |
| Sealed DLP Core | Yes |
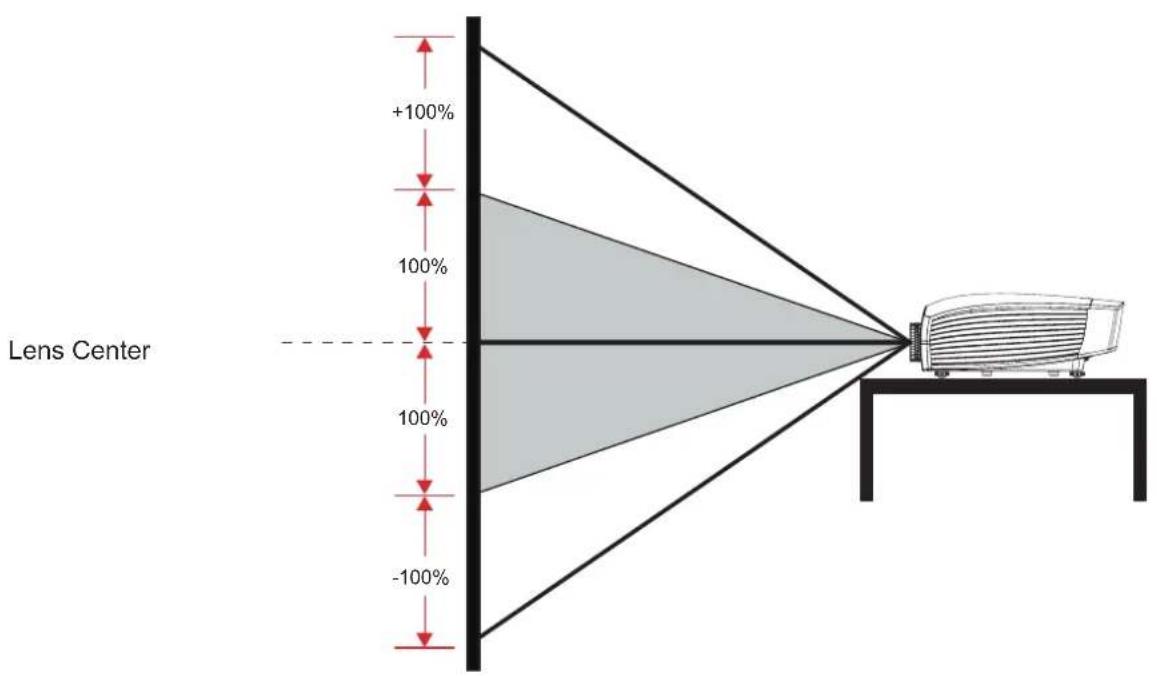
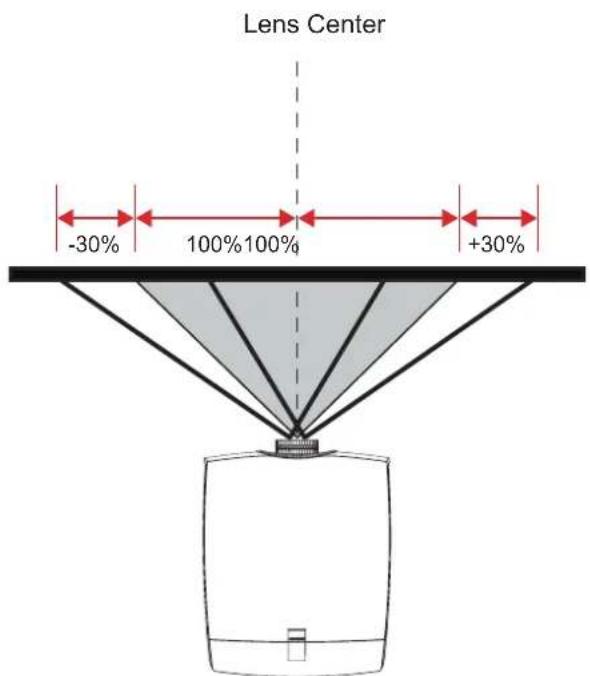
| Optical Lens Shift | Vertical: -100% to +100%; Horizontal: -30% to +30% |
| Keystone Correction | ±20° vertical |
| Inputs | VGA-in, VGA-out, HDMI, DVI, CVBS, LAN, RS232, 12V out, 5V out |
| Max Power Consumption | 580W |
| Power Requirements | 100-240V / 50-60Hz |
| Noise Level | 35 dBA (bright), 32 dBA (eco) |
| Operational Temperature | 5°C to 40°C (41°F to 104°F) |
| Dimensions (W x L x H) | 506 x 516 x 251 mm (without cable cover) |
| Weight | 17.5 kg (without lens) |
| Orientation | Ceiling/floor, front/rear, 360°, portrait |
| 3D Support | Yes (DLP link) |
| Warranty | Limited 3 years parts and labor (extendable to 5) |
| Safety Class | Class 2 laser product; do not stare into beam |
Frequently Asked Questions - PGWX-62L Barco
User questions about PGWX-62L Barco
0 question about this device. Answer the ones you know or ask your own.
Ask a new question about this device
Download the instructions for your Projector in PDF format for free! Find your manual PGWX-62L - Barco and take your electronic device back in hand. On this page are published all the documents necessary for the use of your device. PGWX-62L by Barco.
USER MANUAL PGWX-62L Barco
natural_image
White projector with lens and ventilation slots, shown against a plain gray background (no text or symbols visible)User manual
Doc. Revision: 00
Barco nv Projection Division
Noordlaan 5, B-8520 Kuurne
Phone: +32 56.36.89.70
Fax: +32 56.36.88.24
Support: www.barco.com/en/support
Visit us at the web: www.barco.com
Changes
Barco provides this manual 'as is' without warranty of any kind, either expressed or implied, including but not limited to the implied warranties or merchantability and fitness for a particular purpose. Barco may make improvements and/or changes to the product(s) and/or the program(s) described in this publication at any time without notice.
This publication could contain technical inaccuracies or typographical errors. Changes are periodically made to the information in this publication; these changes are incorporated in new editions of this publication.
The latest edition of Barco manuals can be downloaded from the Barco web site www.barco.com or from the secured Barco web site https://my.barco.com.
Copyright ©
All rights reserved. No part of this document may be copied, reproduced or translated. It shall not otherwise be recorded, transmitted or stored in a retrieval system without the prior written consent of Barco.
EN55022/CISPR22 Class A ITE (Information Technology Equipment)
Class A ITE is a category of all other ITE which satisfies the class A ITE limits but not the class B ITE limits. Such equipment should not be restricted in its sale but the following warning shall be included in the instructions for use:
Warning : This is a class A product. In a domestic environment this product may cause radio interference in which case the user may be required to take adequate measures.
Federal Communications Commission (FCC Statement)
This equipment has been tested and found to comply with the limits for a class A digital device, pursuant to Part 15 of the FCC rules.
These limits are designed to provide reasonable protection against harmful interference when the equipment is operated in a commercial environment. This equipment generates, uses, and can radiate radio frequency energy and, if not installed and used in accordance with the instruction manual, may cause harmful interference to radio communications. Operation of this equipment in a residential area may cause harmful interference, in which case the user will be responsible for correcting any interference at his own expense.
Guarantee and Compensation
Barco provides a guarantee relating to perfect manufacturing as part of the legally stipulated terms of guarantee. On receipt, the purchaser must immediately inspect all delivered goods for damage incurred during transport, as well as for material and manufacturing faults Barco must be informed immediately in writing of any complaints.
The period of guarantee begins on the date of transfer of risks, in the case of special systems and software on the date of commissioning, at latest 30 days after the transfer of risks. In the event of justified notice of complaint, Barco can repair the fault or provide a replacement at its own discretion within an appropriate period. If this measure proves to be impossible or unsuccessful, the purchaser can demand a reduction in the purchase price or cancellation of the contract. All other claims, in particular those relating to compensation for direct or indirect damage, and also damage attributed to the operation of software as well as to other services provided by Barco, being a component of the system or independent service, will be deemed invalid provided the damage is not proven to be attributed to the absence of properties guaranteed in writing or due to the intent or gross negligence or part of Barco.
If the purchaser or a third party carries out modifications or repairs on goods delivered by Barco, or if the goods are handled incorrectly, in particular if the systems are commissioned operated incorrectly or if, after the transfer of risks, the goods are subject to influences not agreed upon in the contract, all guarantee claims of the purchaser will be rendered invalid. Not included in the guarantee coverage are system failures which are attributed to programs or special electronic circuitry provided by the purchaser, e.g. interfaces. Normal wear as well as normal maintenance are not subject to the guarantee provided by Barco either.
The environmental conditions as well as the servicing and maintenance regulations specified in the this manual must be complied with by the customer.
Trademarks
Brand and product names mentioned in this manual may be trademarks, registered trademarks or copyrights of their respective holders.
All brand and product names mentioned in this manual serve as comments or examples and are not to be understood as advertising for the products or their manufacturers.
TABLE OF CONTENTS
1. SAFETY......6
1.1 General considerations....6
1.2 Important safety instructions....7
2. INTRODUCTION....11
2.1 Installation requirements.... 11
2.2 Projector package overview....12
2.3 Product Overview 13
2.3.1 Main Unit 13
2.3.2 Input/Output (I/O) Panel....14
2.3.3 Remote Control....15
3. INSTALLATION....16
3.1 RCU Battery Installation 16
3.2 Installing the Lens....17
3.2.1 Lens Selection....17
3.2.2 Installing the lens for the first time....17
3.3 Connecting the Projector 18
3.3.1 Connecting to a Computer or Laptop 18
3.3.2 Connecting to Video Sources 19
3.3.3 Installing the cable cover 20
3.4 Powering On/Off the Projector....21
3.4.1 Powering On the Projector....21
3.4.2 Powering Off the Projector 21
3.5 Adjusting the Projected Image....22
3.6 Safety Cover Installation 24
3.7 Ceiling Mount Installation....25
4. USER CONTROLS....26
4.1 On-Screen Display Menus....26
4.1.1 Using the OSD Lite Menus 26
4.1.2 Using the Advanced OSD Menus 28
4.1.2.1 Input Menu....29
4.1.2.2 Image Menu....30
4.1.2.3 Layout Menu 32
4.1.2.4 Light Source Menu 33
4.1.2.5 Alignment Menu....34
4.1.2.6 Control Menu 36
4.1.2.7 Service Menu....37
4.2 Color Coordinate Adjustment....38
4.3 Constant Light Output 40
5. TROUBLESHOOTING 41
5.1 Image Problems....41
5.2 LED Indication Chart 42
5.3 Warning Message 43
6. MAINTENANCE & SERVICE 44
6.1 Replacing the Lens 44
SPECIFICATIONS 45
7.1 PGWU-62L / PGWU-62L-K 45
7.2 PGWX-62L / PGWX-62L-K 47
7.3 Dimensions 49
7.4 Compatibility Modes ....50
8. ENVIRONMENTAL INFORMATION ....52
8.1 Disposal information....52
8.2 RoHS compliance....52
8.3 Production address....54
8.4 Importers contact information....54
1. SAFETY
About this chapter
Read this chapter attentively. It contains important information to prevent personal injury while installing and using your PRESENT series projector. Furthermore, it includes several cautions to prevent damage to your PRESENT series projector. Ensure that you understand and follow all safety guidelines, safety instructions and warnings mentioned in this chapter before installing and using the PRESENT series projector. After this chapter, additional "warnings" and "cautions" are given depending on the procedure. Read and follow these "warnings" and "cautions" as well.
Purpose of this device:
The exclusive purpose of this device is to project images onto a screen in an indoor environment.
Clarification of the term "PRESENT series" used in this document
When referring in this document to the term "PRESENT series" means that the content is applicable for following Barco products:
PGWX-62L •
PGWX-62L-K
PGWU-62L •
PGWU-62L-K

Note: This manual is applicable for multiple projector models. Consult the Barco website to know which models are currently for sale.
Overview
General considerations •
Important safety instructions •
1.1 General considerations
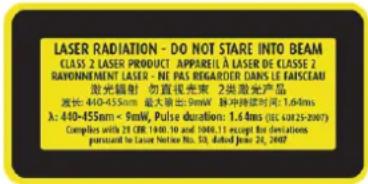
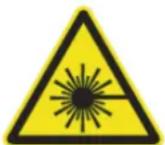
- The projector is a Class 2 laser device that conforms with IEC 60825-1:2007 and CFR 1040.10 and 1040.11 Class 2 laser product. Do not stare into Beam.
- This projector has built-in Class 4 laser module. Disassembly or modification is very dangerous and should never be attempted.
- Any operation or adjustment not specifically instructed by the user's guide creates the risk of hazardous laser radiation exposure.
- Do not open or disassemble the projector as this may cause damage by the exposure of laser radiation.
- Do not stare into beam when the projector is on. The bright light may result in permanent eye damage.
- Without following the control, adjustment or operation procedure may cause damage by the exposure of laser radiation.
General safety instructions
- Before operating this equipment please read this manual thoroughly and retain it for future reference.
- Installation and preliminary adjustments should be performed by qualified Barco personnel or by authorized Barco service dealers.
- All warnings on the projector and in the documentation manuals should be adhered to.
- All instructions for operating and use of this equipment must be followed precisely.
- All local installation codes should be adhered to.
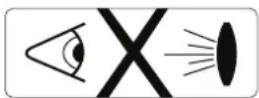
Do not look or stare into the projector's lens when the laser projector is on. The bright light may hurt and damage you eyes.
Notice on safety
This equipment is built in accordance with the requirements of the international safety standards IEC60950-1, EN60950-1, UL60950-1 and CAN/CSA C22.2 No.60950-1, which are the safety standards of information technology equipment including electrical business equipment.
These safety standards impose important requirements on the use of safety critical components, materials and insulation, in order to protect the user or operator against risk of electric shock and energy hazard and having access to live parts. Safety standards also impose limits to the internal and external temperature rises, radiation levels, mechanical stability and strength, enclosure construction and protection against the risk of fire. Simulated single fault condition testing ensures the safety of the equipment to the user even when the equipment's normal operation fails.
Users definition
Throughout this manual, the term SERVICE PERSONNEL refers to persons having appropriate technical training and experience necessary to be knowledgeable of potential hazards to which they are exposed (including, but not limited to HIGH VOLTAGE ELECTRIC and ELECTRONIC CIRCUITRY and HIGH BRIGHTNESS PROJECTORS) in performing a task, and of measures to minimize the potential risk to themselves or other persons. The term USER and OPERATOR refers to any person other than SERVICE PER-SONNEL, AUTHORIZED to operate professional projection systems.
A PRESENT series projector is intended “FOR PROFESSIONAL USE ONLY” by AUTHORIZED PERSONNEL familiar with potential hazards associated with high voltage, high intensity light beams, ultraviolet exposure and high temperatures generated by the laser diode and associated circuits.
Owners record
The part number and serial number are printed on a label which is stuck on the respective part. Record these numbers in the spaces provided below. Refer to them whenever you call upon your Barco dealer regarding this product.
| Product article number | |
| Product serial number | |
| Dealer |
1.2 Important safety instructions
To prevent the risk of electrical shock
This product should be operated from a mono phase AC power source.
- This apparatus must be grounded (earthed) via the supplied 3 conductor AC power cable. If none of the supplied power cables are the correct one, consult your dealer. If you are unable to insert the plug into the outlet, contact your electrician to replace your obsolete outlet. Do not defeat the purpose of the grounding-type plug.
- Do not allow anything to rest on the power cord. Do not locate this product where persons will walk on the cord. To disconnect the cord, pull it out by the plug. Never pull the cord itself.
- Use only the power cord supplied with your device. While appearing to be similar, other power cords have not been safety tested at the factory and may not be used to power the device. For a replacement power cord, contact your dealer.
- Do not operate the projector with a damaged cord. Replace the cord. Do not operate the projector if the projector has been dropped or damaged until it has been examined and approved for operation by a qualified service technician.
Position the cord so that it will not be tripped over, pulled, or contact hot surfaces.
- If an extension cord is necessary, a cord with a current rating at least equal to that of the projector should be used. A cord rated for less amperage than the projector may overheat.
- Never push objects of any kind into this product through cabinet slots as they may touch dangerous voltage points or short out parts that could result in a risk of fire or electrical shock.
Do not expose this projector to rain or moisture. •
Do not immerse or expose this projector in water or other liquids.
Do not spill liquid of any kind on this projector.
- Should any liquid or solid object fall into the cabinet, unplug the set and have it checked by qualified service personnel before resuming operations.
- Do not disassemble this projector, always take it to an authorized trained service person when service or repair work is required.
Do not use an accessory attachment which is not recommended by the manufacturer. - Lightning - For added protection for this video product during a lightning storm, or when it is left unattended and unused for long periods of time, unplug it from the wall outlet. This will prevent damage to the device due to lightning and AC power-line surges.
To prevent personal injury
- To prevent injury and physical damage, always read this manual and all labels on the system before connecting to the wall outlet or adjusting the projector.
To prevent injury, take note of the weight of the projector.
• To prevent injury, ensure that the lens and all covers are correctly installed. See installation procedures. - Warning: high intensity light beam. NEVER look into the lens! High luminance could result in damage to the eye.
- Warning: extremely high brightness laser: This projector uses extremely high brightness laser. Never attempt to look directly into the lens or at the laser.
- Before attempting to remove any of the projector's covers, you must turn off the projector and disconnect from the wall outlet.
- When required to switch off the projector, to access parts inside, always disconnect the power cord from the power net.
- The power input at the projector side is considered as the disconnect device. When required to switch off the projector, to access parts inside, always disconnect the power cord at the projector side. In case the power input at the projector side is not accessible (e.g. ceiling mount), the socket outlet supplying the projector shall be installed nearby the projector and be easily accessible, or a readily accessible general disconnect device shall be incorporated in the fixed wiring.
- Do not place this equipment on an unstable cart, stand, or table. The product may fall, causing serious damage to it and possible injury to the user.
- It is hazardous to operate without lens or shield. Lenses, shields or ultra violet screens shall be changed if they have become visibly damaged to such an extent that their effectiveness is impaired. For example by cracks or deep scratches.
- Exposure to UV radiation: Some medications are known to make individuals extra sensitive to UV radiation. The American Conference of Governmental Industrial Hygienists (ACGIH) recommends occupational UV exposure for an-8 hour day to be less than 0,1 micro-watts per square centimeters of effective UV radiation. An evaluation of the workplace is advised to assure employees are not exposed to cumulative radiation levels exceeding these government guidelines. The exposer of this UV radiation is allowed for only 1 hour per day for maintenance and service persons.
To prevent fire hazard
- Do not place flammable or combustible materials near the projector!
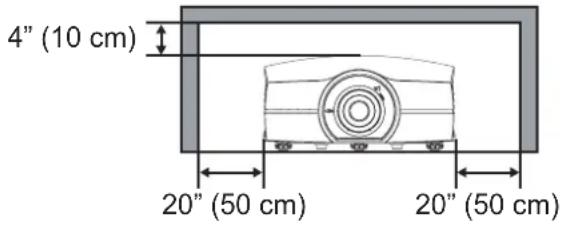
- Barco large screen projection products are designed and manufactured to meet the most stringent safety regulations. This projector radiates heat on its external surfaces and from ventilation ducts during normal operation, which is both normal and safe. Exposing flammable or combustible materials into close proximity of this projector could result in the spontaneous ignition of that material, resulting in a fire. For this reason, it is absolutely necessary to leave an “exclusion zone” around all external surfaces of the projector whereby no flammable or combustible materials are present. The exclusion zone must be not less than 50 cm (20") for all DLP projectors. The exclusion zone on the lens side must be at least 5 m. Do not cover the projector or the lens with any material while the projector is in operation. Keep flammable and combustible materials away from the projector at all times. Mount the projector in a well-ventilated area away from sources of ignition and out of direct sun light. Never expose the projector to rain or moisture. In the event of fire, use sand, CO2 or dry powder fire extinguishers. Never use water on an electrical fire. Always have service performed on this projector by authorized Barco service personnel. Always insist on genuine Barco replacement parts. Never use non-Barco
replacement parts as they may degrade the safety of this projector.
- Slots and openings in this equipment are provided for ventilation. To ensure reliable operation of the projector and to protect it from overheating, these openings must not be blocked or covered. The openings should never be blocked by placing the projector too close to walls, or other similar surface. This projector should never be placed near or over a radiator or heat register. This projector should not be placed in a built-in installation or enclosure unless proper ventilation is provided.
Projection rooms must be well ventilated or cooled in order to avoid build up of heat.
- Let the projector cool down completely before storing. Remove cord from the projector when storing.
To prevent projector damage
- The air filters of the projector must be cleaned or replaced on regular base (a "clean" booth would be monthly-minimum). Neglecting this could result in disrupting the air flow inside the projector, causing overheating. Overheating may lead to the projector shutting down during operation.
- The projector must always be installed in a manner which ensures free flow of air into its air inlets and unimpeded evacuation of the hot air from its cooling system.
- In order to ensure that correct airflow is maintained, and that the projector complies with Electromagnetic Compatibility (EMC) requirements, it should always be operated with all of its covers in place.
- Slots and openings in the cabinet are provided for ventilation. To ensure reliable operation of the product and to protect it from overheating, these openings must not be blocked or covered. The openings should never be blocked by placing the product on a bed, sofa, rug, or other similar surface. This product should never be placed near or over a radiator or heat register. The device should not be placed in a built-in installation or enclosure unless proper ventilation is provided.
- Ensure that nothing can be spilled on, or dropped inside the projector. If this does happen, switch off and unplug the mains supply immediately. Do not operate the projector again until it has been checked by qualified service personnel.
- Do not block the projector cooling fans or free air movement around the projector. Loose papers or other objects may not be nearer to the projector than 30 cm (12") on any side.
- Do not use this equipment near water.
- Special care for Laser Beams: Special care should be used when DLP projectors are used in the same room as high power laser equipment. Direct or indirect hitting of a laser beam on to the lens can severely damage the Digital Mirror Devices™ in which case there is a loss of warranty.
- Never place the projector in direct sun light. Sun light on the lens can severely damage the Digital Mirror Devices™ in which case there is a loss of warranty.
- Save the original shipping carton and packing material. They will come in handy if you ever have to ship your equipment. For maximum protection, repack your set as it was originally packed at the factory.
- Unplug this product from the wall outlet before cleaning. Do not use liquid cleaners or aerosol cleaners. Use a damp cloth for cleaning. Never use strong solvents, such as thinner or benzine, or abrasive cleaners, since these will damage the cabinet. Stubborn stains may be removed with a cloth lightly dampened with mild detergent solution.
- To ensure the highest optical performance and resolution, the projection lenses are specially treated with an anti-reflective coating, therefore, avoid touching the lens. To remove dust on the lens, use a soft dry cloth. Do not use a damp cloth, detergent solution, or thinner.
- Rated maximum ambient temperature, ta= 40 C (104 F).
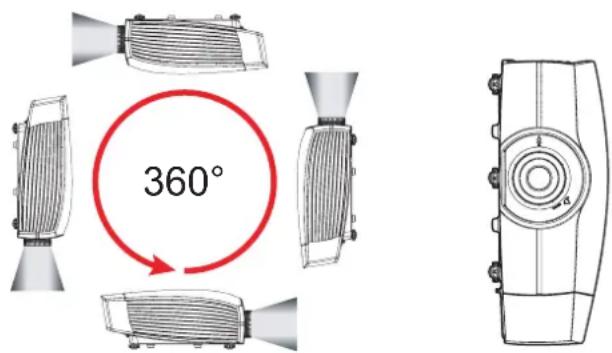
- This projector can be set to any angle within vertical 360 range. It can also rotate 90 into portrait orientation.
1. Safety
- Allowing the proper space of the projector cabinet is critical for proper air circulation and cooling of the unit. The dimensions shown here indicate the minimum space required. If the projector is to be built into a compartment or similarly enclosed, these minimum distances must be maintained.
On servicing
- Do not attempt to service this product yourself, as opening or removing covers may expose you to dangerous voltage potentials and risk of electric shock.
Refer all servicing to qualified service personnel. •
- Attempts to alter the factory-set internal controls or to change other control settings not specially discussed in this manual can lead to permanent damage to the projector and cancellation of the warranty.
- Unplug this product from the wall outlet and refer servicing to qualified service technicians under the following conditions:
When the power cord or plug is damaged or frayed. -
If liquid has been spilled into the equipment. -
If the product has been exposed to rain or water. -
- If the product does not operate normally when the operating instructions are followed. Adjust only those controls that are covered by the operating instructions since improper adjustment of the other controls may result in damage and will often require extensive work by a qualified technician to restore the product to normal operation.
- If the product has been dropped or the cabinet has been damaged.
-
If the product exhibits a distinct change in performance, indicating a need for service.
-
Replacement parts: When replacement parts are required, be sure the service technician has used original Barco replacement parts or authorized replacement parts which have the same characteristics as the Barco original part. Unauthorized substitutions may result in degraded performance and reliability, fire, electric shock or other hazards. Unauthorized substitutions may void warranty.
- Safety check: Upon completion of any service or repairs to this projector, ask the service technician to perform safety checks to determine that the product is in proper operating condition.
To prevent battery explosion
- Danger of explosion if battery is incorrectly installed.
- Replace only with the same or equivalent type recommended by the manufacturer. (AAA LR03,1.5V)
- For disposal of used batteries, always consult federal, state, local and provincial hazardous waste disposal rules and regulations to ensure proper disposal.
2. INTRODUCTION
About this chapter
Read this chapter before installing PRESENT series projector. It contains important information concerning installation requirements for the PRESENT series projector, such as minimum and maximum allowed ambient temperature, humidity conditions, required safety area around the installed projector, required power net, etc.
Furthermore, careful consideration of things such as image size, ambient light level, projector placement and type of screen to use are critical to the optimum use of the projection system.
Overview
Installation requirements •
Projector package overview •

Note: Barco provides a guarantee relating to perfect manufacturing as part of the legally stipulated terms of guarantee. Observing the specification mentioned in this chapter is critical for projector performance. Neglecting this can result in loss of warranty.
2.1 Installation requirements
Environment conditions
Table below summarizes the physical environment in which the PGWX-62L/PGWU-62L/PGWX-62L-K/PGWU-62L-K projector may be safely operated or stored.
Environment Operating Non-Operating
Ambient Temperature 5 C (41 F) to 40 C (104 F) -10 C (14 F) to 60 C (140 F)
Humidity 10% to 85% RH Non-Condensed 5% to 90% RH Non-Condensed
Altitude 0 (0Ft) to 3000m (9843Ft)
Cooling requirements
The projector is fan cooled and must be installed with sufficient space around the projector head, minimum 30 cm (12 inch) to ensure sufficient air flow. It should be used in an area where the ambient temperature, as measured at the projector air inlet, does not exceed +40 C (+104 F).
Clean air environment
A projector must always be mounted in a manner which ensures the free flow of clean air into the projectors ventilation inlets. For installations in environments where the projector is subject to airborne contaminants such as that produced by smoke machines or similar (these deposit a thin layer of greasy residue upon the projectors internal optics and imaging electronic surfaces, degrading performance), then it is highly advisable and desirable to have this contamination removed prior to it reaching the projectors clean air supply. Devices or structures to extract or shield contaminated air well away from the projector are a prerequisite, if this is not a feasible solution then measures to relocate the projector to a clean air environment should be considered.
Only ever use the manufacturer's recommended cleaning kit which has been specifically designed for cleaning optical parts, never use industrial strength cleaners on the projector's optics as these will degrade optical coatings and damage sensitive optoelectronics components. Failure to take suitable precautions to protect the projector from the effects of persistent and prolonged air contaminants will culminate in extensive and irreversible ingrained optical damage. At this stage cleaning of the internal optical units will be noneffective and impracticable. Damage of this nature is under no circumstances covered under the manufacturer's warranty and may deem the warranty null and void. In such a case the client shall be held solely responsible for all costs incurred during any repair. It is the clients responsibility to ensure at all times that the projector is protected from the harmful effects of hostile airborne particles in the environment of the projector. The manufacturer reserves the right to refuse repair if a projector has been subject to knowingly neglect, abandon or improper use.
Main Power requirements
The PRESENT series projector operates from a nominal mono phase power net with a separate earth ground PE.
Projector Power requirements
PGWX-62L/PGWX-62L-K AC INPUT 100-240V, 6.5A, 50/60Hz
PGWU-62L/PGWU-62L-K AC INPUT 100-240V, 6.5A, 50/60Hz
The power cord required to connect the projector with the power net is delivered with the projector.
Projector weight
Do not underestimate the weight of the projector. The projector weights about 17.5 kg without lens. Be sure that the pedestal or ceiling mount on which the projector has to be installed is capable of handling five (5) times the complete load of the system.
2.2 Projector package overview
Box content
This projector comes with all the items shown below. Check to make sure your package is complete. Contact your dealer immediately if anything is missing.
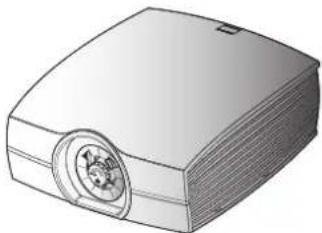 | 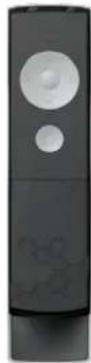 | 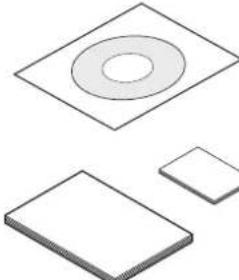 |
| Projector | Remote Control with two AAA size batteries | User Guide, Quick Start Guide, Safety Manual |
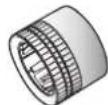 | 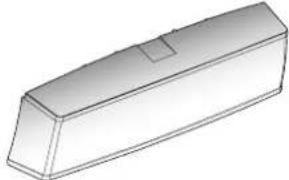 | 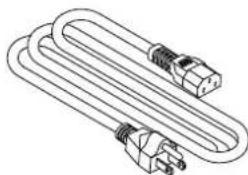 |
| Lens Cover Cable Cover Power Cord (US) | ||
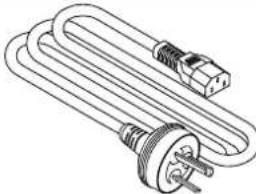 | 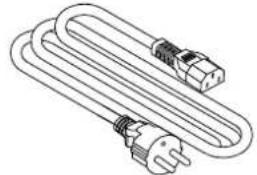 | 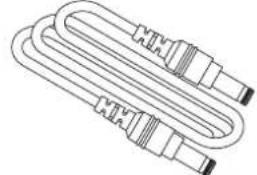 |
| Power Cord (China) Power Cord (EU) | 5V Connection Cable | |

Note: 5V connection cable is for use with optional modules.
2.3 Product Overview
2.3.1 Main Unit
Component Location
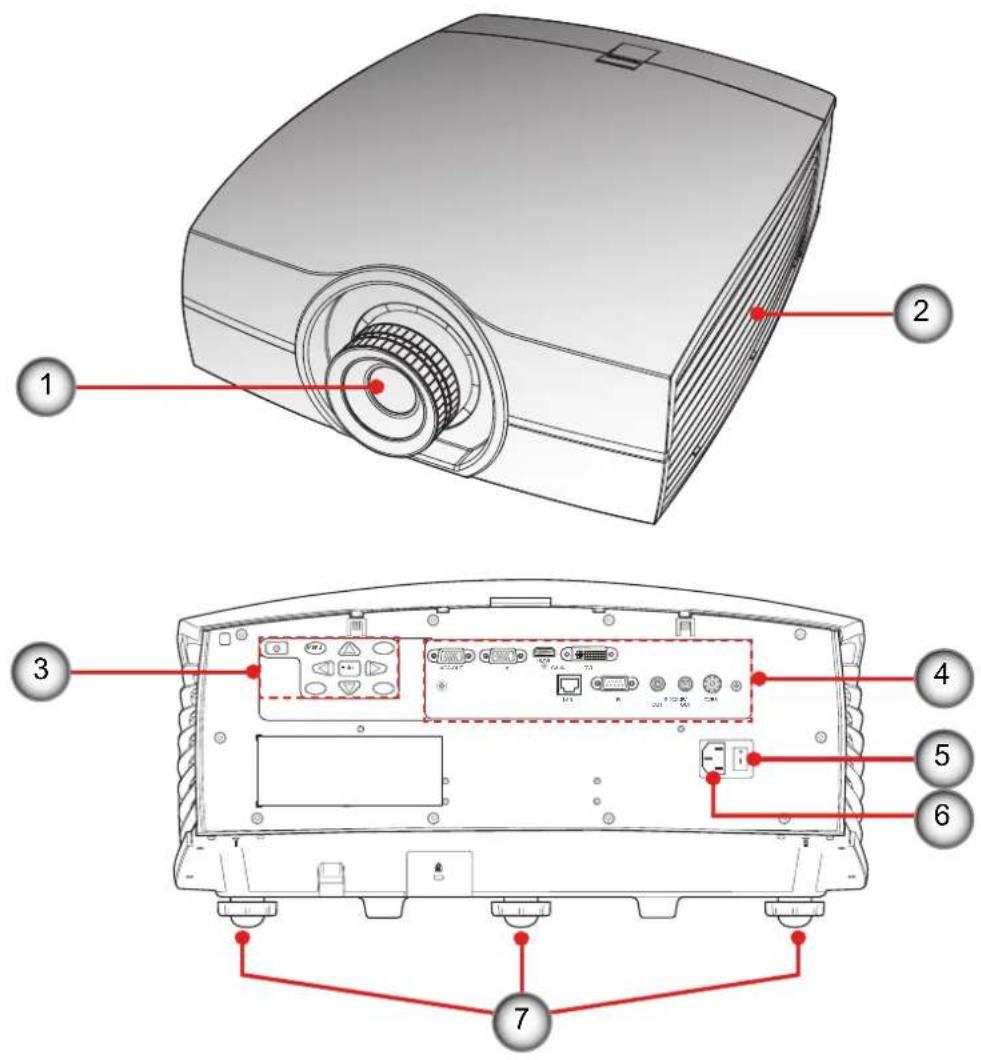
1 Projection Lens Cap
② Ventilation Holes
3 Control Panel
4 Input/Output (I/O) Panel
5 Power Switch
6 Power Socket (AC Input: AC100-240V\~, 50-60Hz)
7 Tilt-Adjustment Feet

Note: The Projection Lens is optional item not a standard accessory in the package.
2.3.2 Input/Output (I/O) Panel
Component Location
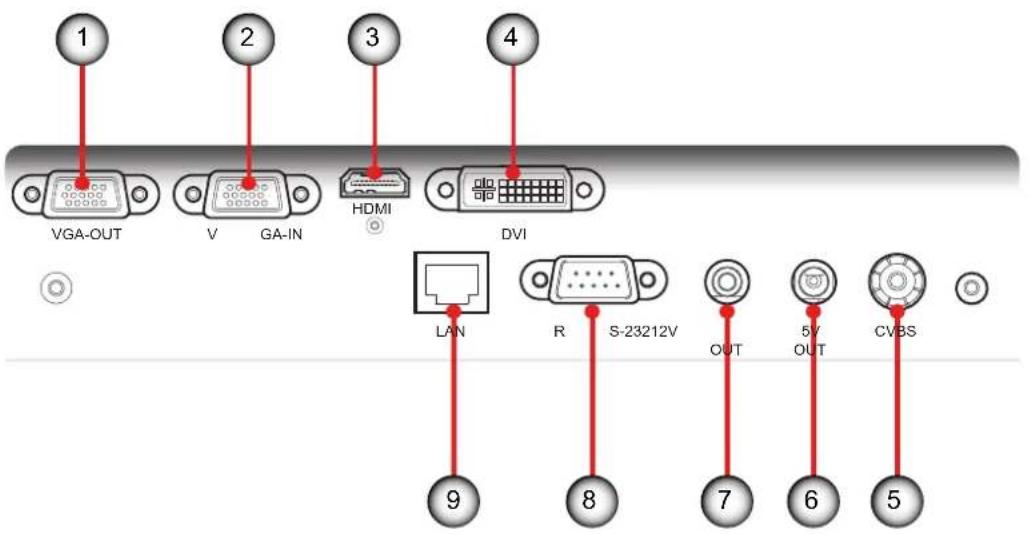
1 Monitor Connector (Loop from VGA)
② VGA Connector (PC Analog Signal/Component Video Input)
③ HDMI Connector
4 DVI-D Input Connector
5 Video Input Connector
6 +5V Relay Connector
7 +12V Relay Connector
8 RS232 Connector
9 Networking Connector RJ45
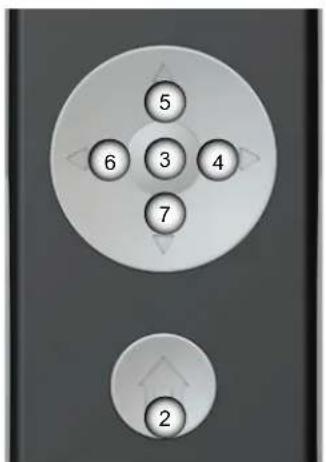
2.3.3 Remote Control
Button Location
1 On/Off
2 Home
3 OK
4 Arrow Right
5 Arrow Up
6 Arrow Left
7 Arrow Down
⑧ LED Indication
9 Battery Compartment
10 IR LED'S
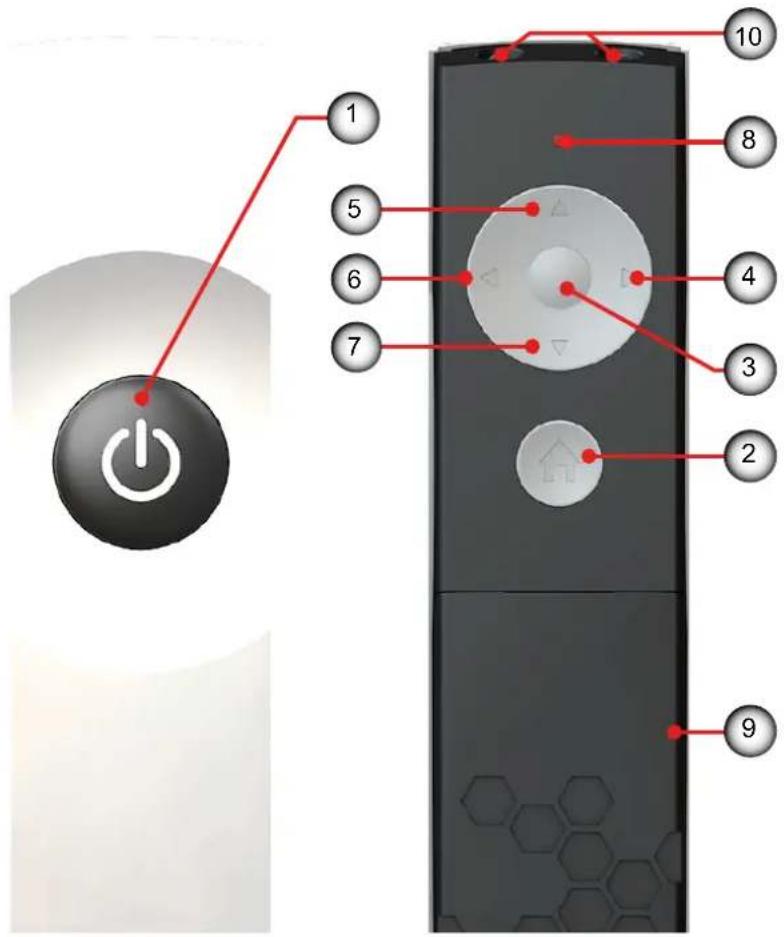
Use the remote control to control these functions.
| Basic Remote Command (Result) Remote Lite (Action) | ||
| Start the projector Press “On/off” | ||
| Turn off the projector Press “On/off” | 1 > 1 | |
| Show main menu on screen Press “Home” | 2 | |
| Move through menu Press “Arrow keys” | 56 47 | |
| Select button Press “OK” | 3 | |
| Select and return to previous menu Press “OK” | 3 | |
| Return to previous menu without selecting Press | “Home” | 2 |
| Clear the menu from the screen Press “Home” | 2 | |
| Activate picture mute function | press 2x “Arrow Up” | Press any key to deactivate. |
| Activate picture freeze function | press 2x “Arrow Left” | Press 2x “Arrow Left” again to deactivate. |

Note: The picture freeze function is not workable when PIP is activated.
3. INSTALLATION
Overview
RCU Battery Installation •
Installing the Lens •
Connecting the Projector •
Powering On/Off the Projector •
Adjusting the Projected Image •
Safety Cover Installation •
Ceiling Mount Installation •
3.1 RCU Battery Installation
Procedure:
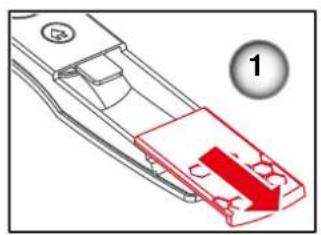
Remove the cover by sliding it in the direction indicated by the arrow.①. Insert two new AAA batteries (observe the polarity).②
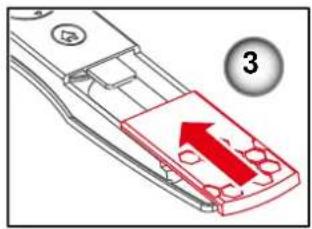
- Replace the cover. ③
natural_image
Diagram of a mechanical component with a red arrow indicating direction, no text or symbols present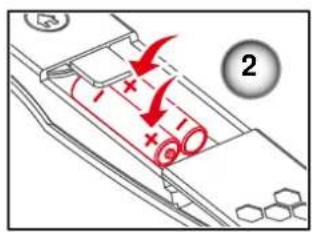

Notes for the Remote Control Unit
- Be sure to insert the batteries in the corresponding orientations to match the polarities.
- Do not mix new batteries with used batteries as it would shorten the life of new batteries or cause leakage.
- Only used AAA batteries as instructed; do not attempt to insert different types of batteries into the remote control.
- If the remote is going to be unused for long periods of time, be sure to remove the batteries to prevent leakage, which could damage the remote control.
- The liquid contents in the batteries is harmful to the skin; do not touch the leakage with your bare hands directly. When installing fresh batteries, be sure to clean up the leakage thoroughly.
- Under most circumstances, you only need to point the remote control towards the screen and the IR signal would be reflected off the screen and picked up by the IR sensor on the projector. But under specific circumstances, the projector may fail to receive signals from the remote control due to environmental factors. When this happens, orient the remote control at the projector and try again.
- If the range of effective remote control signal reception decreases or if the remote control stops working, replace the batteries.
- If the infrared receiver is exposed to fluorescent lamp or strong sunlight, the remote control may not operate normally.
- Refer to the regulations enforced by your local government on the disposal of used batteries; improper disposal could damage the environment.
3.2 Installing the Lens
3.2.1 Lens Selection
Procedure:
Determine the required screen width (SW).1.
Determine the approximate position of the projector in the room.2.
- Start up the Lens Calculator on the Barco website: http://www.barco.com/en/tools/lenscalculator to determine the possible lenses for your configuration. As a result the Lens Calculator window opens.

Notes:
- The Lens Calculator can also be used to determine the position of the projector when the lens type and screen width is known.
- Due to lens tolerances the results of calculated values may be different from measured values. These difference may vary +/- 5%.
3.2.2 Installing the lens for the first time

Warning: This procedure may only be performed by qualified technical service personnel.
Procedure:
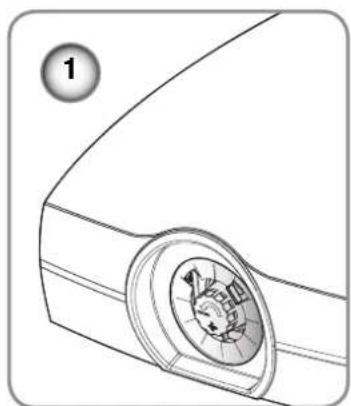
Lens cap should be removed before installing the lens. If not it will damage the projector.①.
Remove the lens cap counterclockwise. 2.
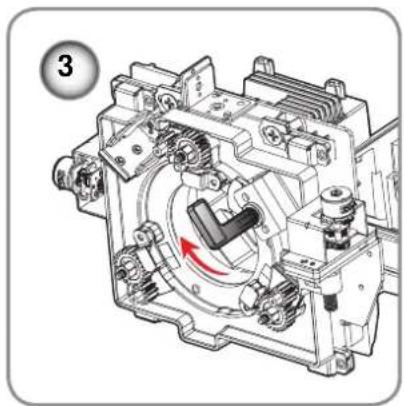
Rotate the bar upwards to release the lock. 3.
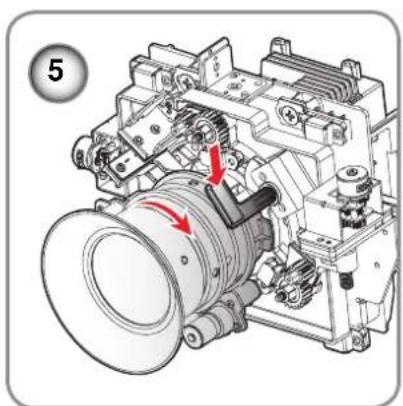
- Be sure the label "TOP" of lens is upward and then push the lens into the position. ④
Rotate the lens clockwise to lock the lens and then rotate the bar downwards.
Put the lens cover on the lens with the sound "click".
natural_image
Diagram of a mechanical component with a circular opening and internal gear-like structure (no text or symbols)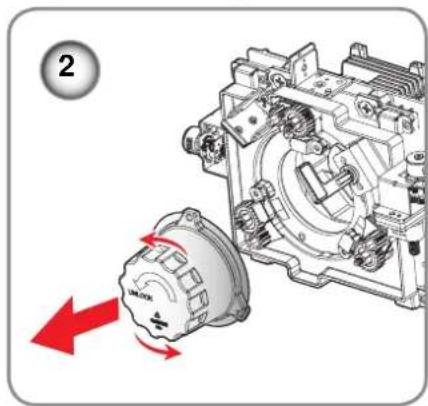
natural_image
Mechanical assembly diagram showing internal components and a red directional arrow (no text or labels)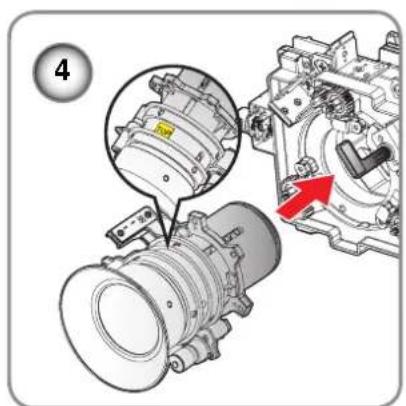
natural_image
Technical illustration of a mechanical assembly with no visible text or symbols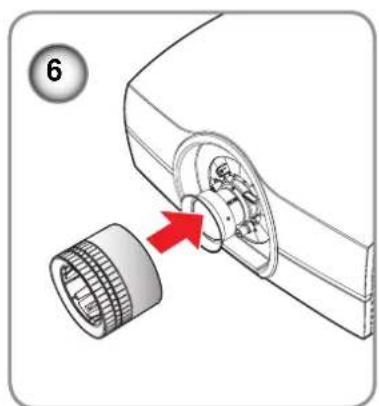
natural_image
Mechanical component diagram showing a cylindrical assembly with a red arrow pointing to a circular opening (no text or symbols)
Caution: Do not transport the projector with any lens installed.
Lens Specification
| Projection Lens P/N R9832755 R9832753 R9832754 R9832756 R9832778 | |||||
| Lens Type Wide Zoom | Standard WXGA/ WUXGA | Standard WUXGA | Long Zoom | Ultra Long Zoom | |
| Throw Ratio (WXGA) 1.00-1.28 1.28-1.61 --- 1.60-3.07 | 3.04-5.78 | ||||
| Throw Ratio (WUXGA) 0.95-1.22 1.22-1.53 1.22-1.53 1.52-2.92 2.90-5.50 | |||||
| Zoom Ratio 1.28X 1.25X 1.25X 1.9X 1.9X | |||||
3.3 Connecting the Projector
3.3.1 Connecting to a Computer or Laptop Wiring Diagram
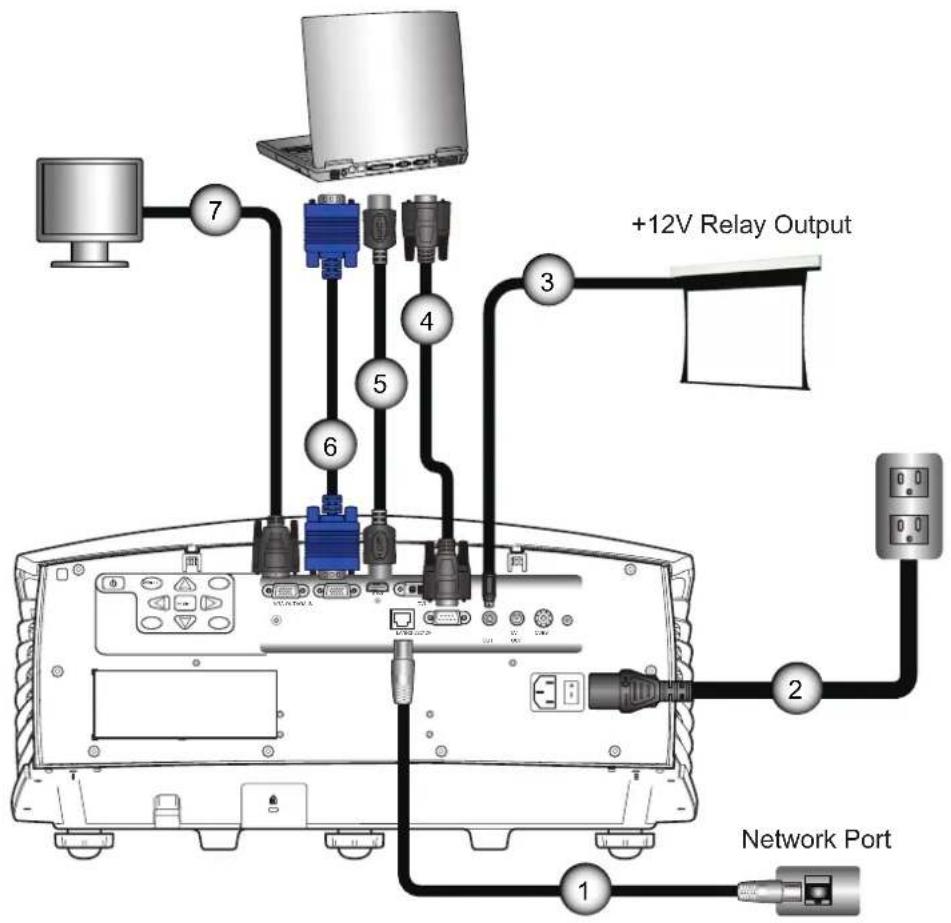
1 Network Cable
5 HDMI Cable
2 Power Cord
6 VGA in Cable
3 12V DC Jack
7 VGA out Cable
4 RS232 Cable
3.3.2 Connecting to Video Sources
Wiring Diagram
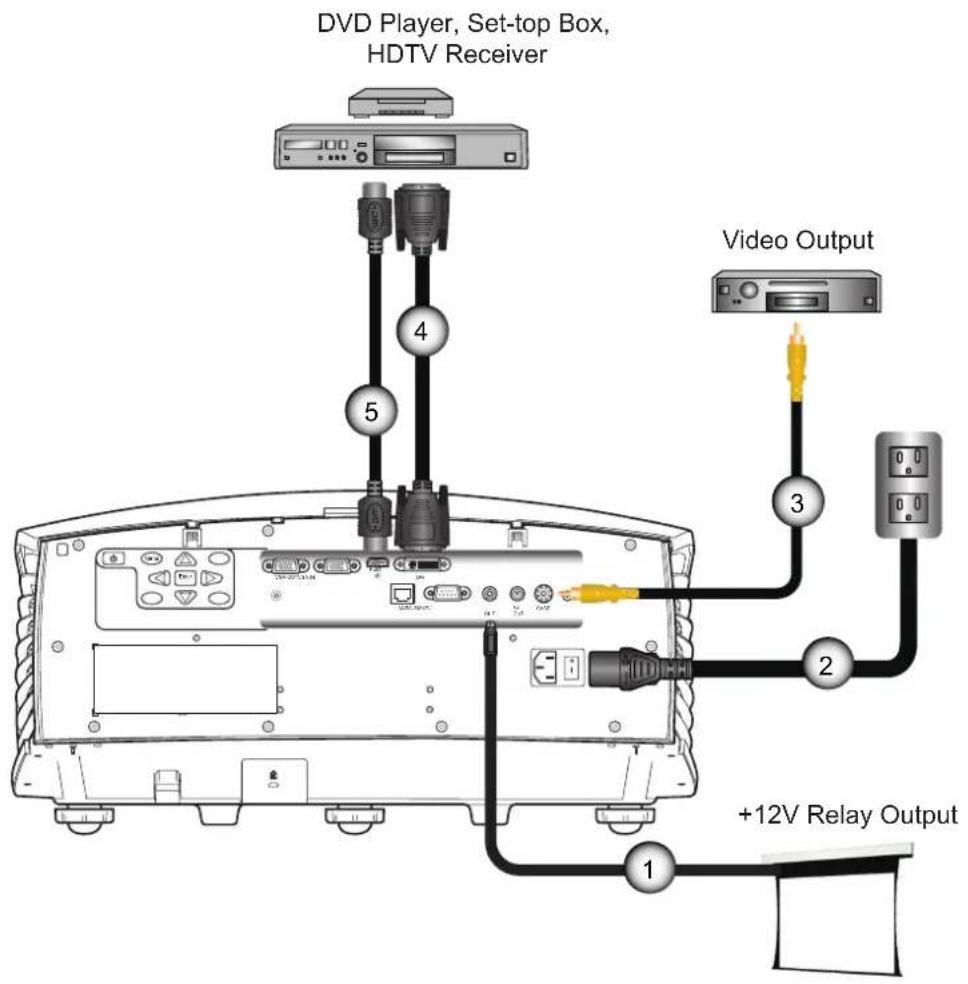
1 12V DC Jack
4 DVI-D Cable
2 Power Cord
5 HDMI Cable
3 Composite Video Cable
3. Installation
3.3.3 Installing the cable cover
Procedure
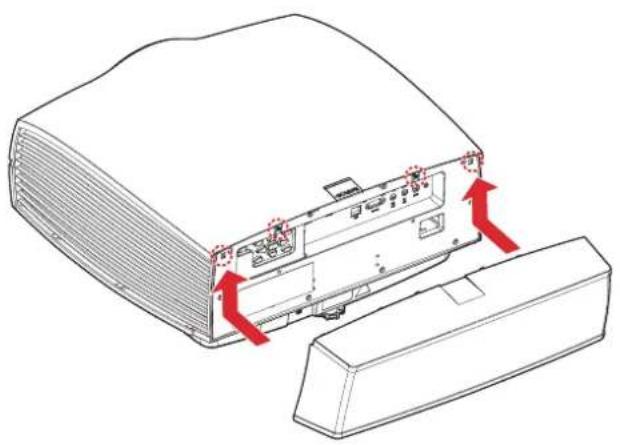
Pull the cable cover upwards to engage the cable cover with the projector.1.
Gently flip the projector over so that its top panel is facing up.2.
Rotate the screws securing the cable cover.3.
natural_image
Diagram of a computer monitor with red arrows indicating ports and components (no text or symbols)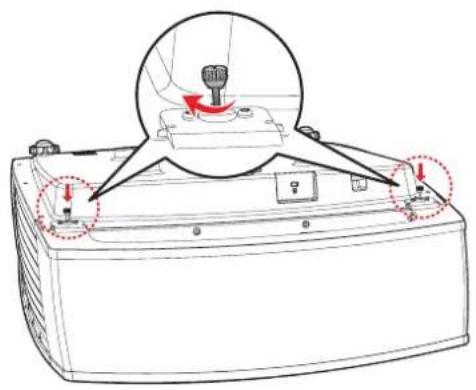

Note: To remove the cable cover, reverse the previous step.
3.4 Powering On/Off the Projector
3.4.1 Powering On the Projector
Procedure:
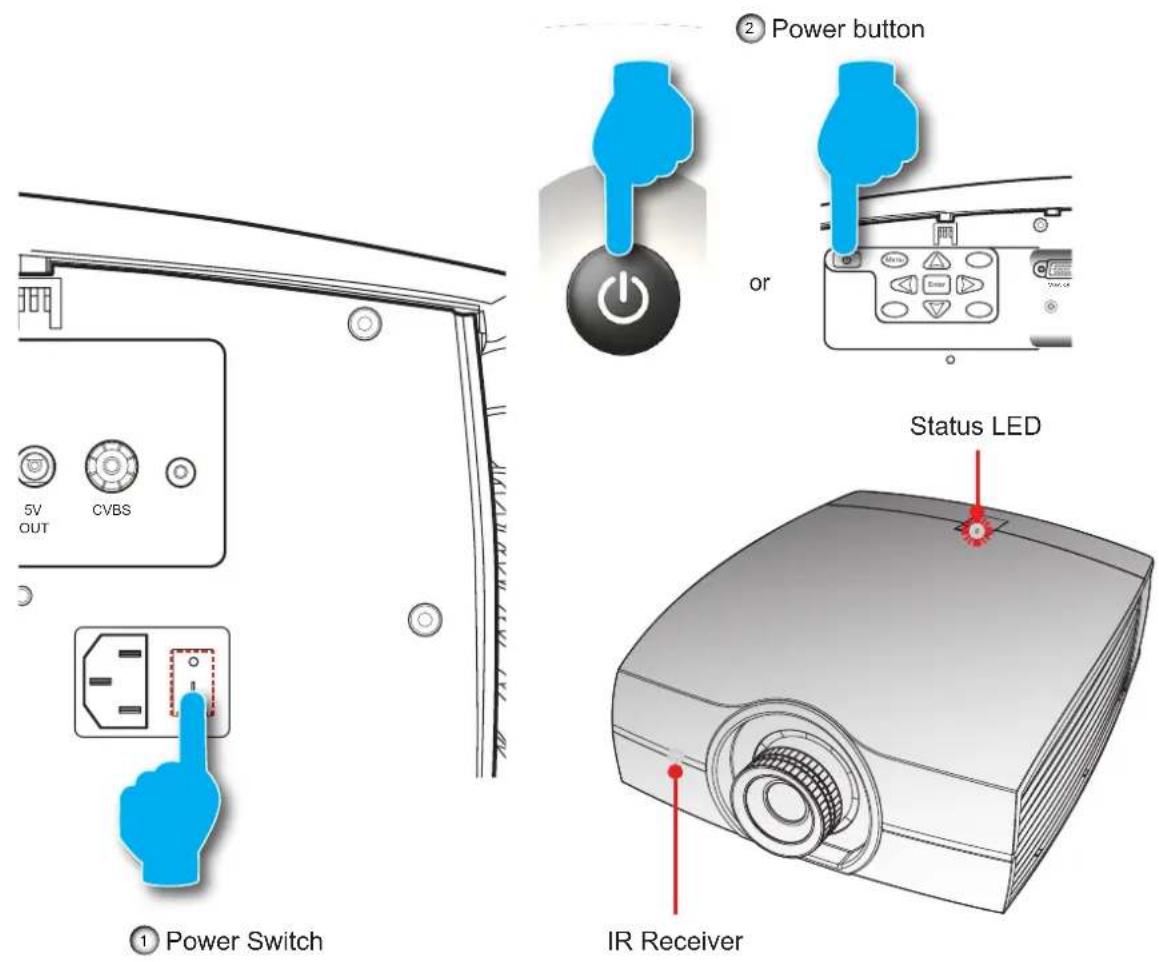
Ensure that the power cord and signal cable are securely connected. Power on the switch ① and wait until the Status LED is solid red.
Turn on the projector by pressing "A" on the remote control or the control panel. The Status LED is one. The startup screen displays in approximately 10 seconds.
Turn on your source. Select an input source by the remote control (HDMI, VGA, DVI or Video). 3. The projector detects the source you selected and displays the image.
3.4.2 Powering Off the Projector
Procedure:
- Press "⏻" key of on the remote control or the control panel, a message displays on the projector's screen.
- Press " 🔊" key again to confirm, otherwise the message disappears after 5 seconds.

CAUTION: Don't turn on the projector immediately after entering Standby mode.
3.5 Adjusting the Projected Image
Adjusting the Projector's Position
To determine where to position the projector, consider the size and shape of your screen, the location of your power outlets, and the distance between the projector and the rest of your equipment. Here are some general guidelines:
Position the projector on a flat surface at a right angle to the screen.
Position the projector to the desired distance from the screen. -
The distance from the lens of the projector to the screen, the zoom setting, and the video format determine the size of the projected image.
The image offset (shift) range for the projector please refer below: -
| Model H V | ||
| PGWX-62L/PGWX-62L-K 30% 100% | ||
| PGWU-62L/PGWU-62L-K 30% 100% | ||
| H: the horizontal image offset range when lens is centered.V: the vertical image offset range when lens is centered. | ||
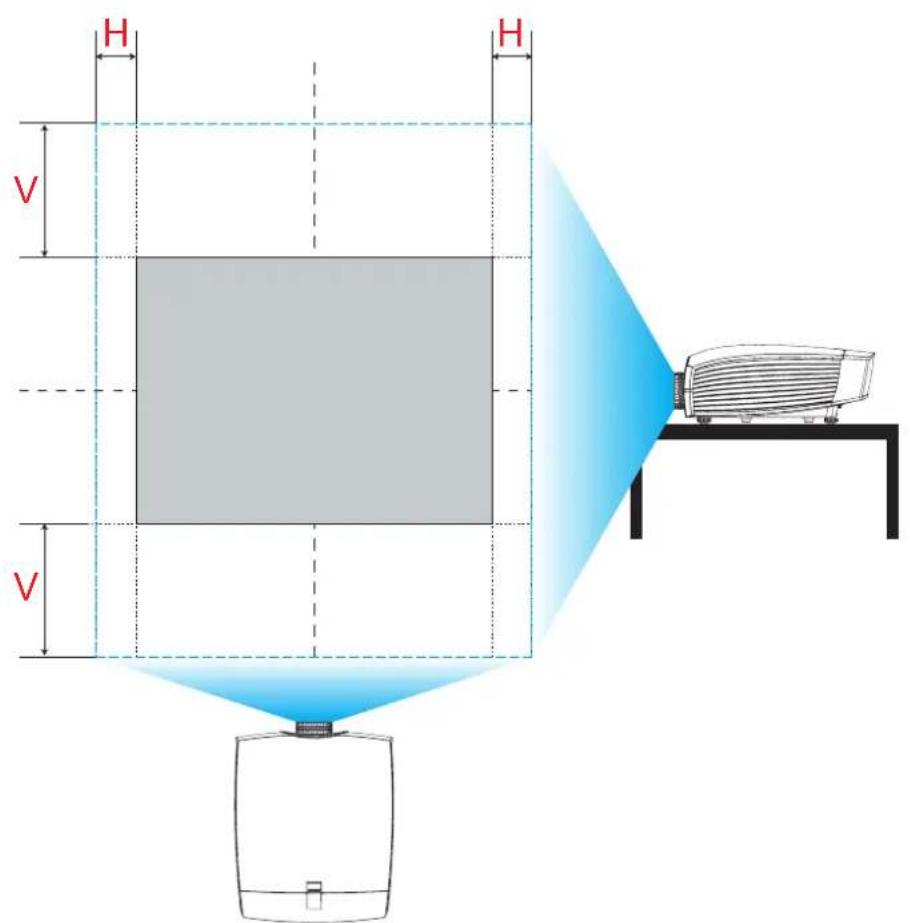
Vertical Image Offset: +/-100%
Horizontal Image Offset: +/-30%
3.6 Safety Cover Installation
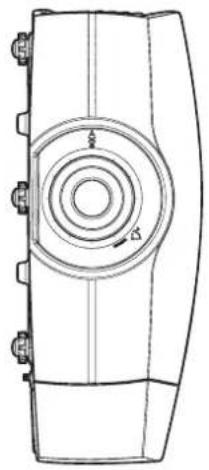
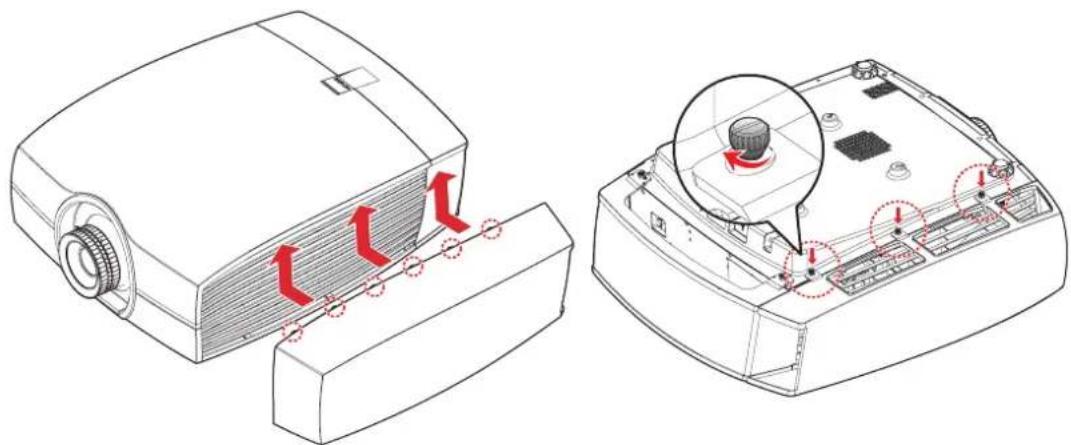
By installing a safety cover (optional part), the projector can be mounted vertically to display images in portrait orientation.
natural_image
Technical line drawing of a mechanical component with concentric circles and bolted ends (no text or symbols)Procedure:
Align and hook the safety cover to the side of the projector, as shown in the illustration below.1.
natural_image
Technical illustration of a projector module with red arrows indicating flow direction (no text or symbols present)Push the safety cover upwards until it locks into place.2.
Gently flip the projector over so that its bottom panel is facing up.3.
Fix the screws to secure the safety cover to the projector.4.

Notes:
- When the projector is in protrait orientation. The OSD will not be able to rotate accordingly and the lens shift will be same as table/ceiling installation direction.
To remove the safety cover, reverse the previous step.
3.7 Ceiling Mount Installation
Requirements:
Ensure the screws used to attach a mount to the projector meet the following specifications:
Screw type: M6*10 -
Mounting dimension -
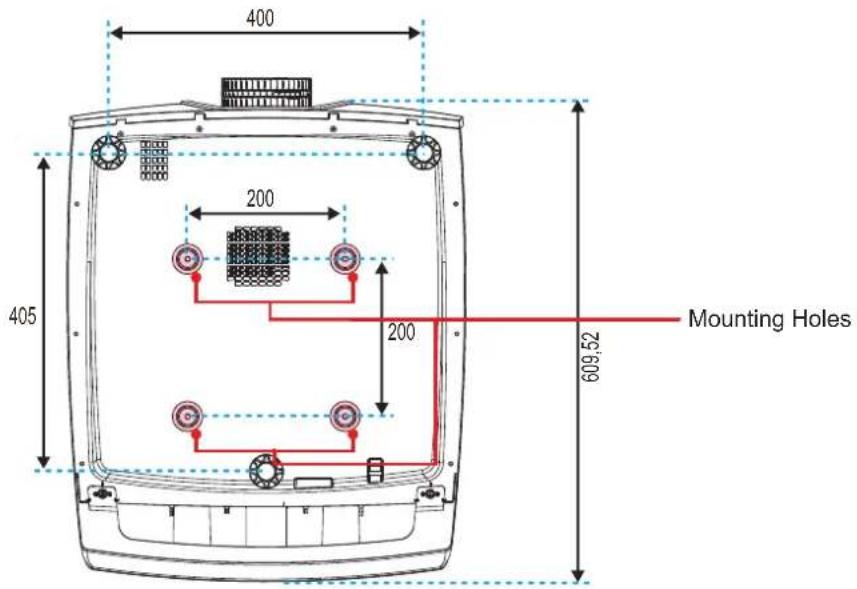

Note: Damage resulting from incorrect installation will void the warranty.
4. USER CONTROLS
Overview
• On-Screen Display Menus
4.1 On-Screen Display Menus
The projector has On-Screen Display (OSD) menus that allow you to make image adjustments and change a variety of settings.
4.1.1 Using the OSD Lite Menus
Main Menu & Buttons
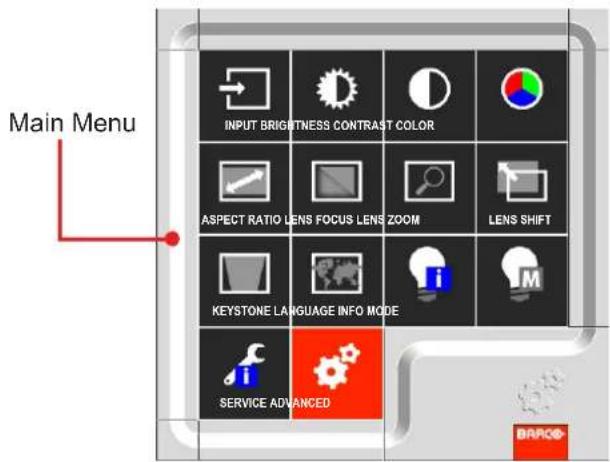
Functionality
| Basic OSD Lite navigation(Result) | Remote Lite(Action) | OSD Lite(On Screen) | |
| Show main menu of OSD Lite on screen | Press “Home” | 2 | main menu appears in bottom right corner |
| To move through the OSD Lite Press | “Arrow keys” |  | button will turn red when the function is available |
| Go to desired function | Press “OK” | 3 | the menu of the desired function will appear |
| Leave the menu or clear the screen | Press “Home” | 2 | the main menu will be displayed or when you are in the main menu the screen will be cleared |
| Hotkey / Short CutRemote Command (Result) | Remote Lite -> OSD Lite(Action -> On Screen) | ||
| To quickly adjust a blurry screen | 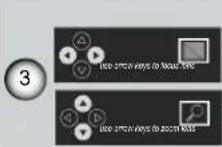 |  |  |
| To mute picture on the projector | 5 > 5 | ||
| Unmute picture on the projector Press any key | |||
| To freeze picture on the projector | 6 > 6 | ||
| Unfreeze picture on the projector | 6 > 6 | ||
| Main menu is on screen, go to button required (Result) | Remote Lite -> OSD Lite(Action -> On Screen) | ||||
| Select input manually |  |  | go to input desired (default setting = AutoSelect) | >3 | |
| Make the image brighter or darker |  |  | 6 4 | >3 | |
| default setting= middle | |||||
| Adapt the contrast between light/dark areas |  |  | 6 4 | >3 | |
| default setting= middle | |||||
| Select color preset most fitted for your image |  |  | best condition to view "computer" images (=default image) | 3 | |
 |  | best option to view movies | 3 | ||
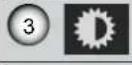 | 100% bright | 3 | |||
| 3 D | provides the simulated DICOM | 3 | |||
| Adjust aspect ratio |  | 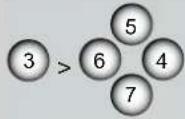 | go to aspect ratio desired (default setting = NATIVE) | >3 | |
| Adjust focus of image |  | 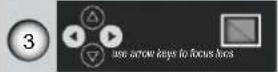 | 6 4 | >3 | |
| Adjust size of image |  | 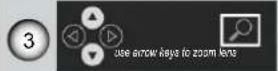 | 5 7 | >3 | |
| Adjust position of image |  |  | 5 6 4 7 | >3 | |
| Adjust keystone |  |  | 5 7 | >3 | |
 | 6 4 | >3 | |||
| Select language |  |  | go to language desired (default setting = ENGLISH) | >3 | |
| Show light source info |  | 3 | >3 | ||
| Select light source mode |  | 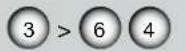 | go to light source mode desired (default setting = NORMAL) | >3 | |
| Show projector info |  | 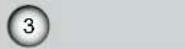 | >3 | ||
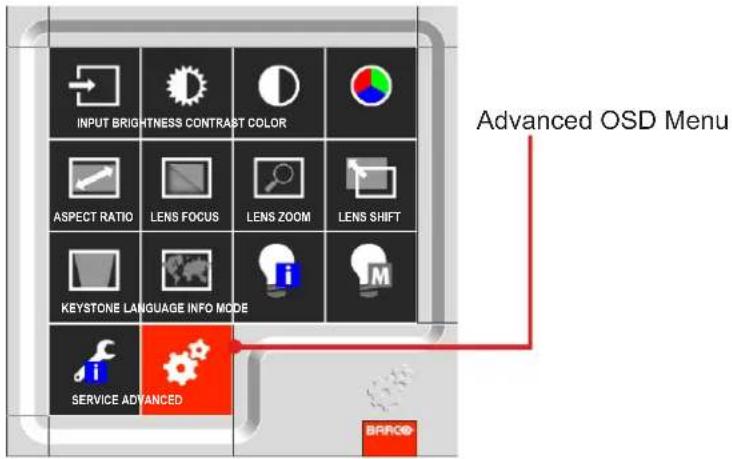
| Enter advanced menu |  | 3 > | Enter advanced menu | >3 | |
4.1.2 Using the Advanced OSD Menus
Procedure:
Select the Advanced button in OSD Lite Menus to enter advanced menu.1.
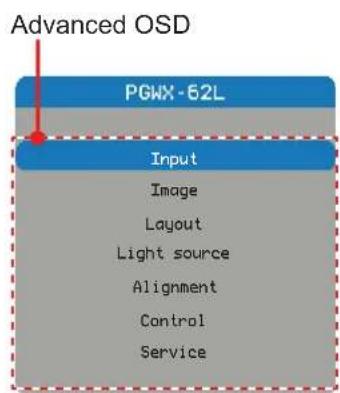
- When the advanced OSD displays, use the arrow keys to navigate in the menu and enter to a desired item.
- Use the UP/DOWN buttons to select the desired item in the submenu and adjust the settings with the LEFT/RIGHT buttons or press ENTER to go to another submenu.
- Select the next item that you want to adjust in the submenu and adjust it as described above. When each item is adjusted, the projector saves the new setting.
- Press HOME to return to the previous menu.
- To exit the OSD menu, press HOME again.
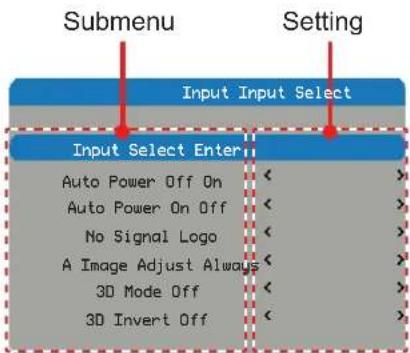
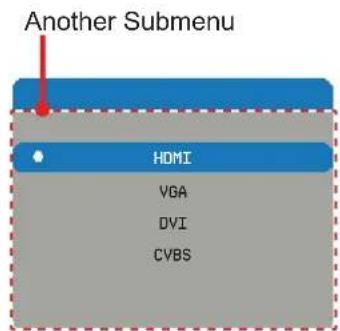
4.1.2.1 Input Menu
| Input | ||
| Input Select | Enter | |
| Auto Power Off | On | > |
| Auto Power On | Off | > |
| No Signal | Logo | > |
| A Image Adjust | Always | > |
| 3D Mode | Off | > |
| 3D Invert | Off | > |
PGWX-62L / PGWX-62L-K
| Input | ||
| Input Select | Enter | |
| Auto Power Off | On | > |
| Auto Power On | Off | > |
| No Signal | Logo | > |
| A Image Adjust | Always | > |
PGWU-62L / PGWU-62L-K
Input Select
Select the active source, include the following options:
HDMI • DVI •
VGA • CVBS •
Auto Power Off
Switch off after a while when no sync detected.
Off: Default value. Disable auto power off function.
On: Projector will switch off automatically when no signal for 20 minutes.
Auto Power On
The projector turns on automatically when switch on projector after connecting power.
- Off: Default value. The projector stays off when AC power is applied. The user must power on the projector.
On: The projector turns on automatically when switch on projector after connecting power.
No Signal
Select what image displayed when no signal.
- Logo: Default value. Search screen is the factory logo picture.
- Blue: Search screen is solid blue (RGB=0,0,255).
- Black: Search screen is solid black (RGB=0,0,0).
- White: Search screen is solid white (RGB=255,255,255).
A Image Adjust
Select the mode of the auto image menu.
- Always: Default value. Always execute the function of image\Auto image even if the timing is the same as previous source.
- Off: Never execute the function of image\Auto image.
- Auto: Execute the function of image\Auto image when you get a different timing then previous source.
3D Mode
Select the 3D mode
- Off: Default value.
- On: Set "On" to turn 3D settings on for 3D images. Compatible 3D source, 3D content and active shutter glasses are required for 3D viewing.
3D Invert (off & on)
- Off: Default value.
- On: Set 3D invert "On" to invert left and right frame contents.
4.1.2.2 Image Menu
| IMAGE | |||
| Brightness | < | 50 | > |
| Contrast | < | 50 | > |
| Saturation | < | 50 | > |
| Tint | < | 50 | > |
| Sharpness | < | 0 | > |
| Noise Reduction | < | 0 | > |
| Color Temp | < | Native | > |
| Input Balance | Enter | ||
| Aspect Ratio | Auto | ||
| Timings | Enter | ||
| Auto Image | Execute | ||
| Display Mode | < | Presentation | > |
Brightness
Adjust the brightness of the image.
Press the to darken image. •
Press the to lighten the image. •
Contrast
Adjust the contrast of the image.
Press the to decrease the contrast.
Press the to increase the contrast.
Saturation
Adjust the color saturation of the image.
Press the to decrease the amount of saturation in the image.
Press the to increase the amount of saturation in the image.
Tint
Adjust the tint (color balance between red and green) of the image.
Press the to increase the amount of green in the image.
Press the to increase the amount of red in the image.
Sharpness
Adjust the sharpness of the image.
Press the to decrease the sharpness.
Press the to increase the sharpness.
Noise Reduction
Reduce temporary and/or spatial noise in the image.
Press the to decrease the noise.
Press the to increase the noise.
Note: Saturation, Tint and Noise reduction function supported source: CVBS.
Color Temp
Adjust the color temperature of the image.
Cool: Apply "Cool" color temperature setting.
Bright: Apply "Bright" color temperature setting.
Warm: Apply "Warm" color temperature setting.
Warmest: Apply "Warmest" color temperature setting.
Input Balance
Adjust the gain and offset of the red, green, or blue channel of the image. This is similar to adjusting contrast, but only affects a single color channel.
Offset: Refer to the control of color imbalance in the darker areas of the projected image.
Gain: Refer to the control of color imbalance in the brighter areas of the projected image.
Press the to decrease the input balance.
Press the to increase the input balance.
Aspect Ratio
Adjust the aspect ratio of the image.
4:3: The input image is resized to a 4:3 aspect ratio.
16:10:The input image is resized to a 16:10 aspect ratio.
- Native: the original aspect ratio of the source is kept and fit to screen. This is height or width whatever comes first.
• Auto: Automatically selects the appropriate display format.
Timings
Adjust the horizontal position, phase or vertical position of the image.
Note: Timings function supported sources: analog computer, analog component.
- Press the to decrease the horizontal position, phase or vertical position.
- Press the to increase the horizontal position, phase or vertical position.
Auto Image
Execute the auto image adjust.
- Press EXECUTE to adjust the image size, phase and timing automatically.
- Force the projector to reacquire and lock to the input signal. This is useful when signal quality is marginal. After executing this command, the projector will enter the search status. After the signal is reacquired, the image settings (H start, H phase, V start) will be optimized for the input signal.
Display Mode
Change the sequence and waveform of the image.
Bright: Default value. This preset provides maximum lumens output.
- Presentation: This preset provides the best possible image for presentation and computer graphics.
• Video: This preset provides the best possible image for video sources (DVD, TV, etc.)
• DICOM: This preset provides the simulated DICOM.
4.1.2.3 Layout Menu
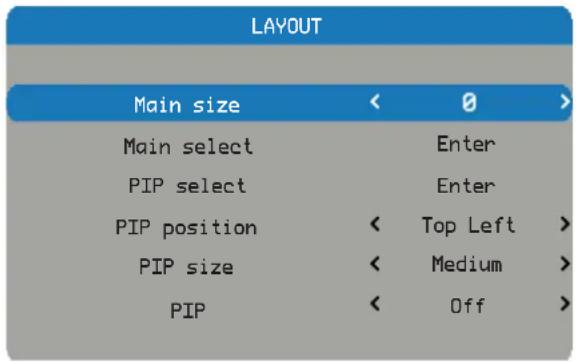
Main size
Set the size of the main window.
This function is zoom out/cropping image, the location of image will be kept in center.
Press the to decrease the main size.
Press the to increase the main size.
Note: Please be noticed that for the PGWU-62L/PGWU-62L-K model. When the main size setting is ≥ 3 at composite input, the ripple picture symptom can be found.
Main select
Select the source for the main window.
HDMI • DVI •
VGA • Video •
PIP select
Select the source for the PIP window. This function is grey when PIP is Off.
HDMI • DVI •
VGA • Video •
PIP position
Set the position of the PIP window.
Top Right: Default value for this function. •
Top Left •
Bottom Left •
- Bottom Right
PIP size
Set the size of the PIP window.
The PIP size can be different for different input resolutions.
- Small: PIP window is about 1/9 width of the entire display.
•Medium: PIP window is about 1/8 width of the entire display.
• Large: PIP window is about 1/7 width of the entire display.
PIP
Activate the PIP window.
Note: The ripple picture symptom (a bit vibrated behavior) occurred at main picture under 480i, 576i & 1080i while PIP mode activate, is a bandwidth limitation.
- Off: Default value. The PIP function is disabled and only main window is visible.
- On: The PIP image is on top of the main image.
4.1.2.4 Light Source Menu
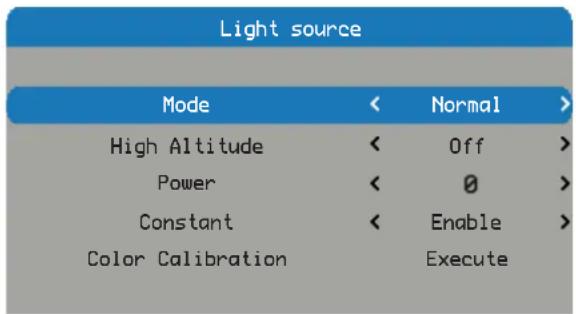
Mode
Set light source mode of the projector.
- Normal: Default value. When set to normal mode, the wattage of the laser diode will be at full power.
Eco: When set to eco mode, the wattage of the laser diode will be at eco power.
Power: Enable laser power adjust.
High Altitude
When "On" is selected, the fans will spin faster. This feature is useful in high altitude areas where the air is thin.
Off: Default value. •
On: Set high altitude mode on.
Power
Set laser power level of the projector.
Note: Power function will not be available if you have set the laser to Eco or Normal modes.
Press the to decrease the power level.
Press the to increase the power level.
Constant
When “Enable” is selected, the light level will apply more power to maintain the constant brightness.
- Enable: The light level will apply more power to maintain the constant brightness as the laser brightness decays naturally over time.
Disable: Default value. •
Color Calibration
Calibrate light sensor for Constant mode to work properly. It will take 3 minutes to complete the color calibration.
4.1.2.5 Alignment Menu
ALIGNMENT
| Rear projection | < | Off | > |
| Ceiling mode | < | Off | > |
| Lens control | Enter | ||
| Keystone | < | 0 | > |
| Gamma | < | Film | > |
| Internal pattern | Enter | ||
| Custom color space | Enter | ||
| Lens to midposition | Execute |
Rear projection
Reverse the image horizontally when the setup is with the projector at the rear of the screen.
Off: Default value. Projector is in front projection mode.
On: Projector is in rear projection mode.
Ceiling mode
Reverse the image vertically when the setup is with the projector which is mounted with a ceiling mount.
Off: Default value. Projector is in the table mode.
On: Projector is in ceiling mode.
Lens control
Zoom: Lens zoom. •
Focus: Lens focus. •
Enter to shift: Each time enter is pressed it will go from zoom/focus to shift to zoom/focus.
Left/Right: Lens shift left/right. •
UP/Down: Lens shift up/down. •
- Enter to zoom/focus: Each time enter is pressed it will go from zoom/focus to shift to zoom/focus.
Keystone
Adjust vertical keystone.
Gamma
Set gamma type.
•Film: for home theater.
•Video: for video or TV source.
• Graphics: for image source.
- Standard: for PC or computer source.
Internal pattern
The projector comes with some standard built-in patterns for testers to calibrate the equipment.
- None - White - Grid
Custom color space
Adjust the .x and .y values of the primary colors and white.
| Custom color space | |||
| Enable | < | On | > |
| Auto Test Pattern | < | On | > |
| Red Weighting of Red | < | 100 | > |
| Green Weighting of Red | < | 0 | > |
| Blue Weighting of Red | < | 0 | > |
| Green Weighting of Green | < | 100 | > |
| Red Weighting of Green | < | 0 | > |
| Blue Weighting of Green | < | 0 | > |
| Blue Weighting of Blue | < | 100 | > |
| Red Weighting of Blue | < | 0 | > |
| Green Weighting of Blue | < | 0 | > |
| Red Weighting of White | < | 100 | > |
| Green Weighting of White | < | 100 | > |
| Blue Weighting of White | < | 100 | > |
| Reset to default | |||
Enable: Set to On to enable CCN. The default value is Off.
• Auto Test Pattern: Set to Off to disable the Auto Test Pattern function. The default value is On.
- Red Weighting of Red: Press the / to decrease/increase the custom color space.
- Green Weighting of Red: Press the / to decrease/increase the custom color space.
- Blue Weighting of Red: Press the / to decrease/increase the custom color space.
- Green Weighting of Green: Press the / to decrease/increase the custom color space.
- Red Weighting of Green: Press the / to decrease/increase the custom color space.
- Blue Weighting of Green: Press the / to decrease/increase the custom color space.
- Blue Weighting of Blue: Press the / to decrease/increase the custom color space.
- Red Weighting of Blue: Press the / to decrease/increase the custom color space.
- Green Weighting of Blue: Press the / to decrease/increase the custom color space.
- Red Weighting of White: Press the / to decrease/increase the custom color space.
- Green Weighting of White: Press the / to decrease/increase the custom color space.
- Blue Weighting of White: Press the / to decrease/increase the custom color space.
- Reset to default: Resets all color points to default value.
Lens to midposition
Set the lens in the center/on axis position.
4.1.2.6 Control Menu
| CONTROL | |||
| Standby 5V | < | Off | > |
| Eco network power | < | On | > |
| RS232 baudrate | < | 9600 | > |
| Network | Enter | ||
| Menu position | < | Top Left | > |
| Auto source | < | Off | > |
| Language | Enter | ||
Standby 5V
Switch on/off for the 5V output in standby.
Off: Default value. 5V output off in standby.
On: 5V output on in standby.
Eco network power
Switch on/off the network power to save power.
Off: Default value. Network is enable in standby and the power consumption is under 3W.
On: Network is not available in standby and the power consumption is under 0.5W.
RS232 baudrate
Select RS232 baudrate.
115200: Default value for this function. •
9600/19200: Other options. •
Network
View the relevant network information.
IP Address: Default value is 192.168.0.100.
Subnet Mask: Default value is 255.255.255.0.
Gateway •
- DHCP: Default value is Off, key in the IP address manually and press APPLY.
- Apply:
- The DHCP function must be set to "On" and press "Apply" to get the IP address from DHCP server automatically.
- It takes several seconds to get the IP.
- In case of fail to get the IP address, please re-apply again.
Menu position
Shift the menu box to a position.
- Center: Default value for this function.
- Top Left
- Top Right
- Bottom Left
- Bottom Right
Auto source
Automatic source searching.
- On: Default value. Automatic source searching is enabled.
- Off: Automatic source searching is disabled.
Language
Select the language to display the OSD Menu.
- English
- Spanish
• Russian
• German
- Simplified Chinese
• Korean
- French
- Japanese
•Turkey
The designated model number of the projector.
Serial no
The designated serial number of the projector.
Soft version
The version of software installed on the projector.
Main/PIP source
Display the current main and PIP sources.
Active resolution
Display the current resolution of the current source.
Pixel clock
Display the pixel clock of the current input signal.
Vert. refresh
Display the current vertical refresh rate of the current source.
Hor. refresh
Display the current horizontal refresh rate of the current source.
Sync type
Value is one of the following:
Separate: • Signal has separate H&V syncs.
Sync on Green: • Sync on green channel.
Composite: S • ync embedded in video signal.
Color space
Display current color space.
Projector runtime
Display the projector's total operating hours.
Factory Reset
Set all persistent settings back to default values.
This function will not apply to items including No Signal, Network, Language, and Projector Hours.
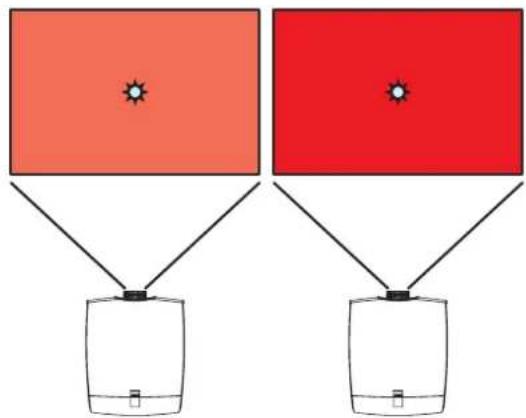
4.2 Color Coordinate Adjustment

Note: If two or above projectors are used for blending, and there is color difference between the projectors, please adjust the color coordinate.
Placement:
Place the lux meters at the marked position "★
natural_image
Two identical diagrams showing a sun symbol above a container with liquid, connected by wires to each other (no text or labels)Procedure:
Press "Menu" -> "Advanced" -> "Alignment" -> "Custom 1. color space.
ALIGNMENT
| Rear projection | < | Off | > |
| Ceiling mode | < | Off | > |
| Lens control | Enter | ||
| Keystone | < | 0 | > |
| Gamma | < | Film | > |
| Internal pattern | Enter | ||
| Custom color space | Enter | ||
| Lens to midposition | Execute |
Select "Red Weighting of Red" to show a Red pattern.2.
Assume lux of two screens are:3.
Left: 1800 lux
Right: 1500 lux
Reduce the OSD value of the left projector to have the 4. lux close to the right one, ex. 83.
Custom color space
| Enable | < | On | > |
| Auto Test Pattern | < | On | > |
| Red Weighting of Red | < | 100 | > |
| Green Weighting of Red | < | 0 | > |
| Blue Weighting of Red | < | 0 | > |
| Green Weighting of Green | < | 100 | > |
| Red Weighting of Green | < | 0 | > |
| Blue Weighting of Green | < | 0 | > |
| Blue Weighting of Blue | < | 100 | > |
| Red Weighting of Blue | < | 0 | > |
| Green Weighting of Blue | < | 0 | > |
| Red Weighting of White | < | 100 | > |
| Green Weighting of White | < | 100 | > |
| Blue Weighting of White | < | 100 | > |
| Reset to default | |||

Note: Turn on "Auto Test Pattern", the item will show the internal R/G/B pattern automatically.
Follow from step (2.) to (4.) to adjust "Green Weighting of Green" and "Blue Weighting of Blue" to have green/5. blue pattern with closed values.
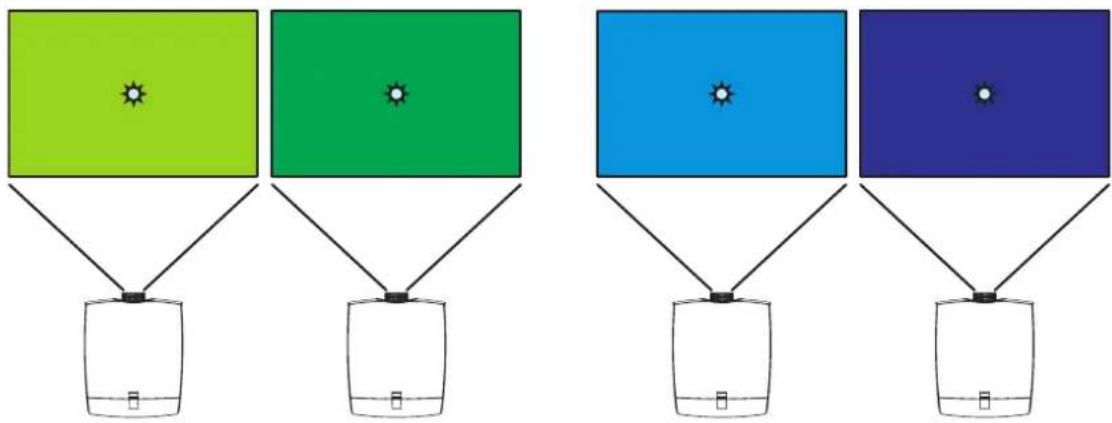
Then the color performance of left/right screens is closed to each other.6.
If you would like to enhance color X with a little color Y, you can increase "Y weighting of X".7.
4.3 Constant Light Output

Note: If the user hopes to maintain the constant light output, please enable the "Constant" function.
Procedure:
Press "Menu" -> "Advanced"-->"Image"-->"Display mode", then choose one display mode: "Presentation" or "Video" or "Bright" or "DICOM SIM".
| 1. IMAGE | |||
| Brightness | < | 50 | > |
| Contrast | < | 50 | > |
| Saturation | < | 50 | > |
| Tint | < | 50 | > |
| Sharpness | < | 0 | > |
| Noise Reduction | < | 0 | > |
| Color Temp | < | Native | > |
| Input Balance | Enter | ||
| Aspect Ratio | Auto | ||
| Timings | Enter | ||
| Auto Image | Execute | ||
| Display Mode | < | Presentation | > |
Press "Light Source"->"Mode", select power, then "Power" function will be activated. Select "Power" and adjust 2. "0,1,2......10" levels of power adjustment, the users can set desired constant light output level.
Choose “Constant” to select “Enable” or “Disable”, the projector will keep the preset brightness level for certain 3. period of time until the light source decay to this level.
When “Constant” is disabled, then the “Color 4. Calibrate” will be workable from “grey” to “black”, in case the users want to calibrate the constant function, or after replacing main board or light engine, or both.
| Light source | |||
| Mode | < | Normal | > |
| High Altitude Off | < | > | |
| Power | < | 0 | > |
| Constant Enable | < | > | |
| Color Calibration Execute | |||

Notes:
- The color temperature will be not a constant value when the constant light output function is activated.
- It is suggested to set the power below level 10 (full power), in order to remain allowance to maintain the constant light output for a period of time.
5. TROUBLESHOOTING
Overview
- Image Problems
- LED Indication Chart
- Warning Message

Note: If you experience a problem with your projector, please refer to the following information. If a problem persists, please contact your local reseller or service center.
5.1 Image Problems
No image appears on-screen •
- Ensure all the cables and power connections are correctly and securely connected as described in the "Installation" section.
Check if all pins are ok in the connector. -
Check if the projection laser has been securely installed. -
Note: This projector can not display 1920*1200 resolution but only 1920*1200 RB (reduce blanking).
Partial, scrolling or incorrectly displayed image •
If you are using a PC (for Windows 95, 98, 2000, XP, Windows 7): -
Open the "My Computer" icon, the "Control Panel" folder, and then double click on the "Display" icon.
▶ Select the "Settings" tab.
▶ Verify that your display resolution setting is lower than or equal to WUXGA (1920 1200).
Click on the "Advanced Properties" button. If the projector is still not projecting the whole image, you will also need to change the monitor display you are using. Refer to the following steps.
▶ Verify the resolution setting is lower than or equal to WUXGA (1920 1200).
▶ Select the "Change" button under the "Monitor" tab.
Click on "Show all devices". Next, select "Standard monitor types" under the SP box; choose the resolution mode you need under the "Models" box.
▶ Verify that the resolution setting of the monitor display is lower than or equal to WUXGA (1920 1200).
- If you are using a Notebook:
▶ First, follow the steps above to adjust resolution of the computer.
▶ Press the appropriate keys listed below for your notebook manufacturer to send signal out from notebook to projector. Example: [Fn]+[F4]
| Acer ⇒ | [Fn]+[F5] | IBM/Lenovo ⇒ | [Fn]+[F7] |
| Asus ⇒ | [Fn]+[F8] | HP/Compaq ⇒ | [Fn]+[F4] |
| Dell ⇒ | [Fn]+[F8] | NEC ⇒ | [Fn]+[F3] |
| Gateway ⇒ | [Fn]+[F4] | Toshiba ⇒ | [Fn]+[F5] |
Mac Apple:
System Preference Display Arrangement Mirror display
- If you experience difficulty changing resolutions or your monitor freezes, restart all equipment including the projector.
- The recommended resolution per projector is the native resolution so PGWX-62L/PGWX-62L-K 1280 800 and PGWU-62L/PGWU-62L-K 1920 1200.
- The screen of the Notebook or PowerBook computer is not displaying your presentation
- If you are using a Notebook PC
Some Notebook PCs may deactivate their own screens when a second display device is in use. Each of them has a different way to be reactivated. Please refer to your computer's manual for detailed information.
Image is unstable or flickering •
Use “-TIMINGS\H PHASE” to correct it.
Change the monitor color setting on your computer. -
Image has vertical flickering bar •
Use “-AUTO IMAGE” to make an adjustment.
- Check and reconfigure the display mode of your graphic card to make it compatible with the projector.
Image is out of focus •
- Adjust lens focus to fit.
- Make sure the projection screen is between the required distance.
- The image is stretched when displaying 16:9 DVD title
- When you play anamorphic DVD or 16:9 DVD, the projector will show the best image when the projector display mode is set to 16:9 in the OSD.
- If you play 4:3 format DVD titles, please change the format to 4:3 in the projector OSD.
- If the image is still stretched, you will also need to adjust the aspect ratio by referring to the following:
- Please setup the display format as 16:9 (wide) aspect ratio type on your DVD player.
• Image is too small or too large
- Adjust lens zoom to fit. If it does not fill the screen properly, please change the correct lens or change the position of the projector.
• Image has slanted sides
- Reposition the projector so that it is perpendicular to the screen.
5.2 LED Indication Chart
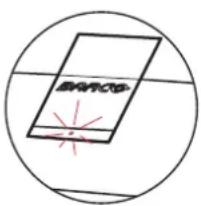
Status LED
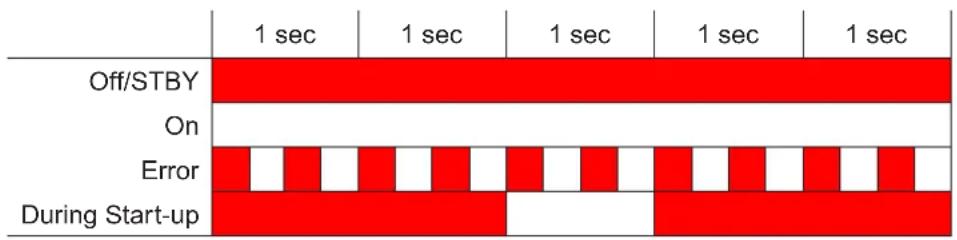
other
| Category | 1 sec | 1 sec | 1 sec | 1 sec | 1 sec | | ---------------- | ----- | ----- | ----- | ----- | ----- | | Off/STBY | | | | | | | On | | | | | | | Error | | | | | | | During Start-up | | | | | |5.3 Warning Message
| Message Description | |
| Over Temperature | Overheating: When you see the warning message, it means the temperature is over operational temperature. |

Note: Please contact service people when you see those warning messages!
6. MAINTENANCE & SERVICE
Overview
Replacing the Lens •
6.1 Replacing the Lens

Warning: This procedure may only be performed by qualified technical service personnel.
Procedure:
Turn the projector off and unplug the power cord. 11.
Allow the projector to cool down for at least 1 minute then start the lens replacement. ②
Remove the lens cover from the projector.③
Rotate the bar upwards and then rotate the lens counterclockwise to remove it from the projector.④.
- Replace the lens to be installed, be sure the label "TOP" of lens is upward and then push the lens into the position. ⑤
Rotate the lens clockwise to lock the lens and then rotate the bar downwards.
Put the lens cover to the projector with the sound "click".
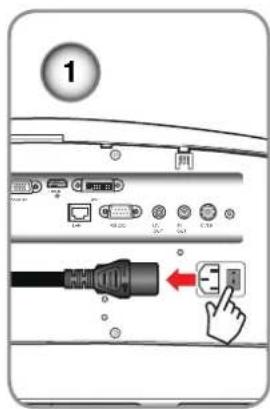
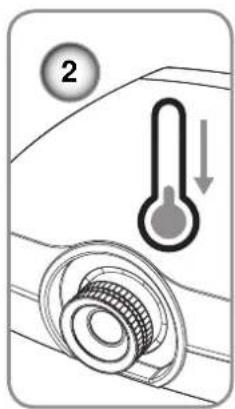
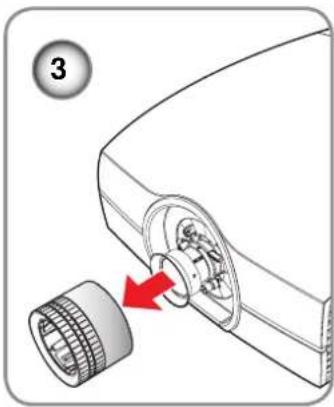
natural_image
Diagram of a car wheel assembly with a red arrow indicating rotation or adjustment (no text or symbols present)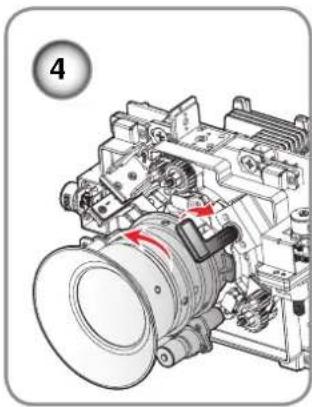
natural_image
Mechanical assembly diagram showing a motor or fan component with red arrows indicating motion direction (no text or symbols present)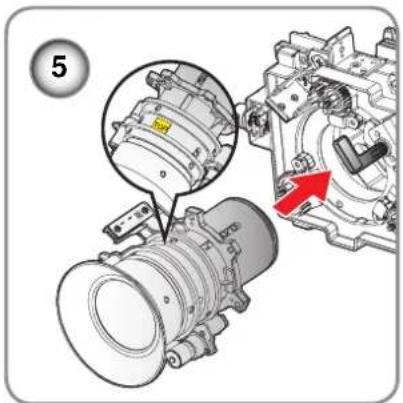
natural_image
Mechanical assembly diagram showing a cylindrical component being inserted into a motor housing, with a red arrow indicating motion direction (no text or symbols present)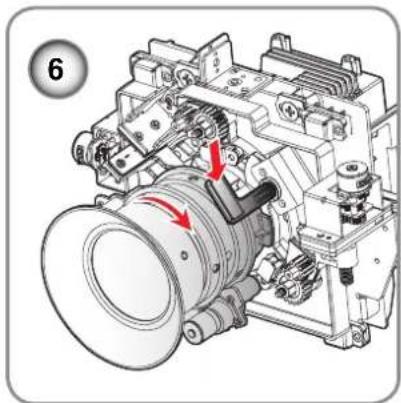
natural_image
Mechanical assembly diagram showing a motor or engine component with red arrows indicating motion direction (no text or symbols present)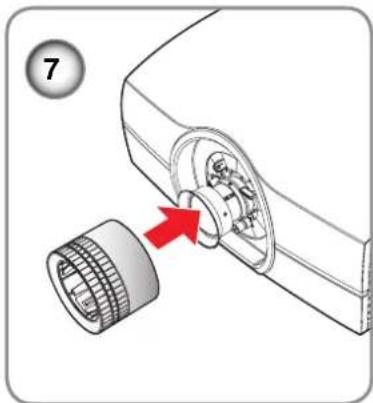
natural_image
Mechanical component diagram showing a cylindrical assembly with a red arrow pointing to a circular feature (no text or symbols)
Caution: Do not transport the projector with any lens installed.

Note: Please verify that all the plastic caps removed from the lens prior inserting in the projector.
7. SPECIFICATIONS
Overview
• PGWU-62L / PGWU-62L-K
• PGWX-62L / PGWX-62L-K
- Dimensions
- Compatibility Modes
7.1 PGWU-62L / PGWU-62L-K
| Specifications PGWU-62L / PGWU-62L-K | |
| Projector type WUXGA single-chip DLP projector | |
| Technology 0.67" DMD | |
| Resolution 1,920 x 1,200 WUXGA | |
| Brightness 6,000 ANSI lumens* | |
| Contrast ratio 11,000:1* | |
| Brightness uniformity 90%* | |
| Aspect Ratio 16:10 | |
| Lens type G lens | |
| Lenses 1.221.53:1; 0.951.22:1; 1.522.92:1; 2.90~5.50 | |
| Optical lens shift Vertical: -100% to +100% / horizontal: -30% to +30% | |
| Color correction Yes | |
| Light source | Laser diode |
| Light source lifetime | 20,000 hours (bright mode) |
| Sealed DLPTM core | Yes |
| Advance Picture in Picture | Yes |
| Orientation | Ceiling/floor, front/rear, 360 degree free installation, portrait |
| Integrated web server | Yes |
| 3D | N/A |
| Keystone correction | app. +/-20 vertical |
| Inputs | VGA-in, VGA-out, HDMI, DVI, CVBS, LAN, RS232, 12V out, 5V out; |
| Input Resolutions | up to WUXGA (1,920 x 1,200) 60Hz |
(*) Measurement, measuring conditions, and method of notation all comply with ISO 21118 international standards.
7. Specifications
| Specifications PGWU-62L / PGWU-62L-K | |
| Software tools Projector Toolset | |
| Control IR, RS232, RJ45 | |
| Network connection 10/100 base-T, RJ-45 connection | |
| Power requirements 100-240V / 50-60Hz | |
| Max. power consumption 580W | |
| Noise level (typical at 25 C/77 F) | 35 dBA (bright mode)/ 32 dBA (eco mode) |
| Operational ambient temperature | 5-40 C / 41 -104 F (sea level) |
| Operating humidity 10-85% | |
| Dimensions (W x L x H) 506 x 516 x 251 mm (without cable cover) | |
| Weight 17.5 kg | |
| Shipping dimensions (WxLxH) | 796 x 595 x 378mm |
| Standard accessories Power cord, wireless remote control, lens cover | |
| Certifications | CB test certificate, US emc, US safety, CE emc and safety, CCC emc and safety |
| Warranty Limited 3 years parts and labor. Extendable up to 5. | |
7.2 PGWX-62L / PGWX-62L-K
| Specifications PGWX-62L / PGWX-62L-K | |
| Projector type WXGA single-chip DLP projector | |
| Technology 0.65" DMD | |
| Resolution 1,280 x 800 WXGA | |
| Brightness 6,000 ANSI lumens* | |
| Contrast ratio 11,000:1* | |
| Brightness uniformity 90%* | |
| Aspect Ratio 16:10 | |
| Lens type G lens | |
| Lenses 1.281.60:1; 1.001.28:1; 1.613.07:1; 3.04 ~ 5.78 | |
| Optical lens shift Vertical: -100% to +100% / horizontal: -30% to +30% | |
| Light source Laser diode | |
| Light source lifetime 20,000 hours (bright mode) | |
| Sealed DLPTM core | Yes |
| Advance Picture in Picture | Yes |
| Orientation | Ceiling/floor, front/rear, 360 degree free installation, portrait |
| Integrated web server | Yes |
| 3D | Yes (DLP link) |
| Keystone correction | app. +/-20 vertical |
| Inputs | VGA-in, VGA-out, HDMI, DVI, CVBS, LAN, RS232, 12V out, 5V out; |
| Input Resolutions | up to WUXGA (1,920 x 1,200) 60Hz |
| Software tools | Projector Toolset |
| Control IR, RS232, RJ45 | |
| Network connection | 10/100 base-T, R-J45 connection |
| Power requirements 100-240V / 50-60Hz | |
| Max. power consumption | 580W |
| Noise level (typical at 25 C/77 F) | 35 dBA (bright mode)/ 32 dBA (eco mode) |
(*) Measurement, measuring conditions, and method of notation all comply with ISO 21118 international standards.
7. Specifications
| Specifications PGWX-62L / PGWX-62L-K | |
| Operational ambient temperature | 5-40 C / 41 -104 F (sea level) |
| Operating humidity 10-85% | |
| Dimensions (W x L x H) 506 | x 516 x 251 mm (without cable cover) |
| Weight 17.5 kg | |
| Shipping dimensions (WxLxH) | 796 x 595 x 378mm |
| Standard accessories Power | cord, wireless remote control, lens cover |
| Certifications | CB test certificate, US emc, US safety, CE emc and safety, CCC emc and safety |
| Warranty Limited 3 years parts and labor. Extendable up to 5. | |
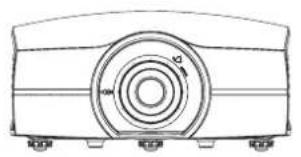
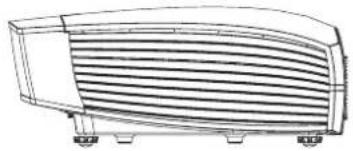
7.3 Dimensions
Projector Outer Dimensions
natural_image
Technical line drawing of a mechanical component with concentric circles and mounting base (no text or symbols)Front View
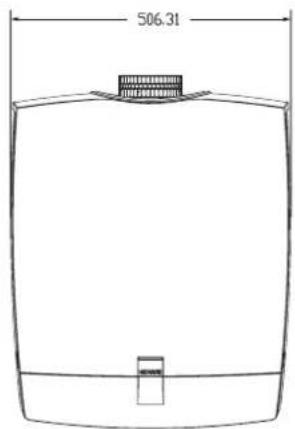
Top View
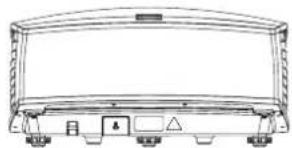
natural_image
Line drawing of a curved electronic device with mounting feet and control panel (no text or symbols)Rear View
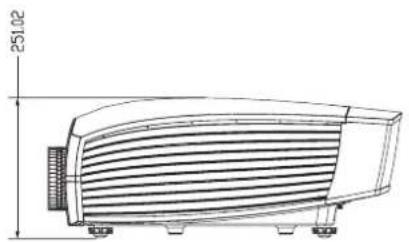
natural_image
Technical line drawing of a heat exchanger or fan unit with no visible text or symbolsLeft Side View
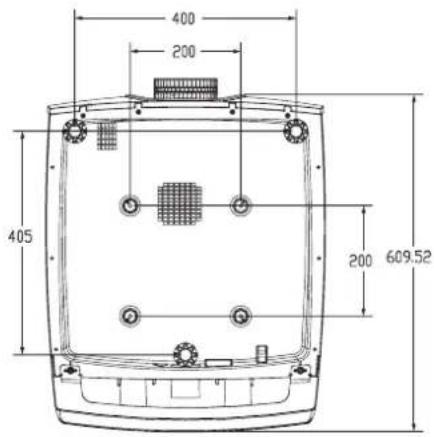
Bottom View
natural_image
Technical line drawing of a curved heat exchanger or radiator component (no text or symbols)Right Side View
Dimensions given in millimeters.

WARNING:
- Be sure to use the correct screw size. Screw Length will vary depending on the thickness of the mounting plate.
Be sure to keep at least 10 cm gap between the ceiling and the bottom of the projector.
Avoid installing the projector near a heat source.
7.4 Compatibility Modes
| Signal Resolution | Frequency | ||||||
| H. (KHz) V. (Hz) Video Digital Analog Remark | |||||||
| NTSC -- 15.734 60 | ☐ | -- -- | |||||
| PAL/SECAM | -- 15.625 | 50 | ☐ | -- -- | |||
| 640 350 31.5 | 70.1 | -- ☐ | ☐ | 70Hz | |||
| 640 400 37.9 | 85.1 | -- ☐ | ☐ | 85Hz | |||
| VGA | 640 480 31.5 | 60 | -- ☐ | ☐ | |||
| 640 480 | 67 | -- ☐ | ☐ | ||||
| 640 480 37.9 | 72.8 | -- ☐ | ☐ | 72Hz | |||
| 640 480 37.5 | 75 | -- ☐ | ☐ | ||||
| 640 480 43.3 | 85 | -- ☐ | ☐ | ||||
| SVGA | 800 600 35.2 | 56.3 | -- ☐ | ☐ | 56Hz | ||
| 800 600 37.9 | 60.3 | -- ☐ | ☐ | 60Hz | |||
| 800 600 46.9 | 75 | -- ☐ | ☐ | ||||
| 800 600 48.1 | 72.2 | -- ☐ | ☐ | 72Hz | |||
| 800 600 53.7 | 85.1 | -- ☐ | ☐ | 85Hz | |||
| XGA | 1024 768 | 48.4 | 60 | -- ☐ | ☐ | ||
| 1024 768 | 56.5 70.1 | -- ☐ | ☐ | 70Hz | |||
| 1024 768 | 60 | 75 | -- ☐ | ☐ | |||
| 1024 768 | 68.7 | 85 | -- ☐ | ☐ | |||
| HD720 | 1280 720 | 50 | -- ☐ | ☐ | |||
| 1280 720 | 60 | -- ☐ | ☐ | ||||
| WXGA | 1280 768 | 47.776 60 | -- ☐ | ☐ | |||
| 1280 768 | 75 | -- ☐ | ☐ | ||||
| 1280 768 | 85 | -- ☐ | ☐ | ||||
| WXGA-800 | 1280 800 | 60 | -- ☐ | ☐ | |||
| 1280 960 | 60 | -- ☐ | ☐ | ||||
| 1280 960 | 75 | -- ☐ | ☐ | ||||
| 1280 960 | 85 | -- ☐ | ☐ | ||||
| 1440 900 | 74.98 | -- ☐ | ☐ | ||||
| SXGA | 1280 1024 | 64 | 60 | -- ☐ | ☐ | ||
| 1280 1024 | 80 | 75 | -- ☐ | ☐ | |||
| 1280 1024 | 91.1 | 85 | -- ☐ | ☐ | |||
| SXGA+ | 1400 1050 | 60 | -- ☐ | -- | |||
| UXGA 1600 | 1200 75 | 60 | -- ☐ | ☐ | |||
| HD1080 | 1920 1080 | 24 | -- ☐ | ☐ | |||
| 1920 1080 | 50 | -- ☐ | ☐ | ||||
| 1920 1080 | 60 | -- ☐ | ☐ | ||||
| WUXGA | 1920 1200 | 60 | -- ☐ | ☐ | Only support [RB] timing | ||
| Signal Resolution | Frequency | ||||||
| H. (KHz) V. (Hz) Video Digital Analog Remark | |||||||
| HDTV | 1920 1080 33.8 30 | ☐ | -- -- | ||||
| 1920 1080 28.1 25 | ☐ | -- -- | |||||
| 1920 1080i 28.125 50 | -- ☐ | ☐ | |||||
| 1920 1080i 33.75 | 60 | -- ☐ | ☐ | ||||
| 1920 1080p | 24 | -- ☐ | ☐ | ||||
| 1920 1080p | 25 | -- ☐ | ☐ | ||||
| 1920 1080p | 30 | -- ☐ | ☐ | ||||
| 1920 1080p | 50 | -- ☐ | ☐ | ||||
| 1920 1080p | 60 | -- ☐ | ☐ | ||||
| 1280 720 | 45 | 60 | ☐ | -- -- | |||
| 1280 720p | 50 | -- ☐ | ☐ | ||||
| 1280 720p | 60 | -- ☐ | ☐ | ||||
| SDTV | 720 576 | 31.3 50 | ☐ | -- -- | |||
| 720 576i | 15.625 50 | -- ☐ | ☐ | ||||
| 720 576p | 50 | -- ☐ | ☐ | ||||
| 720 480 | 31.5 60 | ☐ | -- -- | ||||
| 720 480i | 15.734 60 | -- ☐ | ☐ | ||||
| 720 480p | 31.5 60 | -- ☐ | ☐ | ||||
3D Timing - 120 Hz Frame Sequential
| Input Source Resolution | Frame Rate in Hz (Vertical Frequency) | Line Rate in KHz (Horizontal Frequency) | Pixel Clock in MHz |
| SVGA (800 600) | 119.63 | 76.92 | 83.725 |
| XGA (1024 768) | 120.13 | 98.87 | 139.276 |
| 720p (1280 720) | 120.31 | 92.88 | 161.997 |
8. ENVIRONMENTAL INFORMATION
Overview
Disposal information •
RoHS compliance •
8.1 Disposal information
Disposal Information
Waste Electrical and Electronic Equipment

This symbol on the product indicates that, under the European Directive 2002/96/EC governing waste from electrical and electronic equipment, this product must not be disposed of with other municipal waste. Please dispose of your waste equipment by handing it over to a designated collection point for the recycling of waste electrical and electronic equipment. To prevent possible harm to the environment or human health from uncontrolled waste disposal, please separate these items from other types of waste and recycle them responsibly to promote the sustainable reuse of material resources.
For more information about recycling of this product, please contact your local city office or your municipal waste disposal service.
For details, please visit the Barco website at: http://www.barco.com/en/AboutBarco/weee
Disposal of batteries in the product

This product contains batteries covered by the Directive 2006/66/EC which must be collected and disposed of separately from municipal waste.
If the battery contains more than the specified values of lead (Pb), mercury (Hg) or cadmium (Cd), these chemical symbols will appear below the crossed-out wheeled bin symbol.
By participating in separate collection of batteries, you will help to ensure proper disposal and to prevent potential negative effects on the environment and human health.
8.2 RoHS compliance
Turkey RoHS compliancen

[Republic of Turkey: In conformity with the EEE Regulation]
中国大陆RoHS (Information for China ROHS compliance)
Table of toxic and hazardous substances/elements and their content, as required by China's management methods for controlling pollution by electronic information products.
Hazardous Substances Or Elements / 有毒有害物质或元素
| Component Name /部件名称 | Lead(Pb) /铅 (Pb) | Mercury(Hg) /汞 (Hg) | Cadmium(Cd) /镉 (Cd) | Chromium VI Compounds(Cr VI) /六价铬 (Cr VI) | Polybrominated Biphenyls(PBB) /多溴联苯(PBB) | Polybrominated Diphenyl Ethers(PBDE) /多溴二苯醚(PBDE) |
| Case/Enclosure /机壳 | ○○○ | ○○○ | ||||
| Printed Circuit Assembly / 电子电路组件* | X○○ | ○○○ | ||||
| Chassis / 底座 | ○○○ | ○○○ | ||||
| Engine / 引擎 | ○○○ | ○○○ | ||||
| Hardware / 硬件 | ○○○ | ○○○ | ||||
| Optics / 光学器件 | X○○ | ○○○ | ||||
| *: Printed Circuit Assembly includes all Printed Circuit Boards (PCBs) and their respective population of discrete components, ICs, and connectors.*: 电子电路组件包括所有包括所有印刷电路板(PCB)及其各自的离散组件、IC及连接器。○: Indicates the hazardous and toxic substance content of the part is lower than the threshold defined by the SJ/T11364-2006 standard.○: 表明该部件所含有害和有毒物质含量低于 SJ/T11364-2006 标准定义的阈值。×: Indicates the hazardous and toxic substance content of the part is over the threshold defined by the SJ/T11364-2006 standard. In all cases where an X is shown, Barco uses an allowable exemption per EU RoHS.×: 表明该部件所含有害和有毒物质含量高于 SJ/T11364-2006 标准定义的阈值。对于所有显示为“X”的情况,Barco按照 EU RoHS 采用了容许的豁免指标。 | ||||||
A급 기기 (업무용 방송통신기자재)
8.3 Production address
Producer
Barco nv Entertainment Division
Noordlaan 5, B-8520 Kuurne
Made in information
The made in country is indicated on the product ID label on the product itself.
Production date
The month and year of production is indicated on the product ID label on the product itself.
8.4 Importers contact information
Contact
To find your local importer, contact Barco directly or one of Barco's regional offices via the contact information given on Barco's web site, www.barco.com.
$$ \begin{array}{r} \text{if} \mathcal{O}(\mathbf{A}) = \mathcal{O}(\mathbf{A}), \text{if} \mathcal{O}(\mathbf{A}) = \mathcal{O}(\mathbf{A}) \end{array} $$

natural_image
Solid red rectangular shape with no text, symbols, or patterns
- Changes
- Copyright ©
- EN55022/CISPR22 Class A ITE (Information Technology Equipment)
- Federal Communications Commission (FCC Statement)
- Guarantee and Compensation
- Trademarks
- TABLE OF CONTENTS
- SAFETY......6
- INTRODUCTION....11
- INSTALLATION....16
- USER CONTROLS....26
- TROUBLESHOOTING 41
- MAINTENANCE & SERVICE 44
- SPECIFICATIONS 45
- ENVIRONMENTAL INFORMATION ....52
- SAFETY
- About this chapter
- Purpose of this device:
- Clarification of the term "PRESENT series" used in this document
- Overview
- General considerations
- General safety instructions
- Notice on safety
- Users definition
- Owners record
- Important safety instructions
- To prevent the risk of electrical shock
- To prevent personal injury
- To prevent fire hazard
- To prevent projector damage
- On servicing
- To prevent battery explosion
- INTRODUCTION
- Installation requirements
- Environment conditions
- Environment Operating Non-Operating
- Cooling requirements
- Clean air environment
- Main Power requirements
- Projector Power requirements
- Projector weight
- Projector package overview
- Box content
- Product Overview
- Main Unit
- Input/Output (I/O) Panel
- Component Location
- Remote Control
- Button Location
- INSTALLATION
- RCU Battery Installation
- Procedure:
- Notes for the Remote Control Unit
- Installing the Lens
- Lens Selection
- Notes:
- Installing the lens for the first time
- Connecting the Projector
- Connecting to a Computer or Laptop Wiring Diagram
- Connecting to Video Sources
- Wiring Diagram
- Installing the cable cover
- Procedure
- Powering On/Off the Projector
- Powering On the Projector
- Powering Off the Projector
- Adjusting the Projected Image
- Adjusting the Projector's Position
- Safety Cover Installation
- Ceiling Mount Installation
- Requirements:
- USER CONTROLS
- On-Screen Display Menus
- Using the OSD Lite Menus
- Using the Advanced OSD Menus
- Input Menu
- Input Select
- Auto Power Off
- Auto Power On
- No Signal
- A Image Adjust
- 3D Mode
- 3D Invert (off & on)
- Image Menu
- Brightness
- Contrast
- Saturation
- Tint
- Sharpness
- Noise Reduction
- Color Temp
- Input Balance
- Aspect Ratio
- Timings
- Auto Image
- Display Mode
- Layout Menu
- Main size
- Main select
- PIP select
- PIP position
- PIP size
- PIP
- Light Source Menu
- Mode
- High Altitude
- Power
- Constant
- Color Calibration
- Alignment Menu
- Rear projection
- Ceiling mode
- Lens control
- Keystone
- Gamma
- Internal pattern
- Custom color space
- Lens to midposition
- Control Menu
- Standby 5V
- Eco network power
- RS232 baudrate
- Network
- Menu position
- Auto source
- Language
- Serial no
- Soft version
- Main/PIP source
- Active resolution
- Pixel clock
- Vert. refresh
- Hor. refresh
- Sync type
- Color space
- Projector runtime
- Factory Reset
- Color Coordinate Adjustment
- Placement:
- Constant Light Output
- TROUBLESHOOTING
- Image Problems
- LED Indication Chart
- Warning Message
- MAINTENANCE & SERVICE
- Replacing the Lens
- SPECIFICATIONS
- PGWU-62L / PGWU-62L-K
- PGWX-62L / PGWX-62L-K
- Dimensions
- WARNING:
- ENVIRONMENTAL INFORMATION
- Disposal information
- RoHS compliance
- Production address
- Producer
- Made in information
- Production date
- Importers contact information
- Contact
Brand : Barco
Model : PGWX-62L
Category : Projector