
AirRam 2167 - Vacuum Cleaner BISSELL - Free user manual and instructions
Find the device manual for free AirRam 2167 BISSELL in PDF.


| Product Type | Cordless Stick Vacuum Cleaner |
| Brand | BISSELL |
| Model | AirRam 2167 |
| Battery Type | Lithium-Ion, 22V |
| Charging Time | 4 hours (flat to full); 1 hour burst charge |
| Run Time | Approximately 30 minutes |
| Weight | 2.5 kg (5.5 lbs) |
| Dimensions (Assembled) | Height: 110 cm, Width: 25 cm, Depth: 20 cm |
| Dirt Bin Capacity | 0.5 L |
| Filtration | Washable filter with separator cap |
| Floor Types | Hard floors, carpets, rugs (brush roll can be removed for delicate surfaces) |
| Brush Roll | Removable, cleanable, replaceable |
| Power Button | Foot-operated on the head |
| Handle | Telescoping upper handle for adjustable height |
| Maintenance | Clean filter monthly, empty bin, remove brush roll tangles |
| Safety Features | Automatic shut-off on brush roll jam, battery safety |
| Warranty | 2-year limited manufacturer's guarantee |
| Included Accessories | Charger, brush roll hole plug |
| Intended Use | Domestic dry vacuum cleaning only |
Frequently Asked Questions - AirRam 2167 BISSELL
User questions about AirRam 2167 BISSELL
0 question about this device. Answer the ones you know or ask your own.
Ask a new question about this device
Download the instructions for your Vacuum Cleaner in PDF format for free! Find your manual AirRam 2167 - BISSELL and take your electronic device back in hand. On this page are published all the documents necessary for the use of your device. AirRam 2167 by BISSELL.
USER MANUAL AirRam 2167 BISSELL
natural_image
Line drawing of a vacuum cleaner with a vertical cylindrical body and base (no text or symbols)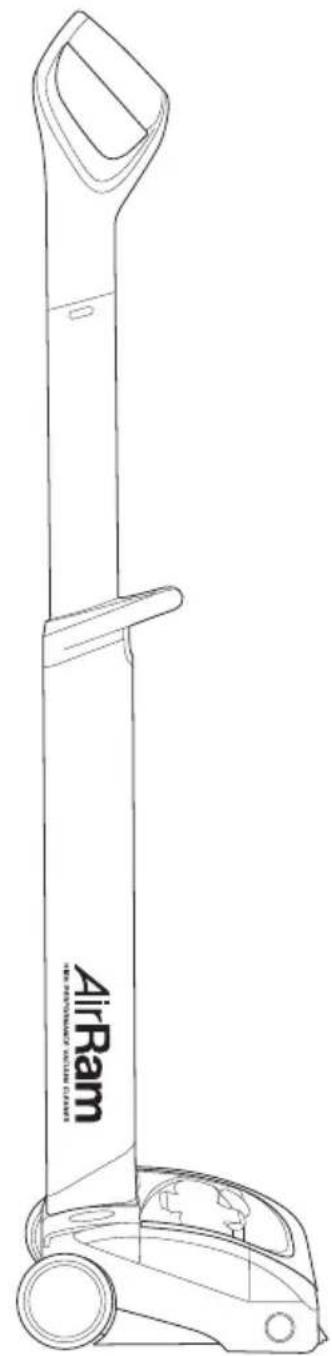
natural_image
Line drawing of a AirRam vacuum cleaner with attached mechanical components (no text or symbols)IMPORTANT SAFETY INSTRUCTIONS

IMPORTANT: READ ALL INSTRUCTIONS BEFORE USE. RETAIN INSTRUCTIONS FOR FUTURE REFERENCE.

Do not use in rain or leave outdoors while raining.

WARNING: Basic safety precautions should always be observed when using an electrical appliance, including the following to reduce the risk of fire, electrical shock or injury:
Personal Safety:
- Store indoors in a dry place out of the reach of children.
• Always use responsibly. This appliance can be used by children aged from 8 years and above and persons with reduced physical, sensory or mental capabilities or lack of experience and knowledge if they have been given supervision or instruction concerning use of the appliance in a safe way and understand the hazards involved. - Don't let children play with the appliance; supervise children using or maintaining the appliance.
- Use only manufacturer's recommended attachments as described in this manual; misuse or use of any accessory or attachment other than those recommended, may present a risk of personal injury.
• Take extra care when cleaning stairs. - Keep the appliance and accessories away from hot surfaces.
- Do not block the appliances openings or hinder air flow; keep openings free of any objects including dust, lint, clothing, fingers (and all parts of the body).
• Particularly keep hair away from openings and moving parts.
Electrical Safety:
- Only use batteries and chargers supplied by BISSELL.
- Never modify the charger in any way.
- The charger has been designed for a specific voltage. Always check that the main's voltage is the same as that stated on the rating plate.
- A charger that is suitable for one type of battery pack may create a risk of fire when used with another battery pack; never use the charger with another appliance or attempt to charge this product with another charger.
- Before use, check the charger cable for signs of damage or aging. A damaged or entangled charger cable increases the risk of fire and electric shock.
- Do not abuse the charger cable.
- Never carry the charger by the cable.
- Do not pull the cable to disconnect from a socket; grasp the plug and pull to disconnect.
- Don't wrap the cable around the charger when storing.
- Keep the charger cable away from hot surfaces and sharp edges.
- The supply cable cannot be replaced. If the cable is damaged the charger should be discarded and replaced.
- Do not handle the charger or the appliance with wet hands.
- Do not store or charge the appliance outdoors.
- The charger must be removed from the socket before removing the battery, cleaning or maintaining the appliance.
Battery Safety:
- This appliance includes Li-Ion batteries; do not incinerate batteries or expose to high temperatures, as they may explode.
- Liquid ejected from the battery may cause irritation or burns.
• In an emergency situation contact professional help immediately! - Leaks from the battery cells can occur under extreme conditions. Do not touch any liquid that leaks from the battery. If the liquid gets on the skin wash immediately with soap and water. If the liquid gets into the eyes, flush them immediately with clean water for a minimum of 10 minutes and seek medical attention. Wear gloves to handle the battery and dispose of immediately in accordance with local regulations.
- Shorting the battery terminals may cause burns or fire.
- When the battery pack is not in use, keep it away from paper clips, coins, keys, nails, screws or other small metal objects that could make a connection from one terminal to another.
- When you dispose of the appliance remove the battery and dispose of the battery safely in accordance with local regulations.
Service:
- Before using the appliance and after any impact, check for signs of wear or damage and repair as necessary.
- Do not use the appliance if any part is damaged or defective.
- Repairs should be carried out by a service agent or a suitably qualified person in accordance with relevant safety regulations. Repairs by unqualified persons could be dangerous.
- Never modify the appliance in any way as this may increase the risk of personal injury.
- Only use replacement parts or accessories provided or recommended by BISSELL®.
- If appliance is not working as it should, has been dropped, damaged, left outdoors, or dropped into water, return it to a service center.
Intended Use:
- This appliance has been designed for domestic dry vacuum cleaning only.
- Do not pick up liquids or use on wet surfaces.
- Do not pick up anything that is flammable, burning or smoking.
- Use only as described in this manual.
- Don't use on concrete, tarmacadam or other rough surfaces.
- The brush bar may damage certain floor surfaces. Before vacuuming flooring, rugs or carpets, check the flooring manufacturer's recommended cleaning instructions.
- May damage delicate fabrics or upholstery. Care should be taken on loose-weave carpets and coverings or where there are loose threads. If in doubt please test on an inconspicuous area first.
- The BISSELL AirRam™ has been designed to clean a wide variety of floor surfaces without the need to change settings. However some surfaces such as delicate loose-pile rugs or carpets, tasselled rug edges or damaged carpets with exposed threads are not suitable for cleaning with a rotary brush. The AirRam can still be used to clean such surfaces by removing the brush bar as shown on page 11 and using the supplied plug in the brush bar hole. This setting should also be used to give the best performance on hard floors with deep crevices.
WARNING:
- Do not use water, solvents or polishes to clean the outside of the appliance; wipe clean with a dry cloth.
- Never immerse the unit in water and do not clean in a dishwasher.
- Never use the appliance without the filter fitted.
Thanks for buying a BISSELL® vacuum!
We love to clean and we're excited to share one of our innovative products with you. We want to make sure your vacuum works as well in two years as it does today, so this guide has tips on using, maintaining, and if there is a problem, troubleshooting.
In just a few simple assembly steps, you'll be ready to vacuum. Let's get started!
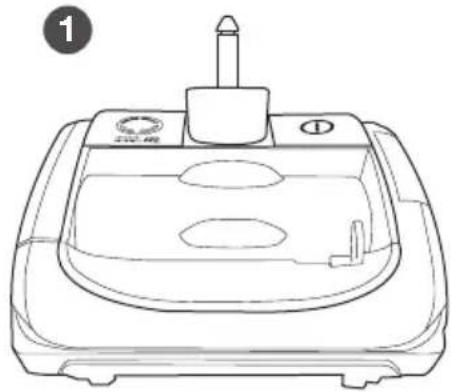
What's in the Box
1 Head
2 Upper Handle
3 Lower Handle
4 Battery
5 Charger
6 Dirt Bin
7 Washable Filter
8 Brush Bar Hole Plug
(Filter and bin are already in place)
natural_image
Line drawing of a portable washing machine with a cylindrical top and base (no text or symbols)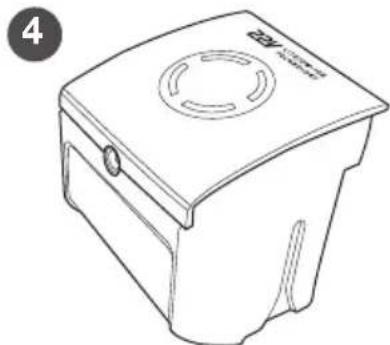
natural_image
Line drawing of a box with a circular vent and handle, no text or symbols present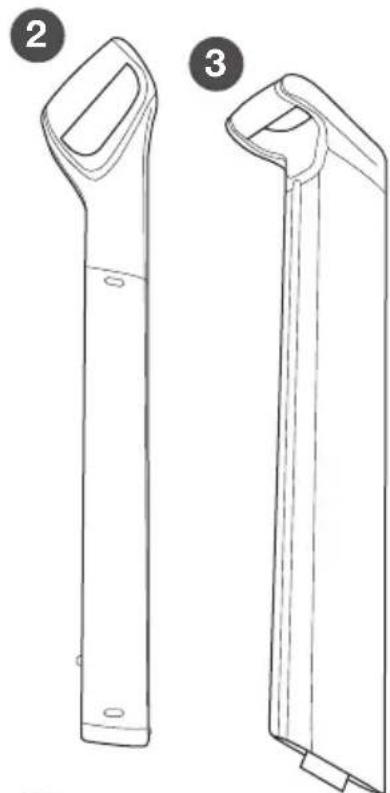
natural_image
Technical line drawing of a two-part mechanical device, labeled with numbers 2 and 3 (no text or symbols on the device itself)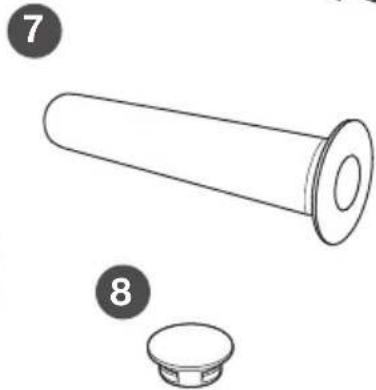
natural_image
Technical line drawing of a cylindrical component with a flange and a circular base, labeled with numbers 7 and 8 (no text or symbols on the diagram itself)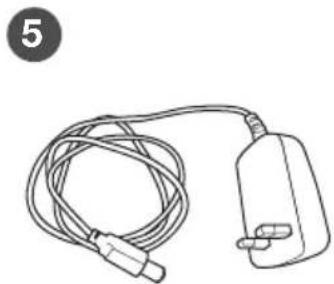
natural_image
Line drawing of a medical or laboratory device with a coiled cable and connector (no text or symbols)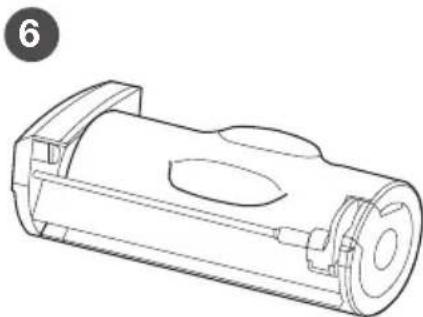
natural_image
Technical line drawing of a mechanical component with cylindrical body and flanges (no text or symbols)NOTE: The Brush Bar Hole Plug is provided to you for situations for cleaning delicate loose-pile rugs or carpets, rugs with tasseled edges or damaged carpets with exposed threads that are not suitable for cleaning with the rotary Brush Roll. Please refer to instructions on how to remove Brush Roll and plug the Brush Bar Hole.
Assembling Your AirRam™
natural_image
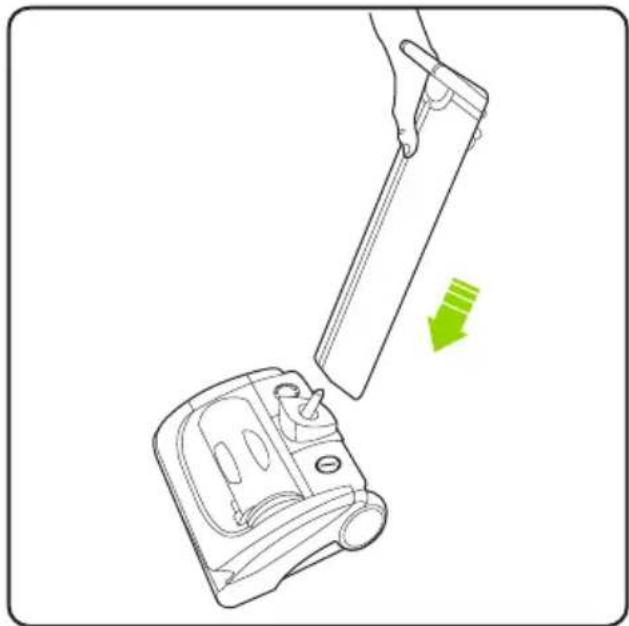
Line drawing of a hand holding a cleaning tool next to a device with a green arrow indicating motion (no text or symbols)Attach the Lower Handle onto the Head of the AirRam.
text_image
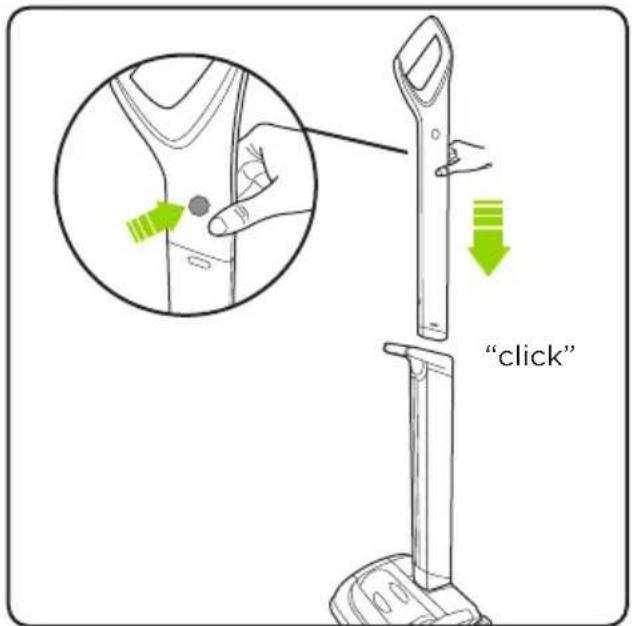
"click"Press the button at the top of the Upper Handle and slide it into the Lower Handle until it "clicks" into place.
text_image
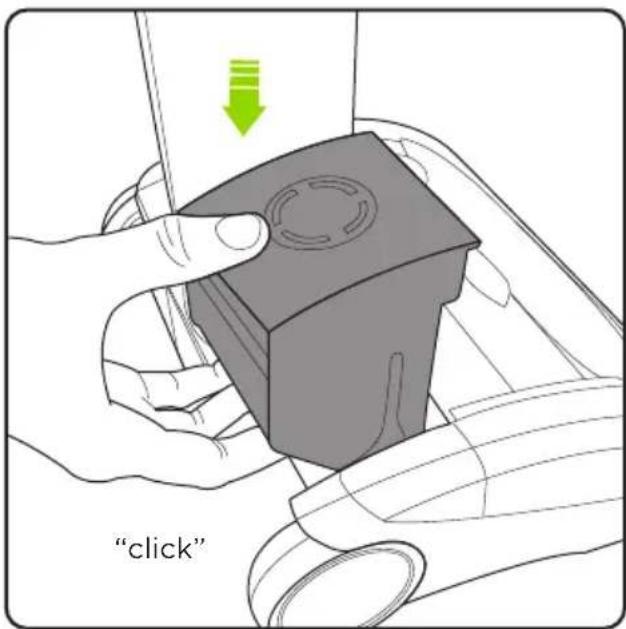
"click"Insert the Battery by sliding it down until it "clicks" into place.
text_image
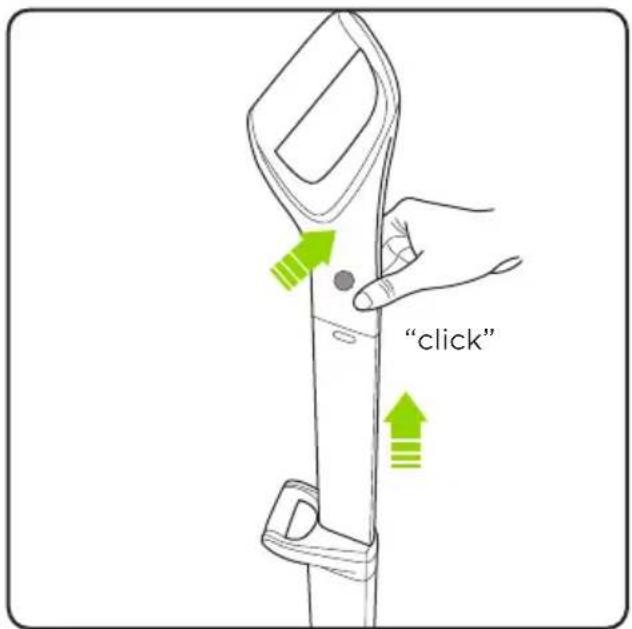
"click"To extend the Upper Handle, hold down the button on the left hand side and pull it up until it "clicks" into place.
Using Your AirRam™
natural_image
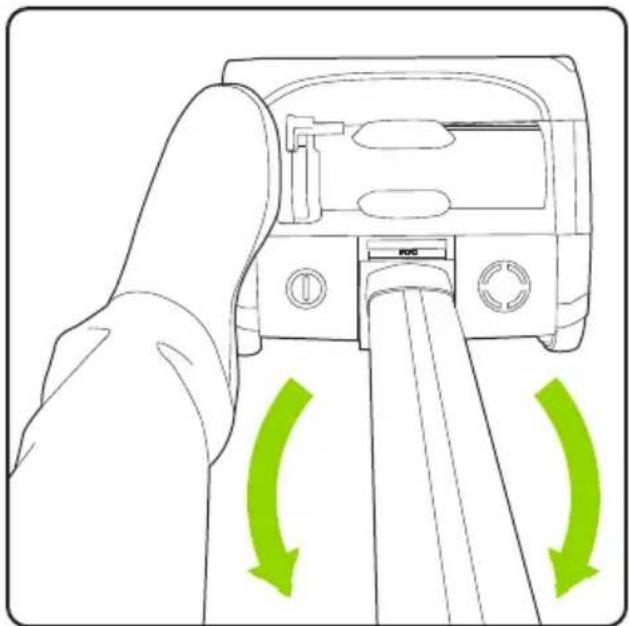
Line drawing of a hand inserting a device into a device with green directional arrows indicating rotation (no text or symbols)Without pressing the power button, place your foot on the left side of the AirRam Head and pull the handle back.
natural_image
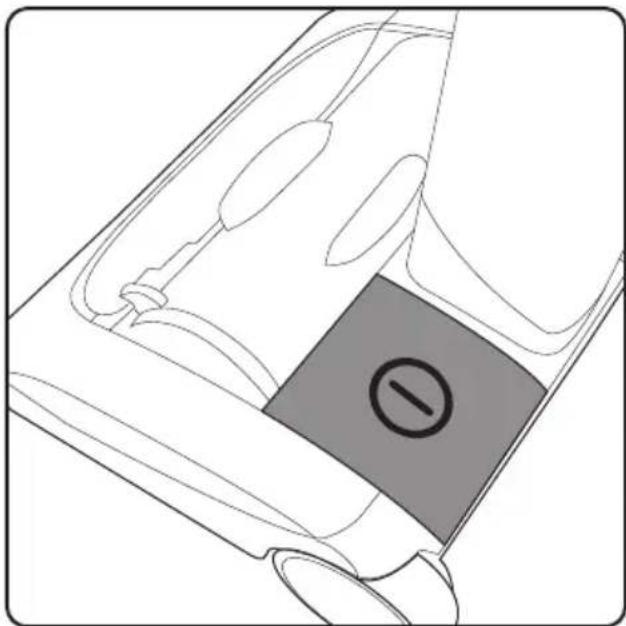
Diagram of a device interior with a highlighted circular component (no text or symbols)The power button is located on the left hand side of the AirRam Head.
natural_image
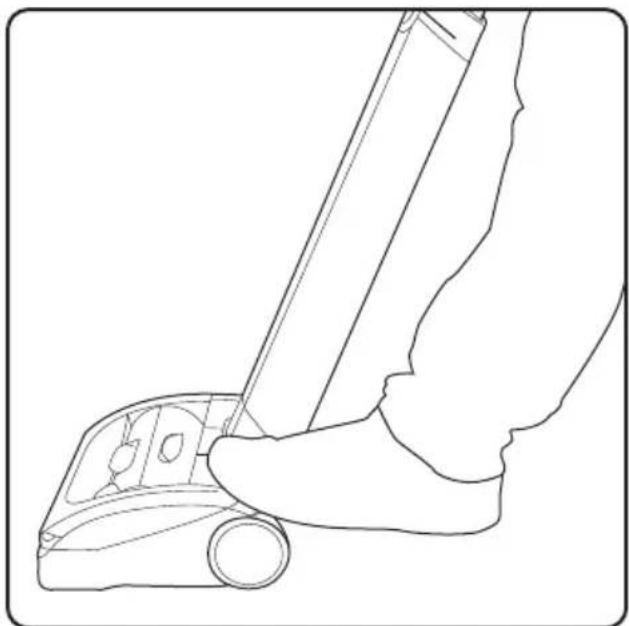
Line drawing of a hand using a tool to lift a car (no text or symbols)Press the button with your foot to turn the AirRam on.
Storing Your AirRam™

natural_image
Line drawing of a hand holding a handheld device with green arrows indicating motion or adjustment (no text or symbols)To stow the Upper Handle, simply press the button on the left hand side and push the handle down.
natural_image
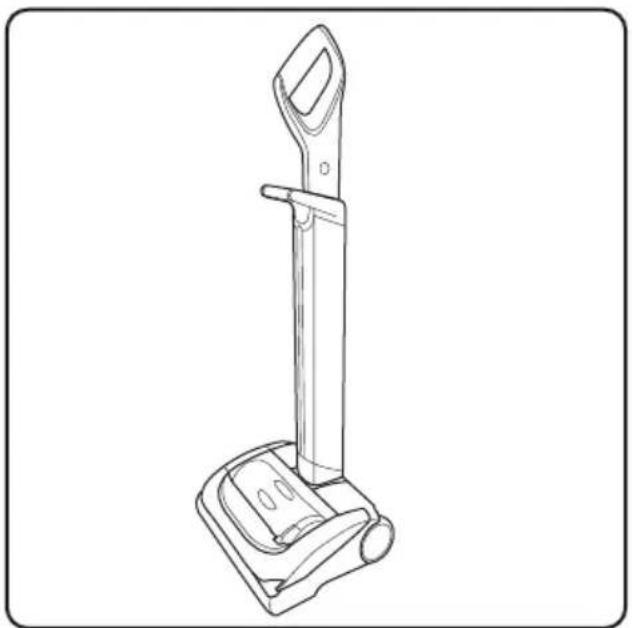
Line drawing of a handheld vacuum cleaner device (no text or symbols)The handle will now be fully retracted and the AirRam can be conveniently stored.
Charging the Battery

natural_image
Circular icon with a green arc and light rays, no text or symbols present.When the charge indicator starts to flash one green LED, recharge the Battery.
natural_image
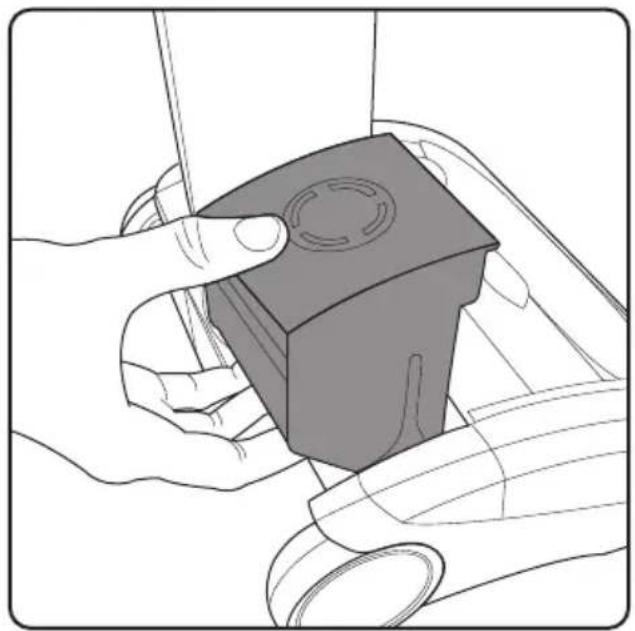
Illustration of hands holding a small mechanical component with a circular feature, no text or symbols presentThe Battery can be charged on or off the machine. To remove the Battery, squeeze the latch underneath and pull up.
natural_image
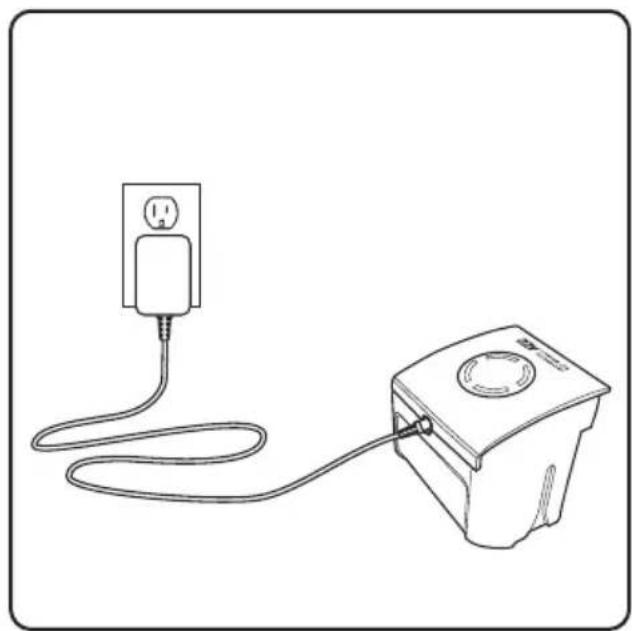
Line drawing of a power plug connected to a small electrical box (no text or symbols)Plug the Charger in and connect it to the Battery.
text_image
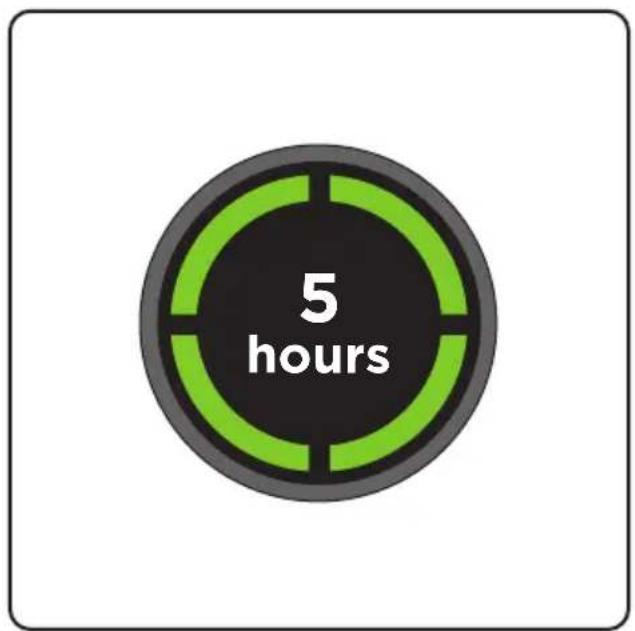
5 hoursThe Battery can be charged from flat in 4 hours. The state of charge indicator will show 4 green lights when it is charged. It is OK to charge for 1 hour for a burst of cleaning.
Emptying the Dirt Bin
natural_image
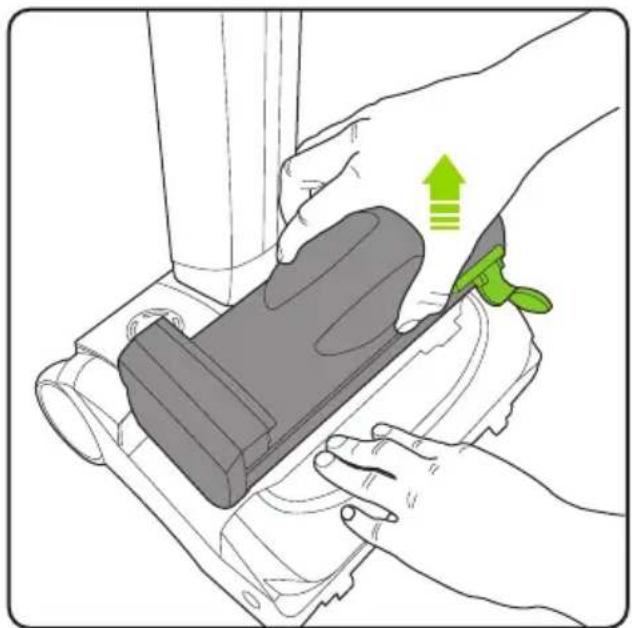
Illustration of hands using a cleaning tool to clean or adjust a mechanical component (no text or symbols visible)Firmly hold the AirRam ^™ with one hand and pull the Dirt Bin handle and lift out of the AirRam.
natural_image
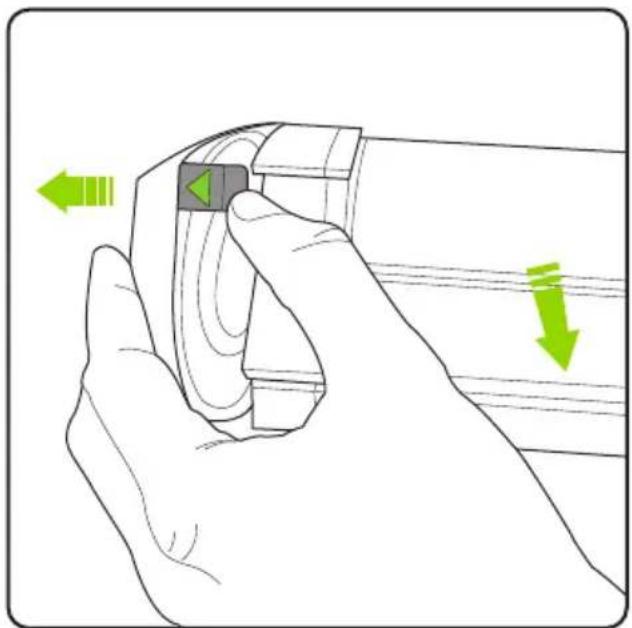
Illustration of a hand holding a device with green directional arrows indicating movement or change (no text or symbols present)Release the latch with the green arrow, to pull open the bin lid.
natural_image
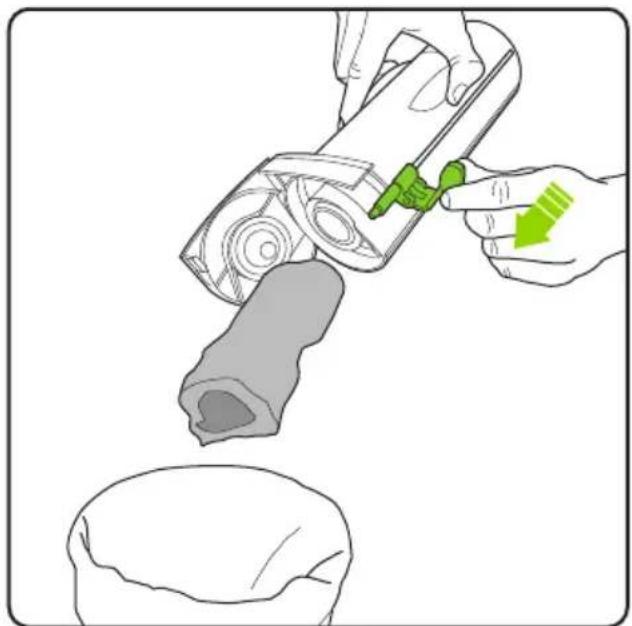
Illustration of hands using a tool to adjust or install a mechanical component, with no visible text or symbols.Hold the Dirt Bin over a waste basket and push the green lever towards the open lid to empty.
natural_image
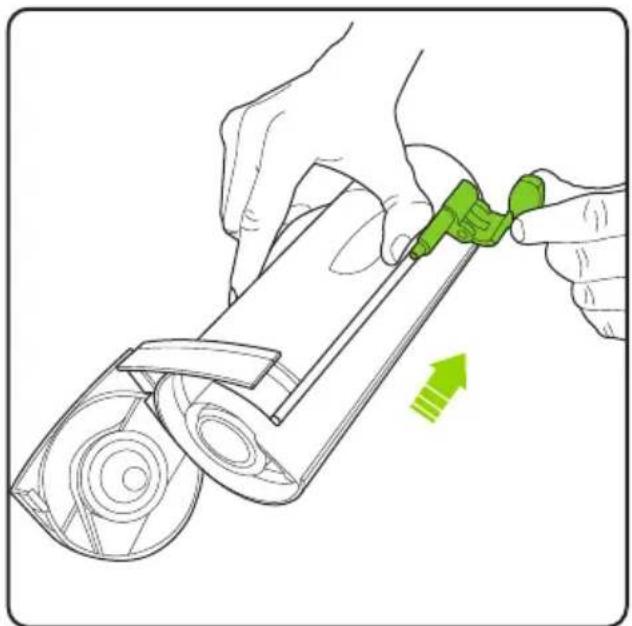
Illustration of hands using a tool to adjust or install a device component, with a green arrow indicating the motion (no text or symbols present)Pull the green lever back towards the bottom of the Dirt Bin. Close the Dirt Bin lid and reinsert into the AirRam.
NOTE: The green lever must be back in its original position to properly close the lid and insert into the AirRam.
Cleaning the Filters
natural_image
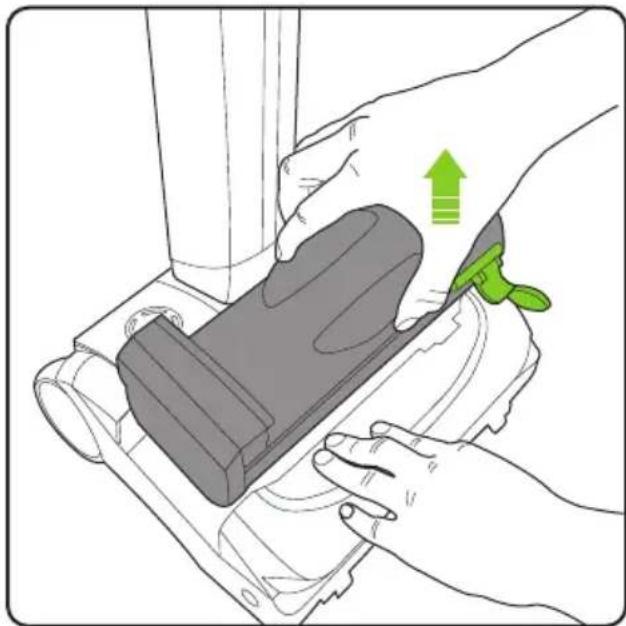
Illustration of hands using a brush to adjust or install a mechanical component, with a green arrow indicating the process (no text or symbols present)Firmly hold the AirRam ^™ with one hand and pull the Dirt Bin handle and lift it out of the AirRam.
natural_image
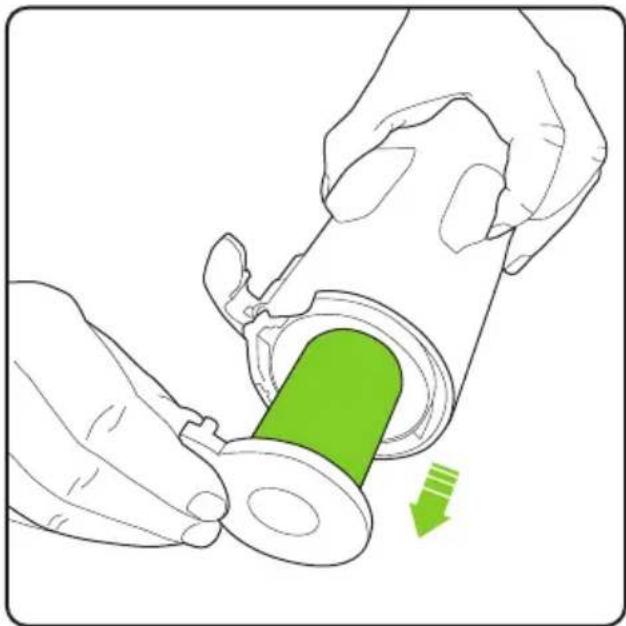
Illustration of hands using a tool to adjust a green component into a circular device (no text or symbols)Pull the fi Iter out of the Dirt Bin. Tap the dirt from the fi Iter and tip any dirt from the fi Iter housing. Wash the fi Iter if necessary.
natural_image
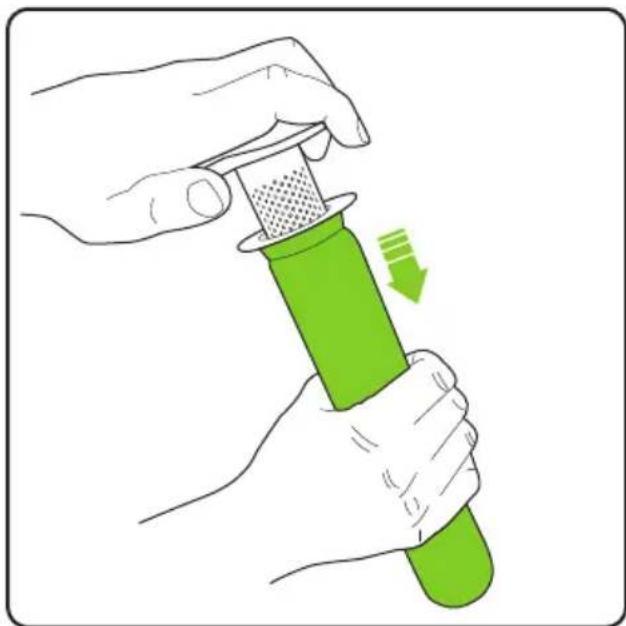
Illustration of hands using a green filter tool to press or adjust a green object, with a green arrow indicating the process (no text or symbols present)Firmly hold the fi Iter and with the other hand grasp the separator cap. Gently pull the fi Iter and separator cap apart. (Gently twisting and pulling will help separate the two parts.)
natural_image
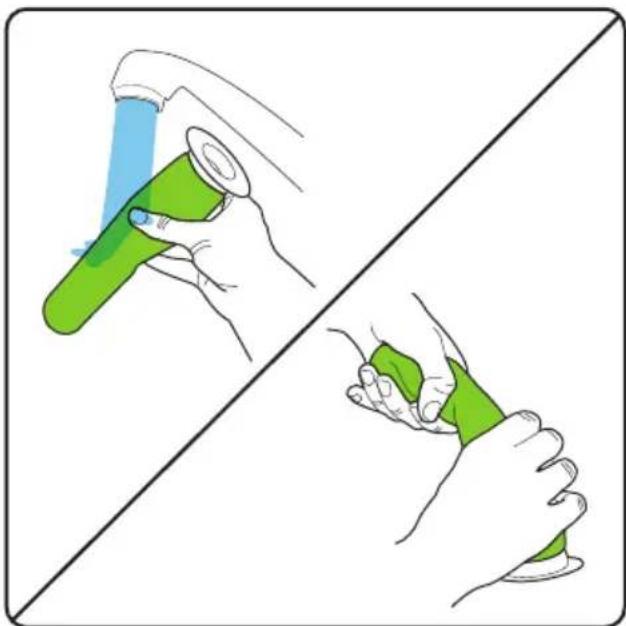
Illustration showing two hands holding green gloves, one spraying a spray can and the other handling a wrist band (no text or symbols)You may gently wash the fi Iter under warm water. Do not use detergents or soaps. The fi Iter must be completely dry before reassembling your machine.
NOTE: Clean the fi Iters at least once a month. More frequent fi Iter cleaning may be necessary depending on your usage and environment
Replacing the Filters
natural_image
Illustration of hands using a green tool to press or install a textured object, with an arrow indicating motion (no text or symbols)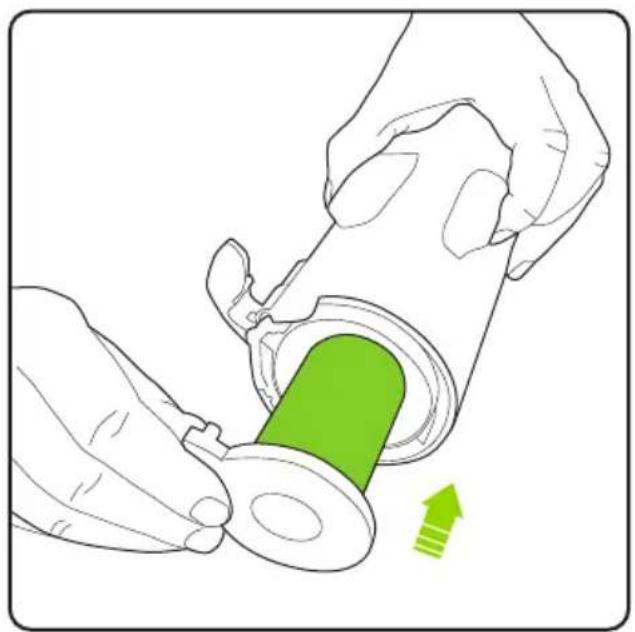
natural_image
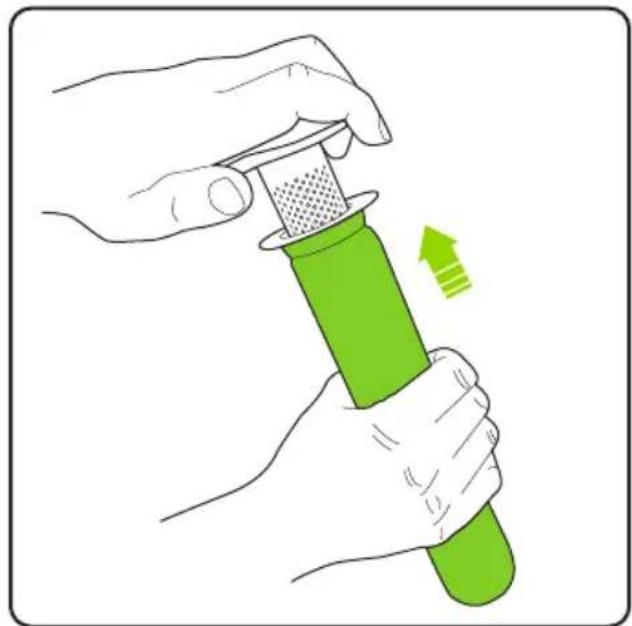
Illustration of hands using a tool to adjust a green cylindrical component (no text or symbols)Slide the filter onto the separator. Slide the filter back into the Dirt Bin.
Removing and Cleaning the Brush Roll
natural_image
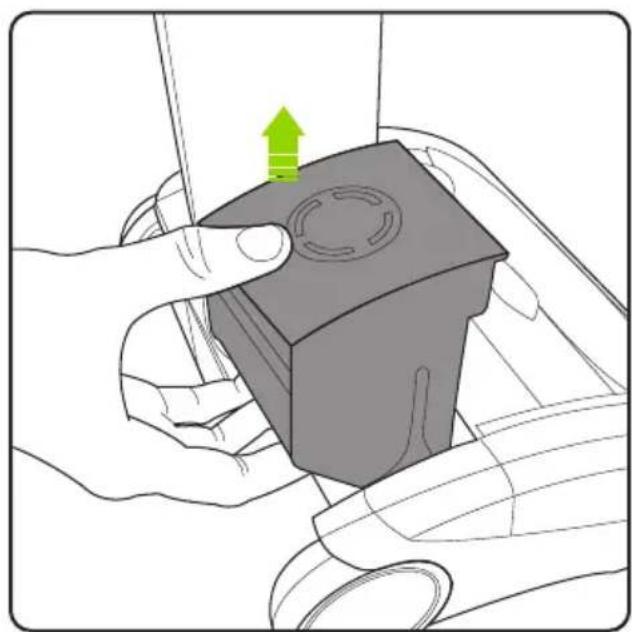
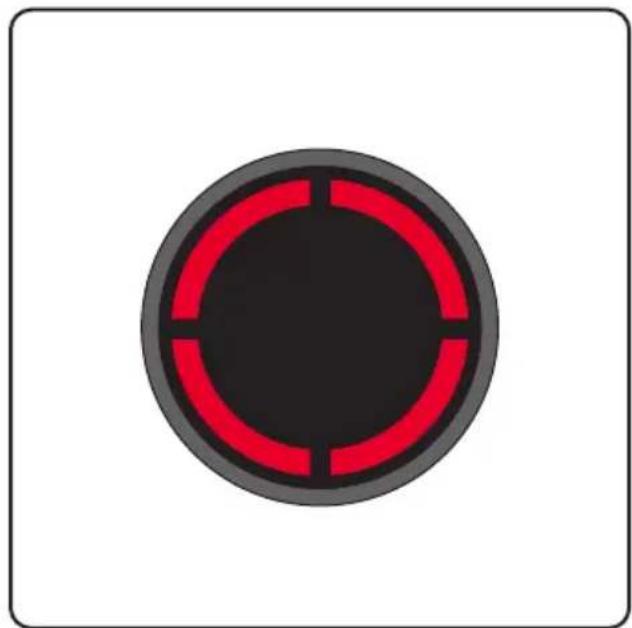
Illustration of hands using a tool to press a mechanical component with a green arrow indicating upward motion (no text or symbols)If the brush bar jams during use, the AirRam™ will stop and the LEDs will turn red. Before checking for a blockage, remove the Battery.
natural_image
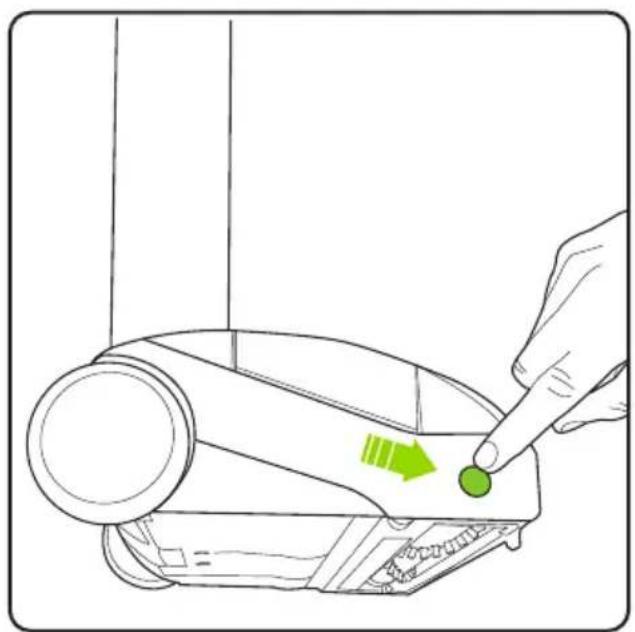
Line drawing of a device with a green arrow pointing to a button, no text or symbols presentRest the AirRam on its side and locate the Brush Roll release button. Press and hold the button and pull out the Brush Roll.
NOTE: The Brush Roll should be pulled first from the side near the release button.
Removing and Cleaning the Brush Roll (Cont.)
natural_image
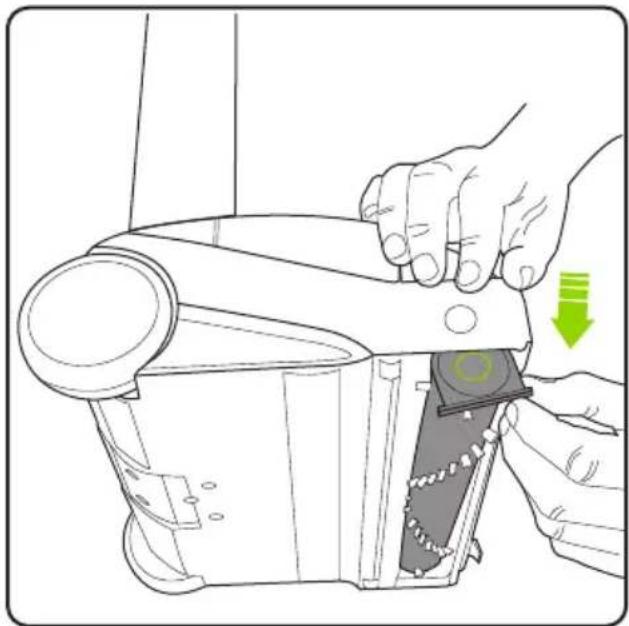
Line drawing of a hand using a handheld device to adjust or install a mechanical component, with no visible text or symbols.Remove the Brush Roll starting at the button end.
natural_image
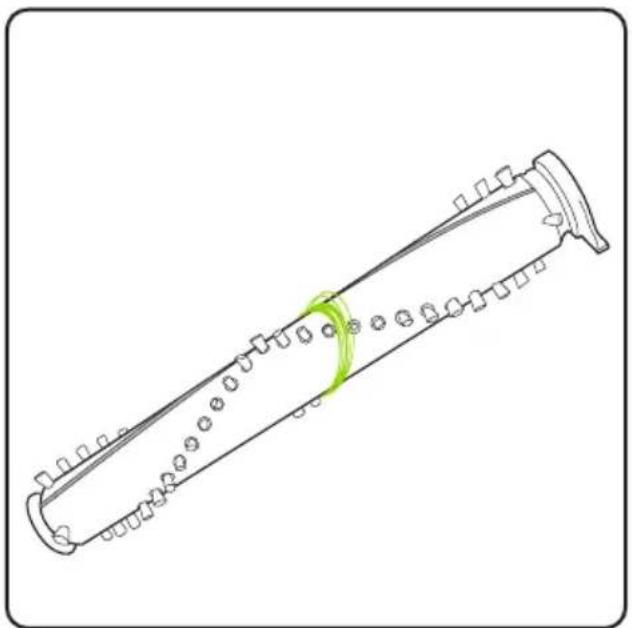
Line drawing of a musical instrument with a green circular accent (no text or symbols)Clean the Brush Roll as needed.
natural_image
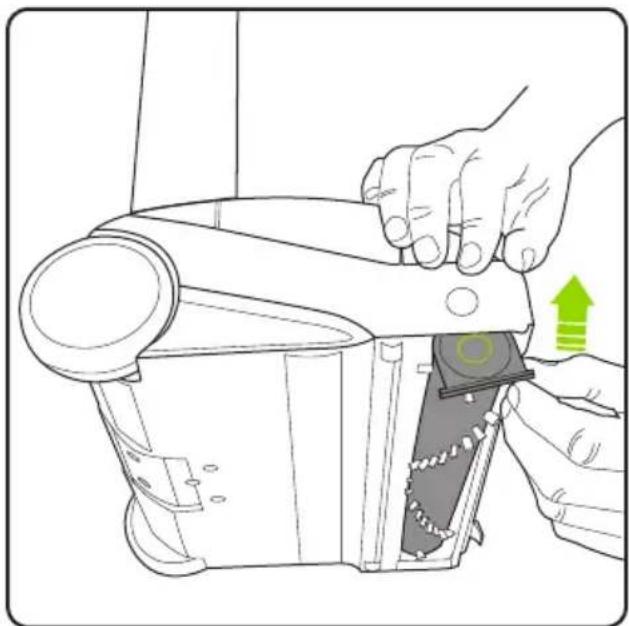
Illustration of hands operating a mechanical device with a green upward arrow indicating motion (no text or symbols)Re-insert the Brush Roll, starting by locating the end farthest away from the button. Push the Brush Roll into the AirRam™ until it "clicks" into place.
text_image
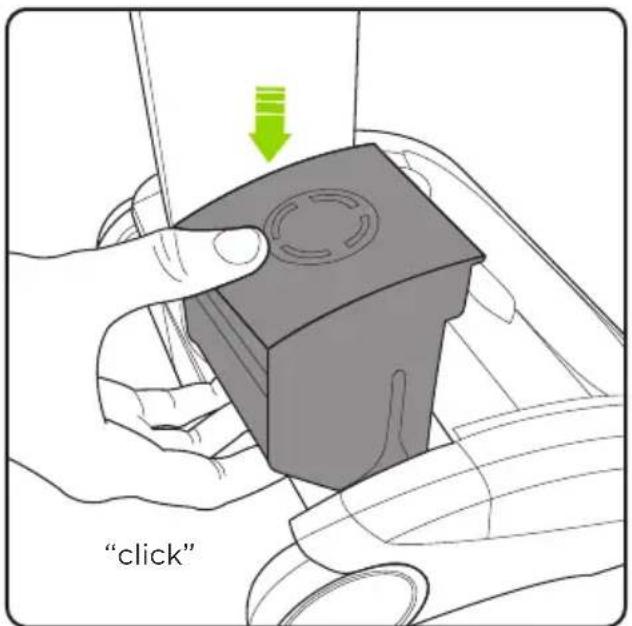
"click"Replace the Battery by sliding it down. It will click into place.
Removing and Cleaning the Brush Roll (Cont.)
natural_image
Circular diagram with red and black segments, no text or symbols presentIf the Brush Roll jams during use, the AirRam™ will stop working and the LEDs will appear red. You will need to remove the Battery first, and then remove the Brush Roll to clean it.
text_image
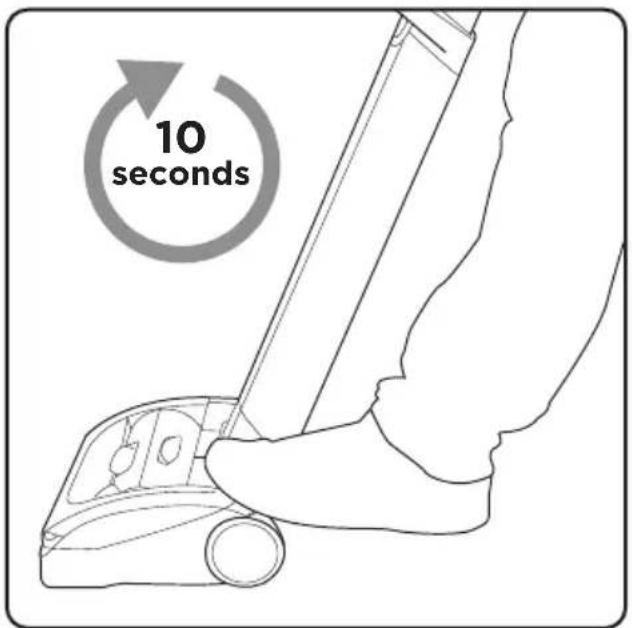
10 secondsThe AirRam will not re-start until the red LED lights go out. It should take approximately 10 seconds for the red lights to turn off after the Brush Roll has been removed, cleaned and the jam is cleared.
Product Care
Your BISSELL AirRam doesn't need much maintenance: keep the filters clean, keep the brush bar tangle-free and charge the battery. Wipe it with a dry cloth if it gets dirty, including under the bin. Never wash it with liquid, run it under a tap or use it without the filter.
Troubleshooting
WARNING
To reduce the risk of electric shock, turn power OFF and disconnect plug from electrical outlet before performing maintenance or troubleshooting checks.
| Problem Possible causes Remedies | ||
| AirRam stopped or won’t work | Battery isn’t fully charged Charge | Battery following instructions on page 8 |
| Brush Roll obstruction Clear debris from the brush bar | ||
| AirRam is not cleaning well | Dirt Bin is full Empty Dirt Bin | |
| Dirt Bin is not installed properly | Position bin correctly and snap firmly into place | |
| Filters need cleaning Follow filter cleaning instructions on page 10 | ||
| Filters need replacing Visit global.BISSELL.com to order replacement filters | ||
| Clog or obstruction Clean the holes in the filter housing and check for blockages | ||
| Battery will not charge | Connection failure Check the plug and charger connections | |
Guarantee
This guarantee gives you specific legal rights, in addition to rights you may have under the Australian Consumer Law. If you need additional instruction regarding this guarantee or have questions regarding what it may cover, please contact your local BISSELL Consumer Care on the details set out below.
BISSELL® Two Year Guarantee
Subject to the *conditions identified below, BISSELL will repair or replace (with new, refurbished, lightly used, or remanufactured components or products), at BISSELL's option, free of charge from the date of purchase by the original purchaser, for two years any defective or malfunctioning part due to manufacturer defect. This guarantee applies to product used for personal purposes, and not commercial or rental service. This guarantee does not apply to fans or routine maintenance or consumable components such as filters, belts, Brush Rolls, etc., damage or malfunction caused by negligence, abuse, neglect, unauthorized repair, or any other use not in accordance with the user guide. BISSELL recommends that the original packaging be kept for the duration of the guarantee period in case such need arises within the guarantee period that the item needs re-packing and transportation.
\*Conditions of Guarantee
Subject to whether such loss is reasonably foreseeable, BISSELL and its in-country distributors are not liable for incidental or consequential damages of any nature associated with the use of this product.
For Australian Consumers Only: Our goods come with guarantees that cannot be excluded under the Australian Consumer Law. You are entitled to a replacement or refund for a major failure and for compensation for any other reasonably foreseeable loss or damage. You are also entitled to have the goods repaired or replaced if the goods fail to be of acceptable quality and the failure does not amount to a major failure.
This guarantee is in addition to other rights or remedies under law. Nothing in this guarantee excludes, limits or modifies any liability of BISSELL which is imposed by law, or limits or modifies any remedy available to the consumer which is granted by law. To make a claim under this guarantee contact BISSELL Australia PTY LTD (details above). Contact BISSELL prior to returning any goods. Where agreed, BISSELL will reimburse reasonable postage / handling costs (if any) for returning goods to BISSELL. To claim expenses incurred in making a claim under this guarantee please provide BISSELL with a copy of the receipt of the expenses by email or post.
Consumer Care
Australia
Telephone: 1300 247 735
Website: www.BISSELL.com.au
New Zealand
Telephone: 0800 247 735
Website: www.BISSELL.co.nz

text_image
every purchase saves pets™ BISSELL PET FOUNDATION®We're Waggin' Our Tails!
BISSELL® proudly supports BISSELL Pet Foundation® and its mission to help save homeless pets. When you buy a BISSELL product, you help save pets, too.
We're proud to design products that help make pet messes, odors and pet homelessness disappear.
Visit BISSELLsavespets.com to learn more.