
da20 DigitalBino - Binoculars ROLLEI - Free user manual and instructions
Find the device manual for free da20 DigitalBino ROLLEI in PDF.


| Product Type | Binoculars with Integrated Digital Camera |
| Brand | Rollei |
| Model | da20 DigitalBino |
| Image Sensor | 2.0 Megapixels |
| Image Resolution (High) | 1600 x 1200 pixels |
| Image Resolution (Low) | 640 x 480 pixels |
| Internal Memory | 16 MB |
| Expandable Memory | SD card (type not specified) |
| Video Recording | Continuous shooting, AVI format |
| Self-Timer | 10 seconds |
| Power Source | 2 x AAA alkaline batteries |
| LCD Display | Yes |
| Connectivity | USB (mass storage device) |
| Operating Temperature | 5°C to 40°C |
| Operating Humidity | 20% to 85% RH (non-condensing) |
| Auto Power Off | After 90 seconds of inactivity |
| Focus System | Center focus knob and diopter knob |
| Interpupillary Distance Adjustment | Yes |
| Eyecups | Foldable rubber eyecups for eyeglass wearers |
| System Requirements | Windows 98SE/2000/ME/XP, Pentium 233 MHz, 128MB RAM, USB port |
| Included Accessories | SD card, CD-ROM with driver and Photo Manager, strap |
| Care Instructions | Clean with soft cloth, avoid liquids, store in dry place |
| Safety Warning | Never look at the sun through binoculars; eye damage risk |
Frequently Asked Questions - da20 DigitalBino ROLLEI
User questions about da20 DigitalBino ROLLEI
0 question about this device. Answer the ones you know or ask your own.
Ask a new question about this device
Download the instructions for your Binoculars in PDF format for free! Find your manual da20 DigitalBino - ROLLEI and take your electronic device back in hand. On this page are published all the documents necessary for the use of your device. da20 DigitalBino by ROLLEI.
USER MANUAL da20 DigitalBino ROLLEI
Rollei da20 DigitalBino Instructions for use
Rollei

natural_image
Black and white photo of a 2.0 MegaPixel binoculars (no visible text or symbols on the device body)CONTENTS
| Introduction > 4 | Digital camera modes | > 12 | |
| Important note | > 5 | Insert of the SD card | > 14 |
| Battery cautions | > 6 | Using the binoculars | > 14 |
| Hints on usage | > 6 | Using the camera | > 15 |
| Operating environment/Care | > 8 | System requirements | > 18 |
| Product part identification | > 9 | Installation of driver | > 18 |
| Saving your photos | > 10 | Image downloading procedure | > 21 |
| Downloading images | > 11 | Viewing video clips on your PC | > 22 |
INTRODUCTION
Your DigitalBino is a binocular with an integral digital camera that is great for sporting events, hiking and wildlife activities, such as bird watching. It lets you record valuable memories and sights at the touch of a button. While the sophisticated binoculars will bring you up close to far-distant subjects, the built-in digital camera will at the same time capture images to take home with you. Then share your fun with others by downloading the images from the camera right to your computer to e-mail to your friends and family.
IMPORTANT NOTE
Never use your DigitalBino to look at the sun!
Looking at or near the sun will cause immediate and irreversible damage to your eyes. Eye damage is often painless, so there is no warning to the observer that damage has occurred until it is too late. Children should be allowed to use your DigitalBino exclusively under adult supervision.
Warnings
- Avoid using the product in the presence of combustible gases.
NEVER look through the binoculars with the latter pointed at the sun, which might cause irreparable damage to your eyes!Make sure that children will not wrap the strap around their neck or body to avoid injury.
Be sure not to whirl about the glasses at the end of the strap to avoid injury to others and damage to the product.
Keep the glasses away from small children to prevent them from swallowing batteries or silica gel.
BATTERY CAUTIONS / HINTS ON USAGE
Battery cautions
Always use size AAA (No. 4) alkaline batteries. Never use unidentified batteries.
Never mix batteries of different brands.
Should the product develop an odd smell, carefully remove the batteries and have these and the binoculars examined by your dealer.
If you will not use the product for a prolonged time, remove the batteries and store them separately.
Hints on usage
To avoid damage to the product, do NOT keep it in the following environments:
- At temperatures above 70^ C .
– In a car parked with closed windows.
– In damp and/or dusty places.
– Exposed to direct sunshine.
– In strong electromagnetic fields.
Never try to disassemble or repair the product.
Do not drop the product to avoid malfunctions or breakage.
Do not use the CD-ROM supplied in household DVD or VCD players.
BATTERY CAUTIONS / HINTS ON USAGE
When exposing the product to marked temperature differences, first let it adopt the temperature of its operating environment to make sure that there is no misting of glass surfaces that would ruin your pictures.
When no action is performed on the product, your DigitalBino will automatically shut down after 90 seconds.
The unit has a battery-level display in the lower right-hand corner of the LCD. When the batteries are low, you will hear a long „beep“. If no action is taken thereafter, the unit will turn off after 10 seconds.
Your DigitalBino should be used exclusively with size AAA alkaline batteries.
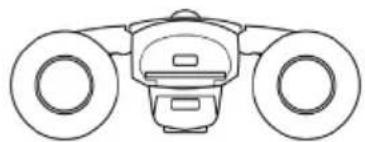
Your DigitalBino comes with an SD memory card that must be inserted before taking and saving images. To do this, open the door that covers the SD card slot and slide the card (with the gold strips facing up) into the slot (11) until it clicks into place.
OPERATING ENVIRONMENT / CARE
Operating environment/ Care of your DigitalBino
5 to 40°C, 20 – 85 % relative humidity, non-condensing.
Care of your DigitalBino
Never immerse the product into any liquid. Remove dust or stains with a soft cloth moistened with water or a neutral detergent. Keep in a dry and cool, dust-free environment when not in use.
Remove the batteries when the product is not going to be used over a long period.
Avoid dropping the product. Never try to disassemble your DigitalBino.
PRODUCT PART IDENTIFICATION

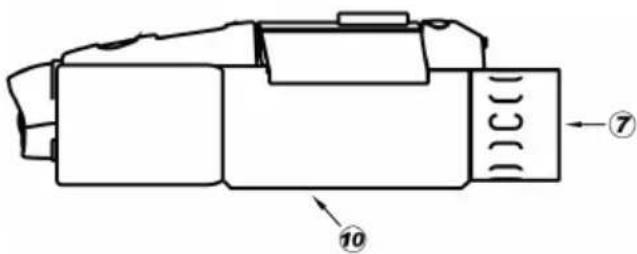
- Diopter Knob (on underside)
- Center Focus Knob
- Objective Lens
- Power/Mode Button
- Shutter/Set Button
- USB Port
- Eyepiece
- Camera Lens
- LCD Screen
- Battery Compartment Lid
- SD Card Slot
SAVING YOUR PHOTOS
Without an SD card
Your photos will be automatically saved to the integral 16MB flash memory of the digital camera until this is full. You can take further pictures after downloading the images and clearing the memory.
With an SD card
Your photos will in this case be automatically saved to the SD card until the latter is full. After downloading the images and clearing the card, you can take further photos. (The integral flash memory of the camera may serve as a backup to increase your shooting capacity.)
Alternate use of flash memory and SD card
If you change midway between flash memory and SD card, the camera will treat the two memories separately. For example, if you insert an SD card after having recorded three pictures in the integral flash memory, the screen will show the first image of the card, and the three images in the flash memory will neither be replaced nor disappear.
DOWNLOADING IMAGES
Downloading images
The flash memory and the SD card must be downloaded separately.
Downloading the flash memory
Remove the SD card and connect your DigitalBino to a computer. Then download the images in the flash memory.
Downloading images from an SD card
Insert the corresponding SD card and follow the downloading steps to download the images on the card to your computer.
DIGITAL CAMERA MODES
Digital camera modes
To scroll through the camera modes, press the left (Mode/Power) button. To select a mode or take pictures, press the right (Shutter/Set) button.
Explanation of mode icons
SD card
HI High resolution (1600 x 1200)
LO Low resolution (640 x 480)
Self-timer (10 s delay)
Delete last image
ALL Delete all images
FMT Format SD card (all images will be deleted)
Continuous shooting (video clips; images saved as an AVI file)
OFF Power Off
DIGITAL CAMERA MODES
Mass storage
"PC" will be displayed when DigitalBino is connected to a computer via USB cable "PC".
SD card full
„Full“ will be displayed when the SD card is full.
SD-card warning
„FMT“ will blink when the camera is unable to access the SD card. The latter may need to be reformatted.
If no action is taken after selecting one of these modes, the camera will automatically switch back to photo mode after 10 seconds.
To power up in mute mode, press Mode/Power and Shutter/Set buttons simultaneously.
Mute mode (without sound)

natural_image
Pure diagram of a mechanical or electrical component with no text, numbers, or symbolsNormal (with sound)

natural_image
Pure diagram of a mechanical component with no text, numbers, or symbols visibleINSERT OF THE SD CARD / USING THE BINOCULARS
Insert of the SD card
SD card lid shut

natural_image
Line drawing of a dual-axis robotic device with USB and SD card labels (no text or symbols on the device itself)SD card lid open
natural_image
Line drawing of a mechanical device with two wheels and a central hub (no text or symbols)Contacts facing up

Adjusting for eyeglass wearers
For optimum viewing comfort, fold down the rubber eyecups and place your eyeglasses against them.
Adjusting the eyepieces
The distance between your eyes is called inter-pupillary distance. This varies from one person to another. It is important to adjust the binoculars to your interpupillary distance before use. To do this, hold the binoculars firmly in the normal viewing position and adjust the barrels by pushing them together or pulling them apart until you see a single circular field with both eyes.

natural_image
Diagram of a mechanical device with three circular components and rotational arrows indicating motion (no text or symbols)Focusing the binoculars
Set the Diopter Knob on the underside to its center point between + and -.
Sight an object at least 15 meters away.
Looking with only your left eye, turn the Center Focus Knob until the object sighted is in sharp focus.
Looking with only your right eye, turn the Diopter Knob until the object sighted is in sharp focus.
Using the camera
Use your DigitalBino in good lighting conditions and avoid facing light sources directly. Remember that photographic subjects should be at least 15 meters away. To take a picture, hold your DigitalBino absolutely steady and press the Shutter/Set button until you hear a beep sound. Failure to hold the unit steady may prevent proper focusing and result in blurred pictures.
USING THE CAMERA
Photo modes
Turn on power by pressing the Mode/Power button (4) for three seconds.
Press the Mode/Power button (4) to select the desired resolution (High or Low).
Sight a target with the binoculars.
Press the Shutter/Set button (5) to take a picture. A short beep will sound to indicate that the picture has been taken.
The digital counter on the LCD will advance each time a picture is taken. When the built-in camera memory is full, the screen will display „Full“.
To delete the last picture, use the Mode/Power button (4) to select „Erase last image“ (trash-can icon) and press the Shutter/Set button for three seconds.
The self-timer function can be selected from the LCD by using the Mode/Power button (4). Press the Shutter/Set button (5) to take an image after 10 seconds.
Your DigitalBino is a mass-storage device. This means that when connected to a PC through the USB port, Windows will add a „Removable Disk“ hard drive under the My Computer icon. Simply access the removable disk to retrieve, view and save images to a permanent location.
When connected to a PC, the screen will display the [PC] screen.
USING THE CAMERA
If at any time the camera cannot access the SD card, the „FMT“ icon will flash. To correct this, the card may need to be formatted. To do this, select the SD-card format mode and press the Shutter/Set button for three seconds.
Note:
This will erase all images stored on the memory card.
Your DigitalBino has a continuous-shooting (CPT) mode that allows you to record video clips as an AVI file. To use this mode:
Select the CPT mode by pressing the Mode/Power button (4).
Press the Shutter/Set button (5) to start recording.
Press the Shutter/Set button again to stop recording.
SYSTEM REQUIREMENTS / INSTALLATION OF DRIVER
System requirements
Windows 98SE/2000/ME/XP
Pentium 233 MHz or higher
128MB SD-RAM
Video (VGA) card with 2MB of RAM for minimum 16-bit (High-Color) display
CD-ROM drive
USB port
60MB of free hard-disk space
Installation of driver
Since your DigitalBino is a mass-storage device, captured images can be accessed just as if it were a hard drive. Therefore, no software driver is normally needed. In conjunction with an older version of Windows 98SE, however, it may be necessary to install the software driver.
INSTALLATION OF DRIVER
Installing the DigitalBino driver
To install the driver, the unit should NOT be connected to your computer via the USB cable.
If the operating system installed in your computer is Windows ME/2000/XP, you should not need to install the DigitalBino driver. Simply view and save images through the My Computer icon.
Load the CD supplied with your Digital-Bino.
Click on "Installation Driver" to start installation.
Begin "InstallShield Wizard", and your computer will automatically execute the installation of the driver program.
Follow the "InstallShield Wizard" steps to guide you through driver installation. Click on "Next" when complete.
Your computer will automatically install the driver.
If you see the "Microsoft digital sign" request appear on screen as you are installing the driver, press the "Yes" button to continue. This product has been registered with Microsoft.
To complete installation, click "Finish".
Restart your computer after installing the DigitalBino driver.
INSTALLATION OF DRIVER
Installing the Photo Manager
Load the CD-ROM.
Select "Install Thalia Photo Manager".
Choose the desired language and press the confirm button.
Enter the installation screen.
After confirming, click the "Next" button.
After confirming, click "Yes".
The serial number is located on the front of the CD-ROM. Click "Next" when complete.
Choose "Custom" or "Typical" form of installation.
Confirm the file location.
Begin installing the software.
When installation is finished, press "Finish" to confirm.
Restart your computer after installing the driver and software.
DOWNLOADING IMAGE FILES
Downloading image files
To execute the Photo Manager, select the buttons as indicated.
» Enter "Removable Disk" to open "DCIM" file.
In "DCIM" file open "100MEDIA" file.
In "100MEDIA" file choose all or selected images.
Finish image download.
Using the Photo Manager
"Help" will give you detailed information on the Photo Manager's many features.
If you have further questions about this software, press "3" to connect with the corresponding website or visit the site directly:
www.photo-dyi.com.cn.
VIEWING VIDEO CLIPS
Viewing video clips on your PC
Use the USB cable to connect the PC's USB port to your DigitalBino. When the linkup is complete, "PC" will be displayed on the LCD.
Double-click "MY COMPUTER" on the PC's desktop.
Double-click "Removable Device".
Open \DCIM\100scope.
Select the video file (*.AVI) and double-click it. The video clip will play through Windows Media Player or other software.
To play back video clips (*. AVI files), "Direct X" needs to be installed.
The program can be downloaded free of charge from http://download.Microsoft.com.
Rollei
- CONTENTS
- INTRODUCTION
- IMPORTANT NOTE
- Warnings
- BATTERY CAUTIONS / HINTS ON USAGE
- Battery cautions
- Hints on usage
- OPERATING ENVIRONMENT / CARE
- Operating environment/ Care of your DigitalBino
- Care of your DigitalBino
- PRODUCT PART IDENTIFICATION
- SAVING YOUR PHOTOS
- Without an SD card
- With an SD card
- Alternate use of flash memory and SD card
- DOWNLOADING IMAGES
- Downloading the flash memory
- Downloading images from an SD card
- DIGITAL CAMERA MODES
- Explanation of mode icons
- Mass storage
- SD card full
- SD-card warning
- Mute mode (without sound)
- Normal (with sound)
- INSERT OF THE SD CARD / USING THE BINOCULARS
- Insert of the SD card
- Adjusting for eyeglass wearers
- Adjusting the eyepieces
- Focusing the binoculars
- Using the camera
- Photo modes
- Note:
- SYSTEM REQUIREMENTS / INSTALLATION OF DRIVER
- System requirements
- Windows 98SE/2000/ME/XP
- Installation of driver
- Installing the DigitalBino driver
- Installing the Photo Manager
- DOWNLOADING IMAGE FILES
- Using the Photo Manager
- VIEWING VIDEO CLIPS
- Viewing video clips on your PC
- Rollei
Brand : ROLLEI
Model : da20 DigitalBino
Category : Binoculars