Lion Rock Traveler M - Tripod ROLLEI - Free user manual and instructions
Find the device manual for free Lion Rock Traveler M ROLLEI in PDF.


| Product Type | Travel Tripod |
| Brand | Rollei |
| Model | Lion Rock Traveler M |
| Material | Aluminum / Carbon Fiber |
| Maximum Height | Approx. 150 cm |
| Minimum Height | Approx. 35 cm |
| Weight | Approx. 1.5 kg |
| Maximum Load | Approx. 5 kg |
| Leg Diameter | Approx. 25 mm |
| Leg Sections | 4 sections |
| Ball Head Type | Integrated Ball Head |
| Quick Release Plate | Removable plate with 1/4" screw |
| Bubble Level | Integrated |
| Included Accessories | Carrying bag, hex key |
| Folded Dimensions | Approx. 42 cm |
| Color | Black |
| Power | None (manual tripod) |
| Care and Cleaning | Clean with a dry cloth; avoid water and solvents |
| Safety | Do not exceed maximum load; lock each section after extension |
| Spare Parts and Reparability | Spare parts available (feet, collars); repair possible at an authorized technician |
| Warranty | 2 years |
Frequently Asked Questions - Lion Rock Traveler M ROLLEI
User questions about Lion Rock Traveler M ROLLEI
0 question about this device. Answer the ones you know or ask your own.
Ask a new question about this device
Download the instructions for your Tripod in PDF format for free! Find your manual Lion Rock Traveler M - ROLLEI and take your electronic device back in hand. On this page are published all the documents necessary for the use of your device. Lion Rock Traveler M by ROLLEI.
USER MANUAL Lion Rock Traveler M ROLLEI
Tripods and Ball Heads
in German, English, French, Spanish, Italian and Portuguese
Rollei
Benutzerhandbuch
Stativ 4
Stativkopf....6
User Guide
Tripod....8
Ball head 10
Lion Rock Traveler

4
Benutzerhandbuch


6

Many thanks for choosing a Rollei product. Please read this manual carefully before using this product.
1. Parts of the Tripod Base
1 Platform
2 Center column adjustment knob
3 Tripod shoulder
4 3/8 inch thread
5 Leg angle adjustment lock
6 Tripod leg
7 Center column
8 Tripod hook
9 Leg locking system
10 Rubber feet
2. Function introduction
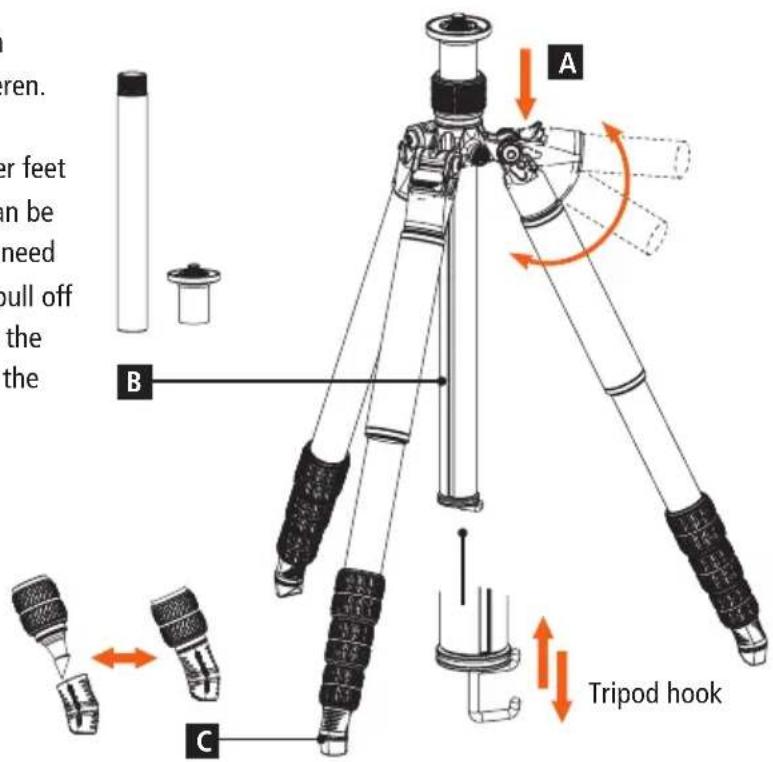
A Angle adjustment: The angle of the tripod legs can be adjusted in three different positions. Therefore please pull out the leg angle adjustment lock. Then you are able to move the leg up and down.
B Two section center column: Entfernen Sie den unteren Teil um bodennahe Aufnahmen zu realisieren.
C Removable rubber feet: Underneath the rubber feet you will find the integrated spikes. These spikes can be used in areas with soil, mud and so on where you need a better grip for the tripod. To use the spikes just pull off the rubber feet. In the unlikely event that you lose the rubber feet you will find 3 extra rubber feet inside the packaging.

Low angle 180° reversal

3. Functions of the Base Plate
D To prevent that the base plate will accidentally screw off, please lock the plate with the help of the screw indicated by the picture. Like this the base plate is firmly fixed onto the tripod.
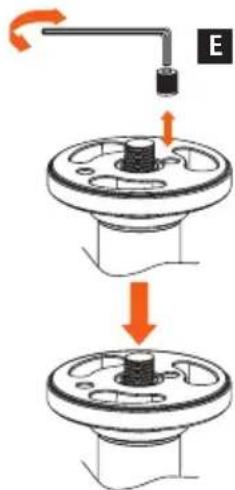
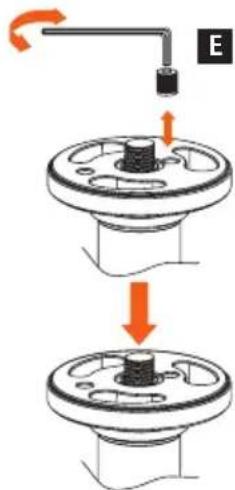
E The screw of the base plate can be inserted in two directions, one side with 3/8 inch screw and 1/4 inch screw on the other side. Choose the side of the screw which is needed for your equipment.
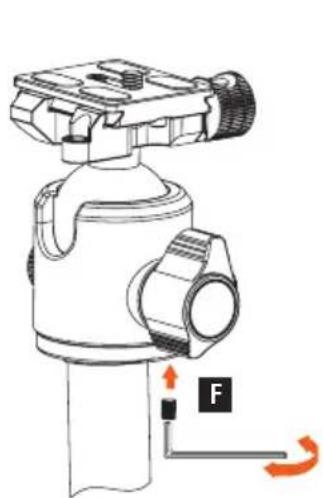
F We recommend that you also lock the tripod head onto the base plate. Therefore screw the anti-rotating screw from below the base plate in the direction of the head. Then the tripod head is firmly attached to the plate and cannot acci dentally be screwed off.


4. Function of the center column 5. Maintenance
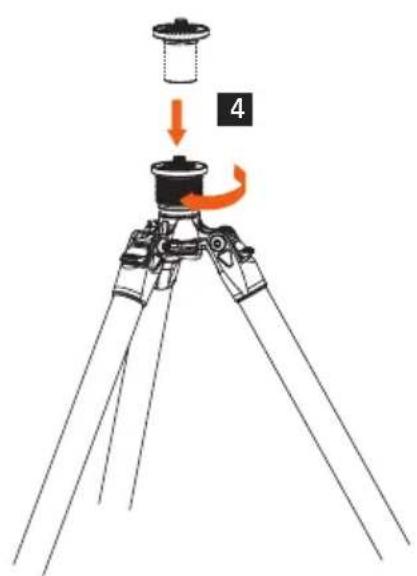
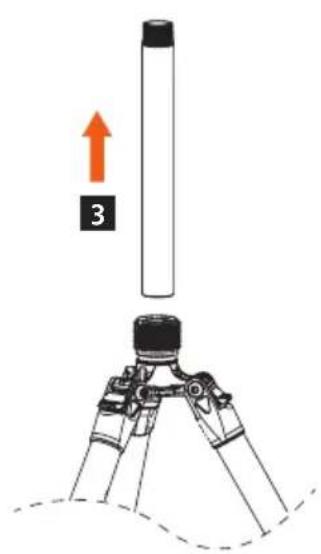
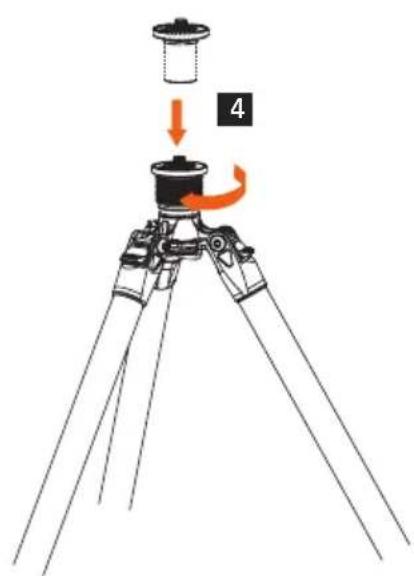
Short center column usages:
1 Rotate and take out the short center column
2 Rotate and take out the hook
3 Take out the center column
4 Insert the short center column an close the Center column adjustment knob
If necessary, please use the soft towel with moderate detergent to clean the locking system and the gliding parts. If necessary, please use regular lubricants or wax oil.


10
Components of the ball head
1 Platform
2 Ball
3 Main body
4 Main fixation
5 Base
6 Swivel lock
7 Fine adjustment
8 Quick release plate
9 1/4" camera screw

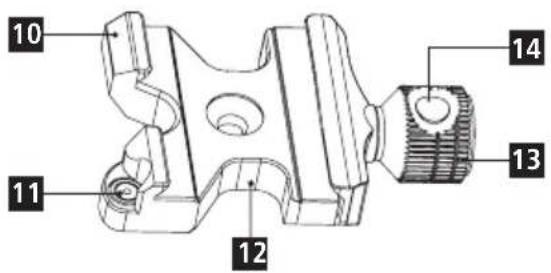
Components of the platform
10 Base
11 Spirit level
12 Anti-slippery groove
13 Locking of the quick release plate
14 Safety button

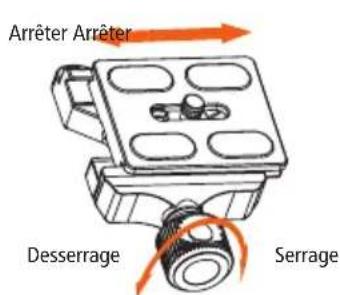
Attaching the quick release plate
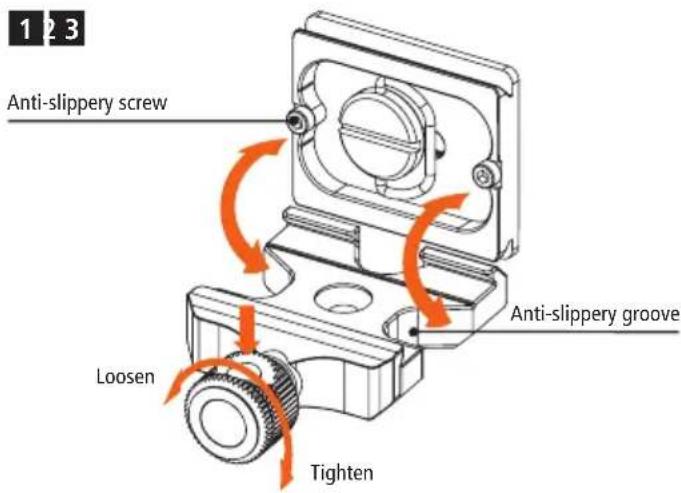

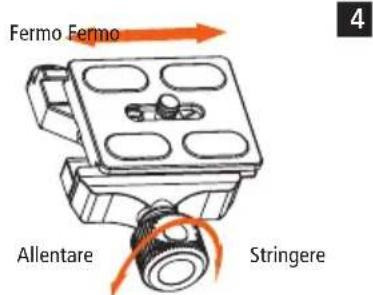
- Loosen the lock of the quick-release plate. In addition, press down the safety button to open the base plate completely.
- Align the quick release plate like shown in the picture.
- First insert one side of the plate then the other.
- If the quick release plate is well positioned, lock the platform locking knob again.
Remark: Loosen the platform locking knob to move the quick release plate horizontally. Press the safety button and loosen the locking knob to take out the quick release plate.
Using the damping mechanism
The damping mechanism will help to prevent that the camera and lens will suddenly fall down if you loosen the main knob. Therefore you can adjust the damping according to the weight of your equipment.

Main fixation Damping fine adjustment Multi-angle locking knob
Setting the damping
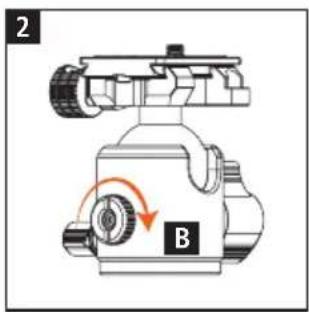
- Attach your camera to the ball head and lock the platform locking knob (A).
- Make sure that the damping fine adjustment knob (B) is totally loosen.
- Loosen the main fixation (A) and check at which point the platform can be moved with the damping tightness which fits your requirements the most. You should be able to adjust the camera angle, but without worrying about the camera falling down suddenly.
- Rotate the damping fine adjustment knob (B) clockwise until you cannot move it anymore. The damping is now set to this point and the main fixation (A) cannot be loosen any further as the position set now.
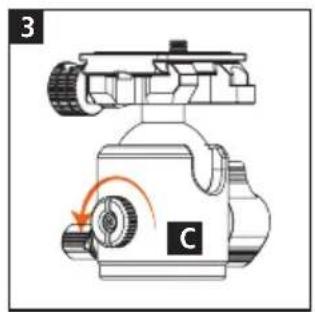
How to relieve damping
- Gently lock the main fixation (A).
- Rotate the damping fine adjustment knob (B) counter clockwise until it is totally loosen.
- Now the damping is released.
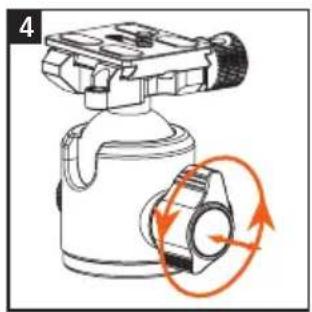
After locking it, the knob can be extended to the side and you can change the position of the main fixing screw. In this way, you can tighten or loosen the screw further.

Notes
- Do not overload.
- Please do not use the product at temperatures lower than -40 °C and higher than +70 °C. When used in environments with moisture, mud or dust, we recommend cleaning the product with a dry cloth. If the tripod has become wet from rain or water, each leg should be extended for a few days until there is no more water in the legs.
- Avoid sand or other small objects going inside the ball head. Please use a dry cloth to remove dirt on the ball head after using. Do not use any lubricant or oil for cleaning.
- Please do not expose the tripod permanently to the sun. Avoid placing the product longer on the windscreen for hours at high temperatures.
- For safety reasons, keep away from charged objects, high voltage equipment and strong chemicals when using this product.
Design and technical data are subject to change without notice.
| Lion Rock |  |  |  |  |  |  |  |  |  |  |  |
| Traveler S | 4 | 22–13 mm | 40 cm | 19.9 cm | 115 cm | 138 cm | 970 g | 42 mm | 78 mm | 280 g | 10 kg |
| Traveler M | 4 | 25–16 mm | 43.5 cm | 20.3 cm | 127.7 cm | 154 cm | 1180 g | 47 mm | 82 mm | 320 g | 15 kg |
| Traveler L | 4 | 28–19 mm | 48 cm | 20.5 cm | 138 cm | 170.7 cm | 1410 g | 47 mm | 82 mm | 320 g | 20 kg |


14

2. Patas del trípode


18

Notas


22


Componentes da plataforma

- ROLLEI
- BENUTZERHANDBUCH
- USER GUIDE
- LION ROCK TRAVELER
- PARTS OF THE TRIPOD BASE
- FUNCTION INTRODUCTION
- FUNCTIONS OF THE BASE PLATE
- FUNCTION OF THE CENTER COLUMN 5. MAINTENANCE
- COMPONENTS OF THE BALL HEAD
- COMPONENTS OF THE PLATFORM
- ATTACHING THE QUICK RELEASE PLATE
- USING THE DAMPING MECHANISM
- SETTING THE DAMPING
- HOW TO RELIEVE DAMPING
- NOTES
- PATAS DEL TRÍPODE
- NOTAS
- COMPONENTES DA PLATAFORMA
Brand : ROLLEI
Model : Lion Rock Traveler M
Category : Tripod