
43LV340H - TV LG - Free user manual and instructions
Find the device manual for free 43LV340H LG in PDF.


User questions about 43LV340H LG
0 question about this device. Answer the ones you know or ask your own.
Ask a new question about this device
Download the instructions for your TV in PDF format for free! Find your manual 43LV340H - LG and take your electronic device back in hand. On this page are published all the documents necessary for the use of your device. 43LV340H by LG.
USER MANUAL 43LV340H LG
Please read this manual carefully before operating your set and retain it for future reference.
ESPAÑOL
natural_image
Technical line drawing of a mechanical component with two views (a and b), no text or symbols present.ENGLISH
Due to the environment regulations about importation and disposal of batteries, remote control batteries will not be provided with LG monitor signage / commercial TV models (Argentina and Colombia).
ESPAÑOL
ENGLISH Read Safety and Reference.
natural_image
Simple line drawing of a rectangular object with a flat top and bottom edges, no text or symbols present.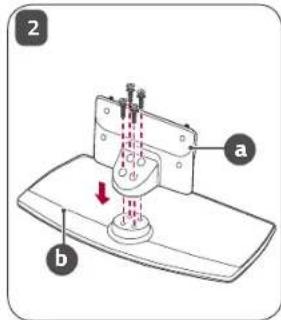
text_image
2 a b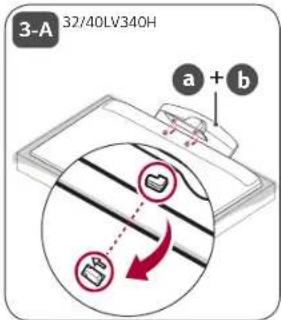
text_image
3-A 32/40LV340H a + b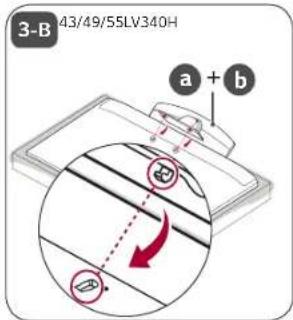
text_image
3-B 43/49/55LV340H a + b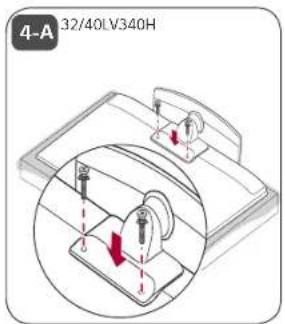
text_image
4-A 32/40LV340H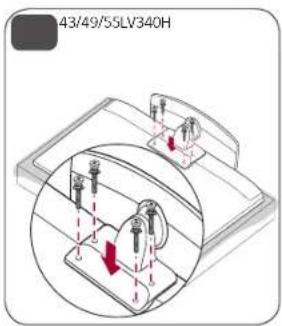
text_image
43/49/55LV340H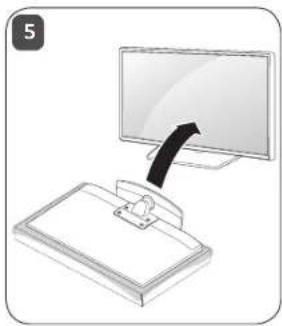
natural_image
Illustration of a computer monitor with a clip attached to a clipboard (no text or symbols)
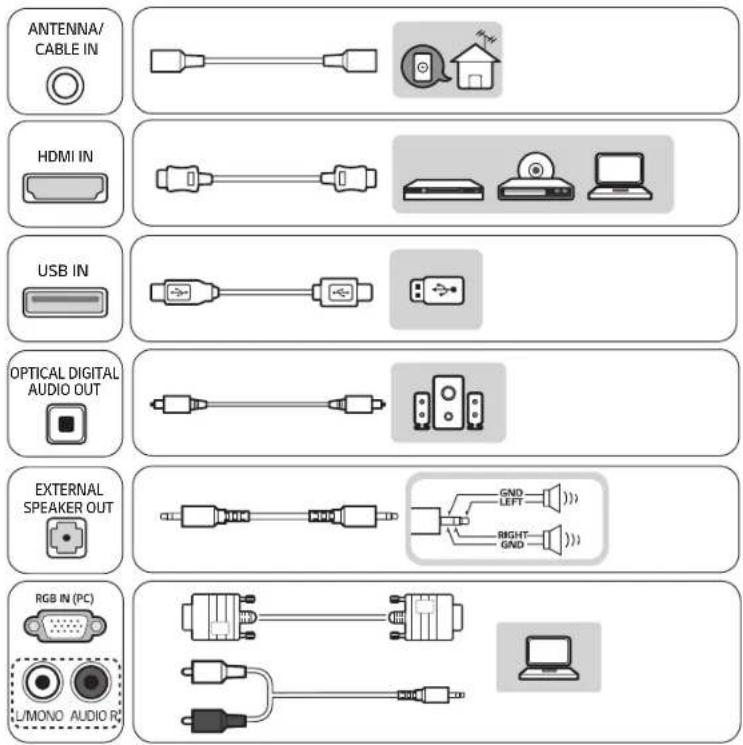
flowchart
graph TD
    A["ANTENNA/CABLE IN"] --> B["LED"]
    C["HDMI IN"] --> D["USB"]
    E["USB IN"] --> F["USB"]
    G["OPTICAL DIGITAL AUDIO OUT"] --> H["LED"]
    I["EXTERNAL SPEAKER OUT"] --> J["GND"]
    I --> K["LEFT"]
    I --> L["BRIGHT"]
    I --> M["GND"]
    N["RGB IN (PC)"] --> O["L/MONO AUDIO R"]
    P["Computer"] --> Q["LED"]
text_image
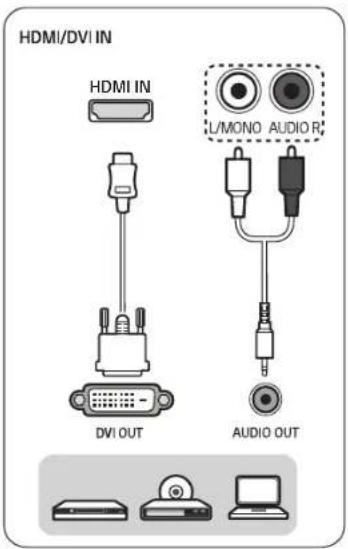
HDMI/DVI IN HDMI IN L/MONO AUDIO R DVI OUT AUDIO OUT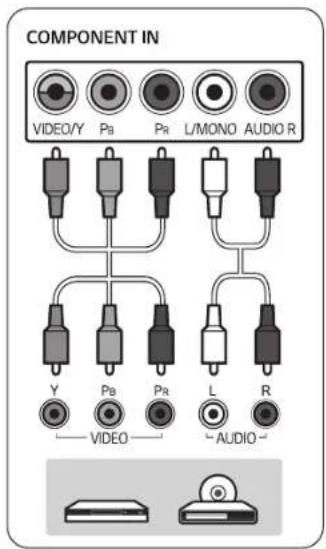
text_image
COMPONENT IN VIDEO/Y Ps Pri L/MONO AUDIO R Y Pb Pr L R AUDIO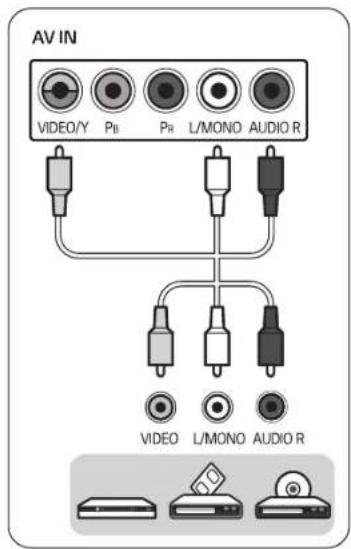
text_image
AV IN VIDEO/Y PB PR L/MONO AUDIO R VIDEO L/MONO AUDIO R
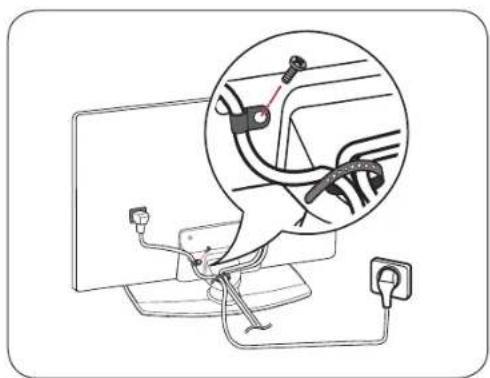
natural_image
Diagram showing a computer monitor connected to a cable with a magnified inset illustrating the cable attachment (no text or symbols present)
text_image
LG Life's Good
natural_image
Simple line drawing of a device with a knob and arrow, no text or symbols present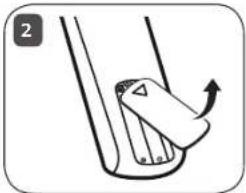
natural_image
Diagram of a mechanical component with a curved arrow indicating rotation (no text or symbols)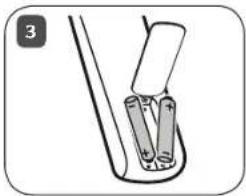
natural_image
Simple line drawing of a mechanical component with two cylindrical parts inserted into a U-shaped tube (no text or symbols)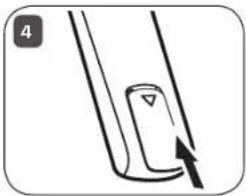
natural_image
Simple line drawing of a mechanical component with an arrow indicating direction (no text or symbols)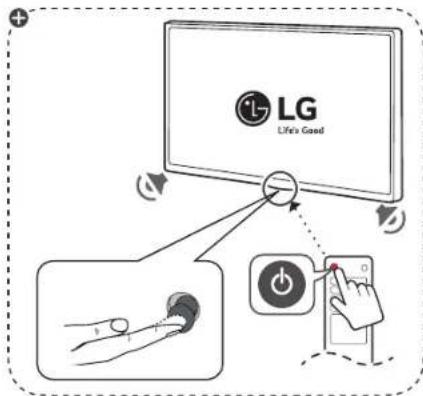
text_image
LG Life's Good
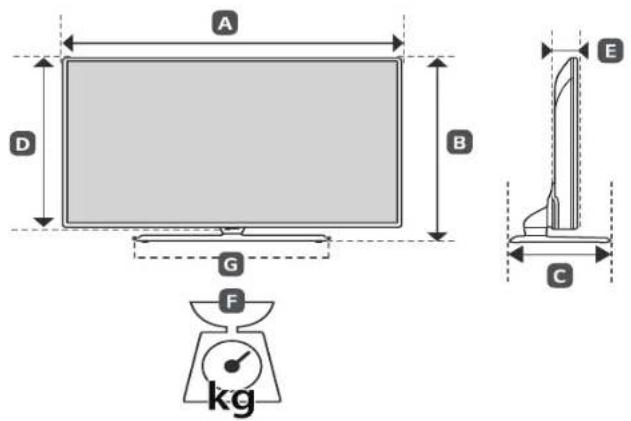
text_image
A D B G F kg C E
| MODELS MODELOS | A | B | C | D | E | F | F-G | Current value / Power consumption | ||||||||
| Corriente de consumo / Consumo de potencia | ||||||||||||||||
| 32LV340H-UA | 739 | 739 | 495 | 495 | 241 | 241 | 84 | 84 | 6.05 | 6,05 | 4.85 | 4,85 | 1.0 A / 60 W | 1,0 A / 60 W | ||
| 40LV340H-UA | 911 | 911 | 576 | 576 | 241 | 241 | 528 | 528 | 55.3 | 55,3 | 8.7 | 8,7 | 7.5 | 7,5 | 0.9 A / 90 W | 0,9 A / 90 W |
| 43LV340H-UA | 974 | 974 | 625 | 303 | 303 | 571 | 571 | 79.4 | 79,4 | 12.45 | ||||||
| 49LV340H-UA | 1,107 | 1 | 107 | 702 | 303 | 303 | 645 | 645 | 79.4 | 79,4 | 14.55 | |||||
| 55LV340H-UA | 1,241 | 1 | 241 | 770 | 770 | 303 | 303 | 720 | 63 | 63 | 9,5 | 16,3 | 16,3 | |||
| Power Requirement / Alimentación requerida | AC 100 - 240 V ~ 50 / 60 Hz | |||||||||||||||
OWNER'S MANUAL
Safety and Reference
LED TV*
* LG LED TVs are LCD TVs with LED backlighting.
Please read this manual carefully before operating your TV and retain it for future reference.
32LV340C
32LV340H
40LV340H
43LV340C
43LV340H
49LV340C
49LV340H
55LV340C
55LV340H
Warning! Important Safety instructions
Read these instructions. Keep these instructions. Heed all warnings. Follow all instructions.
CAUTION
RISK OF ELECTRIC SHOCK
DO NOT OPEN

CAUTION : TO REDUCE THE RISK OF ELECTRIC SHOCK DO NOT REMOVE COVER (OR BACK). NO USER SERVICEABLE PARTS INSIDE. REFER TO QUALIFIED SERVICE PERSONNEL.
The symbol is intended to alert the user to the presence of uninsulated dangerous voltage within the product's enclosure that may be of sufficient magnitude to constitute a risk of electric shock to persons.
The symbol is intended to alert the user to the presence of important operating and maintenance (servicing) instructions in the literature accompanying the device.
WARNING : TO REDUCE THE RISK OF FIRE AND ELECTRIC SHOCK, DO NOT EXPOSE THIS PRODUCT TO RAIN OR MOISTURE.
- Do not use this apparatus near water.
- Clean only with dry cloth.
- Do not block any ventilation openings. Install in accordance with the manufacturer's instructions.
- Do not install near any heat sources such as radiators, heat registers, stoves, or other apparatus (including amplifiers) that produce heat.
- Do not defeat the safety purpose of the polarized or grounding-type plug. A polarized plug has two blades with one wider than the other. A grounding type plug has two blades and a third grounding prong. The wide blade or the third prong are provided for your safety. If the provided plug does not fit into your outlet, consult an electrician for replacement of the obsolete outlet.
- Protect the power cord from being walked on or pinched particularly at plugs, convenience receptacles, and the point where they exit from the apparatus.
- Only use attachments/accessories specified by the manufacturer.
- Use only with the cart, stand, tripod, bracket, or table specified by the manufacturer, or sold with the apparatus. When a cart is used, use caution when moving the cart/apparatus combination to avoid injury from tip-over.

- Unplug this apparatus during lightning storms or when unused for long periods of time.
•Refer all servicing to qualified service personnel. Servicing is required when the apparatus has been damaged in any way, such as power-supply cord or plug is damaged, liquid has been spilled or objects have fallen into the apparatus, the apparatus has been exposed to rain or moisture, does not operate normally, or has been dropped. - Do not press strongly upon the panel with a hand or a sharp object such as a nail, pencil, or pen, or make a scratch on it.
- Do not stick metal objects or any other conductive material into the power cord. Do not touch the end of the power cord while it is plugged in.
- Keep the packing anti-moisture material or vinyl packing out of the reach of children. Anti-moisture material is harmful if swallowed. If swallowed, induce vomiting and go to the nearest hospital. Additionally, vinyl packing can cause suffocation. Keep it out of the reach of children.
- Concerning the Power Cord (Can differ by country): Check the specification page of this owner's manual to be certain concerning current requirements. Do not connect too many devices to the same AC power outlet as this could result in fire or electric shock. Do not overload wall outlets. Overloaded wall outlets, loose or damaged wall outlets, extension cords, frayed power cords, or damaged or cracked wire insulation are dangerous. Any of these conditions could result in electric shock or fire. Periodically examine the cord of your device, and if its appearance indicates damage or deterioration, unplug it, discontinue use of the device, and have the cord replaced with an exact replacement part by an authorized servicer. Protect the power cord from physical or mechanical abuse, such as being twisted, kinked, pinched, closed in a door, or walked upon. Pay particular attention to plugs, wall outlets, and the point where the cord exits the device. Do not
move the TV with the power cord plugged in. Do not use a damaged or loose power cord. Be sure do grasp the plug when unplugging the power cord. Do not pull on the power cord to unplug the TV.
•To reduce the risk of fire or electrical shock, do not expose this product to rain, moisture or other liquids. Do not touch the TV with wet hands. Do not install this product near flammable objects such as gasoline or candles, or expose the TV to direct air conditioning.
- Do not use high voltage electrical equipment near the TV (e.g., a bug zapper). This may result in product malfunction.
- Do not expose to dripping or splashing and do not place objects filled with liquids, such as vases, cups, etc. on or over the apparatus (e.g., on shelves above the unit).
- Grounding (Except for devices which are not grounded.) Ensure that you connect the earth ground wire to prevent possible electric shock (i.e., a TV with a three-prong grounded AC plug must be connected to a three-prong grounded AC outlet). If grounding methods are not possible, have a qualified electrician install a separate circuit breaker. Do not try to ground the unit by connecting it to telephone wires, lightning rods, or gas pipes.
- As long as this unit is connected to the AC wall outlet, it is not disconnected from the AC power source even if the unit is turned off.
- Do not attempt to modify this product in any way without written authorization from LG Electronics. Unauthorized modification could void the user's authority to operate this product.
- Outdoor Antenna Grounding (Can differ by country): If an outdoor antenna is installed, follow the precautions below. An outdoor antenna system should not be located in the vicinity of overhead power lines or other electric light or power circuits, or where it can come in contact with such power lines or circuits as death or serious injury can occur. Be sure the antenna system is grounded to provide some protection against voltage surges and built-up static charges. Section 810 of the National Electrical Code (NEC) in the U.S.A. provides information with respect to proper grounding of the mast and supporting structure, grounding of the lead-in wire to an antenna discharge unit, size of grounding conductors, location of antenna discharge unit, connection to grounding electrodes and requirements for the grounding electrode. Antenna grounding according to the National Electrical Code, ANSI/NFPA 70
- Moving Make sure the product is turned off, unplugged, and all cables have been removed. It may take 2 or more people to carry larger TVs. Do not press or put stress on the front panel of the TV.
- Ventilation Install your TV where there is proper ventilation. Do not install in a confined space such as a bookcase. Do not cover the product with cloth or other materials while plugged. Do not install in excessively dusty places.
•Take care not to touch the ventilation openings. When watching the TV for a long period, the ventilation openings may become hot. This does not affect the performance of the product or cause defects in the product.
- If you smell smoke or other odors coming from the TV, unplug the power cord and contact an authorized service center.
- If water or another substance enters the product (like an AC adapter, power cord, or TV), disconnect the power cord and contact the service center immediately. Otherwise, this may result in fire or electric shock.
- Do not install this product on a wall if it could be exposed to oil or oil mist. This may damage the product and cause it to fall.
- Use only an authorized AC adapter and power cord approved by LG Electronics. Otherwise, this may result in fire, electric shock, malfunction, or product deformation.
- Never disassemble the AC adapter or power cord. This may result in fire or electric shock.
- Handle the adapter carefully to avoid dropping or striking it. An impact could damage the adapter.
- Keep the product away from direct sunlight.
- Never touch this apparatus or antenna during a lightning storm.
- When mounting a TV on the wall, make sure not to install the TV by hanging the power and signal cables on the back of the TV.
- Do not allow an impact shock, any objects to fall into the product, and do not drop anything onto the screen.
- DISCONNECTING THE DEVICE FROM THE MAIN POWER The power plug is the disconnecting device. In case of an emergency, the power plug must remain readily accessible.
- Make sure the power cord is connected securely to the power plug on the TV.
- Batteries Store the accessories (battery, etc.) in a safe location out of the reach of children.
- This apparatus uses batteries. In your community there might be regulations that require you to dispose of these batteries properly due to environmental considerations. Please contact your local authorities for disposal or recycling information.
- Do not dispose of batteries in a fire.
- Do not short circuit, disassemble, or allow the batteries to overheat.
- Cleaning When cleaning, unplug the power cord and wipe gently with a soft cloth to prevent scratching. Do not spray water or other liquids directly on the TV as electric shock may occur. Do not clean with chemicals such as alcohol, thinners, or benzene.
Preparing
•Image shown may differ from your TV.
- Your TV's OSD (On Screen Display) may differ slightly from that shown in this manual.
- The available menus and options may differ from the input source or product model that you are using.
- New features may be added to this TV in the future.
- The items supplied with your product may vary depending upon the model.
- Product specifications or contents of this manual may be changed without prior notice due to upgrade of product functions.
- For an optimal connection, HDMI cables and USB devices should have bezels less than 10mm (0.39 inches) thick and 18mm (0.7 inches) width.
- Use an extension cable that supports USB 2.0 if the USB cable or USB flash drive does not fit into your TV's USB port.
- Use a certified cable with the HDMI logo attached. If you do not use a certified HDMI cable, the screen may not display or a connection error may occur.
- Recommended HDMI cable types
- High-Speed HDMI®/TM cable
- High-Speed HDMI®/TM cable with Ethernet
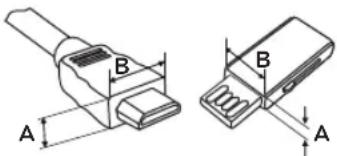
text_image
A B B A*A≤10 mm (0.39 inches)
*B ≤18 mm (0.7 inches)
- Do not use any unapproved items to ensure the safety and lifespan of the product.
- Any damages or injuries by using unapproved items are not covered by the warranty.
- Some models appear to have a thin film on the screen. It is actually part of the screen; do not remove it.
- When attaching the stand to the TV set, place the screen facing down on a cushioned table or flat surface to protect the screen from scratches.
- Make sure that the screws are fastened tightly. (If they are not fastened securely enough, the TV may tilt forward after being installed.)
- Do not fasten the screws with excessive force otherwise they may be worn out and become loose.
Lifting and Moving the TV
When moving or lifting the TV, read the following to prevent the TV from being scratched or damaged and for safe transportation regardless of its type and size.
- It is recommended to move the TV in the box or packing material that the TV originally came in.
- Before moving or lifting the TV, disconnect the power cord and all cables.
- When holding the TV, the screen should face away from you to avoid damage.

- Hold the top and bottom of the TV frame firmly. Make sure not to hold the transparent part, speaker, or speaker grille area.
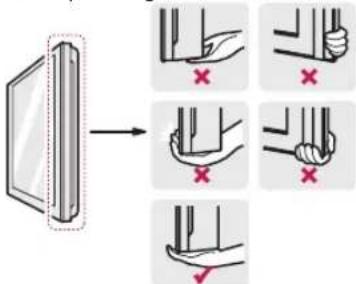
text_image
Diagram illustrating how to adjust or replace a device with red X marks, showing step-by-step instructions.- Use at least two people to move a large TV.
- When transporting the TV by hand, hold the TV as shown in the following illustration.
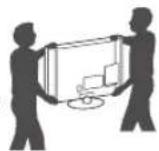
- When transporting the TV, do not expose the TV to jolts or excessive vibration.
- When transporting the TV, keep the TV upright; never turn the TV on its side or tilt towards the left or right.
- When handling the TV, be careful not to damage the protruding buttons.

- Avoid touching the screen at all times, as this may result in damage to the screen.
- Do not place the product on the floor with its front facing down without padding. Failure to do so may result in damage to the screen.
- Do not move the TV by holding the cable holders, as the cable holders may break, and injuries and damage to the TV may occur. (Depending upon model)
Using the Button
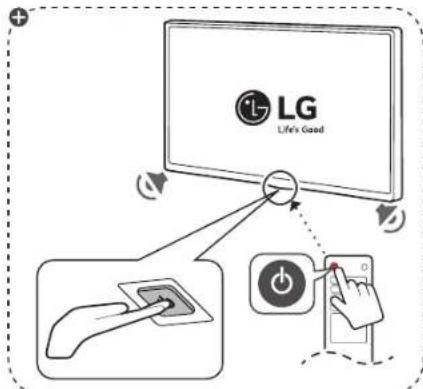
You can operate the TV functions, using the button.
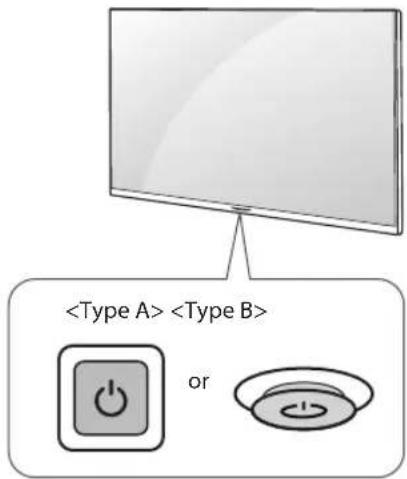
text_image
Basic Functions
(Type A)
| Power On (Press)Power Off (Press and Hold) |
(Type B)
| Power On (Press)Power Off ^1 (Press and Hold) | |
| Volume Control | |
| Channels Control |
1 If the menu button is on the screen, pressing and holding the joystick button will let you exit the menu.
Adjusting the Menu
When the TV is turned on, press the button one time. You can adjust the Menu items using the button. (Depending upon model)
| Turns the power off. | |
| Accesses the setting menu. | |
| × | Clears on-screen displays and returns to TV viewing. |
| Changes the input source. |
Mounting on a Table
(Depending upon model)
1 Lift and tilt the TV into its upright position on a table.
- Leave a 10 cm (4 inches) (minimum) space from the wall for proper ventilation.
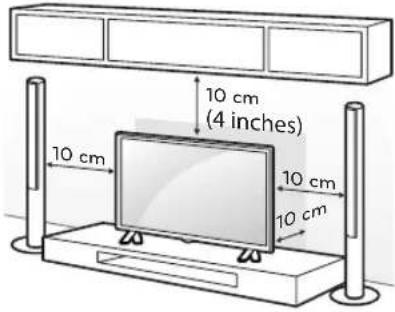
text_image
10 cm (4 inches) 10 cm 10 cm 10 cm2 Connect the power cord to a wall outlet.

- Do not place the TV near or on sources of heat, as this may result in fire or other damage.
- Do not apply foreign substances (oils, lubricants, etc.) to the screw parts when assembling the product. (Doing so may damage the product.)
Adjusting the Angle of the TV to Suit View
(Depending upon model)
Swivel 20 degrees to the left or right and adjust the angle of the TV to suit your view.
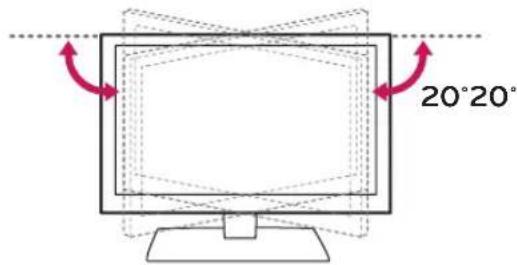
text_image
20°20°
- When adjusting the angle of the TV, watch out for your fingers.
- Personal injury may occur if hands or fingers are pinched. If the product is tilted too much, it may fall, causing damage or injury.
Attaching the TV to a desk
(Depending upon model)
If mounting the TV on a table, make sure it is installed according to the method outlined in 'Attaching the TV to a desk'.
The TV should be attached to a desk so it cannot be pulled in a forward/backward direction, potentially causing injury or damaging the product.
[TYPE 1-1]
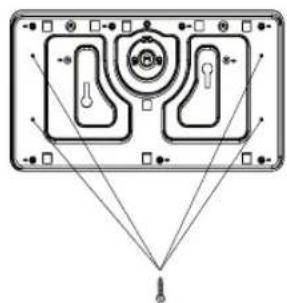
natural_image
Pure technical diagram of a mechanical component with no text, numbers, or symbols4-Screws (Not provided as parts of the product.)
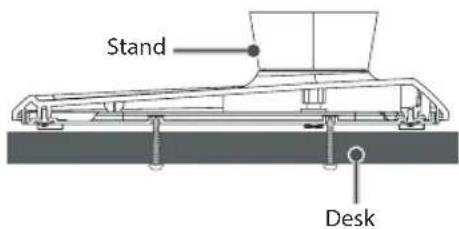
text_image
Stand Desk[TYPE 1-2]
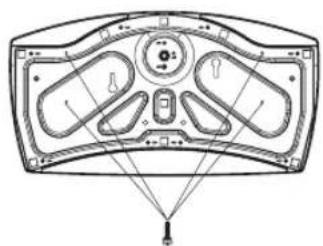
natural_image
Technical line drawing of a mechanical component with no visible text or symbols4-Screws
(Not provided as parts of the product.)
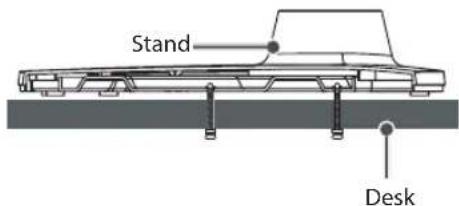
text_image
Stand Desk[TYPE 1-3]
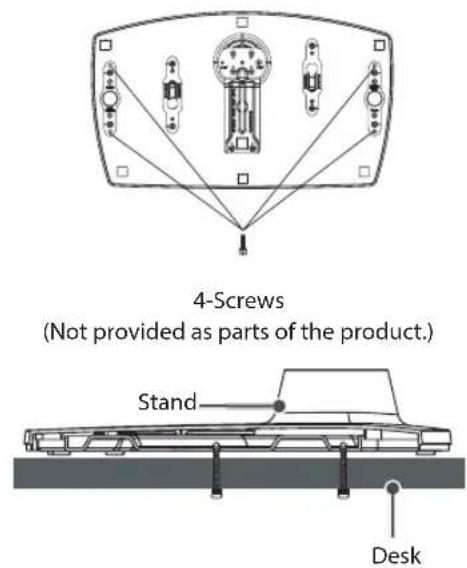
text_image
4-Screws (Not provided as parts of the product.) Stand Desk[TYPE 2-2]
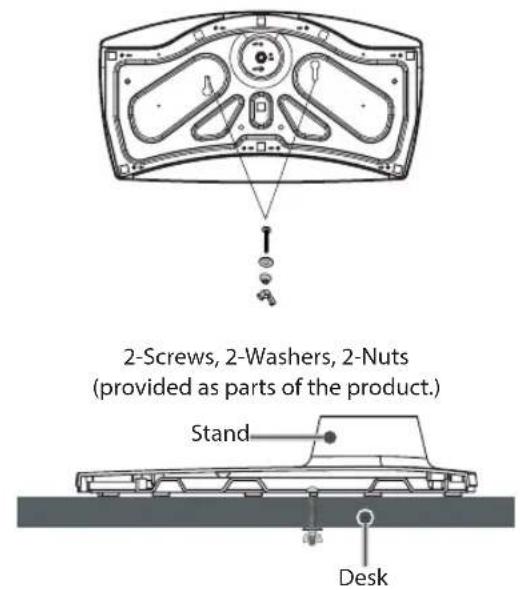
text_image
2-Screws, 2-Washers, 2-Nuts (provided as parts of the product.) Stand DeskNOTE
- Screw: M5 x L (*L: Table depth + 8\~10 mm) ex) Table depth: 15 mm, Screw: M5 x L25
[TYPE 2-1]
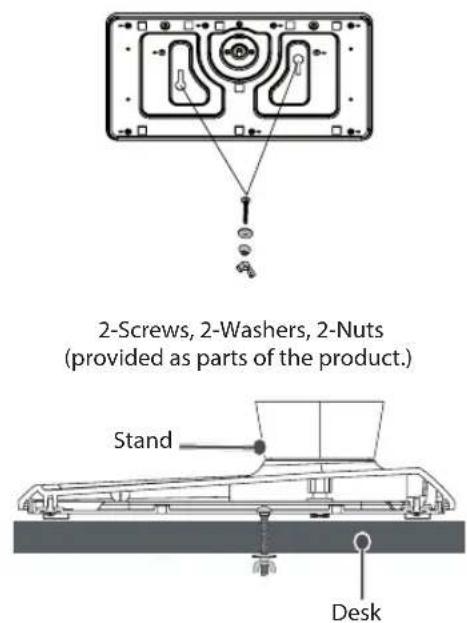
text_image
2-Screws, 2-Washers, 2-Nuts (provided as parts of the product.) Stand Desk[TYPE 2-3]
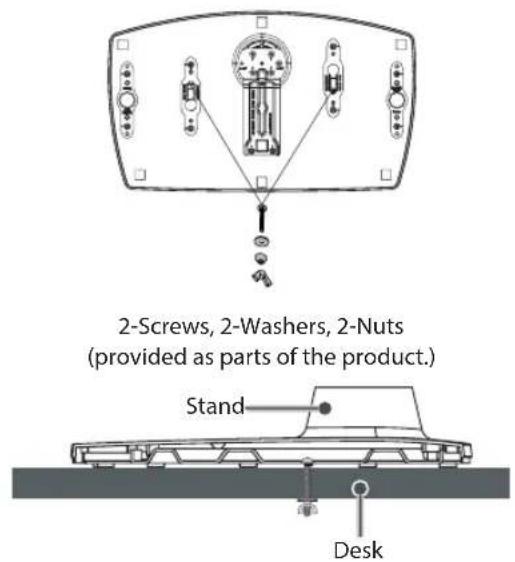
text_image
2-Screws, 2-Washers, 2-Nuts (provided as parts of the product.) Stand DeskUsing the Kensington Security System (optional)
(Depending upon model)
The Kensington security system connector is located at the rear of the TV. For more information of installation and using, refer to the manual provided with the Kensington security system or visit http://www.kensington.com. Connect the Kensington security system cable between the TV and a table.

natural_image
Illustration of a monitor connected to a cable with magnified insets showing the cable being held (no text or symbols present)- The Kensington security system is optional. You can obtain additional accessories from your local dealer.
Securing the TV to a Wall (optional)
(Depending upon model)
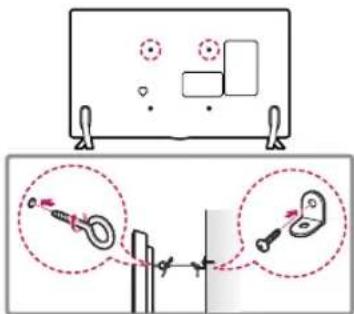
text_image
Diagram illustrating a mechanical or electrical setup with labeled components and directional arrows, likely illustrating a system or process.1 Insert and tighten the eye-bolts or TV brackets and bolts on the back of the TV.
- If there are bolts inserted at the eye-bolts position, remove the bolts first.
2 Mount the wall brackets with the bolts to the wall. Match the location of the wall bracket and the eye-bolts on the rear of the TV.
3 Connect the eye-bolts and wall brackets tightly with a sturdy rope or cable. Make sure to keep the rope parallel to the flat surface.

• Make sure that children do not climb on or hang on the TV.
- Use a platform or cabinet that is strong and large enough to support the TV securely.
- Brackets, bolts, and ropes are optional. You can obtain additional accessories from your local dealer.
Mounting on a Wall
An optional wall mount can be used with your LG Television. Consult with your local dealer for a wall mount that supports the VESA standard used by your TV model. Carefully attach the wall mount bracket at the rear of the TV. Install the wall mount bracket on a solid wall perpendicular to the floor. If you are attaching the TV to other building materials, please contact qualified personnel to install the wall mount. Detailed instructions will be included with the wall mount. We recommend that you use an LG brand wall mount. The LG wall mount is easy to adjust or to connect the cables. When you do not use LG's wall mount bracket, use a wall mount bracket where the device is adequately secured to the wall with enough space to allow connectivity to external devices. If you are using a non-adjustable mount, attach the mount to the wall. Attach the cables to the TV first, then attach the TV to the mount.
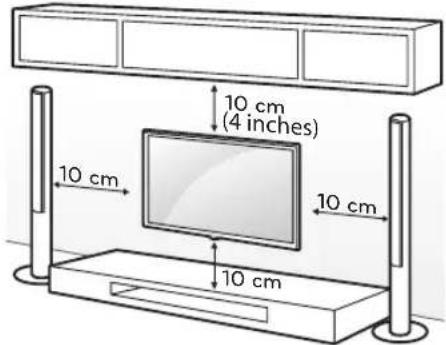
text_image
10 cm (4 inches) 10 cm 10 cm 10 cmMake sure to use screws and wall mounts that meet the VESA standard. Standard dimensions for the wall mount kits are described in the following table.
| Model | 32LV340C | 49LV340C |
| 32LV340H | 49LV340H | |
| 40LV340H | 55LV340C | |
| 43LV340C | 55LV340H | |
| 43LV340H | ||
| VESA (A x B) 200 x 200 | 300 x 300 | |
| Standard screw M6 M6 | ||
| Number of screws 4 4 | ||
| Wall mount bracket (optional) | LSW240B | LSW350B |
| MSW240 | MSW240 |
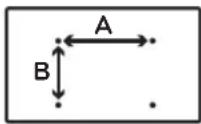

- Remove the stand before installing the TV on a wall mount by performing the stand attachment in reverse.
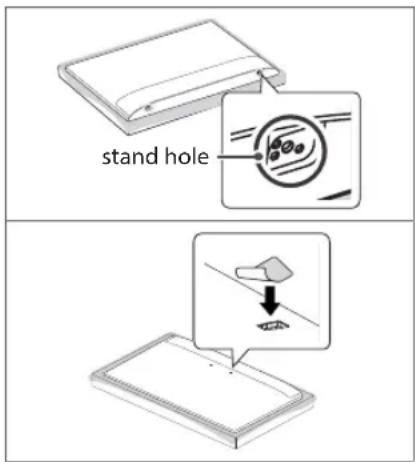
- When using the wall mount, it is recommended that you apply a piece of tape over the Stand holes to prevent dust and bugs from entering the holes. (Depending upon model)
text_image
stand holeConnections (Notifications)
You can connect various external devices to the TV. Supported external devices are: HD receivers, DVD players, VCRs, audio systems, USB storage devices, PC, gaming devices, and other external devices. For more information on external device's connection, refer to the manual provided with each device.
- If you record a TV program on a DVD recorder or VCR, make sure to connect the TV signal input cable to the TV through a DVD recorder or VCR. For more information about recording, refer to the manual provided with the connected device.
- The external device connections shown may differ slightly from illustrations in a manual.
- Connect external devices to the TV regardless about the order of the TV port.
- If you connect a gaming device to the TV, use the cable supplied with the gaming device.
- Refer to the external equipment's manual for operating instructions.
- When connecting via a wired LAN, it is recommended to use a CAT 7 cable. (Depending upon model)
Connecting to an Antenna or Cable
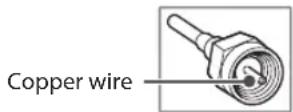
Connect an antenna, cable, or cable box to watch TV while referring to the following. The illustrations may differ from the actual items and an RF cable is optional.
- Make sure not to bend the copper wire of the RF cable.
- Complete all connections between devices, and then connect the power cord to the power outlet to prevent damage to your TV.
- Use a signal splitter to use 2 TVs or more.
- DTV Audio Supported Codec: MPEG, Dolby Digital.
Other Connections
Connect your TV to external devices. For the best picture and audio quality, connect the external device and the TV with the HDMI cable.
•HDMI Audio Supported Format: Dolby Digital (32 kHz / 44.1 kHz / 48 kHz), PCM (32 kHz / 44.1 kHz / 48 kHz / 96 kHz / 192 kHz) (Depending on model)
- Use only with the 3-pole 3.5 ~mm Stereo Jack.
- Do not connect your headphones or earphones to the port for connecting an external speaker.
Remote Control
(Some buttons and services may not be provided depending upon models or regions.)
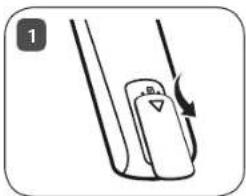
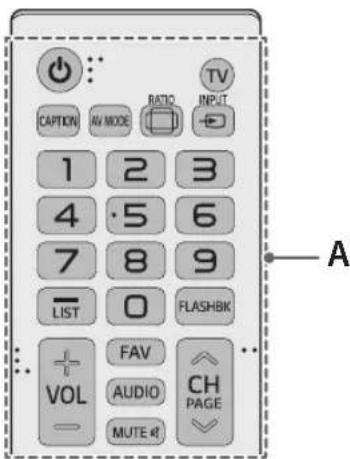
The descriptions in this manual are based on the buttons on the remote control. Please read this manual carefully and use the TV correctly. To install batteries, open the battery cover, replace batteries (1.5 V AAA) matching the + and ends to the label inside the compartment, and close the battery cover. Failure to match the correct polarities of the batteries may cause the battery to burst or leak, resulting in fire, personal injury, or ambient pollution. To remove the batteries, perform the installation actions in reverse. This remote uses infrared light. When in use, it should be pointed in the direction of the TV's remote sensor.
text_image
CAPTION RV MODE RATIO TV INPUT 1 2 3 4 5 6 7 8 9 LIST 0 FLASHBIK VOL FAV AUDIO CH PAGE MUTEA
(Power) Turns the TV on or off.
TV Returns to the last TV channel.
CAPTION Activates or deactivates the subtitles.
AV MODE Selects an AV mode.
Resizes an image.
INPUT Changes the input source.
Number button Enters numbers.
- (Dash) Inserts a dash between numbers such as 2-1 and 2-2.
LIST Accesses the saved channel list.
FLASHBK Alternates between the two last channels selected (pressing repeatedly).
+ vAdjusts the volume level.
FAV Accesses your favorite channel list.
AUDIO Digital signal: Changes the audio language. Analog signal: Changes the MTS sound.
MUTE Mutes all sounds.
^CHS scrolls through the saved channels.
PAGE gives to the previous or next screen.
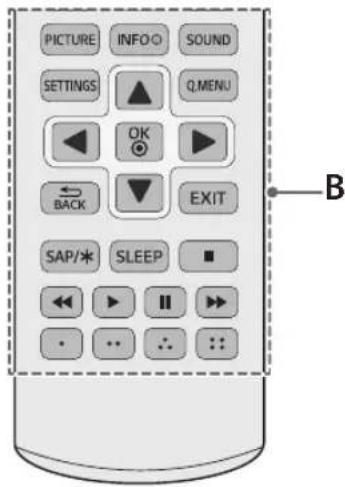
text_image
PICTURE INFO O SOUND SETTINGS ↑ Q MENU ← OK → ← BACK ↓ EXIT SAP/* SLEEP ■ ← ▶ II >> • •• ∴ : : BB
PICTURE Changes the picture mode.
INFO Shows information on the current program.
SOUND Changes the sound mode.
SETTINGS Accesses the setting menu.
Q.MENU Accesses the quick menu.
Navigation button (up / down / left / right) Scrolls through menus or options.
OK Selects menus or options and confirms your input.
BACK Returns to the previous screen.
EXITClears all on-screen displays and returns to TV viewing.
SAP/* Enables SAP (Secondary Audio Program) Feature.
SLEEP Sets the length of time until the TV to turns off.
■, ◀◀ ▶ Control buttons for media contents
These access special functions in some menus.
Settings
To select picture mode
SETTINGS ▶ PICTURE ▶ Picture Mode
Select the picture mode optimized for the viewing environment or the program.
- Vivid Heightens contrast, brightness and sharpness to display vivid images.
- Standard Displays images in standard levels of contrast, brightness and sharpness.
- APS APS (Auto power saving) mode reduces power consumption by dimming control.
- Cinema / Game Displays the optimum picture for a movie or a game.
- Sports Optimised picture mode for sports matches. The pitch and kits are presented in vibrant colours, with crystal-clear images even for fast movements.
- Expert Menu for adjusting picture quality that allows experts and amateurs to enjoy the best TV viewing. This menu for adjustment is provided for ISF-certified picture tuning professionals. (ISF logo can be used only on ISF-certified TVs.) ISFccc : Imaging Science Foundation Certified Calibration Control (Depending upon model)
- Depending upon input signal, the available range of picture modes may differ.
- Expert mode is for picture tuning professionals to control and fine-tune using a specific image. For normal images, the effects may not be drastic.
•Picture Mode change may modify Energy Saving and Motion Eye Care settings and it can affect energy consumption.
To set additional picture options
SETTINGS ▶ PICTURE ▶ Picture Options
Adjusts detailed setting for images.
- Noise Reduction Eliminates noise in the picture.
- MPEG Noise Reduction Eliminates noise generated while creating digital picture signals.
- Black Level Adjusts the brightness and contrast of the screen to suit the black level of the input picture by using the blackness (black level) of the screen.
• Real Cinema Optimizes the screen for movie viewing.
- Motion Eye Care Saves power consumption by adjusting the brightness corresponding to the movement of the image on the screen.
- Depending upon input signal or other picture settings, the range of detailed items for adjustment may differ.
To use energy saving feature
SETTINGS ▶ PICTURE ▶ Energy Saving
Reduces power consumption by adjusting peak screen brightness.
- Auto The TV sensor detects the ambient lighting and automatically adjusts the screen brightness.
- Off Turns off the Energy Saving.
- Minimum / Medium / Maximum Applies the pre-set Energy Saving.
- Screen Off Screen is turned off and only sound is played. Press any button on the remote control to turn the screen back on.
- Depending on the Energy Saving (Auto / Maximum), you may not be able to adjust the Backlight. In this case, navigate to SETTINGS
▶ PICTURE ▶ Energy Saving and set to Off or Minimum.
Licenses
Supported licenses may differ by model. For more information about licenses, visit www.lg.com.
DOLBY AUDIO™
Manufactured under license from Dolby Laboratories. Dolby, Dolby Vision, Dolby Audio, and the double-D symbol are trademarks of Dolby Laboratories.
HDMI ^TM
HIGH-DEFINITION MULTIMEDIA INTERFACE
The terms HDMI and HDMI High-Definition Multimedia Interface, and the HDMI logo are trademarks or registered trademarks of HDMI Licensing LLC in the United States and other countries.
DIVX
HD
This DivX Certified ^® device has passed rigorous testing to ensure it plays DivX ^® video.
To play purchased DivX movies, first register your device at vod.divx.com. Find your registration code in the DivX VOD section of your device setup menu.
DivX Certified ^® to play DivX ^® video up to HD 1080p, including premium content.
DivX ^® , DivX Certified ^® and associated logos are trademarks of DivX, LLC and are used under license.
Covered by DivX Patents 7,295,673; 7,515,710; RE45,052; and others available at [www.divx.com/patents]
(Depending upon model)
Open Source Software Notice Information
To obtain the source code under GPL, LGPL, MPL, and other open source licenses, that is contained in this product, please visit http://opensource.lge.com. In addition to the source code, all referred license terms, warranty disclaimers and copyright notices are available for download.
LG Electronics will also provide open source code to you on CD-ROM for a charge covering the cost of performing such distribution (such as the cost of media, shipping, and handling) upon email request to opensource@lge.com. This offer is valid for three (3) years from the date on which you purchased the product.
Updating Firmware
(Depending upon model)
You can update the firmware for the product by downloading the latest firmware.
1 Download the latest firmware at partner.lge.com. (Signing up for a membership and log-in required)
2 Create a folder named "LG_DTV" or "lg_dtv" on a USB memory device.
3 Move the downloaded file to the folder that you have created on the USB memory device.
4 Connect the USB memory device to the USB port on your TV.
5 When a pop-up window appears, start the update by following the instructions.
Troubleshooting
The software may be updated for improvement in performance. The customer is responsible to ensure the compatibility of their equipment with any LG Electronics software. If needed, please consult with LG Electronics and update new software versions according to the guidance provided by LG Electronics.
- Cannot control the TV with the remote control.
- Check if anything such as tape has been placed over the receiver.
- Check if there is any obstacle between the product and the remote control.
- Replace the batteries with new fresh ones.
- No image display and no sound is produced.
- Check if the product is turned on.
- Check if the power cord is connected to a wall outlet.
- Check if there is a problem in the wall outlet by connecting other products.
•The TV turns off suddenly.
- Check the power control settings.
The power supply may be interrupted.
- Check if the Off Time / Sleep Timer feature is activated in the TIME settings.
- If there is no signal while the TV is on, the TV will turn off automatically after 15 minutes of inactivity.
•Abnormal Display
- If the TV feels cold to the touch, there may be a small flicker when it is turned on. This is normal; there is nothing wrong with TV. Some minute dot defects may be visible on the screen, appearing as tiny red, green, or blue spots. However, they have no adverse effect on the TV's performance. Avoid touching the LCD screen or holding your finger(s) against it for long periods of time. Doing so may produce some temporary distortion effects on the screen.
- This panel is an advanced product that contains millions of pixels. In a very few cases, you could see fine dots on the screen while you're viewing the TV. Those dots are deactivated pixels and do not affect the performance and reliability of the TV.
- Displaying a still image for a prolonged period of time may cause an image sticking. Avoid displaying a fixed image on the TV screen for a extended length of time.
-Generated Sound
- Cracking noise A cracking noise that occurs when watching or turning off the TV is generated by plastic thermal contraction due to temperature and humidity. This noise is common for products where thermal deformation is required.
- Electrical circuit humming/panel buzzing
A low level noise is generated from a high-speed switching circuit, which supplies a large amount of current to operate a product. It varies depending upon the product. This generated sound does not affect the performance and reliability of the product.
Specifications
Product specifications may be changed without prior notice due to upgrade of product functions.
Television System
ATSC, NTSC-M, 64 & 256 QAM
Program Coverage
VHF 2-13, UHF 14-69, DTV 2-69, CATV 1-135, CADTV 1-135
External Antenna Impedance
75 Ω
Environment condition
- Operating Temperature
0 °C to 40 °C (32 °F to 104 °F)
- Operating Humidity
Less than 80%
- Storage Temperature
-20 °C to 60 °C (-4 °F to 140 °F)
•Storage Humidity
Less than 85 %
RGB(PC), HDMI (PC) supported mode
(Use HDMI IN 1 for PC mode)
| Resolution | Horizontal Frequency (kHz) | Vertical Frequency (Hz) |
| 640 x 350 31.46 | 70.09 | |
| 720 x 400 31.46 | 70.08 | |
| 640 x 480 31.46 | 59.94 | |
| 800 x 600 37.87 | 60.31 | |
| 1024 x 768 48.36 | 60.00 | |
| 1152 x 864 54.34 | 60.05 | |
| 1360 x 768 47.71 | 60.01 | |
| 1280 x 1024 * 63.98 | 60.02 | |
| 1920 x 1080 * 67.50 | 60.00 |
* FHD : 43/49/55LV340C, 40/43/49/55LV340H
HDMI (DTV) supported mode
| Resolution | Horizontal Frequency (kHz) | Vertical Frequency (Hz) |
| 640 x 480p | 31.46 59.94 | |
| 31.50 60.00 | ||
| 720 x 480p | 31.47 59.94 | |
| 31.50 60.00 | ||
| 1280 x 720p | 44.96 59.94 | |
| 45.00 60.00 | ||
| 1920 x 1080i | 33.72 59.94 | |
| 33.75 60.00 | ||
| 1920 x 1080p | 26.97 23.97 | |
| 27.00 24.00 | ||
| 33.71 29.97 | ||
| 33.75 30.00 | ||
| 67.43 59.94 | ||
| 67.50 60.00 |
Component port connecting information
| Component ports on the TV | Y | P_B | P_R |
| Video output ports on DVD player | Y | P_B | P_R |
| Y B-Y R-Y | |||
| Y Cb Cr | |||
| Y Pb Pr | |||
Component supported mode
| Resolution | Horizontal Frequency (kHz) | Vertical Frequency (Hz) |
| 720 x 480i | 15.73 59.94 | |
| 15.73 60.00 | ||
| 720 x 480p | 31.47 59.94 | |
| 31.50 60.00 | ||
| 1280 x 720p | 44.96 59.94 | |
| 45.00 60.00 | ||
| 1920 x 1080i | 33.72 59.94 | |
| 33.75 60.00 | ||
| 1920 x 1080p | 26.97 23.976 | |
| 27.00 24.00 | ||
| 33.71 29.97 | ||
| 33.75 30.00 | ||
| 67.432 59.94 | ||
| 67.50 60.00 |
Supported Video Formats
•Maximum: 1920 x 1080 @ 30p (only Motion JPEG 640 x 480 @ 30p)
- .asf, .wmv
[Video] MPEG-2, MPEG-4 Part2, XViD, H.264/AVC, VC1(WMV3, WVC1), MP4
[Audio] WMA Standard, WMA9(Pro), MP3, AAC, AC3
- .divx, .avi
[Video] MPEG-2, MPEG-4 Part2, DivX3.11, DivX4, DivX5, DivX6, XViD, H.264/AVC
[Audio] HE-AAC, LPCM, ADPCM, MPEG-1 Layer I, MPEG-1 Layer II, Dolby Digital, MPEG-1 Layer III (MP3), *DTS
•.ts, .trp, .tp, .mts, .m2ts
[Video] H.264/AVC, MPEG-2, AVS, VC1
[Audio] MPEG-1 Layer I, MPEG-1 Layer II, MPEG-1 Layer III (MP3), Dolby Digital, Dolby Digital Plus, AAC, HE-AAC, *DTS
•.vob
[Video] MPEG-1, MPEG-2
[Audio] Dolby Digital, MPEG-1 Layer I, MPEG-1 Layer II, DVD-LPCM
- .mp4, .m4v, .mov
[Video] MPEG-2, MPEG-4 Part2, DivX3.11, DivX4, DivX5, XVID, H.264/AVC
[Audio] AAC, MPEG-1 Layer III (MP3), *DTS
•.mkv
[Video] MPEG-2, MPEG-4 Part2, XVID, H.264/AVC [Audio] HE-AAC, Dolby Digital, MPEG-1 Layer III (MP3), *DTS, LPCM
- .mpg, .mpeg, .mpe
[Video] MPEG-1, MPEG-2
[Audio] MPEG-1 Layer I, MPEG-1 Layer II, Dolby Digital, LPCM
•.dat
[Video] MPEG-1, MPEG-2
[Audio] MP2
•.flv
[Video] Sorenson H.263, H.264/AVC
[Audio] MP3, AAC, HE-AAC
•.3gp, .3gp2
[Video] H.264/AVC, MPEG-4 Part2
[Audio] AAC, AMR(NB/WB)
*DTS: Depending upon model
Supported Audio Formats
- File type : mp3
[Bit rate] 32 Kbps - 320 Kbps
[Sample freq.] 16 kHz - 48 kHz
[Support] MPEG-1, MPEG-2, Layer2, Layer3
- File Type : AAC
[Bit rate] Free Format
[Sample freq.] 8 kHz \~ 48 kHz
[Support] ADIF, ADTS
- File Type : M4A
[Bit rate] Free Format
[Sample freq.] 8 kHz \~ 48 kHz
[Support] MPEG-4
- File Type : WMA
[Bit rate] 128 Kbps \~ 320 Kbps
[Sample freq.] 8 kHz \~ 48 kHz
[Support] WMA7, WMA8, WMA9 Standard
- File Type: WMA 10 Pro
[Bit rate] \~ 768 Kbps
[Channel / Sample freq.]
M0: up to 2 Channel @ 48 kHz
(Except LBR mode),
M1 : up to 5.1 Channel @ 48 kHz,
M2: up to 5.1 Channel @ 96 kHz
[Support] WMA 10 Pro
- File Type : OGG
[Bit rate] Free Format
[Sample freq.] \~ 48 kHz
[Support] Vorbis
Supported Photo Formats
•Category : 2D (jpeg, jpg, jpe)
[Available file type]
SOF0 : Baseline
SOF1 : Extend Sequential
SOF2 : Progressive
[Photo size]
Minimum : 64 x 64
Maximum : Normal Type : 15,360 (W) x 8,640 (H), Progressive Type : 1,920 (W) x 1,440 (H)
- Category : BMP
[Photo size]
Minimum:64×64
Maximum : 9,600 x 6,400
- Category : PNG
[Available file type] Interlace, Non-Interlace
[Photo size]
- Minimum : 64 x 64
- Maximum : Interlace : 1,200 x 800,
Non-Interlace : 9,600 x 6,400
- BMP and PNG format files may be slower to display than JPEG.
- Non-standard photo/image file may not be displayed.
Regulatory
FCC NOTICE
(For USA)
This equipment has been tested and found to comply with the limits for a Class B digital device, pursuant to Part 15 of the FCC Rules. These limits are designed to provide reasonable protection against harmful interference in a residential installation. This equipment generates, uses and can radiate radio frequency energy and, if not installed and used in accordance with the instructions, may cause harmful interference to radio communications. However, there is no guarantee that interference will not occur in a particular installation. If this equipment does cause harmful interference to radio or television reception, which can be determined by turning the equipment off and on, the user is encouraged to try to correct the interference by one or more of the following measures:
- Reorient or relocate the receiving antenna.
- Increase the separation between the
equipment and the receiver.
- Connect the equipment to an outlet on a circuit different from that to which the receiver is connected.
- Consult the dealer or an experienced radio/TV technician for help.
This device complies with part 15 of the FCC Rules. Operation is subject to the following two conditions: (1) this device may not cause harmful interference and (2) this device must accept any interference received, including interference that may cause undesired operation of the device. Any changes or modifications in construction of this device which are not expressly approved by the party responsible for compliance could void the user's authority to operate the equipment.
FCC Radio Frequency Interference Requirements (for UNII devices)
High power radars are allocated as primary users of the 5.25 to 5.35 GHz and 5.65 to 5.85 GHz bands. These radar stations can cause interference with and/or damage this device. This device cannot be co-located with any other transmitter.
FCC RF Radiation Exposure Statement
[For having wireless function (WLAN, Bluetooth,...)]
This equipment complies with FCC radiation exposure limits set forth for an uncontrolled environment. This transmitter must not be colocated or operating in conjunction with any other antenna or transmitter. This equipment should be installed and operated with minimum distance 20 cm (7.8 inches) between the radiator and your body. Users must follow the specific operating instructions for satisfying RF exposure compliance.
Industry Canada Statement
(For Canada)
[For having wireless function (WLAN, Bluetooth,...)]
This device complies with Industry Canada's applicable licence-exempt RSSs. Operation is subject to the following two conditions:
(1) This device may not cause interference; and (2) This device must accept any interference, including interference that may cause undesired operation of the device.
IC Radiation Exposure Statement
(For Canada)
[For having wireless function (WLAN, Bluetooth,...)]
This equipment complies with IC radiation exposure limits set forth for an uncontrolled environment. This equipment should be installed and operated with minimum distance 20 cm (7.8 inches) between the antenna & your body.
NOTE: THE MANUFACTURER IS NOT RESPONSIBLE FOR ANY RADIO OR TV INTERFERENCE CAUSED BY UNAUTHORIZED MODIFICATIONS TO THIS EQUIPMENT. SUCH MODIFICATIONS COULD VOID THE USER'S AUTHORITY TO OPERATE THE EQUIPMENT.
(For Canada)
[For product having the wireless function using 5 GHz frequency bands]
- The device for operation in the band 5150–5250 MHz is only for indoor use to reduce the potential for harmful interference to co-channel mobile satellite systems;
- For devices with detachable antenna(s), the maximum antenna gain permitted for devices in the bands 5250-5350 MHz and 5470-5725 MHz shall be such that the equipment still complies with the e.i.r.p. limit;
- For devices with detachable antenna(s), the maximum antenna gain permitted for devices in the band 5725-5850 MHz shall be such that the equipment still complies with the e.i.r.p. limits specified for point-to-point and non-point-to-point operation as appropriate; and
- The worst-case tilt angle(s) necessary to remain compliant with the e.i.r.p. elevation mask requirement set forth in Section 6.2.2(3) shall be clearly indicated. (devices operating in the band 5250-5350 MHz with a maximum e.i.r.p. greater than 200 mW)
- High-power radars are allocated as primary users (i.e. priority users) of the bands 5250–5350 MHz and 5650–5850 MHz and that these radars could cause interference and/or damage to LE-LAN devices.
NOTE TO CABLE/TV INSTALLER
(For USA and Canada)
This reminder is provided to call the CATV system installer's attention to Article 820-40 of the National Electric Code (U.S.A.). The code provides guidelines for proper grounding and, in particular, specifies that the cable ground shall be connected to the grounding system of the building, as close to the point of the cable entry as practical.
WARNING!
Never place a television set in an unstable location. A television set may fall, causing serious personal injury or death. Many injuries, particularly to children, can be avoided by taking simple precautions such as:
- Using cabinets or stands recommended by the manufacturer of the television set.
- Only using furniture that can safely support the television set.
- Ensuring the television set is not overhanging the edge of the supporting furniture.
- Not placing the television set on tall furniture (for example, cupboards or bookcases) without anchoring both the furniture and the television set to a suitable support.
- Not placing the television set on cloth or other materials that may be located between the television set and supporting furniture.
•Educating children about the dangers of climbing on furniture to reach the television set or its controls.
If your existing television set is being retained and relocated, the same considerations as above should be applied.
Symbols
| ~ | Refers to alternating current(AC). |
| --- | Refers to direct current(DC). |
| ☐ | Refers to class II equipment. |
| ↓ | Refers to stand-by. |
| | | Refers to “ON” (power). |
| ⚡ | Refers to dangerous voltage. |
Key Codes
• This feature is not available for all models.
| Code (Hexa) | Function Note | Code (Hexa) | Function Note | ||
| 00 CH | PAGE R/C Button 52 SOUND R/C Button | ||||
| 01 | CH PAGE▽ | R/C Button 61 | R/C Button | ||
| 02 VOL + R/C Button 63 | R/C Button | ||||
| 03 VOL - R/C Button 71 | R/C Button | ||||
| 06 | ▶ | R/C Button 72 | R/C Button | ||
| 07 | ◀ | R/C Button 79 | RATIO | □ R/C Button | |
| 08 | ○(Power) | R/C Button | 4C | LIST | R/C Button |
| 09 MUTE ▶ | R/C Button 5B | EXIT | R/C Button | ||
| 0B | INPUT ▶ | R/C Button | OA AUDIO | R/C Button | |
| 1A | FLASHBK | R/C Button 8E | ▶ | R/C Button | |
| 0F TV | R/C Button 8F | ◀ | R/C Button | ||
| 10 - 19 | Number Key 0 - 9 | R/C Button | OE | SLEEP | R/C Button |
| 45 Q.MENU R/C Button AA | INFO 1 | R/C Button | |||
| 28 | ↔BACK | R/C Button B0 | ▶ R/C Button | ||
| 30 AV | MODE R/C Button B1 | ■ | R/C Button | ||
| 39 CAPTION | R/C Button BA | II | R/C Button | ||
| 40 | ▲ | R/C Button 1E FAV | R/C Button | ||
| 41 | ▼ | R/C Button | 4D | PICTURE | R/C Button |
| 43 SETTINGS | R/C Button 91 SAP/ | * | R/C Button | ||
| 44 OK | ◎ | R/C Button | |||
| • Key code 4C (0x4C) is available on ATSC / ISDB models which use major / minor channel. (For South Korea, Japan, North America, Latin America except Colombia models) | |||||
EXTERNAL CONTROL DEVICE SETUP
• Image shown may differ from your TV.
Connect the USB to Serial converter/RS-232C input jack to an external control device (such as a computer or an A/V control system) to control the product's functions externally.
Note: The type of control port on the TV can be different between model series.
* Please be advised that not all models support this type of connectivity.
* Cable is not provided.
USB to Serial converter with USB Cable
USB Type

text_image
(PC) USB IN (TV)- LGTV supports PL2303 chip-based (Vendor ID: 0x0557, Product ID: 0x2008) USB to serial converter which is not made nor provided by LG.
- It can be purchased from computer stores that carry accessories for IT support professionals.
RS-232C with RS-232C Cable
DE9 (D-Sub 9 pin) Type
- You need to purchase the RS-232C (DE9, D-Sub 9 pin female-to-female type) to RS-232C cable required for the connection between the PC and the TV, which is specified in the manual.
•The connection interface may differ from your TV.

text_image
(PC) RS-232C IN (CONTROL & SERVICE) (TV)Phone jack Type
- You need to purchase the phone-jack to RS-232 cable required for the connection between the PC and the TV, which is specified in the manual.
* For other models, connect to the USB port.
* The connection interface may differ from your TV.

text_image
(PC) 3 1 2 SERVICE ONLY (TV)or

text_image
(PC) 3 1 2 RS-232C IN (CONTROL & SERVICE) (TV)Customer Computer
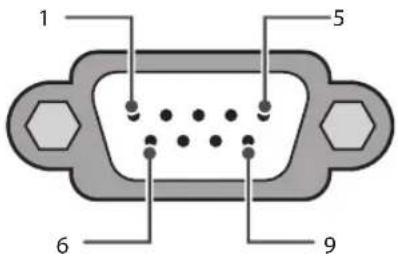
text_image
1 5 6 9RS-232C
(Serial port)
RS-232C Configurations
7-Wire Configurations
(Standard RS-232C cable)
3-Wire Configurations
(Not standard)
PC TV
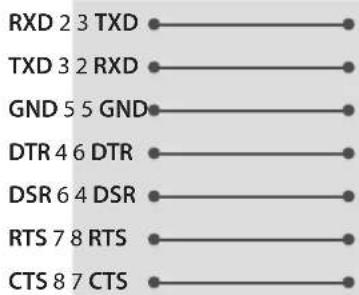
text_image
RXD 2 3 TXD TXD 3 2 RXD GND 5 5 GND DTR 4 6 DTR DSR 6 4 DSR RTS 7 8 RTS CTS 8 7 CTSD-Sub 9 D-Sub 9
PC TV
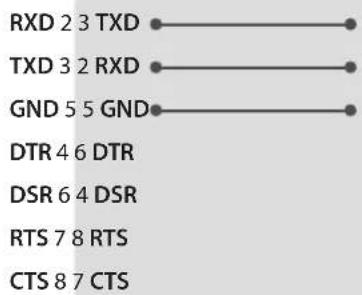
text_image
RXD 23 TXD TXD 32 RXD GND 55 GND DTR 46 DTR DSR 64 DSR RTS 78 RTS CTS 87 CTSD-Sub 9 D-Sub 9
Set ID
1 Press SETTINGS the main menus.
2 Press the Navigation buttons to scroll to OPTION and press OK
3 Press the Navigation buttons to scroll to SET ID and press OK
4 Scroll left or right to select a set ID number and select Close. The adjustment range is 1-99.
5 When you are finished, press EXIT
* (Depending upon model)
Communication Parameters
Baud rate: 9600 bps (UART)
Data length: 8 bits
Parity: None
Stop bit: 1 bit
Communication code: ASCII code
Use a crossed (reverse) cable.
Command reference list
(Depending upon model)
| COMMAND1 | COMMAND2 | DATA (Hexadecimal) | COMMAND1 | COMMAND2 | DATA (Hexadecimal) | ||
| 01. Power* k a | 00 to 01 15. | balance k t 00 | to 64 | ||||
| 02. Aspect Ratio | k c (page 23) | 16. Color (Colour) Temperature | x u 00 to 64 | ||||
| 03. Screen Mute | k d (page 23) | 17. ISM Method (Only Plasma TV) | j p (page 25) | ||||
| 04. Volume Mute | k e 00 to 01 | 18. Equalizer | j v | (page 25) | |||
| 05. Volume Control | k f | 00 to 64 | 19. Energy Saving | j q 00 to 05 | |||
| 06. Contrast | k g 00 to 64 | 20. Tune Command | m | a | (page 25) | ||
| 07. Brightness | k h 00 to 64 | 21. Channel (Programme) Add/Del(Skip) | m | b 00 to 01 | |||
| 08. Color/ Colour | k | i | 00 to 64 | 22. Key | m | c | Key Codes |
| 09. Tint | k j | 00 to 64 | 23. Control Backlight, Control Panel Light | m | g 00 to 64 | ||
| 10. Sharpness k | k 00 to 32 | 24. Input select (Main) | x b (page 28) | ||||
| 11. OSD Select | k l | 00 to 01 | 25. 3D (Only 3D models) | x t (page 28) | |||
| 12. Remote Control Lock Mode | k m | 00 to 01 | 26. Extended 3D (Only 3D models) | x v | (page 29) | ||
| 13. Treble | k r 00 to 64 | 27. Auto Configure | j u (page 29) | ||||
| 14. Bass | k s | 00 to 64 |
* Note: During playing or recording media, all commands except Power (ka) and Key (mc) are not executed and treated as NG. With RS-232C cable, TV can communicate "ka command" in power-on or power-off status. But with USB-to-Serial converter cable, the command works only if TV is on.
Transmission / Receiving Protocol
Transmission
[Command1][Command2][ ][Set ID][ ][Data][Cr]
[Command 1] : First command to control the TV. (j, k, m or x)
[Command 2]: Second command to control the TV.
[Set ID] : You can adjust the [Set ID] to choose desired monitor ID number in option menu.
Adjustment range in TV is 1 to 99. If [Set ID] value is selected to '0', every connected set can be controlled.
* [Set ID] is indicated as decimal (1 to 99) on menu and as Hexadecimal (0x00 to 0x63) on transmission/receiving protocol.
[DATA]: To transmit command data (hexadecimal). Transmit 'FF' data to read status of command.
[Cr] : Carriage Return - ASCII code '0x0D'
[ ] : Space - ASCII code '0x20'
OK Acknowledgement
[Command2][ ][Set ID][ ][OK][Data][x]
The set transmits ACK (acknowledgement) based on this format when receiving normal data. At this time, if the data is data read mode, it indicates present status data. If the data is data write mode, it returns the data of the PC computer.
Error Acknowledgement
[Command2][ ][Set ID][ ][NG][Data][x]
The set transmits ACK (acknowledgement) based on this format when receiving abnormal data from non-viable functions or communication errors.
Data 00: Illegal Code
Real data mapping (Hexadecimal : Decimal)
- When you enter the [data] in hexadecimal, refer to following conversion table.
- Channel Tune (ma) Command uses two-byte hexadecimal value([data]) to select channel number.
00: Step 0 32: Step 50 (Set ID 50) FE: Step 254
01: Step 1 (Set ID 1) 33: Step 51 (Set ID 51) FF: Step 255
...
0A: Step 10 (Set ID 10) 63: Step 99 (Set ID 99) 01 00: Step 256
...
0F: Step 15 (Set ID 15) C7: Step 199 27 0E: Step 9998
10: Step 16 (Set ID 16) C8: Step 200 27 OF: Step 9999
...
01. Power (Command: k a)
• To control Power *On or Off of the set.
Transmission
[k][a][ ][Set ID][ ][Data][Cr]
Data 00: Power Off 01: *Power On
Ack
[a][ ][Set ID][ ][OK/NG][Data][x]
•To Show TV is Power On or *Off
Transmission
[k][a][ ][Set ID][ ][FF][Cr]
Ack
[a][ ][Set ID][ ][OK][Data][x]
* Similarly, if other functions transmit 'FF' data based on this format, Acknowledgement feedback presents status about each function.
02. Aspect Ratio (Command: k c) (Main Picture Size)
- To adjust the screen format. (Main picture format) You can also adjust the screen format using the Aspect Ratio in the Q.MENU or PICTURE menu.
Transmission
[k][c][ ][Set ID][ ][Data][Cr]
Data 01: Normal screen (4:3)
02:Wide screen(16:9)
04: Zoom
05: Zoom 2 (Latin America except Colombia Only)
06: Set by Program/Original
07: 14:9 (Europe, Colombia, Mid-East, Asia except South Korea and Japan)
09: * Just Scan
OB: Full Wide (Europe, Colombia, Mid-East, Asia except South Korea and Japan)
10 to 1F: Cinema Zoom 1 to 16 0c : 21:9 (Depending upon model)
Ack
[c][ ][Set ID][ ][OK/NG][Data][x]
* Using the PC input, you select either 16:9 or 4:3 screen aspect ratio.
* In DTV/HDMI/Component mode (high-definition), Just Scan is available.
* Full wide mode may work differently based on model and is supported for DTV fully, and ATV, AV partially.
03. Screen Mute (Command: k d)
•To select screen mute on/off.
Transmission
[k][d][ ][Set ID][ ][Data][Cr]
Data 00: Screen mute off (Picture on) Video mute off
01: Screen mute on (Picture off)
10: Video mute on
Ack
[d][ ][Set ID][ ][OK/NG][Data][x]
* In case of video mute on only, TV will display On Screen Display(OSD). But, in case of Screen mute on, TV will not display OSD.
04. Volume Mute (Command: k e)
- To control volume mute on/off. You can also adjust mute using the MBiton on remote control.
Transmission
[k][e][ ][Set ID][ ][Data][Cr]
Data 00: Volume mute on (Volume off)
01: Volume mute off (Volume on)
Ack
[e][ ][Set ID][ ][OK/NG][Data][x]
05. Volume Control (Command: k f)
- To adjust volume. You can also adjust volume with the volume buttons on remote control.
Transmission
[k][f][ ][Set ID][ ][Data][Cr]
Data Min: 00 to Max: 64
Ack
[f][ ][Set ID][ ][OK/NG][Data][x]
06. Contrast (Command: k g)
- To adjust screen contrast. You can also adjust contrast in the PICTURE menu.
Transmission
[k][g][ ][Set ID][ ][Data][Cr]
Data Min: 00 to Max: 64
Ack
[g][ ][Set ID][ ][OK/NG][Data][x]
07. Brightness (Command: k h)
- To adjust screen brightness. You can also adjust brightness in the PICTURE menu.
Transmission
[k][h][ ][Set ID][ ][Data][Cr]
Data Min: 00 to Max: 64
Ack
[h][ ][Set ID][ ][OK/NG][Data][x]
08. Color/Colour (Command: k i)
- To adjust the screen Color(Colour). You can also adjust colour in the PICTURE menu.
Transmission
[k][i][ ][Set ID][ ][Data][Cr]
Data Min: 00 to Max: 64
Ack
[i][ ][Set ID][ ][OK/NG][Data][x]
09. Tint (Command: k j)
- To adjust the screen tint. You can also adjust tint in the PICTURE menu.
Transmission
[k][j][ ][Set ID][ ][Data][Cr]
Data Red: 00 to Green: 64
Ack
[j][ ][Set ID][ ][OK/NG][Data][x]
10. Sharpness (Command: k k)
- To adjust the screen sharpness. You can also adjust sharpness in the PICTURE menu.
Transmission
[k][k][ ][Set ID][ ][Data][Cr]
Data Min: 00 to Max: 32
Ack
[k][ ][Set ID][ ][OK/NG][Data][x]
11. OSD Select (Command: k l)
- To select OSD (On Screen Display) on/off when controlling remotely.
Transmission
[k][l][ ][Set ID][ ][Data][Cr]
Data 00: OSD off 01: OSD on
Ack
[I][ ][Set ID][ ][OK/NG][Data][x]
12. Remote control lock mode (Command: k m)
- To lock the front panel controls on the monitor and remote control.
Transmission
[k][m][ ][Set ID][ ][Data][Cr]
Data 00: Lock off 01: Lock on
Ack
[m][ ][Set ID][ ][OK/NG][Data][x]
* If you are not using the remote control, use this mode. When main power is off & on (plug-off and plug-in, after 20 - 30 seconds), external control lock is released.
* In the standby mode (DC off by off timer or 'ka', 'mc' command), and if key lock is on, TV will not turn on by power on key of IR & Local Key.
13. Treble (Command: k r)
- To adjust treble. You can also adjust in the AUDIO menu.
Transmission
[k][r][ ][Set ID][ ][Data][Cr]
Data Min: 00 to Max: 64
Ack
[r][ ][Set ID][ ][OK/NG][Data][x]
* (Depending upon model)
- To adjust Bass. You can also adjust in the AUDIO menu.
Transmission
[k][s][ ][Set ID][ ][Data][Cr]
Data Min: 00 to Max: 64
Ack
[s][ ][Set ID][ ][OK/NG][Data][x]
* (Depending upon model)
15. Balance (Command: k t)
- To adjust balance. You can also adjust balance in the AUDIO menu.
Transmission
[k][t][ ][Set ID][ ][Data][Cr]
Data Min: 00 to Max: 64
Ack
[t][ ][Set ID][ ][OK/NG][Data][x]
16. Color (Colour) Temperature (Command: x u)
- To adjust colour temperature. You can also adjust Color (Colour) Temperature in the PICTURE menu.
Transmission
[x][u][ ][Set ID][ ][Data][Cr]
Data Min: 00 to Max: 64
Ack
[u][ ][Set ID][ ][OK/NG][Data][x]
17. ISM Method (Command: j p) (Only Plasma TV)
- To control the ISM method. You can also adjust ISM Method in OPTION menu.
Transmission
[j][p][ ][Set ID][ ][Data][Cr]
Data Min: 02: Orbiter
08: Normal
20: Color(Colour) Wash
Ack
[p][ ][Set ID][ ][OK/NG][Data][x]
18. Equalizer (Command: j v)
- Adjust EQ of the set.
Transmission
[j][v][ ][Set ID][ ][Data][Cr]
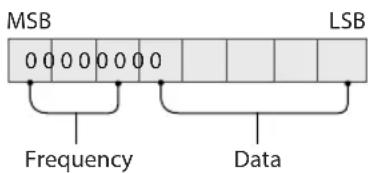
text_image
MSB 0 0 0 0 0 0 0 LSB Frequency Data| 7 | 6 | 5 | Frequency | 4 | 3 | 2 | 1 | 0 | Step | |||||||
| 0 | 0 | 0 | 1st Band | 0 | 0 | 0 | 0 | 0 | 0 | (decimal) | ||||||
| 0 | 0 | 1 | 2nd Band | 0 | 0 | 0 | 0 | 1 | 1 | (decimal) | ||||||
| 0 | 1 | 0 | 3rd Band | ... | ... | ... | ... | ... | ... | |||||||
| 0 | 1 | 1 | 4th Band | 1 | 0 | 0 | 1 | 1 | 19(decimal) | |||||||
| 1 | 0 | 0 | 5th Band | 1 | 0 | 1 | 0 | 0 | 20(decimal) |
Ack
[v][ ][Set ID][ ][OK/NG][Data][x]
* It depends upon model, and can adjust when sound mode is EQ adjustable value.
19. Energy Saving (Command: j q)
- To reduce the power consumption of the TV. You can also adjust Energy Saving in PICTURE menu.
Transmission
[j][q][ ][Set ID][ ][Data][Cr]
Data 00: Off
01: Minimum
02: Medium
03: Maximum
04: Auto (For LCD TV / LED TV)
05: Screen off
* (Depending upon model)
Ack
[q][ ][Set ID][ ][OK/NG][Data][x]
20. Tune Command (Command: m a)
* This command may work differently depending upon model and signal.
* For Europe, Mid-East, Colombia, Asia except South Korea and Japan Model
- Select channel to following physical number.
Transmission
[m][a][ ][Set ID][ ][Data 00][ ]
[Data 01][ ][Data 02][Cr]
* Analog Antenna/Cable
[Data 00][Data 01] Channel Data
Data 00: High byte channel data
Data 01: Low byte channel data
- 00 00 \~ 00 C7 (Decimal: 0 \~ 199)
Data 02: Input Source (Analog)
- 00: Antenna TV (ATV)
- 80: Cable TV (CATV)
* Digital Antenna/Cable/Satellite
[Data 00][Data 01]: Channel Data
Data 00 : High Channel data
Data 01: Low Channel data
- 00 00 \~ 27 0F (Decimal: 0 \~ 9999)
Data 02 : Input Source (Digital)
- 10: Antenna TV (DTV)
- 20: Antenna Radio (Radio)
- 40: Satellite TV (SDTV)
- 50: Satellite Radio (S-Radio)
- 90: Cable TV (CADTV)
- a0: Cable Radio (CA-Radio)
* Tune Command Examples:
- Tune to the Analog antenna (PAL) Channel 10. Set ID = All = 00
Data 00 & 01 = Channel Data is 10 = 00 0a
Data 02 = Analog Antenna TV = 00
Result = ma 00 00 0a 00
- Tune to the digital antenna (DVB-T) Channel 01. Set ID = All = 00
Data 00 & 01 = Channel Data is 1 = 00 01
Data 02 = Digital Antenna TV = 10
Result = ma 00 00 01 10
- Tune to the satellite (DVB-S) Channel 1000.
Set ID = All = 00
Data 00 & 01 = Channel Data is 1000 = 03 E8
Data 02 = Digital Satellite TV = 40
Result = ma 00 03 E8 40
Ack
[a][ ][Set ID][ ][OK][Data 00][Data 01]
[Data 02][x][a][ ][Set ID][ ][NG][Data 00][x]
* For South Korea, North/Latin America except Colombia Model
* To tune channel to following physical/major/minor number.
Transmission
[m][a][ ][0][ ][Data00][ ][Data01]
[ ][Data02][ ][Data03][ ][Data04][ ][Data05][Cr]
* Digital channels have a Physical, Major, and Minor channel number. The Physical number is the actual digital channel number, the Major is the number that the channel should be mapped to, and the Minor is the sub-channel. Since the ATSC tuner automatically maps the channel from the Major / Minor number, the Physical number is not required when sending a command in Digital.
* Analog Antenna/Cable
Data 00: Physical Channel Number
- Antenna (ATV): 02\~45 (Decimal: 2 \~ 69)
- Cable (CATV): 01, 0E\~7D (Decimal: 1, 14\~125)
[Data 01 \~ 04]: Major/Minor Channel Number
Data 01 & 02: xx (Don't care)
Data 03 & 04: xx (Don't care)
Data 05: Input Source (Analog)
- 00: Antenna TV (ATV)
- 01: Cable TV (CATV)
* Digital Antenna/Cable
Data 00 : xx (Don't care)
[Data 01][Data 02]: Major Channel Number
Data 01 : High byte Channel Data
Data 02 : Low byte Channel Data
- 00 01 \~ 27 0F (Decimal: 1 \~ 9999)
[Data 03][Data 04]: Minor Channel Number
Data 03 : High byte Channel Data
Data 04 : Low byte Channel Data
Data 05 : Input Source (Digital)
- 02: Antenna TV (DTV) – Use Physical Channel Number
- 06: Cable TV (CADTV) – Use Physical Channel Number
- 22: Antenna TV (DTV) – Don't Use Physical Channel Number
- 26: Cable TV (CADTV) - Don't Use Physical Channel Number
- 46: Cable TV (CADTV) – Use Physical/Major Channel Number Only (One Part Channel)
- 66: Cable TV (CADTV) – Use Major Channel Number Only (One Part Channel)
* Two bytes are available for each major and minor channel data, but usually the low byte is used alone (high byte is 0).
* Tune Command Examples:
1 Tune to the Analog cable (NTSC) channel 35.
Set ID = All = 00
Data 00 = Channel Data is 35 = 23
Data 01 & 02 = No Major = 00 00
Data 03 & 04 = No Minor = 00 00
Data 05 = Analog Cable TV = 01
Total = ma 00 23 00 00 00 00 01
2 Tune to the digital antenna (ATSC) channel 30-3.
Set ID = All = 00
Data 00 = Don't know Physical = 00
Data 01 & 02 = Major is 30 = 00 1E
Data 03 & 04 = Minor is 3 = 00 03
Data 05 = Digital Antenna TV = 22
Total = ma 00 00 00 1E 00 03 22
Ack
[a][ ][Set ID][ ][OK][Data 00][Data 01]
[Data 02][Data 03][Data 04][Data 05]
[x][a][ ][Set ID][ ][NG][Data 00][x]
* For Japan Model
- To tune channel to following physical/major/minor number.
Transmission
[m][a][ ][0][ ][Data00][ ][Data01][ ][Data02][ ]
[Data03][ ][Data04][ ][Data05][Cr]
* Digital Antenna/Satellite
Data 00 : xx (Don't care)
[Data 01][Data 02]: Major Channel Number
Data 01 : High byte Channel Data
Data 02 : Low byte Channel Data
- 00 01 \~ 27 0F (Decimal: 1 \~ 9999)
[Data 03] : Minor/Branch Channel Number
[Data 04] (Don't care in Satellite)
Data 03 : High byte Channel Data
Data 04: Low byte Channel Data
Data 05 : Input Source (Digital/Satellite for Japan)
- 02: Antenna TV (DTV)
- 07: BS (Broadcasting Satellite)
- 08: CS1 (Communication Satellite 1)
- 09: CS2 (Communication Satellite 2)
* Tune Command Examples:
1 Tune to the digital antenna (ISDB-T) channel 17-1.
Set ID = All = 00
Data 00 = Don't know Physical = 00
Data 01 & 02 = Major is 17 = 00 11
Data 03 & 04 = Minor/Branch is 1 = 00 01
Data 05 = Digital Antenna TV = 02
Total = ma 00 00 00 11 00 01 02
2 Tune to the BS (ISDB-BS) channel 30.
Set ID = All = 00
Data 00 = Don't know Physical = 00
Data 01 & 02 = Major is 30 = 00 1E
Data 03 & 04 = Don't Care = 00 00
Data 05 = Digital BS TV = 07
Total = ma 00 00 00 1E 00 00 07
* This feature is varied based on the model.
Ack
[a][ ][Set ID][ ][OK][Data 00][Data 01]
[Data 02][Data 03][Data 04][Data 05]
[x][a][ ][Set ID][ ][NG][Data 00][x]
21. Channel(Programme) Add/Del(Skip) (Command: m b)
- To skip current channel(programme) for next time.
Transmission
[m][b][ ][Set ID][ ][Data][Cr]
Data 00: Del(ATSC,ISDB)/Skip(DVB) 01: Add
Ack
[b][ ][Set ID][ ][OK/NG][Data][x]
- Set the saved channel status to del(ATSC, ISDB)/skip(DVB) or add.
- Key (Command: m c)
•To send IR remote key code.
Transmission
[m][c][ ][Set ID][ ][Data][Cr]
Data Key code - page 18.
Ack
[c][ ][Set ID][ ][OK/NG][Data][x]
23. Control Backlight, Control Panel Light (Command: m g)
* For LCD TV / LED TV
•To control the backlight.
Transmission
[m][g][ ][Set ID][ ][Data][Cr]
Data Min: 00 to Max: 64
Ack
[g][ ][Set ID][ ][OK/NG][Data][x]
* For Plasma TV
•To control the panel light.
Transmission
[m][g][ ][Set ID][ ][Data][Cr]
Data Min: 00 to Max: 64
Ack
[g][ ][Set ID][ ][OK/NG][Data][x]
24. Input select (Command: x b) (Main Picture Input)
- To select input source for main picture.
Transmission
[x][b][ ][Set ID][ ][Data][Cr]
Data 00: DTV 01: CADTV
02: Satellite DTV 10: ATV ISDB-BS (Japan)
03: ISDB-CS1 (Japan)
04: ISDB-CS2 (Japan)
11: CATV
20: AV or AV1 21: AV2
40: Component1 41: Component2
60: RGB
90: HDMI1 91: HDMI2
92: HDMI3 93: HDMI4
Ack
[b][ ][Set ID][ ][OK/NG][Data][x]
* This function depends on model and signal.
25. 3D (Command: x t) (only 3D models) (Depending upon model)
•To change 3D mode for TV.
Transmission
[x][t][ ][Set ID][ ][Data 00][ ][Data 01][ ]
[Data 02][ ][Data 03][Cr]
* (Depending upon model)
Data Structure
[Data 00] 00: 3D On
01:3D Off
02: 3D to 2D
03: 2D to 3D
[Data 01] 00: Top and Bottom
01: Side by Side
02: Check Board
03: Frame Sequential
04: Column interleaving
05: Row interleaving
[Data 02] 00: Right to Left
01: Left to Right
[Data 03] 3D Effect(3D Depth): Min: 00 - Max:
14 (*transmit by Hexadecimal code)
* If [Data 00] is 00 (3D On), [Data 03] has no meaning.
* If [Data 00] is 01 (3D off) or 02 (3D to 2D), [Data 01], [Data 02] and [Data 03] have no meaning.
* If [Data 00] is 03 (2D to 3D), [Data 01] and [Data 02] have no meaning.
* If [Data 00] is 00 (3D On) or 03 (2D to 3D), [Data 03] works when 3D Mode (Genre) is manual only.
* All 3D pattern options ([Data 01]) may not be available according to broadcasting/video signal.
| [Data 00] | [Data 01] | [Data 02] | [Data 03] |
| 00 | O | O | O |
| 01 | X | X | X |
| 02 | X | X | X |
| 03 | X O | O |
X: don't care
Ack
[t][ ][Set ID][ ][OK][Data00][Data01][Data02]
[Data03][x][t][ ][Set ID][ ][NG][Data00][x]
26. Extended 3D(Command: x v) (only 3D models) (Depending upon model)
•To change 3D option for TV.
Transmission
[x][v][ ][Set ID][ ][Data 00][ ][Data 01][Cr]
[Data 00] 3D option
00: 3D Picture Correction
01: 3D Depth (3D Mode is Manual Only)
02: 3D Viewpoint
06: 3D Color Correction
07: 3D Sound Zooming
08: Normal Image View
09: 3D Mode (Genre)
[Data 01] It has own range for each 3D
option determined by [Data 00].
1) When [Data 00] is 00
00: Right to Left
01: Left to Right
2) When [Data 00] is 01, 02
Data Min: 0 - Max: 14 (*transmit by
Hexadecimal code)
Data value range(0 - 20) converts Viewpoint range (-10 - +10) automatically (Depending upon model)
* This option works when 3D Mode (Genre) is manual only.
3) When [Data 00] is 06, 07
00: Off
01: On
4) When [Data 00] is 08
00: Revert to 3D video from 3D-to-2D converted 2D video
01: Change 3D video to 2D video, except 2D-to-3D video
* If conversion condition doesn't meet, command is treated as NG.
5) When [Data 00] is 09
00: Standard
01: Sport
02: Cinema
03: Extreme
04: Manual
05: Auto
Ack
[v][ ][Set ID][ ][OK][Data00][Data01][x]
[v][ ][Set ID][ ][NG][Data00][x]
27. Auto Configure (Command: j u) (Depending upon model)
- To adjust picture position and minimize image shaking automatically. It works only in RGB (PC) mode.
Transmission
[j][u][ ][Set ID][ ][Data][Cr]
Data 01: To set
Ack
[u][ ][Set ID][ ][OK/NG][Data][x]
IR OUT Using Guide
Suitable / Not Recommend remote-controller data format
| Item Data format code Note | ||
| Suitable Data Format | NEC, Toshiba Full Repeat Code Format | Single : EnableRepeat : Enable |
| Philips RC5, RC6 Code Format | ||
| Zenith Code Format | ||
| Not Recommend Data Format | Matsushita, RCA Code Format Single : Enable | Repeat : Disable |
| Sony 12/15/20 bit, Mitsubishi Code Format | ||
| Sharp, JVC, R-step, Philips RCMM, RECS-80, XMP Code Format | Single : DisableRepeat : Disable | |
IR Receiver specifications
| Carrier frequency 37.9 KHz | |
| Peak Wavelength 940 nm | |
| Minimum burst length Min. 300 us | |
| Minimum gap time is required of Min. 350 us | |
| Data word length Max. 100 ms | |
| Minimum gap time in the data stream is needed of Min. 50 ms |
| Parameter | Symbol | Conditions | Min | Typ | Max | Unit |
| High Level Out Pulse Width | Twh | Burst Wave = 600 μsPeriod = 1.2 ms | 400 | - | 800 | μs |
| Low Level Out Pulse Width | TwI | 400 | - | 800 | μs |

If not use the remote-controller with data formats recommended, IR output signals will be suppressed automatically by IR receiver. In this case, LG does not guarantee IR working function. To make sure of this matter, here are two methods as below.
- Use the remote-controller with suitable data formats.
- Use the IR dongle receiver of the set-top box.
(Image shown may differ from your TV.)
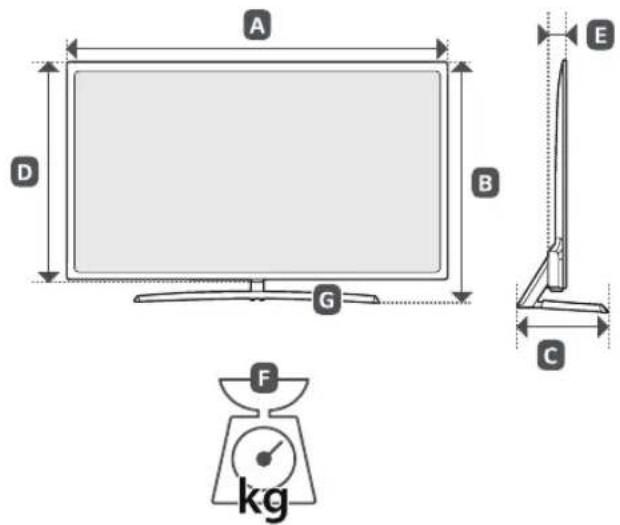
text_image
A D B G E C F kg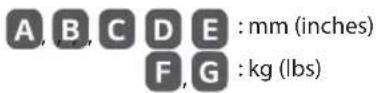
| MODELS | A | B | C | D | E | F | F - G | Current value / Power consumption |
| 32LV340H-UA | 739(29.0) | 495(19.4) | 241(9.4) | 441(17.3) | 84(3.3) | 6.05(13.3) | 4.85(10.6) | 1.0 A / 60 W |
| 32LV340C-UB | 739(29.0) | 472(18.5) | 168(6.6) | 441(17.3) | 84(3.3) | 4.90(10.8) | 4.85(10.6) | 1.0 A / 60 W |
| 40LV340H-UA | 911(35.8) | 576(22.6) | 241(9.4) | 528(20.7) | 55.3(2.1) | 8.7(19.1) | 7.5(16.5) | 0.9 A / 90 W |
| 43LV340H-UA | 974(38.3) | 625(24.6) | 303(11.9) | 571(22.4) | 79.4(3.1) | 12.45(27.4) | 9.2(20.2) | 0.9 A / 90 W |
| 43LV340C-UB | 974(38.3) | 625(24.6) | 220(8.6) | 571(22.4) | 79.4(3.1) | 9.3(20.5) | 9.2(20.2) | 0.9 A / 90 W |
| 49LV340H-UA | 1,107(43.5) | 702(27.6) | 303(11.9) | 645(25.3) | 79.4(3.1) | 14.55(32.0) | 11.30(24.9) | 1.0 A / 100 W |
| 49LV340C-UB | 1,107(43.5) | 701(27.5) | 235(9.2) | 645(25.3) | 79.4(3.1) | 11.42(25.1) | 11.30(24.9) | 1.0 A / 100 W |
| 55LV340H-UA | 1,241(48.8) | 770(30.3) | 303(11.9) | 720(28.3) | 63.0(2.4) | 19.5(42.9) | 16.3(35.9) | 1.25 A / 125 W |
| 55LV340C-UB | 1,241(48.8) | 775(30.5) | 216(8.5) | 720(28.3) | 63.0(2.4) | 16.6(36.5) | 16.34(36.0) | 1.25 A / 125 W |
| Power Requirement AC 100 - 240 V ~ 50 / 60 Hz | ||||||||

LG
Life's Good
The model and serial numbers of the TV are located on the back and on one side of the TV. Record them below should you ever need service.
MODEL
SERIAL
MANUAL DEL USUARIO
text_image
Diagram illustrating how to fold a screen from a device, with red X marks indicating cancellation or error.natural_image
Pure technical diagram of a mechanical component with no text, numbers, or symbolsnatural_image
Technical line drawing of a mechanical component with no visible text or symbolsnatural_image
Illustration of a monitor connected to a hook with magnified insets showing the hook and cable (no text or symbols)text_image
Diagram illustrating a mechanical or electrical setup with labeled components and directional arrows, likely illustrating a system or process.VHF 2-13, UHF 14-69, DTV 2-69, CATV 1-135, CADTV 1-135
Impedancia de antena externa
75 Ω
[Audio] MP3, AAC, HE-AAC
•.3gp, .3gp2
[Video] H.264/AVC, MPEG-4 Parte2
[Audio] AAC, AMR(NB/WB)
Datos 01 & 02 = No Mayor = 00 00
Datos 03 & 04 = No Menor = 00 00
* Para TV LCD/TV LED
- Para controlar luz de pantalla.
Transmisión
[m][g][ ][ID del televisor][ ][Dato][Cr]
Datos Mín.: 00 a Máx.: 64
Ack
[g][ ][ID del televisor][ ][OK/NG][Dato][x]
* Para TV plasma
- Para controlar la luz del panel
Transmisión
[m][g][ ][ID del televisor][ ][Dato][Cr]
Datos Mín.: 00 a Máx.: 64
Ack
[g][ ][ID del televisor][ ][OK/NG][Dato][x]