
Bravo II - Printer PRIMERA - Free user manual and instructions
Find the device manual for free Bravo II PRIMERA in PDF.


| Product Type | Automated Optical Disc Duplication & Printing System |
| Brand | Primera |
| Model | Bravo II |
| Printing Method | Inkjet |
| Print Resolution | Up to 4800 x 1200 dpi |
| Ink Cartridges | One 3-color (CMY) and one monochrome black |
| Disc Capacity (Default) | 25 input, 25 output |
| Disc Capacity (Kiosk Mode) | Up to 50 input, 50 output |
| Supported Media | Printable surface CD-R, CD-RW, DVD-R, DVD-RAM |
| Maximum Print Width | 4.724 inches (120 mm) |
| Interface | USB 2.0 |
| Power Requirement | 100-240 VAC, 50/60 Hz, 60 watts |
| Power Supply | Switching power supply, 12VDC, 4.5A |
| Dimensions (W x H x D) | 17.8" x 7.25" x 16" (455 x 184 x 406 mm) |
| Weight | 18 lbs (8.2 kg) |
| Laser Class | Class 1 Laser Product |
| Safety Certifications | FCC Class B, CE, UL, UL-C |
| Warranty | One year return-to-depot |
| Recordable Disc Formats | CD-Audio, CD-ROM, CD-I, Video-CD, MP3 to CD-Audio, DVD-ROM, etc. |
| PC System Requirements (Minimum) | Pentium III/IV 700 MHz, 256 MB RAM, USB 2.0, Windows 2000/XP/Vista |
| Mac System Requirements (Minimum) | G4 PowerPC 700 MHz, 256 MB RAM, USB 2.0, OS X 10.2+ |
| Maintenance | Clean exterior with ammonia window cleaner; do not lubricate moving parts |
| Included Accessories | Input/output bins, power supply, USB cable, ink cartridges (color and black), installer disc, manual |
Frequently Asked Questions - Bravo II PRIMERA
User questions about Bravo II PRIMERA
0 question about this device. Answer the ones you know or ask your own.
Ask a new question about this device
Download the instructions for your Printer in PDF format for free! Find your manual Bravo II - PRIMERA and take your electronic device back in hand. On this page are published all the documents necessary for the use of your device. Bravo II by PRIMERA.
USER MANUAL Bravo II PRIMERA
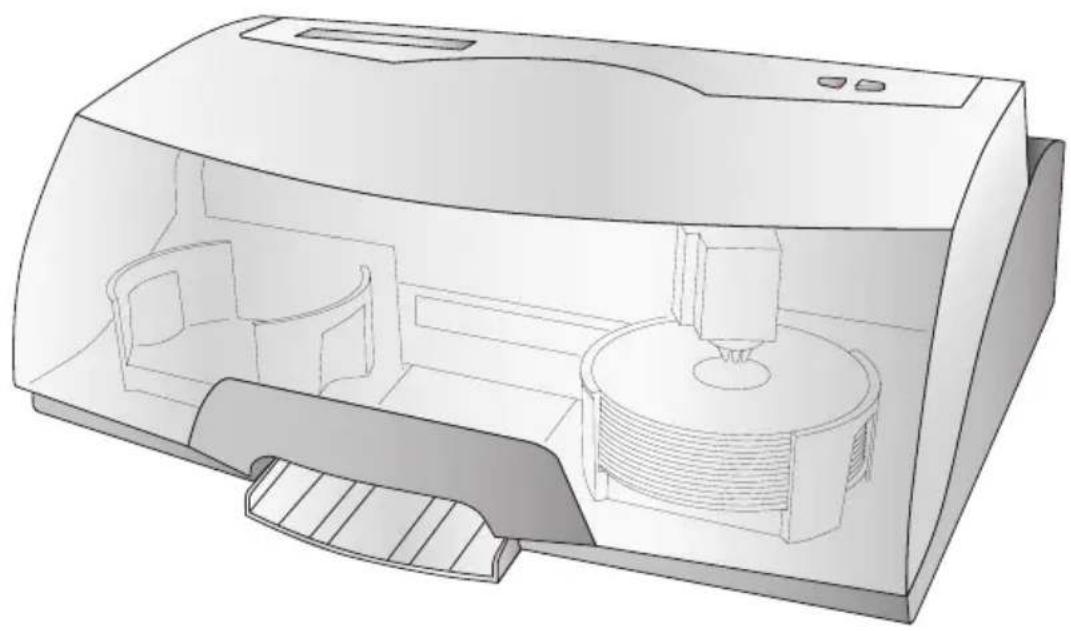
Automated Optical Disc Duplication & Printing System
natural_image
Technical line drawing of a printer internal structure, showing front, side, and top views (no text or symbols)PRIMERA
© 2007 All rights reserved.
Notices: The information in this document is subject to change without notice. NO WARRANTY OF ANY KIND IS MADE WITH REGARD TO THIS MATERIAL, INCLUDING, BUT NOT LIMITED TO, THE IMPLIED WARRANTIES OF MERCHANTABILITY AND FITNESS FOR A PARTICULAR PURPOSE. No liability is assumed for errors contained herein or for incidental or consequential damages in connection with the furnishing, performance, or use of this material. This document contains proprietary information that is protected by copyright. All rights are reserved. No part of this document may be photocopied, reproduced, or translated into another language without prior written consent.
Trademark Acknowledgments: Windows is a registered trademark of Microsoft Corporation. All other trademarks are the property of their respective owners.
Printing History
Edition 9.0, #011707, ©Copyright 2006, All rights reserved.
FCC Compliance Statement: This device complies with part 15 of the FCC rules. Operation is subject to the following two conditions: (1) this device may not cause harmful interference, and (2) this device must accept any interference received, including interference that may cause undesired operation.
For Users in the United States: This product is intended to be supplied by a UL listed Direct Plug-In Power Supply marked "Class 2" or a UL listed ITE Power Supply marked "LPS" with output rated 12VDC, 4.5A or higher. This equipment has been tested and found to comply with the limits for a Class B digital device, pursuant to Part 15 of the FCC Rules. These limits are designed to provide reasonable protection against harmful interference in a residential installation. This equipment generates, uses, and can radiate radio frequency energy and, if not installed and used in accordance with the instructions, may cause harmful interference to radio communications. However, there is no guarantee that interference will not occur in a particular installation. If this equipment does cause harmful interference to radio or television reception, which can be determined by turning the equipment off and on, the user is encouraged to try to correct the interference by one or more of the following measures:
- Re-orient or relocate the receiving antenna.
- Increase the separation between the equipment and receiver.
- Connect the equipment into an outlet on a circuit different from that to which the receiver is connected.
- Consult the dealer or an experienced radio/TV technician for help.
Use of shielded cables is required to comply with the Class B limits of Part 15 of the FCC Rules. You are cautioned that any changes or modifications not expressly approved in this manual could void your authority to operate and/or obtain warranty service for this equipment.
For Users in Canada: This digital apparatus does not exceed the Class B limits for radio noise for digital apparatus set out on the Radio Interference Regulations of the Canadian Department of Communications. Le present appareil numerique n'emet pas de bruits radioelectriques depassant les limites applicables aux appareils numeriques de la class B prescrites dans le Reglement sur le brouillage radioelectrique edicte par le ministère des Communications du Canada.
CAUTION!
TO PREVENT FIRE OR SHOCK HAZARD, DO NOT EXPOSE THE UNIT TO RAIN OR MOISTURE. TO REDUCE THE RISK OF ELECTRIC SHOCK, DO NOT REMOVE EXTERIOR PANELS. NO USER-SERVICEABLE PARTS INSIDE. REFER SERVICING TO QUALIFIED SERVICE PERSONNEL. OPERATE THE UNIT WITH ONLY THE PROPER ELECTRICAL SPECIFICATIONS AS LABELED ON THE PRINTER AND AC ADAPTER.
CAUTION!
THIS PRODUCT CONTAINS A LASER DIODE OF A HIGHER CLASS THAN 1. TO ENSURE CONTINUED SAFETY, DO NOT REMOVE ANY COVERS OR ATTEMPT TO GAIN ACCESS TO THE INSIDE OF THIS PRODUCT. REFER ALL SERVICING TO QUALIFIED PERSONNEL. THE FOLLOWING LABEL APPEARS INSIDE YOUR UNIT:
CLASS 1 LASER PRODUCT
LASER KLASSE 1
CAUTION!
USE OF CONTROLS OR ADJUSTMENTS OR PERFORMANCE OF PROCEDURES OTHER THAN THOSE SPECIFIED HEREIN MAY RESULT IN HAZARDOUS RADIATION.
Table of Contents
Section 1: Getting Started....1
A. Choosing a Good Location ....1
B. Unpacking and Inspection....2
C. Identifying the Parts 2
D. PC System Requirements......4
E. MAC System Requirements ....4
F. Overview of Operation ....5
Section 2: Hardware and Software Set-Up ....8
A. Installing the PC Software....8
B. Installing the MAC Software....8
C. Hardware Setup 9
Step 1: Applying Power ......9
Step 2: Loading Media ......9
Step 3: Installing Ink Cartridges....11
Step 4: Connecting the USB Cable/Installing the Printer Driver....11
Section 3: Creating Discs on a PC....14
A. Tutorial: Copy a CD or DVD....14
B. Using PTPublisher ....19
C. Creating a Print Label Using SureThing 21
D. Advanced Printer Driver Functions 22
E. Using Other Graphics Programs 29
F. Using Kiosk Mode ....30
Section 4: Creating Discs on a MAC ....31
A. Tutorial: Copy a CD or DVD....31
B. Using Discribe 5.3 ....34
C. Printed Label Format Requirements 38
D. Advanced Printer Driver Functions 39
Section 5: Interpreting the Publisher's Indicator Lights......47
Section 6: Maintenance and Troubleshooting ....48
A. Cleaning the Publisher....48
B. Performing a Robotic Self-Test 48
C. Calibration Utility / Robotics Testing (PC)......49
D. MAC Software Test ....50
E. Cleaning the Ink Cartridges ....51
F. Clearing a Media Jam....51
G. Technical Support....51
Section 7: Technical Specifications ....52
Index....54
Section 1: Getting Started
THANK YOU...
...for purchasing the Bravo™ Disc Publisher. Bravo is the perfect all-in-one solution for producing professional looking CD-R and DVD-R discs. A wide variety of disc formats are supported, including audio CDs, Video CDs, data discs and more. Operation is simple and completely automatic once a job has been started.
To begin using your Disc Publisher, please read this manual carefully. This Operator's Manual is a complete step-by-step guide to quickly and easily create discs with your new Optical Disc Publisher.
A separate Help File is provided with your Publisher that explains the operation of the PrimoDVD and Discribe Software. This is accessible under Primo's Help Menu and on the MAC in the Disc Publisher folder in the applications directory.
NOTE ON TERMS AND CONVENTIONS:
From this point forward, the following terms and conventions will apply:
The Bravo Disc Publisher will be abbreviated simply as the Publisher.
Optical discs, which can include many different types of discs including CD-Rs, CD-RWs, DVD-Rs and more are all referred to as CDs or discs. Please note that in order to copy and record DVDs, you will need to have purchased the DVD-R version of the Publisher.
A. CHOOSING A GOOD LOCATION
- Place the Publisher in a location with adequate air circulation to prevent internal heat build up. You will need at least 24" (61 cm) of overhead space to allow the top cover to open freely.
- Do not place the Publisher near heat sources such as radiators or air ducts, or in a place subject to direct sunlight, excessive dust, mechanical vibration or shock.
B. UNPACKING AND INSPECTION
While unpacking your Publisher, inspect the carton to ensure that no damage has occurred during shipping. Make sure that all supplied accessories are included with your unit.
The following items should be included:
• Optical Disc Publisher
- Gray Plastic Input and Output Bins
- Switching Power Supply with Power Cord
• One Three-Color (CMY) Ink Cartridge
• One Monochrome Black Ink Cartridge
- Installer Disc
• USB 2 Interface Cable (Beige)
- Warranty Card
• This Operator's Manual, Quick Start Guide and Other Printed Information
Save the carton and packing materials. They will come in handy later if you ever need to transport the Publisher and/or any of its parts and accessories.
C. IDENTIFYING THE PARTS
Front Panel and Top
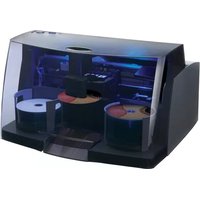
This illustration shows the Publisher, its Control Panel, Buttons, LED indicator lights, Input and Output Bins and other components.
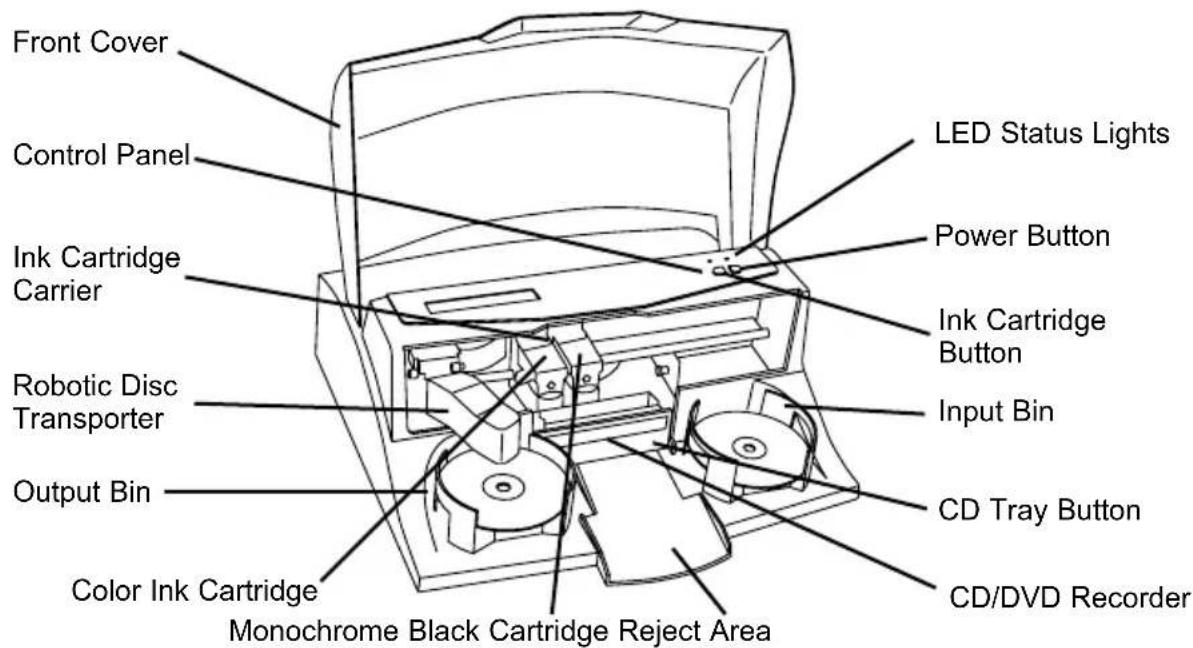
The Robotic Disc Transporter moves discs from the Input Bin, to a CD/DVD Recorder, to the printer, and finally to the Output Bin.
The CD/DVD Recorder is automatically loaded and unloaded by the Publisher's Robotic Disc Transporter.
The Recorder Tray Button manually opens or closes the Recorder Tray. In normal operation, the in/out movement of the Recorder Tray is controlled automatically and this button is not used.
The Control Panel contains LED Status Lights and Buttons to control the Publisher.
The LED Status Lights indicate that Power is ON. They also blink in certain patterns to indicate an error or other condition of the Publisher. See Section 5 for a full explanation of the LED Status Light conditions.
The Power Button turns the Publisher's power ON and OFF.
When the front cover is opened, the Ink Cartridge Button is used to position the Cartridge Carrier for easy ink cartridge replacement. When the front cover is closed, pressing the Ink Cartridge button will open or close the Printer Tray.
The Input/Output Bins are situated under the top cover of the Publisher. The bins will hold up to 25 discs. The right-side bin is the Input Bin for blank media; the left-side bin is the Output Bin for finished discs.
The Reject Area is where discs are dropped if they do not pass a software verification test. The discs slide down the ramp out in front of your Publisher.
The Front Cover is a durable plastic cover that will protect the Publisher from dust and interference.
The Ink Cartridge Carrier holds both a color ink cartridge (left-side pen) and a monochrome ink cartridge (right-side pen).
Rear Panel
This illustration shows the input ports found on the rear panel of the Publisher:
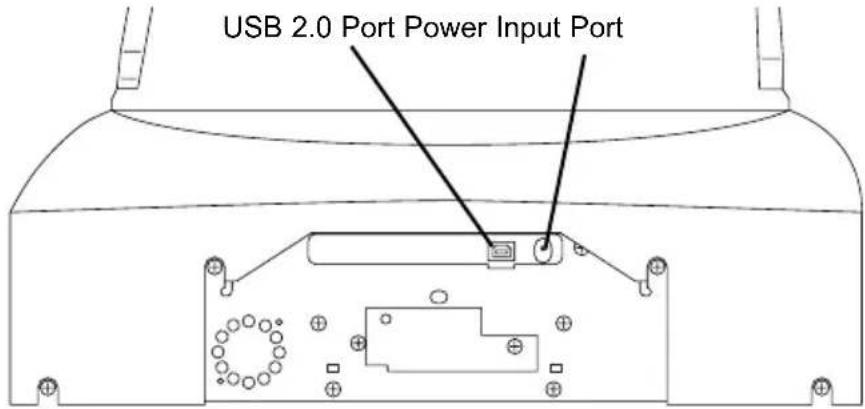
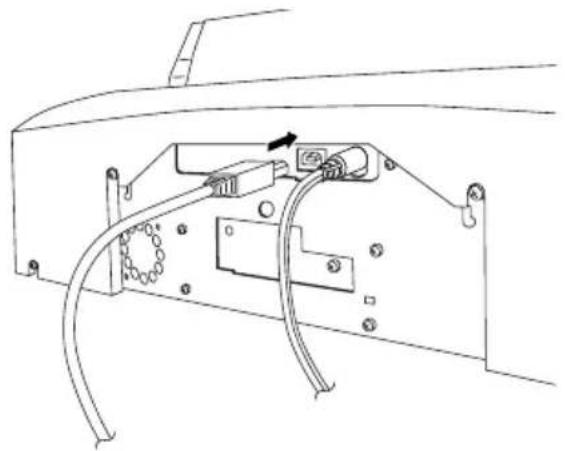
The USB 2.0 Interface is connected to an open USB 2.0 port on your PC with the USB 2.0 cable, included with your Publisher.
The Power Input Port connects to the included 100V\~240V 12V switching power supply.
D. PC SYSTEM REQUIREMENTS
Before getting started, it is important for you to verify that your PC meets the minimum system requirements.
- 700 MHz or faster Pentium III/IV processor running Windows 2000, XP or Vista
• 512 MB or greater RAM
• Free hard drive space of at least 10 GB.
• Available USB 2.0 Port.
If your PC does not have at least these minimum system requirements, system performance may not be acceptable.
E. MAC SYSTEM REQUIREMENTS
Before getting started, it is important for you to verify that your computer meets the recommended system requirements. Here's what you need in order to successfully burn and print with the Discribe software:
• G4 PowerPC 700MHz or higher running OS X version 10.2 or higher
• 256MB RAM
• Free hard drive space of at least 2 GB (up to 6 GB for DVD)
• Available USB 2.0 Port
- Do not connect the Bravo to any USB hubs or the USB port on your keyboard. It should be connected directly to an onboard USB 2.0 port.
If your computer does not have at least these minimum system requirements, system performance may not be acceptable.
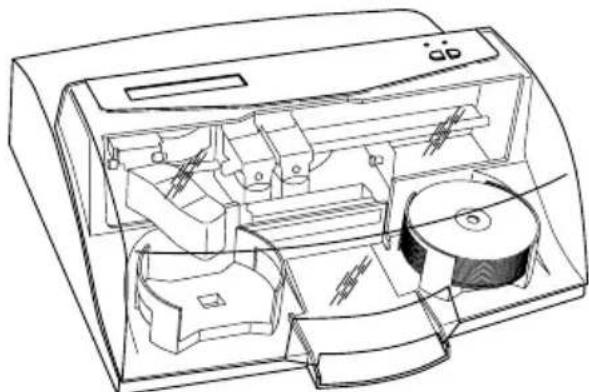
Your new Publisher is an automated, precision device intended for continuous-duty publishing of discs. The following is a description of the complete process of duplicating and printing a CD/DVD job on your Publisher:
- Up to 25 blank discs may be loaded at one time into the Input Bin.
natural_image
Technical line drawing of a mechanical device with internal components (no text or symbols)-
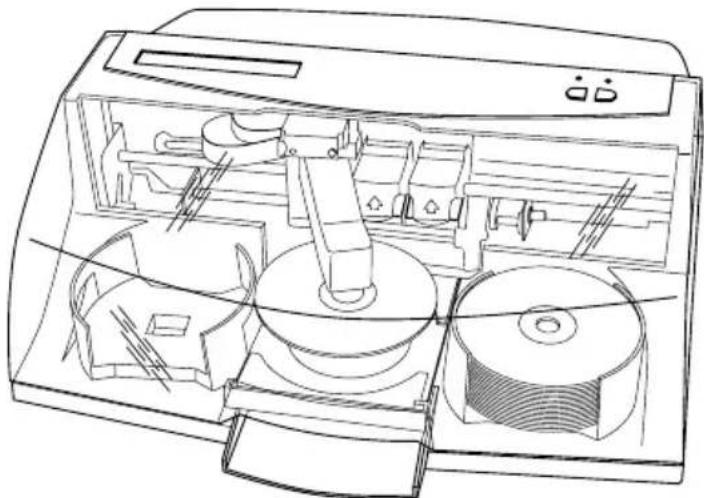
The Publisher's integrated Robotic Disc Transporter will first check your recorder drive for a disc by attempting to "pick" from the recorder. Then, the Robotic Disc Transporter will pick a disc from the Input Bin.
-
The Recorder Tray opens automatically and the Robotic Disc Transporter places a disc into the recorder.
natural_image
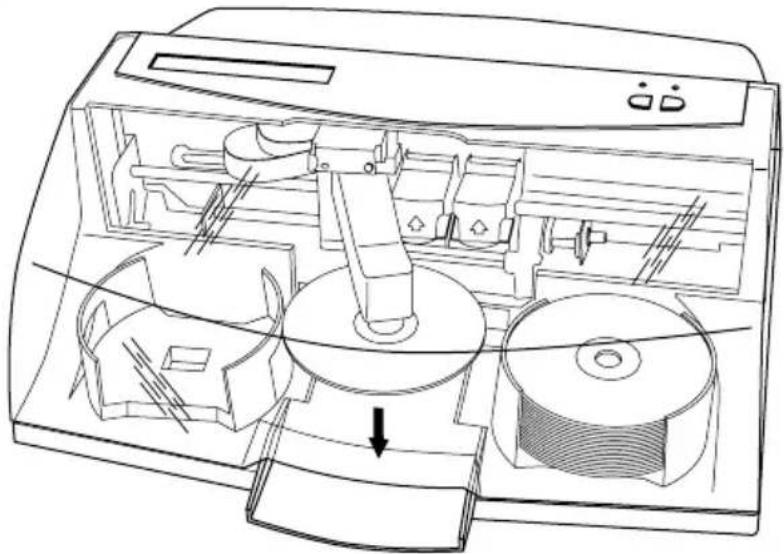
Technical line drawing of a mechanical device with internal components (no text or symbols)- The Recorder Tray then automatically shuts. Robotic Disc Transporter will automatically check the Input Bin to make certain that only one disc was picked.
Through software control, you can perform a test on each disc before recording. If a disc does not pass (meaning that all or part of that disc is not recordable), the Robotic Disc Transporter picks it out of the CD Tray and sends it to the Reject Area.
natural_image
Technical line drawing of a mechanical device with internal components and a downward arrow indicating motion (no text or symbols)-
The Recorder is now writing to the disc. If you were to fully record a CD with data, audio, video or music (650 MB), recording time is about 3½ minutes each. A full DVD records in about 10 minutes. Most jobs don't fill the entire disc, so recording time is usually less than this. After recording, the Recorder Tray opens automatically. The Robotic Disc Transporter will lift the disc out of the Recorder Tray. The Recorder Tray will close, and the Printer Tray will open. The Robotic Disc Transporter will lower the disc into the Printer Tray, and the Printer Tray will then automatically close.
-
If publishing more than one disc, the Robotic Disc Transporter will load the Recording Drive with a blank disc from the Input Bin to start recording the next round.
-
Once recording has started on the next round, printing will start with the recorded disc from the previous round. This simultaneous printing and recording greatly increases the throughput of your Publisher.
-
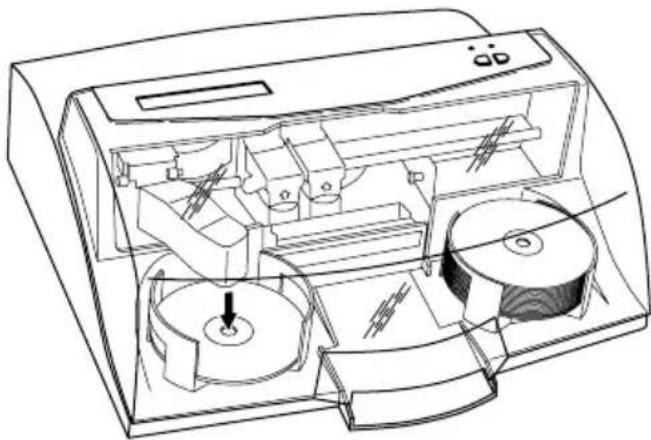
Print time varies according to which print mode has been selected (section 3-D). In most cases, print time takes no more than 2 minutes. After printing the first disc, the Publisher's Printer Disc Tray opens automatically. The Robotic Disc Transporter moves the finished disc to the Output Bin.
natural_image
Technical line drawing of a mechanical device with internal components and a central pin (no text or symbols)-
The process starts over and repeats until all blank discs are gone or the number you have specified via software are copied and printed.
-
Now that you understand the order of operation, it is time to set up your Publisher.
Section 2: Hardware and Software Set-Up
This section will describe the step-by-step process of setting up your Publisher. This includes information on how to load the supplies (ink and disc media) necessary to start producing discs.
A. INSTALLING THE PC SOFTWARE
The Installer Disc has a QuickStart menu that will guide you through the process of setting up your Publisher. Please refer to the following for more information on each step:
-
Place the Optical Disc Publisher Installer CD in your CD-Rom Drive. The Installer application should automatically launch in a few moments. If it does, proceed to Step 2. If it does not automatically launch, follow these steps:
-
Double-click the My Computer Icon, then double-click the icon of the appropriate CD drive containing the Software Installer disc
-
Double-click Installer.exe
-
In the Installer Application, click the Standard Install button. The Installer will guide you step-by-step through the installation process. As you complete each step, click Next. Steps 1-4 are shown in section C below as well as on the monitor. You may follow either to complete the setup.
B. INSTALLING THE MAC SOFTWARE
Before installing Discribe please note that all software must be installed on a hard disk. Once you have installed the software, store the original program CD-ROM in a safe place.
Please note that your user account must have administrative rights to properly install a new printer. You can check with your system administrator or check with Apple support to confirm whether or not your account has administrative rights.
Install the software as follows:
a. Insert the Bravo Installation CD-ROM in your system's CD-ROM drive.
b. Double-click the CD-ROM icon.
c. Double-click on the Disc Publisher Installer.mpkg file icon. Follow the on-screen instructions.
d. The volume containing the operating system should be selected for installation. Click the Continue button. All components will be installed to their proper locations.
e. Once the installation has completed, click Quit.
You have successfully installed all the necessary software! Section C below will describe how to connect the Bravo to your Mac.
C. HARDWARE SETUP
To connect your new disc publisher, please do the following:
Be sure you have removed the packing tape and cardboard insert prior to applying power.
Step 1: Applying Power
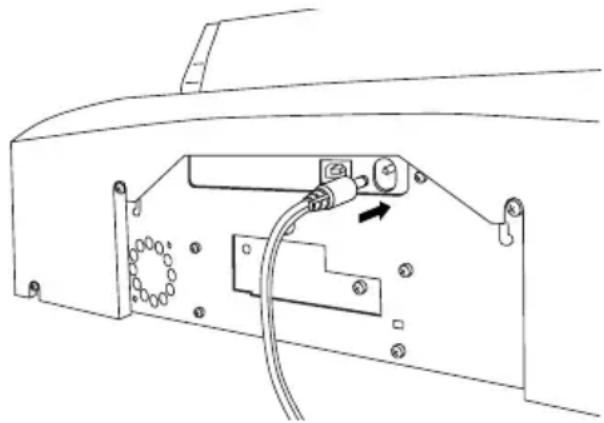
- Locate the power adapter supplied with your Publisher.
- Place one end of the adapter cord into the power port on the rear panel of the Publisher.
- Unit will initialize for approximately 30 seconds or so.
natural_image
Technical line drawing of a mechanical component with no visible text or symbolsStep 2: Loading Media (Discs)
NOTE: Your Publisher can print directly onto virtually any brand of printable-surface CD/DVD media. However, different brands of discs have different printable coatings. Because of this, you may need to adjust the printer driver settings to accommodate your specific brand of CD/DVD media. Refer to Section 3D or 4D for further printer driver information.
Due to the wide variety of printable-surface CD/DVD media, you may find that certain brands of discs provide higher print quality than others. For maximum print quality, use CD/DVD media authorized by Primera.
Refer to the following steps when loading discs in to the Publisher:
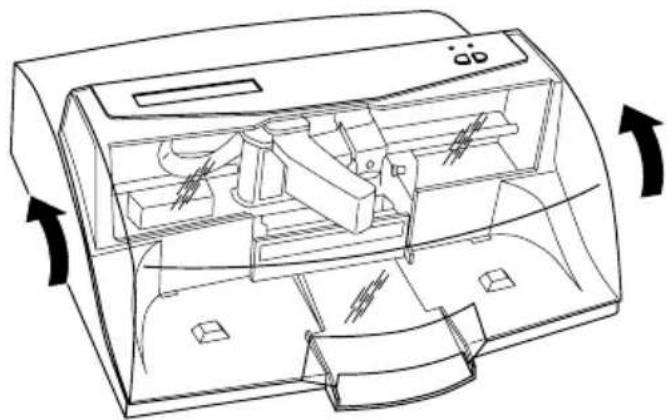
- Open the front cover of the Publisher
natural_image
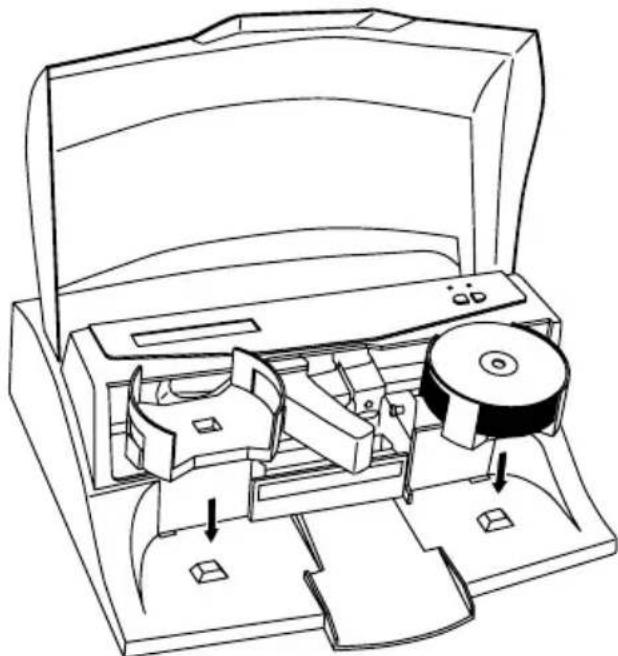
Technical line drawing of a mechanical device with internal components and directional arrows indicating rotation (no text or symbols)- The Publisher will automatically position the cartridge carrier and Robotic Disc Transporter to the center position allowing for easy access to the bins.
natural_image
Line drawing of a mechanical device with internal components and directional arrows (no text or symbols)- Load the Input Bin (the bin located on the right-hand side of the Publisher) with 25 blank discs and place the bins on the mounting pegs.
Step 3: Installing Ink Cartridges
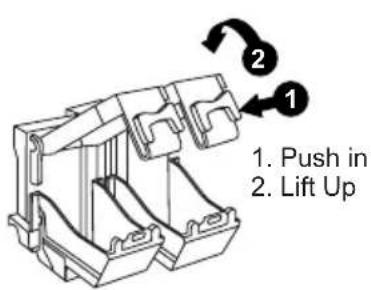
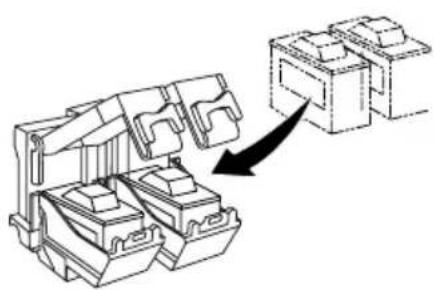
- Press the Ink Cartridge Button to move the Ink Cartridge Carrier to the load position and open the ink cartridge covers
- Remove each ink cartridge from its packaging
- Slowly remove the tape covering the cartridge's print head, being careful to avoid damaging the barcode label on the underside of the cartridge.
natural_image
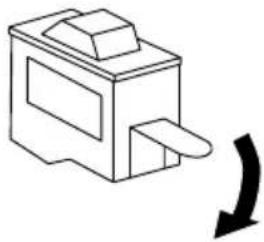
Simple line drawing of a device with a curved arrow indicating rotation or change (no text or symbols)- Insert the ink cartridges into the carrier, copper end first and snap the cartridge cover in place. Insert the color in the left holder, monochrome black in the right cartridge holder.
natural_image
Technical line drawing of a mechanical assembly with an arrow indicating transformation (no text or symbols present)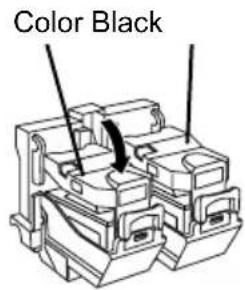
- Close the Publisher's front cover.
Step 4: Connecting the USB 2.0 Cable/Installing the Printer Driver
Connect the Publisher to your computer with the beige USB 2.0 Cable.
natural_image
Technical line drawing of a mechanical assembly with no visible text or symbolsIf you are using a PC:
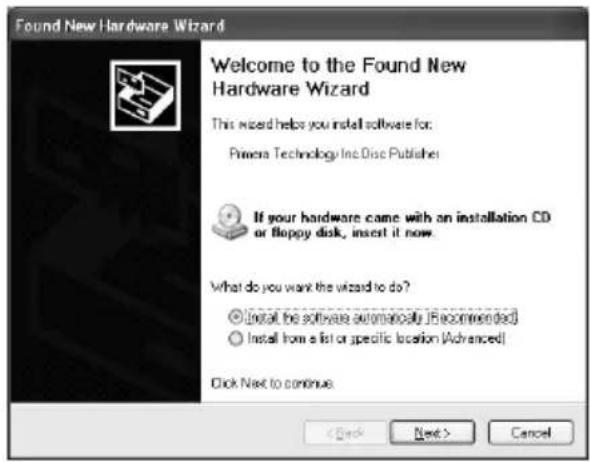
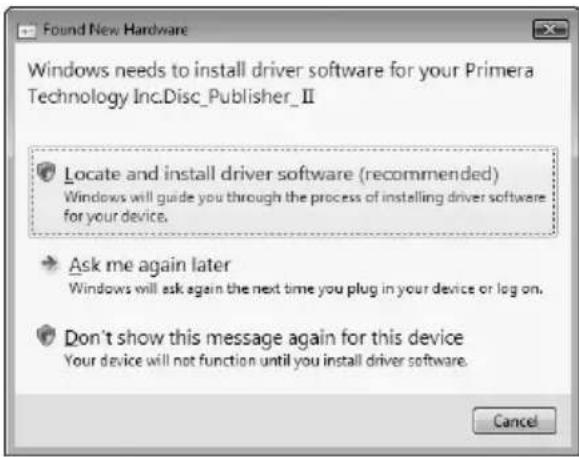
If you are using a PC, after a few moments, Windows will tell you it has found new hardware and is looking for software to install it.
Windows XP
Windows Vista
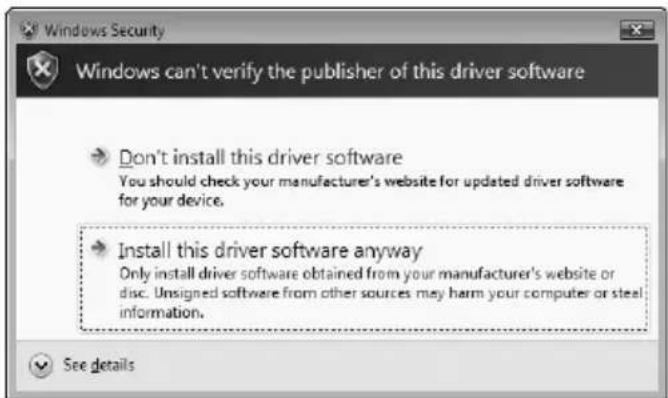
If you are using Windows XP, select "Install the software automatically" and click Next or if you are using Windows Vista click "Locate and install driver software"
You will see a notice like the one shown below depending on which operating system you are using. Click Continue Anyway or Install this driver software anyway to continue installing the printer driver for your Publisher.
![Hardware Installation The software you are installing for the hardware. Printers: has not passed Windows Logo testing to verify its compatibility with Windows XP. [Tell me why this testing is important.] Continuing your installation of this software may impair or destabilize the correct operation of your system either immediately or in the future. Microsoft strongly recommends that you stop this installation now and contact the hardware vendor for software that has passed Windows Logo testing. Continue Anyway STOP Installation](/content/2026/05/817105/images/953ad5c3a6ba756bed748549a2420e17ee725028ffe81a034e6fc6f93e019956.jpg)
Windows XP Message
Windows Vista Message
If you are using a Macintosh:
When connecting USB to a Mac it may be necessary to Add the printer via the Printer Setup Utility.
- Open the Printer Setup Utility located in the Applications - Utilities folder.
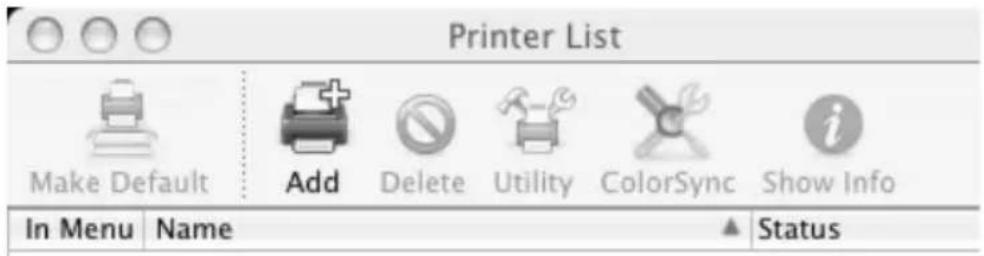
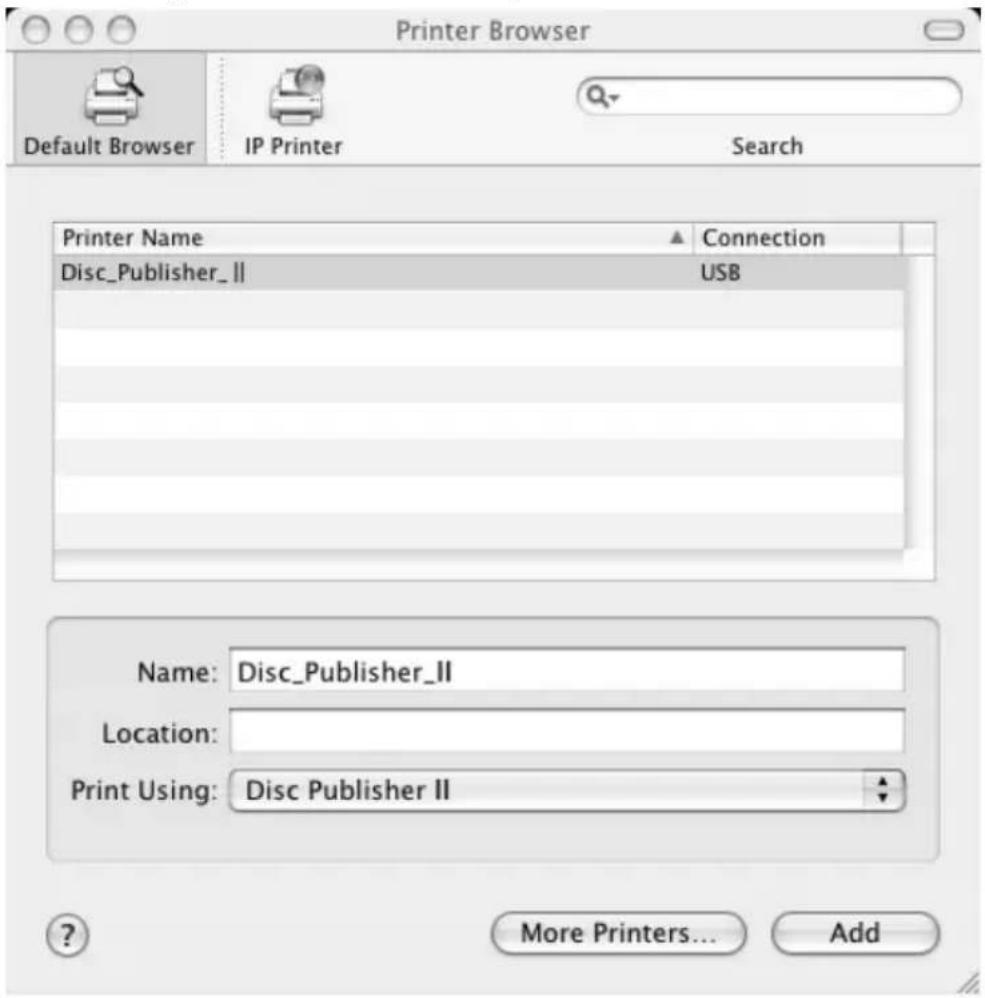
- Click Add. Select the Disc Publisher Pro from the list of available printers. Click Add again.
Section 3: Creating Discs on a PC
There are two main components to creating discs, printing and burning. SureThing CD Labeler is used to design the printing on your discs. PTPublisher controls the recording and allows you to select the image to be printed to your discs. Both applications will be described in detail in this section.
A. TUTORIAL: COPY A CD OR DVD
Copy CD or Copy DVD can be used to copy any CD or DVD master. This project reads the master disc from the Disc Publisher drive to the hard drive of your computer. The master is stored in the Global Image format (*.gi) in a temporary location on your computer. PTPublisher uses this temporary file to make all subsequent copies that are requested. The master disc is read only once to create the initial temporary file.
Recommended for: All CD or DVD types (Audio CD, Data CD, Software Install Disc, Video CD, DVD, DVD-ROM, DVD+/-DL, etc.). This is best used for single runs where you will not need to make additional copies of the master disc a later time.
-
Select Copy Project from the Starter Window or the New Project Panel. A Copy Project sub menu will be displayed. Choose Copy CD or Copy DVD. Step one of the Copy Disc wizard will be displayed.
-
You will be prompted to place the disc you would like to copy into the drive inside the Disc Publisher. The tray door will open automatically. Place the disc in the drive and click OK.
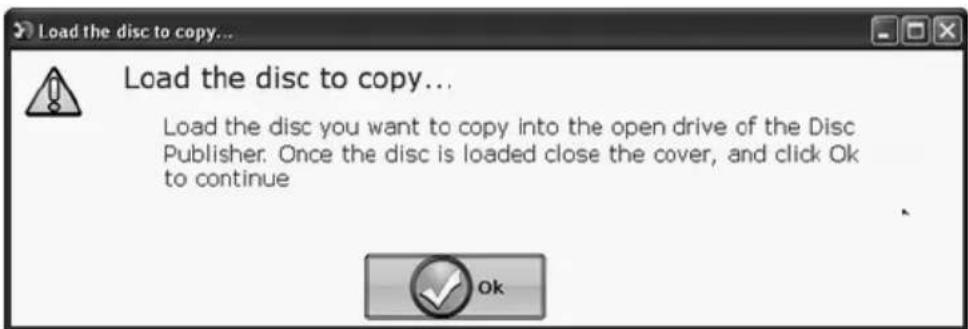
- The Publisher will close the drive and read the contents of the disc. It will display disc type (CD/DVD) and show the size of the disc in Megabytes. Verify this information is correct and click the next arrow to cont

- Select the print label file by clicking the select a label button. When you have selected print label file, click the next arrow. There are several ways to select a print file. See the explanations below for more information.

For any job type you choose you will be prompted to select a label file to print. You may select an existing label, create a label or choose to print nothing. Simply click the next arrow to print nothing on the disc. Otherwise follow the steps below.

4A. Select a Label
4A1 - Click the Select a Label button to open a browse window to choose your print file. Use the Favorites, Browse or Find Tabs on the bottom of the left pane to find the print file or click the Look In drop down to find the file.

4A2 - Double Click on the file to add it to your project.
You may add any BMP, JPG or SureThing (.std) file.
SureThing files are automatically formatted correctly. BMP or JPG files should be 4.72" x 4.72" square. For best print quality the image resolution should be atleast 300 dpi.
Use the tabs on the bottom left to browse in explorer mode or search for files. Below is a description of each of the search types.
Locations. Click on the Locations tab to display favorite locations such as Desktop, My Documents or My Computer.
Browse. Click on the Browse tab to display files in tree view on the left side of the screen. Open and close folders by clicking the + or - next to each folder. Click on the folder to view the contents on the right side of the window.
Find. Click on the Find tab to search for print label files. Type in all or part of a file name to search for any picture file that matches. All JPG, BMP, GIF, PNG, TIF files matching the typed criteria will be displayed. Use the * modifier to search for specific file types such as *.jpg or *.std to search for all files ending those specific extensions.

Select a Label

Create a Label
4B. Create a Label
4B1 - Click the Create a Label button to open the SureThing CD Labler program. This program will allow you create a label.
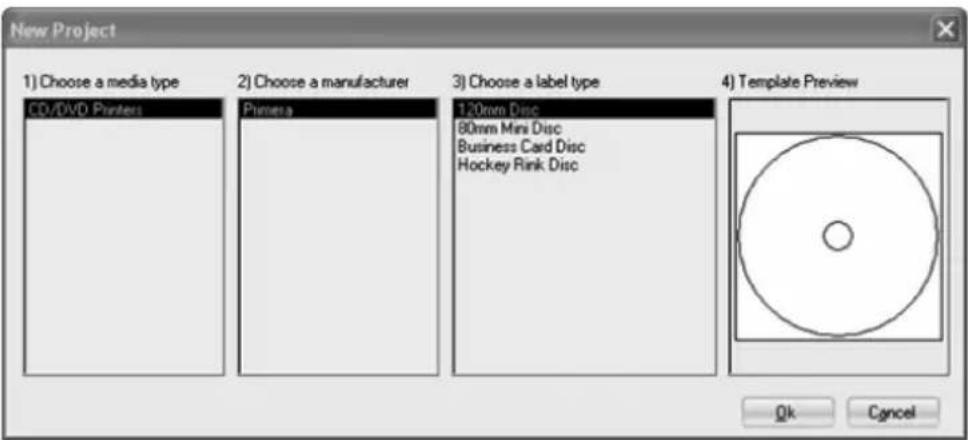
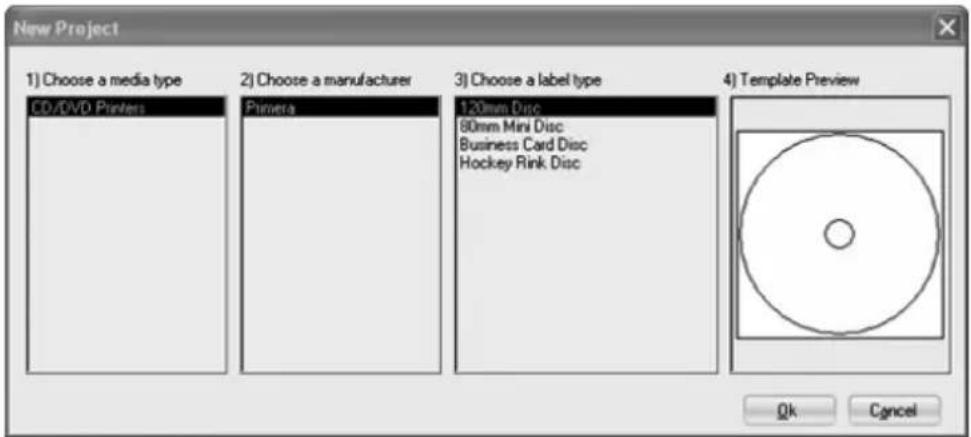
Choose the 120mm DiscTemplate from the window that appears.
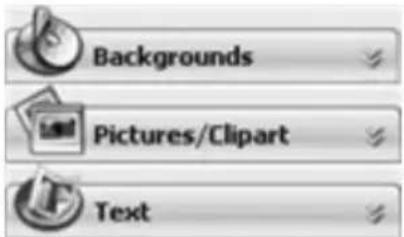
Using the buttons on the left navigation window, you may add your own background, choose a pre-made
background, choose from several text effects or insert a picture. Click the down arrow on the button to view all options. Once you have designed the label go to the file menu and choose save.
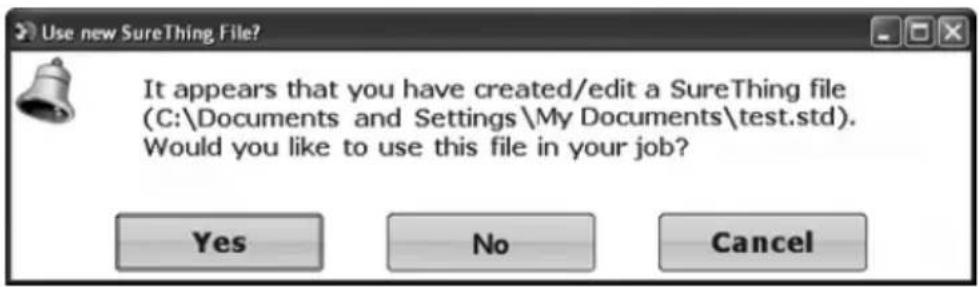
4B2 - Close the SureThing program. A message will appear asking if you would like to use the SureThing file you just created in your project. Click Yesto use it in your project. Once you choose your label a preview will be displayed.
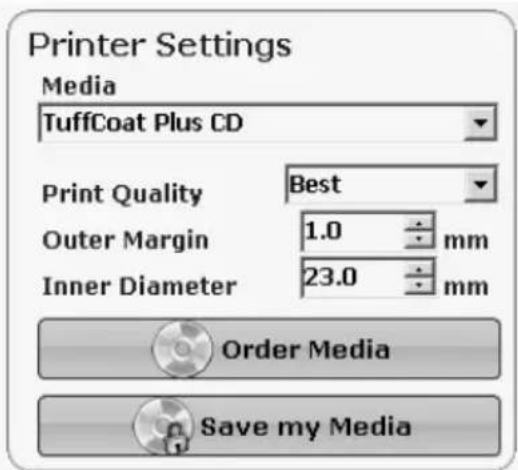
- You can edit the print settings for this file by changing the settings that appear.
Several preset media types that correspond with the media available at our webstore are available from the Media drop down box. When you select a media type from this box the Print Quality, Outer Margin and Inner Diameter are automatically adjusted to fit that media.
If you are not using media sold by Primera you can adjust these settings by changing the quality setting or toggling the size of the printed outer margin or inner diameter. You can save your adjusted settings by clicking Save my Media. You will be prompted to name your custom media settings. This name and the associated settings will now be available to choose in the media drop down box.
- Verify information on the summary window, choose the number of copies and click Go.
Click the More Options button to set additional options such as recording speed and file system type. If you do not set these options the optimal settings will automatically be selected for you.
Once the job starts the Publisher Status window will appear. Here you can view the status of the printer, the robot, and the drive. You can also view a log of all activity.

B. USING PTPUBLISHER
The PTPublisher program is divided into six areas. Refer to the following for a description of each area.
![PTP Publisher - [New Data Job 1] File Languages Tools Window Help Open a Project Create Data DVD - New Data Job 1 Add files/folders to burn... Get Files to Burn Files/Folders Size Pioneer 3.65 MB Flexor 7.70 MB PuEngine 12.73 MB Current Jobs New Data Job 1 Disc Publisher II Ready More Status Volume Name Untitled 24.27 MB Step 1 of 3 PRIMERA TELENDERING INC 0 Disc(x) 7 Disc(x) 99% 87%](/content/2026/05/817105/images/f64d125691cf1a78352b85717919bfd5bc532af7743407691095cc4eb2850a77.jpg)
1. Open Project Panel
This panel allows you to open a previously saved project. It will also display the last few saved projects. To open or close this or any panel click on the down or up arrow on the upper right corner of the panel.
2. New Project Panel
This panel allows you to create any of the project types available for this robot. Click on the category to open specific project types. This panel is your starting point for any new project.
3. Current Projects Panel
This panel displays any project that is running or open. Once you save your project the project name will be displayed here. Click on the project name to open it.
4. Robot Status Panel
This panel displays a picture of currently connected robot. The current status is also displayed. Important errors such as low ink will be displayed here. Click "more status" to view status regarding the printer, recorder drive, currently running jobs and job history log.
5. Status Bar
The Status Bar shows key information such has ink levels and media supply levels for the currently selected robot.
6. Project Detail Window
This screen changes depending on the selected panel option. It can display project steps such as Adding data and Adding a print file. It can also display robot status. Finally, the support center is displayed here any time you click on the help icon. Navigate through the project steps by clicking the next arrow at the bottom right.

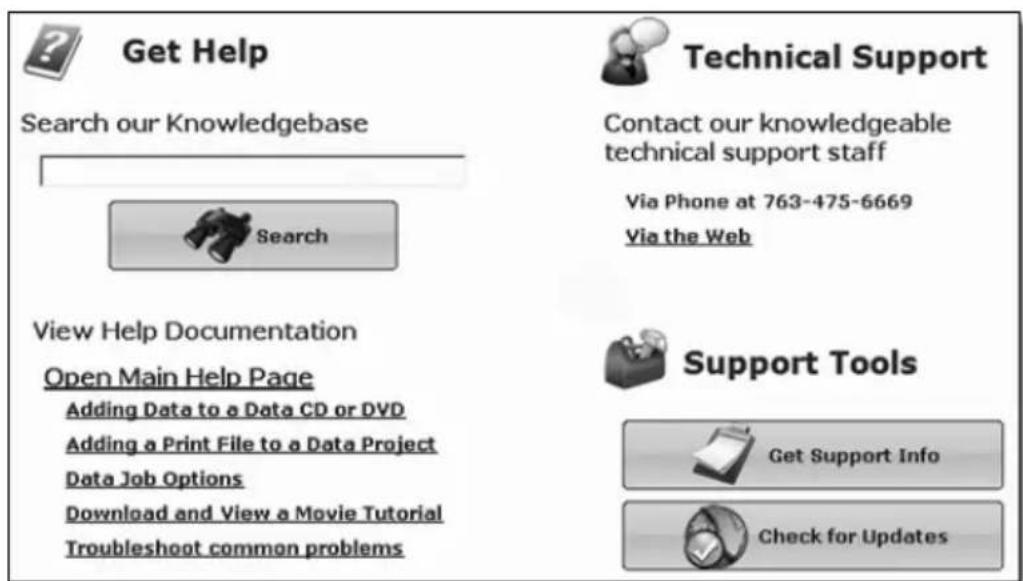
Support Center. Help can be accessed at any time by clicking the ? icon. This will open the support center. Depending on where you are when you click the help icon you will be given several common help documents that apply to the screen you are on.
C. CREATING A PRINT LABEL USING SURETHING
The SureThing Disc Labeler software included with your Publisher is a great tool for creating professional looking discs. You can use SureThing's Smart Designs to quickly label a disc, or easily import your own design in many popular file formats. The Help section included with the software will provide complete instructions on all the features in this package. (Go to the Help Menu - Choose Contents) The following is a tutorial on creating a basic disc design:
- Open the SureThing program. Choose the 120mm DiscTemplate from the window that appears.
- Open the background panel by clicking the arrow on the background button. Add your own background to the label by choosing Select Background.
3A. Browse to the location of your background image. To avoid skewed or blurry printing
make sure your image is 120mm square and of sufficient resolution. We recommend 300 dpi.
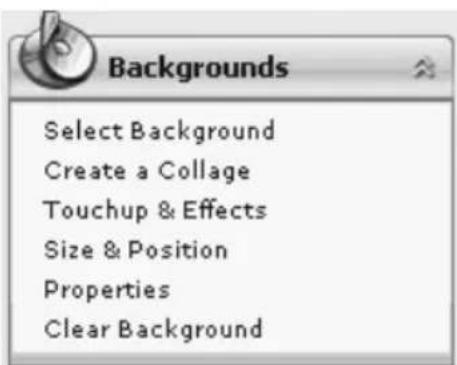
3B. Instead of your own background, you can also choose from several included Surething backgrounds. To choose one of these images click the SureThing Background button in the Browse window that appears when you click Select Background. Also, you can easily toggle through the backgrounds by using the toggle bar below the label. Backgrounds are controlled by the far left toggle button.

4A. Open the text panel by clicking the arrow on the text button. Add text by selecting one of the options below. To create text that follows the curve of the disc choose Add Circular Text.
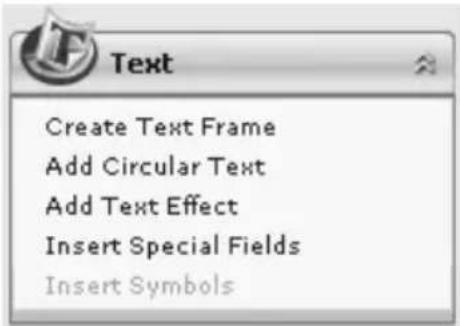
4B. You may also choose from several SureThing smart designs. These design templates automatically position your text and use certain text effects to give your label a professional look. You can easily toggle through smart designs by using the middle toggle button on the toggle bar below the label.
- Finally, Open the picture panel by clicking the arrow on the Pictures/Clipart button. Add any logos, graphics or symbols to the label. These graphics will appear on top of the
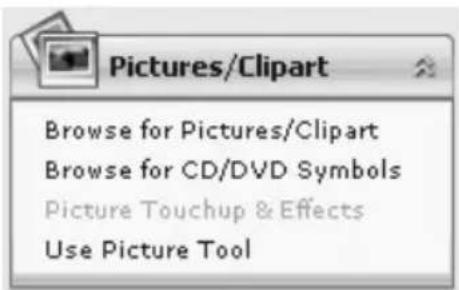
background image. You can size them appropriately by dragging the corner of the selected graphic.
- When you have completed design work save your label by choosing Save Project in the Actions panel.
D. ADVANCED PRINTER DRIVER FUNCTIONS
Once the Publisher software has been successfully installed, you will want to take a moment to familiarize yourself with the printer driver settings for your Publisher. These settings affect the print quality of your discs. The default settings of the Publisher printer driver will fit most printing needs. Please refer to the following steps to change or verify your printer driver options:
- Click the Start button. For Windows 2000 point to Settings and click on Printers. For XP Professional click on Printers and Faxes. For XP Home click on Control Panel, then click on Printers and Other Hardware, then click on Printers and Faxes. For Windows Vista click the Windows button and choose Printers.
Click on the Disc Publisher II icon with the right mouse button and select Printing Preferences.
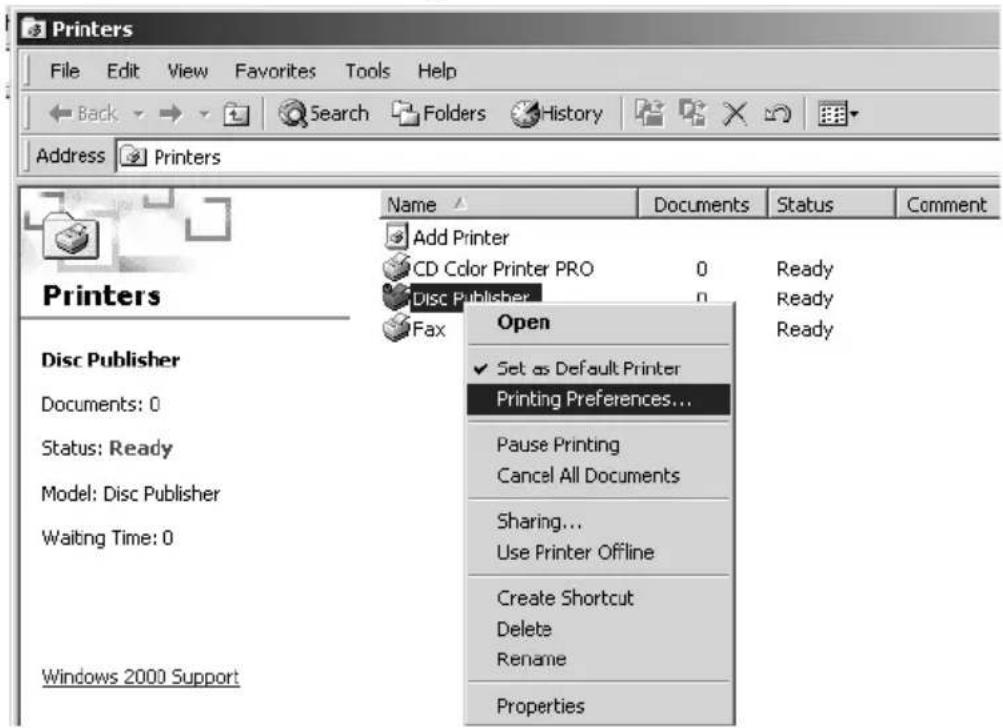
NOTE: Most applications allow you to change these same printer driver options from their "Print" and/or "Printer Setup" screens. This means that you don't have to go back to the main printer setup window each time you want to change a setting or option in the printer driver. These applications will usually give you the same choices and options, but in a slightly altered format. Some applications do not save your printer driver option changes, but instead only use your changes for the current image.
Paper Size
The paper size option will be set to CD for printing onto printable surface CDs and DVDs.
Resolution
Select the appropriate print quality option for your image. Keep in mind that Normal 600 provides the lowest quality but fastest print, and that Ultra Photo 4800 provides the highest quality but slowest print. You may wish to experiment with these options to see which one is best for your particular CD media and print quality requirements.
Cartridge Type
The Print Black with Black Cartridge setting will print discs using both the color and black cartridges. This saves color ink by using just the black cartridge for the black areas of your design. When using this setting, be sure to perform the Alignment Calibration print described later in this section. Please note that the Calibration Alignment will need to be done after installing a new cartridge as alignment may vary from one cartridge to the next. Select Color to print using only the color cartridge. The Monochrome Black setting prints using the Monochrome Black cartridge only.
Color Matching
Click on the Color Matching down arrow and choose the color matching option that's right for you. Select None if you are more interested in print speed rather than color accuracy, if you have already color corrected your image for printing, or if you are using some other third party color matching software.
Select Algebraic if you would like the printer driver to make very simple color balance adjustments based on an RGB color model. This option gives you more natural looking images without actually utilizing any specific color matching software.
Select PrimaColor to enable color-matching profiles written specifically for the Publisher by Candela Color Management System. This setting automatically adjusts the color of your image according to predetermined printer profiles and default system profiles. This results in a very precise color match when attempting to print photographic images.
Select Z-Color to use a factory set color match scheme that is calibrated toward images that have photographic qualities.
Ink Saturation
This option controls the ink saturation of the printed image. When printing onto the printer manufacturer's TuffCoat CD media, this option can be left at its default setting of 50%. When printing onto other brands of printable CD media, you may need to adjust this control in order to optimize the ink saturation for the printable surface of your specific CD media.
Click on the up and down arrows to change the ink saturation setting. Lower numbers reduce the overall ink saturation, while higher numbers increase it. Please note that higher ink saturation results in higher ink usage. This will reduce the amount of discs produced per cartridge.
Inner Diameter
This value changes the size of the non-printed center. Larger numbers cause the non-printed center to be larger and smaller numbers make the non-printed center smaller. This number is incremented by 0.1mm so a change of 10 for inner diameter changes the diameter by 1mm. For Primera TuffCoat TM media use 230 for the inner diameter.
Centering Test Print
NOTE: Your printer comes from the factory pre-calibrated to print the image in the center of the CD. You can use this adjustment if you need to fine-tune this location.
If you ever wish to verify your factory-calibrated Vertical and Horizontal calibration settings, you can run a simple calibration procedure to assure that your images will be centered when printed on a CD. To do this, refer to the following steps:
-
Verify that a disc and a color ink cartridge are installed in the Publisher. It is important to use the same disc you normally use for your publishing because different brands of discs may vary slightly in size. Also, verify that the Publisher is powered ON and that it is connected to your computer.
-
Click on the Centering Properties Test Print button. The printer will begin printing the calibration test print.
-
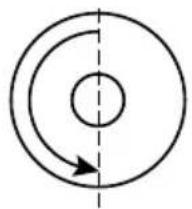
When the print is complete, rotate disc 180 o and put the disc back in the input bin and repeat step 2 using the same disc.
natural_image
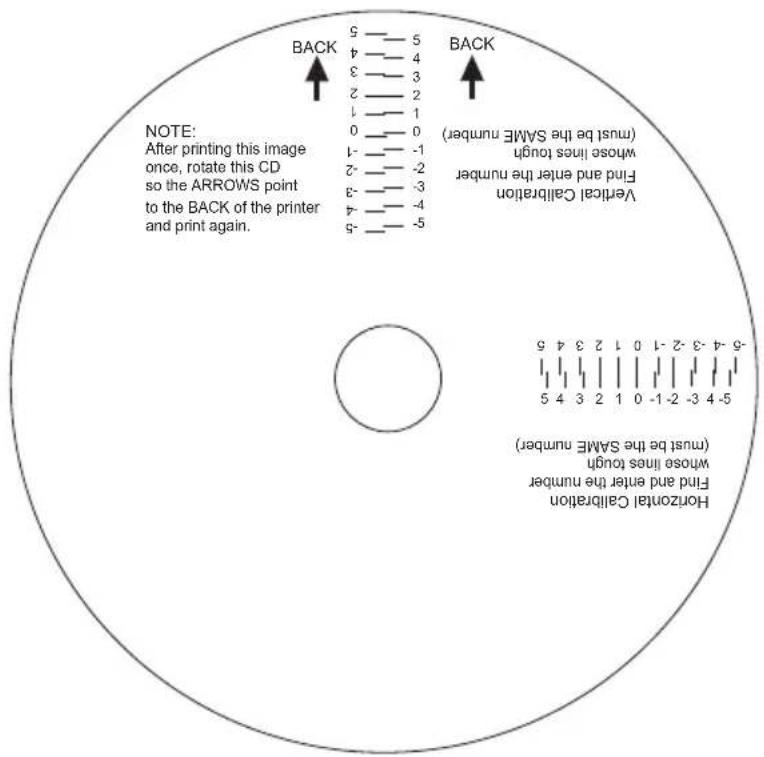
Simple circular diagram with concentric rings and a dashed centerline, no text or symbols present.- When the second run of the print is compete, you should have a test print that looks something like the following:
pie
| Direction | Count | | :--- | :--- | | LEFT | 5 | | LEFT | 4 | | LEFT | 3 | | LEFT | 2 | | LEFT | 1 | | LEFT | 0 | | LEFT | -1 | | LEFT | -2 | | LEFT | -3 | | LEFT | -4 | | LEFT | -5 | | LEFT | -6 | | LEFT | -7 | | LEFT | -8 | | LEFT | -9 | | LEFT | -10 | | LEFT | -11 | | LEFT | -12 | | LEFT | -13 | | LEFT | -14 | | LEFT | -15 | | LEFT | -16 | | LEFT | -17 | | LEFT | -18 | | LEFT | -19 | | LEFT | -20 | | LEFT | -21 | | LEFT | -22 | | LEFT | -23 | | LEFT | -24 | | LEFT | -25 | | LEFT | -26 | | LEFT | -27 | | LEFT | -28 | | LEFT | -29 | | LEFT | -30 | | LEFT | -31 | | LEFT | -32 | | LEFT | -33 | | LEFT | -34 | | LEFT | -35 | | LEFT | -36 | | LEFT | -37 | | LEFT | -38 | | LEFT | -39 | | LEFT | -40 | | LEFT | -41 | | LEFT | -42 | | LEFT | -43 | | LEFT | -44 | | LEFT | -45 | | LEFT | -46 | | LEFT | -47 | | LEFT | -48 | | LEFT | -49 | | LEFT | -50 | NOTE: After printing this image once, rotate this CD so the ARROWS point to the BACK of the printer and print again. Vertical Calibration (must be the SAME number) Find and enter the number (whose lines tough was must be the same number)-
Along the Vertical axis of the printed disc, find the number whose lines touch. For example, in the above illustration, the number would be 2. Enter that number into the Vertical box of the Calibration window and 0 would be entered for the Horizontal axis.
-
Select the OK button. Your images should now be centered when printed on a disc.
After your selections have been made, close out of the printer setup window. You are now ready to go to an application program and print. All printer driver selections will stay the same until you change them.
Enable Ink Low Warning
This setting lets you enable or disable the warning from the printer to tell you when the ink cartridges are getting low.
Ink Levels and Cartridge Maintenance
Select this button to display the current ink levels as well as options for cleaning and changing cartridges.
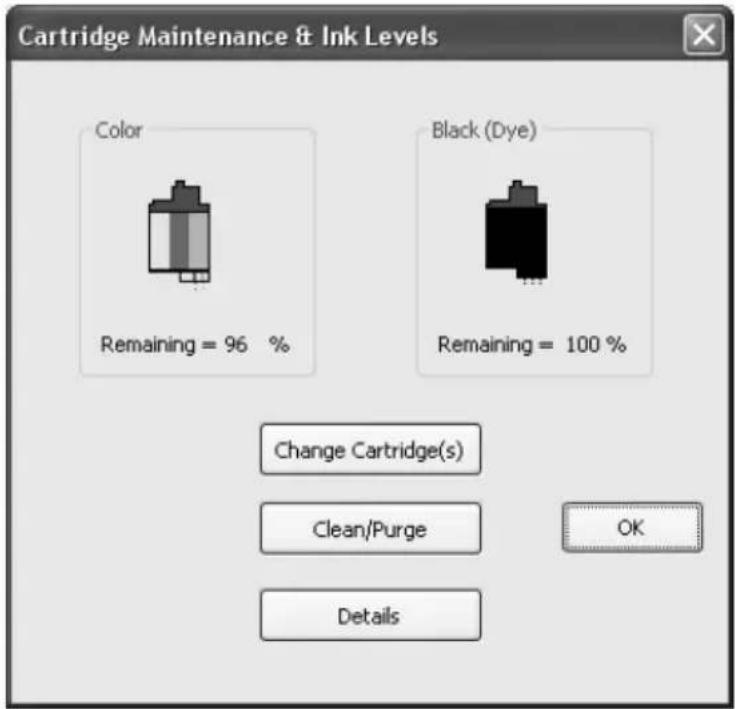
Select Clean button to send a simple test pattern to the printer. Be sure to have a disc in the Bravo's input bin and the front cover closed. The test pattern, shown below, purges ink through nozzles of your ink cartridge to clear any blockages. The test pattern will show if the nozzles require any further cleaning.
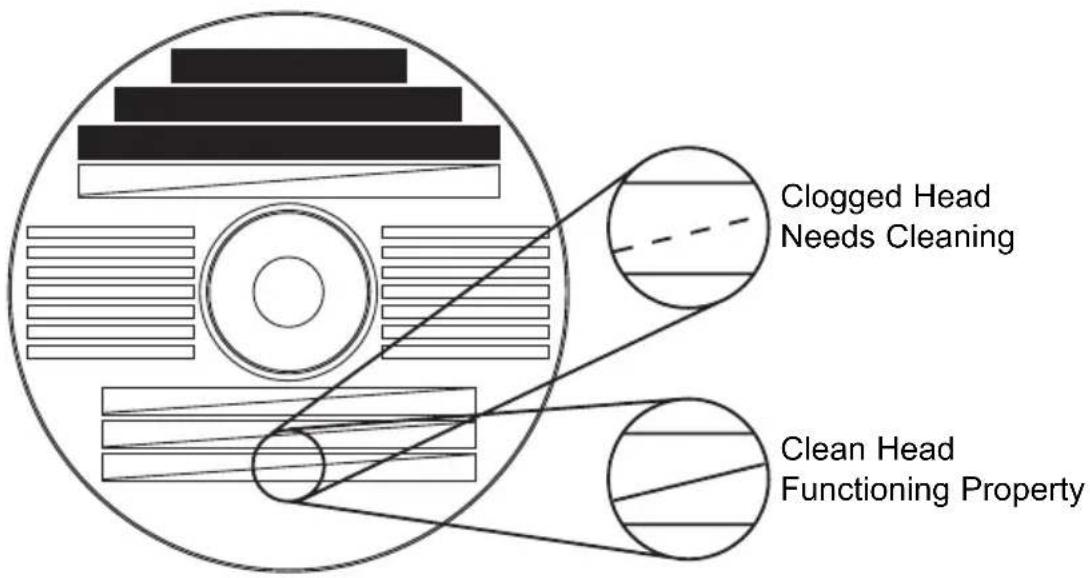
If the Yellow, Magenta, Cyan or Black diagonal lines printed on the disc show breaks, repeat the cleaning procedure. If nozzles still appear to be clogged, remove the cartridge and gently wipe the nozzle area sideways with a clean water-dampened cloth. If after several cleanings a color still does not appear on the test print, the cartridge may be damaged or empty and may need to be replaced.
Select the Change button to install a fresh, new ink cartridge or to switch back and forth between previously used cartridges. After the cartridge has been replaced according to the instructions on page 10, Step 3: Installing Ink Cartridges, select either the New Cartridge Installed button or the Old Cartridge Installed button accordingly. These selections are necessary for the printer to accurately keep track of ink cartridge ink levels.
Select the Details button for information on the drivers, firmware, alignment and number of discs printed with your Publisher.
Disc Output Location
This can be set either Normal (Left Bin acts as output), or Kiosk (finished discs deposited out the Front Exit). The default is Normal (Left Bin). Note that this will only have an effect when doing printing only – this will have no affect when recording and printing through PTPublisher. In PTPublisher select Options from the Tools menu, then find the Options tab, now check the Kiosk Mode box.
Enable Bi-di Printing
When enabled the Bravo will print bi-directional for faster printing. The default is uni-directional printing. When you enable bi-directional printing, you should perform the Alignment Calibration described later in this section. Please note that the calibration is stored on your computer, so if you move to a new computer you must repeat the calibration.
Alignment Calibration
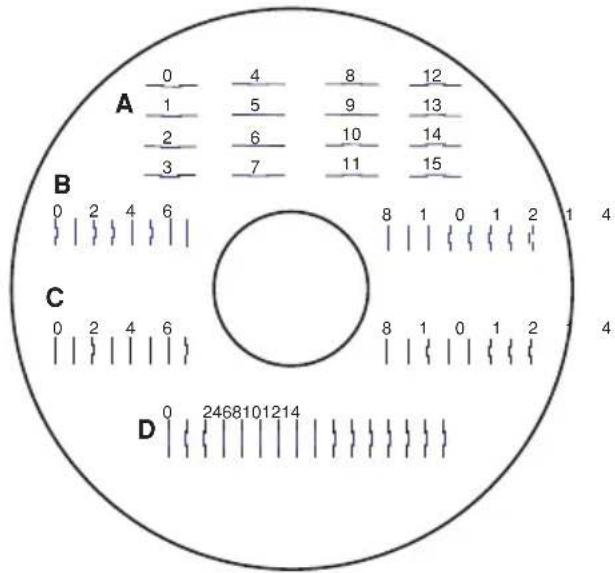
The Alignment Calibration allows you you create a test print that will provide you with values to configure your printer for Bi-Di- Printing and to align the color and black cartridges for Color+Black printing. If Bi-Di Printing is enabled, or if you use Color+Black as a cartridge type in the driver settings, it is important to perform this calibration every time you change a cartridge. To print, click the Alignment Calibration Properties button then click Yes.. The print will look like this:
E. USING OTHER GRAPHICS PROGRAMS
While SureThing will handle most labeling needs, some people prefer to use other graphic programs. Because of this we offer the flexibility to create print files (*.PRN) from any application. Your Publisher will support two types of print files in PrimoDVD 2.1:
- *.STD - SureThing CD Labeler
- *.PRN - Print files created through the Publisher Printer Driver
\*.STD files
As described earlier, these are files created in SureThing CD Labeler. This is the recommended file type for printing as it offers the most flexibility.
.PRN files
These are files created from virtually any Windows graphics application. Instead of printing to a printer, you print to file. In some programs, you can print directly from that software's Print screen, through the correct printer driver software for the brand and model of printer you've installed on your Publisher, to a *.prn file. Adobe Illustrator and CorelDRAW! are examples of such programs. Most of the popular, higher-end graphics applications give you this option of printing directly to a file.
If your graphics software does not allow a direct print to a file, you will need to go into your Windows Control Panel, Printers where you will be able to select File from your list of available printer ports. This will enable the driver to print to a PRN file from any application.
Note: You must change the port back to the USB port before you can print.
F. USING KIOSK MODE
Kiosk Mode allows you to use both of Bravo's Bins as input, doubling your disc capacity from 25 discs to 50 discs. In this mode, the finished discs will be deposited out through the front "reject area" of the Bravo. In Kiosk mode all discs would be ejected in this manner. Rejects can be identified in the stack because they will not be printed in the same manner as successfully recorded discs. Primera Technology offers an optional Kiosk Mode Kit that contains a third output bin to collect the discs. This optional bin hangs off of the edge of a table and attaches just under the front lip of the Bravo. This kit is available through your reseller. To enable Kiosk Mode, Open PTPublisher - select Options from the Tools menu - find the Options tab - now check the Kiosk Mode box.
Section 4: Creating Discs on a Mac
A. TUTORIAL: COPY A CD OR DVD
-
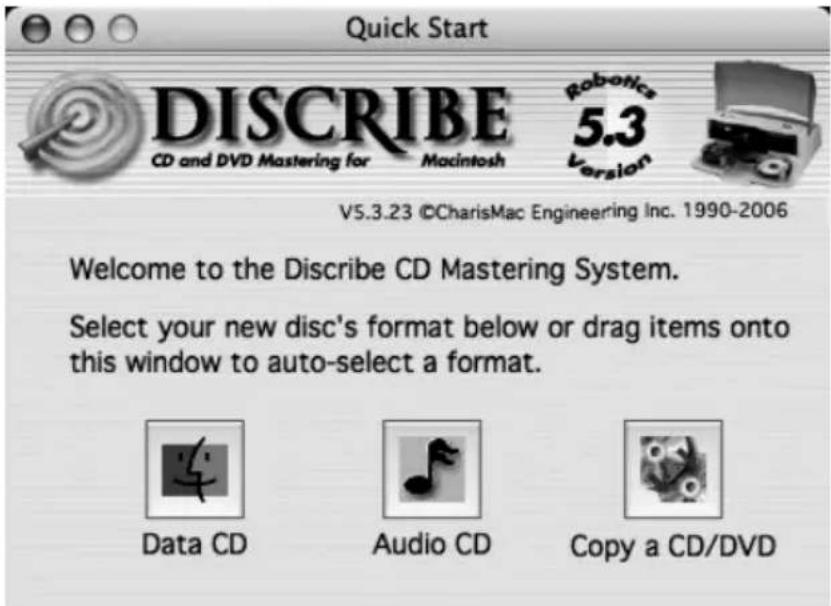
Double click the Discribe Icon to launch the program. You will see a splash screen followed by Discribe's Quick Start Menu.
-
Click the Copy a CD/DVD button.
- Place your master disc in the Publisher Drive.
Important! You must place your master disc in the drive AFTER you open the Discribe software.
-
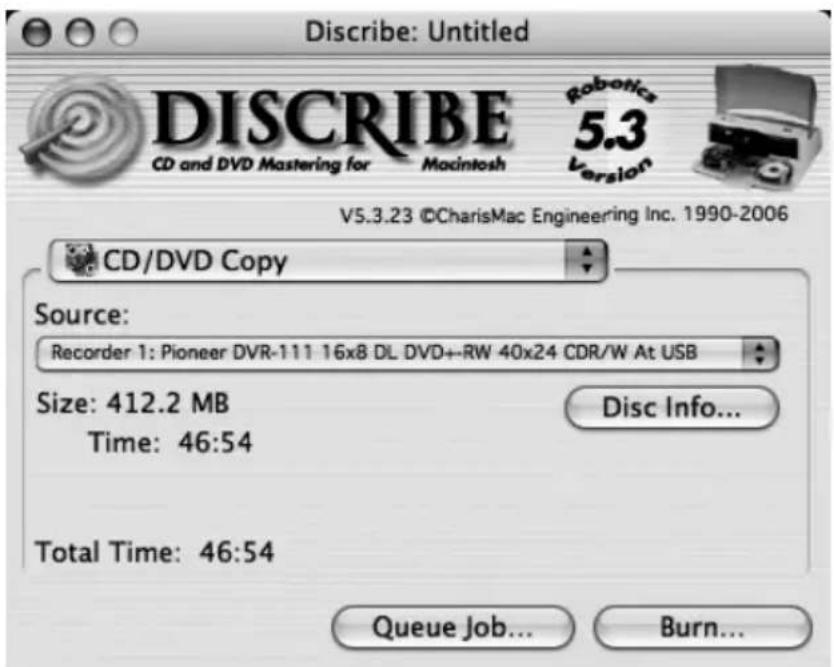
Select the drive that contains your master as the source drive.
-
Click the Burn... button
-
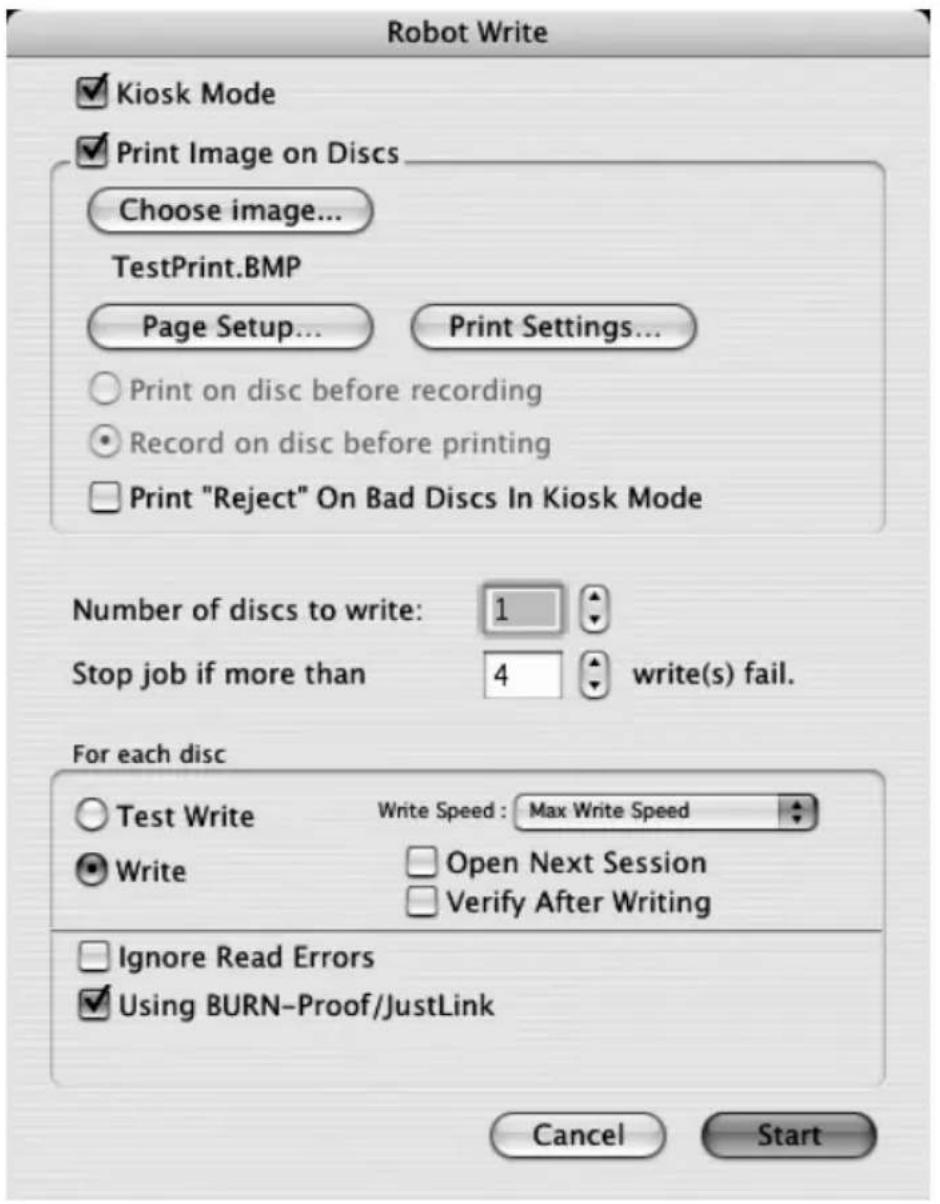
The Robot Write Options window contains selections to help you control the printing of the image, number of discs, recording options and more.
-
Click the Print Image on Discs button to enable printing. This will enable other buttons in this pane.
-
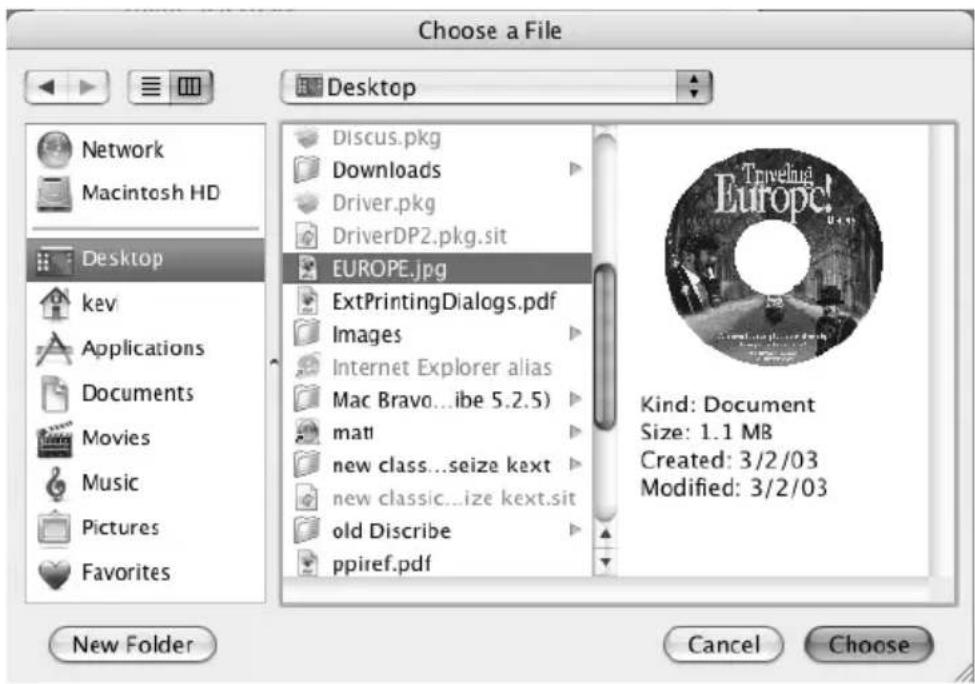
Press the Choose Image button to select an image to print. This will allow you to select any file type Apple's Preview supports including JPEG, TIFF, PICT, PDF, GIF, BMP and more. Refer to Section 4-C for label format requirements. Labels can be created in any graphics program.
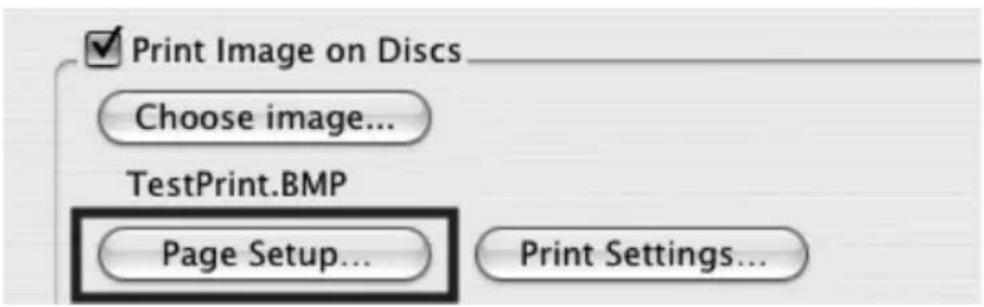
- YOU MUST CLICK Page Setup and set Format For to Disc Publisher II!
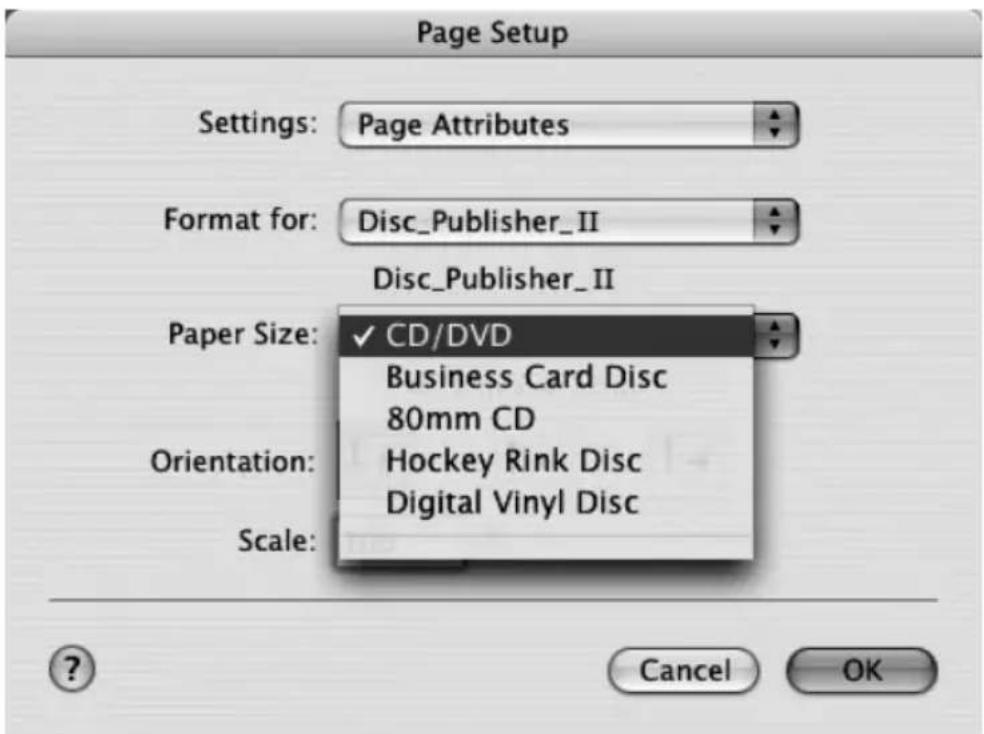
Also set the option to select a paper size to correspond with the type of disc you are using.
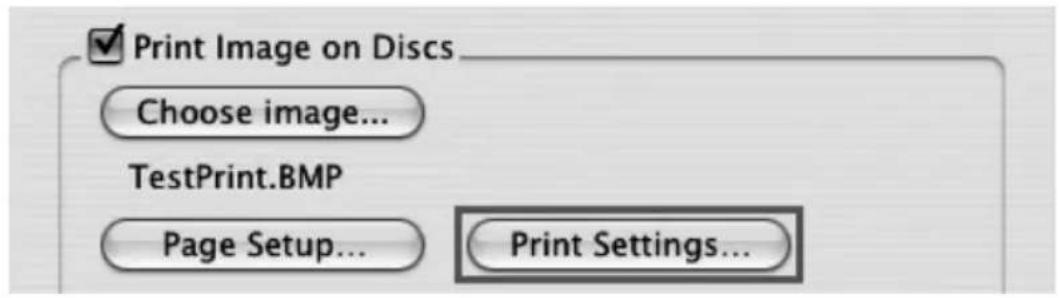
- Print Settings will launch the Printer Driver settings when clicked. These settings are described in detail in Section 4-D of this manual.
- Select the Number of discs requested for this job.
- Once you have selected your image and chosen your preferred settings in the Robot Write Pane, click Start to begin recording your job.
B. USING DISCRIBE 5.3
B.1 Starting a Project
The initial Discribe starter window provides 3 project types: Audio CD, Data CD and Copy CD / DVD. Choose one. Many more projects are available once the data picker window is open. Once you are in one of the main three project types you may choose any of the other available project types by clicking the drop down box at the top of the screen and selecting one of the projects. For more information on any project type please consult the software users manual that is stored on your computer in the Applications - Disc Publisher folder.
Once you choose a new project type you will be prompted to save the original project. Click No.
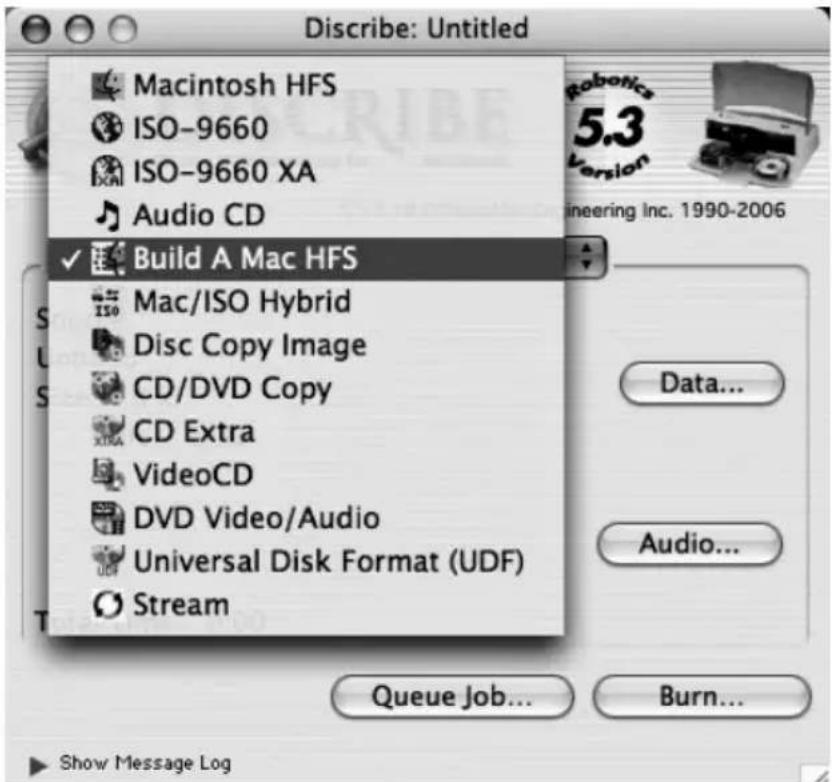
Add data to any project by dragging the data files to this window or by clicking the Data button browse to specific data files or folders. Other popular project types are listed below with a short description of each.
Build a Mac HFS. Use this project type to create a CD for a Macintosh only.
ISO 9660. Use this project type to create a data CD for a Mac and a PC. Using this project type will limit file name lengths to 16 characters.
Universal Disk Format (UDF). Use this project type to create a data DVD for a Mac and a PC.
DVD Video/Audio. This project type can be used to create DVD videos from properly formatted Video_TS and Audio_TS folders on your hard drive. Note: Video_TS and Audio_TS folders must first be created by a DVD authoring program.
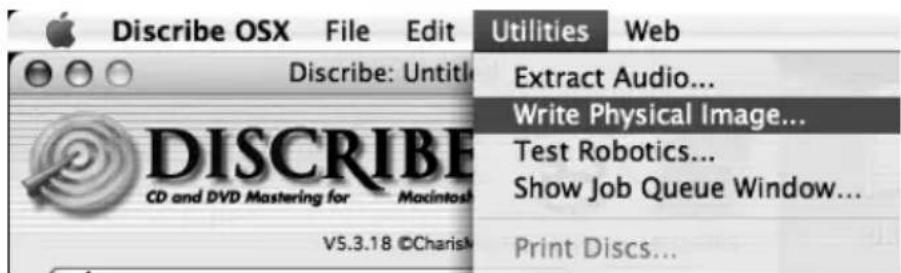
Disc Copy Image. Use this project to create discs from previously created images made from the Discribe software. An image is an exact snapshot of a disc that can be stored in one easily manageable file on your hard drive. Creating an image is useful for discs that you will need multiple copies of over a long period of time. This project saves time by not requiring you to read in the master before every copy project. Create images by using the Utilities - Write Physical Image command shown in the next section. Note: Only Discribe images will be accepted. Images created through other software or the Macintosh Disc Utility will not be recognized by Discribe.
B.2 Utilities and other Menus
Preferences, utilities and support are available through the menu that appears at the top of the screen when Discribe is active.
B.3 Saving Projects
It is possible to save a project so that you can easily open it again and start it. Saving projects is not possible for CD/DVD copy project. When you save a project, the data and print file locations are stored in a small file on your computer. This is different than a disc image since the actual data and print file are not stored in the project file. Once a project is saved you can queue it. Job queuing is described in the next section.
To save a project simply go to the file menu at any time and choose Save Project As.
B.4 Queue Projects
To queue a project choose the Queue Job button at the bottom
of the Data Picker window instead of the Burn button.

If you have not yet saved your project, you will be prompted to do so at this time.
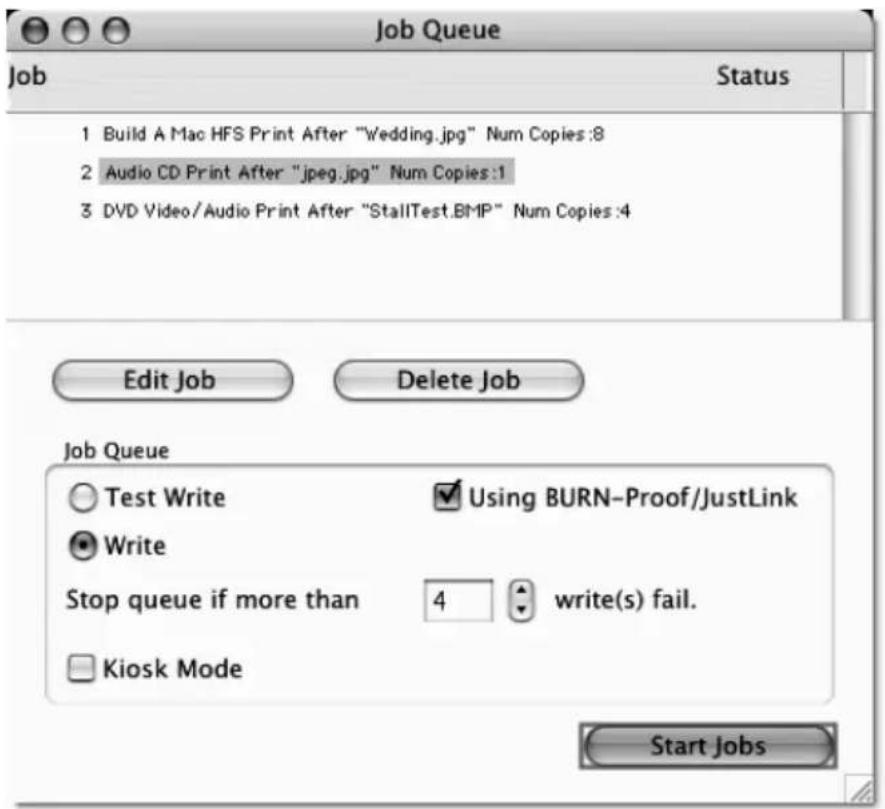
The Robot Write Window described in section 4B.5 will be displayed. Once you choose your print file and burn settings, click OK. The Job Queue list window will be displayed. Here you can manage and edit the jobs that are in queue. To start the jobs click Start Jobs.
B.5 Robot Write Window
For any project Use the Robot Write Window to choose the print file, change print quality settings and choose the number of copies in a project. Print settings are explained in more detail in section 4D. Other settings on this screen can usually be left at their default values.
Important Note: For any project you must always click Page Setup. Now set Format for to Disc Publisher II and Paper Size to CD/DVD.
C. PRINTED LABEL FORMAT REQUIREMENTS
Your printer driver allows you to create labels in most any graphics application. The driver will center the image and automatically crop it to the shape of a CD. This means you do not necessarily need a template to create a CD in your favorite graphics program. Simply create a custom page size of 120mm (4.72 inches) square and center your image in that area and the driver will do the rest. The center sizes listed in Section E should guide you in creating your disc. Because the driver crops the image to the shape of a CD, you do not want to make your design round. You will find it is best to "over bleed" your design by filling the whole 120mm area with your image. This ensures the outer and inner diameters will print perfectly round on your disc.
Label Format Requirements:
- 4.72 x 4.72 (120mm) Square Image.
- No Circular Images
To Print and burn simultaneously through the Discribe program the image will need to be in one of the following supported file formats:
JPEGs, TIFFs, PICTs, PDFs, GIFs, BMP, JPEG 2000, MacPaint, Photoshop, PNG, QuickTime Images, SGI, TGA, and more.
In order to help you design your label, included on the installation disc are templates in eps format. These templates will help you get started designing your label.
To use the template follow these steps:
- Open the template in Photoshop or Illustrator.
- Create a new layer for your image or graphics. (Make sure the template layer is on top of the image layer)
- Place your image or design your graphics on the new layer. Use the template as a guide for image and graphics placement.
- Before you print or save your image in another format, either hide the template layer or delete the template layer. The circular shape and center cut out should not beprinted. Use it only as a guide to layout your image.
D. ADVANCED PRINTER DRIVER FUNCTIONS
The following section will examine the printer driver settings that affect the print quality of your discs. To access print settings from Discribe click the Print Settings button on the Robot Write screen.

The following is a description of the printer driver settings:
- Cartridge to use
The Black and Color setting will use both cartridges when printing your image. Color will only use the Color Cartridge, and Black Only will only use the monochrome cartridge for printing.
Note: If using the Black and Color Setting, be sure to perform the Cartridge Alignment found in the Configuration Utility.
- Kiosk Mode
Kiosk Mode will allow you to increase the capacity of your Bravo from 25 to 50 discs by dispensing finished discs out the front of the unit instead of dropping them to the output bin. This allows you to place blank discs in both the input and output bins doubling your capacity. An optional Kiosk Kit is available from your Primera reseller that contains a custom output bin to catch the finished discs as they leave the Bravo. This setting will be overridden by the Kiosk Mode setting in Discribe's Robot Write or Job Details Pane.
- Print Quality
There are four options for image quality. Keep in mind that Normal 600 provides the fastest print at lower quality while Ultra Photo 4800 delivers the best quality at a slower print speed.
- PrimaColor™
Click on this Check box to enable PrimaColor color matching. The PrimaColor profiles were written specifically for the Bravo to give a precise color match when attempting to print photographic images. If you are using a third-party color management system, disable PrimaColor.
- Intensity
The Intensity setting will control the amount of ink saturation on the disc. When printing onto the Primera ToughCoat discs, 50% is usually sufficient. When printing on to other brands of media, or if you would like to print darker colors, you may wish to increase the Intensity setting. Please note that higher ink saturation could result in discs not drying instantly. Also, higher intensity will result in higher ink usage causing a lower yield of discs per cartridge.
- Inner Diameter
The inner diameter refers to the size of the non-printed center on your disc. The size of the center hub can vary from one type of media to the next. This allows you to set the inner diameter in millimeters allowing you to print all the way to the center hub regardless of the type of disc you are using. For the discs that Primera sells, use the following guide for Inner Diameter:
- 23 mm for Primera's Tuff-Coat CDR
- 24.9 mm for the Hockey Rink Disc, Business Card Disc and 80mm CD
- Outer Margin
The Outer Margin refers to where the printing will cut off around the outer edge of your disc. The size of the printable surface can vary from one type of media to the next. This allows you to set the outer margin in millimeters allowing you to print all the way to the edge regardless of the type of disc you are using.
- Enable Low Ink Warning
The Low Ink Warning basically keeps you from printing discs if one ore more of the colors in your ink cartridge are running out. Your Bravo monitors the amount of ink used when printing and will stop printing if one or more of your colors is within 10% of being empty, and the LEDs on the top will flash in unison. If you press the Cartridge button on the top of the Bravo it will continue to print, but you will want to closely monitor the discs that print. If discoloration occurs, you are most likely out of one or more colors and will want to change cartridges. Please refer to section 4-F for instructions on how to change and align ink cartridges.
- Save As Default
The Save As Default button will save the current settings as the system-wide defaults.
- Restore Defaults
The Restore Defaults button will restore the driver settings to the factory defaults.
- Config Utility
This button launches the Configuration Utility which is explained in detail in the pages that follow.
The Configuration Utility is a program that installs with your Bravo software. This utility allows you to monitor ink levels, maintain and calibrate ink cartridges and align printing on the disc. The Configuration Utility can be launched from the Print Center in OSX by doing the following:
- Click the Finder
- Click the Applications Icon. Open the Utilities folder.
- Scroll to Print Center (Printer Setup Utility in OS X v. 10.4)
- Highlight the Disc Publisher and click the Configure (Utility in OS X v. 10.4) Icon
You can also launch the Configuration Utility from the Disc Publisher printer settings in any printing application by clicking File then Print and selecting Publisher Settings. In Publisher Settings you will find a button to launch the Configuration Utility. When launched, the following pane appears:
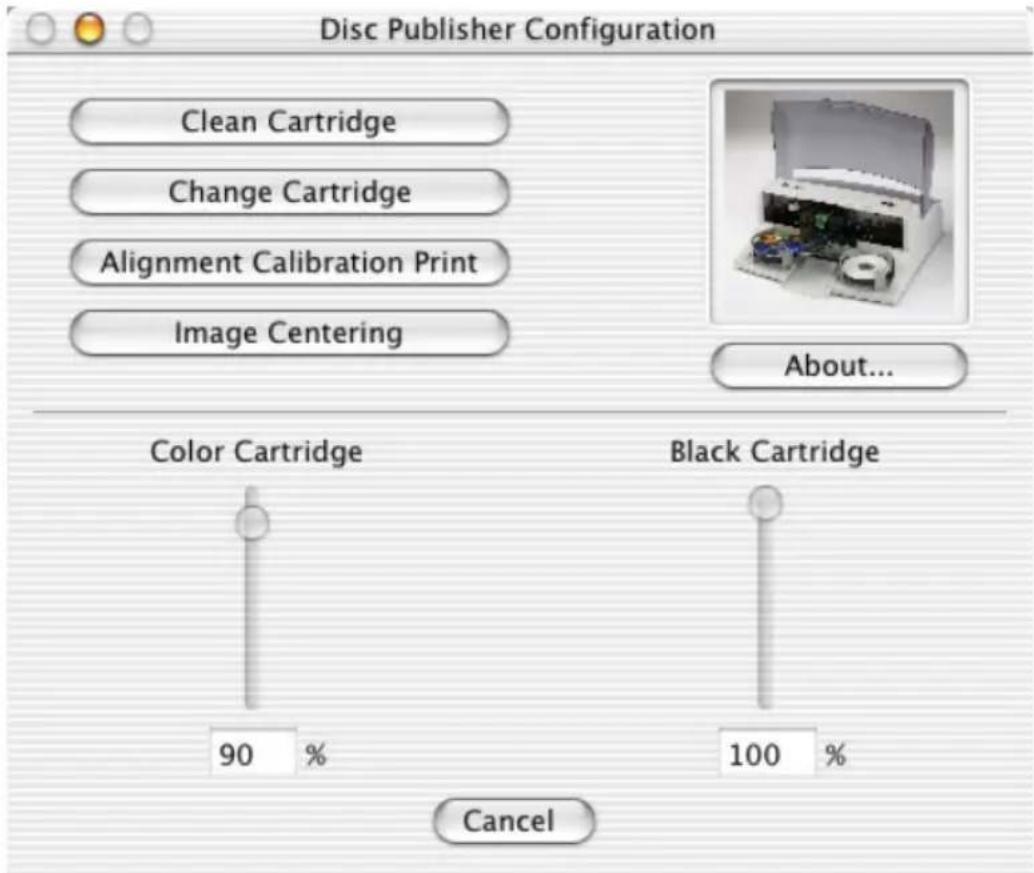
You will see both the Color and Monochrome Ink Levels are displayed. The Color Ink Level represents the lowest color in your cartridge. For instance, if your cartridge has 80% cyan 50% yellow and 65% magenta ink remaining, the level reported would be 50%. You will also see the following buttons:
Clean Cartridge
Cartridges that sit idle in the Bravo for a period of time may start to experience some drying of ink in the tiny nozzles that make up the print head. Clicking the Clean Cartridge button will cause the bravo to pick a disc and place in into the printer tray. The Bravo will then print a simple pattern that will flush ink through the nozzles. The test pattern will also show you if any nozzles are clogged. In the pattern you will see some diagonal lines which should be continuous; breaks in those lines indicate a clogged nozzle. Please note that it may require more than one cleaning to fully clear all nozzles. If the nozzles are not fully clear after a few cleaning prints, it may be necessary to remove the cartridge and actually clean the print head by gently wiping the nozzles with a moist cloth or paper towel and replace it in the Bravo. If this fails, the cartridge may be empty and in need of replacement.
Change Cartridge
If you need to change cartridges, it is a good idea to use the Change Cartridge button in the Configuration Utility. This ensures the most accurate tracking of ink levels. To change a cartridge, click the Change Cartridge button. The cartridge holder will move to the center of the Bravo to make it easier to install the cartridges. Lift the top cover and install the cartridges and described in section 2-C of this manual. You will be prompted to let the system know whether or not you are installing a new or used color or monochrome cartridge. Once installed, click the OK button and the system will update your cartridge levels.
Note: It is recommended that you perform and Alignment Calibration Print after installing a new cartridge.
Alignment Calibration Print
Clicking this button will print a test disc that will provide a scale by which to calibrate the Color Ink Cartridge to the Monochrome Ink Cartridge. This is crucial when selecting the Black and Color Ink Cartridge setting in the Printer Driver as described in Section 4-E of this manual. Make certain you have discs and ink installed in your Bravo prior to pressing this button. Once pressed, the Bravo will load a disc and print the following pattern:
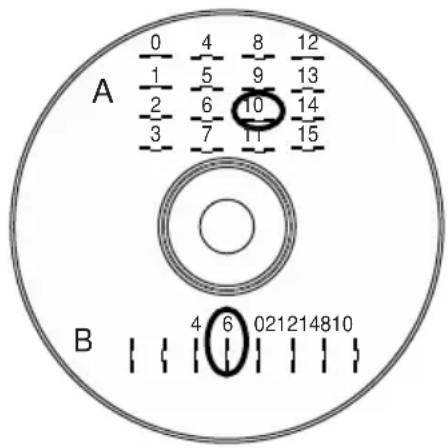
Follow the on-screen instructions and enter the numbers as indicated. For instance, in the example shown, you would choose a value of 10 for the A setting and 6 for the B setting.
It is highly recommended that you perform this calibration whenever you change cartridges if using the Black and Color ink cartridge setting in the printer driver.
Image Alignment
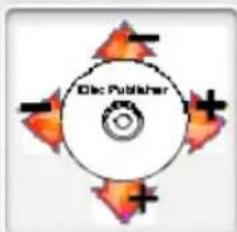
The Image Alignment button will allow you to nudge the image up, down, left, or right on your disc. To center the image, click the Image Alignment button. You will be prompted with a choice to print a test print or simply enter values to nudge the image alignment on the disc.
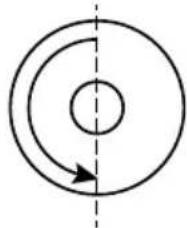
If you do not know the direction and distance to move the image in order to center it on your disc, you can opt to print the centering test print. Make sure the Bravo has discs and ink cartridges installed, and it is connected and ready to receive a print job, and then click the Yes button. The Bravo will pick a disc and print a scale of numbers on it. You will be prompted to open the Bravo's front cover, rotate the printed disc 180 degrees, reload it into the input, and close the cover. Click OK when ready and the Bravo will pick the disc and print another scale of numbers. The disc should look like this:
natural_image
Simple circular diagram with two concentric rings and a dashed vertical axis, no text or symbols present.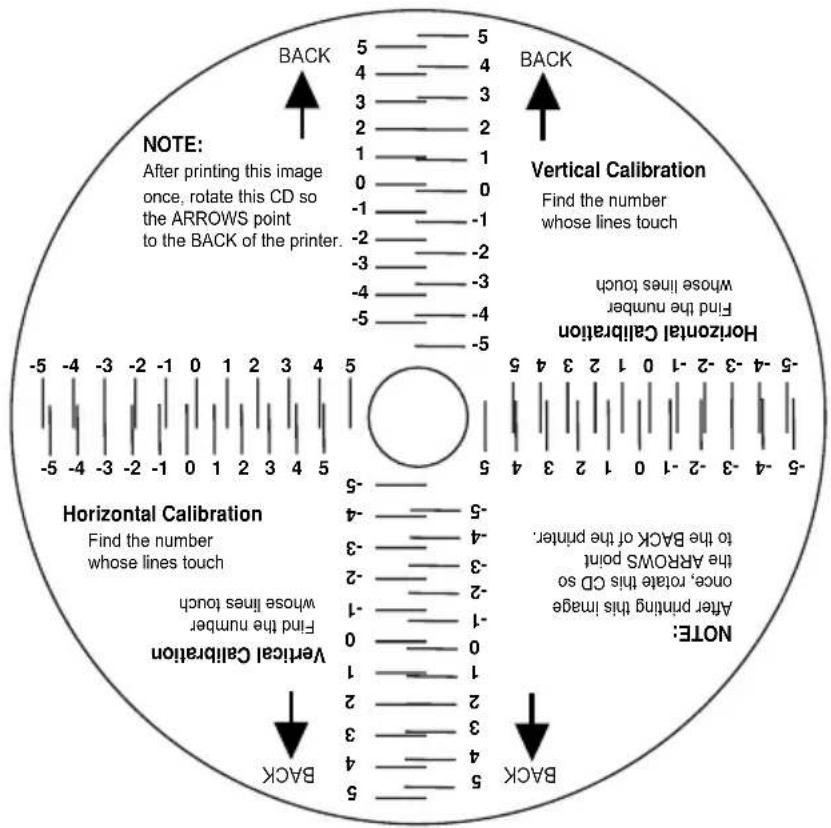
Once the print has finished, you will see the following dialog box:
Now set your centering alignment values. Each value is in approximately 0.1mm. If you printed a centering test print this value can be determined by selecting the best value from the CD that was printed.
Note: The number is not an absolute offset but rather is added to the current offset value stored in the printer.
Horizontal Value
Vertical Value
Cancel
Set Values
Look at the finished alignment disc and pick the numbers that come closest to lining up with one another. For instance, on the disc shown in this manual, the vertical alignment is 2 and the horizontal alignment is -3. Enter this in the alignment dialog box.
If you choose not to print the test print, you will simply see the alignment dialog box and can enter values to move the image. The unit of measure is roughly 0.1mm. Making the Horizontal Calibration number smaller or more negative will move the image slightly to the left. Making the Horizontal Calibration a larger value, or more positive will move the image to the right. If the Vertical Calibration number is made smaller, or more negative the image will move slightly up. If the Vertical Calibration is set to a larger value, or more positive value, the image will move down on the disc.
Section 5: Interpreting the Publisher's Indicator Lights
The Power and Busy LED indicator lights located on the top of the Publisher can tell you a lot about what is happening inside the Publisher. To accurately interpret what it means when these lights are on, off, or flashing, please refer to the following:
Ink Cartridge Power LED LED Publisher
| on solid off Is ready to receive job | ||
| on solid on solid Has received a job and is waiting for the Robotic Disc Transporter to load a disc | ||
| both lights are blinking Waiting for a cartridge to alternately with one another be installed and the lid to be closed. (See section 2-C). | ||
| on solid flashing rapidly The printer tray or ink cartridge carrier has stalled. Press the Ink button to retry the operation. | ||
| flashing rapidly on solid The Publisher has a cartridge problem. Check to make certain that the cartridges are installed correctly and that the bar code labels on the underside of the cartridge are not damaged. | ||
| repeating pattern of both lights This in flashing in unison, then one light momentarily on solid. | indicates low ink warning. If the left light stays solid after the flash, the Color cartridge is low. If the right light stays on after the flash, the Black Monochrome cartridge should be replaced. | |
Section 6: Maintenance and Troubleshooting
The Publisher is designed to operate for extended periods of time with very little attention. In fact, no regular maintenance is recommended other than cleaning the outside case.
NOTE: Do NOT attempt to oil or grease the Publisher's Robotic Arm shaft or other components. You will likely cause more harm than good! Any moving parts are designed to operate for the life of the machine with no additional lubrication required.
A. CLEANING THE PUBLISHER
Use a clean, lint-free rag with a small amount of ammonia window cleaner to clean the Publisher's outside case and trays. This type of cleaner is very effective on inks that may accumulate on the printer tray. Stronger cleaning solutions are NOT recommended because they may damage the paint and plastic materials from which the parts are manufactured.
Always disconnect your Publisher's power cords before cleaning. Resume operation only after the surfaces are completely dry.
B. PERFORMING A ROBOTIC SELF-TEST
To ensure that everything is working properly, a Self-Test feature is built in to your Publisher. In this mode, the Robotic Disc Transporter will go through the motions of picking and placing a disc to ensure proper working order. This test may be performed without connecting the Publisher to the computer. Perform the test by doing the following steps:
- Load some discs into the Input Bin
- Make sure the Publisher's front cover is closed
- With the Publisher turned on, press the
Cartridge Button - While holding the Cartridge Button, press the
Power Button ⏻
until the robotics start to move. - Release both buttons
- To stop the test, wait until the disc has moved to the Output Bin and press the Power Button.

C. CALIBRATION UTILITY/ROBOTICS TESTING (PC)
The calibration utility allows you to change factory calibrated robotic settings and perform robotics tests. Improper use of this utility could result in a non-functioning unit. Please read all instructions carefully or contact tech support for assistance. Instructions for each of the functions are available by hovering your mouse over the buttons and reading the tool tips that appear.
To open the utility follow these instructions.
- Open PTPublisher.
- Click on "More Info" under the Robot Status Panel. The following screen will appear.
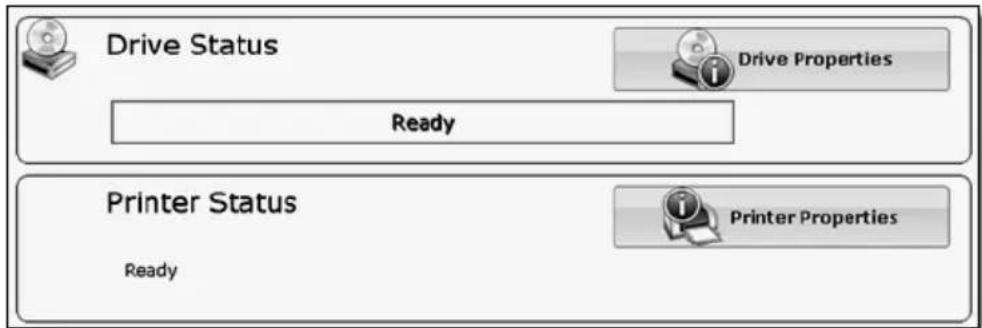
- Click the Printer Properties button. A screen similar to the one below will appear.
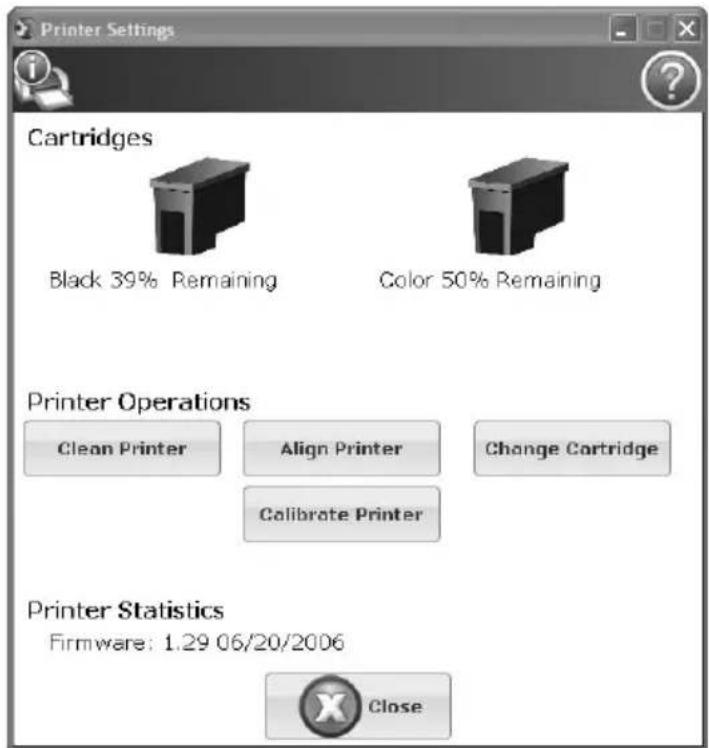
- Click the Calibrate Printer button. A window similar to the one below will appear.
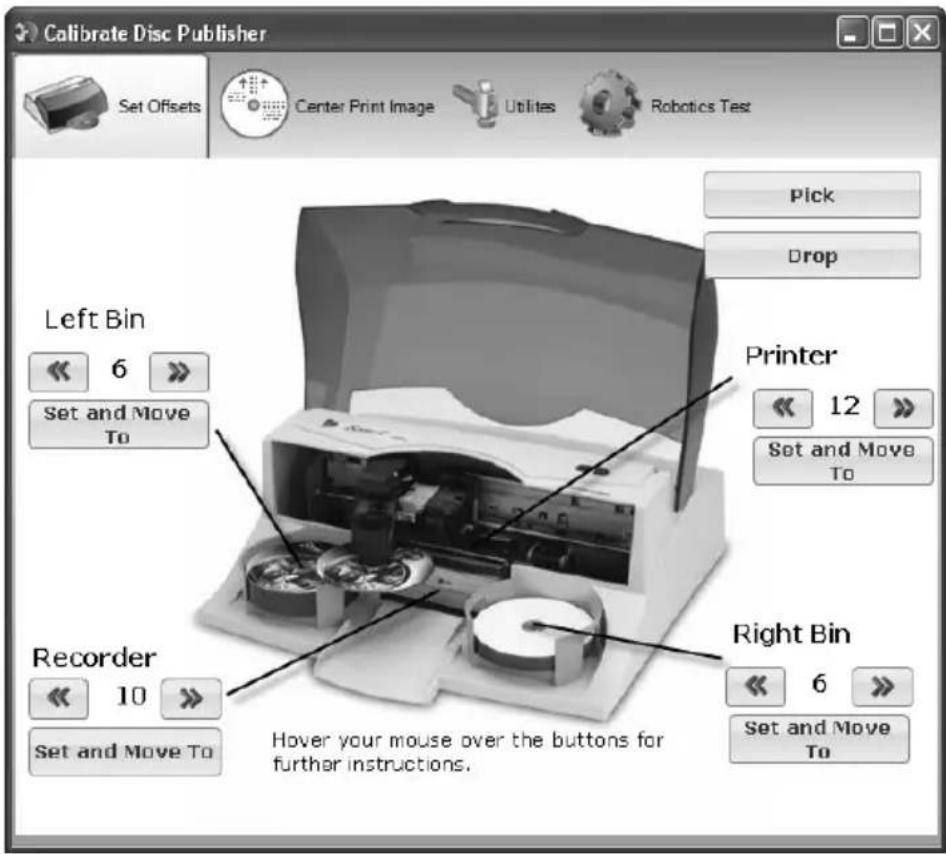
- Click the tabs at the top of the window to navigate to the various functions of the utility.
D. MAC SOFTWARE TEST
This will confirm that the hardware, software, and your computer are all communicating properly. To perform a software test please do the following:
- Launch Discribe.
- Click one of the options from the quick-launch menu (i.e. Data CD).
- Click the Robotics... button.
- Click the Test Robotics button.
- You can select where you want discs to go during the test and the number of times to repeat the test. Click Start. The Bravo will perform your test.
E. CLEANING THE INK CARTRIDGES
It may be necessary to clean the ink cartridge nozzles if you notice reduced print quality, or if you suspect an cartridge nozzle has become slightly dried out or clogged. If you are having print quality problems, follow the steps below:
- Remove the print cartridges.
-
Moisten a lint-free cloth with water.
-
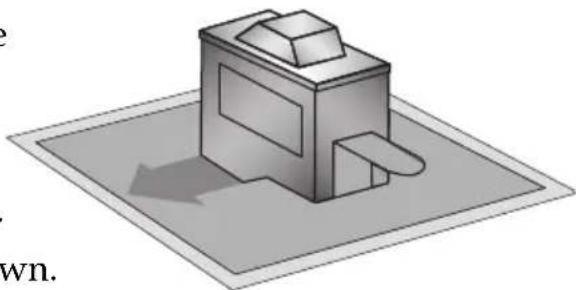
Hold the cloth against the nozzles for three seconds. This will "wick" some additional ink onto the damp cloth.
-
Wipe in the direction shown.
- Repeat the process.
natural_image
3D illustration of a computer with a screen and tower, placed on a flat surface (no text or symbols)F. CLEARING A MEDIA JAM
If a disc should become jammed inside the printing area of the Publisher, with the lid closed press the Cartridge Button. This will eject the Printer Tray. Then open the lid. The Cartridge Carrier will move to the center position automatically.
WAIT FOR THE CARTRIDGE CARRIER TO STOP MOVING! Then carefully move the cartridge carrier assembly to the left to gain access to the printer tray.
G. TECHNICAL SUPPORT
If you have difficulties in operating your Publisher, the procedures in this manual and the PrimoDVD software User's Guide should, in most cases, solve the problem. If you still have difficulty, contact the technical support number listed on the insert included in the supply pack that came with your Publisher.
Section 7: Technical Specifications
Model Optical Disc Publisher
Configurations CD-R Publisher
DVD-R Publisher
Printing Method Ink-Jet
Printing Resolution 4800 x 1200 dpi, 2400 x 1200 dpi, 1200 x 1200 dpi, 600 x 600 dpi
Ink Types Dual Cartridges: One 3-color (CMY) cartridge, and one Black Monochrome (K)
Media Types Printable Surface CD-R, CD-RW, DVD-R, DVD RAM
Maximum print width 4.724" (120mm)
Minimum PC System Intel ® Processor III/IV 750 MHz or higher, 256MB RAM minimum, 512 MB recommended, available PCI slot, one free USB 2.0 port
Minimum MAC System G4 PowerPC 700MHz or higher running Mac OS Version 10.2 or higher, 256MB RAM minimum, 2GB free hard disk space (6GB for DVD)
Disc Capacity 25 disc input, 25 disc output (default)
50 disc input, 50 disc output (Kiosk Mode)
Recordable Formats CD-R: CD-Audio (CD-DA), CD-ROM, CD-I, Video-CD, MP3 to CD-Audio (on the fly, no hard drive overhead required)
Operating Systems Windows 2000, 2003, XP and Vista Mac OSX Version 10.2 or higher
Interface USB 2.0 port
Power Requirement 100-240 VAC, 50/60 Hz, 60 watts
Weight 18 lbs. (8.2kg)
Dimensions 17.8"W x 7.25"H x 16"D
(455mmW x 184mmH x 406mmD)
Certifications Emissions: FCC Class B, CE
Safety UL, UL-C, CE
Warranty One year return-to-depot
Index
Algebraic....24
Alignment Calibration 24, 29, 44
Cartridge Type 24
CD Tray....6
Centering Test Print 25,45
Color Matching....24
Connections, Rear Panel....4
Controls, Front Panel 2
Disc Output Location 28
Enable Ink Low Warning 27
Identifying the Parts 2
Ink Levels and Cartridge Maintenance 27
Ink Saturation 24
Input Bin....3
Inner Diameter 18, 25, 41
LED Status Lights....3
Output Bin....3
Overview of Operation ....5
Paper Size 23
Power Input....4
PrimoDVD Software 51
Print Files....29
Printer Driver Software....30
PRN Files 30
Reject Area 3,6,30
Resolution....23
Specifications 52
STD File....29
System Requirements 4
Technical Support....51
Troubleshooting....48

- Automated Optical Disc Duplication & Printing System
- PRIMERA
- Printing History
- CAUTION!
- Table of Contents
- Section 1: Getting Started....1
- Section 2: Hardware and Software Set-Up ....8
- Section 3: Creating Discs on a PC....14
- Section 4: Creating Discs on a MAC ....31
- Section 5: Interpreting the Publisher's Indicator Lights......47
- Section 6: Maintenance and Troubleshooting ....48
- Section 7: Technical Specifications ....52
- Index....54
- Section 1: Getting Started
- THANK YOU...
- NOTE ON TERMS AND CONVENTIONS:
- CHOOSING A GOOD LOCATION
- UNPACKING AND INSPECTION
- IDENTIFYING THE PARTS
- Front Panel and Top
- Rear Panel
- PC SYSTEM REQUIREMENTS
- MAC SYSTEM REQUIREMENTS
- Section 2: Hardware and Software Set-Up
- INSTALLING THE PC SOFTWARE
- INSTALLING THE MAC SOFTWARE
- HARDWARE SETUP
- Step 1: Applying Power
- Step 2: Loading Media (Discs)
- Step 3: Installing Ink Cartridges
- Step 4: Connecting the USB 2.0 Cable/Installing the Printer Driver
- If you are using a PC:
- If you are using a Macintosh:
- Section 3: Creating Discs on a PC
- TUTORIAL: COPY A CD OR DVD
- Select a Label
- Create a Label
- 4B. Create a Label
- USING PTPUBLISHER
- Open Project Panel
- New Project Panel
- Current Projects Panel
- Robot Status Panel
- Status Bar
- Project Detail Window
- CREATING A PRINT LABEL USING SURETHING
- ADVANCED PRINTER DRIVER FUNCTIONS
- Paper Size
- Resolution
- Cartridge Type
- Color Matching
- Ink Saturation
- Inner Diameter
- Centering Test Print
- Enable Ink Low Warning
- Ink Levels and Cartridge Maintenance
- Disc Output Location
- Enable Bi-di Printing
- Alignment Calibration
- USING OTHER GRAPHICS PROGRAMS
- \*.STD files
- .PRN files
- USING KIOSK MODE
- Section 4: Creating Discs on a Mac
- USING DISCRIBE 5.3
- B.1 Starting a Project
- B.2 Utilities and other Menus
- B.3 Saving Projects
- B.4 Queue Projects
- B.5 Robot Write Window
- PRINTED LABEL FORMAT REQUIREMENTS
- - Cartridge to use
- - Kiosk Mode
- - Print Quality
- - PrimaColor™
- - Intensity
- - Inner Diameter
- - Outer Margin
- - Enable Low Ink Warning
- - Save As Default
- - Restore Defaults
- - Config Utility
- Clean Cartridge
- Change Cartridge
- Alignment Calibration Print
- Image Alignment
- Section 5: Interpreting the Publisher's Indicator Lights
- Section 6: Maintenance and Troubleshooting
- CLEANING THE PUBLISHER
- PERFORMING A ROBOTIC SELF-TEST
- CALIBRATION UTILITY/ROBOTICS TESTING (PC)
- MAC SOFTWARE TEST
- CLEANING THE INK CARTRIDGES
- CLEARING A MEDIA JAM
- TECHNICAL SUPPORT
- Section 7: Technical Specifications
- Index
Brand : PRIMERA
Model : Bravo II
Category : Printer